

Page 1
eyevis ESP Projectors with LED
Projektions-Engine
User Manual
Version 1.1 / 03.2012 / ENGLISH
ESP SERIES
Page 2

eyevis GmbH
Hundsschleestrasse 23
D-72766 Reutlingen
Germany
Tel.: +49 (0) 7121/43303-291
Fax: +49 (0) 7121/43303-22
E-mail: info@eyevis.de
www: www.eyevis.de
Version: 1.1 (03.2012)
Copyright © 2011 eyevis GmbH. All rights reserved.
eyevis User Manual
This manual, as well as the software described in it, is furnished under license and may be used or
copied only in accordance with the terms of such license. Except as permitted by this license, no part
of this publication may be reproduced, stored in a retrieval system, or transmitted, in any form or by
any means, electronic, mechanical, recording, or otherwise, without prior written permission of
eyevisGmbH. Please remember that the content of this manual is protected by copyright, even when
not distributed together with software furnished with an end user license agreement.
The content of this manual is furnished for informational purposes only, is subject to change without
notice, and should not be construed as a commitment by eyevis GmbH. eyevis GmbH assumes no
responsibility or liability for any errors or inaccuracies that may appear in this documentation.
eyevis, the eyevis logo and eyecon are either registered trademarks or trademarks of
eyevis Gesellschaft für Projektions- und Großbildtechnik mbH, also known as eyevis GmbH.
All other trademarks are the property of their respective owners.
S
E
R
V
I
C
E
S
U
P
P
O
R
T
Page 3

Abo ut thi s Product 7
Abo ut thi s MAnuAl 8
Warnings used ..................................................................8
Symbols used .................................................................... 8
sAf ety in structions 9
Intended use ......................................................................9
Operator qualifications ................................................. 9
General information ....................................................... 9
Power .................................................................................... 9
Installation ....................................................................... 10
Use ....................................................................................... 10
Disassembly and storage .......................................... 11
Disclaimer ........................................................................ 11
Conformity ....................................................................... 11
Batteries ............................................................................ 12
trAns Port, storAge, unPAcking 13
Unpacking ........................................................................ 13
Storage of packaging ............................................. 13
del ivery contents 14
Packaging ......................................................................... 14
Projector ....................................................................... 14
Pro duct overview 15
Projector ........................................................................... 15
Control module ............................................................. 16
Power Supply ............................................................. 16
Ass eMbly / instAllAtion 17
Authorized installation options ............................. 17
Unauthorized installation options ........................ 18
Cabling the projectors ............................................... 19
Adressing the projectors ........................................... 20
Dip switches.................................................................... 21
Adjusting the focus ..................................................... 22
con figurAtion 23
General information on the configuration
programs .......................................................................... 23
Program installation and start ........................... 23
Intelligent user interface ...................................... 23
Adjusting the colours with EC-Lcontrol ............. 24
Adjusting the connection parameters .......... 25
Adjusting the colours ............................................ 26
Fine adjustment for selected projectors ....... 29
Establishing communication via eyeDevice .... 31
Establishing communication ............................. 31
Selecting the colour sensor interface
(Coloranalyzeroption) ......................................... 32
Using the Pattern generator ............................... 32
Entering the wall size ............................................. 32
Reading the configurations ................................ 33
Other settings............................................................ 33
Saving the configuration ..................................... 33
Activating the internal
AutomaticColorTracking ......................................... 34
oPe rAtion 35
MAl func tions And troub leshooting 36
Typical problems .......................................................... 36
No picture ................................................................... 36
The projector does not start up ........................ 36
Blurred picture .......................................................... 36
No communication between control PC and
projector ...................................................................... 36
Possible causes of malfunctions and
problems .......................................................................... 37
cle Aning And cAre 38
Cleaning intervals......................................................... 38
Cleaning the housing ................................................. 38
dis AsseMbly And dis PosAl 39
the eyedevicesoft wAre 40
Starting the eyeDevice software ........................... 40
The Load/Save area ..................................................... 41
The selection area ........................................................ 41
The Parameter area ...................................................... 42
Contents
ESP-Projectors with LED Projection Engine 3
Page 4

User ................................................................................ 42
Setup ............................................................................. 43
Status ............................................................................. 45
Gamma ......................................................................... 46
Preference ................................................................... 47
Reports ......................................................................... 48
the ec-lcontrol softwAre 49
Starting the EC-Lcontrol software ........................ 49
The start page at a glance ........................................ 49
The menu bar (1) .......................................................... 51
File > Exit ..................................................................... 51
Wall > Connect with wall ..................................... 51
Wall > Wall setup ..................................................... 51
Wall > Advanced calibration .............................. 51
Wall > Picture ............................................................. 52
Wall > Get wall status information .................. 52
Wall > Get wall color calibration
information ................................................................. 52
Help > About... .......................................................... 52
The setting area (3) ...................................................... 53
Post calibration ......................................................... 53
Colortemperature ................................................... 53
Brightness .................................................................... 53
Iterations / Adjust cube wall .............................. 54
Save all .......................................................................... 54
Fine adjust... ................................................................ 54
wAr rA nt y terM s And con ditions 58
Duration and validity of warranty ......................... 58
Warranty ........................................................................... 58
Warranty disclaimers ................................................... 59
Non-accountable errors and defects .............. 59
Accessories, boxes, batteries and other
parts ............................................................................... 59
Missing, modified or damaged serial
numbers ............................................................................ 59
Recommended procedure for liability claims . 60
Legal and other claims ............................................... 60
Limitation of liability ................................................... 61
tec hnicAl sPec ificAtions 62
General technical specifications ........................... 62
ESP-LXT .............................................................................. 62
ESP-LSXT+ ........................................................................ 62
ESP-LHD ............................................................................ 62
ESP-LWXT .......................................................................... 62
Environmental conditions ........................................ 62
Options .............................................................................. 62
4 ESP-Projectors with LED Projection Engine
Page 5

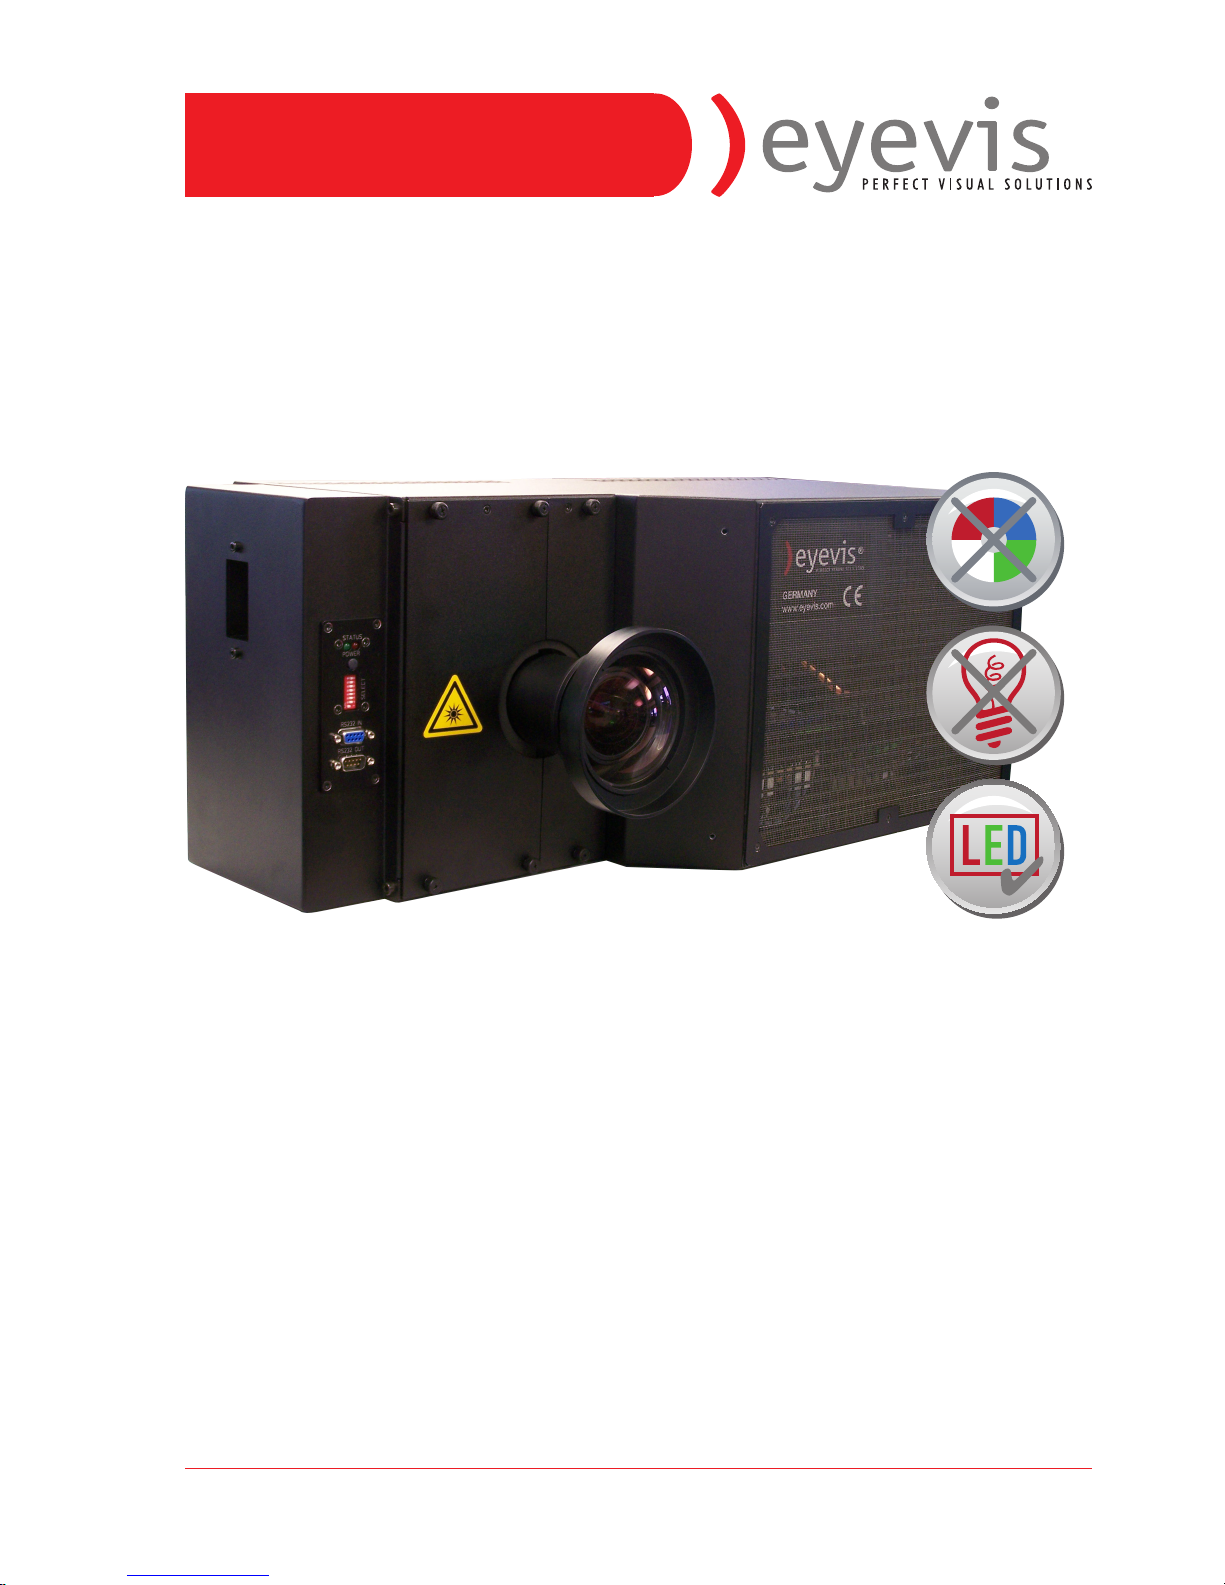
About this ProduCt
The new LED-lit DLP® projectors from eyevis share all the benefits of
DLP® technology, just like conventional lamp-based projectors. In
addition to that the LED-lit versions feature several advantages such as
enhanced life-time fo the illumination technology, wider colour gamut
and improved black-levels.
Standard input signal connection
•
1x DVI-D
Available types:
•
ESP-LXT: with native XGA resolution 1024 x 768 px
•
ESP-LSXT+: with native SXGA+ resolution 1400 x 1050 px
•
ESP-LHD: with native full HD resolution 1920 x 1080 px
•
ESP-LWXT: with native WUXGA resolution 1920 x 1200 px
ESP-Projectors with LED Projection Engine 5
ABOUT THIS PRODUCT
Page 6

About this MAnuAl
Read and pay attention to this manual. It contains important information
on the product. In particular, note all of the safety instructions and
warnings.
Keep this manual in a safe place!
Warnings used
NOTICE
Indicates a hazard that could lead to damage or destruction of the
product.
The general warning symbol indicates a hazard that could lead to
injuries or death. In the text section, the general warning symbol is
used in conjunction with the warning levels described below.
CAUTION
Indicates a hazard that could lead to minor or moderate injuries.
WARNING
Indicates a hazard that could lead to death or serious injury.
DANGER
Indicates a hazard that leads to immediate death or serious injury.
Symbols used
►
Indicates a single action or multiple actions which do not have
to be performed in any specific order.
1.
2.
3.
Indicates a set of actions that have to be performed in a
specific order.
6 ESP-Projectors with LED Projection Engine
ABOUT THIS MANUAL
Page 7

sAfety instruCtions
In this chapter you will find general instructions for the safe handling of
this product.
►
Read this safety information thoroughly and follow all the
instructions carefully.
In the following chapters, warning signs displayed in colour also indicate
hazards that are imminent.
Intended use
The eyevis ESP projector with LED projection engine is intended for
visually replaying contents.
•
Only operate the product in a permitted position.
•
Only use the product in dry rooms.
•
Observe the permissible environmental conditions (see Technical
Specifications on page60.)
Operator qualifications
Installation and preliminary adjustments should only be performed by
qualified service personnel or authorised service dealers.
General information
►
Carefully observe all warnings on the system parts and in this user‘s
manual.
►
Carefully follow all the instructions governing the operation and use
of our systems.
►
Observe all the local system installation and operation regulations
which our systems are subject to.
Power
►
Only use the power cable supplied by eyevis.
►
The power cable must be correctly and securely connected to earthed
power outlets.
►
Do not connect multiple devices to the same power outlet.
►
Do not touch the power plug with wet hands when removing or
plugging the plug into the outlet.
►
Do not forcefully bend or pull the power plug and do not place any
heavy material on it.
►
Do not disconnect the power cable while using the product.
►
To disconnect the device from the mains in an emergency, the plug
must be pulled out from the mains socket. The mains plug must
therefore be easily accessible at all times.
►
Do not overload outlets and cables above their permissible capacity.
Do not use impermissible extension cables.
ESP-Projectors with LED Projection Engine 7
SAFETY INSTRUCTIONS
Page 8

►
Do not install or operate the device under environmental conditions
that deviate from the technical specifications. This mainly includes
areas with constantly high humidity levels and in direct proximity to
water, fire, radiators or ovens or exposed to direct sunlight or similar.
Deviating operating conditions can lead to electric shocks, fire or can
cause the device to crash.
Installation
►
The devices should be installed professionally by your dealer.
►
When unpacking or carrying the devices, at least two people are
needed. Make sure the devices are carried upright.
►
When installing the devices, use the designated frame supplied by
eyevis. Use a special vibration absorbing frame from eyevis when
using the devices in locations subject to vibration.
►
Do not place the device in an unstable location such as e.g.
inappropriate double-floors or inclines. Install on a horizontal, stable
surface instead.
►
Do not install the device in areas where the humidity or temperature
is high. Information on permissible environmental conditions can be
found in the Technical Specifications section on page60.
►
Do not place objects on the device and take appropriate measures to
prevent the devices from falling down.
►
Do not block the ventilation holes on the device.
►
Always plug the power cable into the device before plugging it into
the outlet and do not locate the device where persons may trip over
the cable. If an extension cable is necessary, a cable with a current
rating at least equal to that of the device should be used.
Use
►
This device operates at high voltages. Never repair, modify or
disassemble the device by yourself.
►
Do not insert any objects into the device.
►
If there is thunder or lightning, do not touch the device, cable or
power plug.
►
Do not climb onto or stand on the device.
►
If the device will not be used for a long period of time, remove the
power plug from the wall outlet for safety.
►
Do not operate the device with a damaged cable or if the device has
been dropped or damaged until it has been examined by a qualified
service technician.
►
Caution: Some parts of the device may become hot during operation.
8 ESP-Projectors with LED Projection Engine
SAFETY INSTRUCTIONS
Page 9
Disassembly and storage
►
Let the device cool down completely before storing.
►
Disconnect the power cable and all other cables before moving or
disassembling the device. Remove the power plug by pulling the plug
(and not the cable) out of the outlet.
►
Pack the device into the original packaging to ensure the best
possible storage for the device.
►
Observe the environmental conditions for storage in the section
Technical Specifications section on page60.
Disclaimer
►
eyevis is not liable for any damage caused by natural disaster (such as
earthquake, thunder etc.), fires, acts by third parties, accidents,
owner‘s intentional misuse and fault or uses in other improper
conditions.
►
eyevis is not liable for incidental damages such as profit loss or
interruption in business, data modification or data deletion caused by
the use of eyevis products or their operation failure.
►
eyevis is not liable for any damage caused by non-adherence to the
instructions described in the user manual.
►
eyevis is not liable for any damage caused by using its products in
conjunction with other products, systems and software.
►
eyevis is not liable for any damage caused by the improper
installation of its products.
Conformity
This device complies with the following directives from the European
Union:
•
EMC Directive 2004/108/EC
This device complies with Category A requirements. It can cause
electromagnetic interference (EMI) when used in residential areas.
The owner may be forced to take suitable measures to prevent EMI
emissions at his/her own expense.
•
Low-Voltage Directive 2006/95/EC
•
2002/95/EC (as of January 27, 2003, Directive of the European
Parliament and the Council on the restriction of the use of certain
hazardous substances in electrical and electronic equipment (RoHS))
•
2002/96/EC (as of January 27, 2003, Directive from the European
Parliament and the Council on waste electrical and electronic
equipment (WEEE)).
The compliance with the requirements is certified with the CE symbol
labelled on the product.
The manufacturer cannot be held liable for the operation of the device
outside the operating conditions as described in this user‘s manual. Any
improper operation will also void your product liability and warranty
claims.
ESP-Projectors with LED Projection Engine 9
SAFETY INSTRUCTIONS
Page 10

Batteries
►
If the batteries are not exchanged properly, there is a risk of
explosion. Only replace the batteries with the same type or with a
similar type recommended by the battery manufacturer.
►
When disposing of used batteries, please observe the legal
regulations and environmental protection directives valid for the
specific country/region.
►
Do not expose the batteries to excess heat and do not throw the
batteries into fire.
►
Do not attempt to recharge or to open the batteries. The batteries
could either leak or explode.
10 ESP-Projectors with LED Projection Engine
SAFETY INSTRUCTIONS
Page 11

trAnsPort, storAge, unPACking
Unpacking
The projector is packaged in a cardboard box. To protect the projector
during transportation, the projector is wrapped in foam. The packaging is
secured with packing tape.
To unpack the projector:
1. Open the package
2. Remove the projector with the protection foam from the package.
3. Remove the protection foam.
Storage of packaging
►
Store the original packaging in a safe place. It is the ideal packaging
for sending or storing the devices.
ESP-Projectors with LED Projection Engine 11
TRANSPORT, STORAGE, UNPACKING
Page 12

delivery Contents
Dimensions and technical details may vary depending on the product
version.
Packaging
Projector
•
ESP-LYY (ready mounted)
•
1 power cable
•
1 RS-232 serial cable
•
1 DVI Cable (1 meter)
•
1 eyevis projector adjustment software on CD
•
User Manual
12 ESP-Projectors with LED Projection Engine
DELIVERY CONTENTS
Page 13
ProduCt overview
This section provides an overview of the entire product, the individual
parts as well as the connection and adjustment elements.
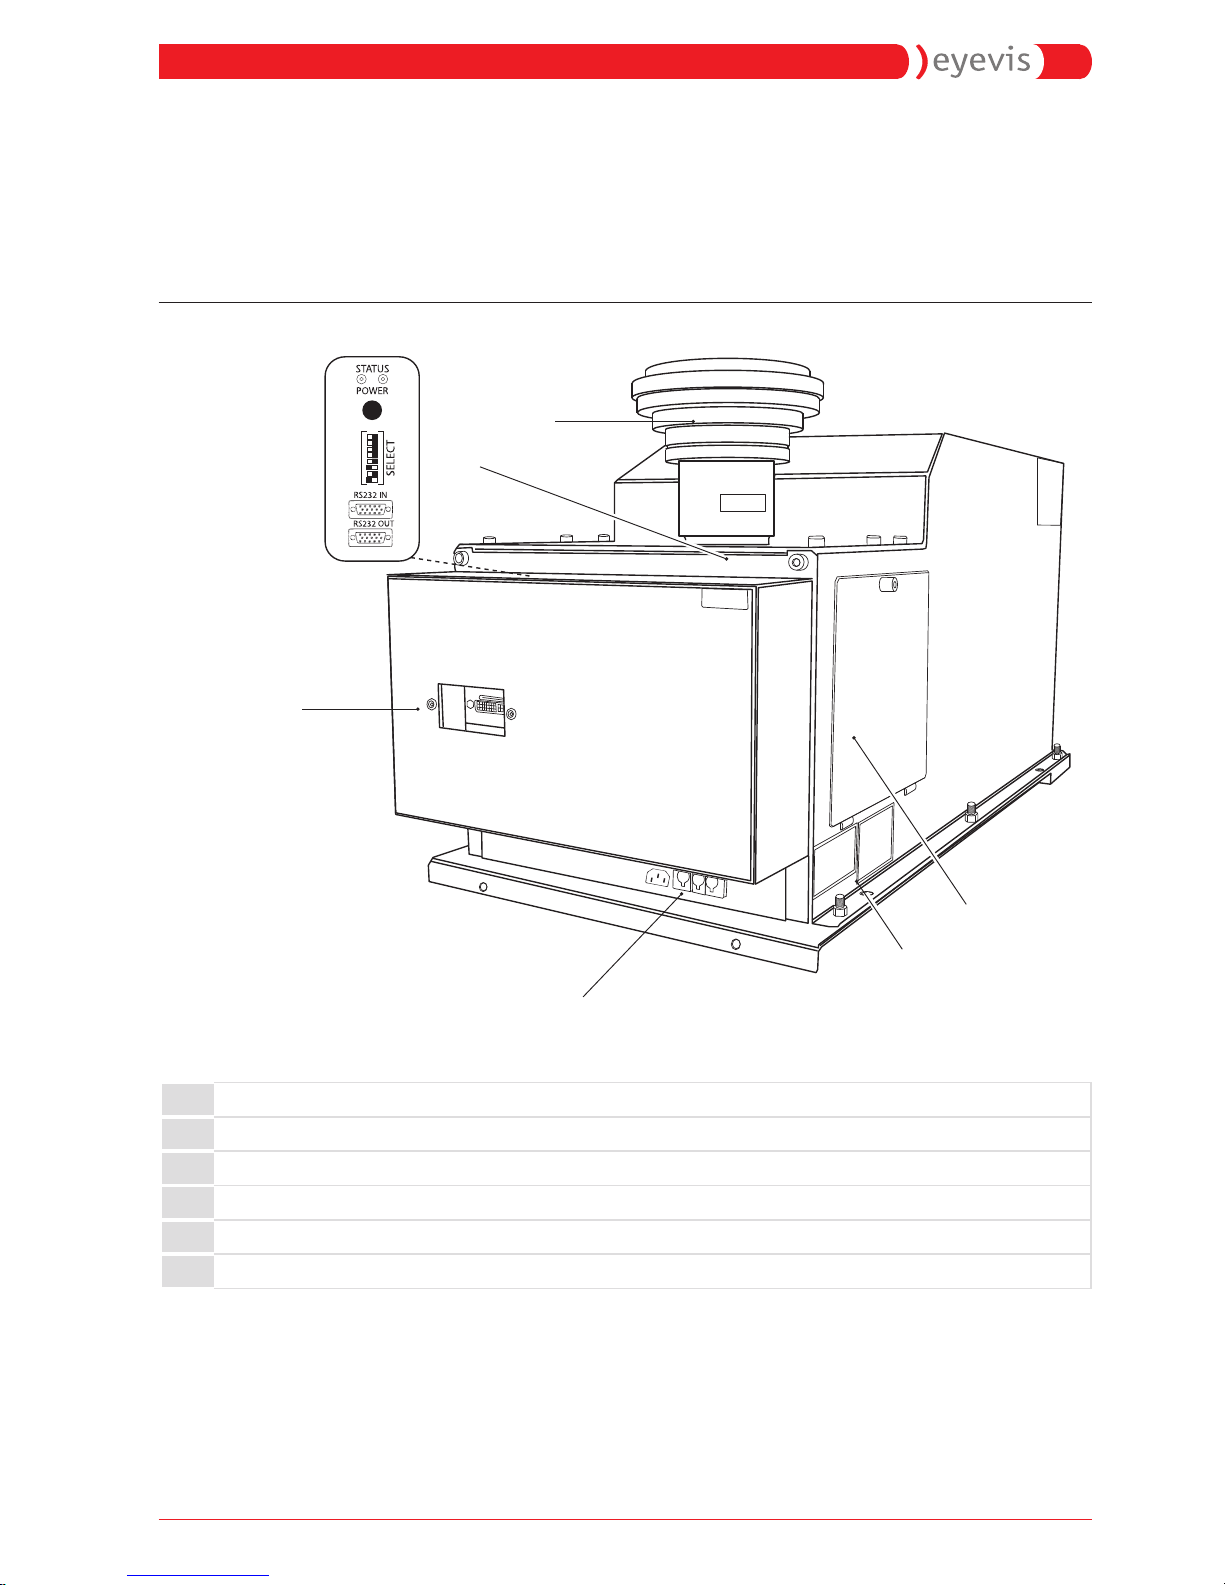
Projector
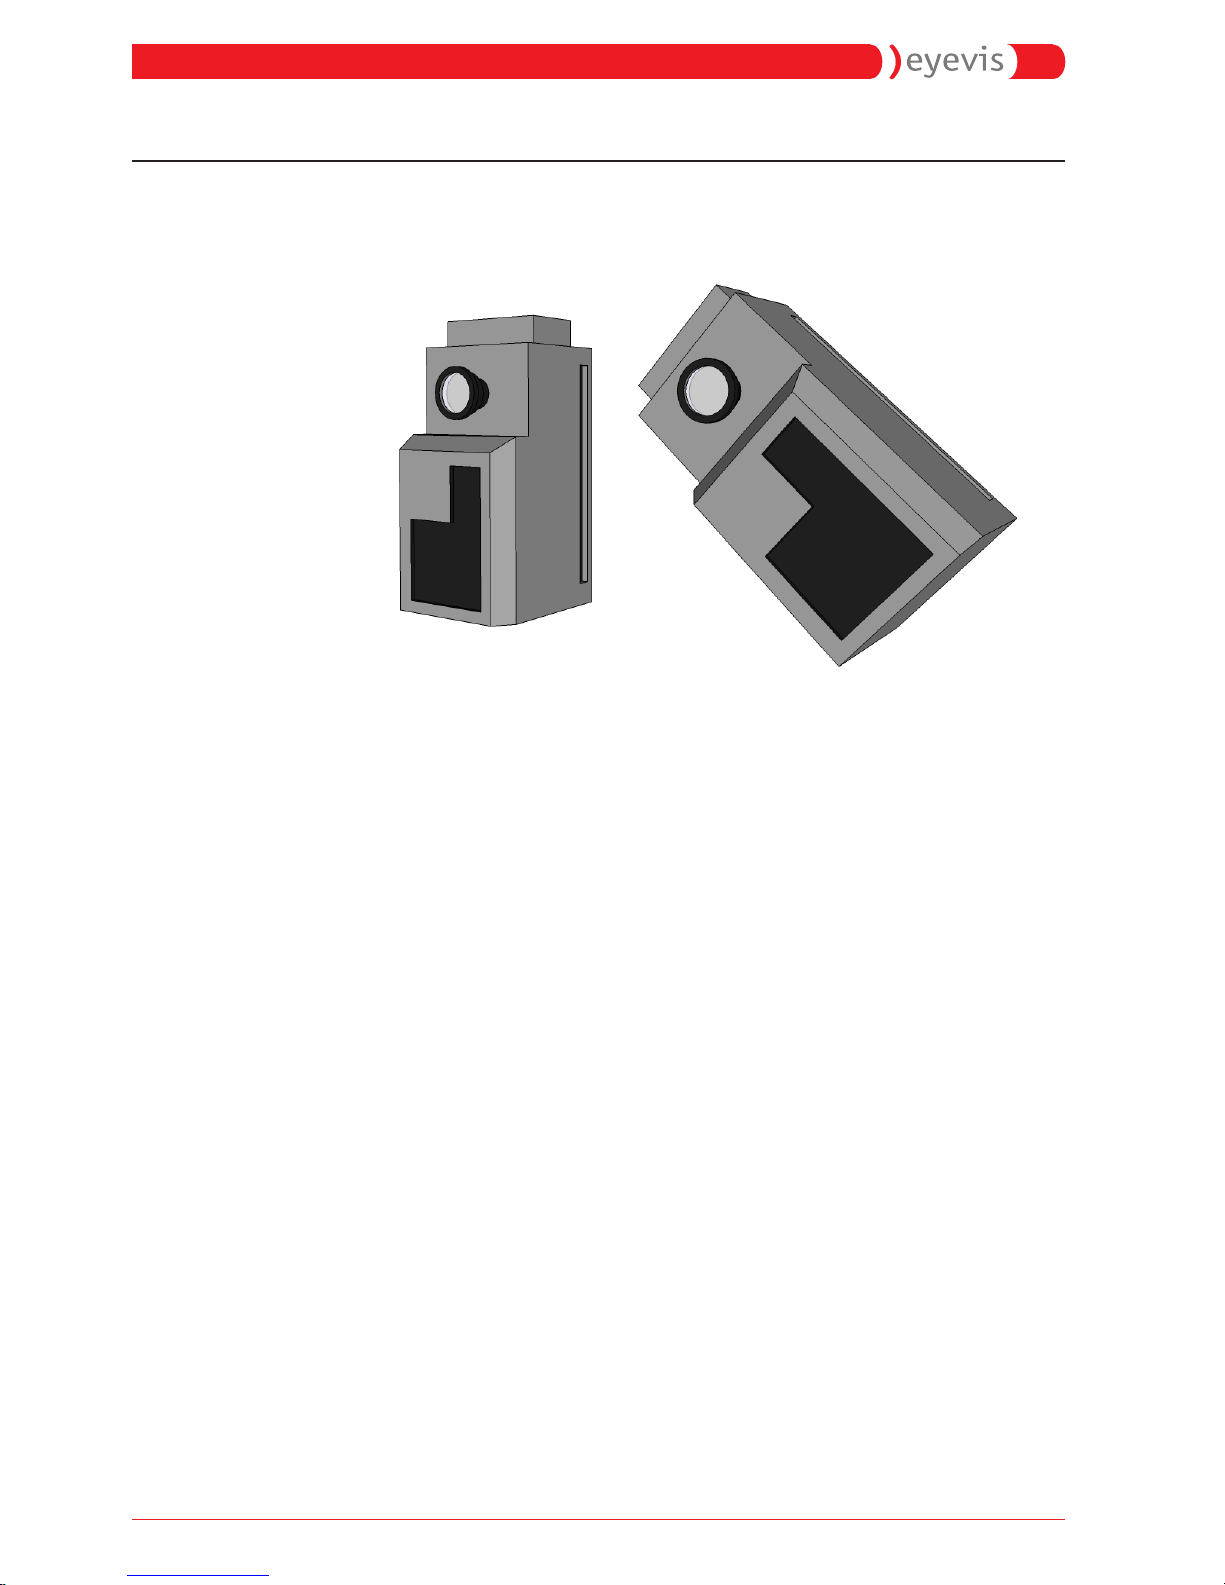
Fig. 1: Front view of projector
ON EDG
1 2 3 4 5 6 7 8
1
5
6
4
3
2
1 Optics
2 Service cover for focus adjustment
3 DVI IN from input box
4 Main power engine - shield - protection
5 Serial number of projector
6 Service cover
ESP-Projectors with LED Projection Engine 13
PRODUCT OVERVIEW
Page 14

Control module
Fig. 2: Vorderansicht des
Bedienfeldes
1 LEDs display status
2 Powerbutton (On / Off)
3 DIP-switcher
4 VGA (RS232 IN)
5 VGA (RS232 OUT)
Power Supply
Fig. 3: Power Supply
1 Power Supply
2 Protection
3 Main switcher On / Off
ON EDG
1 2 3 4 5 6 7 8
1
2
3
4
5
1
2
3
14 ESP-Projectors with LED Projection Engine
PRODUCT OVERVIEW
Page 15
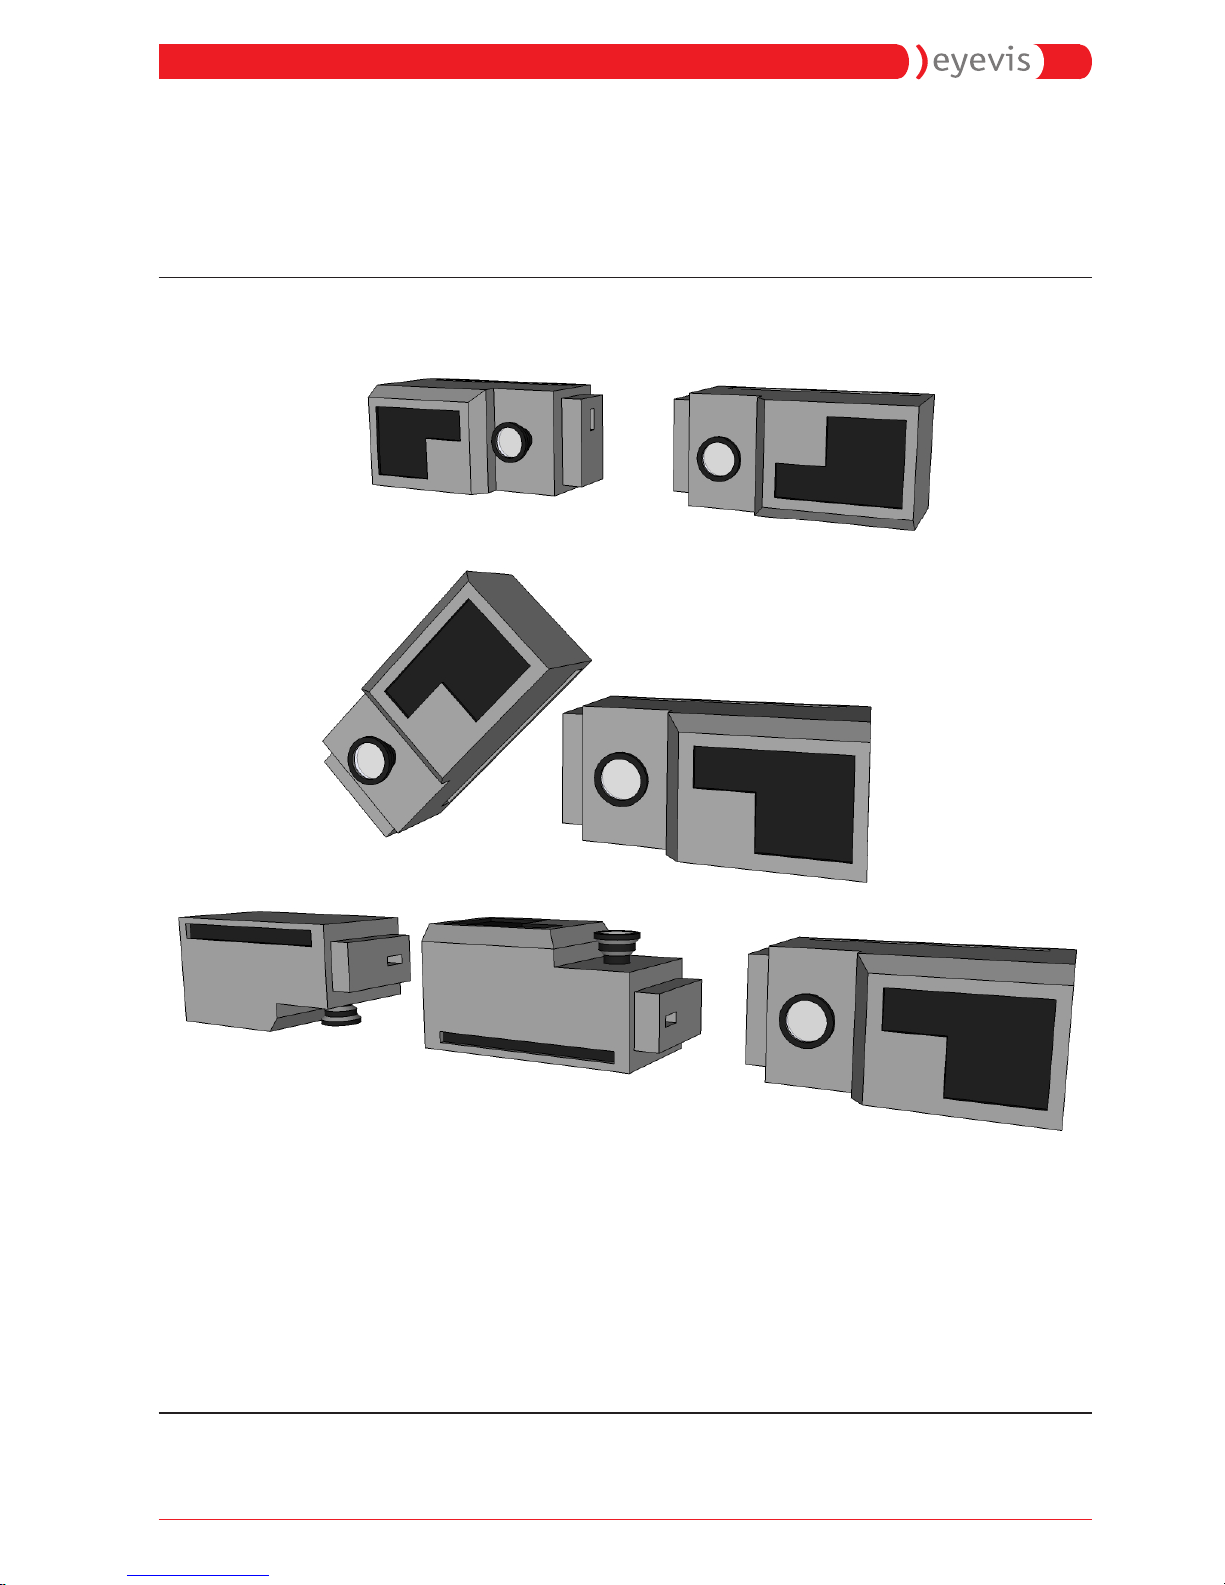
AsseMbly / instAllAtion
This section describes how to mount and install the projector.
Authorized installation options
Fig. 4: Authorized installation option
ESP-Projectors with LED Projection Engine 15
ASSEMBLY / INSTALLATION
Page 16
Unauthorized installation options
In the following position shows the cooling element of the projector
down. In this position, a sufficient cooling performance can not be
guaranteed.
Fig. 5: Unauthorized installation options/ EInbaulagen
16 ESP-Projectors with LED Projection Engine
ASSEMBLY / INSTALLATION
Page 17
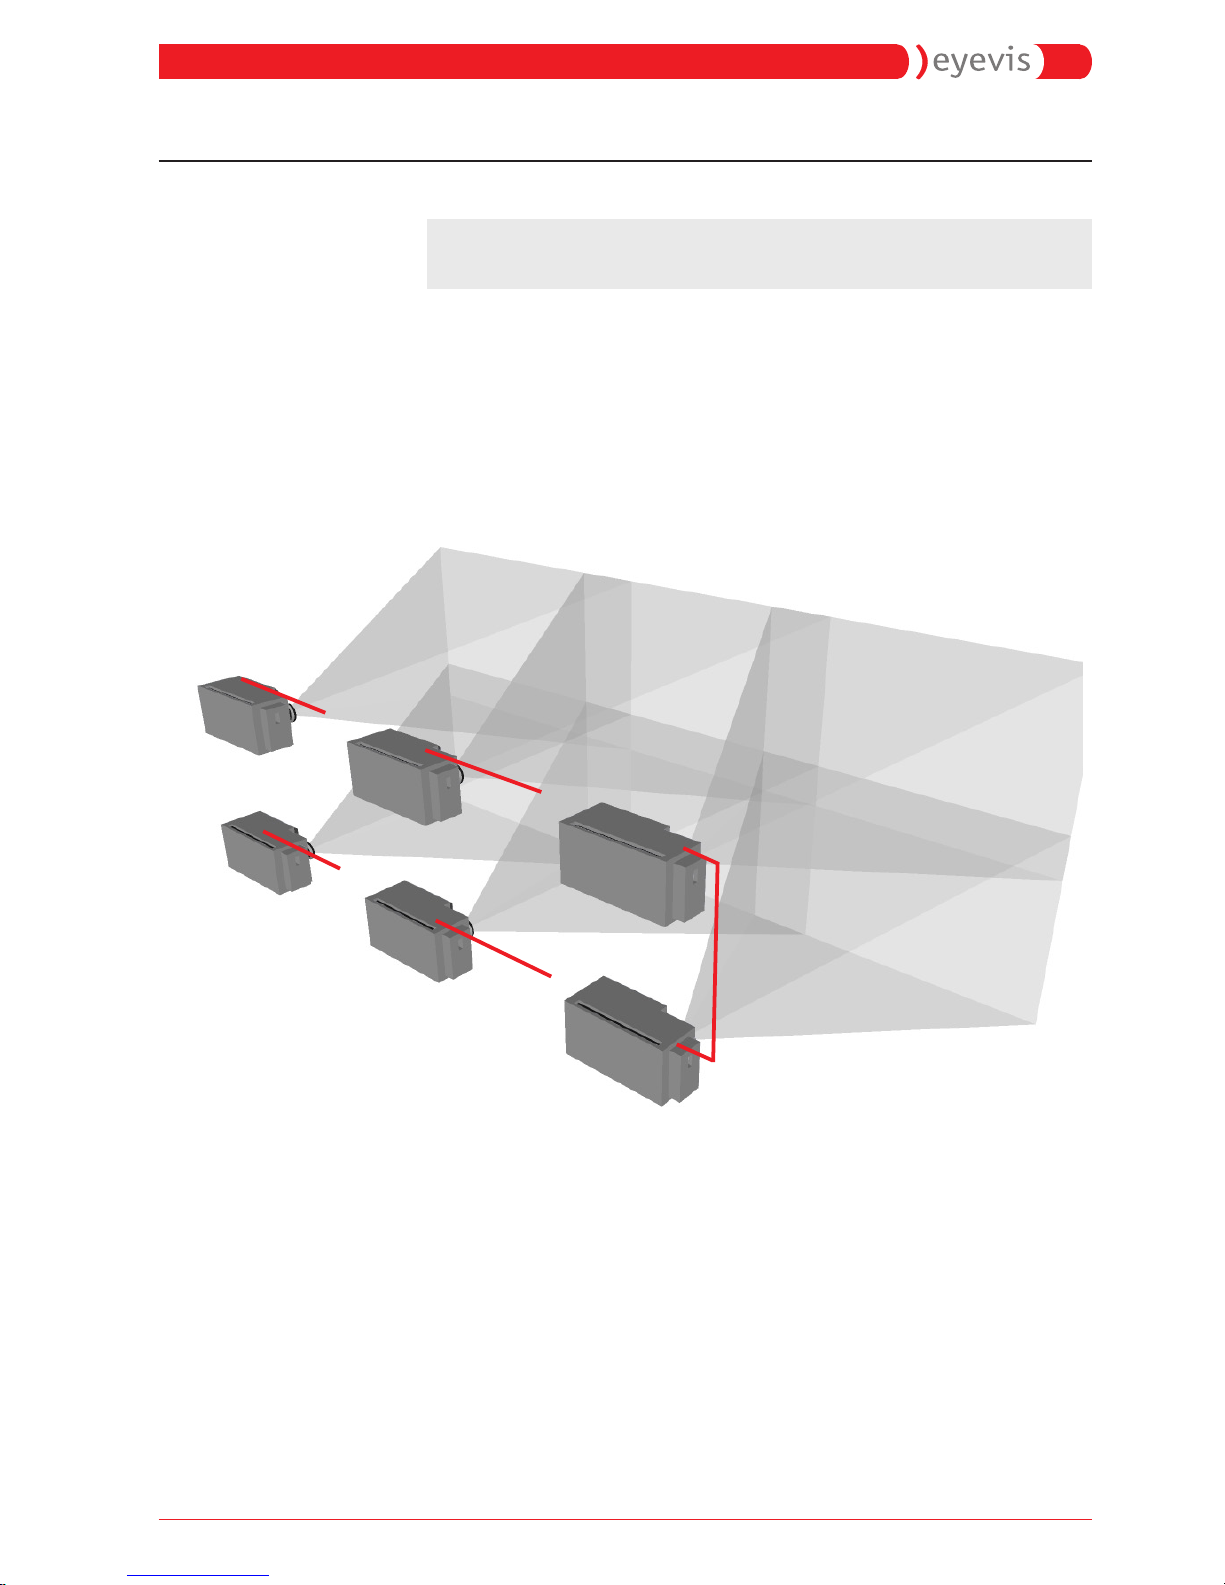
Cabling the projectors
The projectors are connected together via RS232 cables.
NOTE:
The RS232 cable is a 9-pin D-sub extension cable with 1:1 wiring.
To cable the projectors together:
Use the RS232 data cable provided (9-pin D-sub 1:1 extension cable) and
connect each RS232OUT to RS232IN. Proceed according to the following
diagram:
Fig. 6: Unauthorized installation options/ EInbaulagen
ESP-Projectors with LED Projection Engine 17
ASSEMBLY / INSTALLATION
Page 18

To connect the projectors to the control PC:
►
Connect the control PC to projector1 either via a RS232 data cable or
via a KAT.5 Ethernet cable (optional):
1
2
3
RS232
Fig. 7: Connecting the projecotrs to the control PC
Adressing the projectors
To control the projectors and to enable communication, each projector
must be allocated with an individual address. The projectors are
addressed with consecutive numbers.
Fig. 8: Adressing the projecotrs
18 ESP-Projectors with LED Projection Engine
ASSEMBLY / INSTALLATION
Page 19

DIP Switches
Setting of projector address for serial connection
Adresse DIP 1 DIP 2 DIP 3 DIP 4 DIP 5 DIP 6
1 1 0 0 0 0 0
2 0 1 0 0 0 0
3 1 1 0 0 0 0
4 0 0 1 0 0 0
...
9 1 0 0 1 0 0
...
Fig. 9: DIP switches
ON EDG
1 2 3 4 5 6 7 8
ESP-Projectors with LED Projection Engine 19
ASSEMBLY / INSTALLATION
Page 20

Adjusting the focus
In order to achieve a clear image, it is necessary to adjust the optical
focus of the projection engine. In the event that the image on the screen
becomes blurred, it is necessary to readjust the focus setting. To adjust
the focus, we recommend using an image with suitable content
displayed on the screen, e.g. an image with writing in all corners or
something similar. You can find appropriate test images on your
eyeDevice software CD.<GT><GT>
To adjust the focus:
1. Remove the four screws that secure the left part of the cover to the
focus.
2. Removce the cover.
ª You can now access the inside of the projector.
3. Loosen the adjustment screws.
ª SYou can now adjust the focus of the lens by turning the
adjustment screw to the left or right.
4. Secure the adjustment screw again in its position once you have
made the setting.
5. Close the cover on the projector again using the four screws.
Fig. 10: Focus setting on the projector
20 ESP-Projectors with LED Projection Engine
ASSEMBLY / INSTALLATION
Page 21

ConfigurAtion
The projectors have to be configured before they can be commissioned.
Two programs are available to help you configure the projectors:
eyeDevice software and EC-Lcontrol. Both programs are stored on the CD
provided.
General information on the configuration programs
Both programs for configuring the projectors are used to perform
different tasks:
EC-Lcontrol:
•
Colour adjustment
eyeDevice software:
•
Communication between PC and Projector
•
Adjustment of colour (with EC-Lcontrol) and geometry
•
Status query of projectors
•
Gamma adjustment (with EC-Lcontrol)
•
Generating reports
NOTE:
The EC-Lcontrol program is specially developed for adjusting the
colour of the eyevis ESP projectors. For this reason, use this program
for colour adjustments instead of the colour adjustment function in
the eyeDevice software.
Program installation and start
The programs do not have to be installed.
1. Simply copy the entire program folder to the desired location you
wish on your PC (usually C:\Programs).
2. Open the relevant exe file to launch the programs.
Intelligent user interface
Once the connection to the projectors has been established, the
programs detect which parts are connected and display the relevant
functions on the user interface. The setting parameters are read out from
the projectors and displayed in the program windows. Any changes to
the settings are saved in the projectors or can be stored in a
configuration file on the PC.
ESP-Projectors with LED Projection Engine 21
CONFIGURATION
Page 22

Adjusting the colours with EC-Lcontrol
This section describes how to adjust colours using the “EC-Lcontrol”
program.
A detailed description of the program can be found in
TheEC-LcontrolSoftware section from page47.
To start the program:
►
Launch the EC-Lcontrol software (EC-Lcontrol.exe).
ª The start window opens.
3.
NOTE:
The EC-LControl software can be used for both ESP eyevis projectors
and for the eyevisCube series. Therefore, both the concepts of CUBE
and projector are used.
(In the software and in the text)
EC_Lcontrol.exe
22 ESP-Projectors with LED Projection Engine
CONFIGURATION
Page 23

Adjusting the connection parameters
1. Select the Wall menu and open WallSetup.
ª The connection parameters window opens.
2. Select the COM port to which the first projector is connected.
You now have two options to select which projectors you want to adjust:
•
Manual input of the first and last projector
•
Automatic projector recognition
To enter the first and last projectors manually:
►
Enter the ID numbers of the first and last projector.
Example: If you want to adjust all projectors on a wall with 4 x 2
projectors: serial ID start=1, ID end=8
To automatically detect the projectors:
1. Select the scan option in the Serialport field:
a. Use only selected serial port: Only the COM port selected in the
top selection box is scanned.
b. Scan all available serial ports: All COM ports are scanned.
2. Click the (Connect with wall) button.
ª The number of projectors found as well as the IDs of the first and
last projectors are displayed.
3. You can now change the IDs.
ESP-Projectors with LED Projection Engine 23
CONFIGURATION
Page 24

Adjusting the colours
Fig. 11: The EC-Lcontrol start window
NOTE:
The settings you change will be applied to all projectors that you
previously selected (SerialID start, SerialIDend).
To display the current settings:
►
Press the Getactualvalues button.
ª The current projector settings are displayed in the status window.
24 ESP-Projectors with LED Projection Engine
CONFIGURATION
Page 25

To manually adjust the projectors:
1. Select the colour you wish from the Colourtemperature field.
ª Information on the colour temperatures can be found in Tab. 1 on
page 53.
2. Adjust the brightness in the Brightness field.
ª The brightness can be estimated from the values contained in the
list for each projector.
3. Click on Adjustcubewall to apply the settings.
ª The current settings will be displayed in the lower part of the
window and illustrated in the colour diagram.
ª The displayed images on the video wall change at the same time.
To adjust the projectors to the maximum brightness:
This function can be used to adjust the projectors to the maximum
brightness regardless of a specific colour temperature.
►
Press the button to adjust all projectors to the maximum
brightness.
To automatically adjust the projectors:
This function is used to automatically calculate the correct set value for
both colour and brightness. The software then applies this set value to
define a standard colour and brightness for all projectors. The current
values of each projector are used to calculate the set value for x and y as
well as the brightness. (Note: If the maximum brightness has been set as
described above, the current value is the maximum value.) This process is
not dependent on a specific colour temperature. A set value that allows
the maximum brightness is used.
1. Press the button to get the values recommended by the software.
ª The current settings are displayed in the lower part of the window.
ª The values are automatically entered in the entry fields. The
suggested values are calculated by the software to achieve the
optimal setting for all projectors.
ª The brightness of the projectors can be reduced during the colour
settings in order to achieve an optimal colour representation.
2. Press the Adjustcubewall button.
ª The wall is adjusted to the maximum attainable values.
►
If you are not satisfied with the result, you will need to adjust the
colour temperature and brightness again. Refer to the following
section on how to optimise the “whitepoint”.
To optimise the whitepoint:
Example: The wall appears blue on the master display but the desk
monitors appear red. In this scenario, instead of setting the maximum
brightness, it is more beneficial to find a better whitepoint.
►
Select a colour temperature from the list of set values and click on the
Adjust projector wall button.
ª The table below shows a text output of two projectors which were
set to a colour temperature of 3500K.
ESP-Projectors with LED Projection Engine 25
CONFIGURATION
Page 26

Text output in display field Notes
2010_07_21 13:09:46
adjust whitepoint....
iteration: 1 of 10
iteration: 2 of 10
[ERR] Cube_2 RED-OVERRUN
iteration: 3 of 10
[ERR] Cube_2 RED-OVERRUN
iteration: 4 of 10
iteration: 5 of 10
iteration: 6 of 10
iteration: 7 of 10
iteration: 8 of 10
iteration: 9 of 10
iteration: 10 of 10
==================================
Iteration steps for
optimisation
The error messages
indicate that the red LED
cannot be set to an
adequate brightness
setting to achieve the
selected colour
temperature. The
brightness of the other
colours must therefore be
reduced accordingly.
LED capacity:
cube R G B
1 83% 35% 25%
2 98% 38% 27%
--------------------------max: 98% 38% 27%
cube: #2 #2 #2
--------------------------min: 83% 35% 25%
cube: #1 #1 #1
--------------------------mean: 90% 36% 26%
==================================
LEDcapacity displays the
control of the LEDs of
projector 1 and 2.
The high capacity of the
red LED (R) can be clearly
identified.
chromatic deviation:
cube x y L
1: -0.0001 0.0004 0.4834
2: -0.0026 -0.0022 0.6407
==================================
Chromatic deviation
actual color values:
cube x y L dx dy dL temp
1 0.4125 0.382 99.4 0.0008 0.0002 0.6 31°
2 0.411 0.3827 99.9 0.0007 0.0005 0.1 32°
==================================
Actual colour values
accuracy:
x y L
0.0008 0.0003 0.3
done!
Accuracy
These values can be used to manually select the default brightness (see
page 40/41) If the maximum capacity of the LEDs is set to just 60%, a
higher brightness default value can be selected.
►
If you are satisfied with the result, proceed to the next step to
perform fine adjustments.<GT>
26 ESP-Projectors with LED Projection Engine
CONFIGURATION
Page 27

Fine adjustment for selected projectors
Fine differences in colour rendering and brightness between the
projectors can be adjusted with the fine adjustment function.
To open the fine adjustment function:
1. Click on the Fine adjust... button.
ª The Colorfineadjust window opens.
2. Select a projector and adjust the RGB values until a harmonious
colour rendering is achieved for the entire wall.
ª As soon as you change the RGB values, the Reset button appears
underneath the RGB boxes. Click on Reset to reset the changes.
3. Click on Applyactualwallstatus.
ª It takes a few seconds to apply the changes.
4. Close the window if you are satisfied with the result.
ª The start window opens again.
5. Click on SaveAll to save the settings in all projectors.
You have now completed the colour settings.
1. Select the projector you want from the list in the left-hand field.
2. Click on the button to apply the changes for the selected
projector only.
You have the following input options:
•
Drag the whitepoint across the colour field
•
Direct input of RGB values
•
Direct input of CIE values
ESP-Projectors with LED Projection Engine 27
CONFIGURATION
Page 28

Drag the whitepoint across the colour field:
1. Use the arrow buttons in the colour space to shift the whitepoint in
the direction you want.
ª The effects on the x, y and L values are displayed simultaneously.
2. Click on Adjust to transfer the settings to the selected projector.
Enter the RGB values:
1. Manually enter the values for red, green and blue.
2. Transfer the values into the CIE area by proceeding as follows:
a. Checkmark the boxes for x, y and L to determine which values
should be changed.
b. Click on the button to apply the settings for all projectors.
c. Click on the button to apply the changes for the selected
projector.
3. Click on Adjust to transfer the settings to the selected projector.
Enter the CIE values:
1. Manually enter the values for CIEx, CIEy and L.
2. Click on Adjust to transfer the settings to the selected projector.
Complete the entry and then save:
1. Close the Colorfineadjust window.
2. Press the Saveall button in the main menu window.
28 ESP-Projectors with LED Projection Engine
CONFIGURATION
Page 29

Establishing communication via eyeDevice
This section describes how to establish the communication with the
projectors with the help of the eyeDevice software.
A detailed description can be found in TheeyeDeviceSoftware section
from page38 onwards.
To start the eyeDevice software:
1. Open the eyeDevice software (eyeDEVICE.exe).
2. Confirm with OK without entering a password. You do not need
administrator rights for the following steps.
Establishing communication
►
Open the Preference page.
ª The serial connection via RS232 interface (Useserialport) is
selected as standard.
To use the serial port:
1. In the SerialPort entry field, select the COM port to which the video
wall is connected.
2. For the remaining settings, the standard values should match the
ones displayed in the screenshot.
3. Press Applychanges to apply the new settings.
ª You can check if the connection is active on the Reports page.
To establish a connection via Ethernet (optional):
3 A connection is established to the first projector via the Ethernet
cable.
1. Select Uselocalareanetwork.
2. Enter the IP address to the connected projector (the first projector).
3. For the remaining settings, the standard values should match the
ones displayed in the screenshot.
4. Press Applychanges to apply the new settings.
ª You can check if the connection is active on the Reports page.
eyeCube.exe
ESP-Projectors with LED Projection Engine 29
CONFIGURATION
Page 30

Selecting the colour sensor interface
(Coloranalyzeroption)
NOTE:
An automatic colour sensor enables the projector settings with the
UHP lamp. This function is not required with LED projects.
Using the Pattern generator
NOTE:
The pattern generator tests the entire colour spectrum from 100%
(white) to 0% (black). Greyscales and individual colours can also be
checked. The pattern generator is required with lamp projectors to
ensure homogeneity over the entire wall.
Even though the pattern generator is not required for configuring LED
projectors, it is useful for checking different greyscales and the
homogeneity on the video wall.
To use the pattern generator:
3 The eyePattern program first has to be installed on the sourcePC.
3 An Ethernet connection must also be established between the
sourcePC and controlPC.
1. Open the software on the sourcePC.
2. Enter the name or the IP address of the sourcePC in the
Runningonmachine field.
3. Press Applychanges to apply the new settings.
ª You can check if the connection is active on the Reports page.
Entering the wall size
In the Wallsize field, you can enter the number and layout of the
projectors:
1. In the first window, select the number of columns, which is 4 in the
example above.
2. In the second window, select the number of rows, which is 2 in the
example above.
30 ESP-Projectors with LED Projection Engine
CONFIGURATION
Page 31

Reading the configurations
1. Mark the projector you want in the wall view. You can select several
projectors at once: Click and hold the left mouse button in a field and
mark the relevant area.
2. Click on Read current...
ª The data of the selected projectors are displayed in the view
window.
Other settings
Detailed information on other setting options can be found in
TheeyeDeviceSoftware section from page38 onwards.
Saving the configuration
Once you have adjusted all the settings, you can save the configuration
in a file on the PC.
1. Click on Write....
2. Select the target location and file name and click on OK.
ESP-Projectors with LED Projection Engine 31
CONFIGURATION
Page 32

Activating the internal AutomaticColorTracking
Once you have finished the colour adjustment with the EC-Lcontrol
software, you have to activate the internal Automatic Color Tracking
function. This step is performed in the eyeDevice software.
NOTE:
ACT (Automatic Color Tracking) is available in two versions:
•
ACTintern is available as a setting in eyeDevice:
The projector-internal AutomaticColorTracking function is
activated in the eyeDevice software via ACTintern. This function
simply tracks the colours on each individual projector without
comparing the projector in a combined projection.
•
ACTextern and Communication Box:
ACTextern comprises the ACT software and the Communication Box.
In contrast to ACTintern, ACTextern constantly compares the colour
settings of all projectors on one wall and adjusts the colours, if
necessary, to achieve a harmonious colour rendering. The
Communication Box can be connected to the projectors via a serial
interface or LAN. Besides controlling the projectors, ACTextern also
generates detailed log files and can check the temperatures of each
projector over time. It is also possible to connect external
temperature sensors to ACTextern.
To activate ACTintern in eyeDevice:
1. Open the eyeDevice software.
2. Open the Setup page.
3. Select the reference value for automatic colour tracking:
Open Projector Setup/Act_Reference and click on Set.
4. Set the colour adjustment setting to Internal.
Open Projector Setup/Act_Control and select the Internal setting.
5. Press the Saveall... button to save the current settings.
6. Repeat the same steps for each projector.
To use ACTextern with the Communication Box:
►
Please observe the information in the Communication Box manual.
32 ESP-Projectors with LED Projection Engine
CONFIGURATION
Page 33

oPerAtion
NOTICE
Shocks and vibrations
Strong shocks and vibrations can damage the projector.
►
Protect the projectors from heavy shocks and impacts.
NOTE:
•
The projector is suitable for use in motion simulators.
•
The limits for use in moving environments can be requested if
necessary.
NOTICE
Switching on the projector after a power failure
Switching on the projectors immediately after a power failure can
damage the projectors.
►
Wait at least 30 seconds after a power failure before restarting the
projectors.
ESP-Projectors with LED Projection Engine 33
OPERATION
Page 34

MAlfunCtions And troubleshooting
Before calling your service partner, please check the following table for a
possible cause to the trouble you are currently experiencing.
NOTE:
The devices may only be opened by specially trained and qualified
personnel.
Typical problems
No picture
►
Make sure that the power cable is plugged in.
►
Check if the projector‘s power is OFF or if the projector is in standby
mode.
►
Check that the auxiliary equipment is connected properly.
►
Check if the input setting is correct.
►
Check that the signal is suitable.
The projector does not start up
►
Check the cable connections between the projector and power
outlet.
Blurred picture
►
Check the focus adjustment of the projector.
No communication between control PC and
projector
►
Check that you have selected the right COM port.
►
Check the COM port settings.
►
Check the serial cable connection for communication.
34 ESP-Projectors with LED Projection Engine
MALFUNCTIONS AND TROUBLESHOOTING
Page 35

Possible causes of malfunctions and problems
CAUTION
Smoke or peculiar smells
If you continue to use the device when smoke or peculiar smells are
coming from the projector housing, it may cause a fire or an electric
shock.
►
Immediately remove the power plug from the outlet.
►
Make sure that the device is not smouldering inside and this is going
unnoticed.
►
Contact your dealer for inspection.
CAUTION
Liquids or objects inside the device
If you continue to use the device after water, other fluids or objects
have been spilled or dropped, this may cause a fire or an electric
shock.
►
Immediately remove the power plug from the outlet.
►
Contact your dealer for inspection.
CAUTION
Damage caused by dropping the device
If you continue to use the device after it has been dropped or the
housing has been damaged, it may cause a fire or an electric shock.
►
Immediately remove the power plug from the outlet.
►
Contact your dealer for inspection.
CAUTION
Damaged or hot power cable
If you continue to use the device even though the power cable is
damaged or becomes hot, it may cause a fire or an electric shock.
►
Immediately remove the power plug from the outlet.
►
Contact your dealer for inspection.
ESP-Projectors with LED Projection Engine 35
MALFUNCTIONS AND TROUBLESHOOTING
Page 36

CleAning And CAre
This section describes how to clean the device. Regular and proper
cleaning helps to maintain the quality of this device and to protect it
from damage.
WARNING
Dangerous electric voltage inside the device
Cleaning the device while connected to the power supply can result
in death, severe injury or can damage the device.
►
Always unplug the device from the electrical outlet before cleaning
it.
►
Never yank at the cable to pull the plug from the outlet. Take hold of
the plug and pull to disconnect.
►
Do not spill any fluids inside the device.
Cleaning intervals
How often you clean the device primarily depends on the environmental
conditions.
►
Clean the device if dust has collected on the housing.
►
Contact your dealer for internal cleaning once a year.
Cleaning the housing
NOTICE
Unsuitable cleaning substances
Strong cleaning substances such as thinners, benzene or abrasive
cleaners can damage the housing.
►
Never use liquid cleaners or cleaning sprays. Use a damp cloth for
cleaning.
►
Wipe the housing over regularly with a soft cloth to keep it clean.
Small stains can be removed using a damp cloth and a small amount
of mild detergent.
36 ESP-Projectors with LED Projection Engine
CLEANING AND CARE
Page 37

disAsseMbly And disPosAl
This device was made almost exclusively from material that can be
disposed of and recycled in an environmentally friendly manner. Once
the device is removed from operation eyevis will take it back to promote
the reuse or recycling of material resources, provided the device is
returned in a condition that reflects use as intended. Non-recyclable
device parts are disposed of correctly.
The packaging and packing aids can be recycled and are intended for
reuse.
ESP-Projectors with LED Projection Engine 37
DISASSEMBLY AND DISPOSAL
Page 38

theeyedeviCesoftwAre
eyevis has developed the eyeDevice software for setting the projectors
and for colour adjustment. The eyeDevice software provides all the
necessary functions for adjusting the colours, brightness and contrast of
the projectors. The EC-Lcontrol program is used in conjunction with the
ESP projectors for colour adjustment. However, all other settings are
programmed with the eyeDevicesoftware.
Starting the eyeDevice software
1. Open the eyeDevicesoftware to configure your video wall.
ª Two types of users are available:
a. Administrator: This type is intended for advanced, trained
personnel. The password required is available from the eyevis
service. Enter the password and confirm with OK.
b. User: This is the normal user type (no service settings are possible).
Confirm with OK without entering a password.
ª Once the program has been launched, the program interface is
displayed:
1
2
3
The interface is divided into three areas:
1
Load/Save area
To load and save configurations and set the video wall size.
2
Selection area
To display the video wall with the prjectors. The currently active
projector is highlighted.
3
Parameter area
Windows with parameters that can be selected with tabs.
eyeCube.exe
38 ESP-Projectors with LED Projection Engine
THEEYEDEVICESOFTWARE
Page 39

The Load/Save area
In this area of the window, you can load and save configurations as well
as determine the size of the video wall.
File Configuration Load Loads a configuration file saved on the PC
(for example the saved file of the first system
configuration).
Write Saves a configuration file with the current settings on
the PC.
Wall Size Enters the size of the wall:
•
First number: number of vertical columns
•
Second number: number of horizontal rows
Projectors internal
database
Read default Reads the default settings of the active projector. The
factory projector settings can thus be restored at any
time.
Read current Reads the current settings of the active projector. The
settings are then displayed in the parameter area.
Save all Saves all the current settings in the projector.
The selection area
A preview of your projection configuration appears in this part of the
screen. A single projector can be selected with the mouse to adjust the
settings. If a projector is selected, the current settings can be read by
clicking on the Readcurrent button.
Fig. 12: Visualising the projection wall with 4 x 2 projectors
To select several projectors, click and hold the left mouse button and
mark the area you wish.
ESP-Projectors with LED Projection Engine 39
THEEYEDEVICESOFTWARE
Page 40

The Parameter area
The settings are displayed and can be changed in this area of the screen.
User
In the User menu, you can find parameters for adjusting the colour
values,
Buttons Refresh Refreshes the screen content
Update Reloads the settings from the projector
Color Adjustment Contrast_Red Sets the contrast level of red
Contrast_Green Sets the contrast level of green
Contrast_Blue Sets the contrast level of blue
Brightness_Red Sets the brightness level of red
Brightness_Green Sets the brightness level of green
Brightness_Blue Sets the brightness level of blue
Saturation Sets the saturation level of the displayed image
Gain Sets the gain level of the displayed image
Signal Adjustment Pixel Sets the number of horizontal pixels in the active
area (horizontal resolution)
Lines Sets the number of vertical pixels in the active area
(vertical resolution)
H-Shift Shifts the displayed image in a horizontal direction
V-Shift Shifts the displayed image in a vertical direction
40 ESP-Projectors with LED Projection Engine
THEEYEDEVICESOFTWARE
Page 41

Power Control Power Activates/deactivates the check box to switch the
display on/off.
Setup
The basic password, projector and scaler settings can be performed on
this page.
Security Setting User password Administrators can enter a password for users here
when logged in as Admin.
Admin password Administrators can change the admin password
here when logged in as Admin.
Bias Bias_Red Sets the basic brightness for red
(shifts the brightness curve of the colour)
Bias_Green Sets the basic brightness for green
(shifts the brightness curve of the colour)
Bias_Blue Sets the basic brightness for blue
(shifts the brightness curve of the colour)
ESP-Projectors with LED Projection Engine 41
THEEYEDEVICESOFTWARE
Page 42

Projector Setup Orientation Projection mode for rear/front/ceiling or floor
projection
Gamma Loads default pre-configured gamma curves.
Meaning of values:
0 = Film, 1 = Graphics, 2 = Video, 3 = Linear
NOTE: The function is only active if the
DIPswitches 1+2 = Off.
Boot Mode Activates/deactivates the display during the
projector startup
V_Freq Selects input signal frequency for the colour
sensor (50Hz or 60Hz signal)
Picture_Mode Selects the display mode (shows image, activates
freeze, activates blank, activates LED pattern)
LED_Pattern Selects the colour of the LED pattern
Test_Grid Optional, only available with scaler board.
Selects between various test grids.
ACT_Control “Automatic Color Tracking” system, activates the
internal sensor for colour tracking.
ACT_Reference Sets the reference for the “Automatic Color
Tracking” after colour adjustment.
Security_Mode Activates the “Color Rescue Control” in the event a
LED fails:
•
Mode 1: Displays image in black/white mode.
•
Mode 2: Displays image flashing slowly in black/
white mode.
•
Mode 3: The missing colour is displayed by a
mixture of the remaining primary colours.
•
Mode 4: The missing colour is displayed by a
mixture of the remaining primary colours. The
image content flashes.
Security_Level Sets the level of colour replacement for the Color
Rescue Control and flashing frequency of the
image (standard=5/Off=0/Highest value=10)
LED Unit R_Red Manual colour adjustment of red LED
G_Green Manual colour adjustment of green LED
B_Blue Manual colour adjustment of blue LED
Scaler Setup
2)
Menu_Left Exits the OSD submenu
Menu_Right Opens the OSD submenu
Down Navigates down in the OSD menu
Up Navigates up in the OSD menu
Left Navigates left in the OSD menu
Right Navigates right in the OSD menu
+ Increases the selected value
– Decreases the selected value
Escape Exits the OSD menu
1) Only available in conjunction with the optionally available scaler.
42 ESP-Projectors with LED Projection Engine
THEEYEDEVICESOFTWARE
Page 43

Status
In this window, you can call up current status information such as errors,
temperature, firmware etc.
Projector Info Database_Version Database version ID
Projector Projector type
CPU_Temperature Temperature of the CPU board in °C
PLED_Temperature Temperature of the PLED board in °C
LED_on Number of startup sequences of the LEDs
LED_Timer Total operating hours of the LEDs
Firmware_CPU Firmware version of CPU board
Firmware_PLED Firmware version of PLED board
LED Driver_FW Firmware version of LED driver
Firmware_CS Firmware version of colour sensor
Status Info Engine_Ready
•
1 = normal mode
•
0 = error mode
Engine_OK
•
1 = normal mode
•
0 = error mode
Fan_PS
•
1 = normal mode
•
0 = error mode
Fan_LED_Driver
•
1 = normal mode
•
0 = error mode
Fan_DMD
•
1 = normal mode
•
0 = error mode
Fan_LED_1
•
1 = normal mode
•
0 = error mode
Fan_LED_2
•
1 = normal mode
•
0 = error mode
Ledlit
•
1 = normal mode
•
0 = error mode
Status Service code
ESP-Projectors with LED Projection Engine 43
THEEYEDEVICESOFTWARE
Page 44

LED Info LED_red_Temp Temperature of red LED in °C (first value)/
raw parameter (second value)
LED_green_Temp Temperature of green LED in °C (first value)/
raw parameter (second value)
LED_blue_Temp Temperature of blue LED in °C (first value)/
raw parameter (second value)
Heatpipe_Temp Temperature of heatpipe system in °C
LED_driver_Temp Temperature of LED driver in °C (first value)/
raw parameter (second value)
LED_PG 1 = normal mode
0 = error mode
LED_Driver_PG 1 = normal mode
0 = error mode
Projector Info Status info Advanced status information for internal use
(e.g. for error analysis)
LED Info
Serial Number Serial number of projector
Engine_Serial Serial number of projection engine
CS_Serial Serial number of colour sensor
LED_Type LED type
CPU_Serial Serial number of the CPU board
PLED_Serial Serial number of the PLED board
Colour Info Sensor_Light Reference values in percent (%) for R, G and B
CS_Resolution Colour sensor resolution
CS_Time Integration time of the colour sensor/
frequency of colour sensor
Sensor_Data Firmware data for sensor1
Sensor2_Data Firmware data for sensor2
Gamma
The Gamma program area gives you full control over the gamma curve of
the individual colours (red, green, blue).
NOTE:
With the new ESP projectors, the “Gamma” program area is less
important. The colours of the ESP projectors are now adjusted using
the special “EC-Lcontrol” colour adjustment software.
Information on how to work with the colour adjustment software can be
found in TheEC-LcontrolSoftware section from page 47 onwards.
44 ESP-Projectors with LED Projection Engine
THEEYEDEVICESOFTWARE
Page 45

Preference
The communication to the first projector is defined on this page. The
Color Analyzer and pattern generator options can also be set.
Communication Settings Use local area network With an Ethernet connection between the PC
and the first prjector
•
Socket: Standard 7992
•
First device IP Address: IP address of the
connected projector (the first projector)
•
Each device has a network board: With an
Ethernet connection when each projector
has its own network card.
•
Apply changes: Accepts the new settings
You can check on the Reports page if the
connection is active.
Use serial port With an RS232 interface connection between
the PC and the first projector
(this is the standard communication gateway)
•
Serial Port: COM port used
•
Baud rate: Standard is 38400
•
Bits: Standard is data = 8, stop = 1
•
Parity: Standard is None
•
Apply changes: Accepts the new settings
You can check on the Reports page if the
connection is active.
Color analyzer option Probe model
These settings
are only relevant for
UHP projectors (with lamp).
Communication port
Percentage of
tolerance of the
measures
Display the gradient
color into the gamma
page
Pattern generator Running on machine
(name or IP address)
ESP-Projectors with LED Projection Engine 45
THEEYEDEVICESOFTWARE
Page 46

Reports
All software status messages are collected and can be monitored here.
Command sequences can also be generated and sent to a projector.
Clear reports Deletes all reports
Send Send Sends the command in the Send field to the
selected projector.
File Selects a previously created file from the file
directory. The selected file is added to the Send
window and can then be sent to the selected
projectors by clicking on Send.
NOTE:
Only administrators have the authorisation to send commands (logon
with password).
Command sequences are used to control the projectors. A separate
manual for serial commands is available to show you how to generate
command sequences. This can be requested from the eyevis service.
46 ESP-Projectors with LED Projection Engine
THEEYEDEVICESOFTWARE
Page 47

theeC-lControlsoftwAre
The EC-Lcontrol program has been specially developed for controlling
the colour of the eyevis LED projectors series.
Starting the EC-Lcontrol software
NOTE:
The EC-Lcontrol software uses serial interfaces only..
3 You have created a connection to the first projector.
Use the eyeDevice software (see TheeyeDeviceSoftware section from
page38 onwards) to set the connection parameters.
1. Open EC-Lcontrol.exe to launch the program for the colour
adjustment of the video wall.
ª The start page opens.
The start page at a glance
Fig. 13: Start page of the EC-Lcontrol software
1
2
3
4
5
EC_Lcontrol.exe
ESP-Projectors with LED Projection Engine 47
THEECLCONTROLSOFTWARE
Page 48

1
Menu bar
•
File: Closes the program
•
Wall: Projection settings, calibration
•
Help: Calls up the online help
2
Button bar
Quick access to these functions:
Establishes the connection
Switches on the entire wall
Switches off the entire wall
3
Setting area
•
Post calibration: Compares internal values to the actual
brightness and colour on the front of the screen.
•
Color temperature: Sets the colour temperature
•
Brightness: Sets the brightness
•
Iterations: Number of iterations for optimisation
•
Save all: Saves all settings
•
Fine adjust.: Fine adjustment of colour values
If no connection is established with the projector, a black cube
housing is displayed instead of the setting parameters.
4
Colour diagram window
Displays the colour spectrum with the set colour curve
Deletes data in the CIE diagram
5
Status window
Displays the current settings and messages.
In the example, the number of projectors connected with the
control PC are highlighted blue.
48 ESP-Projectors with LED Projection Engine
THEECLCONTROLSOFTWARE
Page 49

The menu bar (1)
In the menu bar, you have access to all settings and functions.
File > Exit
The program is closed.
Wall > Connect with wall
Establishes the connection to the video wall. The same function is also
available with .
Wall > Wall setup
Opens the window for adjusting the connection parameters.
Serial connection to projectors
Serial port
Selects the COM port to which the first
projector is connected
Detect connected projectors
Serial port
Selects the COM port request:
Scan all available serial ports: All serial
ports are scanned.
Use only selected serial port: Only the port
entered under Serialport is scanned.
Establishes the connection with the
projector
Connected projectors
Enters the IDs from the first and last
projector. The IDs are usually set at the input
box when commissioning each projector
(see Addressing the projectors on page 18).
Advanced functions.
Only for users with administrator rights.
Wall > Advanced calibration
Advanced calibration functions. Only for users with administrator rights.
ESP-Projectors with LED Projection Engine 49
THEECLCONTROLSOFTWARE
Page 50

Wall > Picture
Switching the image:
•
Normal (signal): Normal operation, the signal is reproduced.
•
White: The screen is switched to white.
•
Black: The screen is switched to black.
Wall > Get wall status information
Reads the current wall status and saves the results in a text file. Path and
file name:
...\EC_Lcontrol\status\status_[Date].txt
Wall > Get wall color calibration information
Reads the information for wall colour calibration and displays it in the
display field.
Help > About...
Information on software.
50 ESP-Projectors with LED Projection Engine
THEECLCONTROLSOFTWARE
Page 51

The setting area (3)
Post calibration
Enables the selection of a calibration standard. Once a standard is
selected, the values of the standard can be retrieved via the
Getactualvalues button.
To use the „Portcalibration” function:
1. Open the drop-down menu and select a standard.
If you select No post calibration 1:1 no standard is selected and no
calibration is performed.
2. Click on the Get actual values button.
ª The settings of the selected standard are displayed in the display
window.
Colortemperature
Adjusting the colour temperature.
The colour temperature can be entered numerically or changed using the
arrow keys. When a colour temperature is entered, the CIE values x and y
are intuitively adjusted. This point in the CIE coordinates system is
referred to as the whitepoint.
The colour temperature is a measurement for the colour rendering of a
light source and is represented in the unit [K] Kelvin. Various ambient
conditions (daylight, artificial light) display varying colour temperatures.
The projection can be adjusted to these ambient conditions.
The table below displays some of the typical colour temperature values:
Tab. 1: Colour temperatures
Candle 1500K
Bulb 2200K – 3000K
Halogen lamp 3000K
Sun late evening: 3400K, morning/evening: 5000K,
am/pm: 5500K
Daylight lamp 5600K – 7000K
Overcast sky 6500K – 7500K
Fog, mist 7500K – 8500K
Blue on shaded
north side
9000K – 12000K
Brightness
Setting the brightness
L Manual input of brightness.
The software calculates the brightness and the whitepoint
based on the current settings of the projection. An average
value is calculated from the recorded colour and brightness
of all projectors. This option is useful when no explicit
whitepoint or colour temperature is required.
ESP-Projectors with LED Projection Engine 51
THEECLCONTROLSOFTWARE
Page 52

Iterations / Adjust cube wall
Optimising the brightness settings.
Iterations Number of iterations for optimising the settings.
Adjust cube wall
After clicking on the button, the optimisation is
performed with the number of iterations listed
under Iterations. The progress of the optimisation
is shown in the display window.
Resets all projectors to maximum brightness.
Save all
All the settings made in the setting area are saved in all projectors.
Fine adjust...
Fine adjust is used to finely adjust the colour values. Click on the button
to open a new window:
Fig. 14: Fine adjustment: view without CIE window, left without RGB deviations, right with RGB deviations
(reset button is visible)
CUBE selection
Selects the desired projectors.
LED adjustment
Input the RGB values and apply as CIE offset.
NOTE:
Each projector has its own internal colour sensor calibrated in the
factory. To attain a precise colour homogeneity of a projection, it can
sometimes be necessary to adjust the colours of individual segments.
The calibration can be refined by allocating offset values to the colour
point of individual projectors. These offsets are permanently saved and
used for every colour adjustment. They are not only valid once for the
current colour but as general correction values for the internal sensor.
52 ESP-Projectors with LED Projection Engine
THEECLCONTROLSOFTWARE
Page 53

Red
Green
Blue
Direct input of RGB values
Apply actual
wall status
After the desired values are entered, all offsets and
brightness values are transferred to the selected
projector(s).
The projectors are then adjusted accordingly to
immediately check the new entries.
Reset
adjustment
Deletes all the set but not saved offsets under LED
adjustment or CIE adjustment for all projectors. The
offsets that are stored on the projectors are not
deleted.
By resetting the values, the fine calibration can be
restarted.
Read stored
configuration
Restores the last offsets stored in the projector.
Unwanted or defective settings can be reset in this
way.
Reset Resets the changes made under Red/Green/Blue.
Opens the window for entering the CIE values.
Fig. 15: Fine adjustment with CIE window
CIE adjustment
Setting the CIE offset either by applying the RGB values, entering
numerical figures or by changing settings in the colour field.
Applies the RGB values to all projectors.
Applies the RGB values only to the projector selected in
CUBEselection.
x
y
L
Selects the CIE parameters which should be changed by the
RGB input.
ESP-Projectors with LED Projection Engine 53
THEECLCONTROLSOFTWARE
Page 54

CIE x
CIE yLDisplay and numerical input of offsets.
Resets all offsets to 0.
Adjust Transfers the offsets to the selected projector.
Saves the offsets.
Colour field
Click on the arrow buttons to shift the colour point in the colour field.
The changes are displayed directly in the CIE fields.
Working with CIEadjustment and colour field
You have already learned how to change the RGB values in the Fine
adjustment for selected projectors section on page 27. You will find out
below how to change the CIE values directly or via the colour field.
►
Click on the symbol to open the advanced CIEadjustment
window and select the projector you want to adjust from the list in
the left-hand field.
You have the following input options:
•
Drag the whitepoint across the colour field
•
Enter the RGB values directly
•
Enter the CIE values directly
Drag the whitepoint across the colour field:
1. With the arrow buttons in the colour space, you can shift the
whitepoint in the direction you want.
ª The effects on the x, y and L values are displayed immediately.
2. Click on Adjust to transfer the settings to the selected projector.
Enter the RGB values directly:
1. Manually enter the values for Red, Green and Blue.
2. Transfer the values into the CIE section by proceeding as follows:
a. Checkmark the boxes for x, y and L to determine which values
should be changed.
b. Click on the button to apply the settings for all projectors.
c. Click on the button to apply the changes for the selected
projector.
3. Click on Adjust to transfer the settings to the selected projector.
Enter the CIE values directly:
1. Manually enter the values for CIEx, CIEy and L.
2. Click on Adjust to transfer the settings to the selected projector.
54 ESP-Projectors with LED Projection Engine
THEECLCONTROLSOFTWARE
Page 55

Complete the entry and then save:
1. Close the ColorfineAdjust window.
2. Press the Saveall button in the start window.
ESP-Projectors with LED Projection Engine 55
THEECLCONTROLSOFTWARE
Page 56

wArrAnty terMs And Conditions
Duration and validity of warranty
The specified product is under warranty for 24months beginning from
the date of delivery by eyevis GmbH.
Warranty services during the warranty period do not extend the validity
period of the warranty.
This warranty applies to products that were purchased in the European
Union. Warranty services can only be claimed in these countries.
The sales agreement or the invoice (original invoice with serial number)
of the first purchaser must be presented as proof of purchase to claim
warranty services. If the customer cannot provide this evidence of
purchase, the warranty period is dated back to the date of purchase at
the specialist supplier (first supplier) plus one month.
Warranty
If the product shows any faults or defects during the warranty period,
eyevisGmbH provides the following services in compliance with the
warranty:
•
Exchange of defective parts by the customer
•
Device repair at eyevis
•
On-site device repair by eyevis
The choice of services depends on each particular warranty case and
must be arranged with eyevis before commissioning.<GT>
56 ESP-Projectors with LED Projection Engine
WARRANTY TERMS AND CONDITIONS
Page 57

Warranty disclaimers
Non-accountable errors and defects
This warranty only covers malfunctions caused by material damage and/
or faulty workmanship on a product that was distributed by eyevis
GmbH. The warranty therefore excludes faults and defects beyond the
responsibility of eyevis GmbH, particularly in cases of:
•
Improper use, mechanical damages (e.g. marks caused by scratches,
pressure or breakage), incorrect storage or cleaning, transport
damages, misuse or any other reason the customer or a third party is
responsible for, especially if the instructions contained in this user
manual are not adhered to.
•
Display damages caused by continuous display of freeze images
(or part freeze images).
•
Failure or fluctuations of the electrical power supply or the electric
circuit, the air-conditioning system or other external factors.
•
Unusual operating conditions including operation in areas with
smoke (from cigarettes etc.) and dust.
•
Force majeure, fire, flooding, chemical or biological factors, war and
violence or other similar events.
•
Any kind of defect and fault on accessory parts and components
(even if they were supplied by eyevis GmbH) are not an integral part
of the product that is covered by this warranty.
•
Any attempts to adjust, modify, install or retrofit the product or
services rendered to the product by a person not authorised by
eyevisGmbH.
Accessories, boxes, batteries and other parts
Accessory parts such as boxes, packaging, batteries and other parts,
which are used together with this product and which you would expect
to have to replace, are not covered by the warranty.
Missing, modified or damaged serial numbers
If a product‘s serial number is damaged, modified or removed, it will no
longer be covered by this warranty.
ESP-Projectors with LED Projection Engine 57
WARRANTY TERMS AND CONDITIONS
Page 58

Recommended procedure for liability claims
Refer to the Malfunctions and Troubleshooting section from page34
onwards and check if the problem could be rectified on-site before
claiming for a warranty service.
If the problem continues, the customer should claim for support from
his/her regional eyevis GmbH partner. Please have the following
information ready:
•
Product ID and serial number of the device
•
A description of the problem
•
Pick-up address and contact information
•
Date and place of purchase
•
A description of the required service work
Once the device‘s faults and damages have been analysed, eyevis GmbH
shall accept the warranty claims if the necessary conditions have been
fulfilled. The customer shall receive a service code and eyevis GmbH will
perform the service work requested by the customer. The customer shall
be obliged to have the product ready for collection (in cases of DOA, the
product must be equipped with all cables and mains adapters before it is
packaged into the box). If the customer fails to have the device ready for
collection, he/she shall be obliged to bear the costs for the replacement
device.
eyevis GmbH can provide a suitable transport box on request if the
customer cannot ensure that the device is packaged correctly and
labelled as breakable goods. The customer shall be liable for damages
caused by the use of improper and unsuitable packing by the customer.
The customer shall be responsible for arranging the transport of the
display to eyevis GmbH.
The customer shall have his/her service code ready for any further
contacts with eyevis GmbH concerning this warranty claim.
eyevis GmbH shall reserve the right to invoice the customer for costs
incurred by complaints made about defects or faults that are not covered
by this warranty.
Legal and other claims
No other express or implied warranties, representations or conditions are
available other than those stated in this warranty. Other legal or
contractual claims, even those made to the supplier of the product, are
excluded as far as eyevis GmbH has provided the service based on this
warranty.
This warranty does not affect nor has influence on other legal warranty
claims or other contractual claims between the customer and the
supplier of the product. These claims can be made independently to the
claims referred to in this warranty document.
58 ESP-Projectors with LED Projection Engine
WARRANTY TERMS AND CONDITIONS
Page 59

Limitation of liability
In cases of minor negligent breaches of duty, the liability of eyevis GmbH
is limited to direct, foreseeable and contractual-specific average
damages. The slight negligent breach of minor contractual obligations
excludes liability cliams. In the event that the liability of eyevis GmbH
shall be excluded and limited, this shall also apply to the personal
compensation liability of its employees, staff, associated employees,
agents and auxiliary personnel. The preceding limitations of liability do
not apply to the customer‘s claims derived from the Product Liability Act
and to claims concerning damages to the body or health or in the case of
the loss of life of the customer.
ESP-Projectors with LED Projection Engine 59
WARRANTY TERMS AND CONDITIONS
Page 60

teChniCAl sPeCifiCAtions
General technical specifications
Description Digital DLP® projector for video and data display
Brightness: ca 600 ANSI lumens, depending on the color temperature
Contrast ratio: 1.800:1 (full on / full off). Up to 10.000:1 or more with dynamic contrast.
Illumination ≥ 95%
Input singnal: 1 DVI
Dimensions (B x H x T): 617,5 x 287,5 x 256 mm
Weight: ca. 13.5 kgs (without optics)
Power consumption: 250 Watt @ 110/240 VAC
LED Life: 60.000 hrs (under certain operating conditions)
Software: eyevisDeviceManager / EC-Lcontrol
ESP-LXT
Resolution: 1024 x 768 Pixel (XGA)
ESP-LSXT+
Resolution: 1400 x 1050 Pixel (SXGA+)
ESP-LHD
Resolution: 1920 x 1080 Pixel (full HD)
ESP-LWXT
Resolution: 1920 x 1200 Pixel (WUXGA)
Environmental conditions
Environment temperatures: •In operation: +5°C – +35°C (with Seamless Screen: +18°C – +25°C)
•
When stored: 0°C – +50°C
Air humidity: 0% – 80% noncondensing
Height: 0 – 3000 m
Noise ≤ 36 dB
Options
Service and maintenance contracts
60 ESP-Projectors with LED Projection Engine
TECHNICAL SPECIFICATIONS
Page 61

ESP-Projectors with LED Projection Engine 61
TECHNICAL SPECIFICATIONS
Page 62

62 ESP-Projectors with LED Projection Engine
TECHNICAL SPECIFICATIONS
Page 63

ESP-Projectors with LED Projection Engine 63
TECHNICAL SPECIFICATIONS
 Loading...