

Eye Vac EYE-VAC HOME User Manual
EYEVAC BILINGUAL:Layout 1 1/10/10 5:08 AM Page 1
MANUEL DE
USER MANUAL
MANUAL
DEL USUARIO
L'UTILISA
1
TEUR
EYEVAC BILINGUAL:Layout 1 1/10/10 5:08 AM Page 2
eye
vac
P RO F E S
®
S IO N AL
IMPORTANT SAFETY
This electrical appliance must always be used according
as this manual contains important safety and operating information. When using an electrical appliance, basic
cautions should always be followed, including the
READ ALL INSTRUCTIONS CAREFULLY BEFORE
WARNING: To reduce the risk offire, electric shock
1. Always turn Control Dial
2. Always unplug the appliance before cleaning orservicing
plug, not the
3. Do not let the EYE-VAC HOME be used as a toy. Close attention isnecessary when used near children. Donot use
AUTO Mode orleave appliance plugged innear small children
4. Do not pull orcarry the appliance by the cord. Do not run the appliance over the cord, close a door on the cord,
pull the cord around sharp edges orcorners. Keep the cord away from heated
5. Do not use the appliance ifthe cord orplug
6. Do not handle the plug orappliance with wet
7. Do not use appliance on wet
8. Do not expose
9. Do not use appliance
not use topick up any liquid orwet
10. Do not use appliance
where these liquids may be
11. Do not use this appliance
12. Keep hair, loose clothing, and all parts ofthe body, especially fingers, away from openings and moving
13. Do not put any objects into appliance openings,
14. Do not use this appliance
fore
15. Do not operate without the Collection Bin properly
16. Use the appliance only as described inthis Use and Care
17. Turn appliance
18. Unplug appliance before cleaning
19.
as
20. When cleaning the outside ofthe appliance, wipe with a damp cloth
surface.
To reduce the risk of electric shock, this appliance has a polarized plug (one blade is wider than the other).
This plug will fit in a polarized outlet only one way. If the plug does not fit fully in the outlet, reverse the plug.
If it still does not fit, contact a qualified electrician to install the proper outlet. Do not change the plug in any way.
WARNING!
cord.
vacuuming.
If
the appliance isnot working as itshould, call
it will
invalidate your
To reduce the risk ofelectric shock, do not use on wet surfaces. Do not expose torain. Store
to
the OFF
position before unplugging
to rain.
off
surfaces.
to
disposeofwater ordamp materials such as mud, tile grout, plaster filler,
objects.
to
vacuum up flammable orcombustible liquids, such as gasoline. Do not use
present.
to
vacuum up burning orsmoking materials, such as cigarettes, matches orhot
to
pick up hard orsharp objects orother large surface litter. Pick these up by hand
and unplug before removing orreplacing the Collection Bin
warranty.
or maintenance.
following:
USING THIS APPLIANCE
or injury:
is damaged.
hands.
for
SAVE THESE
FOR HOUSEHOLD USE
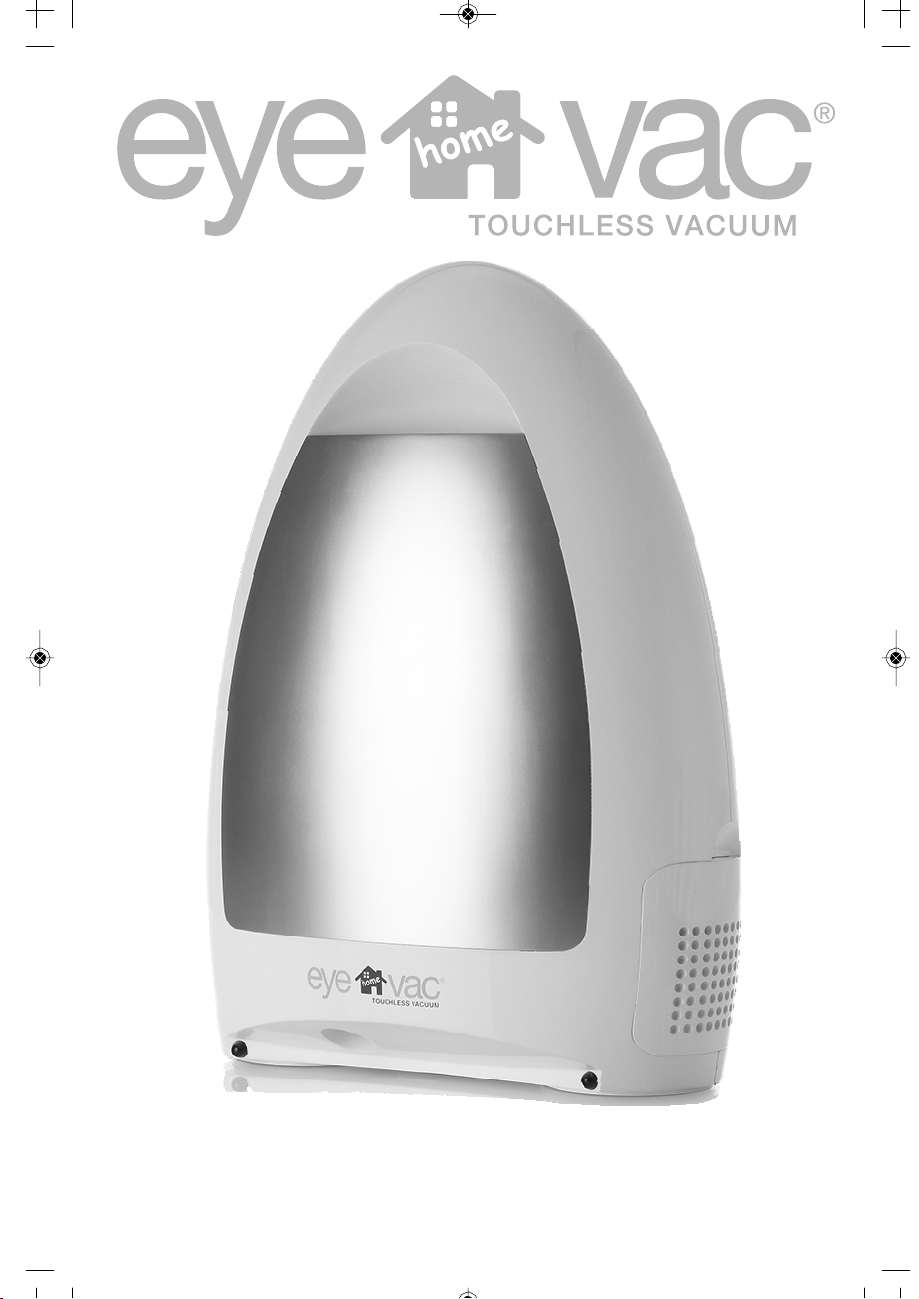
DESCRIPTION OF EYE-VAC HOME
Figure 1
Collection Bin Full
Detector
Status Indicator
INSTRUCTIONS
to
the following safety instructions.
EYE-VAC HOME.
it.
Do not unplug by pulling the cord;
or infants.
surfaces.
or
use with any openings blocked
in place.
Guide.
instructions where
INSTRUCTIONS
Light
to
send
to
reduce the static electricity on the
ONLY
Save these
to
or plugged.
or Filter.
for
repair. Do not attempt
Figure
instructions
pre-
unplug, grasp
or
caulking.
in areas
ashes.
parts.
to repair,
outer
indoors.
2
the
in
or
Do
be-
Collection Bin
Dirt Inlet
Eye-V
1. Remove EYE-VAC HOME
Micro Exhaust Filter on the side
acSensors
from packaging and set upright on any non-carpeted flooring. Remove
of
the
unit. 2.
Filter
Holder
Filter
BEFORE USING FOR THE
Plug unit into any standard 120V AC electrical
Dirt Filter
Collection Bin
Collection Bin
FIRST TIME
Cover
Handle
Collection
Bin
packing
outlet. 3
tape from
2

EYEVAC BILINGUAL:Layout 1 1/10/10 5:08 AM Page 3
English
Turn Control Dial tothe MAN position
Indicator Light
ready for
will
illuminate when the Control Dial
use.
NOTE: EYE-VAC HOME cannot operate when the Control Dial is in the OFF
1. Turn the Control Dial tothe MAN position
POWER Indicator Light
2.Inthe MANUAL Mode, sweep debris towards the Inlet at the Base ofthe unit, press the Manual Activation
and let EYE-VAC HOME vacuum the debris through the Inlet and into the Collection
NOTE:
1.
The MANUAL Mode
Manual Activation Button more than
2. When the Control Dial isturnedtothe AUTO position, sweep debris towards the Inlet at the Base ofthe unit
the Eye-Vac™ Sensors
once the Eye-Vac™ Sensors no longer detect debris. EYE-VAC HOME
into the Collection Bin without you ever having
3. Use the Manual Activation Button tobegin vacuuming ineither the MANUAL
4. As debris accumulates, the Collection Bin
when
it’s
time
will
will
will
detect the debris and automatically initiate a timed vacuuming cycle which
to
empty the Collection
1. To empty the EYE-VAC HOME Collection Bin, turn the Control Dial tothe OFF
unit.
2. Pull the Collection Bin outward from the front
and away from the EYE-VAC HOME Main
3. Holding the Collection Bin firmly with one hand, grasp the Collection Bin Lid Handle with the other hand and
the Lid straight up and out
4. Turn the Collection Bin upside down over a trash can. Make sure you empty all
below the Bin. To ensure that all the
trash can. Re-attach the Collection Bin Lid tothe top
5. Clean Sensors, Dirt Inlet area and Collection Bin Cavity with a damp rag
6. Insert the assembled Collection Bin with Lid fitted snugly into position bottom-first into the Collection Bin Storage
Cavity at the front
the unit. Grasp the Collection Bin Grip and lock the Collection Bin back into
HEALTH
TIP
If
you suffer from allergies orasthma, take the Collection Bin outdoors
can, gently tap the Collection Bin against the side
to remove.
of
the EYE-VAC HOME. The 2grooves inthe bottom ofthe Bin
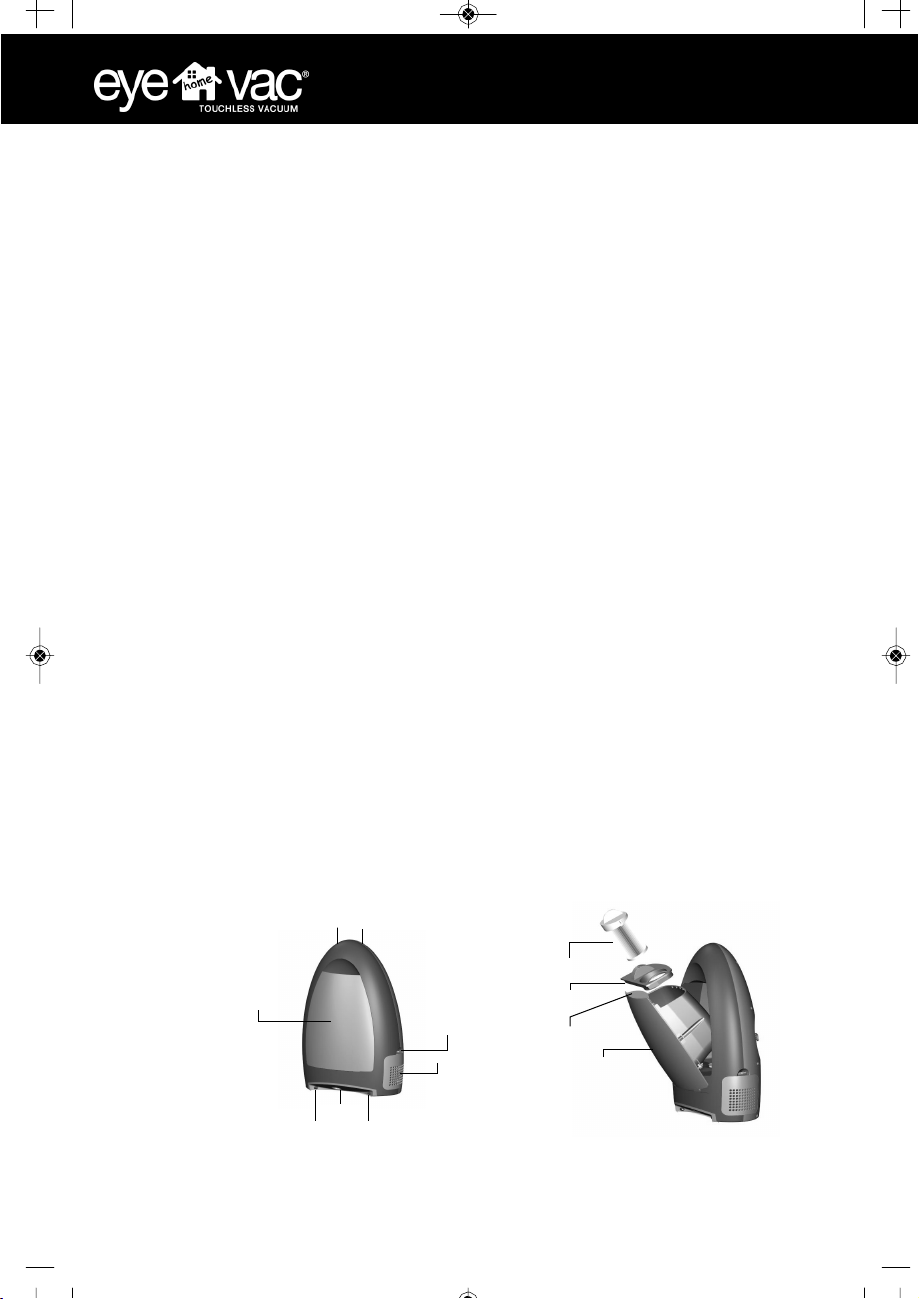
To maintain optimal performance, the Dirt Filter
must be clean and free ofelements, which might hinder the flow
1. Turn the Control Dial tothe OFF
2. Pull the Collection Bin outward from the front
and away from the EYE-VAC HOME Main Unit. Locate the Dirt Filter
3. Remove the Dirt Filter by grasping the Dirt Filter Handle and turning counter-clockwise tothe “unlock” position.
the Filter straight up and out oftop ofthe Collection Bin (See Figure 3.). Rinse under running water
4. IMPORTANT! Dry thoroughly before
5. Slide the Dirt Filter back into the top
Bin back into
IMPORTANT! NEVER OPERATE THE EYE-VAC HOME WITHOUT THE DIRT FILTER PROPERLY
place.
Figure 3
for
manual operation
OPERATING
for
illuminate when the Control Dial
run
for 7.5
once.
manual operation
seconds. Depending on the amount ofdebris, itmay be necessary topress
to
will
need tobe emptied. The Collection Bin Indicator Light lets you
Bin.
or to
is in
the AUTO position
either ofthese
INSTRUCTIONS
or to
is in
either ofthese
bend over ortouch the
USER MAINTENANCE INSTRUCTIONS
of
the Bin Cavity. Grasp the Collection Bin Grip firmly and
Unit.
dirt
spills out, tap the side
of
the can toremove loose
of
the Collection
of
the Collection Bin gently against the edge
CLEANING THE DIRT
will
need cleaning whenever the suction isnot strong. The Dirt
position and unplug the
of
the Bin Cavity. Grasp the Collection Bin Grip firmly and
use.
of
the Collection Bin. Rotate clockwise tothe “lock” position. Put the
of air.
unit.
Handle.
Micro
Exhaust
Filter Holder
Figure
4
3
for
positions.
the AUTO position
will
vacuum the debris through
dirt.
Bin.
or towel.
position.
to
empty. As you empty the
FIL
TER
automated use. The POWER
Your EYE-VAC HOME isnow
position.
positions
Bin.
or
AUTO
Modes.
position
and
dirt
and debris from inside
fit
easily over the rod inthe front
debris.
Figure
for
automated use. The
will
the
unplug the
dirt
to clean.
IN PLACE.
5
Button
terminate
Inlet and
lift it out
of the
into the
lift it out
Collection
the
and
know
pull
and
of
trash
Filter
Pull

e
EYEVAC BILINGUAL:Layout 1 1/10/10 5:08 AM Page 4
CLEANING THE MICRO EXHAUST FILTER HOLDER
1. The Micro Exhaust Filter Holder slides up and out
2. Gently pull the Filter out ofthe Filter Holder. (See Figure
3. Tap Filter gently against trash container tofree and eliminate excess
4. To clean the Filter, wash inmild soap and water; rinse and dry thoroughly before using the
5.Ifa new Filter isneeded, replace with standard HEPA HF4 filter cartridges. Make sure that
Holder. Replacement Filters are available through the Customer Service
6. Slide the Holder back into the unit with the Filter facing
IMPORTANT! NEVER OPERATE EYE-VAC HOME WITHOUT THE MICRO EXHAUST FILTER AND
PROPERLY IN PLACE.
CLEANING THE COLLECTION
The Collection Bin should be washed
1. Wash the Bin inwarm water using a mild soap. Avoid harsh orabrasive cleaners orsponges. Rinse
TO AVOID DAMAGE, DO NOT PLACE COLLECTION BIN IN THE
2. Let itair dry. Make sure the Collection Bin iscompletely dry before putting itback into the EYE-VAC PROFESSIONAL.
3. Insert the assembled Collection Bin following the instructions outlined inthe USER MAINTENANCE
INSTRUCTIONS on page
3.
IMPORTANT NOTES
Other than cleaning the Dirt Filter and replacing the Micro Exhaust Filter Holder, as described
this Automatic Vacuuming Dust Bin
Serv
icing by our Authorized Service Center isrequired
periodically.
is
of its
housing on the side ofthe
unit.
4)
dirt
and debris. (See Figure
5)
unit.
it fits
snuglyinthe
Filter
Department.
outwards.
FIL
TER
HOLDER
BIN
in
this Owner’s
thoroughly.
Manual,
DISHW
ASHER.
not user serviceable. There are no user serviceable parts inside the unit.
to
avoid damage
to
internal
components.
STORAGE
1. Unplug unit and clean Collection Bin and all Filters before
2. Store EYE-VAC HOME indoors, ina clean, dry
3. Never store EYE-VAC HOME while
of
Storage area on the back
could cause the cord towear and
the EYE-VAC HOME unit. Do not put any stress on the cord where itenters the unit, as
break.
place.
it is still
plugged in. Never wrap cord tightly around the appliance,
WARNING! TO REDUCE THE RISK OF ELECTRIC SHOCK, DO NOT USE OUTDOORS OR ON WET
storing.
SURF
use
ACES.
the Cord
it
TROUBLE
SHOOTING
Problem
EYE-VAC HOME
won't
run
Does not pick up
EYE-VAC sensors do not
Suction isnot
Status indicator light
debris
strong
Possible
1.Not firmly plugged
in
OFF
position 4.No power
in
plug 5.Blown house fuse
tripped circuit
1.Dirt inlet isblocked 2.Container
is full
3.Debris may be too
for inlet
activat
1.Unit isnot
1.Filters may be
1.Eye-Vac sensors have been
blinking
off for
power tothe motor tobe shut
cause
breaker
in
AUTO
in
mode
dirty
position 3.Dirt filter
30 seconds which
2.Unit
in wall
Possible
is
1.Plug
is not
position 3.Re-attach collection bin
bin
or
qualified
circuit breaker
First. Turn control dial toOFF
large
dirt
1.Turn control dialtoAUTO
1. Turn control dial tothe OFF
or
shut
1. Turn control dial tothe OFF
caused
filter
off
clean.
Solution
in
firmly 2.Turn control dial toMAN
4.Check house fuse
licensed electrician replace house fuse
inlet 2.Empty collection bin 3.Clear large
Micro Exhaust filters when
and micro exhaust filters toensure they are
lid to
or
circuit breaker 5.Have a
position 1.Clean path
position
position 2.Clean Dirt
needed.
position 2.Check
top
or
of
AUTO
debris
collection
or
reset
of
filter
dirt
Collection Bin Indicator Light
ON
Debris at inlet before unit
powered
on
is
is
1.Collection bin
is full
Empty the Collection Bin; 2.Clean all
1.
1.Turn control dialtothe MANUAL
2.
Activate unit
manually
dirt filters
position
4
 Loading...