

© 2012 EyeSpy TM is a registered trademark of EyeSpy Toys Ltd. All rights reserved.
Manufactured for and distributed by Citiwell International Inc.
Conforms to the safety Requirements of ASTM F963 and EN-71(1).
WARNING! . Not suitable for children under 3 years of age due to small parts.
In an effort to continually improve our products, the items inside this package may vary slightly
from the photographs
9-401 Magnetic Drive, Toronto,Canada, M3J 3H9
Customer Care:1866 469 9686
MADE IN CHINA
PRINTED IN CHINA
www.eyespytoys.com
Contains LiPo battery pack. • Battery pack must be recycled or disposed of properly. • If at any time in
the future you should need to dispose of this product please note that Waste Electrical Products should
NOT be disposed of with household waste. Please recycle where facilities exist. Check with your Local
Authority or retailer for recycling advice. (Waste Electrical and Electronic Equipment Directive).
INSTRUCTION GUIDE
surveillance technology
6+6+
www.eyespytoys.com
Warning: Changes or modifications to this unit not expressly approved by the party responsible for compliance could void the user’s authority to
operate the equipment.
NOTE: This equipment has been tested and found to comply with the limits for a Class B digital device, pursuant to Part 15 of the FCC Rules.
These limits are designed to provide reasonable protection against harmful interference in a residential installation. This equipment generates,
uses and can radiate radio frequency energy and, if not installed and used in accordance with the instructions, may cause harmful interference to
radio communications.
However, there is no guarantee that interference will not occur in a particular installation. If this equipment does cause harmful interference to
radio or television reception, which can be determined by turning the equipment off and on, the user is encouraged to try to correct the
interference by one or more of the following measures:
- Reorient or relocate the receiving antenna.
- Increase the separation between the equipment and receiver.
- Connect the equipment into an outlet on a circuit different from that to which the receiver is connected.
- Consult the dealer or an experienced radio/TV technician for help.
Shielded cables must be used with this unit to ensure compliance with the Class B FCC limits.
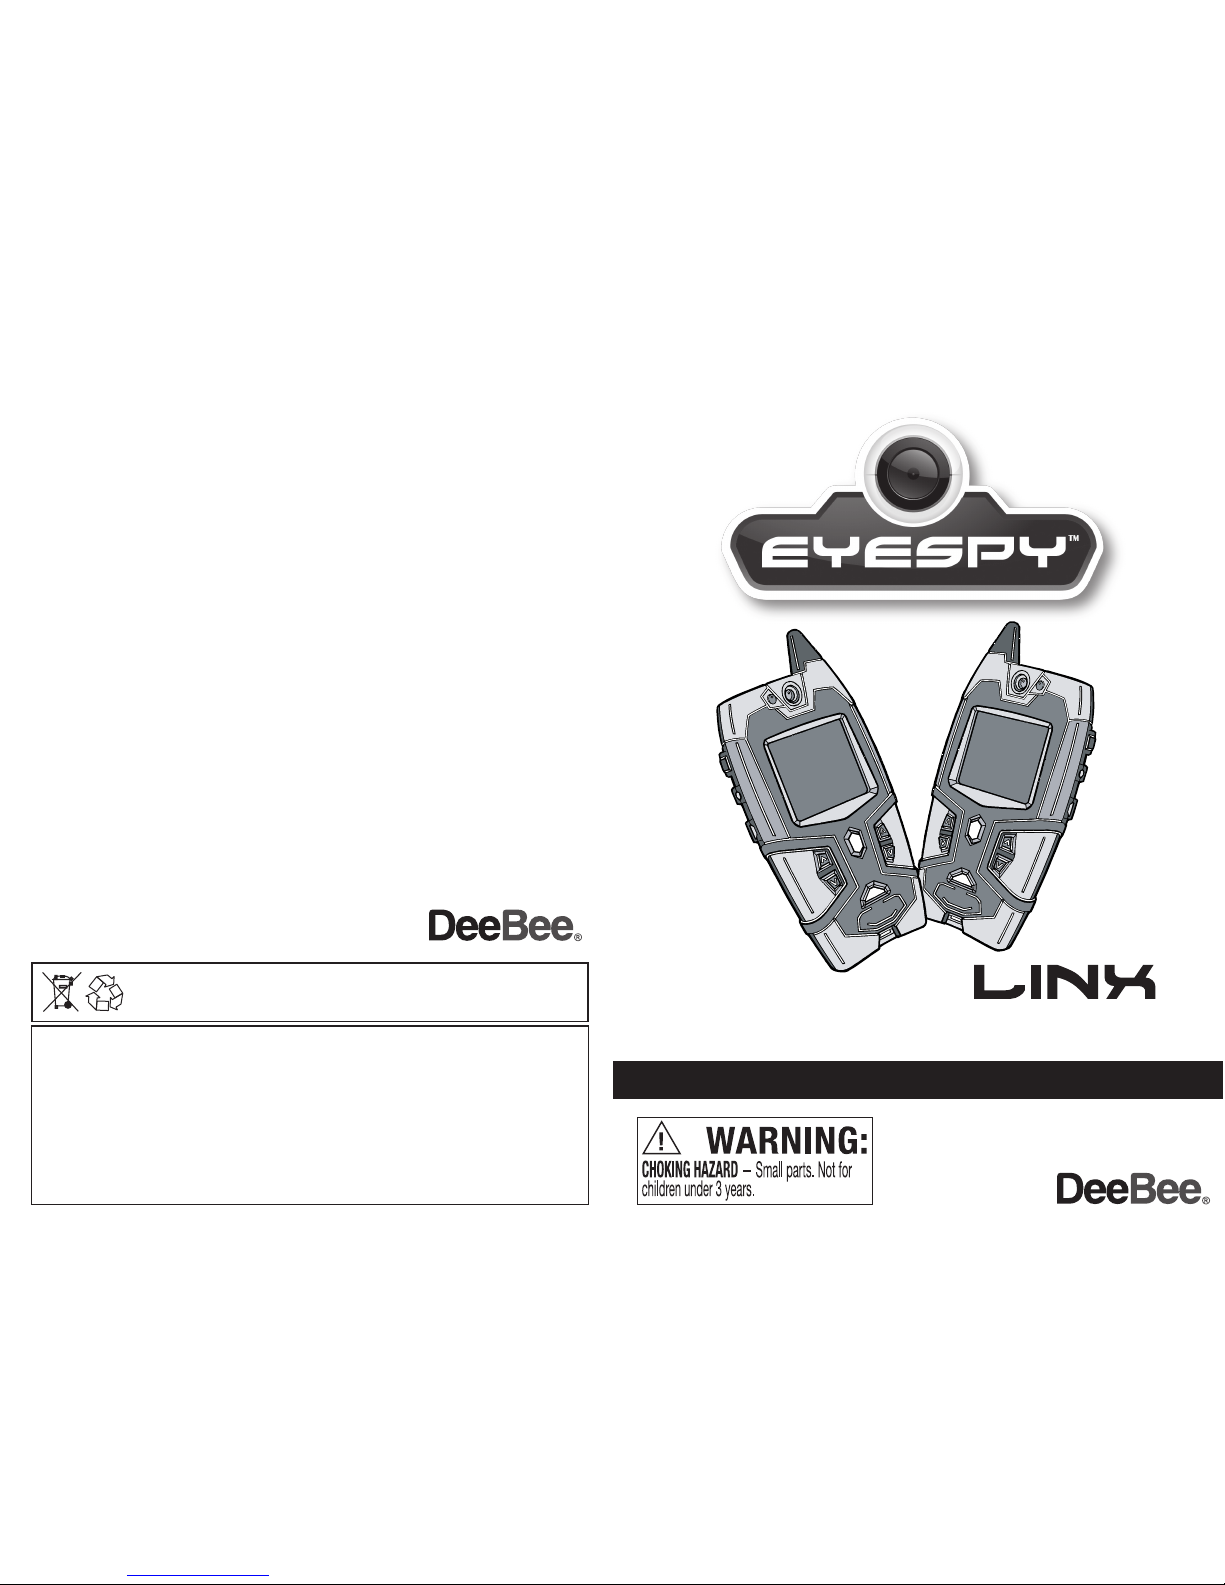
Linx:
- The Linx is a live video Walkie Talkie operating in true color and night vision modes. It sends
video and sound signals to another Linx device at a range of up to 500 feet (152 metres) in
open areas, away from devices that can cause electrical interference. It also allows the user to
send preset icons and messages to the other Linx device.
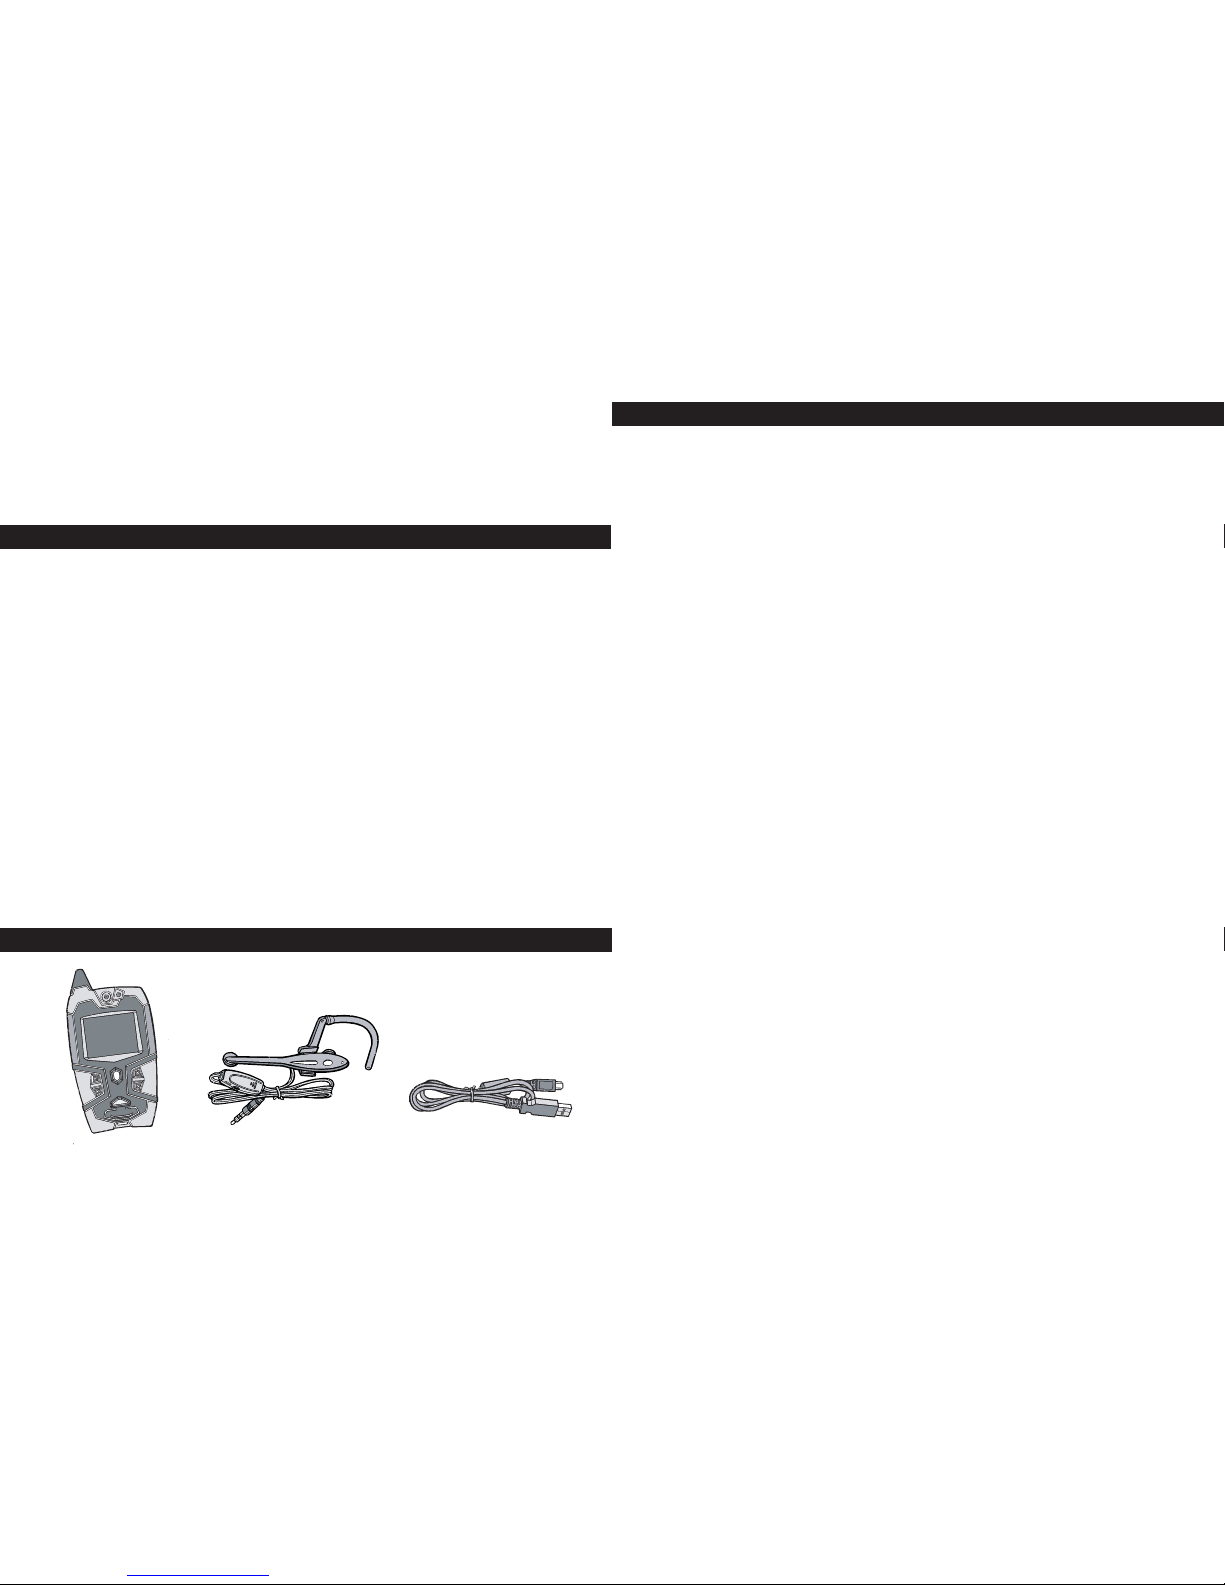
USB Cord :
- The USB cord is used to charge the Linx’s lithium-polymer rechargeable battery, and connects
the Linx to the USB port that is commonly found on most computers.
Earpiece:
- The earpiece consists of a built in microphone and speaker. One connects to each Linx
handset and enables the users to speak to each other. The built in volume control allows the
user to set the volume to a comfortable level.
CONTENTS LIST AND PARTS IDENTIFICATION
KEY FEATURES
1. 6.
Linx x2 Earpiece x2 USB Cable
The EyeSpy™ Linx is an advanced walkie-talkie system featuring
voice communication and two-way color video communication,
coupled with the ability to send and receive pre-programmed phrases
and emoticons.
TROUBLE-SHOOTING
If at any time the Linx unit stops working, or works in an unexpected fashion:
1. Check the battery condition icon on the viewing screen. If indicated remaining life is low,
please recharge the unit with the USB cord.
2. To reset the unit, switch ‘OFF’, wait for 30 seconds, then switch “ON’ again.
For any other problems or concerns,
please contact us
via the EyeSpy website
www.eyespytoys.com or call our Customer Assistance Line at 1866 469 9686

Both Linx units contain a Lithium-Polymer rechargeable 800mAh, 3.7V, non-removable
Battery. These batteries need to be charged before the units can be used.
To charge a unit, plug the large end of the
included USB cord to the USB jack on a
computer or standard USB hub. Then plug the
small end of the cord into the mini USB port on
the right side of the Linx. The screen will light up
and the EyeSpy logo will be seen. Let the Linx
charge for three hours. Repeat the operation for
the second Linx unit.
GETTING STARTEDHOW TO USE (Continued)
5. 2.
IMPORTANT SAFETY INSTRUCTIONS AND WARNINGS
For LI-ION / POLYMER BATTERIES
• You must read these safety instructions and warnings before using or charging your battery.
• Never disassemble the Linx or try to remove the battery.
• While generally safe, Lithium-Polymer batteries are volatile. Failure to read and follow the below
instructions may result in fire, personal injury and damage to property if charged or used improperly.
• Lithium-Polymer battery may explode and cause fire if misused or defective.
• When charging the battery, please place it on a fire resistant surface. Do not leave the Linx on
a wood surface or on paper, carpet, or grass. Do not leave the unit unattended while it is
charging. If at any time you witness the Linx starting to swell up, emit smoke or feel hot,
discontinue charging process immediately, disconnect the Linx and observe it in a safe place
for approximately 15 minutes. The battery may be leaking, and the reaction with air may cause
the chemicals to ignite, resulting in fire. In the unlikely event of this occurring, please contact us
via the EyeSpy website www.eyespytoys.com or call our Customer Assistance Line at 1866 469 9686.
•
Never store or charge the Linx inside your car in extremely warm temperatures (105ºF or 41ºC),
since extreme temperature could ignite a fire.
• Never drop the Linx, as this may cause a battery to leak.
Never point the Linx camera at a very strong light source such as the sun, a nearby
floodlight or car headlight or a powerful flashlight. This may destroy the camera and
screen. If this occurs, you should return the unit to us for repair or replacement at your
expense.
Add
USB
Cable
EXPLANATION OF EACH FUNCTION
1.
2.
7. The “down-arrow” button under
the right side of the screen is used to
display six pre-loaded phrases.
Choose the phrase you wish to send
and press the orange SEND button
to send the phrase to the other Linx
unit. If you do not send an icon or
phrase in five seconds the screen
will revert to a normal image.
8. The screen image will darken slightly after about 30 seconds to preserve battery power.
Touching the left “up-arrow” will bring up the brightness again.
9. The blue CALL button is pressed to let
the other user know you want to communicate. Both units must be on. When the
CALL button is pressed the word CALLING flashes on both screens and a tone
is heard in the headphone. When the
second user answers by pressing their
CALL button the word CALLING will stop
flashing. Pressing CALL again will
eliminate the word.
10. When the screen is on a blue battery
icon appears in the upper right corner. A
solid blue icon shows that the battery is
fully charged. As the power is used a ring
will disappear. After more use a second
ring vanishes. At this point, with only one
ring showing, the available usage time is
limited. When the battery needs charging
the screen will go black.
Messages
"Low battery" indicated
Warning: Changes or modifications to this unit not expressly approved by the party responsible for compliance could void the user’s authority to
operate the equipment.
NOTE: This equipment has been tested and found to comply with the limits for a Class B digital device, pursuant to Part 15 of the FCC Rules.
These limits are designed to provide reasonable protection against harmful interference in a residential installation. This equipment generates,
uses and can radiate radio frequency energy and, if not installed and used in accordance with the instructions, may cause harmful interference to
radio communications.
However, there is no guarantee that interference will not occur in a particular installation. If this equipment does cause harmful interference to
radio or television reception, which can be determined by turning the equipment off and on, the user is encouraged to try to correct the
interference by one or more of the following measures:
- Reorient or relocate the receiving antenna.
- Increase the separation between the equipment and receiver.
- Connect the equipment into an outlet on a circuit different from that to which the receiver is connected.
- Consult the dealer or an experienced radio/TV technician for help.
Shielded cables must be used with this unit to ensure compliance with the Class B FCC limits.

HOW TO USE
1. Plug one earphone/microphone unit (two
included) into each Linx unit. Insert the plug into
the round jack on the right side of each Linx. The
earphone/microphone unit can be adjusted for use
on either a left or right ear. The curved “over-theear” unit can slide off the main unit section and
then be re-attached on the opposite side. Unlike
other walkie talkies, the linx is unique in that it
allows for 2 way talking as in a conversation on a
telephone.
2. Turn each unit on by pressing in on the POWER button and hold it in for two or three
seconds, just until the EyeSpy logo appears on the screen.
3. Give a Linx unit to a nearby person and
keep one for yourself. Hold the Linx about
a foot away from your face with the
screen aimed toward you. Tell the other
person to hold their Linx the same way.
4. Press and release the black “up-arrow”
button under the left side of the screen to
see either your face or your partner’s
face. This can also be used as a “mirror”
and also to position yourself on the
screen so that the other person can see
you in frame.
5. Press and release the black “downarrow” button to turn on the green-tinged
“night-vision” feature. Press and release
again to turn the screen black. Press and
release again to return to a normal
picture.
6. If you press and release the
“up-arrow’ button under the right
side of the screen to see an expressive icon. Repeatedly pressing this
button will show you each of the five
icons. When you see the one that
shows what you wish to send, press
the orange SEND button. The
chosen icon will be sent to the other
Linx unit and will be seen on the
screen for about five seconds.
HOW TO USE
3. 4.
(Continued on page 5)
Night Vision
Power
Earpiece Jack
USB Port
Camera
A NOTE ON TRANSMISSION AND RECEPTION RANGE:
•
EyeSpy wireless transmission can suffer from interference caused by other 2.4MHz devices such as
baby monitors, home wireless CCTV security systems, wireless telephones and WIFI.
•
Keep away from high voltage cable and towers. Keep away from communication/mobile stations. Do
not use the units in damp, wet or high temperature conditions.
•
The screen quality is severely impaired by sunlight
•
The maximum effective range of 500 feet (152 metres) may be severely reduced if the units are
used in any of the above noted situations.
•Reception is good in open areas such as arenas, or outdoors on level ground and away from
buildings and transmission towers, poles and wires. Keep a good distance away from home or
business Wi-Fi routers. Keep away from machine rooms.
Add
Earpiece
Send
Call
Left Up arrow
Left Down arrow
Right Down arrow
Right Up arrow
Communicate
Grin
Wink
Confused Shocked
Sad
Icons
 Loading...