

Eyemax 9030, 9060, 9120, 9632, X948 User Manual
...
0
Rev 1.0
Rev 1 .0

[ Ey eMax Series ] User’s Manual (5.5.4.0)
1
TABLE OF CONTENTS
CHAPTER 1 Hardware Specification ......................................................... 4
1. Production Specification ................................................................................ 4
CHAPTER 2 Software Installation ............................................................ 5
1. Automatic Installation ................................................................................... 6
(1) Definition ........................................................................................................ 6
(2) Installation Method Selection .............................................................................. 6
(3) Installing Drivers .............................................................................................. 6
(4) DVR File System Installation .............................................................................. 7
(5) Completion and Retry ...................................................................................... 10
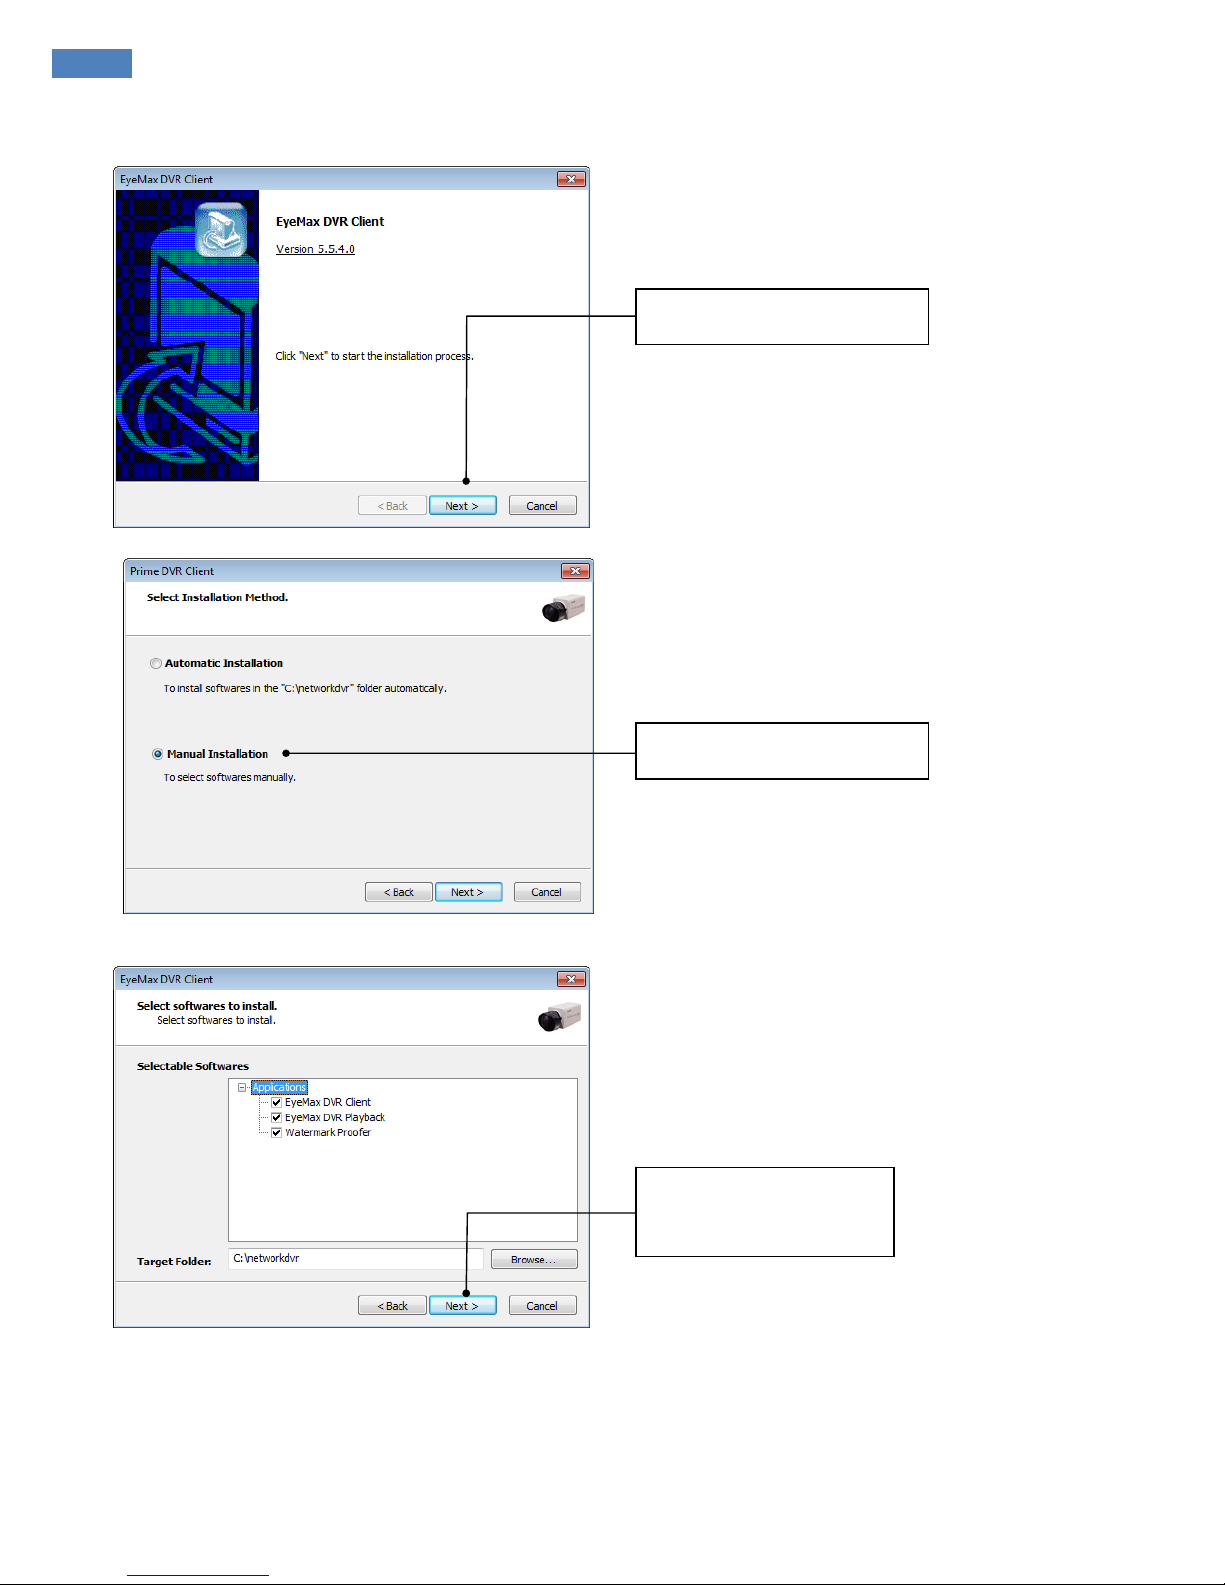
2. Manual Installation ...................................................................................... 11
(1) Definition ...................................................................................................... 11
(2) Software Selection .......................................................................................... 11
3. Remote Client Installation ........................................................................... 12
(1) Using EyeMax Radar S/W ................................................................................. 12
(2) Using Web Browser ......................................................................................... 13
4. Uninstallation .............................................................................................. 15
5. Program Execution ...................................................................................... 15
CHAPTER 3 Main System Application ..................................................... 16
1. Startup Screen ............................................................................................... 16
2. Login ............................................................................................................. 16
3. Exit/Logout ................................................................................................... 16
4. System Information ....................................................................................... 17
5. Control Screen ............................................................................................... 17
(1) System .......................................................................................................... 17
z Channel Relocation ......................................................................................... 18
(2) Right click menu on screen ............................................................................... 18
6. Setup ............................................................................................................. 19
(1) System .......................................................................................................... 19
z DVR Information ............................................................................................. 19
z System Time Setup ......................................................................................... 20
z System Power Management ............................................................................. 20
z Auto-switching Interval ................................................................................... 21
z E-map ........................................................................................................... 22
z TV-out .......................................................................................................... 23

2
z On-screen Display .......................................................................................... 25
z Text Inserter .................................................................................................. 27
z Hard Disk Usage ............................................................................................ 30
z I-phone (Two-Way Audio Communication) .......................................................... 30
(2) Device ......................................................................................................... 31
z Camera ......................................................................................................... 32
z Output Device ................................................................................................ 47
z Input Device .................................................................................................. 48
z Audio ........................................................................................................... 49
z Alert ............................................................................................................. 50
z Hybrid Device ................................................................................................ 52
(3) Event ............................................................................................................ 53
z Input ............................................................................................................ 53
z Motion Detection ............................................................................................ 55
z No Video Signal ............................................................................................. 56
z Watch Dog .................................................................................................... 56
(4) Schedule ....................................................................................................... 61
z Manual (Instant) Recording .............................................................................. 61
z Device .......................................................................................................... 62
(5) Network ........................................................................................................ 62
z DVR Server ................................................................................................... 63
z Dual Streaming Support .................................................................................. 63
z Web Server ................................................................................................... 64
z Central Station ............................................................................................... 64
z E-mail .......................................................................................................... 65
z Smartphones Rate .......................................................................................... 69
z IP Address Setup ............................................................................................ 69
z User ............................................................................................................. 70
CHAPTER 4 View Log Application (Status) ............................................ 71
1. Screen Features ............................................................................................ 71
(1) Event log ....................................................................................................... 72
z Motion Detection ............................................................................................ 72
z Output Selection ............................................................................................ 73
z Input Selection .............................................................................................. 73
z General ......................................................................................................... 74
(2) Network Client Log .......................................................................................... 74
(3) Status of the HDD ........................................................................................... 75

[ EyeMax Series ] User’s Manual (5.5.4.0)
3
CHAPTER 5 Playback Application (Search) ............................................ 77
1. Search Features 1 .......................................................................................... 77
2. Search Features 2 .......................................................................................... 78
(1) Playback ........................................................................................................ 78
(2) Event/Object/Text/People Count Search .............................................................. 79
(3) Monitoring & Searching .................................................................................... 86
(4) Bookmark & Go To .......................................................................................... 87
(5) Save ............................................................................................................. 88
(6) Backup .......................................................................................................... 92
z DFS Backup ................................................................................................... 92
z EXE Backup ................................................................................................... 95
z EXE Backup with CD Recording ......................................................................... 98
CHAPTER 6 Remote Monitoring System (Client) .................................. 102
1. Remote Client Software ............................................................................... 102
(1) Software Execution ........................................................................................ 102
(2) Remote Save and Backup ............................................................................... 104
(3) Realtime Audio ............................................................................................. 105
2. Web Viewer ................................................................................................. 106
(1) Software Execution ........................................................................................ 106
(2) Live Display .................................................................................................. 117
(3) Playback ...................................................................................................... 118
2. Smartphone Access ..................................................................................... 109
(1) Real Time Monitoring ..................................................................................... 109
Appendix Two-way Audio Communication ............................................ 110
1. Installation .................................................................................................. 110
2. Execution .................................................................................................... 111
3. Audio Setup ................................................................................................. 112

4
CHAPTER 1
HARDWARE Specification
1. Product Specification
Models
9030 9060 9120 9240 9448 9632 X948
Displaying
Speed
(NTSC)
30fps 60fps 120fps 240fps 480fps 960fps 480fps
Recording
Speed
(NTSC)
30fps 60fps 120fps 240fps 480fps 480fps 480fps
Video Inputs
4 16 16 16 16 32 16
Audio Inputs
1 2 4 8 16 16 16
Sensor
Inputs
4 4 16 16 16 16 16
Alarm
Outputs
2 2 8 8 8 8 8
Video
Resolution
D1 / Half D1 / CIF
Compression
Type
MPEG4 / H.264 (Software Codec)
H.264
(Hardware
Codec)
Supported
Signal Types
NTSC / P AL
Supported
Network
TCP/IP, PSTN
Supported
Backup
Devices
HDD, DVD/R, CD/RW, Network Driver, etc.
Supported
PTZ
Protocols
C&B Tech-CND100200&SMART, Ch angzhou Minking-Minking, CTNCom-HD0670, Dong
Yang Unitech-DSC230, DRAGON-DRAGON, Dynacolor-TPD7720, Geosan-GRX1000,
GOLDENEYE-GOLDENEYE, InterM-VRX2201, KALATEL-KTD312, KJK-KJK,
LG-LPTA100L, PELCO D&P,
SAMSUNG-SCC641&SDZ160R&SPD1600&SPX1000&SPT1000, SONY-EVID3031,
Vicon-Survey&2000, ZITEC-ZITECH, etc.
Operating
Systems
Windows XP, Windows 7
z Specification may change without notice
[ EyeMax Series ] User’s Manual (5.5.4.0)
5
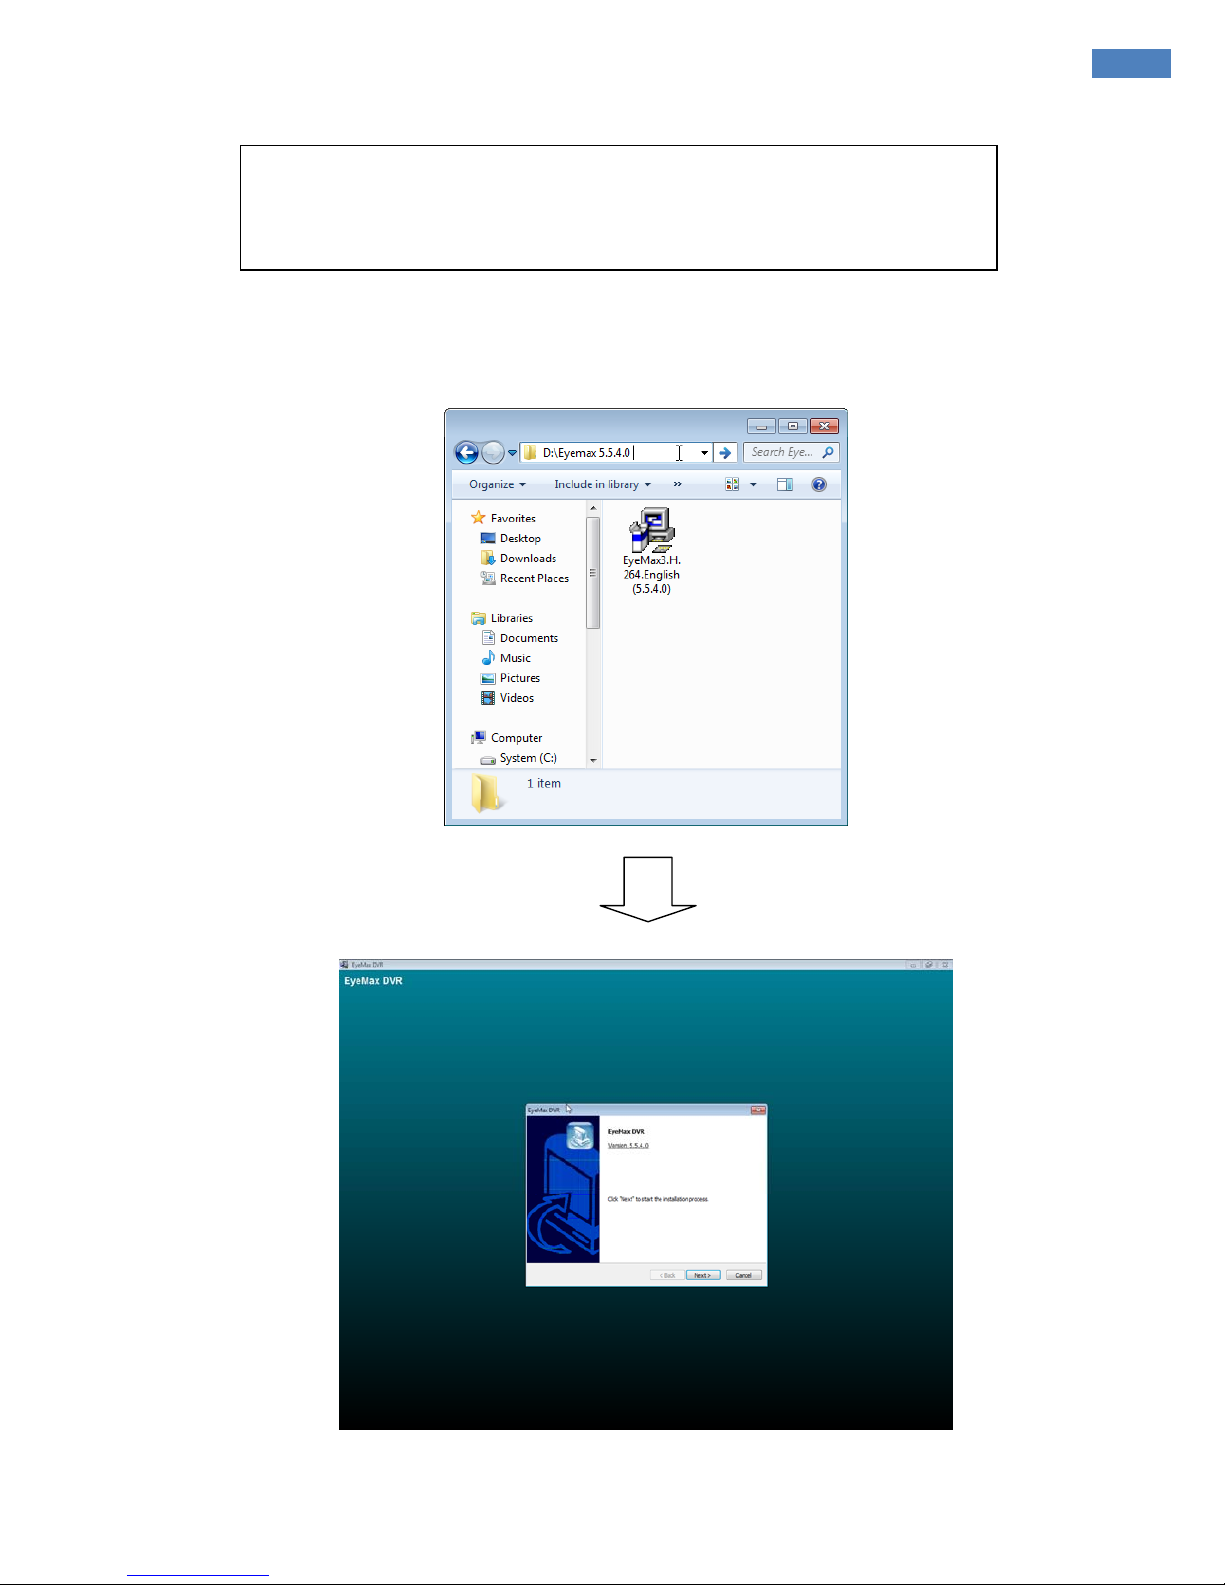
Steps:
1. Insert EyeMax S/W.
2. Double-click “EyeMax.English(5.5.4.0)”.
CHAPTER 2
Software Installation
6
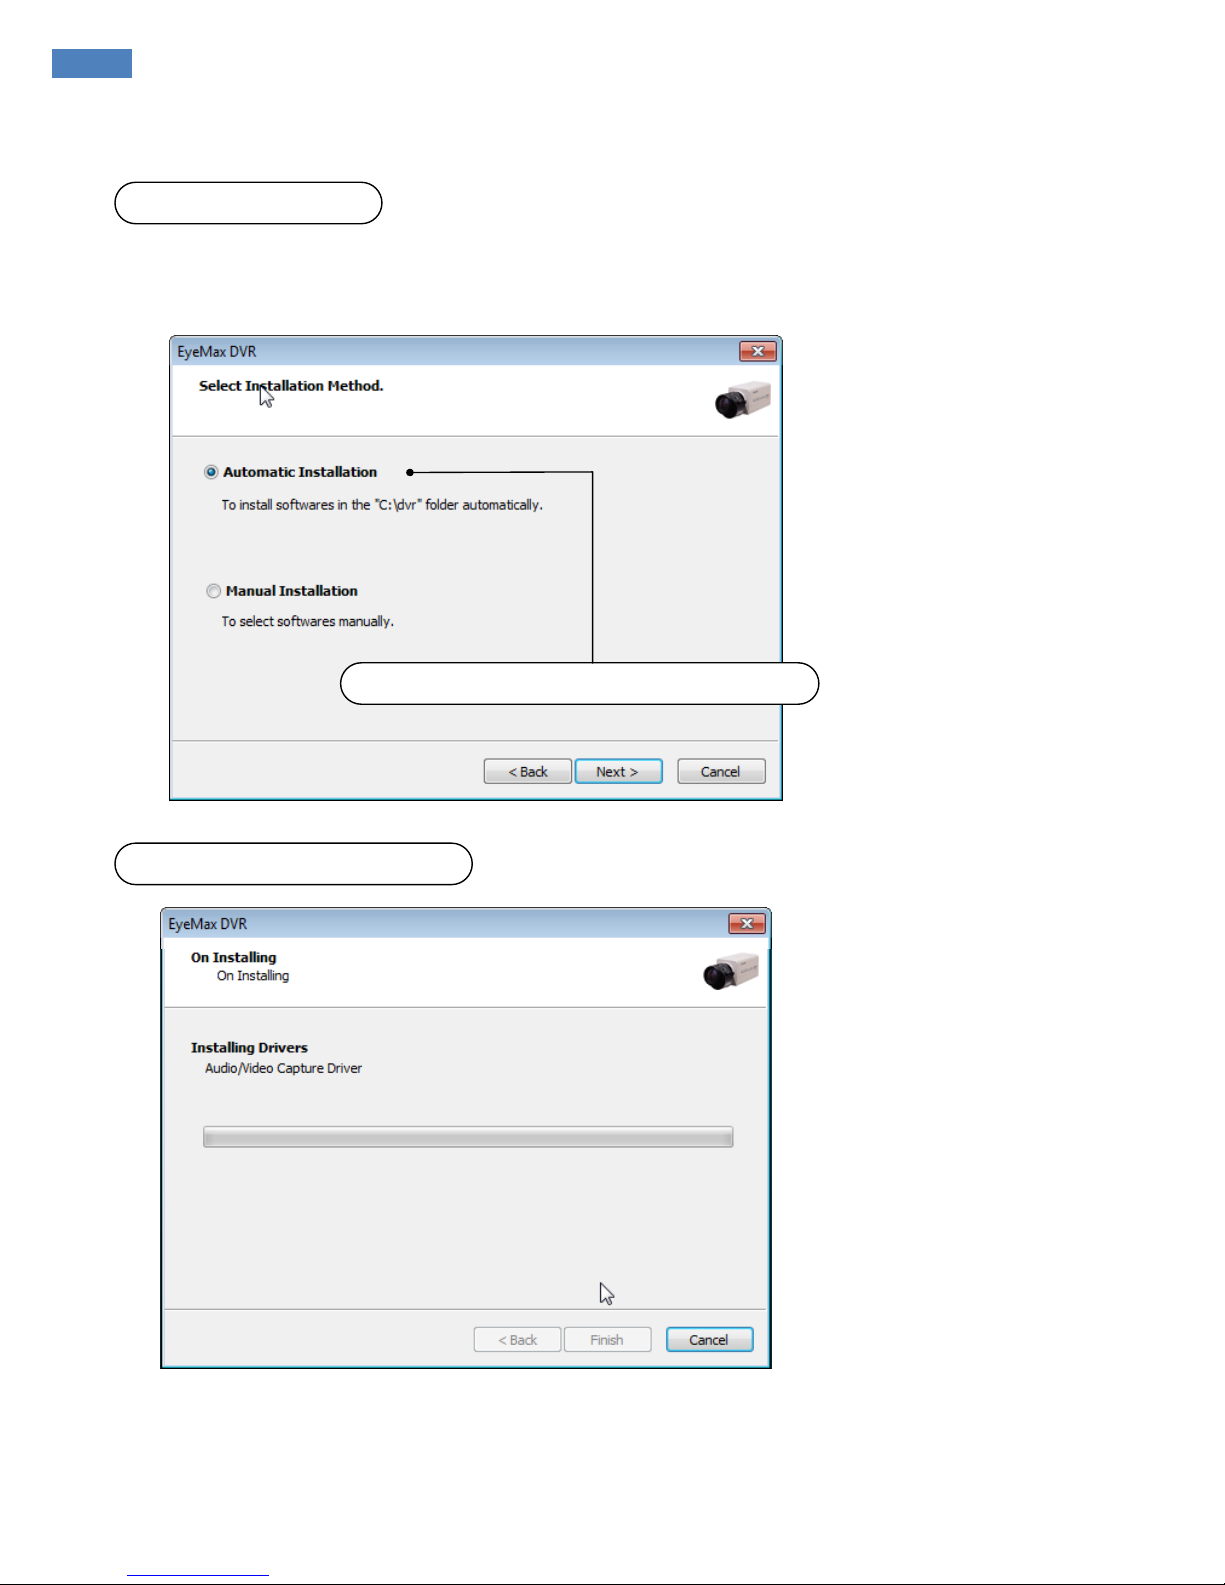
1. Automatic Installation
It is a method to install all the relevant software automatically.
Select “Automatic Installation” at all times unless only “Client Software” is to be installed.
(3) Installing Drivers
(1) Definition
(2) Installation Method Selection
[ EyeMax Series ] User’s Manual (5.5.4.0)
7
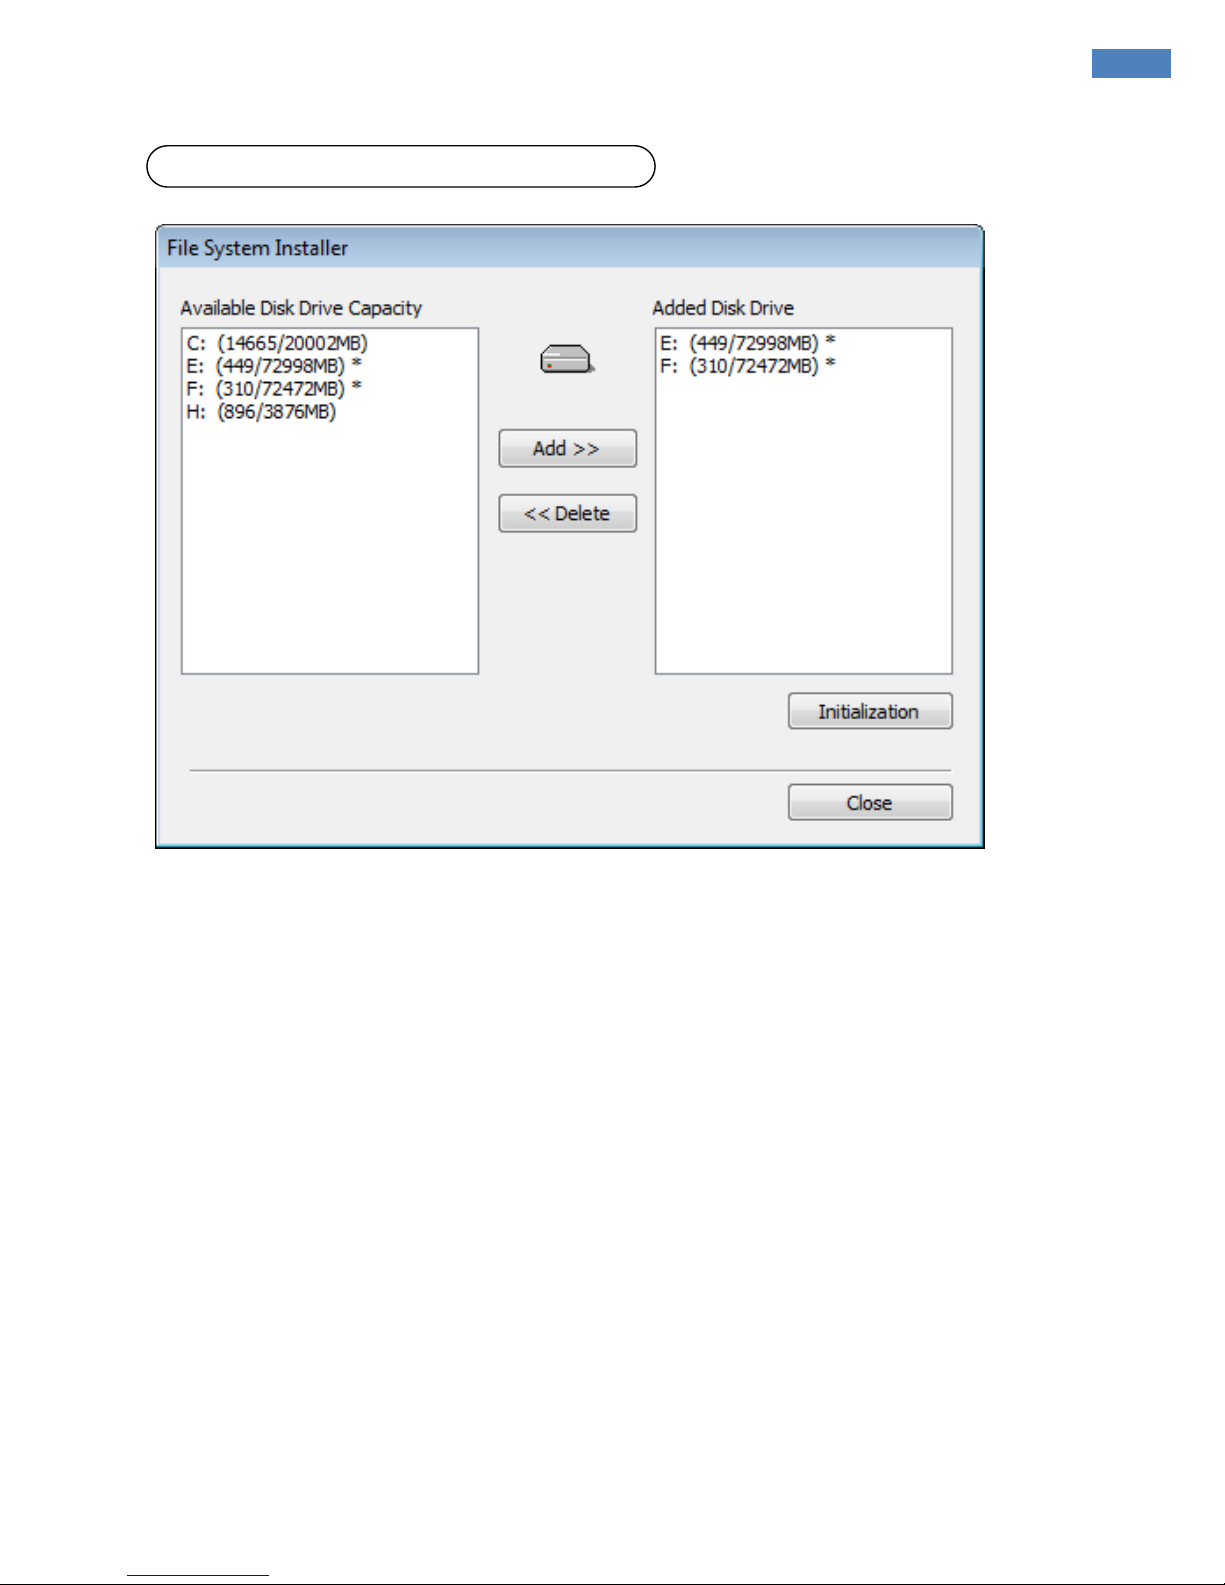
Definition:
Occupying disk
capacity to record data
Steps:
1. Select drives from
“Available Disk Drive Capacity”
2. Click “Add”.
3. Click “Initialization”.
Caution:
1. “C Drive” cannot be added to DFS disk, it is used for O/S and DVR software.
2. HDD has to be initialized to record data
(4) DVR File System Installation
8
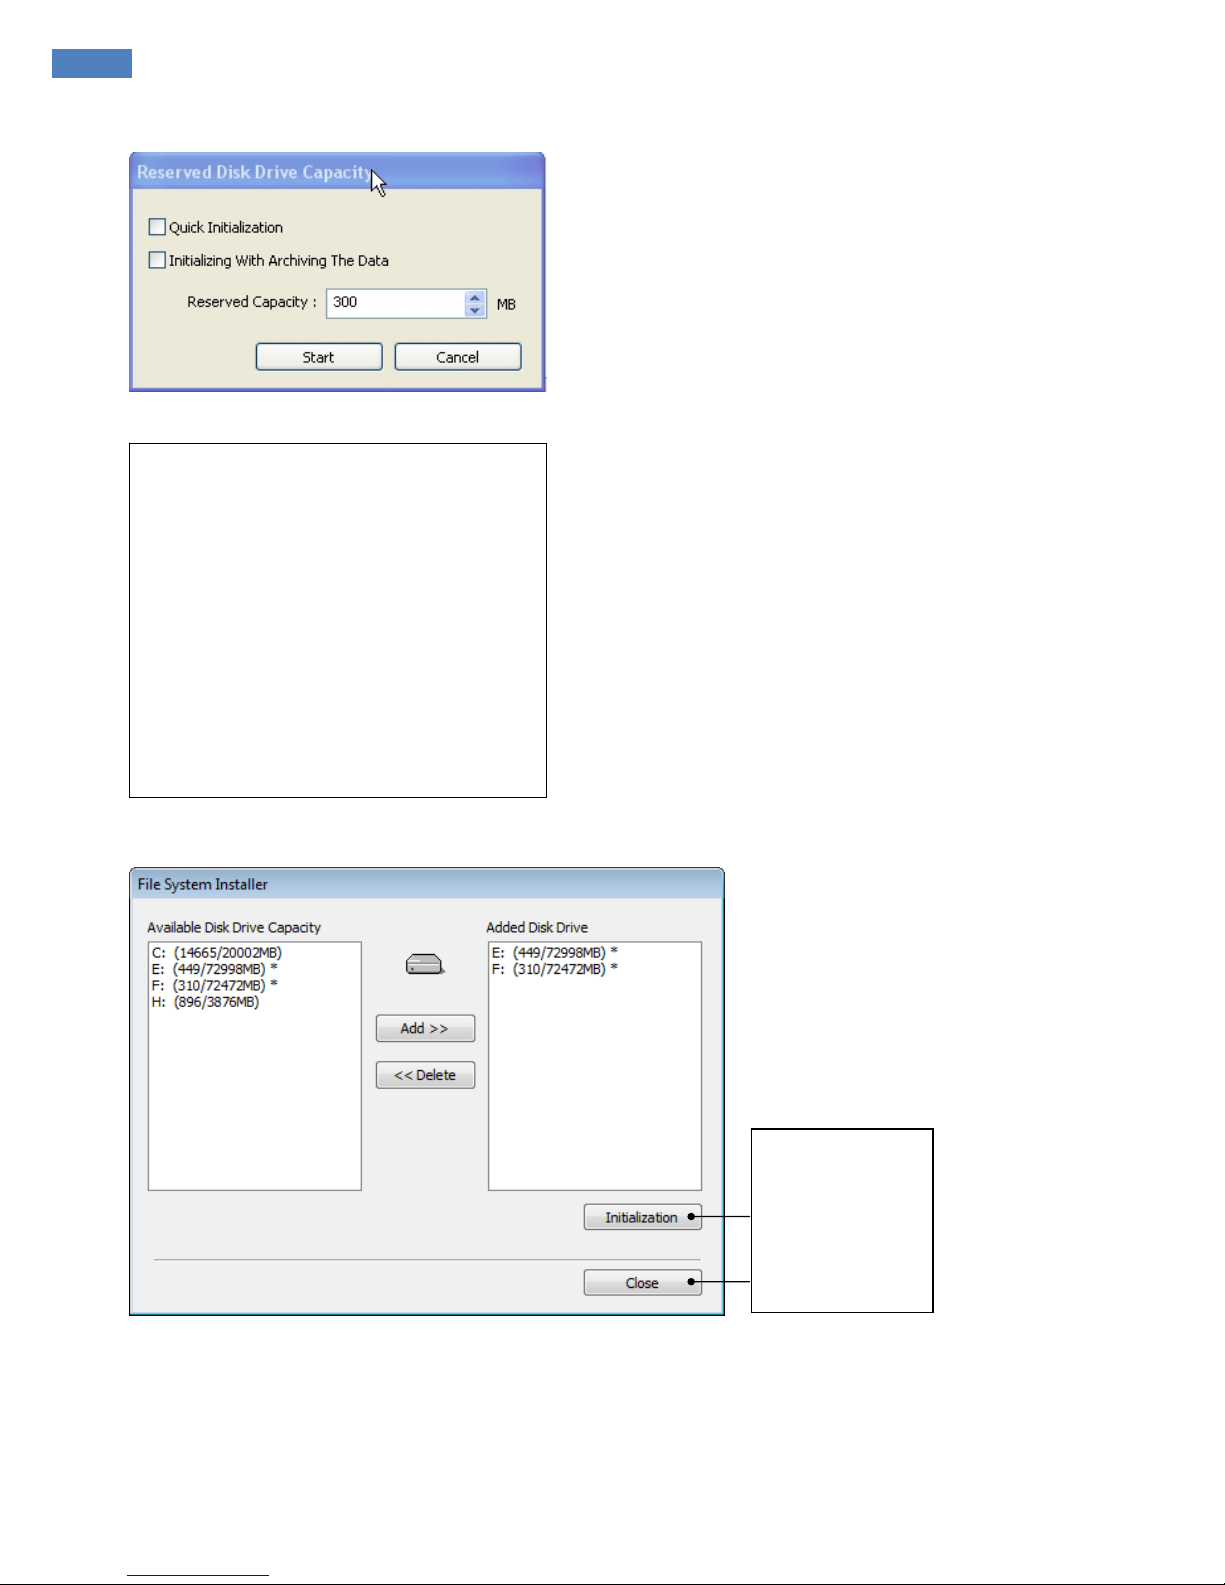
Selecting “Quick Initialization” will lead to the
initialization of entire disk capacity added.
Otherwise, put in desirable number to
initialize. Note that the number can not
exceed total capacity added.
Initializing With Archiving the Data: This is to
increase DFS storage by taking additional
space from the current “Reserved Capacity”.
So new value for “Reserved Capacity” can
not exceed the current one.
Minimum 300MB is recommended for DVR
performance.
Initialization
process will be
performed
automatically.
Click “Close”
upon completion.

[ EyeMax Series ] User’s Manual (5.5.4.0)
9
At least one of “available disk drive” must be added for data storage.
Otherwise, the alert message will pop up.
10
Retry the entire procedure if an error message is displayed.
(5) Completion & Retry
[ EyeMax Series ] User’s Manual (5.5.4.0)
11
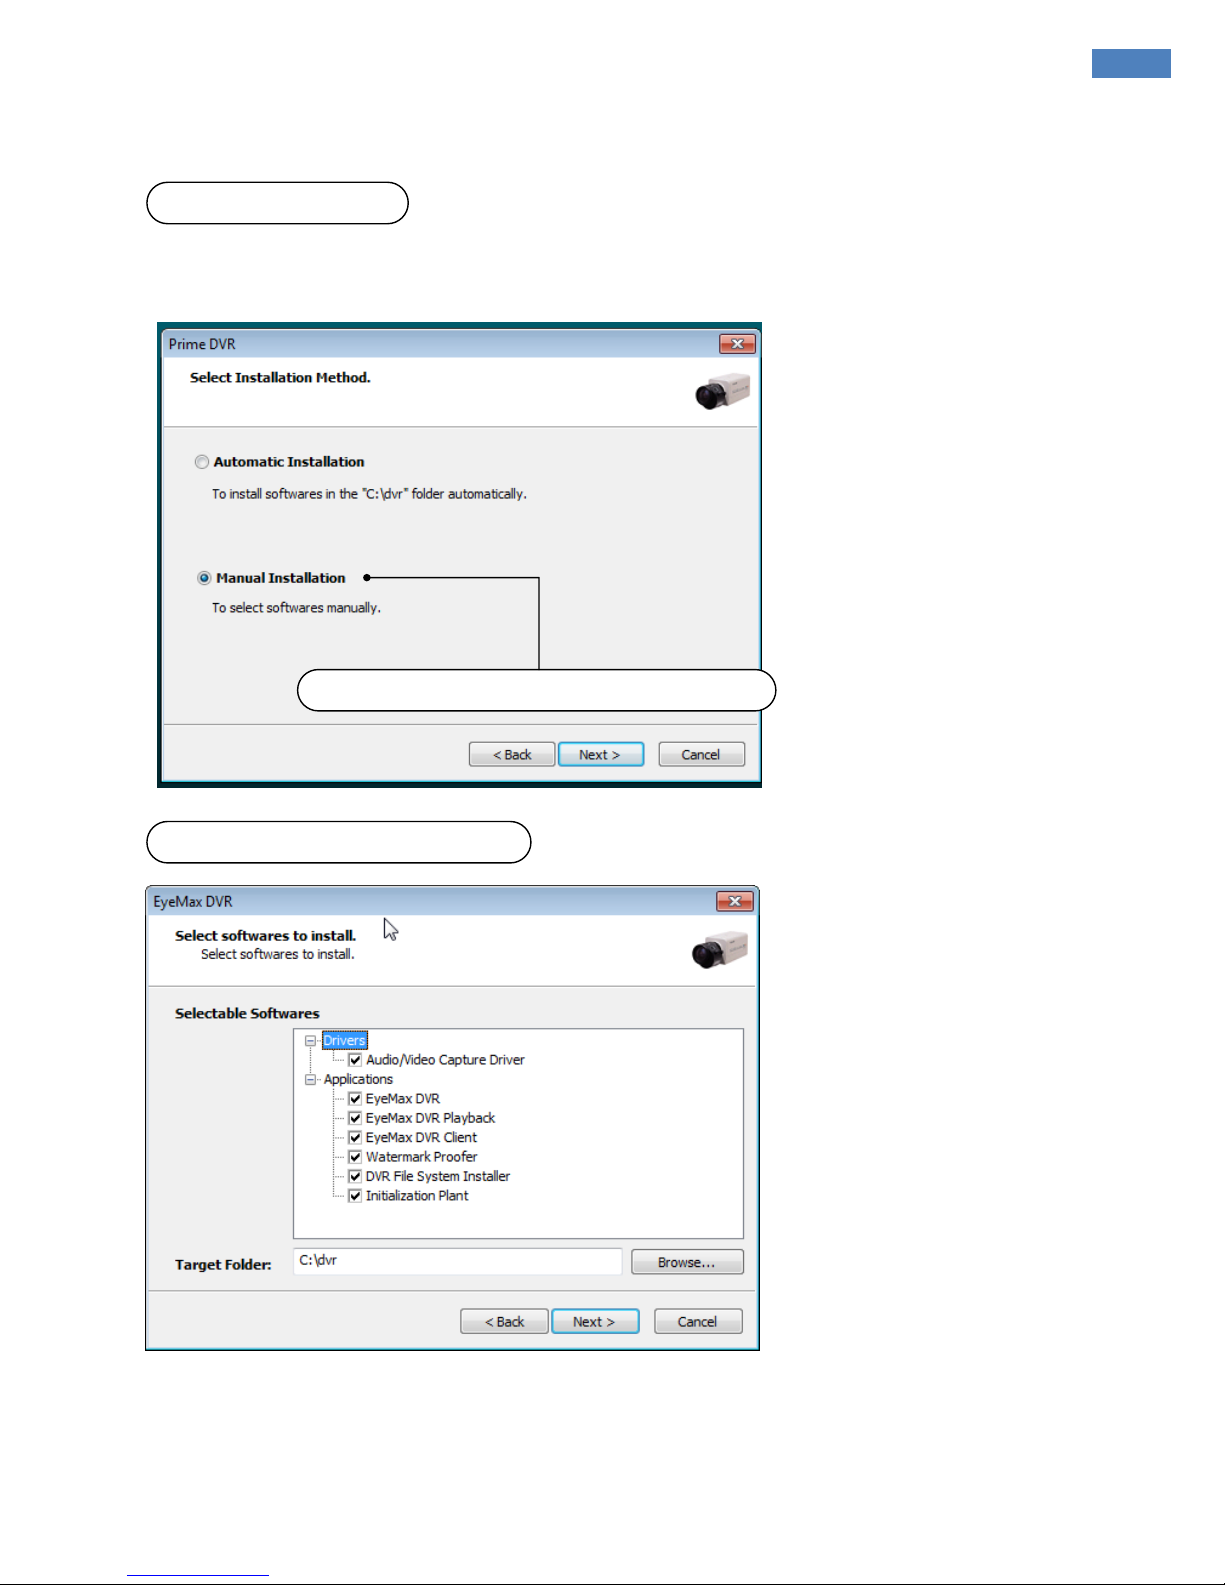
2. Manual Installation
It is a method to install selected software manually.
Select “Manual Installation” only in the case of “Client Software” installation.
Note:
The rest of the procedures are the same as “Automatic Installation”
.
(3) Software Selection
(1) Definition
(2) Installation Method Selection
12
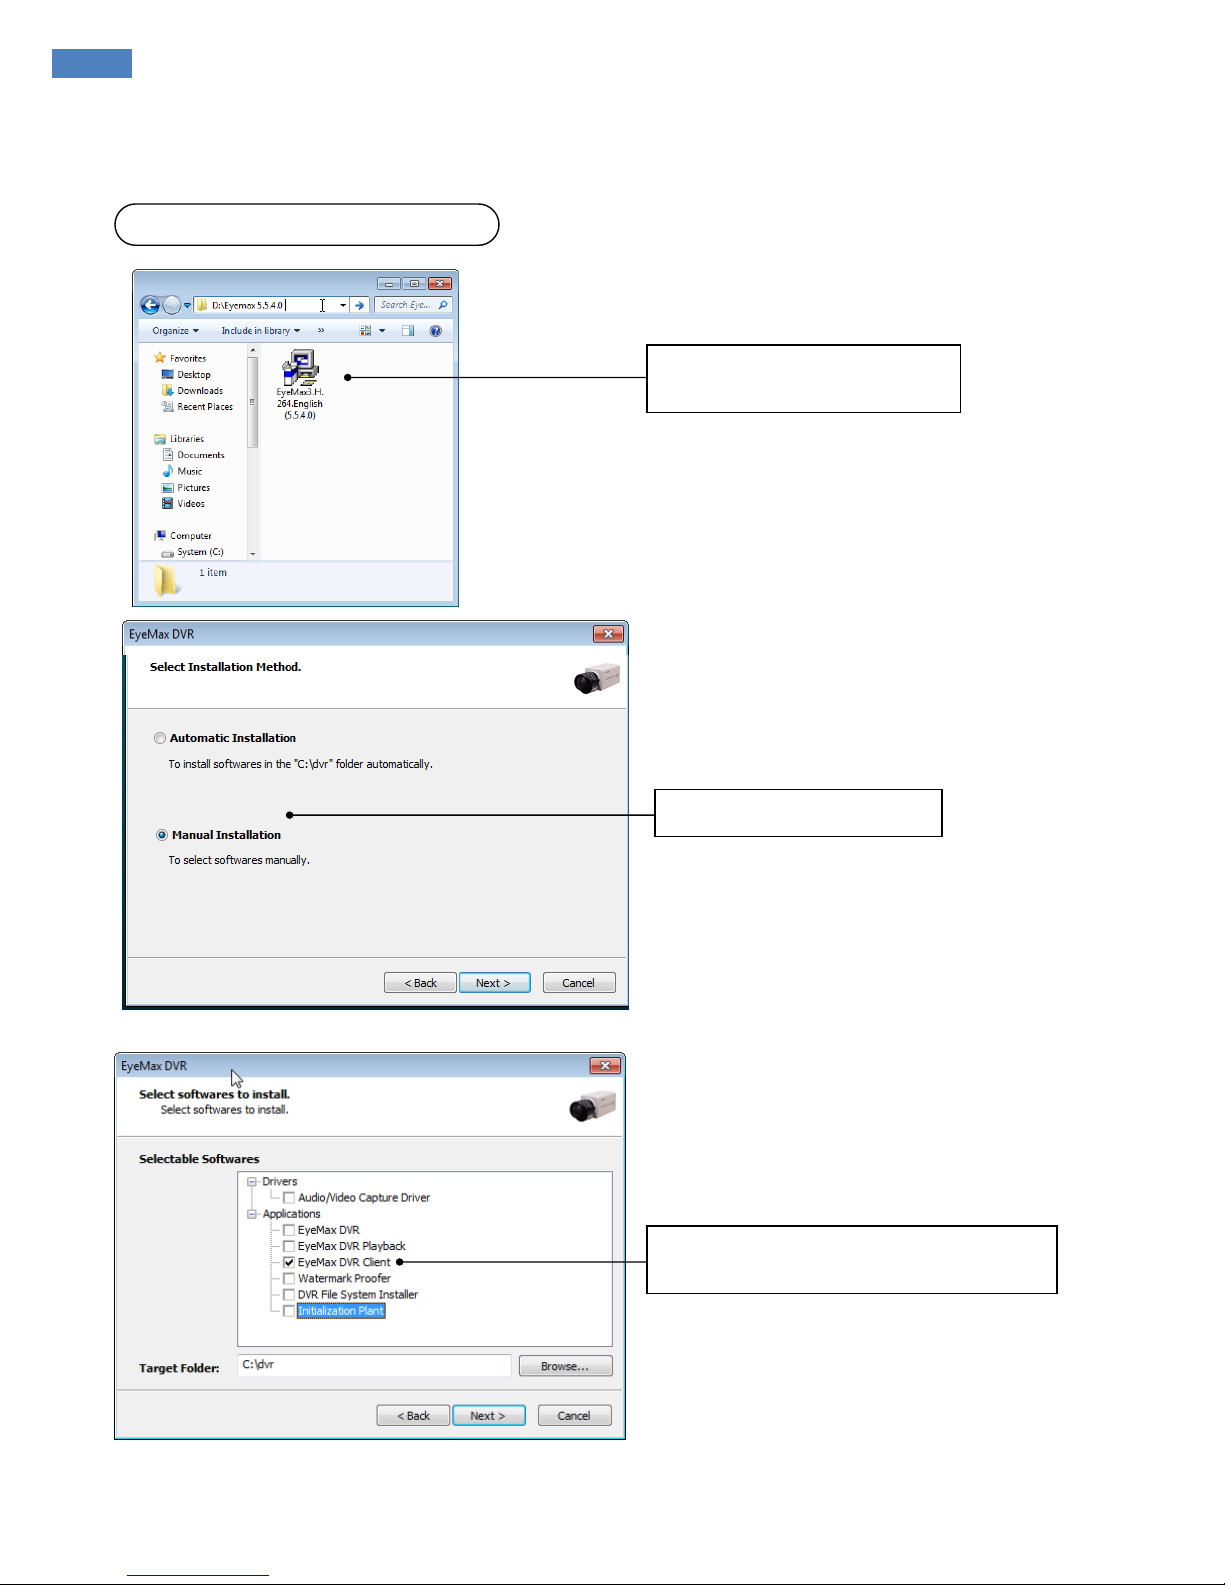
Select “Eyemax DVR Client” only.
3. Remote Client Installation
(1) Using EyeMax S/W
Double-click
“Eyemax.English(5.5.4.0).exe”.
Select “Manual Installation”.
[ EyeMax Series ] User’s Manual (5.5.4.0)
13
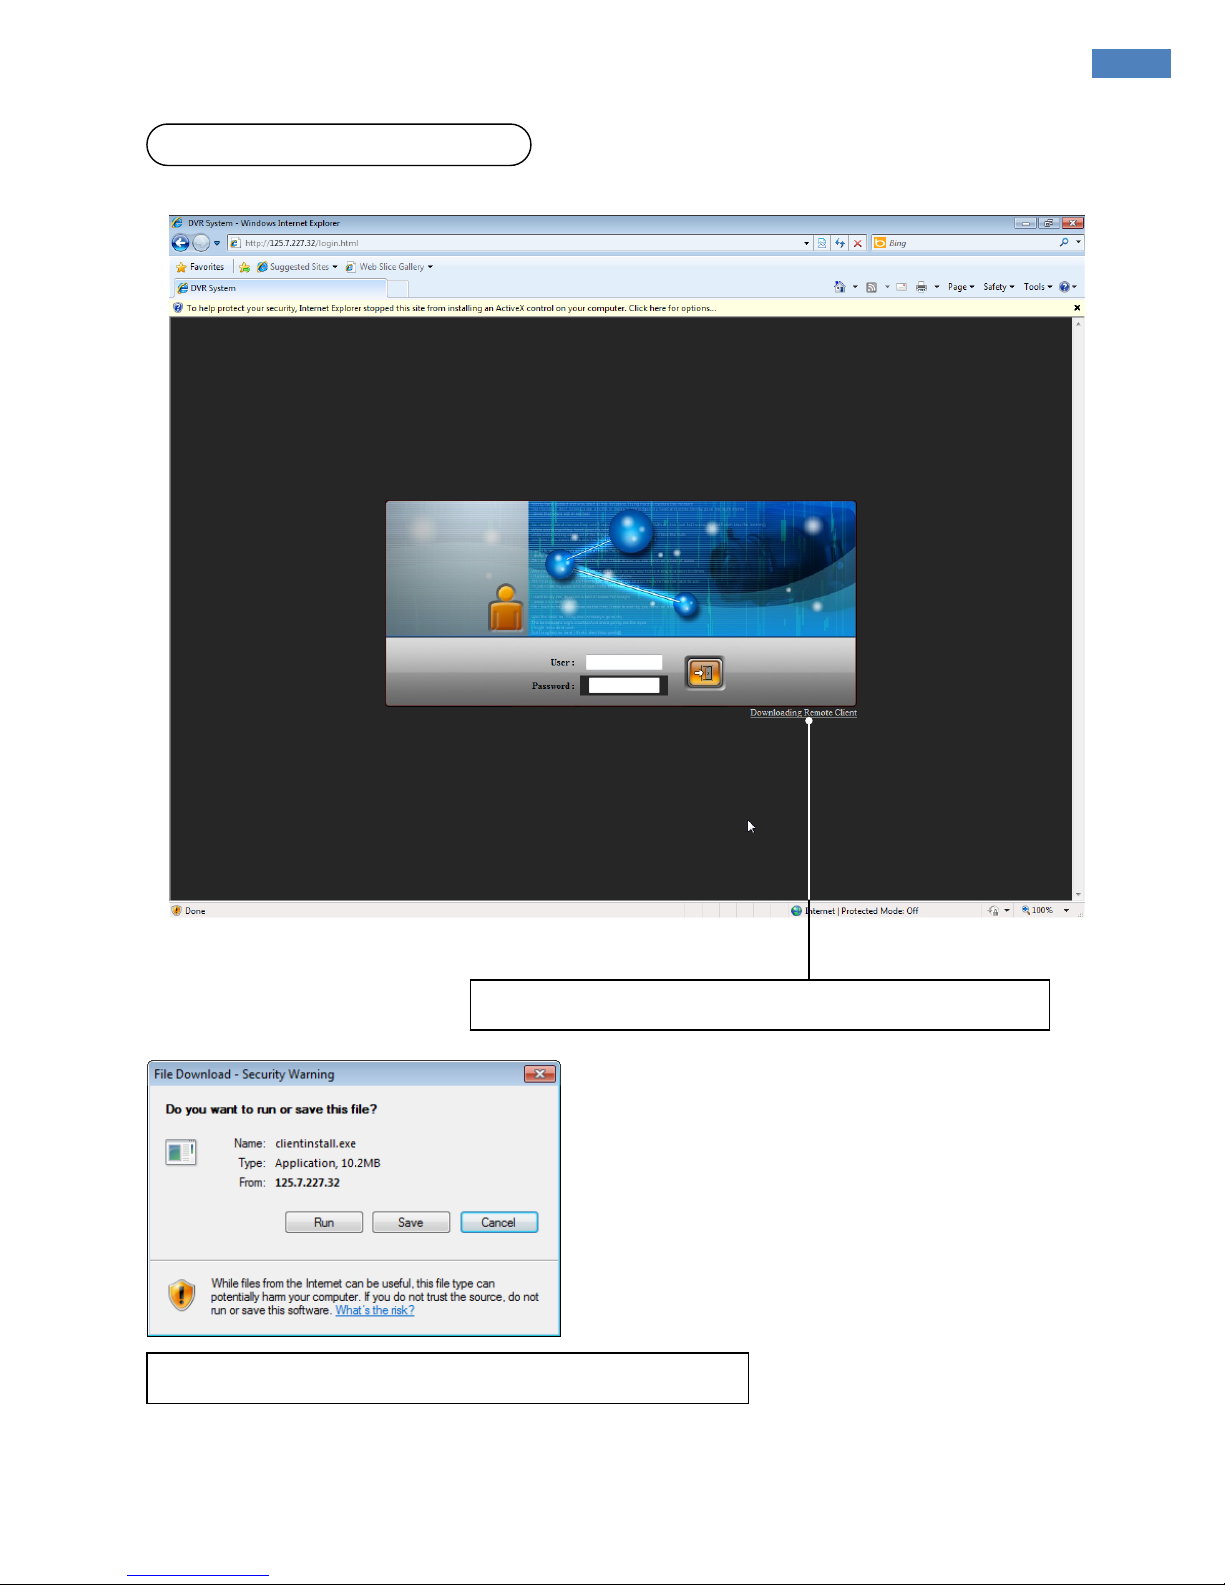
1. Click the “Install Remote Client” button for downloading.
2. Save Client software and run “clientinstall.exe” file to continue.
(2) Using Web Browser
14
3. Click “Next” to proceed.
5. Click “Next” to finish
installation process.
4. Select “Manual Installation”.
[ EyeMax Series ] User’s Manual (5.5.4.0)
15
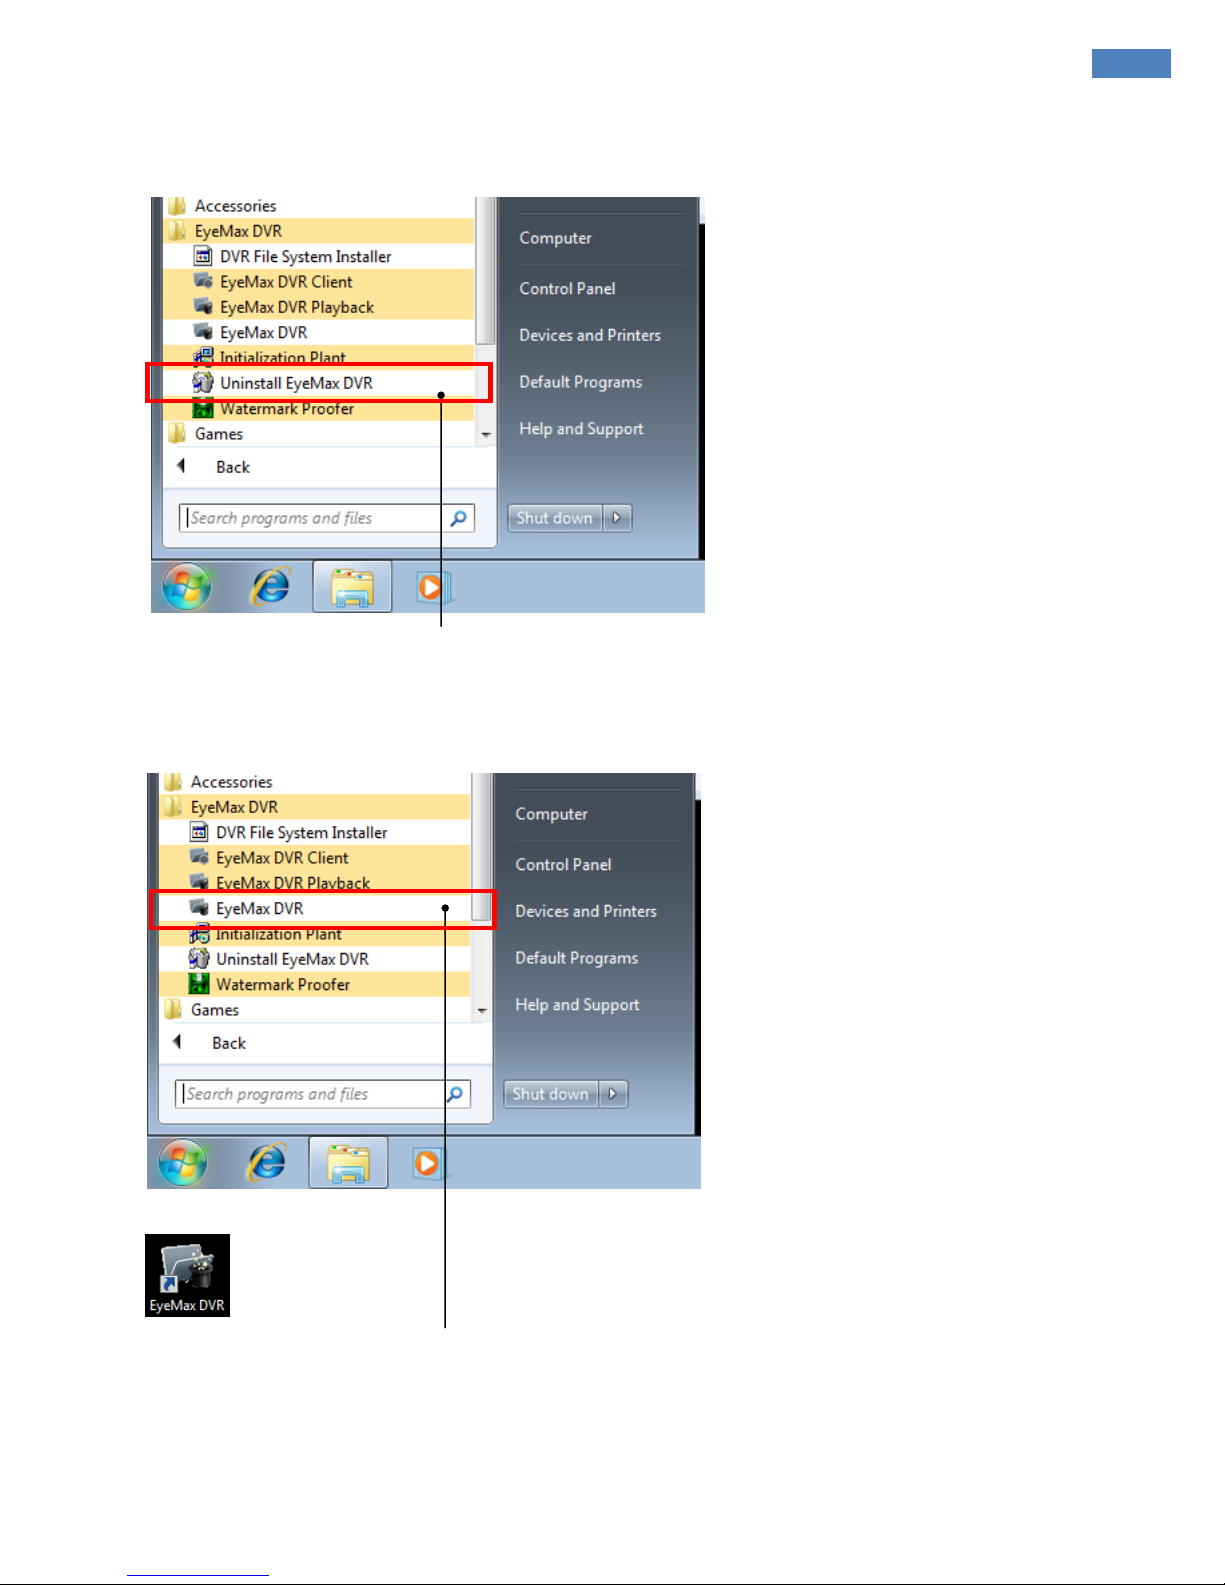
4. Uninstallation
Execute “Uninstall EyeMax DVR” to uninstall software.
5. Program Execution
Find the icons on the desktop to execute “EyeMax DVR” and “EyeMax DVR Client”.
Or find “EyeMax DVR” under “All Programs”.
16
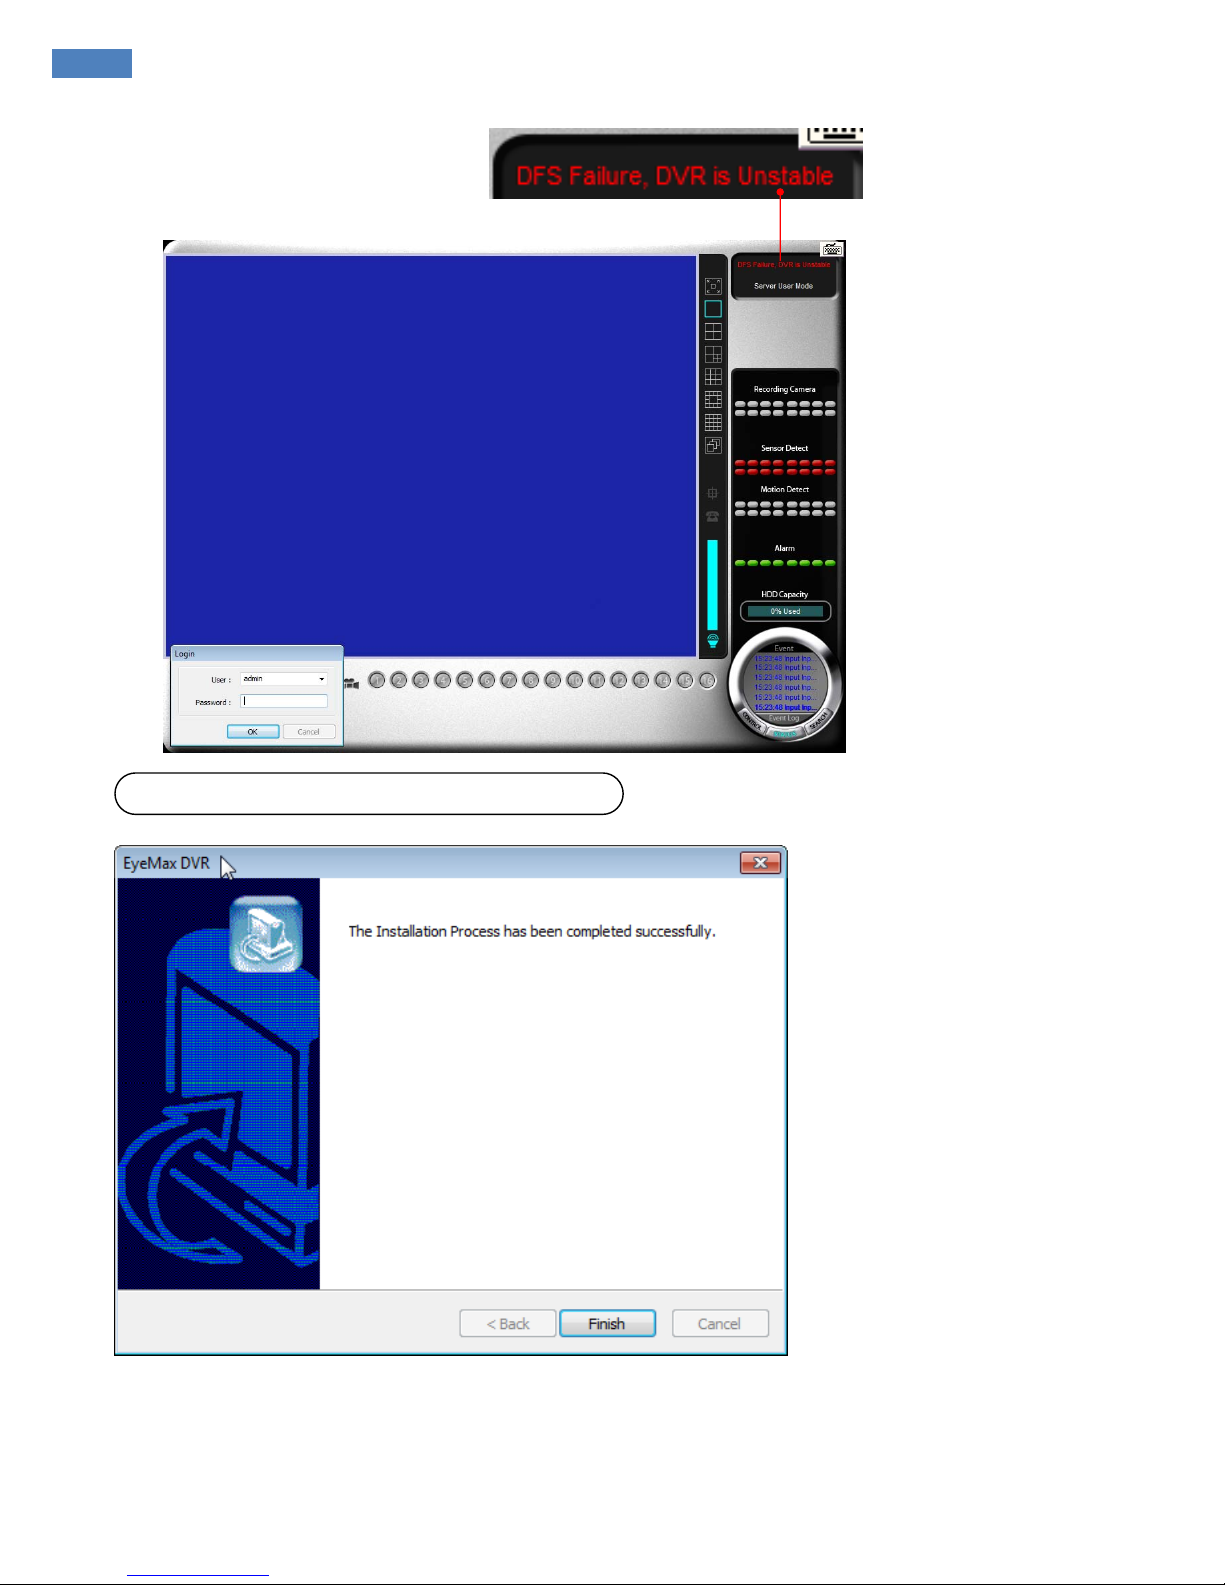
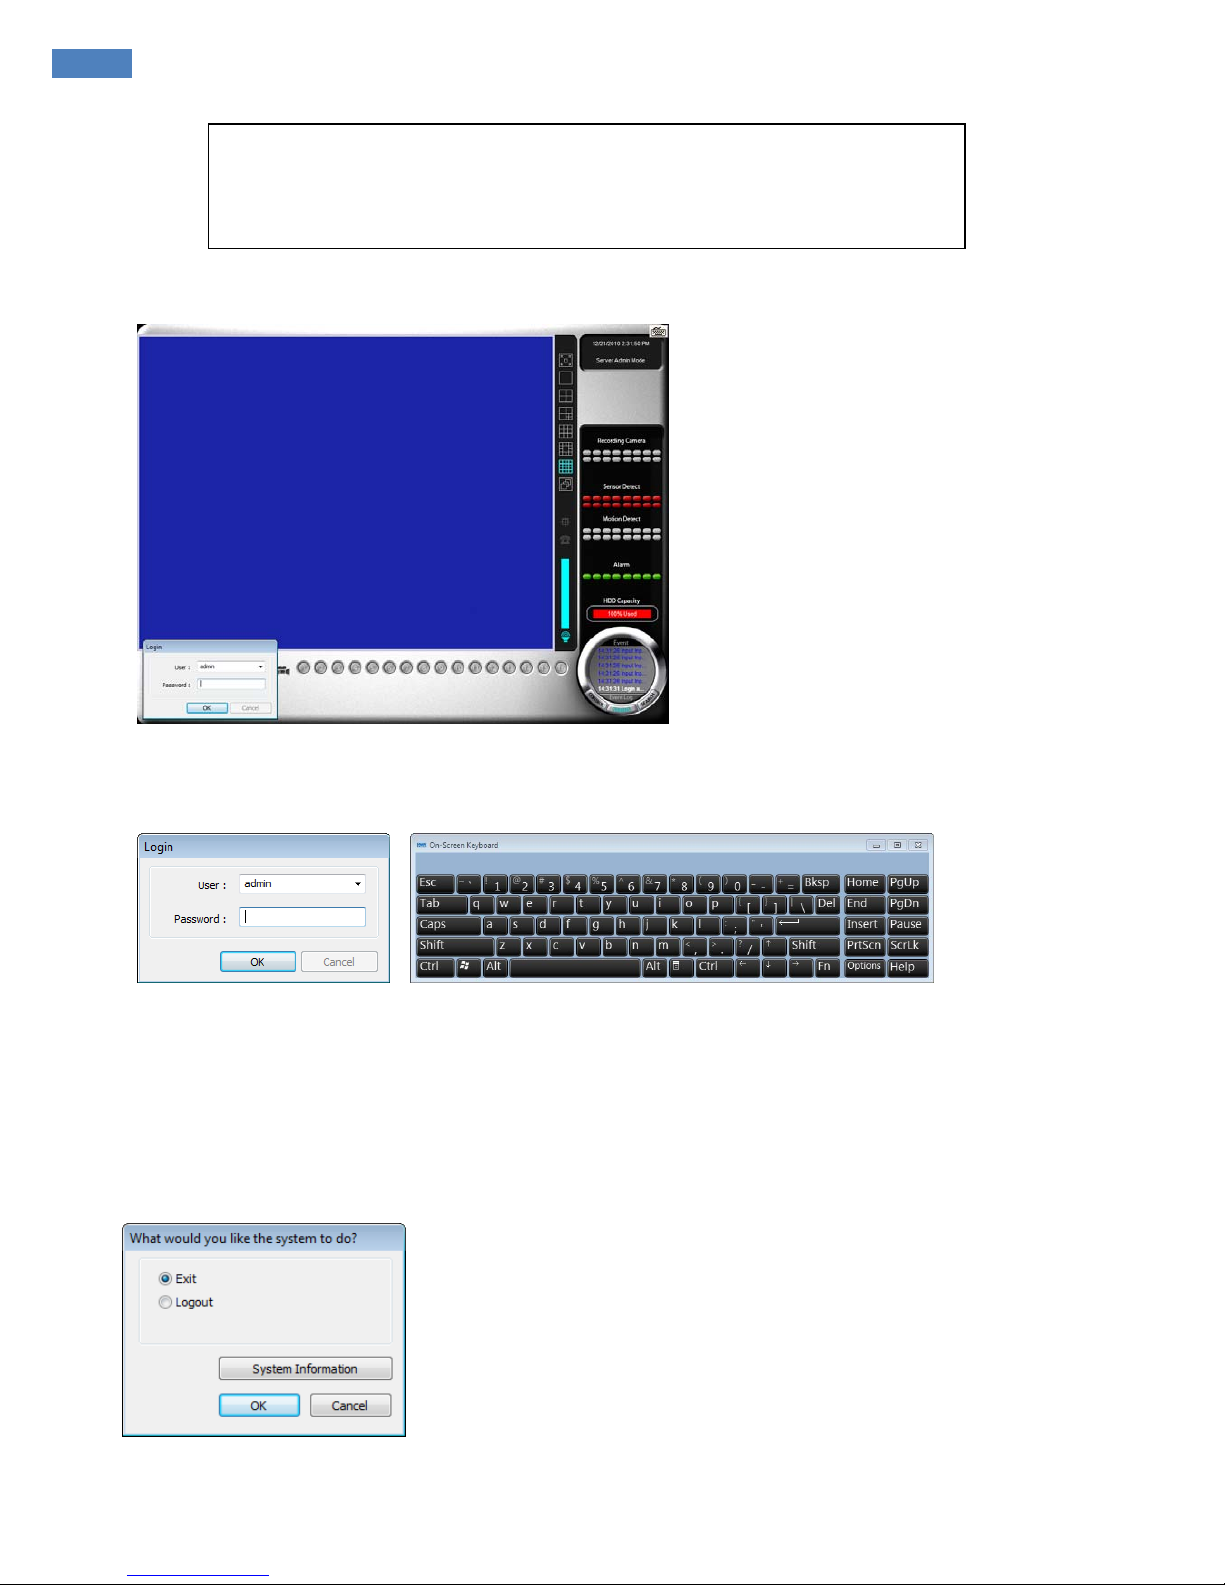
1. Startup Screen
The above screen will appear as EyeMax DVR system starts.
2. Login
The default values for User and Password are “admin” and “no password”. Click “OK”
to execute DVR system. To give “admin” a password and to create new users,
certain configurations are required (Setup/User). Only “admin” and users with appropriate
authorization have access to the Setup menu.
Note:
Virtual keypad is available on the right top of GUI if needed
3. Exit/Logout
To end EyeMax DVR system, select “Exit” and type in password.
Press OK button to continue.
CHAPTER 3
Main System Application
[ EyeMax Series ] User’s Manual (5.5.4.0)
17
Main System Application(Control)
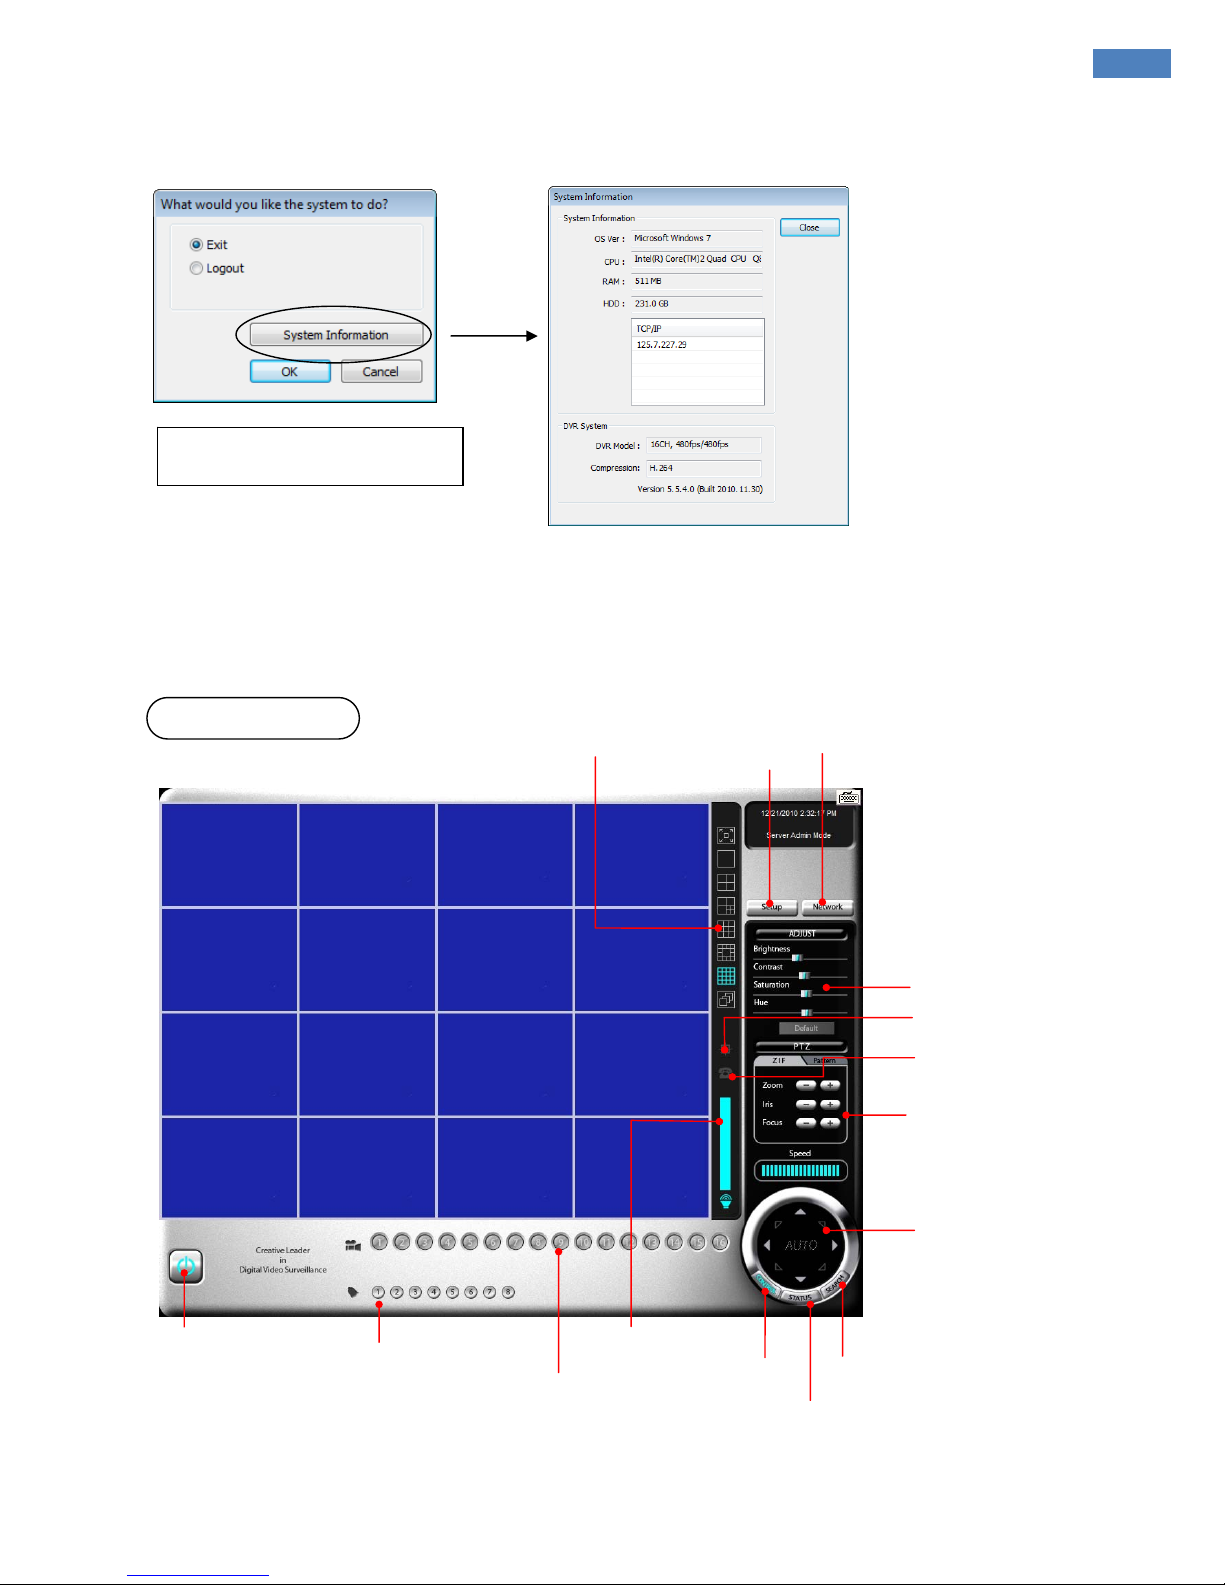
4. System Information
Click on System Information to see DVR system information, such as OS version,
CPU, RAM, HDD, IP address, DVR model and DVR software.
5. Control Screen
(1) System
Click Power button and then
“System Information” button
Setup
Color Control
PTZ Adjustment
I-Phone
(Two way Communication)
E-map
PTZ Control
Power
Camera Layout Panel
Volume
Camera Selection
Manual Output Panel
Control
Status
Search
Light
Network
18
z
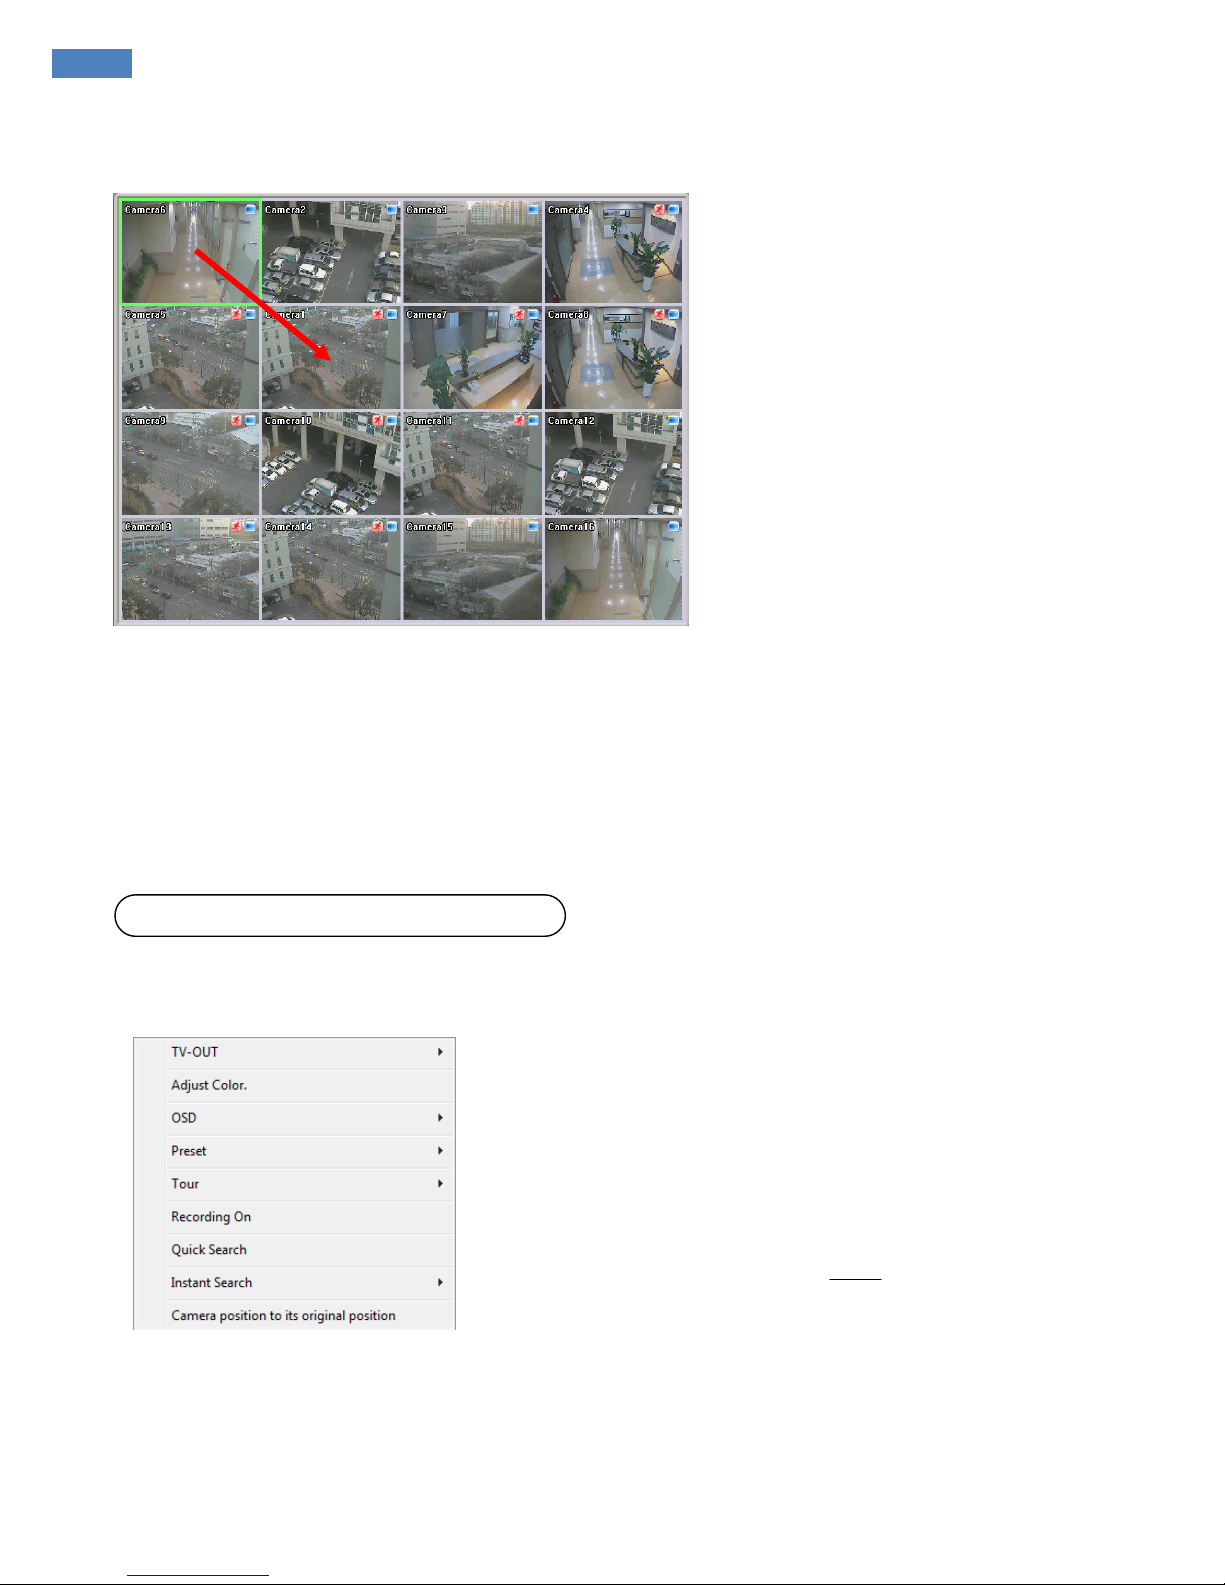
Channel Relocation
Camera location can be changed by drag & drop by mouse.
How to configure channel by drag & drop:
1. Select channel: click mouse button.
2. Hold on mouse button and drag over to target channel
3. Release mouse button over the target channel.
4. You will see the location of channel has changed on
(Refer to above picture)
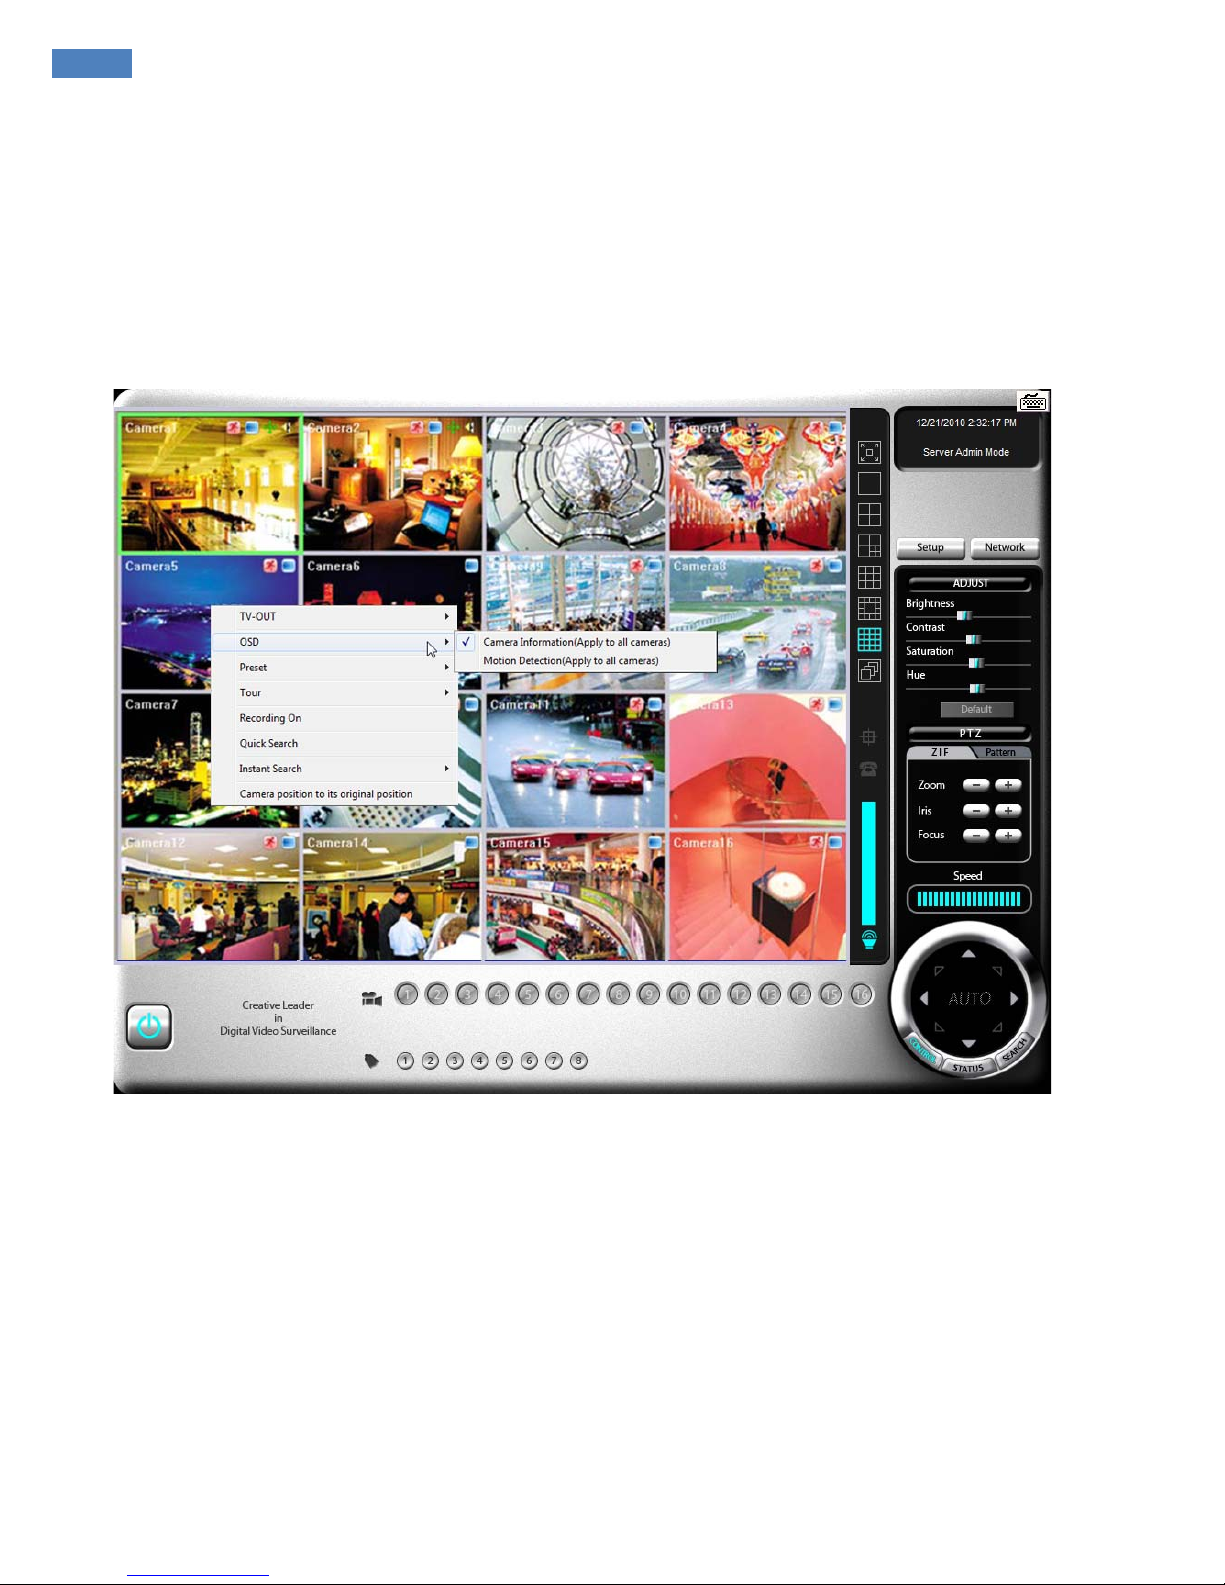
On control tab, click right mouse button to open shortcut menu.
TV-OUT: Enable selected channel to TV out 2 manually.
Adjust Color: Adjust color setting of selected channel
OSD: Enable/Disable OSD on screen.
(Camera Information/Detection Zone)
Preset / Tour: This is to Add Preset and Tour.
Recording On: Enable force recording on selected channel
Quick Search: Playback selected channel by pop-up screen.
Instant Search: Playback selected channel on screen
(Before 10/20 seconds)
Camera position to its original position:
Revert to default channel location.
(2) Right click menu on screen
[ EyeMax Series ] User’s Manual (5.5.4.0)
19
Main System Application(Control)
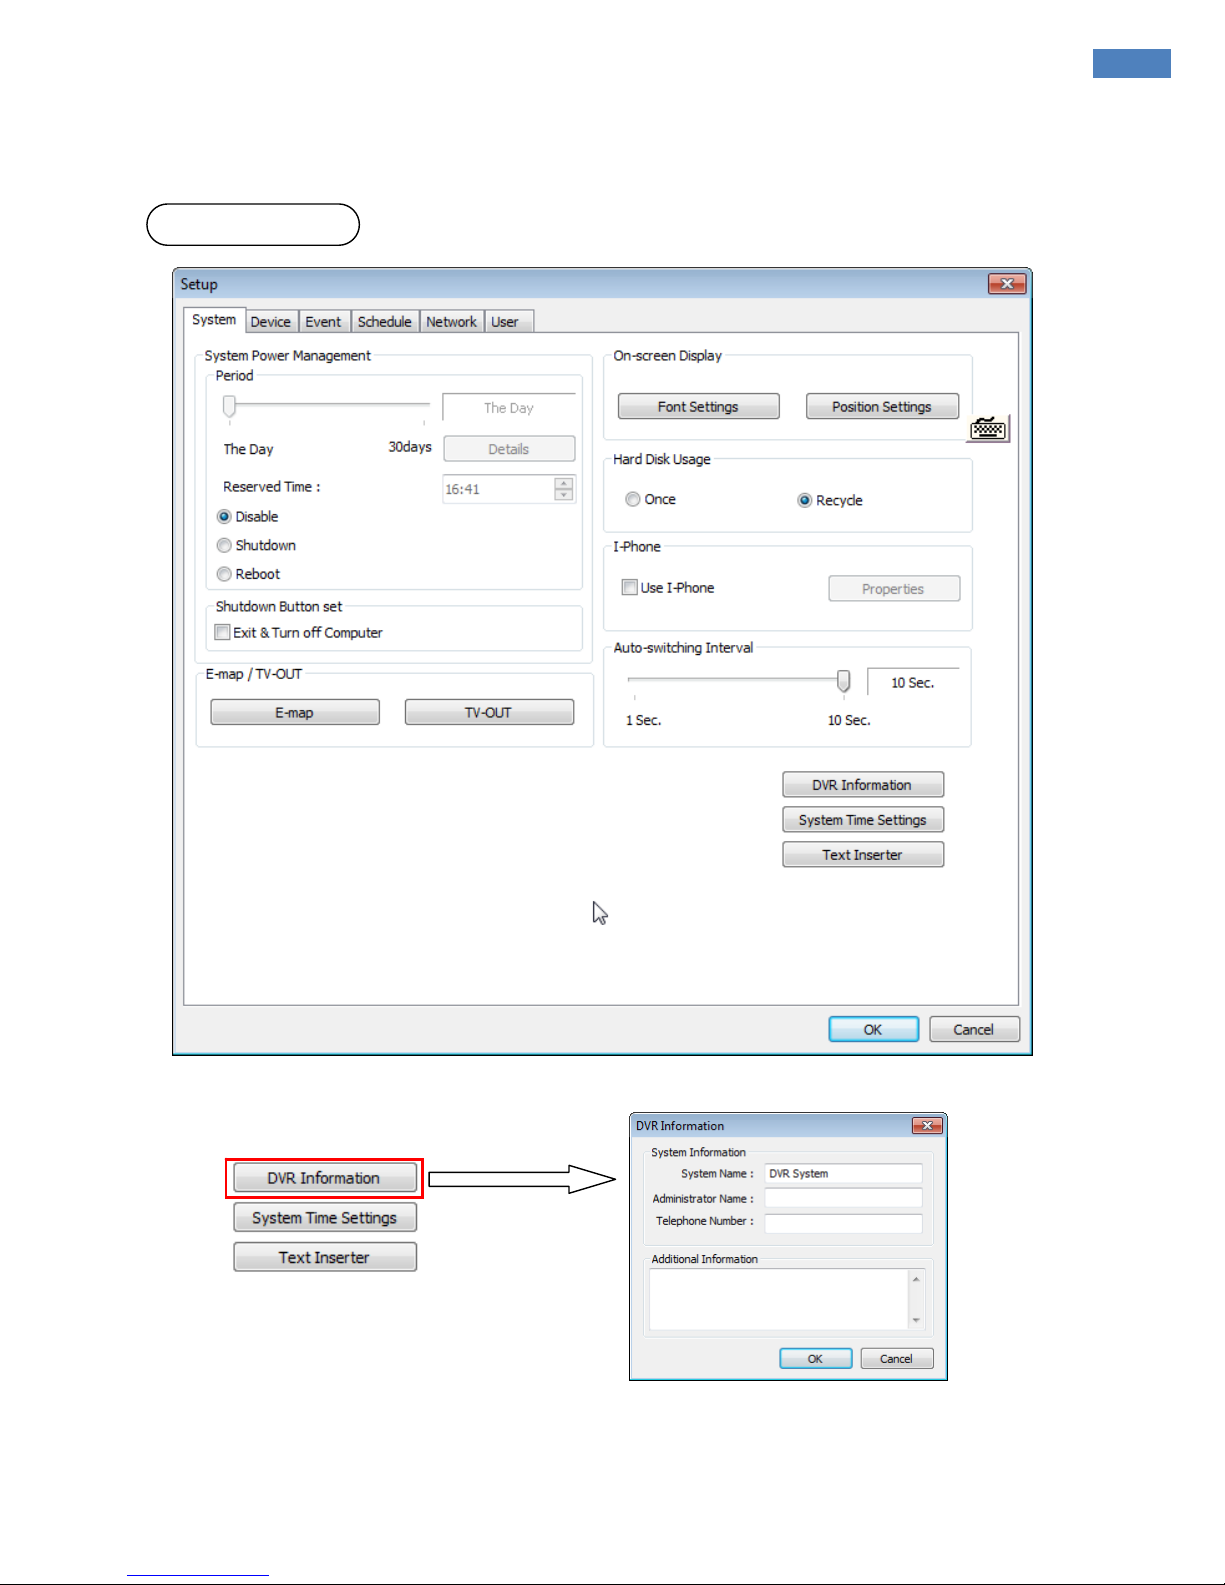
6. Setup
z
DVR information
Click DVR Information button to open window
Create a system name and put in administrator info. This information will be displayed on outgoing e-mails.
(1) System
20
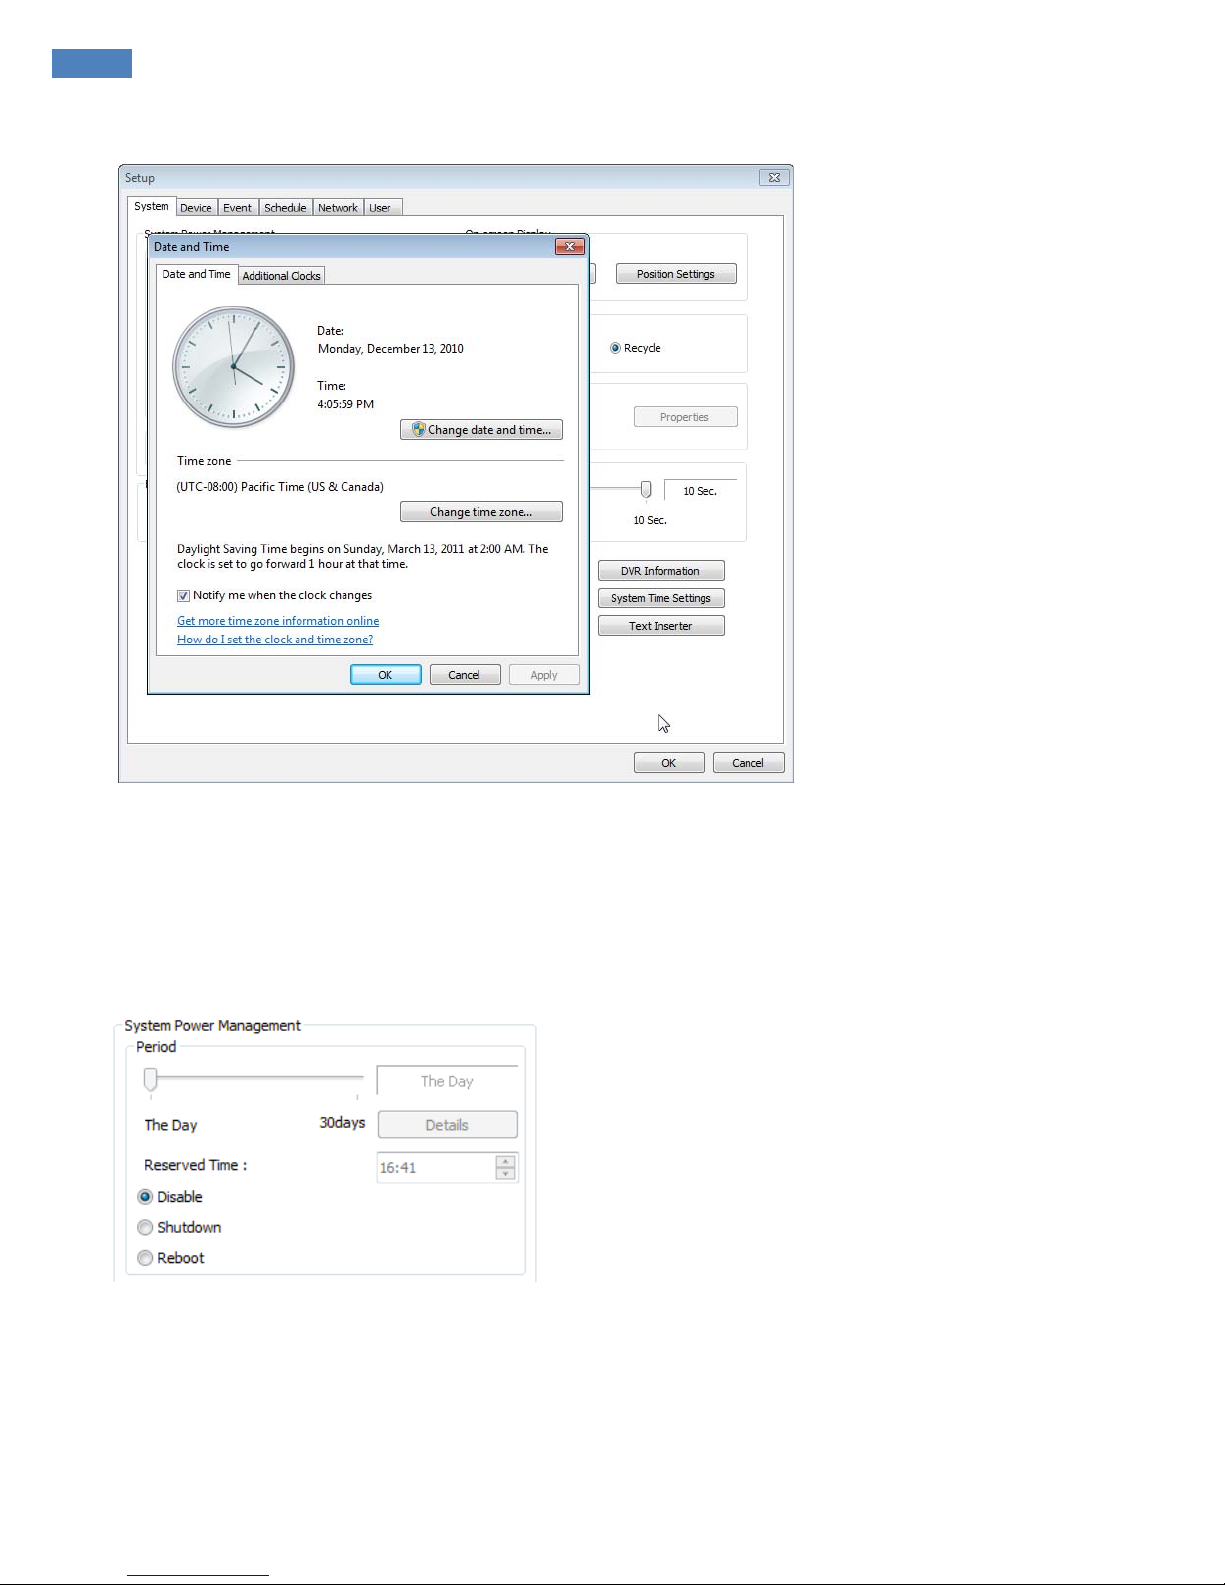
z System Time Setup
By clicking “System Time Settings”, user is able to set Date and Time in DVR software.
Change date and time: To change current time manually.
Change time zone: To change Current time zone in DVR system.
z
System Power Management
Period: Select a day that DVR system reboots
automatically by the period.
Reserved time:
Time set to shut down or to reboot
computer.
Disable:
selected when System Power Management is
not to be used.
Shutdown:
selected when shutting down computer is
required at the time set.
Reboot:
selected when rebooting computer is required at
the time set.
Exit & Turn off Computer:
By checking the box, computer will be turned off automatically as a user exits
from DVR system.
[ EyeMax Series ] User’s Manual (5.5.4.0)
21
Main System Application(Control)
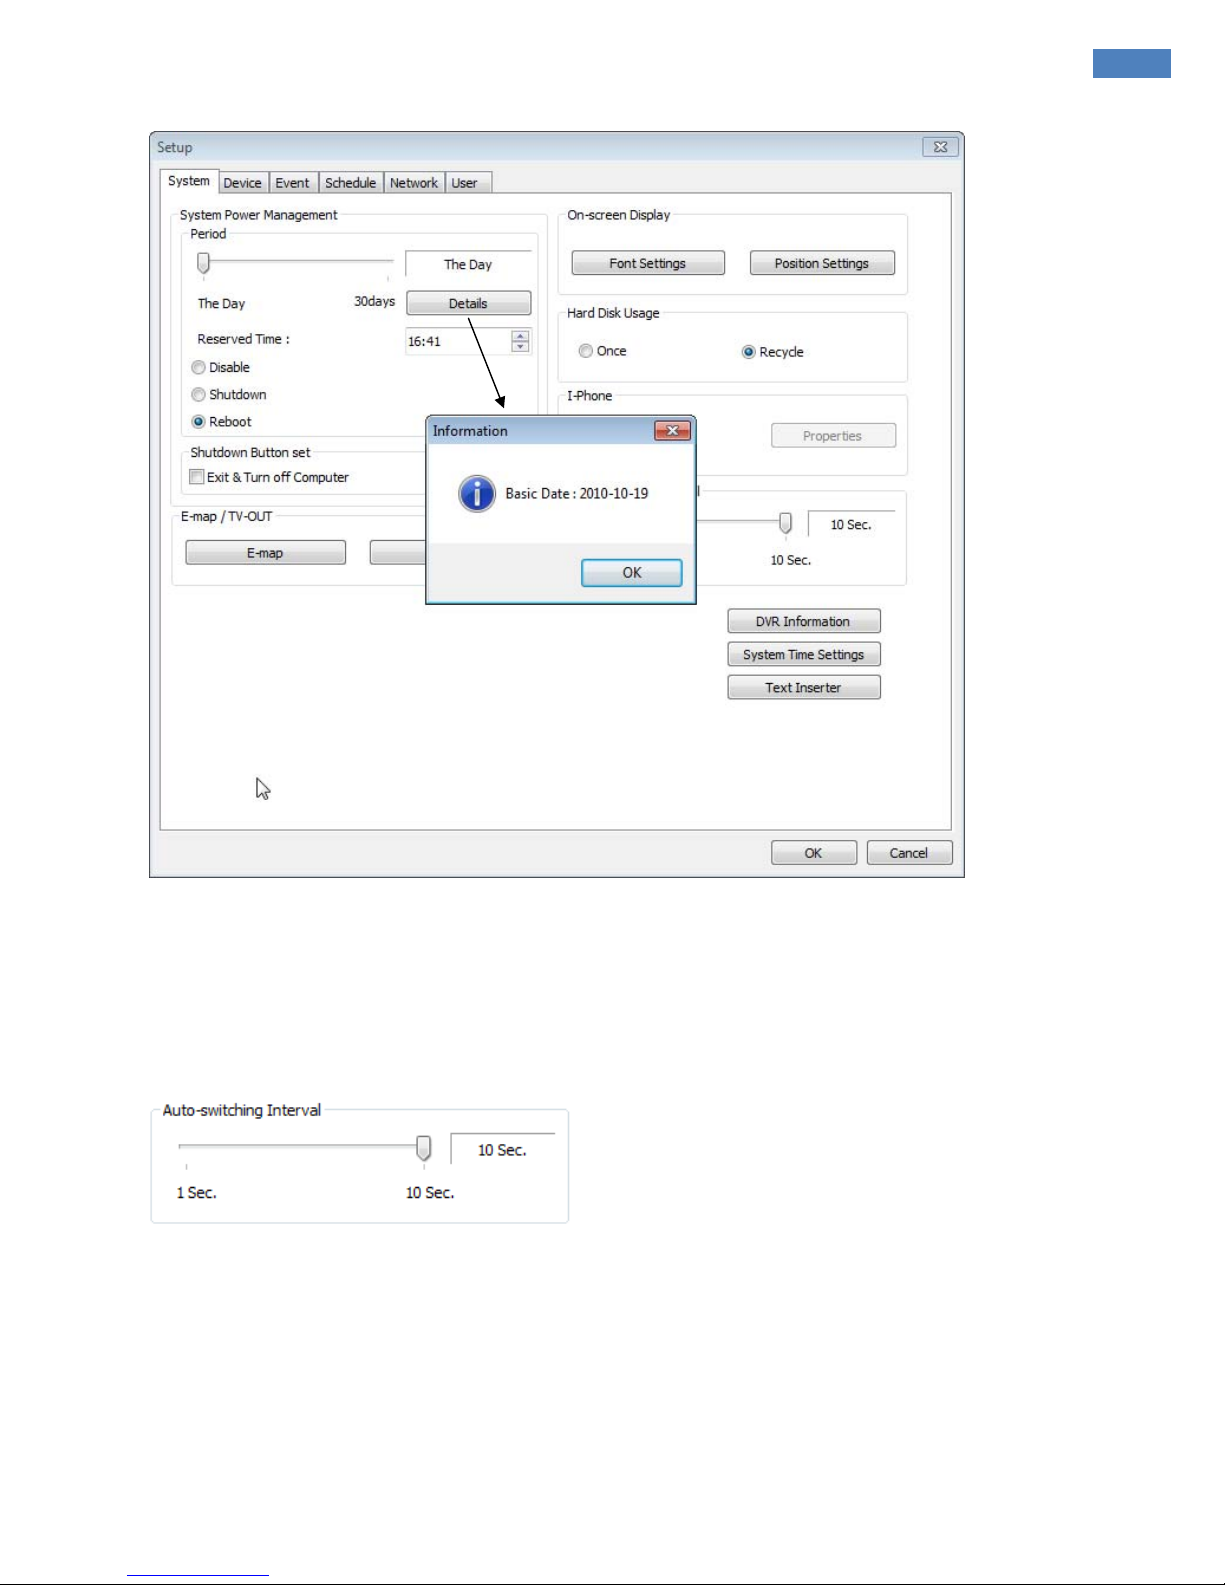
Details:
First select either “Shutdown” or “Reboot” to enable Period.
For example in above picture, 7 days after the basic date, system will shutdown automatically.
“Details” shows the set date and it will be the starting point.
z
Auto-switching Interval
Auto-switching Interval is a function that all ows green square around selec ted camera to move to th e next one
at the interval set.
e.g.) Camera 1
→
10 sec.→Camera 2→10 sec.→Camera 3….
22
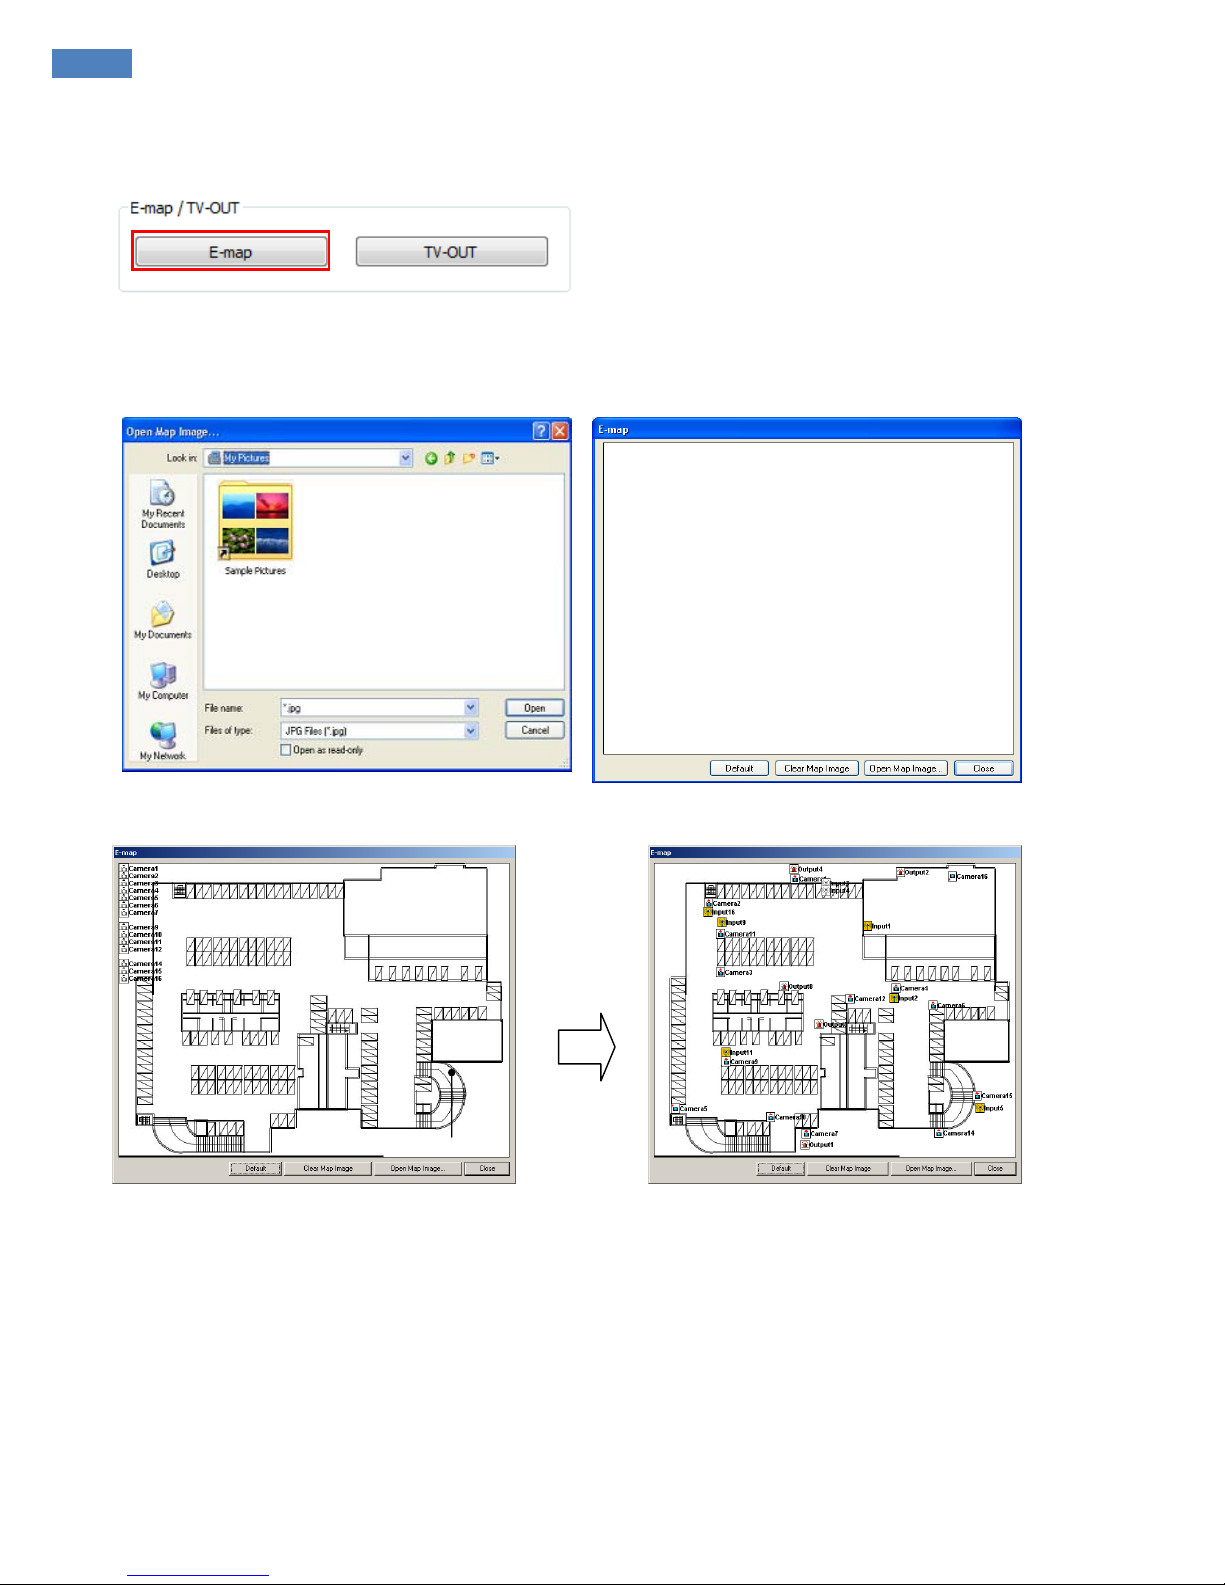
z
E-map
Click on the “E-map” button to design E-map.
Click on “Open Map Image” to select an E-map image.
The above is a designed E-map sample.
Drag mouse to position Camera/Input/Output and design E-map.
[ EyeMax Series ] User’s Manual (5.5.4.0)
23
Main System Application(Control)
Click on the E-map button to open E-map.
White Camera:
Not on Recording, Yellow Camera: On Recording,
White Input/White Output:
Not Activated, Yellow Input/Yellow Output: Activated
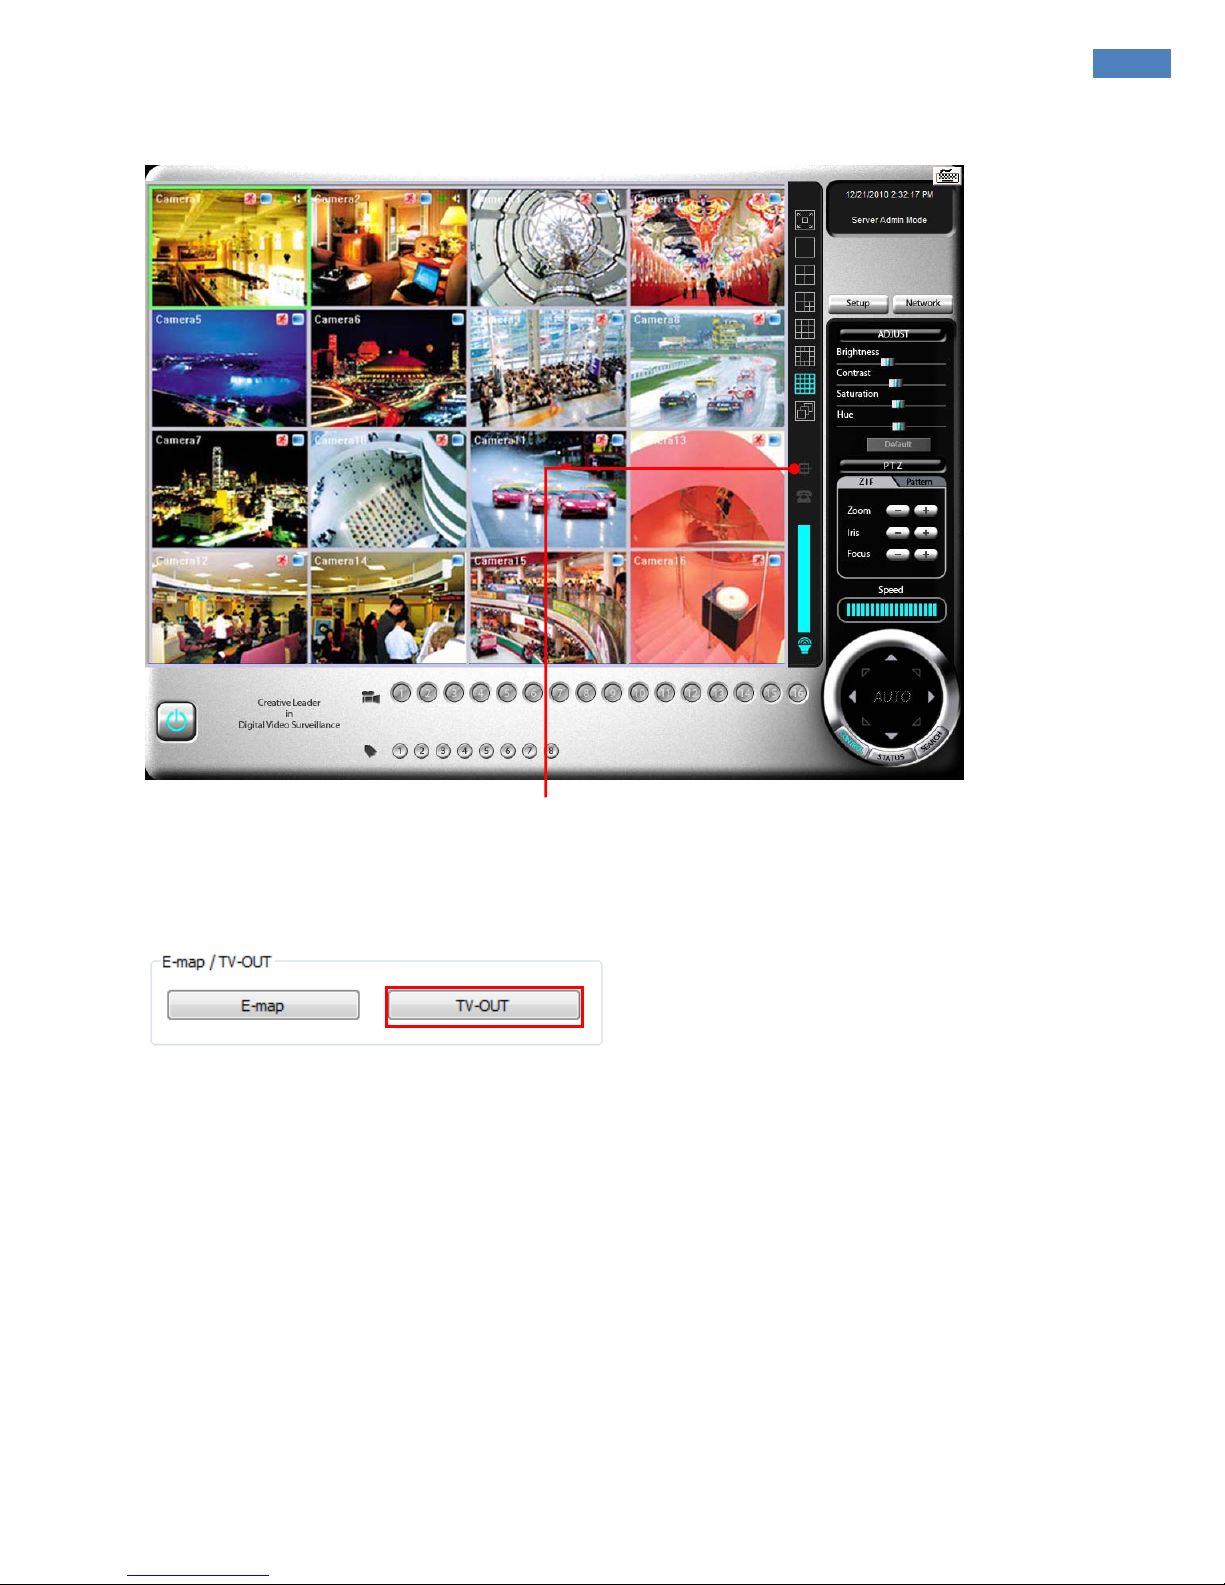
z
TV-OUT
TV-OUT is a function that sends selected cameras to a call monitor (external analog monitor).
Click on the “TV-OUT” button for setup.
24
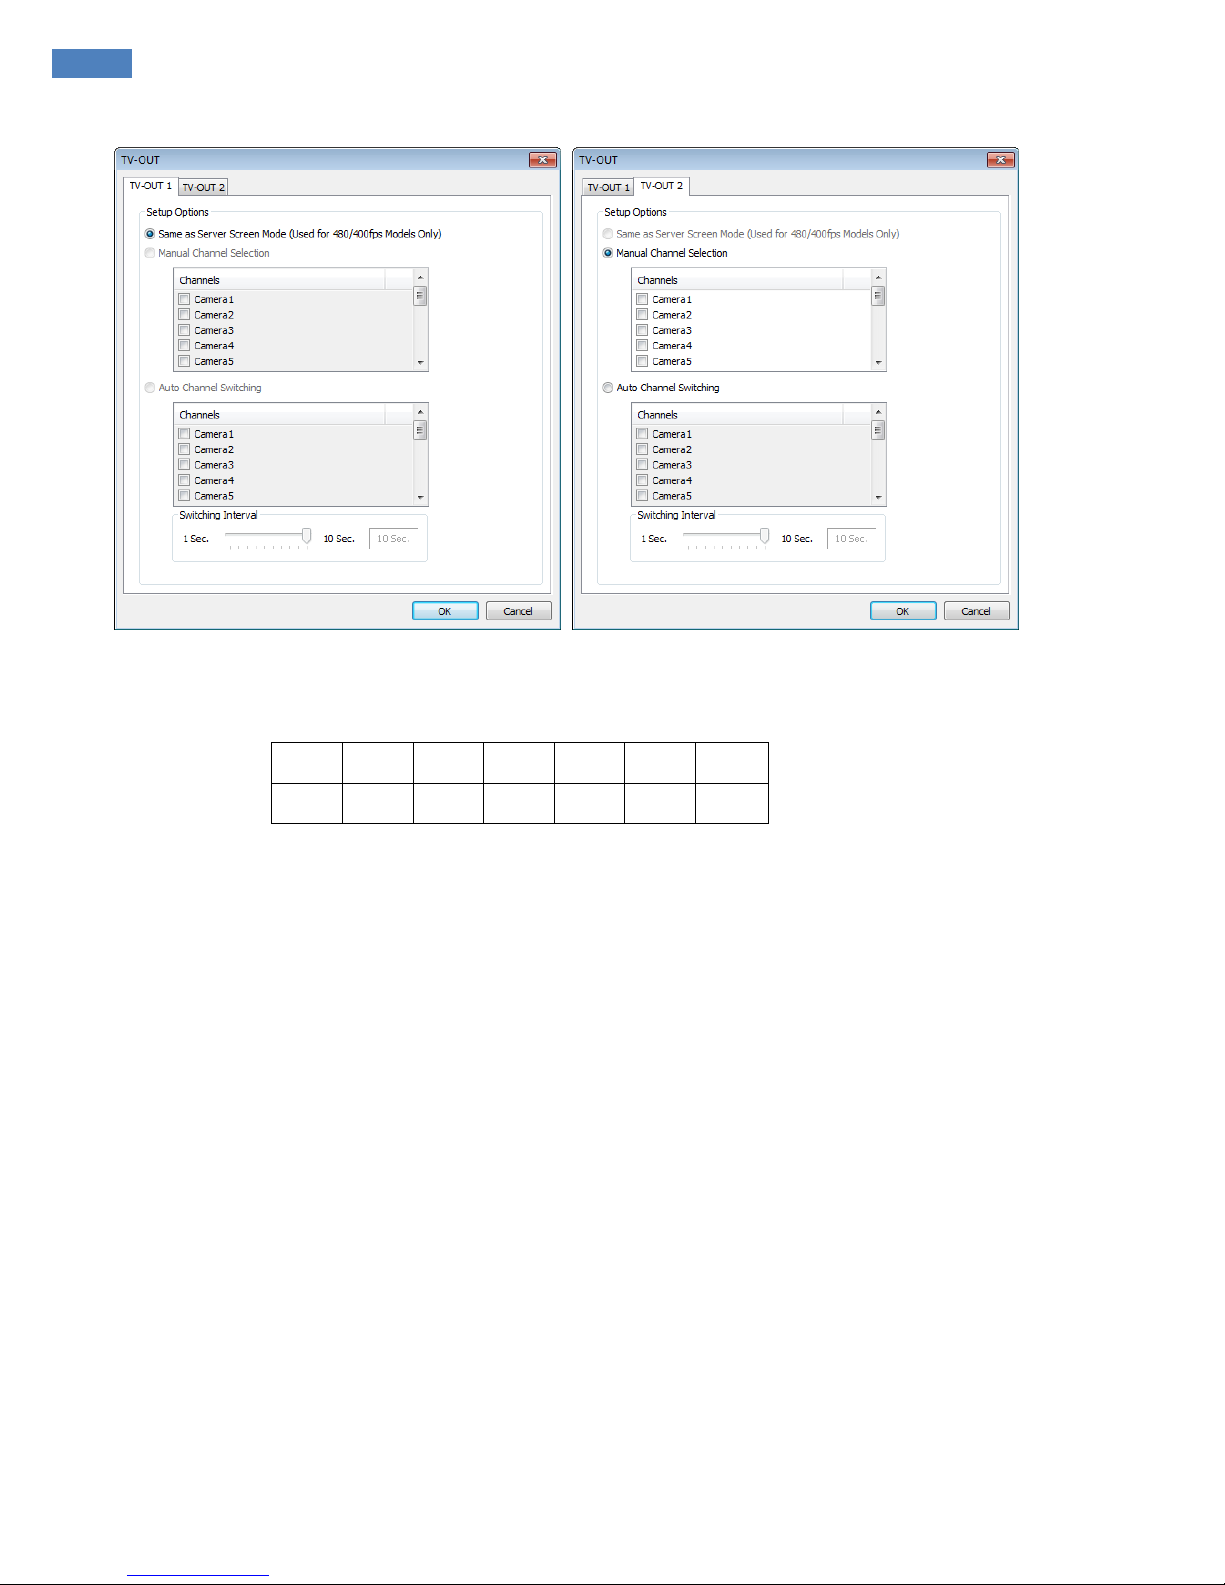
The Number of TV-out Supported
9030 9060 9120 9240 9448 9632 X948
1 1 1 1 1(2) 2 2
The models such as 9240 (240FPS/240FPS), 9632(480FPS/480FPS), 9832(960FPS/480FPS) and
X948(480FPS/480FPS) support 2 TV-OUTs. And the rest of the models support 1.
Setup Options:
1. Same as Server Screen Mode
(9448, 9632 and X948 only) - TV-OUT Monitor displays what’s on DVR server.
Manual Channel Selection - Channels are selected manually. Once “Manual Channel Selection” is
selected, channels can also be selec ted manual ly on Control screen by plac ing mouse on camera pic ture
and clicking the right mouse.
2. Auto Channel Switching - Selected channels rotate to display at the switching interval set.
Switching Interval:
The length of time to stay at one camera
[ EyeMax Series ] User’s Manual (5.5.4.0)
25
Main System Application(Control)
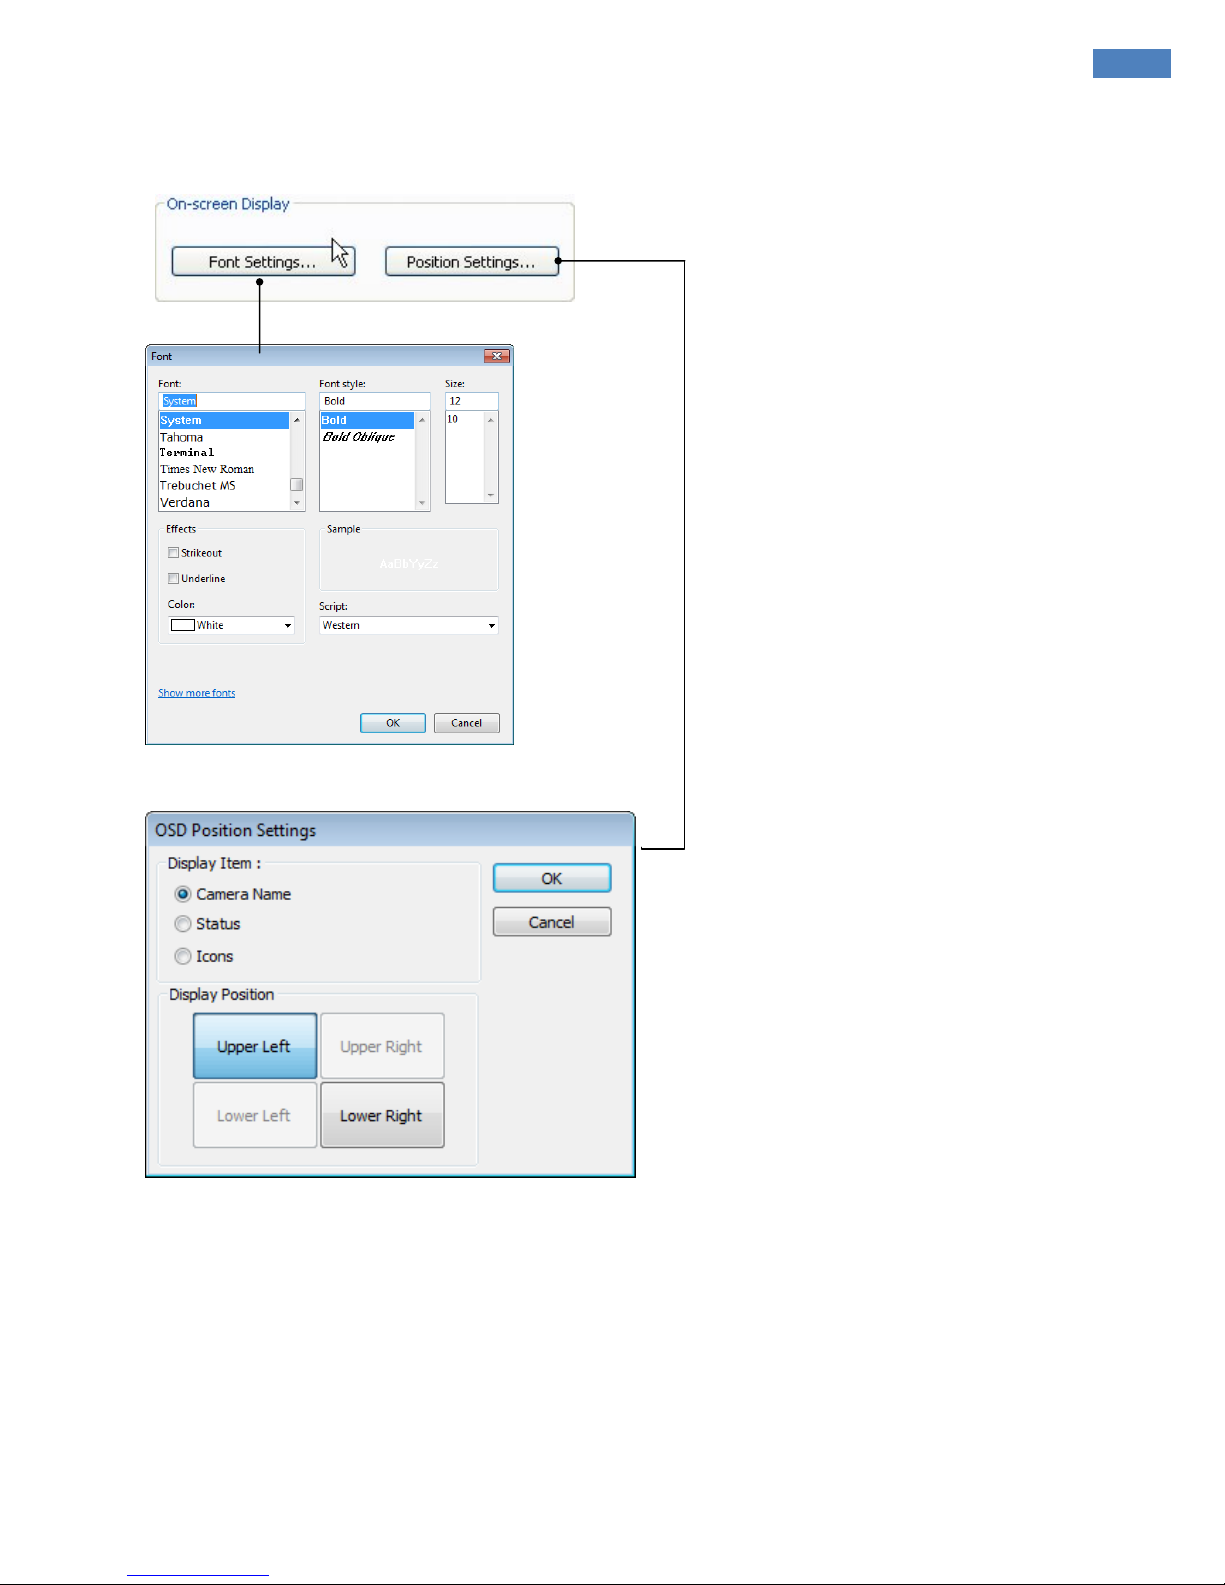
z
On-screen Display
Font Settings: Font change on screen display.
Postion Setting: Position change on screen display.
26
On a control screen, you may click right mouse button to control OSD as below.
Camera Information:
By checking it, camera names and status will be displayed on camera pictures.
Motion Detection:
By checking it, green motion detection blocks will be displayed on camera pictures when
recording schedule is set as “M” (Setup/Schedule).
Note: One right mouse click can be a very useful tool. Manual TV-out and OSD setup can be done.
Additionally, instant recording can start by one click.

[ EyeMax Series ] User’s Manual (5.5.4.0)
27
Main System Application(Control)
z
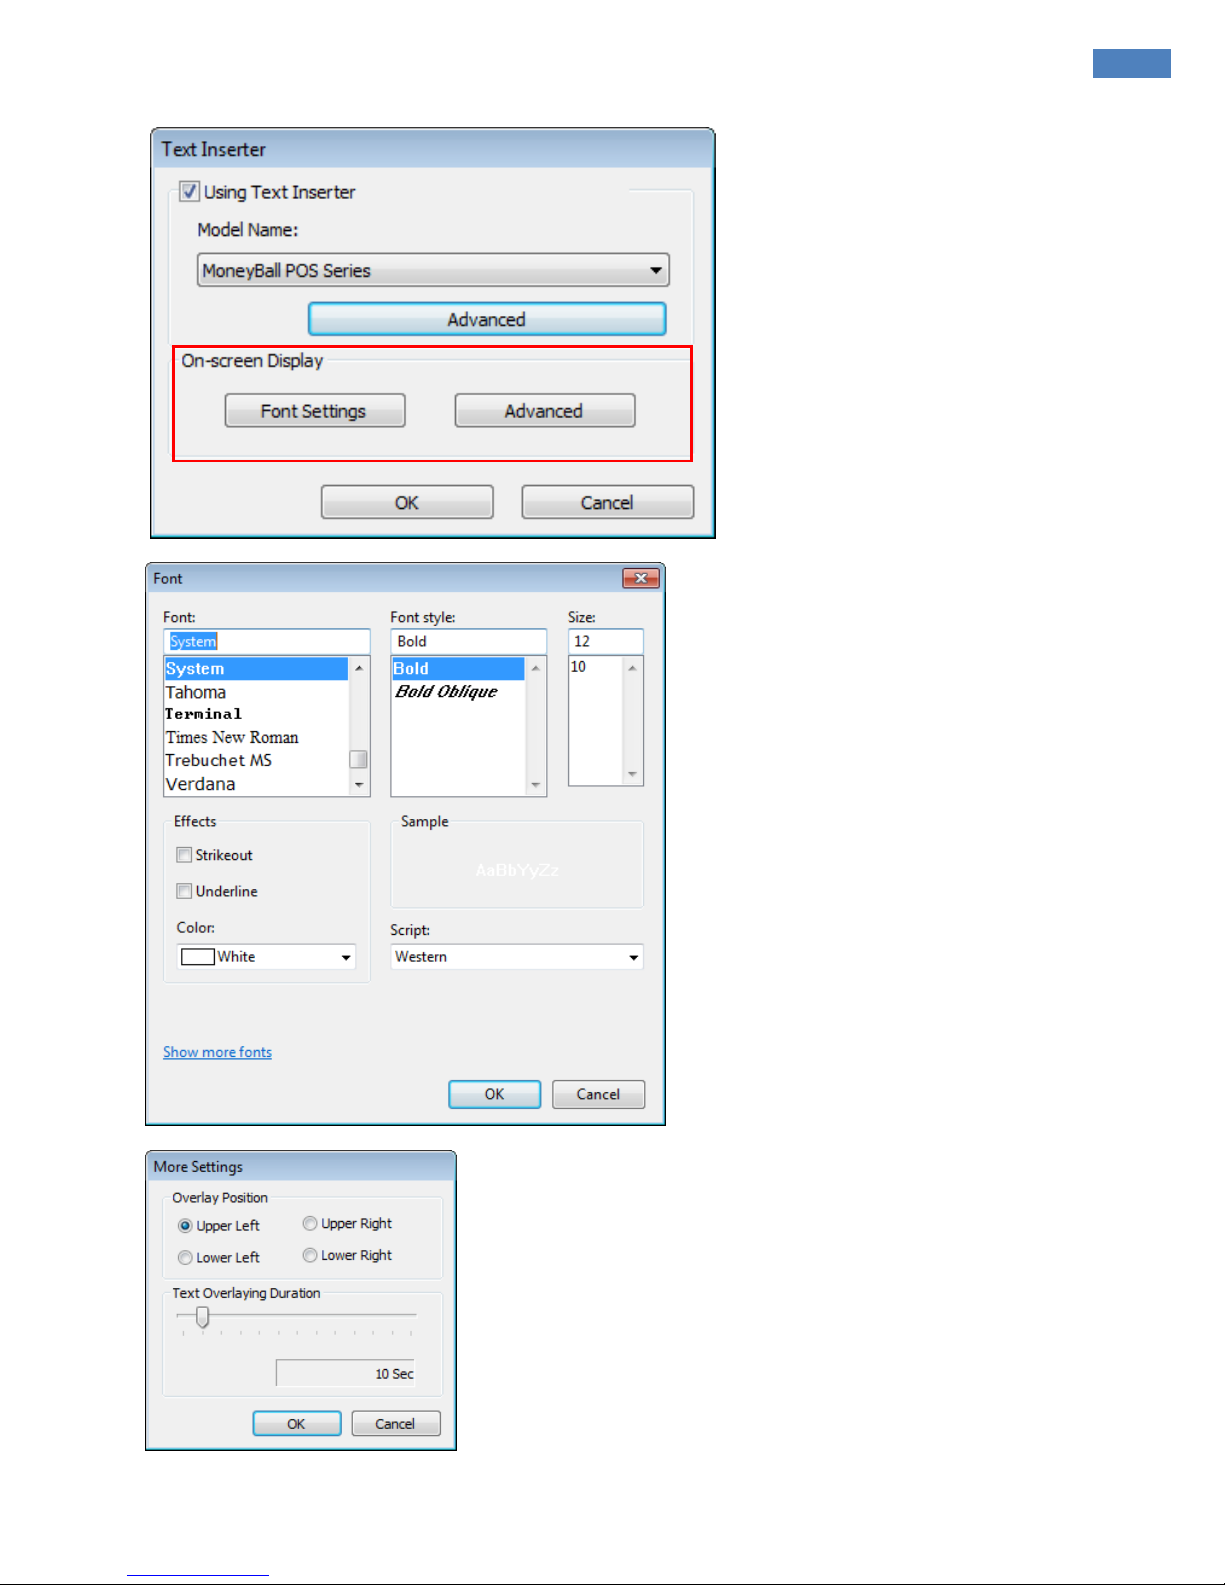
Text Inserter
Text Inserter is a function that allows MagicRadar DVR system to integrate with POS machines . Simply select
POS driver like selecting PTZ driver to enable POS text inserter program and transactions that occur will be
displayed on selected camera pictures. Transaction recording and text search are possible as well.
For more detailed installation and information, refer to Appendix 1.
How to Set
1. Tick the “Using Text Inserter”
2. Choose a connected POS driver.
(POS driver is addable as PTZ protocol adding.)
3. Click on Advanced to set hardware feature.
Device Connection:
Select camera(s) and a comport connected with POS system(s)

28
Text Filter:
Register important goods and useless text to display distinguishably and
search POS data conveniently.
Important goods items:
Pre-registered items will be displayed in red characters.
Useless text:
It is not going to be displayed during transaction.
About:
Shows POS S/W version.
[ EyeMax Series ] User’s Manual (5.5.4.0)
29
Main System Application(Control)
Font Settings:
Font change on screen display.
Advanced:
Position change on screen display.
Overlay Position:
Specify position of POS overlay.
Text Overlaying Duration:
Specify duration of POS data shows.
 Loading...