

Eyecon 9420 Instruction Manual

Eyecon 9420
Pill Counting, Inventory, and Validation System
Instruction Manual
AWT35-501651
Issue AA

Avery Weigh-Tronix is a trademark of the Illinois Tool Works group of companies whose ultimate parent company is
Illinois Tool Works Inc (“Illinois Tool Works”). Copyright © 2017 Illinois Tool Works. All rights reserved.
No part of this publication may be reproduced by making a facsimile copy, by the making of a copy in three dimensions of a two-dimensional
work and the making of a copy in two dimensions of a three-dimensional work, stored in any medium by electronic means, or transmitted in
any form or by any means, including electronic, mechanical, broadcasting, recording or otherwise without the prior written consent of the
copyright owner, under license, or as permitted by law.
This publication was correct at the time of going to print, however Avery Weigh-Tronix reserves the right to alter without notice the
specification, design, price or conditions of supply of any product or service at any time.
Eyecon9420_u_en_501651.book

Table of Contents
page
Table of Contents ......................................................................................................................................3
Chapter 1 General information and warnings ............................................................. ............................ 6
About this manual ..............................................................................................................6
Text conventions .........................................................................................................6
Special messages .......................................................................................................6
Installation ....................................... .................................... ................................ ...............7
Unpacking ...................................................................................................................7
Intended use .................... ............................................................................................7
Sharp objects ........ .... ... ... ... .... ... ... ......................................................................................8
Training ..................................... ............................................................. ............................8
Warranty policy ......................... .........................................................................................8
Specifications .................................. .................................... ................................ ...............9
FCC statement ...................................................................................................................9
UL ......................................................................................................................................9
Chapter 2 Introduction ............................................................................................................................ 10
Video training ...................................................................................................................10
General description ... .......................................................................................................10
Product identification .................................................................................................10
Setup ...................................... ..........................................................................................11
Sulfa and penicillin platter .........................................................................................12
Preparing the Eyecon for use ..........................................................................................13
Turn on the Eyecon .......................................................................................................... 13
Routine maintenance .......................................................................................................14
Cleaning the machine ......................................................................................................15
Funnel and slide gate ................................................................................................15
Rapid fill counting tray ...............................................................................................16
Licensing agreement ........................................................................................................18
Medi-Span copyright and disclaimer information ......................................................18
Software updates .............................................................................................................19
Update warnings .......................................................................................................19
Install software updates .............................................................................................19
Turn off the Eyecon (shutdown) .......................................................................................20
Restart ................................... .................................................... ................................ 20
Shutdown ..................................................................................................................20
About Eyecon screen .......................................................................................................21
Back up the Eyecon data .................................................................................................21
Helpful hint ............ .... .......................................................................................................21
Navigating the touch screen ......................................................................................21
Definitions ........................................................................................................................22
Detecting misfit objects ....................................................................................................22
Chapter 3 Settings menu .......................................................................................................................23
Setting time and date ................... ....................................................................................24
General menu ........................... .......................................................................................24
About EyeCon 9420 ..................................................................................................25
Auto Close Transaction Recorded Message .............................................................25
Drug Substitution .......................................................................................................25
Stock Item Verification ........... ... ... .... ... ... ... .................................................................26
Allow an Under-Fill ....................................................................................................26
Allow an Over-Fill ......................................................................................................26
Eyecon 9420 Instruction Manual 3

Calibrate Platter ........... .... ..........................................................................................26
Barcode menu .................................... ..............................................................................27
Barcode Type ..................................... .......................................................................27
Data menu .......................................................................................................................28
Transaction Purge Time ............................................................................................28
Delete Report Data ................ ... ... .... ..........................................................................29
Tray Photo Count ......................................................................................................29
TCP/IP menu ...................................................................................................................29
Pharm. Mgmt. SW menu .................................................................................................30
General notes on connecting to a pharmacy management system ..........................30
PMSS Provider: .........................................................................................................31
Listening Port ............................................................................................................31
Use PMSS Connection Timeout ............... .... .............................................................31
PMSS Data Purge Time (In Days): ...........................................................................31
Clear PMSS Data ......................................................................................................32
Photo Retriever Application: ...................................................................................... 32
Photo Retriever Port: .................................................................................................32
Remote Server menu .......................................................................................................33
Double Check menu ........................................................................................................33
Login / Scan Out menu ....................................................................................................34
Edit Users ..................................................................................................................34
Count Login, Validation Login, and Inventory Login .................................. ... ... ... .... ... 35
User Lookup ..............................................................................................................35
Test menu ........................................................................................................................35
Scanner test ....... .......................................................................................................36
Camera test ........................ .......................................................................................36
Touchscreen test .......................................................................................................36
Speaker test ....... .......................................................................................................36
Auto Updater menu ..........................................................................................................37
Validate Update Server Access .................................................................................37
Update Now ...............................................................................................................37
Manual Update from USB .........................................................................................37
Automatic Updates: ...................................................................................................38
Multi-Eyecon menu ..........................................................................................................38
Trained Drugs menu ........................................................................................................38
Backup / Restore menu ...................................................................................................39
Inventory menu ................................................................................................................39
Inventory Interface Provider: .....................................................................................40
Auto Delete Inventory Data After Export: - ................................................................ 41
Download Inventory - ................................................................................................41
Delete Inventory Data - .............................................................................................41
Chapter 4 Eyecon operation ................................................................................................................... 42
START screen .................................................................................................................42
Count Only mode ................... ..........................................................................................43
Counting .................................................................................................................... 43
Validation mode operation ........................ .......................................................................45
Rx validation and dispensing .................... .... ... ... ... .... ... ...... ... .... ... ... ... .... ... ... ... ... .... ... 46
Physical Inventory mode ..................................................................................................52
Inventory operation without the interface connection ................................................ 52
Inventory operation with the interface connection ........ ... .......................................... 54
Practices common to all modes .......................................................................................55
Login ...................................... ....................... ................... ....................... ...................55
Manual NDC entry .....................................................................................................56
Drug Number Not Found ...........................................................................................56
Edit drug database ....................................................................................................57
Best counting practice ...............................................................................................57
4 Eyecon 9420 Instruction Manual

Best filling practice ....................................................................................................58
Common messages or warnings ...............................................................................59
Unit of Use for pill counting ....................................... ... ... ... ... ....... ... ... .... ... ... ... ... .... ... 59
Hand counts ..............................................................................................................61
Dispensing large quantities .......................................................................................63
Train or Retrain a pill image ......................................................................................64
Double Count (DEA Controlled Substances) ............................................................65
Back Count (DEA Controlled Substances) ................................................................66
Chapter 5 User login barcodes .................................................. ...................... ....................... ................68
User login barcodes .................. .......................................................................................69
Chapter 6 Audit reports ....................................... .......................... .......................... ......................... .......70
Access Eyecon Auditor ....................................................................................................70
Initial use ..........................................................................................................................70
Specify and view a report .................................................................................................70
Accessing the saved photos and reports .................................................................. 72
Chapter 7 Accuracy verification procedure .......................................................................................... 73
Chapter 8 Supported bar code symbologies ........................................................................................ 75
Supported symbologies ...................................................................................................75
UPC/EAN ..................................................................................................................75
Code 128 ...................................................................................................................76
Code 39 .....................................................................................................................76
Code 93 .....................................................................................................................76
Code 11 .....................................................................................................................76
Interleaved 2 of 5 (ITF) ..............................................................................................76
Discrete 2 of 5 (DTF) .................................................................................................77
Codabar (NW - 7) ......................................................................................................77
MSI ............................................................................................................................77
Chinese 2 of 5 ...........................................................................................................77
Matrix 2 of 5 .............. ... ..............................................................................................77
Korean 3 of 5 .............................................................................................................77
Inverse 1D ................................................................................................................. 78
Postal Codes .............................................................................................................78
GS1 DataBar .............................................................................................................78
Composite ................................................................................................................. 78
2D Symbologies ........................................................................................................78
Symbology-Specific Security Levels ......................... ... ... ... ... ....... ... ... .... ... ... ... ... .... ... 79
Macro PDF ................................................................................................................79
Index .........................................................................................................................................................81
Eyecon 9420 Instruction Manual 5
General information and warnings
1 General information and warnings
1.1 About this manual
This manual is divided into chapters by the chapter number and the large text at the top
of a page. Subsections are labeled as shown by the 1 and 1.1 headings shown above.
The names of the chapter and the next subsection level appe ar at the top of alternating
pages of the manual to remind you of where you ar e in the manual. Th e manual name
and page numbers appear at the bottom of the pages.
1.1.1 Text conventions
The buttons used to interface with the Eyecon are via the touch screen display. The
buttons are shown in bold letters and reflect the case of the displayed button.
Screen headings will appear in bold italic (i.e. START) and reflect the case of the
displayed heading.
Displayed messages appear in italic type and reflect the case of the displayed
message.
1.1.2 Special messages
Examples of special messages you will see in this manual are defined below. The
signal words have specific meanings to alert you to additional inform ation or the relative
level of hazard.
DANGER!
THIS IS A DANGER SYMBOL.
DANGER MEANS THAT FAILURE TO FOLLOW SPECIFIC PRACTICES
OR PROCEDURES WILL CAUSE INJURY OR DEATH.
CAUTION!
This is a Caution symbol.
Cautions give information about procedures that, if not observed, could result
in damage to equipment or corruption to and loss of data.
NOTE: This is a Note symbol. Notes give additional and important information, hints
and tips that help you to use your product.
6 Eyecon 9420 Instruction Manual

1.2 Installation
DANGER: RISK OF ELECTRICAL SHOCK. NO USER SERVICEABLE
PARTS. DO NOT ATTEMPT TO SERVICE THE EYECON BY REMOVING
THE COVER OR OPENING THE UNIT. REFER TO QUALIFIED SERVICE
PERSONNEL FOR SERVICE.
CAUTION: Danger of explosion if battery is incorrectly replaced. Replace only
with the Panasonc Corporation CR-2032L/BN, CR-2032N/BN, or CR-2032L/BE.
Dispose of used batteries according to the manufacturer’s instructions.
CAUTION: Replace the detachable mains power supply chord with 18/3 AWG
SVT Type 240VAC 10A.
ATTENTION: Il y a danger d'explosion s'il y a remplacement incorrect de la
batterie, remplacer uniquement avec une batterie du même type ou d'un type
équivalent recommandé par le constructeur. Mettre au rebut les batteries
usagées conformément aux instructions du fabricant.
1.2 Installation
DO NOT EXPOSE THE EYECON TO RAIN OR MOISTURE. DO NOT
EXPOSE THE EYECON UNIT TO DRIPPING OR SPLASHING LIQUIDS.
1.2.1 Unpacking
Caution! The Eyecon contains components that can be damaged by rough
handling. Unpack all items carefully.
1.2.2 Intended use
Eyecon™ uses machine vision technology to accurately count tablet s and capsules for
Rx dispensing.
Machine vision technology allows for identification of most foreign substances and pill
variations during the counting and dispensing process.
The specialized technology of the Eyecon™ does not support the counting of gel-caps.
IF THE EQUIPMENT IS USED IN A MANNER NOT SPECIFIED BY THE
MANUFA CTURER, THE PROTECTION PROVIDED BY THE EQ UIPMENT
MAY BE IMPAIRED.
Eyecon 9420 Instruction Manual 7

General information and warnings
1.3 Sharp objects
Do not use sharp objects such as screwdrivers or long fingernails to operate the
buttons.
1.4 Training
Do not attempt to operate or complete any procedure on the Eyecon un less you ha ve
received the appropriate training or read this Instruction Manual .
T o avoid the ri sk of RSI (Repetitive S train Injury), place the machine on a surface which
is ergonomically satisfactory to the user. T ake frequent br eaks during prolonged usage.
1.5 Warranty policy
Avery Weigh-Tronix warrants its products to be free from defects in material and
workmanship for a period of two (2) years from the origina l date of purchase. Standard
"Terms and Conditions of Sale" apply.
Factory parts and labor are provided at no charge for up to two full years from the
original date of purchase.
The obligation of Avery Weig h-Tronix is limited to r epairing or replacing equip ment and
components that upon inspection, testing and verification by Avery Weigh-Tronix are
found defective. Avery Weigh-Tronix extends this warranty only upon proper
installation and use of the equipment in the application for which it was intended and
does not warranty equipment that has been subject to a ny of the follo wing co nditio ns:
l Alterations, misuse or unusual physical or electrical stress beyond the
written specifications of that equipment.
l Exposure of electronic components to Electrostatic Discharge (ESD)
resulting from improper handling or installation.
l Damage caused by freight carriers, negligence, fire, flood or other natural
disaster.
In the event equipment is repaired or replaced under the terms of the warranty, the
warranty of the repaired or replaced equipment is limited to the remaining portion of the
original warranty period or 90 days, whichever is greater.
Avery Weigh-Tronix is responsible for repair, replacement or, at the sole discretion of
Avery Weigh-Tronix, credit of nonconforming equipment under the conditions and
terms of this warranty. Avery Weigh-Tronix is not liable for the cost of repairs, on-site
labor or any travel-related expenses performed by another party unless otherwise
agreed in writing.
Transportation charges for mate rial shipped to A ver y W eigh-Tronix for warranty repair
is paid by the shipper . Avery Weigh-Tronix will pay the transportation charges, via
standard carrier , fo r the return of items repa ired or replaced under warra nty. Failure to
handle and ship equipment correctly will void the warranty on that equipment.
The sole remedy under this warranty is to rep air, replace or provide credit for equipment
at the sole discretion of Avery Weigh-Tronix. Avery Weigh-Tronix is not liable for
expenses either direct or consequential that arise from the use of or inability to use the
product. Avery Weigh-Tronix is not responsible or liable for losses, injury, or property
damage due to the installation or failure of the product.
8 Eyecon 9420 Instruction Manual

For warranty , product service, and product regi stration visit www.eyeconvpc.com or call
866-260-6540.
1.6 Specifications
Platter Surface Area 48 sq inch
Dimensions 28" H x 11" W x 17.5" D
Screen 7" Color LCD flat panel touch screen
Barcode Scanner
1.6 Specifications
Integrated 1D & 2D scanner
symbologies
Supply Voltage 100 VAC - 240 VAC
Frequency Range 50/60 Hz
Current 0.75 A
Temperature Range 50 - 90 ºF
Communication (2) USB, (1) Ethernet
Relative Humidity Up to 70% at 90ºF
Altitude of Use Up to 2000 meters
Interface Contact Avery Weigh-Tronix for details on work
Accuracy 99.97% count accuracy
Design Open flow, easy to clean
Approvals FCC, UL
Warranty Two year limited
1.7 FCC statement
Supported
The Eyecon 9420 scanner supports hundreds of
symbologies. See Supported bar code
symbologies on page 75 for the complete list.
flow integration
This equipment has been tested and found to comply with the limits for a Class A digit al
device, pursuant to Part 15 of the FCC Rules. These limits are designed to provide
reasonable protection against harmful interfe rence when the equipment is operated in
a commercial environment.
This equipment generates, uses, and can radiate radio frequency energy and, if not
installed and used in accordance with the instruction manual, may cause harmful
interference to radio communications.
Operation of this equipment in a residential area may cause harmful interference in
which case the user will be required to correct the interference at his/her own expense.
1.8 UL
Evaluated to UL 61010-1 3rd edition UL/cUL.
Eyecon 9420 Instruction Manual 9
Introduction
Description Part Number
1 Touch Screen Interface N/A
2 Infra Red Camera N/A
3 Rapid Fill Platter 249400-303A0
4 Infra Red Emitter N/A
5 (2) Spatula 44-70-43547R
6 Clear Funnel Face 44-70-43760
7 Barcode Scanner N/A
8 Funnel Slide Gate 44-70-43546
9 Penicillin Platter 249400-301A0
Sulfa Platter 249400-302A0
10 Leg Assembly 249400-304A0
2 Introduction
2.1 Video training
Copy this URL into your browser to see the full list of training videos for the Eyecon
9420: https://www.youtube.com/watch?v=ysdKd1Q1iME&list=PLl-
hAOdLOPokPO52rWfNTPbP0rK9RG_ap
2.2 General description
Refer to the diagram below for part descriptions and field replaceable and non-field
replaceable parts.
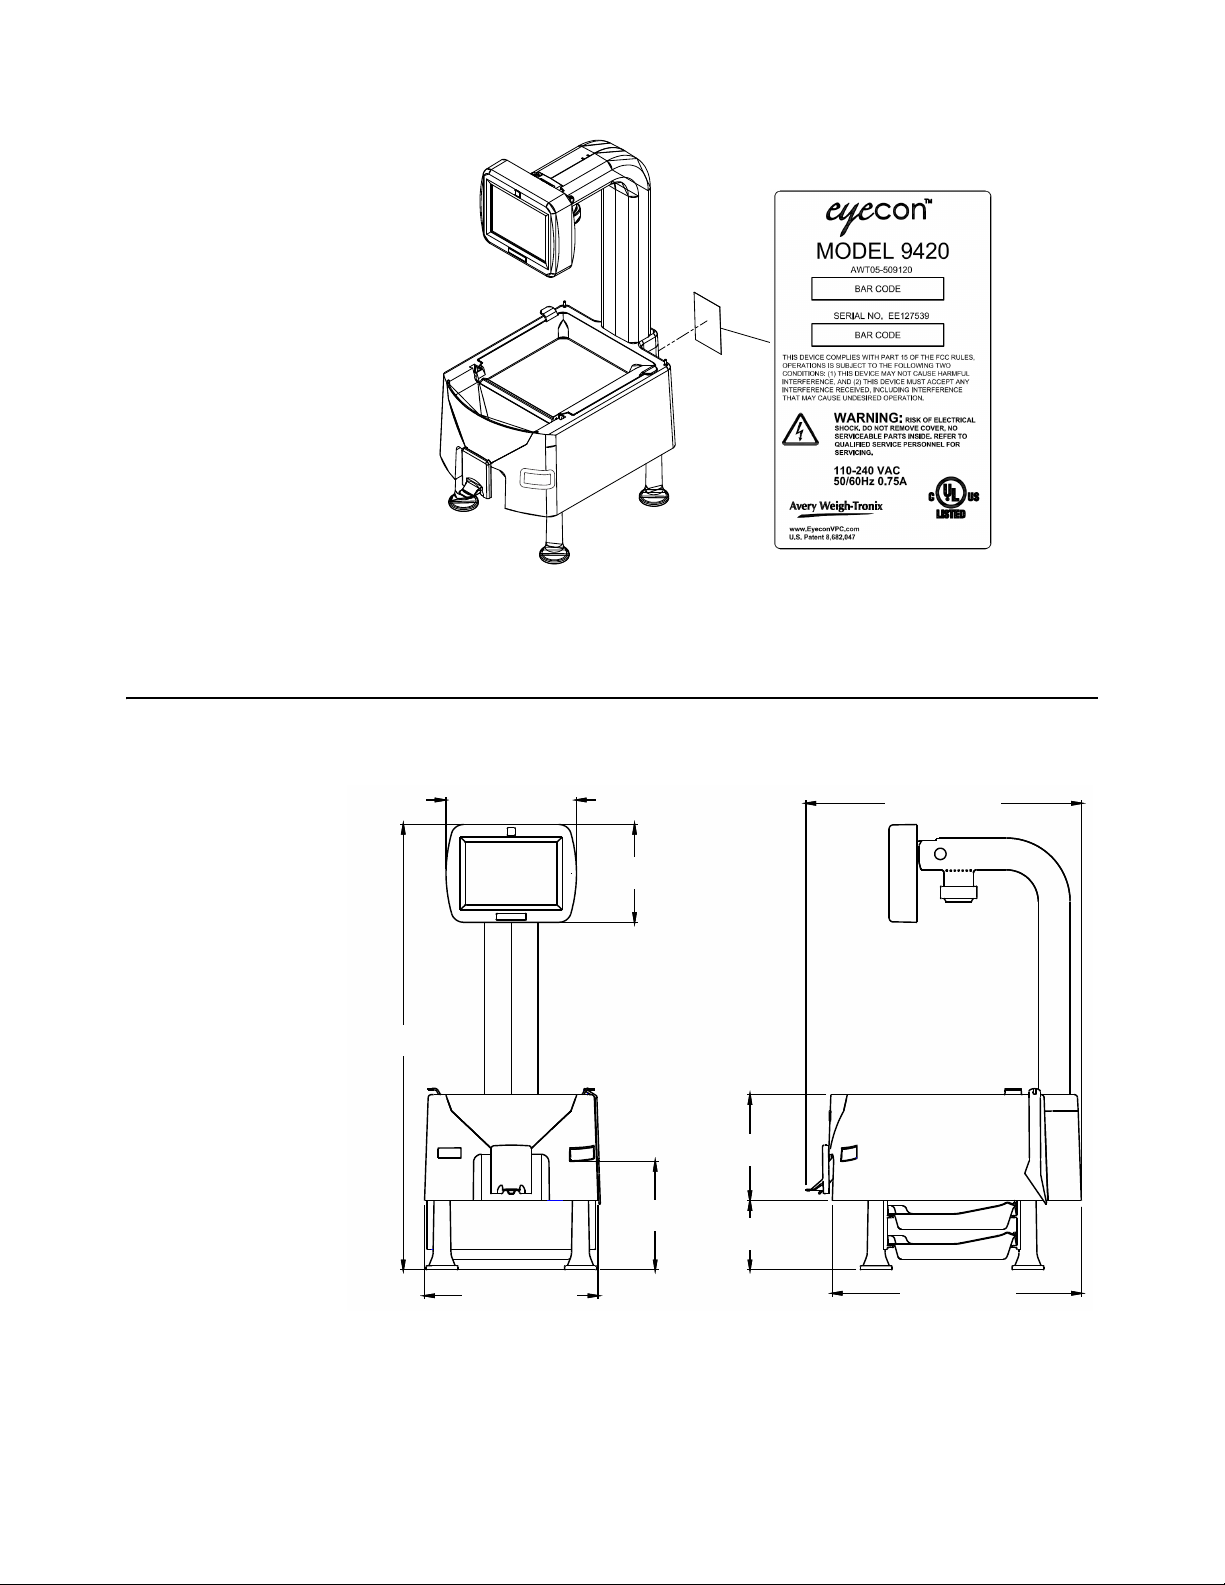
2.2.1 Product identification
Each Eyecon has a specific part number and a unique serial number. Please refer to
Figure 2.1.
10 Eyecon 9420 Instruction Manual
2.3 Setup
17.30 (439. 4)
8.09 (2 05. 5)
6.14 (156. 0)
28.25 (717. 5)
6.81 (172. 9)
10.89 (2 76. 7)
4.35 (110.5)
6.65 (168. 9)
15.65 (3 97. 4)
This information will be needed for periodic updates, service, and warranty claims.
Figure 2.1 Product Markings
2.3 Setup
Place the Eyecon on a level surface and away from direct sunlight. Refer to Figure 2.2
for dimensions of the Eyecon.
Figure 2.2 Eyecon dimensions
Eyecon 9420 Instruction Manual 11
Introduction
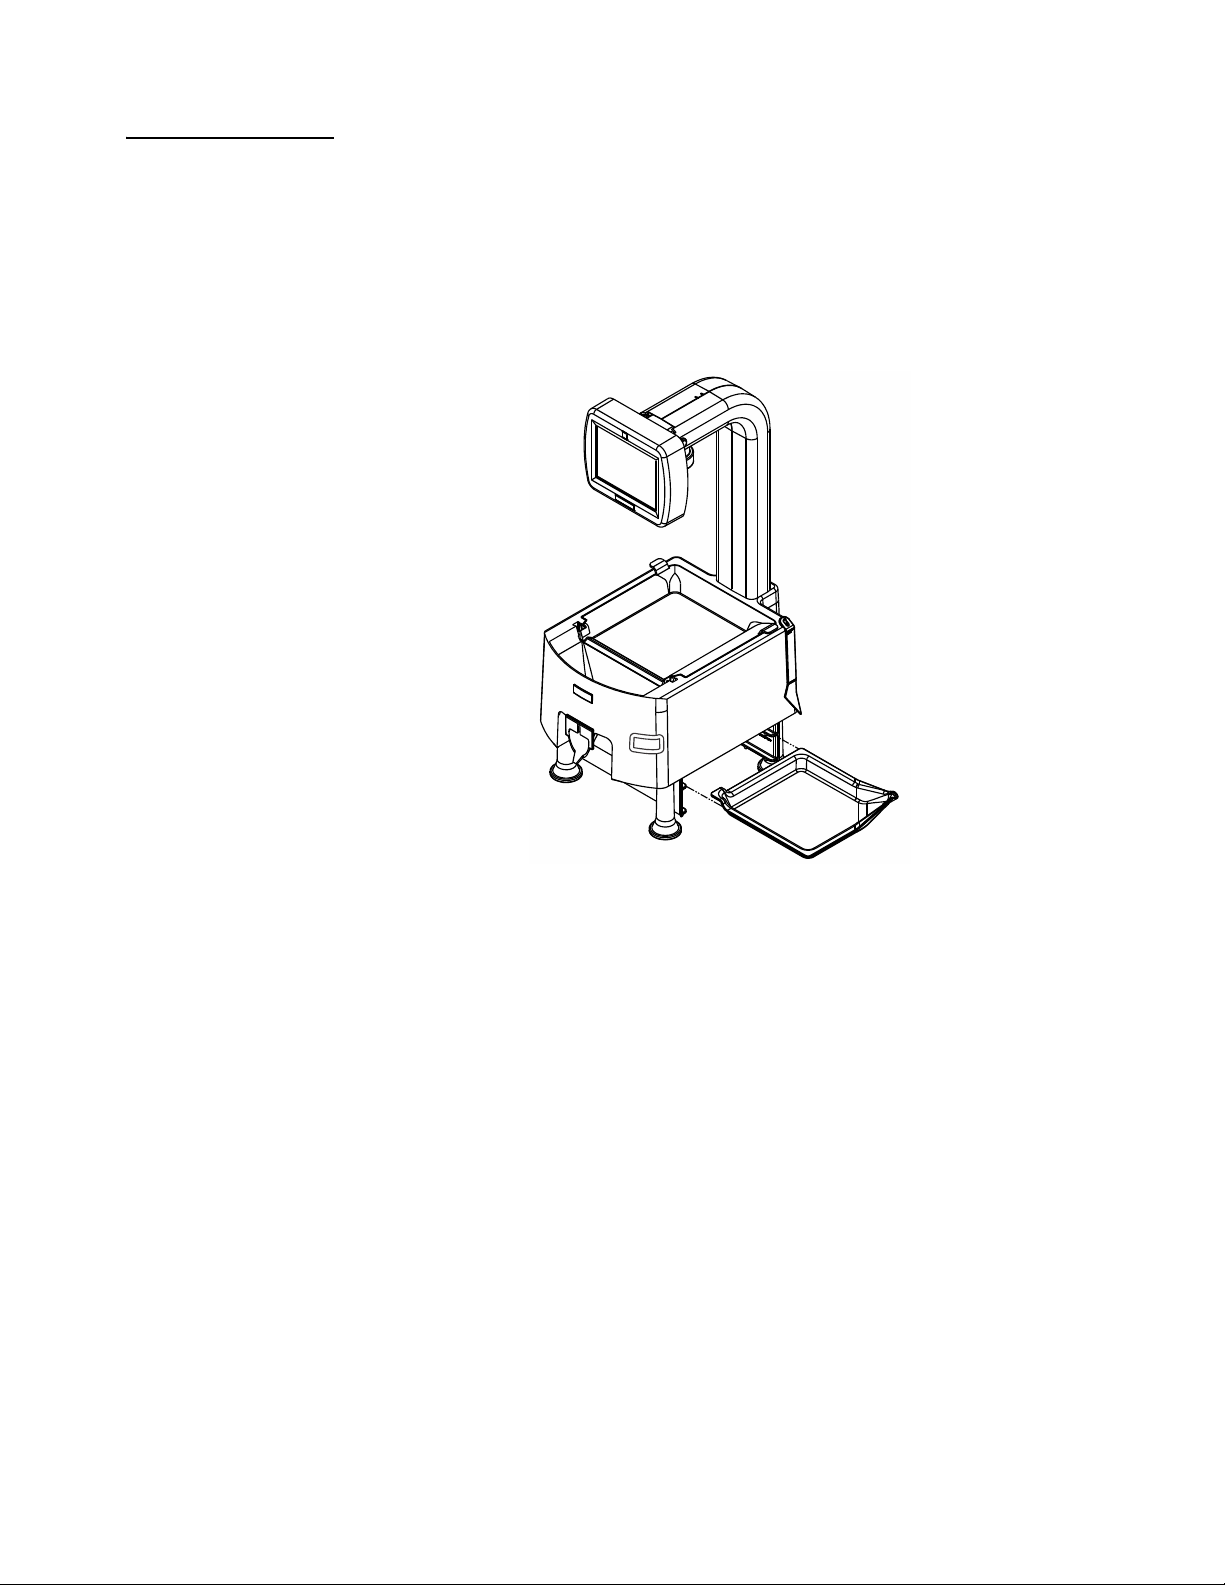
2.3.1 Sulfa and penicillin platter
The sulfa (yellow) and penicillin (red) platters are used to avoid cross contamination
and are standard with Model # 179400-004311. The platters store easily under the
base of the Eyecon.
The platters come with the product but extras may be ordered. See the part numbers
below:
l When ordering the Penicillin platter only, use part number 249400-301A0.
l When ordering the Sulfa platter only, use part number 249400-302A0.
Figure 2.3 Storing Sulfa and Penicillin platters
12 Eyecon 9420 Instruction Manual

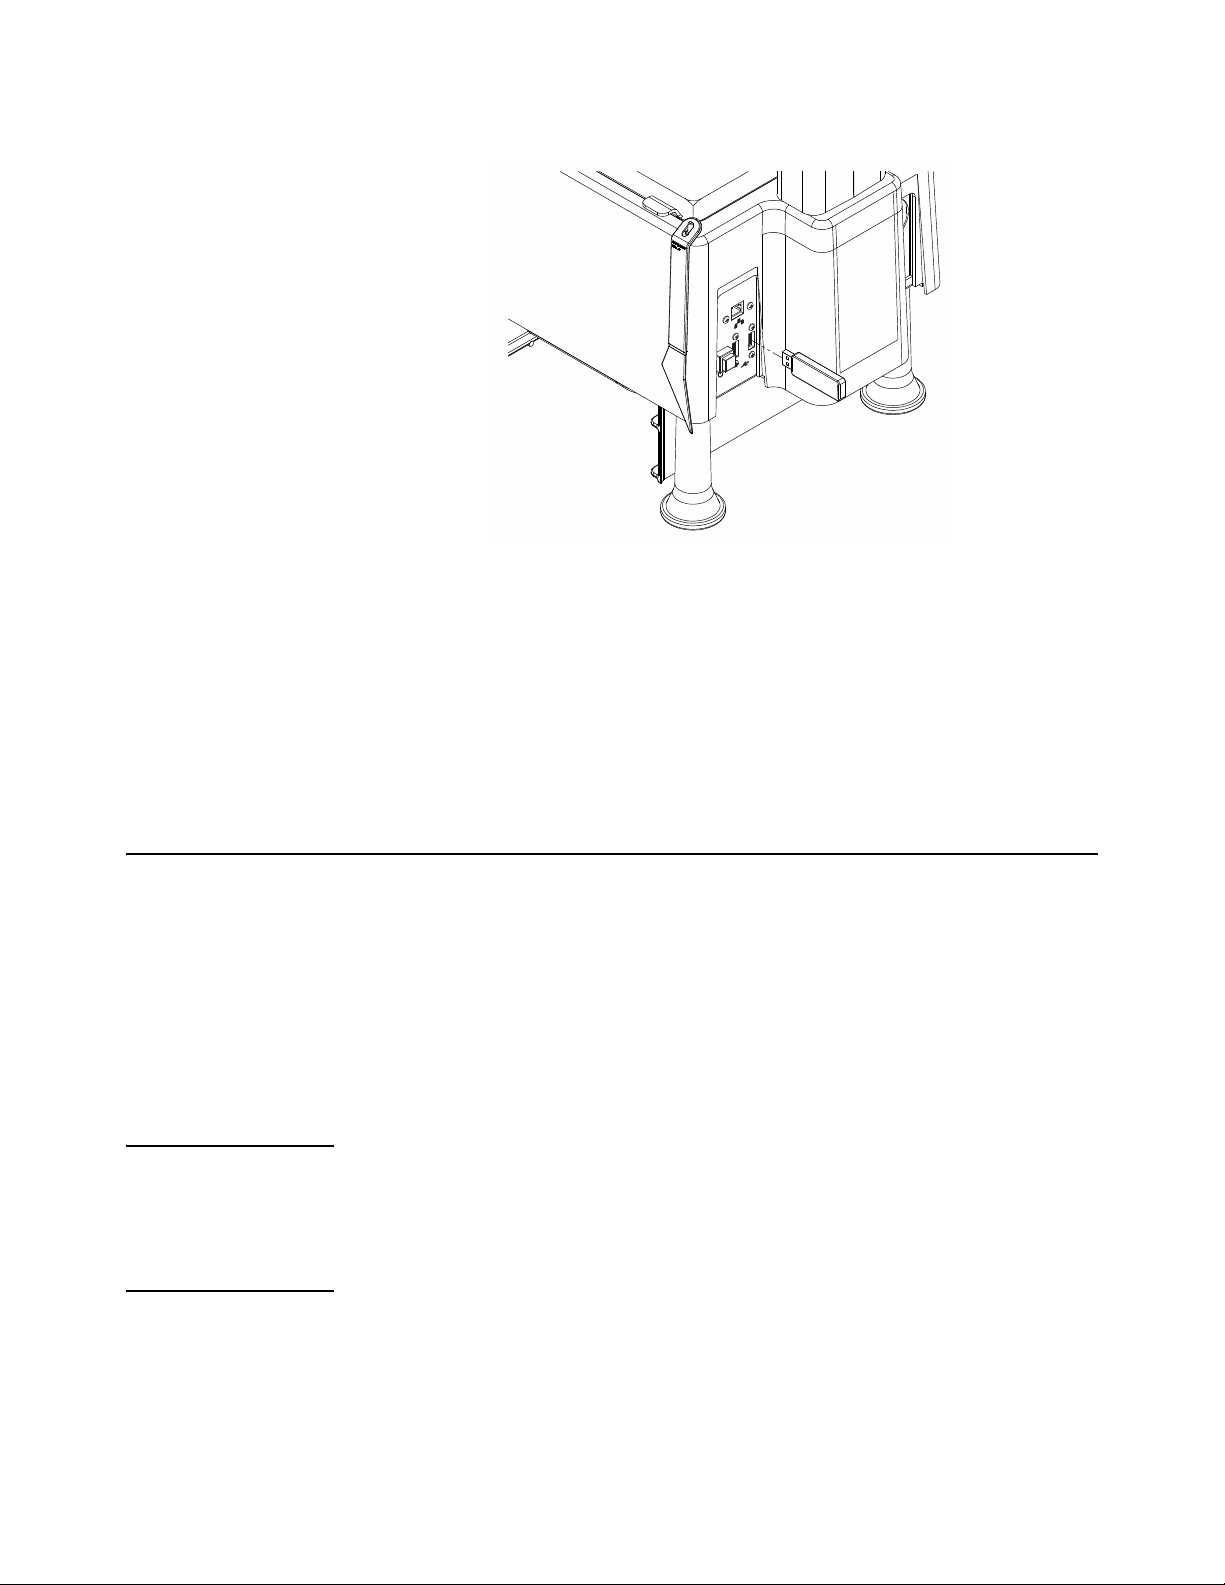
2.4 Preparing the Eyecon for use
1. Inse rt the po we r cable into the receptacle on the back of the Eyec o n. Refer to
Figure 2.4.
2. The Eyecon must be installed near an easily accessible socket outlet. Plug the
Eyecon power cord into the outlet.
2.4 Preparing the Eyecon for use
3. Protective Earthing is provided by the Earthing pin of the IEC60320 type
appliance inlet.
2.5 Turn on the Eyecon
When you plug in the Eyecon, the unit will power up in five to ten seconds. There is no
need to press the pushbutton on the back of the unit.
Do not use the pushbutton to turn of f t he Eye con. Ref er t o Figur e 2.4 for power
connector location. The Eyecon is designed to be turned off through the touch
screen menus. Refer to page 20 for details on shutting down the Eyecon.
If power is lost or the unit has been shut down, fully depress and release the
power pushbutton to turn on the Eyecon. Refer to Figure 2.5 for power
pushbutton location
Figure 2.4 Power connector
Eyecon 9420 Instruction Manual 13

Introduction
Power
Pushbutton
USB Ports
RJ-45 Network
Connector
If a network cable is to be connected plug it into the receptacle on the back. Refer to
Figure 2.5.
For interfaces having a power pin such as external USB ports, ensure that the
connectors and wires are suitably rated for 5VDC 0.5A. All connection from/to the
product shall be with 60950 certified equipmen t only.
2.6 Routine maintenance
Always turn off the machine and unplug the power cord before starting any routine
maintenance to avoid the possibility of electric shock.
Make sure that it is placed securely on a flat and level surface.
Figure 2.5 Eyecon Back Panel
14 Eyecon 9420 Instruction Manual

2.7 Cleaning the machine
Be sure to keep the Eyecon unit clean and free of dust. Do not use harsh detergents or
spray water on the Eyecon unit.
It is recommended the Eyecon unit be cleaned on a daily basis. Powder and pill dust
tends to accumulate on surfaces such as the rapid fill tray and funnel gate. Follow the
steps below for effective cleaning.
You can use isopropyl alcohol in a spray bottle to wet surfaces and then wipe with a
soft cloth or paper towel.
2.7.1 Funnel and slide gate
1. Slide the gate up while pulling out away from the housing as shown in the photo
below.
2.7 Cleaning the machine
2. Clean the clear funnel gate by running it und er a faucet. Ma ke sure it is
completely dry before reattaching to the housing.
3. Clean the pill funnel by running a slightly damp rag throu gh it a few times.
4. Clean the funnel gate bracket rails to remove a ll pill dust.
Eyecon 9420 Instruction Manual 15

Introduction
5. Reinstall the funnel gate by sliding down the funne l post until it sna ps into
place.
2.7.2 Rapid fill counting tray
1. Lift the counting tray up to a vertical position.
2. Tilt the tray to the left, the right side should pull out of the enclosure.
3. Pull up on the tray to remove completely.
16 Eyecon 9420 Instruction Manual

2.7 Cleaning the machine
4. Clean the tray by running under a faucet. Make sure it is completely dry before
reattaching to housing.
5. Before reinstalling the tray, clean the diffuser surface under the tray with a soft
damp cloth.
6. Reinstall rapid fill tray onto Eyecon unit by holding the tray vertical and push it
into the slots in the housing.
Eyecon 9420 Instruction Manual 17

Introduction
2.8 Licensing agreement
When the Eyecon is powered up for the first
time a Database Subscription Terms and
Conditions screen will be displayed, shown at
right.
Before the Eyecon can be used, you must
agree to these terms.
1. Read the terms and conditions
thoroughly and check the “I accept” box
on the lower left and then click the OK button which appears.
The End User License Agreement
(EULA) screen at right appears.
2. Read the EULA and press Accept to
advance to the START screen.
2a. If you press the Cancel button instead,
the warning screen at right is displayed.
Press the Return To EULA
button to return to the Licensing
Agreement.
Press the Shutdown button to
turn off the Eyecon.
2.8.1 Medi-Span copyright and disclaimer information
Copyright: Copyright© 2005 by Wolters Kluwer Health, Inc.
All rights reserved. The Master Drug Data Base (MDDB v2.5) Documentation Manual
and the database supplied with it may not be repr oduced in any form or by any means,
in whole or in part, without written consent from the publisher . Any unauthorized use of
this copyrighted material will be subject to legal action.
Medi-Sp an is a division of Wolters Kluwer Health, Inc.
Master Drug Data Base (MDDB®) is a registered tra demark of W olters Kluwer Health,
Inc.
Copyright: Copyright © 2003 Wolters Kluwer Health, Inc.
All rights reserved. The Drug Image Database Documentation Manual and the
database supplied with it may not be reproduced in any for m or by any means, in whole
or in part, without written consent from the publisher. Any unauthorized use of this
copyrighted material will be subject to legal action.
18 Eyecon 9420 Instruction Manual

Disclaimer: The information contained in the Medi-Span databases is intended to
supplement the knowledge of physicians, pharmacists, and other healthcare
professionals regarding drug therapy problems and patient counseling information.
This information is advisory only and is not intended to replace sound clinica l judgment
in the delivery of healthcare services. You are advised to review the definitions,
functionality, and limitations of each Medi-Span database.
Medi-Span disclaims all warranties, whether expressed or implied, including any
warranty as to the quality, accuracy, and suitability of this information for any purpose.
2.9 Software updates
The software must be updated quarterly to up hold the Licensing Agree ment. This can
be done through the Eyecon 9420 menus, if it is con nected to the in te rnet, or yo u can
download the software update from www.eyeconvpc.com. These updates contain drug
data/photo updates and application enhancements.
In the USA, the third party supplier for licensed drug data is Wolters Kluwer Health
(Medi-Span).
2.9 Software updates
2.9.1 Update warnings
Warnings will be provided when the expiration date on the data has p assed. There are
four levels of warning that can be chosen in the Eyecon Settings menu. Table 1.1,
below, shows the warning frequency based on your warning level choice (choice is
made in Settings>Auto Updater>Medi-Span Expiration Warning Level menu.
Warning interval is dependent on the length of time since the expiration date has
passed.
Table 2.1 Update Warning Frequency
Time since expiration Standard Level 2 Level 3 Level 4
1st week post expiration: One warning per day. 1/week none none
2nd week post expiration: One warning per 4 hours. 1/day 1/day 1/day
3rd week post expiration: One warning per hour. 1/four hours 1/four hours 1/day
4th week post expiration: One warning every 10 minutes. 1/hour 1/two hours 1/four hours
Last 2 days One warning every 5 minutes 1/ten minutes 1/thirty minutes 1/hour
Beyond the 4th week the third party licensed drug data is removed from the Eyecon.
2.9.2 Install software updates
1. If you’re Eyecon is connected to the internet you can download the latest
updates by using the Auto Updater menu item and choosing Update Now.
If you are not connected to the internet, you can do wn loa d th e late st software
updates from the Eyecon website (eyeconvpc.com) to your computer and place
on a USB memory stick and transfer the updates to the Eyecon. Be sure the
memory stick does not contain an older version of an update file b efore copying
the current update file.
Eyecon 9420 Instruction Manual 19
Introduction
2. Plug the USB memory stick into an unoccupied USB port of the Eyecon. See
Figure 2.6 for USB port location.
Figure 2.6 USB memory stick Installation
3. Follow the prompts displayed on the Eyecon.
If no message appears when the USB memory stick is plugged in, then
follow the instructions below.
If you see a message asking if you want to reboot the Eyecon, click on
NO.
2.10 Turn off the Eyecon (shutdown)
The Shutdown button in the START screen is used
for restarting or turning off the Eyecon. Y o u will see
the display at right. You can choose to Restart,
Shutdown or Cancel.
2.10.1 Restart
Press the Restart button in order to initialize a reboot sequence and return to the
START screen.
2.10.2 Shutdown
1. Press the Shutdown button to turn off the Eyecon.
20 Eyecon 9420 Instruction Manual

2. Press Cancel to terminate the process.
The barcode scanner may come on when it detects motion even if the Eyecon is off.
2.11 About Eyecon screen
The About Eyecon 9420 screen provides
information specific to the Eyecon. Including
software release date, serial number and MediSpan data.
1. From the START screen, press Settings.
2. Press Skip Login.
3. Press General at the top of the
Configuration Manager list at the left of the screen.
4. Press About EYECON 9420 at the top of the list on the right side of the
screen.
2.11 About Eyecon screen
The screen shown in the illustration above is displayed.
5. Press OK to return to the START screen or press View EULA to view the
Software Licensing Agreement.
2.12 Back up the Eyecon data
CAUTION!
The Eyecon is a computer based device and it is s trongly suggest ed to back up
all transaction data and images periodically . Otherwise saved data can be
permanently lost!!!.
See Backup / Restore menu on page 39 for more details on backing up report
data and images.
2.13 Helpful hint
2.13.1 Navigating the touch screen
Use your finger to press the buttons on screen or to swipe/move scrollable lists.
Eyecon 9420 Instruction Manual 21

Introduction
2.14 Definitions
There are several terms used throughout this manual that will be helpful to define at the
start.
Vial Patient’s pill/capsule container to hold their counted Rx.
Vial label The label that is applied to the patient’s Rx vial. The label
Patient pamphlet This paper may contain information that cannot fit on the
Stock bottle/item Bulk storage bottles or boxes that hold pills, capsules,
Stock bottle label The label on the bulk storage bottle that shows the
NDC # National Drug Code. It has three segments separated by
may contain some or all of the following information in
written or barcode form: the drug number, the Rx number
and the quantity of pills.
vial label such as patient instructions and barcodes.
creams or syringes for dispensing.
required information about the contained drug.
dashes. One segment typically has a leading zero that is
dropped in order to fit into a 10 digit UPC number. It is
present on all Rx and most non-prescription medication
packages in the US. The full 11 digit format is XXXXXXXXX-XX but this can vary as usually a leading zero is
dropped from one of the segments.
UPC barcode Currently most drugs in the USA have a UPC barcode
2D barcode The DSCSA (Drug Supply Chain Security Act) requires a
Rx barcode This is a barcode that contains the Rx number. This may
Rx Short for prescription.
2.15 Detecting misfit objects
The Eyecon identifies broken pills and non-matching shapes very well but is not
infallible. There may be instances when broken pills may not be detected or an
incorrect drug will have a size and shape that escapes detection. Barcode validation is
the number one way to ensure the correct drug is dispensed.
which is associated with the drug’s NDC number.
2D barcode on stock items beginning November 2017.
This format contains UPC number, the expiration date,
serial number and lot number of the drug.
also contain other information as needed by the
pharmacy.
22 Eyecon 9420 Instruction Manual
3 Settings menu
Top level menu
Press the Settings button on the START screen to access the SCAN USER LOGIN
screen, shown below.
If a user has been setup they can scan their login barcode or press the Manual Login
button and key in their login ID.
If no users have been set up, press the Skip Login button. This takes you to the
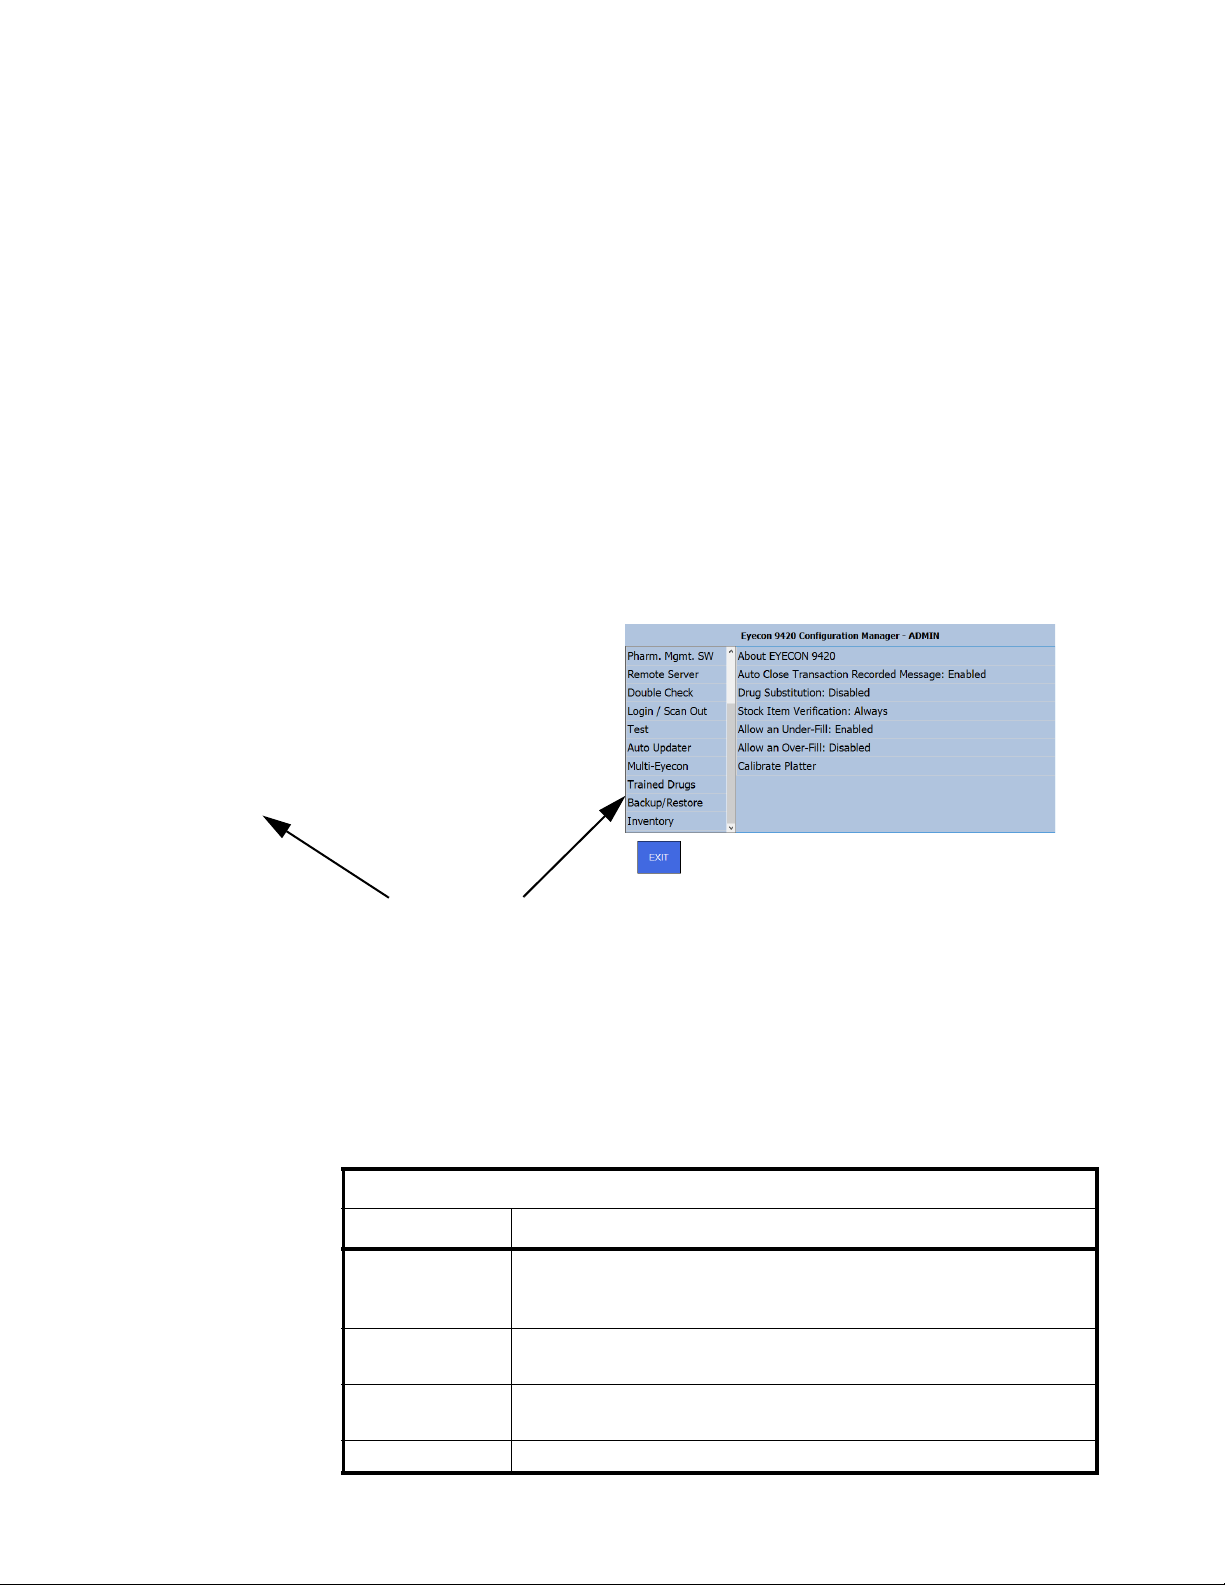
Configuration Manager screen, shown below.
Notice the left side of the screen contains the top level menu and since they can’t all fit
on the screen you can use your finger to scroll the list up and down. When you touch
the item you want in the list, the choices under that item appear on th e right side of the
display.
Table 3.1 shows the entire main list of items and a quick description of what they are
used to configure or view.
Table 3.1 Configuration Manager List
Eyecon 9420 Configuration Manager
Main Menu Item Description
Access this to see information about the 9420, enable or disable the Auto Close
General
Barcode
Data
TCP/IP Use this to access the TCP/IP settings
Recorded Message, Drug Substitution, Stock Item Verification, Allow an Underfill or Over-fill and to calibrate the platter.
Access this to set the Barcode Type, lengths, offsets, to enable or disable the
Rx Scan in Count Mode and to enter the Barcode Test Mode.
Access this to set the Transaction Purge Time, Delete Report Data and see the
Tray Photo Count.
Eyecon 9420 Instruction Manual 23

Settings menu
Main Menu Item Description
Pharm. Mgmt. SW Access this to setup an interface between Eyecon and your pharmacy system.
Remote Server
Double Check Access this to set up double counts and back counts.
Login/Scan Out Access this to set up user login and scan out parameters.
Test Access this to test the scanner, camera, touchscreen and speaker.
Auto Updater Access this to manage updates for the Eyecon.
Multi-Eyecon Access this to manage communication among multiple connected Eyecons
Trained Drugs Access this to import or export the trained pill images to or from this Eyecon.
Backup/Restore Access this to backup and restore the database or configuration.
Inventory Access this to manage inventory data.
3.1 Setting time and date
Eyecon 9420 Configuration Manager
Access this to configure the Eyecon to Rx fill results back to your pharmacy
system.
T o set the time and date, which appear in the upper
right corner of the START screen, tap on the time
and date text to reveal the screen at right.
To set the date, tap the small calendar icon on the
right side of the screen and choose the year , month
and day from the small display that appears.
To set the time, tap the unit you want to change
(hour, minute, second or PM/AM) and use the up or
down arrow on the right to increase or decrease the
value. You can also set your time zone in the bottom drop down list.
Press OK when finished and the START screen is displayed.
3.2 General menu
Use the General menu, shown at
right, to see information about the
9420, enable or disable the Auto
Close Recorded Message, Drug
Substitution, Stock Item
Verification, Allow an Under-fill or
Over-fill and to calibrate the
platter. All of these are described
on the following pages.
24 Eyecon 9420 Instruction Manual

3.2.1 About EyeCon 9420
This screen, shown at right, lists various
pieces of information about the Eyecon.
Press View EULA to view the End User
License Agreement (EULA)
Press OK to exit the screen.
3.2.2 Auto Close Transaction Recorded Message
This is the second item in the General menu. The
screen shown at right, allows you to enable or
disable the Auto Close Transaction Recorded
Message. Tap your choice and press OK to
accept the change or Cancel to abort a change.
If enabled, the screen at lower right is displayed
saying the transaction has been recorded. This
message will appear briefly after every counting
transaction.
3.2 General menu
If disabled the message screen will be skipped
when a count is performed.
3.2.3 Drug Substitution
This is the next menu item General menu.
l If Disabled, drug substitution is not
allowed.
l If Package Size is selected, the user
will be prompted to approve the
substitution if the package size of the
scanned item differs from the drug
specified for the Rx.
l If Equiv Drug is selected, the user will be prompted to approve the
substitution if the package size of the scanned item differs from the drug
specified for the Rx OR if the selected drug is a generic equivalent.
Tap your choice and press OK to accept the change or Cancel to abort a change.
Eyecon 9420 Instruction Manual 25

Settings menu
3.2.4 Stock Item Verification
Choose whether to verify a stock item scan every
time, never or per user.
l If Stock Item Verification is set to
Always, the Scan Stock Item screen
will appear every time the Rx label is
scanned.
l If S tock Item Verification is set to Never,
the Scan Stock Item screen will never appear after the Rx label is scanned
and will go to the Counting screen.
l If Stock Item Verification is set to User, scan the stock item to proc eed or
press the Skip Validation button to proceed to the Counting screen.
Tap your choice and press OK to accept the change or Cancel to abort a change.
Display returns to the General menu.
3.2.5 Allow an Under-Fill
This item lets you enable or disable the ability to
allow an under-fill of an Rx.
Tap your choice and press OK to accept the
change or Cancel to abort a change. Display
returns to the General menu.
3.2.6 Allow an Over-Fill
This item lets you enable or disable the ability to
allow an over-fill of an Rx.
Tap your choice and press OK to accept the
change or Cancel to abort a change. Display
returns to the General menu.
3.2.7 Calibrate Platter
This function is used to calibrate the counting
platter viewing area if the count is unstable.
1. Remove all foreign objects from the
counting platter.
2. Press the Calibrate Platter menu item and
the platter will be automatically calibrated.
3. Platter Calibration Successful will be
displayed when the calibration is
complete, shown at right.
26 Eyecon 9420 Instruction Manual
4. Press OK to return to the General menu.
List of items if Validation is selected.
List of items if PMSS is selected.
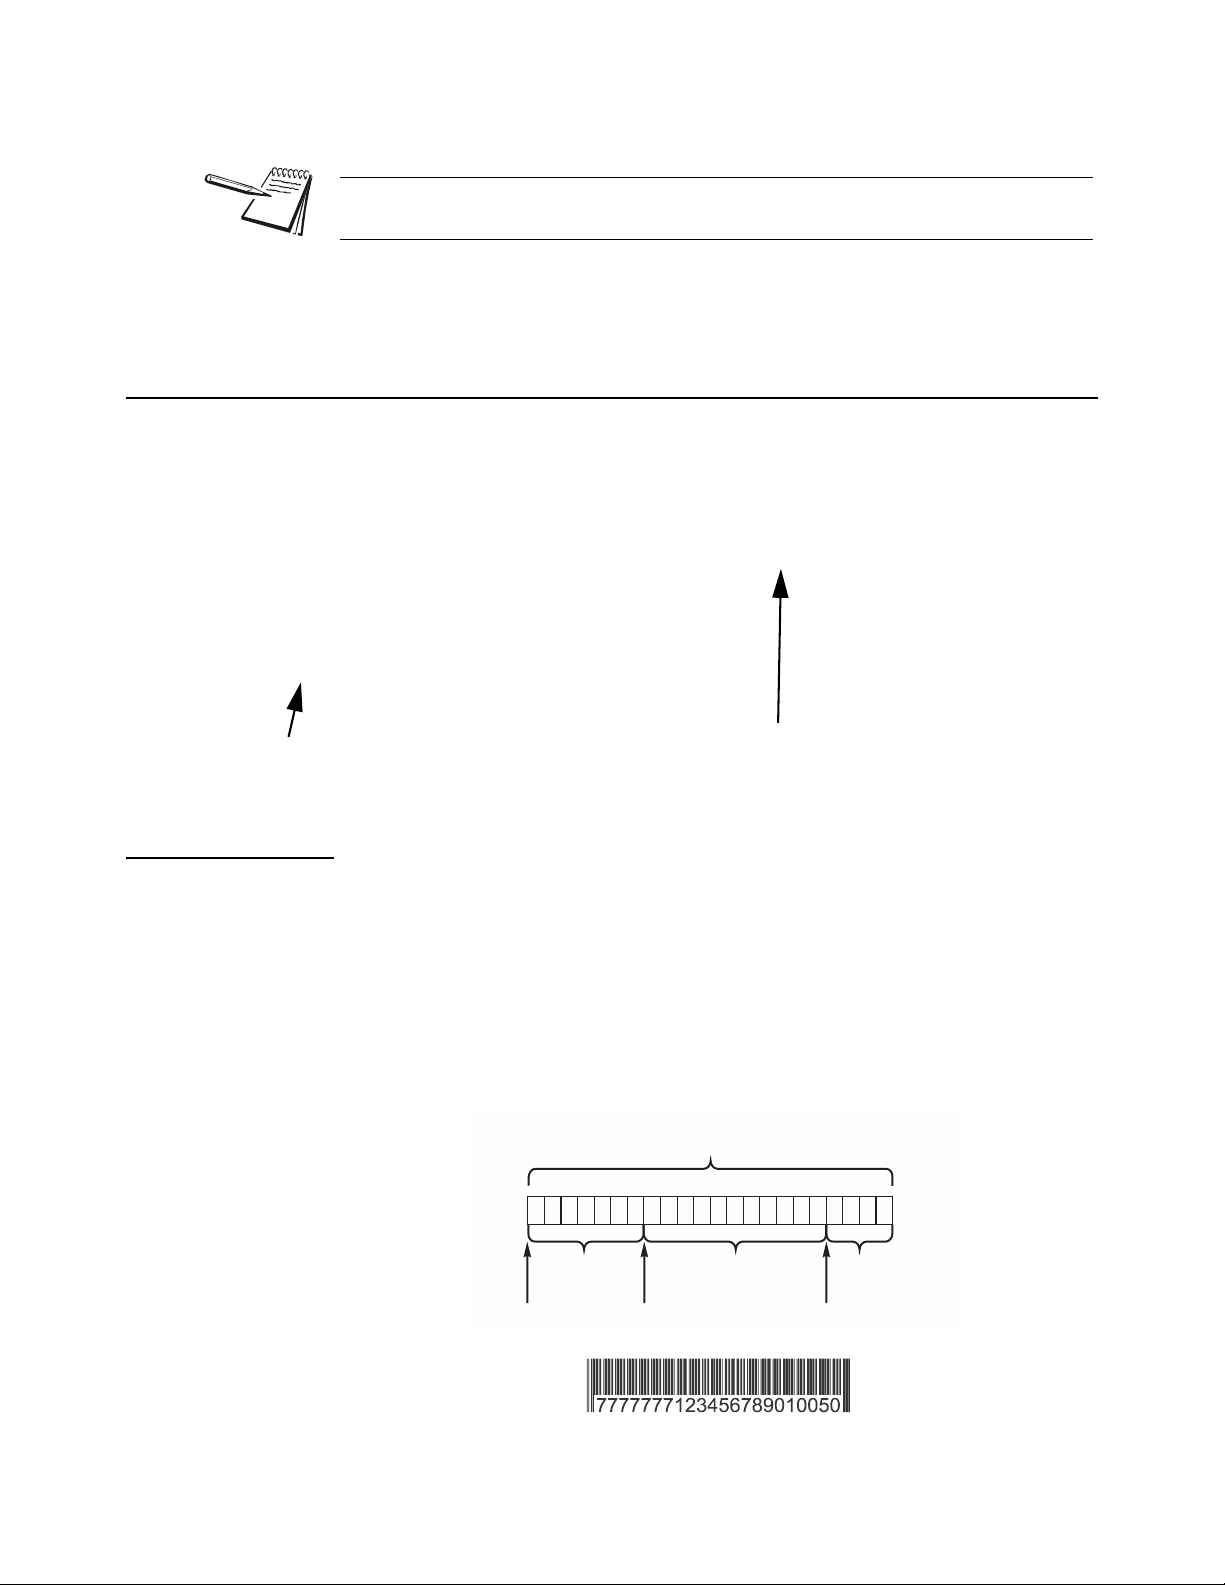
Validation Barcode Length = Overall barcode length
Example = 22
Offset: 0 Offset: 7 Offset: 18
Rx#
Length: 7
Drug Numb er
Length: 11
Qty.
Length: 4
1 2 3 4 5 6 7 8 9 10 1112 13141516171819 202122
77777771 23456789010050
If the Unable To Calibrate message appears, clean surface of counting platter and
light diffuser. Try the Calibrate Platter process again.
This completes the General menu.
3.3 Barcode menu
Access this to set the barcode type. Depending on which type you choose, Validation or PMSS, a different
set of choices appears in the right hand screen. Each is explained below.
3.3 Barcode menu
3.3.1 Barcode Type
Tap Barcode Type at the top of the right hand screen and select a method of Rx filling;
Validation or PMSS. Tap your choice and press OK to accept the change or Cancel to
abort a change. Display returns to the Barcode menu.
Validation
If you select the Validation mode you can use the choices on the right hand screen to
set the total length of the barcode and then the offsets and lengths of each part of the
barcode: Rx#, Drug Number and Quantity. This is illustrated by the example below:
Eyecon 9420 Instruction Manual 27
 Loading...