


EyeCloud Cam
User Manual

Hello! Thank you for purchasing EyeCloud Cam.

Contents
What’s Inside
General Information
Ways to Place your EyeCloud Cam
Getting Started
Mount Your Camera
Adjust the Monitoring Range
4
5
6
7
12
14

1. What's Inside
1 x Eyecloud Cam
A.
1 x magnetic mount
B.
2 x stickers
C.
1 x type-C USB cable
D.
3 x mounting screws
E.
1 x User Manual
F.
4
A B C
D E F

2. General Information
This is your Eyecloud Cam.
Function button/Indicator blue light
Lens
Microphone
Speaker
Charging Port
Rectangle magnetic area
5

3. Ways to place your
Eyecloud Cam
Horizontal surfaces Vertical walls Roofs and ceilings
6

4. Getting Started
1. Get the app
1. Download the app via App Store
or Google Play
EyeCloud Cam
INSTALL
Email
Verication
1
Password
Register
Log In
2. Register with your email address
3. Log in
2
3
7

2. Switch on Eyecloud Cam
Blue Light On - device is working
Light Off - charge your battery
1. Get the camera out of the box
8
2. Press the Function Button for 10 seconds to switch on the device

To Charge your Camera:
1. Get the USB Cable from the package
2. Open the rubber cover of the Data Interface on the
Camera Body.
3. Connect the Camera and an Adaptor with the
USB Cable.
Charging Time
Around 5 hours Fully charged
At least 10 minutes Power on
Voltage:
< <
V
V 5.25V
4.75
Current:
>
2A
1
2
3
9

3. Sync the device with the app
3
1. Open the Eyecloud Cam app
2. Click ‘Camera’
3. Click ‘+’ [upper left corner]
4. Enter your wi-fi network name and password
5. Click ‘Next’
6. Here's your QR code
10
Wi-
Password
4
5
Next
6
2

7. Scan QR code in a recommended 4 feet distance
7
8. Click ‘Next’ to configure your device
9. Wait a couple of seconds for the "Successful
Connection" page to pop up
Blue Light Button on Camera:
Not Connected to Wifi
8
Next
Connecting to Wifi
9
Connected to Wifi
11
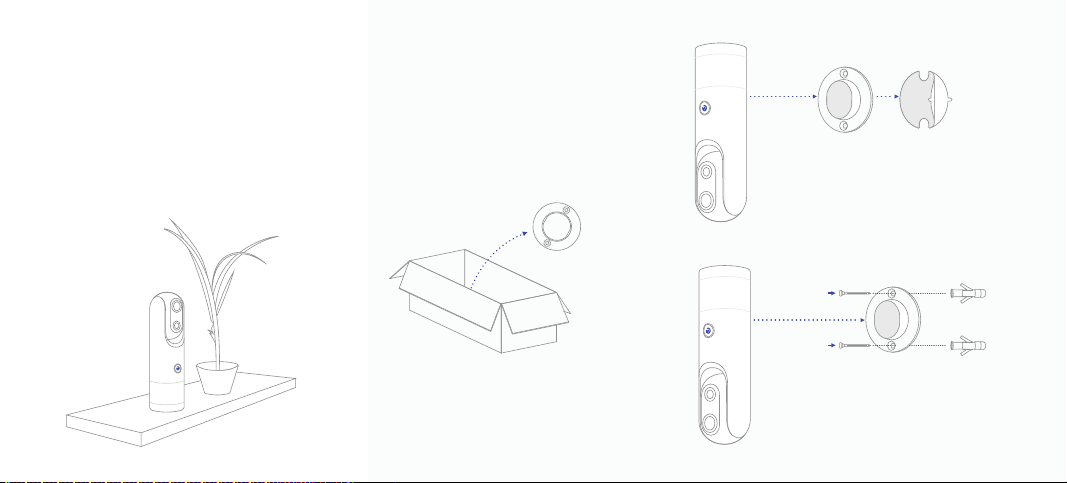
5. Mount Your Camera
1. Horizontal surfaces 2. Vertical Walls
Place the camera on any
horizontal surface. That's
about that.
1. Get the magnetic mount
out the box
12
2a. Use stickers
2b. Use screws

3. Roofs and Ceilings
Made of iron
Not made of iron
B
A
1313
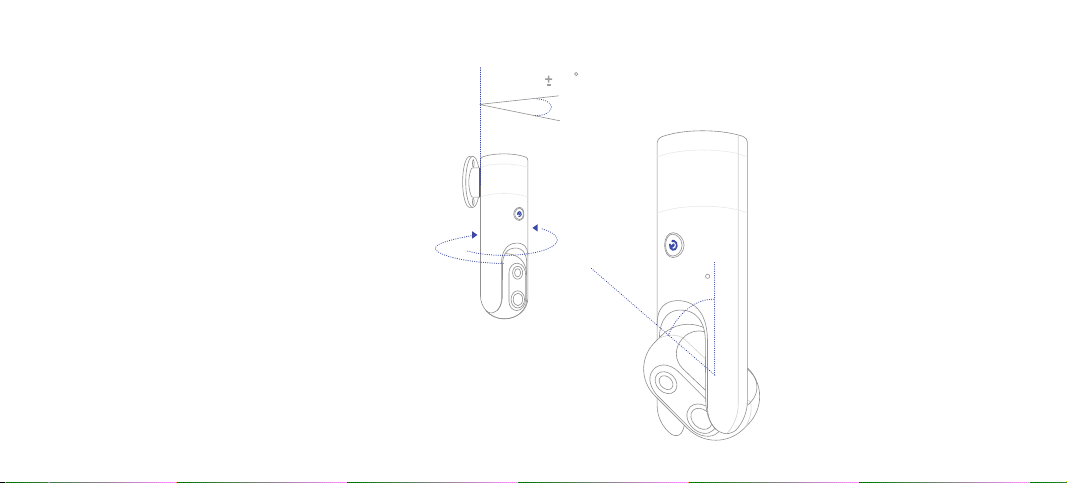
6. Adjust the Monitoring Range
35
Rotate the camera body
to adjust the horizontal
range.
14
60
Rotate the camera head to
adjust the vertical
monitoring range.

FCC Caution.
This device complies with part 15 of the FCC Rules. Operation is subject to the following two conditions: (1) This device may not cause harmful
interference, and (2) this device must accept any interference received, including interference that may cause undesired operation.
Any Changes or modifications not expressly approved by the party responsible for compliance could void the user's authority to operate the
equipment.
Note: This equipment has been tested and found to comply with the limits for a Class B digital device, pursuant to part 15 of the FCC Rules. These
limits are designed to provide reasonable protection against harmful interference in a residential installation. This equipment generates uses and can
radiate radio frequency energy and, if not installed and used in accordance with the instructions, may cause harmful interference to radio
communications. However, there is no guarantee that interference will not occur in a particular installation. If this equipment does cause harmful
interference to radio or television reception, which can be determined by turning the equipment off and on, the user is encouraged to try to correct
the interference by one or more of the following measures:
-Reorient or relocate the receiving antenna.
-Increase the separation between the equipment and receiver.
-Connect the equipment into an outlet on a circuit different from that to which the receiver is connected.
-Consult the dealer or an experienced radio/TV technician for help.
* RF warning for Portable device:
The device has been evaluated to meet general RF exposure requirement. The device can be used in portable exposure condition without restriction.
15

 Loading...