

Page 1

1 | S 30.12CI H User Manual
Page 2

2 | S 30.12CI H User Manual
Notice
This manual can help you to become familiar with how-to-use and the many great features of the
digital satellite receiver S 30.12CI H. All the safety and operating instructions should be read before
the digital satellite receiver S 30.12CI H is operated. Please keep the manual in a fixed place so
that it can be easily referred to later.
The following symbols will serve as follows:
Indicates any other additional important or helpful information.
Indicates warning information.
“MENU”
(Double quotation marks)
Indicates a button on the remote control or the product.
To reduce the risk of electric shock, do not remove cover (or back).
No user serviceable parts inside. Refer servicing to qualified service
personnel.
Indicates dangerous voltage inside the product that presents a risk
of electric shock or personal injury.
Indicates important-operating and maintenance instructions
accompanying the product.
Page 3
#
Safety and Precautions
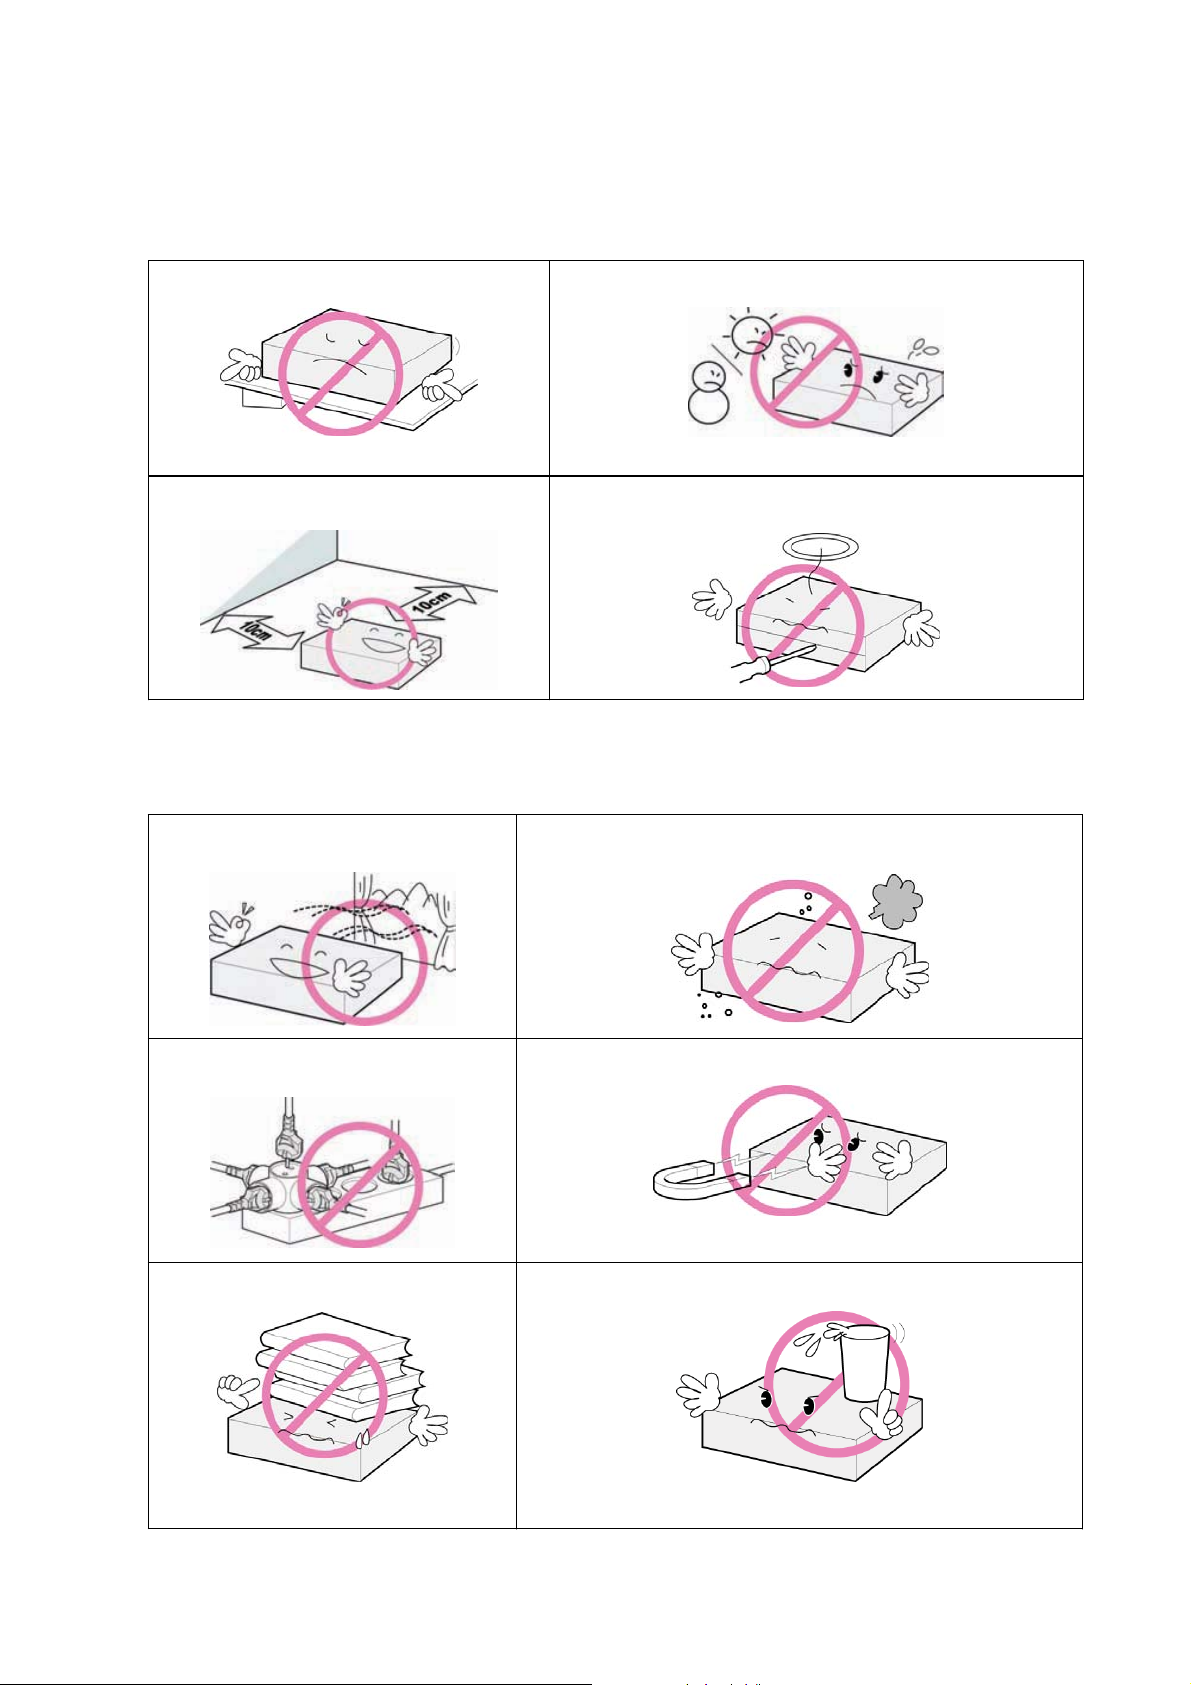
<Attention when installing the receiver>
Contents | 3
Install on an even plane.
Leave a minimum 10cm gap all around the product.
<Use and care of the receiver >
Place the product in a well-ventilated area.
Don˅t install in the cold or under direct sunlight.
Don˅t disassemble, repair, or reorganize the product.
Place the product where dust and other materials do not build up.
Don˅t plug in with several other power plugs.
Don˅t place objects on top of the product.
˅
t place the product where there are extreme vibrations or near magnetic forces.
Don
˅
t place cups that hold water or other liquids on top of the product.
Don
Page 4

4 | S 30.12CI H User Manual
Table of Contents
Chapter 1. Before You Begin ············· 5
1.1 Features ········································· 6
1.2 Package Contents ·························· 7
1.3 Names of Each Parts ····················· 8
1.3.1 Front Panel ·································· 8
1.3.2 Rear Panel ·································· 9
1.4 Names of Remote Control ·············· 10
Chapter 2. Connections ··················· 13
2.1 Connecting to TV & VCR ·············· 14
2.2 Connecting to Dish ······················· 16
2.3 Connect to the Optical S/PDIF ····· 17
2.4 Connecting to CI module ················· 17
2.5 Starting Up ······································· 18
Chapter 3. Basic Settings ················ 19
4.9.5 Changing Satellite Group ··········· 32
4.9.6 Editing Channels ·························· 33
4.10 Managing Favorite Channel Lists ·· 35
4.11 Changing Channel Mode ············ 37
4.12 Viewing Program Guide ·············· 37
4.13 Viewing Teletext ·························· 38
4.14 Changing STB/TV ······················· 38
Chapter 5. Settings ··························· 39
5.1 Search Channel ···························· 41
5.1.1 Antenna Setting ··························· 41
5.1.2 Automatic Search ······················· 42
5.1.3 Manual Search ··························· 43
5.1.4 Advanced Search ······················· 44
5.1.5 Blind Scan ·································· 44
5.1.6 USALS ······································· 45
3.1 Language ····································· 20
3.2 Time Setting ································· 20
3.3 Antenna Setting ···························· 21
Chapter 4. Operations ······················ 23
[ Basic Functions ] ······························ 24
4.1 Changing Channel ······················· 24
4.2 Adjusting Volume ·························· 24
4.3 Viewing Program Information ······· 25
4.4 Switching TV and Radio ··············· 26
4.5 Freezing Screen/Zooming Screen · 26
4.6 Changing Subtitle Language ········ 27
4.7 Changing Audio Language ··········· 28
4.8 Selecting Audio Output Direction ·· 28
[ Advanced Functions ] ······················· 29
4.9 Managing Channel List ················ 29
5.2 Edit Channel ································· 46
5.2.1 Edit Channel ································· 46
5.2.2 Edit Favorite ································· 46
5.2.3 Edit Transponder ·························· 46
5.2.4 Remove Satellite ·························· 47
5.3 Setup ··············································· 48
5.3.1 Language Setting ························· 48
5.3.2 OSD Setting ······························· 49
5.3.3 Output SettingG ···························· 49
5.3.4 HDMI Setting ····························· 50
5.3.5 Time Setting ······························· 50
5.3.6 Timer Setting ······························ 51
5.3.7 Lock Control ······························· 51
5.4 Tools ············································· 52
5.5 Common Interface ··························· 55
4.9.1 Displaying Channel List ············· 29
4.9.2 Searching Channel ···················· 30
4.9.3 Viewing Multi-Channels Window · 31
4.9.4 HDMI Color Adjust ························ 32
Chapter 6. Appendix ························· 57
6.1 Trouble Shooting ····························· 58
6.2 Specification ·································· 59
Page 5

5 | S 30.12CI H User Manual
==>
Chapter 1
Before You Begin
Page 6

6 | S 30.12CI H User Manual
1.1 Features
Enjoy a full of thrills and excitement with Arion’s new product!
The S 30.12CI H is a set-top box perfectly suited for receiving digital satellite broadcasts. You can
enjoy the various TV and radio programs. The simple connection and easy-of- use operation,
user-friendly three-dimensional OSD, highest quality audio output with Dolby AC-3 Digital Audio,
and Multi-channel screen are all designed to enrich the user experience.
Furthermore, S 30.12CI H provides the enhanced Electronic Program Guide (EPG), various
utilities, and channel change effect modes.
<Main Features>
z
MPEG-2 / DVB(Digital Video Broadcasting ) compliant
z
MPEG Layer I and II, CD quality audio sound
z
Supports RS-232 port for S/W upgrade (115,200 bps)
z
Separated TV/Radio/All List & Favorite Group List
z
Offering 8,000 TV and radio channels
z
DiSEqC 1.0/1.1/1.2 and USALS
z
Supports multi-channel screen (Mosaic)
z
Variable kind of utilities (Calendar, Calculator, Zoom In)
z
Channel change effect mode (Blank, Fade-in/Out, Freeze)
z
Supports 2 Slot Common Interface (CAM)
z
1 Port HDMI Output
<Other Features>
z
Capable of receiving both SCPC and MCPC channels
z
Powerful and easy functions for editing (Lock, Delete, Move, Rename Channel & Favorite group)
z
Games Included: Tetris, Block Out, etc.
z
Electronic Program Guide (EPG) for On Screen Channel Information
z
12 OSD languages and 256 color OSD menu
z
Auto searching & manual searching function
z
Parental lock function (Install Lock/Menu Lock/ IRD Lock)
z
Ergonomic full functions remote control & VFD and 8 buttons on the front panel
z
Teletext and subtitle supported by VBI and OSD
z
Channel editor & channel loader in PC environment
z
Software transfer from receiver to receiver
z
Total 8 configurable timer control
z
S/PDIF for digital audio(Optional)
z
Free voltage
Page 7
Ch1. Before You Begin | 7
#
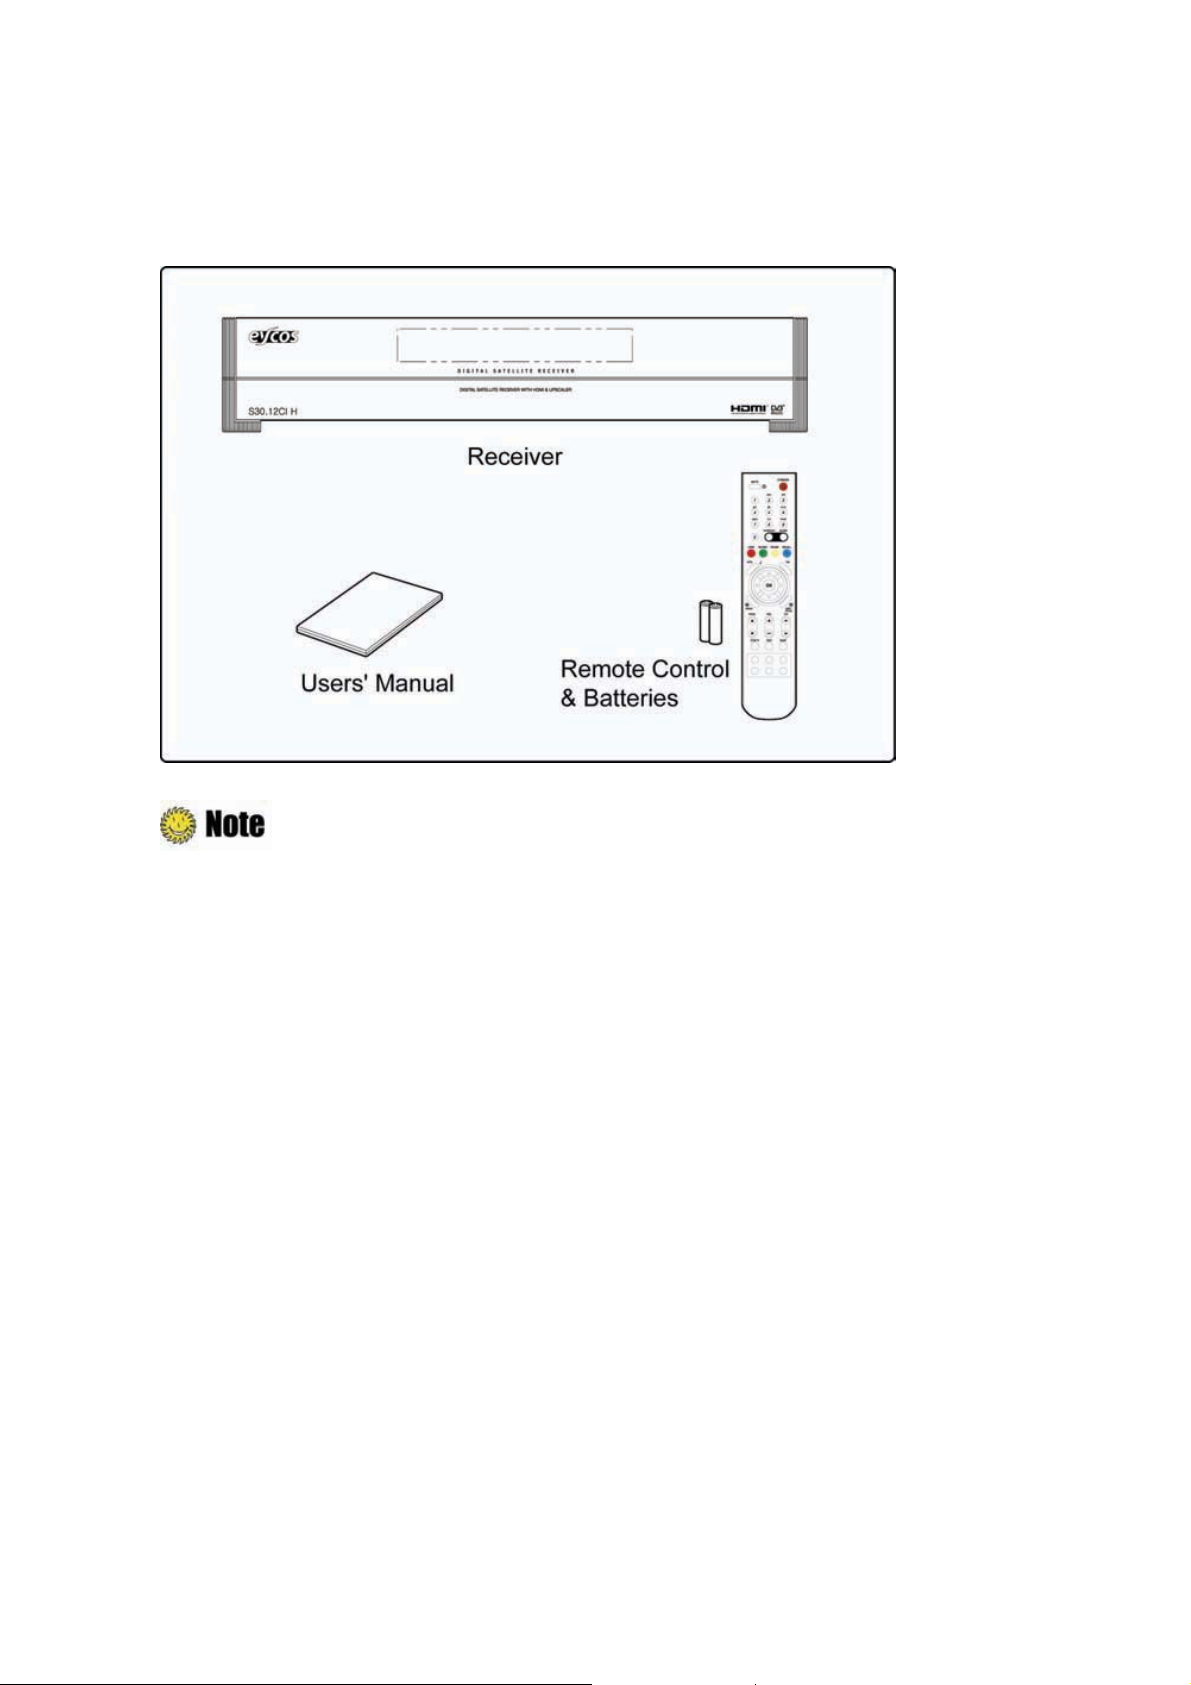
1.2 Package Contents
Please check to make sure the following contents are in the product’s package.
z
Product contents may be subject to change.
z
Cables not specified above must be purchased separately.
Page 8
8 | S 30.12CI H User Manual
1.3 Names of Each Parts
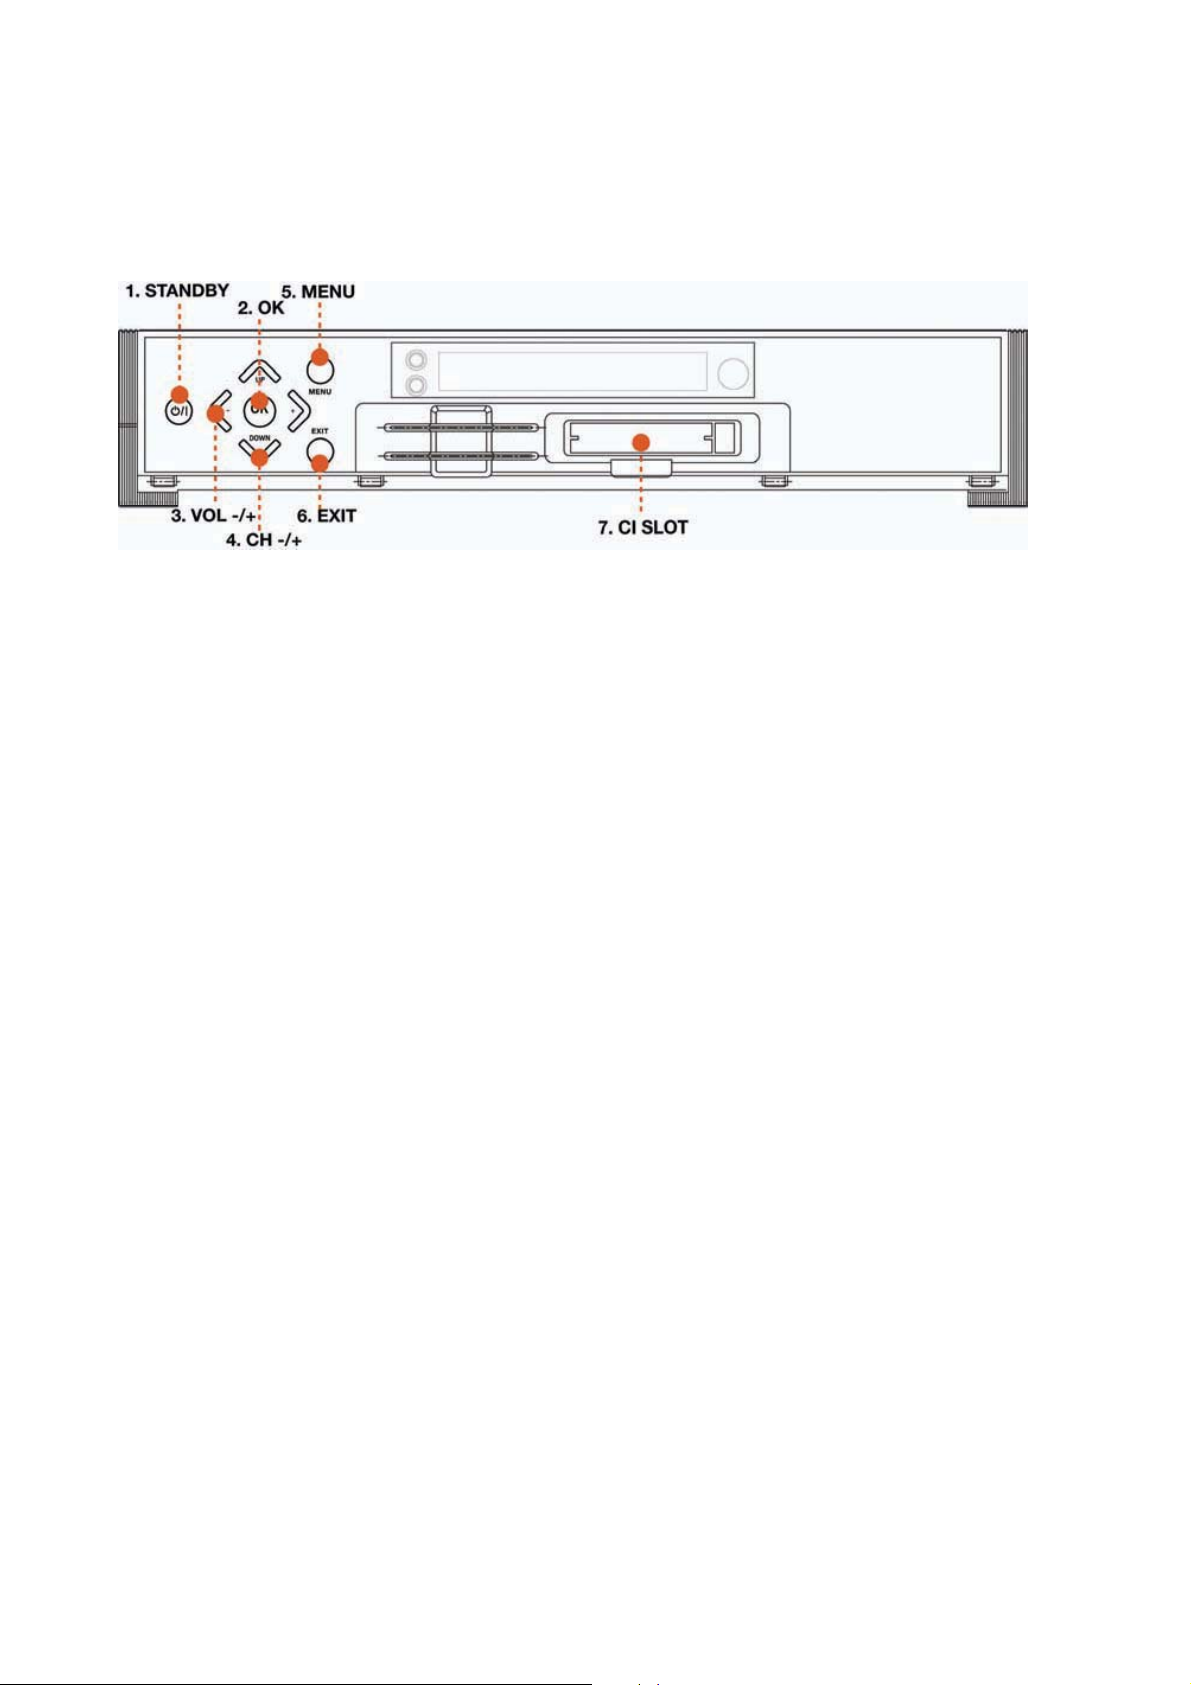
1.3.1GFront Panel
1. STANDBY
To switch the receiver on/off.
2. OK
To select a menu or confirm the user’s action and display the channel list during watching a TV.
3. VOL -/+
To increase or decrease TV/Radio volume level or change the value of an item with
䯝”#
preprogrammed values. The “
the highlighted menu.
button can be used to show the sub-menu corresponding to
4. CH -/+
To change the TV/Radio channel Up/Down.
5. MENU
To display the menu OSD.
6. EXIT/ZOOM
To exit from the current menu or cancel the current operation in menu state. Zoom in/out the
screen during watching a program.
7. CI Slot
Insert CI module into CI slot for conditional access..
Page 9
Ch1. Before You Begin | 9
#
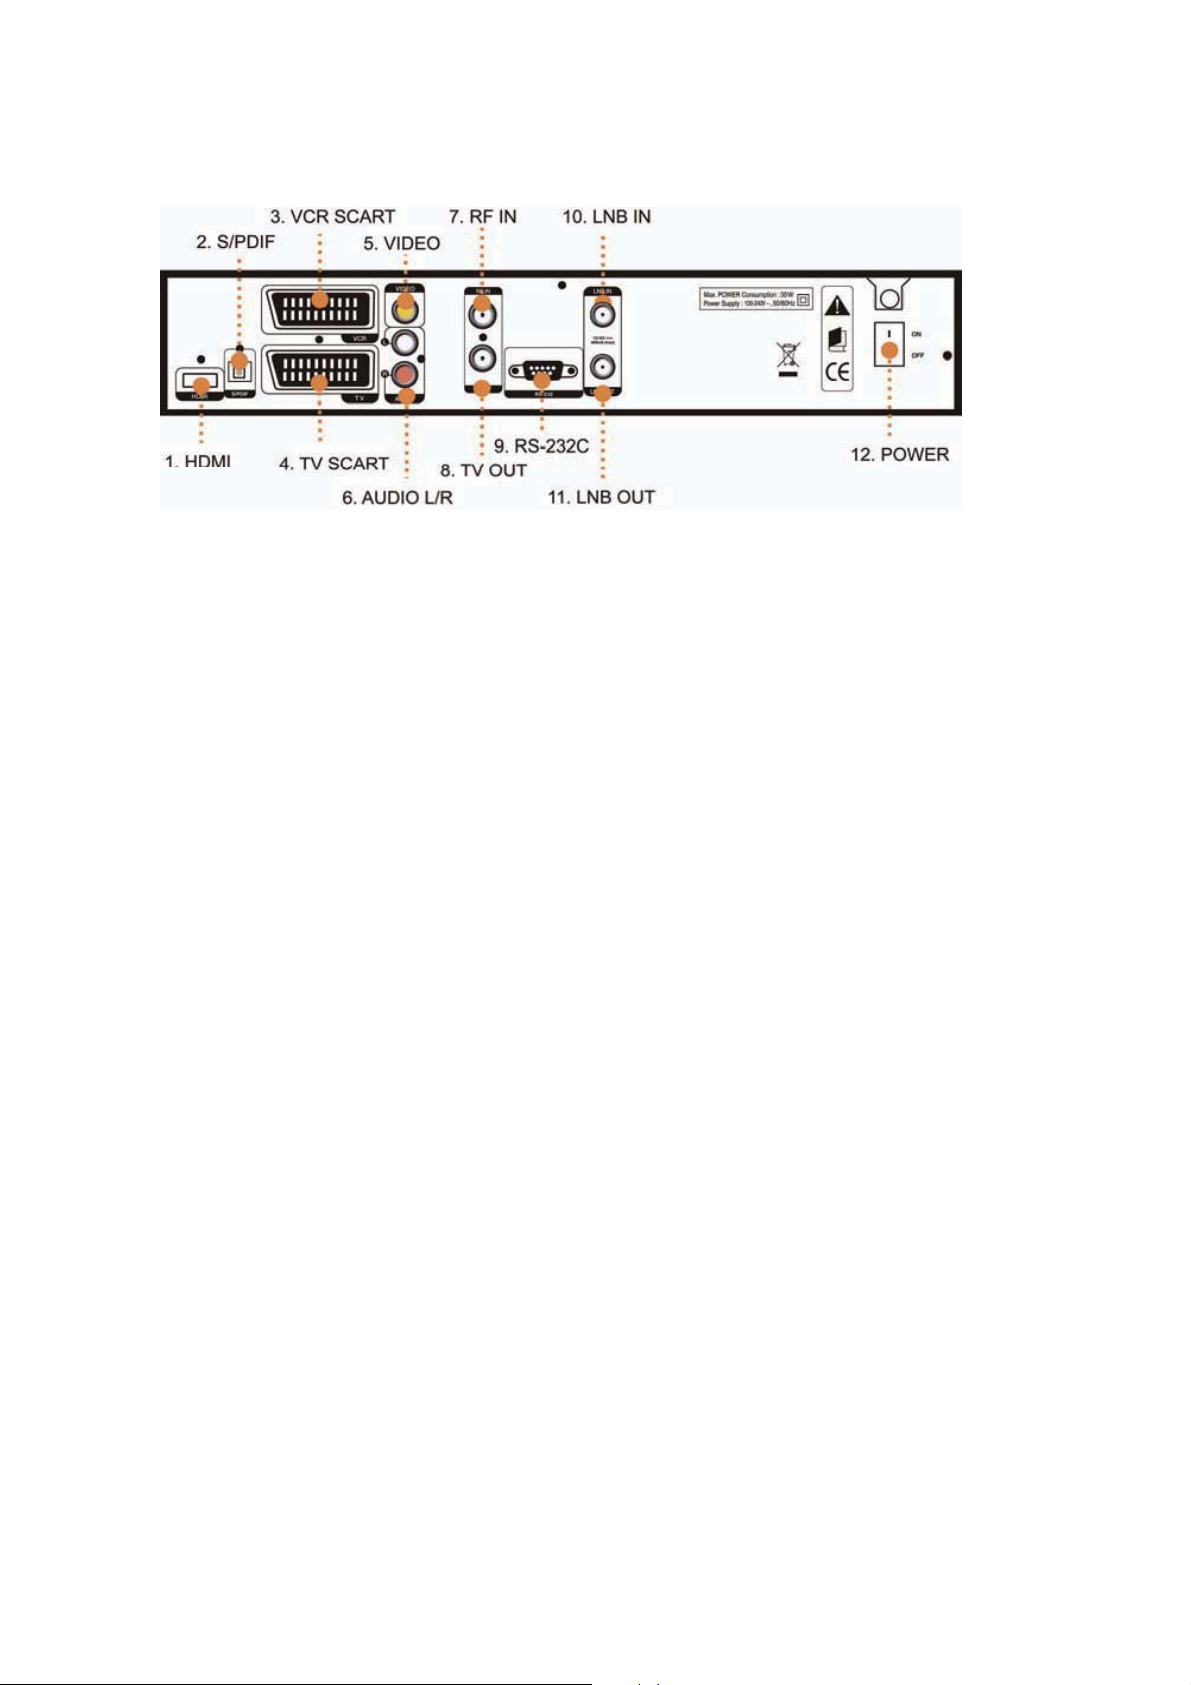
1.3.2 Rear Panel
1. HDMI
Connect this connector to your TV via a HDMI cable.
2. S/PDIF
Connect S/PDIF to audio input of your amplifier with optical digital port via an optical cable.
3. VCR SCART(*Optional)
Connect this connector to your VCR via a SCART cable.
4. TV SCART(*Optional)
Connect this connector to your TV via a SCART cable.
5. VIDEO
Connect VIDEO to video input of your TV or VCR via a RCA cable.
6. AUDIO L/R
Connect AUDIO L/R to the matching Audio Inputs of your TV/VCR via a RCA cable.
7. RF-IN
Connect RF-IN to your TV antenna or cable TV system.
8. TV-OUT
Connect TV OUT to your TV antenna input.
9. RS-232C
Connect RS-232C to your PC via a serial cable to upgrade S 30.12CI software
10. LNB IN
Connect a coaxial cable of your LNB to this connector.
11. LNB OUT
Connect LNB OUT to another set-top box.
12. POWER
Turn the S 30.12CI H On/Off.
Page 10
10 | S 30.12CI H User Manual
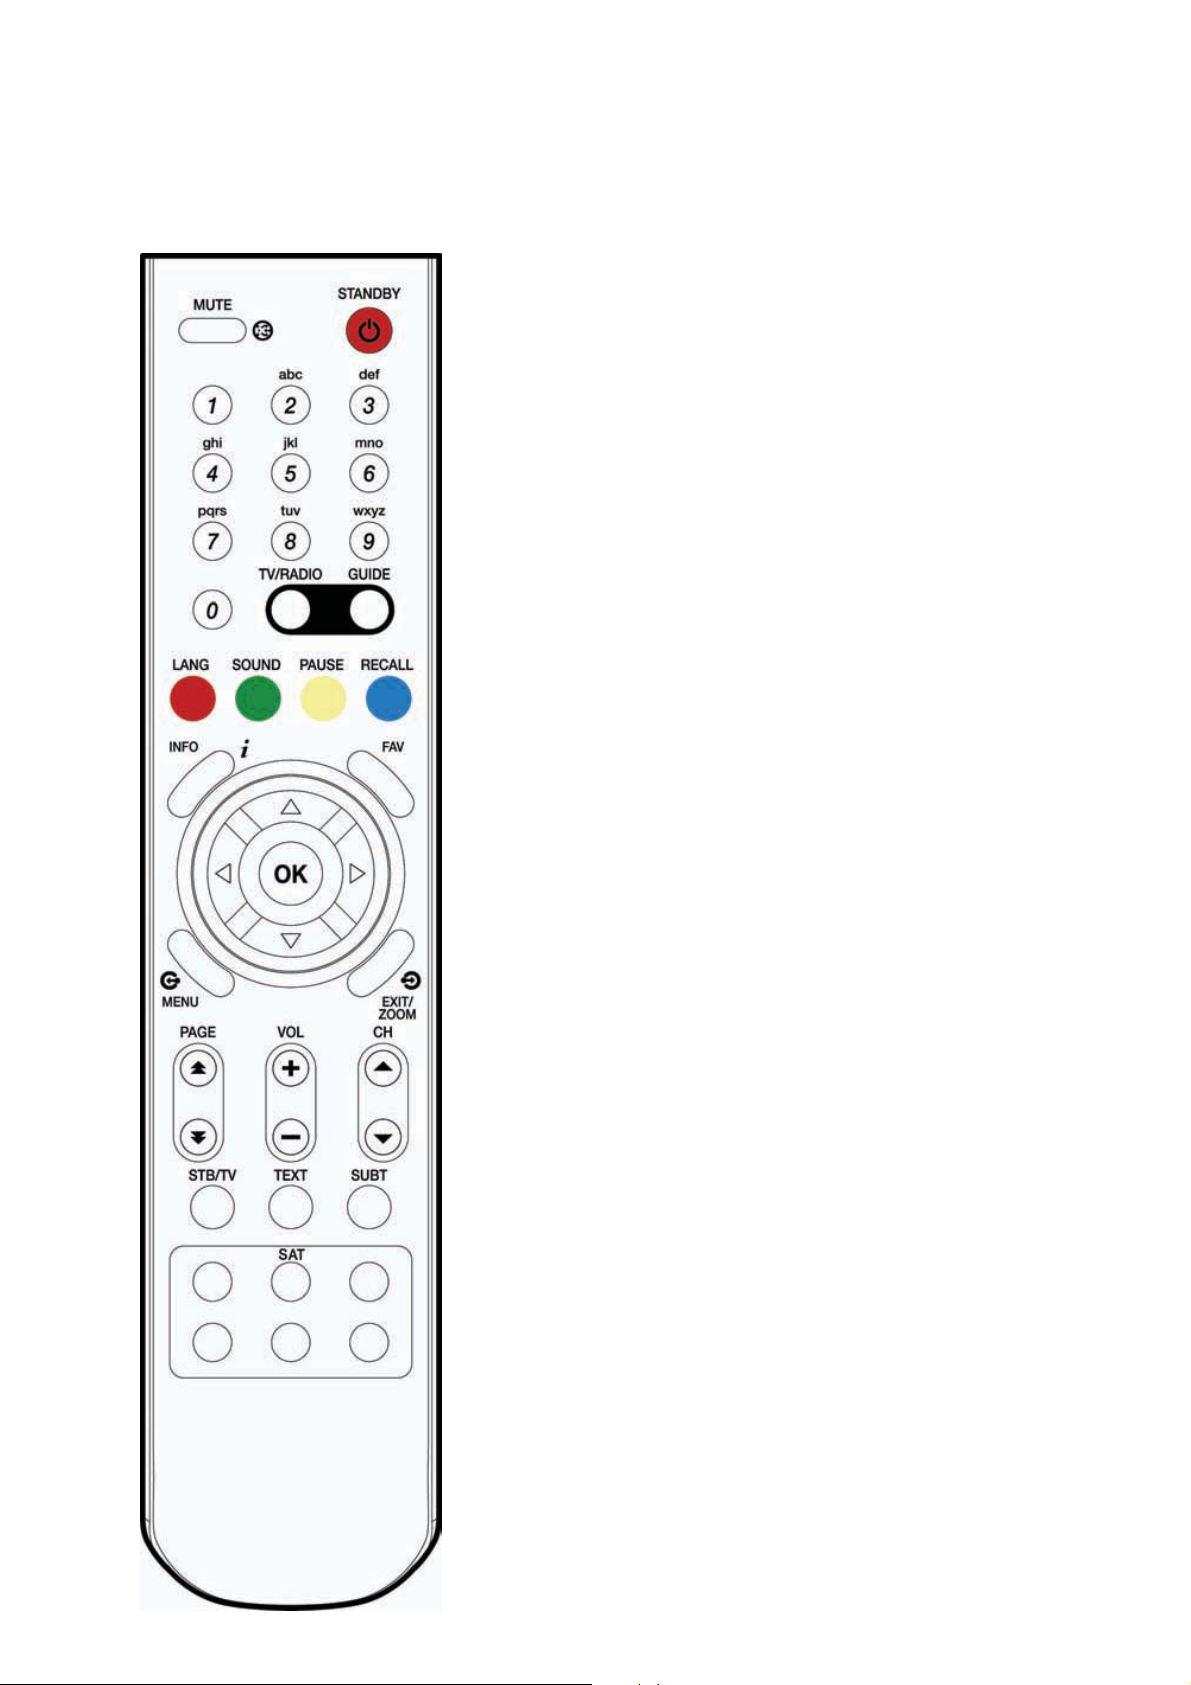
1.4 Names of Remote Control
MUTE
To mute the sound.
STANDBY
To switch the receiver On/Standby.
CH-/ +
To change the TV/radio channels Up/Down.
VOL -/+
To increase or decrease TV/Radio volume level or change the
value of an item with preprogrammed values. The “
be used to show the sub-menu corresponding to the highlighted
䯛”#
menu and the “
the numerical input.
button can be used as a backspace to cancel
䯝”#
button can
OK
To select a menu or confirm the user’s action and display the
channel list during watching a program.
MENU
To display the menu OSD.
EXIT/ZOOM
To exit from the current menu or cancel the current operation in
menu state. Zoom in/out the screen during watching a program.
Red(LANG, hereafter “Red”)
To display the provided audio language lists of the current channel.
Green(SOUND, hereafter “Green”)
To select the sound mode (stereo, left, or right.)
Yellow(PAUSE, hereafter “Yellow”)
To pause the TV screen.
Blue(RECALL, hereafter “Blue”)
To return to the previous chosen channel.
Page 11

Ch1. Before You Begin | 11
#
NUMERICAL (0~9) BUTTONS
To enter a TV/Radio channel number or characters.
Guide
To display the Electronic Program Guide. Press again to return to the normal mode.
FAV
You can register the favorite channels by pressing the “MENU” button, and then change the channel modes by
pressing the “FAV” button.
Lower VOL/CH
To change the TV/Radio volume/channel without displaying the OSD.
PAGE
To change the TV/Radio channel lists by the page.
INFO
To display the information about the channel.
TV/RADIO
To switch the receiver TV/Radio
TEXT
To display the teletext information about the channel if applicable.
SUBT
To display the provided subtitle language lists of the current channel.
SAT
To select the specific satellite.
Page 12
12 | S 30.12CI H User Manual
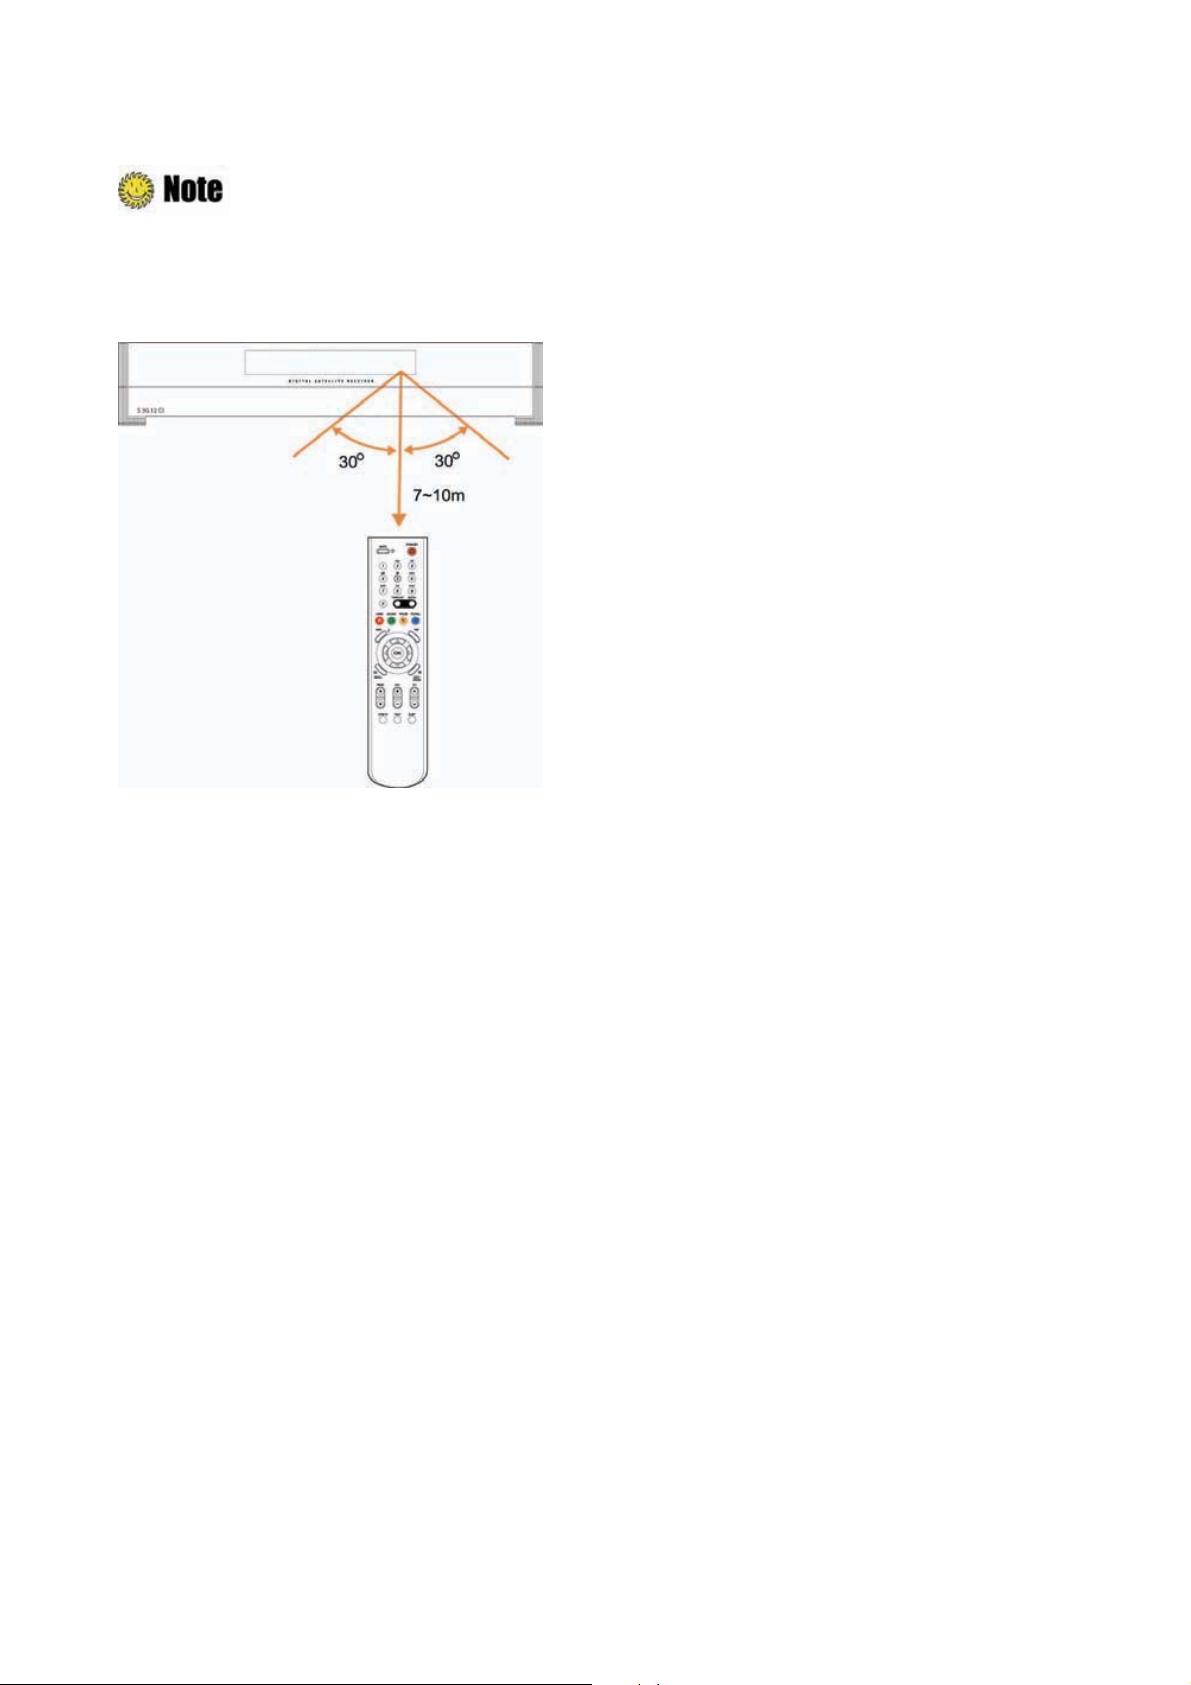
: Angle of remote control use
The remote control can be used at a distance of up to 7 to 10 meters, and at an angle of 30
degrees from the remote control led.
Page 13

13 | S 30.12CI H User Manual
Chapter 2
Connections
Page 14
14 | S 30.12CI H User Manual
This chapter describes how to connect the receiver. Choose the most appropriate procedure
depending on your environments.
: If you encounter with any problem during connecting the receiver, please contact
your local product distributor.
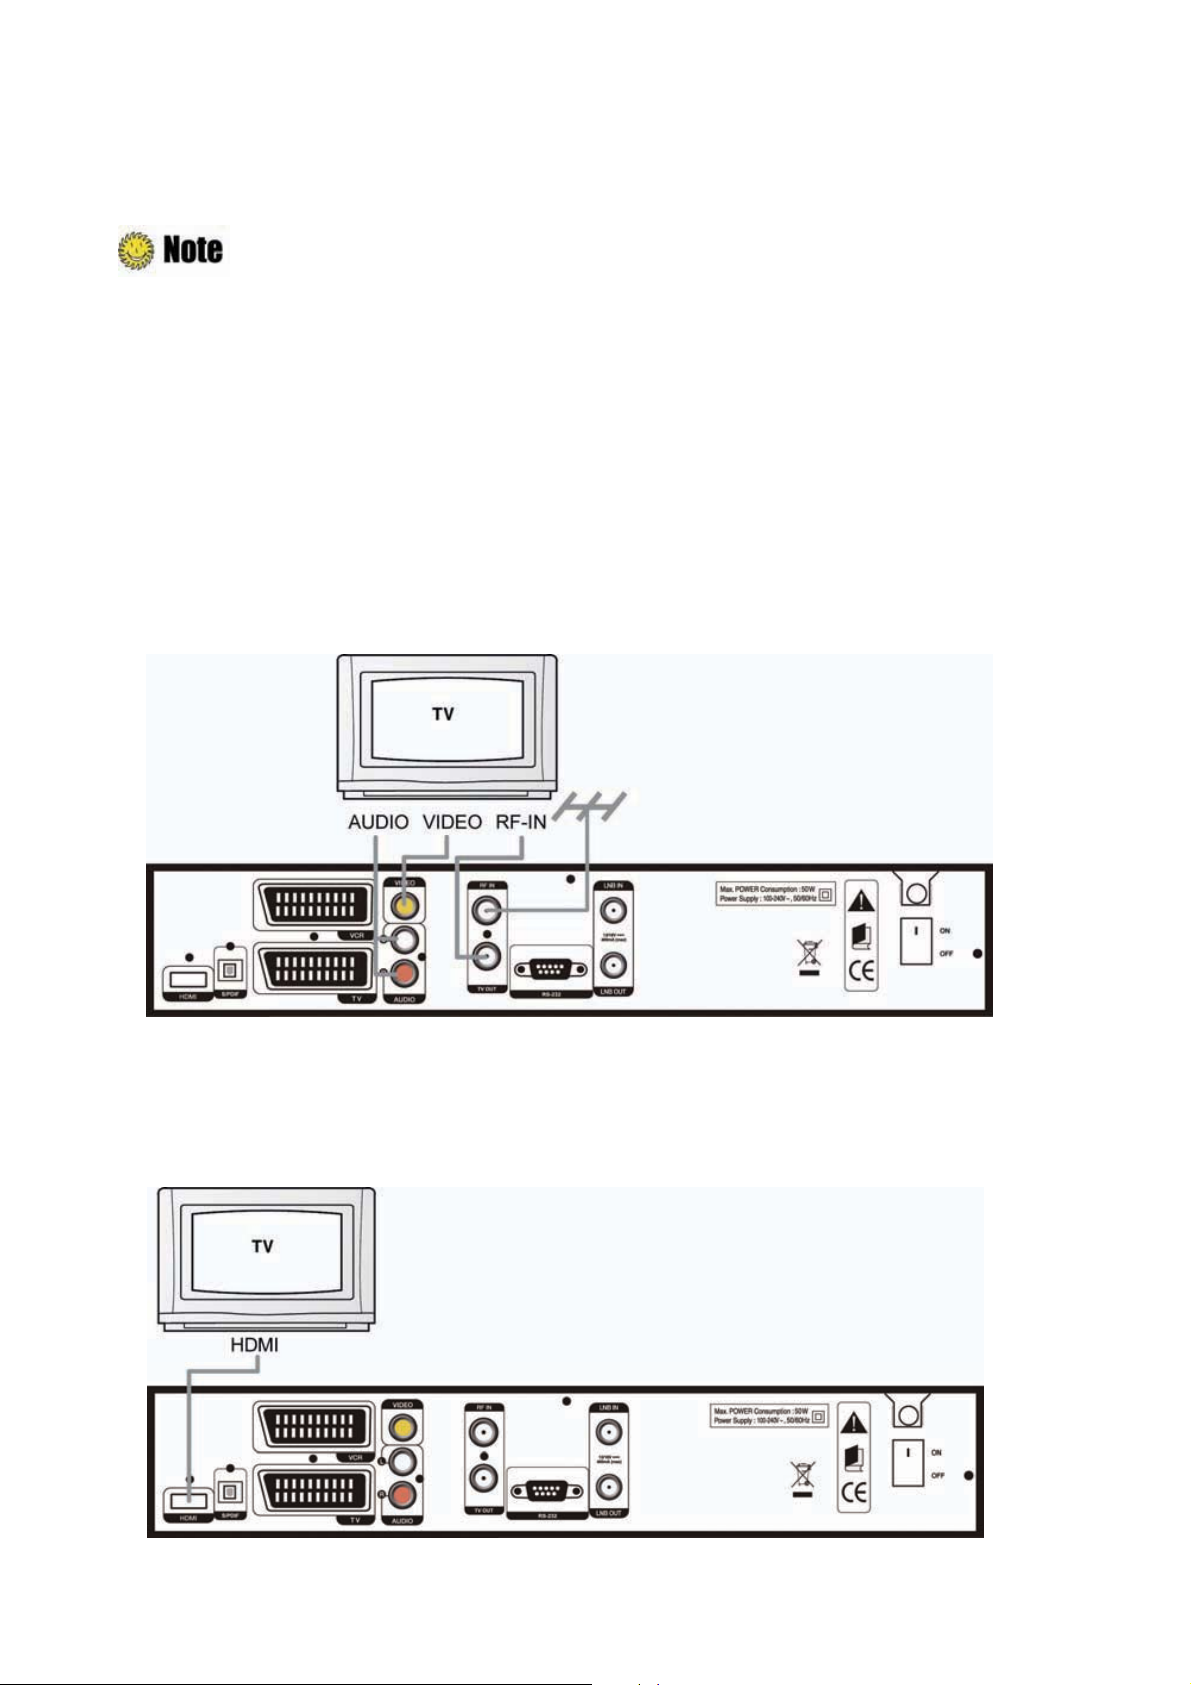
2.1 Connecting to TV & VCR
1. Connecting to TV with RF
1) Connect the TV antenna to the RF-IN of the receiver.
2) Connect the RF-IN of TV to the TV-OUT of the receiver.
3) Connect the Video and Audio of TV to the VIDEO and AUDIO L/R of the receiver.
4) Go to
2.2 Connecting to Dish, and
then connect your dish.
2. Connecting a TV with HDMI
1) Connect the TV HDMI port to the HDMI port of the product.
Page 15
#
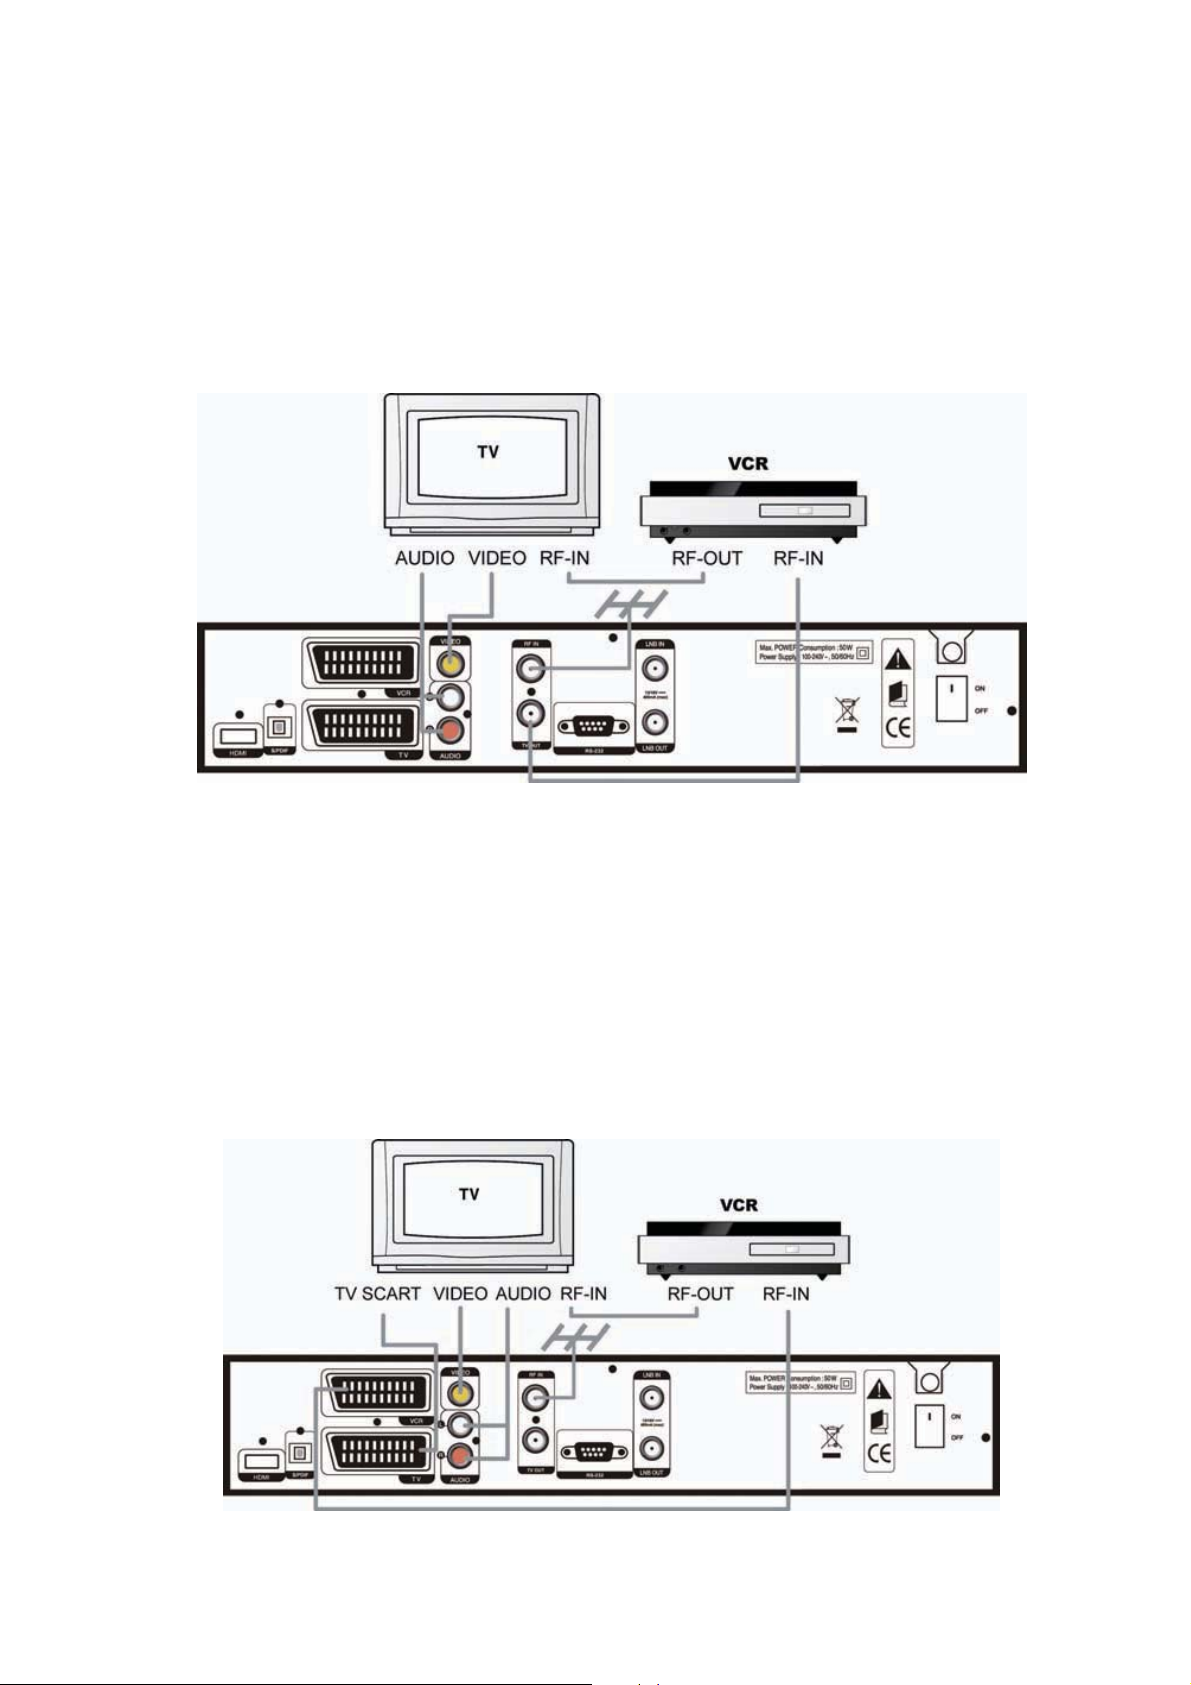
3. Connecting to TV and VCR with RF
1) Connect the TV antenna to the RF-IN of the receiver.
2) Connect the RF-IN of VCR to the RF-OUT of the receiver.
Ch2. Connections | 15
3) Connect the
4) Connect the Video and Audio of TV to the VIDEO and AUDIO L/R of the receiver.
5) Go to section
{}
-OUT of VCR to the RF-IN of TV.
2.2 Connecting to Dish, and
then connect your dish.
4. Connecting TV and VCR with Scart Cable
1) Connect the TV antenna to RF-IN of the receiver.
2) Connect the RF-IN of VCR to the RF-OUT of the receiver.
3) Connect the RF-OUT of VCR to the RF-IN of TV.
4) Connect the Video and Audio of TV to the VIDEO and AUDIO L/R of the receiver.
5) Connect the TV Scart of TV to TV SCART with fully featured Scart cable.
6) Go to section
2.2 Connecting to Dish, and
then connect your dish.
Page 16
16 | S 30.12CI H User Manual
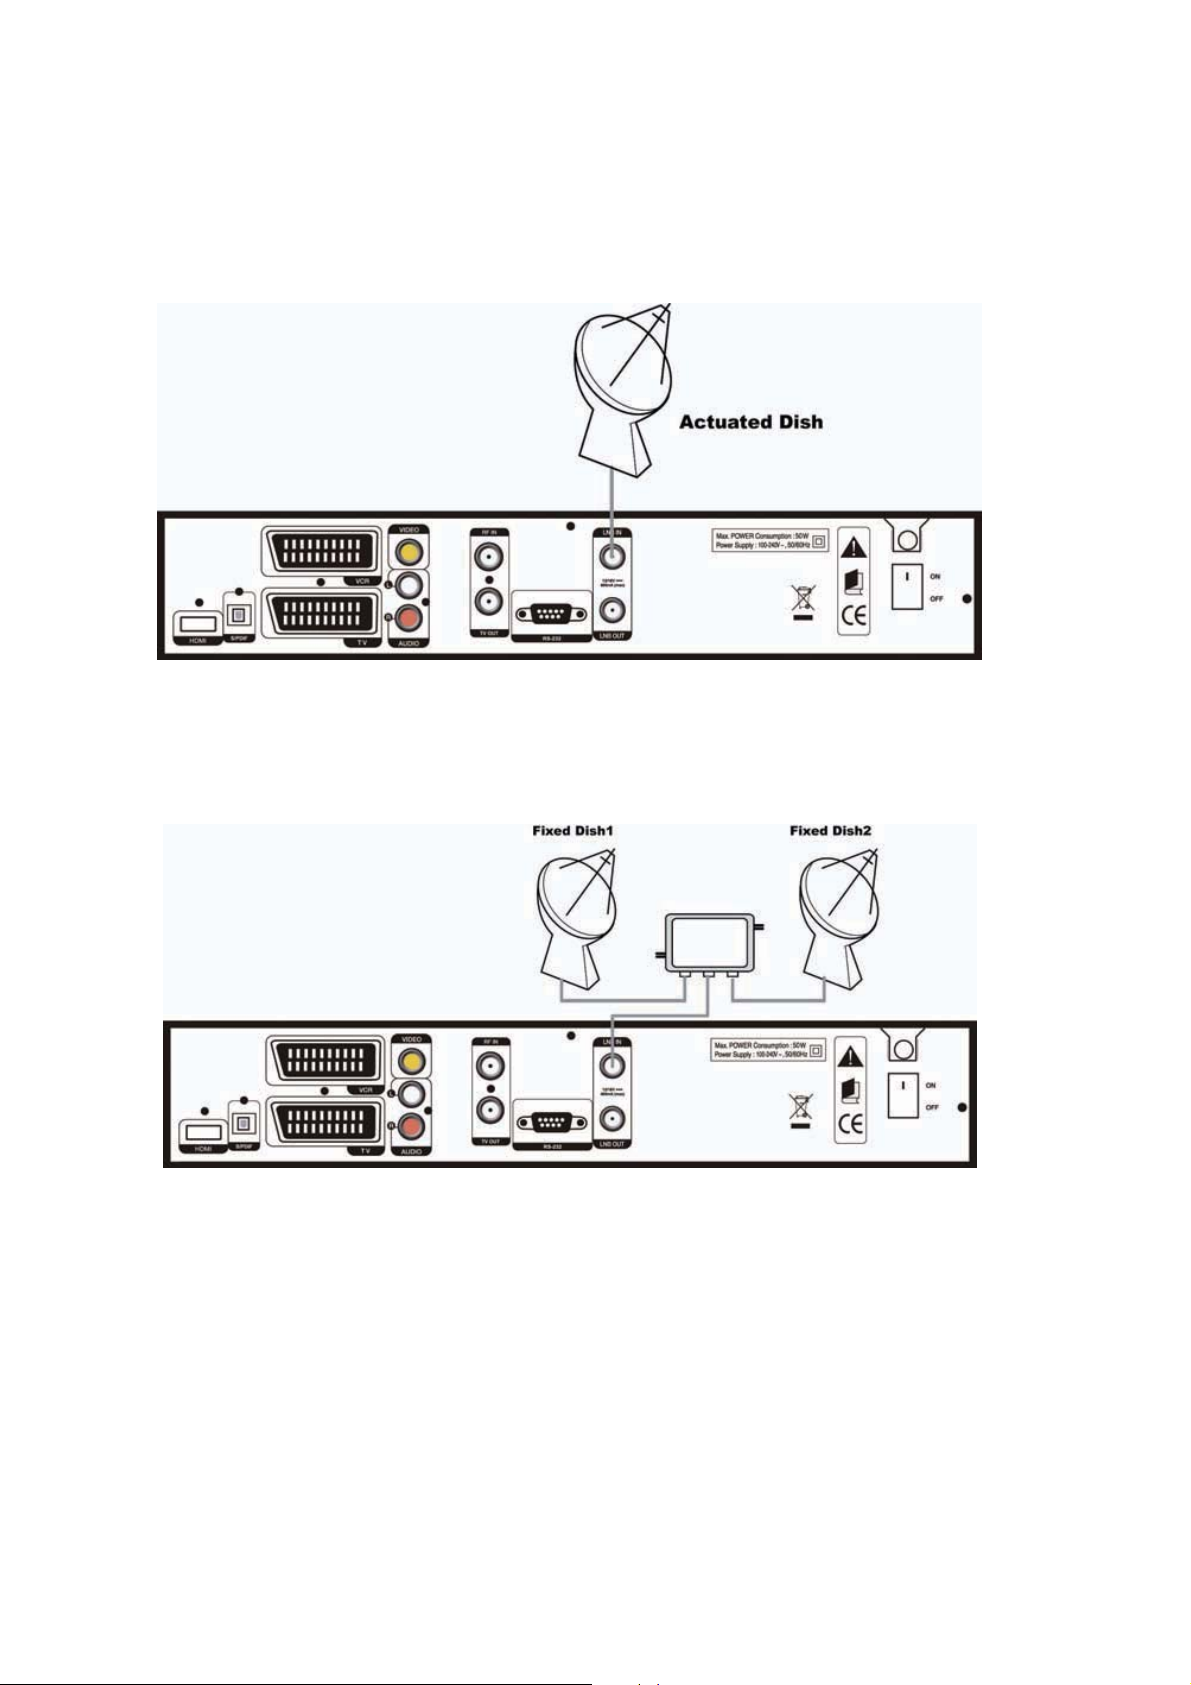
2.2 Connecting to Dish
1. Dish
Connect the satellite antenna cable to the LNB IN.
2UGFixed Dishes Using DiSEqC
Connect the output of DiSEqC to the LNB IN of the receiver.
Page 17
Ch2. Connections | 17
#
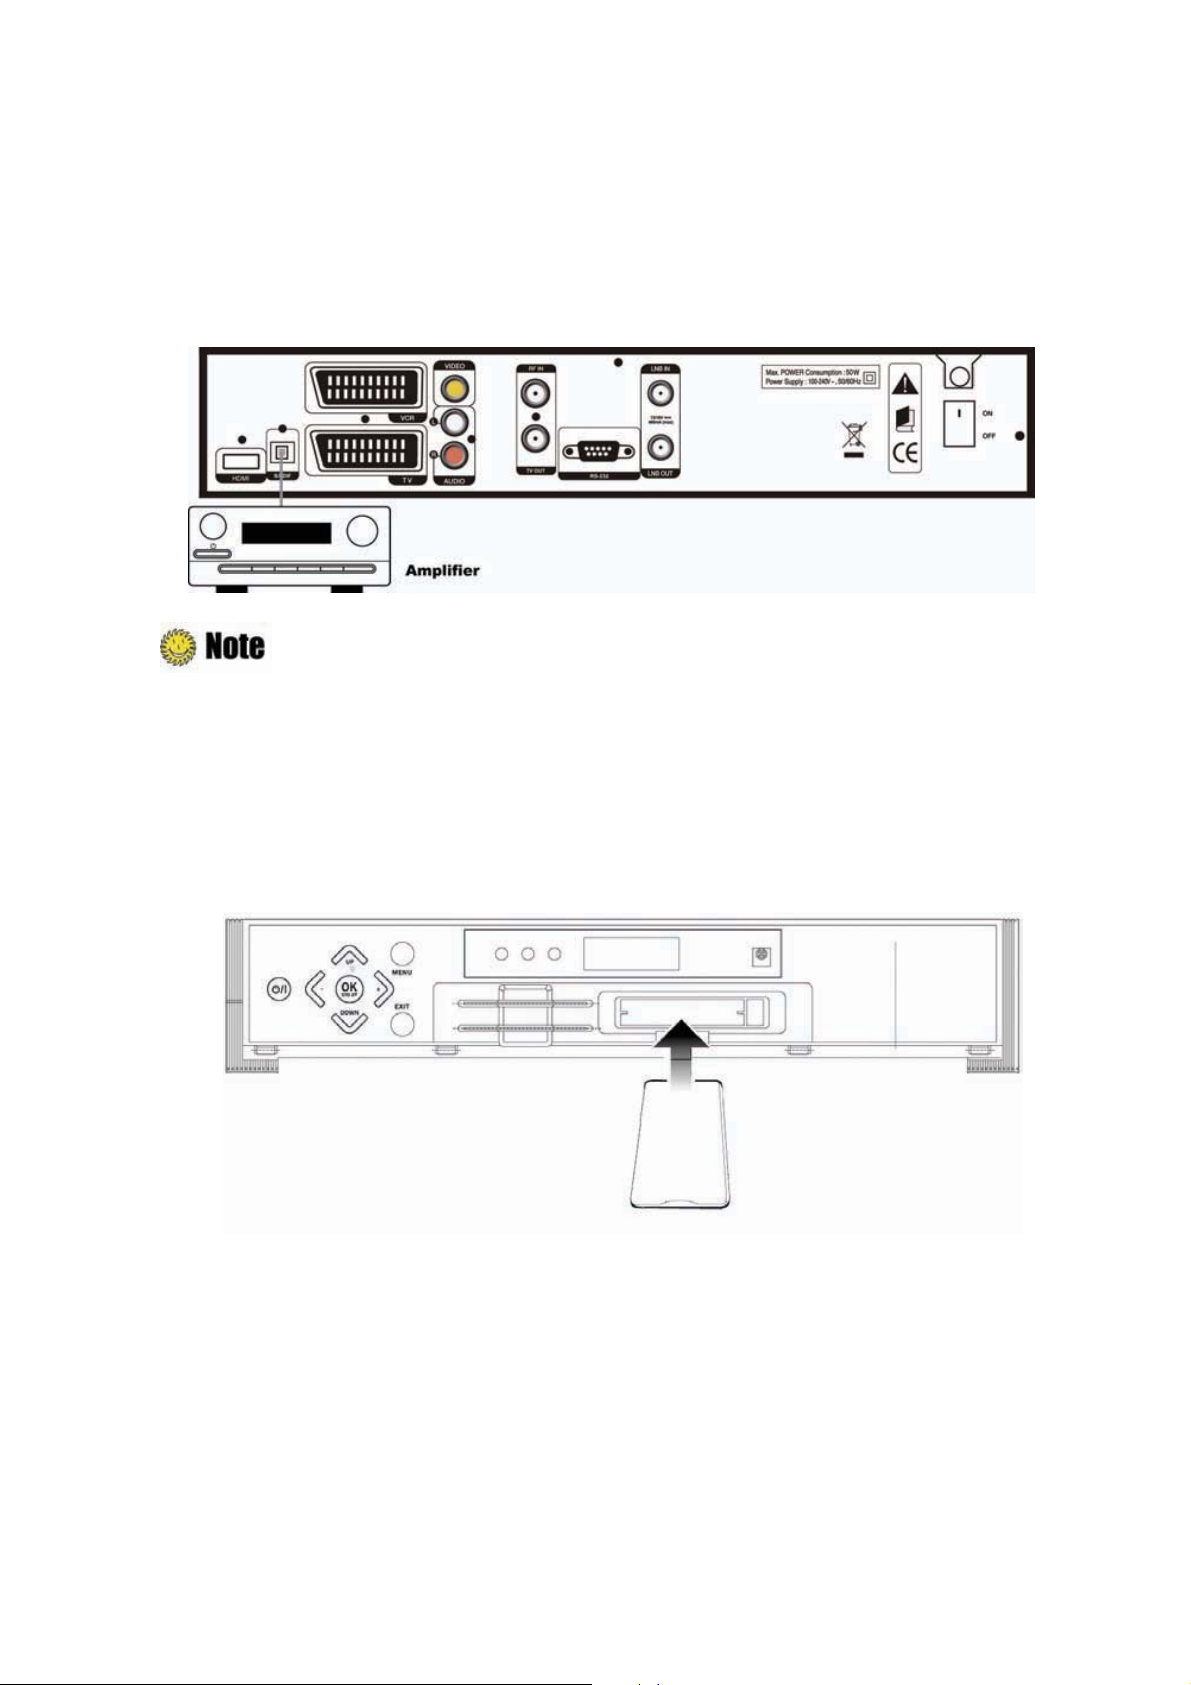
2.3 Connect to the Optical S/PDIF(Optional)
If you watch a program encoded by a Dolby Digital, you can enjoy the higher quality sound of the
Dolby Digital audio
Connect the optical S/PDIF to Dolby digital decoder or Digital television.
U
S/PDIF is an optional port.
2.4 Connecting to CI Module
Insert CI module fully into CI slot for watching TV programs from Service Provider.
Page 18

18 | S 30.12CI H User Manual
2.5 Starting Up
1. Connect the power cord of the receiver to a power outletGand press the “Power” button at the
rear panel to turn the receiver on.
2. The first time you power up the receiver, it will display the initial screen, then some parameters
for system configuration should be set. Refer to the following chapter for detailed information
about the basic settings.
Page 19

19 | S 30.12CI H User Manual
Chapter 3
Basic Settings
Page 20
20 | S 30.12CI H User Manual
If you use the receiver for the first time after connecting, you have to perform basic settings. Once
the setup procedure is finished correctly, you can start watching TV or listening to radio.
Turn on your TV and the receiver. Follow the instruction on the screen.
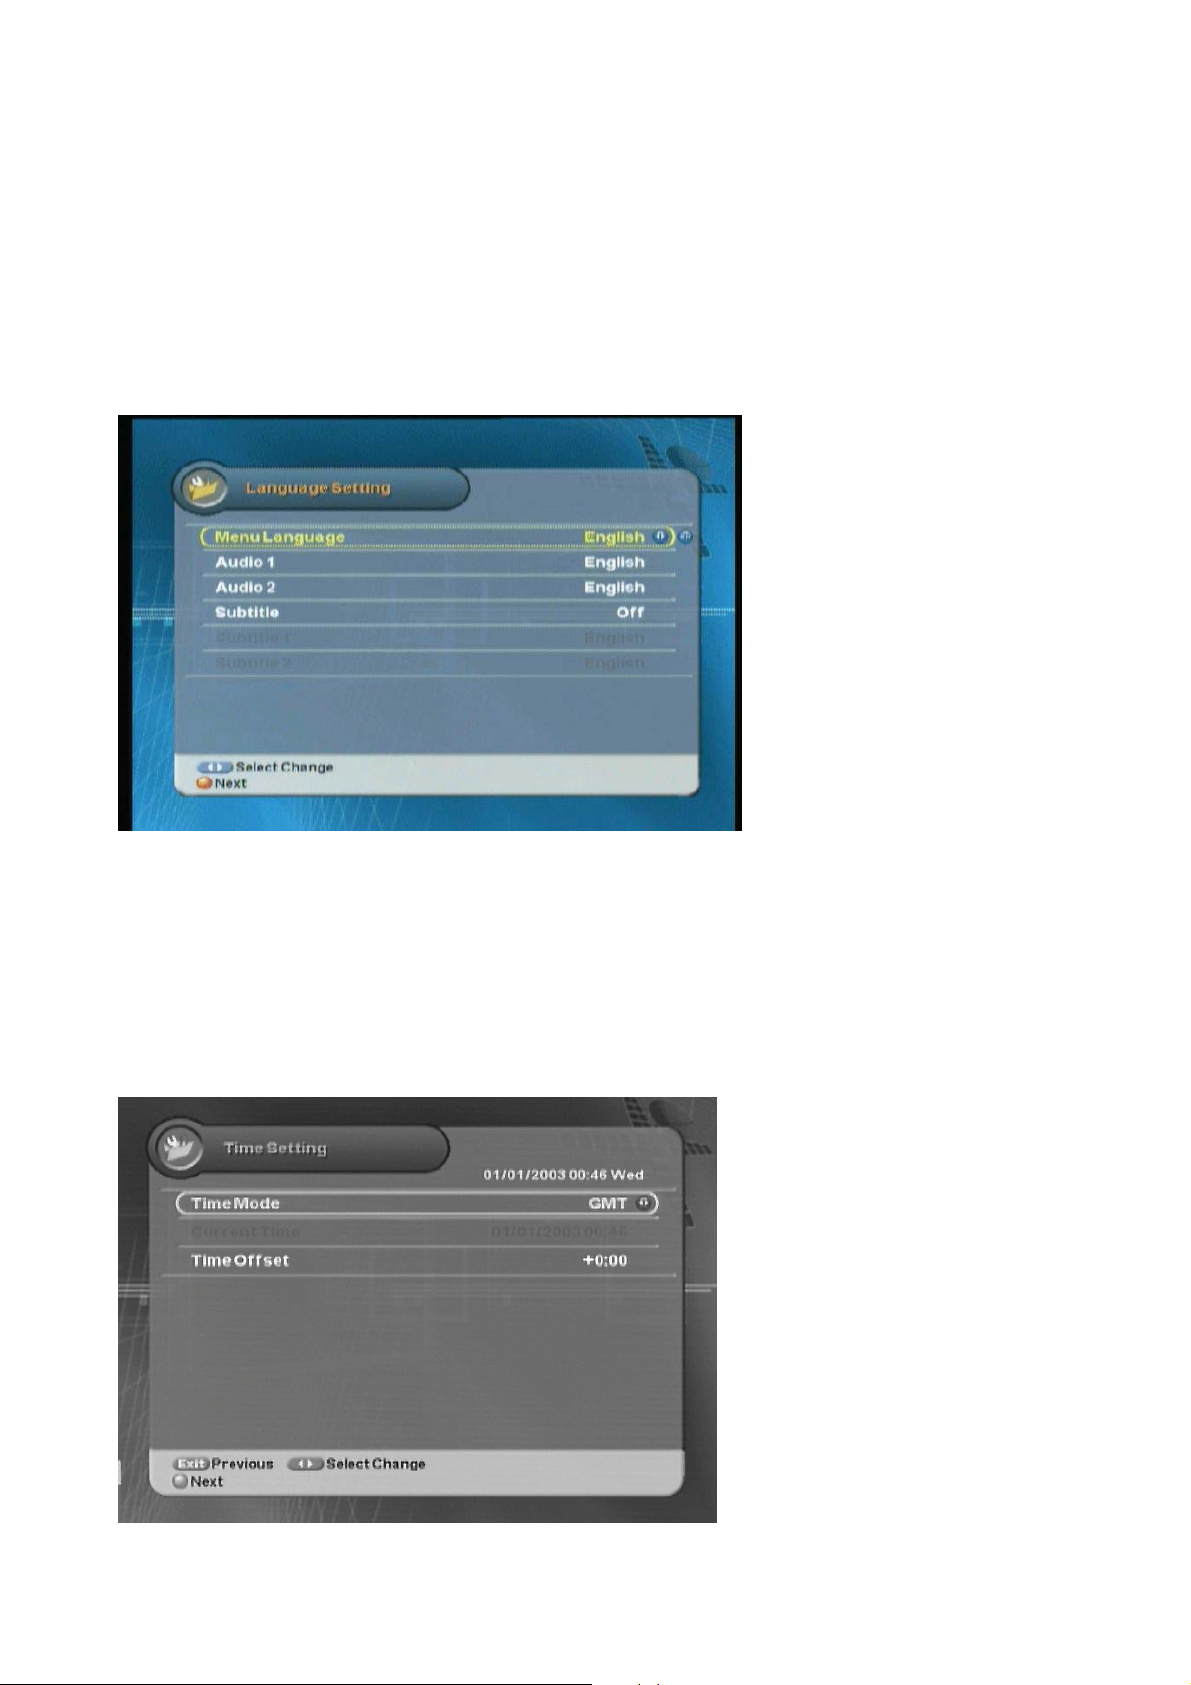
3.1 Language
You can select Menu Language, Audio, and the Subtitled Language.
1. Select the appropriate language from the list using the “
2. Press the “
3. Press the “Red” button to move to the next setting.
” buttons to move cursor into other language items.
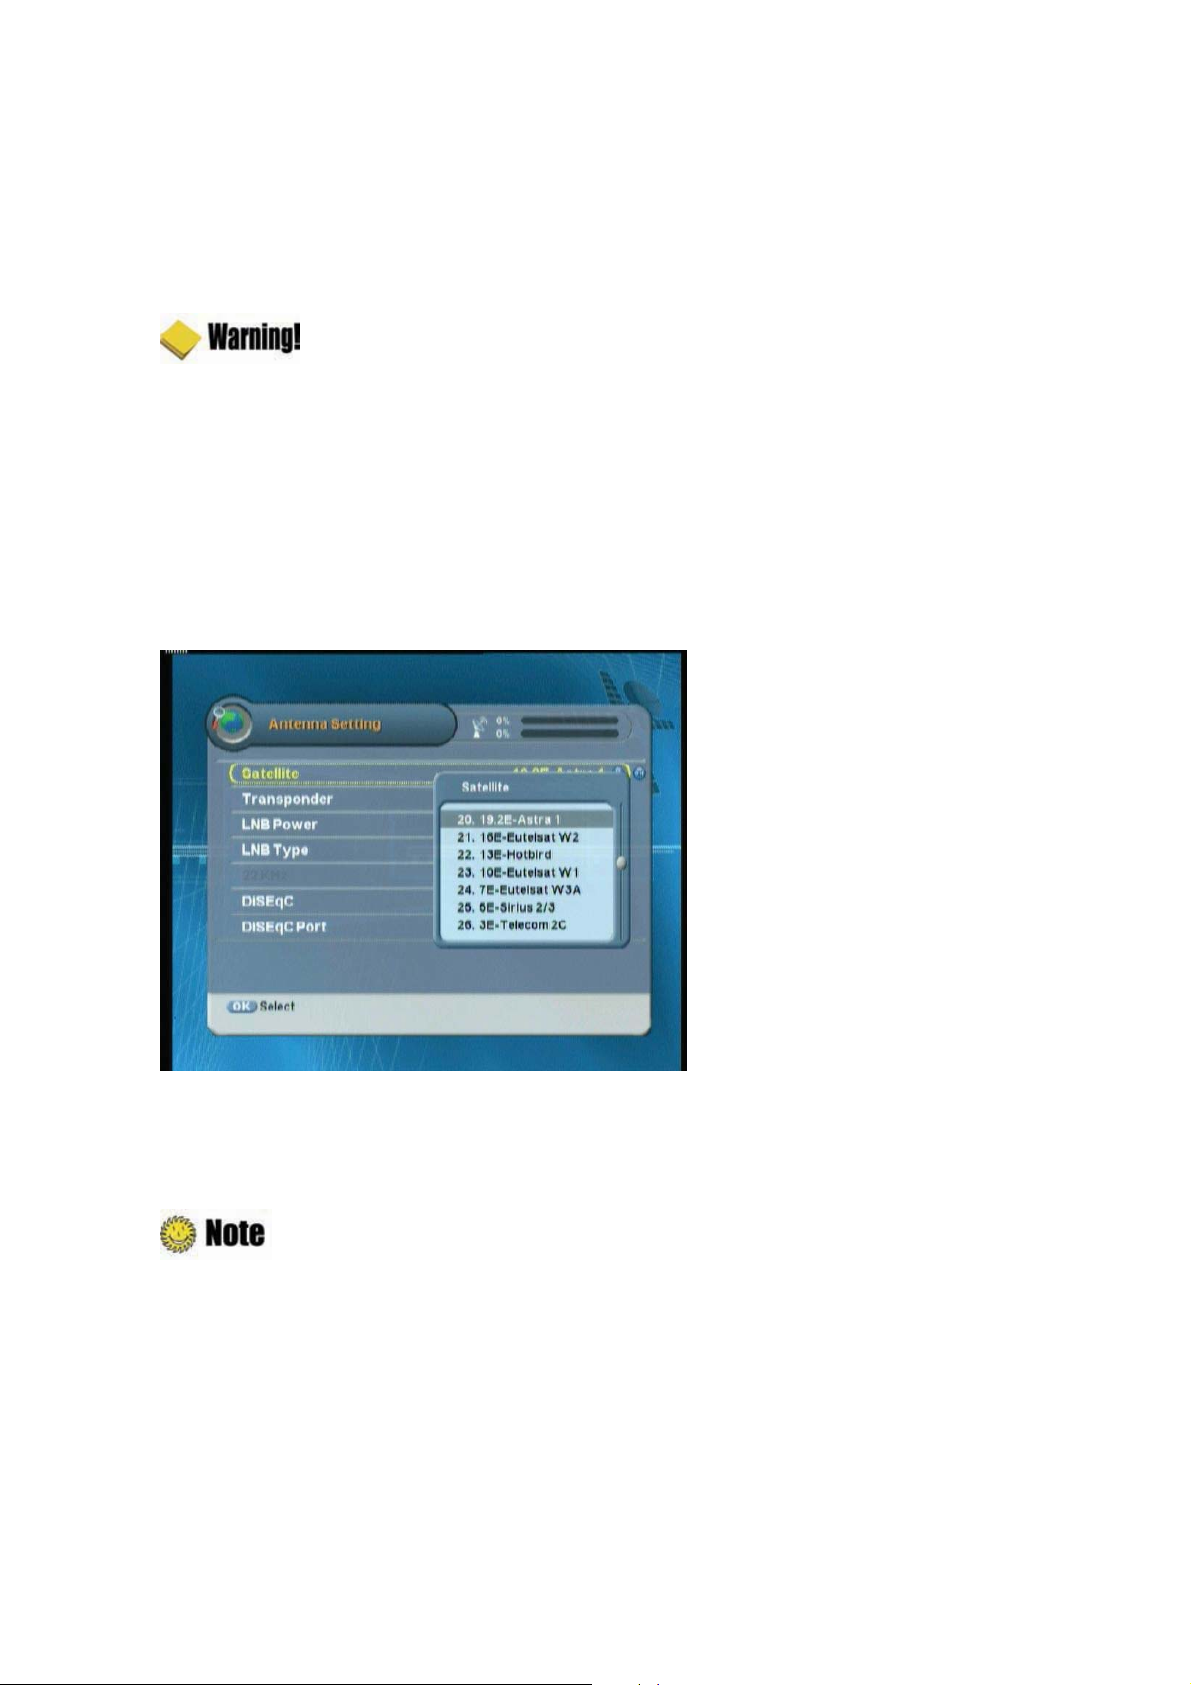
3.2 Time Setting
You can set the current time.
ൖ൘
” button.
1. Select Time Mode between GMT Offset and Local time using the “
ൖ൘
” button.
Page 21
Ch3. Basic Settings | 21
#
2. Select the appropriate GMT Offset value using the “
“0~9” button.
3. Press the “Red” button to move to the next setting. Or press the “EXIT” button to return to the
previous screen.
Press the “EXIT” button to save the previous input information and exit the basic settings. If you
exit the basic settings without fully completing the setting procedures, you may not watch any
broadcasting normally.
ൖ൘
” button or enter the local time using the
3.3 Antenna Setting
You can set the antenna's properties to watch the program.
ൖ൘
1. Select the Satellite name using the “
2.
Set transponder value for the satellite
3. Set the LNB power and frequency type using the “
: When using Universal LNB, select Universal for LNB type (9750/10600 (MHz)). Also,
if you select Universal, 22KHz tone value is disabled.
4. Select 22kHz Tone using the “
Otherwise, select ‘Off’.
5. Select DiSEqC item using the “
6. When you complete the setting, press the “Red” button to search the channel.
ൖ൘
” button.
using the “
ൖ൘
” button. When using 22kHz tone switch, select ‘On’.
” button.
ൖ൘
ൖ൘
” button.
” button.
Page 22
22 | S 30.12CI H User Manual
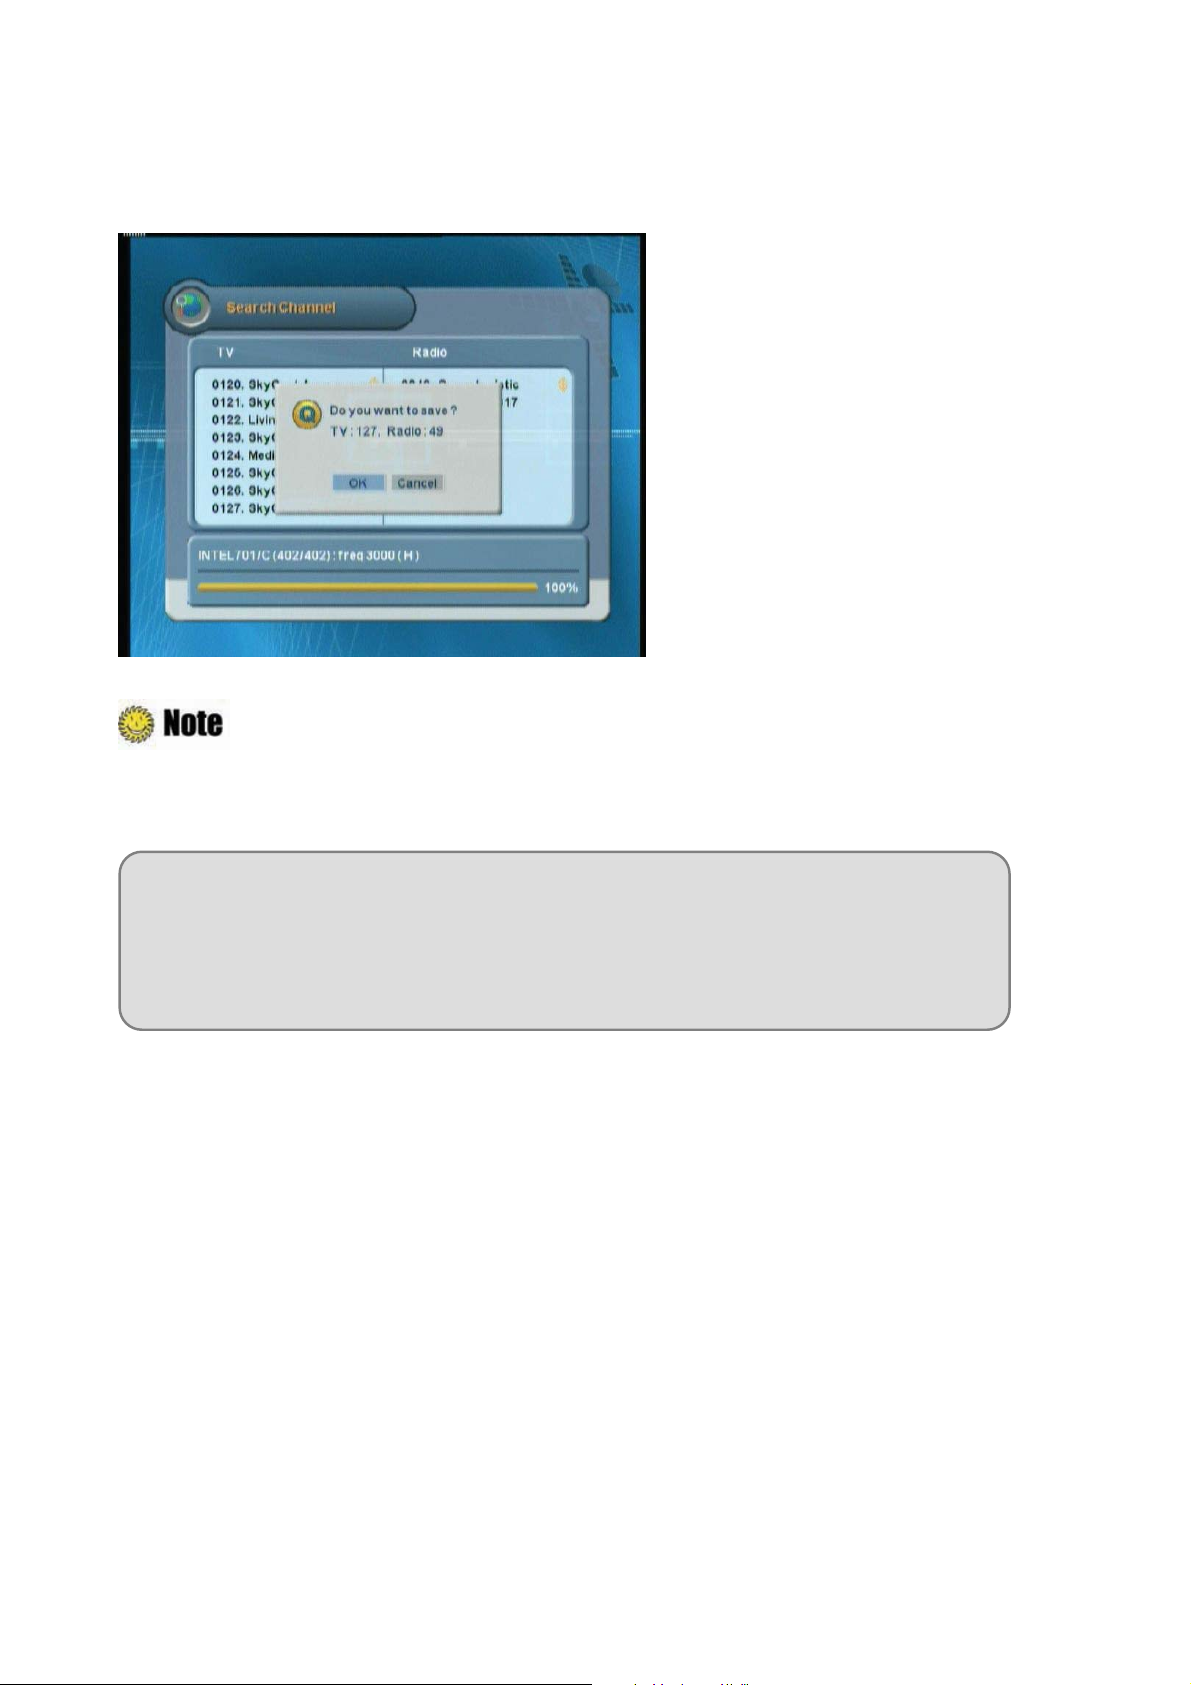
7. When completing Channel Search, the following message will appear. Move cursor to the “OK”
button and press the “OK” button to save the changes.
If you encounter with any problems or have any questions when setting up the antenna, please
contact your local product installer or distributor.
Now you have completed all steps required for watching TV or listening to radio.
For detailed information about how to use the receiver, refer to Chapter 4.
Page 23

23 | S 30.12CI H User Manual
Chapter 4
Operations
Page 24
24 | S 30.12CI H User Manual
[Basic
Functions ]
4.1 Changing Channel
There are several ways to change the channel.
z
Press the “
z
Enter your desired channel number using the “0~9“ buttons directly.
z
Press the “OK” button to display TV channel list, and then select the desired channel.
z
You can move to the previous channel by pressing the “Blue” button.
G
” button on the remote control to access the channels sequentially.
: During setting up the Menu(ex, Guide, Edit channel, etc), you can also change the
current channel using the lower “CH
” button without OSD.
G
4.2 Adjusting Volume
You can change the volume level of the current channel.
z
Press the “
z
Press the “MUTE” button to turn the sound off temporarily.
䯛䯝
” button to change the audio volume level.
: During setting up the Menu(ex, Guide, Edit channel, etc), you can also change the
volume level using the lower “VOL
” button without OSD.
G
Page 25
Ch5. Settings | 25
#
4.3 Viewing Program Information
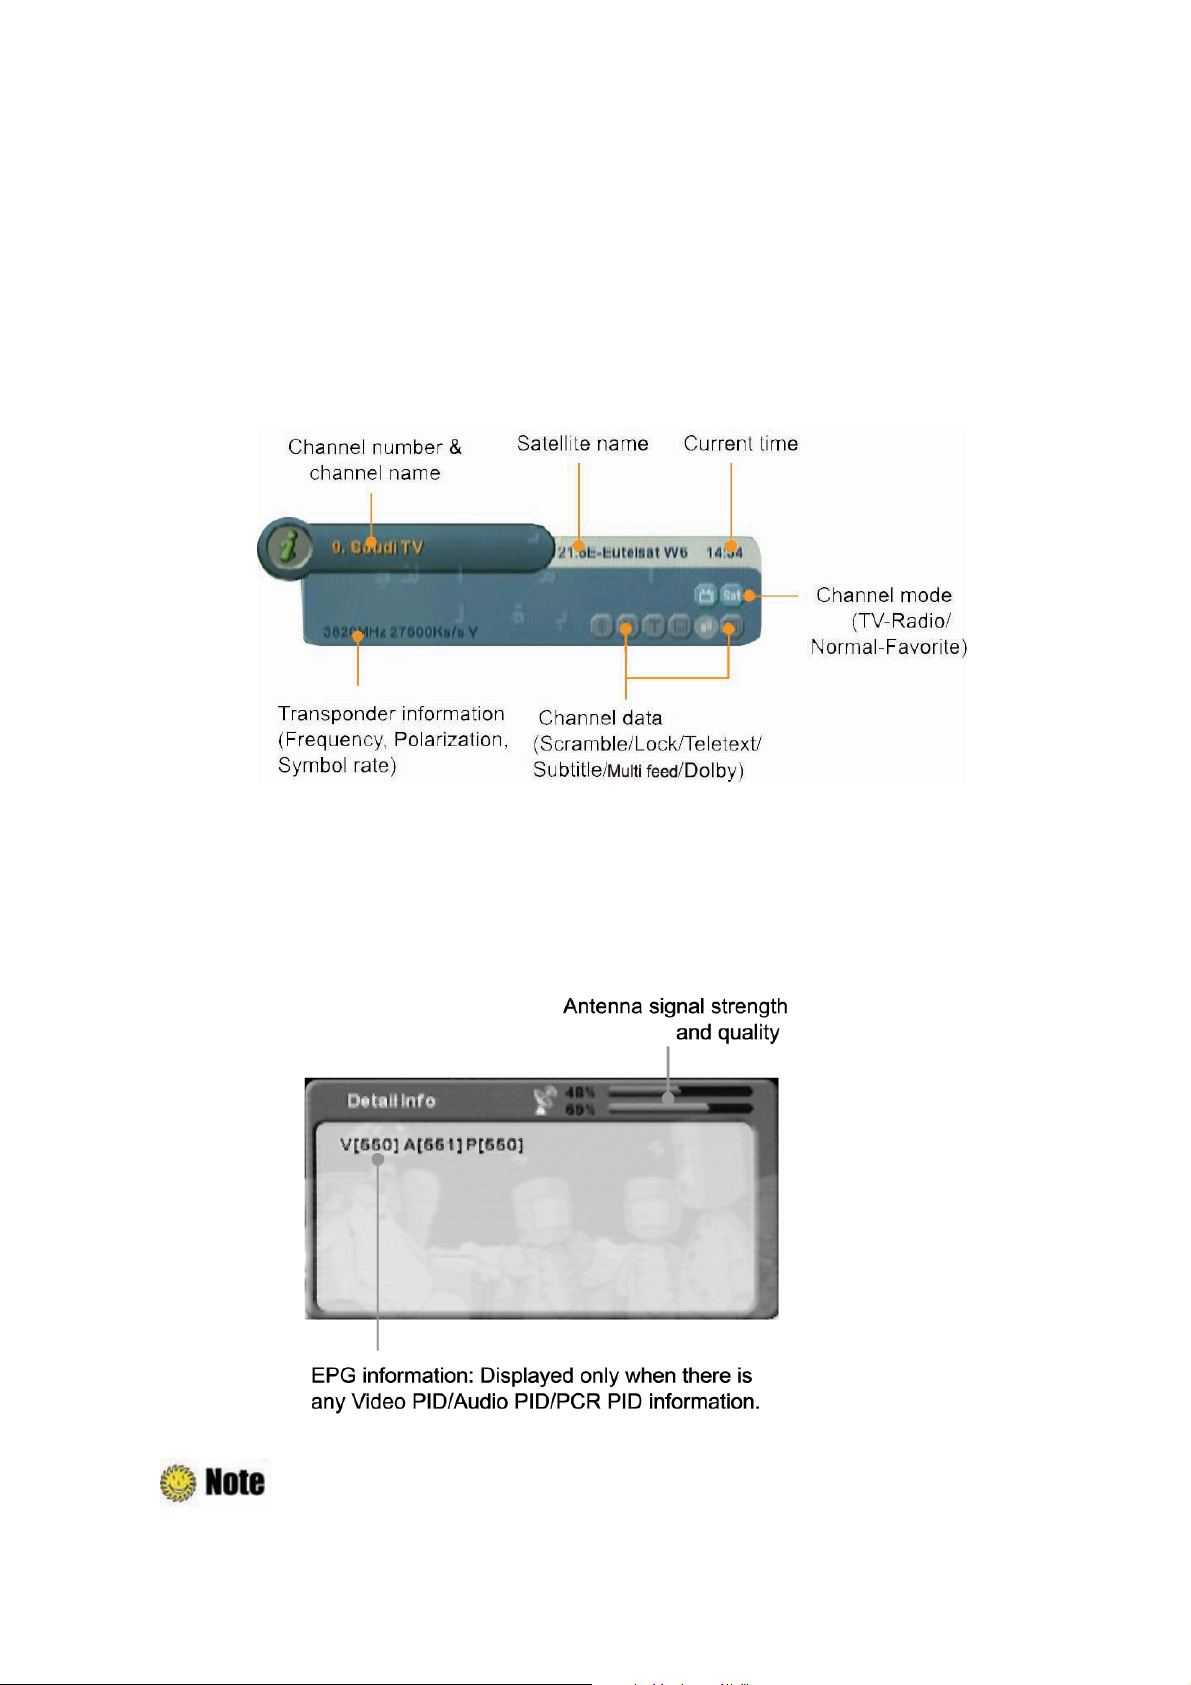
You can view the program information window by pressing the “INFO” button while watching a
program. Press the “EXIT” or “INFO” button to hide the program information.
1. Basic Information
The Basic Information is displayed as following on the screen.
2. Detailed Information
You can see detailed information about the current program. Press the “INFO” button to view
detailed information during the basic information is displayed. Press the “EXIT” or “INFO” button to
hide the program information.
: If there is no available EPG information, it is not displayed. Refer to
Advanced Search
for more information.
Chapter 5.1.4
Page 26
26 | S 30.12CI H User Manual
4.4 Switching TV and Radio
Press the “TV/RADIO” button to switch TV/Radio.
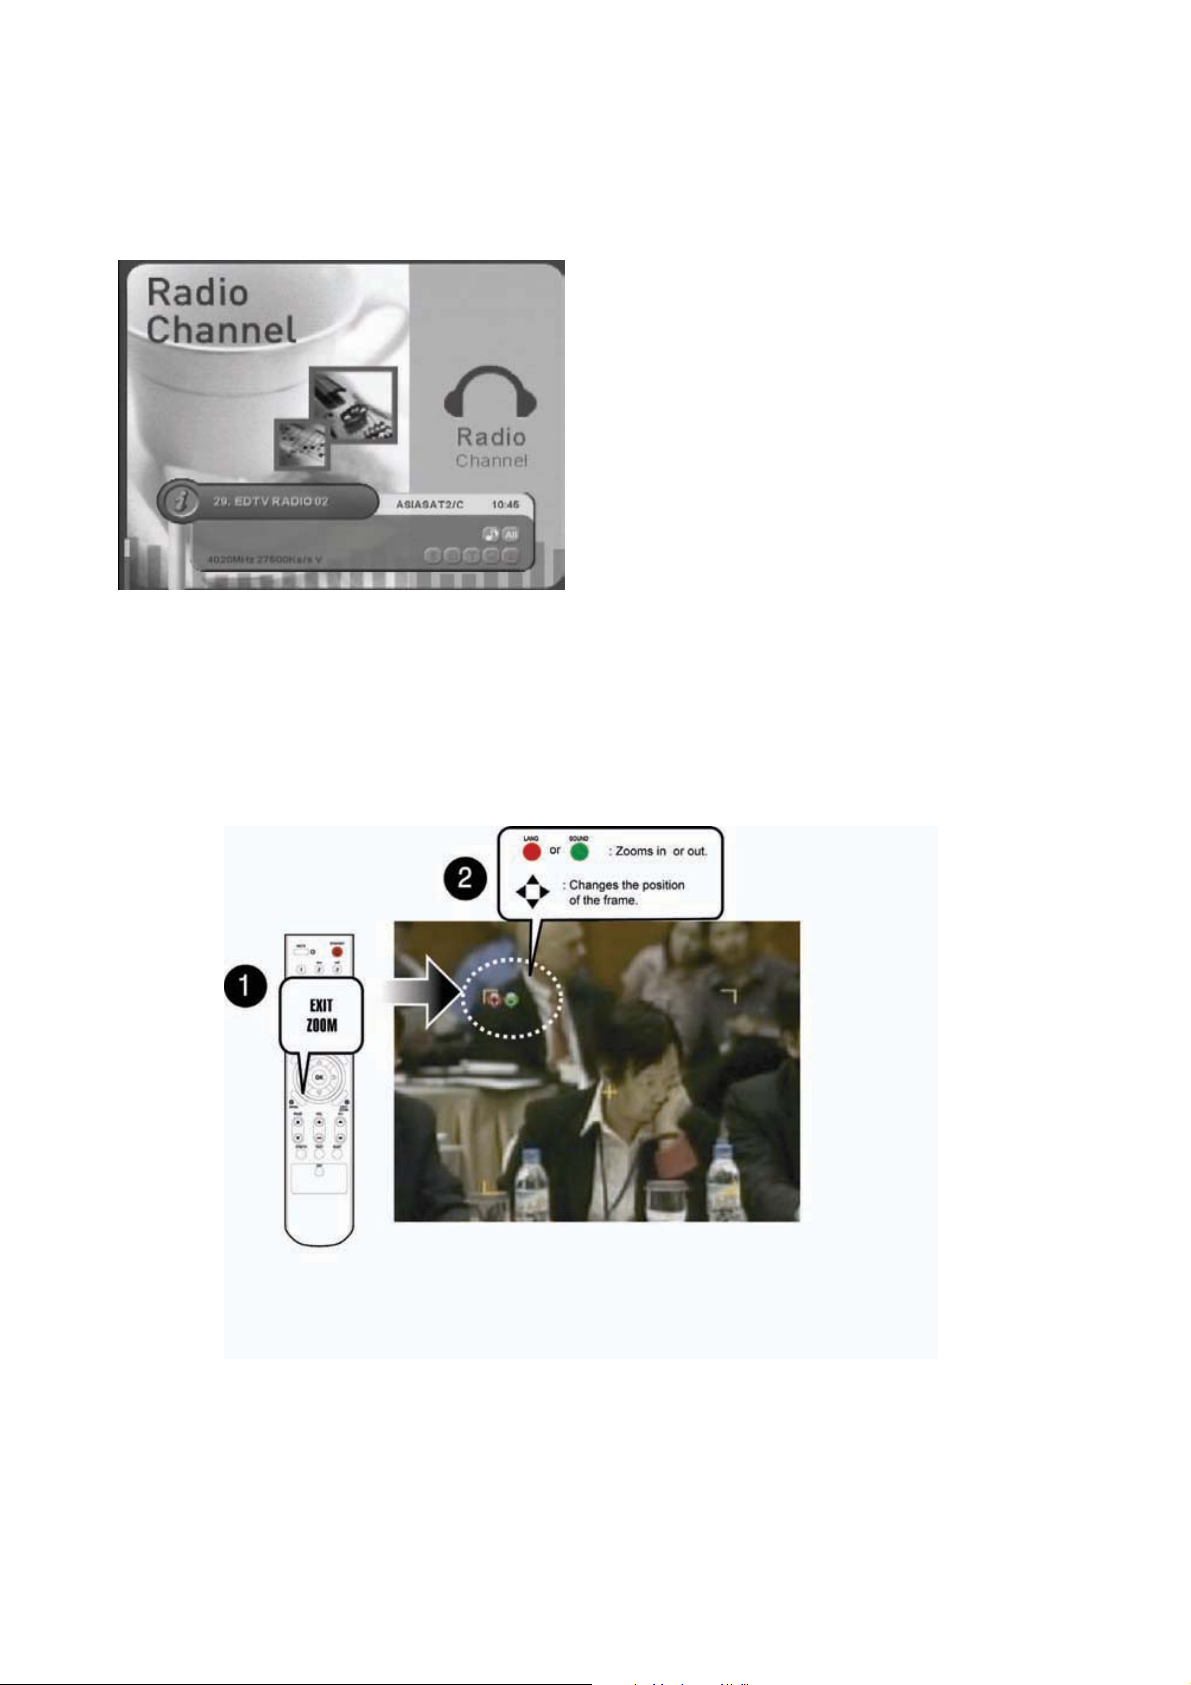
4.5 Freezing Screen/Zooming Screen
You can zoom in or out the current screen.
1. Press the “Yellow” button to pause the current program.
2. Press the “EXIT/ZOOM” button to select zooming mode.
3. Press the “Red” button to zoom in the screen or the “Green” button to zoom out the screen.
Or press the “
4. Press the “OK” button to zoom in or out the current screen.
5. Press the “EXIT” button to return to the normal screen size. Press the “Yellow” button again to
continue the program.
䯛䯝
” button to change the position of the frame.
Page 27
Ch5. Settings | 27
#
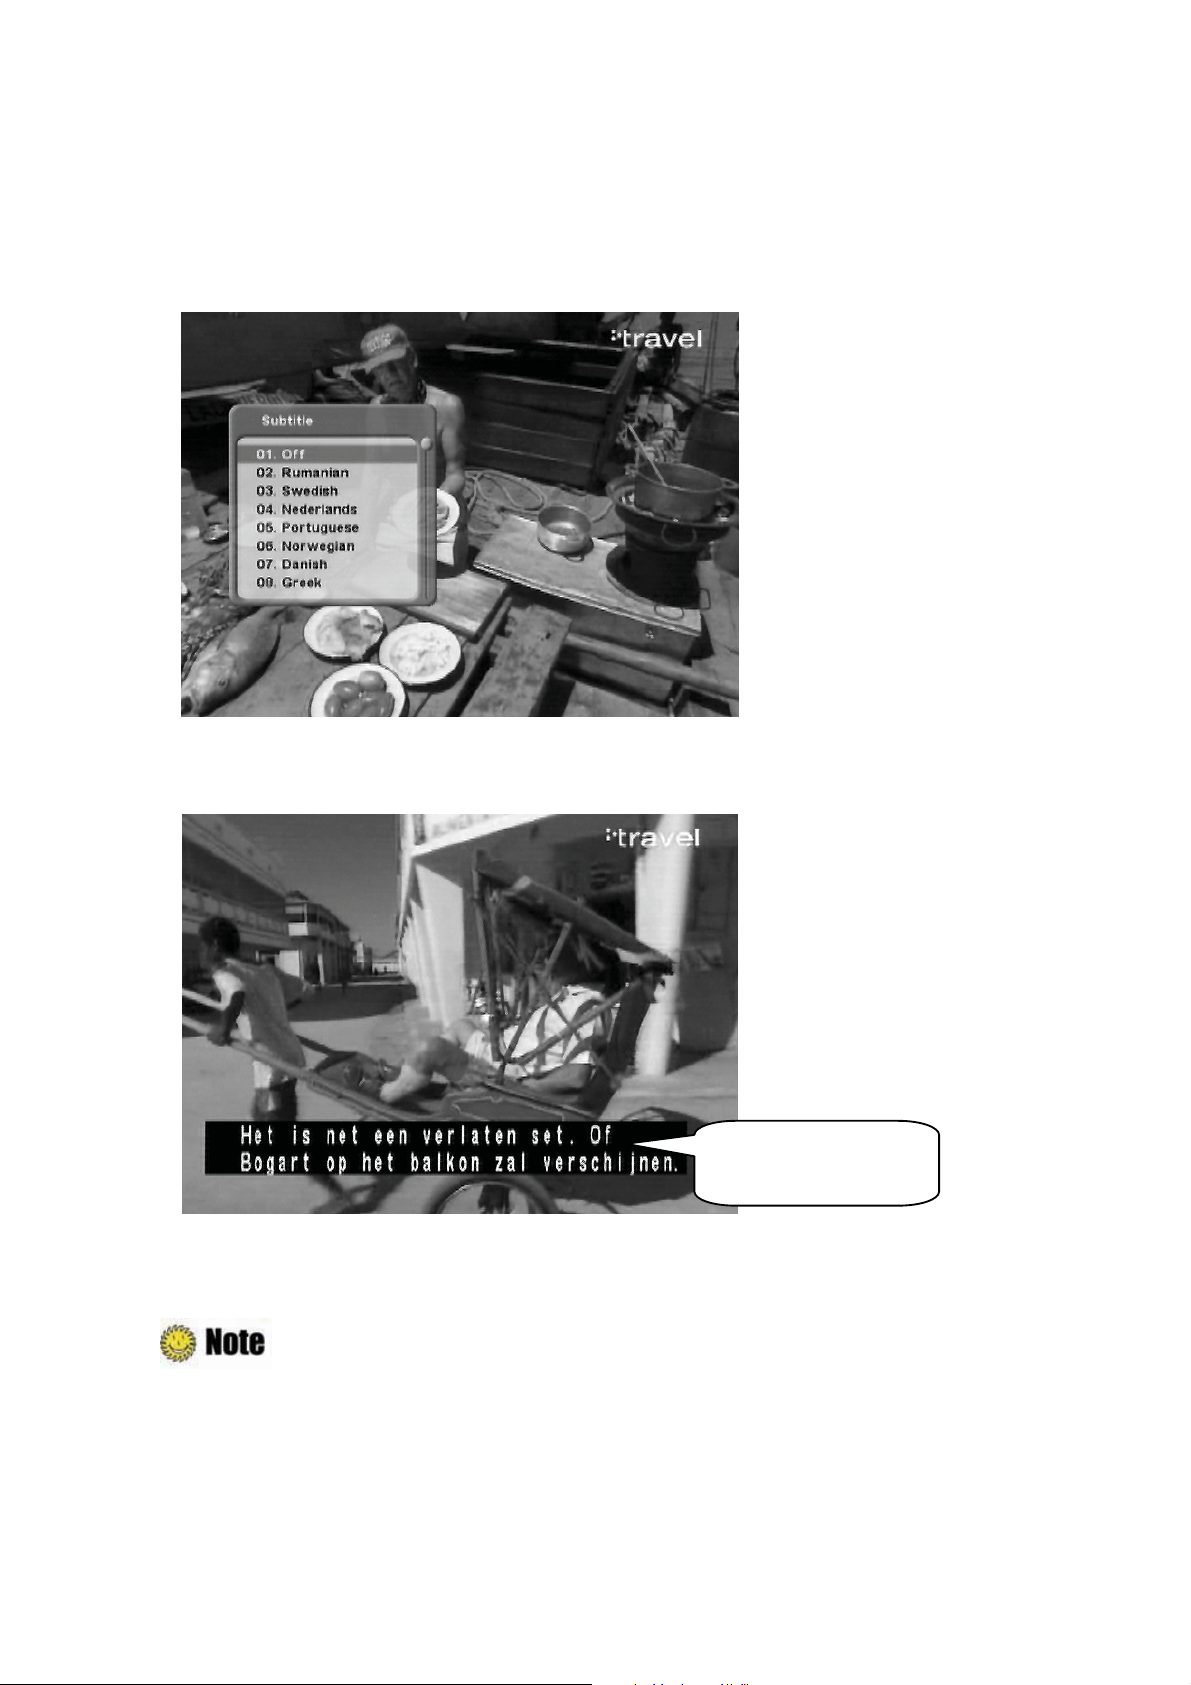
4.6 Changing Subtitle Language
If the current program provides Subtitle information, you can select the subtitle language.
1. Press the “SUBT” button to display the subtitle language list.
2. Select the desired subtitle language using the “
subtitle language will be displayed at the bottom of the screen.
3. Select ‘OFF’ from the subtitle language list not to display subtitle from the screen.
ˉG
button, and press the “OK” button. The
Subtitle language
: You can select a default subtitle language by pressing the “MENU” button and
selecting the Setup–Language Setting–Subtitle menu in order. Refer to
5.3.1 Language Settings
for more information.
Chapter
Page 28
28 | S 30.12CI H User Manual
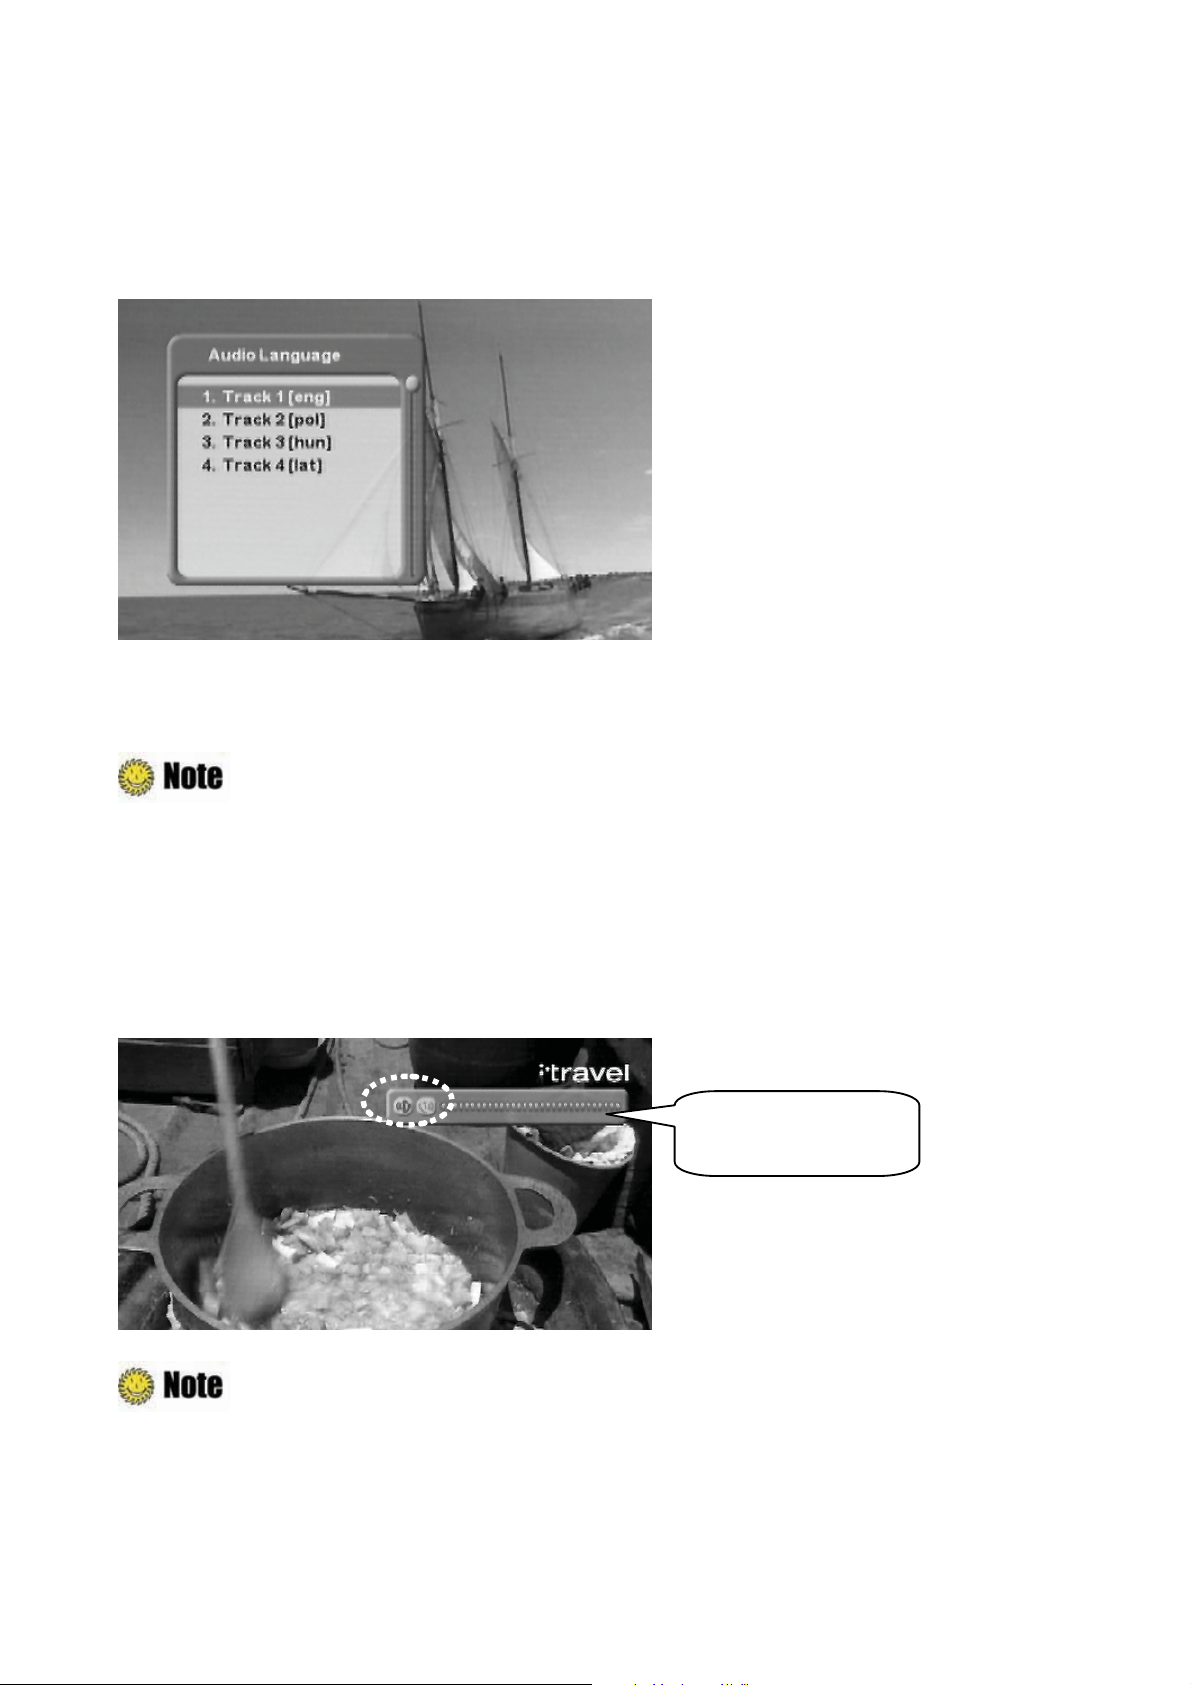
4.7 Changing Audio Language
If the current program provides multiple audio languages, you can select the desired language.
1. Press the “Red” button to display the audio language list.
2. Select the desired audio language using the “
audio language will be changed immediately.
: You can select a default audio language by pressing the “MENU” button and
selecting the Setup–Language Setting– Audio menu in order. Refer to
5.3.1 Language Settings
for more information.
ˉG
button, and press the “OK” button. The
4.8 Selecting Audio Output Direction
You can select the direction of audio output such as left, right, or stereo.
Press the “Green” button to toggle the direction of audio output among left, right, or stereo.
Audio Output Direction
Chapter
z
If the program supports Dolby AC-3 sound, you cannot select the direction of audio output.
z
You can select Dolby by pressing the “MENU” button and selecting the Setup–Output
Setting– S/PDIFOutput menu in order.
Page 29
Ch5. Settings | 29
#
[ Advanced
Functions ]
4.9 Managing Channel List
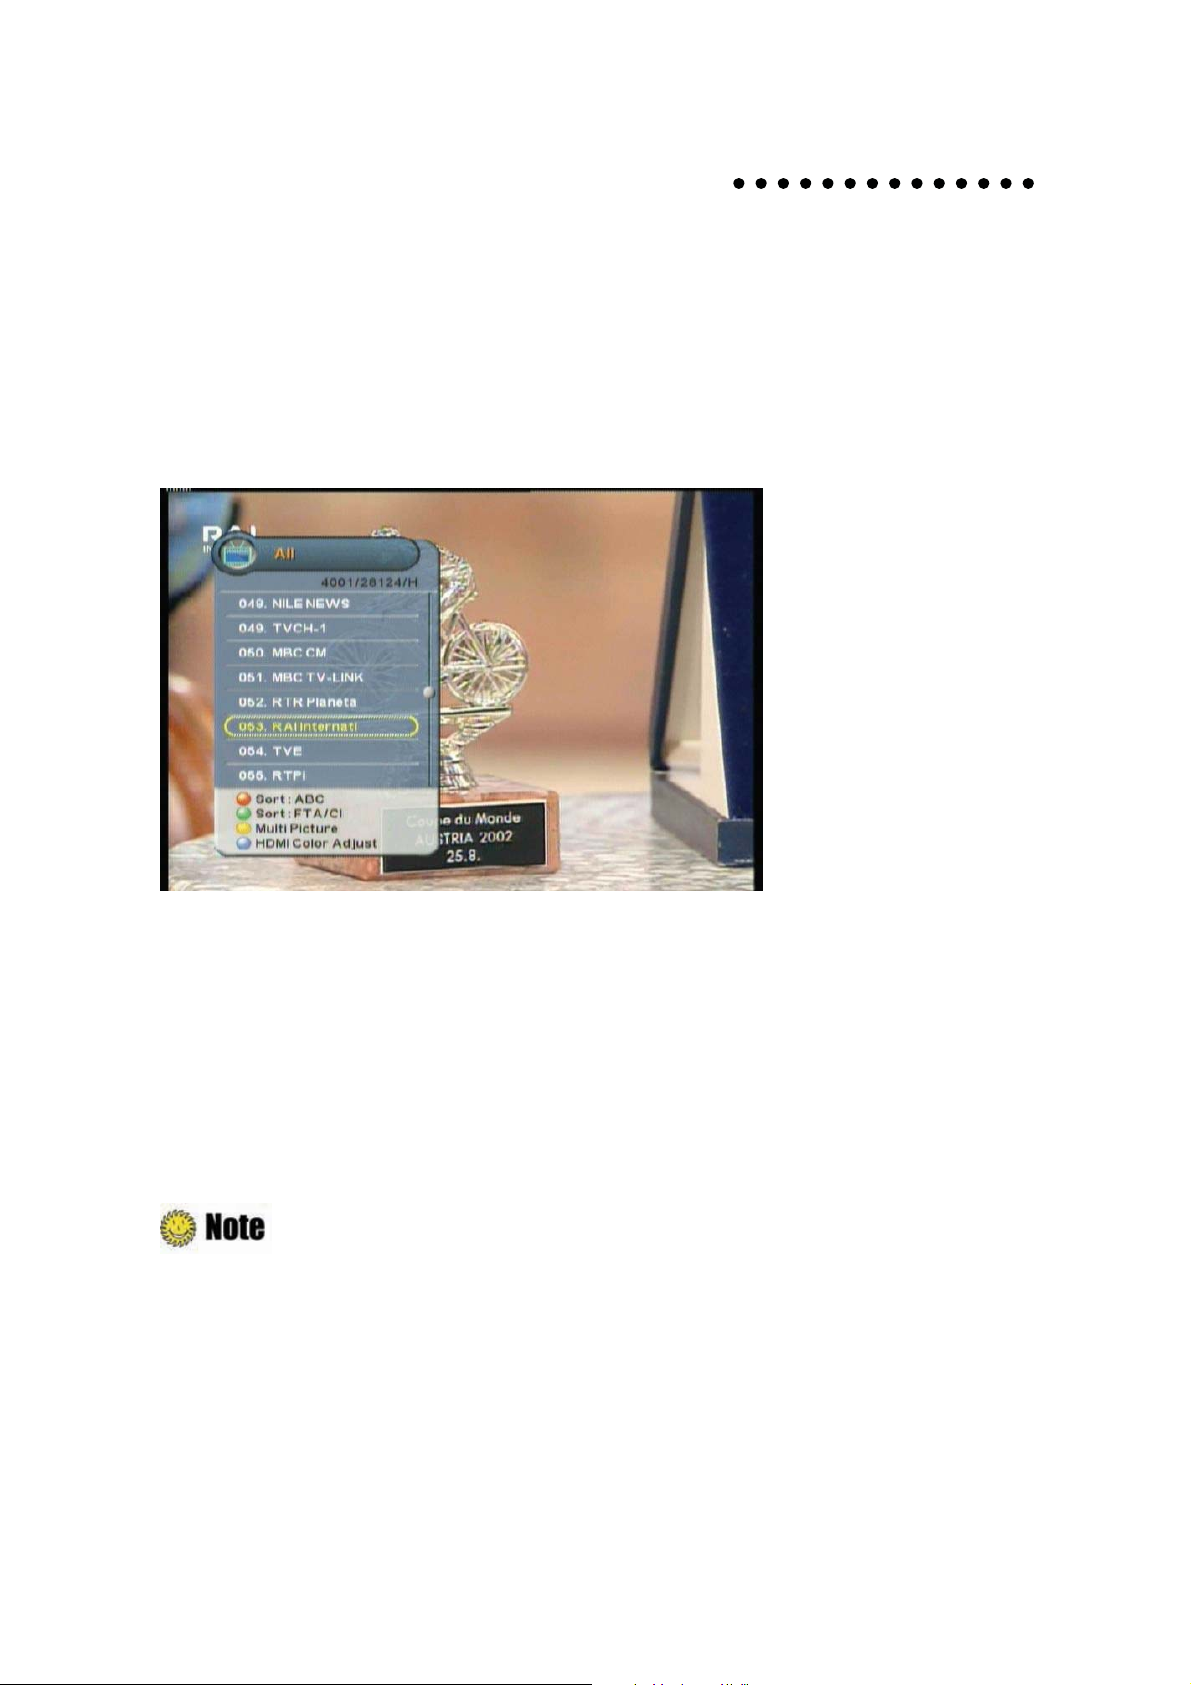
4.9.1 Displaying Channel List
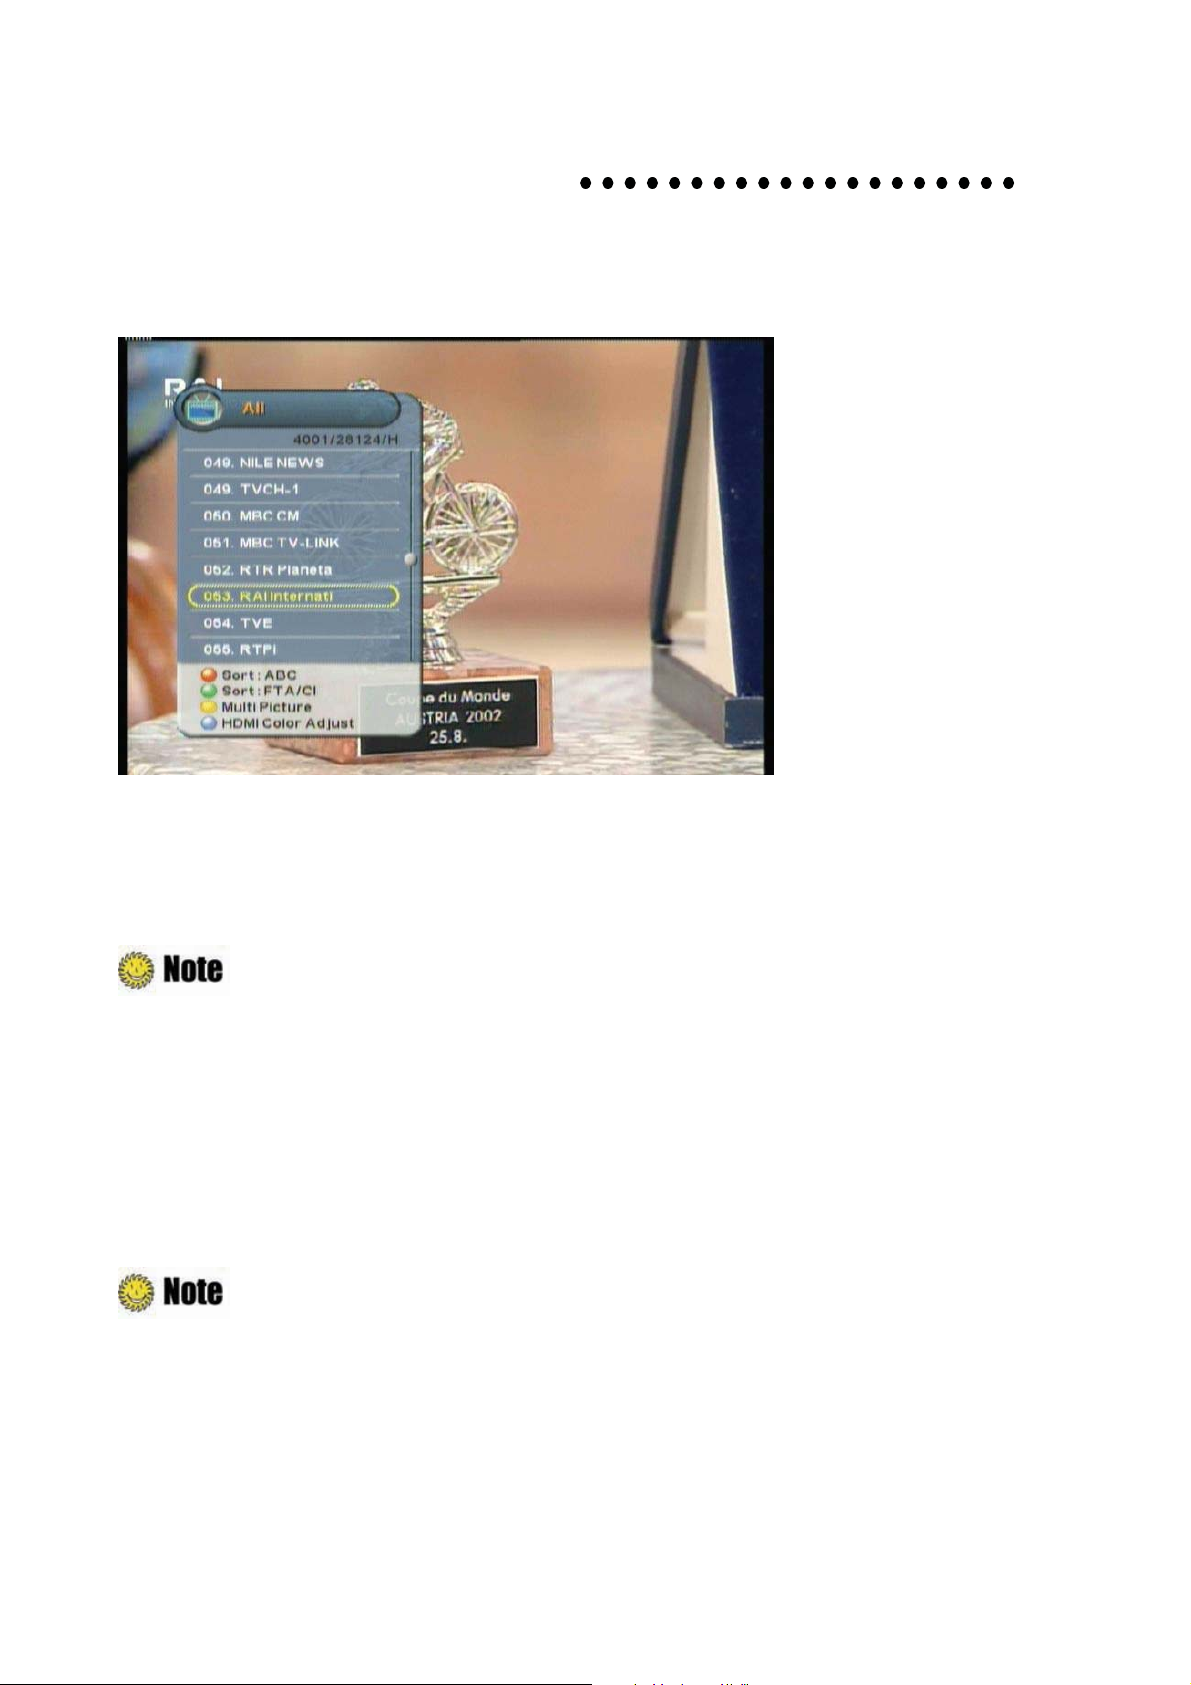
You can see various channel lists and change the channels from the channel list more
conveniently.
1. Press the “OK” button while watching a program to display the selected channel list.
z
RED: Sorts the channel lists by alphabetic order.
z
Green: Sorts the channel lists by FTA/CI order.
z
Yellow: Displays the multi-channel window.
z
Blue: HDMI Color adjust.
ˉ
2. Move to the desired channel using the “
channel.
Press the “FAV” button to switch among the channel modes such as ‘ALL, FAV1~4, etc’. Refer to
Chapter 4.10 Managing Favorite Channel Lists
button and press the “OK” button to change the
for more information.
Page 30
30 | S 30.12CI H User Manual
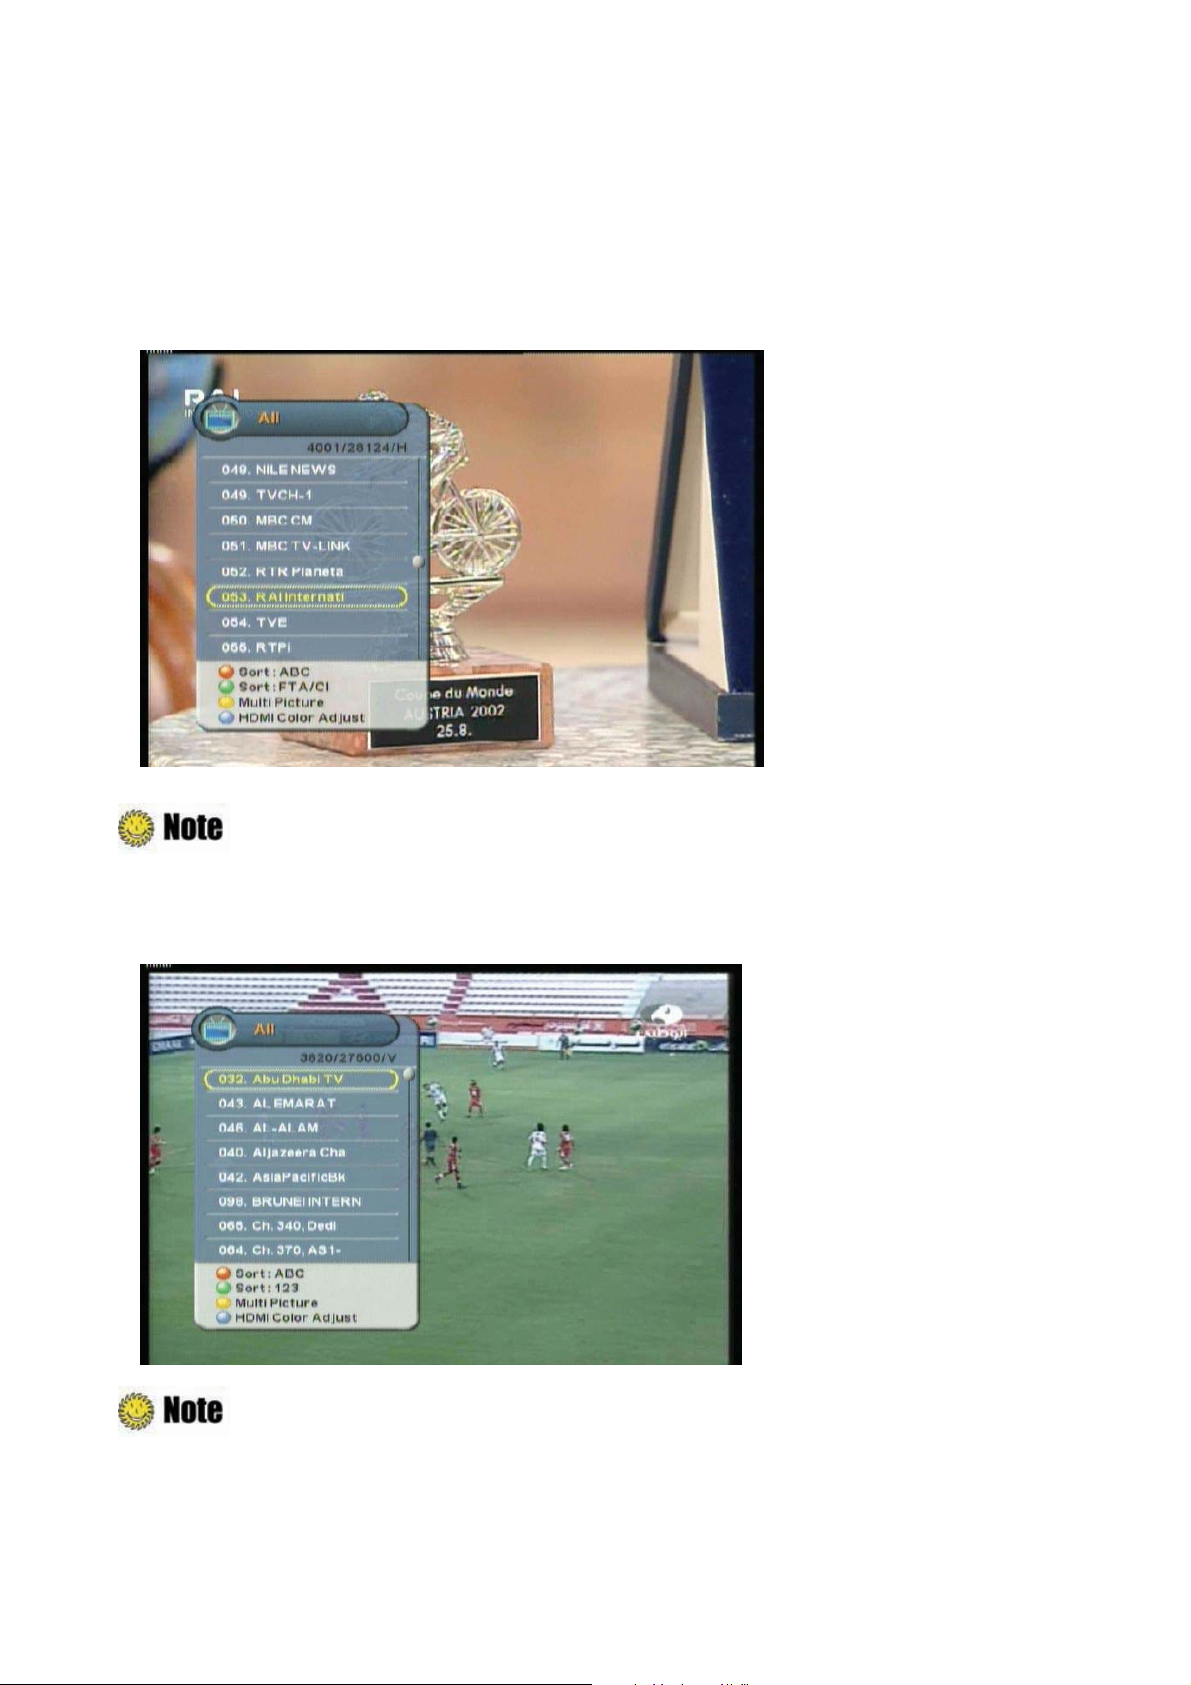
4.9.2 Searching Channel
You can search the specific channel among various channel lists more conveniently.
1. Press the “OK” button while watching a program to display the selected channel list.
2. Press the “Red” button to sort the channel lists by alphabetic order.
: Press the “Greenˉ button to sort the channel lists by FTA/CI order.
3. Press the “2(abc)~9(wxyz)” button to search the channel lists which have same initial. For
example, press the “2(abc)” button, and then see the channel lists which start with ‘a’.
: Press the “PAGE
button to move to the previous/next page(about 8 channels).
ˉ
Page 31
Ch5. Settings | 31
#
4.9.3 Viewing Multi-Channels Window
You can display multi-channels window and select a channel to watch.
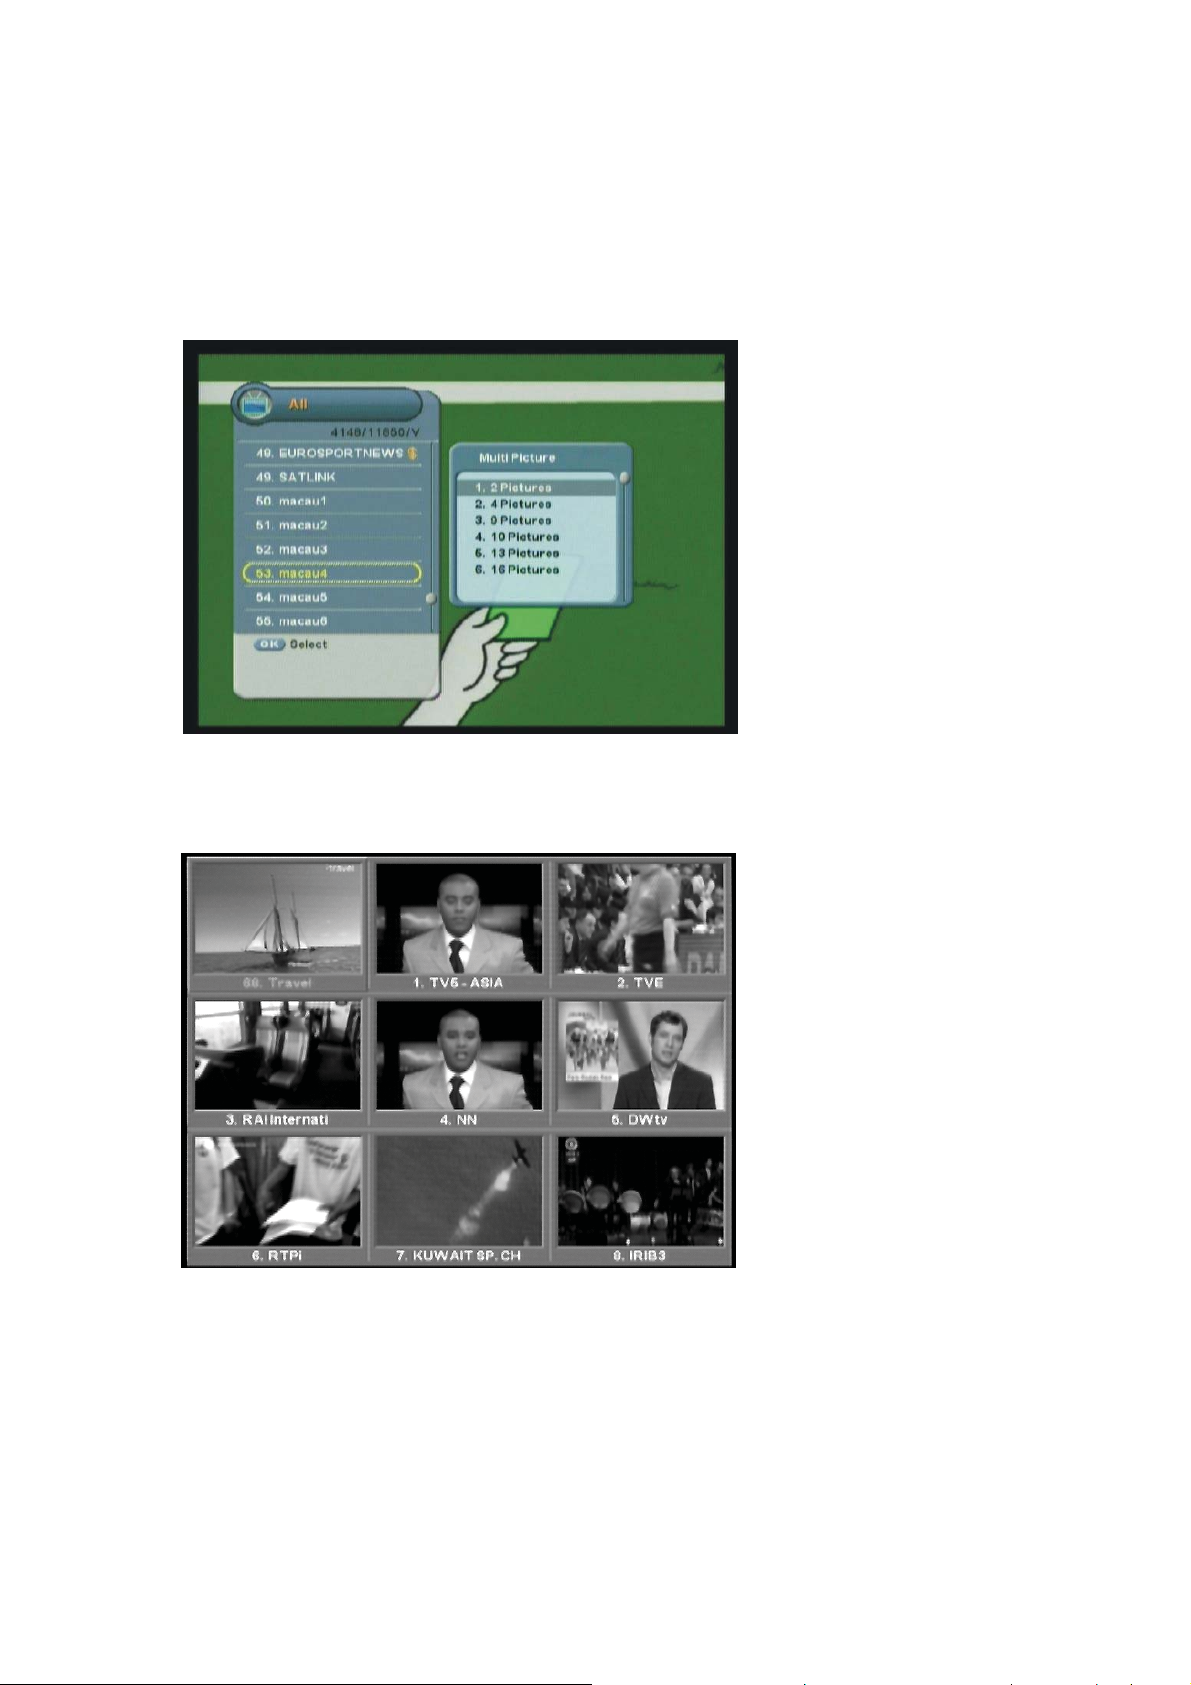
1. Press the “OK” button while watching a program to display the selected channel list.
2. Press the “Yellow” button to display the number of the multi-channel among 2, 4, 9, or 16.
3. Move to the desired number of window using the “
display multi-channels.
4. Move to the desired channel using the “
䯛䯝ˉ
button and press the “OK” button to watch the
program.
ź” button and press the “OK” button to
5. Press the “EXIT” button anytime to return to one channel mode.
Page 32
32 | S 30.12CI H User Manual
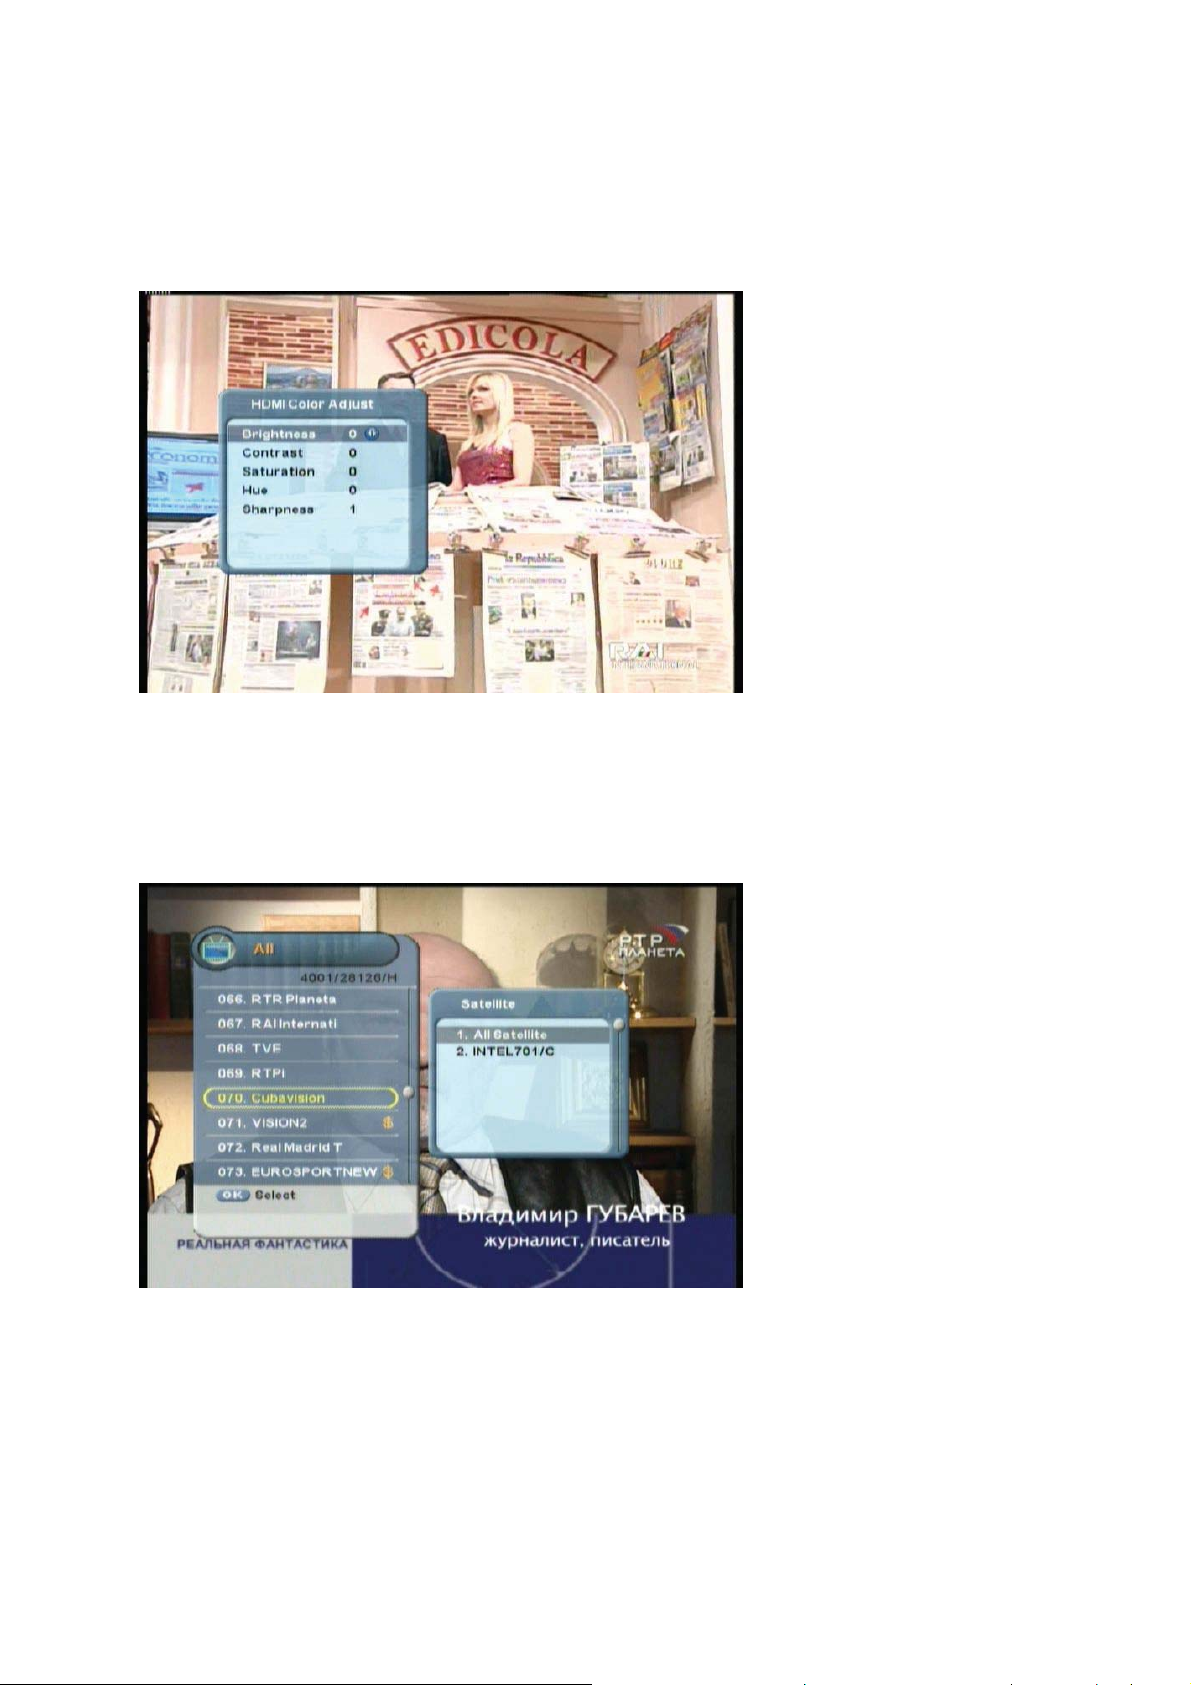
4.9.4 HDMI Color Adjust
1. Press the “OK” button while watching a program to display the selected channel list.
2. Press the “Blue” button while the channel list is displayed to view the Hdmi Color Adjust.
4.9.5 Changing Satellite Group
You can change the satellite group.
1. Press the “SAT” button while the channel list is displayed to view the satellite group lists.
2. Select the desired channel group using the “
3. Press the “EXIT” button to return to the previous screen.
ź” button to display its sub-groups.
Page 33
Ch5. Settings | 33
#
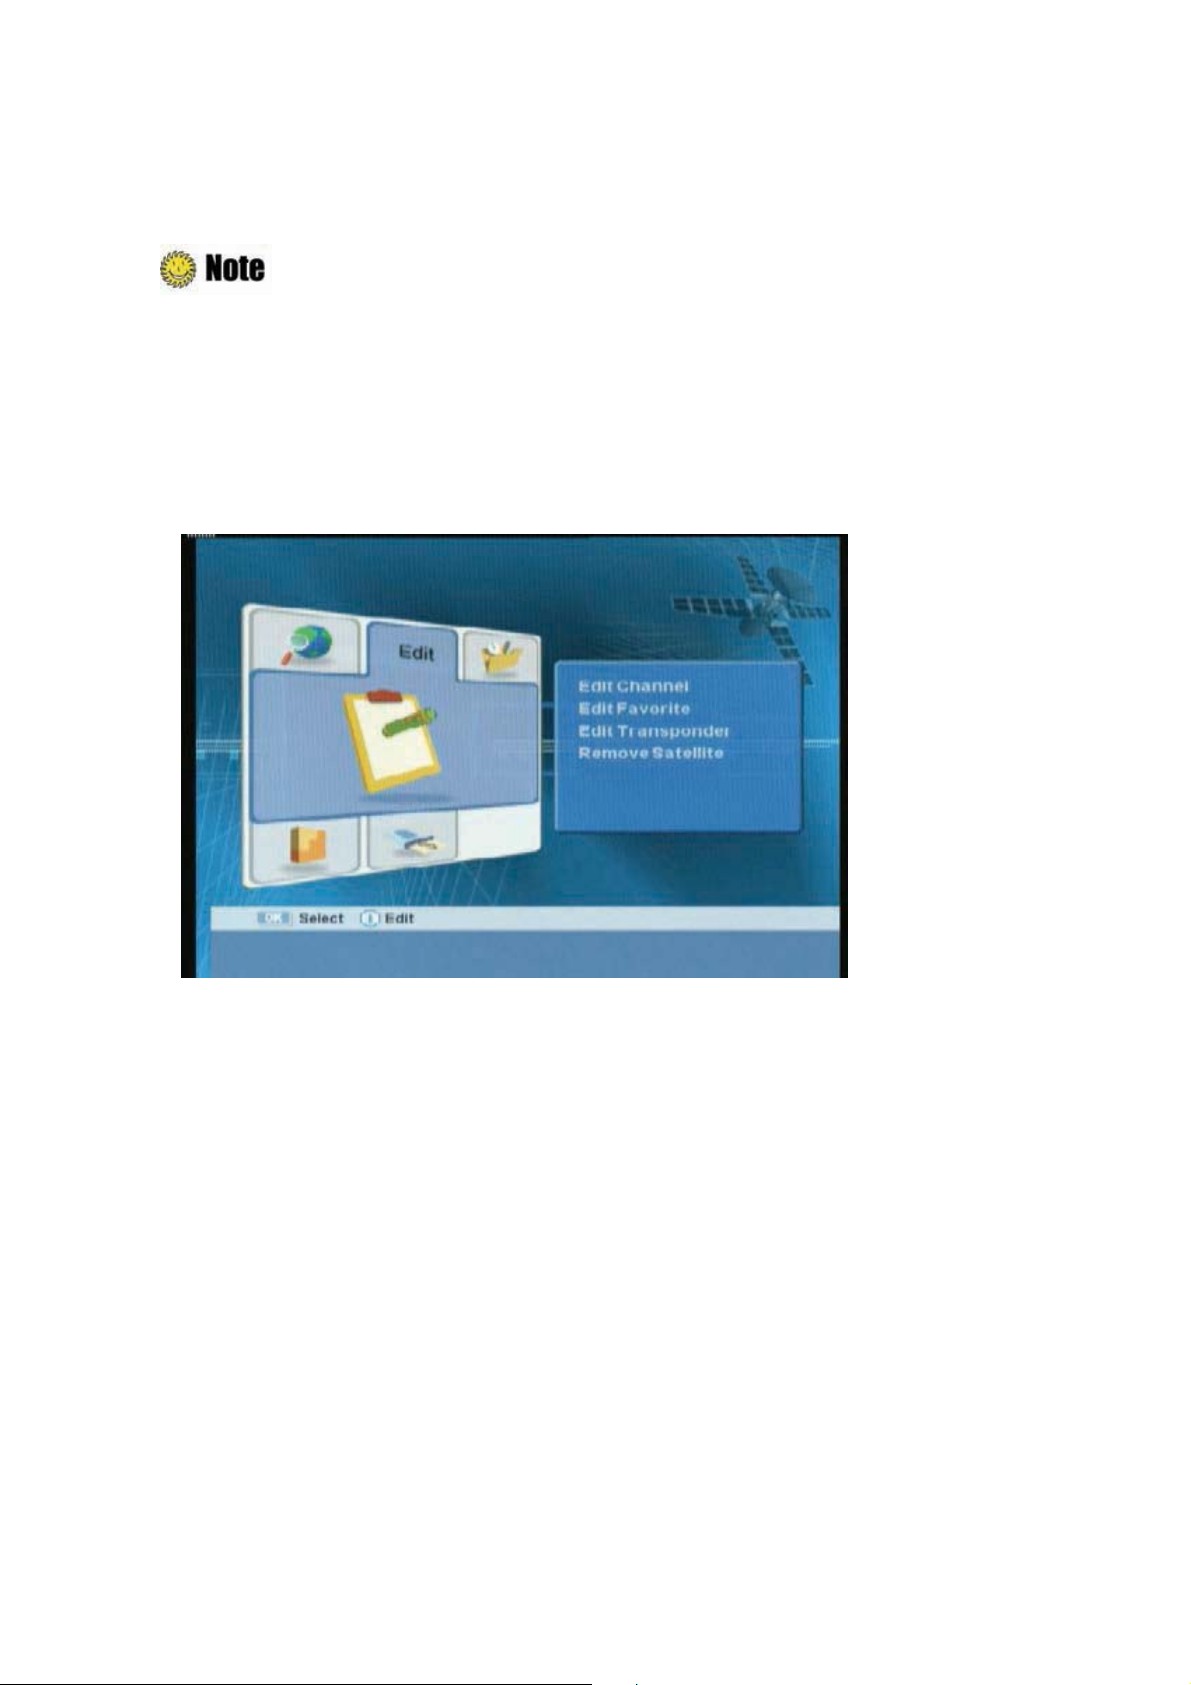
4.9.6 Editing Channels
You can edit(such as lock, delete, move, and rename) all channels or each channel.
Press the “EXIT” or “MENU” button to save the changes and return to the previous menu.
1. Press the “MENU” button.
2.
ᐭ!Move to the Edit menu using the “
Channel menu using the “OK” button.
default password is 0000.
䯛䯝
” button, and press the “OK” button.
ᐯ
Enter your password using the ˈ0~9ˉ buttons.GThe
!
ᐮ!Select the Edit
3. You can lock, delete, move, and rename all channels or each channel. If you want to delete one
or more channels, select the desired channel(s) and press the “Green” button.
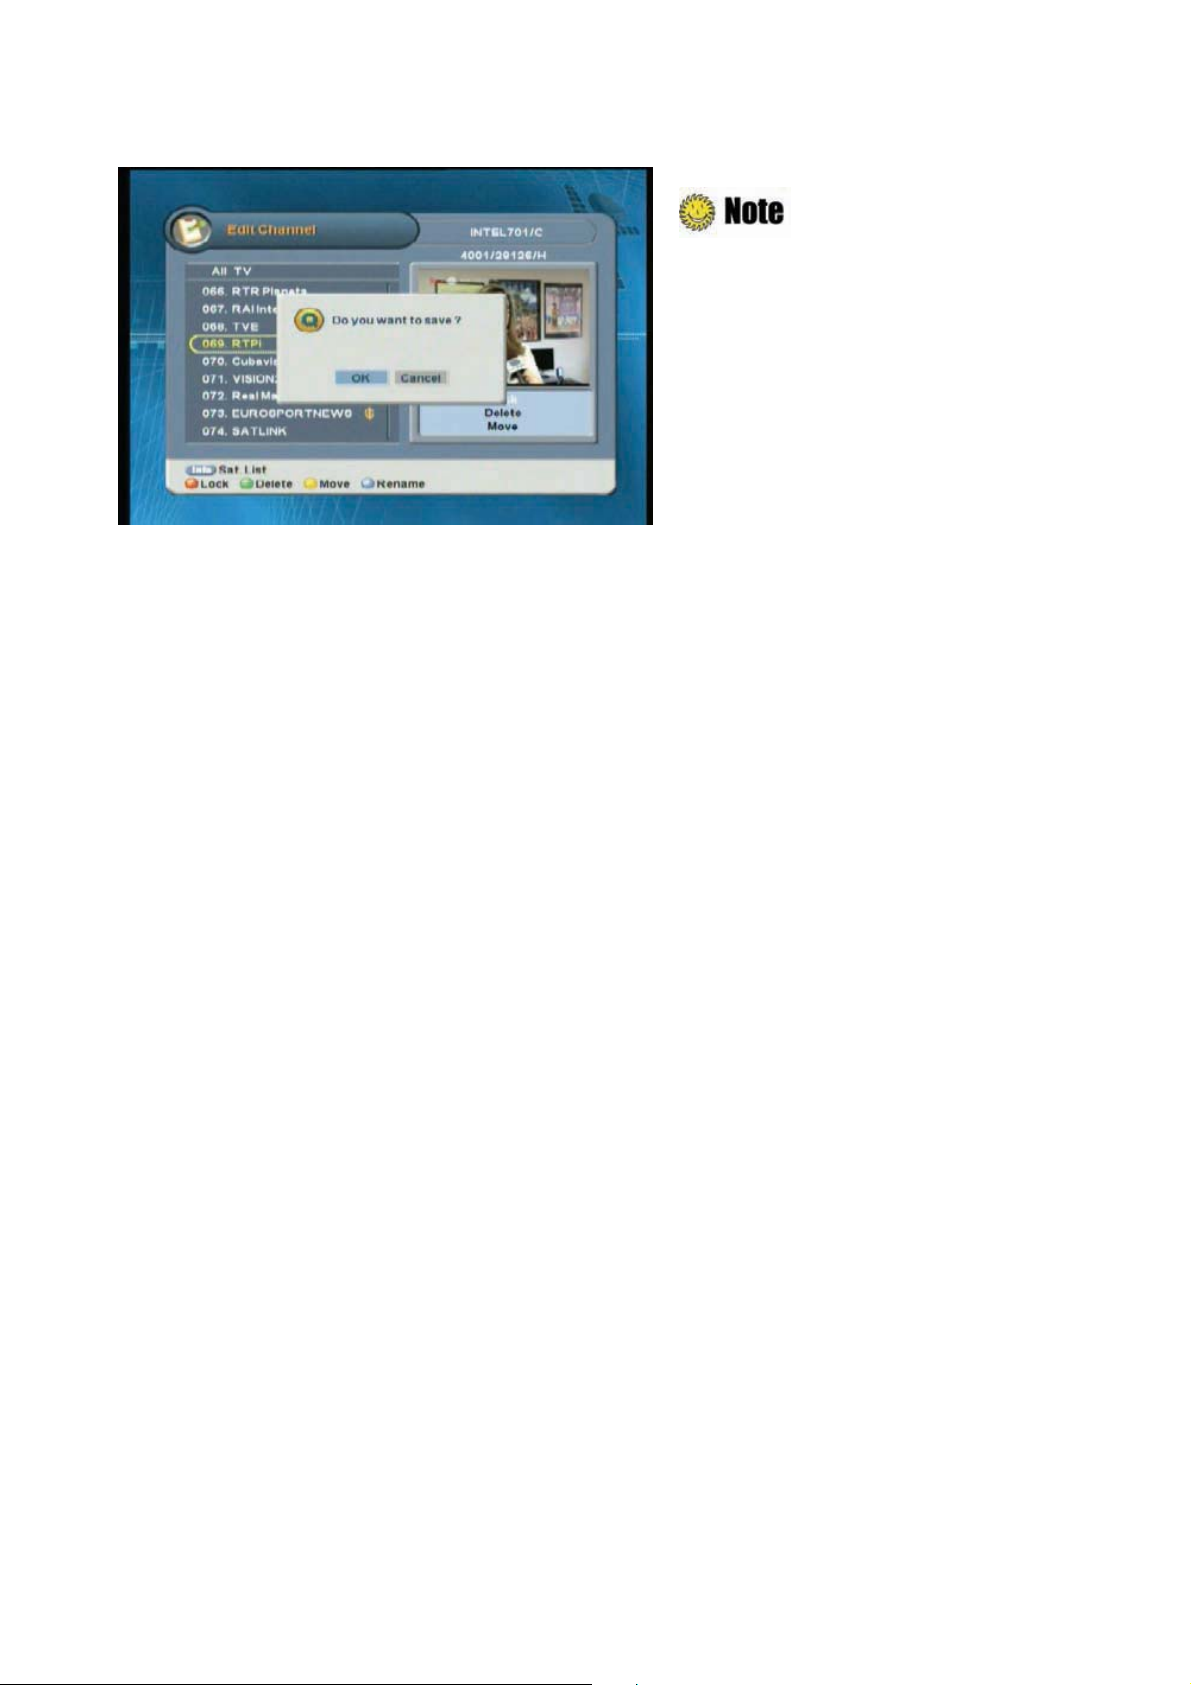
4. Whenever you press the “MENU” or “EXIT” button after completing channel deletion, the
following message will appear. Move cursor to the “OK” button and press the “OK” button to
save the changes.
Page 34
34 | S 30.12CI H User Manual
z
INFO: Selects a satellite list group.
z
Red : Locks/unlocks channel(s).
z
Green: Deletes channel(s).
z
Yellow: Moves channel(s) to the
desired location.
z
Blue: Renames a channel name.
Page 35
#
4.10 Managing Favorite Channel Lists
You can create and edit favorite channel list(s) or group(s).
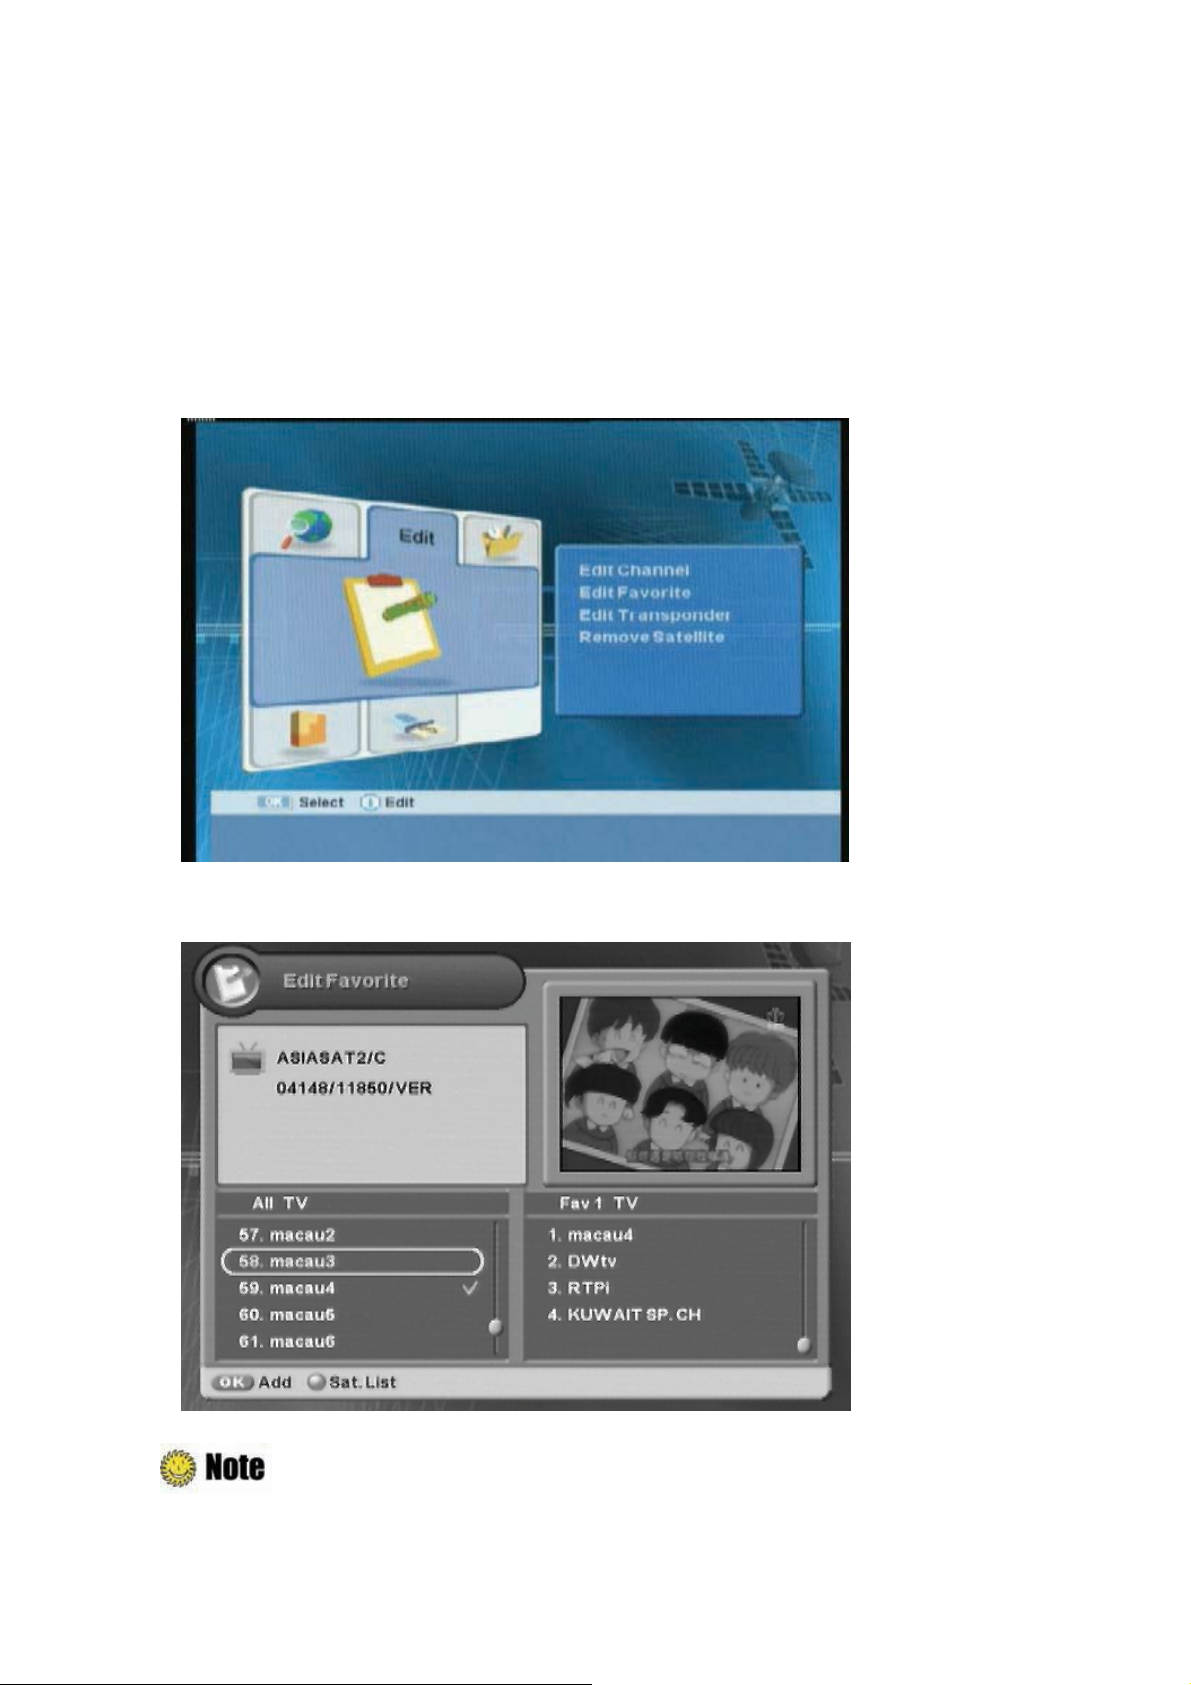
1. Press the “MENU” button.
2.
ᐭ!Move to the Edit menu using the “
Favorite menu using the “OK” button.
default password is 0000.
䯛䯝
” button, and press the “OK” button.
ᐯ
Enter your password using the ˈ0~9ˉ buttons.GThe
!
Ch5. Settings | 35
ᐮ!Select the Edit
3. Press the “FAV” button to create new favorite
: FAV1~4 are default name. You can also rename them for your convenience.
channel
group.
Page 36
36 | S 30.12CI H User Manual
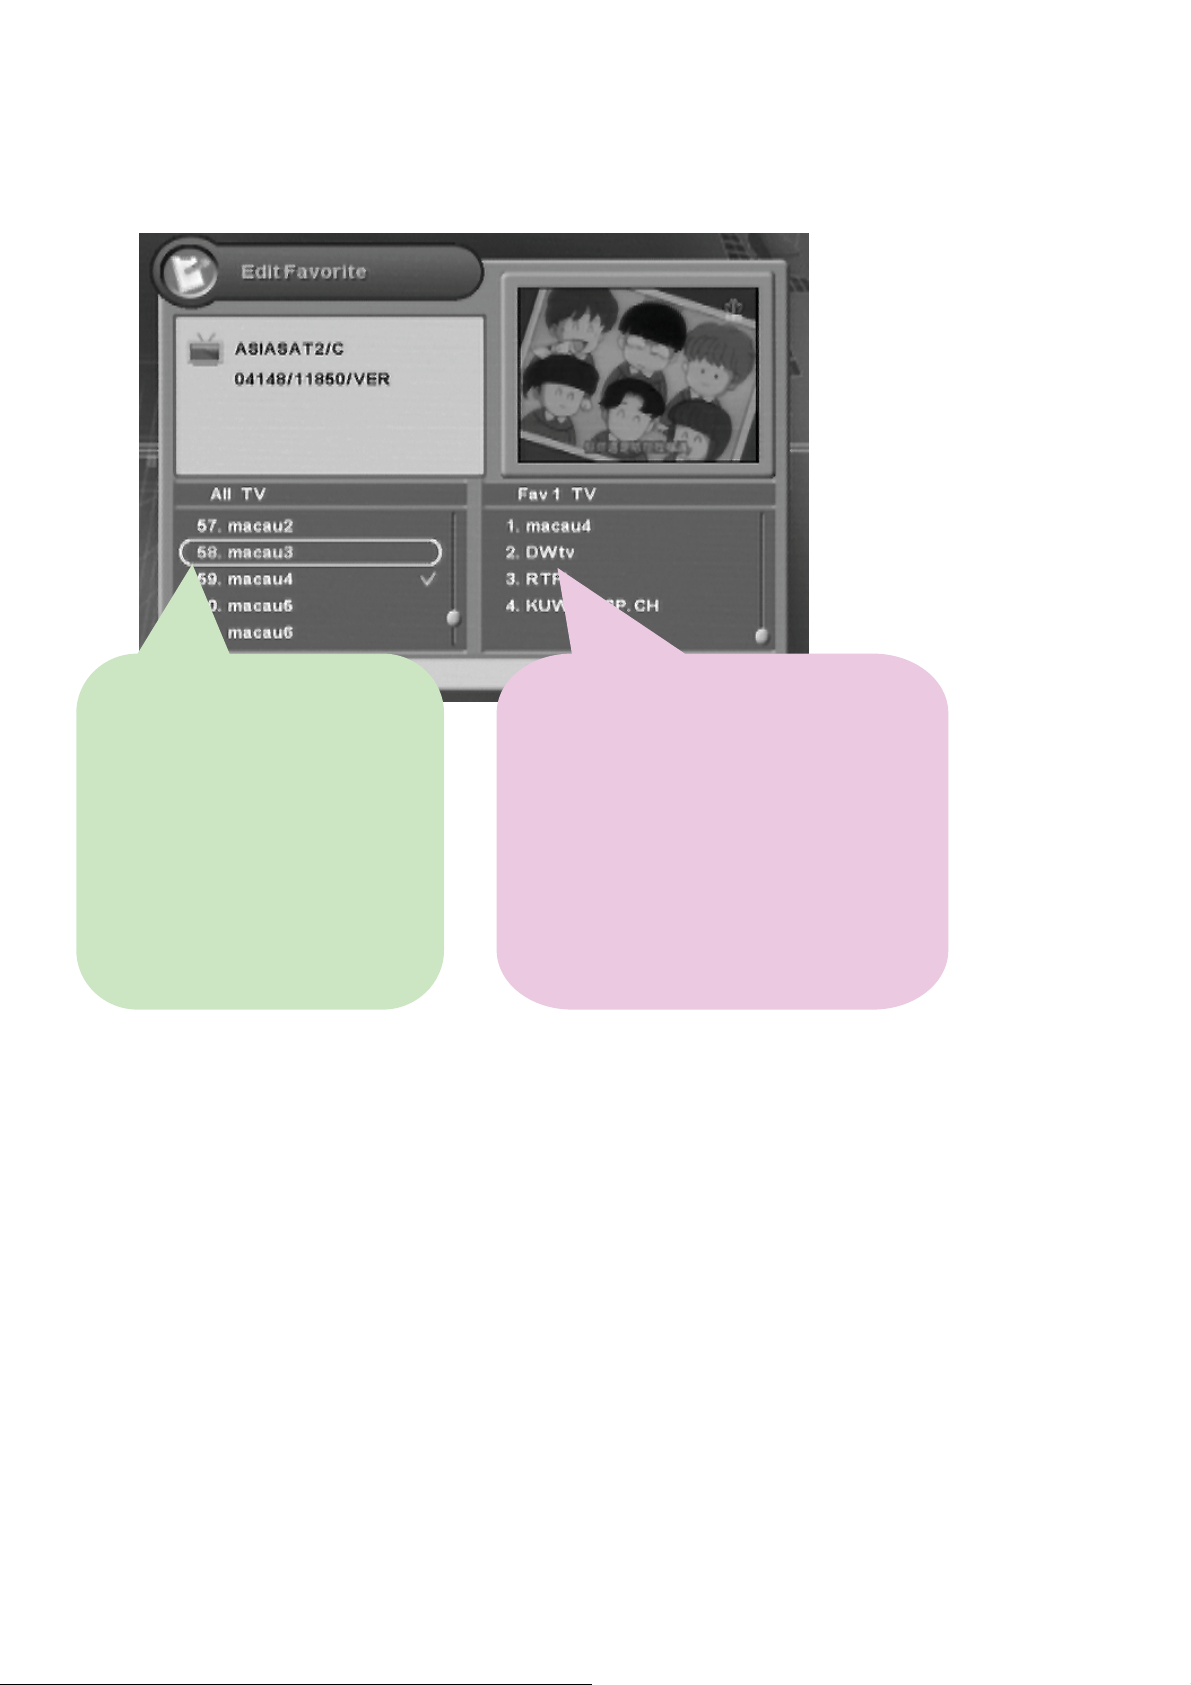
4. You can edit favorite channel list(s) or group(s). If you want to add channel(s), select the desired
channel, and then press the “OK” button.
Ɣ൘ :
Switches Right column.
FAV :
Ɣ
the Right column.
Ɣ
Ɣ
Changes the Favorite mode on
OK :
Adds channels.
RED
: Views the satellite lists.
Ɣൖ :
Switches Left column.
FAV :
Ɣ
column.
Ɣ
Ɣ
Ɣ
Ɣ
Ɣ
Changes the Favorite mode on the left
OK :
Deletes one or more channel.
RED :
Locks/unlocks one or more channel(s).
Green
: Renames a channel group name.
:Moves channel(s) to the desired location.
Yellow
: Renames a channel group
Blue
5. Whenever you press the “MENU” or “EXIT” button after editing favorite channel, the
confirmation message will appear. Move cursor to the “OK” button and press the “OK” button to
save the changes.
Page 37
Ch5. Settings | 37
#
4.11 Changing Channel Mode
You can change the channel mode by group.
1. Whenever you press the “FAV” button, the channel mode changes sequentially such as
ALLĺFAV1ĺ FAV2ĺ…ĺ
hss
.
Channel Mode
2. Press the “OK” button to display All Channel or Favorite Channel lists according to the current
channel mode.
4.12 Viewing Program Guide
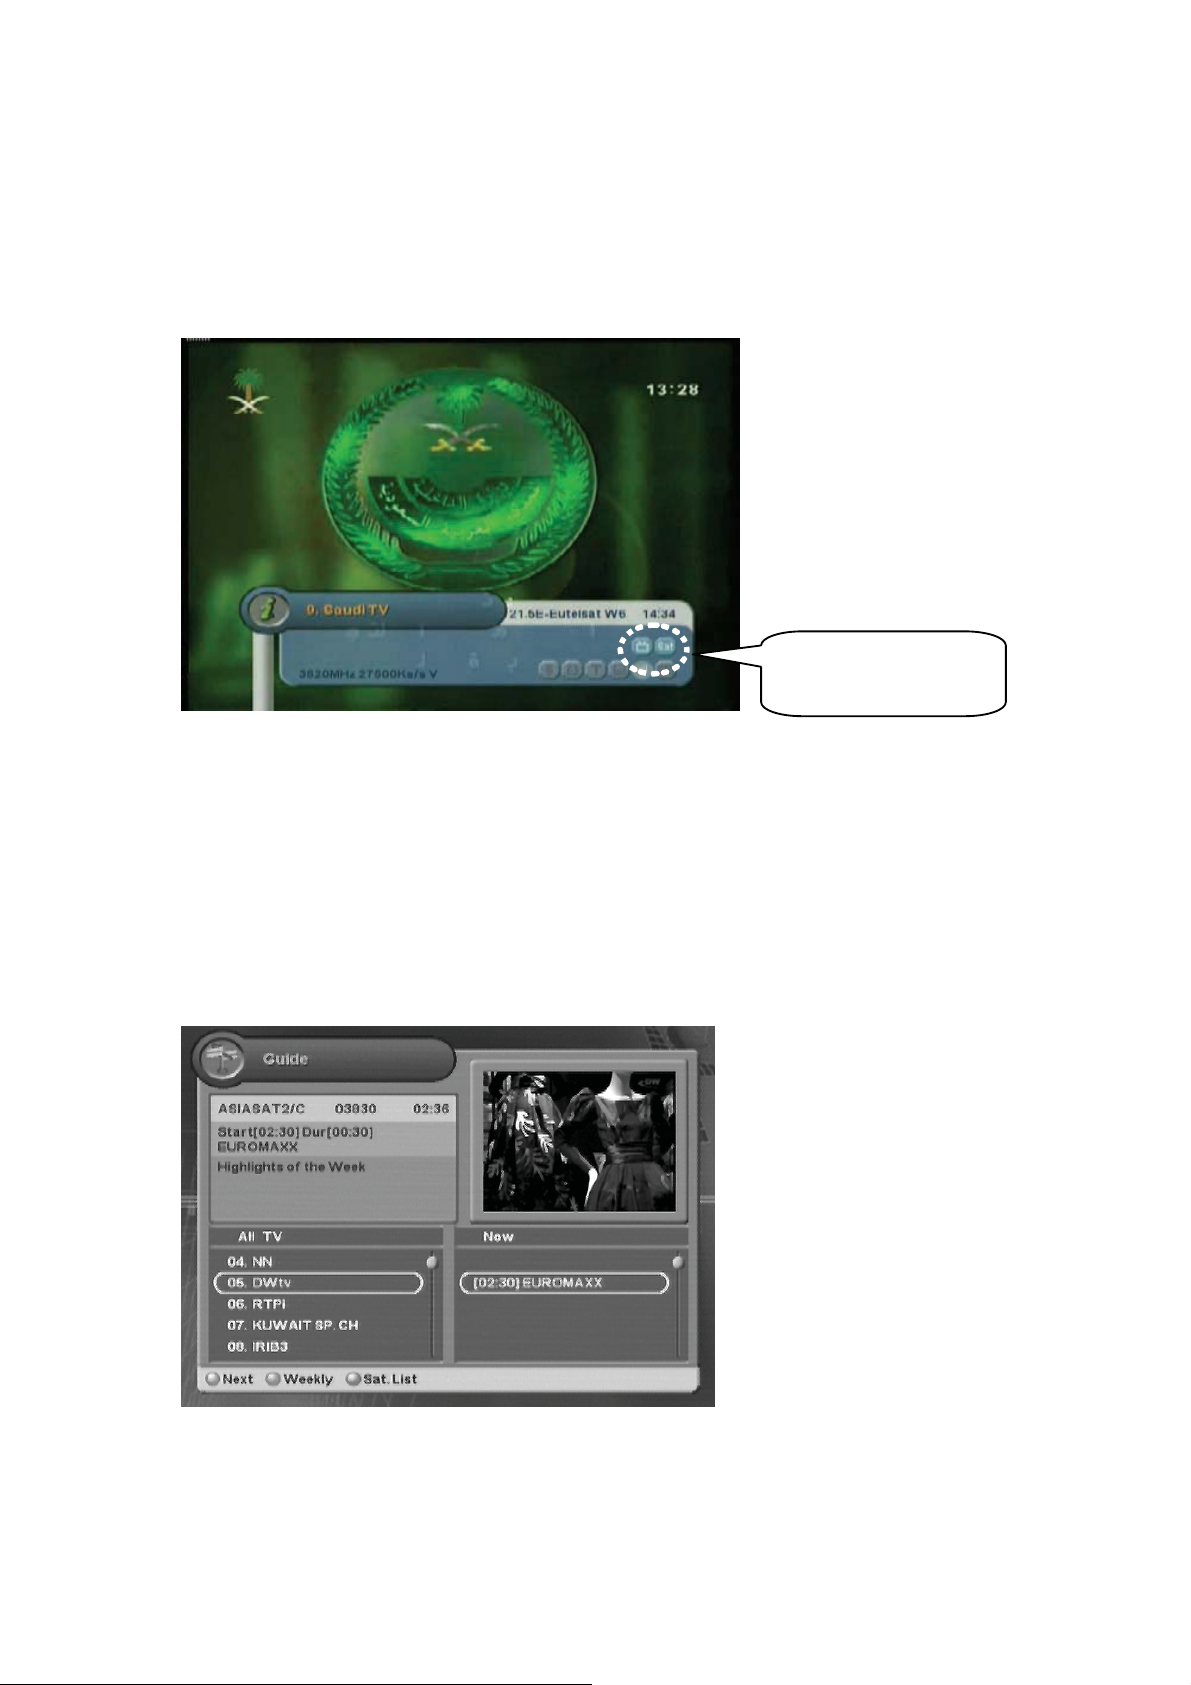
The Program Guide shows program information about each channel-by date and time.
1. Press the “GUIDE” button.
Move to other desired channel using the “ź” button. If there areGmultiple channels, use the
“PAGE
2. Press the “Red” button to view weekly schedule for the selected channel.
ź” button to move toGchannels by page.
Page 38

38 | S 30.12CI H User Manual
4.13 Viewing Teletext
Teletext Service is text data service from Service Provider. It is available only when the program
provides teletext data service.
1. Press the “TEXT” button. Teletext Service Data is displayed. Select the desired language using
the “
ź” button, and press the “OK” button.
2. Select the page using the “0~9” buttons(100~899).
3.
Press the “EXIT” button to the previous screen.
4.14GChanging STB/TV
This function is used for receiving a signal through the RF modulator.
Press the “STB/TV” button. The signal reception path will change to RF modulator.
Page 39

Ch5. Settings | 39
#
Chapter 5
Settings
Page 40
40 | S 30.12CI H User Manual
This chapter describes how to search for channels, edit channel, setup for language(OSD,
Timer, etc.), and show tools.
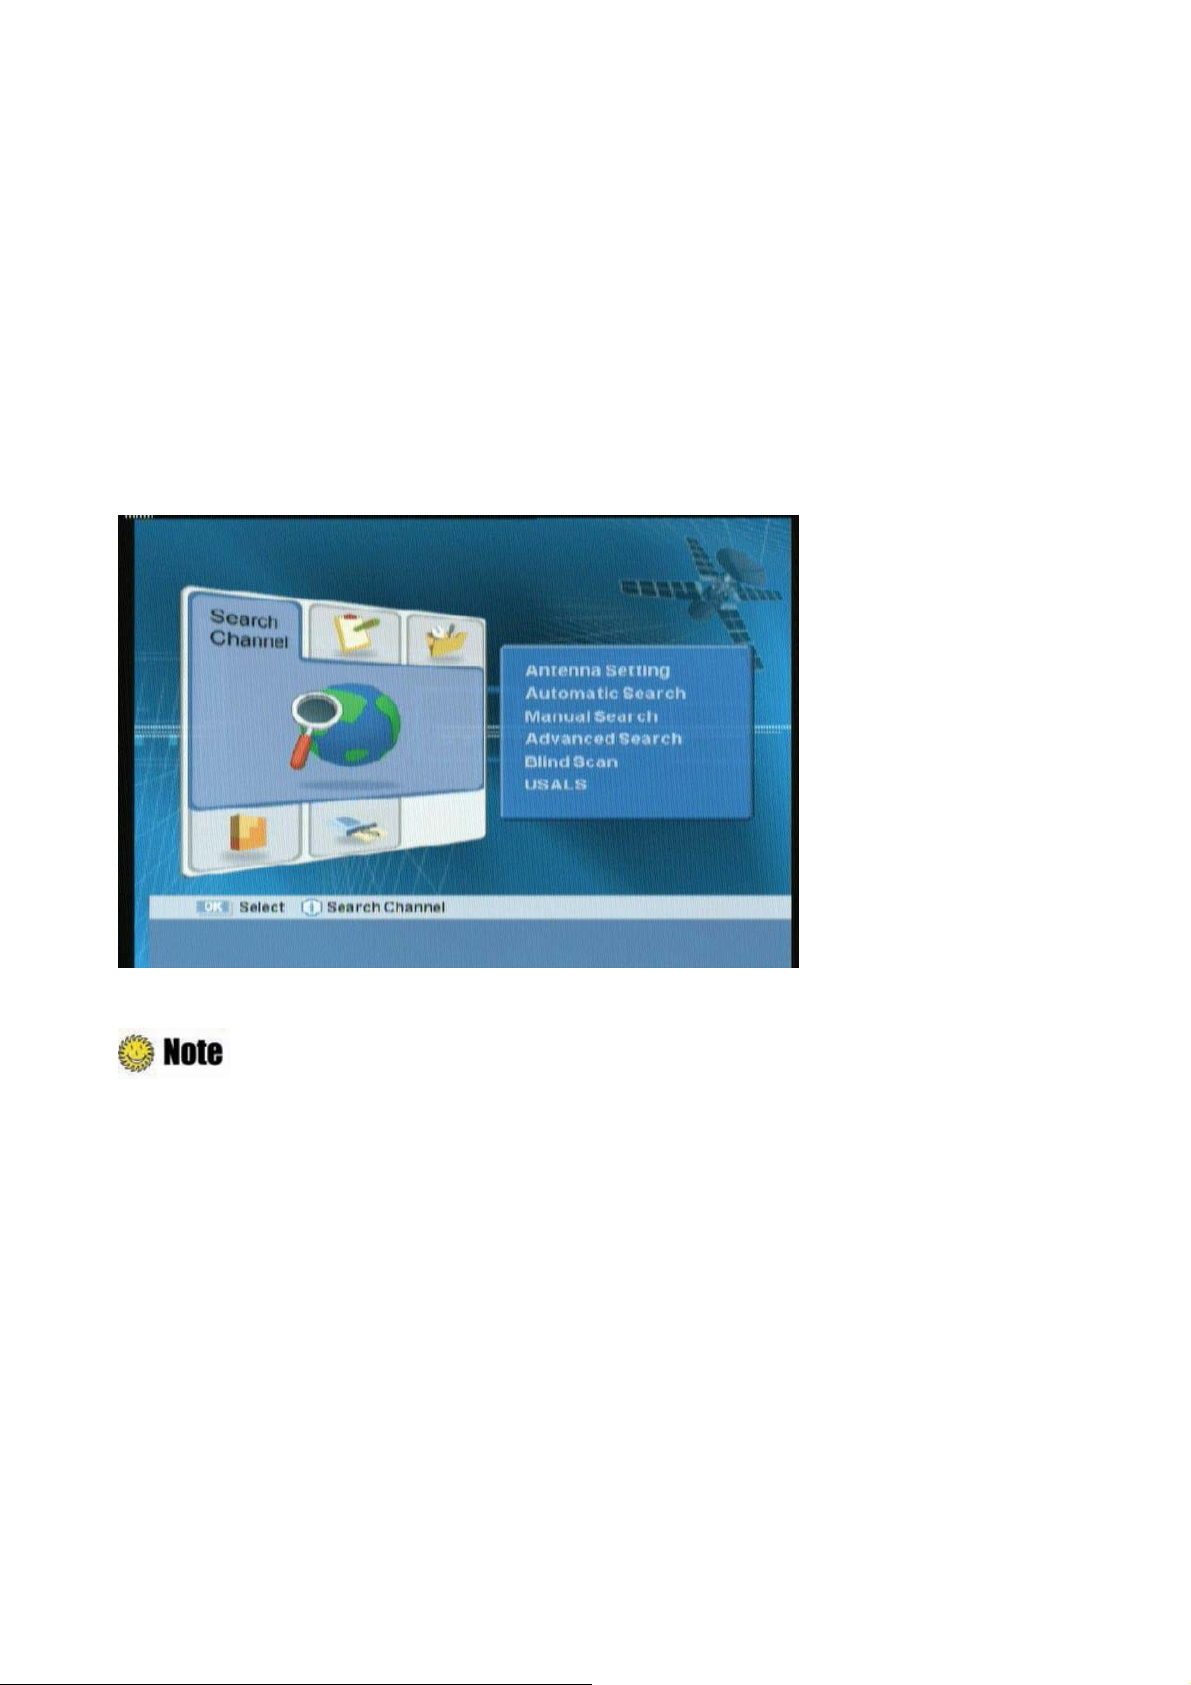
1. Press the “MENU” button to display the Menu OSD.
2. Move to the appropriate Menu using the “
ൖ൘
” button, and then press the “OK” button to select
the menu.
3. Move to the appropriate Menu using the “
” button, and then press the “OK” button to select
the sub-menu.
4. If the password input window appears, enter your password using the
default password is 0000.
ˈ
0~9ˉ buttons.GThe
z
Press the “EXIT” button to return to the previous screen.
z
Press the “MENU” button to exit the setting menu.
z
The menu program shows buttons that can be used at every stage of setup.
Page 41
#
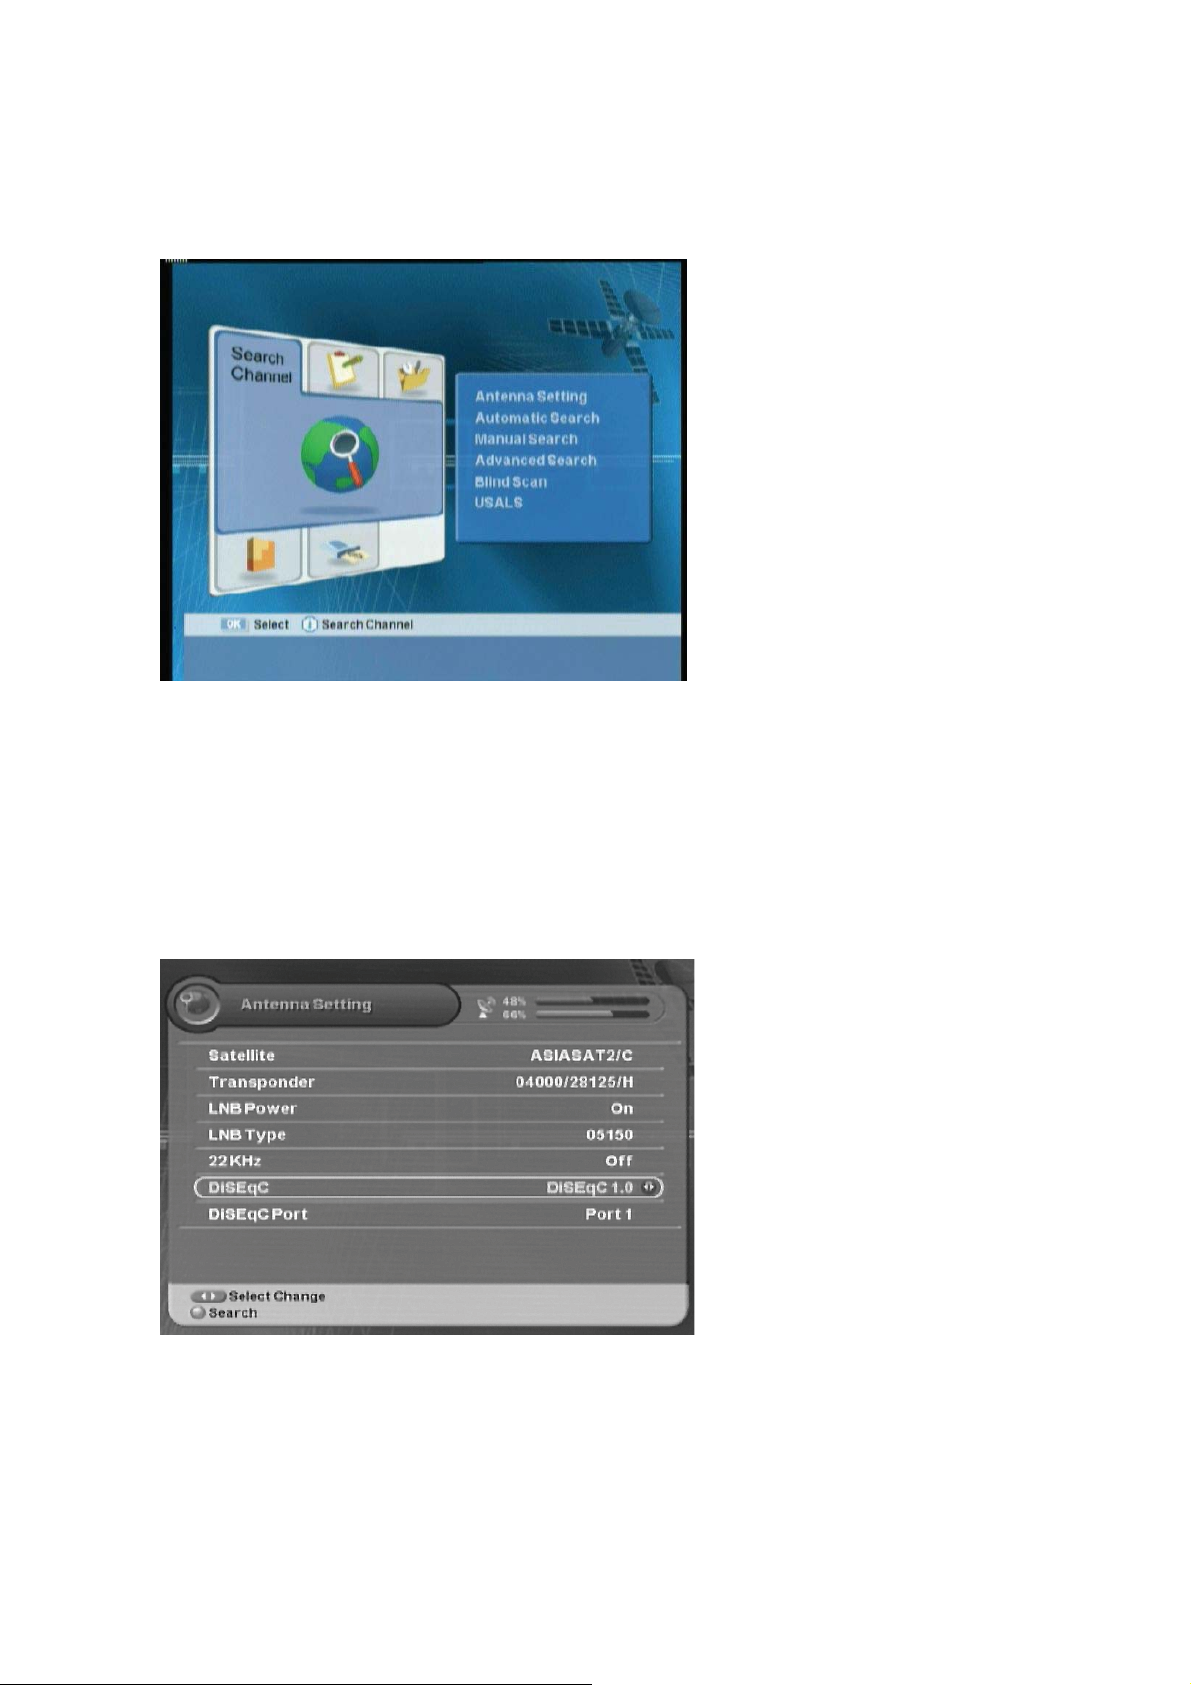
5.1 Search Channel
You can set the antenna's properties and search channel.
z
Antenna Setting:
properties.
z
Automatic Search:
satellite automatically.
z
Manual Search:
manually.
z
Advanced Search:
channel.
z
Blind Scan:
information.
z
USALS:
Searches the TP
Sets Antenna angle.
Ch5. Settings | 41
Sets the Antenna
Searches the
Searches the channel
Finds the specific
5.1.1 Antenna Setting
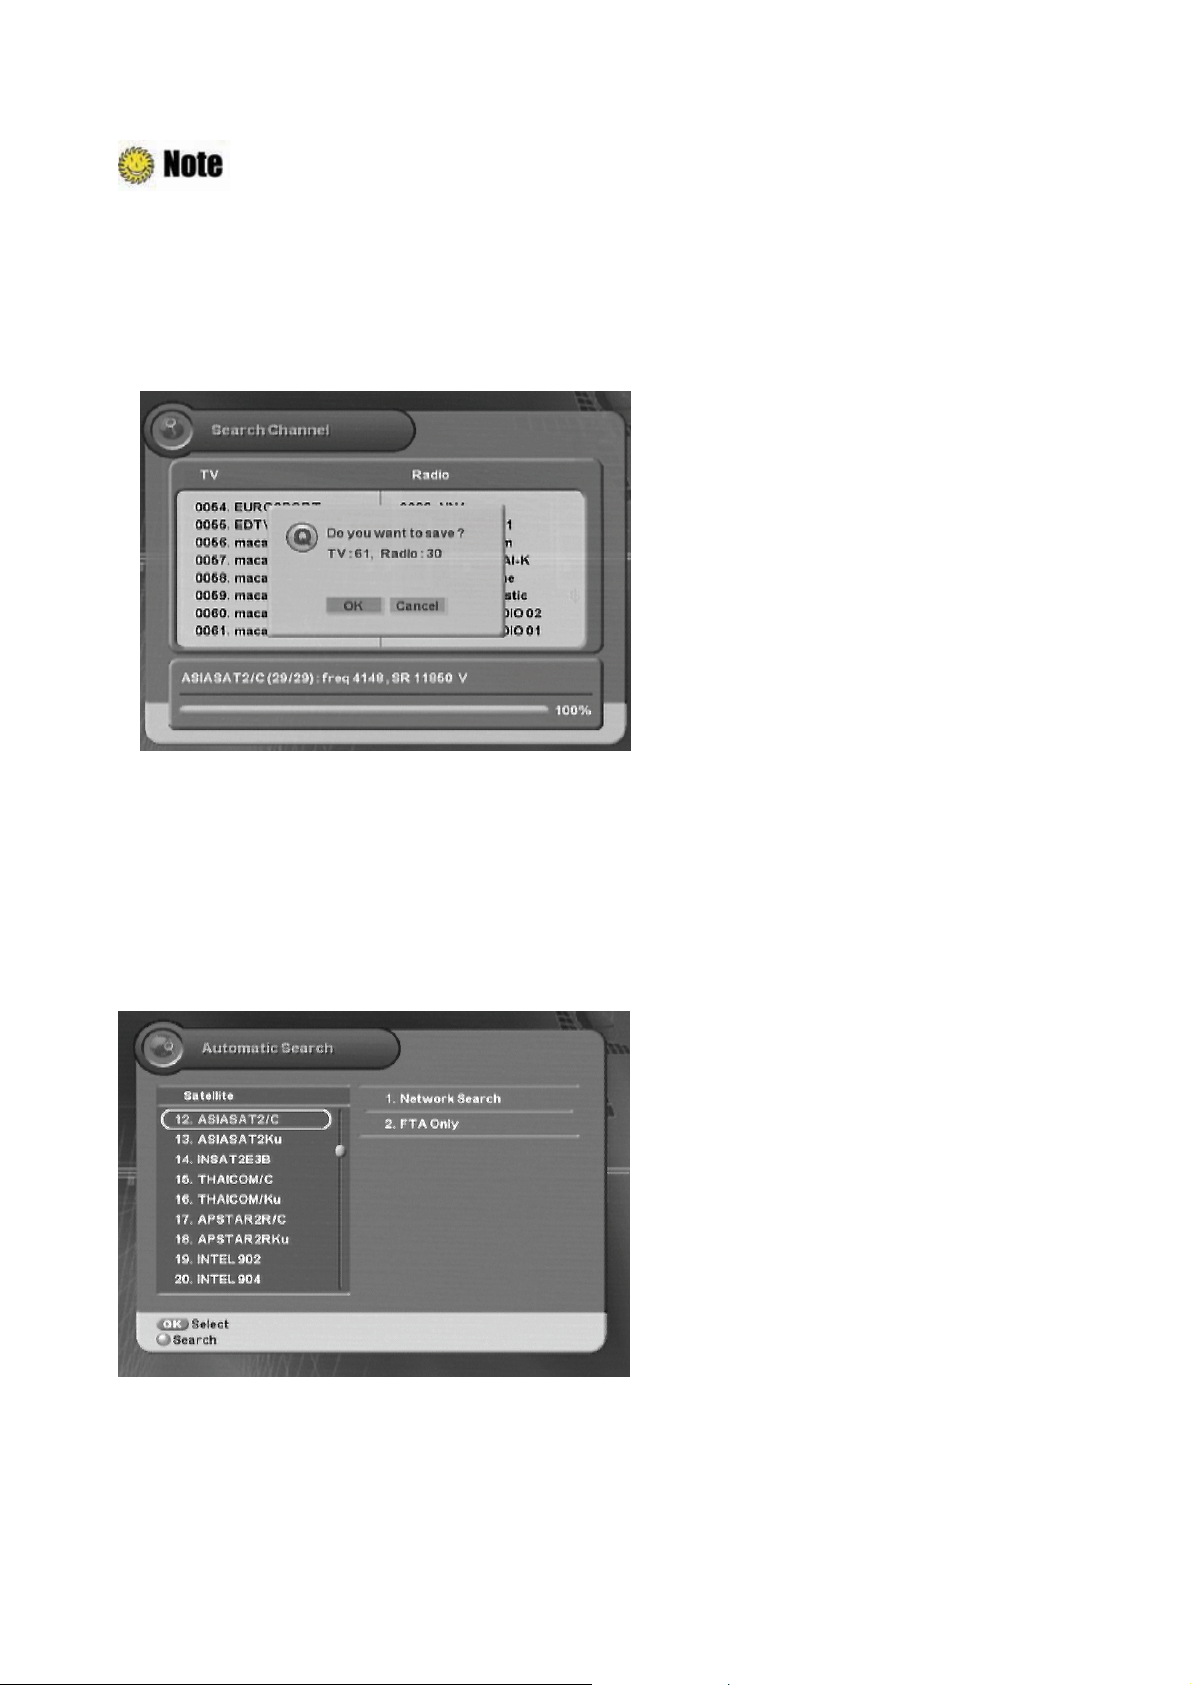
You can set the antenna's properties such as satellite, transponder, LNB, DiSEqC, and etc.
ᐭ!Move to the Search Channel menu using the “
Move to the Antenna Setting sub-menu using the “
Enter your password using the
ˈ
0~9ˉ buttons.GThe default password is 0000.
䯛䯝
” button, and press the “OK” button.
” button, and press the “OK” button.!ᐯ
z
z
z
LNB Power :
22KHz :
DiSEqC:
On, Off
On, Off
Off, 1.0, 1.1, Motor, USALS
ᐮ
!
1. Select the Satellite, the
transponder,
2. Select 22kHz Tone using the “
Otherwise, select ‘Off’.
3. Select DiSEqC item using the “
ൖ൘
the LNB Power and Type value using the “
ൖ൘
” button. When using 22kHz tone switch, select ‘On’.
ൖ൘
” button.
” button.
Page 42
42 | S 30.12CI H User Manual
: When using Universal LNB, select Universal for LNB Type (9750/10600 MHz).
Also, if you select Universal, 22KHz tone value is disabled.
4. When you complete the setting, press the “Red” button to search the channel.
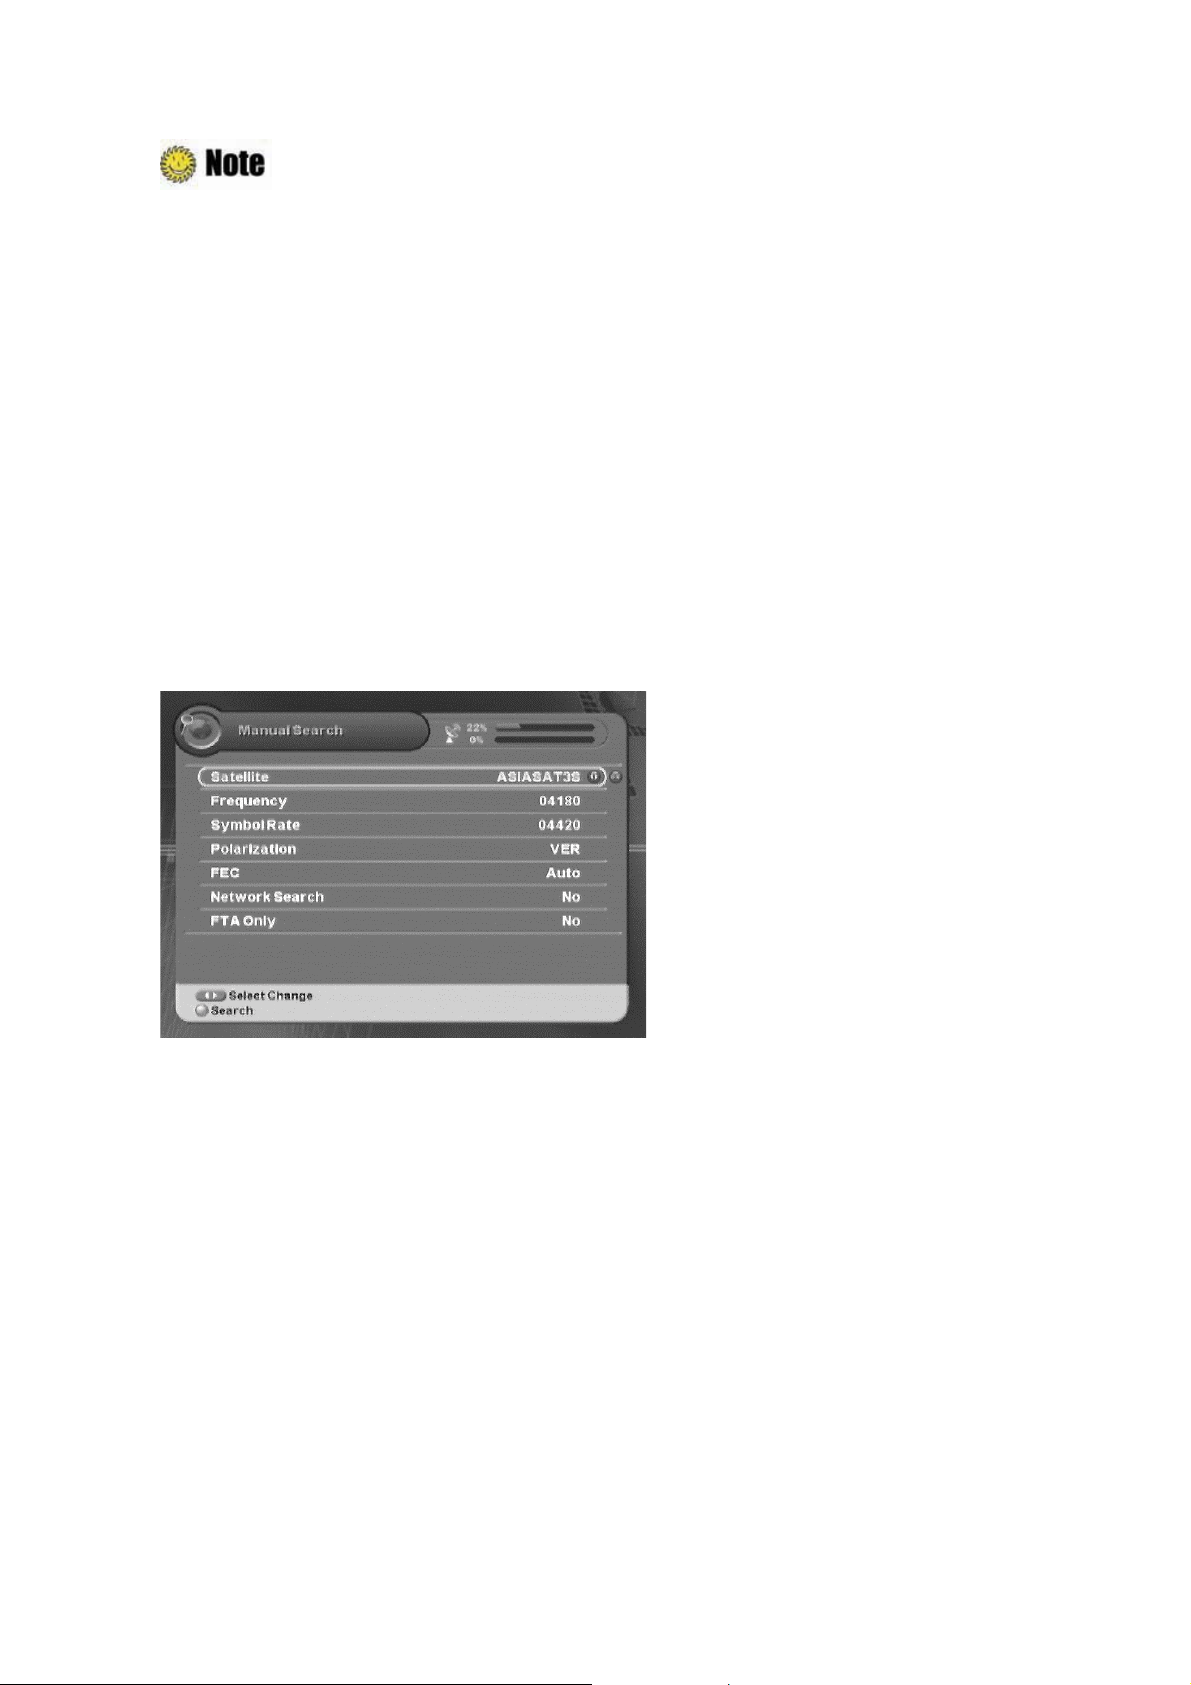
5. When Channel Search is finished, the following message will appear. Move cursor to the “OK”
button and press the “OK” button to save the changes.
5.1.2 Automatic Search
After antenna setting, you can automatically search for satellites.
ᐭ!Move to the Search Channel menu using the “
Move to the Automatic Search sub-menu using the “
Enter your password using the
ˈ
0~9ˉ buttons.GThe default password is 0000.
䯛䯝
” button, and press the “OK” button.
” button, and press the “OK” button.!ᐯ
z
z
z
z
z
: Moves to other satellite.
ൖ൘
: Moves to other column.
OK
: Selects the satellite
Red
: Starts to search the satellite.
MENU or EXIT
: Exits the menu.
ᐮ
!
1. Select the desired satellite using the “OK” button.
2. Move to the right column using “
f
” button, and then select the method using the “OK” button.
3. Press the “Red” button to search satellite.
Page 43
Ch5. Settings | 43
#
: Please wait for finishing the Automatic Search. If you want to stop the Automatic
Search, press the “EXIT” button anytime. If Automatic Search is stopped or finished,
the-searched information is automatically saved.
4. When Satellite Search is finished, the confirmation message will appear. Move cursor to the
“OK” button and press the “OK” button to save the changes.
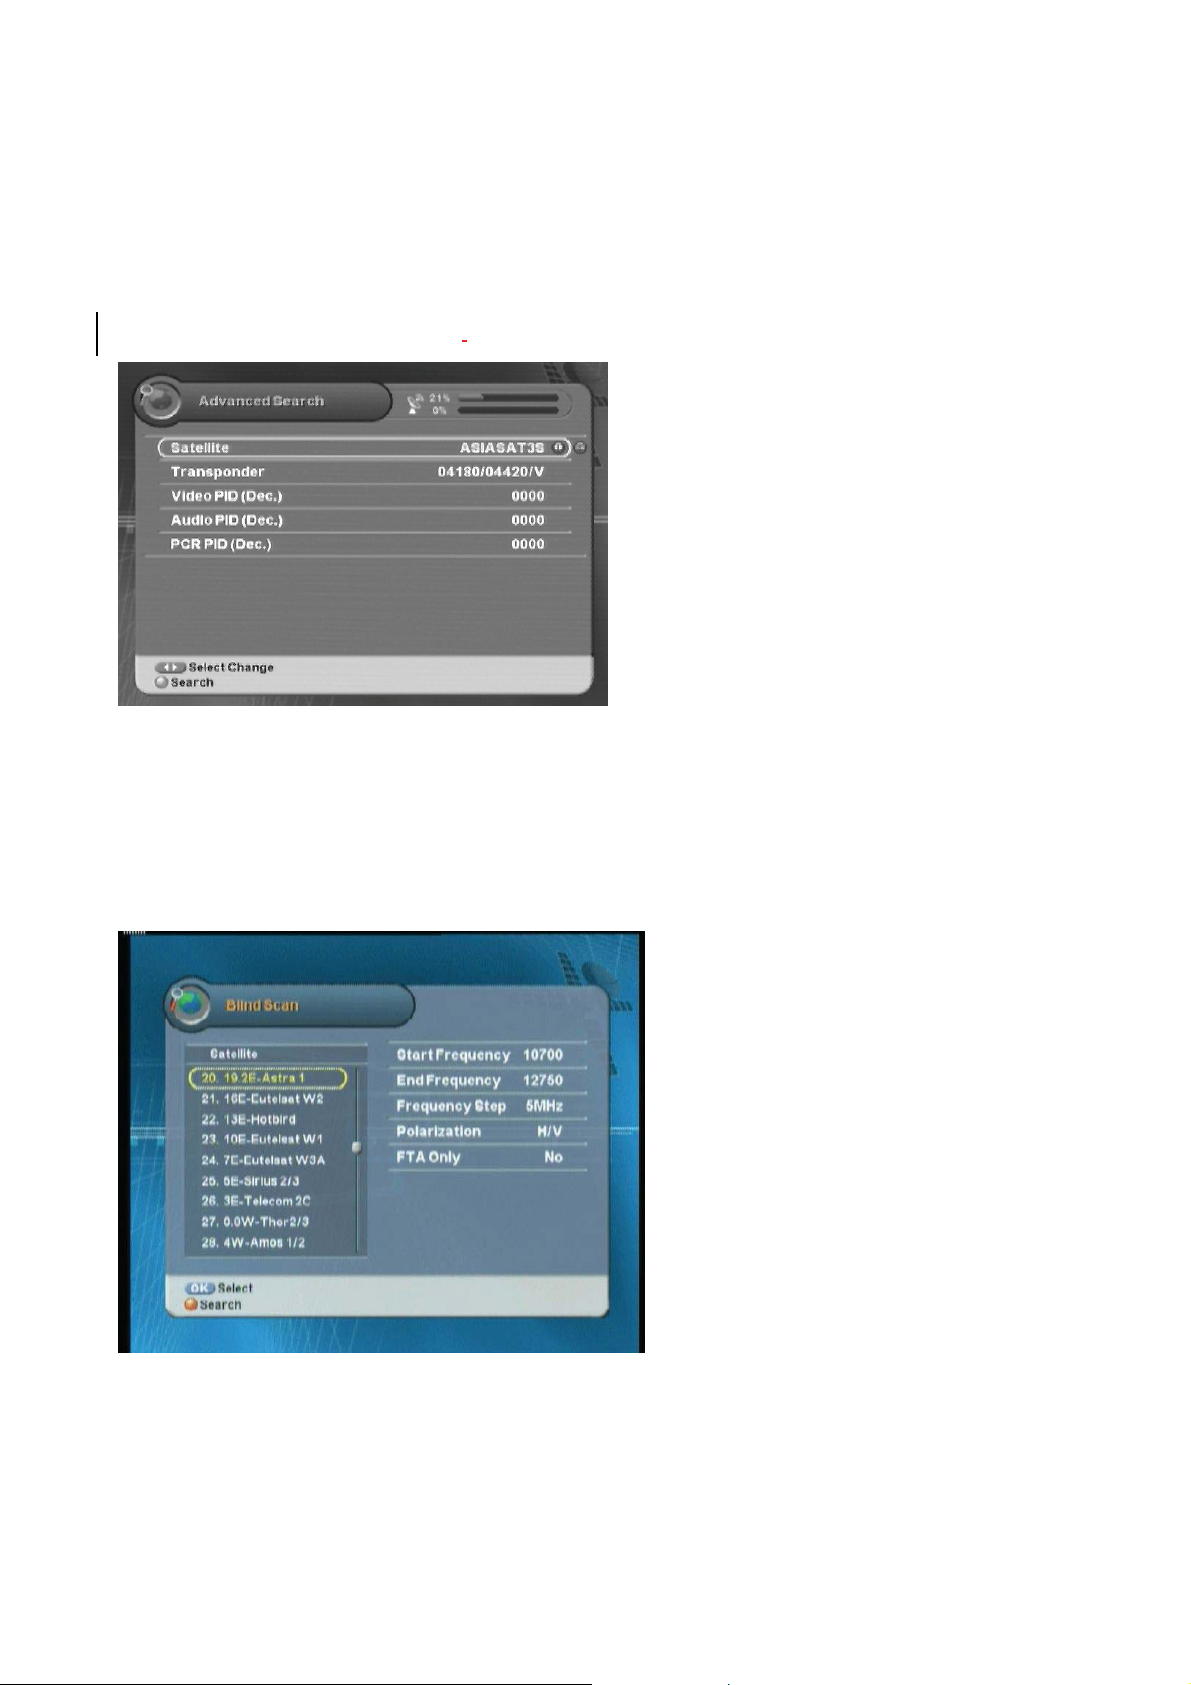
5.1.3 Manual Search
After antenna setting, you can search channel(s) from the selected satellite if you know the
transponder information.
ᐭ!Move to the Search Channel menu using the “
Move to the Manual Search sub-menu using the “
Enter your password using the
1. Select the desired satellite using the “
ˈ
0~9ˉ buttons.GThe default password is 0000.
䯛䯝
” button.
䯛䯝
” button, and press the “OK” button.
” button, and press the “OK” button.!ᐯ
z
Frequency, symbol rate :
the value using the “0~9” button.
z
Polarization:
z
FEC:
z
Network Search & FTA only:
2. Enter the Frequency & Symbol Rate value using the “0~9” button.
ᐮࣜ
You can edit
Vertical, Horizontal
Auto, 1/2, 2/3, 3/4, 5/6, 7/8
Yes , No
3. Select the Polarization, FEC, Network Search, and FTA Only value using the “
䯛䯝
” button.
4. When you complete the setting, press the “Red” button to search the channel.
5. When Channel Search is finished, the confirmation message will appear. Move cursor to the
“OK” button and press the “OK” button to save the changes.
Page 44
44 | S 30.12CI H User Manual
5.1.4 Advanced Search
You can find the desired channel by entering Video, Audio and PCR PID directly.
ᐭ!Move to the Search Channel menu using the “
Move to the Advanced Search sub-menu using the “
䯛䯝
” button, and press the “OK” button.
䮨䮪
” button, and press the “OK” button.!ᐯࣜ
Enter your password using the ˈ0~9ˉbuttons.GThe default password is 0000.
1. Select the desired satellite using the “
䯛䯝
Video, Audio, PCR PID :
value using the “0~9” button. Refer to
4.3 Viewing Program Information
the values.
” button.
You can enter the
chapter
for getting
2. Enter Video, Audio and PCR PID directly using the “0~9” button.
3. When you complete the entering PID values, press the “Red” button to search the channel.
ᐮ
!
5.1.5 Blind Scan
1. Blind Scan: in this search mode you can
search for cannels even if you don't know TP
information. You can search the whole
frequency rang or only a part of it.
2. Frequency Step: you can adjust the
searching frequency step.
3. Polarization: select horizontal or vertical.
4. FTA Only: select to search FTA channels only
or all.
1. When completing Channel Search, an message will appear. Move cursor to the “OK” button
and press the “OK” button to save the changes.
Page 45
#
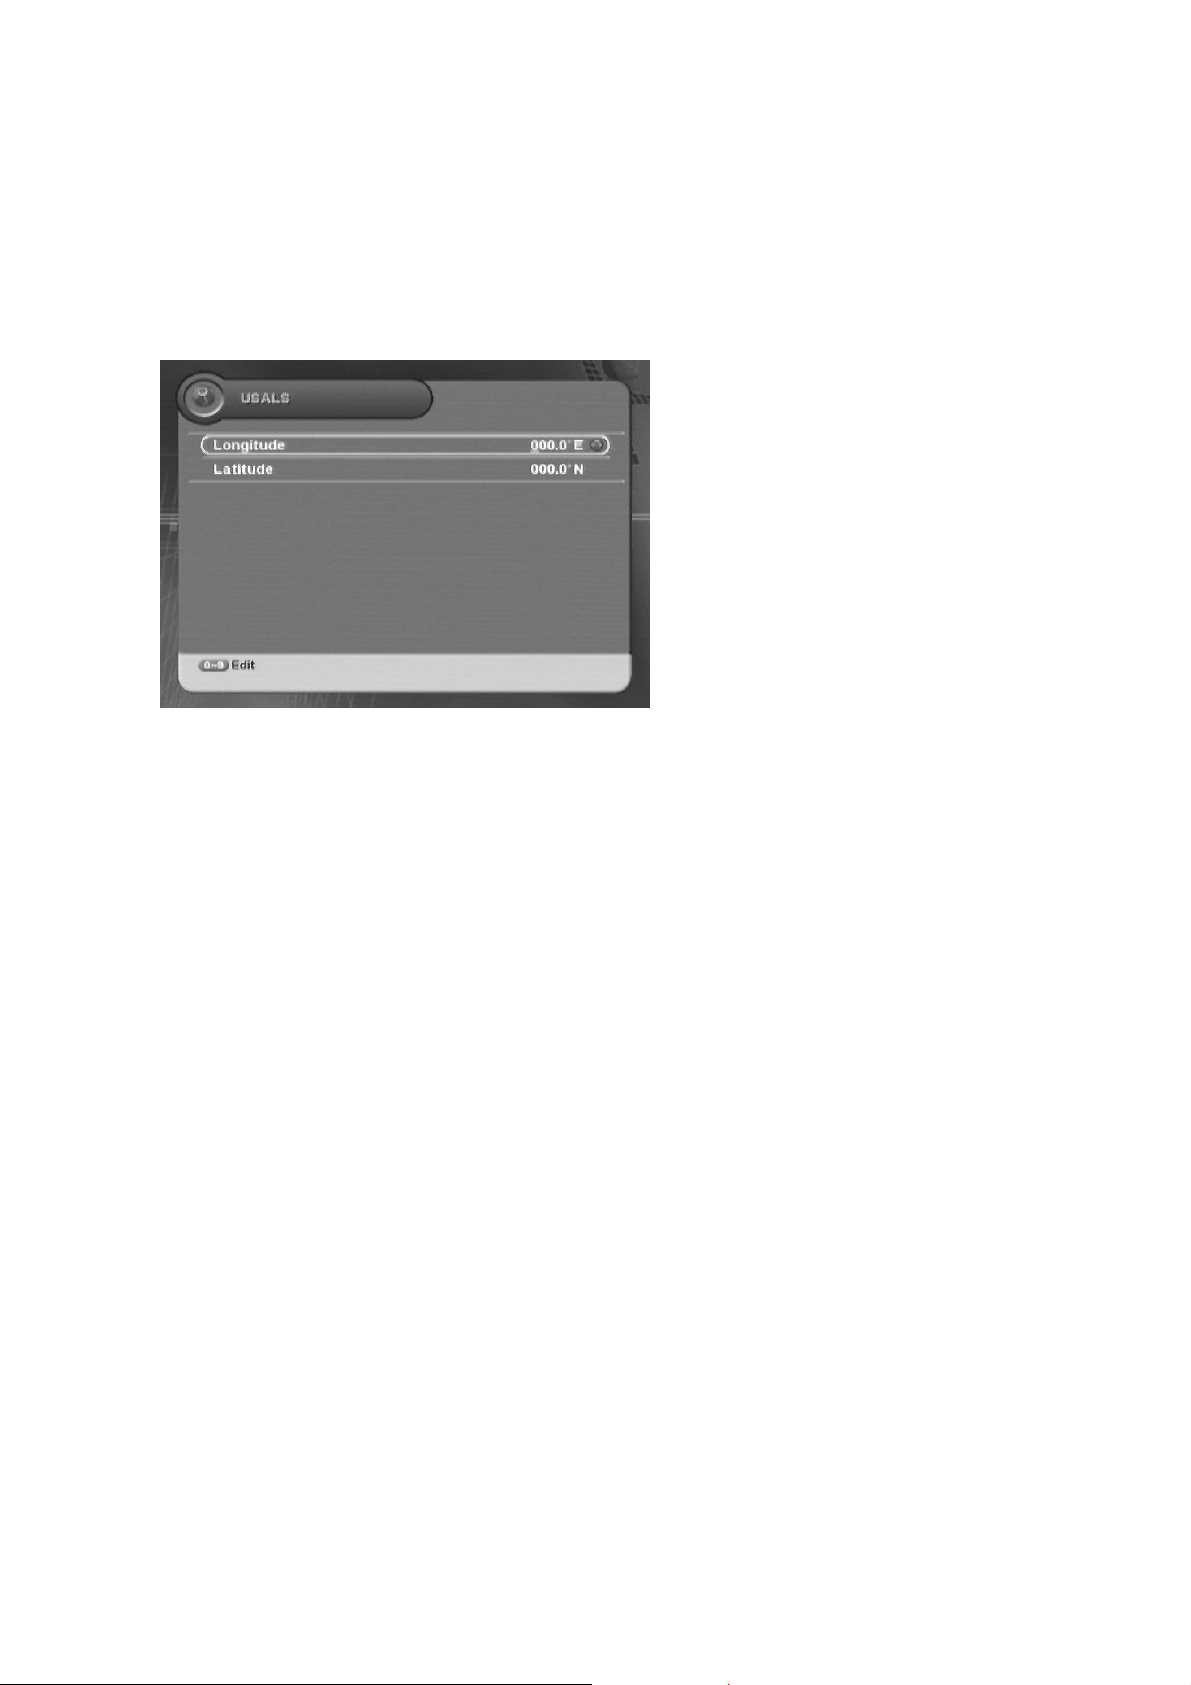
5.1.6 USALS
You can set the angle of the antenna by entering the values directly.
Ch5. Settings | 45
ᐭ!Move to the Search Channel menu using the “
Move to the USALS sub-menu using the “
password using the
ˈ
0~9ˉ buttons.GThe default password is 0000.
䮨䮪
䯛䯝
” button, and press the “OK” button.
” button, and press the “OK” button.!ᐯ
Longitude, Latitude :
using the “0~9” button.
You can enter the value
ᐮ
Enter your
1. Enter Longitude and Latitude value directly using the “0~9” button.
2. When the entering angle values are finished, the confirmation message will appear. Move
cursor to the “OK” button and press the “OK” button to save the changes.
!
Page 46
46 | S 30.12CI H User Manual
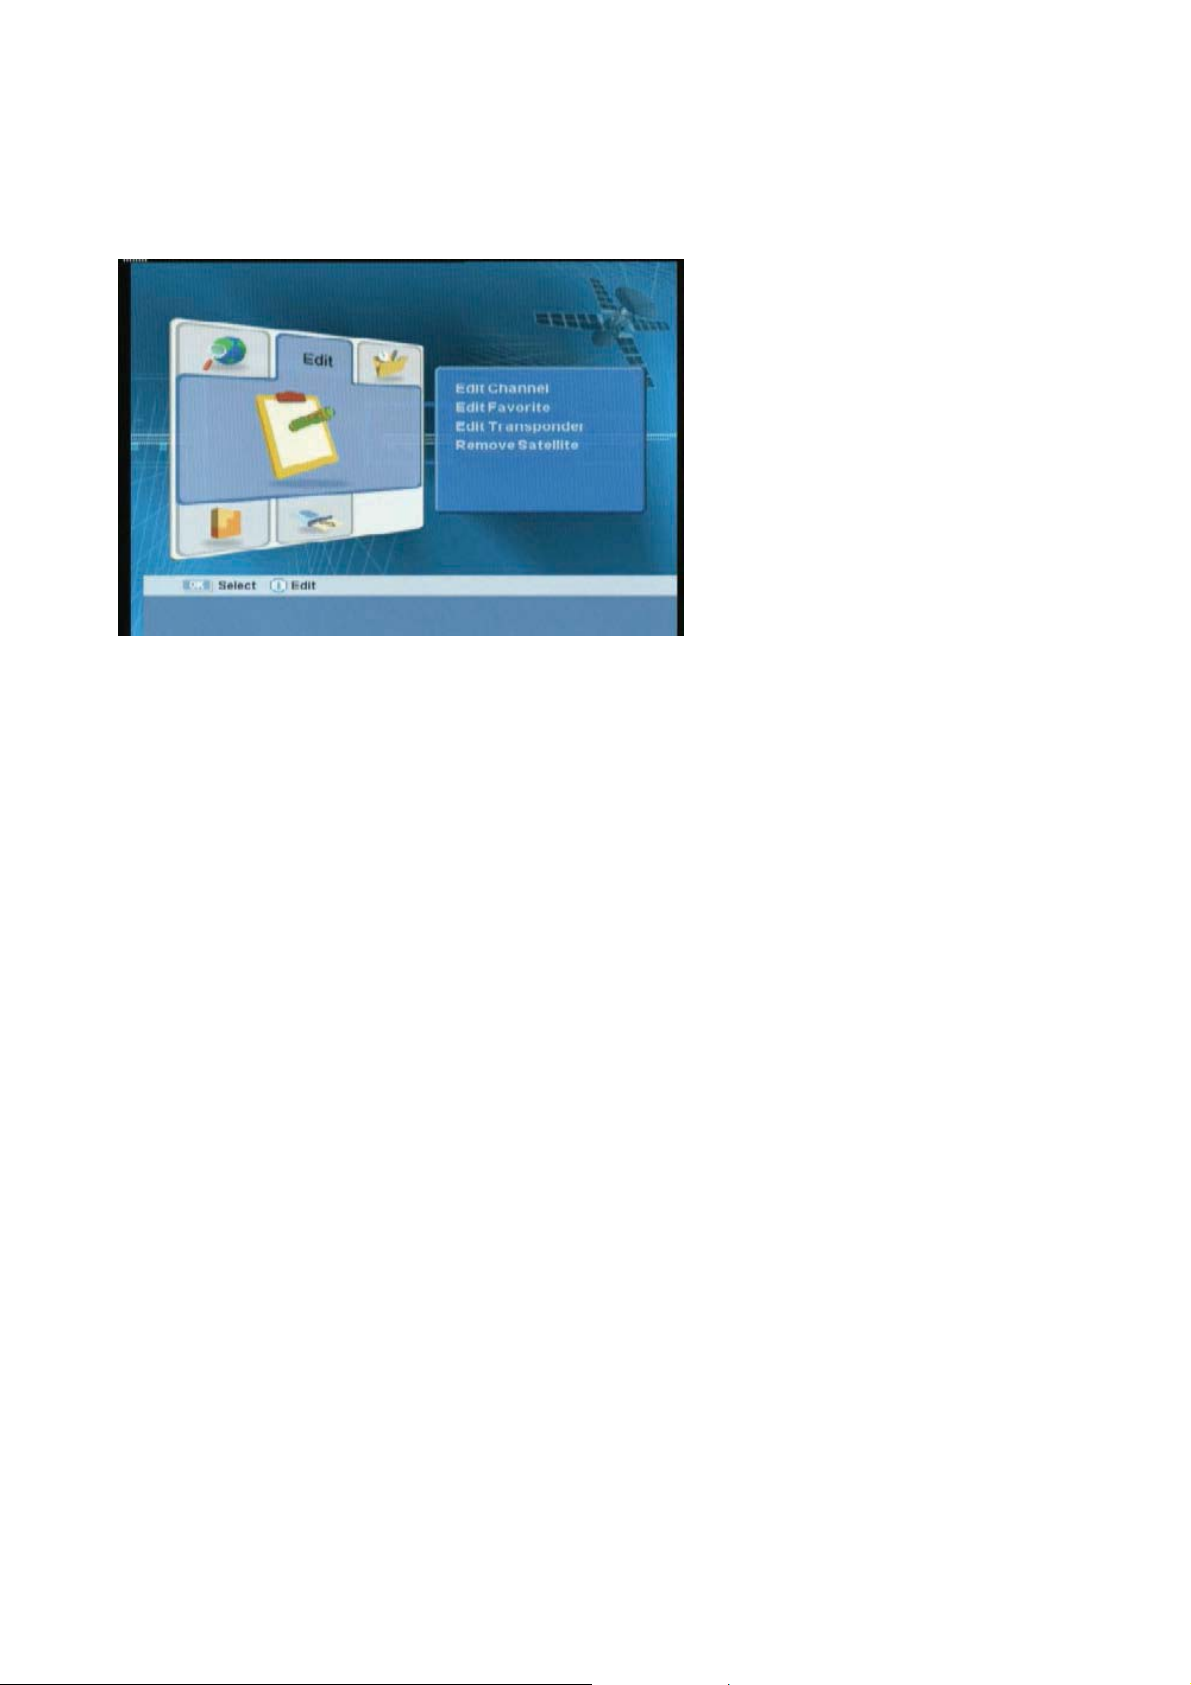
5.2 Edit Channel
You can edit channel(s), favorite channel(s), transponder and remove satellite.
z
Edit Channel:
Locks/deletes/moves/renames
channel.
z
Edit Favorite:
favorite channel.
z
Edit Transponder:
transponder.
z
Remove Satellite:
satellite.
Creates/edits
Creates/edits
Removes
5.2.1 Edit Channel
You can edit(such as lock, delete, move, and rename) all channels or each channel. Refer to
Chapter 4.9.5 Editing Channels
for more information.
5.2.2 Edit Favorite
You can create and edit favorite channel list(s) or group(s). Refer to
Favorite Channel Lists
for more information.
Chapter 4.10 Managing
5.2.3 Edit Transponder
You can create and edit transponder.
1.
#ᐭࣜ
Move to the Edit menu using the “
Edit Transponder sub-menu using the “
password using the
ˈ
0~9ˉ buttons.GThe default password is 0000.
2. Press the “Green” button to create new transponder.
3. You can edit new transponder data.
ൖ൘
” button, and press the “OK” button.
” button, and press the “OK” button.!ᐯࣜ
ᐮ!Move to the
Enter your
4. If you want to add transponder(s), select the desired transponder, and then press the “OK”
button.
5. Whenever you press the “MENU” or “EXIT” button after editing transponder, the confirmation
message will appear. Move cursor to the “OK” button and press the “OK” button to save the
changes.
Page 47
#
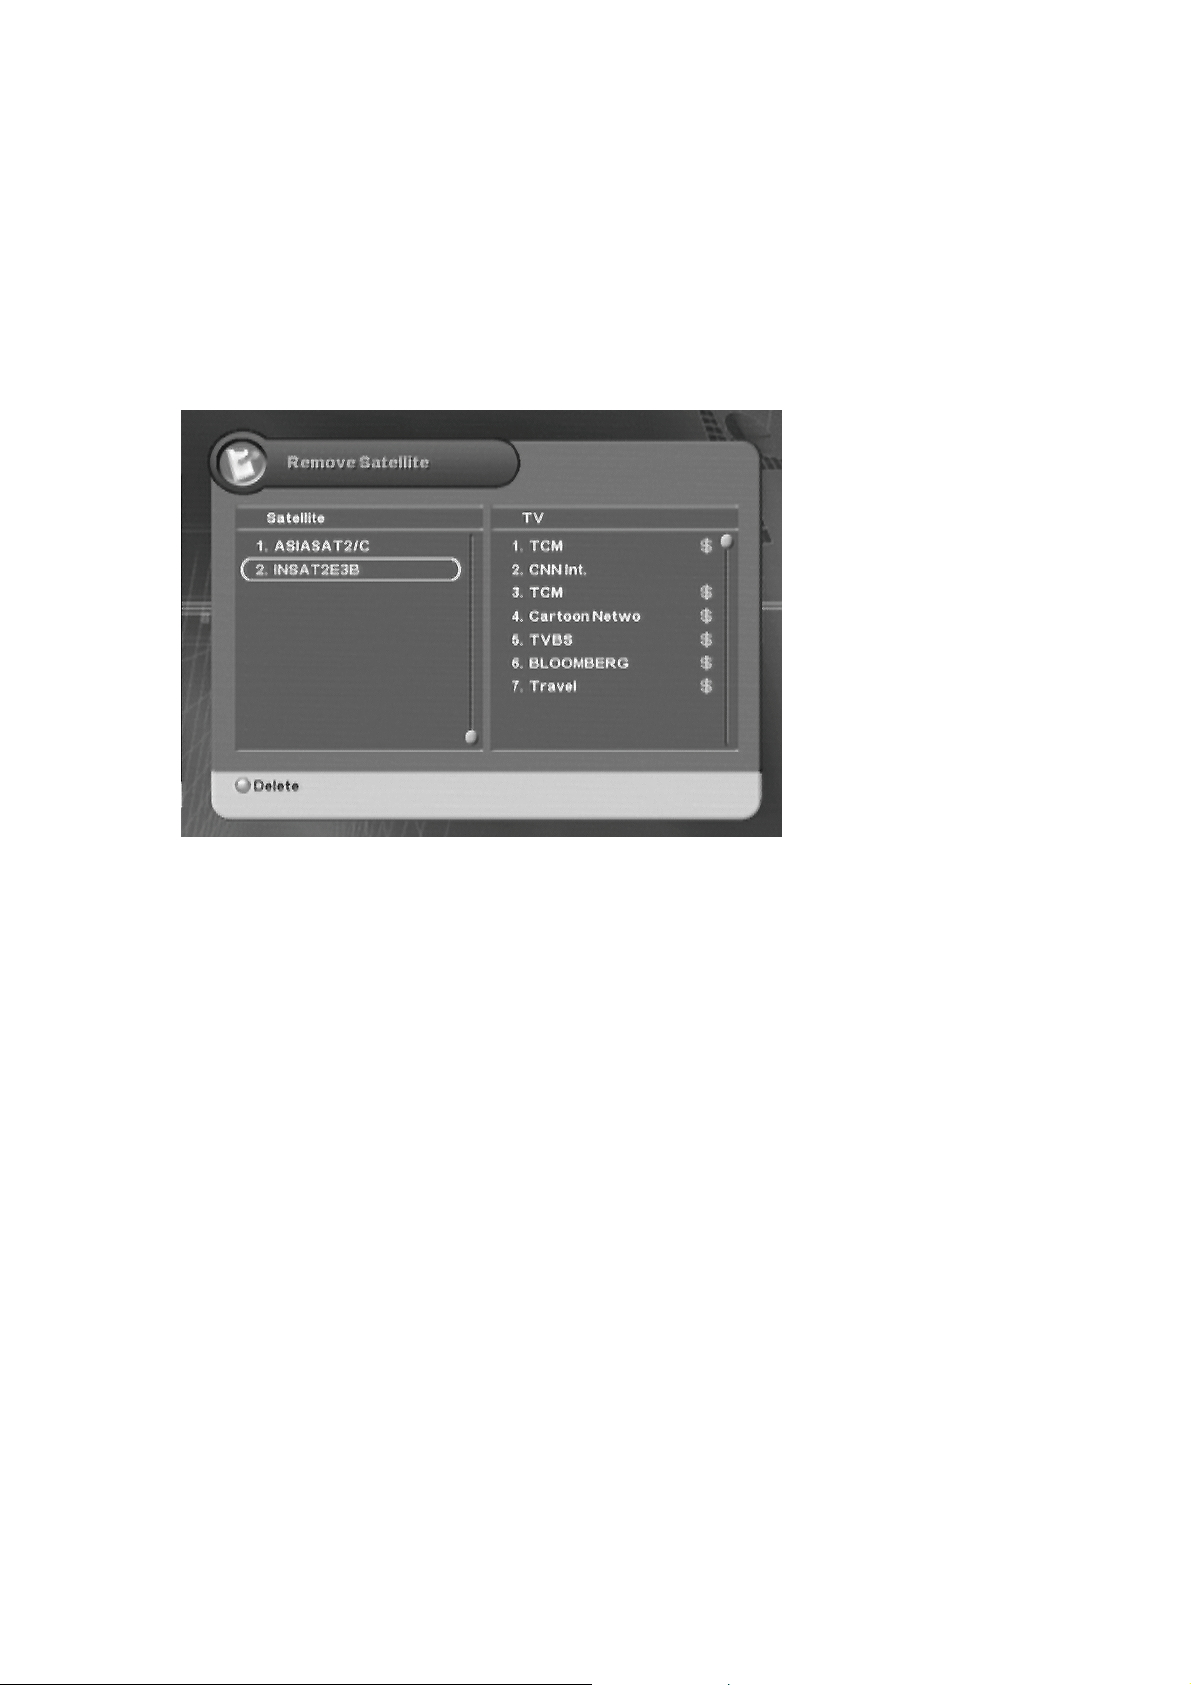
5.2.4 Remove Satellite
You can remove the channel(s) for the only added satellite.
1.
#ᐭ!Move to the Edit menu using the “
Remove Satellite sub-menu using the “
password using the
ˈ
0~9ˉ buttons.GThe default password is 0000.
2. Press the “OK” button to select the satellite.
ൖ൘
” button, and press the “OK” button.
” button, and press the “OK” button.!ᐯ
Ch5. Settings | 47
ᐮ!Move to the
Enter your
3. Press the “Red” button to delete the channel(s) for the satellite.
4. Whenever you press the “MENU” or “EXIT” button after deleting the channel(s), the confirmation
message will appear. Move cursor to the “OK” button and press the “OK” button to save the
changes.
Page 48
48 | S 30.12CI H User Manual
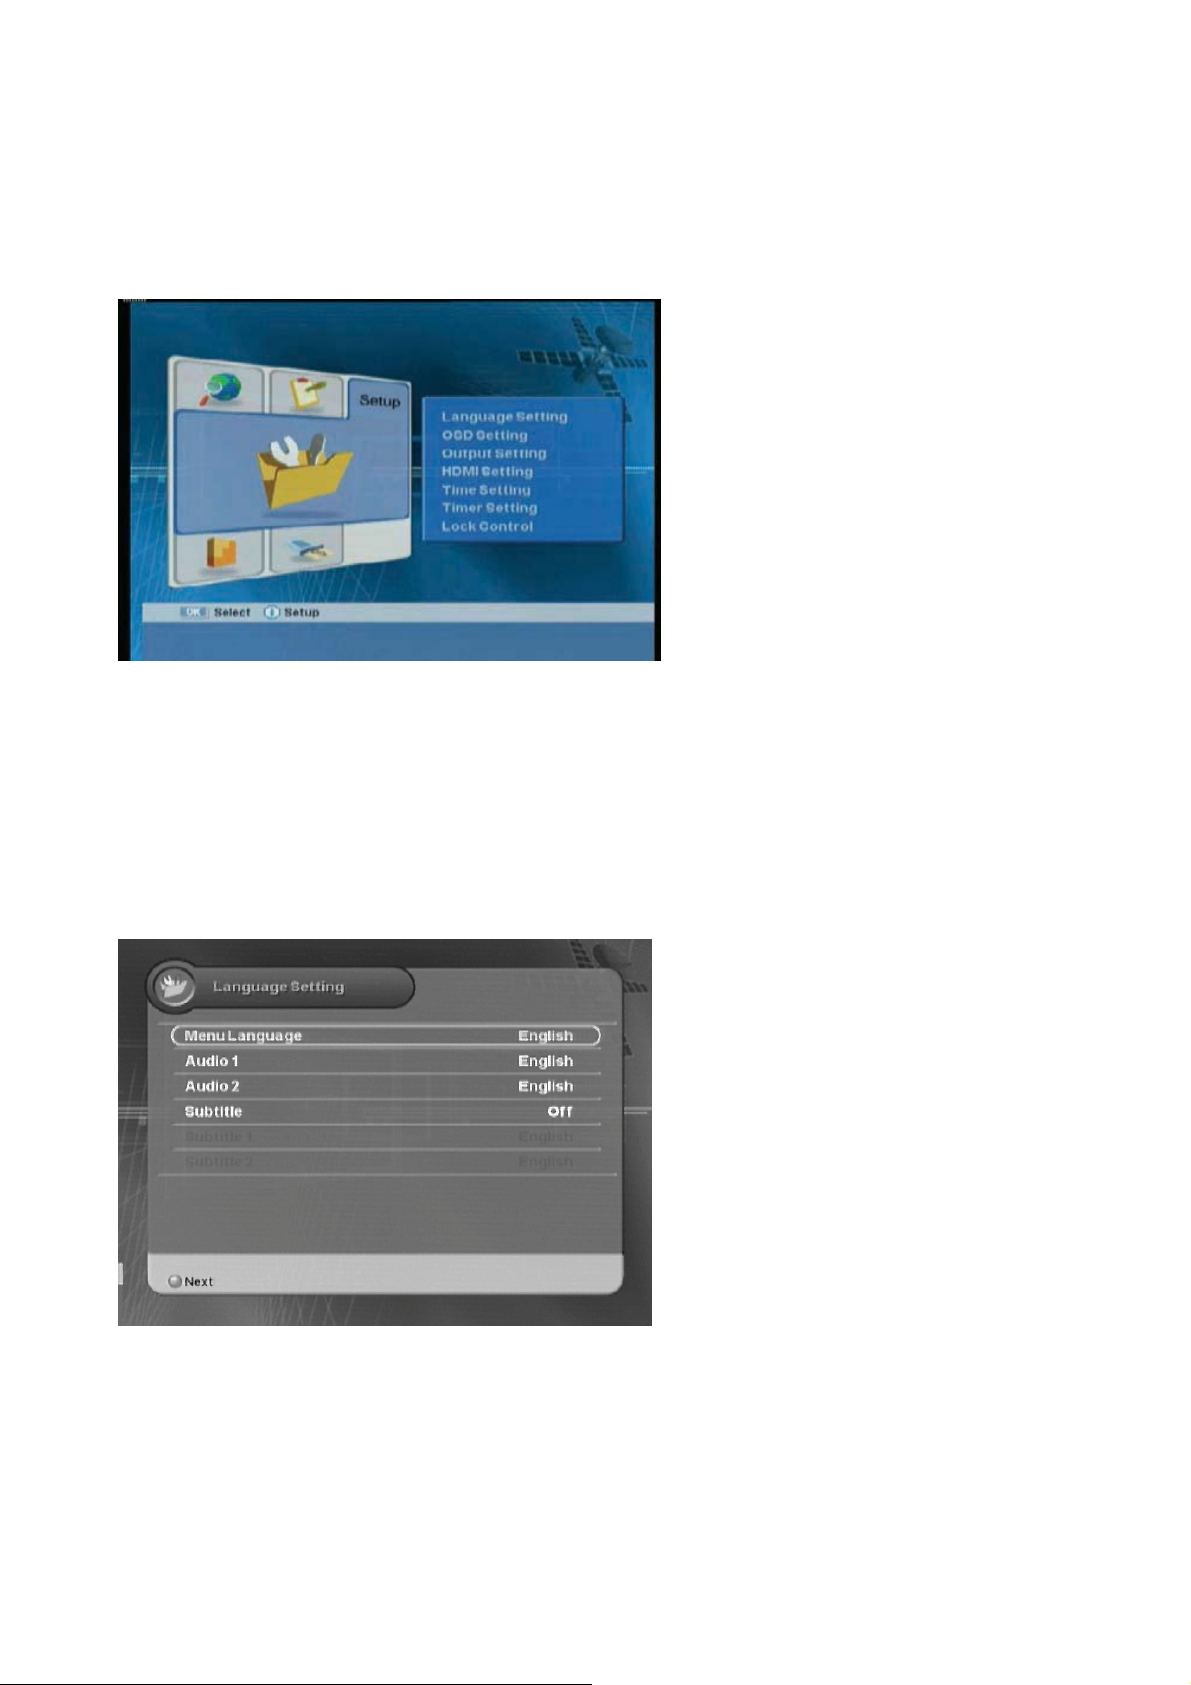
5.3 Setup
You can setup additional function such as Language Setting, OSD, Output Setting, Time & Timer
Setting, and Lock Control.
z
Language:
z
OSD Setting:
z
Output Setting:
devices.
z
HDMI Setting :
output.
z
Time & Timer Setting:
and timer.
z
Lock Control:
Selects the language.
Sets the OSD.
Sets the connected
Sets the HDMI
Sets the time
Sets the system lock.
ᐭ!Move to the Setup menu using the “
desired sub-menu using the “
” button, and press the “OK” button.
ൖ൘
” button, and press the “OK” button.
5.3.1 Language Setting
You can select the Menu Language, Audio, and Subtitled Language.
z
Menu Language :
desired menu language.
z
Audio :
language.
z
Subtitle :
Off.
ᐮ!Move to the
Selects the
Selects the desired audio
Selects the subtitle On or
ᐭ!Move to the desired item using the “
1ࣜᐯࣜ
button
Exit the menu using “MENU” or “EXIT” button.
” button. ྚ Select the desired value using the “
ൖ൘
”
Page 49
Ch5. Settings | 49
#
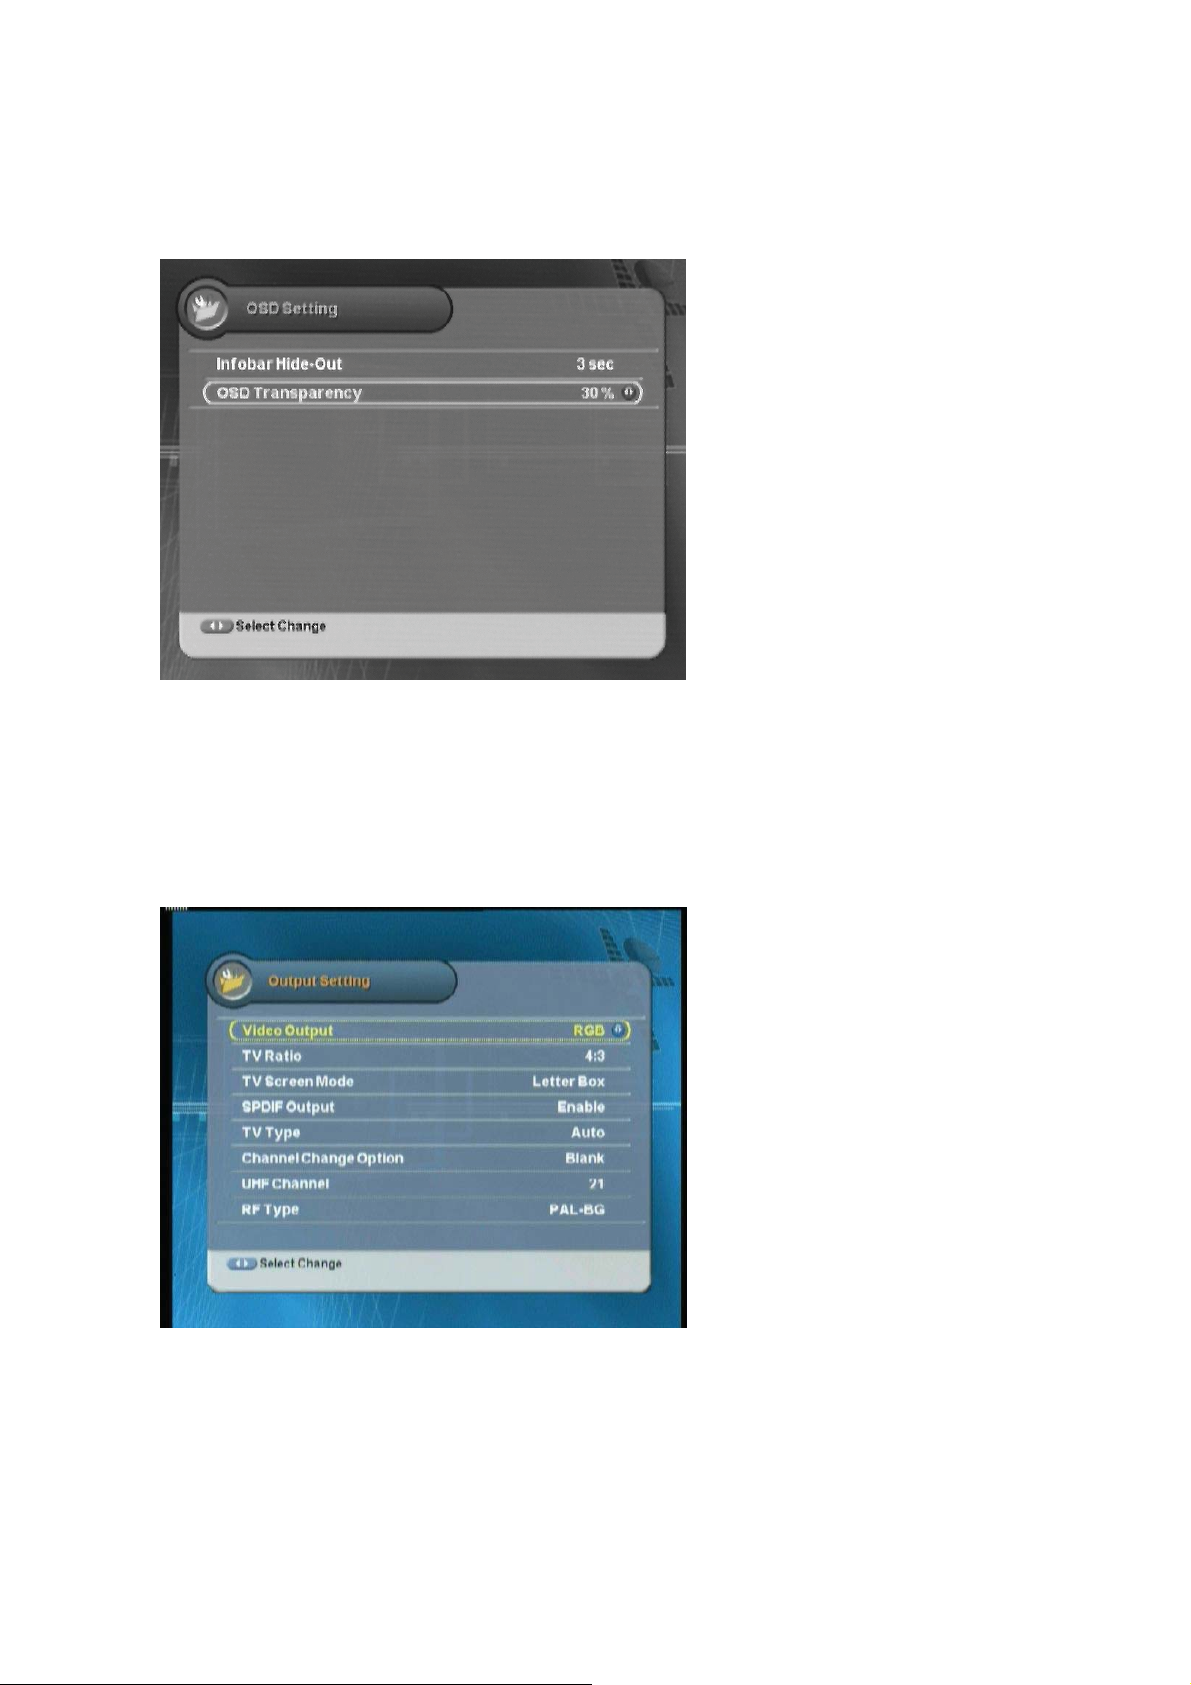
5.3.2 OSD Setting
You can set the interval for the program information bar hide-out or the OSD transparency.
z
Infobar Hide-Out :
hide out time.
z
OSD Transparency :
transparency of On Screen Display.
Selects the infobar
Sets the
ᐭ!Move to the desired item using the “
1ࣜᐯࣜ
button
Exit the menu using “MENU” or “EXIT” button.
” button. ྚ Select the desired value using the “
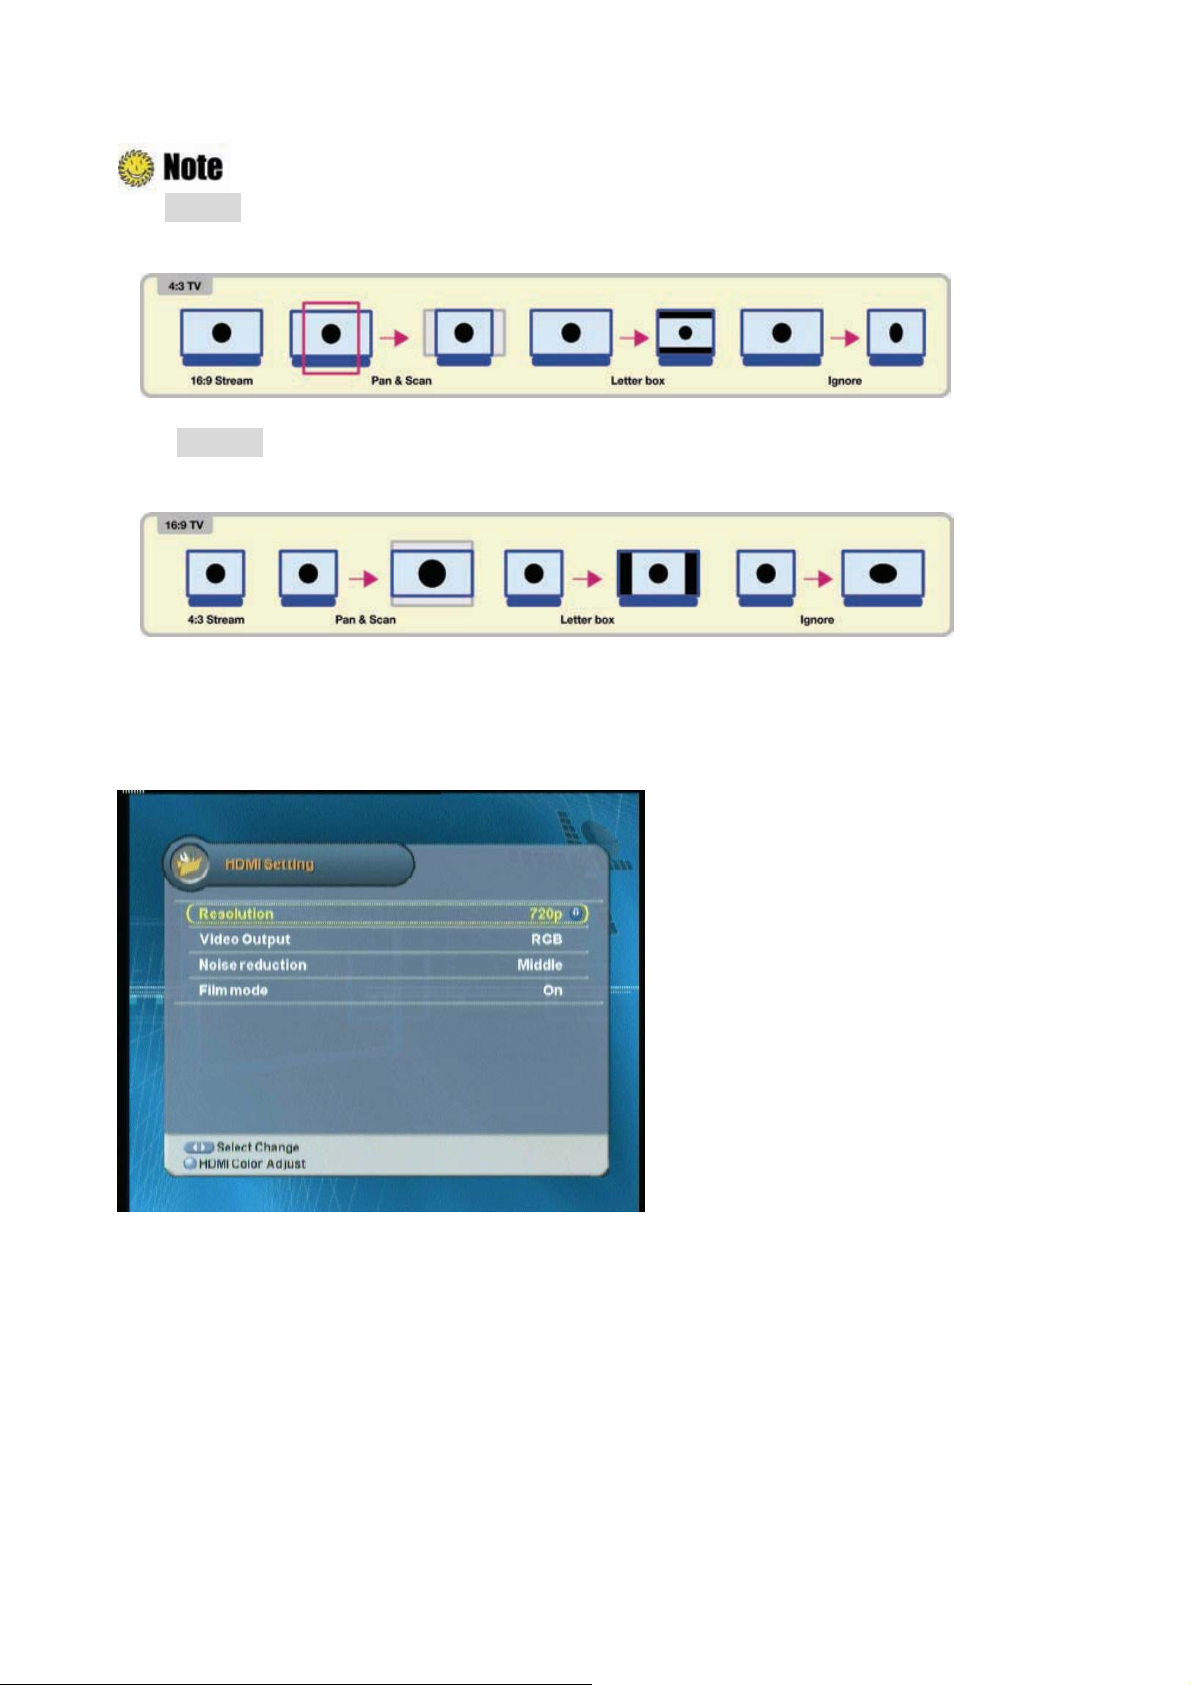
5.3.3 Output Setting
You can set the connected devices such as TV, Dolby AC-3 decoder, and etc.
z
Video Output :
RGB and CVBS
z
TV Ratio :
16:9
z
TV Screen Mode :
Letter box., Pan scan, Ignore.
z
SPDIF Output :
and Disable.
z
TV Type :
Auto/PAL/NTSC.
z
Channel Change Option :
among Blank/Freeze/Fade in·out.
Selects one among 14:3,
Selects one among
ൖ൘
”
Selects one between
Selects one among
Selects one between
Selects one
ཛ!Move to the desired item using the “
button
1 ཝ
Exit the menu using “MENU” or “EXIT” button.
z
UHF Channel
channel (CH21~CH69).
” button. ྚ Select the desired value using the “
:
Select an UHF
ൖ൘
”
Page 50
50 | S 30.12CI H User Manual
:
TV, Aspect Ratio
TV – 4: 3
TV – 16: 9
(You can adjust 16:9 stream to 4:3 TV, In case 4:3 stream no change).
(You can adjust 4:3 stream to 16:9 TV, In case 16:9 stream no change).
5.3.4 HDMI Setting
You can set the HDMI outputs. such as resolution, video output, and etc.
5.3.5 Time Setting
You can set the current time. Refer to
z
ൖ൘
z
z
0~9
z
MENU
EXIT
z
Chapter 3.2 Time Setting
: Selects the desired value.
: Moves to other items.
: Enters the value
: Exits the menu.
: Returns to the previous screen.
for more information.
Page 51
#
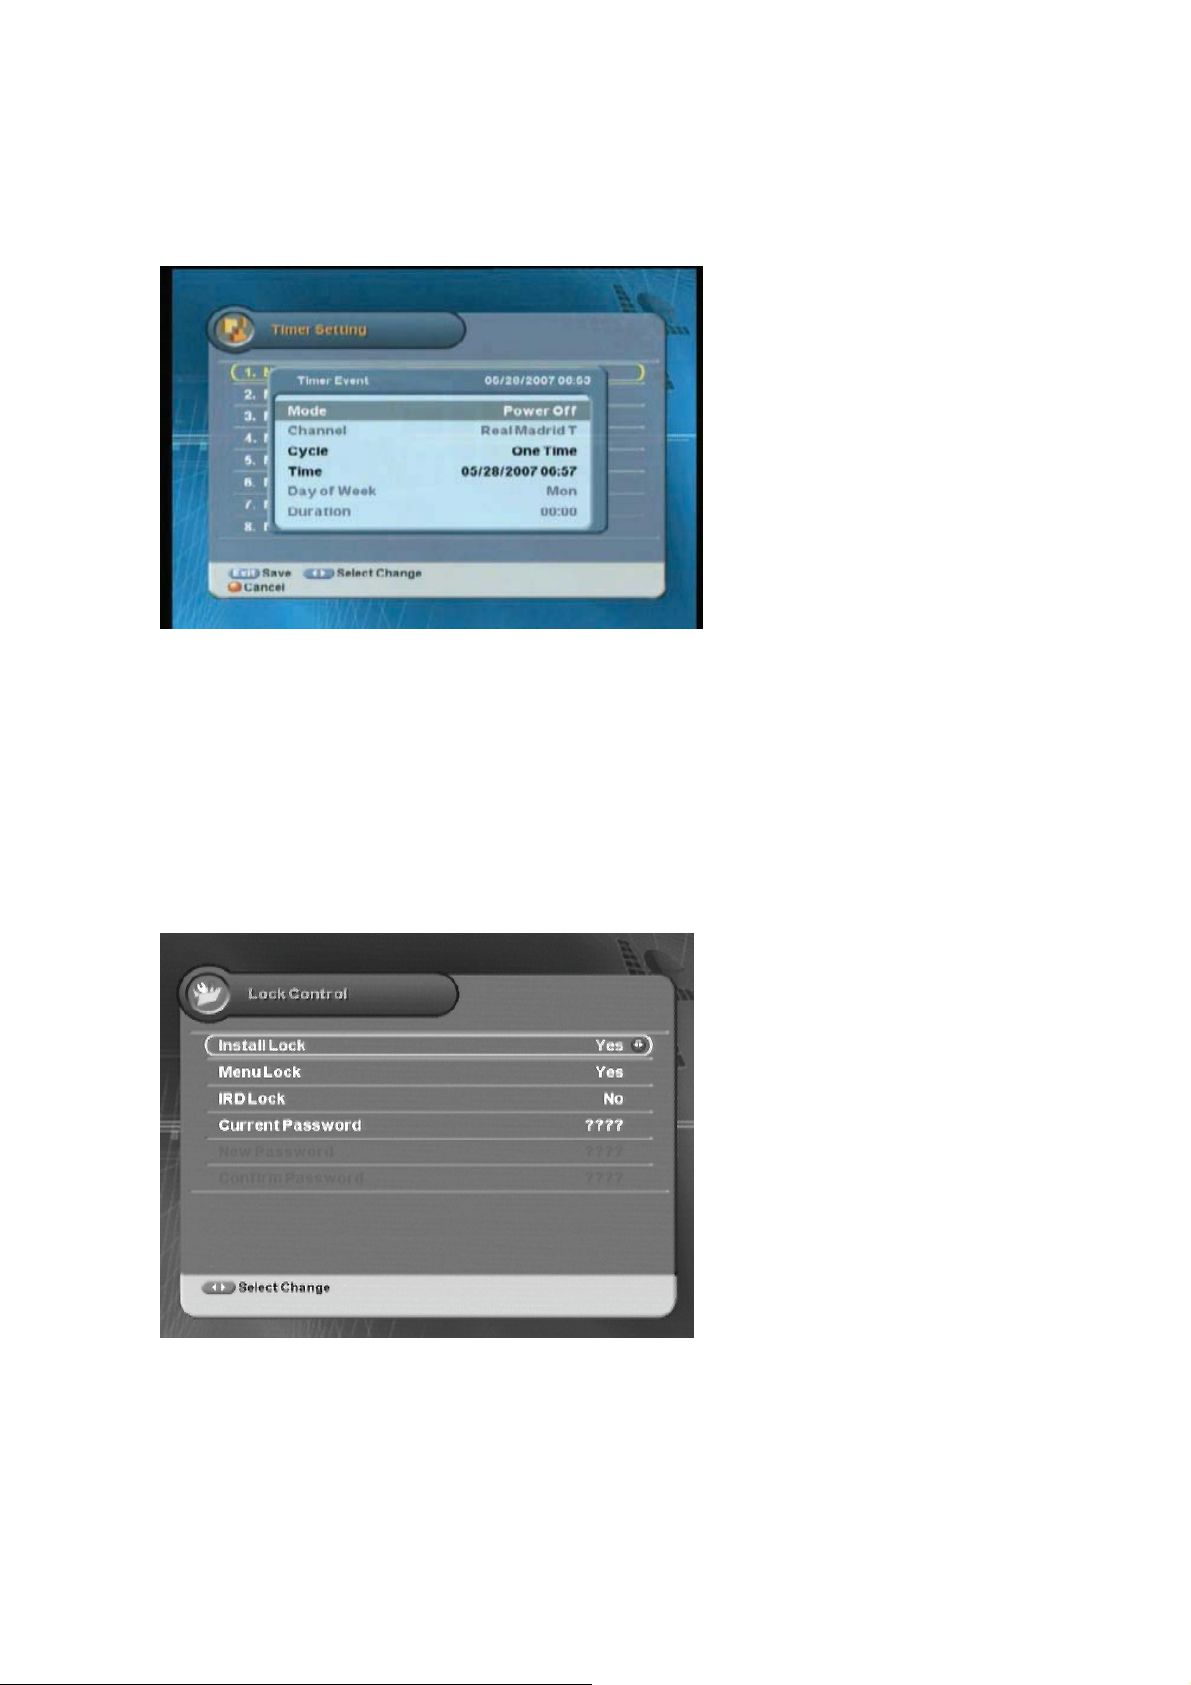
5.3.6 Timer Setting
You can set the timer.
Ch5. Settings | 51
z
Mode :
Power Off and Power On.
z
Channel :
channel.
z
Cycle :
Time/Every Day/Every Week.
z
Time :
z
Day of Week :
selected in the Cycle menu, you can
select the menu.
z
Duration :
Selects one mode between
Selects the desired
Selects one among One
Selects the time.
If Every Week is
Sets the running time.
ཛ!Move to the desired item using the “
button
1 ཝ
Exit the menu using “MENU” or “EXIT” button.
” button. ྚ Select the desired value using the “
5.3.7 Lock Control
You can prevent wrong usage by using the Install/Menu/IRD Lock and Password.
z
Install Lock/Menu Lock/IRD Lock :
Selects one between Lock and
Unlock.
z
Current Password :
existing password.
z
New Password :
password.
z
Confirm Password :
password to confirm.
Changes the
Enters new
Enters the new
ൖ൘
”
ཛ!Move to the desired item using the “
button
1 ཝ
Exit the menu using “MENU” or “EXIT” button.
” button. ྚ Select the desired value using the “
ൖ൘
”
Page 52
52 | S 30.12CI H User Manual
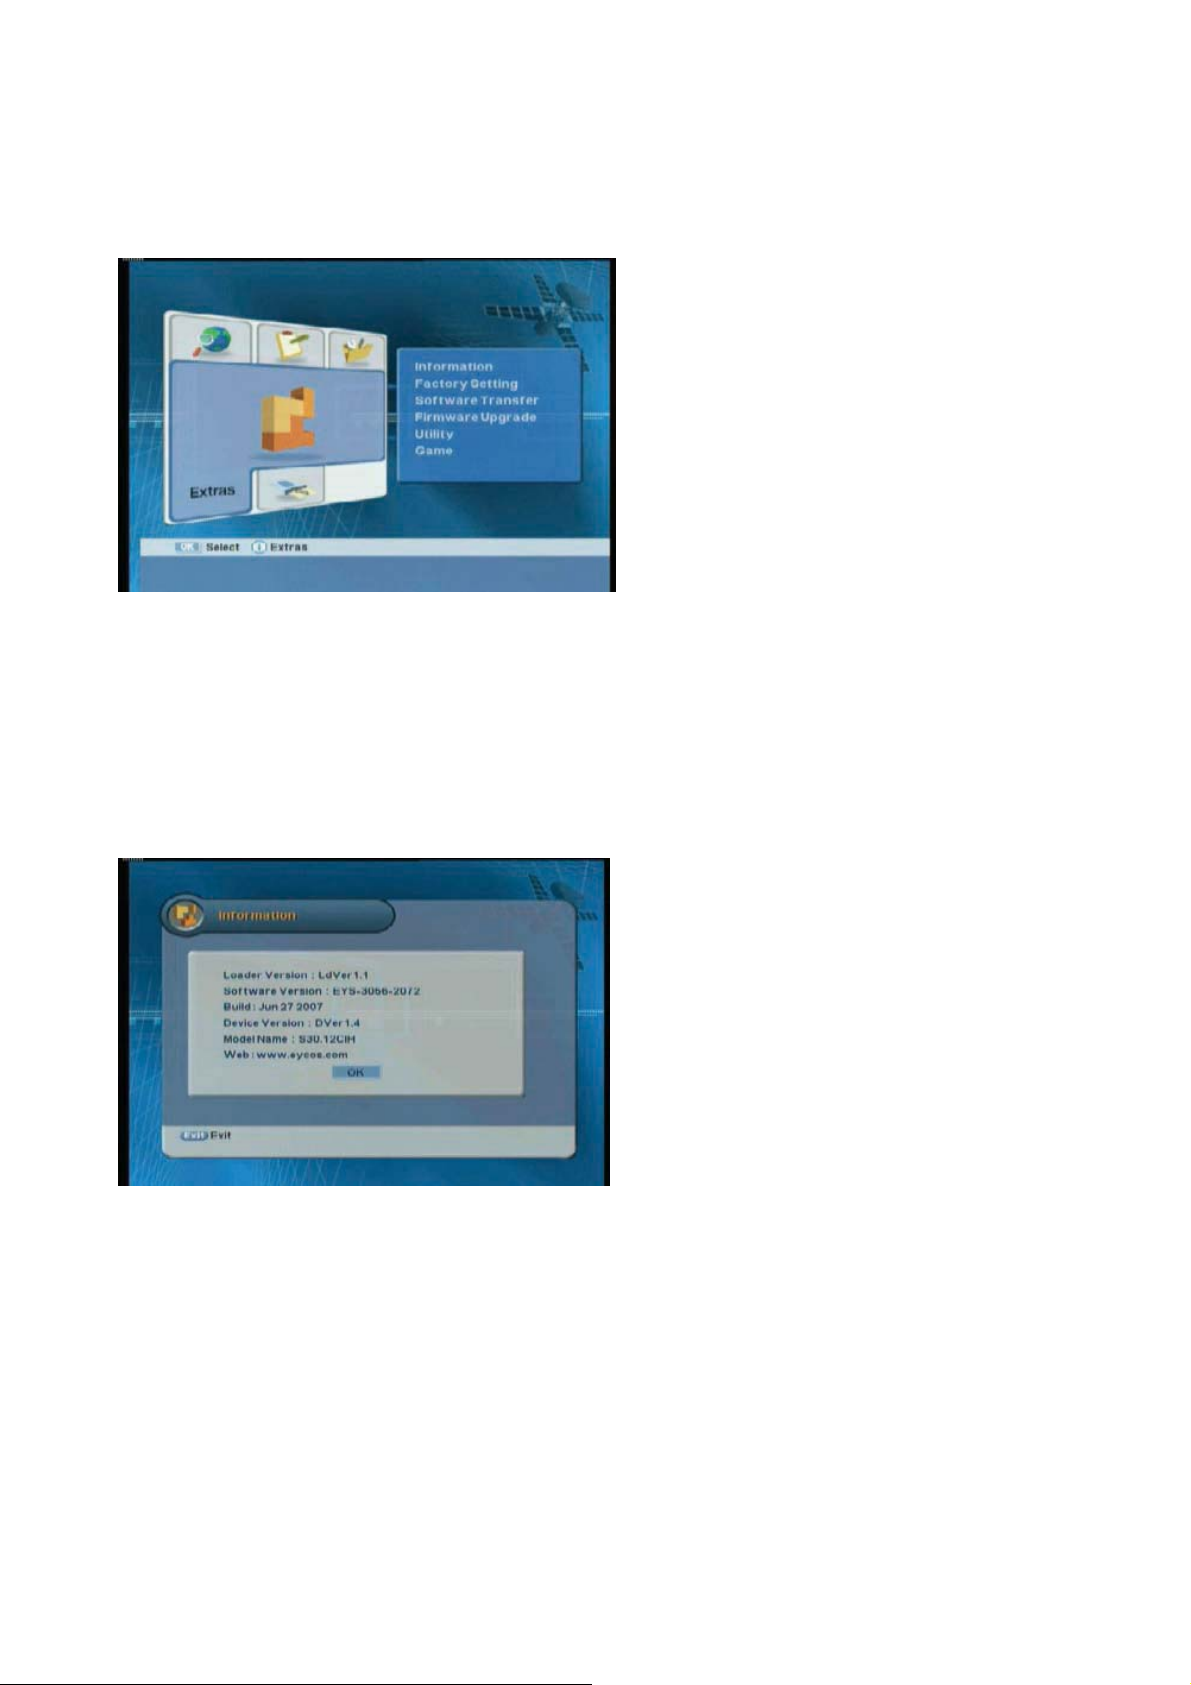
5.4 Tools
You can view the receiver information, restore to the default setting, upgrade the program, and etc.
z
Information:
z
Factory Setting:
setting.
z
Software Transfer:
program.
z
Firmware upgrade:
downloaded by on-air.
z
Utility:
such as calendar and calculator.
z
Game:
Shows the receiver version.
Restores to the default
Upgrades the
The latest s/w can be
Provides the convenient utilities
Provides the games.
ᐭ!Move to the Tools menu using the “
desired sub-menu using the “
” button, and press the “OK” button.
5.4.1 Information
You can view system information.
ൖ൘
” button, and press the “OK” button.
ᐮ!Move to the
Page 53
#
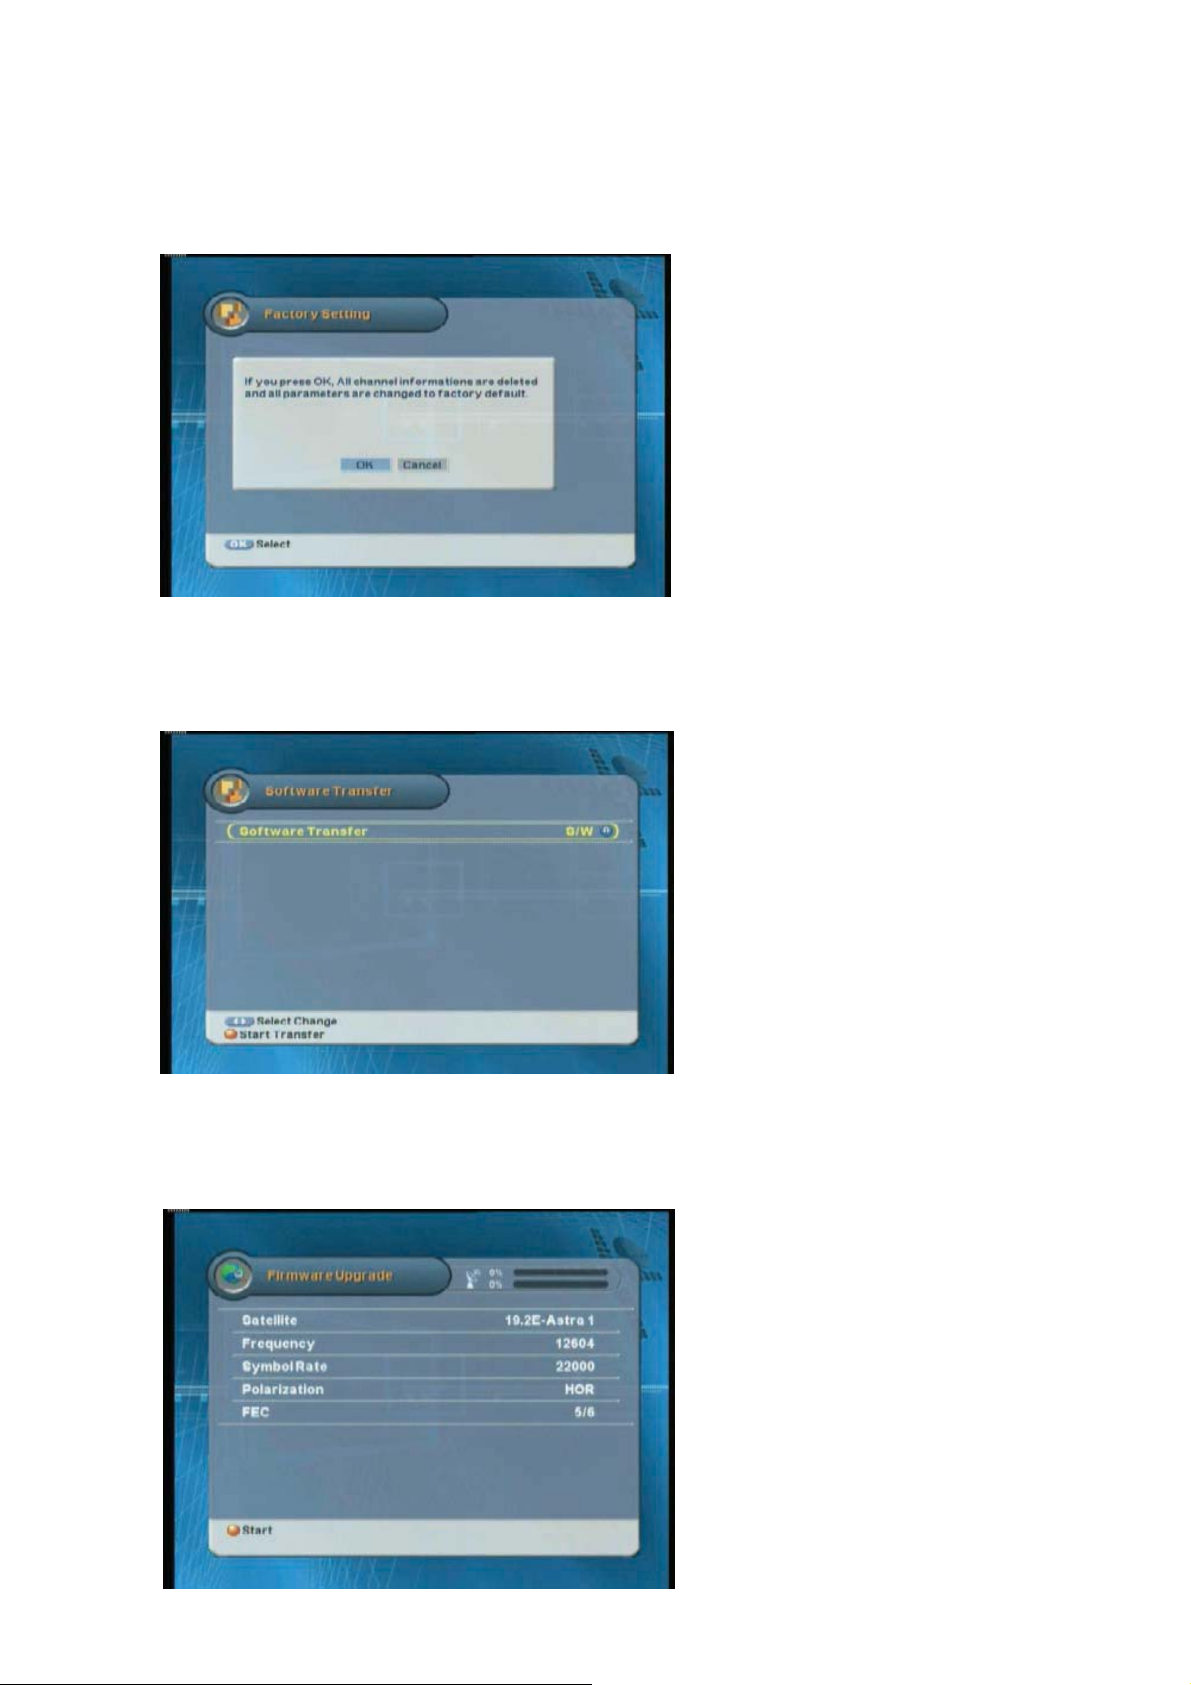
5.4.2 Factory Setting
Factory Setting restores the receiver to the default settings.
5.4.3 Software Transfer
Ch5. Settings | 53
You can update software from menu.
5.4.4 Firmware Upgrade
The latest s/w can be downloaded by on-air.
Page 54
54 | S 30.12CI H User Manual
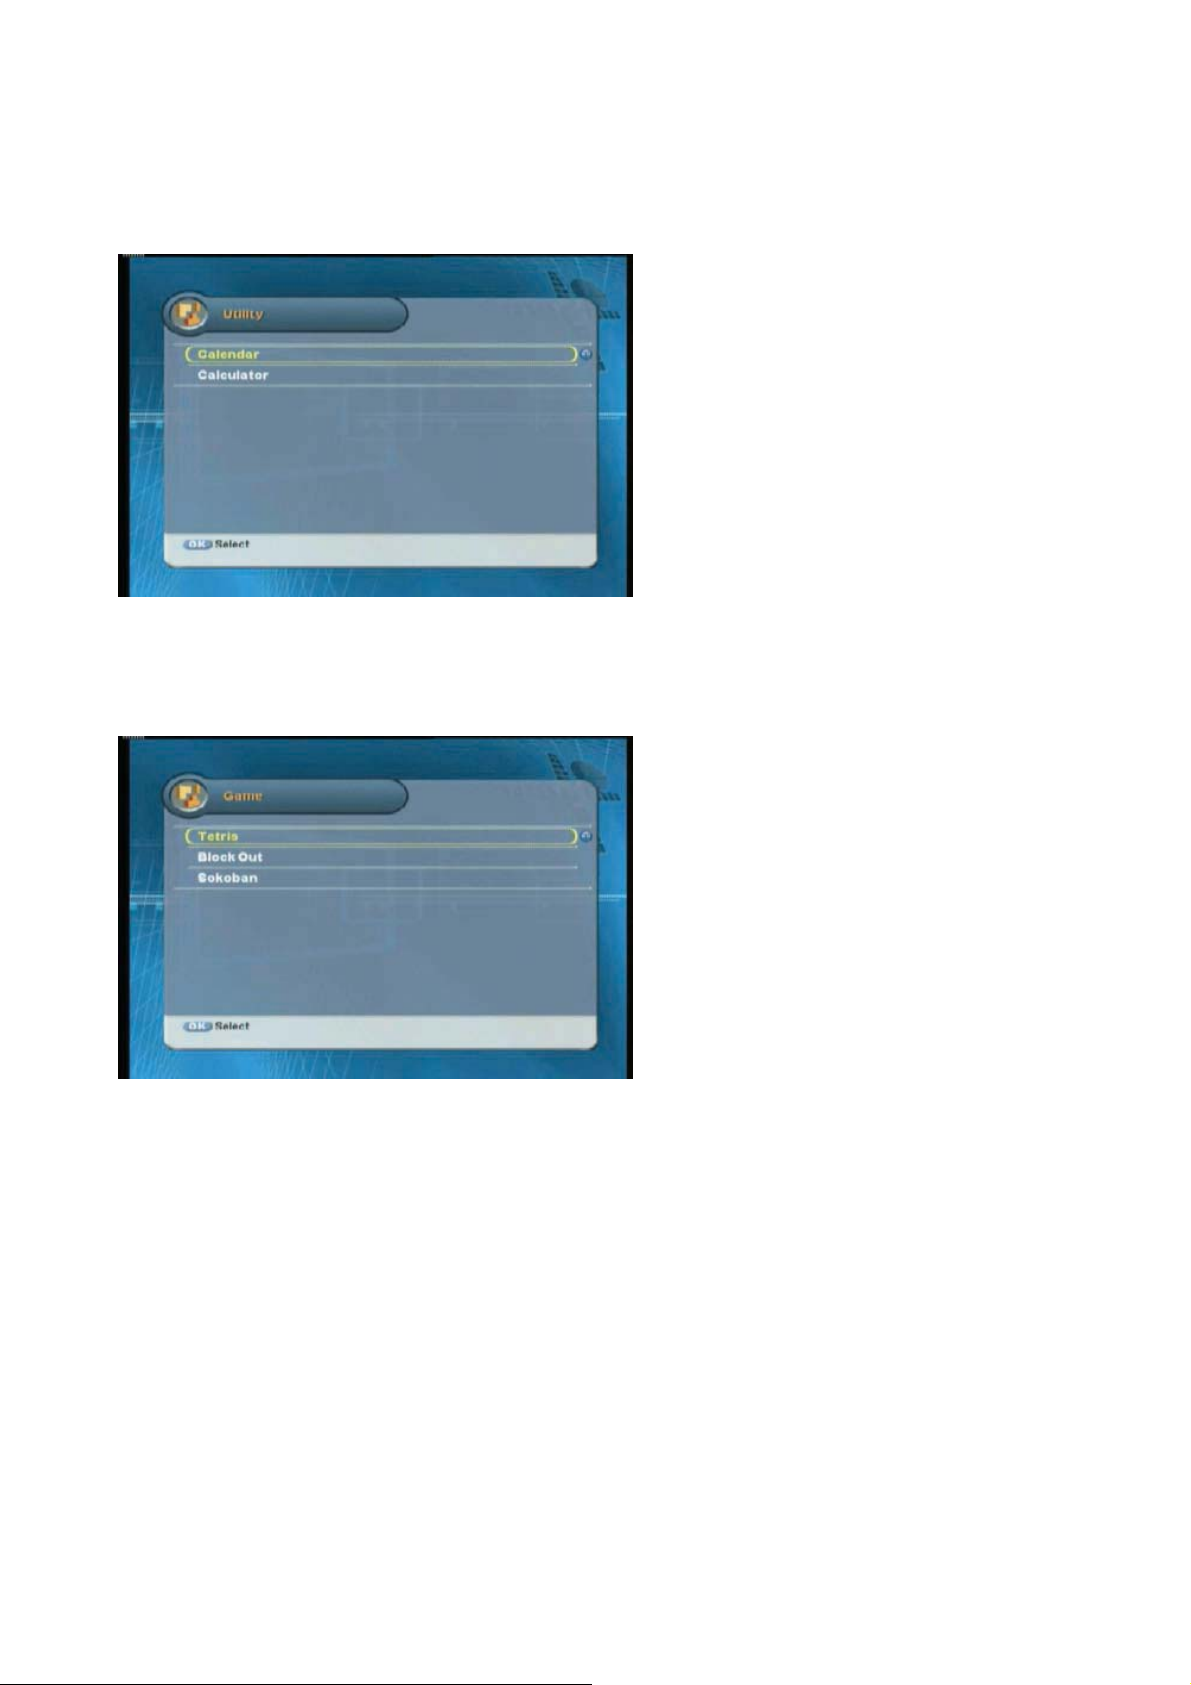
5.4.5 Utility
This product provides calendar and calculator.
5.4.6 Game
This product provides games such as Tetris, Block Out and Sokoban.
Page 55
Ch5. Settings | 55
#
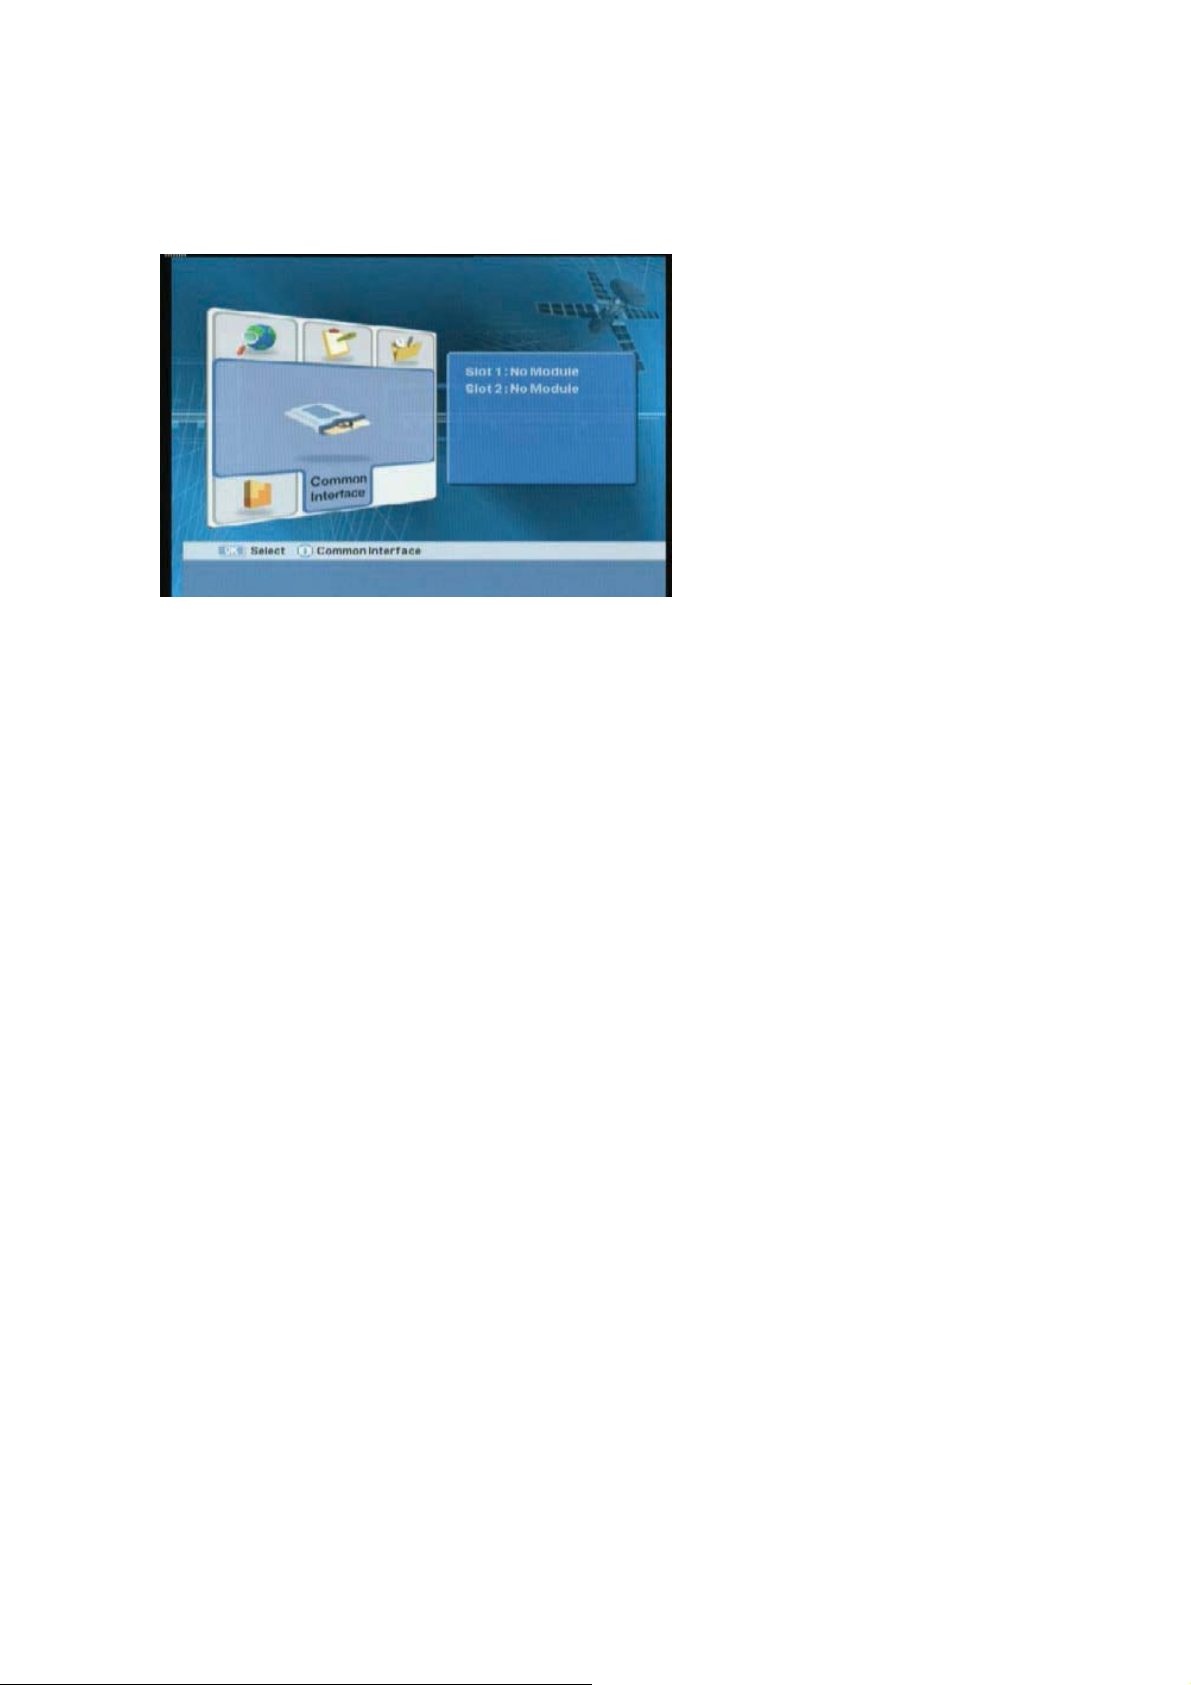
5.5 Common Interface
You can view the information about each slot.
If you want to watch TV programs from a Service Provider you must use a CI module with a Smart
Card. If no CI module is used, you can only watch FREE TO AIR TV programs.
Page 56

56 | S 30.12CI H User Manual
Page 57

Ch6. Appendix | 57
#
Chapter 6
Appendix
Page 58
58 | S 30.12CI H User Manual
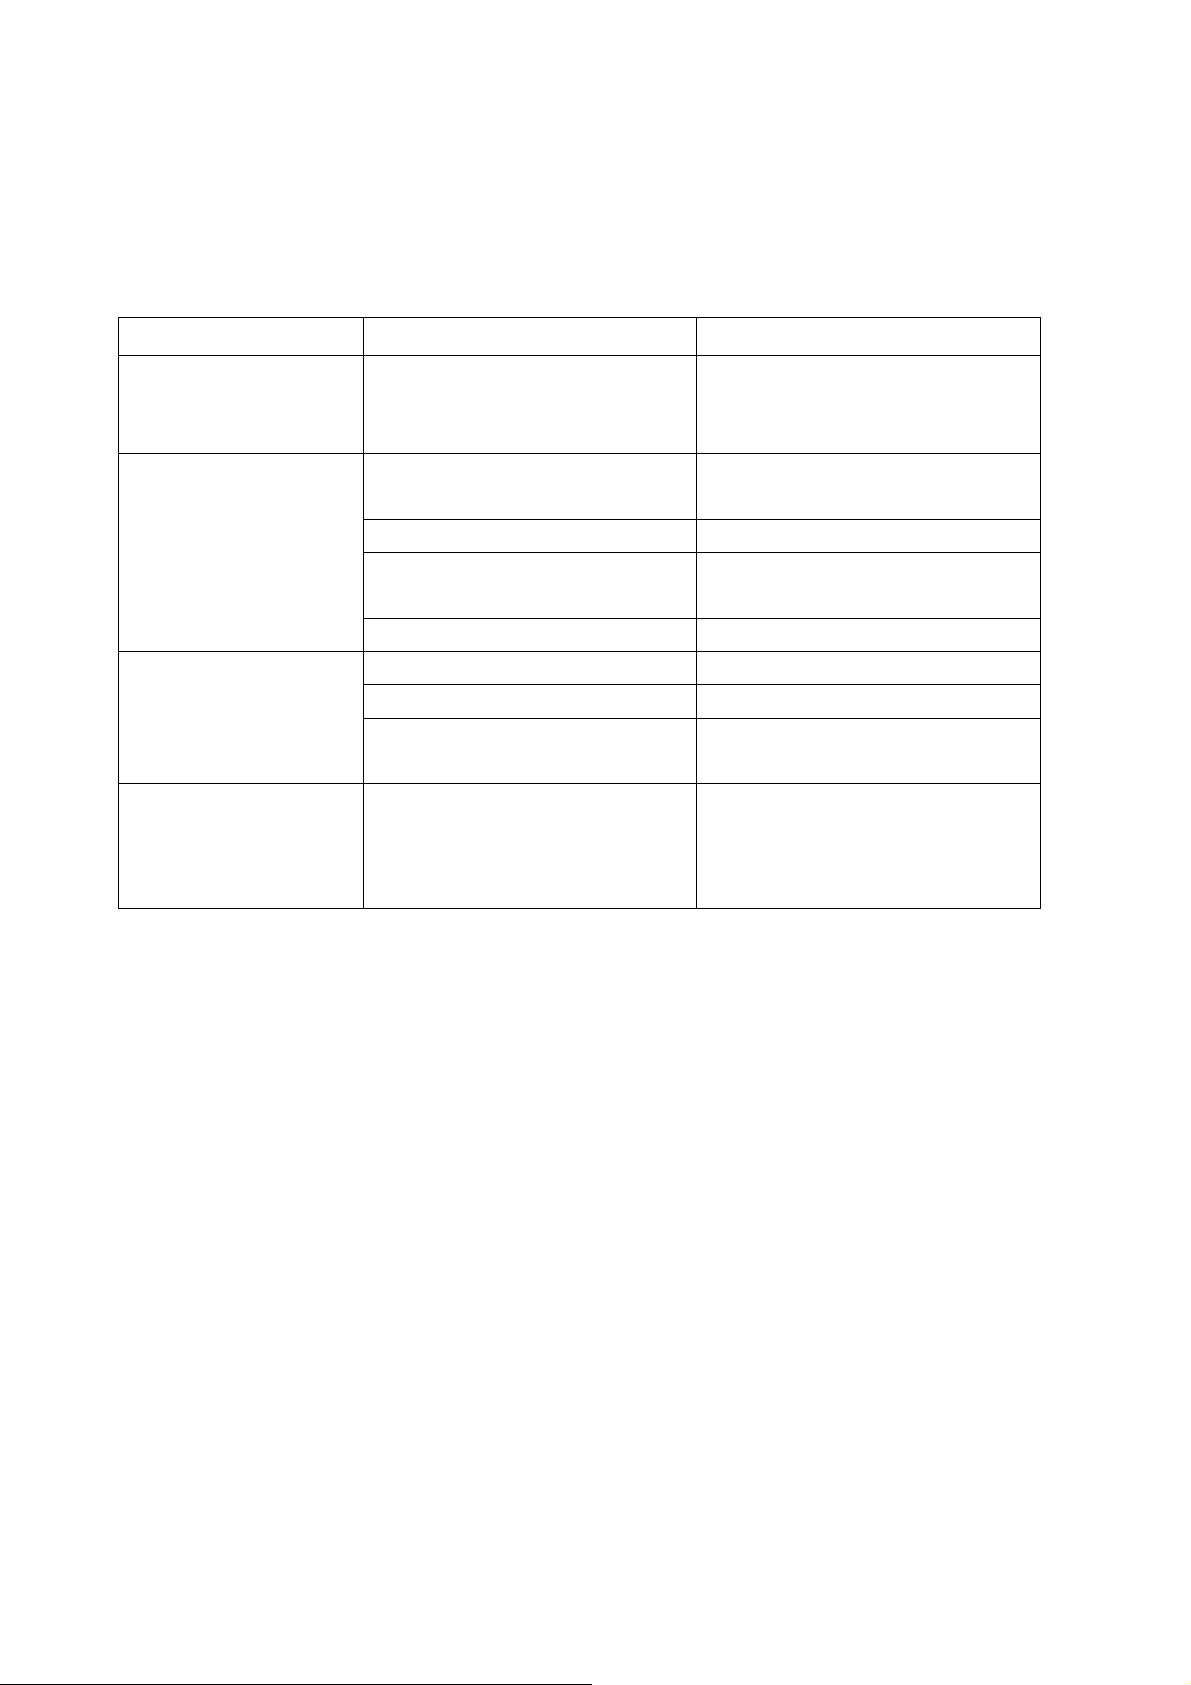
6.1 Trouble Shooting
If the receiver does not work properly after checking it, please contact the dealer. Don't open the
receiver. It may result in a dangerous electric shock and will invalidate your warranty
Problem Possible Causes What to do
The display on front
panel does not light up.
No picture, no sound.
The remote control unit
(RCU) does not working.
Bad picture or noisy
sound in the TV or radio
mode.
The main power cable is not
connected.
Wrong connection of the audio/video
output of the receiver to TV.
TV power off. Turn TV on.
The receiver is standby mode.
No or Bad signal message appears. Connect the antenna cable correctly.
No Batteries. Change the batteries (both).
The RCU is incorrectly aimed. Aim the RCU properly to the receiver.
The receiver is standby mode.
Bad reception of the signal.
Check that the main power cable is
plugged in to the wall outlet.
Connect the audio/video output
of the receiver to TV correctly.
Change the mode to the normal
mode.
Change the mode to the normal
mode.
Make sure the dish and LNB are clean
and correctly adjusted.
Page 59
#
6.2 Specification
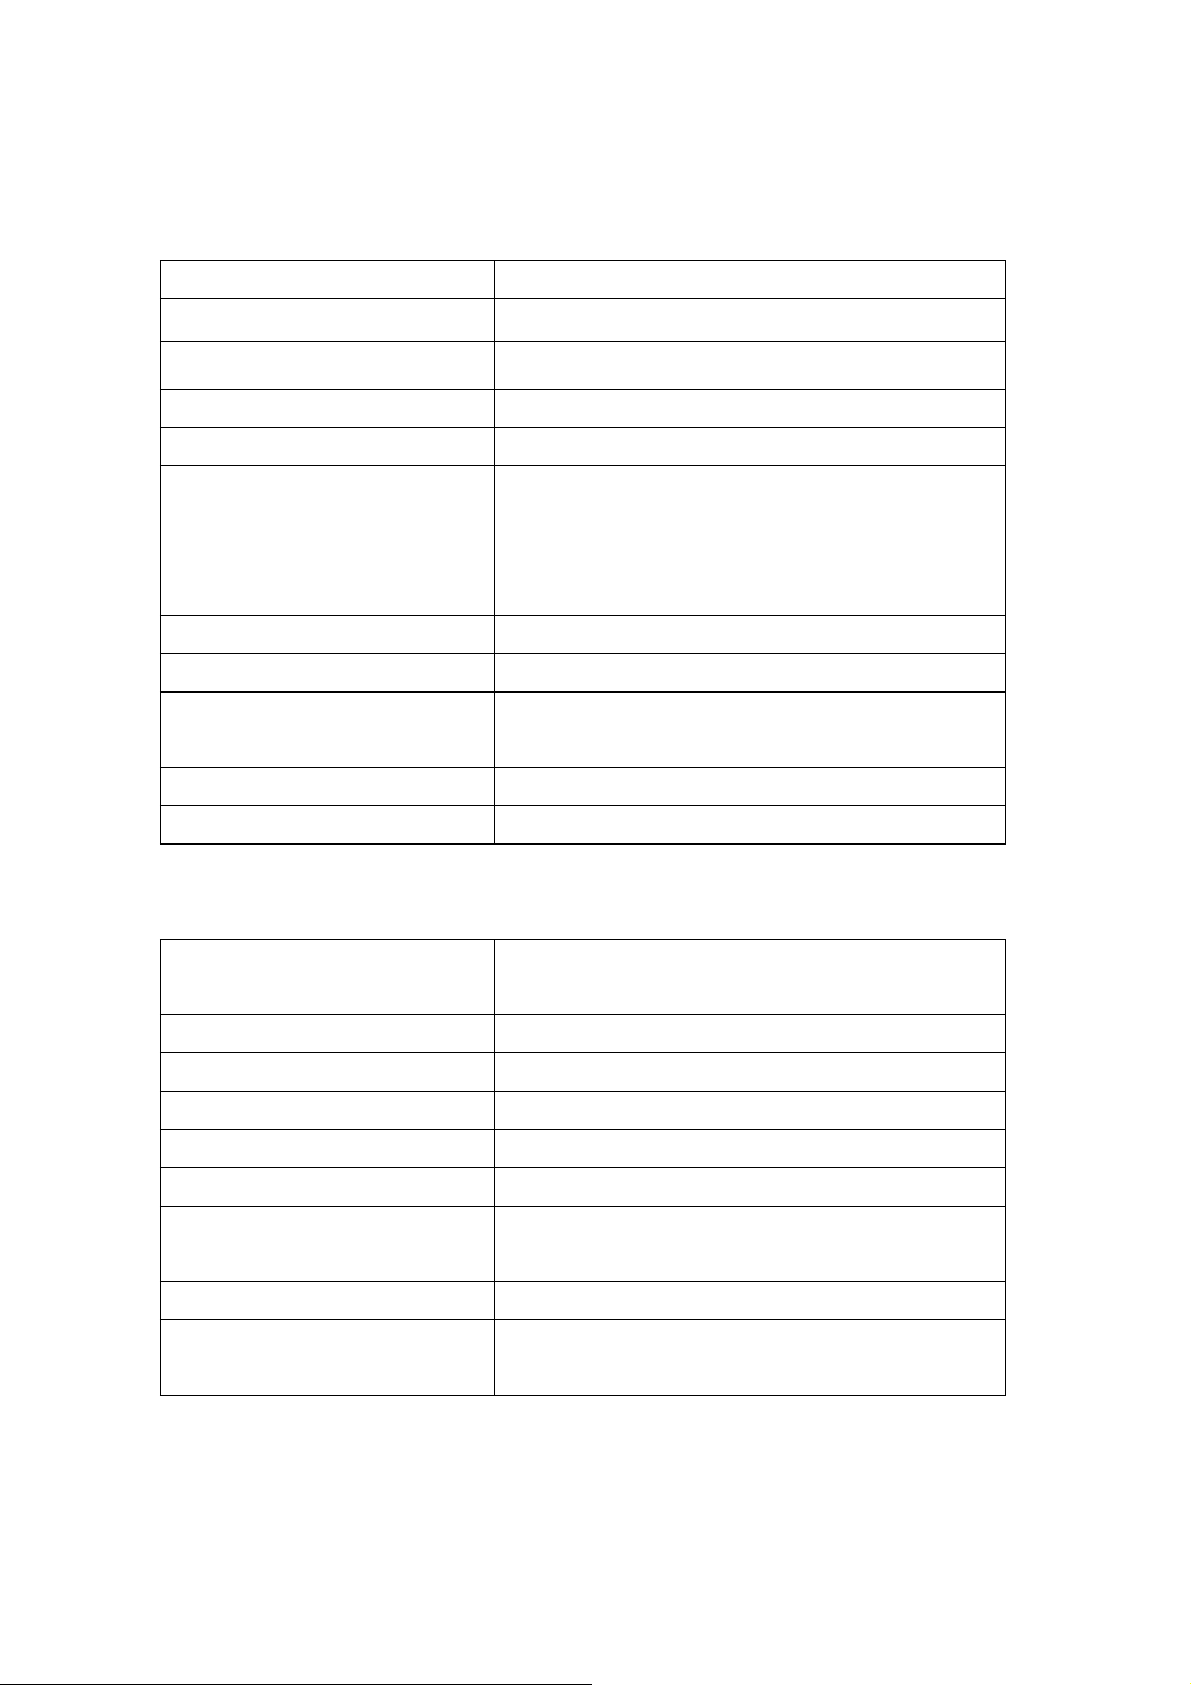
1. Tuner & Demodulator
RF input Connector F-Type(Female), IEC 169-24
RF Frequency Range 950Mhz to 2150 MHz
Input Impedance 75 Unbalanced
Input Signal Level -65 dBm to -25 dBm
IF Frequency ZERO IF
LNB POWER Vertical : 13.0Vdc
Horizontal : 18.0Vdc
Current : 500mA(MAX)
Overload Protection
LNB Control DiSEqC 1.0, 1.1, 1.2, USALS
Ch6. Appendix | 59
Band Switch Control 22KHz Tone
22KHz Tone Frequency : 22±2KHz
Amplitude : 0.6±0.2V
Demodulation QPSK
Symbol Rate 2 to 45Ms/s
2. A/V Decoding
Transport Stream MPEG-2 ISO/IEC 13818
Transport Stream Specification
Profile Level MPEG-2 MP@ML
Input Rate Max, 60 Mbit/s
Aspect Ratio 4:3, 16:9 (Letterbox)
Video Resolution 720 x 576(PAL), 720 X 480(NTSC)
Audio Decoding MPEG Layer I & II
Audio Mode Single Channel / Dual Channel
Joint Stereo / Stereo
Sampling Rate 32, 44.1 & 48 KHz
Graphic Engine 2 – OSD Plane
1-Background Plane / 256 Full Color
Page 60
60 | S 30.12CI H User Manual
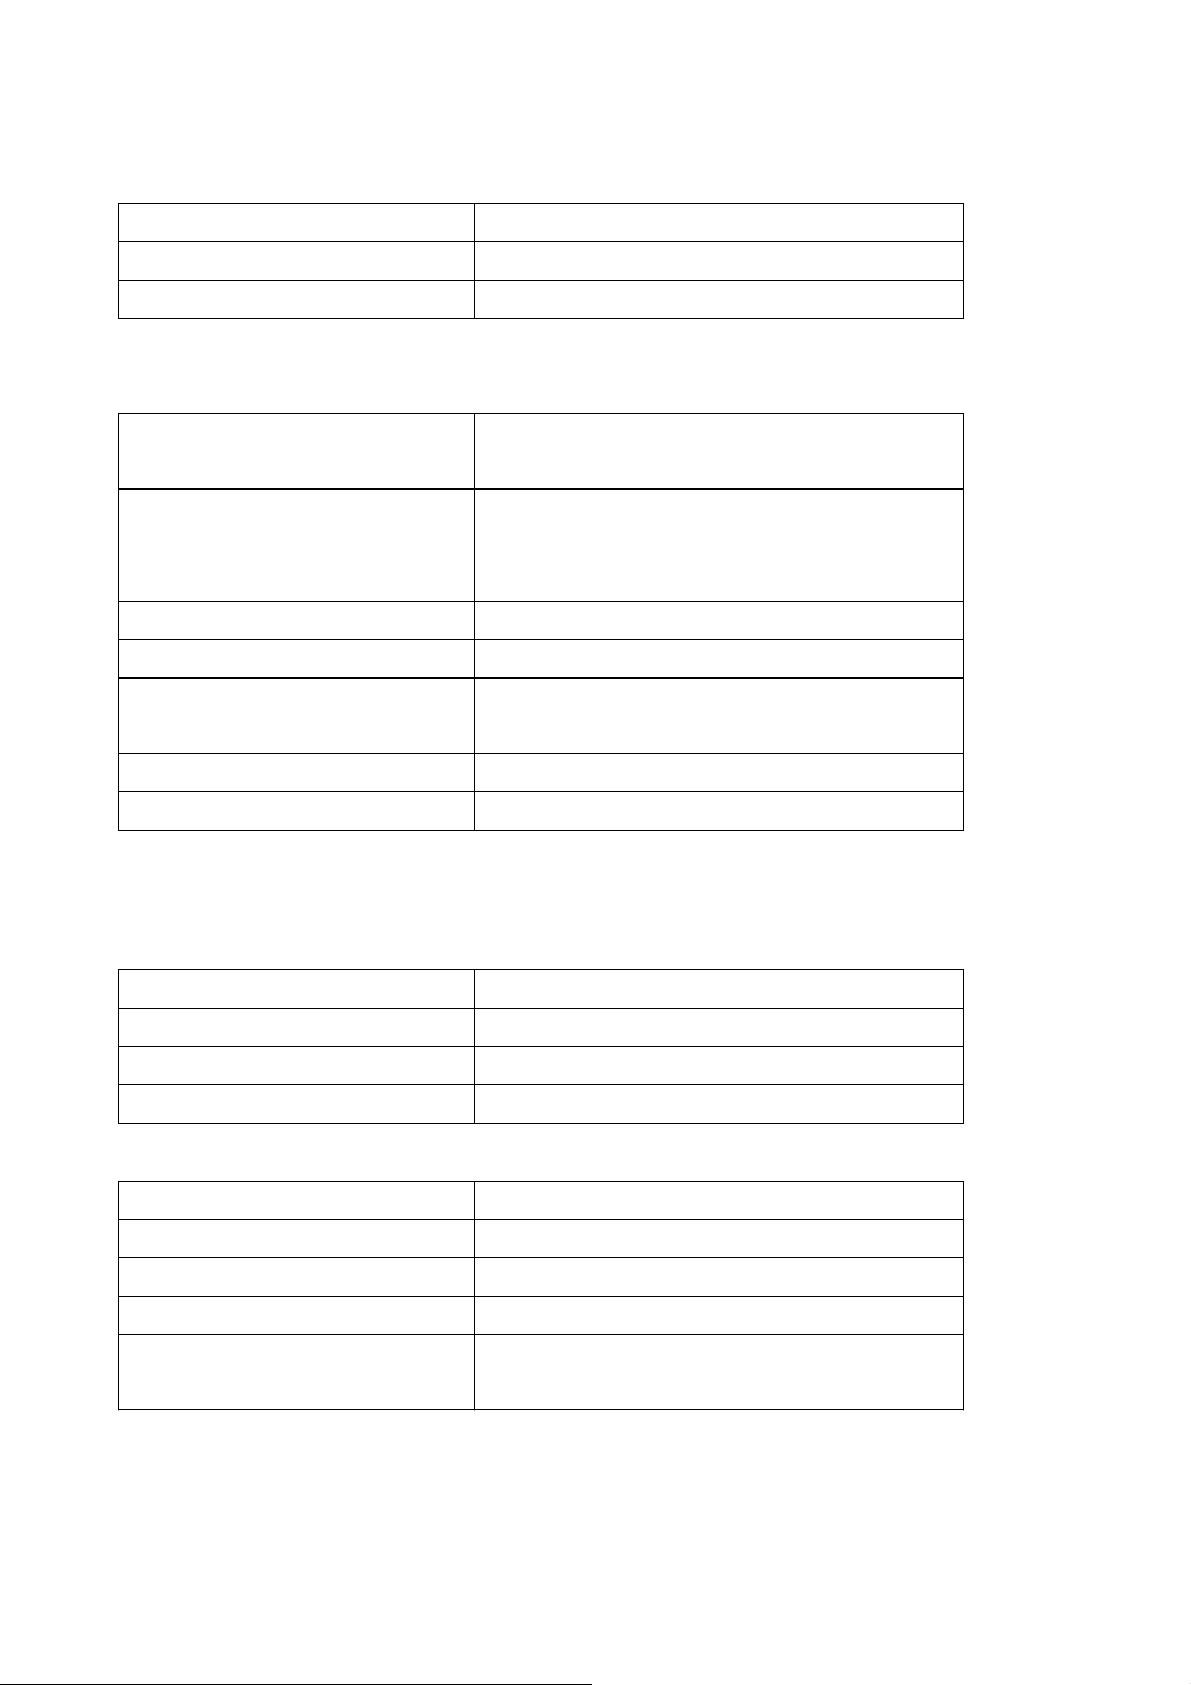
3. Main system
CPU uPD61120(EMMA2L)
Flash Memory 2 Mbytes
Graphic & System DDR SDRAM 16 Mbytes(CL2.5)
4. A/V Data In/Out
TV SCART Video Output (CVBS, RGB)
Audio Output
VCR SCART Video Output (CVBS)
Video Input (CVBS, RGB)
Audio In/Output
RCA VIDEO Video Output (CVBS)
AUDIO R/L RCA/Cinch Volume & Mute Control
RS-232C Transfer Rate 115.2Kbps
9 Pin D-sub Type
HDMI Output RGB/YUV/720X576P, 1280X720P, 1920X1080i
DIGITAL AUDIO( Optional) SPDIF / COAXIAL
5. RF-Modulator(Optional)
1) American Standard
RF-Connector F Type(Female)
Output Channel CH3,CH4
TV Standard NTSC-M
Switch Position CH3
2) European Standard
RF-Connector 75ȍ, IEC 169-2,Male/Female
Frequency 470 to 860MHz
Output Channel CH21~69 for the Demodulator
TV Standard PAL B/G, I , D/K, NTSC-M
Preset Channel CH21(PAL-BG)
Software Changeable by Menu
Page 61

#
6. Power Supply
Input Voltage 100 to 240 Vac, 50Hz/60Hz
Type SMPS
Power Consumption Max 30W
7. Environment
Ch6. Appendix | 61
Operating Temperature +5ଇ ~ +50
Storage Temperature -40ଇ ~ +65
ଇ
ଇ
8. Physical Specification
Size(W X D X H) 360 x 230 x 63 mm
Weight(Net) 2.0kg
Page 62

62 | S 30.12CI H User Manual
Page 63

Ch6. Appendix | 63
#
C/EYS/S30.12CI H/EOSD1.0/REV1.0/ENG
Page 64
64 | S 30.12CI H User Manual
 Loading...