

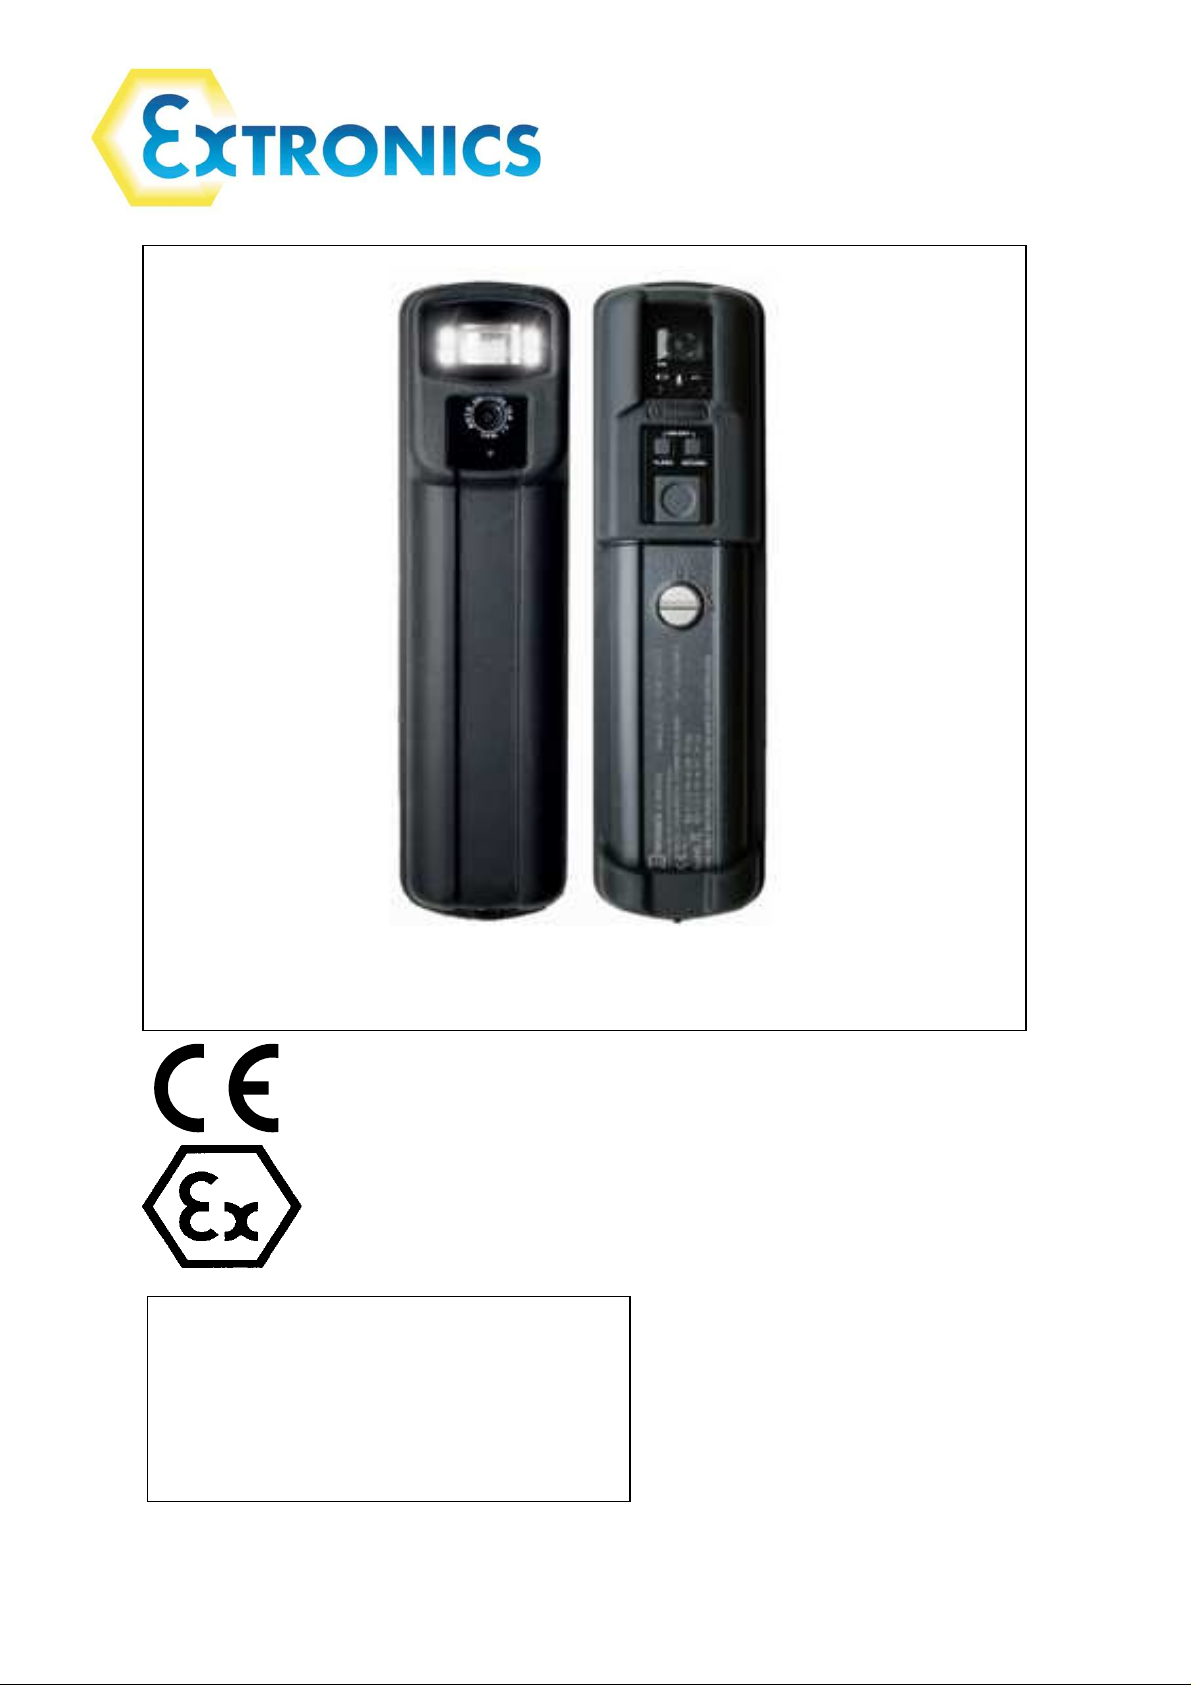
iCAM501U and iCAM502
This device complies with part 15 of the FCC
Rules. Operation is subject to the following
two conditions: (1) This device may not cause
harmful interference, and (2) this device must
accept any interference received, including
interference that may cause undesired
operation
Country of Origin: United Kingdom
Operating Manual

Operating Manual
This page is intentionally left blank.
Document Number 334392_02
©2013 Extronics Limited. This document is Copyright Extronics limited.
Extronics reserve the right to change this manual and its contents without notice, the latest
version applies.
2

Operating Manual
Contents
1 Safety Information and Notes ........................................................................................ 5
1.1
Storage of this Manual ........................................................................................... 5
1.2
Special Conditions For Safe Use ........................................................................... 5
1.2.1
ATEX / IECEx ................................................................................................. 5
(Taken from ITS09ATEX2868X Issue 3 Section 17 and IECExITS09.0027X Issue 2) ... 5
1.2.2
Class1 Division 1 ............................................................................................ 6
1.3
List of Notes ........................................................................................................... 6
1.3.1
iCAM501U ...................................................................................................... 6
1.3.2
iCAM502 ........................................................................................................ 8
2 User Guide ...................................................................................................................10
2.1
Preparing for Use ..................................................................................................10
2.2
Changing/Installing Batteries.................................................................................11
2.3
Powering On/Off ...................................................................................................12
2.4
Taking a Picture ....................................................................................................13
2.5
Picture Quality ......................................................................................................13
2.5.1
Image blur analysis feature ...........................................................................14
2.6
Using the flash ......................................................................................................14
2.6.1
Variable flash brightness ...............................................................................15
2.6.2
Compatibility of the iCAM50x LED flash with optical flame detection
equipment .....................................................................................................................15
2.7
Voice record function ............................................................................................16
2.8
Connectingthe iCAM50xto a computer ..................................................................17
2.9
Downloading Pictures and Audio ..........................................................................17
2.9.1
Windows XP ..................................................................................................18
2.9.2
Windows Vista / Windows 7 ..........................................................................19
2.10 Setting Time and Date of the iCAM50x .................................................................20
2.10.1 Setting Time and Date in Windows XP ..........................................................20
2.10.2 Setting Time and Date in Windows Vista/ Windows 7 ....................................21
2.10.3 Using Windows XP Microsoft Scanner and Camera Wizard ..........................23
2.10.4 Using Windows XP Automatic Picture Download Feature .............................26
2.10.5 Using Windows Vista / Windows 7 Import Pictures and Videos Wizard .........26
2.11 Upgrading Firmware .............................................................................................29
2.12 Error Codes ..........................................................................................................31
3 Structure and Function .................................................................................................31
3.1
Intended Purpose Usage ......................................................................................31
3.2
Transportation and Storage ..................................................................................31
3.3
Authorized Persons ...............................................................................................32
3.4
Cleaning and Maintenance ...................................................................................32
3.5
Safety Precautions ................................................................................................32
3.6
Cleaning and Maintenance Intervals .....................................................................32
3.7
Aggressive substances and environments ............................................................32
3.8
Exposure to external stresses ...............................................................................32
4 Technical Data ..............................................................................................................33
4.1
iCAM501U ............................................................................................................33
4.2
iCAM502 ...............................................................................................................34
5 Warranty Information ....................................................................................................35
6 Certification ..................................................................................................................36
6.1
iCAM501U EC Declaration of Conformity ..............................................................36
6.2
iCAM502 EC Declaration of Conformity ................................................................37
6.3
iCAM501U Class 1 Division 1 Certificate of Compliance .......................................38
6.4
ATEX / IECEx Certificates .....................................................................................42
7 Revision History ............................................................................................................43
3

Operating Manual
4

Operating Manual
1 Safety Information and Notes
1.1 Storage of this Manual
Keep this user manual safe and in the vicinity of the device. All persons required to work with
the device should be advised on where this manual is stored.
Important This manual applies to both the iCAM501U and iCAM502. It is important
to note the different safety instructions for these two products. When
‘iCAM50x’ is used in this manual, it applies to both the iCAM501U and
iCAM502.
1.2 Special Conditions For Safe Use
1.2.1 ATEX / IECEx
1.2.1.1 iCAM501U
(Taken from ITS09ATEX2868X Issue 3 Section 17 and IECExITS09.0027X Issue 2)
For Group II applications only, the user shall not carry more than a maximum of two spare
MN 1500 AA cells into the hazardous area. Precautions shall be taken to prevent short
circuiting of un-protected battery terminals. Discharged cells shall be removed from the
hazardous area.
For Group 1 applications, the changing of the batteries in the hazardous area and the
transportation of spare batteries into the hazardous area is not permitted.
The USB port shall only be connected in the non-hazardous area
If the camera is damaged in any way, it shall be removed from the hazardous area.
1.2.1.2 iCAM502
(Taken from ITS09ATEX2868X Issue 4 (Amended March 2013) Section 17 and IECExITS09.0027X
Issue 4)
For Group II applications only, the user shall not carry more than a maximum of two spare
approved AA cells into the hazardous area. Precautions shall be taken to prevent short
circuiting of un-protected battery terminals. Discharged cells shall be removed from the
hazardous area.
The Temperature class for the equipment is determined by type of batteries used.
T4: Duracell MN 1500
T3: Duracell Procell PC 1500, Energizer E91, Panasonic LR6XWA
For Group 1 applications, the changing of the batteries in the hazardous area and the
transportation of spare batteries into the hazardous area is not permitted.
Duracell MN 1500 is the only type of battery permitted for Group 1 applications
The USB port shall only be connected in the non-hazardous area
If the camera is damaged in any way, it shall be removed from the hazardous area.
5

Operating Manual
1.2.2 Class1 Division 1
1.2.2.1 iCAM501U
(Taken from FM approvals certificate of conformity 3042108)
Must be used with Battery specified in this operating manual
Temperature code is T4, Ta=-20°C to 55°C with Duracell Plus or Procell MN1500 batteries or
T3C, Ta=-20°C to 50°C with Duracell Procell PC1500 or Energizer E91 batteries.
1.2.2.2 iCAM502
The iCAM502 is not currently Class1 Division 1 approved.
1.3 List of Notes
The notes supplied in this chapter provide information on the following.
• Danger! / Warning!
o Possible hazard to life or health.
• Caution
o Possible damage to property.
• Important
o Possible damage to enclosure, device or associated equipment.
• Information
o Notes on the optimum use of the device
1.3.1 iCAM501U
Warning! For ATEX applications, ONLY Duracell Plus MN1500 or Duracell Procell
MN1500 cells may be used with the iCAM501U.
Warning! Any connection to the iCAM501 USB port must NOT be made in a
hazardous area.
Warning! For Class1 Division 1 applications NOTE THE REDUCED TEMPERATURE
CLASSIFICATION of T4 at 55oC when Duracell MN1500/ Duracell Procell
MN1500 cells are used.
Warning! For Class 1 Division 1 applications ONLY,Duracell Procell PC1500 or
Energizer E91 cells may additionally be used, NOTE THE REDUCED
TEMPERATURE CLASSIFICATION of T3C at 50oC ambient when these
cells are used (see Table 1).
Warning! The user shall NOT mix MN1500, PC1500 or E91 cells in ANY application
6

Operating Manual
Application
:
Duracell Plus
Duracell Procell
Duracell Procell
Energizer E91
iCAM501U
CANNOT
BE
CANNOT BE
iCAM501U
CANNOT BE
CANNOT BE
iCAM501U
Warning! For GROUP I applications ONLY, the changing of the cells in the
hazardous area or the transportation of spare cells into the hazardous
area is NOT PERMITTED.
Warning! For GROUP II applications ONLY, the user shall not carry more than a
maximum of 2 spare Duracell Plus MN1500 or Duracell Procell MN1500
cells into the hazardous area. Precautions shall be taken to prevent
short circuiting of un-protected cell terminals. Discharged cells shall be
removed from the hazardous area.
Warning! For Class 1 Division 1 applications ONLY, the user shall not carry more
than a maximum of 2 spare Duracell Plus MN1500, Duracell Procell
MN1500/PC1500 or Energizer E91 cells into the hazardous area.
Precautions shall be taken to prevent short circuiting of un-protected
cell terminals. Discharged cells shall be removed from the hazardous
area.
Warning! For GROUP II applications ONLY the rated ambient temperature range of
the equipment is from -20oC to 60oC.
Warning! For GROUP I applications ONLY the rated ambient temperature range of
the equipment is from 0oC to 60oC.
Warning! For Class 1 Division 1 applications ONLY the rated ambient temperature
range of the equipment is from -20oC to 55oC/50oC dependent on the
cells used (see Table 1).
Warning! If any damage to the iCAM501U is found which may invalidate the
required safety minimum IP rating (IP54 for group I applications), (IP20
for group II and class 1 division 1 applications), the iCAM501U shall be
removed from the hazardous area.
Important Any repairs or replacement of parts MUST be performed by the
manufacturer or its nominated sub-contractor or agent.
Important The iCAM501U contains no user serviceable parts. The main part of the
enclosure must not be opened under any circumstances.
Table 1Cells approved for use with iCAM501U units
MN1500
MN1500
PC1500
OK, T4 at 60oC OK, T4 at 60oC
ATEX GROUP II
USED
USED
OK, T4 at 60oC OK, T4 at 60oC
ATEX GROUP I
USED
USED
OK, T4 at 55oC OK, T4 at 55oC OK, T3C at 50oC OK, T3C at
CLASS
50oC
1DIVISION 1
7

Operating Manual
1.3.2 iCAM502
Warning! For ATEX/IECEx GROUP II applications, Duracell Plus MN1500, Duracell
Procell MN1500, Duracell Procell PC1500, Energizer E91 or Panasonic
LR6XWA cells may be used with the iCAM502.
Warning! NOTE THE DIFFERENT TEMPERATURE CLASSSIFICATION of T3 at 60oC
when Duracell Procell PC1500, Energizer E91 or Panasonic LR6XWA
cells are used.
Warning! For ATEX/IECEx GROUP II applications ONLY, the user shall not carry
more than a maximum of 2 spares of the approved cells listed above into
the hazardous area. Precautions shall be taken to prevent short
circuiting of un-protected cell terminals. Discharged cells shall be
removed from the hazardous area.
Warning! For ATEX/IECEx GROUP I applications, ONLY Duracell Plus MN1500 or
Duracell Procell MN1500 cells may be used with the iCAM502.
Warning! For ATEX/IECEx GROUP I applications, the changing of cells in the
hazardous area, or the transportation of spare cells into the hazardous
area is NOT PERMITTED.
Warning! The user shall NOT mix different cells in ANY application
Note Duracell Plus MN1500 and Duracell Procell MN1500 cells are equivalent
Warning! For ATEX/IECEx GROUP II applications, note that the rated ambient
temperature range of the equipment is from -20oC to 60oC.
Warning! For ATEX/IECEx GROUP I applications, note that the rated ambient
temperature range of the equipment is from 0oC to 60oC.
Warning! Any connection to the iCAM502 USB port must NOT be made in a
hazardous area.
Warning! If any damage to the iCAM502 is found which may invalidate the required
safety minimum IP rating (IP54 for ATEX/IECEx Group I applications,
IP20 for ATEX/IECEx Group II applications) the iCAM502 shall be
removed from the hazardous area.
Important Any repairs or replacement of parts MUST be performed by the
manufacturer or its nominated sub-contractor or agent.
Important The iCAM502 contains no user serviceable parts. The main part of the
enclosure must not be opened under any circumstances.
8

Operating Manual
Application
Duracell
Duracell
Duracell
Energizer
Panasonic
iCAM502
iCAM502
CANNOT BE
CANNOT BE
CANNOT
Table 2Cells approved for use with iCAM502 units
ATEX/IECEx
GROUP II
ATEX/IECEx
GROUP I
Plus
MN1500
OK, T4 at
60oC
OK at 60oC OK at 60oC
Procell
MN1500
OK, T4 at
60oC
Procell
PC1500
OK, T3 at
60oC
USED
E91
OK, T3 at
60oC
USED
LR6XWA
OK, T3 at
60oC
BE USED
9
Operating Manual
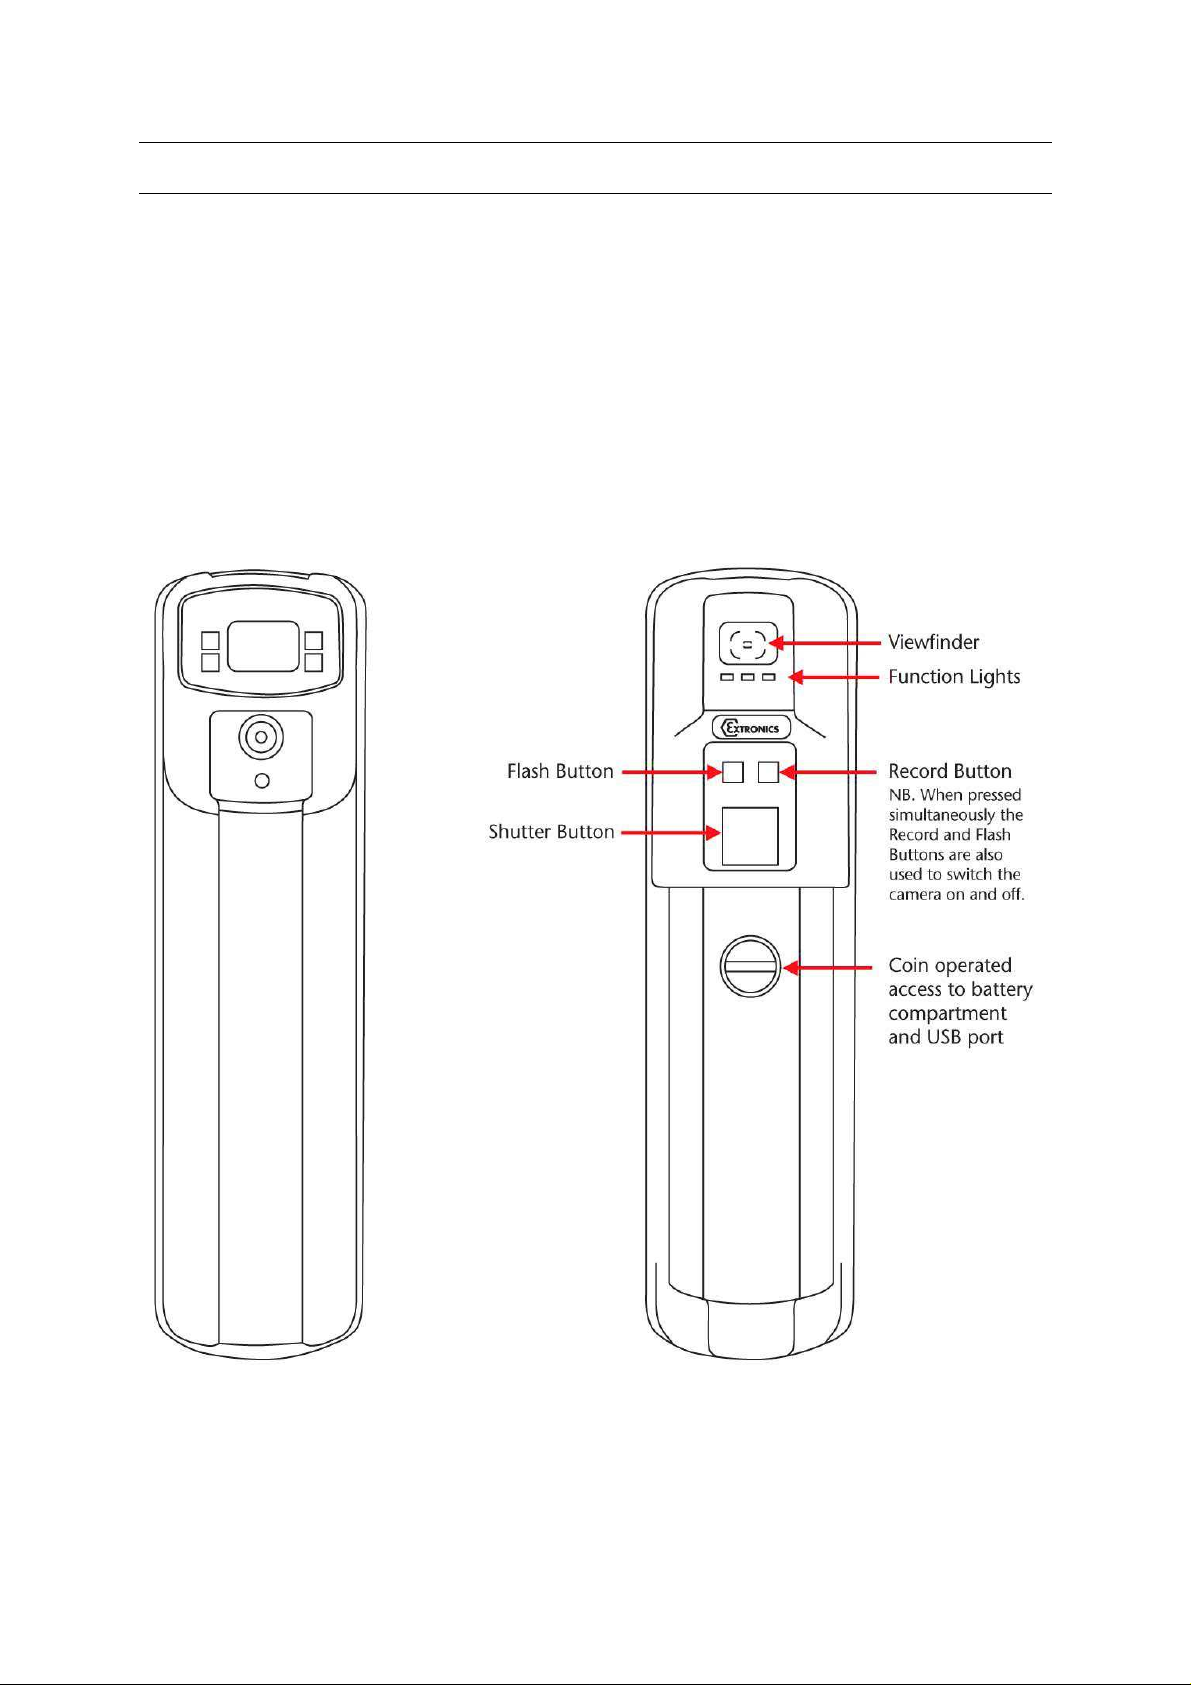
2 User Guide
2.1 Preparing for Use
The iCAM50x is shipped with a protective film fitted to the front and rear windows. This
should be removed carefully before use.
The iCAM50x may be used with the protective rubber over-boot supplied. Only the rubber
over-boot supplied by Extronics should be as it is made from electrostatically-dissipative
material.
10

Operating Manual
Battery
USB Port
2.2 Changing/Installing Batteries
Warning! For iCAM501U refer to notes in section 1.3.1, and refer to Table 1 for
permitted cells.
Warning! For iCAM502 refer to notes in section 1.3.2, and refer to Table 2 for
permitted cells.
To change or install the batteries in the iCAM50x, turn the screw as indicated below to
remove the cover:
Install the batteries in the correct orientation (indicated on the enclosure) and close the lid
again:
Compartment
11
Operating Manual
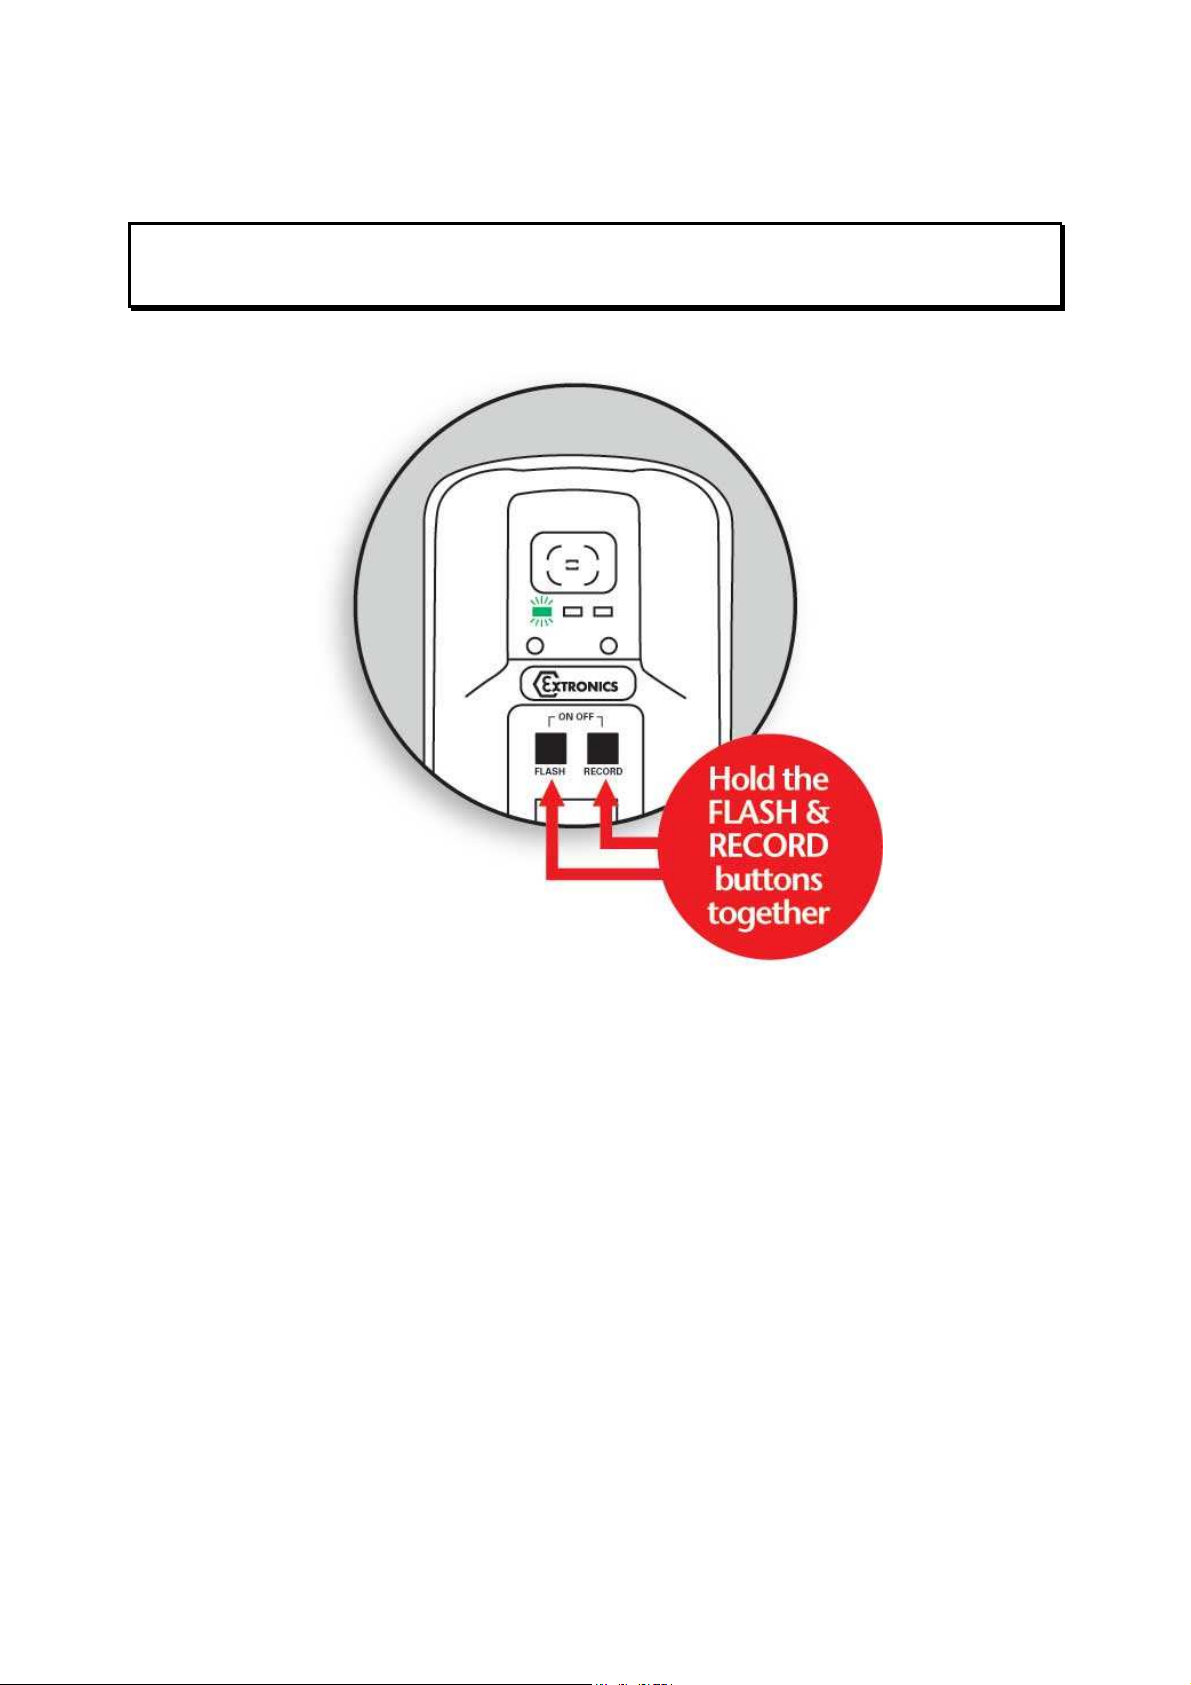
2.3 Powering On/Off
Information The iCAM50x must be fully powered on before plugging a USB cable into
the camera or taking a picture. This will be indicated when the green LED
has stopped flashing rapidly.
The Green LED will flash rapidly for ~10 seconds & the Blue and Red LED will flash briefly.
The Green LED then goes solid when ready. The Green LED flashing slowly (approximately
1 flash per second) indicates a low battery level.
The diagram above shows how to power on the iCAM50x. The same procedure is required to
turn the iCAM50x off. Once it is turned off no LEDs should be lit.
12
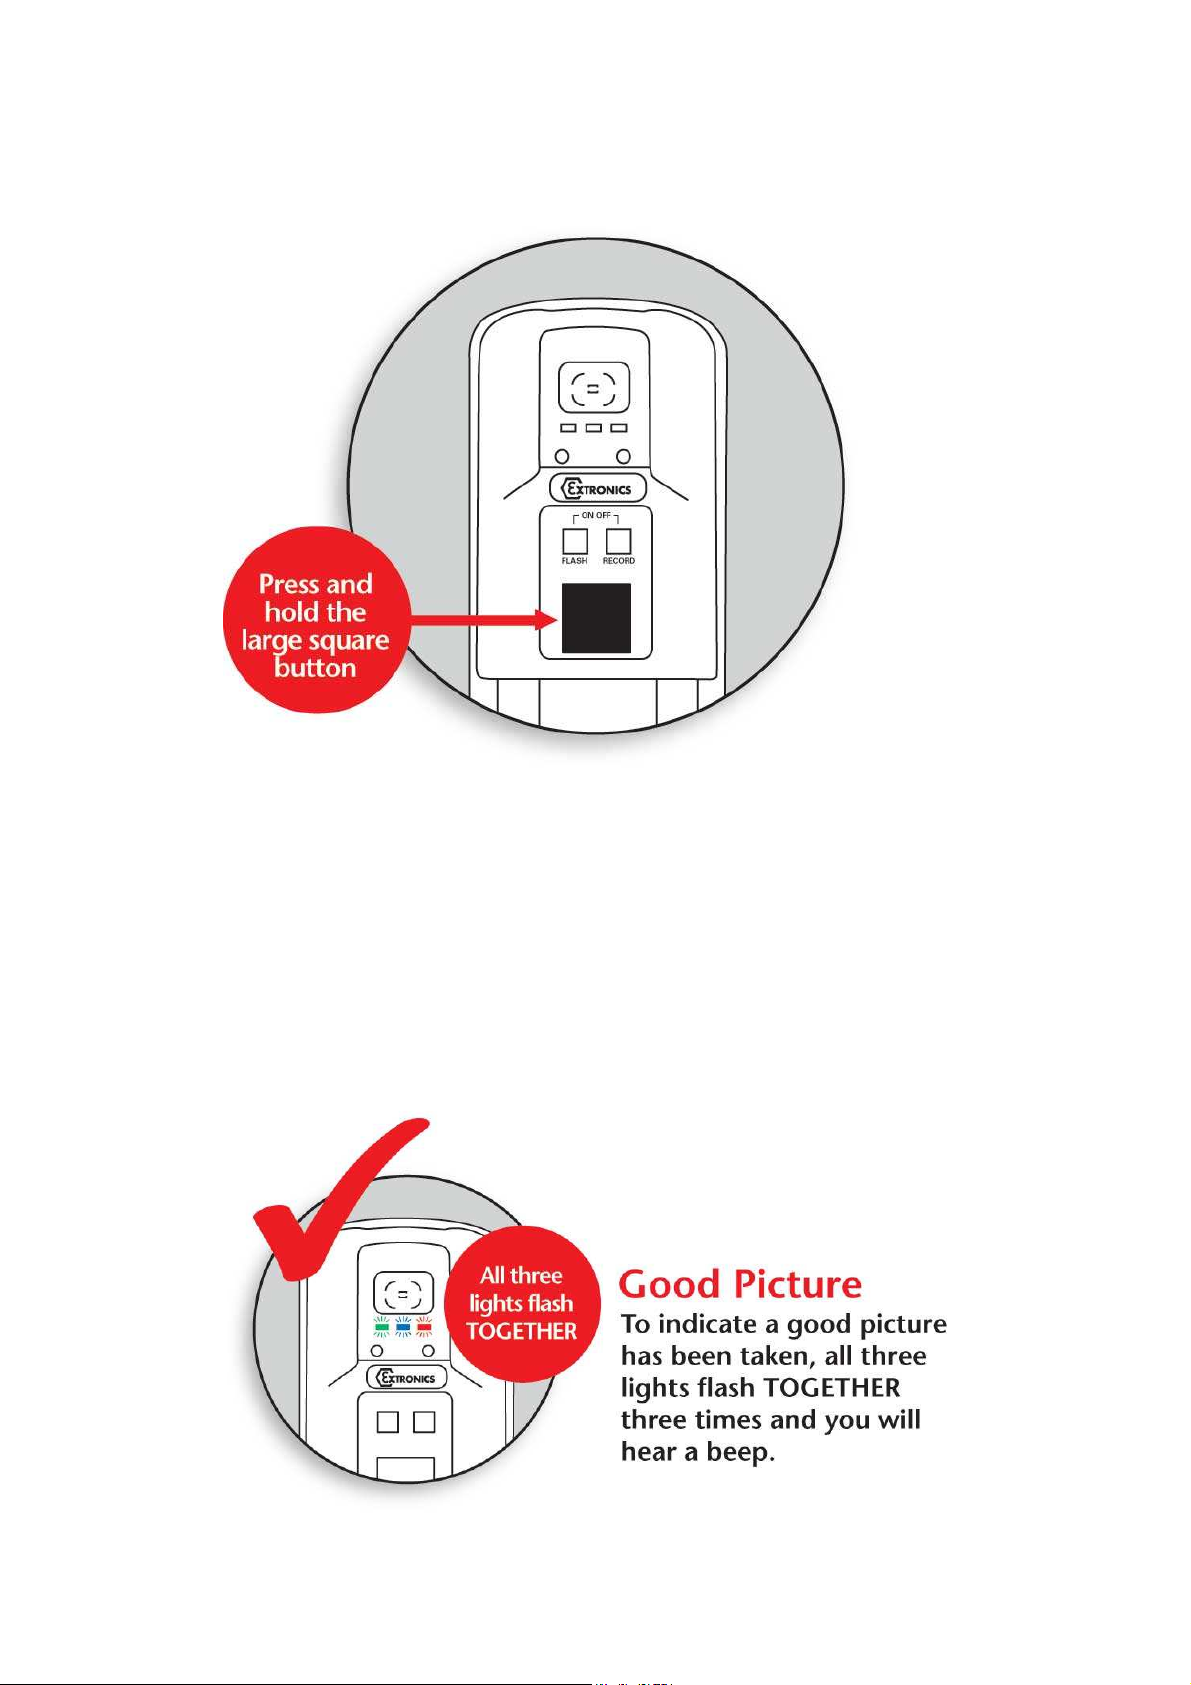
2.4 Taking a Picture
Operating Manual
1. Press and hold the picture button until the Green LED starts flashing rapidly.
2. Wait for the Green LED to stop flashing before moving the camera.
2.5 Picture Quality
To indicate a good picture has been taken, all three LED’s flash TOGETHER three times and
you will hear a beep.
13

Operating Manual
To indicate a bad picture, the three LED’s flash IN SEQUENCE three times from right to left
i.e. red, blue, green etc.
The iCAM50x will still store the picture even if it is indicated as having poor quality. The
reason for this is that factors such as the lighting conditions may mean it is not possible to
get a perfect picture, and a poor one is better than no picture. However it is strongly
recommended that another picture is taken.
If the flash is required when taking a picture in low lighting conditions, turn the flash on as
indicated in the next section.
2.5.1 Image blur analysis feature
Images are analysed for characteristics of blurring, and given a score, which is in turn
compared with a threshold based on the average light level in the image. Good or bad
images are indicated using the LED sequence previously described.
However, the reliability of the image analysis function is dependent on the nature of the
scene being photographed. Images which contain little or no details such as edges (for
example a blank wall) may be indicated as blurred when they are in-fact acceptable.
Therefore the user should bear this limitation in mind when taking pictures, and it is
suggested that users should take some practice shots to get a ‘feel’ for the way in which this
software behaves.
2.6 Using the flash
Press the flash button and the red LED will start to flash. The LED will become solid
indicating the flash is ready for use. The green LED flashing slowly indicates low battery.
Once enabled the flash function is automatic i.e. will only operate in low light conditions.
14

Operating Manual
Flash
Button
Note: The flash can take up to 20 seconds to fully charge when the batteries are depleted.
2.6.1 Variable flash brightness
The purpose of this feature is to reduce the incidence of over-exposure of images when
close-up shots of reflective surfaces are taken with the flash; when the flash is enabled, and
a shot is triggered, a short low-brightness ‘ranging’ flash pulse will firstly be seen,
immediately followed by the image capture flash. The iCAM50x software rapidly analyses the
reflected light level from the ranging pulse, and adjusts the brightness of the flash
accordingly. However, this system is not infallible, and so the flash may still be too bright
under some circumstances. The camera will indicate a bad image if the light level is
extremely high, but if you are trying to photograph text close-up on a reflective rating plate for
example, it is strongly recommended to use ambient lighting where possible.
2.6.2 Compatibility of the iCAM50x LED flash with optical flame detection equipment
The flash LEDs fitted to the iCAM50xoperate with a peak wavelength of 440nm (with a
secondary lower peak at 550nm). Therefore the majority of the light emitted is towards the
blue end of the visible spectrum.
Typical UV/IR flame detectors operate in the 180-260nm UV range and the 2000-4000nm IR
range. Consequently the majority of the energy emitted by the flash on the iCAM50x is well
outside of the operating range of typical flame detectors.
However, Extronics have not done any testing of the iCAM50x with optical flame detectors,
so we cannot guarantee compatibility with any specific model of detector.
If you do find that particular sensors may be activated by the flash, it can be turned off by the
user with the press of a key as per the operating instructions.
15

Operating Manual
Record
iCAM50x LED Flash Spectral Response
2.7 Voice record function
1. This feature allows a message to be associated with a picture. Press the record
button – the blue LED should illuminate, indicating the feature is enabled. Take a
picture in the usual way but CONTINUE to hold the picture button.
2. When the blue LED flashes, record your message and release picture button when
finished.
Button
Note: The optimum distance is 10cm from the mouth which ensures that not too much
background noise is picked up. Once the audio recording is finished simply release the
button and the recording will be saved to the flash memory as a *.wav file with the same
filename as the image file.
16

Operating Manual
Camera
Pictures
Audio
2.8 Connecting the iCAM50xto a computer
Note The iCAM50x does not require the installation of any drivers
Simply turn on the iCAM50x, connect the USB cable to a Windows 7, Vista or XP computer
and follow the onscreen instructions.
2.9 Downloading Pictures and Audio
The iCAM50x has been designed to use the widely supported Picture Transfer Protocol
(PTP) to allow it to easily communicate with multiple operating systems without having to
install drivers. This is supported by Windows XP and above, and also by most versions of
Linux.
The iCAM50x images are stored with the time and date shown in the filename, and the
properties of the file also contain the date and time the picture was taken. This date and time
is also stamped within the image. The iCAM50x automatically generates files with the
following name structure:
iCAM501U iCAM501_HHMMSS-DDMMYYY.jpg iCAM501_HHMMSS-DDMMYYY.aud.wav
iCAM502 iCAM502_HHMMSS-DDMMYYY.jpg iCAM502_HHMMSS-DDMMYYY.aud.wav
Where:
HH = Hour,MM = Minutes,SS = Seconds,DD = Day,MM = Month,YYYY = Year
17

Operating Manual
Example of iCAM50x image time stamping
If the clock on the iCAM50x has not been set, and the camera has been stored without
batteries for an extended period of time, the camera will use filenames in the format ‘DSCxx’.
To resolve this issue, set the clock as described in Section2.10.
To download the pictures and audio from the camera to a PC, remove the battery cover by
turning the screw, a mini USB socket is then visible. Plug the mini USB end of the USB cable
into this socket and the other standard USB plug end into the PC.
The iCAM50x must be powered on and the green status LED must be solid before
connecting to a host operating system, otherwise the operating system will not establish
communication with the camera. Once the green LED has become solid connect the
iCAM50x via a USB cable to the host computer.
2.9.1 Windows XP
Once the iCAM50x has been connected to a machine running Windows XP, communication
will automatically be established. A “balloon” icon will show up in the taskbar stating that
“Your new hardware is installed and ready to use”.
If the Windows ‘Autorun’ feature is enabled (it is enabled by default) a window like the one
below will be shown. By clicking on any of the listed programs and then clicking ok the files
currently on the camera will be displayed in the chosen application, by clicking cancel
nothing will open.
18

2.9.2 Windows Vista / Windows 7
Operating Manual
Once the iCAM50x has been connected to a machine running Windows Vista or Windows 7,
communication will automatically be established. A “balloon” icon will show up like the one
pictured below:
If the Windows Autoplay feature is enabled (it is enabled by default) a window like the one
below will be shown. By clicking on any of the listed options and then clicking ok the files
currently on the camera will be displayed in the chosen application. By clicking the close
button nothing will happen.
19

Operating Manual
2.9.2.1 Operation without windows 7 Autoplay
Simply browse to Computer\iCAM50x, and click on Internal NAND Flash as shown. Pictures
and audio are presented as a list of files
2.10 Setting Time and Date of the iCAM50x
The iCAM50x has an internal clock which is used to time code the JPEG file with information
on when a picture and audio file was taken. The internal clock will need to be set when the
camera is first used or when the batteries have been removed for an extended period of
time. If the time and date is not set the JPEG files will have an incorrect time code embedded
into the file, and the filename will be in the DSCxxx format.
2.10.1 Setting Time and Date in Windows XP
Attach the iCAM50x to the machine running Windows XP once the green status LED has
turned solid. Navigate to ‘My Computer where an icon for the iCAM50x will be displayed as
shown below. Right click on the iCAM50x icon and click properties.
When the camera is first plugged in click ‘Properties’ and the following display is likely to be
shown.
20

Operating Manual
If there are large numbers of pictures on the iCAM50x this may take some minutes as it will
download thumbnails for the pictures when it is first plugged in. If this is taking an excessive
amount of time, try unplugging the USB cable and then reconnecting the device.
To set the time, simply click the ‘Set Time’ button; the iCAM50x will synchronize with the
current Windows system time, you must therefore ensure that the Windows system time is
set correctly.
2.10.2 Setting Time and Date in Windows Vista/ Windows 7
For Windows Vista and all versions of Windows 7, it is necessary to download the iCAM50x
time setting application. Visit www.extronics.com and browse to the iCAM501U or iCAM502
product page for instructions. This software is common to the iCAM501U and iCAM502.
here to download the iCAM50x Time setting tool from the Extronics website.
Click
21

Operating Manual
Installation
Please note that you may require administrative rights on your computer to install and
run this program. If in doubt, please consult your IT support service.
• In Windows XP/Vista/7, double click on the ‘iCAM501 Windows Time Setting Tool.zip’
• Simply drag or copy the ‘iCAM501 Windows Time Setting Tool.exe’ file to your
file. This will open the zip file containing the program.
windows desktop or other convenient location.
Usage
To use the iCAM501 Time Setting Tool, simply follow these instructions:
1. Switch on your iCAM501 in the normal manner
2. Connect your iCAM501 USB port to your PC, set in normal operating mode (the
same mode as used for downloading pictures).
3. Double-click on the iCAM501 Time Setting Tool application
4. If the application can successfully connect to your camera, the following window
will appear:
5. Press the ‘Yes’ button
6. If the time setting was successful the following should appear:
22

Operating Manual
7. If the time setting process fails, the following will appear. Reconnect the iCAM501
and try again. If the process is still unsuccessful, reboot the iCAM501, and also
check that you are able to download pictures from the camera per the instructions
in the user manual.
2.10.3 Using Windows XP Microsoft Scanner and Camera Wizard
If the Microsoft Scanner and Camera Wizard is chosen to automatically start when the
camera is plugged in a window should then popup similar to that below:
If you have recorded an audio image you will need to click the advanced users only link in
the window to access these files, the following window will then be displayed allowing you to
copy and paste the pictures.
23

Operating Manual
You will notice the audio file has been saved with the same numeric value as the picture it is
linked to.
If you do not have any audio to download you can use the PTP feature to quickly move
pictures to a folder of your choice. To do this click the next button and the windows below will
appear, here select the images you wish to use and click next again
Select the folder where you wish to save the pictures to
24

Operating Manual
You will be presented with a progress bar indicating the transfer of the pictures
Then select “nothing, I’m finished working with these pictures” and click next and then the
screen below will appear. This gives you the option to open the folder where the pictures
were stored to or just click finished to exit the wizard.
25

Operating Manual
2.10.4 Using Windows XP Automatic Picture Download Feature
If the Automatic picture download feature was selected in section 2.10.4,then once the
iCAM50x has been connected to the PC,all files (both pictures and audio) will automatically
be copied to the PC with a progress bar indicating this process.
Once downloaded Windows should then automatically open the folder where the pictures are
located. If it does not automatically open,you can then browse to the folder to view the files. If
the “create folder with today’s date”option was selected the pictures will be in an individual
folder.If a file with the same file name is already in the download folder, Windows will prompt
if you wish to replace these files.
2.10.5 Using Windows Vista / Windows 7 Import Pictures and Videos Wizard
By clicking on the import pictures and video option you will be presented with the following
window. Note by using this feature audio files will not automatically be imported from the
iCAM50x. Audio files must be downloaded manually using Windows explorer as the import
wizard does not copy audio files.
You can enter a tag for the pictures which are to be downloading by entering the text into the
field below. For example if you type in “Site Survey” then depending on the import setting
chosen, the folder and/or pictures will contain the tag for easy reference.
26

Operating Manual
Click on the Import settings to customize the where and the way in which Windows will
import the pictures.
Here you can select you preferences for downloading pictures. You can choose the folder
where all pictures should be imported to by clicking the browse button. Select the option for
how a folder name is created when downloading pictures, i.e. it will import to ..\My
pictures\Date Imported + Tag\
27

Operating Manual
Select an option for how a file name is constructed. E.g. ..\My pictures\Date Imported +
Tag\Tag xxx.jpg. This will rename all imported files to the tag plus a number. Select original
file name if you wish to preserve the filename created by the iCAM50x as described in
section 2.9.
If prompt for tag on import is not selected the pictures will automatically be imported without
a tag. You can automatically erase all imported files from the iCAM50x by selecting the
always erase option.
28

Operating Manual
Open Windows Explorer after import will automatically open the folder containing the latest
files imported. Click ‘OK’ and then click ‘Import’, a progress bar will appear showing the
progress of the import.
Once imported if the automatically open Windows Explorer option was selected the folder
containing the pictures will open. If it does not open then use Windows Explorer to navigate
to the import folder which was chosen in the import settings window.
2.11 Upgrading Firmware
Information If you accidentally put the iCAM50x into upgrade mode the only way to
get out of this mode is to remove a battery. This is a deliberate feature to
stop the unit from being accidentally switched off during an upgrade
Important If you decide to perform a firmware upgrade it is recommended to put a
brand new pair of cells into the iCAM50x so that the unit cannot lose
power during the upgrade.
Important Do not remove the USB cable from the iCAM50x until the upgrade has
completed or you may render the iCAM50x unusable.
Information The iCAM50x can only be upgraded under Windows XP/Vista/7
From time to time Extronics will release firmware updates which will enhance and improve
the iCAM50s. In order to perform a software upgrade the iCAM50x must be put into upgrade
mode. First ensure that the unit is powered down, then press and hold the flash button and
picture taking button at the same time for approximately 2 seconds. The middle blue LED
should then flash, indicating it is in upgrade mode.
Once in this mode connect a PC running Windows XP/Vista/7 to the unit via a USB cable
and run the upgrade file which has been obtained from Extronics. The unit should power
itself off once the upgrade is complete.
Under Windows XP/Vista/Windows 7, simply run the upgrade installer provided. When the
window below is shown, select the desired location and press ‘Install’. If you are asked about
installing software from an unknown vendor, just press the ‘continue’ button.
29

Operating Manual
Once installation is complete, go to Start ->Programs -> Extronics -> iCAM50x and run the
desired installation configuration.
The following window should be displayed:
To put the iCAM50x into upgrade mode, power the camera down and then press and hold
the ‘trigger’ and ‘flash enable’ buttons until the blue LED begins flashing (this should be the
only LED lit).
Next, plug a USB cable into the iCAM50x, and into the PC. The upgrade application should
then prompt you to press the start button once it has recognised the iCAM50x is connected
and in the correct mode. Follow the on-screen instructions.
30

Operating Manual
Once complete, the camera will power itself off. Simply power it back on as normal (press
and hold the ‘flash enable’ and ‘record enable’ buttons together). It will now be running the
upgraded software.
2.12 Error Codes
• If the iCAM50x has all 3 LEDs constantly flashing it means that it is in an
unrecoverable state. The only way to get it out of this state is to remove the batteries
and then replace them.
Note: If the green status LED continually flashes slowly this does not indicate an error, this
means that the batteries are running low and will soon need replacing.
3 Structure and Function
3.1 Intended Purpose Usage
Important Before setting the unit to work, read the technical documentation
carefully.
Important The latest version of the technical documentation or the corresponding
technical supplements is valid in each case.
The iCAM50x is built using modern components and is extremely reliable in operation;
however it must only be used for its intended purpose. Please note that the intended purpose
also includes compliance with the instructions issued by the manufacturer for installation,
setting up and service.
Any other use is regarded as conflicting with the intended purpose. The manufacturer is not
liable for any subsequent damage resulting from such inadmissible use. The user bears the
sole risk in such cases.
3.2 Transportation and Storage
All iCAM50x devices must be so transported and stored so that they are not subjected to any
excessive mechanical or environmental stresses.
31

Operating Manual
3.3 Authorized Persons
Only persons trained for the purpose are authorized to handle the iCAM50x; they must be
familiar with the unit and must be aware of the regulation and provisions required for
explosion protection as well as the relevant accident prevention regulations.
3.4 Cleaning and Maintenance
The iCAM50x and all its components require no maintenance. All work on the iCAM50x by
personnel who are not expressly qualified for such activities will cause the Ex approval and
the guarantee to become void.
3.5 Safety Precautions
Important For the installation, maintenance and cleaning of the units, it is
absolutely necessary to observe the applicable regulations and
provisions concerned with explosion protection (EN 60079-0, EN 60079-
14) as well as the Accident Prevention Regulations.
3.6 Cleaning and Maintenance Intervals
The cleaning intervals depend on the environment where the system is installed.
3.7 Aggressive substances and environments
The iCAM50x is not designed to come into contact with aggressive substances or
environments, please be aware that additional protection may be required.
3.8 Exposure to external stresses
The iCAM50x is not designed to be subjected to excessive stresses e.g. vibration, heat,
impact. Additional protection is required to protect against these external stresses.
The iCAM50x will require additional protection if it is used in a location where it may be
subjected to damage.
32

4 Technical Data
Certification Number
ITS09ATEX26868X, IECEx ITS 09.0027X
ATEX Certification
II 1 G Ex ia IIB T4 Ga, II 2 G Ex ia IIC T4 Gb,
-
20°C
≤Ta≤ +60°C
IECEx Certification
II 1 G Ex ia IIB T4 Ga, II 2 G Ex ia IIC T4 Gb,
-
20°C
≤Ta≤ +60°C
FM Certification
Intrinsically Safe for Class 1, Division 1, Groups A,B,C,D T4/T3C
-
20°C
≤Ta≤55/50°C
Compliance
EMC: EN 55022 1998 class B, EN 550
24 1999
Dimensions
132mm x 32mm x 22mm (5.20” x 1.26” x 0.87”)
IP Rating
IP65
Operating Temperature
Group II
-
20ºC to +60ºC / Group I 0°C to +60°C
Weight
Approx. 200g
including batteries
Housing
Injection mou ld ed anti
-
sta tic plas tic housing
Relative humidity
95% RH non condensing
Power
2 x Alkaline AA batteries, refer to ATEX/FM Certificate for details on range of approved
Memory
On board 1Gbyte NAND Flash (holds
approx. 5,000 JPEG im ag es without any au dio
Image
3.1 Mega
-
Pixel (2048 x 1536 resolution)
Lens Fixed focus 1/4” format
lens in plastic holder
Focal Distance
30 cm to infinity
View Finder
Two element optical view finder
Power Modes
Operate and auto power
-
down (after 3 mins)
Battery Life
Up to 800 shots without flash and up to 150 shots with flash taken one after the ot
her. 310
Connectivity
USB 1.1 via mini
-
USB socket for use in the safe area only. Certified for direct connection to
OS Support
PTP imaging device in Windows XP/Vista/7 and most versions of Linux.
Flash
4 LED flash giving 131 lux.seconds of energy at 67ms exposure
Audio recording format
wav
Image format
jpeg
Time and Date
Time and date stamping of stored images and filenames
4.1
iCAM501U
I M1 Ex ia I Ma 0°C ≤Ta≤ +60°C
Ex ia I Ma 0°C ≤Ta≤ +60°C
(USA and Canada)
LV: EN 60950 2002
FCC: FCC: Class A device, compliance through verification route
Operating Manual
batteries. Batteries may not be carried or changed in Group I hazardous areas.
recording a nd a dd it ional 960 Kbyt es p er min for audi o)
shots as per the CIPA DC-002 standard (mixed mode shots with and without flash)
Note it is very difficult to be precise about exact numbers as there are many factors that can
influence this such as the ambient temperature, how long the camera is powered up,
number of voice recordings made and the number and length of time it is connected to a PC
for transferring picture and voice data.
a PC without requiring an external protection barrier
USB firmware upgrade utility for Windows XP/Vista/7 only.
Time and date set via Picture Transfer Protocol (PTP) automatically
33

4.2 iCAM502
Certification Number
ITS09ATEX26868X, IECEx ITS 09.0027X
ATEX Certification
II 1 G Ex ia IIB T4 Ga, II 2 G Ex ia IIC T4 Gb,
-
20°C
≤Ta≤ +60°C
IECEx Certification
II 1 G Ex ia IIB T4 Ga, II 2 G Ex ia IIC T4 Gb,
-
20°C
≤Ta≤ +60°C
Compliance
EMC: EN 55022
1998 class B, EN 55024 1999
Dimensions
132mm x 32mm x 22mm (5.20” x 1.26” x 0.87”)
IP Rating
IP65
Operating Temperature
Group II
-
20ºC to +60ºC / Group I 0°C to +60°C
Weight
Approx. 200g including batteries
Housing
Injection mou ld ed anti
-
sta tic plas tic housing, su pp lied with antis ta tic silicon e rubber
Relative humidity
95% RH non condensing
Power
2 x Alkaline AA batteries, refer
to ATEX Certificate for details on range of approved
Memory
On board 1Gbyte NAND Flash (holds
approx. 5,000 JPEG im ag es without any au dio
Image
3.1 Mega
-
Pixel (2048 x 1536 resolution)
Lens Autofocus lens, effective focal length 3.39mm, F2.8, 68
o
diagonal field of view
Focal Distance
5cm to infinity
View Finder
Two element optical view finder
Power Modes
Operate and auto power
-
down (after 3 mins)
Battery Life
Up to 600 shots without flash and up to 100 shots with flash taken one after the other. 170
Connectivity
USB 1.1 via mini
-
USB socket for use in the safe area only. Certified for direct connection to
OS Support
PTP imaging device in Windows XP/Vista/7 and most
versions of Linux.
Flash
4 LED flash giving 131 lux.seconds of energy at 67ms exposure
Audio recording format
wav
Image format
jpeg
Time and Date
Time and date stamping of stored images and
filenames
Operating Manual
I M1 Ex ia I Ma 0°C ≤Ta≤ +60°C
Ex ia I Ma 0°C ≤Ta≤ +60°C
LV: EN 60950 2002
FCC: FCC: Class A device, compliance through verification route
boot for ad di ti onal shock pr ot ecti on
batteries. Batteries may not be carried or changed in Group I hazardous areas.
recording a nd a dd it ional 960 Kbyt es p er min for audi o)
shots as per the CIPA DC-002 standard (mixed mode shots with and without flash)
Note it is very difficult to be precise about exact numbers as there are many factors that can
influence this such as the ambient temperature, how long the camera is powered up,
number of voice recordings made and the number and length of time it is connected to a PC
for transferring picture and voice data.
a PC without requiring an external protection barrier
USB firmware upgrade utility for Windows XP/Vista/7 only.
Time and date set via Picture Transfer Protocol (PTP) automatically
34

Operating Manual
5 Warranty Information
The Customer shall carry out a thorough inspection of the delivered project or equipment
with 21 days of delivery and shall give immediate written notification to the Company of any
omissions, defects or faults.
The Company warrants that the project or equipment delivered shall accord with the
Quotation or Pricing Schedule and related Company specifications, but it does not warrant its
fitness for any other purpose.
Extronics will make good, by repair or at Extronics option by the supply of a replacement,
defects which, under proper use in accordance with specifications and manufacturer’s
instructions, appear in the goods within a period of twelve calendar months after the goods
have been delivered and arise solely from faulty design, materials or workmanship, provided
always that defective parts have been returned to Extronics if Extronics shall have so
required.
The warranty of any goods is based upon a return to Extronics factory (Return to Base
Warranty) which will be at the Customers cost. The repaired or new parts will be delivered by
Extronics carriage paid. If you allege that goods are totally unfit for their purpose they must
be returned within 7 days of receipt. Site Warranty is expressly excluded from these terms
and conditions unless agreement is made in writing between the parties.
Extronics liability under this clause shall be in lieu of any warranty or condition implied by law
as to the quality or fitness for any particular purpose of the goods, and save as provided in
this clause Extronics shall not be under any liability, whether in contract, or otherwise, in
respect of defects in goods delivered or for any injury other (than personal injury caused by
Extronics negligence as defined in Section 1 of the Unfair Contract Terms Act, 1977),
damage or loss resulting from such defects or from any work done in connection therewith,
provided however that nothing in this clause shall operate to exclude any warranty or
condition implied by law as to the quality of the goods in the event that the goods when sold
by you or when sold by any person or persons to whom you may sell the goods shall become
the subject of a consumer sale as defined in the Supply of Goods (Implied Terms) Act, 1973
except that any claim under such warranty or condition shall have arisen from any act or
omission by you or by any person or persons selling the goods by way of a consumer sale.
35

Operating Manual
6 Certification
6.1 iCAM501U EC Declaration of Conformity
36

Operating Manual
6.2 iCAM502 EC Declaration of Conformity
37

Operating Manual
6.3 iCAM501U Class 1 Division 1 Certificate of Compliance
38

Operating Manual
39

Operating Manual
40

Operating Manual
41

Operating Manual
6.4 ATEX / IECEx Certificates
Please refer to Extronics website for all current product approval certificates, or email
info@extronics.com
42

Operating Manual
Ben
Seaby
Digitally signed by Ben Seaby
DN: CN = Ben Seaby, C = GB,
O = Extronics Ltd, OU = R&D
Reason: I am approving this
document
Date: 2013.04.02 12:56:26
+01'00'
7 Revision History
Revision 01 02
Description Initial Release
Date 31/01/2012 02/04/13
Author B.Seaby B Seaby
Checked
Approved
Updated
iCAM502 D of C
43
 Loading...