


Extronics Limited, registered in England and Wales no. 03076287
Registered office 1 Dalton Way, Midpoint 18, Middlewich, Cheshire, UK. CW10 0HU
Tel: +44 (0) 845 277 5000 Fax: +44 (0)845 277 4000 E-mail: info@extronics.com Web: www.extronics.com 1
USER MANUAL:
iRFID500 handheld Bluetooth
passive UHF RFID tag reader
Revision 2.0
Updated 24/10/2016

Extronics Limited, registered in England and Wales no. 03076287
Registered office 1 Dalton Way, Midpoint 18, Middlewich, Cheshire, UK. CW10 0HU
Tel: +44 (0) 845 277 5000 Fax: +44 (0)845 277 4000 E-mail: info@extronics.com Web: www.extronics.com 2
Contents
1. ATEX Safety Instructions for Hazardous Area Units ........................................................................ 4
1.1 Storage of the manual............................................................................................................. 4
1.2 Special conditions for safe use ................................................................................................ 4
1.3 List of notes ............................................................................................................................. 4
2. Read me first ................................................................................................................................... 5
2.1 Disposal of Product ................................................................................................................. 5
3. Product description ......................................................................................................................... 6
4. Front panel ...................................................................................................................................... 7
5. USB Charger/Cable .......................................................................................................................... 8
6. Demonstration kit ........................................................................................................................... 9
7. Ordering options ........................................................................................................................... 10
8. Getting Started .............................................................................................................................. 11
8.1 Easy2Read mode ................................................................................................................... 11
8.2 HID mode .............................................................................................................................. 14
8.2.1 Android devices ............................................................................................................. 14
8.2.2 Windows devices .......................................................................................................... 16
8.2.3 Apple devices ................................................................................................................ 18
8.3 USB communication setup .................................................................................................... 20
9. Resetting the iRFID500 .................................................................................................................. 20
10. iRFID500 offline mode .............................................................................................................. 21
10.1 Offline mode options ............................................................................................................ 21
10.1.1 DWNLOAD ..................................................................................................................... 21
10.1.2 ERASE ............................................................................................................................ 22
10.1.3 VIEWTAG ....................................................................................................................... 22
10.1.4 BTSCAN .......................................................................................................................... 22
10.1.5 LOGOPT ......................................................................................................................... 22
10.1.6 DISPLAY ......................................................................................................................... 22
11. iRFID500 configuration menu ................................................................................................... 23
11.1 Menu options ........................................................................................................................ 23
11.1.1 PROFILE ......................................................................................................................... 24
11.1.2 BEEP .............................................................................................................................. 24

Extronics Limited, registered in England and Wales no. 03076287
Registered office 1 Dalton Way, Midpoint 18, Middlewich, Cheshire, UK. CW10 0HU
Tel: +44 (0) 845 277 5000 Fax: +44 (0)845 277 4000 E-mail: info@extronics.com Web: www.extronics.com 3
11.1.3 VIBRATE ......................................................................................................................... 25
11.1.4 POWER .......................................................................................................................... 25
11.1.5 CLOCK ............................................................................................................................ 26
12. iRFID500 technical specification ............................................................................................... 27
13. iRFID500 regulatory compliance ............................................................................................... 29
13.1 Federal Communications Commission (FCC) compliance ..................................................... 29
13.2 CE compliance ....................................................................................................................... 30
13.3 RoHS EU Directive compliance .............................................................................................. 30
14. Revision control ........................................................................................................................ 31

Extronics Limited, registered in England and Wales no. 03076287
Registered office 1 Dalton Way, Midpoint 18, Middlewich, Cheshire, UK. CW10 0HU
Tel: +44 (0) 845 277 5000 Fax: +44 (0)845 277 4000 E-mail: info@extronics.com Web: www.extronics.com 4
1. ATEX Safety Instructions for Hazardous Area Units
1.1 Storage of the manual
Keep this user manual safe and in the vicinity of the device. All persons who have to work on or with
the device should be advised on where the manual is stored.
1.2 Special conditions for safe use
The following are Conditions of Certification and relate to safe installation and/or use of the
equipment. These must be followed to comply with the certificate.
1. The USB socket must not be used in the hazardous area
2. Equipment must only be recharged with USB Charger Adapter model number iRFID500UC
1.3 List of notes
The notes supplied in this chapter provide information on the following.
Warning!
o Possible hazard to life or health.
Caution
o Possible damage to property.
Important
o Possible damage to enclosure, device or associated equipment.
Information
o Notes on the optimum use of the device
Warning Always follow the connection diagrams in the manual.
Warning! iRFID500 battery should only be replaced in the safe area, by a competent
person who is approved by the manufacturer.
Important! The device contains no user serviceable parts.
Important! Any repairs or replacement of parts MUST be performed by the
manufacturer or its nominated sub-contractor or agent.

Extronics Limited, registered in England and Wales no. 03076287
Registered office 1 Dalton Way, Midpoint 18, Middlewich, Cheshire, UK. CW10 0HU
Tel: +44 (0) 845 277 5000 Fax: +44 (0)845 277 4000 E-mail: info@extronics.com Web: www.extronics.com 5
2. Read me first
Please read this manual before using the device to ensure safe and proper use.
The goal of this manual is to provide the basic information to work with the iRFID500
Bluetooth UHF RFID reader.
Descriptions in this manual are based on the device’s default settings.
Some content may differ from your device depending on the region, model specifications or
device software.
Extronics is not liable for performance issues or incompatibilities due to associated
applications operating on smart devices or PCs.
Modifying the device’s operating system or installing software from unofficial sources may
result in device malfunction and data corruption or loss. These actions are violations of
Extronics conditions of sale and will void both your hazardous area certification and the
product warranty.
No part of this manual may be reproduced in any form or by any means, electronic,
mechanical, recording, or otherwise, without the prior written permission of Extronics.
The information contained herein has been carefully checked and is believed to be accurate;
however, no responsibility is assumed for inaccuracies. Extronics reserves the right to modify
its product specifications without giving any notice; for up to date information please visit
www.extronics.com.
2.1 Disposal of Product
Do not dispose of the product in municipal or household waste. Please check your
local regulations for disposal or recycling of electronic products.

Extronics Limited, registered in England and Wales no. 03076287
Registered office 1 Dalton Way, Midpoint 18, Middlewich, Cheshire, UK. CW10 0HU
Tel: +44 (0) 845 277 5000 Fax: +44 (0)845 277 4000 E-mail: info@extronics.com Web: www.extronics.com 6
Industrial
Black collar and black fascia
Ex certified
Suitable for hazardous areas
Label on reverse detailing the
Ex certification
3. Product description
The iRFID500 is a handheld reader designed for hazardous areas and harsh environments.
The hazardous area versions are intrinsically safe, certified to ATEX/IECEx zones 0, 1, and 2 and for
M1 mining. In addition, it is certified for Class 1 Div 1 in North America.
It is also available in an industrial version, suitable for harsh environments requiring rugged
equipment. This version offers the same functionality as the hazardous area version but is not
suitable for use in hazardous areas.
The iRFID500 has an integrated antenna suited for short to medium range applications and, thanks
to the Bluetooth® communication interface, it is a perfect UHF RFID add-on for any Bluetooth®
enabled host such as a PC, a smartphone, a PDA, or a tablet. The reader is compatible with Windows
XP/7/10, Windows CE/Mobile, Android, iPhone, and iPad. It is a Bluetooth class 2 device and is
compliant with UHF RFID ISO 18000-6C/EPC C1G2 standards.
The HID mode supports native keyboard emulation allowing it to interact directly with applications,
office automation SW or any other generic solution requiring manual input.
Designed for use by mobile operators in indoor or outdoor areas, the iRFID500 is ideal for inventory
management, service and maintenance applications.
“IRFID Black”
“iRFID Blue”
Suitable for harsh
environments
Blue collar and blue fascia

Extronics Limited, registered in England and Wales no. 03076287
Registered office 1 Dalton Way, Midpoint 18, Middlewich, Cheshire, UK. CW10 0HU
Tel: +44 (0) 845 277 5000 Fax: +44 (0)845 277 4000 E-mail: info@extronics.com Web: www.extronics.com 7
4. Front panel
Link LED
Status
Description
Off
No connection established
Orange
USB charger/cable connected
Blue
Bluetooth connected
Power LED
Status
Description
Green
Reader is active and the battery is above 35% charged
Orange
Reader is active and the battery is between 15% and 35% charged
Red
Reader is active and the battery is below 15% charged
Trigger button
press to
activate the chosen option
Power LED
indicate reader status
and power level. See
Link LED
Changes colour to indicate
information
LCD display
characters by 2 lines
Power button
Press once to switch on
the reader or hold down
return to the main menu
Bluetooth and USB
charger/cable connection.
See table below for more
Inventory mode:
activate an inventory
cycle (hold down to
repeat inventory cycles)
Menu mode: quick press
to scroll, hold down to
Changes colour to
table below for more
Alphanumeric 8
for 2 seconds to switch
off the reader.
Menu mode: press to

Extronics Limited, registered in England and Wales no. 03076287
Registered office 1 Dalton Way, Midpoint 18, Middlewich, Cheshire, UK. CW10 0HU
Tel: +44 (0) 845 277 5000 Fax: +44 (0)845 277 4000 E-mail: info@extronics.com Web: www.extronics.com 8
Warning: The hazardous area certified versions of the iRFID500 must not be charged
within the hazardous area under any circumstances.
Attention: Empty battery condition
If the battery becomes fully discharged, the display may not illuminate when the USB
charger/cable is connected. If this occurs, leave the reader connected for at least 5
minutes, then disconnect the USB charger/cable and perform the reset procedure as
explained in section 9 of this manual. Switch off the reader by pressing the power
button and then reconnect the USB charger/cable again.
Attention: Voltage levels
Note: only the USB charger/cable supplied may be used, as it provides the correct
voltages for the reader. Other USB cables are not suitable for charging the iRFID500.
The USB charger/cable should not be used to charge any other device as the higher
voltage level may cause damage to the attached device.
5. USB Charger/Cable
The iRFID500 is supplied with a USB charger/cable. When the reader is charging, the display lights up
and shows a blinking charge indicator message. The display shows a static message, “charge 100%”,
to indicate charging is complete.
A micro USB type B socket is located on the bottom side of the iRFID500 and can be used to connect
the reader to a USB host port or to an AC/DC plug top charger.

Extronics Limited, registered in England and Wales no. 03076287
Registered office 1 Dalton Way, Midpoint 18, Middlewich, Cheshire, UK. CW10 0HU
Tel: +44 (0) 845 277 5000 Fax: +44 (0)845 277 4000 E-mail: info@extronics.com Web: www.extronics.com 9
6. Demonstration kit
To test the iRFID500 in your own environment, a demonstration kit is available. This includes:
iRFID500 (variant of your choice)
USB charger/cable
Wrist strap lanyard
A selection of Extronics iTAG500 passive tags
The demonstration kit also gives you access to the CAEN easy2read app and the Software
Development Kits (SDKs) for Windows or Android, so you can try potential integrations with your
systems.

Extronics Limited, registered in England and Wales no. 03076287
Registered office 1 Dalton Way, Midpoint 18, Middlewich, Cheshire, UK. CW10 0HU
Tel: +44 (0) 845 277 5000 Fax: +44 (0)845 277 4000 E-mail: info@extronics.com Web: www.extronics.com 10
Name
Hazardous area
Certificate
Frequency
Order Code
Reader
iRFID Blue
ATEX/IECEx
ETSI
iRFID50001
MET
FCC
iRFID50003
iRFID Black
Not for use in
hazardous areas
ETSI
iRFID50005
FCC
iRFID50007
Demonstration kit
iRFID Demo
Black
ETSI
iRFID500DK1
FCC
iRFID500DK2
iRFID Demo
Blue
ATEX/IECEx
ETSI
iRFID500DK3
MET
FCC
iRFID500DK4
USB charger/cable
* All models
iRFID500UC
7. Ordering options
* USB charger/cable is identical for all models.

Extronics Limited, registered in England and Wales no. 03076287
Registered office 1 Dalton Way, Midpoint 18, Middlewich, Cheshire, UK. CW10 0HU
Tel: +44 (0) 845 277 5000 Fax: +44 (0)845 277 4000 E-mail: info@extronics.com Web: www.extronics.com 11
3. Click on Add
Reader
4. Click on Bluetooth
8. Getting Started
The IRFID500 has two communication interfaces: Bluetooth and USB. The Bluetooth interface is the
preferred communication using the SPP profile (Serial Port Profile).
After powering on the reader, the Bluetooth interface is available to accept incoming connection
requests (discoverable) from Bluetooth enabled hosts like PCs, PDAs, tablets, and smartphones.
In the IRFID500 configuration menu you can choose between two different profile options:
EASY2RD (factory default): choosing this option you select the CAEN RFID easy2read
communication protocol. Select this option in order to control the reader using the CAEN
RFID Easy Controller application or the SDK (Software Development Kit) library.
HID: choosing this option you select the keyboard emulation protocol. For details on the use
on the HID profile please refer to iRFID500 HID PROFILE in section 8.2 of this manual.
The iRFID500 factory profile is set to EASY2RD.
8.1 Easy2Read mode
Bluetooth Communication Setup using the Easy Controller for Android
1. Download in to your smart device the CAEN RFID Easy Controller for Android app from the
Google Play store.
2. Launch the CAEN RFID Easy Controller app.

Extronics Limited, registered in England and Wales no. 03076287
Registered office 1 Dalton Way, Midpoint 18, Middlewich, Cheshire, UK. CW10 0HU
Tel: +44 (0) 845 277 5000 Fax: +44 (0)845 277 4000 E-mail: info@extronics.com Web: www.extronics.com 12
5. Click on “yes” to
confirm the Bluetooth
permission request
6. Click Here to select
the iRFID500 reader
7. Confirm the passkey
8. Once the connection is
established the Bluetooth
LED turns blue

Extronics Limited, registered in England and Wales no. 03076287
Registered office 1 Dalton Way, Midpoint 18, Middlewich, Cheshire, UK. CW10 0HU
Tel: +44 (0) 845 277 5000 Fax: +44 (0)845 277 4000 E-mail: info@extronics.com Web: www.extronics.com 13
9. To start using your
iRFID500, click on the
reader ID line
10. Click on start inventory
11. A list of the tags
read will be shown

Extronics Limited, registered in England and Wales no. 03076287
Registered office 1 Dalton Way, Midpoint 18, Middlewich, Cheshire, UK. CW10 0HU
Tel: +44 (0) 845 277 5000 Fax: +44 (0)845 277 4000 E-mail: info@extronics.com Web: www.extronics.com 14
1. A list of the
Bluetooth available
devices will be shown
2. Click on the
iRFID500 reader and
wait while the pairing
is completed
3. Click OK to confirm
the passcode if
required
8.2 HID mode
By choosing the HID profile option you select the keyboard emulation protocol. The HID profile can
be connected to all devices and different operating systems (Android, Windows, and iOS).
8.2.1 Android devices
On your Android device, go to Settings and enable the Bluetooth.

Extronics Limited, registered in England and Wales no. 03076287
Registered office 1 Dalton Way, Midpoint 18, Middlewich, Cheshire, UK. CW10 0HU
Tel: +44 (0) 845 277 5000 Fax: +44 (0)845 277 4000 E-mail: info@extronics.com Web: www.extronics.com 15
7. In the text editing
app window you will
see the identity number
of each tag read
4. Once the connection is established the Bluetooth blue LED turns on.
5. Launch a text editing app (or any other app accepting keyboard input).
6. Start an inventory read by pressing the trigger button.
Note that when configured in HID profile and paired to a device, the iRFID500 will automatically
reconnect to the same device every time the Bluetooth link is active (iRFID500 switched ON and
Bluetooth activated on the host). When the iRFID500 is switched on, the blue LED lights up
automatically to verify the Bluetooth link is active.

Extronics Limited, registered in England and Wales no. 03076287
Registered office 1 Dalton Way, Midpoint 18, Middlewich, Cheshire, UK. CW10 0HU
Tel: +44 (0) 845 277 5000 Fax: +44 (0)845 277 4000 E-mail: info@extronics.com Web: www.extronics.com 16
1. Click on Add a
Bluetooth Device
2. Select the
iRFID500 reader and
click on “Pair”
8.2.2 Windows devices
On your Windows device / PC, right click on the Bluetooth icon in the taskbar

Extronics Limited, registered in England and Wales no. 03076287
Registered office 1 Dalton Way, Midpoint 18, Middlewich, Cheshire, UK. CW10 0HU
Tel: +44 (0) 845 277 5000 Fax: +44 (0)845 277 4000 E-mail: info@extronics.com Web: www.extronics.com 17
Example with Microsoft Excel
3. Click on “yes” to
confirm the passcode
7. In the window you will
see the identity number
of each tag read
4. Once the connection is established the Bluetooth blue LED turns on.
5. Launch a text editing app (or any other app accepting keyboard input).
6. Start an inventory cycle by pressing the trigger button.
Note that when configured in HID profile and paired to a device, the iRFID500 will automatically
reconnect to the same device every time the Bluetooth link is active (iRFID500 switched ON and
Bluetooth activated on the host).

Extronics Limited, registered in England and Wales no. 03076287
Registered office 1 Dalton Way, Midpoint 18, Middlewich, Cheshire, UK. CW10 0HU
Tel: +44 (0) 845 277 5000 Fax: +44 (0)845 277 4000 E-mail: info@extronics.com Web: www.extronics.com 18
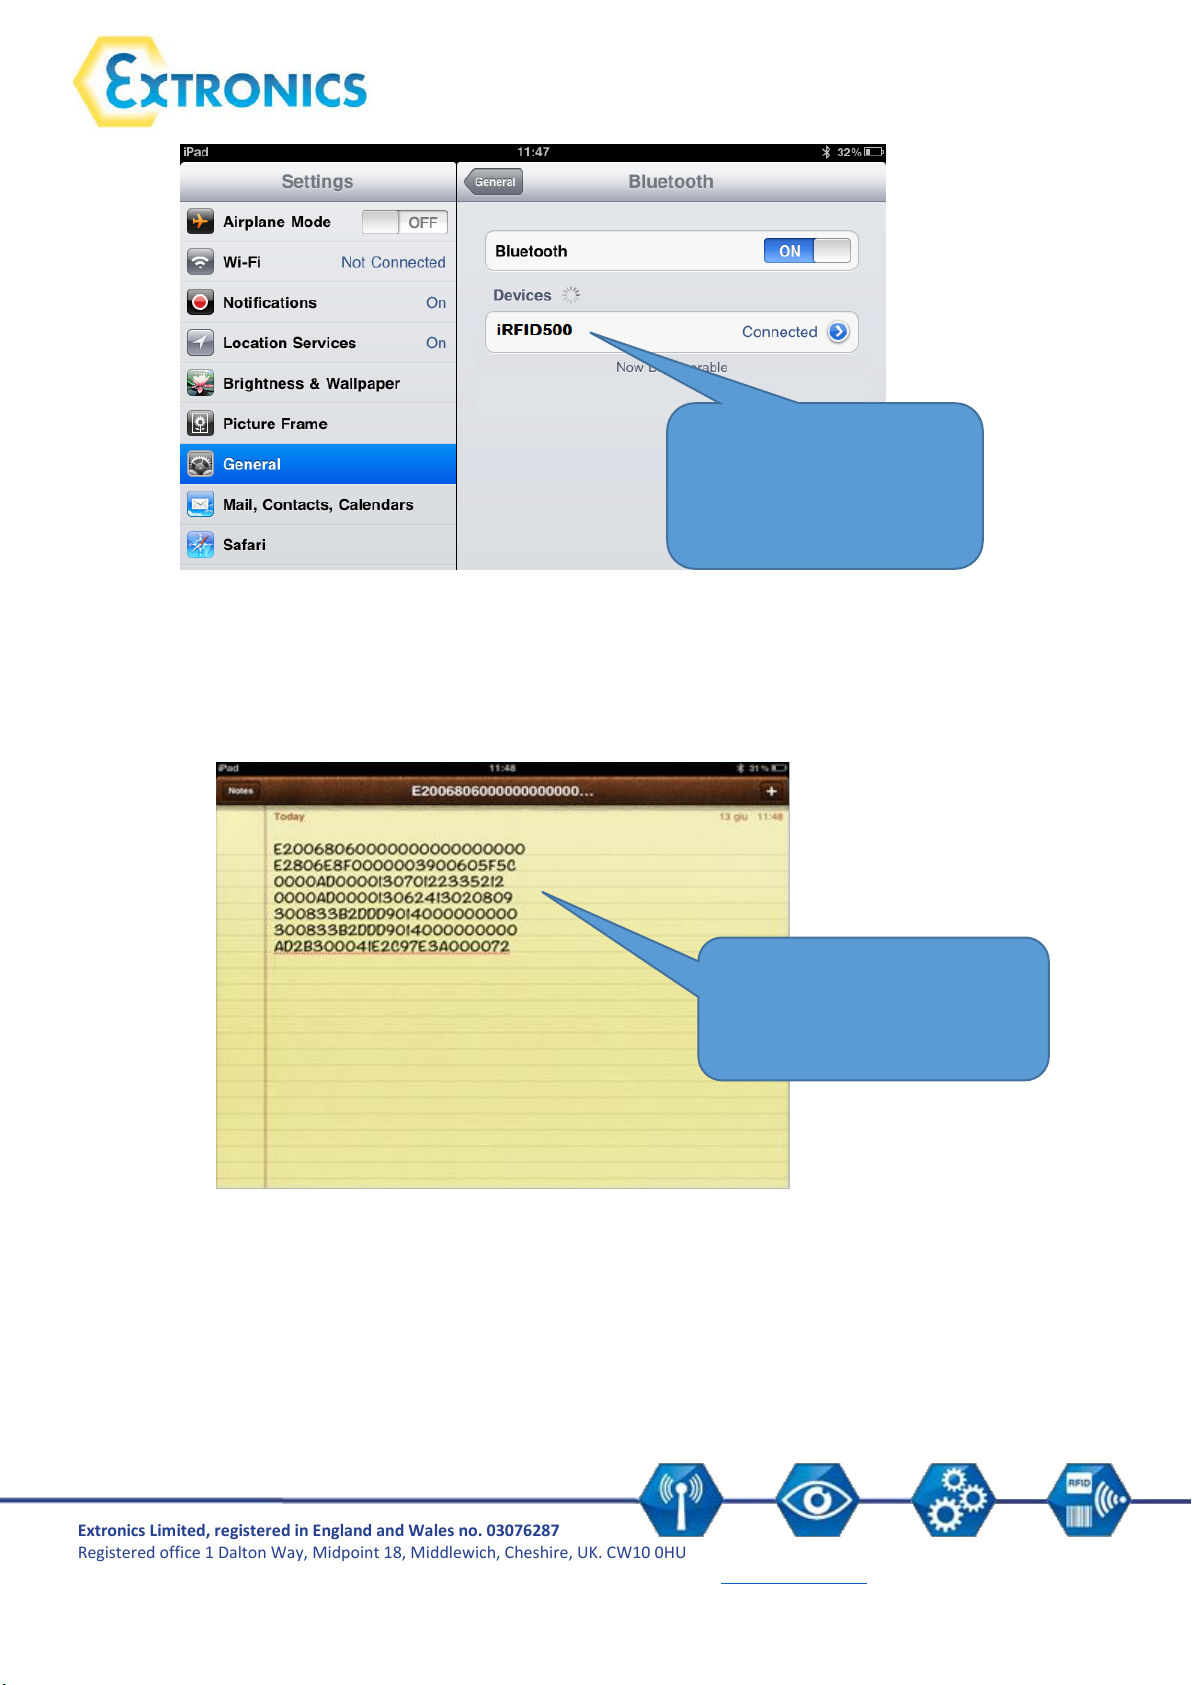
8.2.3 Apple devices
1. On your device, go
to Settings and
enable Bluetooth
2. A list of the
available Bluetooth
devices is shown
Extronics Limited, registered in England and Wales no. 03076287
Registered office 1 Dalton Way, Midpoint 18, Middlewich, Cheshire, UK. CW10 0HU
Tel: +44 (0) 845 277 5000 Fax: +44 (0)845 277 4000 E-mail: info@extronics.com Web: www.extronics.com 19
3. Click on the
iRFID500 reader and
wait while the pairing
is completed:
7. In the app window you
will see the identity
number of each tag read
4. Once the connection is established the Bluetooth blue LED turns on.
5. Launch a text editing app (or any other app accepting keyboard input).
6. Start an inventory cycle by pressing the trigger button.

Extronics Limited, registered in England and Wales no. 03076287
Registered office 1 Dalton Way, Midpoint 18, Middlewich, Cheshire, UK. CW10 0HU
Tel: +44 (0) 845 277 5000 Fax: +44 (0)845 277 4000 E-mail: info@extronics.com Web: www.extronics.com 20
Attention: Reset Warning
Note that the reader MUST NOT be connected to the USB charger/cable during a
reset, otherwise the reader enters in the firmware upgrade state. If, by mistake, you
enter in the firmware upgrade state, restore the normal reader operation by
disconnecting the USB charger/cable and repeat the reset procedure once again.
8.3 USB communication setup
The iRFID500 reader can be connected to a PC using the provided USB charger/cable and it is
detected by the PC as an emulated serial port. In order to correctly operate with the reader you
need to install a driver.
1. Power ON the reader and plug the USB charger/cable into the iRFID500USB port.
2. In order to connect the iRFID500 reader to the PC you need to install the VCP (Virtual Com
Port) drivers for your operating system. You can download VCP drivers for Windows based
systems from the CAEN RFID Web Site, SW/FW section or from the Software and Firmware
download area.
3. Open the System properties: go to Control Panel → All Control Panel Items → System and
click on Device Manager.
4. After having installed the driver, the reader is detected by the PC as an emulated serial port
(VCP)
Note that when configured in the HID profile, the iRFID500 reader cannot be controlled using the
CAEN RFID Easy Controller application.
The iRFID500 reader, when configured in the HID profile and connected via USB to a PC, sends the
identity numbers of the detected tags via the serial port as ASCII characters. So, in order to operate
with the reader in this configuration, follow these steps:
1. Launch a terminal emulator application (e.g Hyperterminal)
2. Connect the terminal emulator application to the virtual COM port assigned to the iRFID500
reader
3. Press the trigger button to perform an inventory cycle (hold down the button to repeat
inventory cycles)
The identity numbers are displayed on the terminal emulator window
9. Resetting the iRFID500
To reset the reader, press the power and the trigger buttons (see Section 4. iRFID500 Front Panel)
simultaneously for about six seconds and then release the buttons. The reader restarts by itself.

Extronics Limited, registered in England and Wales no. 03076287
Registered office 1 Dalton Way, Midpoint 18, Middlewich, Cheshire, UK. CW10 0HU
Tel: +44 (0) 845 277 5000 Fax: +44 (0)845 277 4000 E-mail: info@extronics.com Web: www.extronics.com 21
In this section the words hold and press are used to indicate use of a button.
hold indicates activate the button for over half a second.
press indicates a momentary activate and release of the button.
Warning:
Note that data stored in the reader using the OFFLINE mode cannot be downloaded if
you activate a different profile (EASY2RD or HID). However data is maintained in
memory and can be downloaded later by returning to the OFFLINE profile.
10. iRFID500 offline mode
In the OFFLINE mode the reader stores identity number into the internal memory when the
communication links (USB or Bluetooth®) are not available. The operator collects codes and then
connects the reader to the charger/cable in order to download the data.
To perform the tag inventory, hold down the trigger button for the desired time.
If the reader reads only one tag, the display shows the identity number of the tag. If display scroll is
enabled, the scrolling text on the display shows the whole identity number. If display scroll is
disabled, the display shows the last 8 characters of the tag identity number.
If the reader reads more than one tag, the display shows the number of read tags.
10.1 Offline mode options
In the OFFLINE profile the reader works in stand-alone mode. You can download data or see the
stored tags list by entering the OFFLINE profile options:
1. Turn on the reader, the display shows information on the currently active profile (OFFLINE)
and then the message "ready" informs you that the reader is operating.
2. Press the power button to scroll through the OFFLINE profile options:
DWNLOAD – Sends stored tag identity numbers to a linked device
ERASE – Deletes stored tag ID numbers from the internal memory
VIEWTAG – Shows a list of stored tag ID numbers on the screen
BTSCAN – Scans for active Bluetooth Devices
LOGOPT – Allows the user to enable time stamping of tag reads
DISPLAY – Allows the user to enable the display scroll function
10.1.1 DWNLOAD
Hold down the trigger button to enter this option and to download data. Press the trigger button
and a message “send?” will appear. Launch a terminal emulator (e.g. Hyperteminal), connect the
reader via Bluetooth (the Bluetooth device is the one identified through the BTSCAN menu option)
or USB and then press the trigger button to start the download.

Extronics Limited, registered in England and Wales no. 03076287
Registered office 1 Dalton Way, Midpoint 18, Middlewich, Cheshire, UK. CW10 0HU
Tel: +44 (0) 845 277 5000 Fax: +44 (0)845 277 4000 E-mail: info@extronics.com Web: www.extronics.com 22
10.1.2 ERASE
Hold down the trigger button to enter this option and delete stored data. The text “Erase” on the
display starts blinking. Once data is deleted, the device returns to the main menu.
10.1.3 VIEWTAG
This option shows the list of the read tags during the last scan. Hold down the trigger button to enter
this option. Then press the trigger button to scroll through the identity number of the read tags.
10.1.4 BTSCAN
The BTSCAN option is used to identify active Bluetooth devices within the read range of the reader
for the download of stored data.
To activate the discovery of Bluetooth devices, hold down the trigger button. After about 5 seconds,
the reader shows the list of active Bluetooth devices. You can only connect with one Bluetooth
device at a time. The currently connected Bluetooth device is marked with an asterisk.
To scroll through the active Bluetooth devices list, press the trigger button.
To return to the main menu, press the power button.
To activate a different Bluetooth device, scroll through the list by pressing the trigger button until
the desired Bluetooth device is displayed, then hold down the trigger button for a few seconds: the
name of the Bluetooth device will begin to flash. Once activated, the device returns to the main
menu.
10.1.5 LOGOPT
Hold down the trigger button to enter the Log Option:
TIMESTP: Time Stamp associates a date and time to the identity number of the read tag. To
enable/disable the TimeStp, hold down the trigger button. The enable (or disable) option will begin
to flash. Once activated, the device returns to the main menu.
The currently active state is marked with an asterisk. By default the TimeStp option is disabled.
10.1.6 DISPLAY
Hold down the trigger button to enter the Display Option:
SCROLL: To enable/disable the display scroll, hold down the trigger button. The chosen option will
begin to flash. Once activated, the device returns to the main menu. The currently active state is
marked with an asterisk. By default scroll is enabled and the flowing text on the display shows the
whole ID number of the tag.
If display scroll is disabled, the display shows the last 8 characters of the tag ID number.

Extronics Limited, registered in England and Wales no. 03076287
Registered office 1 Dalton Way, Midpoint 18, Middlewich, Cheshire, UK. CW10 0HU
Tel: +44 (0) 845 277 5000 Fax: +44 (0)845 277 4000 E-mail: info@extronics.com Web: www.extronics.com 23
In this section the words hold and press are used to indicate use of a button.
hold indicates activate the button for over half a second.
press indicates a momentary activate and release of the button.
EASY2RD
PROFILE
HID
OFFLINE
PWR UP
BEEP
PWR DOWN
SCAN TAG
PWR UP
VIBRATE
PWR DOWN
SCAN TAG
25 mW
50 mW
POWER
100 mW
200 mW
DATE
CLOCK
TIME
11. iRFID500 configuration menu
To access the main menu, turn on the device and hold down the trigger button within two seconds.
To scroll through the main menu press the trigger button repeatedly. To select a menu option, hold
down the trigger button.
11.1 Menu options
This table shows an overview of the iRFID500 menu options:

Extronics Limited, registered in England and Wales no. 03076287
Registered office 1 Dalton Way, Midpoint 18, Middlewich, Cheshire, UK. CW10 0HU
Tel: +44 (0) 845 277 5000 Fax: +44 (0)845 277 4000 E-mail: info@extronics.com Web: www.extronics.com 24
11.1.1 PROFILE
The PROFILE menu is the first option of the main menu. To select it, hold down the trigger button.
To scroll through the PROFILE options, press the trigger button. The currently active profile is
marked with an asterisk.
The PROFILE submenu options are the following:
EASY2RD (factory default): choosing this option you select the CAEN RFID easy2read
communication protocol. Select this option in order to control the reader using the CAEN
RFID Easy Controller application or the SDK (Software Development Kit) library.
HID: choosing this option selects the keyboard emulation protocol.
OFFLINE: choosing this option you select the standalone mode and the reader stores EPC
codes into the internal memory when the communication links (USB or Bluetooth®) are not
available.
The EASY2RD and HID profiles require the presence of a nearby host that controls the reader (such
as a smartphone, tablet, or PC), while in the OFFLINE profile the reader works in standalone mode.
To return to the main menu, press the power button.
Only one profile can be active at a time.
To activate a different profile, scroll through the PROFILE options by pressing the trigger button until
the desired profile is displayed. Hold down the trigger button for a few seconds: the name of the
profile will begin to flash. Once activated, the device returns to the main menu.
When you turn on the reader, the display shows the currently active profile and then the message
"ready" to inform you that the reader is ready to operate.
Note that if the reader is in the HID profile you must disconnect it from any connected device
before selecting another profile.
11.1.2 BEEP
To scroll through the menu options, press the trigger button. The BEEP menu is the second option of
the menu. To select, hold down the trigger button.
The BEEP submenu options are:
PWRUP: beep at the power on of the reader
PWRDOWN: beep at the power off of the reader
SCANTAG: beep at the identification of a tag
To enable/disable the submenu options, scroll through the BEEP options menu by pressing the
trigger button until the desired BEEP option is displayed and then hold down the trigger button for a
few seconds.
Scroll through enable and disable options by pressing the trigger button and hold down the trigger
button for a few seconds to activate one of them. The enable (or disable) option will begin to flash.
Once activated, the device returns to the main menu.

Extronics Limited, registered in England and Wales no. 03076287
Registered office 1 Dalton Way, Midpoint 18, Middlewich, Cheshire, UK. CW10 0HU
Tel: +44 (0) 845 277 5000 Fax: +44 (0)845 277 4000 E-mail: info@extronics.com Web: www.extronics.com 25
The currently active state is marked with an asterisk. By default, all the BEEP options are disabled.
Note that you can enable or disable the beeper for each option independently so that the beeper
can be simultaneously active on more than one option.
To return to the main menu, press the power button.
11.1.3 VIBRATE
To scroll through the menu options, press the trigger button. The VIBRATE menu is the third option
of the menu. To select, hold down the trigger button.
The VIBRATE submenu options are the following:
PWRUP: vibration at the power on of the reader
PWRDOWN: vibration at the power off of the reader
SCANTAG: vibration at the identification of a tag
To enable/disable the submenu options, scroll through the VIBRATE options menu by pressing the
trigger button until the desired VIBRATE option is displayed, then hold down the trigger button for a
few seconds.
Scroll through enable and disable options by pressing the trigger button and hold down the trigger
button to activate the option. The enable (or disable) option will begin to flash. Once activated, the
device returns to the main menu.
The currently active state is marked with an asterisk. By default, all the VIBRATE options are
disabled.
Note that you can enable or disable vibration for each option independently so that vibration can be
simultaneously active on more than one option.
To return to the main menu, press the power button.
11.1.4 POWER
Through the POWER menu you can set the power level emitted by the reader and hence the read
range. To scroll through the menu options, press the trigger button. The POWER menu is the fourth
option of the menu. To select, hold down the trigger button.
The POWER submenu options are the following:
25 mW
50 mW
100 mW
200 mW
To scroll through the POWER options, press the trigger button. To return to the main menu, press
the power button.

Extronics Limited, registered in England and Wales no. 03076287
Registered office 1 Dalton Way, Midpoint 18, Middlewich, Cheshire, UK. CW10 0HU
Tel: +44 (0) 845 277 5000 Fax: +44 (0)845 277 4000 E-mail: info@extronics.com Web: www.extronics.com 26
The currently active power is marked with an asterisk. By default, the 200mW power level is active.
You can activate only one power level at a time.
To activate a different power level, scroll through the POWER options by pressing the trigger button
until the desired power level is displayed. Hold down the trigger button for a few seconds, the power
level option will begin to flash. Once activated, the device returns to the main menu.
Note that when the reader is configured in the EASY2RD profile, you can also use the CAEN RFID
Easy Controller application or the SetPower function of the SDK (Software Development Kit) library
to set the power.
11.1.5 CLOCK
The reader does not consider the date and time until this has been initially set by the user.
To scroll through the menu options, press the trigger button.
The CLOCK menu is the last option of the menu. To select it, hold down the trigger button to enter
the sub-menu.
The CLOCK submenu options are the following:
Date: the date is the first option of the clock submenu.
o To set the date, hold down the trigger button for a few seconds. The date is shown
in the format dd mmm yy (e.g. 18 Oct 16).
o Press the trigger button to change the day value. Then hold down the trigger button
to save the day and pass to the month value.
o Press the trigger button to change the month value. Then hold down the trigger
button to save the month and pass to the year value.
o Press the trigger button to change the year value. Then hold down the trigger button
to save the year and hold down again to save the complete date.
o The date begins to flash and the reader returns to the main menu.
Time: the time is the second option of the clock submenu
o Scroll through the CLOCK options menu by pressing the trigger button until the Time
option is displayed
o Hold down the trigger button for a few seconds to set the time. The time is shown in
the 24-hour format hh:mm (e.g. 12:51).
o Press the trigger button to change the hh value. Then hold down the trigger button
to save the hour value and pass to the minutes value.
o Press quickly the trigger button to change the “mm” value. Then hold down the
trigger button to save the minutes value and hold down again to save the complete
time.
o The time begins to flash and the reader returns to the main menu.
To return to the main menu, press the power button.
In the OFFLINE profile, if you want to show the date and time information for read tags, you also
need to set the clock and enable the Time Stamp option.

Extronics Limited, registered in England and Wales no. 03076287
Registered office 1 Dalton Way, Midpoint 18, Middlewich, Cheshire, UK. CW10 0HU
Tel: +44 (0) 845 277 5000 Fax: +44 (0)845 277 4000 E-mail: info@extronics.com Web: www.extronics.com 27
Certification (hazardous
area version only)
A II 1 GD, Ex ia IIC T4 Ga, Ex ia IIIC T4 Ga
A I M1 Ex ia I Ma
US & Canada MET Class I, II, Div 1, Groups A-D (pending)
Operating frequency
865.6—867.6 MHz (ETSI EN 302 208 v. 1.4.1)
902—928 MHz (FCC part 15.247)
RF power
0 – 200mW
Antenna
Integrated linear (horizontal)
Number of channels
4 channels (compliant to ETSI EN 302 208 v. 1.4.1.)
50 hopping channels (compliant to FCC part 15.247)
RFID compliance
ISO 18000-6C/EPC C1G2
Read range
0 – 1m (tag dependent)
Connectivity
USB Interface: USB 2.0 Full Speed (12 Mbit/s) device port
Bluetooth Interface: Class 2, 2.1 EDR with output power 4dBm e.i.r.p., 10m
range
Virtual COM port parameters:
- Baudrate: up to 230.4kbps
- Databits: 8
- Stopbits: 1
- Parity: none
- Flow control: none
Battery
Rechargeable Lithium Ion Polymer 3.7 V, 600 mAh
Memory capacity
48KB (equivalent to 4096 EPC Codes)
USB charger/cable length
105cm
Operating temperature
-20 to +55˚C (-4°F to +131°F)
Dimensions
L128 x W59 x D22mm (5.04 x 2.32 x 0.87in)
Weight
150g
Ingress protection
IP64
Display
LCD alphanumeric (8 characters x 2 lines)
Buttons
On/off and trigger/confirmation
Indication lights
Two LEDs: power level and communication status
Internal clock
For time stamping tag reads with date and time
OS compatibility
Windows, Android, HID profile, Virtual com port
12. iRFID500 technical specification

Extronics Limited, registered in England and Wales no. 03076287
Registered office 1 Dalton Way, Midpoint 18, Middlewich, Cheshire, UK. CW10 0HU
Tel: +44 (0) 845 277 5000 Fax: +44 (0)845 277 4000 E-mail: info@extronics.com Web: www.extronics.com 28
Warning:
The industrial only versions of the iRFID500 must not be operated within the
hazardous area under any circumstances.
Attention:
The RF frequency must match the country/region of operation to comply with local
laws and regulations. The usage of the reader in different countries/regions from the
one in which the device has been sold is not allowed.

Extronics Limited, registered in England and Wales no. 03076287
Registered office 1 Dalton Way, Midpoint 18, Middlewich, Cheshire, UK. CW10 0HU
Tel: +44 (0) 845 277 5000 Fax: +44 (0)845 277 4000 E-mail: info@extronics.com Web: www.extronics.com 29
13. iRFID500 regulatory compliance
The iRFID500 is designed to comply with several international standards.
13.1 Federal Communications Commission (FCC) compliance
This equipment has been tested and found to comply with the limits for a Class B digital device,
pursuant to Part 15 of the FCC Rules. These limits are designed to provide reasonable protection
against harmful interference in a residential installation.
This equipment generates uses and can radiate radio frequency energy and, if not installed and used
in accordance with the instructions, may cause harmful interference to radio communications.
However, there is no guarantee that interference will not occur in a particular installation. If this
equipment does cause harmful interference to radio or television reception, which can be
determined by turning the equipment off and on, the user is encouraged to try to correct the
interference by one of the following measures:
a. Reorient or relocate the receiving antenna.
b. Increase the separation between the equipment and receiver.
c. Connect the equipment into an outlet on a circuit different from that to which the receiver is
connected.
d. Consult the dealer or an experienced radio/TV technician for help.
This device complies with Part 15 of the FCC Rules. Operation is subject to the following two
conditions: (1) This device may not cause harmful interference, and (2) this device must accept any
interference received, including interference that may cause undesired operation.
Any changes or modification not approved by Extronics Ltd could void the user’s authority to
operate the equipment.
Reference document: Test report TBA

Extronics Limited, registered in England and Wales no. 03076287
Registered office 1 Dalton Way, Midpoint 18, Middlewich, Cheshire, UK. CW10 0HU
Tel: +44 (0) 845 277 5000 Fax: +44 (0)845 277 4000 E-mail: info@extronics.com Web: www.extronics.com 30
To ensure optimal RF performance and to comply with FCC regulations, please use the reader as
shown in the photographs below.
13.2 CE compliance
Reference standard:
ETSI EN 301 489-1 V. 1.9.2:2011
ETSI EN 301 489-3 V. 1.6.1:2013
ETSI EN 302 208-2 V. 2.1.1:2015
ETSI EN 300 328 V1.9.1:2015
CEI EN 50364:2011
CEI EN 55022:2014
CEI EN 55024:2013
Bluetooth DTA
Reference documents: 16721A
13.3 RoHS EU Directive compliance
The iRFID500 is compliant with the EU Directive 2011/65/EU on the Restriction of the Use of certain
Hazardous Substances in Electrical and Electronic Equipment (RoHS).

Extronics Limited, registered in England and Wales no. 03076287
Registered office 1 Dalton Way, Midpoint 18, Middlewich, Cheshire, UK. CW10 0HU
Tel: +44 (0) 845 277 5000 Fax: +44 (0)845 277 4000 E-mail: info@extronics.com Web: www.extronics.com 31
Issued By:
Pete Ruddock
Issue Date :
24/10/2016
Approved By:
Nick Saunders
Approval Date :
xx/10/2016
Doc Ref:
418348
Revision:
2.0
THIS DOCUMENT MUST NOT BE MODIFIED WITHOUT
PRIOR PERMISSION FROM THE AUTHORISED PERSON
Document Change History
Issue
No.
Changed
By
Details Of Change
Date
Red
Line
PIL
ECN
Approved by:
2.0
PR
Draft Release
24/10/2016
N/A
N/A
NS
Notes
This document is not to be modified without prior reference to an authorized person.
14. Revision control
© This document is copyright Extronics Limited 2016.
Extronics reserve the right to change this document and its content without notice. The latest
version applies.
 Loading...