

Page 1
PPC 25 Installation Instructions
POWE
R
CNO
PA
G
IN
G R
E
LA
Y
D
ELA
Y
SEN
SITI
VITY
12V
0.2A
MAX
O
N
1
2
L R
A
U
X
/M
IX
IN
D
O
N
O
T
G
R
O
U
N
D
O
R
S
H
O
R
T
S
P
EA
K
E
R
O
U
T
P
U
T
S
!
1
B
1
A
I
N
P
U
T
S
O
U
T
P
U
T
S
2
B
2
A
3
B
3
A
R
S
-2
3
2
M
L
C
/IR
D
C
V
O
L
4
/8
O
h
m
s
A
M
P
L
IF
IE
D
OU
T
P
U
T
S
V
O
L
/M
U
T
E
T
x
ABC
R
x
IR
1
2
V
1
0
V
P
O
W
E
R
12V
3A
M
A
X
U
S
LISTE
D
17
TT
AUD
IO/
VIDEO
APPARATUS
®
RGB
VIDEO RGB
VIDEO
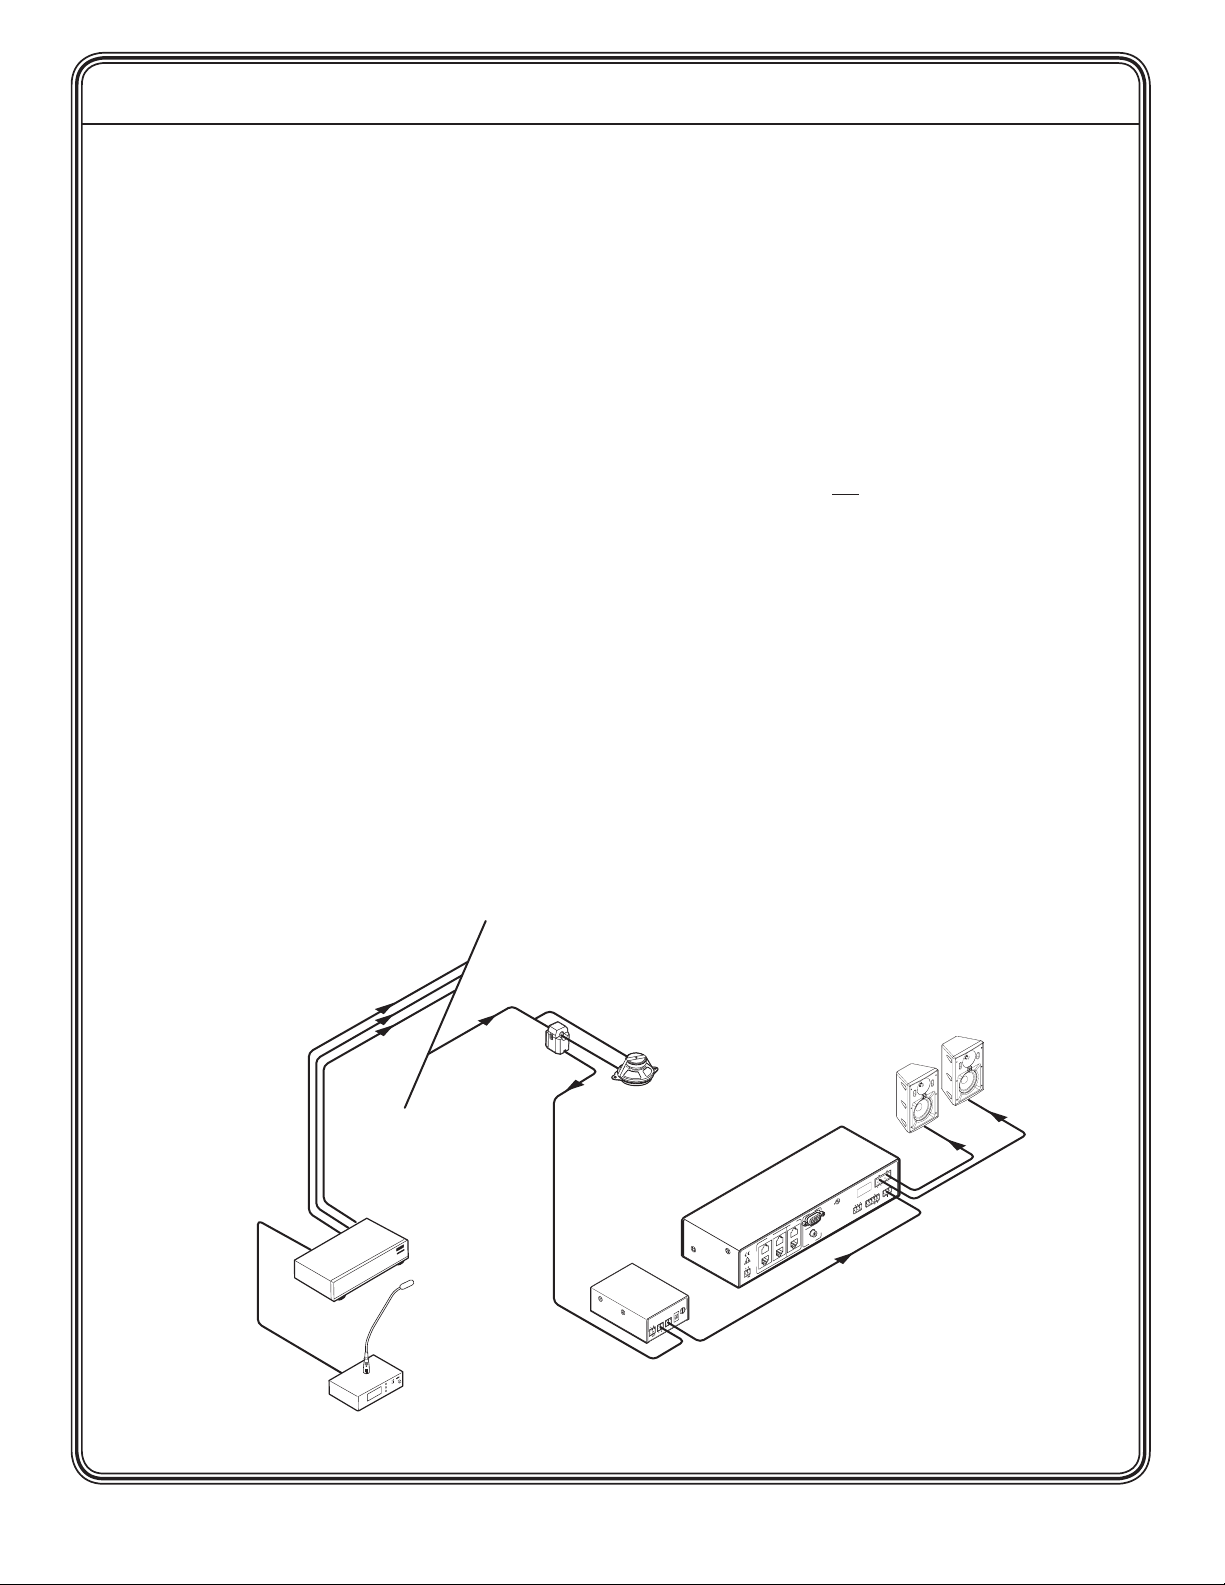
Ceiling Mounted
Paging Speaker
Paging System
Sensor
ClassroomAdmin Building
To Classroom
Paging Speakers
Relay Output
Remote Vol/Mute
Control
Extron
PPC 25
Priority Page
Controller
Extron
PVS 204SA
Twisted Pair
Switcher
Extron
SI 26
Surface Mount
Speakers
PPC 25 Overview
The Extron PPC 25 Sensor and Controller mute classroom audio for the duration of an announcement that is made over a
public address (PA) system.
The sensor connects to a PA speaker lead and detects current flow when a PA announcement is initiated.
A signal from the sensor triggers the PPC 25 Controller’s output relay to close. This relay closure can connect to a PoleVault®
switcher, a mini power amplifier (MPA), a MediaLink® controller (MLC), or any device with a contact closure type of mute
control or a configurable digital input.
The output relay remains closed, muting the classroom audio, until the PA announcement ends. It then opens, dropping the
mute signal and restoring the classroom audio.
If the output relay is connected to a MediaLink controller digital input, use Global Configurator software to configure the
input port, and set the monitoring conditions and actions to drive the desired mute function on the classroom audio device.
For instructions, consult the MLC’s user’s guide.
For a PoleVault System, the output relay must connect only to the PVS 204SA switcher and not the MLC. This arrangement
requires no software configuration.
Included Parts:
Priority Page Controller•
Priority Page Sensor•
UL-compliant junction box with a cable clamp and a lid•
35’ (10.7 m) of sensor cable•
Y-cable for sharing power with another unit•
The PPC 25 Sensor assembly must be installed in a UL-compliant junction box with a cover to meet
the plenum rating requirement. All cables to and from the sensor must also be plenum rated.
N
The PPC 25 works with traditional 25 V or 70 V and 4/8 ohm PA systems. It is not designed for, and may not work
properly with, two-way intercoms, or systems that are IP-based or use digital clocks.
PPC 25 Priority Page Sensor • Installation Instructions
A Typical PPC 25 Installation
68-1437-01
Rev G
12 08
1
Page 2
PPC 25 Installation Instructions, cont’d
PPC 25
RELAY
7
2
3 4 5 6
1
POWER
CNO
PAGING
SENSOR
OUT
TIME
RELAY
SENSITIVITY
12V
0.5A MAX
ON
1
2
TIME
ON
1
2
= 2.0 sec (default) = 4.0 sec = 6.0 sec = 8.0 sec
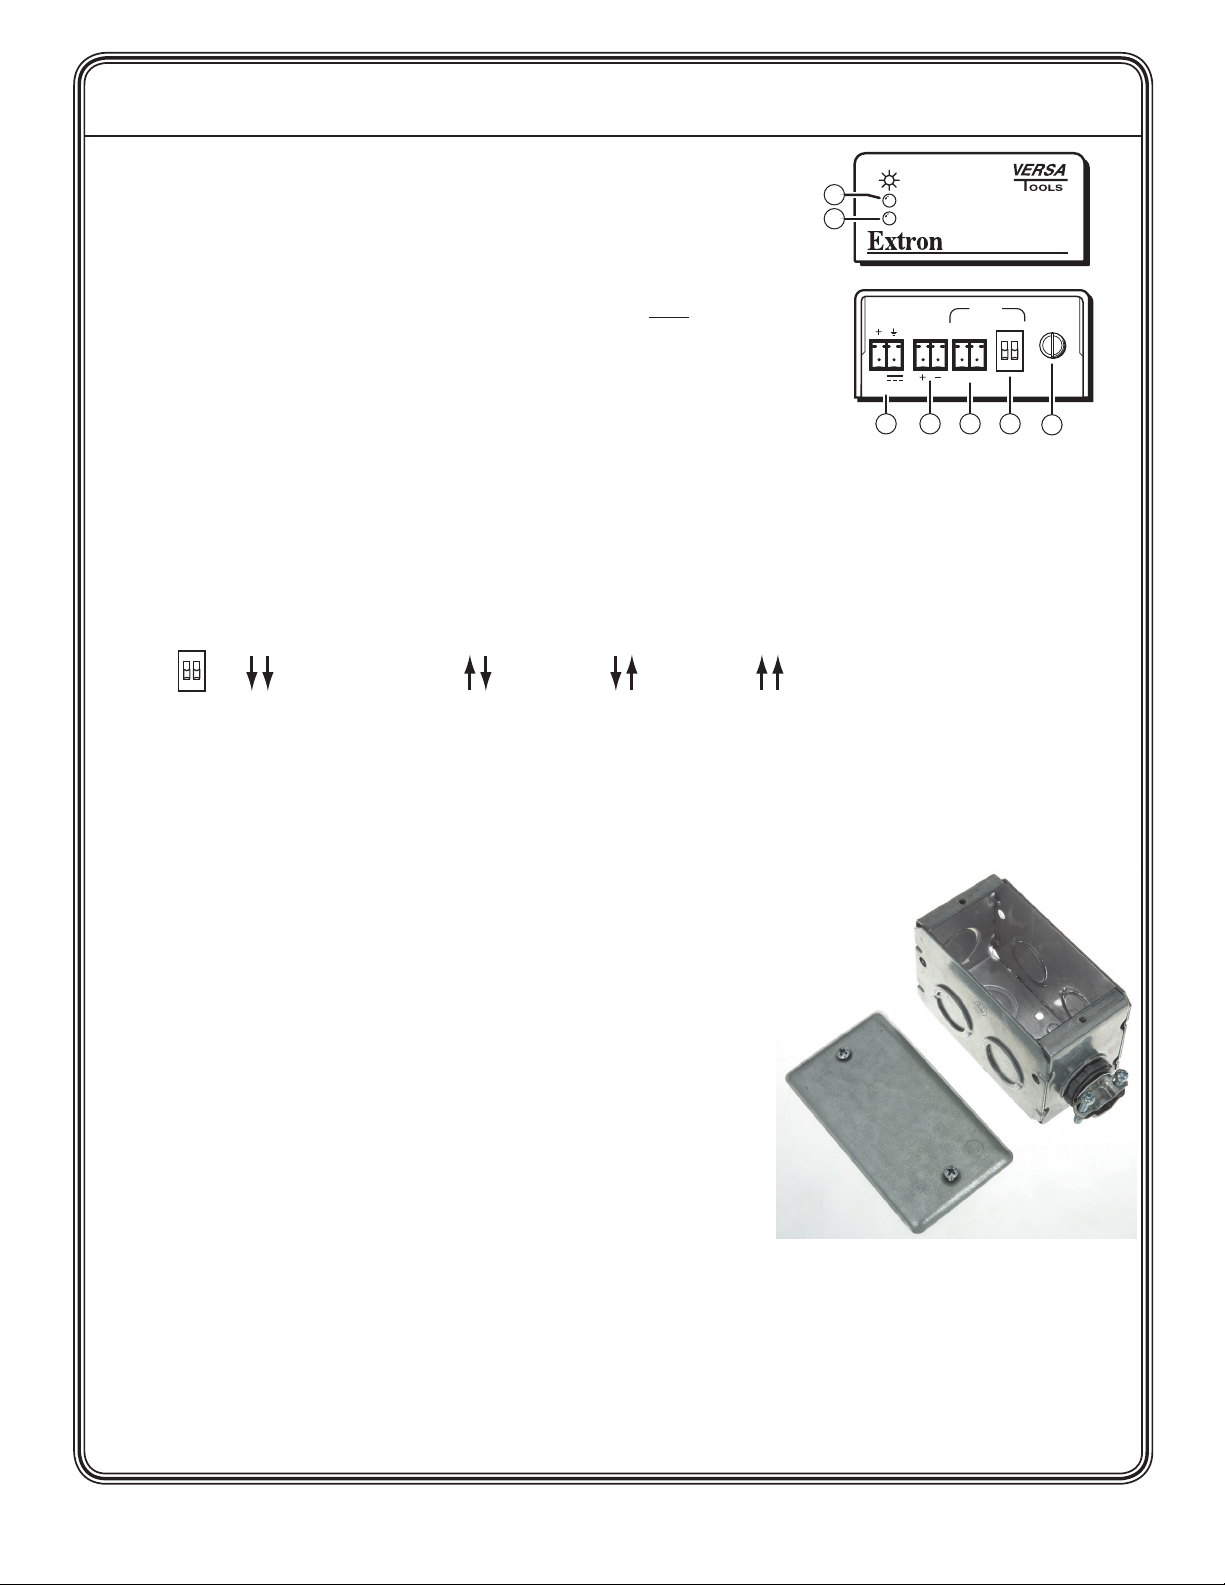
Front and Rear Views of the PPC 25 Controller
Power-on LED — green when power is on.
a
Relay LED — amber when output relay is closed.
b
Power receptacle — 12 VDC, 33 mA. The unit does not ship with a power
c
supply. Power may be shared with another device. Polarity must be observed.
N
Paging Sensor connector — for the Priority Page Sensor that is located near a
d
PA system speaker.
Relay Out connector — connects to an amplifier or switcher that has a contact closure type of mute control input,
e
or to an MLC device with a digital input. When a PA system announcement is initiated, the output relay closes and
remains closed for the duration of the announcement. The closed output relay triggers the classroom audio mute
function. When integrating the PPC 25 into a PoleVault System, connect the output relay to the PVS 204SA Mute and
Ground pins only (see diagram on page 2).
Time switch — sets how long the output relay will remain closed after a PA announcement has ended. A short time
f
delay is necessary so that, if the PA system announcer pauses briefly during the announcement, the classroom audio is
not restored prematurely. The 2-position DIP switch provides the following time settings:
When using the PPC 25 controller with a PoleVault switcher, use the
Y-shaped power cable (provided) to power both units (see page 3).
Sensitivity adjustment — sets the sensitivity level for the signal arriving from the Priority Page Sensor. The final
g
setting depends on the type of paging system and the number of wire loops on the sensor (see page 3). Rotate
clockwise to increase sensitivity and counterclockwise to decrease sensitivity.
Installation Procedure
W
All structural steps and electrical installation should be
performed by qualified personnel in accordance with local and
national building codes, fire and safety codes, and/or local and
national electrical codes.
To meet the plenum rating requirement the PPC 25 Sensor
assembly must be installed in a UL-compliant junction box with
a cover and all cables to and from the sensor must be plenum
rated.
1. Choose suitable locations for the controller and sensor. The controller must
be located close to the PVS 204SA and its power supply. The sensor must be
located near, and in series with, the speaker.
2. If the sensor is to be located in a plenum space, the junction box (provided)
can be used. Knock out an opening at one end of the junction box and
attach the cable clamp (see figure at right). Secure the box where the
sensor will go.
3. Disconnect the speaker cable from the speaker.
2
PPC 25 Priority Page Sensor • Installation Instructions
Page 3

4. Remove the outer protective jacket from the speaker
Blue
Sensor
Cable
Ceiling Mounted
Paging Speaker
Priority
Page
Sensor
Strip plenum jacket from
speaker cable to reveal
two speaker wires.
Speaker Cable with
Plenum Jacket Intact
POWER
CNO
PAGIN
G
S
ENSO
R
OUT
T
IME
SENS
ITIVITY
12V
0.5
A
ON
1
L
R
RS-232 MLC/IR
4
/8
O
hms
A
MPLIFIED OUTPUT
S
VOL/MUTE
Tx
A
B
C
Rx
I
R 12V
10V
Page
Controller
PVS 204SA
cable to expose the two speaker wires from the sensor
to the speaker (as shown at right). Do not remove
the inner protective jackets that cover the individual
wires.
If the sensor is to be located in a plenum space, feed
a loop of one of the exposed speaker wires through
the cable clamp into the junction box. The other
wire can bypass the junction box.
Open the top of the Priority Page Sensor.
5. Loop one of the speaker wires tightly around the top part of the sensor. Polarity need not be observed.
N
Loop only one of the speaker wires around the sensor cover. Do not loop both wires.
The other speaker wire must bypass the sensor and connect directly to the speaker.
• Fora25Vor70Vsystem,wrap5to8loops.
• Fora4/8ohmsystem,wrap2to4loops.
6. Close and latch the top of the Priority Page Sensor.
7. Reconnect the speaker cable to the speaker.
8. Cutan18"(45cm)sectionfromtheunterminatedendofthesuppliedbluesensorcable
(see the figure above). Use it to connect the Relay Out port on the PPC 25 Controller to
theMuteandGroundpinsonthePoleVaultPVS204SAVol/Muteport(seethegure
at right). Polarity need not be observed.
N
Do not connect either of the outputs from the PPC 25 Controller to the 10V
port on the PVS 204SA switcher. The output relay must connect only to the
PVS 204SA switcher and not to a MediaLink controller.
PPC 25 Priority Page Sensor • Installation Instructions
3
Page 4

Extron USA - West
Headquarters
+800.633.9876
Inside USA / Canada Only
+1.714 .491.1500
+1.714 .491.1517 FAX
Extron USA - East
+800.633.9876
Inside USA / Canada Only
+1.919.863.1794
+1.919.863.1797 FA X
Extron Europe
+800.3987.6673
Inside Europe Only
+31.33.453.4040
+31.33.453.4050 FAX
Extron Asia
+800.7339.8766
Inside Asia Only
+65.6383.4400
+65.6383.4664 FAX
Extron Japan
+81.3.3511.7655
+81.3.3511.7656 FAX
Extron China
+400.883.1568
Inside China Only
+86.21.3760.1568
+86.21.3760.1566 FAX
Extron Middle East
+971.4.2991800
+971.4.2991880 FAX
PPC 25 Installation Instructions, cont’d
POWER
C NO
PAGING RELAY
DELAY
SENSITIVITY
12V
0.2A
MAX
ON
1
2
L R
AUX/MIX IN
DO NOT GROUND
OR SHORT
SPEAKER OUTPUTS!
1B
1A
I
N
P
U
T
S
O
U
T
P
U
T
S
2B
2A
3B
3A
RS-232 MLC/IR
DC VOL
4/8 Ohms
AMPLIFIED OUTPUTS
VOL/MUTE
Tx
A BC
RxIR 12V
10V
POWER
12V
3A MAX
US
LISTED
17TT
AUDIO/VIDEO
APPARATUS
®
RGB
VIDEO RGB
VIDEO
To Power
Supply
Extron
PPC 25
Priority Page
Controller
Extron
PVS 204SA
Twisted Pair
Switcher
POWE
R
CNO
PAGING
SENSO
R
OUT
S
ENSITIVIT
Y
12V
0.5A
O
N
1
2
Page
Sensor
Page
Controller
POWER
CNO
PAGING RELAY
DELAY
SENSITIVITY
12V
0.2A
MAX
ON
1
2
L R
AUX/MIX IN
DO NOT GROUND
OR SHORT
SPEAKER OUTPUTS!
1B
1A
I
N
P
U
T
S
O
U
T
P
U
T
S
2B
2A
3B
3A
RS-232 MLC/IR
DC VOL
4/8 Ohms
AMPLIFIED OUTPUTS
VOL/MUTE
Tx
AB
C
Rx
IR 12V
10V
POWER
12V
3A MAX
US
LISTED
17TT
AUDIO/VIDEO
APPARATUS
®
RGB
VIDEO RGB
VIDEO
Ceiling Mounted
Paging Speaker
Paging System
PPC 25
Priority
Page
Sensor
Relay Output
Remote
Vol/Mute
Control
Extron
PPC 25
Priority Page
Controller
Extron
PVS 204SA
Twisted Pair
Switcher
Extron
SI 26
Surface Mount
Speakers
9. Strip3/16"ofinsulationfromeachconductoronthebarewireendoftheremaining
blue sensor cable. Do not tin the leads. Connect the wires to the 2-pole captive screw
connector on the Priority Page sensor. Polarity need not be observed.
10. Route the connector end to the PPC 25 controller, and plug it into the Paging Sensor
receptacle.
11. If a junction box is being used in a plenum space, ensure the sensor and
all wires fit inside the box (as shown at right). All cables leaving the box
must be plenum rated. Tighten the cable clamp and secure the lid to the
junction box.
12. Use the included Y-shaped cable assembly to power the PPC 25 from the
PVS 204SA power supply (as shown below). This cable assembly allows
both devices to be powered from a single power supply.
Testing and Adjustment Procedure
The fully installed system is shown in the figure to the right. To test
that the classroom audio is muted when a PA system announcement
(page) occurs:
4
1. Turn the classroom audio on.
2. Speak into the PA system microphone. The classroom audio
should be muted while the PA system page occurs and be
restored when the page ends.
3. If the PPC 25 fails to mute the classroom audio during a
page, turn the Sensitivity adjustment, on the rear panel of the
controller, clockwise.
4. If classroom audio is muted without a page occurring, turn the
Sensitivity adjustment counterclockwise.
PPC 25 Priority Page Sensor • Installation Instructions
 Loading...