

Page 1
MLM 226 Faceplates Installation Guide
MLM 226 Faceplates
This guide provides instructions for installing the following Extron MediaLink
Mounting Options faceplates, which are designed for use with the MLC 226 IP
MediaLink Controller.
The MLM 226 L, MLM 226 3GWP, or MLM 226 5GWP faceplate is shipped
with the MLC 226 IP controller, depending on the controller configuration that is
ordered. The rest of the mounting options described below may be ordered
separately as replacements, or for use with an MLC 226 IP that is ordered without
a faceplate.
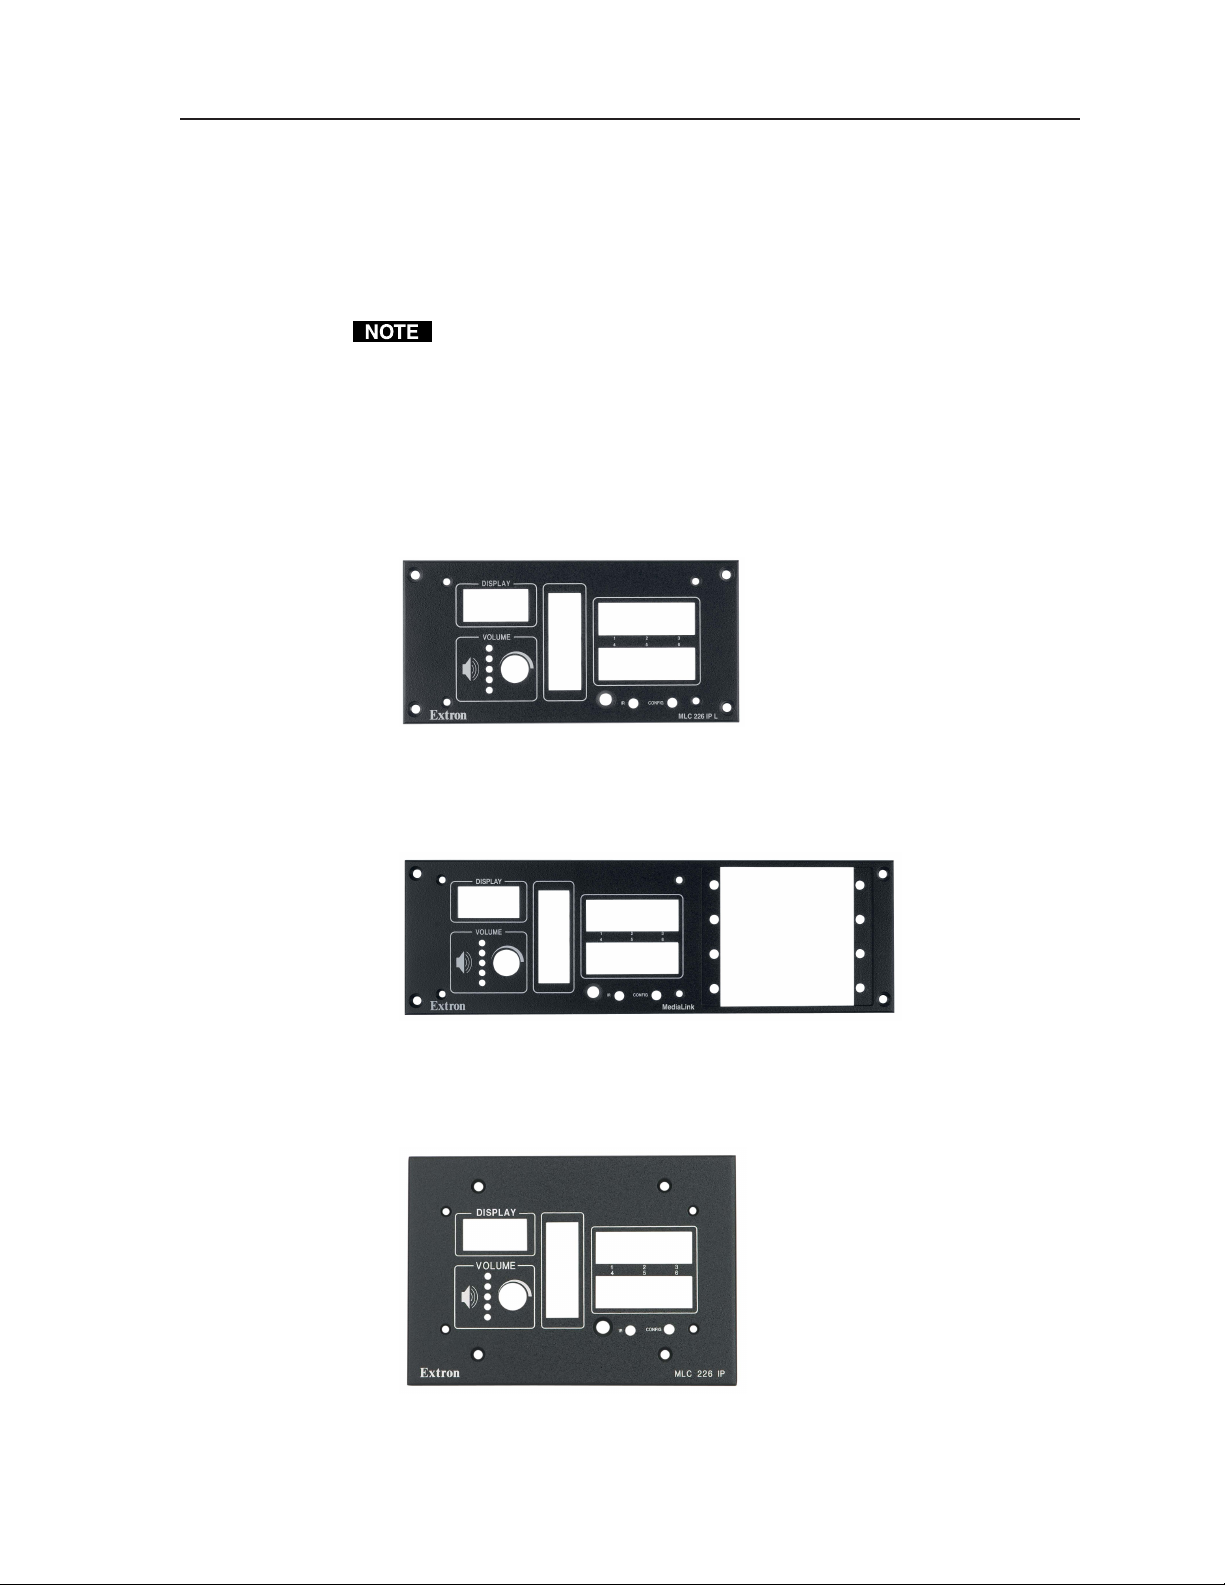
• MLM 226 L — A low-profile, 3.15" H x 6.50" W (8.0 cm H x 16.5 cm W) lectern/
furniture-mounting faceplate. This faceplate is required when you are mounting
an MLC 226 IP using an optional UCM RAAP or UCM 10X8P mounting kit.
Part numbers: 70-342-02 (black), 70-342-03 (white), 70-342-05 (RAL9010 white)
™
• MLM 226 LAAP — A low-profile, 3.15" H x 10.00" W (8.0 cm H x 25.40 cm W)
lectern/furniture-mounting faceplate with an opening that accommodates four
single-space AAPs
Part numbers: 70-343-02 (black), 70-343-03 (white), 70-343-05 (RAL9010 white)
• MLM 226 3GWP — A three-gang (4.50" H x 6.40" W [11.43 cm H x 16.26 cm W])
faceplate that can be mounted to a mud ring (mounting bracket), an Extron
Surface Mount Box, an Extron External Wall Box, or a standard electrical box
Part numbers: 70-376-02 (black), 70-376-03 (white), 70-376-05 (RAL9010 white)
68-919-01, Rev. D
08 07
1MLM 226 Faceplates • Installation Guide
Page 2
MLM 226 Faceplates Installation Guide, cont’d
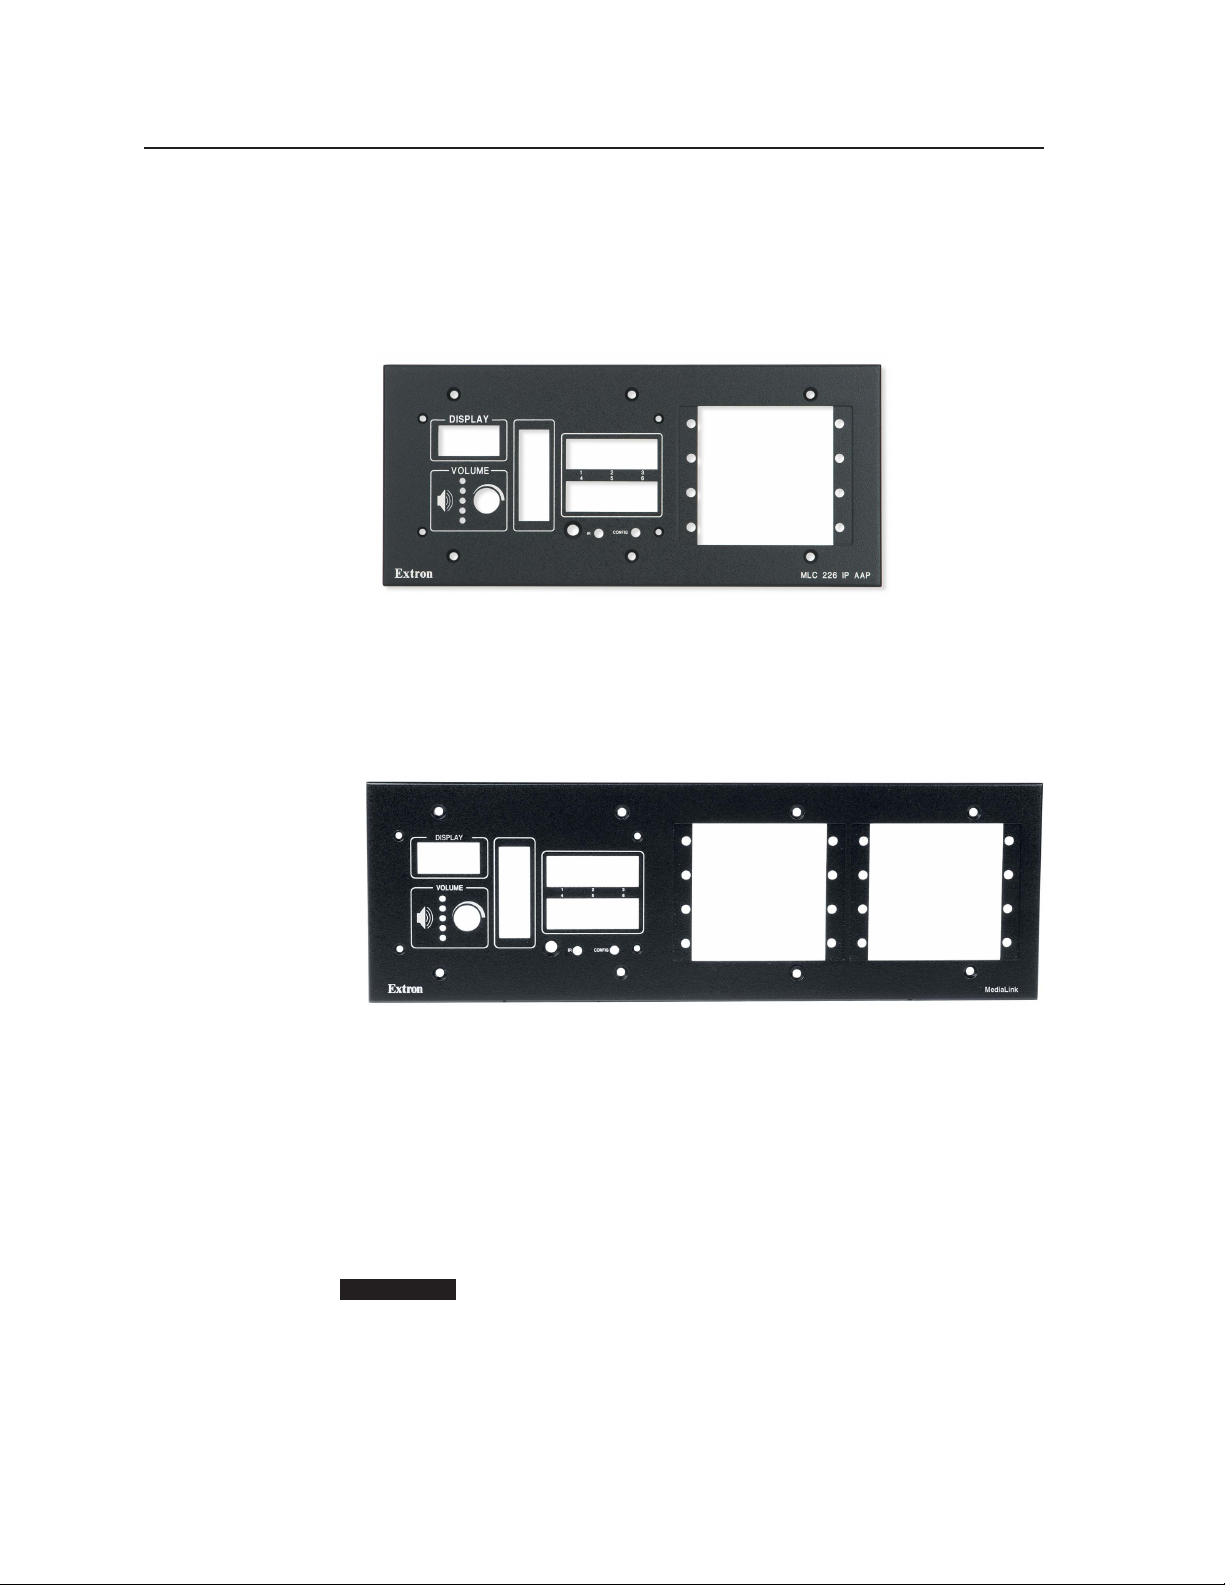
• MLM 226 5GWP — A five-gang (4.50" H x 10.04" W [11.43 cm H x 25.50 cm
W]) faceplate with an opening that accommodates four single-space AAPs. It
can be mounted to a mud ring, an Extron Surface Mount Box, an Extron
External Wall Box, or a standard electrical box.
Part numbers: 70-377-02 (black), 70-377-03 (white), 70-377-05 (RAL9010
white)
• MLM 226 7GWP — A seven-gang (4.50" H x 13.665" W [11.43 cm H x
34.71 cm W]) faceplate with two openings that accommodate four singlespace AAPs each (eight AAPs total). It can be mounted to a mud ring, an
Extron Surface Mount Box, an Extron External Wall Box, or a standard
electrical box.
Part numbers: 70-340-02 (black), 70-340-03 (white), 70-340-05 (RAL9010
white)
Replacing an MLC 226 IP Faceplate with an MLM
Faceplate
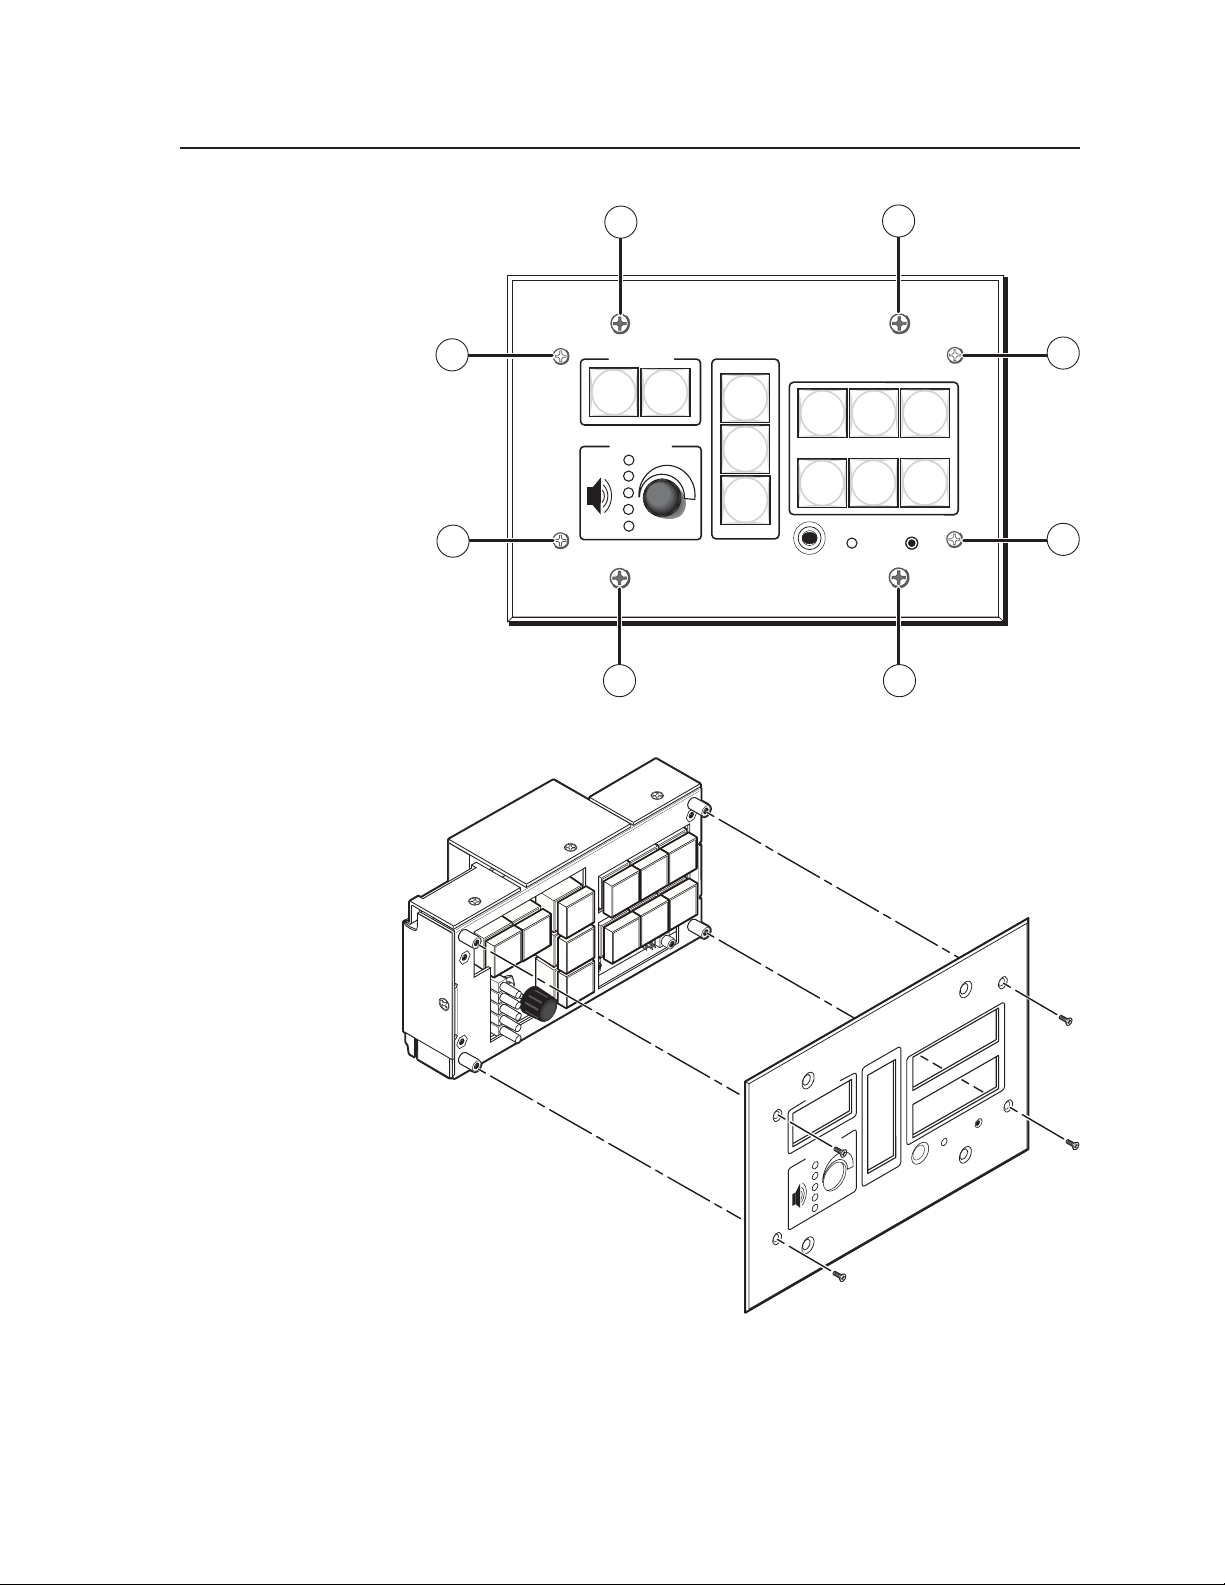
1. If your MLC controller is already installed in a wall or furniture, remove the
four screws that attach it to its mounting surface (marked a in the diagram
on the next page), and lift it out.
2. After the MLC has been removed from the wall or furniture, use a small
Phillips screwdriver to remove the four faceplate attachment screws (
diagram on the next page), and save them for later use.
CAUTION
Do not remove the four faceplate screws while the MLC is installed in a
wall or furniture, or the controller may fall down into the wall or
furniture.
b
in the
MLM 226 Faceplates • Installation Guide2
Page 3
1
1
2
2
DISPLAY
ON
VOLUME
OFF
PIC
MUTE
AUTO
IMAGE
VCR
1
4
DOC
CAM
LAPTOP
IR
Extron
1
3. Lift the faceplate off the MLC 226 IP, as shown below.
D
V
D
R
C
V
IC
P
E
T
U
M
C
O
OFF
ON
D
M
A
C
O
T
U
A
E
G
A
IM
C
P
P
O
T
P
A
L
DVD
2
5
CONFIG
3
6
PC
MLC 226 IP
1
2
2
3
6
2
5
1
4
IG
F
N
O
C
IR
226 IP
LC
M
DISP
VOL
LAY
UME
Extron
4. Align the openings in the new MLM faceplate with the controller’s buttons,
knob, and LEDs, then place the new faceplate on the MLC 226 IP.
5. Replace the four screws removed in step 2, and hand tighten them.
6. Install the MLC 226 IP controller with the MLM 226 faceplate in a wall or
furniture as appropriate.
3MLM 226 Faceplates • Installation Guide
Page 4

MLM 226 Faceplates Installation Guide, cont’d
Templates
Use one of the following templates as a guide to measure and mark the hole for
installing the MLM 226 faceplate with an attached MLC 226 IP. (Refer to your
MLC 226 IP user’s manual for instructions on preparing the mounting site.)
CAUTION
These templates are not to scale. Use the dimensions shown in the
templates as reference guidelines for measuring and drawing the rectangle
that will be cut out.
The MLC controller requires a depth of at least 2.0" (5.1 cm) inside the wall or
furniture.
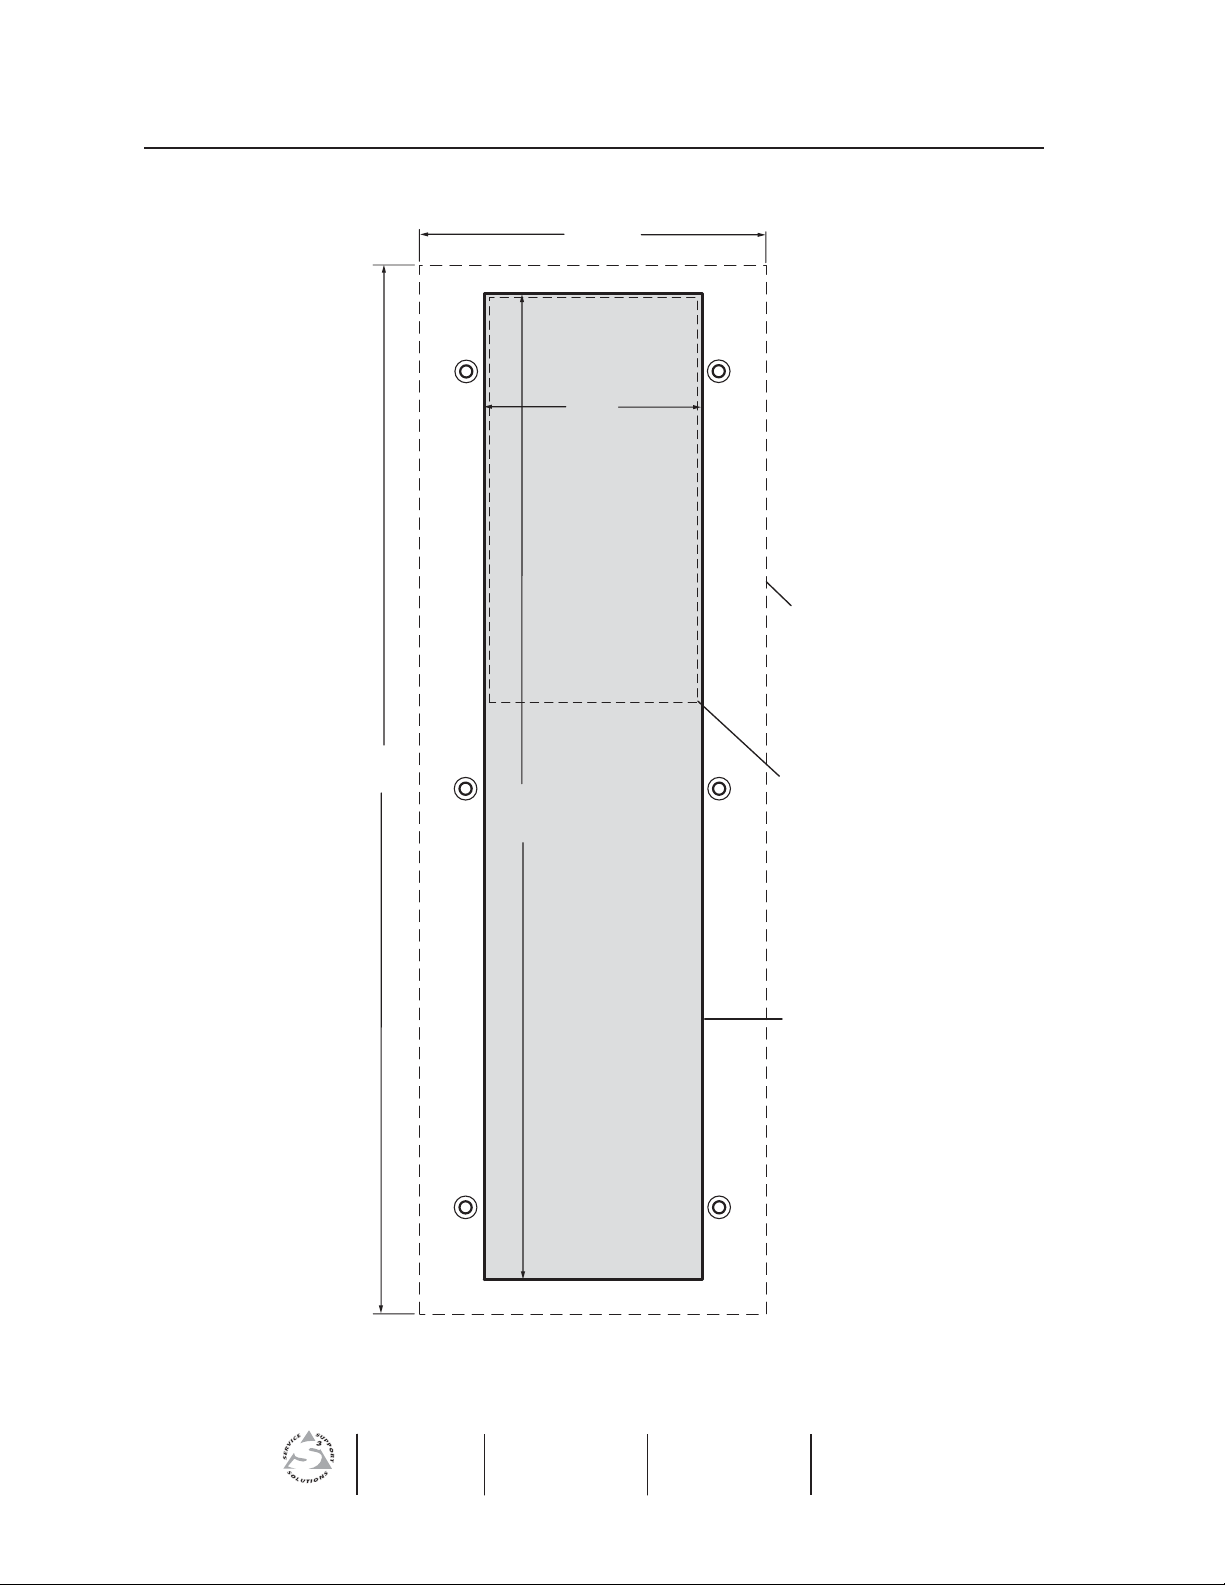
MLM 226 L and MLC 226 IP L template
3.15"
(8.0 cm)
2.9"
(7.4 cm)
SURFACE CUT-OUT AREA
6.5"
(16.5 cm)
FOR FURNITURE MOUNT
5.4"
(13.7 cm)
.250"
(4 places)
(0.64 cm)
Top Panel
Location of MLC 226 IP
To install MLC 226 IP
and MLM 226 L
directly into furniture,
cut along this line.
.295"
(4 places)
(0.75 cm)
TEMPLATE IS NOT FULL SIZE.
Cut-Out Template for Extron's MLM 226 L and MLC 226 IP L
MLM 226 Faceplates • Installation Guide4
Page 5

MLM 226 LAAP template
3.15"
(8.0 cm)
2.9"
(7.4 cm)
10"
(25.4 cm)
8.9"
(22.6 cm)
SURFACE CUT-OUT
AREA FOR
FURNITURE MOUNT
Top Panel
Location of MLC 226 IP
To install MLC 226 IP
and MLM 226 LAAP
directly into furniture,
cut along this line.
.250" (0.64 cm)
.295" (0.75 cm)
TEMPLATE IS NOT FULL SIZE.
Cut-Out Template for Extron's MLM 226 LAAP
5MLM 226 Faceplates • Installation Guide
Page 6

MLM 226 Faceplates Installation Guide, cont’d
MLM 226 3GWP and MLC 226 IP template
4.5"
(11.4 cm)
2.9"
(7.4 cm)
SURFACE CUT-OUT AREA
6.4"
(16.26 cm)
FOR FURNITURE MOUNT
5.4"
(13.7 cm)
Top Panel
Location of MLC 226 IP
To install MLC 226 IP
and MLM 226 3GWP
directly into furniture,
cut along this line.
TEMPLATE IS NOT FULL SIZE.
Cut-Out Template for Extron's MLM 226 3GWP and MLC 226 IP
MLM 226 Faceplates • Installation Guide6
Page 7

MLM 226 5GWP and MLC 226 IP AAP template
4.5"
(11.4 cm)
2.9"
(7.4 cm)
10.04"
(25.5 cm)
8.9"
(22.6 cm)
SURFACE CUT-OUT
AREA FOR
FURNITURE MOUNT
Top Panel
Location of MLC 226 IP
To install MLC 226 IP
and MLM 226 5GWP
directly into furniture,
cut along this line.
TEMPLATE IS NOT FULL SIZE.
Cut-Out Template for Extron's MLM 226 5GWP and MLC 226 IP AAP
7MLM 226 Faceplates • Installation Guide
Page 8
MLM 226 Faceplates Installation Guide, cont’d
MLM 226 7GWP template
4.5"
(11.4 cm)
2.9"
(7.4 cm)
Top Panel
13.665"
(34.71 cm)
Location of MLC 226 IP
12.7"
(32.3 cm)
SURFACE CUT-OUT
AREA FOR
FURNITURE MOUNT
To install MLC 226 IP
and MLM 226 7GWP
directly into furniture,
cut along this line.
MLM 226 Faceplates • Installation Guide8
www.extron.com
TEMPLATE IS NOT FULL SIZE.
Cut-Out Template for Extron's MLM 226 7GWP
Extron Electronics, USA
1230 South Lewis Street
Anaheim, CA 92805
800.633.9876 714.491.1500
FAX 714.491.1517
Extron Electronics, Europe
Beeldschermweg 6C
3821 AH Amersfoort, The Netherlands
+800.3987.6673 +31.33.453.4040
FAX +31.33.453.4050
Extron Electronics, Asia
135 Joo Seng Rd. #04-01
PM Industrial Bldg., Singapore 368363
+800.7339.8766 +65.6383.4400
FAX +65.6383.4664
© 2007 Extron Electronics. All rights reserved.
Extron Electronics, Japan
Kyodo Building, 16 Ichibancho
Chiyoda-ku, Tokyo 102-0082
Japan
+81.3.3511.7655 FAX +81.3.3511.7656
 Loading...