

Page 1
ISM VS Output Board Setup • Guide
SCALER
VIDEO
L
R
V
HV
G/Y
B-Y
H/
R-Y
B/
ISM VS
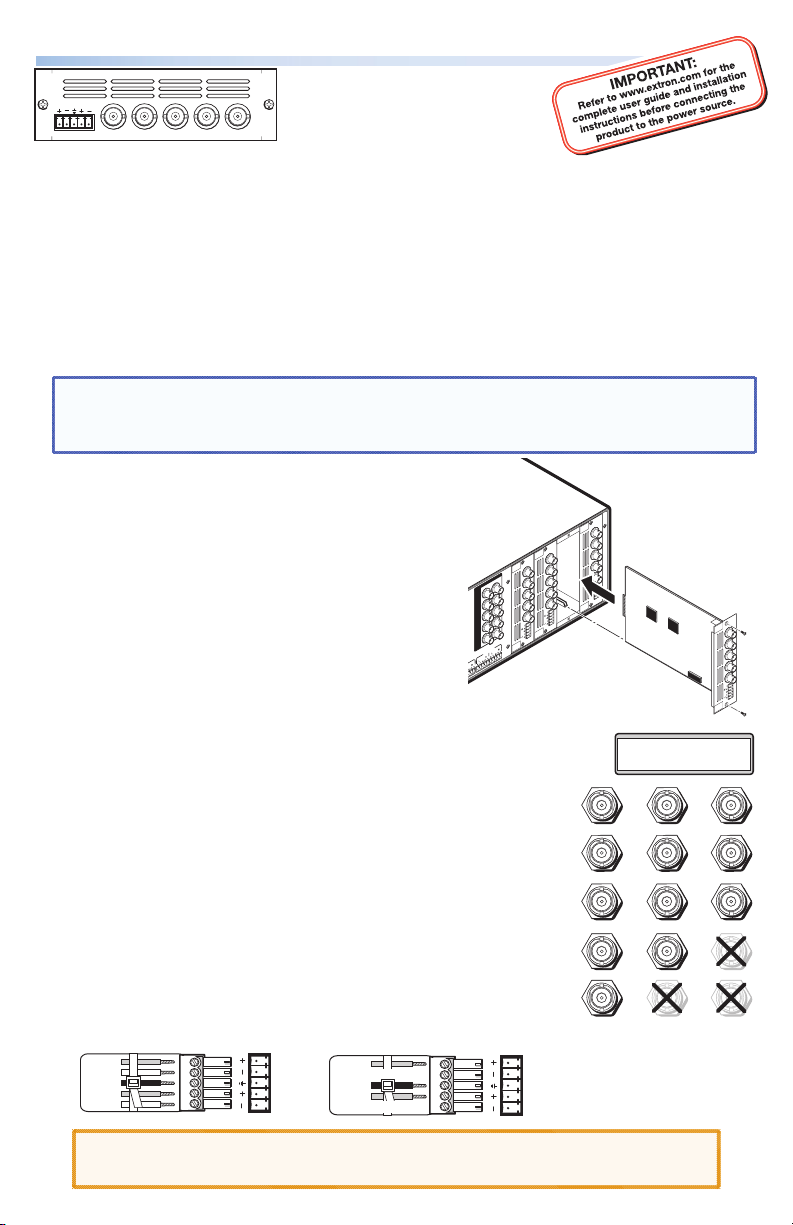
and YUVi) signals and passes through RGB and HD component signals. It has
5 female BNC connectors and a local audio output. The board mounts in one of the
four vertical expansion slots (numbered 1 to 4) at the rear of the ISM 824.
Refer to the ISM 824 User Guide, available at www.extron.com.
To install an ISM VS output board in the ISM 824 base unit:
1. Turn off the ISM 824. Remove the power cord. Repeat for all connected devices.
2. Select an open slot at the rear, or take out a blank plate by removing the two
retaining screws (top and bottom), and lifting the plate away.
NOTE: Retain and re-use the screws to secure the new output board in place.
Retain the blank plates. If a board is already installed in the desired
slot, remove the screws and carefully pull out the board.
3. Holding the new board by the frame,
align the front (non-connector end) of the
board with the top and bottom plastic
guides in the ISM 824. Slide the board in
carefully, keeping within the guides. Push
it into place firmly, and secure it with the
retained screws.
4. If required, repeat steps 2 through 4
for any other output boards.
5. Power on the ISM 824. Any new output
boards are autodetected, and take
approximately 30 seconds to initialize. The 16 character LCD
display indicates the new board type, slot used, and counts
down the initialization
time. See inset for example display of a new ISM VS
board installed in slot #1, with 11 seconds left.
6. Following the image at right, connect output device
cables to the BNC connectors to output RGBHV, RGsB
video, RGsB, or HD component video signals. The output
can be configured from the front panel (see page 2) or
by SIS™ commands (see pages 3 and 4).
7. Insert a 5-pole captive screw connector into the local
audio output connector for balanced or unbalanced
stereo audio output. Wire the connector as shown below.
Tip
Ring
Sleeve(s)
Tip
Ring
The Extron® ISM VS is a video
scaler board for the ISM 824,
R/
and outputs scaled low
resolution (composite, S-video,
L R
Left
Right
Tip
NO GROUND HERE.
Sleeve(s)
Tip
NO GROUND HERE.
OUTPUT
5
R/
R-Y
OUTPUT
3
R/
G/Y
R-Y
B/
B-Y
G/Y
OUTPUTS
1 2
R/R-Y
G/Y
R/R-Y
VID
B/C
B-Y
G/Y
VID
H/HV
B/C
B-Y
V
H/HV
PASS THRU
V
1
7 8
H/
B/
HV
B-Y
H/
V
HV
V
UNIV.
SCALER
70-544-01
VIDEO
SCALER
70-545-01
2
Example Output Board Installation
L R
Left
Right
OUTPUT
8
R/
R-Y
G/Y
B/
B-Y
H/
HV
V
PASS
THRU
70-547-01
RGBHV
Video
R/R-Y
G/Y
VID
B/C
B-Y
H/HV
V
Extron
ISM 824
Integration Scaling
Matrix Switcher
Align output board
with top and bottom
plastic guides.
New V ideo Scaler
Slot #1 11
R/R-Y
G/Y
VID
B/C
B-Y
H/HV
V
RGBS
Component
Video
OUTPUT
7
R/
R-Y
G/Y
B/
B-Y
H/
HV
V
SCAN
CONV.
70-546-01
RGsB or
Video
R/R-Y
G/Y
VID
B/C
B-Y
H/HV
V
CAUTION: For unbalanced audio, DO NOT connect the sleeves to the
negative contacts. Connect to center ground contact.
1
Page 2

ISM VS Output Board • Setup Guide, cont’d
ISM VS configuration menu
Using the front panel menu buttons (Menu and Next), the ISM VS configuration
menu can be accessed. From the Output Configuration screen, press Next until
reaching the #x Video Scaler menu (see the image below). Press Menu and Next
to navigate through the menus and use the front panel adjust knobs ({ [), to
change the settings as desired. Refer to the ISM 824 User Guide, online at
www.extron.com for full details.
From the default cycle press Menu repeatedly to reach the Output Configuration
menu. Press Next (enters Select Output menu) and rotate either Adjust
knob to select the Video Scaler menu. Follow the figure below to enter
each menu and use the Adjust knobs to change value as desired.
Se lec t O ut put
#3 Vi deo Sc a l er
2
Next
#3 Vi deo Sc a l er
Ou tpu t C on fig
Re sol u t i on
10 24x 7 6 8 6 0
Rotate encoder to
adjust pixel value
Rotate encoder to
adjust refresh rate
Ou tpu t Ty p e
RG BHV
Rotate either encoder
to select output type
(RGBHV, RGBS,
RGsB, YUV Bi-Level)
Sy nc Pol ari ty
H - V -
Rotate either encoder
to change sync polarity
(H- V-, H- V+, H+ V-, H+ V+)
Within any submenu, press the Menu button
NOTE:
to go directly to the top level (Output Card
Configuration) menu. If, for 30 seconds, no
button is pressed or adjust knob is rotated,
the menu times out and reverts to the default
display cycle.
Next
Next
Next
Menu
Next
#3 Vi deo Sc a l er
<N A> 1 2 3
<N A> 1 2 3
Us er P r e se ts
Next
Sa v e Pr ese t
Rotate either encoder
to select a preset to
save current settings
Next
Er ase P r es et
Rotate either encoder
to select a preset
to erase
Menu
Next
Menu
#3 Vi deo Sc a l er
Ad v anc ed Con f i g
Au t o I mag e
In put # 2 On
Rotate encoder to
select input
Rotate encoder to
turn On or Off
Next
Top Bla nki n g B ot
00 0 00 0
Rotate encoder
to adjust top blanking
Rotate encoder to
adjust bottom blanking
Next
Fi lte r
Of f <O n>
Rotate either encoder
to turn encoder filter
On or Off
Next
Bl ue M o d e
<O ff> On
Rotate either encoder
to turn Blue Mode
On or Off
Next
Au t o M emo rie s
Of f < O n>
Rotate either encoder
to turn auto memories
On or Off
Next
2: 2 P u l l do wn
Of f < On>
Rotate either encoder
to turn 2:2 Pulldown
On or Off
Next
En han c e d M ode
<O ff> On
Rotate either encoder
to turn enhanced mode
On or Off
Next
MENU NEXT
ADJUST
Page 3

Output Config
The Output Config submenu displays and allows changes to be made to the
resolution and refresh rate. Use the adjust knobs to select a resolution and
refresh rate.
Resolution 50 Hz 60 Hz
640x480 X X
800x600 X X
852x480 X X
1024x768 X X
1280x768 X X
1280x1024 X X
1360x765 X X
1365x768 X X
1366x768 X X
1365x1024 X X
1400x1050 X X
480p X
576p X
720p X X
1080i X X
1080p X X
User Presets
The User Preset submenu displays and allows the current settings to be saved as
a preset, or to erase an existing saved preset. Use the Adjust knobs to select the
presets.
Advanced Config
Within this submenu the following settings can be adjusted: auto image
(on or off), top and bottom blanking (set area), filter (on or off), blue mode
(on or off), auto memories (on or off), 2:2 pulldown (on or off), and enhanced
mode (on or off).
Board-specific SIS™ commands
The ISM VS board can be configured with specific Special Instruction Set™ (SIS)
commands. The table on page 4 lists some of the ISM VS board-specific
commands.
Refer to the ISM 824 User Guide, available online at www.extron.com for a full
list of definitions and commands.
SIS commands table and definitions are on page 4.
3
Page 4

ISM VS Output Board • Setup Guide, cont’d
Board-specific SIS commands table
Command ASCII
command
(host to ISM)
Input selection
Video and audio
Video
Audio
Output scaler rate
Set output rate
View
User presets (1 to 3)
Recall preset
Save preset
Edge smoothing filter
Set filter on/off
View setting
Enhancement mode
Set mode on/off
View setting
Top blanking
Specify a value
Increment value
Decrement value
View
Bottom blanking
Specify a value
Increment value
Decrement value
View
X!*X@! OutX@•InX!•All
X!*X@& OutX@•InX!•RGB
X!*X@$ OutX@•InX!•Aud
X@
X2!* X2@
*
X@
= X2!*X2@
X@*X2%.
X@*X2%,
16*X@*X1)# X@
16*X@#
52*X@*X1)# X@
52*X@#
X@*X1% ( X@
X@+( X@
X@-( X@
X@(
X@*X1% ) X@
X@+) X@
X@-) X@
X@)
Response
(ISM to host)
= RteX@ *X2!*X2@
]
X@
X2%]
Rpr
X@
X2%]
Spr
X! *X1)]
Fil
X1)]
X! *X1)]
Ehn
X1)]
X!*X1%]
Blt
X!*X1%]
Blt
X!*X1%]
Blt
X1%]
X!*X1%]
Blb
X!*X1%]
Blb
X!*X1%]
Blb
X1%]
]
Additional description
]
Tie video/audio input X! to X@.
]
Tie video input X! to output X@.
]
Tie audio input X! to output X@.
Set output resolution/refresh rate
View resolution/refresh rate
Recalls user preset
Saves user preset
Set filter on or off.
View setting.
Set enhancement mode on or off.
View setting.
Set number of top lines to blank.
Increase number of lines to blank.
Decrease number of lines to blank.
Show number of lines to blank.
Set number of bottom lines to
blank.
Increase number of lines to blank.
Decrease number of lines to blank.
Show number of lines to blank.
X2%
X2%
.
.
NOTE: X! = Input number, 0-8
X@
= Output number, 1-8
X1)
= Mode status, 1 = on, 0 = off
X1%
= Picture adjustment (0 to 255)
X2!
= Output resolution, 01 = 640x480, 02 = 800x600, 03 = 852x480, 04 = 1024x768,
07 = 1280x768, 08 = 1280x1024, 09 = 1360x765, 10 = 1365x768, 11 = 1366x768,
12 = 1365x1024, 13 = 1400x1050, 15 = 480p, 16 = 576p, 17 = 720p,18 = 1080i,19 = 1080p
X2@
= Refresh rate, 1 = 50 Hz, 2 = 60 Hz
X2%
= User presets (1 to 3)
Extron USA - West
Headqua rters
+800.6 33.9876
Inside USA / Canada Only
+1.714.491.1500
+1.714.491.1517 FAX
4
Extron USA - Eas t
+800.6 33.9876
Inside USA / Canada Only
+1.919.863.1794
+1.919.863.1797 FA X
Extron Euro pe
+800.3 987.6673
Inside Europe Only
+31.33.4 53.4040
+31.33.4 53.4050 F AX
© 2010 Extron Electronics. All rights reserved. www.extron.com
Extron Asia
+800.7 339.8766
Inside Asia Only
+65.63 83.440 0
+65.63 83.466 4 FAX
Extron Japa n
+81.3.35 11.7655
+81.3.35 11.7656 FAX
Extron Chi na
+400. 883.1568
Inside China Only
+86.21. 3760.1568
+86.21. 3760.1566 FA X
Extron Mid dle East
+971.4.2 991800
+971.4.2 991880 FA X
68-1123-63
Rev A
08 10
 Loading...