

Page 1

User’s Guide
IN3212 and IN3214
Distribution Amplifier/Line Drivers
68-822-01 Rev. A
Printed in the USA
07 03
Page 2
Installation
Introduction
The IN3212™ and IN3214™ are high performance composite video
or (for IN3214 only) S-video distribution amplifiers with gain and
peaking controls. The IN3212 features 300 MHz (-3dB)
bandwidth and the IN3214 features 280 MHz (-3dB) bandwidth.
The compact design allows them to be installed in any convenient
location. They accept NTSC, PAL, and SECAM video signals, as
well as high resolution monochrome, and distribute the signal to
separately buffered outputs.
Both models are powered by an external 110V or 220V power
supply. The power supply included with each unit is appropriate
to the region where the DA is sold.
HDTV
Plasma
VCR
1
T
U
P
T
U
N
O
I
T
M
R
T
U
4
B
I
1
R
T
2
3
P
O
O
L
IN
LCD Projector
E
V
I
R
D
S
I
E
D
N
I
O
L
E
/
D
I
R
V
E
I
T
F
I
U
L
O
P
-
4
M
A
N
I
-
1
/
T
U
O
2
T
U
P
Monitor
4
T
U
P
T
U
O
3
T
U
P
T
U
O
2
O
T
U
U
T
P
P
T
U
U
T
O
O
T
U
P
IN
Features
• Two (IN3212) or four (IN3214) outputs — Distribute a video
signal from a single input to two or four outputs.
• Gain and Peaking controls — Compensate for long cable runs
and increase fine details and clarity.
• Quad-standard compatibility — Compatible with composite
NTSC 3.58, NTSC 4.43, PAL, and SECAM video as well as high
resolution monochrome video signals.
• Split mode operation (IN3214) — Can be functionally split
into two independent two-output distribution amplifiers.
• Local monitor loop-through — Provides a passive loopthrough signal for a local monitor, or to create a larger DA
system.
Normal and Split Mode (IN3214 Only)
The IN3214 can be configured to either normal mode or split mode.
• Normal mode (factory default) — A single 1-input by 4-output
composite video distribution amplifier (figure 1).
In this mode, the Loop Out/Input 2 connector can be jumpered
as a loop-through to provide a buffered local output signal.
• Split mode — Two, independent 1-input by 2-output DAs.
Composite video — The DA can accept two composite video
inputs and distribute eachinput to two separate outputs.
If a loop-through signal is required when the IN3214 is
configured for split mode and is buffering composite video, set
the inputs for High Z (see the jumper table on page 5) and use
a BNC “T” connector on the input to split the signal.
S-video — The DA can accept a single S-video input (with the
luminance [Y] input on one input connector and the
chrominance [C] input on the other) and distribute the Y/C
output to two separate S-video devices (figure 2).
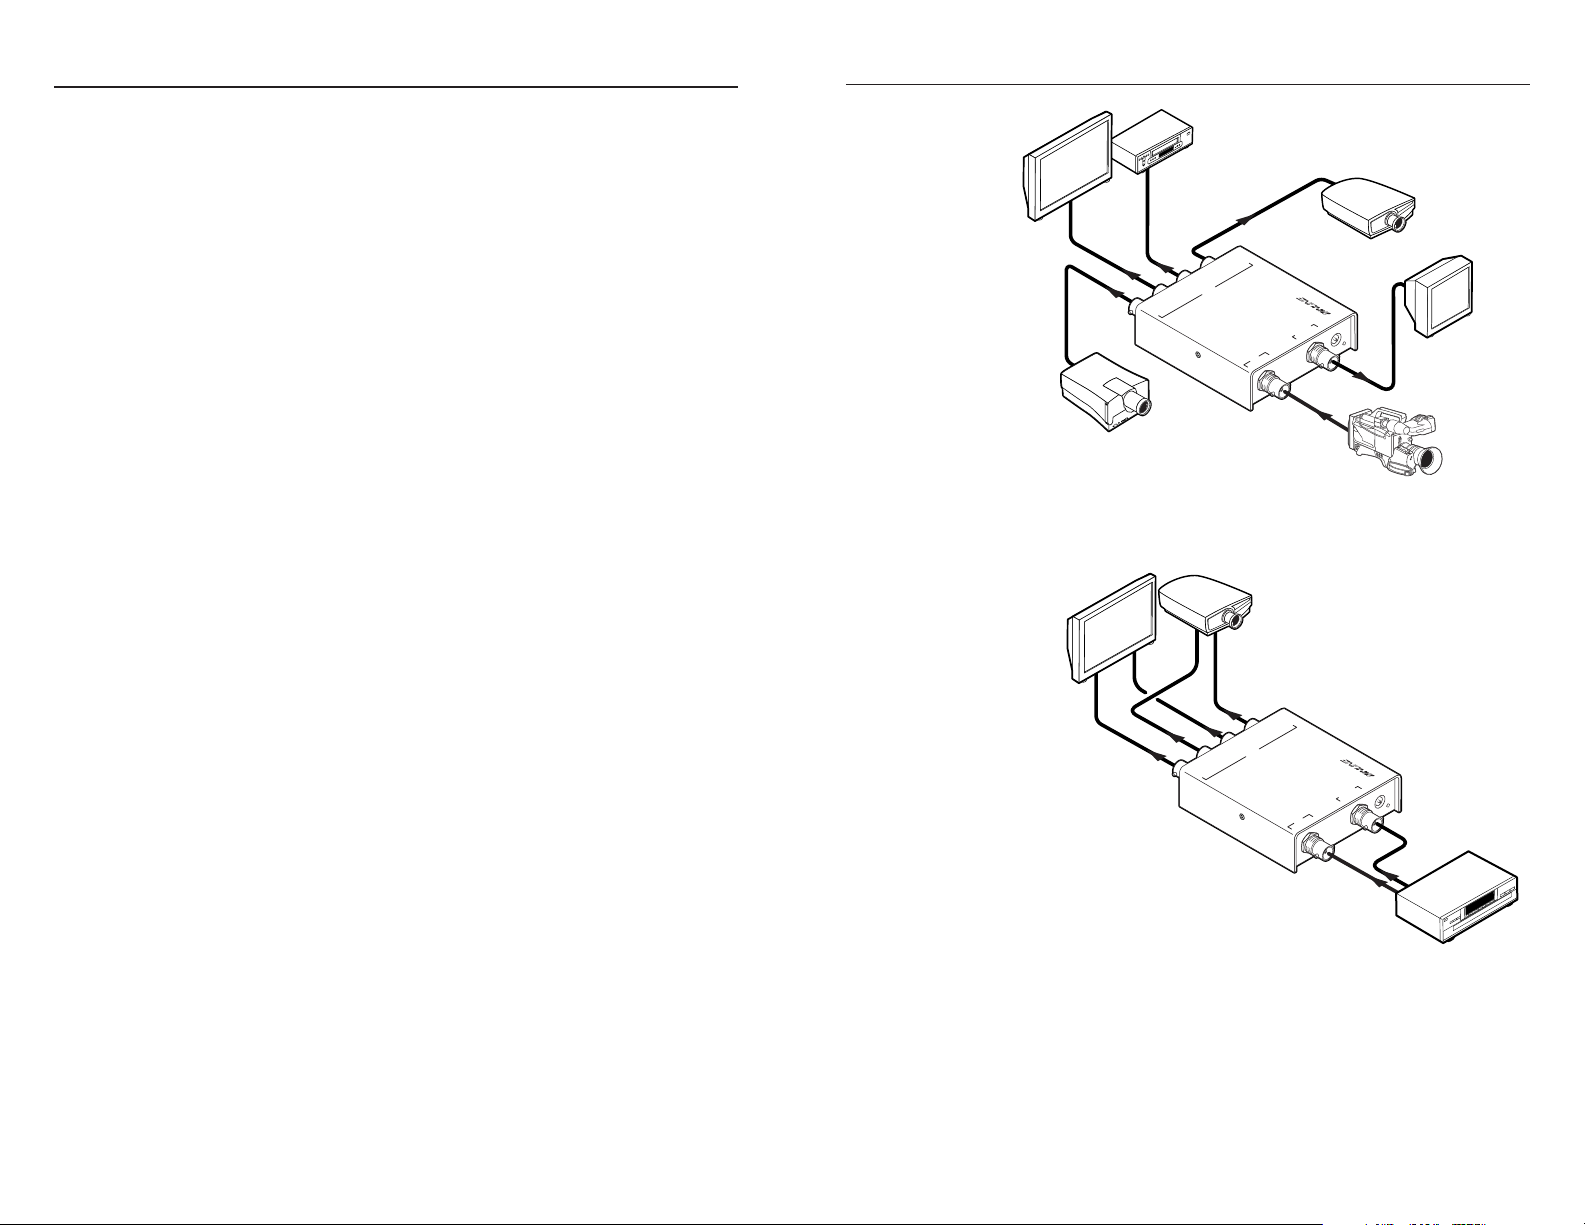
Extron
Projector
IN3214
Video Distribution
Amplifier
Video Camera
Figure 1 — Typical normal mode composite video
application
LCD
Projector
HDTV
Plasma
Y
C
C
Y
OUTPUT 1
OUTPUT 4
OUTPUT 3
OUTPUT
OUTPUT 2
N
IO
T
M
R
T
U
E
IB
IV
R
R
T
D
IS
3214
E
D
IN
O
E
ID
LOOP OUT/
INPUT 2
INPUT
Extron
IN3214
Video Distribution
Amplifier
Y
Figure 2 — Typical split mode S-video application
Installation
1. Turn off and disconnect all equipment.
2. If necessary, reconfigure the internal jumpers for the desired
mode and Loop Out/Input 2 connector termination. See Normal
and Split Mode (IN3214 Only) and Jumper configuration.
/ L
R
V
IE
T
IF
U
L
P
-O
M
4
A
-IN
1
C
DVD
2
IN3212 and IN3214 • Installation 3IN3212 and IN3214 • Normal and Split Mode (IN3214 Only)
Page 3

Installation
J3
J2
J4
J5
O
U
T
P
U
T
L
O
O
P
O
U
T
/
I
N
P
U
T
2
O
U
T
P
U
T
1
O
U
T
P
U
T
2
O
U
T
P
U
T
3
O
U
T
P
U
T
4
I
N
P
U
T
1
-
I
N
4
-
O
U
T
V
I
D
E
O
D
I
S
T
R
I
B
U
T
I
O
N
A
M
P
L
I
F
I
E
R
/
L
I
N
E
D
R
I
V
E
R
32
1
4
T
M
3. Place the DA in the desired location or mount it in a convenient
location using the optional mounting brackets.
4. Connect the input device(s) to the input connector(s).
5. Connect the output devices to the output connectors.
CAUTION
6. Apply power to all devices and turn on the input and
output devices.
7. Adjust the gain and peaking as needed. See Connections and
Controls.
Jumper configuration
The DA is factory configured in normal mode (IN3214 only) with
the Loop Out/Input 2 connector terminated (no loop-through).
For any other type of video, reconfigure the jumpers as follows:
1. Remove the screw on each side of the cover (figure 3).
Remove the four
hex nuts.
Figure 3 — Opening the DA
2. Using an Extron BNC extraction tool (part #100-096-01) or a
14mm, deep well socket, remove the four hex nuts securing
the output BNC connectors to the rear panel. Slide the
cover forward until the cover clears the BNC connectors.
Lift the cover off.
3. Locate J2 through J5 on the printed circuit board (figure 4).
4. Set the jumpers as shown in the table on the following page.
4
5. Replace the cover and reinstall the screws.
Ensure you are using the correct power supply, 110V
or 220V, for your region. Using the wrong power
supply will damage the DA.
4
T
U
P
T
U
O
3
T
U
P
T
U
O
2
O
T
U
Remove screw
each side.
U
T
P
P
T
U
U
T
O
1
T
U
P
T
U
O
TM
4
1
2
3
AMPLIFIER / LINE DRIVER
1-IN 4-OUT VIDEO DISTRIBUTION
/
T
U
O
2
P
T
O
U
O
P
L
N
I
T
U
P
N
I
Figure 4 — Jumper locations
Mode/Termination J5J3 J4J2
Normal/75 ohms (default)
No loop-through on input 2.
Normal/High Z
Loop-through on input 2.
Split/75 ohms
Split/High Z
Shaded = IN3214 only, = jumper installed, = jumper removed.
Furniture mounting
If desired, furniture mount the unit using the optional IN9127
mounting brackets, as follows:
1. Attach the mounting brackets to the distribution amplifier
with the provided machine screws (figure 5).
Figure 5 — Desk mounting the IN3212 and IN3214
IN3212 and IN3214 • Furniture Mounting 5IN3212 and IN3214 • Jumper Configuration
Page 4

Furniture Mounting
2. Hold the unit with the attached brackets against the
underside of the table or other furniture. Mark the location
of the screw holes of the bracket on the mounting surface.
3. Drill 3/32” (2 mm) diameter pilot holes, 1/4” (6.3 mm) deep
in the mounting surface at the marked screw locations.
4. Insert #8 wood screws into the four pilot holes. Tighten
each screw into the mounting surface until just less than
1/4” of the screw head protrudes.
5. Align the mounting screws with the slots in the brackets
and place the unit against the surface, with the screws
through the bracket slots.
6. Slide the DA slightly forward or back, then tighten all four
screws to secure the unit in place.
Connections and Controls
Top view Bottom view
3
4
INPUT
LOOP OUT
3212
1-IN 2-OUT VIDEO DISTRIBUTION
AMPLIFIER / LINE DRIVER
TM
Figure 6 — IN3212 connectors and controls
Top view Bottom view
3
4
INPUT
LOOP OUT/
INPUT 2
1-IN 4-OUT VIDEO DISTRIBUTION
AMPLIFIER / LINE DRIVER
3214
TM
Figure 7 — IN3214 connectors and controls
Power connector — Plug the 9VDC power supply into this
1
connector.
CAUTION
Ensure you are using the correct power supply, 110V
or 220V, for your region. Using the wrong power
supply will damage the DA.
OUTPUT
OUTPUT
1
T
U
P
T
U
O
2
T
U
P
T
U
O
1
T
U
P
T
U
O
2
T
U
P
T
U
O
3
T
U
P
T
U
O
4
T
U
P
T
U
O
Video Output connectors — Connect up to two (IN3212) or
2
four (IN3214) composite video output devices, such as
projectors, VCRs, or monitors, to these female BNC connectors.
For an IN3214 configured in split mode and distributing
S-video, Outputs 1 and 2 output one video plane (Y or C)
and Outputs 3 and 4 output the other plane (C or Y).
Input 1 connector — Connect a composite video input or
3
(for the IN3214 only) an S-video Y or C input, such as from
a DVD player or a VCR, to this female BNC connector.
Loop-out/Input 2 connector —
4
Default configuration — In the factory default
configuration, this female BNC connector is not used.
Buffered loop-through — To provide a buffered loopthrough signal, the internal jumper settings must be
changed (see the jumper table on page 5).
1
2
9VDC 500 mA
TECHNICAL SUPPORT:
(800) 882-7117
(714) 921-4100
.
A
.
S
.
U
N
I
E
D
A
M
POWER
4
2
T
U
P
T
U
+
GAIN
3
+
SHARPNESS
O
2
1
T
U
P
T
U
O
Split mode (IN3214 only) — When the IN3214 is
configured for split mode, this female BNC connector
provides an input connection for a second signal source,
either composite video or an S-video C or Y input. See
Normal and Split Mode (IN3214 Only) for more details.
Gain control — Use a tweeker to adjust the amount of
5
amplification that is added to the video signal. The
adjustment range, assuming a 1.0V input, is from 0.7V (30%
5
6
decrease) to 1.4V (40% increase).
Peak/Sharpness control — Use a tweeker to adjust for the
6
best sharpness.
C
0
4
C
I
N
H
2
8
8
)
1
2
9
)
+
GAIN CONTROL
+
PEAK CONTROL
+
GAIN CONTROL
+
PEAK CONTROL
M
:
T
R
O
P
P
U
S
L
A
7
1
1
7
0
0
1
4
-
4
T
U
P
T
U
O
3
T
U
P
T
U
O
2
2
T
U
P
T
U
O
1
T
U
P
T
U
O
Specifications
Video
Gain ............................................... -3dB to +3dB, adjustable (0.7V p-p to
1.5V p-p output when input is 1V p-p)
Bandwidth .................................... IN3212: 300 MHz (-3dB)
5
IN3214: 280 MHz (-3dB)
POWER
E
T
0
8
1
9VDC 500 mA
(
1
7
(
4
2
3
6
.
A
.
S
.
U
N
I
E
D
A
Video input and loop-through
Number/signal type ................... 1 composite video
1 composite video loop-through
Connectors .................................... 2 female BNC
Nominal level ............................... 1V p-p
Minimum/maximum levels ...... Analog: 0.4V to 2.0V p-p with no offset at
unity gain
Impedance .................................... 75 ohms
6
IN3212 and IN3214 • Specifications 7IN3212 and IN3214 • Connections and Controls
Page 5

Specifications
Return loss .................................... <-35dB @ 5 MHz
Video output
Number/signal type
IN3212 ............................... 2 composite video
IN3214 ............................... 4 composite video
Connectors
IN3212 ............................... 2 female BNC
IN3214 ............................... 4 female BNC
Nominal level ............................... 1V p-p at unity gain
Minimum/maximum levels ...... 0.3V to 3.5V p-p
Impedance .................................... 75 ohms
Return loss .................................... <-35dB @ 5 MHz
DC offset ....................................... ±8mV maximum with input at 0 offset
Sync
Standards ...................................... NTSC 3.58, NTSC 4.43, PAL, SECAM
General
Power ............................................. 110VAC or 220VAC, 50/60 Hz, 2 watts,
external; to 9VDC, 500 mA power supply.
Product requires 0.1 A.
Temperature/humidity .............. Storage -40° to +158°F (-40° to +70°C) /
10% to 90%, non-condensing
Operating +32° to +122°F (0° to +50°C) /
10% to 90%, non-condensing
Rack mount ................................... Yes
Enclosure type .............................. Metal
Enclosure dimensions ................. 4.0" H x 5.6" W x 1.25" D
10.1 cm H x 14.2 cm W x 3.2 cm D
(Depth excludes connectors.)
Product weight ............................. 0.8 lbs (0.3 kg)
Shipping weight .......................... 2 lbs (1 kg)
Vibration ....................................... ISTA/NSTA 1A in carton (International
Safe Transit Association)
Listings .......................................... ETL (UL1950)
Compliances ................................. CE
MTBF ............................................. 30,000 hours
Warranty ....................................... 3 years parts and labor
www.extron.com
Specifications are subject to change without notice.
Extron Electronics, USA
1230 South Lewis Street
Anaheim, CA 92805
USA
714.491.1500
Fax 714.491.1517
Extron Electronics, Europe
Beeldschermweg 6C
3821 AH Amersfoort
The Netherlands
+31.33.453.4040
Fax +31.33.453.4050
© 2003 Extron Electronics. All rights reserved.
Extron Electronics, Asia
135 Joo Seng Road, #04-01
PM Industrial Building
Singapore 368363
+65.6383.4400
Fax +65.6383.4664
Extron Electronics, Japan
Daisan DMJ Building 6F
3-9-1 Kudan Minami
Chiyoda-ku, Tokyo 102-0074 Japan
+81.3.3511.7655
Fax +81.3.3511.7656
 Loading...