

Page 1
IMPORTANT:
installation instructions,
specifications bef
oduct to the po
ore connecting the
wer source.
HC 402 • Setup Guide
Go to www.extron.com for the complete
user guide,
pr
HC402 System
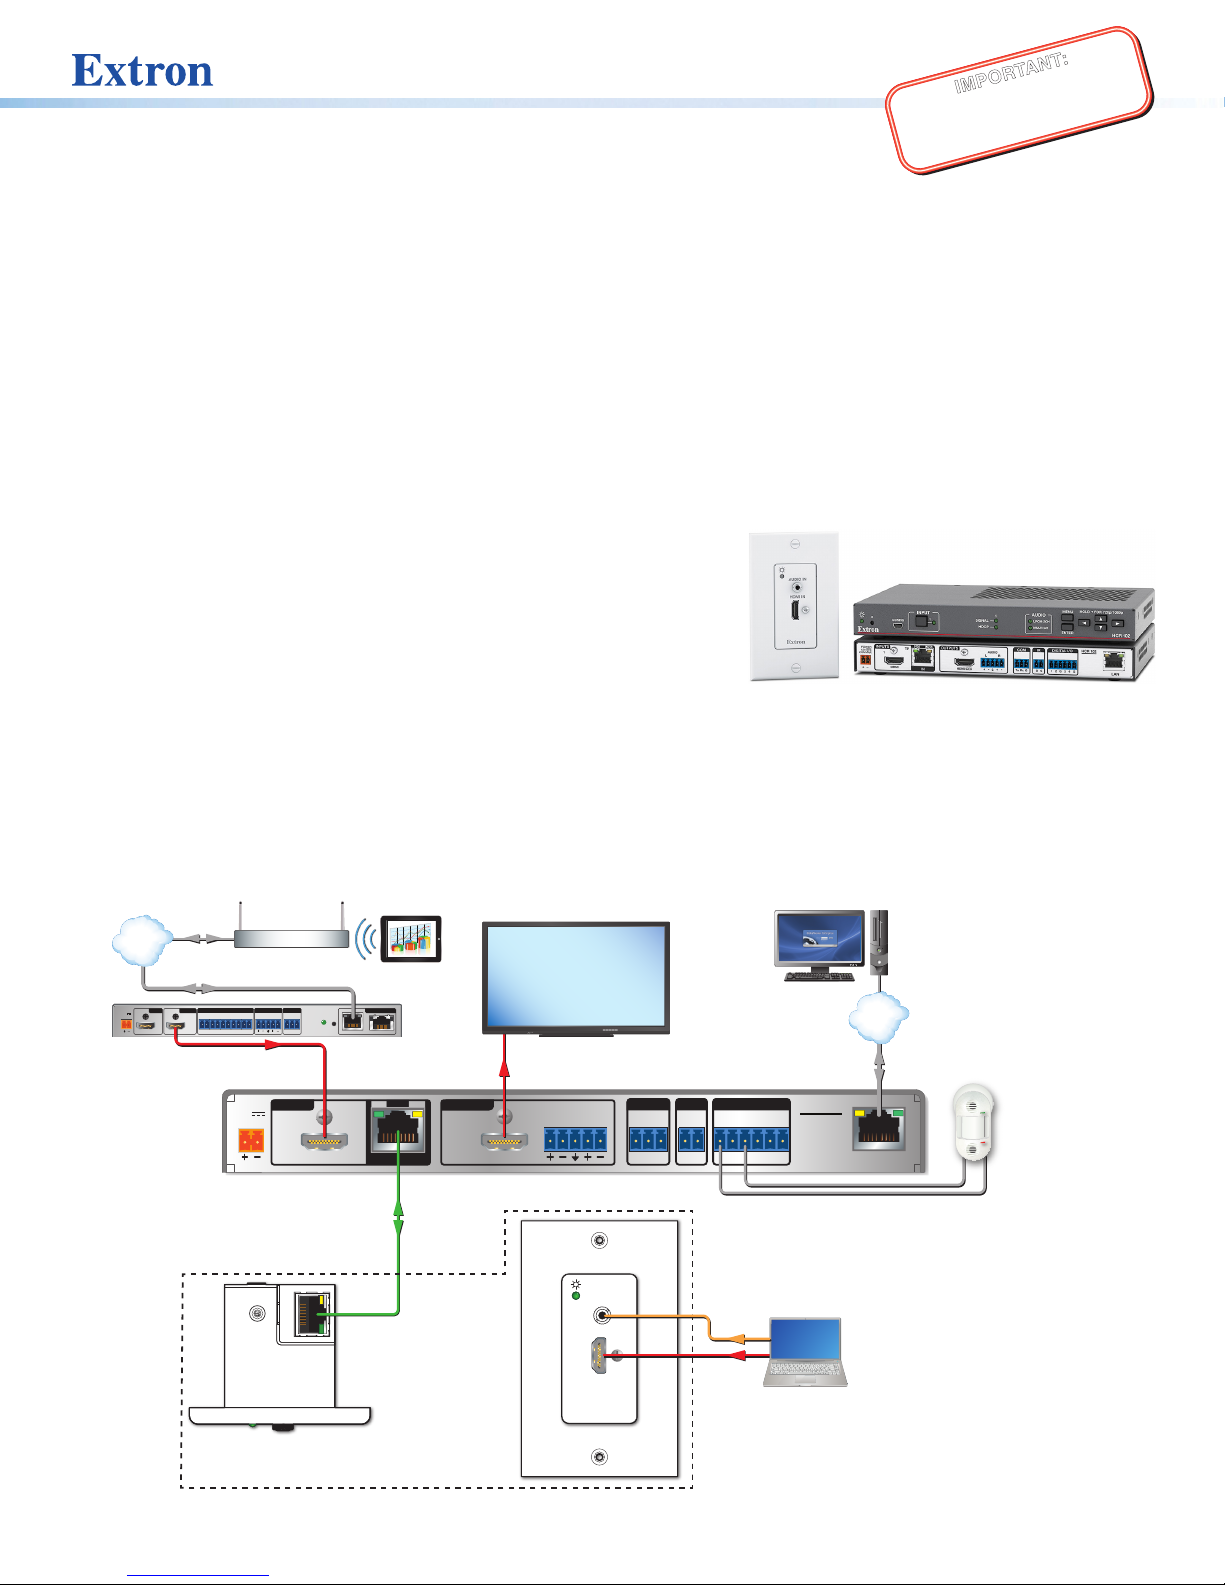
The Extron HC402 system is an AV presentation solution that incorporates a built-in control processor for display control via
HDMI Consumer Electronics Control (CEC), RS-232, IR, or Ethernet. It also includes digital I/O ports.
Each system is a transmitter-receiver pair that is factory-optimized to work together as if it were a single unit.
Together each transmitter-receiver system extends video, audio, and control signals up to 230feet (70m) over a single CATx cable.
Each system offers two auto-input switching modes, one of which automatically selects sources based on input signals and also
allows manual source selection via buttons. Auto-switching modes can be enabled or disabled via Extron Product Configuration
Software (PCS). The “last connected” auto-switching mode is enabled by default.
The HC402 features two AV inputs and one output. It consists of a one-input transmitter (HCT101D) and a scaling receiver
(HCR102) that has one HDMI input and one connection from the transmitter. The transmitter has a decorator-style wallplate and
can be mounted into a standard US 1-gang junction box; and the receiver is wall, furniture, or rack mountable.
Transmitter
The HCT101D transmitter includes one digital (HDMI) video input and
one analog audio input. It does not include input selection buttons and
LEDs. The extended HDMI video signal can be HDCP-compliant.
and
Receiver
The HCR102 receiver incorporates a high performance, HDCP compliant
scaler that scales video to provide a consistent output resolution to a
display. It accepts video with resolutions from 480i up to 1920x1200, 1080p, and 2K, and performs upscaling and downscaling
with multiple output rates up to 1920x1200, including HDTV 1080p/60 and 2K. The receiver includes an on-screen display, test
patterns, and EDID Minder.
This setup guide provides instructions for an experienced installer to install the HCT101D and the HCR102. The guide provides
information needed to configure the most essential settings for the system and the receiver. It also describes basic operations using
front panel controls and the on-screen display (OSD) menu system. Full details are available in the HC400 Series User Guide.
Room
Ethernet
TCP/IP
Network
Ethernet
POWER
INPUT
OUTPUT
12V
1.7A MAX
HDMI HDMI
Extron
ShareLink Pro 1000
Wireless and Wired
Collaboration
Gateway
CONTACT / TALLY
1
C T2C T3C T4C T G +V
Wireless Access
Point
COM
OUTPUT
AUDIO
RS-232
L
R
Tx Rx G
HDMI
POWER
INPUTS
12V
2.0A MAX
HCR 102
Scaling Receiver
HCT 101 D
Transmitter
Tablet
LAN
RESET
A/PoE B
SIG
TP
LINK
IN
Twisted Pair
Cable (AV )
230'
1
HDMI
OUTPUTS
MODEL 80
HDMI/CEC
HDMI,
CEC
FLAT PANEL
Display
AUDIO
L R
COM IR DIGITAL I/O
HCT101D HCR102
Ethernet
HCR 102
1 2S GTx Rx G G 3 4 G
TCP/IP
Network
LAN
PC with
GlobalViewer
Enterprise
Extron
OCS 100W
Wall Mount
Occupancy
Sensor
Top
Figure 1. An HC 402 System Application
Front
AUDIO IN
AUDIO IN
HDMI IN
HDMI IN
e
e
Audio
HDMI
1
Page 2
HC 402 • Setup Guide (Continued)
HC
AI
J
B
D
HFGE
POWER
12V
2.0A MAX
INPUTS
OUTPUTS
1
TP
HDMI
LR
AUDIO
HDMI/CEC
SIG
LINK
IN
COMIR DIGITAL I/O
12SGTx Rx GG34G
HCR 102
LAN
MAC: 00-05-A6-XX-XX-XX
S/N: ####### E######
00-05-A6-XX-XX-XX
A F ND G H
K L M
HCR 102 Rear
O
HCT 101 D
POWER
12V
A MAX
0.7
OUT
e
HDMI IN
AUDIO IN
HDMI IN
A
UDIO IN
B
D
HCT 101 D Front
HCT 101 D
Rear
HCT 101 D
Right Side
HCT 101 D Top
Wallplate
A
E
E
Panels and Features
Front Panel Features
R 102
INPUT
R
CONFIG
1
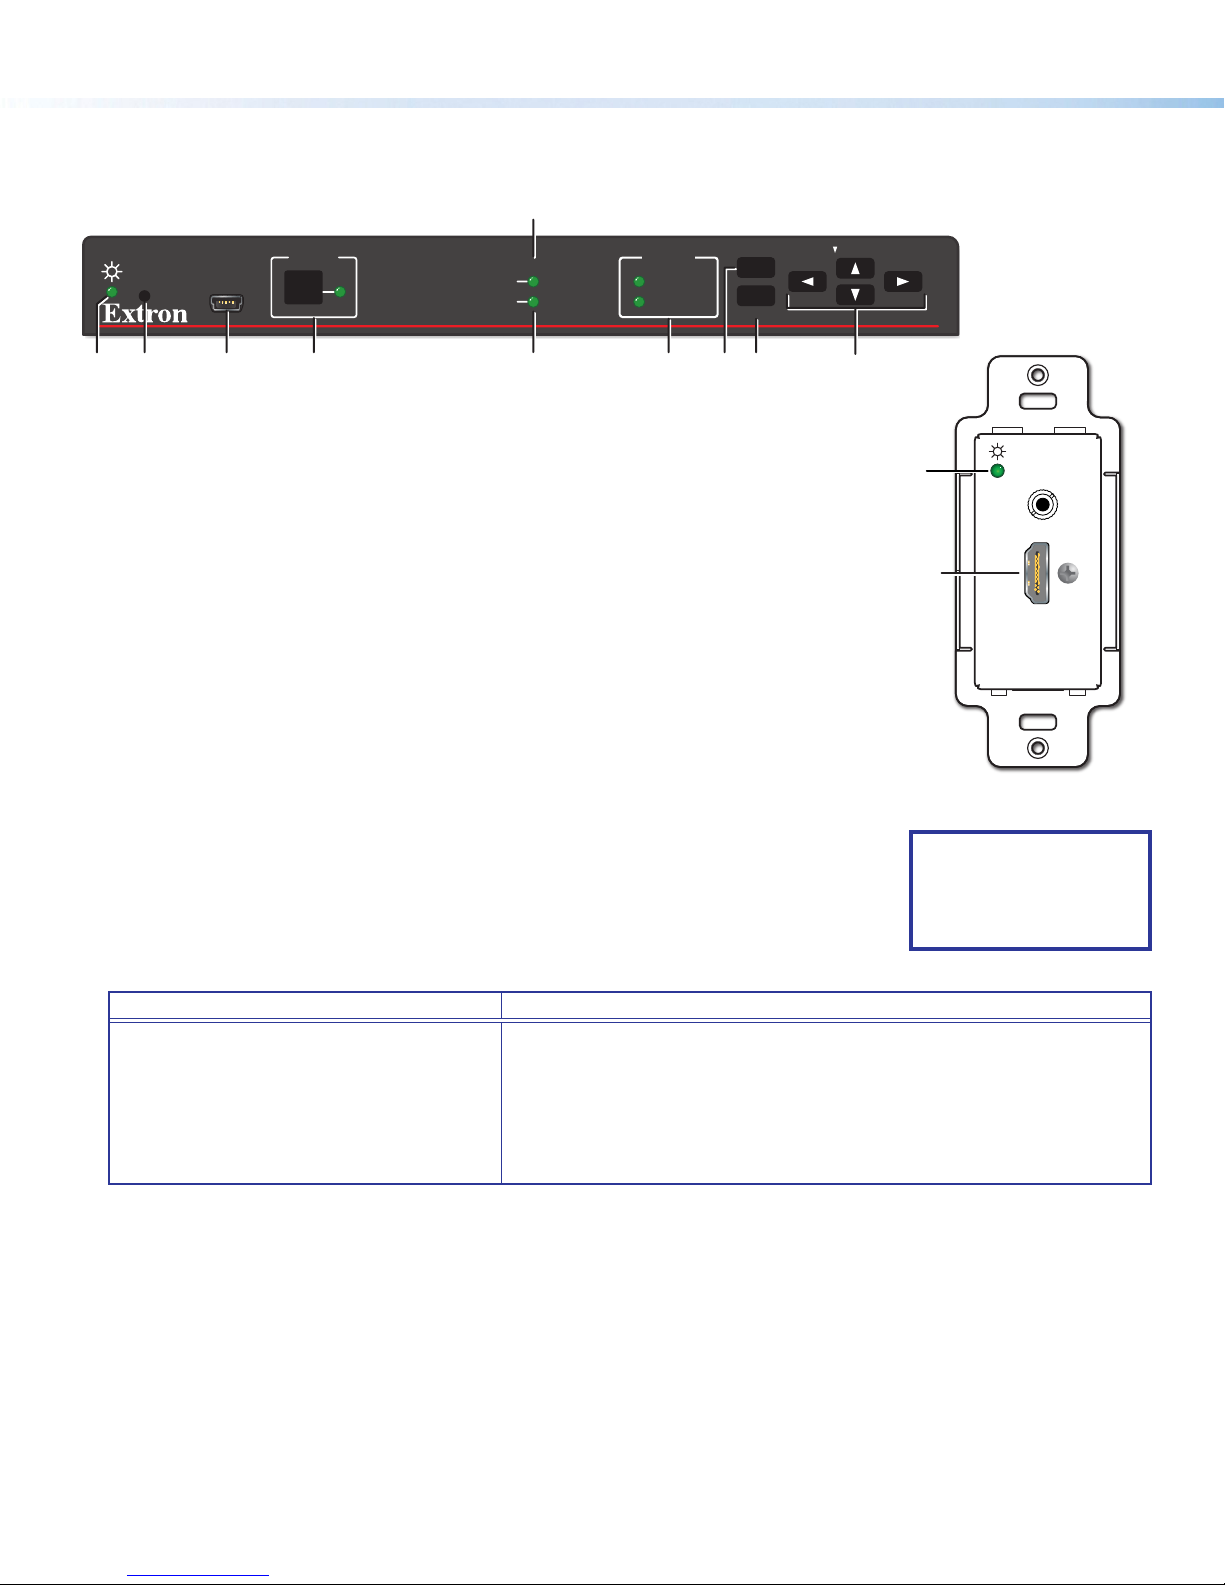
Figure 2. HCR102 Front Panel (Above),
HCT101D Front Panel Without Wallplate (Right)
Configuration (Config) connector (USB mini-B), page 11
A
Input selection button and LED, page 13
B
Input signal presence (Signal) LED, page 13
C
HDCP status LED, page 13
D
Audio input type LEDs (LPCM-2Ch and Multi-Ch, page 14)
E
Menu button,
F
Enter button, and
G
Navigation (right , left , up , and down arrow) buttons (see To configure
H
the AV settings using the OSD and front panel buttons: on page7)
Power LED (HCT101D), power and reset indicator LED (HCR102) —
I
This green LED indicates either the power status of the HCT101D transmitter or
the HCR102 receiver, or the reset mode of the receiver. For LED indications, see
the table below.
Reset button (HCR102) — Pressing this recessed button causes various product
J
settings to be reset to the factory defaults (see Reset Modes: a Brief Summary on
page15).
Reset and power LED (I) indications are as follows:
HCT 101 D Transmitter HCR 102 Receiver
• Off — The unit is not powered on.
• On, lit amber — The unit is powered on
but there is no active signal at that input.
• On, lit green — The unit is powered on
and there is an active signal at that input.
C
1
SIGNAL
HDCP
• Off — The unit is not powered on.
• On, lit steadily — The unit is powered on.
• Blinking — The unit is powering up or the HCR102 is performing a reset.
The blink pattern depends on the selected reset mode.
For full descriptions of reset modes, how to use the reset button to activate
them, and details of LED indications of each mode, see the HC400 Series
User Guide.
AUDIO
LPCM-2CH
MULTI-CH
MENU
ENTER
HOLD FOR 720p/1080p
HCR 102
I
Input
2
AUDIO IN
HDMI IN
e
HCT 101 D Front
(Without Wallplate)
NOTE: For other
connectors on the
HCT101D, see Rear
and Side Panel
Features on page3.
2
Page 3

Rear and Side Panel Features
A F ND G H
K L M
HCT 101 D
POWER
12V
A MAX
0.7
OUT
e
HDMI IN
AUDIO IN
HDMI IN
A
UDIO IN
B
D
HCT 101 D Front
HCT 101 D
Rear
HCT 101 D
Right Side
HCT 101 D Top
Wallplate
A
E
E
HCR 102 Rear
SIG
POWER
12V
2.0A MAX
INPUTS
1
TP
LINK
OUTPUTS
AUDIO
LR
COMIR DIGITAL I/O
HCR 102
00-05-A6-XX-XX-XX
MAC: 00-05-A6-XX-XX-XX
S/N: ####### E######
HDMI
IN
Figure 3. HCR102 Rear Panel
Power input connectors, page 12
A
Audio input connector, page 9
B
HDMI input connectors, page 10
D
Transmitter output RJ-45 connector
E
(twisted pair interconnection),
page 10
Receiver input RJ-45 connector
F
(twisted pair interconnection),
page 10
HDMI/CEC output connector,
G
page 10
Analog audio output connector,
H
page 10
COM RS-232 control port,
K
page 11
IR output control port, page 11
L
Digital I/O (digital input/output)
M
control ports,
page 11
LAN (Ethernet) connector and
N
LEDs, page 11
MAC address (on side of receiver),
O
page 11
HDMI/CEC
12SGTx Rx GG34G
LAN
O
NOTE: Features
available on other HC400 Series
C, I
, and J are
transmitter models.
Figure 4. HCT101D Right Side Panel (Top Left), Rear Panel (Top Right),
Top Panel (Bottom Left), Front Panel (Bottom Right)
3
Page 4
HC 402 • Setup Guide (Continued)
POWER
12V
--A MAX
INPUTS
OUTPUTS
1
TP
HDMI
L R
AUDIO
HDMI/CEC
SIG
LINK
COM IR DIGITA L I/O
1 2
S GTx Rx G
G 3 4 G
HCR 102
LAN
IN
Installation and Configuration
ATTENTION:
• Installation and service must be performed by experienced personnel.
• L’installation et l’entretien doivent être effectués par du personnel expérimenté.
Step 1 — Get Ready
1. Familiarize yourself with the features of the transmitter and receiver (see Front Panel Features and Rear and Side Panel
Features on page3).
2. Download and install the latest version of the following:
• PCS Product Configuration Software — for detecting and configuring the AV settings for the transmitter-receiver pair
• Toolbelt software — for discovering the HCR102 receiver and other control products on the network, for managing
core settings, and for upgrading firmware if the need arises
• Global Configurator
modes include a link to the Toolbelt software.
• IPLink
®
Pro device drivers — for use with GC, to make control of other AV devices possible
All are avail able from www.extron.com (see Locating Software, Firmware, and Driver Files on the Extron Website on page16).
3. Obtain network information for the unit from the network administrator. You will need the following details for each HCR102
receiver and for any other Extron Pro control product that is part of the system:
DHCP setting (on or off) Subnet mask Username
Device (HCR102) LAN IPaddress Gateway IP address Passwords
4. Write down the MAC address of each HCR102 (see figure 4,
5. Obtain model names and setup information for devices the HCR102 will control.
®
(GC) software — for setting up and configuring the control system. GCProfessional and GCPlus
on the previous page) or other IPLinkPro device to be used.
O
Step 2 — Mount the Receiver, Prepare the Installation Site for
the HCT101D
Turn off or disconnect all equipment power sources and mount the
transmitter and receiver as required.
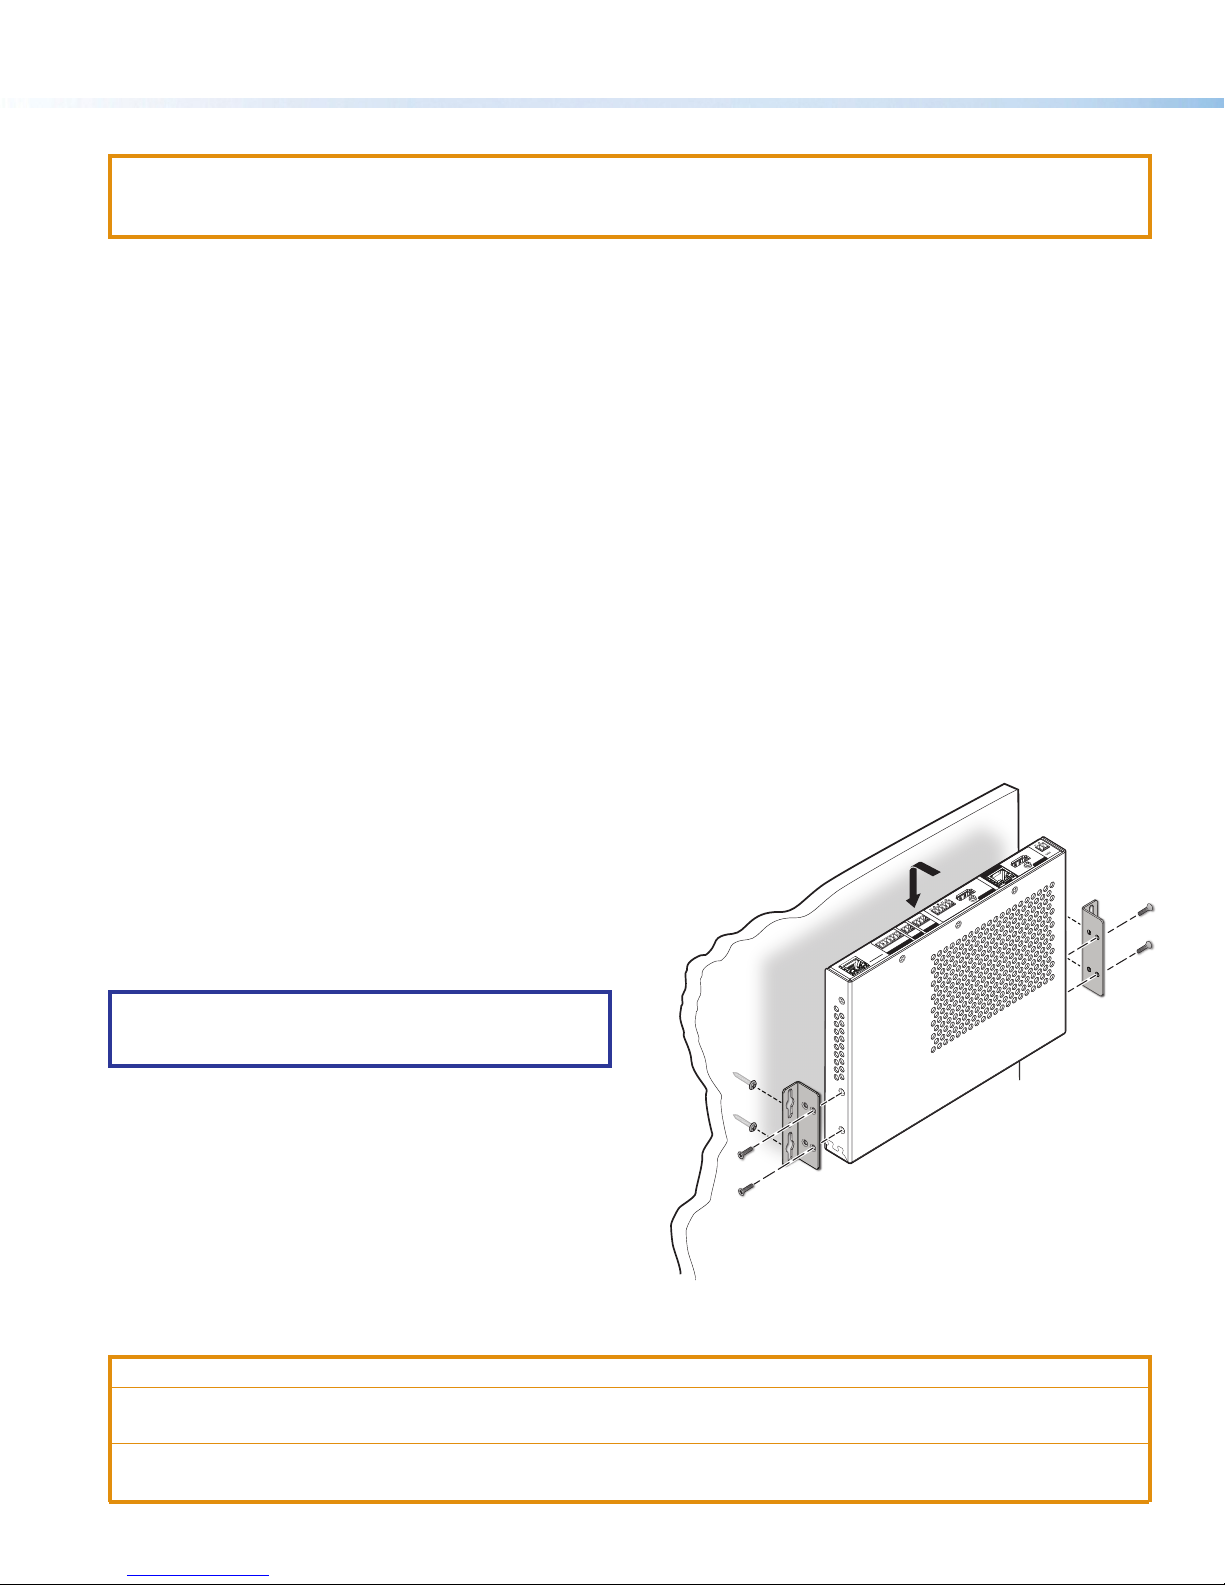
Mounting the HCR102
The HCR102 receiver ships with furniture mounting brackets
attached for mounting to furniture or a wall.
NOTE: The receiver is designed so that its vents face
away from the wall or furniture when mounted in order to
achieve optimal air circulation and cooling.
Each receiver is one inch high, one half rack wide, and can
be rack mounted. The product page on www.extron.com
includes links to recommended optional rack shelves or rack
mounting kits. Alternatively, you can remove the pre-installed
furniture mounting brackets and attach four rubber feet at the
corners of each unit and place it on a table or desk.
Observe local and UL safety guidelines for mounting devices
to equipment racks. See the HC400 Series User Guide for UL
rack mounting guidelines.
Prepare the Installation Site for the HCT101D
ATTENTION:
• Installation and service must be performed by authorized personnel only.
• L’installation et l’entretien doivent être effectués uniquement par un technicien qualifié.
• Extron recommends installing the HCT101D into a grounded, ULListed electrical junction box.
• Extron recommande d’installer le HCT101D dans un boîtier d’encastrement électrique mis à la terre, certifié UL.
Figure 5. Mounting the Receiver
4
Page 5

ATTENTION:
• If the HCT101D will be installed into fine furniture, it is best to hire a licenced, bonded craftsperson to cut the access
hole and perform the physical installation so the surface will not be damaged.
• S’il est prévu d’installer le HCT101D dans du beau mobilier, il est préférable de faire appel à un artisan autorisé et
qualifié pour couper le trou d’accès et réaliser l’installation de telle façon que la surface ne soit pas endommagée.
• Follow all national and local building and electrical codes that apply to the installation site.
• Respectez tous les codes électriques et du bâtiment, nationaux et locaux, qui s’appliquent au site de l’installation.
NOTE: For the installation to meet UL requirements and to comply with National Electrical Code (NEC), the HCT101D must be
installed in a ULListed junction box. The end user or installer must furnish the junction box. It is not included with the unit.
Americans with Disabilities Act (ADA) compliance
When planning where to install the HC system, you may need to consider factors affecting accessibility of the units such as height
from the floor, distance from obstructions, and how far a user must reach to press the buttons or insert a cable. For guidelines,
see sections 307 (“Protruding Objects”) and 308 (“Reach Ranges”) of the 2010 ADA Standards for Accessible Design available at
http://www.ada.gov/regs2010/2010ADAStandards/2010ADAStandards.pdf.
Site preparation
Wall
Each HCT101D fits a standard US one-gang junction box or mud ring
and decorator-style wallplate. Each unit ships with a mud ring.
Optional ULListed junction boxes, external junction boxes, and
surface mounting boxes are available for use with the unit. Read
any installation instructions and UL guidelines that come with the
mounting devices, then install the box or mud ring in the opening
at the installation site.
To prepare the site:
1. Using the size of the junction box or mud ring for reference,
cut the hole in the mounting surface. Protect the surface prior
to and during cutting so the surface is not damaged.
2. Run cables to the mounting location, leaving enough slack for
device installation.
3. Install the junction box or mud ring into the wall or furniture.
4. Secure the cables with a clamp for strain relief and so they do
not slip back down into the wall or furniture.
Mud Ring
Figure 6. Installing a Mud Ring
Step 3 — Connect AV, Interconnection, and Control Cables
1. Connect AV sources to the input connectors (see AV Inputs on page9).
2. Use a shielded twisted pair cable to connect the transmitter to the receiver via the Output and Input RJ-45 connectors (see
Transmitter-Receiver Interconnection on page10).
3. Connect AV output devices (display, projector, or other device, and an amplifier or powered speakers) to the output
connectors (see AV Outputs on page10).
4. If applicable, use Extron Show Me cables for controlling and indicating input selection (see instructions for the Remote
connectors in Control on page11).
5. Cable the control ports on the receiver as desired for controlling AV devices and for communicating with the system via LAN
(see Control on page11).
Step 4 — Connect Power
Connect the power supply or power supplies to the HC400 Series system (see Power on page12), connect power cords, and
power on all the devices.
NOTE: The power supplies can be set on a tabletop, or mounted to a rack or furniture. Follow the mounting directions
included with each power supply or see the power supply installation guides available on the PS Series Power Supplies
page on the Extron website.
5
Page 6

HC 402 • Setup Guide (Continued)
Step 5 — Configure Network Settings
You can configure the basic network settings in one of the following ways:
• Via front panel controls and the OSD menu — a quick method you can use whether or not you need to configure other
control settings (see Using the OSD menu to configure the AV settings on page8). This requires connection to a
display device.
• Via PCS software — a method that provides basic network configuration and is convenient when you are ready to use PCS
to configure AV settings. This requires a PC, software, and a LAN or USB connection.
• Via Toolbelt software — a method that allows you to configure additional connection settings and is convenient when you
want to configure additional device, password, system, and control port settings. This requires a PC, software, and a LAN
connection.
To configure network settings from the OSD menu:
From the Quick Setup menu:
• DHCP — Select and enter the DHCP Mode submenu and press the arrow buttons to turn DHCP on or off (default: off).
• IP address — Select and enter the IP Address submenu. Press the left or right arrow button to move between
octets. Press the up and down arrow buttons to change the value in the selected octet.
Default: 192.168.254.250.
From the Communication menu:
NOTE: Press and hold the Enter button for 10 seconds to edit settings in the Communication submenu.
• DHCP — Select and enter the DHCP Mode submenu and press the arrow buttons to turn DHCP on or off (default: off).
• IP address — Select and enter the IP Address submenu. Press the left or right arrow button to move between
and select octets. Press the up and down arrow buttons to change the value in the selected octet.
• Subnet mask — Select and enter the Subnet Mask submenu. Press the left or right arrow buttons to select an
octet of the subnet mask address. Press the up and down arrow buttons to adjust the value of the selected octet.
Default: 255.255.255.0.
• Gateway — Select and enter the Gateway submenu. Press the left or right arrow buttons to select an octet of the
gateway address. Press the up and down arrow buttons to adjust the value of the selected octet.
Default: 0.0.0.0.
To configure network settings using PCS:
1. Connect the PC and the LAN port of the HCR102 receiver (see LAN port on page11) to the same network.
Or
Connect the PC to the front panel Cong port of the HCR102 receiver using a USB type A male to USB mini-B male cable
(such as the Extron USB CFG cable).
2. Apply power to the PC and the HCR102.
3. Open the PCS software. You might need to open the application as an administrator by right-clicking the PCS icon and
selecting Run as administrator. PCS opens to the Device Discovery page. The Device Discovery process begins
automatically. The page displays a list of all Extron devices connected to the network as PCS detects them.
4. Using the MAC address, locate the desired device (HCR102) in the list.
5. In the row for the HCR102, click the Edit button in the IP Address
column. The Communication Settings dialog box opens,
displaying controls for network configuration.
6. Either select (enable) the Use DHCP checkbox to have the receiver
obtain an IP address automatically from a DHCP server, or enter the
static IP address for the unit in the IP Address field.
NOTE: When setting up DHCP during network configuration or if
using a host name instead of an IP address, the user must enter
a qualified host name (Username.HostName.Domain). For
example: somename.extron.com.
7. Configure the other items (device name, subnet mask, gateway
address, DNS server address) as needed.
8. Click Apply to save the configuration changes. Alternatively, you can
click Apply and Connect to save the configuration changes and
then establish a connection from the PCS software to the receiver to
configure AV settings or front panel lockout.
6
Figure 7. The PCS Communication Settings
Dialog Box
Page 7

To configure network settings using Toolbelt:
Navigation buttons
Enter button
Menu button
P
s
I
O
A
Ad
d
C
D
1. Connect the PC that you will use for setup and the HCR102 receiver to the same network, and apply power to all devices.
For details on the LAN connection, see LAN on page11.
2. Start Toolbelt.
3. Start device discovery from within Toolbelt. Toolbelt displays a list of all Extron control devices connected to the network.
4. In Toolbelt, use the MAC address to locate the desired device (the HCR102) in the list and select it.
5. Use the Set IP feature in Toolbelt or use the Toolbelt Manage > Network Settings tab feature to enter the IP address and
subnet address, then configure other network settings as needed.
NOTE: When setting up DHCP during network configuration or if using a host name instead of an IP address, the user
must enter a qualified host name (Username.HostName.Domain). For example: somename.extron.com.
Step 6 — Configure AV Settings
The AV and scaling settings for the system can be configured via a host connection through the LAN port or the USB port using
PCS software or the on-screen display. Many settings can be configured using either method (OSD or PCS). Some settings are
available only in the PCS software.
To configure the AV settings using PCS software:
1. Install Extron PCS (Product Configuration Software) on a PC and start the program.
2. Connect the PC to the receiver via the rear panel LAN port (see figure 4,
connector (see figure 2, A on page 2). USB connection requires a user-provided USBA to USBmini-B cable.
3. Use the PCS program to set the output resolution and rate, configure EDID Minder, adjust the video color bit depth, or
monitor the signal and HDCP status, or other AV settings, as required. For details, see the HC400 Series User Guide, or
access the PCS Help File (press <F1> on the keyboard or click the ? button in the software and select Help File).
To configure the AV settings using the OSD and front panel buttons:
1. Connect an HDMI display device to the HDMI/CEC output connector on the HCR102.
2. Power on the receiver and the display device, if they are not already powered on.
3. Press the front panel Menu button on the HCR102 (see figure 2,
on page 2, or
F
the image at right). The OSD main menu appears on the display
(see the example below, at right).
The OSD menu system consists of the following menus:
• Quick Setup • Audio
• Picture Controls • Advanced
• Input • Communications
• Output
and one read-only information screen (Device Info).
4. Navigate through the menus and make adjustments.
a. Press the up
and down arrow navigation buttons
(see H) to navigate to and highlight the desired menu or
submenu.
b. Press the Enter button (
) or right arrow button
G
to access submenu items for the selected submenu (see
Using the OSD menu to configure the AV settings for
information about the contents of each submenu).
c. Press the up
and down arrow buttons to navigate to
and highlight submenu items.
d. Press the Enter or right arrow button to adjust a
submenu item.
NOTE: The OSD times out and closes after one minute if no
buttons are pressed.
on page 3) or the front panel Config USB
N
Extron Electronics
HCR 102
Quick Setup
Quick Setup
Picture Controls
icture Control
Input
nput
Output
utput
Audio
udio
Advanced
vance
Communications
ommunications
Device Info
evice Info
Input 1
1920x1080 @ 60Hz
MENU
ENTER
Input 1: Input Format
HOLD FOR 720p/1080p
HDMI
Input 1: EDID
1920x1080 @60Hz
Output Resolution
1920x1200 @60Hz
Audio Mute
On
Test Pattern
Crop
DHCP Mode
Off
IP Address
192 . 168 .254 . 250
Output Resolution
1920x1200 @ 60Hz
HCR 102
192.168.254.250
FW 2.03
7
Page 8

HC 402 • Setup Guide (Continued)
Using the OSD menu to configure the AV settings
• Use the Quick Setup submenu to set input EDID settings, set output resolution, mute audio, activate video test patterns,
enable or disable DHCP, and set the IP address.
• Use the Picture Controls submenu to view the image position and size.
• Use the Input submenu to set the input format for digital inputs, set horizontal and vertical start values, set the total pixels
and phase, set HDCP authorization, and set the EDID for the current input.
• Use the Output submenu to set output resolution, HDMI output format, and HDCP notification.
• Use the Audio submenu to mute audio, set the audio input format (see table below) for the selected input, set program audio
volume, and set audio output format (stereo, mono).
Audio Input Format Details
None Mutes all audio for selected input. Sets “No Audio” EDID.
Analog Sets the selected input to analog (default for input 1). Sets “No Audio” EDID.
LPCM-2Ch Sets the selected input to LPCM-2Ch digital audio (default for input 2). Sets 2Ch audio EDID.
Multi-Ch Sets the selected input to Multi-Ch digital audio. Sets Multi-Ch audio EDID.
LPCM-2Ch auto Sets the selected input to prioritize digital audio (default for inputs 3-4). Analog audio is passed when
digital audio is not present. Sets 2Ch audio EDID.
Multi-Ch auto Sets the selected input to prioritize digital audio. Analog audio is passed when digital audio is not
present. Sets Multi-Ch audio EDID.
• Use the Advanced submenu to select a test pattern, set the screen saver, set the aspect ratio, configure auto switching, and
reset the device to factory defaults.
• Use the Communication submenu to view the device MAC address, DHCP status, the current IP address and subnet mask,
and gateway.
NOTE: Press and hold the Enter button for 10 seconds to edit settings in the Communication submenu.
• Use the Device Info screen to view the device name, firmware build, temperature, input and output information, and
detected display. This screen is read-only.
See the HC400 Series User Guide for details about the menus and available settings, and for a list of output scaler rates.
Step 7 — Configure the Control Settings
To use the COM, IR, or digital I/O ports on the receiver, you must configure them. Also, CEC control of the output device can be
customized during configuration with Global Configurator.
The basic steps are outlined below in the recommended order.
NOTE: See the Toolbelt Help File or Global Configurator Help File, and GUI Designer Help File as needed for step-by-step
instructions and detailed information. The help file for GC includes an introduction to the software and how to start a project
and configuration.
1. Using GC, create a new GCPro or GCPlus project and configure the receiver and other IP Link Pro devices. The
configuration tells the receiver:
• how its control ports function • what to monitor
• how to control other products • when to do things
• which touchpanels to interact with • whom to notify, how, and under what circumstances
a. Configure the control ports on the receiver.
• Select device drivers and link them to each serial, IR, or Ethernet port.
• Select settings (serial protocol or digital I/O settings) as needed.
• Configure CEC controls, if desired
b. Set up monitors, schedules, macros, timers, and local variables.
c. Add any optional touchpanels and set them up:
• Create the GUI configuration for the touchpanels and add it to the project.
• Program functions, monitors, or schedules to the touchpanels and their buttons.
2. Save and build the project.
3. Upload the system configuration to the HCR102 receiver.
8
Page 9

Step 8 — Test and Troubleshoot the System
Electr
J
Bo
Tip (L)
(unbalanced input)
1. Test the system. See the HC400 Series User Guide for
an outline of the system testing procedure.
2. Make adjustments to wiring or configuration as needed.
Step 9 — Mount the HCT101D
NOTE: Extron recommends taking safety precautions
to avoid electrostatic discharge issues during
installation.
1. Disconnect power at the source from all devices
in the system.
2. Insert the cabled transmitter into the mud ring or junction
box within the wall or furniture, aligning the mounting
holes in the transmitter with those in box or mud ring
(see figures 8 and 9).
3. Secure the transmitter to the junction box or mud ring as
follows:
a. Insert the included screws through the oval
mounting holes at the top and bottom of the
transmitter and into the corresponding threaded
holes in the box or mud ring.
b. Using a Phillips screwdriver, lightly tighten
the screws until snug.
ATTENTION:
• Do not overtighten the screws.
• Veillez à ne pas trop serrer les vis.
Wall
AUDIO IN
HDMI IN
Mud Ring
e
HCT 101 D
Wallplate
Figure 8. Mounting the Transmitter to a Mud Ring
Wall
4. Attach the wallplate to the transmitter:
a. Align the wallplate openings with the
faceplates of the transmitter, and place the
wallplate against the unit.
b. Insert the included screws through the
circular holes in the wallplate and the tabs
on the transmitter. Tighten the screws
using a flat bladed screwdriver until snug.
ical
unction
x
5. Reconnect power to all devices.
Cabling
Attach cables using the following wiring diagrams
as a guide. Full details are available in the
HC400 Series User Guide.
Figure 9. Mounting the Transmitter to a Junction Box
AV Inputs
Analog audio input
For analog audio sources, connect the source device to the audio input 3.5 mm tip-ring-sleeve (TRS)
connector on the transmitter (see figure 4, B on page 3 for connector location). Wire the connector
as shown at right.
AUDIO IN
HDMI IN
e
HCT 101 D
Wallplate
Ring (R)
Sleeve (Gnd)
3.5 mm Stereo Plug
9
Page 10

HC 402 • Setup Guide (Continued)
a
Insert twisted
pair wires.
Pins:
LR
Balanced Audio Output
Slee
Unbalanced Audio Output
No Ground Here
Digital AV input
For HDMI video and for digital audio embedded within HDMI signals:
1. Connect a digital video source device to any HDMI input connector on the
transmitter or receiver (see D in Rear and Side Panel Features on page3).
2. To secure each cable to the unit, attach an Extron LockIt
secure it to the cable with a zip tie.
a. Plug the HDMI cable into the panel connection (see
b. Loosen the HDMI connection mounting screw from the panel enough to allow the
LockIt lacing bracket to be placed over it (b). The screw does not have to be
removed.
c. Place the LockIt lacing bracket on the screw and against the connector (
tighten the screw (d) to secure the bracket.
d. Loosely place the included tie wrap around the connector and the LockIt lacing
bracket as shown (e).
e. While holding the connector securely against the lacing bracket, tighten the tie
wrap, then remove any excess length.
Complete details on LockIt installation are available in the LockIt HDMI Cable Lacing
Bracket Installation Guide.
Transmitter-Receiver Interconnection
®
bracket to the unit and
at right).
a
c
b
c
), then
3
d
e
Connect the Out port of the transmitter (see figure 3, E, on page 3) to the In port of the
receiver (F) using a shielded twisted pair CATx cable of up to 230 feet (70 m), as shown in
figure 1 on page 1. Terminate the cable with shielded RJ-45 connectors using the TIA/EIA-
T568B wiring standard at both ends, as shown at right.
ATTENTION:
• Do not connect this port to a computer data network or a telecommunications network.
• Veuillez ne pas connecter ce port à un réseau de données informatiques ou à un
réseau de télécommunications.
• Do not use Extron UTP23SF-4 Enhanced Skew-Free AV UTP cable or STP201 cable.
• N’utilisez pas le câble AV Skew-Free UTP version améliorée UTP23SF-4 d’Extron ou
12345678
TIA/EIA-T568B
Pin
1
White-orange
2
Orange
3
White-green
4
Blue
5
White-blue
6
Green
7
White-brown
8
Brown
le câble STP201.
For optimal performance, Extron highly recommends the following:
• Use the TIA/EIA-T568B wiring standard for terminating all STP cables with RJ-45 connectors.
• Use shielded twisted pair cable, 24 AWG solid conductor or better, with a minimum cable bandwidth of 400 MHz.
• Use shielded RJ-45 plugs to terminate the cable.
• Overall transmission distance capabilities vary depending on the number of patches used. If possible, limit the number of
patches to 2 total.
• If patches must be used in the system, Extron recommends shielded CAT6 (or better) patch cables.
AV Outputs
1. Connect a display, projector, or other AV device to the Outputs HDMI/CEC connector (see figure 3,
panel for HDMI AV output.
2. Connect the cable and install the LockIt bracket (see step 2 within Digital AV input above) in the same method as for the
HDMI inputs.
3. For analog audio output, connect an amplifier,
powered speaker or other audio device to the
3.5mm, 5-pole captive screw connector. See the
diagrams at right for the appropriate wiring for your
application. For unbalanced audio, connect the
sleeve(s) to the ground contact; do not connect
Tip
Ring
ves
Tip
Ring
LR
Sleeves
the sleeve(s) to the negative (-) contacts.
) on the receiver rear
G
Tip
Tip
No Ground Here
Wire color
10
Page 11

Control
IR
IR Receiver
2
-
E######
2
2
E####
RJ-45
Connector
USB connections
Connect a host computer to the USB mini-B port on the receiver (see figure 2, A on page 2) for AV configuration.
Receiver connections for display or device control
The serial, IR, digital I/O, LAN, and CEC ports can all be used for device control. All of these ports must be configured using
Global Configurator
Serial
For serial control using RS-232, connect the serial control port
of the AV device to the COM port (see figure 3, K on page
3) of the HCR102 receiver as shown below.
COM
Tx Rx G
HCR 102
Rear
Panel
G
Rx
Tx
Select protocol via software.
COM port default protocol:
• 9600 baud
• 8 data bits
• no parity
• 1 stop bit
• no ow control
NOTE: If you use a cable that has a drain wire,
tie the drain wire to ground at both ends.
Heat Shrink
Ground
Receive
Transmit
Serial (COM) Port (RS-232)
NOTE: The COM port
software ow control only.
Strip wires 3/16" (5 mm) max.
RS-232-
Receive (Rx)
Transmit (Tx)
Controllable
Device
supports
Digital I/O
To use digital input or output to control other devices, provide
feedback to the receiver, or trigger actions, connect devices to
the digital I/O ports (M) as shown in the following diagram.
DIGITAL I/O
12G34G
HCR 102
Rear
Panel
Digital I/O (digital input/output)
Congure each port as a digital input or output,
with or without +5 VDC pull-up. Use these ports to:
• Monitor or trigger events and functions (toggle relays,
issue commands, send e-mail), once congured.
• Trigger LEDs, incandescent lights, or other devices
that accept a TTL signal.
Infrared
For IR control of AV equipment, connect one or two
IR emitters to the IR port (L) of the HCR102 receiver
as shown below.
HCR 102
Rear
Panel
SG
Unidirectional
IR
Ground
G
IR Output Signal
S
IR Port
IR (30 kHz to 300 kHz,
with or without carrier signals)
(-)
(+)
(-)
(-)
(+)
(+)
Two Single IR Emitters
To the
of a
Projector,
Display, or
Other
Device
LAN
Connect the receiver to a network via the LAN port (N)
for remote monitoring and conguration of the system,
for touchpanel control, or to allow the receiver to control an
Ethernet-enabled product. You will need the MAC address
(O) during device discovery and conguration.
PC
AV Device
Insert Twisted
Pair Wires
Ethernet
TCP/IP
Network
NOTE: Initial units ship with
the functions of these LEDs
reversed. Subsequent
units will ship with
standard LED functions.
Ground
G
4
3
G
2
1
Switch,
Sensor
Indicator
LED
Wire
Nut
Device 4
Device 3
Device 2
Device 1
Share the
same ground
among I/O
connections.
(Switches,
sensors,
LEDs,
relays, or
similar
items)
Activity
LED
XX-XX-XX
-
-
#
HCR 102 Rear Panel
Pins:
LAN
LAN
LAN (Ethernet)
Default protocol:
• IP address: 192.168.254.250
12345678
• Gateway IP address: 0.0.0.0
• Subnet mask: 255.255.255.0
Link
• DNS address: 127.0.0.1
LED
• DHCP: off
• Link speed and duplex level:
autodetected
• Data rates: 10/100Base-T
Default login credentials:
• Username: admin
• Password: extron
11
Page 12

HC 402 • Setup Guide (Continued)
l
AIO
HCR 102 Rear PanelCEC-Compliant Display
HDMI/CEC
Connect an AV device that supports CEC control to the
HDMI/CEC output port on the receiver (see figure 3, G on
page 3) to allow the HCR102 to automatically turn display
power on or off based on whether an active signal is detected at
LINK
OUTPUTS
HDMI/CEC
AUDIO
LR
R
HDMI
CEC
MODEL 80
FLAT PANEL
the selected input.
The HCR102 sends CEC driver commands to the display for basic control functions. CEC control is pre-configured and works
“out of the box” but it can be customized further using GC.
NOTE: It can take up to 2 minutes after powering up the receiver to initiate CEC display control.
Power
ATTENTION:
• Always use a power supply supplied or specified by Extron. Use of an unauthorized power supply voids all regulatory
compliance certification and may cause damage to the supply and the unit.
• Utilisez toujours une source d’alimentation fournie par Extron. L’utilisation d’une source d’alimentation non autorisée annule toute
conformité réglementaire et peut endommager la source d’alimentation ainsi que l’unité.
For port locations, see figure 3 and figure 4, A on page 3. You have two options for powering the system:
• Connect the included 12VDC, 4.2A power supply (Extron PS1242) at the receiver to remotely power the transmitter.
HCT 101 D
Rear Panel
0.7
12V
POWER
A MAX
HCT 101 D
Top Panel
AV, Communication, Power
POWER
INPUTS OUTPUTS
12V
2.0A MAX
SIG
1
TP
HDMI
LINK
HDMI/CEC
IN
AUDIO
LR
COMIRDIGITAL I/O
12SGTx Rx GG34G
HCR 102
HCR 102
Rear Pane
LAN
Ground all devices.
To AC power
OUT
HCT 101 D
R
HCR 102
Front Panel
Remote Power:
50 watt Receiver Power Input
• Receiver front
panel LED ( )
blinks during
boot-up and
remains lit
when the unit
is powered
and
operational.
• Connect an
included
12 VDC, 4.2 A
power supply to
the receiver only.
The receiver
supplies power
to the
transmitter.
Ridged
– Return
+12 VDC input
Smooth
External
Power Supply
(12 VDC, 4.2 A max.,
Extron P/N 28-394-07LF )
NOTE: The receiver can provide power remotely to the transmitter using a 50watt power supply. Remote power mode
requires at least 2.5A. The transmitter can receive power from but cannot provide power to the receiver. The remote
power feature is enabled by default but can be disabled by using a control in the PCS software.
12
Page 13

• Alternatively, you can connect an optional 12VDC, 1.5A power supply (Extron PS1215 C) at the transmitter, and
HCR 102
l
Front Panel
HCT 101 D
HCT 101 D
1
HDCP
SIGNAL
connect an optional 12VDC, 2A power supply (Extron PS1220) at the receiver.
Rear Panel
0.7
12V
POWER
A MAX
OUT
HCT 101 D
– Return
+12 VDC input
18 watt
Transmitter Power Input
• Connect to optional
12 VDC, 1.5 A power supply.
Ridged
Smooth
Top Panel
To
AC
power
NOTE:
Check the polarity of
each power supply before
connecting it to a unit.
AV and Communication Only
External Power Supply
(12 VDC, 1.5 A max.,
Extron P/N 28-327-57LF)
POWER
INPUTS OUTPUTS
12V
1
2.0A MAX
• Connect to optional
12 VDC, 2 A
power supply.
TP
HDMI
– Return
+12 VDC input
24 watt Receiver Power Input
SIG
LINK
IN
To AC power
Ridged
Smooth
• Receiver front panel LED ( ) blinks
during boot-up and remains lit when
the unit is powered and operational.
For both options, connect the external power supply or supplies to a 100 to 240VAC power source.
Front Panel Operation and Indications
HDMI/CEC
AUDIO
LR
COMIRDIGITAL I/O
12SGTx Rx GG34G
Ground all devices.
(12 VDC, 2 A max.,
Extron P/N 28-284-07LF)
Rear Pane
HCR 102
External
Power Supply
HCR 102
LAN
R
Input Selection and Indication
Input selection button and LED
To select an input from the receiver front panel, push the input 1 button (see figure 2, B, on page 2) to select
the input connected to receiver input 1.
The corresponding LED lights to indicate that that input is selected (active). If the input is deselected, the LED turns off (is unlit).
Use the auto-switching feature, which is active by default. In the “last connected” auto switch mode, the system automatically
switches to the input where an active AV source device was last connected. If that device is disconnected, the system switches to
the last device connected before that, as long as it has an active signal.
Signal, HDCP, and Audio LEDs
Signal LED — This LED (see figure 2, C) lights to indicate the presence of an active signal at the corresponding
input connector. If there is no active signal, the LED is unlit.
HDCP LED —This LED (D) lights to indicate the presence of an active signal with HDCP encryption at the
corresponding input connector.
HDCP LED State and Indication
On (Lit Steadily) Off (Unlit)
An HDCP encrypted TMDS signal is detected at the
corresponding input.
An unencrypted TMDS signal is detected at the
corresponding input or no active TMDS signal is detected.
1
13
Page 14

HC 402 • Setup Guide (Continued)
AUDIO
Audio input signal LEDs (LPCM-2Ch and Multi-Ch)— These two LEDs (E) on the receiver indicate
the presence or absence of the specific types of audio signal on the selected (active) input.
Audio Input LED State and Indication
LED Type On (Lit Steadily) Off (Unlit)
LPCM-2Ch An embedded LPCM-2Ch audio signal is
present on the selected HDMI TMDS input.
Multi-Ch Multi-Ch or bitstream (non-PCM) audio is
present on the selected HDMI TMDS input.
There is no LPCM-2Ch audio signal in the selected TMDS input.
There is no TMDS signal on the selected input.
The audio embedded in the selected input is in Multi-Ch format.
There is no Multi-Ch audio signal in the selected TMDS input.
There is no TMDS signal on the selected input.
The audio embedded in the selected input is in LPCM-2Ch format.
OSD Use
See the section on page 7 of this guide about configuring the AV settings using the on-screen display and front panel buttons,
and see the HC400 Series User Guide for full details on the OSD and how to use it.
Locking the Front Panel (Executive Mode)
To prevent unauthorized access or accidental changes to device settings, you can lock the front panel controls, making control
available only by software. (The default state is unlocked.)
• You can lock and unlock the front panel by using a control in the PCS software.
• Front panel lockout (Executive) mode 2 can also be enabled and disabled by pressing and holding the Menu and Enter
buttons for 2 or more seconds.
LPCM-2CH
MULTI-CH
Firmware Upgrades
The firmware can be upgraded via the HCR102 embedded web page, or via Toolbelt (available at www.extron.com).
14
Page 15

Reset Modes: a Brief Summary
The HCR102 receiver offers the following reset modes:
• Use Factory Firmware: Press and hold the receiver front panel Reset button (see figure 2, J on page 2 for
location) while applying power to the unit. Keep holding the button down until the Power LED
(I) blinks twice, or for 6 seconds, then release the button. The receiver enters factory firmware
mode. Use this mode to revert to factory firmware in the event of a firmware failure.
Do not continue to operate the control processor using the factory firmware version. If you want
to use the factory default firmware version, you must upload that version again.
• Project Recovery: See the HC400 Series User Guide for instructions. Use this mode to recover the project in the
event of a lost user name and password.
• Run/Stop Program: Hold down the Reset button for about 3 seconds, until the Power LED blinks once. Release
and press the Reset button momentarily (for <1second) within 1second*. (*Nothing happens if
the momentary press does not occur within 1second.) The LED blinks 2 times if the program is
starting. The LED blinks 3 times if the program is stopping. This mode allows you to restart any
scripts or events stopped by an IP settings reset.
• Toggle DHCP Client: Press the Reset button five times (consecutively). Release the button. Do not press the button
within 3seconds following the fifth press. Use this mode to enable or disable the DHCP client
for the LAN port.
• The Reset LED blinks 6 times if the DHCP client is enabled.
• The Reset LED blinks 3 times if the DHCP client is disabled.
NOTES:
• DHCP toggle mode is supported on firmware version 1.01 or higher.
• By default DHCP is off and the unit uses a static IP address.
• When you disable the DHCP client by using this mode, the unit reverts to using the
previously-set static IP address.
• Reset All IP Settings: Press and hold the HCR102 front panel Reset button for 6 seconds. After the PowerLED
blinks twice, release and momentarily press the Reset button. Use this mode to reset all
network settings to factory default values without affecting user-loaded files. This reset mode
also stops any running programs.
• Reset to Factory Defaults: Press and hold the HCR102 front panel Reset button for 9 seconds. After the PowerLED
blinks three times, release and momentarily press the Reset button within 1 second. Use this
mode to return the receiver to factory default settings. This mode also deletes all user-loaded
files and configurations from the HCR102, and also the factory default GC configuration. The
basic GC configuration project can be downloaded from the Extron website if you want to
restore it to the unit after a reset.
For detailed information on each mode and its use, see the HC400 Series User Guide at www.extron.com.
Resources
Obtaining Control Drivers
Extron provides an extensive selection of device drivers available on the Extron website. If the system requires a control driver that
is not already available, you can request a new IR, serial (RS-232), or Ethernet driver from Extron.
Obtaining Instructions, Information, and Assistance
Basic setup steps are outlined in this guide. For additional information see the help files and the HC400 Series User Guide,
available at www.extron.com. If you have questions during installation and setup, call the ExtronS3 Sales & Technical Support
Hotline or the ExtronS3 Control Systems Support Hotline (1.800.633.9877).
15
Page 16

HC 402 • Setup Guide (Continued)
Locating Software, Firmware, and Driver Files on the Extron Website
There are three main ways to find software, firmware, and device drivers within www.extron.com:
• Via links from the web page for the specific product
• Via the Download Center page (Click on the Download tab at the top of any page within www.extron.com.)
• Via links from search results
NOTES:
• For some software you have the option to click the Download Now button to begin downloading the software file. For
other software there is a link for contacting an Extron support representative who can provide you access to the latest
version.
To obtain Extron control product software, you must have an Extron Insider account. Extron provides training to our
customers on how to use the software. Access to the full features of Global Configurator Professional is available to
users who successfully complete Extron Control Professional Certification.
• You must use serial and Ethernet drivers developed specifically for the IPLinkPro platform. With the exception of IR
device drivers, drivers used for IPLink (non-Pro) devices are not compatible.
For information on safety guidelines, regulatory compliances, EMI/EMF compatibility, accessibility, and related topics, see the
Extron Safety and Regulatory Compliance Guide on the Extron website.
© 2019 - Extron Electronics All rights reserved. www.extron.com
16
Worldwide Headquarters: Extron USA West, 1025 E. Ball Road, Anaheim, CA 92805, 800.633.9876
All trademarks mentioned are the property of their respective owners.
68-3063-53
Rev. A
04 19
 Loading...