

Page 1
Upgrade Guide
PRELIMINARY
Global Confi gurator 2.2,
MLC 226/104 Confi guration Program 3.1.1, and
System 5 IP Confi guration Program 3.1.1
68-1313-01 Rev. A
08 06
Page 2

PRELIMINARY
Introduction
This installation guide provides step by step instructions on how to
•
Upgrade to Global Configurator 2.2
• Upgrade from GC 2.0.x
Upgrade from GC 2.1.x
•
• Upgrade to MediaLink 226/104 or System 5 IP Configuration Software 3.1.1
Upgrade the System 5 IP with patch firmware (This includes information on how
•
to retain IP settings after upgrading from version 1.0x to 2.00.)
If you encounter problems with the following upgrades, please keep in mind that
Extron Technical Support (http://www.extron.com/company/contactus.asp) is only
a phone call or a few mouse clicks away.
Upgrading to Global Configurator 2.2: a Checklist
Prior to upgrading your existing Global Configurator (GC) project to GC 2.2, ensure
that the following four elements are present on your system.
cThe Global Configurator project file
For GC 2.0.x
• Original project files
For GC 2.1.x
• Original project files or
• Import a compressed project file (.gcc) or
• Import the file from an IP Link device
cThe Extron serial and IR drivers used in the project file
These drivers can be found
• On the Extron Web site (http://www.extron.com/iplinkdrivers)
• Via the Driver Subscription feature of GC 2.2
• Via the IR Learner software's user-defined IR drivers (.eir)
N
Defective device drivers are routinely removed from the Extron Web site, so you
may find that some drivers are missing. Most of these drivers are replaced with
newer versions.
If a required device driver is missing after you open your project in GC 2.2, and
it cannot be found on the Extron Web site, search for an updated version of the
driver. When the correct driver is found, you must upgrade it for every IP Link
device in your network.
PRELIMINARY
cThe minimum firmware version for the MLC products
Global Configurator 2.2 requires the following minimum firmware
versions. Any IP Link device with an earlier version requires a firmware
upgrade. This firmware can be obtained from the Extron Web site
(http://www.extron.com/iplinkdrivers).
• MLC 104 Series, version 1.03
• MLC 104 IP Series, version 1.03
• MLC 226 IP Series, version 1.05
N
For IP Link devices that reside on a network, firmware can be easily upgraded
using IP Link File Manager 1.1.3 or later.
Global Configurator, Windows-based Control Programs
1
Page 3

Upgrade Guide, cont’d
N
If a firmware update is needed, execute the EscZY reset command after the
firmware is updated. See the firmware’s release notes for instructions.
cThe minimum firmware version for the System 5 IP products
Global Configurator 2.2 requires the following minimum firmware
version. Any IP Link device with an earlier version requires a firmware
upgrade. This firmware can be obtained from the Extron Web site
(http://www.extron.com/firmware).
System 5 IP Series, version 2.00
N
For instruction on how to retain your System 5 IP settings when upgrading
the firmware from version 1.0x to 2.00, please refer to the System 5 IP Patch
Firmware Upgrade section.
c IP Link devices that are online
Upgrading to Global Configurator 2.2 requires that all IP Link devices
be online to successfully upload the configuration.
N
Upgrading from GC 2.0.x
Upgrading from Global Configurator (GC) 2.0 requires the original project file
(.gc2) and all of its device configuration files (.xml). The Import File option cannot
be used for this configuration.
When uploading files to devices, please note that any customized GlobalViewer
(GV) files, including those placed in the GC2 directory of an IP Link device,
must be uploaded after the GC 2.2 upload process is complete.
PRELIMINARY
PRELIMINARY
Step 1: Open the GC project file.
1. Open the Global Configurator file by choosing Open... from the File menu
and choosing the file.
The following message box appears.
2. Click OK.
Step 2: Rebuild all devices in the configuration
1. From the Build menu, choose Build All Configurations. The Upload Manager
appears when the build is complete.
2. On the Upload Manager window, click Begin.
3. Click Close when the upload is complete.
Using this rebuild option saves your project in the new GC 2.2 format.
2
Global Configurator, Windows-based Control Programs
Page 4

Upgrading from GC 2.1.x
Use any of the following three methods to upgrade from GC 2.1.x:
• Open the original GC2 project file (.gc2).
• Import the project from an IP Link device on a network.
N
• Import the project from a compressed GC2 project file (.gcc) from a disk.
Opening the original GC2 project file
Step 1: Open the GC project file.
1. Open the Global Configurator file by choosing Open... from the File menu
The following message box appears.
Importing from devices online requires that all IP Link devices in the project be
online.
and choosing the original file.
PRELIMINARY
2. Click OK.
Step 2: Rebuild all devices in the configuration.
1. From the Build menu, choose Build All Configurations. The Upload Manager
appears when the build is complete.
2. On the Upload Manager window, click Begin.
3. Click Close when the upload is complete.
Using this rebuild option saves your project in the new GC 2.2 format.
PRELIMINARY
Global Configurator, Windows-based Control Programs
3
Page 5
Upgrade Guide, cont’d
Importing the GC2 project from a disk or network
Step 1: Choose the Import Project Config... option.
1. From the Global Configurator software, choose Import Project Config... from
the File menu.
The default Import Project Configuration dialog appears (as shown below),
suggesting that you rebuild all IP Link devices. This occurs regardless of
where the GC2 project is imported from.
2. Click OK.
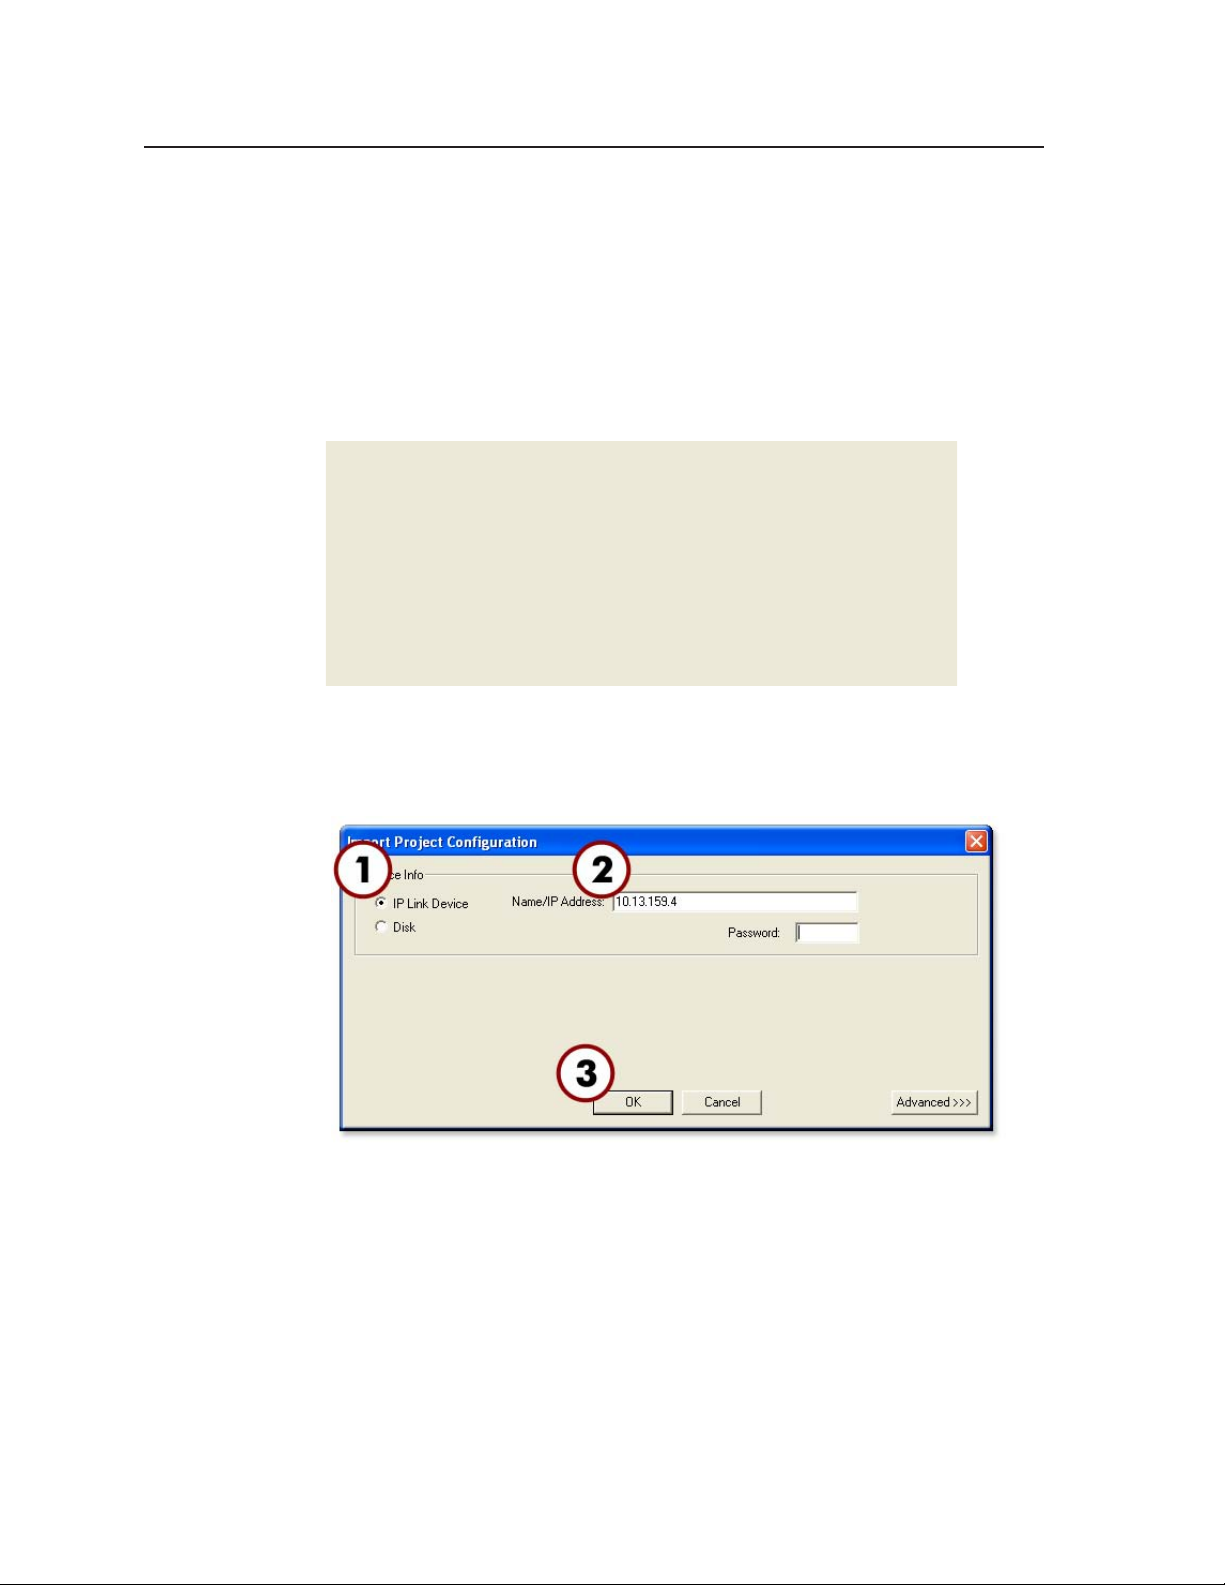
Importing from a GV Host
1. Choose the IP Link Device radio button.
2. Enter the host name or IP address of the GV Host IP Link device
PRELIMINARY
PRELIMINARY
3. Click OK.
N
When importing via an IP Link device, you must import using the same
communication method as your previous upload. For example, if you previously
uploaded to the device serially, you should import the device configuration
serially again.
4
Global Configurator, Windows-based Control Programs
Page 6

Importing from a disk
1. Choose the Disk radio button.
2. Browse to a compressed GC2 project file (.gcc) previously exported from a
disk, as shown on the following page.
PRELIMINARY
3. Click OK.
Step 2: Rebuild all configurations.
1. Before rebuilding, name and save the project by selecting the
Save Project As... option from the File menu.
2. From the Build menu, choose Build All Configurations. The Upload Manager
appears when the build is complete.
3. On the Upload Manager window, click Begin.
4. Click Close when the upload is complete.
PRELIMINARY
Global Configurator, Windows-based Control Programs
5
Page 7

Upgrade Guide, cont’d
Troubleshooting
There are several issues that may impede a successful upload. Please take note of
the following potential problems.
Missing serial and/or IR drivers
If an IR or serial driver used in your GC project file cannot be found on your PC,
the following dialog box appears.
PRELIMINARY
PRELIMINARY
To obtain the needed drivers, use the Driver Subscription feature or download the
drivers from the Extron Web site.
N
If using the driver subscription feature, you must rebuild the driver database.
This is most easily be done by exiting and restarting GC 2.2.
Upgrading firmware over a network
C
For networked IP Link devices with outdated firmware, the 1.1.3 version of
IP Link File Manager allows you to upgrade multiple IP Link devices at the same
time.
To use this feature, choose Firmware Update Manager under the Tools menu.
Before selecting this option, ensure that all IP Link devices are included in
IP Link File Manager’s list.
N
N
Download IP Link device firmware from the Extron Web site
(http://www.extron.com/firmware).
If you are upgrading firmware but your original configuration file does
not reside on a disk, download the configuration from your IP Link
device(s) before upgrading. The firmware upgrade may require a device
reset, which would erase the current files on your IP Link device.
IP Link File Manager can open GC2 project files (.gc2).
Firmware Update Manager can update only the firmware of similar devices. By
selecting the Model column, you can easily sort the list, selecting only those
devices in the list that require updating.
6
Global Configurator, Windows-based Control Programs
Page 8

Potential build and upload problems
There are several errors that can occur during the build process. The following are
common error messages that may appear in the Upload Manager.
Problem: Insufficient firmware
Solution: Obtain the minimum required firmware version and upgrade those
devices that indicated errors during the build.
N
Problem: Insufficient file space
Solution 1: Erase all the files on the IP Link device(s) that reported insufficient
space.
N
Solution 2: Use the GV Host Flag option to find only 8 MB IP Link devices.
Problem: Unable to connect to device
Solution: While it is still possible to upload the project, devices that are offline (or
unconnected) are still susceptible to this problem. GC 2.2 properly
marks these IP Link devices as not being uploaded, but you can
upload them at a later date by selecting the Build Changed
Configurations menu option.
Use IP Link File Manager 1.1.3, available from the Extron Web site.
For this step, you can use the Device Settings feature in GC 2.2.
Upgrading to MediaLink 226/104 or System 5 IP
Windows-based Control/Configuration Program 3.1.1
The Windows-based configuration program upgrade checklist
Prior to upgrading your existing MediaLink 226/104 or System 5 IP configuration,
ensure that the following elements are present on your system.
c The Window-based configuration software, version 3.1.1
The software can be found on the Extron Web site.
c All Extron serial and IR drivers used in the device configuration
• These drivers can be found on the Extron Web site.
• For IR drivers only, you can “learn” the command using the IR Learner
software (obtained from the Extron Web site download center
(http:www.extron.com/download/driverfilter.asp).
• If the drivers you are using can not be found on the Extron Web site,
please contact Extron and ask to speak with an Applications Engineer.
N
Defective device drivers are routinely removed from the Extron Web site, so
you may find that some drivers are missing. Most of these drivers are simply
replaced with newer versions.
If a required device driver is missing after you open your project in GC 2.2, and
it cannot be found on the Extron Web site, search for an updated version of the
driver. When the correct driver is found, you must upgrade the driver for every
IP Link device in your network.
PRELIMINARY
PRELIMINARY
c MediaLink and System 5 IP devices that are online
This upgrade requires that all previously configured devices be rebuilt and
uploaded.
Global Configurator, Windows-based Control Programs
7
Page 9

Upgrade Guide, cont’d
Upgrading to configuration software 3.1.1
After updating the configuration software on your PC to version 3.1.1, you must
rebuild and upload the MLC or System 5 IP configuration. Simply restoring a
previously saved configuration cannot fix inherent problems in version 3.1 of the
configuration software.
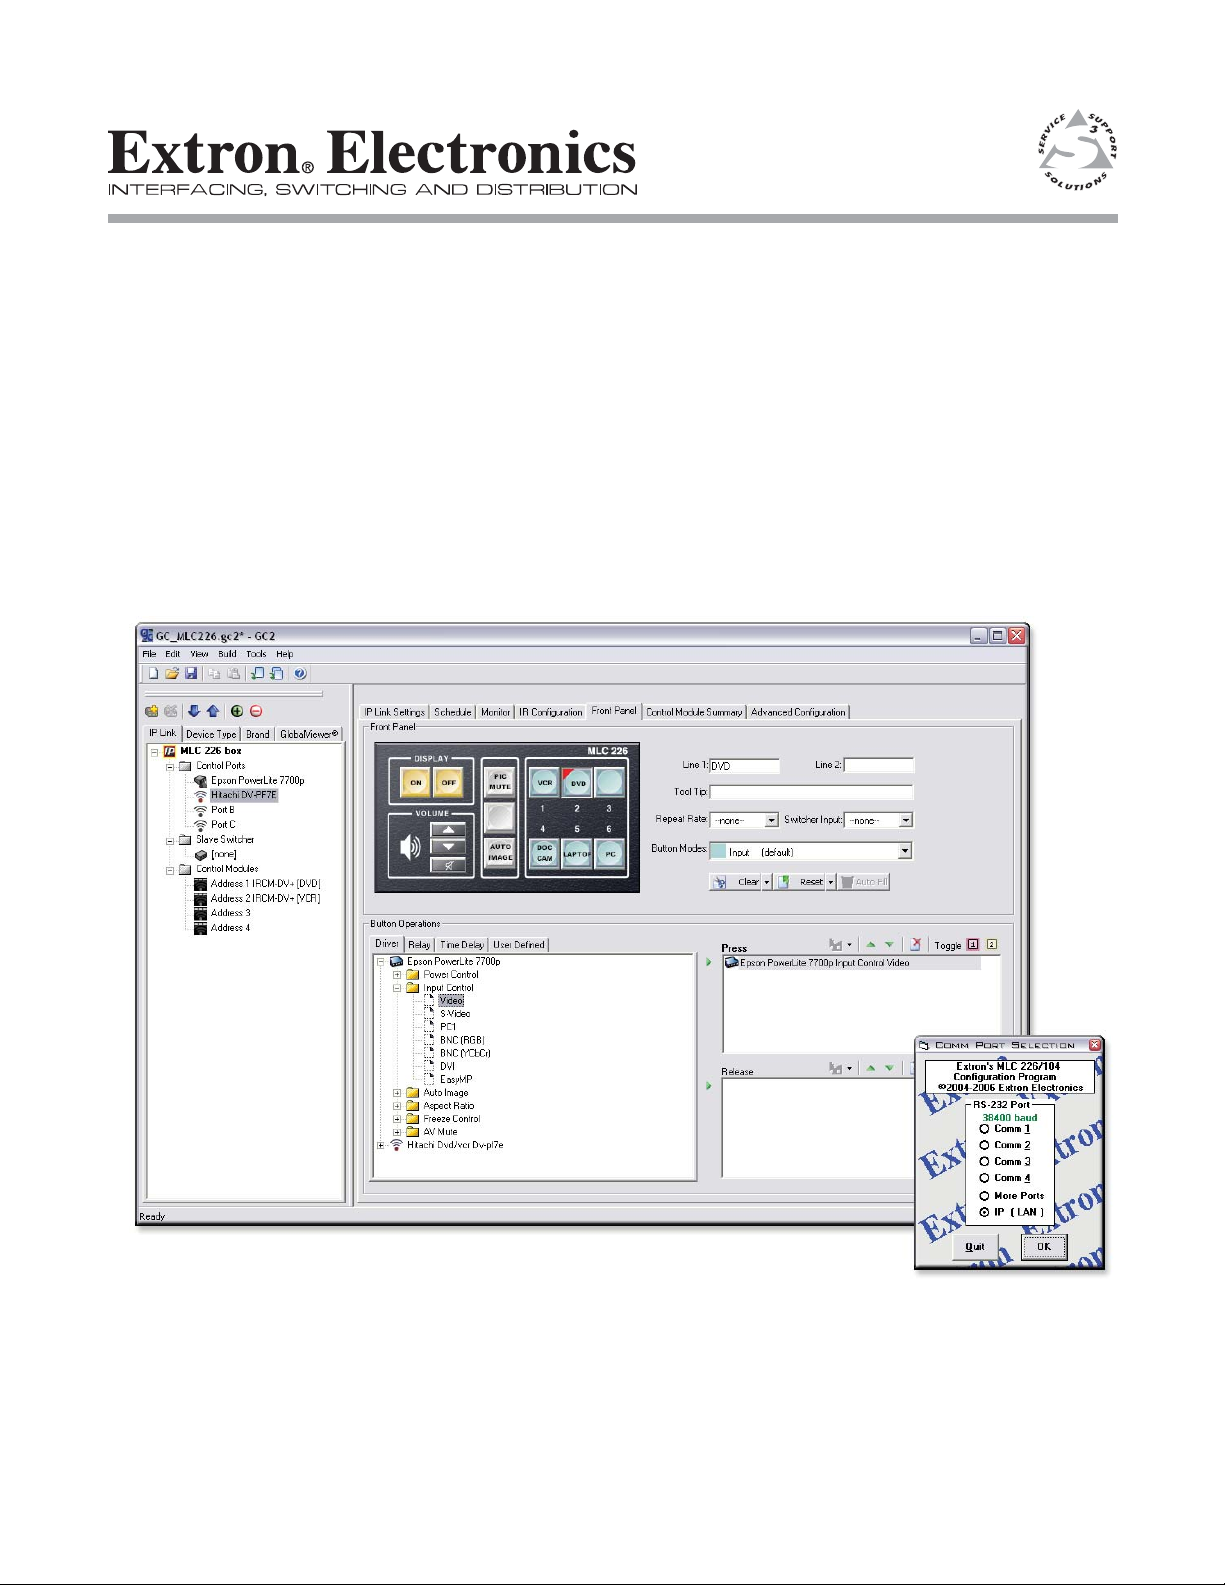
Step 1: Connect with the device.
Open the configuration software and connect to the MLC or System 5 IP device via
RS-232 or IP (shown below).
PRELIMINARY
PRELIMINARY
Step 2: Obtain missing drivers.
If your PC is unable to find certain IR and/or serial drivers in the configuration,
a warning dialog appears (as shown below). If there is no warning, skip to step 3
below.
1. Download missing drivers from the Extron Web site.
2. Place downloaded drivers in the C:\Program Files\Extron\Driver2 directory.
3. Use the driver filters to find the device(s) listed in the dialog above.
When new drivers are successfully downloaded to the PC, you must restart the
configuration software.
8
Global Configurator, Windows-based Control Programs
Page 10

Step 3: Rebuild and upload the configuration.
To complete the upgrade process, you must rebuild the configuration and upload it
to the device. Copies of the configuration files are stored on the MLC/
System 5 IP, so they are not required to reside on your local PC. The configuration
software pulls the configuration from the unit when the application is started.
1. To rebuild and upload the configuration, select Rebuild & Apply
Configuration from the Tools menu, as shown below.
A message appears, prompting you to proceed with rebuilding the configuration.
2. Click OK.
Step 4: Apply upgrade to all devices in the project.
Repeat steps 1 through 4 for all MLC 226 IP, MLC 104, MLC 104 IP, and/or
System 5 IP devices in your system.
System 5 IP Patch Firmware Upgrade
The following instructions allow you to retain IP settings when upgrading from
firmware 1.0x to 2.00 or higher on the System 5 IP Series Switchers. The stored IP
settings include the following:
• IP Address
• Gateway IP Address
• Subnet Mask
• Unit Name
• DHCP Setting
• Port Mapping (telnet/Web/direct access)
For more information please call your Extron Applications Engineer.
PRELIMINARY
PRELIMINARY
Global Configurator, Windows-based Control Programs
9
Page 11

PRELIMINARY
Upgrade Guide, cont’d
The patch (applicable to firmware versions prior to 2.00) loads into a standardized
location on your computer using a Windows installer application. The specific file
name for this patch is 503512V100.s19. The following files are loaded onto your
computer:
• 503512V100.S19
• System_5_IP_FW_Patch_Instruction_01.pdf
• Patch_Web_Loader_Sys5IP.html
• System_5_IP_19_1335_50_V2_00.S19
• System_5_IP_FW_Revision_History_04.pdf
Upgrade instructions using the Patch Web Loader
An easy to use program called the Patch Web Loader can be loaded onto your
System 5 IP switcher to facilitate the upgrade process. After running the software
setup, follow the instructions below to ensure a proper update to the System 5 IP
switcher.
Step 1: Load the Patch Web Loader.
After you run the software installer, the Patch Web Loader program copies itself
onto your hard drive, but must be uploaded to the switcher.
1. Using Internet Explorer®, browse to the System 5 IP internal Web page by
entering http://x.x.x.x/nortxe_index.html, where x.x.x.x is the IP address
of the product to update.
2. Select the File Management tab and browse to the directory specified
during setup. The default location is
C:\Program Files\Extron\Firmware\System_5_IP\04.
3. Select the Patch Web Loader file, Patch_Web_Loader_Sys5IP.html, and
PRELIMINARY
then click Upload File to initiate the process.
10
Global Configurator, Windows-based Control Programs
Page 12

Step 2: Run the Patch Web Loader.
The Patch Web Loader should appear listed under the file selection area.
1. Locate the Patch Web Loader file.
2. Double-click the file. A browser window opens.
3. Browse to the directory specified during setup and select the patch file. The
default location is C:\Program Files\Extron\Firmware\System_5_IP\04.
4. Select the patch file 503512V100.S19, then click Upload to initiate the process.
The unit automatically resets once the upload process completes.
PRELIMINARY
PRELIMINARY
After you have successfully applied the patch, the current firmware version is
displayed as 1.00.0007 (see step 2, above, to review the version prior to patch
installation).
Global Configurator, Windows-based Control Programs
11
Page 13

Upgrade Guide, cont’d
Step 3: Upgrade the firmware.
It is now safe to load firmware version 2.00.
1. Browse to the directory specified during setup. The default location is
C:\Program Files\Extron\Firmware\System_5_IP\04.
2. Select the firmware file System_5_IP_19_1335_50_V2_00.S19, then click
Upload to initiate the process.
PRELIMINARY
PRELIMINARY
The unit automatically resets once the upload process is complete.
12
Global Configurator, Windows-based Control Programs
Page 14

After the firmware is loaded successfully, the current firmware version displays as
2.00.
3. Once the upload is complete, execute the EscZY reset command via Telnet or
RS-232.
4. Close the browser or repeat the above to upgrade additional System 5 IP
switchers.
Instructions for upgrading without Patch Web Loader
If you are an administrator or are familiar with loading firmware, use the following
instructions to upgrade without using the Patch Web Loader software.
Step 1: Verify the product candidacy.
The included patch file is designed to work with factory installed firmware versions
1.01 through 1.03.
1. Follow the steps below to determine if the patch file is needed:
a. Connect via Telnet to the product being updated by entering
Start>Run>telnet x.x.x.x, where x.x.x.x is the IP address assigned to the
product.
b. Enter the SIS command 2I
This returns the product name which can be compared to the products
shown above.
c. Enter the SIS command 3Q
This returns the factory installed firmware version in the format x.yy, which
must be between 1.01 and 1.03 for this patch to work correctly.
PRELIMINARY
PRELIMINARY
Global Configurator, Windows-based Control Programs
13
Page 15

Upgrade Guide, cont’d
Step 2: Apply the Patch.
1. Using Internet Explorer, browse to the System 5 IP internal Web page by
entering http://x.x.x.x/nortxe_index.html, where x.x.x.x is the IP address used
in step 1.
2. Select the Configuration tab and then select Firmware Upgrade from the left
side menu as shown below.
3. Browse to the directory specified during setup. The default location is
C:\Program Files\Extron\Firmware\System_5_IP\Patch.
4. Select the patch file 503512V100.S19, then click Upload to initiate the process.
Step 3: Verify the patch
PRELIMINARY
PRELIMINARY
5. To verify that the patch is applied to your device, use Telnet (see step 1 on
page 13 for details) and enter the SIS command *Q.
This returns the current firmware version in the following format: x.yy.zzzz where
x.yy matches the value from step 1, C. on page 13. The value for zzzz should
display as 0007.
N
Step 3: Upgrade the firmware.
You can now load firmware version 2.00.
1. Select the Configuration tab and then select Firmware Upgrade from the left
2. Browse to the directory specified during setup; the default location is
3. Select the firmware file System_5_IP_19_1335_50_V2_00.S19, then click
N
4. Once the upload is complete, enter the EscZY reset command via Telnet or
Telnet may not connect right away because the patch installation and reboot
process take some time to finish. It may be up to 2 minutes before a connection is
complete.
side menu.
C:\Program Files\Extron\Firmware\System_5_IP\0x.
Upload to initiate the process.
It may take time for the firmware to load and initialize, so the Web page may not
return right away. This does not indicate a problem; wait 30-45 seconds and
click the Status tab again.
RS-232.
14
Global Configurator, Windows-based Control Programs
Page 16

Step 4: Verify the update.
1. On the Web page, click the Status tab and confirm that the version is 2.00.
N
2. Close the browser, or repeat steps 1 through 4 to update additional System 5
It may take time for the firmware to load and initialize, so the Web page may not
return right away. This does not indicate a problem; wait 30-45 seconds and
click the Status tab again.
IP switchers.
PRELIMINARY
PRELIMINARY
Global Configurator, Windows-based Control Programs
15
 Loading...