

Page 1
Dante Controller User
Guide
User Guide
For Dante Controller version 3.4 for Windows and Mac OSX
For Windows XP, Windows 7 and Windows 8, and Mac OS X 10.6.8, 10.7.5 and 10.8.
Document version: 1.0
Document name:AUD-MAN-DanteController-3.4.x-v1.0.pdf
Published: Thursday, 28 March 2013
Page 2
Dante Controller User Guide
Contents
About Audinate 8
About Dante 8
Introduction 9
About Dante Controller 9
What's New in version 3.4 9
v3.4.0 9
v3.2.9 10
v3.2.8 10
Minimum System Requirements 10
General 10
Windows 10
Mac OSX 11
OperatingSystem Updates 11
Firewall Configuration 11
Monitor Requirements 11
Installing Dante Controller 12
Downloading Dante Controller 12
Installing Dante Controller on Windows 12
Installing Dante Controller on Mac OSX 12
Uninstalling Dante Controller 12
Windows 13
Mac OS X 13
Dante Basics 14
Discovery and auto-configuration 14
Automatic network configuration 14
Automatic discovery 14
Differentiating between input and output channels 14
Device Names and Channel Labels 14
Rules for Names and Labels 15
Routing Audio 15
Routing Terminology 15
Subscription 16
Redundancy 16
Audio Formats 17
Flows 17
Advanced Routing: Using Multicast 18
Clock Synchronization 18
Dante Clock Types 18
Clock Settings 18
Slave to External Word Clock 18
Copyright © 2013 Audinate Pty Ltd. All rights reserved.
-2-
Page 3

Dante Controller User Guide
Preferred Master 18
Clocking and Synchronization in Redundant Networks 19
Clock Health Monitoring 19
Activating Clock Health Monitoring 19
Latency 20
Latency and the Dante Virtual Soundcard 20
Dante Control and Monitoring 20
Starting Dante Controller 21
Where to find the Dante Controller application 21
Windows 21
Mac OSX 21
Configuring Dante Controller 21
Network Interface Selection 21
Using Dante Controller 23
Network View 23
Network View Menu bar 24
File 24
Device 24
Help 24
Network View Toolbar 24
Network View Tabs 24
Sub-views within the Network View 25
Routing View 25
Expanding the Routing View 25
Customizing the Network View 26
Device Channels 26
Subscribing to Audio Channels 26
Subscribing to Multiple Audio Channels at once 26
Unsubscribing Audio Channels 27
Subscription Status 27
Device Status View 27
Clock Status View 28
Clock Domains 30
Master Clocks 31
Events View 31
Automatic Notification of Device Errors 32
Incorrect IP address configuration 32
Failsafe mode 32
Device View 32
Device View Menu bar 34
File 34
Copyright © 2013 Audinate Pty Ltd. All rights reserved.
-3-
Page 4

Dante Controller User Guide
Device 34
Help 34
Device View Toolbar 34
Device View Tabs 34
Receive Tab 35
Available Channels 36
Subscribing to Audio Channels in the Device View 36
Changing Rx channel labels in the Receive Tab 36
Transmit Tab 36
Changing Tx channel labels 38
Status Tab 38
Device Information 38
Dante Information 38
Clock Synchronization 39
Primary Interface 39
Secondary Interface 40
Device Config Tab 40
Configurable Parameters 41
Rename Device 41
Sample Rate 41
Receive Latency 41
Reset Device 41
Network Config Tab 42
Dante Redundancy / Switch Configuration 43
Redundant 43
Switched 43
Switch Configuration 43
Addresses 43
HA Remote 43
Multicast Transmit Flow Configuration 44
Presets 46
Saving Presets 46
Loading Presets 46
Troubleshooting 48
Messages on Startup 48
Computer Configuration Checklist 48
Third-party firewall configuration 48
Troubleshooting Dante IP Address Configuration 49
Correct IP configuration 49
Possible IP network configuration mistakes 49
Incorrect PC/Mac IP configuration 49
Copyright © 2013 Audinate Pty Ltd. All rights reserved.
-4-
Page 5
Dante Controller User Guide
Incorrect general IP configuration 49
Incorrect redundant network configuration 49
What are the symptoms of using the wrong network interface on my computer? 50
How do I check which network interface my Dante Controller/Dante Virtual Soundcard is
using? 50
How do I check IP addresses for all devices on my network? 50
Troubleshooting Switch Configuration and Cabling 51
Symptoms of switch or cabling issues 51
Switch and Cabling Checklist 51
Index 52
Copyright © 2013 Audinate Pty Ltd. All rights reserved.
-5-
Page 6

Dante Controller User Guide
Contacts
Audinate Pty Ltd
Level 1, 458 Wattle Street
Ultimo NSW 2007
AUSTRALIA
Tel. +61 2 8090 1000
Postal address
Audinate Pty Ltd
PO Box 855
Broadway NSW 2007
AUSTRALIA
Audinate Inc
1732 NW Quimby Street
Suite 215
Portland, OR 97209
USA
Tel: +1 503 224 2998
info@audinate.com
www.audinate.com
Copyright
© 2013 Audinate Pty Ltd. All Rights Reserved.
Audinate®, the Audinate logo and Dante are trademarks of Audinate Pty Ltd.
All other trademarks are the property of their respective owners.
Audinate products are protected by one or more of US Patents 7747725, 8005939, 7978696, 8171152, and
other patents pending or issued. See www.audinate.com/patents.
Legal Notice and Disclaimer
Audinate retains ownership of all intellectual property in this document.
The information and materials presented in this document are provided as an information source only.
While effort has been made to ensure the accuracy and completeness of the information, no guarantee is
given nor responsibility taken by Audinate for errors or omissions in the data.
Copyright © 2013 Audinate Pty Ltd. All rights reserved.
-6-
Page 7

Dante Controller User Guide
Audinate is not liable for any loss or damage that may be suffered or incurred in any way as a result of
acting on information in this document. The information is provided solely on the basis that readers will be
responsible for making their own assessment, and are advised to verify all relevant representation,
statements and information with their own professional advisers.
Software Licensing Notice
Audinate distributes products which are covered by Audinate license agreements and third-party license
agreements.
For further information and to access copies of each of these licenses, please visit our website:
www.audinate.com/software-licensing-notice
Copyright © 2013 Audinate Pty Ltd. All rights reserved.
-7-
Page 8

Dante Controller User Guide
About Audinate
Audinate Pty Ltd is a leading developer of media networking technology whose products and solutions are
transforming the way the world interconnects multimedia systems. Audinate’s rapidly growing customer
base spans the broader international AV industry and includes many key industry brands.
Audinate’s hardware and software products and solutions are founded on patented technologies invented
by its world-class networking experts. They enable manufacturers and AV system solution providers to
produce sophisticated, easy to use, pro-audio quality AV solutions over standard IP networks.
Audinate is based in the United States and in Sydney, Australia.
Digital Media Networking Perfected
About Dante
Audinate’s Dante technology provides high performance digital media networking that meets the quality
and performance requirements of professional live sound, AV installations and broadcast and recording
systems.
Designed to fully exploit the capabilities of today and tomorrow’s networking equipment, Dante provides
media transport mechanisms that eliminate many traditional audio network design restrictions. Dante
makes it easy to set up robust, flexible digital audio networks with virtually unrestricted performance. A
Dante network can be designed with mixed Gigabit and 100Mbps network speeds, simultaneously support
audio with different sample rates and bit depths, and even allow the design of network zones with different
latencies.
Dante is built on Internet Protocols — not just Ethernet. Because it uses standard IP over Ethernet, Dante
is capable of running on inexpensive off-the-shelf computer networking hardware, and with the use of
standard QoS can share installed networks with other data and computing traffic.
Dante provides sample-accurate synchronization and can deliver the very low latency required by
professional audio. Dante’s network-centric, audio-independent approach to synchronization allows
perfectly synchronized playout across different audio channels, devices and networks, even over multiple
switch hops.
Dante makes networking a true plug-and-play process, allowing automatic device discovery and system
configuration. Dante-enabled devices will automatically setup their network configuration and advertise
themselves and their channels on the network, reducing complicated, error-prone set-up procedures.
Instead of “magic numbers”, networked devices and their input and output signals can be named to make
sense to the user.
Dante is not restricted to allowing configuration and transmission of audio channels. Dante also provides
mechanisms to send or receive control and monitoring information across the Dante IP network, including
equipment-specific messages and control specified and developed by a particular manufacturer.
With its strong foundations and links to current and evolving network standards, Dante is able to deliver a
level of future proofing otherwise unavailable in other types of digital audio transportation. Dante was
designed for Gigabit networks from its inception, and Dante as it exists today already incorporates aspects
of the emerging AVB networking standards. Continued evolution of its networking technology is an integral
part of the Dante roadmap.
Dante technology is available in ready-to-implement hardware and software products, reference designs
and development APIs.
For more information, please visit the Audinate website at www.audinate.com.
Copyright © 2013 Audinate Pty Ltd. All rights reserved.
-8-
Page 9
Dante Controller User Guide
Introduction
About Dante Controller
Dante Controller is a software application provided by Audinate which allows
users to configure and route audio around Dante networks. It is available for PCs
running Windows 7 and Windows 8, and Apple Macs running OS X 10.6.8, 10.7.5
and 10.8.
Once you install Dante Controller on your PC or Mac and connect it to a Dante
network, you can use Dante Controller to:
n View all Dante-enabled audio devices and their channels on the network
n View Dante-enabled device clock and network settings
n Route audio on these devices, and view the state of existing audio routes
n Change the labels of audio channels from numbers to names that suit you
n Customize the receive latency (latency before play out)
n Save audio routing presets
n Apply previously saved presets
n View and set per device configuration options including:
o
Changing the device name
o
Changing sample rate and clock settings
o
Viewing detailed network information
o
Access the device web page to upgrade firmware and license information (where supported)
o
Identify a device for example by flashing LEDs (where supported)
What's New in version 3.4
v3.4.0
n Metering icons are displayed for supported devices.
n The Multicast Bandwidth for the network is displayed on the menu bar.
n The event log icons have been updated.
n Subscription in progress icons are now displayed when new subscriptions are made.
n Clock Health Monitoring - displays a notification if a device clock is showing signs of instability.
n Clear Config replaces FactoryReset for supported devices.
n Mute Status has been added to the Device view > Status tab.
n The Apple Bonjour service is no longer used for device discovery by Dante Controller for Windows -
the Audinate 'Dante Discovery' service is now used instead. Dante Discovery is installed
automatically with Dante Controller v3.4.0 for Windows.
Note: If you have Dante Firmware Update Manager or Dante Virtual Soundcard, do not uninstall
Bonjour from your system - it is still required by those applications.
Copyright © 2013 Audinate Pty Ltd. All rights reserved.
-9-
Page 10
Dante Controller User Guide
v3.2.9
n For supported devices (Dante-MY16-AUD cards v3.3.9 and up), the Device View now includes an
HARemote tab.
n Dante Controller for Mac now supports OSX10.8.
v3.2.8
n Switch Configuration - supported devices allow specialist switching configurations
n Device View > Status tab - for supported devices, the 'Device Information' pane in the Device View
> Status tab now displays manufacturer, product type and product version information for the device.
Dante-specific information for the device (Dante model, Dante software and Dante firmware
versions) is now displayed in the 'Dante Information' pane.
n Device Status View - the 'Type' and 'Version' columns have been renamed as 'Product Type' and
'Product Version'
n Various performance and stability enhancements
Minimum System Requirements
The tables below list the minimum system specifications for your computer to be able to use Dante
Controller.
Disclaimer: It is possible that your computer may meet the requirements below, but suffer from some
other individual performance limitation related to its particular hardware. Please seek the advice of your
computer support administrator.
General
Component Recommended Minimum Requirement
Processor 1GHz or better
Memory 512Mbyte of RAM
Network Standard wired Ethernet network interface (100Mbps or Gigabit). Wireless LAN (Wi-
Fi) Ethernet interfaces are not supported
Windows
Component Recommended Minimum Requirement
Operating
System
n
Windows XP SP3 (32-bit only)
n Windows 7 (32-bit and 64-bit)
n Windows 8 (32-bit and 64-bit)
NOTE: Both UTF-8 and Unicode are supported EXCEPT for host or device
names; the DNS standard does not support Unicode for these
Copyright © 2013 Audinate Pty Ltd. All rights reserved.
-10-
Page 11
Dante Controller User Guide
Mac OSX
Component Recommended Minimum Requirement
Operating System Mac OS X 10.6.8, 10.7.5 and 10.8.
NOTE: Intel architecture only; PPC architecture is not supported
Note: If you intend to also install Dante Virtual Soundcard on the same machine as Dante Controller,
you will require a machine which meets the minimum system requirements for Dante Virtual
Soundcard.
OperatingSystem Updates
Ensure your PC or Mac has the latest Windows or Apple updates installed.
Firewall Configuration
Firewall configuration for Windows Firewall and Mac OSX built-in firewall is automatically handled during
installation.
Dante Controller communicates over UDP over the following ports:
n Dante Control and Monitoring: 8700-8704, 8800
If you are using a third-party firewall product, use the port information provided above to configure it
accordingly.
Monitor Requirements
n A display resolution of at least 1024 x 768, with a screen size of at least 19” is recommended for
Dante Controller.
Copyright © 2013 Audinate Pty Ltd. All rights reserved.
-11-
Page 12

Dante Controller User Guide
Installing Dante Controller
Downloading Dante Controller
Dante Controller is available for download from Audinate’s website.
To download a copy of Dante Controller:
1. Go to Audinate’s website: www.audinate.com.
2. Navigate to Support > Software Downloads > Dante Controller.
3. If not already logged in, you will be asked to log in or register before continuing.
4. Once registered, download the required version of Dante Controller (Mac OS X or Windows).
This will download a self-installing Dante Controller file.
Installing Dante Controller on Windows
Once you have downloaded the self-installing Dante Controller file, navigate to the directory where you
have downloaded it (e.g. Desktop).
To install:
1. Ensure you are logged on to your PCas an administrator.
2. Navigate to and double-click the Dante Controller installer file.
3. Read the license agreement. If you agree to the terms, select the 'I agree' checkbox and click
Install. If you do not agree to the terms, click Close.
4. Confirm / acknowledge any Windows security prompts that are displayed.
Dante Controller will then be installed. Dante Controller will be added to the start menu, under
'Audinate'.
Installing Dante Controller on Mac OSX
To install Dante Controller on Mac OSX:
1. Double-click the Dante Controller .dmg file. A drive icon will appear on your Desktop Finder window.
Double click on this to open.
2. Double click the Dante Controller .pkg. This will run the installer.
3. Read the license text, and if you accept the terms of the agreement, click Agree.
If you do not accept these terms, click Disagree to terminate the installation.
Uninstalling Dante Controller
You should not need to uninstall Dante Controller before installing a new version.
However, if you do wish to uninstall DanteController:
Copyright © 2013 Audinate Pty Ltd. All rights reserved.
-12-
Page 13
Dante Controller User Guide
Windows
Navigate to Control Panel > Programs and Features, select Dante Controller and click Uninstall.
Note: Two other Dante features, 'Dante Control and Monitoring' and 'Dante Discovery', may still be
present in the programs list after uninstalling Dante Controller. Do not uninstall these features if they
are present - they are required by other Dante software applications (for example, Dante Virtual
Soundcard, Firmware Update Manager, and third-party Dante control applications). They will be
removed automatically if they are no longer required.
Mac OS X
Drag the Dante Controller application into the Trash folder.
Copyright © 2013 Audinate Pty Ltd. All rights reserved.
-13-
Page 14
Dante Controller User Guide
Dante Basics
Discovery and auto-configuration
When a Dante-enabled device is connected to an IP/Ethernet network, it will automatically:
1. Configure its IP address
2. Advertise itself to allow automatic discovery
Within seconds of a Dante-enabled device connecting to a network, Dante Controller will automatically
discover and display the device, allowing you to configure channels and route audio.
Automatic network configuration
A Dante-enabled device connected to a network will automatically setup its own network configuration,
including its IP address.
If the network has a DHCP server, which may be the case for installed networks, it will receive its IP
configuration using the standard DHCP protocol.
On a network without a DHCP server, which may be the case for temporary or smaller networks, the
Dante-enabled device will automatically assign itself an address using link local protocols, in the same
way PCs and printers often do.
Automatic discovery
A Dante-enabled device will advertise information about itself to other Dante devices and Dante Controller,
including:
n Device name
n Audio channel labels
n Number of audio channels
n Sample rates and bit depths
This information can be seen when viewing a device on Dante Controller, and allows Dante devices to
determine compatibility with other devices, such as compatible sample rates to allow audio to be routed.
Differentiating between input and output channels
Channels are classified according to whether they put audio data onto or take audio data off the network:
n A channel that puts audio data onto the network is known as a transmitting, Tx or output channel.
n A channel that takes data off the network is known as a receiving, Rx or input channel.
Device Names and Channel Labels
In Dante, devices and audio channels are identified by names and labels, not “magic numbers”. Device
names and channel labels can be customized.
Copyright © 2013 Audinate Pty Ltd. All rights reserved.
-14-
Page 15

Dante Controller User Guide
n Dante routing is performed using the device names and channel labels. A receive channel can be
subscribed to the name of a transmit channel at a device.
Example: “Analog L@my-transmitter” describes a channel labelled “Analog L” on a device
named “my-transmitter”. Device names must be unique on a Dante network. Channel labels
must be unique on the device.
n If a device or channel is renamed, Dante routing considers it to be a different device or channel. If a
new device or channel is then given the old name, Dante routing will route from the new device in
place of the previous device.
Example: The power supply on “stage-box” fails and “stage-box” needs to be replaced. The
old “stage-box” is removed, and a new box is plugged in and named “stage-box”. Dante
receivers previously subscribed to the old “stage-box” will now automatically restore their
subscriptions to the new “stage-box”.
n Device names must be unique on the network. If you attempt to rename a device using Dante
Controller to a name that is already in use on the network, Dante Controller will notify you and reject
the name change.
Example: There is an existing device on the network called “MY16-slot1”. If user attempts to
rename another device to “MY16-slot1” Dante Controller will notify the user that the name is
already in use. The device will not be renamed.
n If a new device is added to the network with a name that already exists, a name conflict is detected,
and one of the devices will rename itself by appending (2) to its name. This device will not be able to
transmit audio until it is renamed.
Note: A device that has been renamed with (2) appended (e.g. “MY16-slot1(2)”) WILL NOT BE
ABLE TO TRANSMIT AUDIO until it is renamed. The device name must be changed by the user to
be a valid non-conflicting name before the device can become fully functional.
Rules for Names and Labels
n All Dante names and labels are up to 30 characters in length. Name and label comparisons are case-
insensitive; “Guitar” and “guitar” are treated as the same label. Unicode and non-roman
characters are not supported.
n Device names should follow Domain Name System (DNS) hostname rules. Legal characters are A-
Z, a-z, 0-9, and '-' (dash or hyphen). Device names must begin with A-Z (or a-z).
n Tx channel labels may use any character except '=' (equals), '.' (full stop or period), or '@' (at). Tx
channel labels must be unique on a device. Tx channel labels do not need to be unique on the
network as they are always qualified by device (channel@device).
n Rx channel labels follow the same rules as Tx channel labels.
Routing Audio
Routing Terminology
n Device: A device means a Dante-enabled device, and more specifically that component of the audio
equipment that implements the Dante interface. A Dante device typically has Tx and Rx channels
and other routing-related properties.
Copyright © 2013 Audinate Pty Ltd. All rights reserved.
-15-
Page 16
Dante Controller User Guide
n Transmit (Tx) channel: A transmit channel transmits audio from the audio hardware onto the
network.
n Receive (Rx) channel: A receive channel receives audio from the network and sends it to the audio
hardware.
n Flow: Dante audio routing creates flows. Each flow carries several channels of audio from a
transmitter to one or more receivers. Unicast routing creates flows to single receivers. Multicast
routing creates flows that can be received by multiple receivers. Multicast flows are assigned IDs
enabling them to be identified in Dante Controller.
n Unicast routing: Unicast flows are point-to-point from a single transmitter to a single receiver.
Unicast flows typically have room for 4 channels of audio.
n Multicast routing: Multicast flows are one-to-many from a single transmitter to any number of
receivers. Use Dante Controller to choose what channels are to be multicast. Unlike unicast routing,
multicast flows consume network bandwidth even if there are no receivers, but do not require
additional bandwidth to add more receivers.
n Subscription: A subscription configures a receive channel to receive audio from a transmit channel
on another Dante device.
n Subscription status: For a receive channel, subscription status indicates whether it is subscribed,
whether it is receiving unicast or multicast audio, whether the subscription is OK, or whether an error
has occurred.
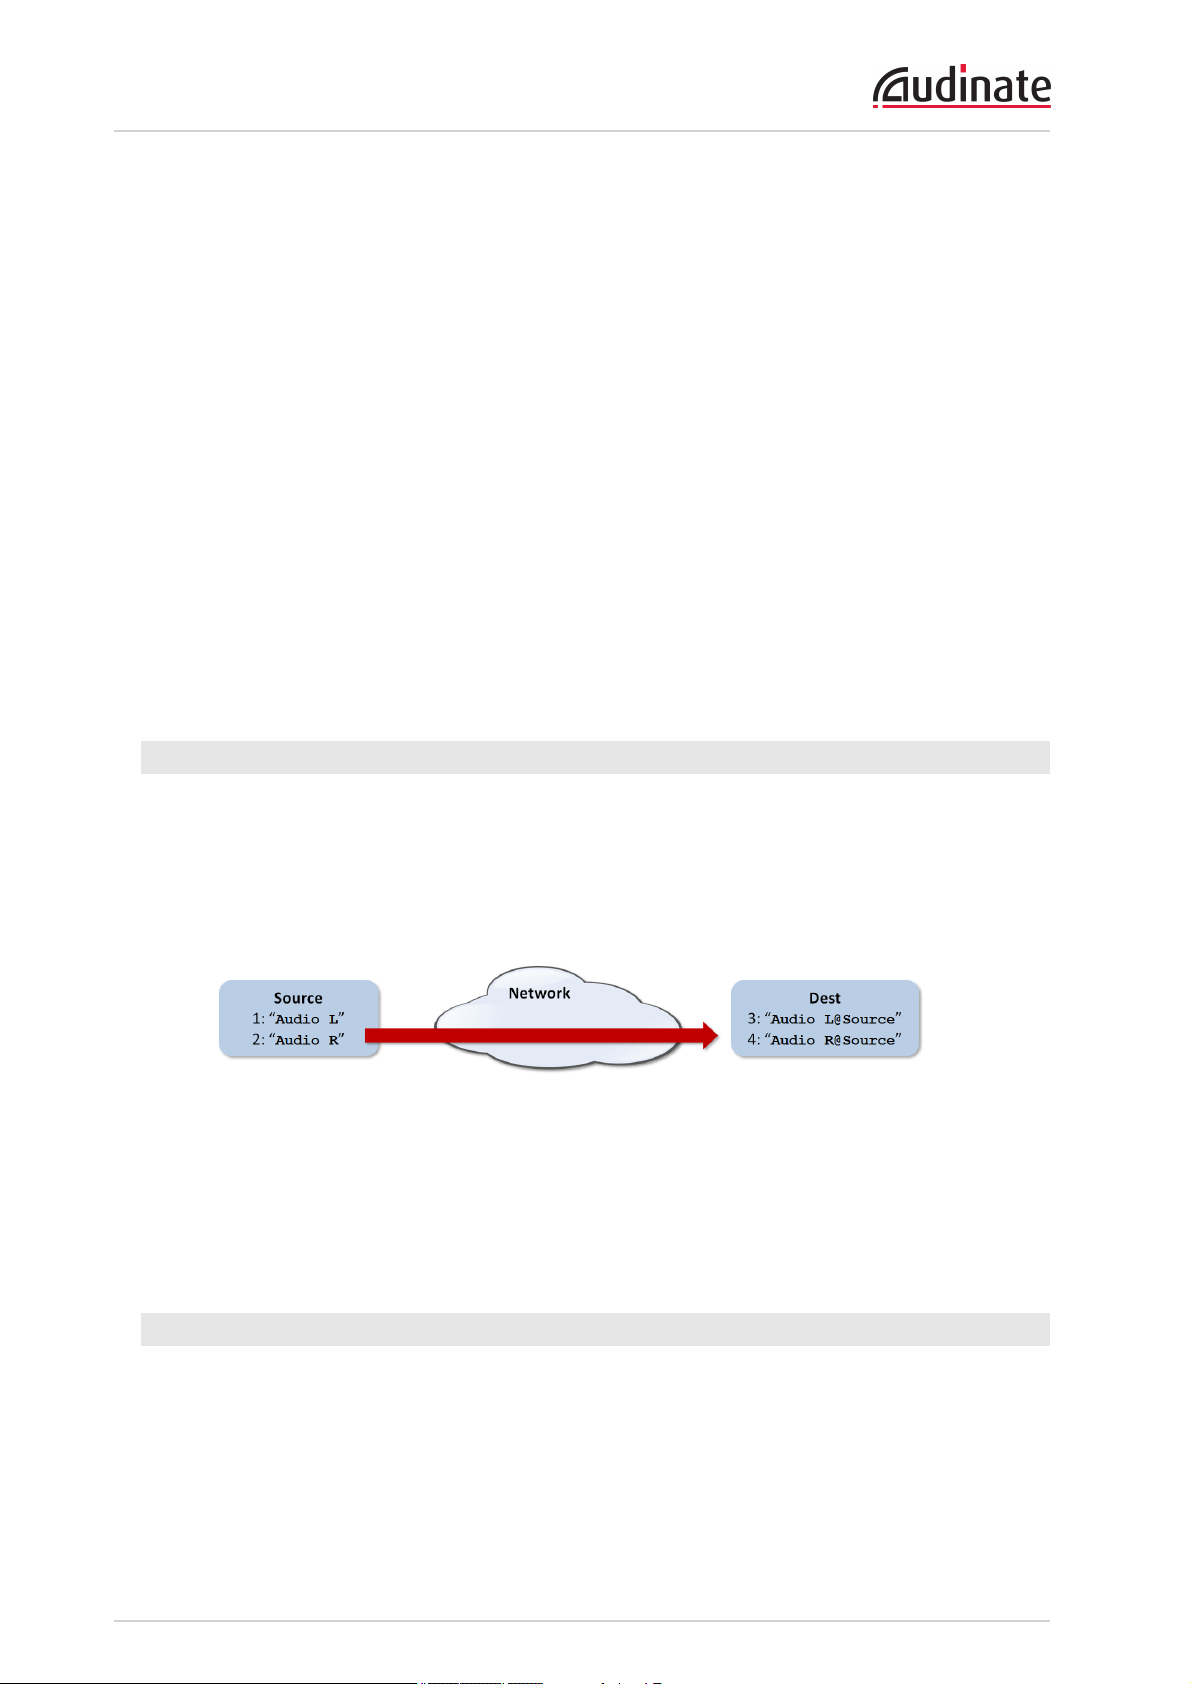
Subscription
Dante routing is performed by associating a receiving (Rx) channel with a transmitting (Tx) channel. This is
called subscription.
Example: Route Tx channels 1 and 2 (labeled “Audio L” and “Audio R”) on the device labeled
“Source” to Rx channels 3 and 4 on the device labeled “Dest”.
Rx channels 3 and 4 on “Dest” are subscribed as follows:
n 3. Audio L@Source
n 4. Audio R@Source
Dante will perform the necessary audio routing to deliver the audio from the Tx channels to the Rx
channels.
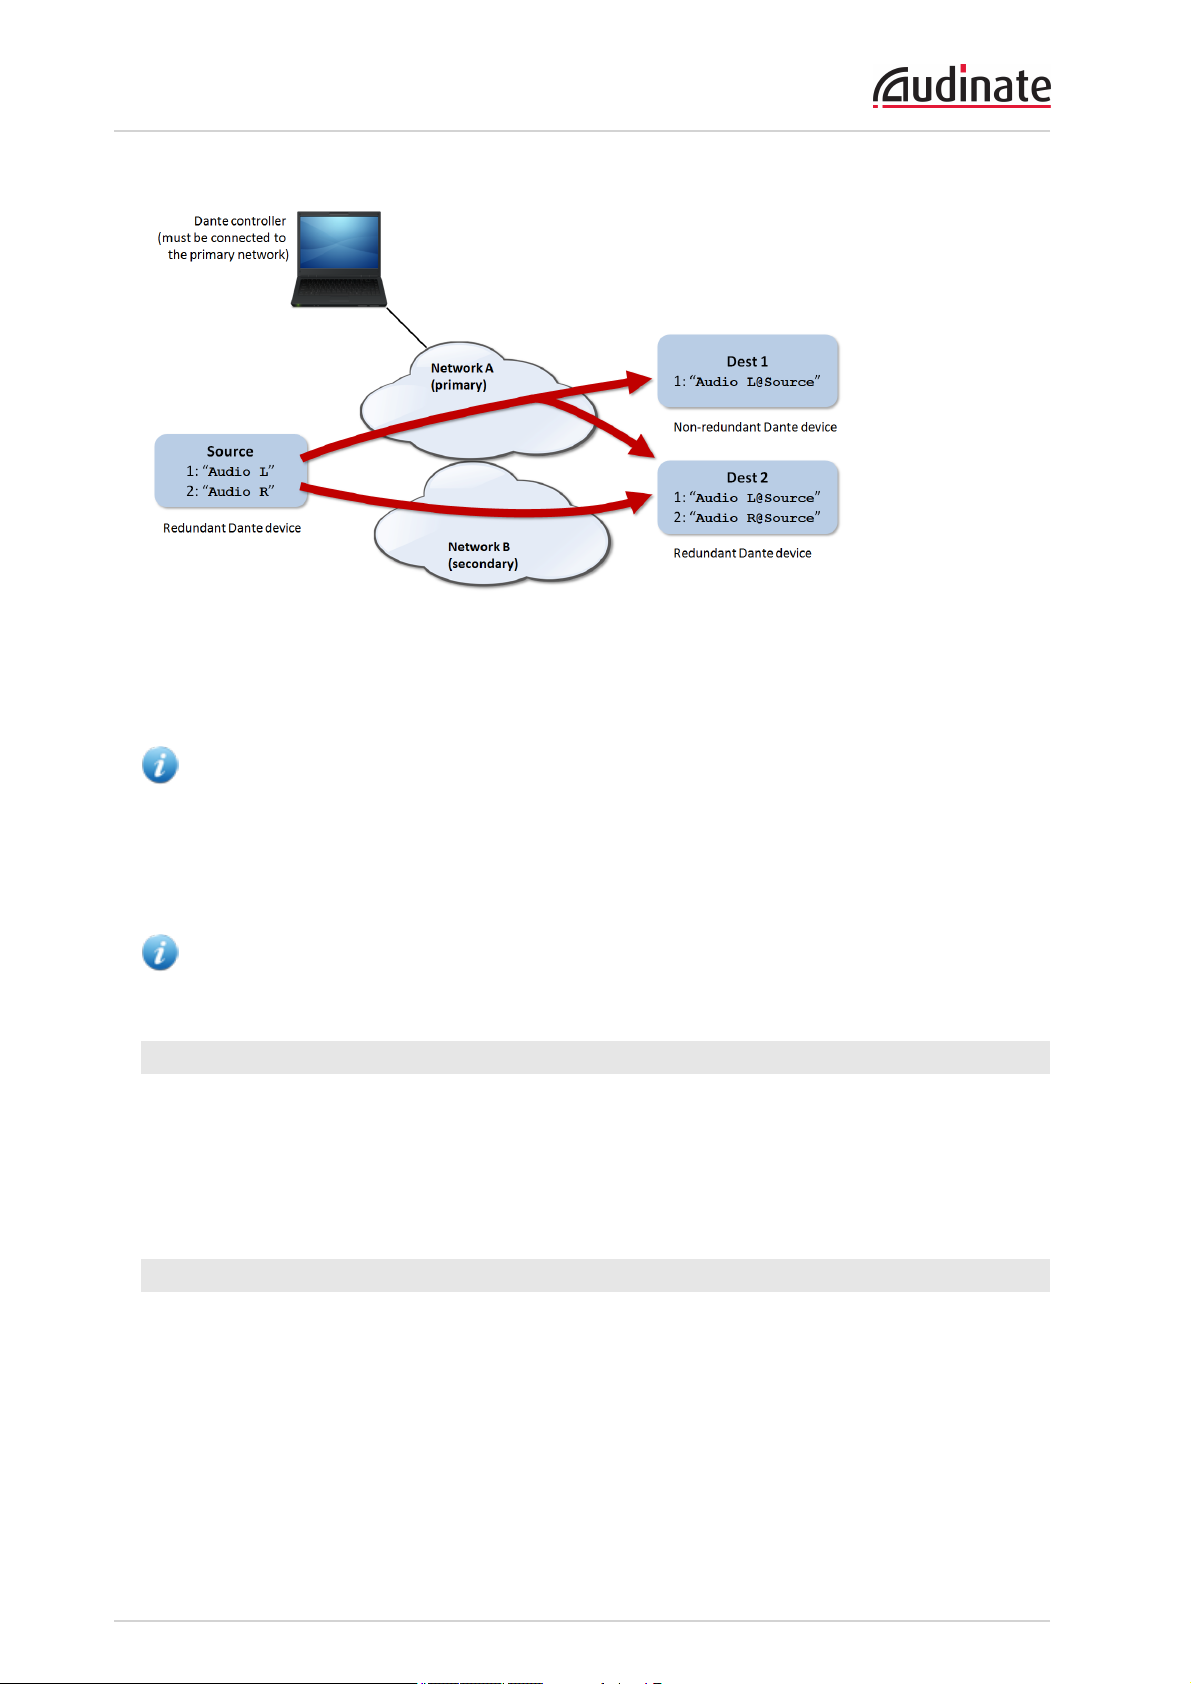
Redundancy
Many Dante devices support redundant audio routing. These devices have two network interfaces, labeled
primary and secondary. Primary interfaces should be connected to one physical network. If redundancy is
being used, secondary interfaces should be connected to a second separate network. Secondary
interfaces cannot communicate with primary interfaces.
Copyright © 2013 Audinate Pty Ltd. All rights reserved.
-16-
Page 17
Dante Controller User Guide
If the secondary network is connected to a device that supports redundancy, it is enabled automatically.
Audio data is transmitted on both the primary and secondary networks simultaneously. In the event of a
failure on one network, audio will still continue to be received via the other network.
Note: Dante redundancy requires that both the primary and secondary interfaces on any redundant
device are connected using the same link speed. For example, if the primary interface is connected to
a 1 Gbps switch port, the secondary interface must also be connected to a 1 Gbps switch port.
Similarly, if the primary interface is connected to a 100 Mbps switch port, the secondary interface
must also be connected to a 100 Mbps switch port.
Note: Dante devices that do not support redundancy must be connected to the primary network only.
Dante Controller must be connected to the primary network.
Audio Formats
Different Dante devices may support different audio formats. Most Dante devices support either 48 kHz
24-bit PCM or 96 kHz 24-bit PCM. Some devices can be switched between 48 kHz and 96 kHz, but will
not support both at once.
It is only possible to set up a route between channels which have a common audio format. Channels
having incompatible formats will be shown in grey and will not be routable.
Flows
Dante audio routing creates 'flows'. Each flow carries one or more channels of audio from a transmitting
device to one or more receiving devices. There are two types of flow, unicast and multicast.
Unicast routing creates flows to a single receiving device; a unicast flow typically assigns space for 4
channels of audio. Unicast flows are setup when a receiver subscribes to an available audio channel, and
are automatically removed when the receiver unsubscribes from all channels in that flow.
Multicast routing creates flows that can be received by multiple receivers. Multicast flows are assigned
IDs enabling them to be identified in Dante Controller and to facilitate their removal. In contrast to unicast
Copyright © 2013 Audinate Pty Ltd. All rights reserved.
-17-
Page 18

Dante Controller User Guide
flows, multicast flows must be set up on the transmitting Dante device before receivers can subscribe to
these flows.
Advanced Routing: Using Multicast
Dante routing is unicast by default. This means that a separate flow is set up between each transmitter and
receiver. If several receivers are all subscribed to the same channels of a transmitter, it may sometimes be
more efficient to use
Multicast sends the same set of channels to multiple receivers. In practice, this usually means that the
audio flow is flooded throughout the network. If many receivers want the same channels, using multicast
can reduce overall network use, especially on the transmitter, because only one copy of each audio
channel needs to be sent, rather than many.
Dante receivers will automatically prefer multicast to unicast if it is available. This means that if a new
multicast flow is created containing the channels that a receiver is currently receiving as unicast, the
receiver will switch over to receiving audio from the multicast flow and the unicast flow will be removed.
multicast
.
Clock Synchronization
All Dante-enabled devices use the IEEE 1588 Precision Time Protocol (PTP) across the network to
synchronize their local clocks to a master clock, providing sample-accurate time alignment throughout the
network.
One Dante device will be elected as the PTP Master Clock for the network; all other Dante devices act as
a PTP Slave Clocks to the elected master clock. Although many Dante devices may be capable of
becoming PTP Master Clock, only one device will win the election. Devices with clock inputs (e.g. word
clock or AES3) will be preferred in the election process. A gigabit connected device is preferred over a
device connected via 100Mbps. A tie-breaker rule of the lowest MAC address is used if several equivalent
candidate master clocks are available. The election process may be overridden by manually setting “PTP
Preferred” master on a device.
Dante Clock Types
Each Dante hardware device can derive its clock from either its high-quality onboard clock circuit, or an
externally connected word clock. In the case of Dante Virtual Soundcard, the computer’s clock will be
used.
Clock Settings
Slave to External Word Clock
A Dante device with "Slave to External Word Clock" set will use the external word clock from its host
equipment to tune its onboard VCXO. A Dante device with this attribute set will become the PTP Master
Clock, unless there is another Dante device present with "Preferred Master" set.
Preferred Master
Sometimes it may be necessary to force a particular device to provide the PTP Master Clock. A Dante
device with "Preferred Master" set will always be chosen as the PTP Master Clock. If more than one
device has "Preferred Master" set, the device with the lowest MAC address will be chosen.
Copyright © 2013 Audinate Pty Ltd. All rights reserved.
-18-
Page 19

Dante Controller User Guide
Clocking and Synchronization in Redundant Networks
In a redundant network, the clock synchronization protocol operates over both primary and secondary
networks. Each network will have a designated PTP master clock; usually this will be the same device on
both networks. If this is not the case (e.g. if a non-redundant device is designated Preferred Master) then
one device will bridge the clock synchronization information from the primary to the secondary network,
ensuring that all devices derive their clock from the same source. Redundant PTP Slave clocks will
synchronize their local clocks based on information from one of the networks they are connected to. In
event of a failure on one network a redundant device will continue to receive clock synchronization
information over the other network.
Clock Health Monitoring
Supported devices are constantly monitored by Dante Controller to establish the accuracy and stability of
their clock synchronization with the Dante network master clock.
If a device clock is exhibiting significant instability, it becomes at risk of losing sync with the master clock,
and Dante Controller can a display a ‘Clock Instability Detected’ pop-up, identifying the device.
Which devices are supported?
Dante PCIe cards, Dante-MY16-AUDcards, and devices that include a 'Brooklyn II'Dante module are
currently supported.
If your device is a Brooklyn IIdevice, it will be displayed as the Model type in the Dante Information
section of the Device View > Status tab.
If a device’s clock becomes too unstable and loses sync, the device will be automatically muted.
Activating Clock Health Monitoring
Clock Health Monitoring is off by default. To activate it, click the clock button on the main toolbar:
When Clock Health Monitoring is active, the button is down and the icon is green:
To switch it off, click the button again.
Note: The pop-up will be displayed only once for each device. Further instances of clock instability
(on a device that has already been identified as unstable) will not produce a new pop-up, unless Clock
Health Monitoring is reset, by switching it off and back on again (using the Clock Health Monitoring
button).
If you have Clock Health Monitoring switched on and you see no pop-ups, it indicates that all clocks on
your network are currently stable, and synchronizing well with the master clock.
There are a range of network conditions that can interfere with a device’s ability to synchronize with the
master clock. These include:
n A switch is configured to use Energy Efficient Ethernet ('Green Ethernet') functionality
n A 100 Mb switch or link is present where a Gigabit connection is required
n One or more switches are incorrectly configured
Refer to the Dante FAQs for more information.
Copyright © 2013 Audinate Pty Ltd. All rights reserved.
-19-
Page 20

Dante Controller User Guide
Latency
In Dante, variation in latency in the network is compensated for at the receiver. Each receiver has an Rx
latency setting. This setting defines the latency between the timestamps on the incoming audio samples
and when those samples are played out.
The typical default latency for a Dante device is 1 msec. This is sufficient for a very large network,
consisting of a Gigabit network core (with up to 10 hops between edge switches) and 100 megabit links to
Dante devices. Smaller, Gigabit-only networks can use lower values of latency (down to below 200µsec).
Recommended latency settings are displayed in Dante Controller and may also be found in the
documentation accompanying the product.
Note: The minimum latency available for a device connected to a 100 Mbps network port is 1 msec.
Latency and the Dante Virtual Soundcard
The Dante Virtual Soundcard allows a standard Apple Mac or Windows PC to function as a Dante device.
Because the Dante Virtual Soundcard runs on a general purpose computer without special hardware to
support Dante timing requirements, additional latency needs to be added to connections received from a
Dante Virtual Soundcard transmitter.
The Dante Virtual Soundcard is configured with custom latency values for reliable operation. Dante
devices with Rx channels that are subscribed to Tx channels from a Dante Virtual Soundcard transmitter
will automatically configure themselves to use these higher latency values for those channels only. The
latency on all other subscriptions on the receiver is unaffected.
Dante Control and Monitoring
In addition to automatic configuration and discovery, audio transport and routing, Dante-enabled devices
can also be controlled and monitored in various ways. This includes being able to view and change specific
parameters, such as clock configuration settings. Dante devices are also capable of sending status events
that can be viewed using Dante Controller. Status events include changes in clock status, or network
interface changes.
Copyright © 2013 Audinate Pty Ltd. All rights reserved.
-20-
Page 21

Dante Controller User Guide
Starting Dante Controller
Where to find the Dante Controller application
Windows
By default Dante Controller will be installed in
C:\Program Files\Audinate\Dante Controller\
It can be started in several ways:
n Using the Start menu: Start > Programs > Audinate > Dante Controller > Dante Controller
n Run by going to Start > Run and entering
C:\Program Files\Audinate\Dante Controller\DanteController.exe
in the dialog box
n
Navigate to the directory where it is installed, and double-click the Dante Controller icon:
Mac OSX
The Dante Controller application will be installed in the Applications folder.
To start:
n
Navigate to Applications folder, and double-click the Dante Controller icon:
Or:
n Drag the icon to the Dock and click on it
Configuring Dante Controller
Network Interface Selection
Dante Controller communicates with other Dante devices on their primary network. Dante Controller needs
to know which of the network interfaces of the host computer is connected the primary Dante network.
The first time Dante Controller is run, the user may be presented with the Configure Dante Interfaces
dialog box providing a list of interfaces from which to select the primary Dante interface. Once an interface
has been selected it is remembered for future use and this dialog box will not be shown when Dante
Controller is run subsequently.
Copyright © 2013 Audinate Pty Ltd. All rights reserved.
-21-
Page 22

Dante Controller User Guide
The selected network interface can be changed via the 'interface selection' button in the Network
View toolbar of Dante Controller, which also brings up this Configure Dante Interfaces dialog box.
Note: You MUST have a standard wired Ethernet network available and connected to use Dante
Controller. Wireless and other non standard wired Ethernet interfaces are NOT shown in this dialog
box, and cannot be selected.
Note: All Dante applications on the same PC or Mac have a shared understanding of which interface
is the primary Dante interface. For example, if you have installed Dante Virtual Soundcard on the
same PC as Dante Controller and a new primary interface is selected from within Dante Virtual
Soundcard, Dante Controller will automatically switch to the newly selected interface and begin
operating on that interface.
Copyright © 2013 Audinate Pty Ltd. All rights reserved.
-22-
Page 23

Dante Controller User Guide
Using Dante Controller
Dante Controller presents the user with two main types of view: Network View and Device View.
Important: After making changes to Dante network routing (e.g. subscriptions, device names,
channel labels etc.) please wait at least 5 seconds before disconnecting or powering down any
affected devices. This ensures that the new information has been properly saved to the devices.
Device configuration (e.g. sample rates, latency, clock settings) are saved instantly.
Note: Mac OSX users: Please note that the key combinations shown below are for Windows users.
When using Dante Controller on a Mac, please use the “Command (CMD)” or “Apple” key instead of
the “Control” key when following the instructions below, and substitute standard Mac key
combinations where applicable – see the Dante Controller menu for details.
Network View
When Dante Controller is started it always begins by presenting the Network View:
Copyright © 2013 Audinate Pty Ltd. All rights reserved.
-23-
Page 24

Dante Controller User Guide
Network View Menu bar
The menu bar in the Network View contains three menus: File, Device and Help.
File
n Load Preset (Ctrl+L): loads a configuration from a file
n Save Preset (Ctrl+S): saves configuration for currently displayed devices to a file
n Exit (Alt+F4): Exits Dante Controller
The use of Presets is described in detail later in this guide.
Device
n Refresh (F5): Refreshes the displayed network / device data
n Device View (Ctrl+D): Opens a new Device View window
Help
n About: Shows Dante Controller version and current log file
n License: Displays the license text
n Contents (Shift+F1): Opens a help window and displays help contents
Network View Toolbar
Below the menu bar there is a toolbar containing five buttons:
Reload Device Information Updates the current view with the latest device information from
the network. This is useful when a recent change to the network
has not yet propagated automatically through to Dante Controller
(for example, a new device has been added to the network).
Load Preset Loads a previously saved audio routing configuration. See Presets
for more information.
Save Preset Saves the current audio routing configuration. See Presets for more
information.
Choose a Dante Interface Opens the Configure Dante Interfaces dialog. See Configuring
Dante Controller for more information.
Clock Health Monitoring Activates the Clock Health Monitoring function. See Clock
Synchronization for more information.
To the right of the toolbar, Dante Controller displays the current master clock (or clocks, in the case of
redundant networks) and an indication of the current Dante multicast audio bandwidth on the network. Note
that there may also be traffic from other sources on the network.
Network View Tabs
There are four sub-views within the Network View that can be selected by clicking on the tabs below the
menu bar and toolbar. These are as follows:
n Routing
n Device status
Copyright © 2013 Audinate Pty Ltd. All rights reserved.
-24-
Page 25

Dante Controller User Guide
n Clock Status
n Events
The use of each of these tabs is described in the next section.
Sub-views within the Network View
Routing View
When Dante Controller is started, it always displays the Routing Tab within the Network View. In this view
the network is shown in the form of a grid. Devices with Tx channels are displayed along the top row of the
grid, and those with Rx channels are displayed along the left-hand column of the grid. Initially a collapsed
view is presented; individual channels cannot be seen.
Note: If a device name is shown in red, it means Dante Controller has automatically detected an
error condition. Double-click the device name to see more information. Refer to Automatic
Notification of Device Errors for further explanation.
Note: If a device has Tx and Rx channels, it is shown both along the top row of the grid and also
along the left-hand edge.
Expanding the Routing View
Copyright © 2013 Audinate Pty Ltd. All rights reserved.
-25-
Page 26

Dante Controller User Guide
The Rx channels associated with any device can be displayed by clicking on the [+] to the left of the
device name in the left-hand column of the grid. The Tx channels associated with any device can be
displayed by clicking on the [+] above the device name on the top row of the grid. When this action is
performed the grid view expands to show each channel of the device, and the [+] becomes a [-]. Clicking
on [-] collapses the view.
The Rx channels associated with all devices can be simultaneously expanded by clicking on the [+] of “[+]
[-] Dante Receivers” at the top of the left-hand column. Similarly, the Tx channels associated with all
devices can be simultaneously expanded by clicking on the [+] of “[+] [-] Dante Transmitters” at the left of
the top row. Clicking on [-] will collapse the view.
Customizing the Network View
The Network view can be customized using the “Filter Transmitters” and “Filter Receivers” boxes below
the Audinate logo in the top left-hand corner. Any text string typed into the box will filter out and only display
devices that contain that text string in either a device or channel name. The filtering is case-insensitive. For
example, in the Dante Controller Network view above, entering the string “dme” in either of the Filter fields
would display only the MY16-DME-Slot devices and their channels.
Device Channels
A Dante device has a number of channels associated with it. These are either transmit (Tx) or receive (Rx)
channels. Receive channels and devices are listed down the left side of the grid. Transmit channels and
devices are listed along the top of the grid.
Transmit channels are advertised on the network. A receiver uses this advertisement to establish a
subscription to the channel. A transmit channel can be sent to multiple receivers using unicast or
multicast.
Receive channels are connected to transmit channels via a subscription. Each receive channel will receive
audio over the network from at most one transmit channel.
Subscribing to Audio Channels
In the Routing View, a blue square at the intersection of an Rx and a Tx channel indicates that is it possible
to create an audio route between those channels. A grey square indicates that it is not possible to create a
route between those channels. This may be because of a mismatch in sample rate between the transmitter
and receiver or because a device cannot route to itself.
When the user clicks on a blue square at the cross-point between a transmit channel and a receive channel
a subscription will be created and a green tick will appear in the matrix cross point. You may initially see
a gray hourglass icon (usually very briefly) to indicate that the subscription is in progress.
If there is a problem with the subscription, either a warning or an error icon may appear. If many
devices have been subscribed at the same time, a yellow pending icon may appear temporarily.
Note: Subscriptions can also be created in the Device View. This is covered in the Device View
section (Device View is NOT the same as Device Status View).
Subscribing to Multiple Audio Channels at once
To subscribe multiple channels at the same time, hold down the Ctrl key and click the [-] symbol at the top
left corner of the intersection between the two devices. All possible channels will be subscribed at the
Copyright © 2013 Audinate Pty Ltd. All rights reserved.
-26-
Page 27

Dante Controller User Guide
same time (see the figure in Expanding the Routing View).
Unsubscribing Audio Channels
To unsubscribe an audio channel, click on the cross-point containing a subscription. The subscription icon
will be removed and revert to a plain blue square.
Subscription Status
The symbol displayed at the intersection of the Tx channel and the Rx channel in the Routing View
provides information on the status of the subscription or connection, as follows:
In progress The subscription is in progress
Subscribed Connection is established and fully functional
Warning Indicates that the subscription is unresolved, typically because the
transmitting device is not visible on the network (for example
because it has been removed or turned off)
Error An error has occurred, for example there is insufficient bandwidth to
establish the subscription
Pending Device is part-way through setting up subscription. Most commonly
seen when subscribing many devices at a time (by Ctrl-click)
Note: The status of a subscription can change after it has been initially established, due to changes
in the network or changes in other devices.
Device Status View
The Device Status view can be displayed by clicking on the Device Status tab within the Network View
window.
The Device Status view presents a network wide overview of device configuration and operating
information. The tabular view presents the following information, in columns from the left, as follows:
Copyright © 2013 Audinate Pty Ltd. All rights reserved.
-27-
Page 28

Dante Controller User Guide
n Device Name: The label currently associated with the device
n Product Type: The product type
n Product Version: The product version
n Primary Address: The IP address assigned to the primary interface. IP addresses are currently
assigned via DHCP or automatically self-assigned. Self assigned addresses on the primary
interface will be in the 169.254.X.Y range.
n Primary Link Speed: The Ethernet link speed that the primary interface is currently operating over
(i.e. 1Gbps or 100Mbps).
n Secondary Address: The IP address assigned to the secondary interface. IP addresses are
currently assigned via DHCP or automatically self-assigned. Self assigned addresses on the
secondary interface will be in the 172.31.X.Y range.
IP Address Assigned P address
Link Down Secondary Dante interface supported but not connected
Not supported Secondary Dante interface not supported
n Secondary Link Speed: Indicates the Ethernet link speed that the secondary interface is currently
operating over (i.e. 1Gbps or 100Mbps). Other values as described above for Secondary Address.
Note: A Dante interface may have a preferred link speed. Where it does and the primary and/or
secondary interface is not operating at that preferred link speed, the values in the Primary Link Speed
and/or Secondary Link Speed columns will be presented in red.
Note: Older Dante devices may not support querying of some of this information. In this case the
relevant column will display “Not Supported”.
Clock Status View
The Clock Status tab within the Network View provides a network wide overview of the clocking state
within the network.
Copyright © 2013 Audinate Pty Ltd. All rights reserved.
-28-
Page 29

Dante Controller User Guide
This view provides a convenient way of quickly scanning the network for clock information. The view is in
table format, with the following fields for each device, in columns from the left, as follows:
n Device Name: the label currently associated with the device.
n Primary Interface Clock Status: indicates the state of the PTP clock for the primary network
interface. Clock Status values and their meanings are as follows:
Master Device is the current PTP Master Clock on the primary
Dante network
Slave Device is a PTP Slave on the primary Dante network
Passive Device is not using clock synchronization information from
this interface
Link Down The interface is not connected to the network
Not
Supported
Not
Where the device is non redundant the second interface is
Not Supported
The device does not support clock status reporting
Available
Devices that are configured with sample rate pull-up/down are shown with the relevant pull-up/down value
against their Clock Status. For example, a device acting as master clock with +4.1667% pull-up will be
shown as Master +4.1667%. See Clock Domains for more information.
Note: Other transient clock states exist, which are not listed above.
n Secondary Interface Clock Status: indicates the state of the PTP clock for the secondary network
interface of a redundant device. The pull-up/down setting for the device is also shown.
n Clock Role: shows the capabilities of the device, and allows the user to select 'Preferred Master'
status for a device. The possible values are:
Copyright © 2013 Audinate Pty Ltd. All rights reserved.
-29-
Page 30

Dante Controller User Guide
Preferred Master
Device may act as master clock
(checked or
unchecked)
Slave only Device is not capable of becoming a PTP master
Not Supported Setting of clock role is not supported by this device
Not Available Clock Role information is not available for this
device
Checking 'Preferred Master' raises the priority of the device in the master clock election. If only one device
on a particular clock domain has this box ticked, it ensures that the selected device becomes master clock
(for the relevant clock domain). When multiple devices have their Preferred Master box ticked, the master
will be elected from within that group. This is a convenient method of controlling the group of devices from
which the master can be selected.
n Slave To External Word Clock:
o
Where a device can be slaved to an external Word Clock, the value 'Yes' (and a check box) will
appear in this column. When checked, this will force the device to derive its local clock from the
external word clock source. This will also ensure that this Dante device becomes master clock
for the relevant clock domain (unless another device has 'Preferred Master' selected). It is not
normal practice to configure more than one device per clock domain with an external clock
source. In this case, the user is assumed to have synchronized external word clock sources
(e.g. house clock).
o
Where a device is shown with a checkbox and the text 'Yes' but the checkbox and text is greyed
out, it means that the Dante device
can
be slaved to an external word clock, but it cannot be set
directly from Dante Controller - it must be done via the host device user interface, or via some
other method (e.g. third-party control software). If the checkbox is populated, it means that the
Dante device is currently slaved to the external clock.
o
Where a device does not support slaving to an external Word Clock, the value in this column will
be 'Not Supported'.
Note: Older Dante devices may not have the ability to report their clock status. In such cases,
regardless of whether they are master or slave or have some other status, their status will be shown
as “Not Available”.
Clock Domains
Dante Devices that are
using the default clock. Devices that
'clock domains', which have their own dedicated PTP clocks, adjusted to account for the pulled up/down
sample rates.
Clock domains are not physically separated, they all exist on the network simultaneously. Devices with
pull-up/down synchronise to the appropriate clock for their pull-up/down setting, and ignore other clocks.
Those devices are shown with the relevant pull-up/down value against their Clock Status in the Clock
Status tab.
Dante devices can only transmit audio to, and receive audio from other devices on the same clock domain.
For example, a device with zero sample rate pull-up/down operates on the default clock domain, and
cannot transmit audio to, or receive audio from any devices on the +4.1667% clock domain, or the -1%
clock domain, etc.
not
configured with sample rate pull-up/down operate on the default clock domain,
are
configured with sample rate pull-up/down operate on separate
Copyright © 2013 Audinate Pty Ltd. All rights reserved.
-30-
Page 31

Dante Controller User Guide
Up to 5 separate clock domains can be supported at any one time. All clock domains have their own
master clock.
Master Clocks
The Dante network master clock, called the 'Grand Master', is displayed at all times in the center of the
toolbar of the Network View. This is the device that is providing the time sync source for all devices on the
network.
If multiple clock domains are in use, the Grand Master for each domain is shown, in a comma-separated
list.
The master clock is chosen automatically through an election process, though there are user configurable
parameters that allow prioritization of some devices in the master clock election. Configuring a device to
have an external word clock source will force that device to become master clock, unless another device
has 'Preferred Master' set.
Checking the 'Preferred Master' flag will always result in that device (or the device with the lowest MAC
address, if more than one device has been checked) becoming master clock for that domain.
Events View
The Events tab within the Network View provides information on significant changes and failures in the
network.
Dante Controller continually monitors Dante devices and the network as a whole. It is able to watch for
problematic configurations, unexpected problems and communication failures between itself and Dante
network devices. Events are displayed are stored in an event log. Each incident is given a severity grading,
as follows:
Information
Alert
Copyright © 2013 Audinate Pty Ltd. All rights reserved.
-31-
Page 32

Dante Controller User Guide
Warning
Events are also written to a log file. Each time the controller starts it creates a new log file with a timestamped filename, to avoid overwriting previous logs. The events pane provides a button enabling deletion
of log files more than seven days old.
You can find the path to these log files under Help > About.
Automatic Notification of Device Errors
Dante Controller is able to identify several types of problems that a Dante device may experience. A
device that is found to have problems will have its device name displayed in red. Additional information
about the problem can be found by double-clicking on the device.
A device displayed in red will either have entered failsafe mode or have an identified issue with its IP
configuration. These states are described in more detail below.
Incorrect IP address configuration
Dante networks use IP Addressing to communicate. Incorrect address configuration can make it hard or
impossible for a Dante device to communicate. Dante Controller attempts to identify and report several
types of incorrect IP address configuration, including:
n Having multiple DHCP servers on the same network
n Incorrectly configured static IP addresses
n Connecting the secondary interface of a Dante device to the primary network
n Different interfaces on the same device using the same IP address subnet
If you need further information, please refer to the Troubleshooting section.
Failsafe mode
A device will enter failsafe mode when the firmware image stored on the board has become corrupted.
Although rare, this can occur when:
n The firmware update process is interrupted by power loss or network failure
n The firmware image itself that was used in an upgrade is corrupt
If your device enters failsafe mode, please use the Failsafe Recovery function in the Firmware Update
Manager application (if available) or contact your device manufacturer.
Device View
The Device View is used to view and modify detailed information and settings for a specific device. Device
view can be activated by double-clicking on a device name in the Routing View within the Network View
window, or by selecting Device View from the Device menu (CTRL-D or CMD-D) in the Network View
window. The Device View opens in a new window.
Note: Mac OSX users: Please note that the key combinations shown below are for Windows users.
When using Dante Controller on a Mac, please use the “Command (CMD)” or “Apple” key instead of
Copyright © 2013 Audinate Pty Ltd. All rights reserved.
-32-
Page 33

Dante Controller User Guide
the “Control” key when following the instructions below, and substitute standard Mac key
combinations where applicable – see the Dante Controller menu for details.
The label of the device being viewed is displayed in the middle of the toolbar. In the screenshot above,
Weyland-D8 is the device being displayed in the drop-down list box.
The device viewed can be changed by selecting another device from the drop-down list.
Multiple Device View windows may be opened from the Network View, so that several devices can be
examined simultaneously.
The Device View has up to five sub-views allowing the user to see different information relating to a
specific Dante device:
n Receive: display and configure device’s receive (Rx) channels
n Transmit: display and configure device’s transmit (Tx) channels including multicast
n Status: device software, clock and network status information
n Config: rename device and set other attributes as relevant to device type
n Baseboard: only available when the Dante device is mounted on a Dante PDK audio baseboard
(NOTE: the device must be in SPI Master mode)
Copyright © 2013 Audinate Pty Ltd. All rights reserved.
-33-
Page 34

Dante Controller User Guide
Device View Menu bar
The menu bar in the Device View contains three menus: File, Device and Help.
File
n Load Preset: loads a configuration from a file
n Save Preset: saves configuration for currently displayed devices to a file
n Exit: Exits Dante Controller
The use of Presets is described in detail later in this guide.
Device
n Refresh: Refreshes the displayed network / device data
n Device View: Opens a new Device View window
Help
n About: Shows Dante Controller version and current log file
n License: Displays the license text
n Contents: Opens a help window and displays help contents
Device View Toolbar
The Device View toolbar contains 4 buttons: Refresh, Web Configure, Identify, and Multicast
Configuration. These provide the following functionality:
Refresh Re-load routing and configuration information for
the current device
Web Config Some Dante devices can be configured via a web
interface. This button opens a web browser window
which can be used to perform functions such as
firmware upgrades. This feature is not supported on
all Dante devices.
Identify Identify the current device by, for example, causing
its LEDs to flash. Note that this feature is not
supported on all Dante devices.
Multicast Configure multicast transmit flows on the current
device.
The toolbar also provides a drop down list of all available devices on the network which allows the user to
switch to a different device.
Device View Tabs
Below the toolbar, the Device View window has five tabs: Receive, Transmit, Status, Device Config and
Network Config, which are described in detail below.
Copyright © 2013 Audinate Pty Ltd. All rights reserved.
-34-
Page 35

Dante Controller User Guide
An additional tab, Baseboard, is only available when the Dante device is a module mounted on a Dante
PDK baseboard (and is in SPI Master mode).
Receive Tab
The Receive tab presents information about all channels being received, and able to be received by the
current device. The tab is arranged into two areas
n Receive Channels: Lists the Rx channels in the left pane of the window. It shows whether or not
they are connected and, if connected, the channel they are connected to and the status of that
connection.
n Available Channels: On the right pane of the window, lists the Tx channels from other devices that
are available for subscription by the current device.
The Receive Channels view on the left side of the tab contains three fields:
n Channel: An editable field that lists the receive channel labels for the current device. These can be
edited to change the current label of a receive channel.
n
Signal: Supported devices will also show the following channel metering icons, indicating the
presence of audio on subscribed channels:
Channel is either muted, or receiving audio at less than -61dbFS
Channel is receiving audio between -61dbFS and 0dfFS
Channel is clipping
n Connected To: Lists the Tx channel that the receive channel is currently subscribed to.
n Status: Lists the status of both primary and secondary subscriptions using the following icons:
Copyright © 2013 Audinate Pty Ltd. All rights reserved.
-35-
Page 36

Dante Controller User Guide
Subscription is OK and audio should be flowing
No subscription, or a subscription error
Subscription is via unicast connection
Subscription is via multicast connection
A particular subscription may have several symbols in its Status column. Common status icon
combinations and their meanings are as follows:
A Unicast device successfully subscribed to a
transmitter, and audio is present on the
channel
Redundant device successfully subscribed on
both primary and secondary to the transmitter
via unicast
Redundant device successfully subscribed on
both primary and secondary to the transmitter
via multicast
Redundant device successfully subscribed on
primary only to the transmitter via unicast. This
is typical when the secondary interface is not
connected
Available Channels
The Available Channels view on the right side of the tab lists the devices and advertized channels
available on the network. Devices that are grayed out indicate that this receiver cannot subscribe to those
channels or devices. This is typically because of a mismatch in parameters (e.g. sample rate
incompatibility etc.), or because a device cannot route audio to itself.
Subscribing to Audio Channels in the Device View
Subscriptions are created by selecting a channel from the Available Channels list in the right-hand pane of
the Receive Tab, then dragging and dropping it onto the appropriate receive channel in the left-hand pane of
the Receive Tab.
Multiple channels can be selected and then dragged and dropped onto the Receive Channels Tab to make
several subscriptions simultaneously.
Changing Rx channel labels in the Receive Tab
Rx channel labels can be changed by double clicking on the channel label and typing in a new value.
Transmit Tab
The Transmit tab is used to inspect and modify the transmit configuration of a device.
Copyright © 2013 Audinate Pty Ltd. All rights reserved.
-36-
Page 37

Dante Controller User Guide
The Transmit Tab is arranged in two areas:
n Transmit Channels: The area on the left pane of the tab shows the Tx channels for the device, and
any user-defined channel label. It allows the user to create labels for transmit channels. Input to the
table is filtered to prevent illegal characters from being used in channel labels.
Supported devices will also show the following channel metering icons in the Signal column,
indicating the presence of audio on subscribed channels:
Channel is either muted, or receiving audio at less than -61dbFS
Channel is receiving audio between -61dbFS and 0dfFS
Channel is clipping
n Transmit Flows: The area on the right pane of the tab indicates how many unicast flows are
currently in use, as well as the multicast transmit flows that have been configured on the device.
Multicast flows are listed in ID order, including the channels contained within the flow.
Note: Unicast flow details are not displayed in the transmit flow window. The total number of
transmit flows currently in use is shown at the top of the pane. The total number of flows is the sum of
the unicast and multicast flows in use. The maximum number of flows that the device supports is
also shown (16 in the screenshot above).
Copyright © 2013 Audinate Pty Ltd. All rights reserved.
-37-
Page 38

Dante Controller User Guide
Changing Tx channel labels
To change a Tx channel label double click on the label and type in a new one. Tx channel labels must be
unique on a single device.
Status Tab
The Status tab is used to obtain current information about a Dante device.
The tab is divided into sections. The information presented on this tab can be very useful when
investigating networking or clocking issues in the system. The Refresh button can be used to update
this information if required.
Note: Not all Dante devices support the display of all of this information.
Device Information
This provides the following general information about the device:
n Manufacturer: The name of the device manufacturer.
n Product Type: The type of device.
n Product Version: The product version.
Dante Information
This provides Dante-specific information about the device:
Copyright © 2013 Audinate Pty Ltd. All rights reserved.
-38-
Page 39

Dante Controller User Guide
n Model: The Dante device type.
n Software Version: The version of the Dante software running on the device.
n Firmware Version: The version of the Dante firmware running on the device.
Clock Synchronization
This provides the following information about device clocking:
n Mute Status: 'Muted' indicates that the device is has been automatically muted (due to a clock
synchronisation problem, or because the external word clock is invalid). 'Unmuted' indicates that the
device is not muted, and audio is flowing normally.
n Sync Status: 'Locked' indicates that the device is locked to the network PTP clock. 'Not Locked'
indicates that the interface has not achieved lock with the network PTP clock.
n External Word Clock: 'No' indicates that the device has been configured to use the internal clock
source. 'Yes' indicates that the device has been configured to accept an external word clock source.
NOTE: If the Dante device is configured to accept an external word clock source, it is important to
make sure that the host equipment has been configured to provide its word clock to the Dante
device. Check your product manual for more information.
n Preferred: 'No' indicates that the card has not been set to preferred master mode. 'Yes' indicates
that the card is set to preferred master mode.
n Frequency Offset: Indicates the offset from the network clock master measured in parts-per-billion.
Primary Interface
Provides the following information about the primary network interface:
n IP address: The IP address currently assigned to the interface
n MAC address: The Media Access Control address of the interface, associated with the Ethernet
layer
n Tx Utilization: Shows the current total transmit bandwidth in use
n Errors: (on the same line as Tx utilization) shows the number of transmit Cyclic Redundancy Check
(CRC) or packet errors detected since the device was last started
n Rx Utilization: Shows the current total receive bandwidth is use
n Errors: (on the same line as Rx utilization) shows the number of receive Cyclic Redundancy Check
(CRC) or packet errors detected since the device was last started
Note: The Rx Utilization includes not only network traffic destined for the Dante device, but any
other multicast or broadcast traffic received at this network interface.
Note: As a rule of thumb neither the Rx nor the Tx utilization should exceed about 85% of the link
speed in order to guarantee good clock synchronization performance (links are full duplex).
The graphic also indicates the speed and connected state of the interface as follows:
Indicates that the interface is running at 1Gbps.
Copyright © 2013 Audinate Pty Ltd. All rights reserved.
-39-
Page 40

Dante Controller User Guide
Indicates that the link is operating at 100Mbps
Indicates that the link is not connected or that there is an error.
The IP address will read N/A, and Tx and Rx utilization will be 0
kbps.
Secondary Interface
This provides the same information for the secondary interface that is provided for the primary interface, as
described above.
Note: The secondary network interface will only be displayed if the device supports redundancy.
Device Config Tab
This tab on the device view window allows the user to configure device specific parameters. The specific
options available will depend on the capabilities of the device. In the case where a device does not support
configuration via Dante Controller, the tab will be disabled.
Note: Dante Virtual Soundcard does not have a Config Tab available on Dante Controller. The Dante
Virtual Soundcard User Interface on the PC or Mac must be used to configure these devices.
Copyright © 2013 Audinate Pty Ltd. All rights reserved.
-40-
Page 41

Dante Controller User Guide
Configurable Parameters
Rename Device
Allows the user to enter a new Dante 'friendly name' for the device. The text field displays the current
name.
To change the device name, enter a new name in the text field and press Enter.
See Device Names and Channel Labels for information about name conflicts and device name rules.
Sample Rate
n Shows the current sample rate of the device, and allows the user to change the operating sample
rate of the Dante device. This may require the device to be rebooted to take effect. All sample rates
that the device supports are shown in the drop down box.
n Shows the current pull-up/down setting for the device, and allows the user to change the pull-
up/down setting. The pull-up/down setting can be used to adjust the sample rate of the device to
synchronise audio with video that has undergone frame rate conversion. For example, to
synchronise Dante audio with video that has been converted from 24 fps to 25 fps, set the sample
rate pull-up/down for any relevant Dante audio devices to +4.1667%.
Note: Changing the sample rate pull-up/down for a device places that device in a dedicated clock
domain. Dante devices can only transmit audio to, or receive audio from other devices on the same
clock domain. See Clock Status View for more information.
Receive Latency
Shows the current receive latency setting and allows the user to change the operating receive latency for
the selected device. Select a value and click OK to apply the latency to all flows that the device is
receiving.
Note: The 0.15 msec setting is unavailable for devices that include an internal network switch.
Warning: changing the latency value will cause disruption in the audio while the flows are re-
established at the new latency setting.
Reset Device
Allows you to remotely reboot the Dante interface, and also to reapply factory settings (Factory Reset).
Rebooting the Dante device may also require a reset of the host audio equipment containing the device.
Factory Reset wipes the following device configuration settings:
n User-defined device name
n User-defined channel labels
n Clock configuration (clock master / external clock master setting)
n Static IP addresses
n Redundancy configuration
n Sample rate setting (including pull-up/down)
Copyright © 2013 Audinate Pty Ltd. All rights reserved.
-41-
Page 42

Dante Controller User Guide
n Latency setting
n Any existing audio routes
Supported devices allow you to 'Clear Config' instead of Factory Reset. Clear Config wipes the same
configuration settings listed above, but allows you to optionally keep the IPsettings (i.e. retain the Dante
Redundancy settings, and any static IP addresses currently configured in the Network Config tab).
A reboot is required after clearing the configuration for the changes to take effect. Some devices will allow
you to automatically reboot after clearing the configuration. If this option is not available, a manual reboot is
required.
Network Config Tab
Use the Network Config Tab to toggle supported devices between Redundant and Switched modes, and to
specify static IP addresses for a device's Ethernet ports.
Copyright © 2013 Audinate Pty Ltd. All rights reserved.
-42-
Page 43

Dante Controller User Guide
Dante Redundancy / Switch Configuration
Depending on the manufacturer's configuration of a device, it may be possible to toggle the device
between Redundant and Switched modes, or to select a Switch Configuration.
Redundant
When a device is set to Redundant, the device will duplicate Dante audio traffic to both Ethernet ports,
allowing the implementation of a redundant network via the secondary port. Not all devices support
redundancy.
Switched
When a device is set to Switched, the secondary Ethernet port will behave as a standard switch port,
allowing daisy-chaining through the device.
Switch Configuration
Certain devices support specialist switching and/or redundancy configurations for the Ethernet ports. For
these devices, the top pane of the Network Config tab will be titled 'Switch Configuration'. Please refer to
the manufacturer's technical documentation for information on the supported switching configurations for
the device.
Addresses
Dante devices obtain IP addresses automatically by default, and in the vast majority of circumstances
there is no need to change the Addresses settings. However, static IP addresses can be assigned if
necessary.
To assign a static IP address:
1. Select 'manually configure an IPAddress' for the appropriate Ethernet port.
2. Enter the IPAddress and Netmask.
3. Click Apply.
The DNSServer and Gateway settings are optional - the device will use network defaults if they are not
specified.
Click Revert to revert back to the previous settings.
Note: Assigning static IPaddresses requires a device reboot.
HA Remote
For supported devices (Dante-MY16-AUD cards v3.3.9 and up), the Device View also includes an
HARemote tab. The HARemote tab allows the selection of the HARemote bridging mode for the device.
Copyright © 2013 Audinate Pty Ltd. All rights reserved.
-43-
Page 44

Dante Controller User Guide
HARemote is a proprietary serial control protocol used by Yamaha products. For more information about
HARemote bridging modes, please download the latest version of the Dante-MY16-AUD user guide from
the Yamaha website.
Multicast Transmit Flow Configuration
Clicking on the Multicast Configuration button in the Device View (regardless of which tab view is currently
displayed) will open a Create Multicast Flow dialog box that allows the user to select individual channels to
add to a new multicast flow.
Copyright © 2013 Audinate Pty Ltd. All rights reserved.
-44-
Page 45

Dante Controller User Guide
The window shows a list of the Tx channels for the device and allows the user to add them to the new
multicast flow that is being created, by checking the tick box next to each channel name. Once the user
has selected all the channels required, the multicast flow can be created by clicking on the Create button at
the bottom of the dialog box. To abandon creating a new multicast flow, click on the Cancel button.
A single multicast flow can contain up to the maximum supported channels per flow for this device. This is
displayed at the top of this window and is 8 channels for this device. If the user selects more than the
maximum allowed channels per flow, multiple flows will be created. Once a flow has been created, it will
appear in the list of flows in the transmit pane, along with the channels contained within that flow.
Channels cannot be added to or removed from existing flows. Each time the dialog is used to select
additional channels, a new multicast flow will be created.
By default, Dante devices "prefer" multicast over unicast. When a user clicks on a transmit channel to
make a subscription, the receiver will automatically connect to the channel via a multicast flow if one
exists. Likewise, when a channel that did not form part of an existing multicast flow is added to a new
multicast flow then any existing unicast subscription to that channel will automatically switch over to use
the new multicast flow.
Care should be taken when deleting a multicast flow, as the existing subscriptions will convert back to
unicast. This has the potential to result in exceeding the link capacity or maximum number of flows at the
transmit device as multiple unicast flows will be established between the transmitter and its receivers. It
may be advisable to remove some or all of the audio routes prior to deleting the multicast flow.
A good rule of thumb is to use multicast when there are more than two receivers for a specific audio
channel. You should also assume that the flow will flood throughout the entire network and therefore
consume bandwidth on all network links.
Note: Certain Ethernet switches support IGMP (Internet Group Management Protocol), a protocol
that provides the ability to “prune” multicast traffic so that it travels only to those end destinations that
require that traffic. If this is the case and IGMP is correctly configured on all the Ethernet switches
then multicast audio will not flood throughout the network but instead be sent only over the links
needs to deliver it to subscribed devices.
Copyright © 2013 Audinate Pty Ltd. All rights reserved.
-45-
Page 46

Dante Controller User Guide
Presets
Dante Controller supports loading and saving of audio routing configurations, known as Presets. A Preset
file contains subscription, labeling and multicast flow configuration for a set of devices.
Saving Presets
To save a Preset, click the ‘Save Preset’ icon in the toolbar of the Network View.
Alternatively select File > Save Preset via the Network view menu bar.
A ‘Save a Preset File’ dialog window is opened allowing the user to select a directory and filename for the
Presets file to be created.
Routing view filtering may be used to restrict the extent of preset file generation. A preset contains the
following information:
n Subscriptions for all receive channels that are displayed in the main routing view window
n Labels for all transmit channels that are displayed in the main Routing View window
n Multicast flow configuration for all devices that are displayed in either the transmit or receive area of
the routing view
Loading Presets
Note: When loading Presets It is important to make sure that there is no filtering applied in the
Routing View window.
Click on the ' Load Preset ' icon on the toolbar of the Network View, or select File > Load Preset via
the Network view menu bar to bring up the "Open a Preset File" dialog window.
This allows the user to navigate to the directory where previously saved Preset files are stored, and select
a Preset file to load.
Choose the preset file to load and click OK. This pops up a Preset Load window similar to that shown in the
following screenshot:
Copyright © 2013 Audinate Pty Ltd. All rights reserved.
-46-
Page 47

Dante Controller User Guide
Devices that will have their audio routing changed as a result of applying this preset are highlighted in
green. Devices that are present in the Preset but are currently not on the network are highlighted in red
italic. Devices and channels that will are not affected by this Preset are displayed in grey.
The expanded device view displays the subscription changes that would apply to this device. New
subscriptions, labels and multicast flows are displayed in green, while existing elements that will be
deleted are displayed as struck out text. Subscriptions that will be changed show the new subscription in
green and the old subscription in struck out text.
Click the OK button to apply the preset or the Cancel button to cancel.
Copyright © 2013 Audinate Pty Ltd. All rights reserved.
-47-
Page 48

Dante Controller User Guide
Troubleshooting
Messages on Startup
Error Message Meaning & Actions
The Bonjour service is not available, please
try again in a few minutes. If this message
persists, please re-install the Bonjour
software available from:
http://www.apple.com/support/downloads/
bonjourforwindows.html
Dante Controller was unable to connect to the
Conmon manager. Dante Controller cannot
function without this connection. This problem
is most likely caused by the Conmon
manager service or daemon stopping
unexpectedly. You may need to restart your
computer or reinstall Dante Controller to repair
this problem.
Affects: Windows only.
Meaning: On some computers, system services may
take a long time to start when the computer is rebooted
and you may be able to log in and open the Dante
Controller application before all required services are
available.
Action: If you have already installed Bonjour, please wait
a few minutes to allow the services to start and try again.
The Dante Controller application should then start
normally.
Affects: Windows only.
Meaning: Dante Control and Monitoring service is not
responding.
Action: Reboot your PC, or restart this service via Control
Panel > Administrative Tools > Services.
Computer Configuration Checklist
Before installing Dante Controller, you must be logged in to your computer as a user with administrator
privileges.
To be correctly configured for use with a Dante network, the computer should have:
n Dante Controller installed
n The correct network interface selected
n The correct IP addresses in use
Third-party firewall configuration
n Standard Windows and Mac firewalls are typically configured on installation.
n Third party firewalls will need to be manually configured.
If your computer has a third-party firewall installed, please read the Dante Controller and Dante Virtual
Soundcard User Guides for detailed information about firewall requirements and configuration.
Copyright © 2013 Audinate Pty Ltd. All rights reserved.
-48-
Page 49

Dante Controller User Guide
Troubleshooting Dante IP Address Configuration
All devices in a Dante network, including Dante Virtual Soundcard, must be using IP addresses from the
same network. When using Dante Virtual Soundcard or Dante Controller, your PC or Mac must be
connected to the Primary Dante network, and must have a correct IP address.
Note: If a device name is shown in red, it means Dante Controller has automatically detected an
error condition. This will be either an IP address configuration issue, or the device has entered
failsafe. Double-click the red device name to see more information.
Correct IP configuration
Dante hardware devices are set to obtain their IP address automatically from the network. They will either:
n Automatically assign themselves an address in the range 169.254.*.* (172.31.*.* for the secondary
network if present), or
n Obtain an IP address from a DHCP server if it is present on the network
Dante Virtual Soundcard uses the IP address of the PC or Mac it is installed on. If the computer has more
than one wired Ethernet network interface, it will use the IP address of the selected network interface.
Your PC or Mac TCP/IP network configuration set should be set to "Obtain an IP address automatically".
This way it will automatically acquire a Link Local automatic IP address in the same network as other
Dante devices. If a DHCP server is present, the computer and Dante devices will all acquire their IP
addresses via DHCP.
Possible IP network configuration mistakes
Possible network configuration errors are listed below. Dante Controller will try to automatically detect
these. If detected the offending device will be displayed in red.
Incorrect PC/Mac IP configuration
n Accidentally having multiple network interfaces with addresses in the same subnet
Incorrect general IP configuration
n Accidentally having multiple DHCP servers on the same network
Unusual – for example, someone may have a PC connected to the network with a DHCP server
running that they’re not aware of.
n Incorrectly configured static IP addresses
You shouldn’t need to configure static IP addresses at all. If for some unusual reason you do, it
must be in the same subnet as the rest of the network.
Incorrect redundant network configuration
Setting up a redundant network is described in “Redundancy”. There are a few ways to incorrectly configure a
redundant network. More than one of these can be present at the same time.
n Connecting the secondary interface of a Dante device to the primary network
Copyright © 2013 Audinate Pty Ltd. All rights reserved.
-49-
Page 50

Dante Controller User Guide
Most commonly by either misunderstanding how redundancy works, and using only one switch
with all cables connected to it; or correctly using two switches or networks, but accidentally
connecting one secondary cable to a primary network switch
n Joining the primary and secondary Dante networks
By connecting primary and secondary switches, or perhaps just using one switch.
n Multiple interfaces on the same device using the same IP address subnet
Possibly by having the same DHCP server on both primary and secondary networks, or both
DHCP servers configured to serve the same IP addresses
What are the symptoms of using the wrong network interface on my computer?
If you have more than one wired network interface, and Dante Controller is not using the interface the rest
of the Dante device are connected to:
n Dante Controller cannot see any Dante devices
n Dante Virtual Soundcard is not sending or receiving any audio when it is expected to
How do I check which network interface my Dante Controller/Dante
Virtual Soundcard is using?
n
The selected network interface can be viewed or changed via the 'interface selection' button in
the Network View toolbar of Dante Controller.
n It can also be viewed on the Dante Virtual Soundcard Settings tab
n If the Dante network is standalone and does not have a DHCP server installed, this address should
be 169.254.*.*
n If the Dante network is using a DHCP server, the IP address should conform to the addressing
scheme it is using (as shown in the image above)
How do I check IP addresses for all devices on my network?
n Use the Dante Controller Device Status tab to view the IP addresses of all the devices on your
network.
Copyright © 2013 Audinate Pty Ltd. All rights reserved.
-50-
Page 51

Dante Controller User Guide
n The Primary Address of all devices should follow the same IP address scheme (e.g. 169.254.*.* or
10.12.0.*). Same for secondary addresses…
n Note that some older Dante devices or devices running older firmware may not show this
information.
Troubleshooting Switch Configuration and Cabling
Cables are the most vulnerable part of a network system. If you suspect cabling issues, check for:
n Faulty or manually terminated cables
n Unplugged /badly connected Ethernet cables
n Incorrectly configured switches
n Dante devices removed or turned off
Symptoms of switch or cabling issues
n You cannot see (some) devices in the Dante Controller network view
n Dante Controller shows orange “unsuccessful subscription” icons, which usually means a device
that was present earlier is now missing
n Faulty cables can lead to intermittent faults, which may be heard as dropped samples or “cracks” in
the audio
n Dante devices may appear and disappear in Dante Controller
Switch and Cabling Checklist
n Are all the connected link/status lights on the switch lit, or flashing as expected?
o
Is the switch powered on?
o
Is the cable correctly plugged in at the switch and the PC or equipment?
n Is the switch correctly configured?
o
Perhaps QoS or VLANs have been incorrectly set up
n Are you using a switch from another application with an unchecked or tested configuration?
o
Consult the switch manual and check the switch configuration
Copyright © 2013 Audinate Pty Ltd. All rights reserved.
-51-
Page 52

Dante Controller User Guide
Index
Audio Formats 17
Auto-configuration 14
Available Channels 35-36
Bonjour 48
Cabling 51
Cabling issues 51
Changing channel labels 36
Changing Tx channel labels 38
Channel 35
Channel Labels 14
Channel metering 35, 37
Clear Config 42
Clock Domains 30
Clock Health Monitoring 19
Clock Instability Detected 19
Clock Master 29, 31
Clock Role 29
Clock Status View 28
Clock Synchronization 18, 39
Clock Types 18
Computer Configuration 48
Config Tab 40
Configure Dante Interfaces 21
Configuring Dante Controller 21
Conmon 48
Customizing the Network View 26
A
B
C
Dante Controller application 21
Dante Information 38
Dante Virtual Soundcard 20
Device 24, 34
Device Channels 26
Device Information 38
Copyright © 2013 Audinate Pty Ltd. All rights reserved.
D
-52-
Page 53

Dante Controller User Guide
Device Name 28
Device Names 14
Device Status View 27
Device View 32
DHCP 14, 32
Discovery 14
Display resolution 11
Downloading Dante Controller 12
Errors 32, 39
Events View 31
External Word Clock 30, 39
Failsafe 32
failsafe mode 32
File 24
Firewall Configuration 11
Firmware image 32
Firmware update 32
Flows 17
frame rate conversion 41
Frequency Offset 39
E
F
Help 24
Installing Dante Controller on Mac OSX 12
Installing Dante Controller on Windows 12
IP address 39
IP configuration 49
Keep IP settings 42
Latency 20
Link Down 29
Load Preset 46
MAC address 39
H
I
K
L
M
Copyright © 2013 Audinate Pty Ltd. All rights reserved.
-53-
Page 54

Dante Controller User Guide
Manufacturer 38
Memory 10
Messages 48
Monitoring 20
Multicast 16, 18, 34, 44
Multicast bandwidth 24
Multiple Audio Channels 26
Mute Status 39
Network Interface 21
Network View 23
Passive 29
Precision Time Protocol 18
Preferred Master 18, 30
Presets 46
Primary Address 28
Primary Interface 39
Primary Link Speed 28
Processor 10
Product Type 28
Product Version 28
PTP 18
PTP Slave 29
pull-up/down 41
N
P
Receive channels 26, 35
Receive Latency 41
Receive Tab 35
Redundancy 16
Redundant Networks 19
Refresh 34
Rename Device 41
Reset Device 41
Routing 15
Routing Audio 15
Routing View 25
Rx 26
Rx Utilization 39
Copyright © 2013 Audinate Pty Ltd. All rights reserved.
R
-54-
Page 55

Dante Controller User Guide
Sample Rate 41
Saving Presets 46
Secondary Address 28
Secondary Interface 29, 40
Secondary Link Speed 28
Signal 35, 37
Slave 18, 29
Slave to External Word Clock 18
Status 35
Status Tab 38
Subscribing 26, 36
Subscription status 16, 27
Sync Status 39
Synchronization 18, 29
System Requirements 10
S
Transmit channels 26, 37
Transmit Flows 37
Transmit Tab 36
Troubleshooting 49, 51
Troubleshooting Switch Configuration 51
Tx 26
Tx Utilization 39
UDP 11
Unicast 16, 45
Uninstalling Dante Controller 12
Unsubscribing Audio Channels 27
Web Config 34
T
U
W
Copyright © 2013 Audinate Pty Ltd. All rights reserved.
-55-
 Loading...