

Page 1

User’s Guide
CTU 100
Universal Termination Compression Tool
68-749-01 Rev. H
02 06
Page 2
CTU 100 Universal Termination Compression Tool
e
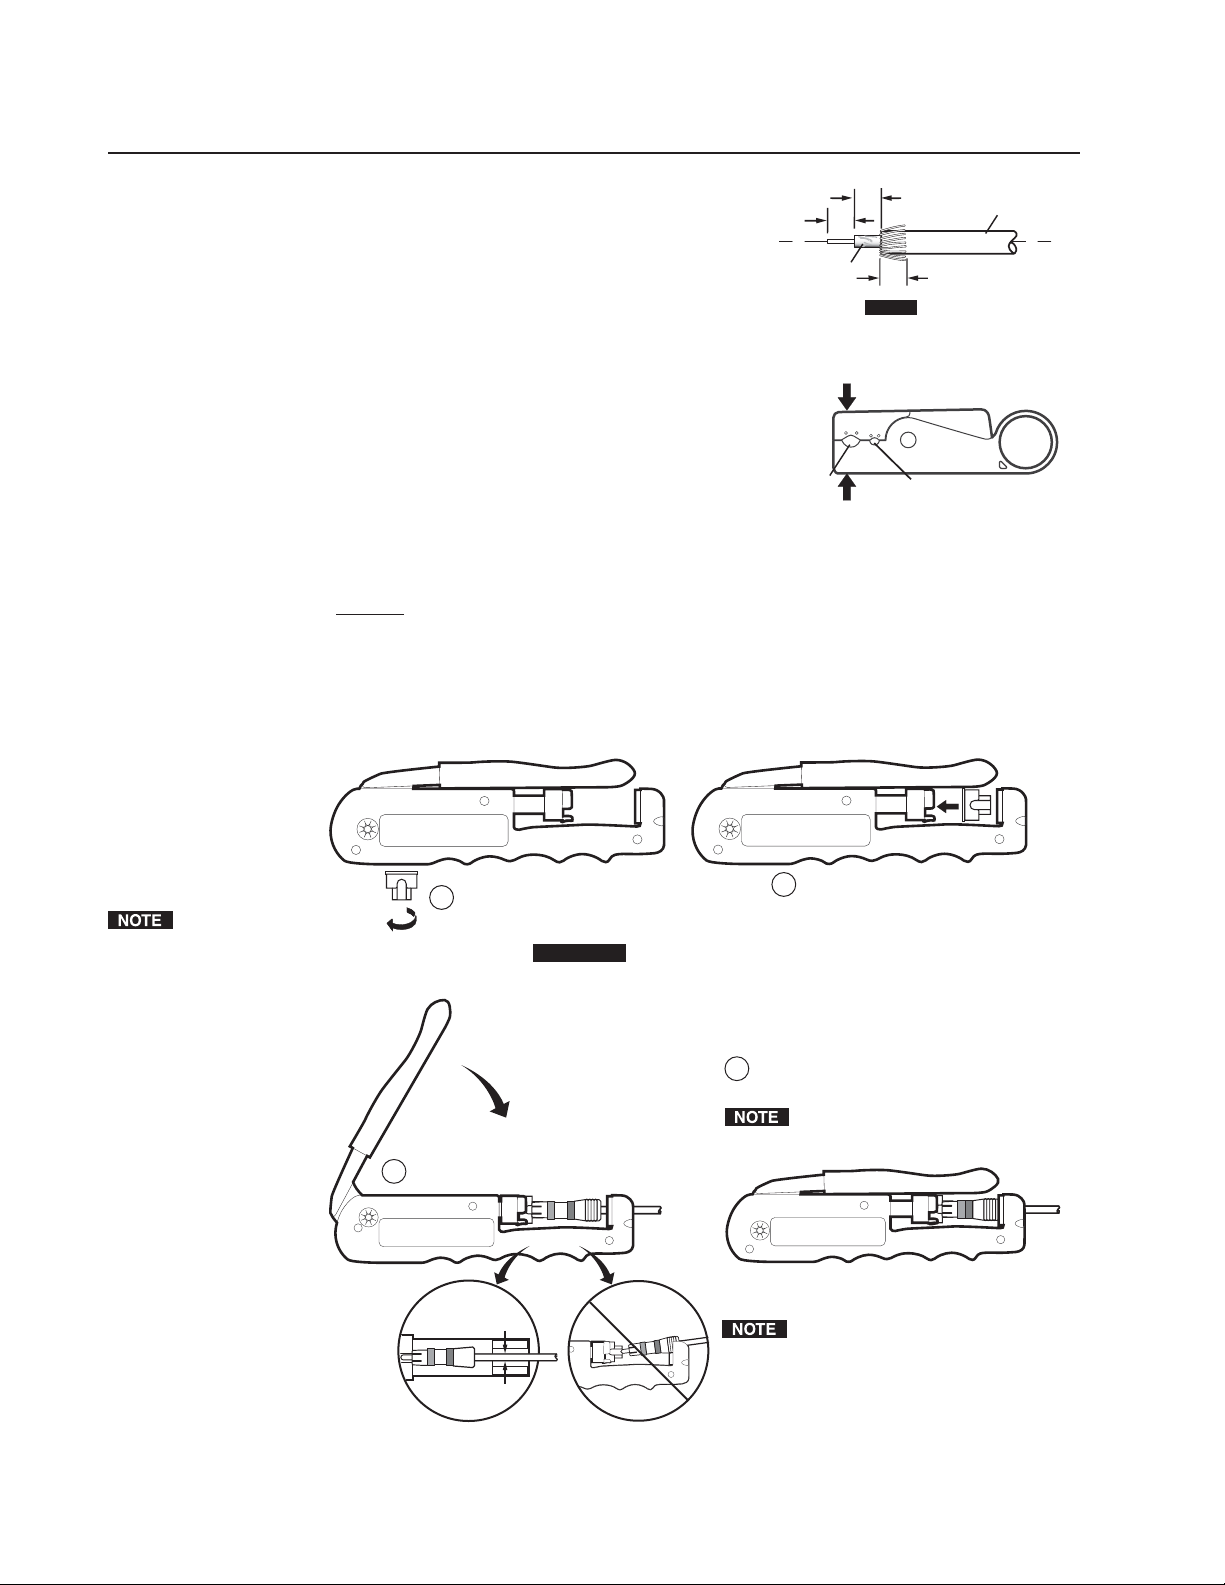
Preparing the Cable
1. Insert the cable end into the properly sized hole (RG6 and
RG 59 in the larger hole, mini HR and mini 59 in the
smaller hole) in the cable stripper and line up the cable end
flush with the side of the tool. See the illustration at right.
2. Rotate the tool several times in one direction and then
several times in the opposite direction. For RG6 and RG 59
cables only, apply pressure. Do not over cut the braids.
Center
Conductor
Leave foil in place
(if present).
1/4"
1/4"
NOTE
For RG6 and RG59 cable only,
apply pressure to top and
bottom of cable stripper to cut
through outer insulation.
3. Pull the cable out of the tool with the tool still closed.
4. For Mini HR and Mini 59 cables only, straighten and
smooth the stranded center conductor. Do not twist the
conductor. This will help deter crumpling or “frizzing” of
RG6/
RG59
the stranded cable when the center pin is installed.
5. Ensure that the dielectric is rounded and that no braid is wrapped around the center core.
6. Fold back the braid. Do not remove the foil.
7. For RG59 HR
plenum cable only, gently twist the foil to ensure that it is tighly molded to the
dielectric and that it is not peeled away from the dielectric.
Using the Universal Compression Tool and Adapters
(Adapters are used for terminating RCA and F-type connectors only)
Dielectric
1/4"
Braid
Illustration is not to scale.
Mini HR/
Mini 59
Outer
Insulation
Two adapters, one gold and one
silver, are shipped with the
universal compression tool.
These adapters are only required
for RCA and F-type connectors.
See Part Numbers on
the rear page for proper
applications.
If applicable, unscrew the adapter from
1
bottom of the compression tool.
CAUTION
Opened
Insert the connector into the plunger.
3
Centered
Top Vi ew
If applicable, insert the adapter
2
into the plunger.
Using the wrong adapter can damage the tool and/or connector.
Use no adapter for BNC connectors.
Use the gold adapter for gold RCA and F connectors only.
Use the silver adaper for nickel RCA and F connectors only.
Compress the connector until you feel firm
4
resistance or the tool’s handle reaches the body.
For Mini HR or Mini 59 cable, use your fre
hand to firmly push the cable into the tool
Closed
Side View
as you close the tool.
Ensure that the cable and connector
are centered over the plunger and go
straight into the plunger and not at an
angle.
2 CTU 100 Universal Termination Compression Tool
Page 3

/
Terminating the Cable with BNC connectors
1. Mini HR and Mini 59 cable only — Slide
the center conductor pin onto the center
conductor.
2. Mini HR and Mini 59 cable only — Place
the plastic dielectric sleeve over the center
conductor pin.
3. Mini HR and Mini 59 cable only — Slide
the compression sleeve over the dielectric
sleeve as far as possible.
4. RG 59 HR plenum cable only — Slide the
barrel over the braid and outer insulation.
CAUTION
For RG 59 HR plenum cable,
ensure that the foil slides
cleanly into the ferrule and
does not bunch up. If the foil
does bunch up, you must cut
and restrip the cable and start
over.
5. Push the compression connector onto the
cable, gently twisting the cable in the
compression connector, until the center pin is flush with the BNC
front ring.
6. Place the cable and connector in the opened compression tool (no
adapter is necessary).
7. Compress the cable and connector together, as shown on page 2.
BNC Front
Ring
Compression
Connector
Compression
Sleeve
Plastic
Dielectric
Sleeve
Center
Mini HR/
Mini 59
SuperFlex
Cable
Optional
Color
Ring
Pin
5
3
2
1
5
4
Center
Conductor
RG59 HR
Plenum
Cable
Optional
Color
Ring
Foil must go inside
compression sleve.
5
Center
Conductor
RG59 HR
(Non-plenum)
RG6 SHR
Plenum or
Non-plenum
Cable
Optional
Color
Ring
Compression
Sleve
Coax Foil
RG59
Plenum
Cable
Terminating the Cable with F-type connectors
1. Push the compression connector onto the cable until
the dielectric is flush with the inner sleeve top of the
connector. Use the compression tool to provide
leverage as shown. The center conductor should
protrude slightly from the front ring. Discard the
plastic slug.
2. Select and place the correct adapter into the
compression tool. Use the
connectors and the
connectors.
CAUTION
Using the wrong adapter can damage the
tool and/or the connector .
3. Place the cable and connector in the opened
compression tool.
4. Compress the cable and connector together, as shown
on page 2.
gold adapter for gold
silver adapter for nickel
Inner Sleeve goes
over the dielectric and
under the braid.
Use compression
tool for leverage
Dielectric is
flush with inner
sleeve top.
1
Plastic
Slug
(discard)
Inner Sleeve
Compression
Connector
Center Pin
Dielectric
Optional
Color
Ring
RG59/RG6
Cable
3CTU 100 Universal Termination Compression Tool
Page 4

Terminating the Cable with RCA connectors
1. Mini HR and Mini 59 cable only — Slide the plastic guide
onto the exposed conductor with the smaller hole on top.
2. Mini HR and Mini 59 cable only — Slide the sleeve over the plastic guide
to cover the braid.
3. Place the center pin on the exposed conductor.
Use the cable stripper for leverage as shown at
right. Mini HR and Mini 59 cable only — Ensure
that the strands of the center conductor do not get
crumpled or “frizzed”.
Listen for the center pin to
click into place.
4. Push the compression connector onto the cable and pin until the pin
protrudes past the top of the connector by approximately 1/4".
5. Select and place the correct adapter into the compression tool. Use the
gold adapter for gold connectors and the silver adapter for nickel
connectors.
CAUTION
Using the wrong adapter can damage the tool and/or the
connector.
6. Place the cable and connector in the opened compression tool.
7. Compress the cable and connector together, as shown on page 2.
Installing the Color Ring
Slide the appropriate color ring into the groove in the middle of the connector.
3
2
1
MHR/M59
Cable
Compression
Connector
Center
Pin
Sleeve
Plastic
Guide
Optional
Color
Ring
44
3
RG59/RG6
Cable
The color ring can be slid into position from either direction, from behind the connector
or stretched over the front of the connector.
Replacing the Stripper’s Blade Assembly
1. Push in on the ridged plate on the underside of the
cable stripper tool and slide the blade assembly
forward out of the tool.
2. Slide a replacement blade assembly, part #100-184-01,
into the tool until it snaps into place.
Sharp cutting blades.
Use care when removing or
replacing cutting blade cartridge.
2CTU 100 Universal Termination Compression Tool
Page 5

Part Numbers
Tools, Kits, and Replacement Parts Part #
Universal Compression T ool 100-181-01
Compression Coax Prep T ool 100-183-01
Compression Coax Prep T ool Replacement Blades 100-184-01
MHR BNC Compression Kit 60-538-01
RG6 (SHR) BNC Compression Kit 60-538-02
Replacement adapter (nickel) 100-405-01
Replacement adapter (gold) 100-405-02
MHR (26 AWG) Connectors and Parts Part #
BNC connectors (nickel), qty. 50 (orange) 100-186-01
BNC connectors (gold), qty. 50 (orange) 100-186-02
BNC pins, qty. 100 100-367-02
BNC nylon sleeves, qty. 100 100-369-02
BNC ferrules, qty. 100 100-368-02
RCA connectors (nickel), 50 (orange) 100-302-01
RCA connectors (gold), 50 (orange) 100-302-02
RCA pins, qty. 100 100-375-02
RCA nylon sleeves, qty. 100 100-377-02
RCA ferrules, qty. 100 100-376-02
Mini 59 (24 AWG) Connectors and Parts Part #
BNC connectors (nickel), qty. 50 (purple) 100-187-01
BNC connectors (gold), qty. 50 (purple) 100-187-02
BNC pins, qty. 100 100-371-02
BNC nylon sleeves, qty. 100 100-373-02
BNC ferrules, qty. 100 100-372-02
Mini 59 (24 AWG) (continued) Part #
RCA connectors (nickel), qty. 50 (purple) 100-303-01
RCA connectors (gold), qty. 50 (purple) 100-303-02
RCA pins, qty. 100 100-379-02
RCA nylon sleeves, qty. 100 100-381-02
RCA ferrules, qty. 100 100-380-02
RG59 (HR) Connectors and Parts Part #
1
BNC connectors, non-plenum (nickel), qty. 50 (red)
BNC connectors, plenum (nickel), qty . 50 (red)
1
100-189-01
100-212-01
BNC connectors, non-plenum (gold), qty . 50 (red) 100-189-02
F-type connectors (nickel), qty . 50 (red) 100-209-01
F-type connectors (gold), qty . 50 (red) 100-209-02
RCA connectors (nickel), qty. 50 (red) 100-304-01
RCA connectors (gold), qty. 50 (red) 100-304-02
RCA pins, qty 100 100-383-02
RG6 (SHR) Connectors and Parts Part #
BNC connectors (nickel), qty . 50 (green) 100-188-01
BNC connectors (gold), qty. 50 (green) 100-188-02
F-type connector (nickel), qty . 50 (green) 100-208-01
RCA connectors (nickel), qty. 50 (green) 100-305-01
RCA connectors (gold), qty. 50 (green) 100-305-02
RCA pins, qty. 100 100-385-02
RCA Color Rings2 100 Ea. Part #
R
RCA color rings
100-306-01(R),02(G),03(B),04(yel),05(blk),06(wht)
1
The color coding for BNC HR non-plenum and HR plenum cables are both red; to
identify each connector, check the connector legend. The plenum version contains the
letters “PL4”, as shown at right.
2
6 different color rings are available for different signal-type indications.
Extron Electronics, Asia
135 Joo Seng Rd. #04-01
PM Industrial Bldg., Singapore 368363
+800.7339.8766 +65.6383.4400
FAX +65.6383.4664
www.extron.com
Extron Electronics, USA
1230 South Lewis Street
Anaheim, CA 92805
800.633.9876 714.491.1500
FAX 714.491.1517
Extron Electronics, Europe
Beeldschermweg 6C
3821 AH Amersfoort, The Netherlands
+800.3987.6673 +31.33.453.4040
FAX +31.33.453.4050
© 2007 Extron Electronics. All rights reserved.
BNC HR (RG59) cable
F-CONN
FS59BNC
(non-plenum)
FSBNC
59BNC-PL4
BNC HR (RG59) cable
(plenum)
Extron Electronics, Japan
Kyodo Building, 16 Ichibancho
Chiyoda-ku, Tokyo 102-0082
Japan
+81.3.3511.7655 FAX +81.3.3511.7656
 Loading...