

Page 1

IMPORTANT:
complete user guide
instructions, and specifications.
Slee
Slee
6-pole Audio OUTPUT Wiring
t
3-pole Audio OUTPUT Wiring
Tip
Tip
Sleev
Go to www.extron.com for the
, installation
AXI 02 AT • Setup Guide
This guide provides basic instructions for an experienced technician to install the AXI 02 AT Dante Audio Interface. The Extron
AXI02AT is a compact audio interface that receives two channels from a Dante® audio network, providing connectivity to devices
without a Dante interface. It features two line level analog outputs on captive screw connectors with a mirrored two-channel
S/PDIF output on a coaxial RCA connector. Device conguration is performed using Extron DSP Congurator Software. Full
Dante conguration is available using Dante Controller. For additional information, specications, and the user guide, see the
AXI02AT product page at www.extron.com.
Disconnect Power and Mount the AXI 02 AT
Disconnect power from the AXI 02 AT and turn off all devices that will be connected to it. The AXI 02 AT is housed in an
eighth-rack width, 4.42-inch (133 mm) deep, 1U-high enclosure that can be mounted on a rack shelf, secured with the included
ZipClip100™ mounting clip, or secured to rack rails with tie wraps. Select a suitable mounting location, then choose an
appropriate mounting option.
Rear Panel Connections
OUTPUTS
S/PDIF
1/2
12
A B
Analog Audio Outputs
A
S/PDIF Audio Output
B
Figure 1. AXI 02 AT Rear Panel Connections
Analog Audio Outputs — Use 6-pole, 3.5 mm captive screw connectors to connect two balanced or unbalanced mono
A
line level devices. Balanced or unbalanced stereo devices can also be connected using 3-pole or 6-pole captive screw
connectors.
Tip
Ring
ve
Tip
Ring
ve
Balanced Output Unbalanced Outpu
Tip
NO Ground Here
Sleeve
Tip
NO Ground Here
Sleeve
Ring
e
Balanced Output
NO Ground Here
Sleeve
Unbalanced Output
Figure 2. Audio Output Wiring
ATTENTION :
• For unbalanced audio outputs, connect the sleeves to the ground contact. DO NOT connect the sleeves to the
negative (-) contacts.
• Pour l’audio asymétrique, connectez les manchons au contact au sol. NE PAS connecter les manchons aux
contacts négatifs (–).
NOTES:
• Balanced or unbalanced stereo sources can be connected with 6-pole connectors.
• When using a 5-pole CSR adapter, connect it so the far left plug is inserted into the far left jack of the 6-pole output.
S/PDIF Audio Output — Two S/PDIF output channels mirror the analog outputs on a coaxial RCA connector. Attenuation
B
applied to the analog outputs does not affect the S/PDIF output.
1
Page 2
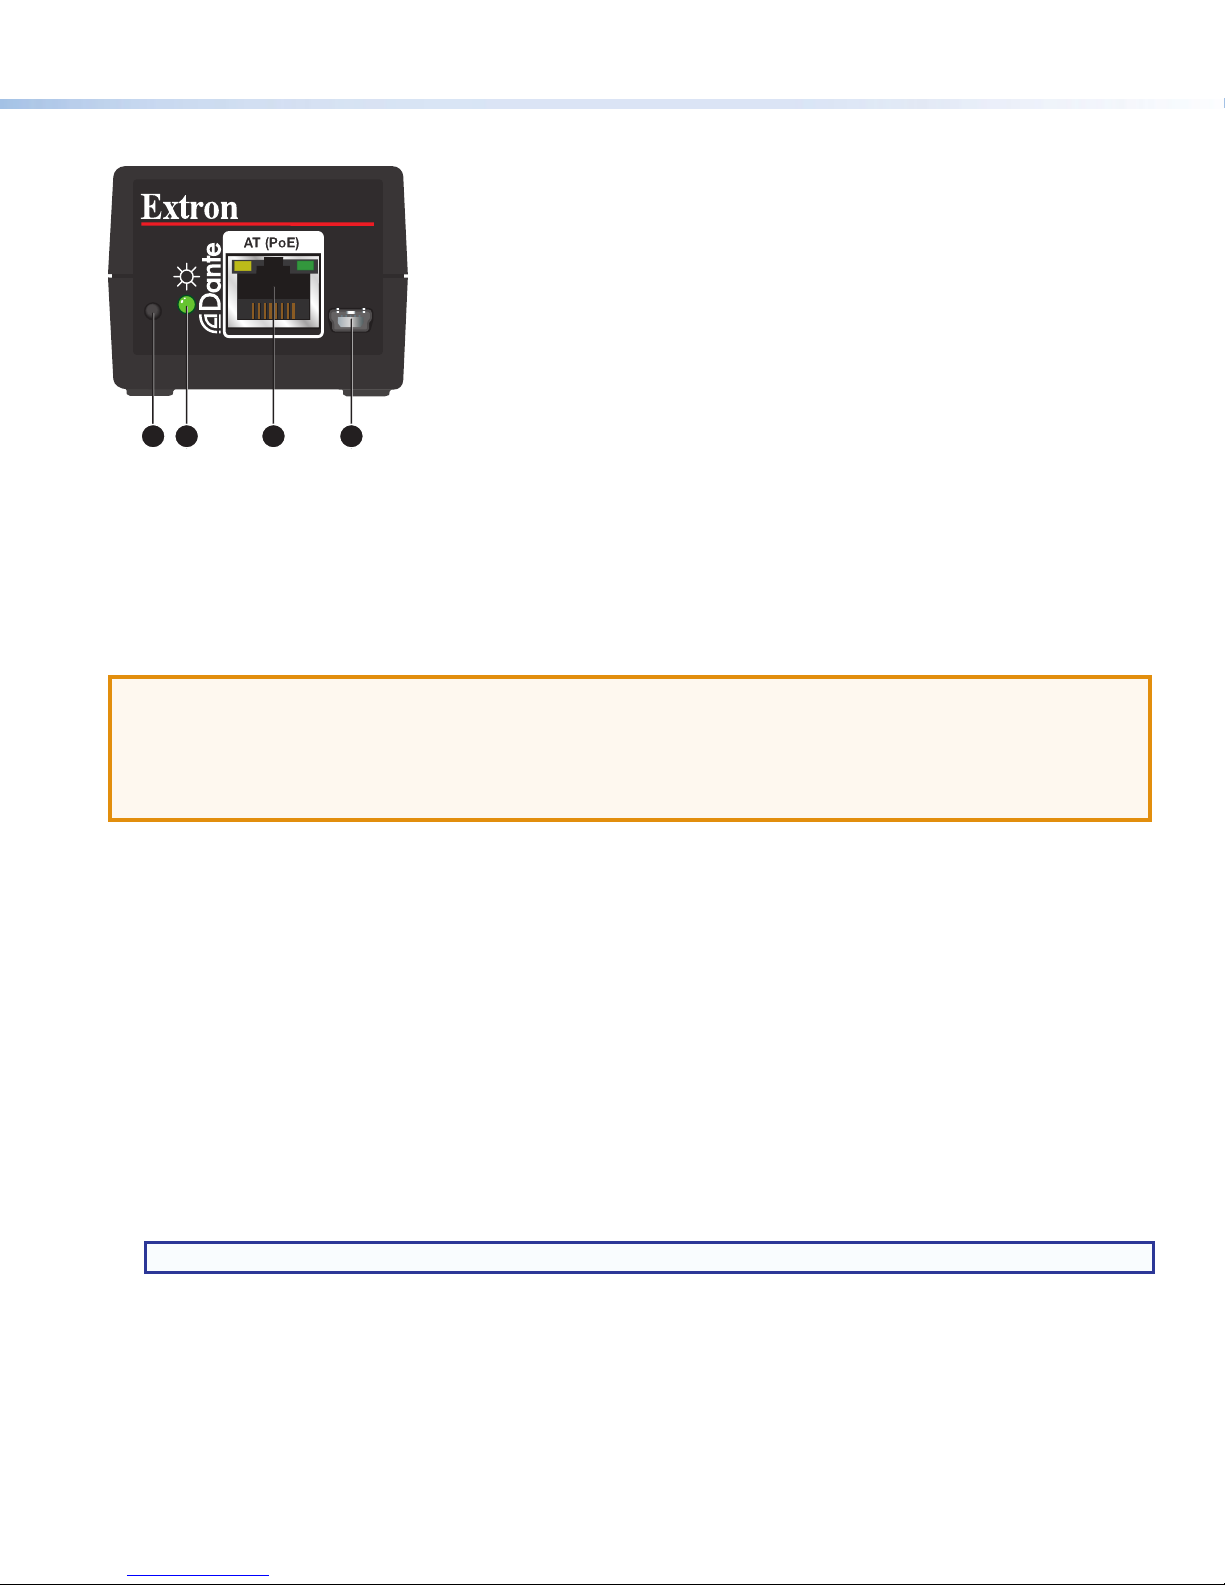
Front Panel Features
AXI 02 AT
®
R
A
Figure 3. AXI 02 AT Front Panel Features
Power Indicator LED — This green LED blinks during boot up and lights steadily when the AXI 02 AT is powered and fully
A
operational. This LED also blinks amber for 10 seconds when the device receives a Dante identification signal (see the
AXI02AT User Guide for more information on identifying physical Dante devices).
USB Config Port — Connect a computer to this USB Mini-B port for device configuration and firmware updates.
B
AT (PoE) Port — This RJ-45 port is used to connect the AXI 02 AT to a Dante network. The AT (PoE) port supports digital
C
audio transport (AT), communication with the Dante network, communication with DSP Configurator for device configuration,
and power over Ethernet (PoE).
C BD
CONFIG
Power Indicator LED
A
USB Config Port
B
AT (PoE) Port
C
Reset Button
D
ATTENTION:
• Power over Ethernet (PoE) is intended for indoor use only. It is to be connected only to networks or circuits that
are not routed to the outside plant or building.
• L’alimentation via Ethernet (PoE) est destinée à une utilisation en intérieur uniquement. Elle doit être connectée
seulement à des réseaux ou des circuits qui ne sont pas routés au réseau ou au bâtiment extérieur.
Reset Button — Using a stylus or small screwdriver, press and release this button to reset the unit to different tiers of factory
D
defaults, including Dante settings such as device name, IP address, channel names, and audio format (see the AXI02AT
User Guide for more information regarding resets).
DSP Configurator Software Installation
The AXI 02 AT can be congured with Extron DSP Congurator Software using the USB port or AT (PoE) port. Install
DSPCongurator on a PC running Microsoft® Windows®. For full computer requirements, see the DSP Congurator product page
at www.extron.com.
Downloading DSP Configurator from the Extron Website
1. From the Extron homepage (www.extron.com), click the Download tab to open the Download page.
2. Under Software, on the left side of the page, select DSP Configurator Software. The DSPConfiguratorSoftware
product page opens.
3. Click the Download button and follow the on-screen instructions.
NOTE: An Extron Insider account is required to download DSP Configurator.
2
Page 3

AXI 02 AT Configuration
Renaming the AXI 02 AT
The AXI 02 AT default device name consists of the device model and the last six characters of the device MAC address. When
multiple devices are on the network with default device names, identifying a specic device is difcult. To avoid confusion when
multiple devices are on a network, Extron strongly recommends renaming each device with a unique and meaningful identier.
NOTE: Dante Devices can also be renamed using Dante Controller (see the AXI 02 AT User Guide for more information).
To name the Dante device:
1. Open DSP Congurator and select Connect... from the splash screen drop-down and click OK.
2. Select the USB or Dante tab from the Connect to device... dialog, depending on the chosen connection method.
3. Select the AXI 02 AT being congured from the list of available devices and clickOK.
NOTE: If connecting through the Dante tab, the AXI 02 AT default device
name needs to be known. The AXI 02 AT default device name consists
of the device model and the last six characters of the device MAC
address. The MAC address is located on the white label on the side
of the device (see the image to the right for one example of a default
device name).
4. Select Tools > Device Settings. The Device Settings dialog box
opens to the Unit Info tab.
5. Select the Dante Device tab at the top of the dialog box.
6. Enter a unique and meaningful name for the AXI in the Device Name eld. For
example, in the image on page5, the AXI 02 AT has been renamed to
AXI02-Breakout1 to indicate it is located in breakout room #1.
NOTES:
• Device names cannot be longer that 31 characters, cannot begin or
end with dashes (-), and cannot contain + ~ , @ = { } [ ] < >
“ ; : \ | ‘ ? ! # $ % _ ` . / ^ or spaces.
7. Click Apply.
8. AXI network conguration details can be viewed below the device name in the Dante Device tab.
9. Click OK to close the Device Settings dialog box.
• The name applied in the Device Name eld is applied to the Dante
device and is the name that appears in Dante Controller.
Additional Configuration
Additional conguration, such as renaming channels and adjusting output attenuation, can be performed with DSP Congurator.
Refer to the AXI02AT User Guide for information regarding additional conguration with the DSP Congurator Software.
To route audio across the Dante network and complete other Dante-specic congurations, use Dante Controller (see
Downloading and Installing Dante Controller software on the next page).
3
Page 4

Downloading and Installing Dante Controller Software
Digital Matrix Processor
Dante Controller from Audinate is required to route audio across the Dante network and for limited conguration of the device.
Install Dante Controller on a PC running Microsoft Windows 7 or newer. For full details regarding computer requirements, see the
Dante Controller product page at www.extron.com.
1. From the Extron homepage (www.extron.com), click the Download tab to open the Download page.
2. Under Software, on the left side of the page, select Dante Controller. The Dante Controller product page opens.
3. Click the Download button and follow the on-screen instructions to complete the Dante Controller installation process.
NOTE: An Extron Insider account is required to download Dante Controller.
Creating a Physical Dante Network
A physical network is required to share Dante audio channels among Dante-enabled devices like the AXI 02 AT. Other devices
capable of sending and receiving audio over a Dante network must be on the same physical network in order to communicate via
Dante (see gure 4 below for an example of a physical Dante Network).
Conference Room #1
Extron
SM 3
Surface
Mount
Speakers
Audio
AXI 02 AT
®
R
CONFIG
Extron
AXI 02 AT
Audio Expansion
Interface with
Dante
Extron
MPA 152 Plus
Stereo Amplier
Extron Extron
STEREO
DUAL
MONO
BASSLEVEL TREBLE
MPA 152 Plus
MINI POWER AMPLIFIER
Conference Room #2 Conference Room #8
Microphones
AXI 02 AT
®
R
CONFIG
Extron
AXI 02 AT
Audio Expansion
Interface with
Dante
Extron
SM 3
Surface
Mount
Speakers
Audio
Extron
MPA 152 Plus
Stereo Amplier
AXI 02 AT
®
R
CONFIG
Extron
AXI 02 AT
Audio Expansion
Interface with
Dante
Extron
SM 3
Surface
Mount
Speakers
Audio
Extron
MPA 152 Plus
Stereo Amplier
Extron Extron
STEREO
DUAL
MONO
BASSLEVEL TREBLE
MPA 152 Plus
MINI POWER AMPLIFIER
Extron Extron
STEREO
DUAL
MONO
BASSLEVEL TREBLE
MPA 152 Plus
MINI POWER AMPLIFIER
Ethernet
Ethernet
Dante
Ethernet
CONFIG
Extron
Ethernet
INPUTS OUTPUTS
1 2 3 4 5 6 7 8 1 2 3 4 5 6 7 89 10 11 12
ACTIVITY
CLIP
EXPLAN USB
CLIP
SIGNAL
SIGNAL
DMP 128 Plus
DIGITAL MATRIX PROCESSOR
DMP 128 Plus C AT
Digital Matrix Processor
INPUTS OUTPUTS
1 2 3 4 5 6 7 8 1 2 3 4 5 6 7 89 10 11 12
ACTIVITY
CLIP
Ethernet
EXPLAN USB
CONFIG
Extron
CLIP
SIGNAL
SIGNAL
DMP 128 Plus
DIGITAL MATRIX PROCESSOR
DMP 128 Plus C AT
Figure 4. Physical Dante Network Diagram
4
Page 5

Dante Network Setup
Use a standard Ethernet cable to connect the AXI to a network via the RJ-45 AT (PoE) port (see figure 3, B on page2) and
power the device with a PoE-enabled switch or a power injector such as the Extron XTP PI 100. Launch the Dante Controller
software.
Dante Controller auto-discovers all Dante devices on the network and advertises itself to allow Dante-enabled devices to
communicate with it. The default device name is the model name followed by the last six characters of the device MAC address.
Multiple devices on the same network can present difculty in identifying inputs and outputs. To avoid confusion, rename each
device to a unique and meaningful identier.
NOTE: To simplify setup, connect only one Dante device to the network at a time, name the device, and then connect the
next device.
Dante Operation
Dante Receivers
A Dante network is comprised of transmitters that output digital audio onto the Dante network and receivers that receive digital
audio from the Dante network.
The AXI 02 AT analog outputs are listed as Dante receivers because they receive digital audio from the Dante network.
Additionally, audio received by the analog outputs is mirrored over the S/PDIF output. The AXI 02 AT does not transmit signal onto
the Dante network, and therefore does not have transmit channels.
NOTE: Refer to the AXI 02 AT User Guide for information regarding naming receiver channels.
Network View Layout
Dante transmitters are listed horizontally across the top of the Network View window (see 1 in the gure below), while Dante
receivers are listed vertically on the left side of the window(2). Creating a subscription in the connection matrix (3) routes audio
from a Dante transmitter to a Dante receiver.
Routing Transmitters and Receivers
1. Click the + box next to the device with the desired Dante
transmitters (AXI44AT-ConfRm1 in the example to the right).
The available transmitters display horizontally.
2. Click the + box next to the device with the desired Dante
receivers (AXI02-Breakout1 in the example to the right). The
available receivers display vertically.
3. Click the junction of the desired channels in the connection
matrix.
Example: AXI44-ConfRm1 Mic/Line In 1 to
AXI02A-Breakout1 Analog-S/PDIF Out 1.
A green check mark at the junction indicates the subscription is
made. A check mark is also placed next to the receiver channel
(if a green check mark does not appear, refer to the Dante
Controller section of the AXI 02 AT User Guide).
NOTE: A transmitter can transmit signal to multiple
receivers, but a receiver can only receive signal from one
transmitter.
4. Click the junction again to remove the subscription and
disconnect the transmitter from the receiver.
Additional transmitters and receivers can be connected or
disconnected using steps 1 through 4 above (for additional information on Dante Controller operation, see the Dante Controller
section of the AXI02 AT User Guide at www.extron.com).
© 2018 Extron Electronics All rights reserved. All trademarks mentioned are the property of their respective owners. www.extron.com
5
68-3070-50 Rev. A
02 18
 Loading...