

Page 1
Product Category
TI
QGE 100 • Setup Guide
The QGE 100 Quantum Graphics Encoder encodes an RGB or DVI signal from a source computer or similar graphical device
and streams it to a Quantum® Elite Videowall Processor, computer, or other viewing device over an IP network. The viewing
device can then decode the image data and reproduce the original source image, displaying it at its original or scaled
resolution. The QGE is connected between a source computer and its monitor, keyboard, and mouse without affecting the
performance of the computer. From these connections it obtains data about changes in the display content, along with
keyboard and mouse actions.
NOTE: For full installation, configuration, and operation details, see the QGE 100 User Guide at www.extron.com.
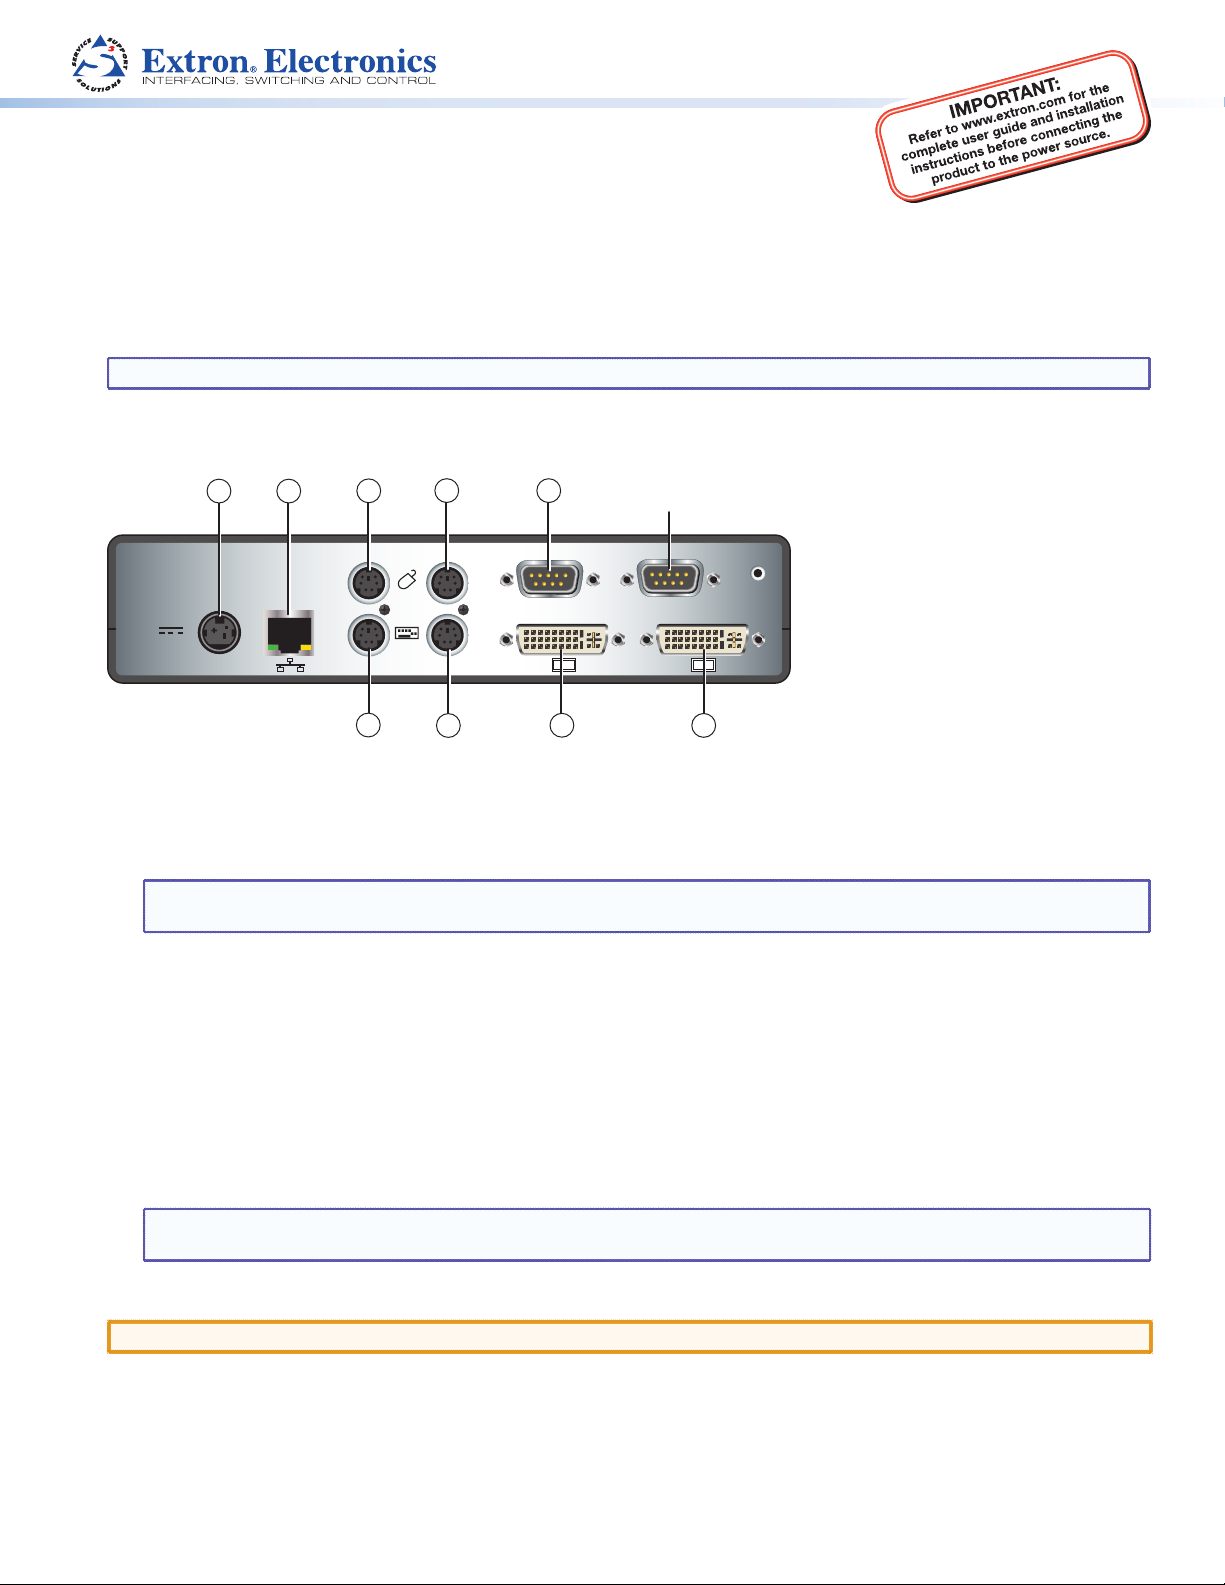
Rear Panel Features and Connections
Reserved for
Future Use
COM 2
Power connector
a
Ethernet port
b
Peripheral mouse connector
c
PC mouse connector
d
N
6
COM1 serial port
e
DVI-I In monitor port
f
DVI-I Out loop-through connector
g
PC keyboard connector
h
Peripheral keyboard connector
i
12V DC IN
REG
1.5A MAX
Refer all servicing to
qualified service personnel
1 2
3
PERIPH PC
9
4
8
5
COM 1
OU
DVI-I DVI-I
7
Installation Steps
1. Disconnect power from the QGE and power off all other equipment in the system.
2. Connect the QGE to the source computer:
NOTE: If you do not intend to use keyboard and mouse control of the source computer through the QGE 100, omit
the first four bullets (connecting the QGE between the source computer and its keyboard and mouse).
z Connect the PS/2 mouse of the source computer to the QGE Periph mouse port (
z Connect the PS/2 keyboard of the source computer to the QGE Periph keyboard port (
z Connect the QGE mouse PC port (
z Connect the QGE keyboard PC port (
z Connect the DVI-I In (
z Connect the monitor of the source computer to the DVI-I Out loop-through connector (
3. Connect the QGE to the network. Connect the QGE Ethernet port to the network of your viewing device.
4. Connect power to the QGE 100 (see “Connecting Power to the QGE 100,” below).
) monitor port of the QGE to the monitor port of the source computer.
f
) to the PS/2 mouse connector of the source computer.
d
) to the PS/2 keyboard connector of the source computer.
h
in the diagram above).
c
).
i
) of the QGE.
g
NOTE: Always power up the QGE 100 before the source computer; otherwise, the QGE does not correctly detect
the mouse, keyboard, and monitor.
5. Power on the source computer.
CAUTION: Always power on the source computer and QGE 100 after making all connections between them.
Connecting Power to the QGE 100
1. Plug the mini DIN connector of the provided 12 VDC power supply into the rear panel connector labeled “12V DC.”
2. Connect the provided power cord between the IEC connector of the power supply and an AC outlet. (The QGE 100
power supply is double-insulated and does not require an earth to ground connection.)
1
Page 2
QGE 100 • Setup Guide (Continued)
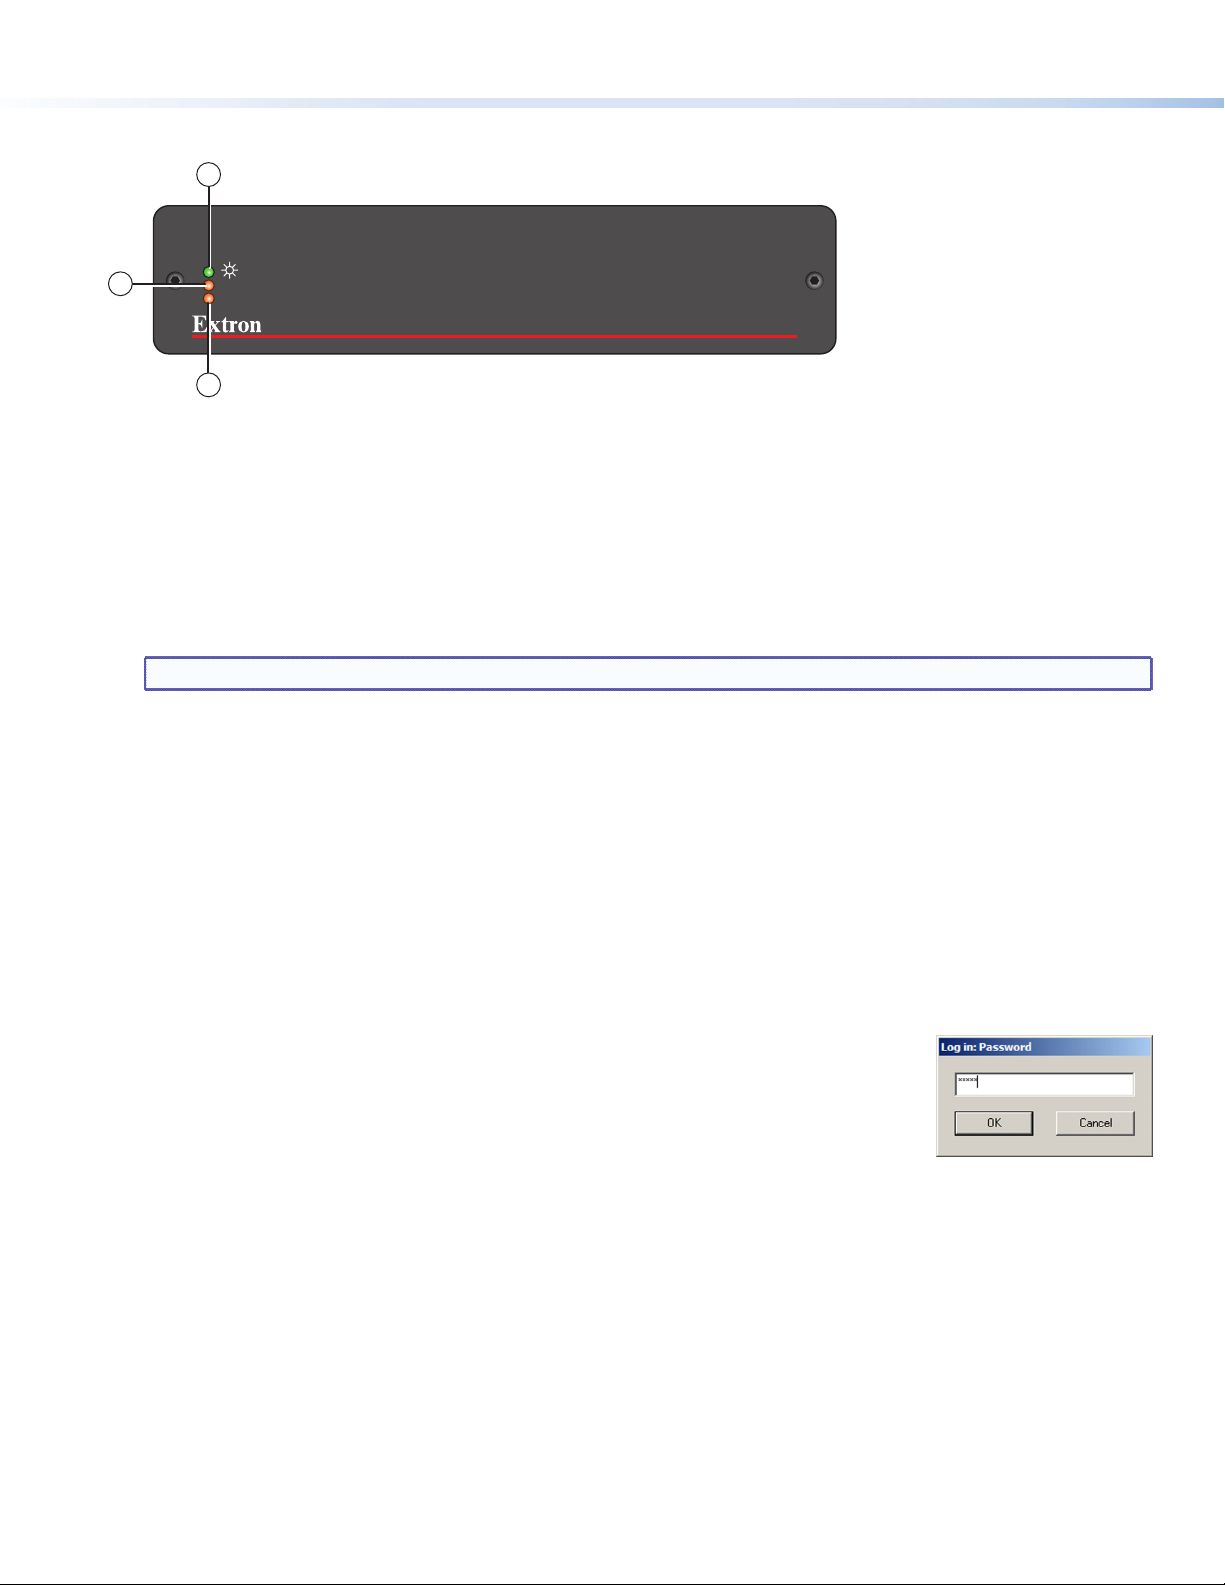
Front Panel Features
1
3
LAN
STATUS
QUANTUM GRAPHICS ENCODER
QGE 100
2
Power LED (green) — Lights when the unit has power.
a
LAN LED (amber) —
b
z Blinking: Data is being transmitted.
z Unlit: No data is being transmitted or no source is connected.
Status LED (amber) —
c
z Lit steadily: The unit is connected to a valid source and is functioning normally.
z Blinking regularly: The unit is functioning normally; no source is connected.
z Unlit: The unit is not functioning correctly.
NOTE: When the QGE 100 is powered on, the three LEDs light steadily for approximately 10 seconds.
Configuring the QGE 100
To set up the QGE 100, use the QGE 100 Administrator software, which is provided with the product on the Extron
Videowall Processing CD.
1. Install and start the QGE 100 Administrator program:
a. Load the Videowall CD in the external disk drive of your viewing computer.
b. On the external root directory of the CD, locate and double-click the Administrator icon, located at:
QGE 100\Software\QGE 100 Administrator\QGE 100 Administrator Vn.nn.exe. The installation wizard opens.
c. Follow the instructions on the wizard screens to complete the program installation.
d. On your desktop, click Start > All Programs > Extron Electronics > QGE 100 > QGE 100 Administrator >
QGE 100 Administrator. The main application window opens with the QGE 100 List section displaying all QGE 100s
detected on the network.
2. Log in as administrator by selecting Log in from the Admin menu and entering Admin (the
default password) on the Log in: Password screen. This enables you to access the fields in the
Configure QGE 100 Properties section.
3. On the QGE 100 list, click the name of the QGE that you want to configure, then click the
Connect button.
4. In the Performance Settings section under Configure QGE 100 Properties, select the following settings:
z Frame Rate Limit: From this menu, select the refresh rate (number of frames per second) (5 is recommended).
z Bandwidth Limit: From this menu, select the maximum possible flow of data streaming onto the network (5000 is
recommended).
5. Make changes to the network settings as desired:
a. In the Network Settings section, click the Advanced Network Settings button. The Network Settings screen opens.
b. The factory default IP address for the QGE 100 is 172.28.231.98. To change this, enter a new address in the
IP Address field on the Network Settings screen.
c. Enter subnet mask, gateway, DNS server, and WINS server addresses as appropriate. You can also enter a name for
the QGE and select the network speed from the drop-down menu.
d. When finished entering network settings, click OK to close the Network Settings screen and enable your changes.
2
Page 3

Product Category
6. In the Network Settings section of the main window, enter the following multicast settings:
z TTL (Time to Live): Enter the number of jumps a multicast message can make through a router to other subnets
before being canceled (5 is recommended).
z Refresh Factor: Enter the frequency (number of frames) after which the QGE will automatically update the screen
(a setting of 1, specifying the most frequent updates, is recommended).
z If the QGE 100 will be operating in multicast mode (connected to multiple viewing devices or to a Quantum Elite
processor), select the Enable Multicast check box and enter the multicast group IP address and port number in the
appropriate fields (see “Configuring for Use with a Quantum Elite Processor [UDP Multicast Mode],” below).
NOTE: The multicast group address must be within the range of 225.0.0.0 through 239.255.255.255.
Ensure that the address you choose is unique to your QGE and is not being used anywhere else on the
network.
7. When finished, click the Apply button in the lower-right corner of the main window to save and implement your
settings. The fields in the QGE 100 Properties section are updated with the new settings.
Configuring the QGE for Use with a Quantum Elite Processor (UDP Multicast Mode)
To use a Quantum Elite Videowall Processor as a viewing device or to connect the QGE 100 source to multiple viewing
devices, the QGE must be in multicast mode. To configure multicast connection parameters:
1. Make sure that you are logged in as administrator.
2. On the QGE 100 List, select the QGE that will be used with the Quantum.
3. In the Network Settings section, make any desired changes in the multicast settings fields:
z Multicast Group: Enter an IP address to
which all viewing devices will connect in
order to view the QGE 100 source.
z Multicast Port: Enter the port number for
the multicast connection (normally 5000).
z TTL: Enter a Time To Live value for multicast messages (number of jumps a multicast message can make through a
router to other subnets before being canceled). The range for this field is 1 through 255; 5 is recommended.
z Refresh Factor: Enter the number of frames that will be processed between the automatic screen updates. A value
of 1 (recommended) specifies the most frequent updates.
4. Select the Multicast Enabled check box.
5. Click Apply to implement your multicast settings.
6. Use the Quantum Elite Control Software to set up a source definition for your QGE 100 on your Quantum Elite
Videowall Processor:
a. With both the Quantum Elite processor and the QGE 100 powered on and connected to the network, open the
Quantum Elite software.
b. Select a Quantum on the network to use with the QGE:
1. On the left taskbar, click the Choose Display Processors
button to display the display processors screen.
2. On the toolbar at the top of the Quantum main window,
click the Probe the Network for Quantum Frames button.
The IP addresses of all Quantum Elite Processors on the
network are displayed.
3. Select the check box next to the processor that you want to use.
c. Click the Set Up Sources button on the taskbar (shown at right).
d. In the source explorer tree in the left pane of the Set Up Sources workspace, right-click Display Processors and
select Detect Sources from the drop-down menu. The Detect Quantum Sources window opens.
e. Click the Full Detect button, then click Yes on the confirmation prompt that opens. A list of source types
(including QGE 100) is added to the source explorer tree (depending on the available sources on the network, this
may take a few seconds to display completely).
f. If necessary, click the + button in front of QGE 100 to expand the source type category. The name of your QGE 100 is
listed below the source type.
3
Page 4

g. If you want to make changes to the QGE properties, click on the name of your QGE in this list to display its
information in the right pane. Enter any changes, then click Apply. (The Source Selected TX field should remain
blank.)
For detailed information on setting up sources, see the Quantum Control Software User Guide, available on the Extron
website at www.extron.com.
Using the QGE 100 Viewer Software
To display a QGE 100 source on your viewing computer:
1. With the QGE powered on, open the Viewer program by clicking Start > All Programs > Extron Electronics >
QGE 100 > QGE 100 Viewer > QGE 100 Viewer on your viewing computer desktop. All QGEs on the network are detected
and displayed in the right pane.
2. In the right pane, double-click on the QGE name that you want to view. The source is displayed in the left pane.
3. Do any of the following as desired:
z Click the Unity button to display the source at its native resolution.
z Use the scroll bars to select the part of the source frame you want to view.
z Click Full Screen to maximize the display area. To exit full screen mode, press <ESC> or <Alt> + <Enter>.
z To refresh the QGE list at any time, click the Refresh button.
Setting Up Remote Keyboard and Mouse Control (Unicast Mode Only)
To set up remote keyboard and mouse control via the QGE, ensure the QGE
is connected between the source computer and its keyboard and mouse
(see the QGE 100 User Guide for details) and that the QGE is in unicast
mode.
1. From the Tools menu of either the QGE Administrator viewer or the
QGE 100 Viewer, select Mouse & Keyboard. A check mark appears in
front of the option on the menu.
2. If desired, select Mouse & Keyboard Options from the Tools menu to
change the default hot keys or timeout settings.
3. Click within the source window. A red border appears around the
source window to indicate a control session in active.
4. To access a menu of special key functions, such as the Windows key,
press <Ctrl> + <F2>.
5. To end the control session, press <Ctrl> + <F1> or wait for the session
to time out.
Extron Headquarters
+1.800.633.9876 (Inside USA/Canada Only)
Extron USA - West Extron USA - East
+1.714.491.1500 +1.919.863.1794
+1.714.491.1517 FAX +1.919.863.1797 FAX
4
Extron Europe
+800.3987.6673
(Inside Europe Only)
+31.33.453.4040
+31.33.453.4050 FAX
© 2012 Extron Electronics All rights reserved. www.extron.com
Extron Asia
+800.7339.8766
(Inside Asia Only)
+65.6383.4400
+65.6383.4664 FAX
Extron Japan
+81.3.3511.7655
+81.3.3511.7656 FAX
Extron China
+4000.398766
Inside China Only
+86.21.3760.1568
+86.21.3760.1566 FAX
Extron Middle East
+971.4.2991800
+971.4.2991880 FAX
Extron Korea
+82.2.3444.1571
+82.2.3444.1575 FAX
Extron India
1800.3070.3777
Inside India Only
+91-80-3055.3777
+91 80 3055 3737 FAX
68-2178-50
Rev. A 01 12
 Loading...