

Page 1

nl
f
en
d
it
es
gebruiksaanwijzing
mode d’ emploi
manual
gebrauchsanweisung
manuale
manual
K 20141029
kosmos
design by dirk wynants for extremis © 2008
Page 2
www.extremis.beKOSMOS
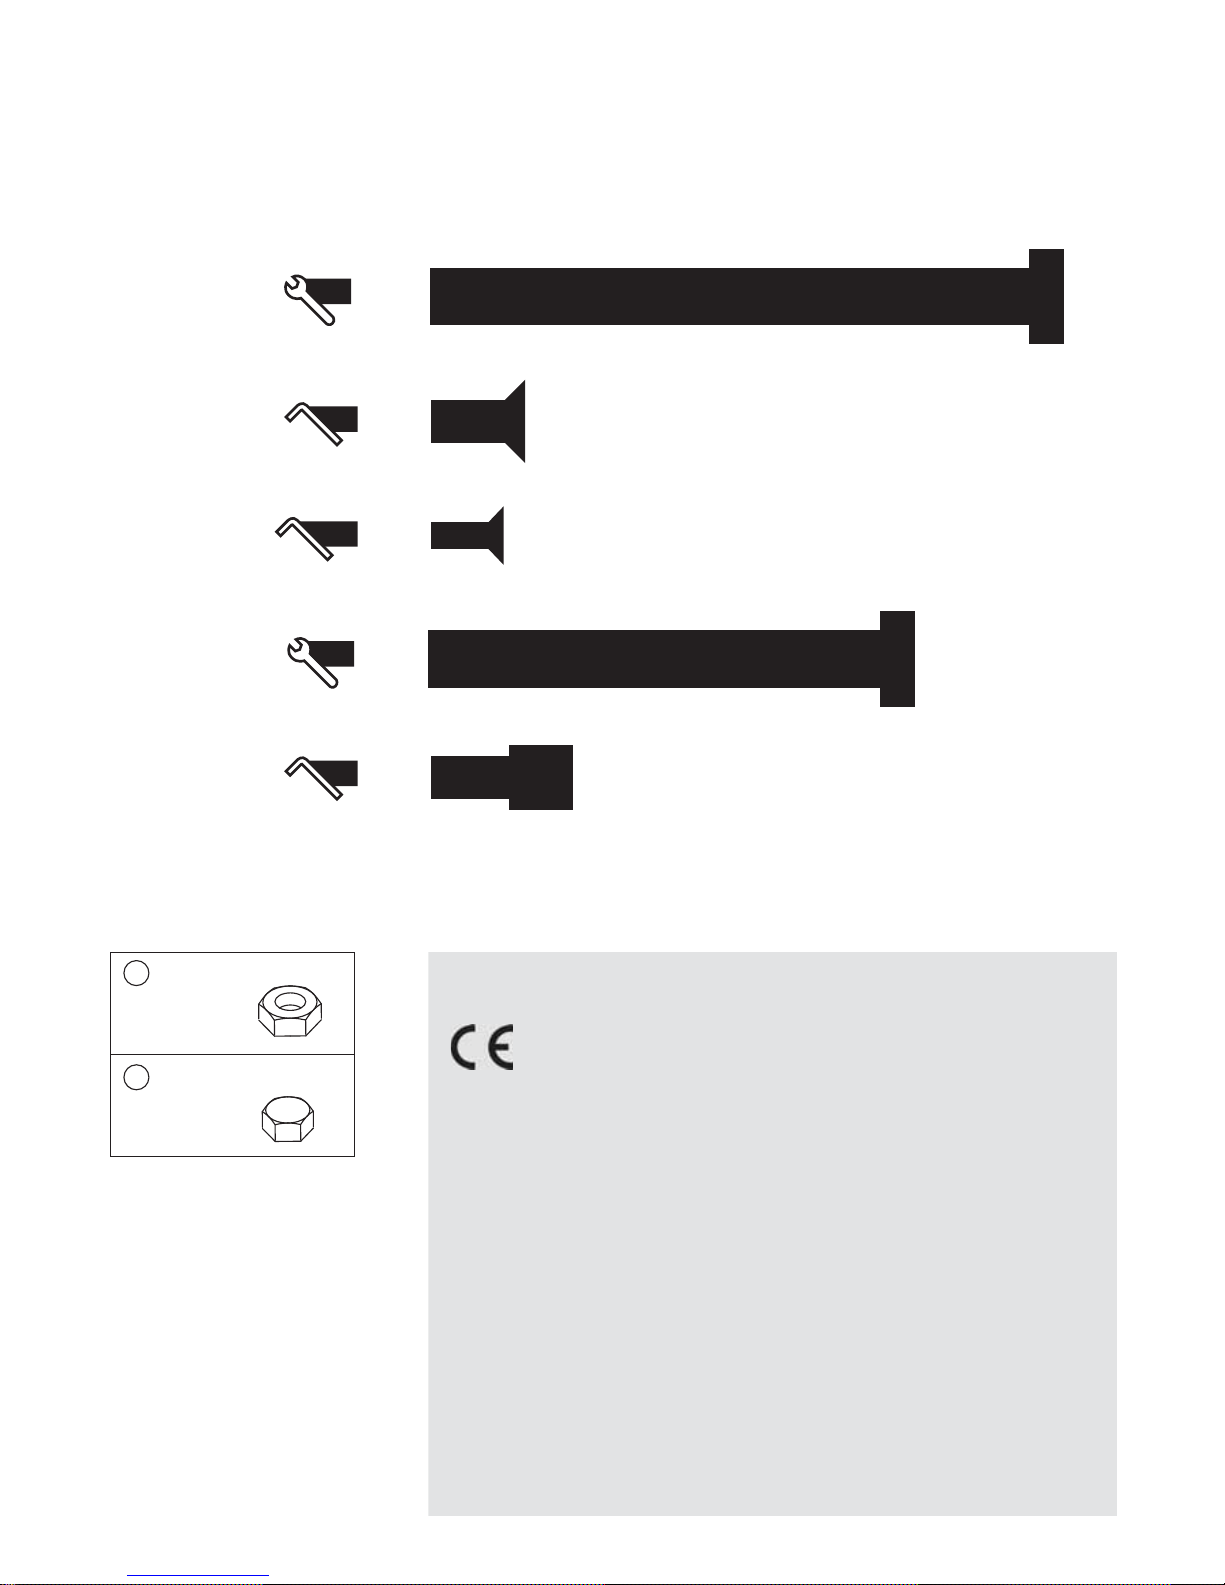
M8*80
M6*14
M4*10
M8*70
M6*12
6x
6x
5x
4x
8x
A
B
C
D
E
13
13
4
2,5
5
a
b
onderdelenlijst
M8 moer 6x
M6 dopmoer
6x
VERKLARING VAN CONFORMITEIT:
Dit product is in
overeenstemming met de eisen
van de Europese richtlijnen 2006/95/CE
en 2004/108/CE.
SPECIFICATIES
° model: KPR + KLED
° 110-220 V ~ 50/60 Hz
° 1 x 7 W
° type lamp: Extremis KLED lamp
° IP 65
WAARSCH UWIN G
De geleverde stekker (onderdeel van
KPR) is van het EU-type (Type C CEE
7/16 of Europlug). Deze is van toepassing
voor gans Europa, behalve Verenigd
Koninkrijk, Ierland en Malta.
De montage en het vervangen van de
LED’s dient uitgevoerd te worden door
een erkend elektricien. Extremis kan
niet aansprakelijk gesteld worden voor
eventuele schade bij een slechte installatie,
of bij oneigenlijk en niet voorzienbaar
gebruik, rekening houdend met alle
specificaties en voorschriften vermeld in
deze handleiding.
Page 3
3
nederlands
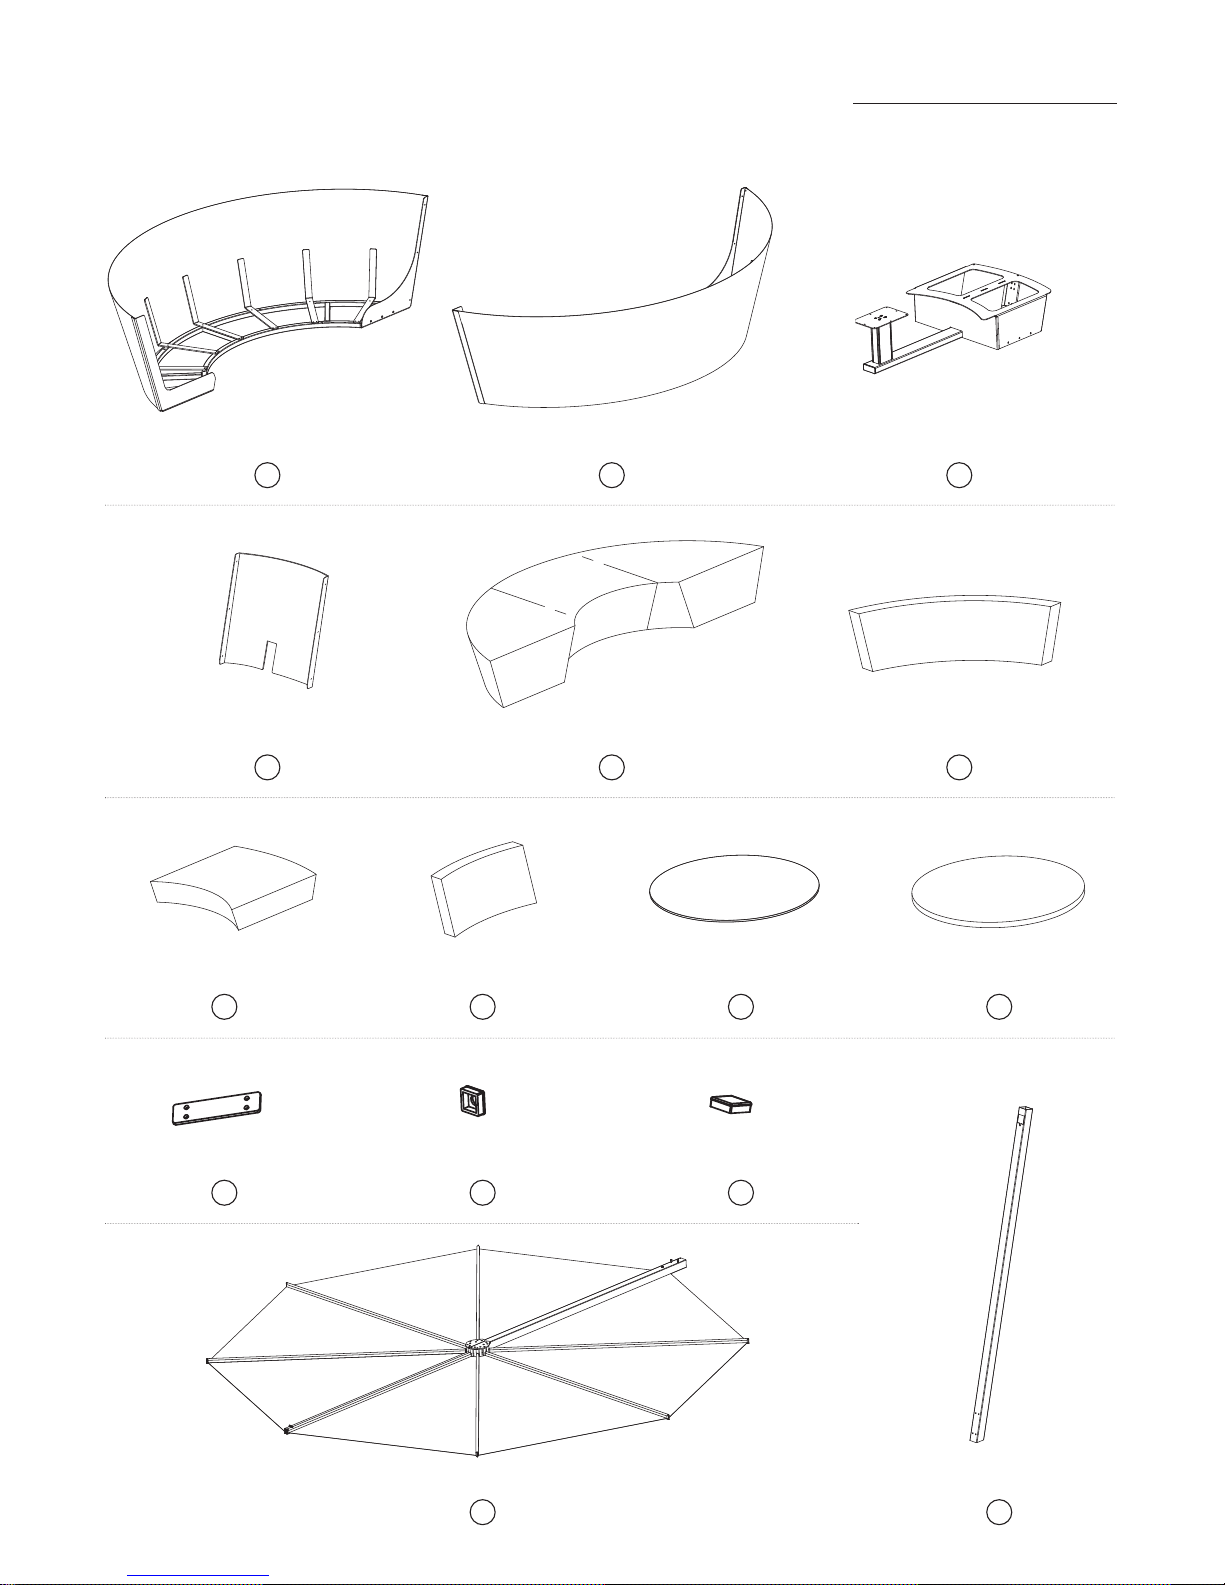
2 x groot zitkussen
3 x klein rugkussen 1 x tafelblad 1 x tafelkussen
1 x verticale buis 60*601 x parasolframe met doek 60*60
1 x linkse zetelhelft
1 x rugsteun 4 x groot rugkussen
1 x rechtse zetelhelft 1 x zetelframe klein
1 x klein zitkussen
1 x plastic plaat 1 x dop 50*50 1 x dop 60*60
1
4
7
11
2
5
8
12
14 15
3
6
109
13
Page 4
www.extremis.beKOSMOS
6x
A
montage
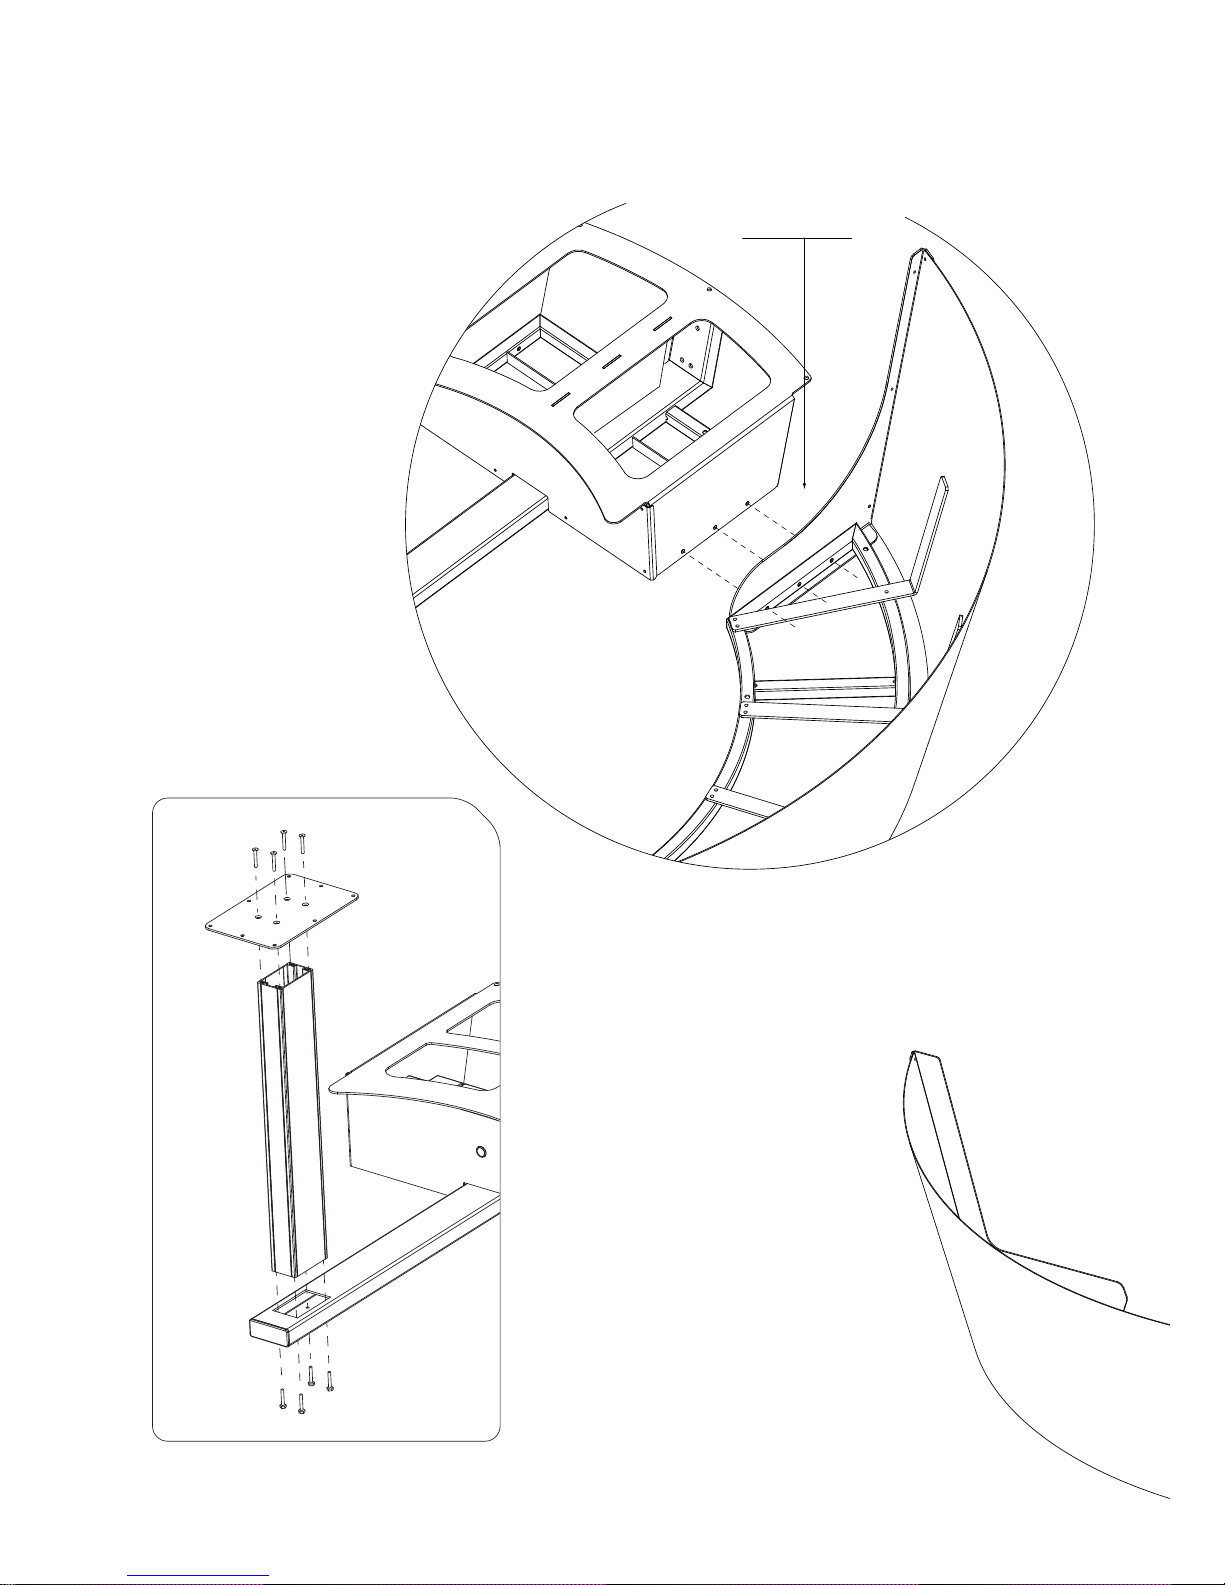
(in geval van vaste tafelpoot: monteer
eerst de lange rechthoekige buis op het
kleine zetelframe en de tafelbladconnectie
er bovenop, met bijgeleverde M6* 30mm
bouten)
Page 5
5
nederlands
6x
B
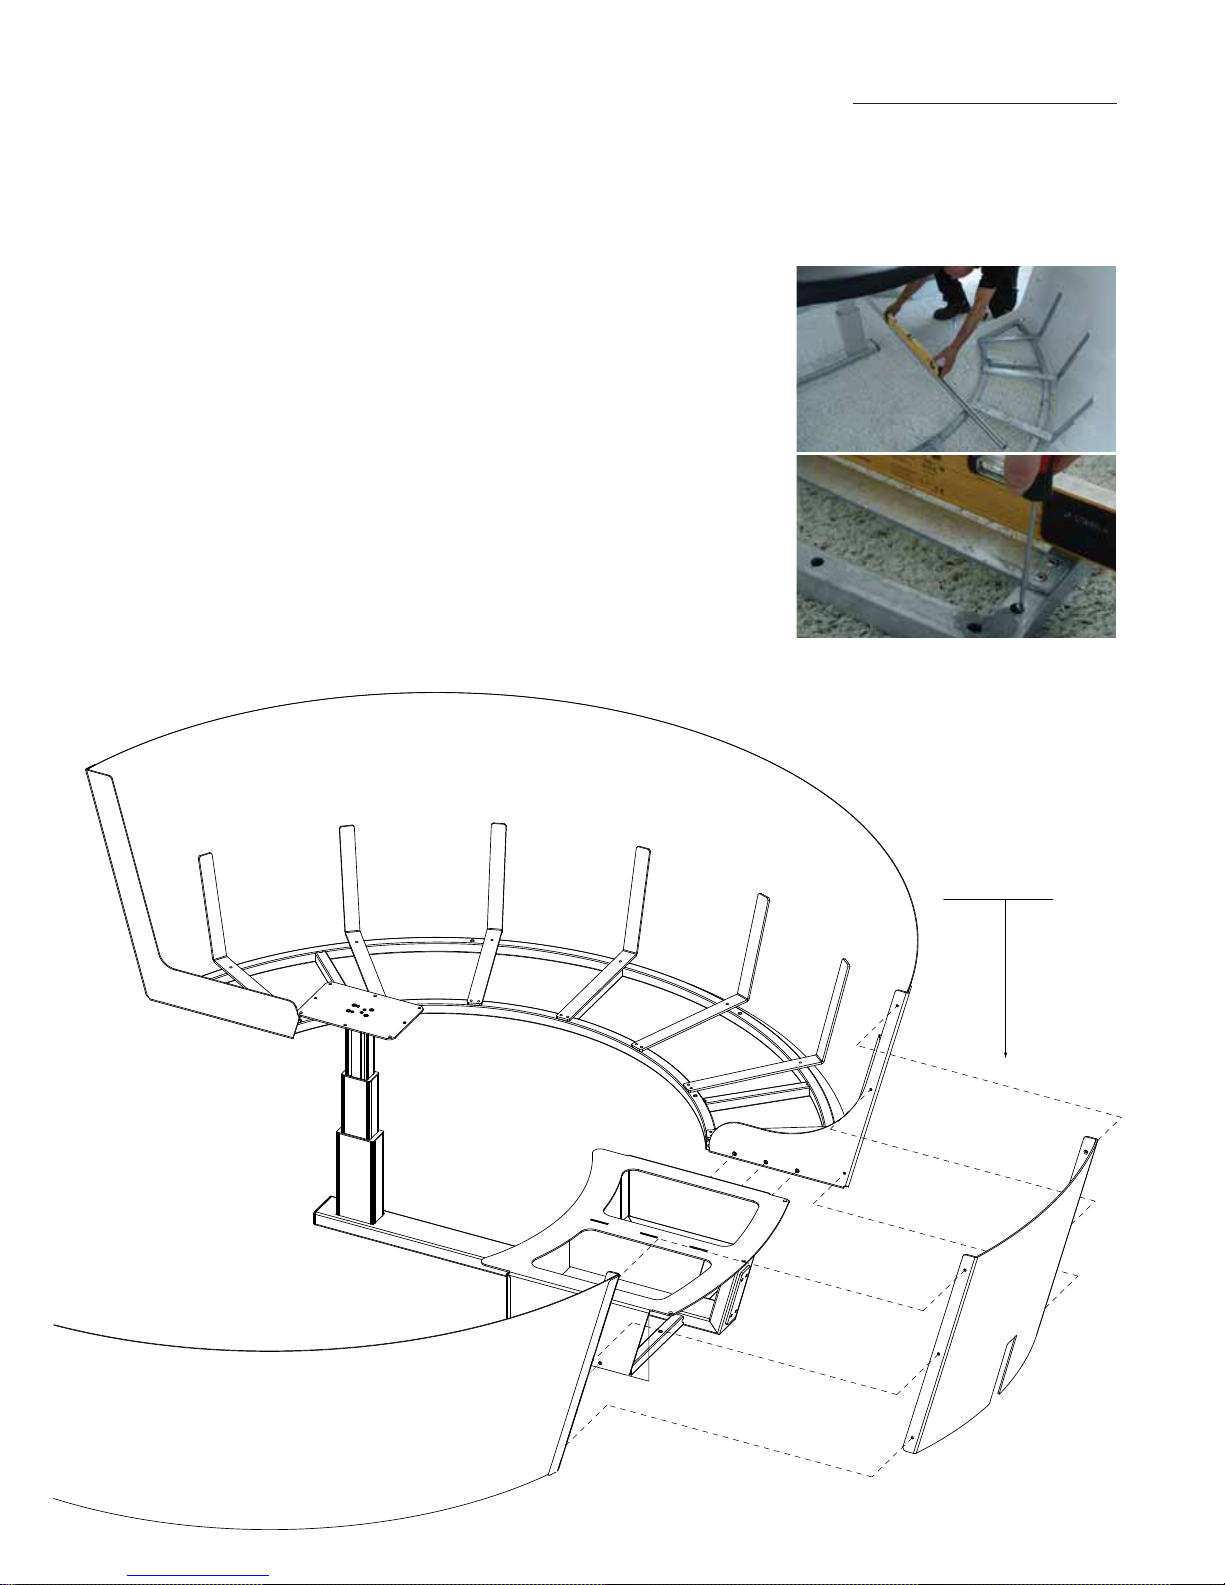
1. Plaats het kleine zetelframe (3) op de
gewenste plaats met de tafelkoppeling in
het centrum en wijzend in de richting
van waaruit de wind het grootste deel
van het jaar waait.
Draai nu de stelvoetjes die het
grondoppervlak niet raken van bovenaf
met een platte schroevendraaier uit en
zorg verder dat het geheel waterpas
komt te staan (zie foto’s >>>)
2. Koppel nu de beide zetelhelften (1 & 2)
aan het kleine zetelframe (3) met
behulp van telkens drie bouten (A)
en drie moeren (a). Zorg ook dat deze
frames waterpas komen te staan, en dat
alle stelvoetjes de ondergrond raken.
3. Plaats de rugsteun (4) tussen de twee
zetelhelften en schroef dit vast met zes
M6*10 bouten en dopmoeren (B & b).
Page 6
www.extremis.beKOSMOS
4x
D
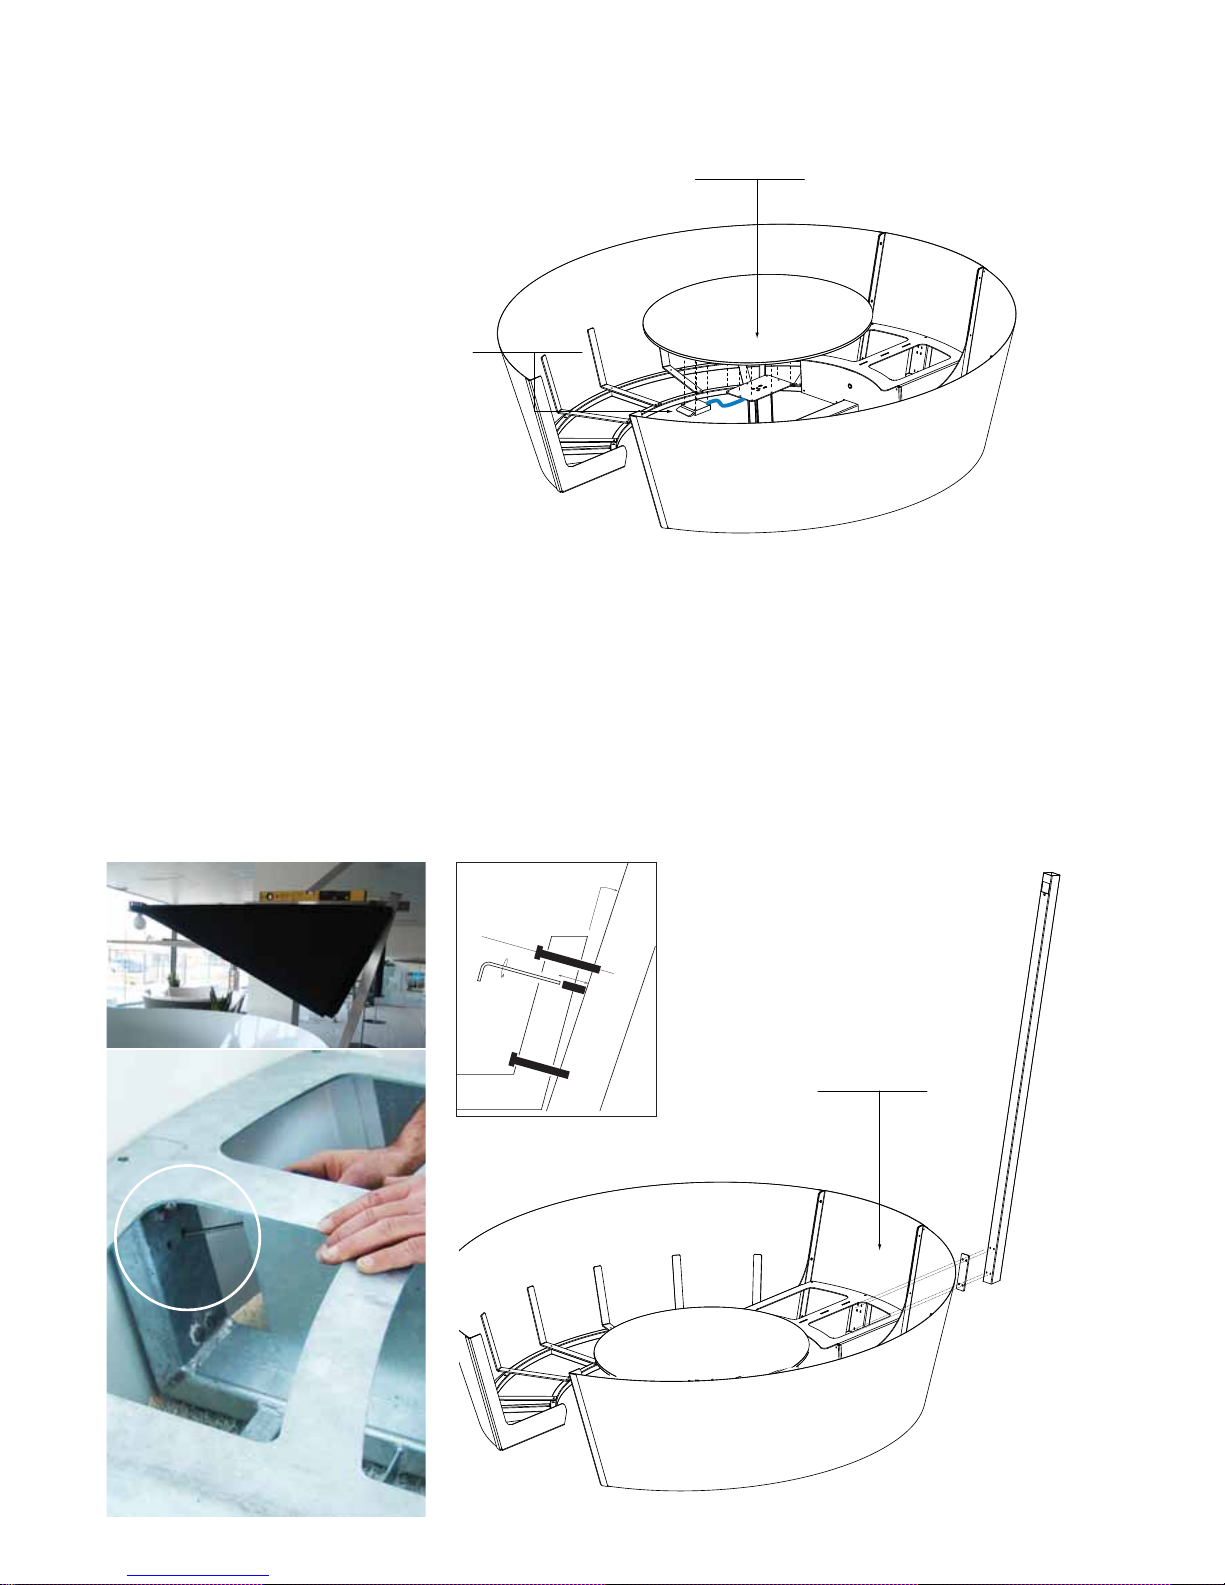
5. Steek langs de binnenkant van het
meubel 4 bouten (D) door de daarvoor
voorziene openingen (twee onderaan en
twee bovenaan). Schuif aan de
buitenkant vervolgens de plastic
afstandshouder (11) erover en
vervolgens de parasolpaal (15). Draai
goed aan.
De twee vrije openingen dienen om de
parasol iets naar achter te laten hellen en
zo het parasoldoek waterpas te zetten,
door middel van stelschroeven (zie
detailtekening en foto’s >>>).
Schroef hiervoor eerst de bovenste
bouten weer wat losser tot de ideale
hoek wordt bereikt, en draai vervolgens
de stelschroees in wijzerzin tot tegen
de vertikale buis.Gebruik hiervoor een
inbussleutel #4.
4. Schroef het tafelblad (9) vast
met de verzonken bouten (E). Het
bedieningselement voor de hoogte instelling wordt met 4 bouten (C)
bevestigd onderaan het blad. Dit
bedieningselement moet naar de
zetelopening wijzen.
8x
E
4x
C
montage
Page 7

7
nederlands
4x
E
7. Steek nu de parasol door de opening in
de vertikale buis (15) tot dit blokkeert en
vergrendel met de bouten (E).
6. Neem het parasolframe met doek (14)
en ga met het snoer zo dicht mogelijk bij
het uiteinde van de parasolpaal (15).
Laat het snoer door de opening zakken
tot het onderaan tevoorschijn komt.
Na de montage dient een erkend
elektriciën het uiteinde van de kabel te
voorzien van een gepaste stekker.
Page 8
www.extremis.beKOSMOS
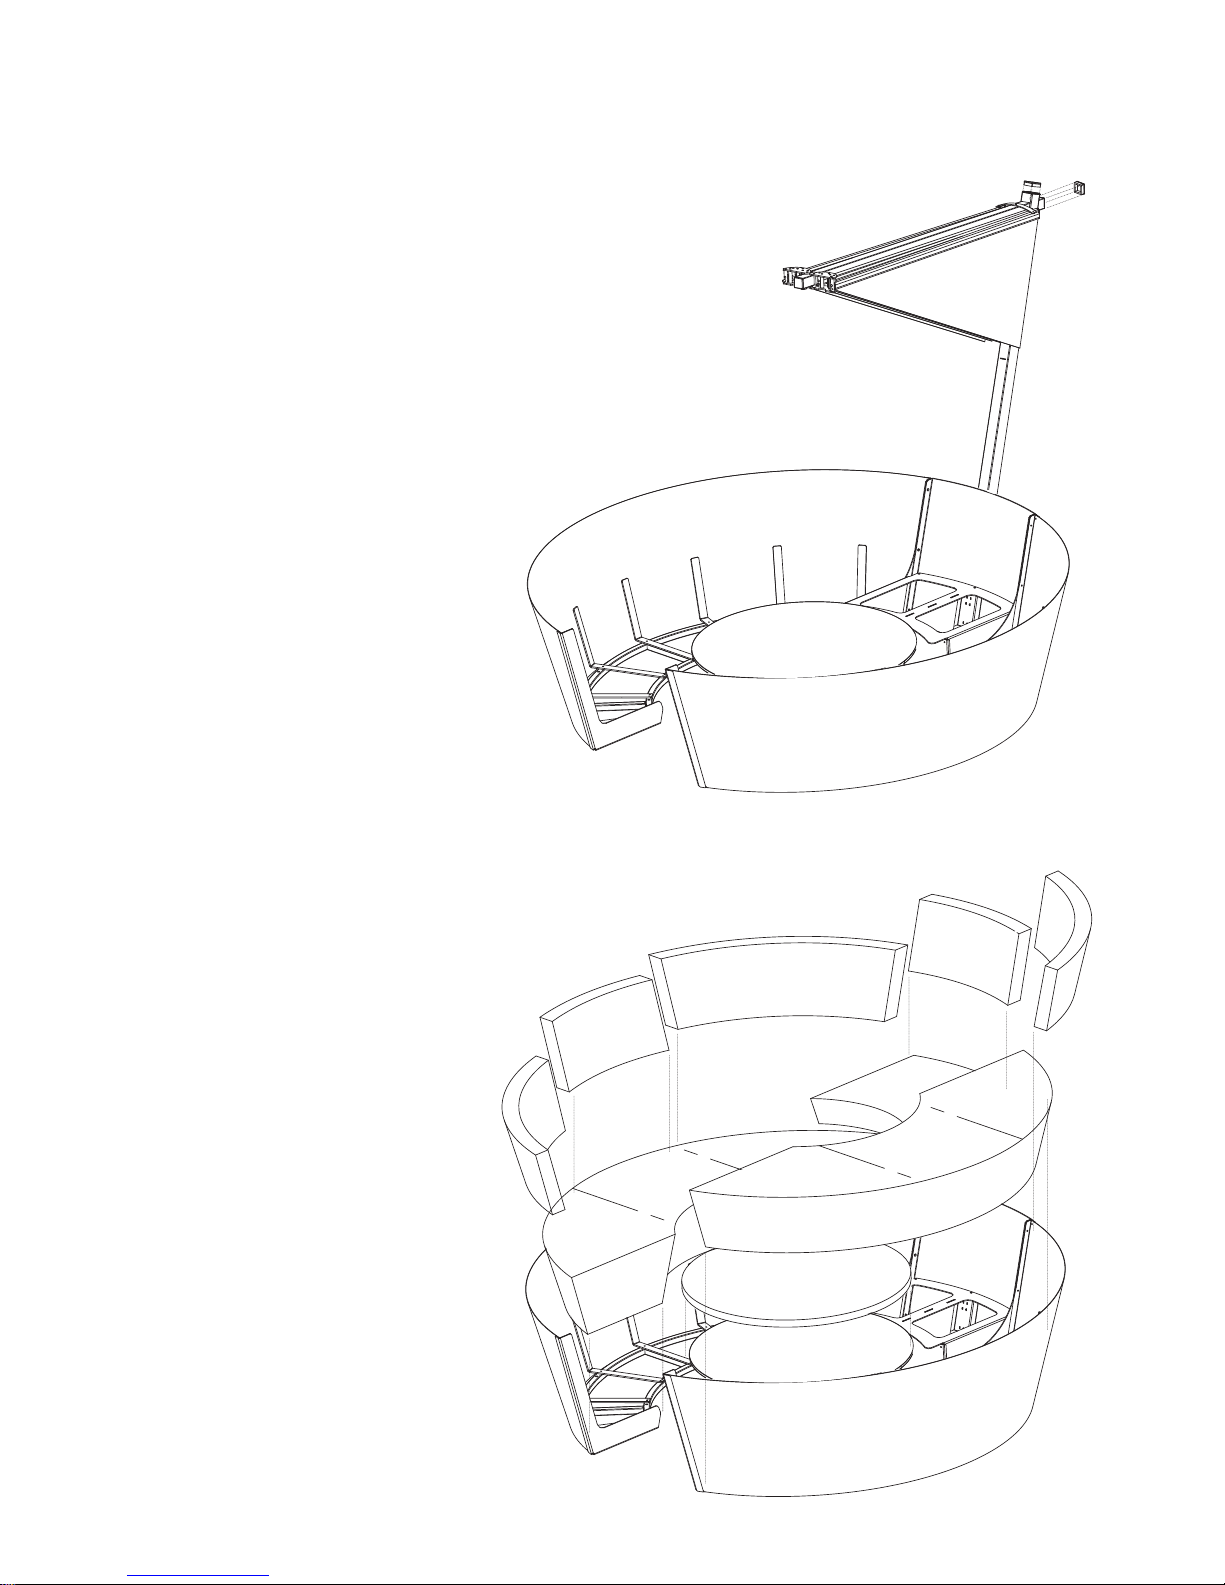
9. De kussens worden in het meubel
geplaatst zoals te zien in de configuratie
op de tekening.
8. Plaats nu de passende doppen (12 &
13) op het parasolframe (14) en de
vertikale buis (15).
montage
Page 9

9
nederlands
10. Open nu de parasol. Houdt de
magneetsluiting het niet, maak dan
eerst de velcroband los en open
de parasol opnieuw. Pas nu mag je de
velcroband opnieuw sluiten.
In gesloten toestand dient men het lederen
riempje op het parasolframe vast te maken
aan de twee buitenste baleinen om te
verhinderen dat de parasol open gaat.
Dit riempje kan ook gebruikt worden om
de parasol open te houden:
A) bij regen: creëert afvoerkanalen
B) na lange tijd de parasol niet
gebruikt te hebben: mogelijks houdt
de magneetsluiting het tijdelijk niet,
door interne spanning in het
parasoldoek. Plaats dan zolang als nodig
het riempje op de magnetische baleinen
(zoals te zien op onderstaande foto)
zodat de stof opnieuw wat rekt.
Optioneel: draai nu ook de lamp in de
fitting.
11. Om van de tafel een zetelbed te maken, druk met de rechterhand de tafel naar beneden, terwijl je met links de hendel onder het
tafelblad indrukt.
12. Om opnieuw de tafel te gebruiken, dien je de hendel onder het tafelblad ingedrukt te houden, terwijl je met de andere hand de
tafel omhoog trekt.
Page 10
www.extremis.beKOSMOS
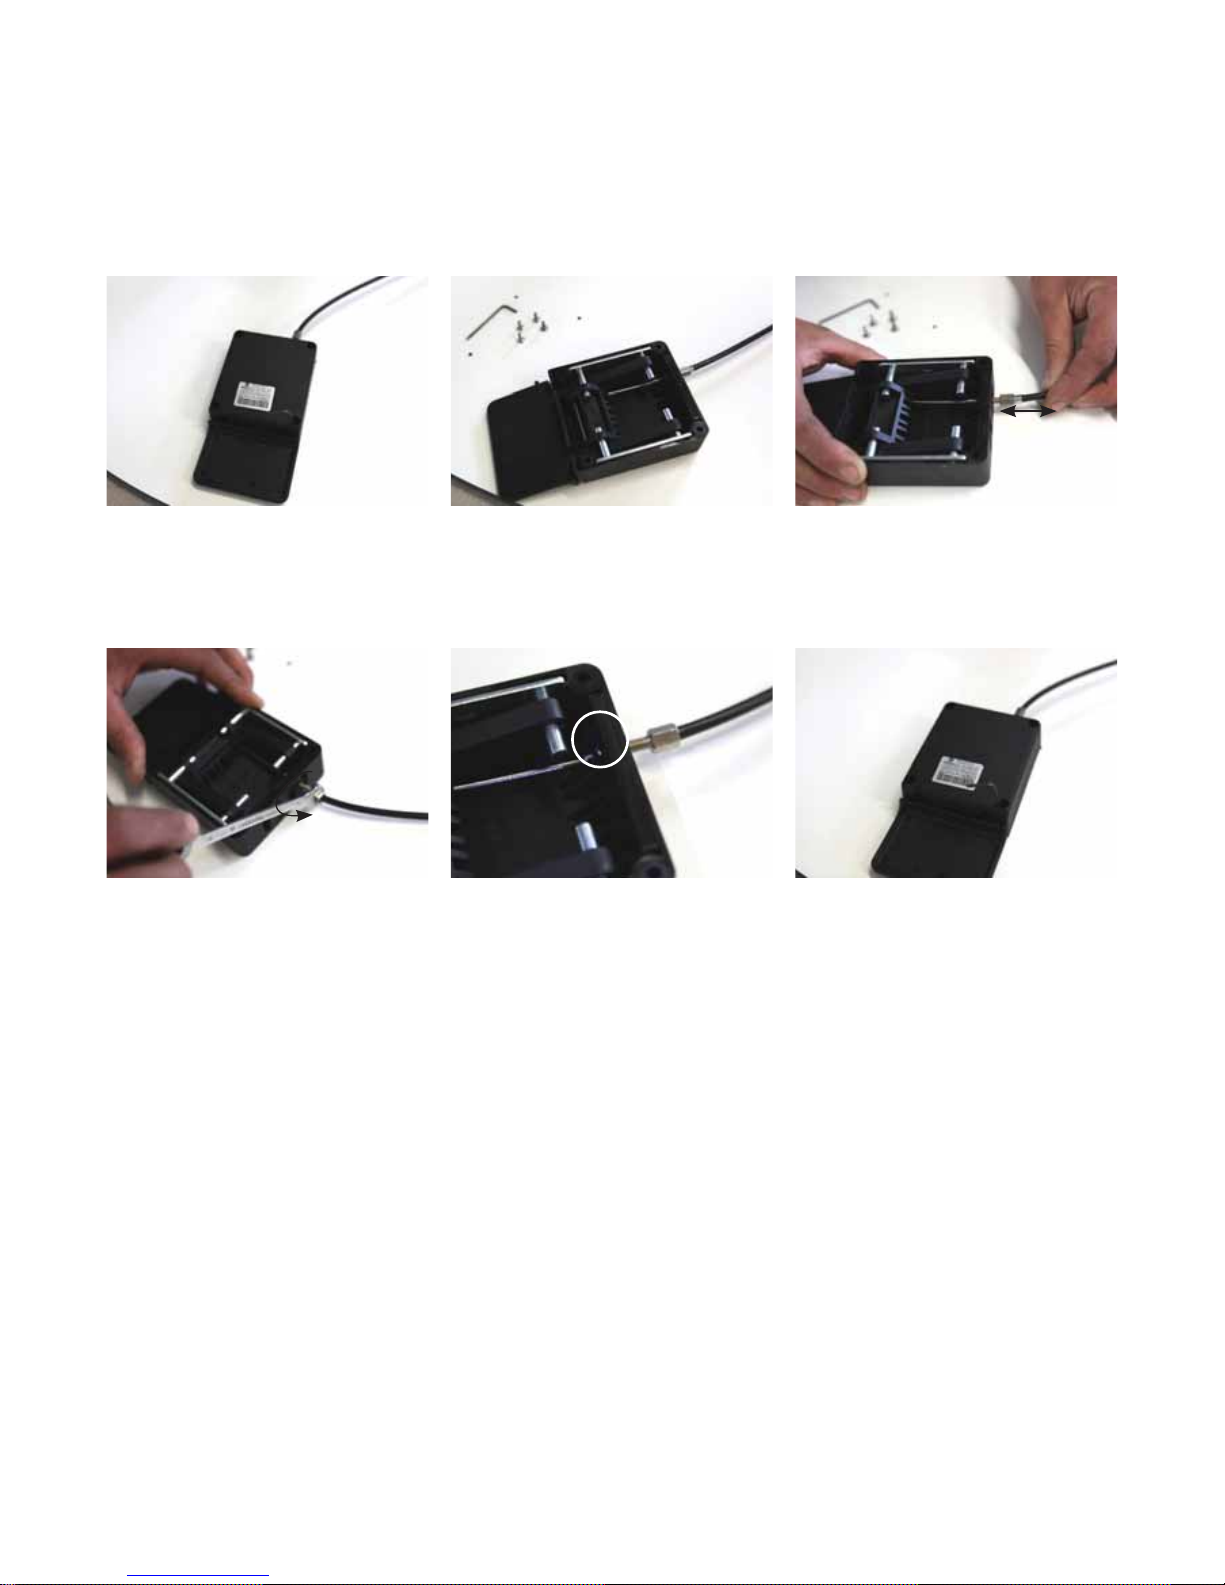
1. Demonteer de klep door de schroeven
uit de draaien.
2. Draai de klep om. 3. Controleer of er speling tussen de kabel
& de bevestigingsschroef zit.
4. Zo ja, draai de schroef uit tot de speling
weg is & draai dan nog 2 extra toeren
verder.
5. Let op op dat de schroef niet volledig
uitgedraaid wordt.
6. Monteer de hendel opnieuw d.m.v. de
schroeven die je daarnet uitgedraaid
hebt. Indien nog niet voldoende,
herhaal dan stap 1 - 3.
bijregelen verstelbare tafel
Page 11
11
nederlands
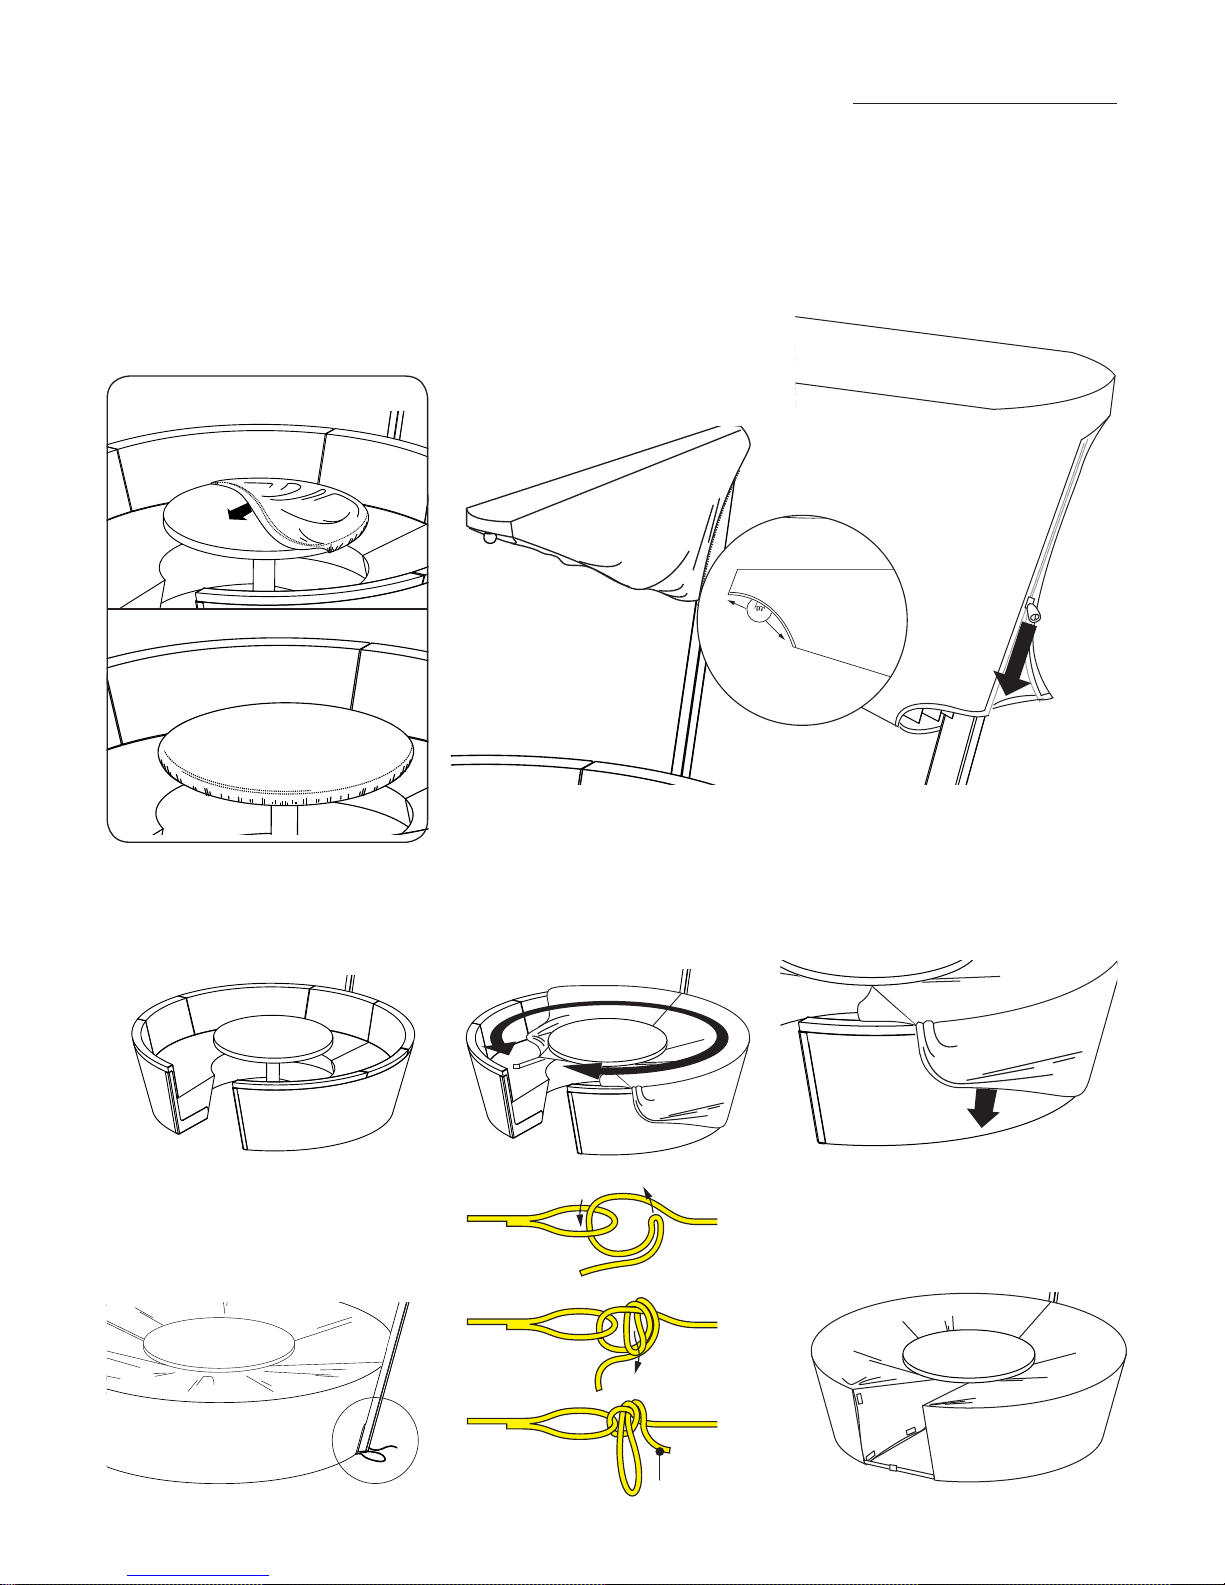
TAFELHOES
1.
2.
INHOUD
° 1 x zetelhoes
° 1 x parasolhoes
° 1 x tafelhoes
PARASOLHOES
1. Schuif de parasolhoes over de gesloten
parasol. Indien uw parasol verlichting
bevat, moet er zeker op gelet worden dit
voorzichting te doen, zodat de lamp niet
breekt.
2. Sluit de rits.
ZETELHOES
1. Zorg ervoor dat de kussens mooi rechtop
staan, en zet het tafeltje in de hoogste
stand.
2. Leg de zetelhoes over de Kosmos met de
taartvormige opening in de inkom van
het zitmeubel. De tafel komt boven de
hoes uit, en de tafelpoot zit in de punt
van het taartstuk.
3. Trek de zijflap overal mooi strak tot aan
de onderzijde van het meubel. Positioneer
de hoeknaden van de hoes mooi bovenop
het hoekstuk.
4. Knoop aan de achterkant van de Kosmos
het touwtje vast, onder de parasolpaal.
Het beste kan dit zoals hiernaast
beschreven.
5. Sluit aan de voorzijde de velcrosluitingen
en de kliksluiting.
pull to untie
a)
b)
c)
kosmos hoezen
Page 12
www.extremis.beKOSMOS
PAR ASOL
Reinig het zeil van de parasol en de hoes
door te spoelen met water en handzeep,
en voorzichtig te wrijven met een zachte
borstel. Zorg er in eerste instantie voor
dat de parasol stof niet te vuil wordt en
plaats zo veel mogelijk de hoes over de
parasol.
° Spuit de parasol nooit af met een hoge
drukreiniger.
° Borstel zeer zacht, wees extra voorzichtig
op de naden, deze kunnen loskomen bij
te harde wrijving.
° Na het reinigen moet de stof volledig
gedroogd worden in open toestand.
° Gebruik geen detergenten. Deze tasten
de beschermlaag van het textiel aan.
Bij hardnekkige vlekken raden wij aan
‘zonnescherm-,dekzeil- en tentenopfrisser’
te gebruiken van het merk ‘HG’. Zie
ww w.hg.eu voor meer info. Volg strikt de
instructies op de flacon!
KUSSENS
Eenvoudig te reinigen met warm
water en een microvezeldoek. Gebruik
geen solventen, bleekmiddelen,
schuurmiddelen, chemische detergenten
of waxen. Bij buitentoepassing dient
telkens de optionele hoes over het hele
meubel geplaatst worden wanneer dit
niet in gebruik is, gezien de kussens om
ventilatie redenen niet 100% waterdicht
zijn.
De kussens moeten regelmatig gereinigd
worden om zo hun uiterlijk te behouden
en om de vorming van vuil en bacteriën
tegen te gaan.
Lakken en inkten, schoonmaakmiddelen,
wasmiddelen en oplosmiddelen zoals
thinner, aceton of alcohol kunnen zeer
effectief zijn in het verwijderen van
vlekken, maar veroorzaken directe schade
en dragen bij aan de verslechtering van
het materiaal. Het gebruik van dergelijke
reinigingsmiddelen is op eigen risico.
TAFEL
HPL (high presure laminate): te reinigen
met standaard reinigingsmiddelen zoals
men gebruikt voor de keuken. Voor
hardnekkige verontreinigingen gebruiken
wij zelf “HG kunststof, verf en behang
intensief reiniger”. Voor meer info: www.
hginternational.com
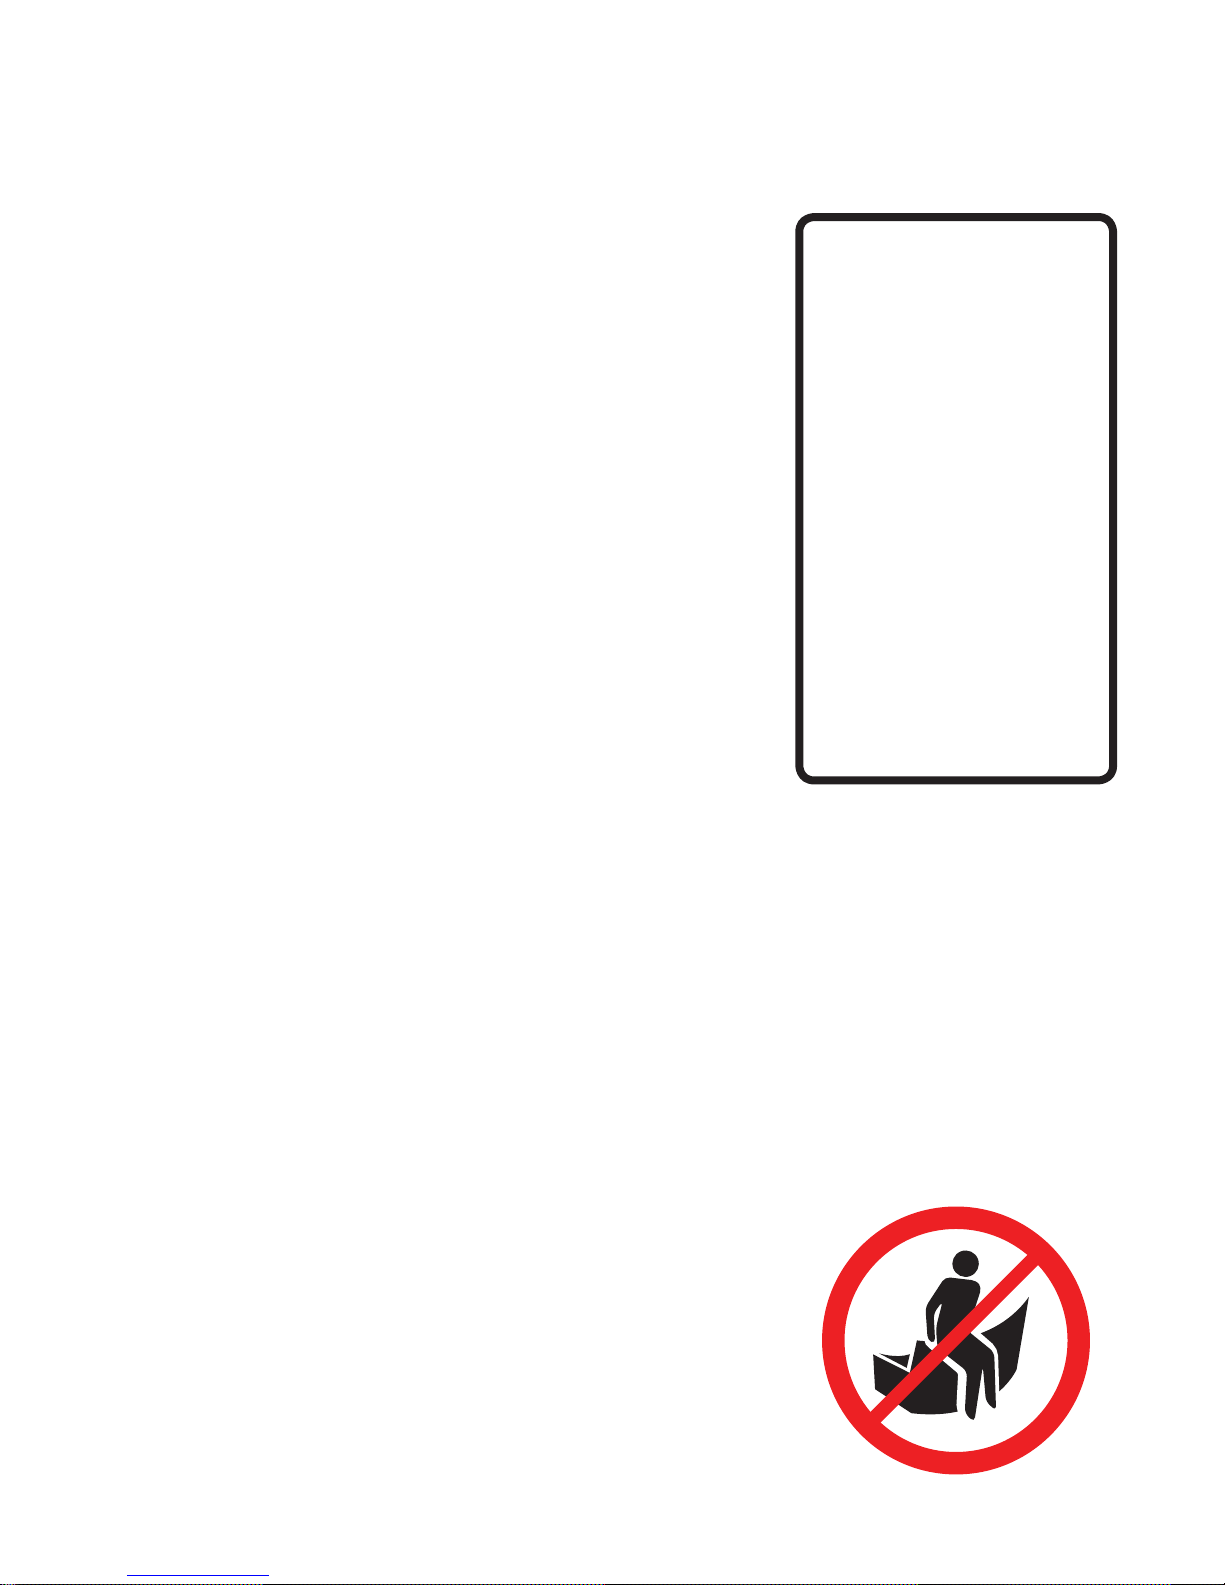
WAARSCH UWIN G
Ga nooit zitten op de rugleuning om
beschadiging aan de kussens en de
aluminiumplaat te vermijden.
WAARSCH UWIN G
Bij hevige wind of niet gebruik,
sluit de parasol en breng de hoes
aan om te vermijden dat de parasol
open waait of vuil wordt.
Laat de geopende parasol nooit
onbewaakt achter.
Laat de Kosmos parasol niet gesloten
als ze niet volledig droog is. Laat ze
niet gedurende lange tijd gesloten in
vochtige omstandigheden.
Als u de parasol voor lange tijd
niet gebruikt, berg ze dan op als
volgt: perfect gedroogd in een droge
omgeving.
onderhoud
Page 13
13
nederlands
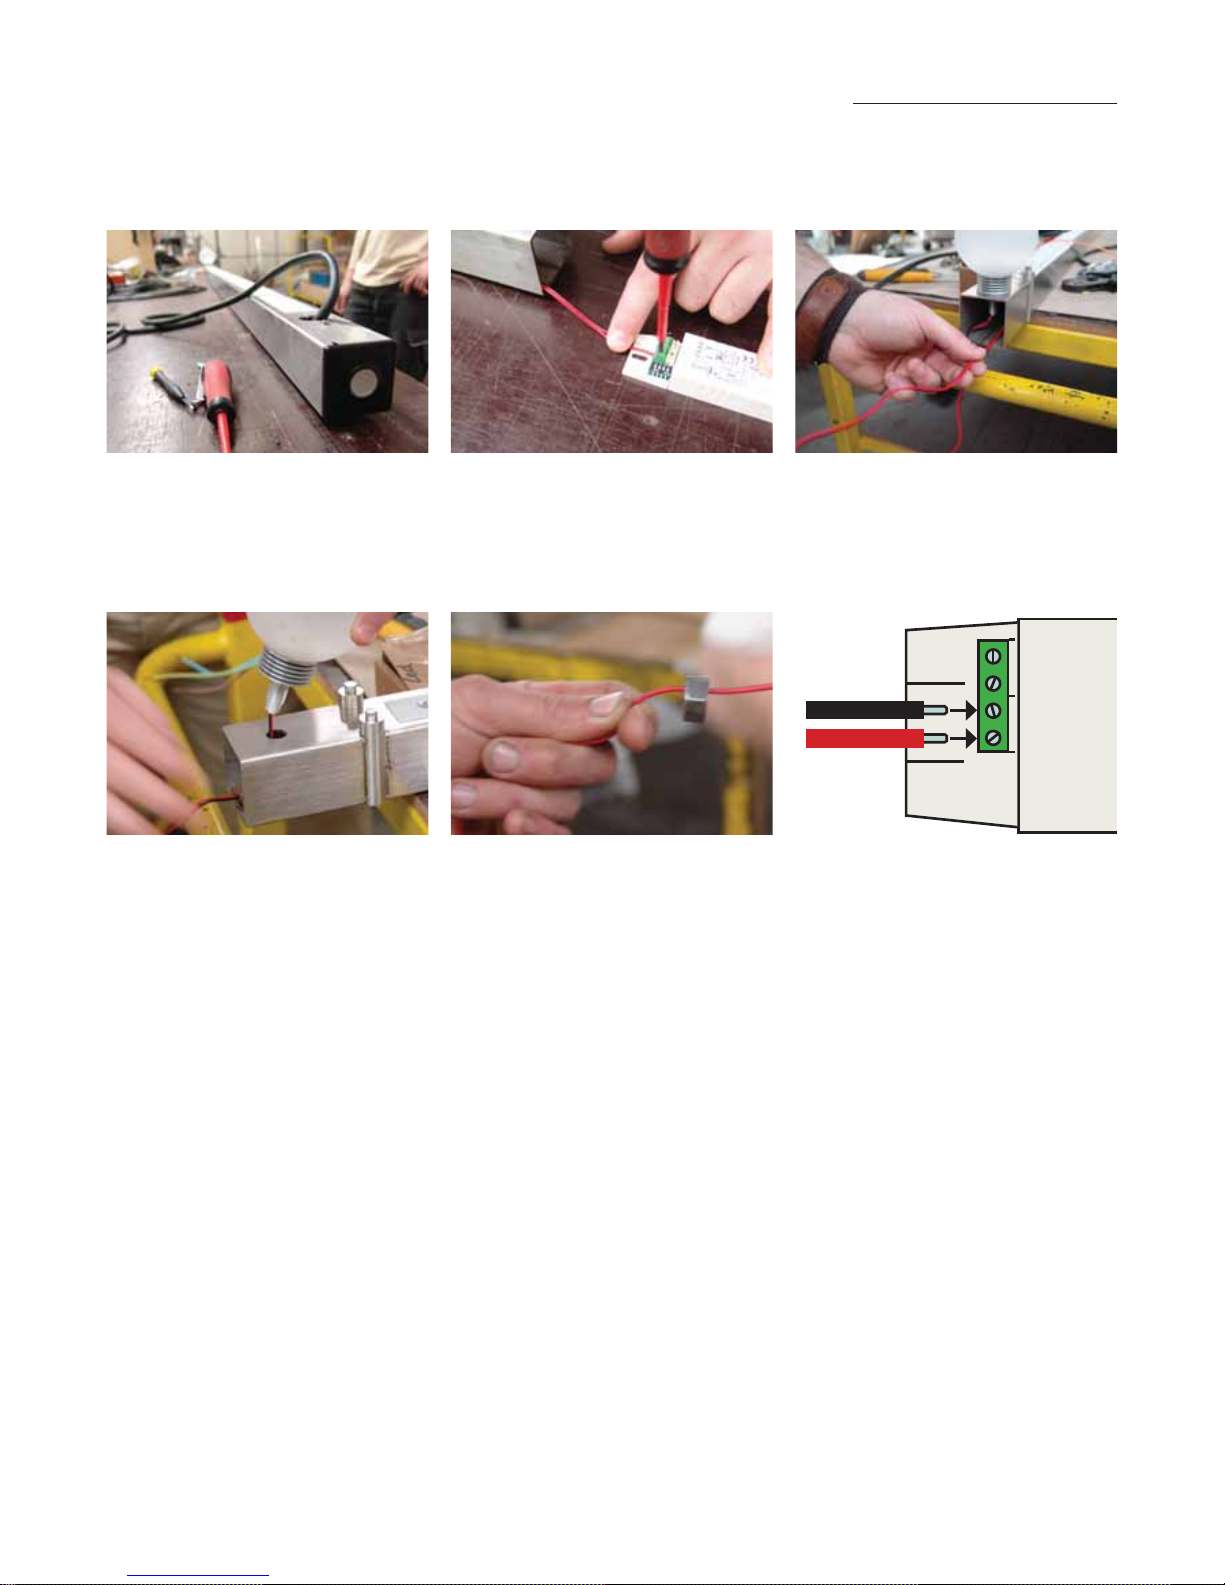
1. Verwijder de buisdop met schakelaar en
haal de LED adapter uit de parasolbuis.
2. Haal het rode en het zwarte kabeltje uit
de adapter
3. Verwijder de buisdop in het centrum van
de parasol, trek het snoer doorheen
de buis en draai de moer van de
verlichtingssokkel los.
lamp vervangen
4. Verwijder de kapotte LED uit de buis
en draai de bol er af, zodat deze op de
nieuwe LED lamp bevestigd kan worden.
Vergeet hierbij niet ook de rubberen ring
te plaatsen.
5. Plaats de nieuwe LED, schuif de moer
over het snoer, en span de moer aan.
Steek de kabel door de buis zodat deze
aan het andere uiteinde tevoorschijn
komt.
6. Verbind de kabeltjes met de LED adapter
zoals hier afgebeeld.
7. Plaats beide doppen opnieuw op de
uiteinden van de parasolbuis.
Page 14
www.extremis.beKOSMOS
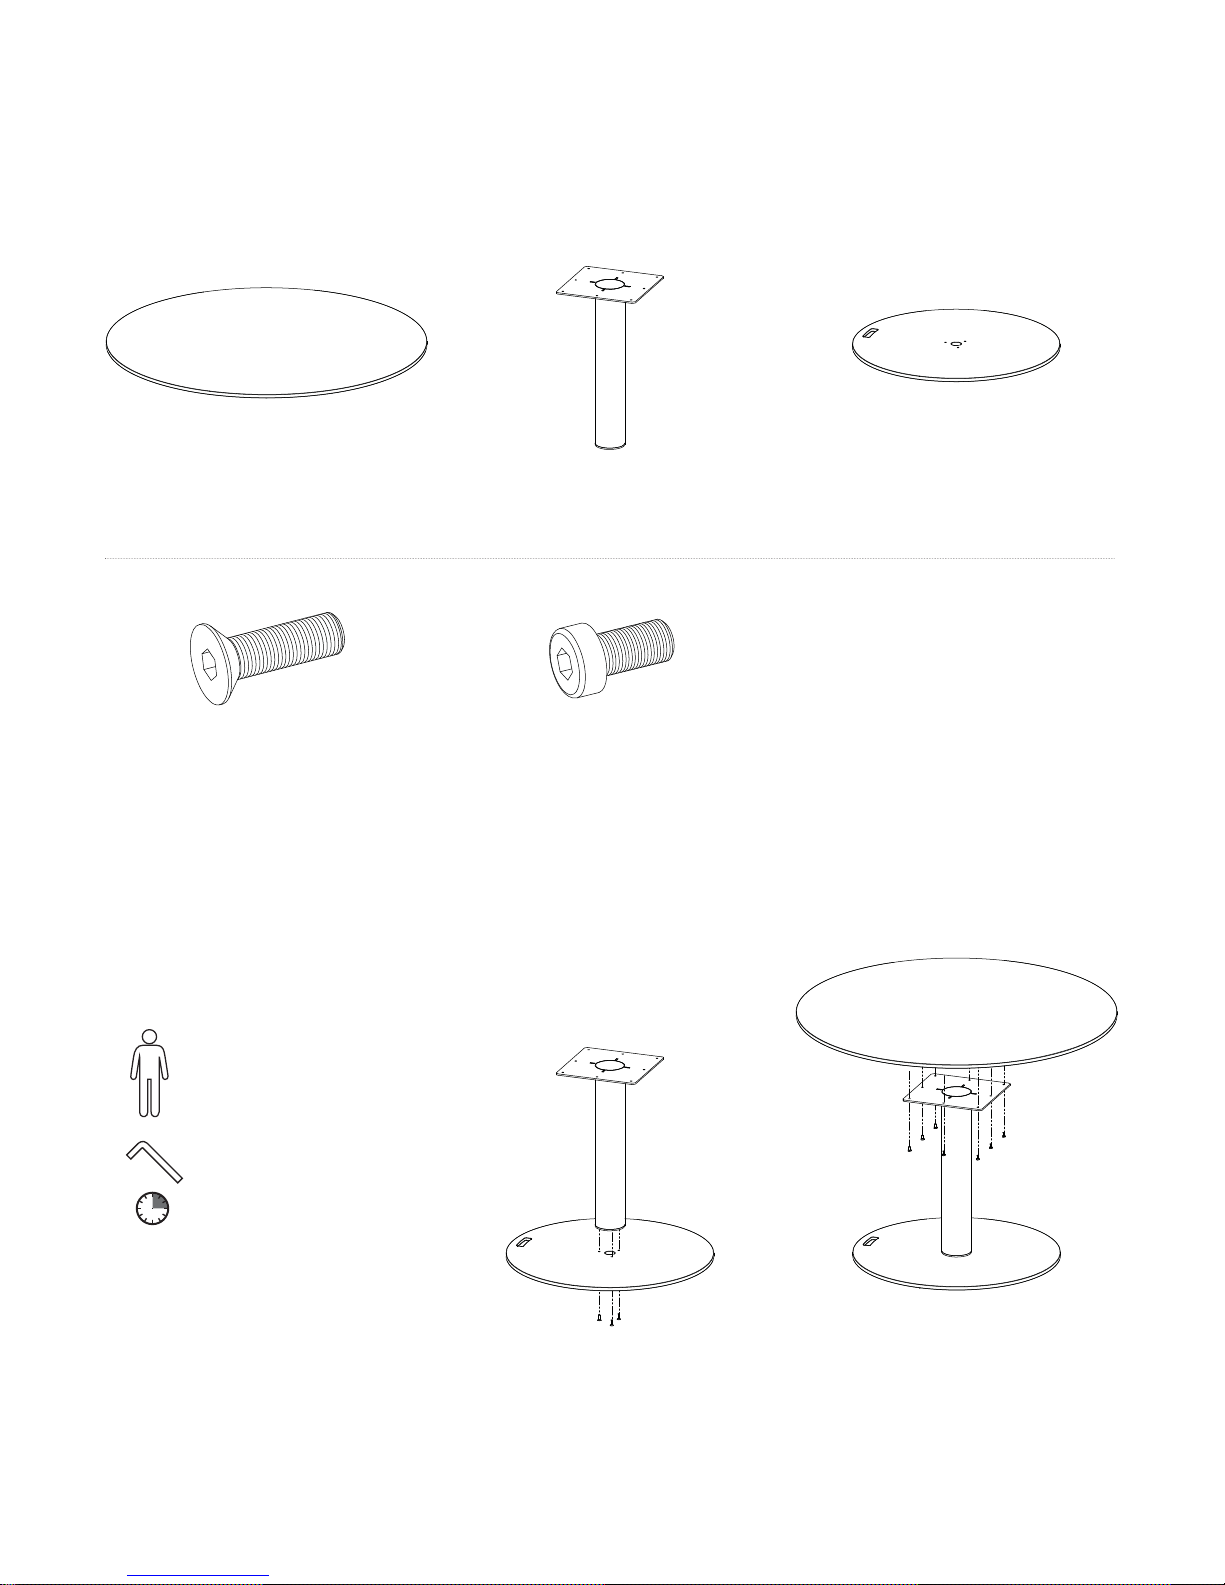
1. Neem de voetplaat en monteer deze
d.m.v. 3 verzonken binnenzeskantbouten
M10 x 25 aan de onderkant van de
inoxen buis zoals aangegeven op
bovenstaande tekening.
2. Plaats nu het tafelblad op de
inoxen buis zoals aangegeven op
de tekening en bevestig deze d.m.v. 8
binnenzeskantbouten M6 x 12.
kosmos vrijstaande tafel
montage
1 x tafelblad
3 x verzonken binnenzeskantbout
M6 x 25
1 x buis
8 x binnenzeskantbout M6 x 12
1 x voetplaat
benodigdheden
min. 1 persoon
+/- 15 min.
inbussleutel nr. 4
Page 15

15
nederlands
www.extremis.be
Page 16
www.extremis.beKOSMOS
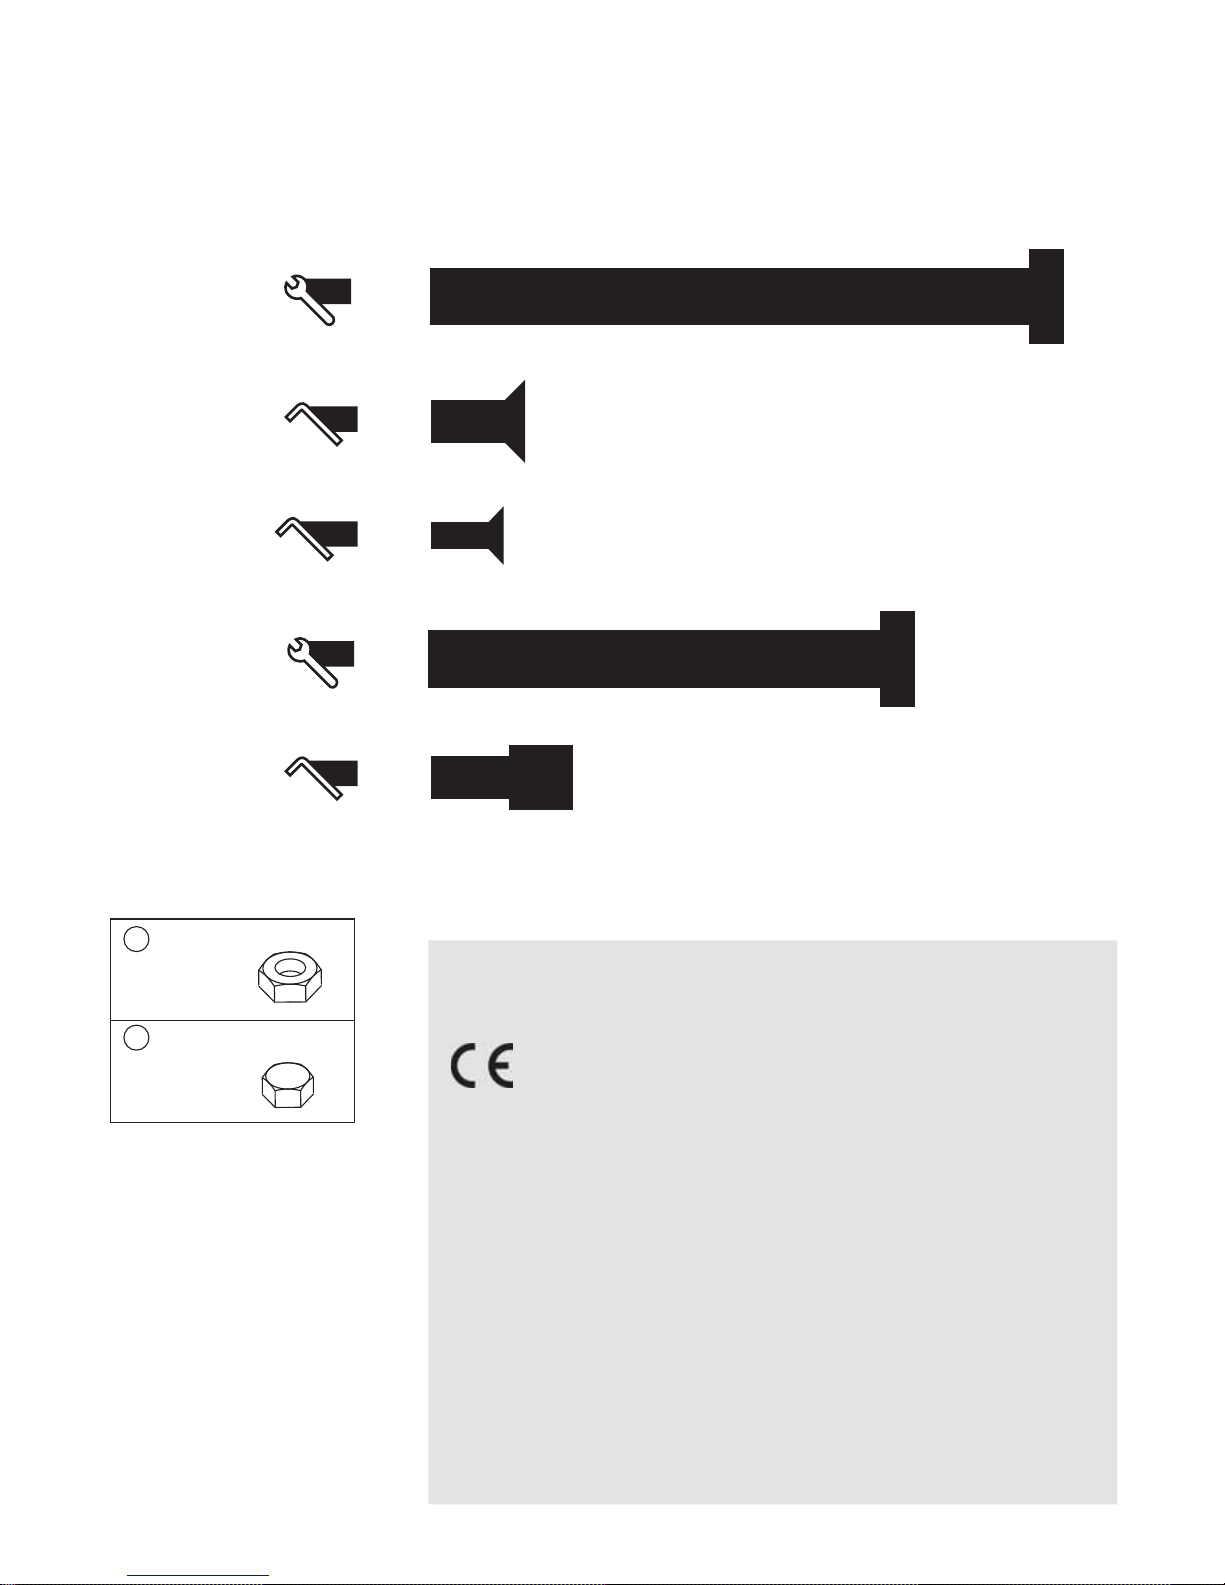
a
b
M8 nut 6x
M6 cap nut 6x
parts list
DECLARATION OF CONFORMITY:
is product meets the
requirements of European
Directives 2006/95/EC and 2004/108/
EC.
SPECIFICATIONS
° model: KPR + KLED
° 110-220 V ~ 50/60 Hz
° 1 x 7 W
° type lamp: Extremis KLED lamp
° IP 65
CAUTION
e supplied plug (part of KPR) is a
Europlug (Type C CEE 7/16). It can be
used throughout Europe, except in the
United Kingdom, Ireland and Malta.
e assembly and the replacement of the
LED light bulbs may only be carried out
by a qualified electrician. Extremis shall
not be liable in any way for any damage
caused by incorrect assembly, improper
or unforeseeable use, taking account of
all the specifications and instructions
contained in this manual.
M8*80
M6*14
M4*10
M8*70
M6*12
6x
6x
5x
4x
8x
A
B
C
D
E
13
13
4
2,5
5
Page 17
17
english
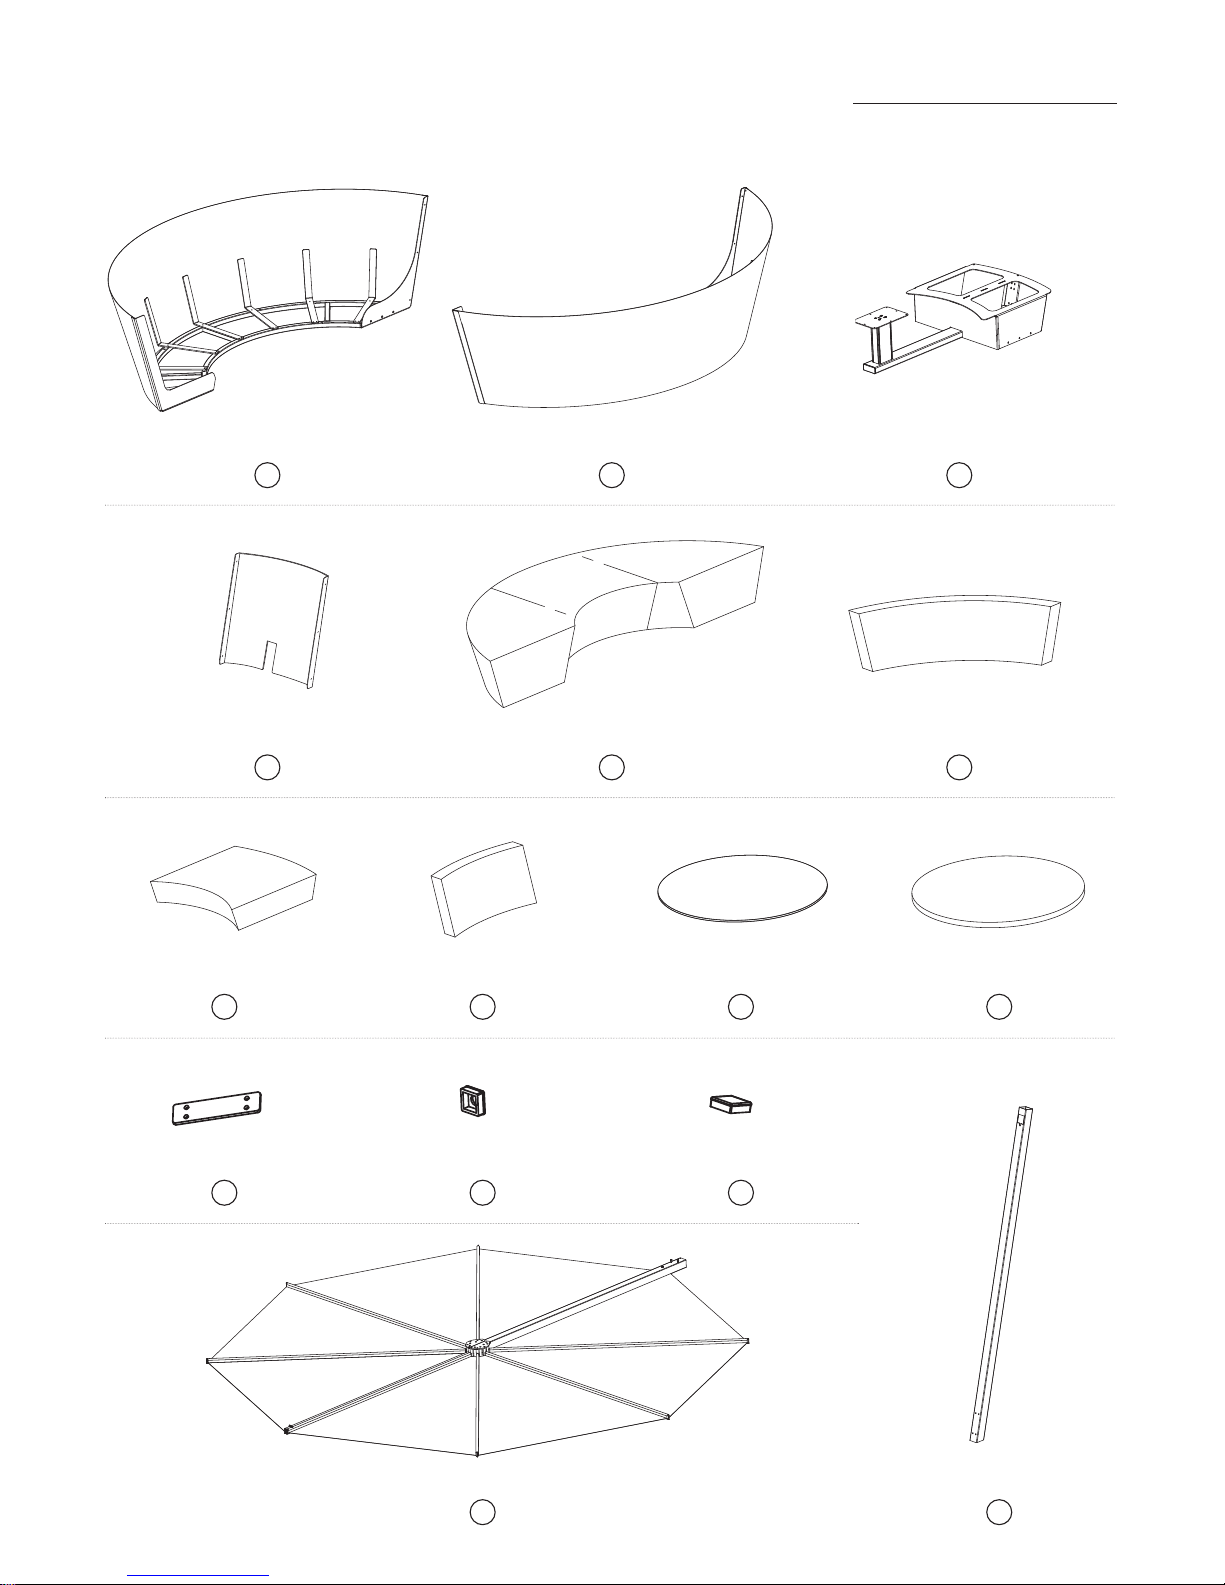
2 x large seat cushion
3 x small back cushioin 1 x tabletop 1 x tablecushion
1 x vertical parasol pole 60*601 x parasol frame with fabric 60*60
1 x left half of the seat
1 x backrest 4 x large back cushion
1 x right half of the seat 1 x small seat frame
1 x small seat cushion
1 x plastic spacer 1 x cap 50*50 1 x cap 60*60
1
4
7
11
2
5
8
12
14 15
3
6
109
13
Page 18
www.extremis.beKOSMOS
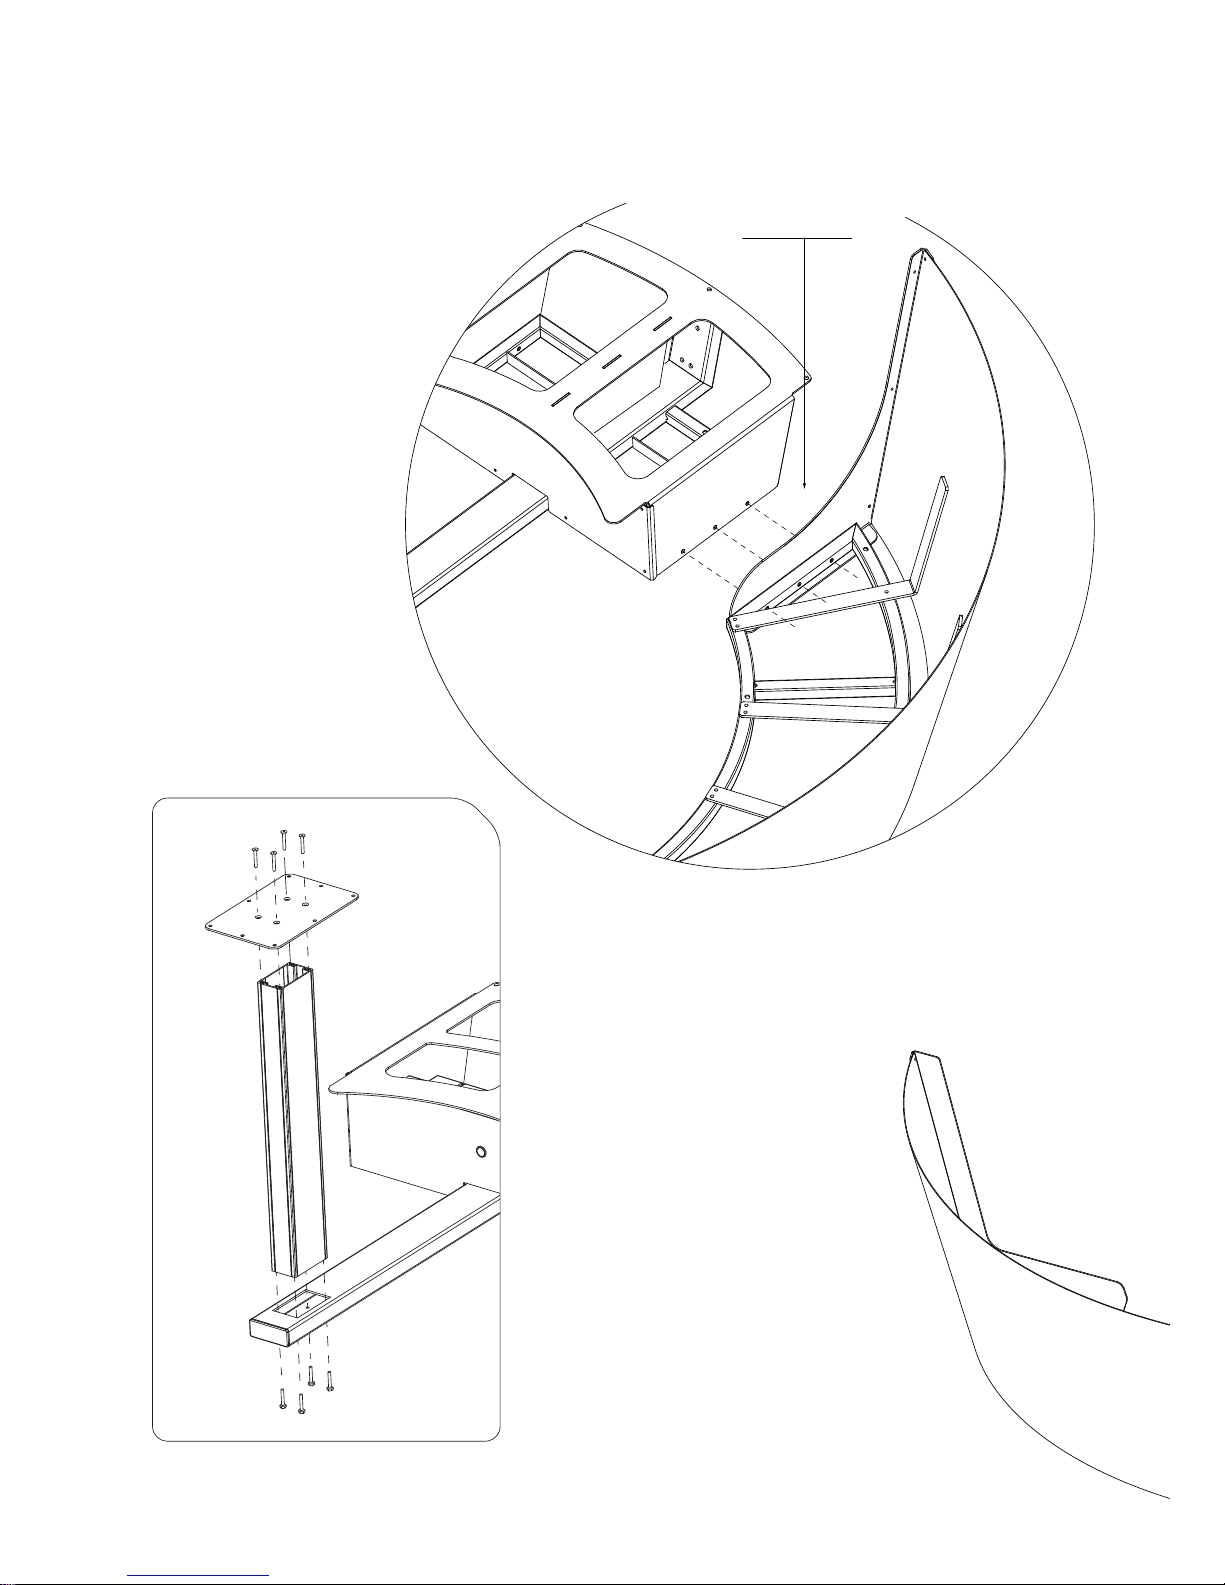
(in case you bought a fixed table,
first mount the aluminium
profile to the small seat frame
and the tabletop connection on
top of it, with M6*30mm bolts)
assembly
6x
A
Page 19
19
nederlands
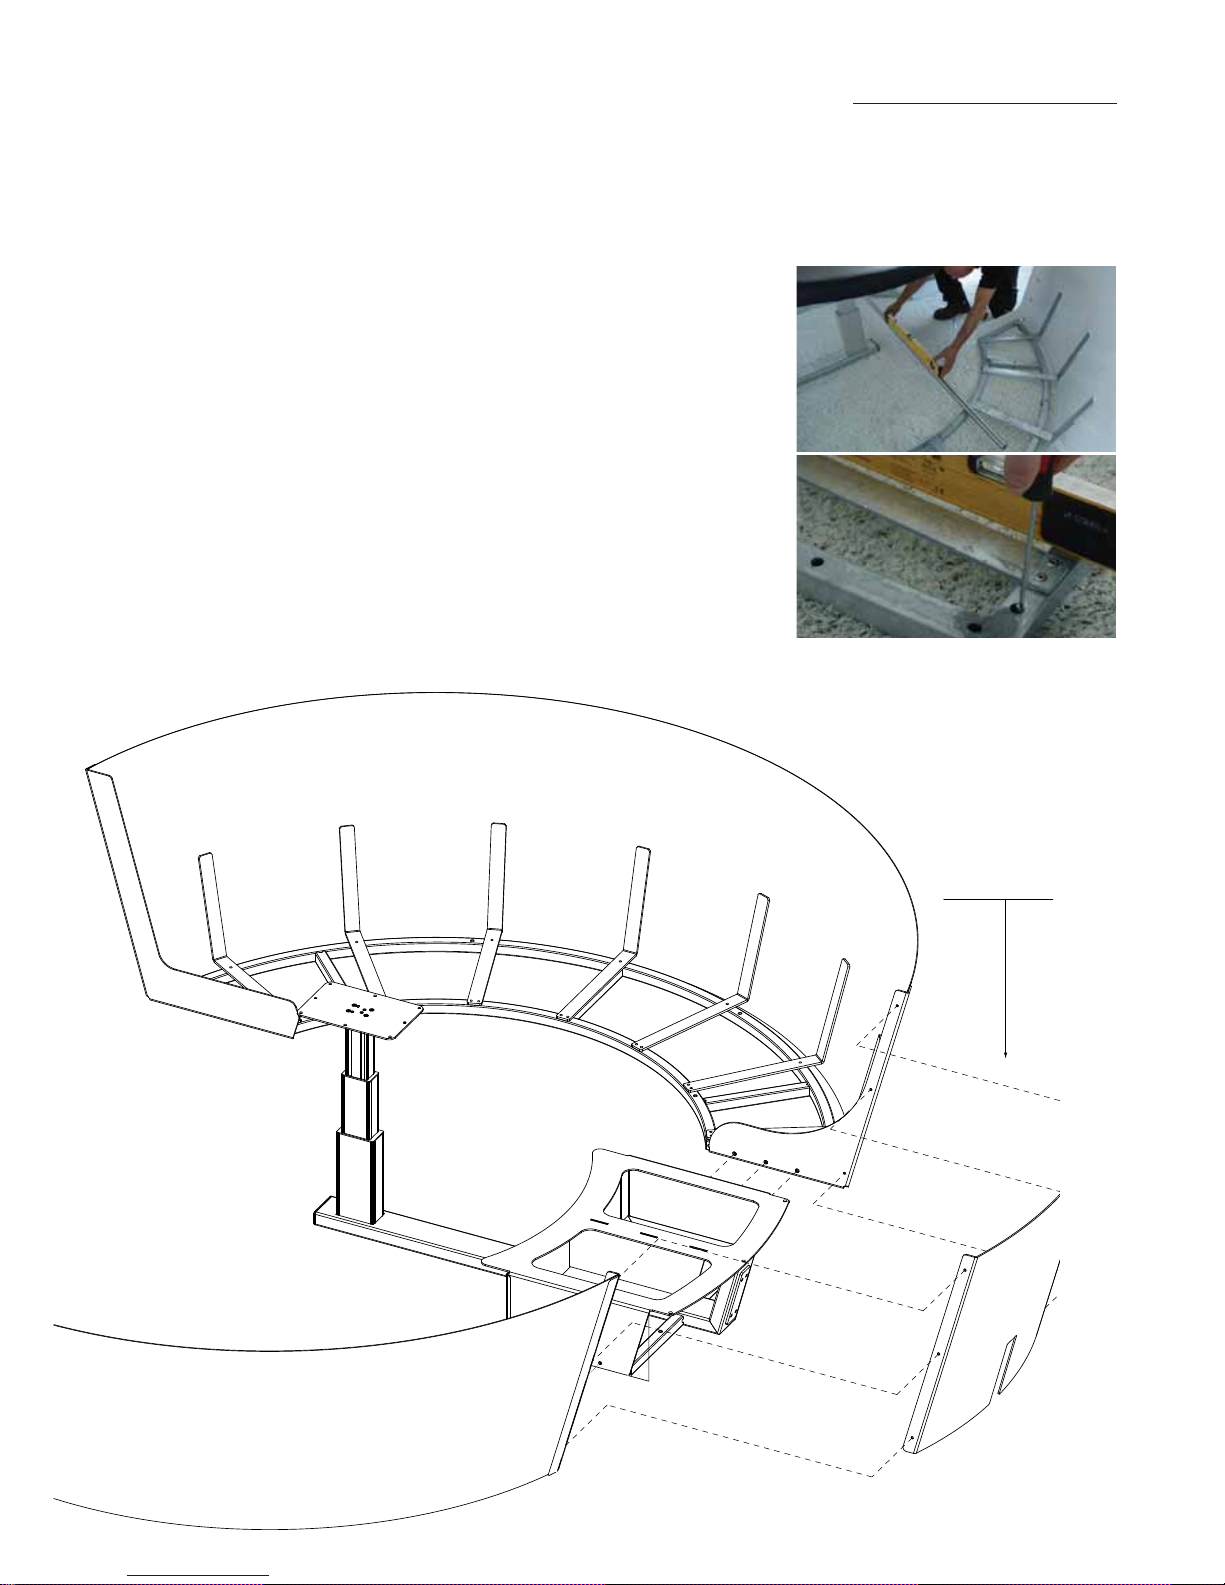
1. Put the small seat frame (3) in its
desired position. Make sure that the
coupling bar is facing the prevailing
wind direction.
Loosen the adjustable feet, which are
not touching the ground, from above
using a flat blade screwdriver. Make
sure that the element is perfectly level
(see pictures >>>).
2. Attach the two seat halves (1 & 2) to
the small seat frame (3) using three
bolts (A) and three nuts (a) on each
side. Make sure that these elements
are also perfectly level and that all their
adjustable feet are firmly resting on the
ground.
3. Position the backrest (4) between the
two seat halves and screw it down using
six M6*10 bolts and cap nuts (B & b).
6x
B
Page 20
www.extremis.beKOSMOS
8x
E
4x
D
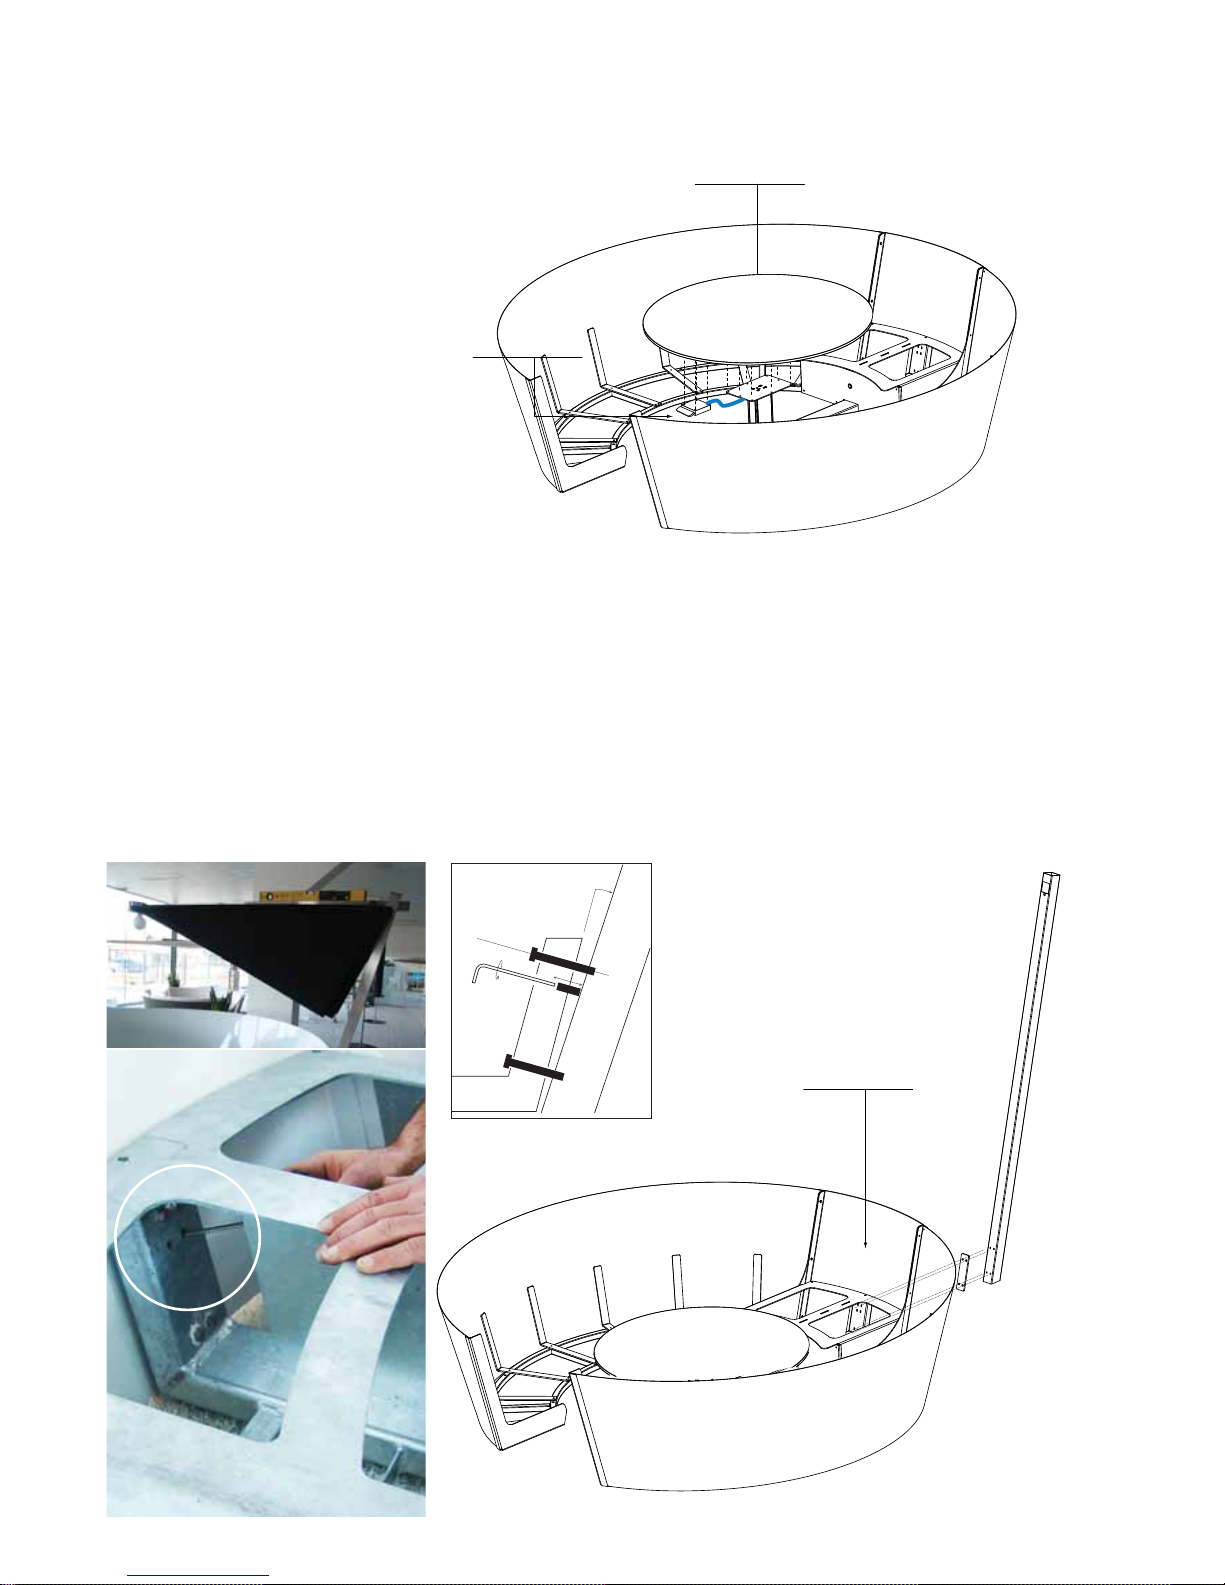
5. Insert four bolts (D) in the pre-drilled
holes (two at the bottom and two at the
top) on the inside of the small seat
frame. On the outside, slide the plastic
spacer (11) and the vertical parasol pole
(15) over the bolts. Tighten them
securely.
e parasol pole has to be be slightly
tilted by turning the two adjusting
screws in the two remaining holes (see
detailed diagram and pictures >>>). To
this end, first loosen the top bolts a little
until you obtain the desired angle. en
turn the adjusting screws clockwise using
a 4mm hexagonal wrench until they touch
the vertical parasol pole.
4. Screw the tabletop (9) down using the
bolts (E). Attach the height adjustment
lever to the underside of the table
using 4 bolts (C). Make sure the height
adjustment lever is facing the open
section of the Kosmos.
4x
C
assembly
Page 21
21
nederlands
4x
E
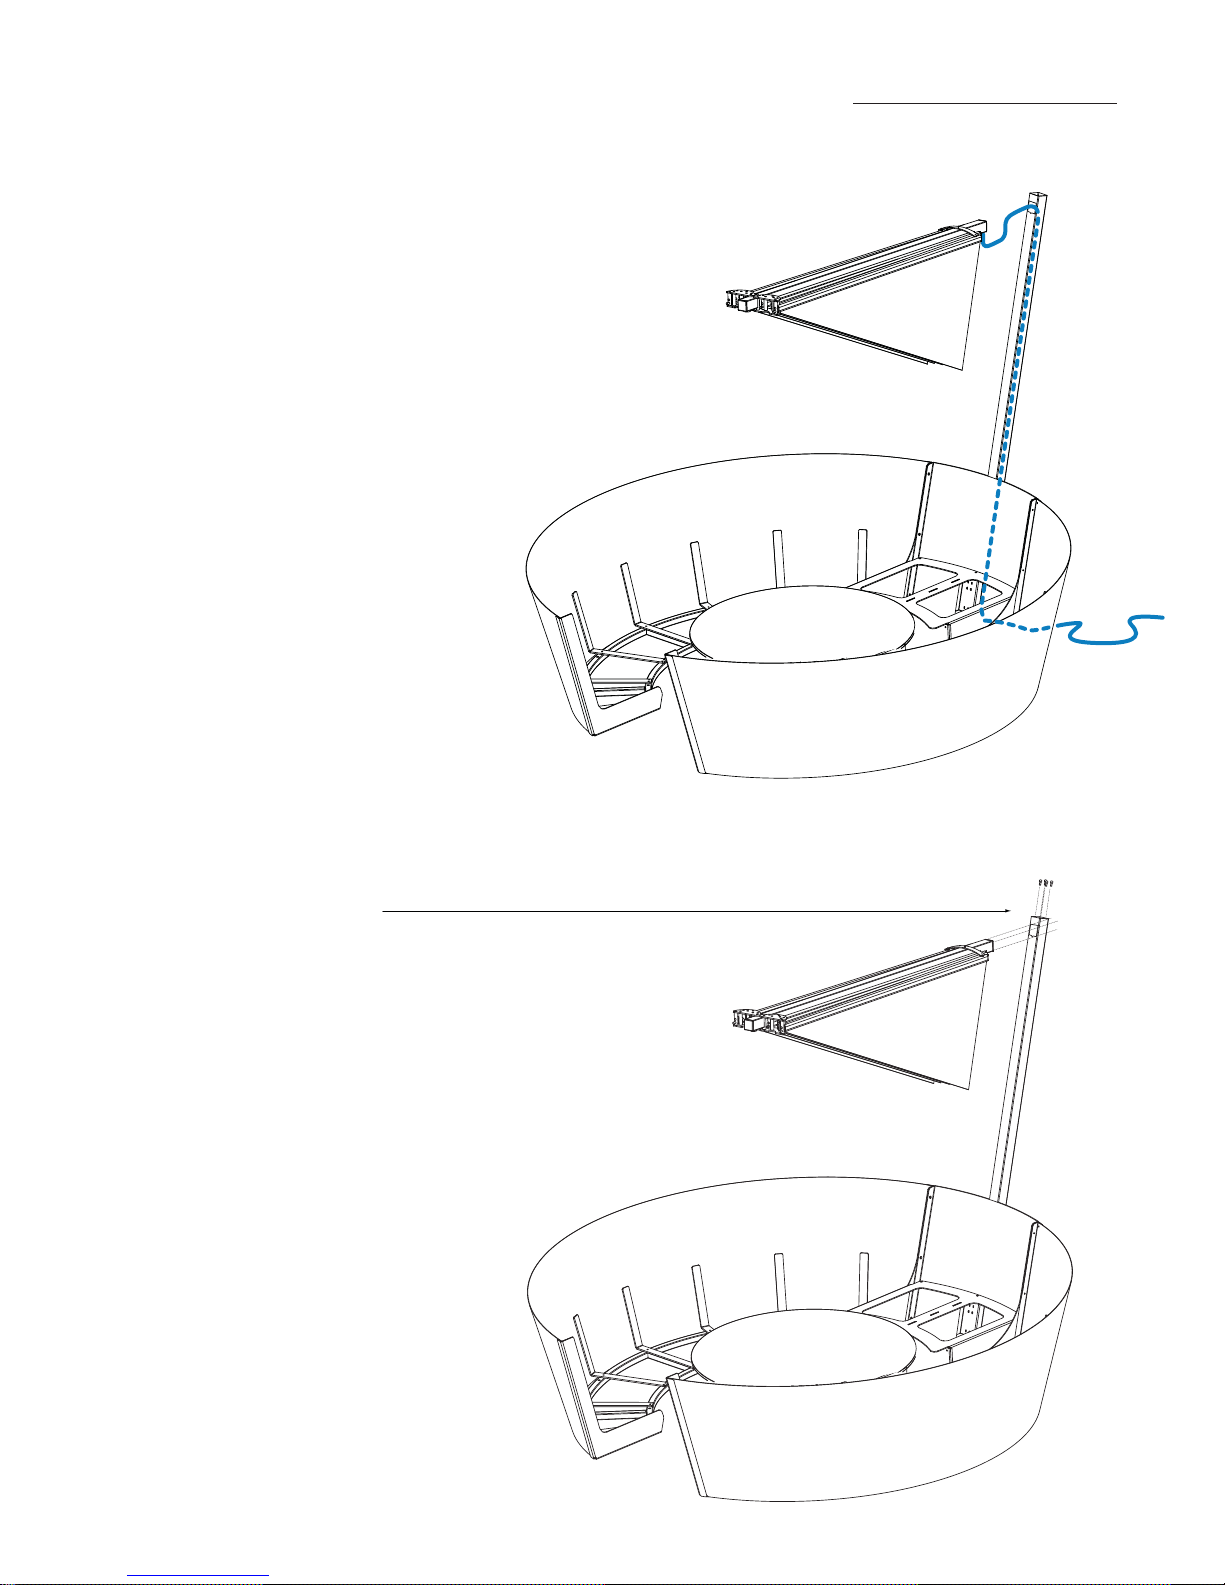
7. Now insert the parasol as far as possible
into the hole in the vertical parasol pole
(15) and fasten it by means of the bolts
(E).
6. Take the parasol frame with its fabric
(14) and bring the cable as closely as
possible to the top of the vertical parasol
pole (15). Insert the cable in the hole in
the parasol pole and lower it down until
it appears at the bottom.
Once the cable is fitted, you must ask
a qualified electrician to install a suitable
plug on the cable.
Page 22
www.extremis.beKOSMOS
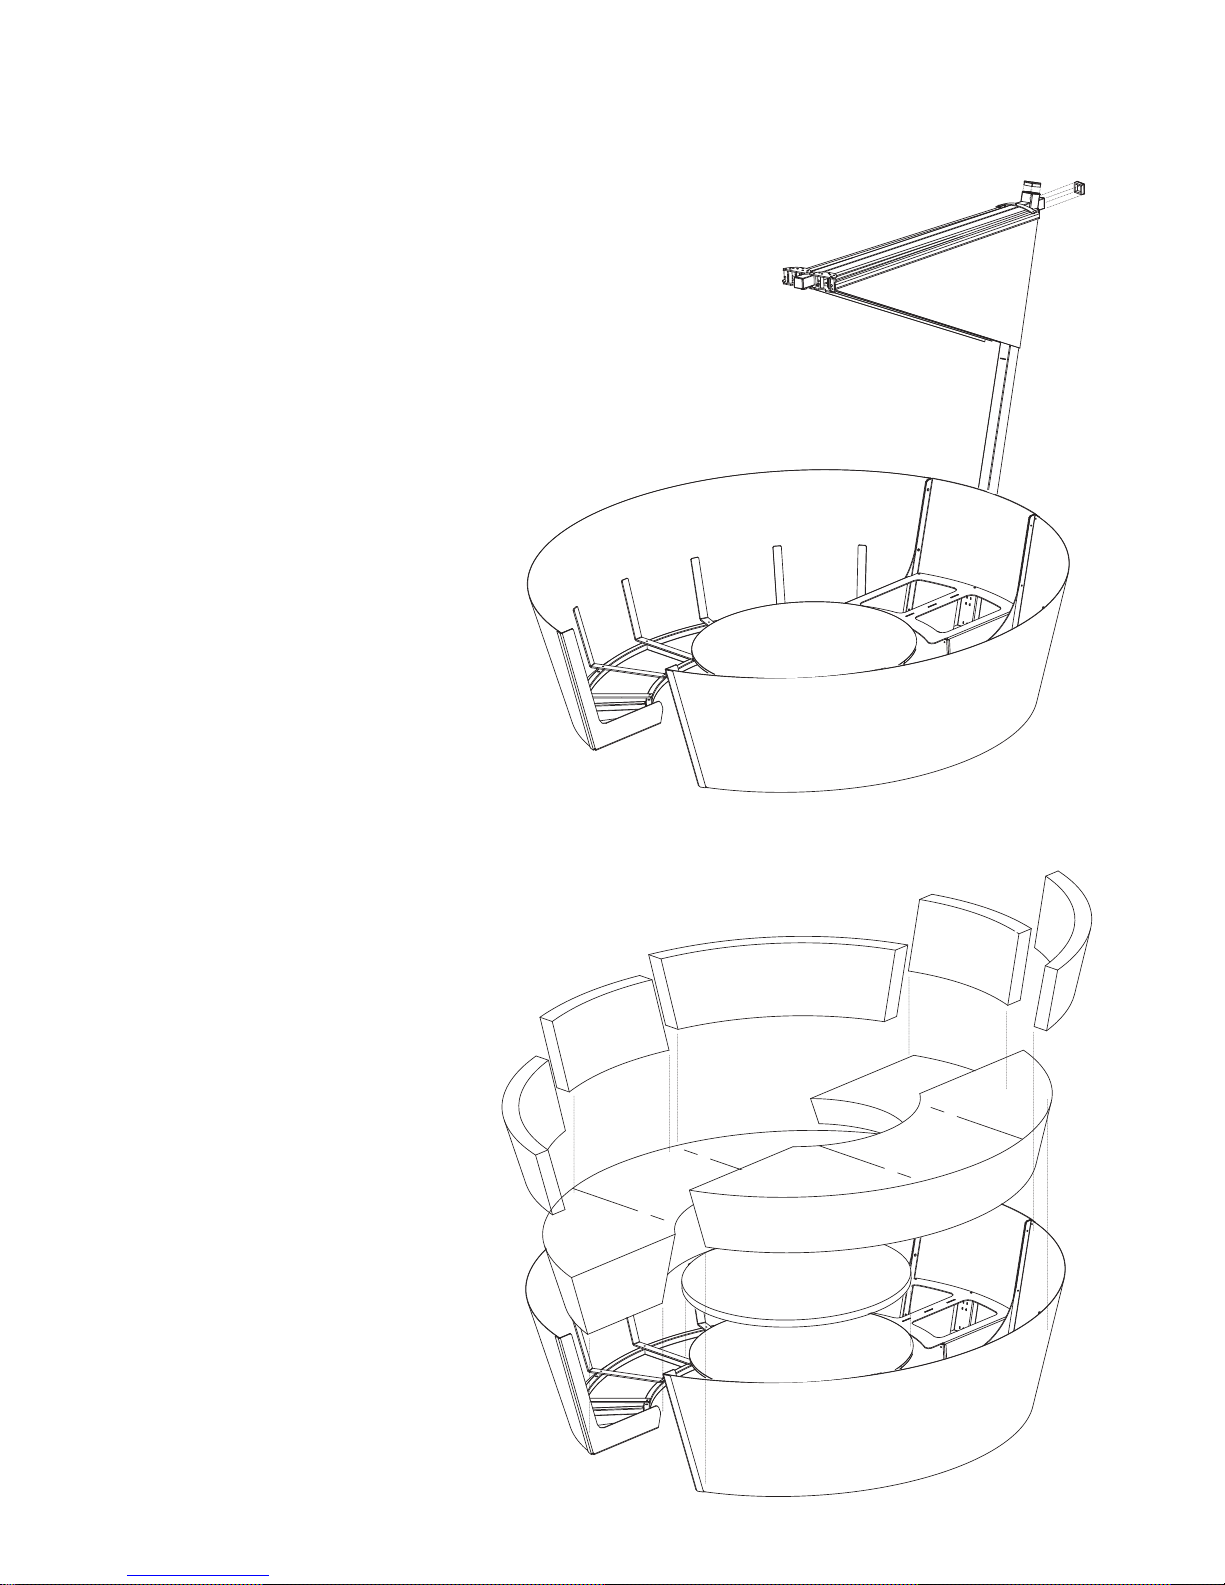
9. Arrange the cushions as shown in the
diagram.
8. Put the protective caps (12 & 13) onto
the parasolframe (14) and the vertical
parasol pole (15).
assembly
Page 23
23
nederlands
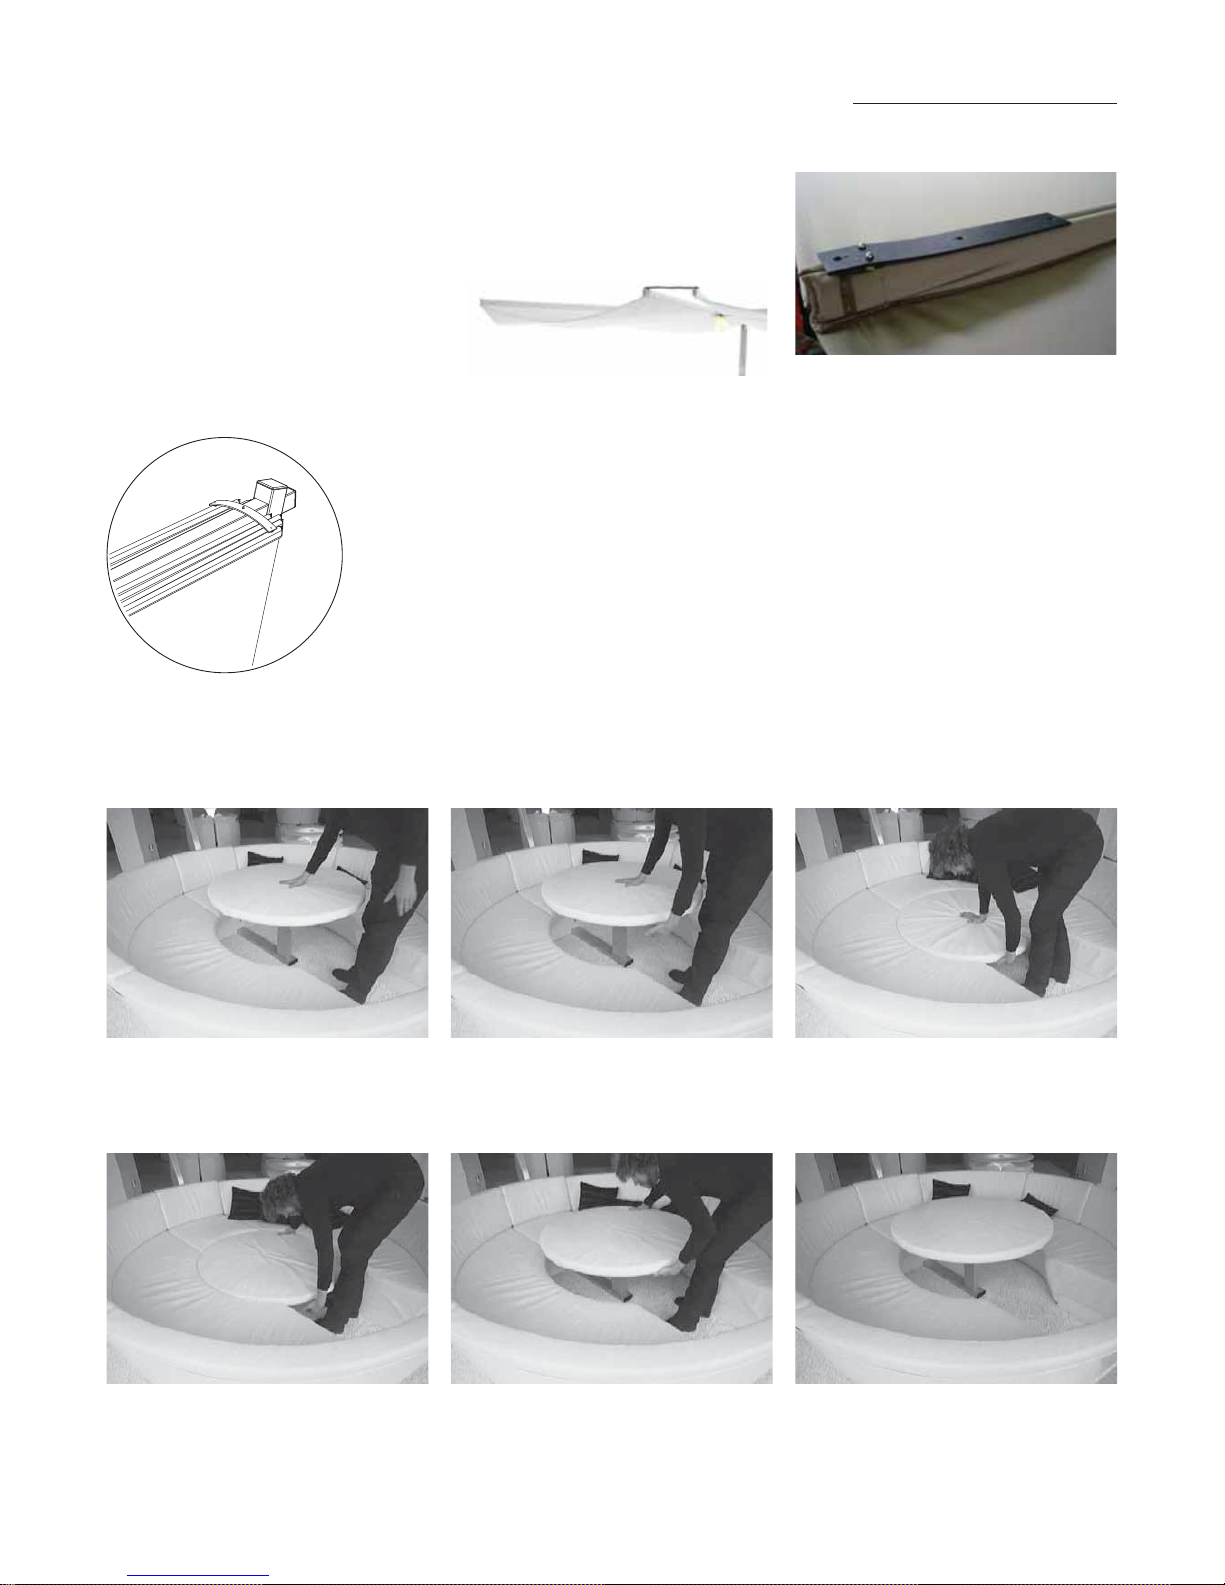
11. To switch your Kosmos into lounge bed, push the table downward with your right hand, while squeezing the handle underneath the
tabletop with your left hand.
12. To use the table, squeeze the handle underneath the tabletop again, and pull the table with the other hand.
10. Now open the parasol. If the magnets
don’t close well, first loosen the velcro
fasteners and open the parasol again.
Only now you can position the velcro
fastener again.
Put the leather strap on the parasol to
prevent the parasol from opening.
is leather strap can also be used to keep
the parasol open:
A) in case of rain: creates water draining
B) after a long time not being in use: it’s
possible the parasol magnets don’t keep
closed well. is is caused by internal
stress in the parasol cloth. Use the
leather strap on the top of the magnet
fastening system, as long as it takes to
stretch the cloth.
Optional: now screw the LED bulb into
the fitting.
Page 24
www.extremis.beKOSMOS
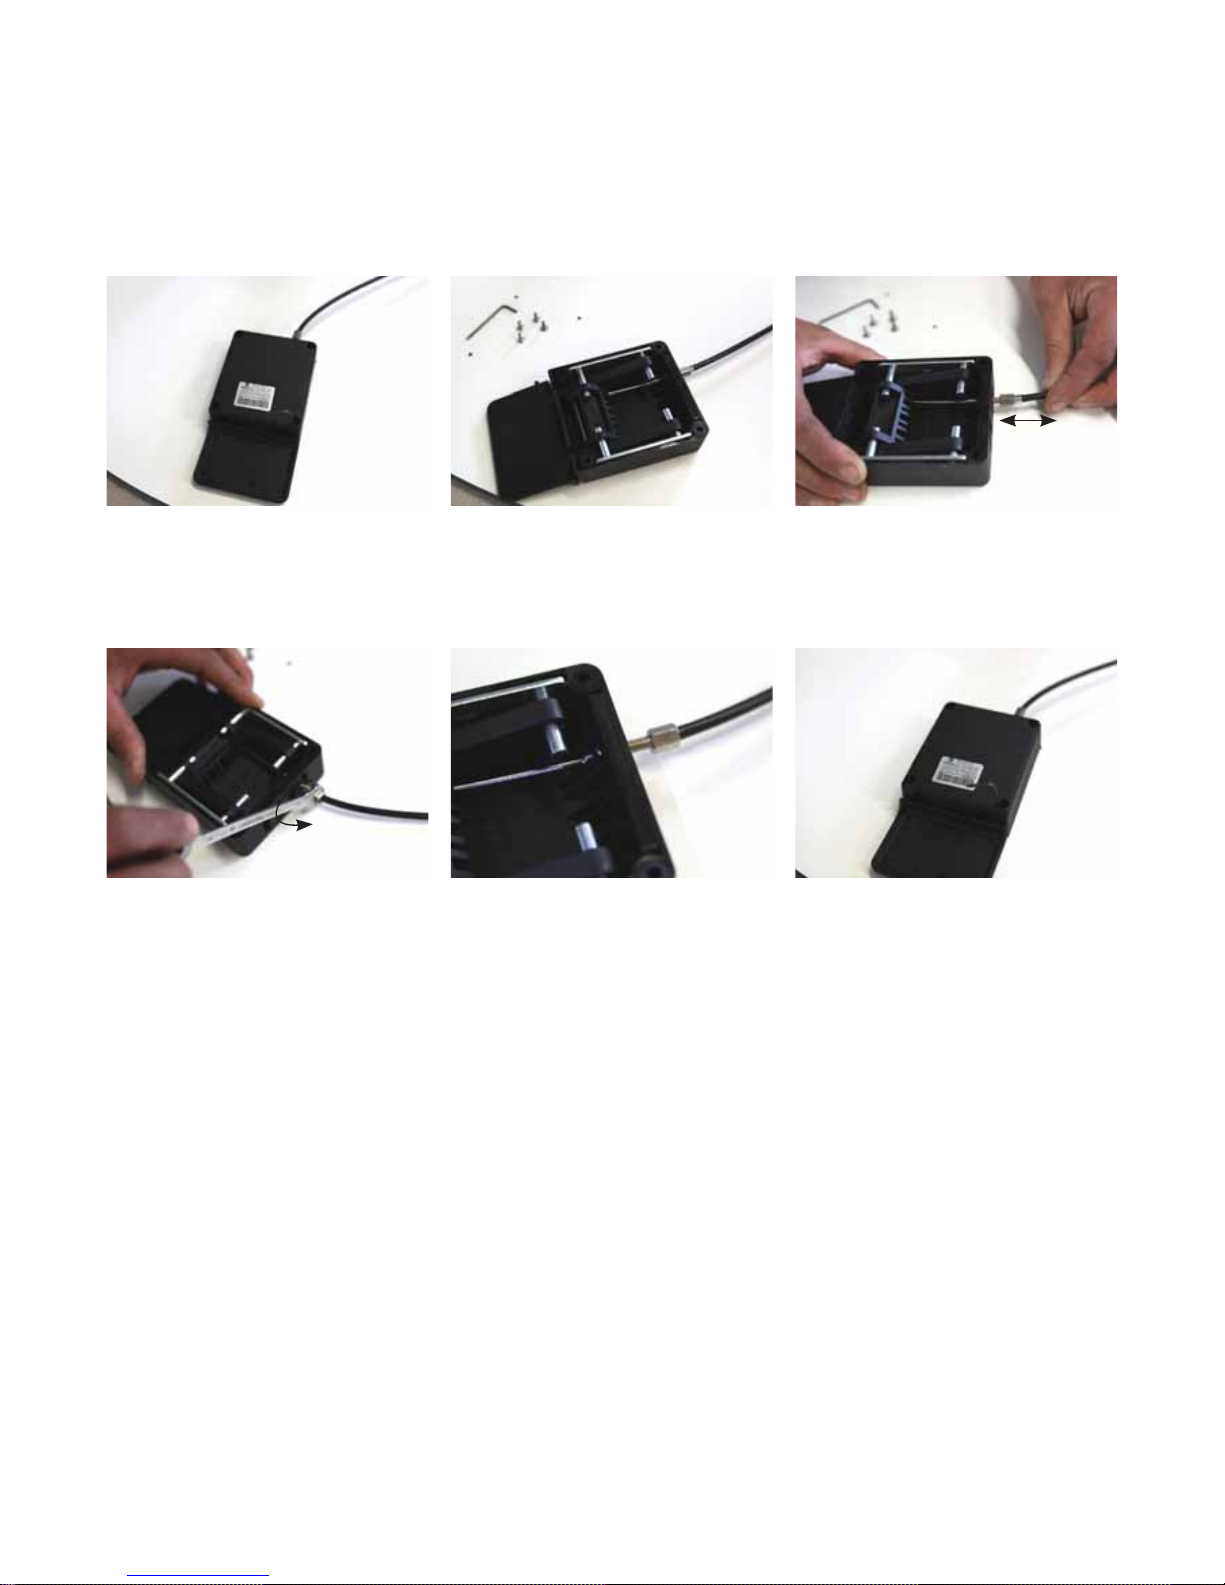
1. Demount the valve by screwing the
bolts out.
2. Turn the valve around. 3. Check if there is any space between the
cable and the fastening screw.
4. If so, screw the bolts out until there is
no space left and turn two more times.
5. Be careful not to screw out the bolts
completely.
6. Mount the grip again by using the same
bolts you have just screwed out
If still not enough, repeat steps 1 - 3.
adjust adjustable table
Page 25
25
nederlands
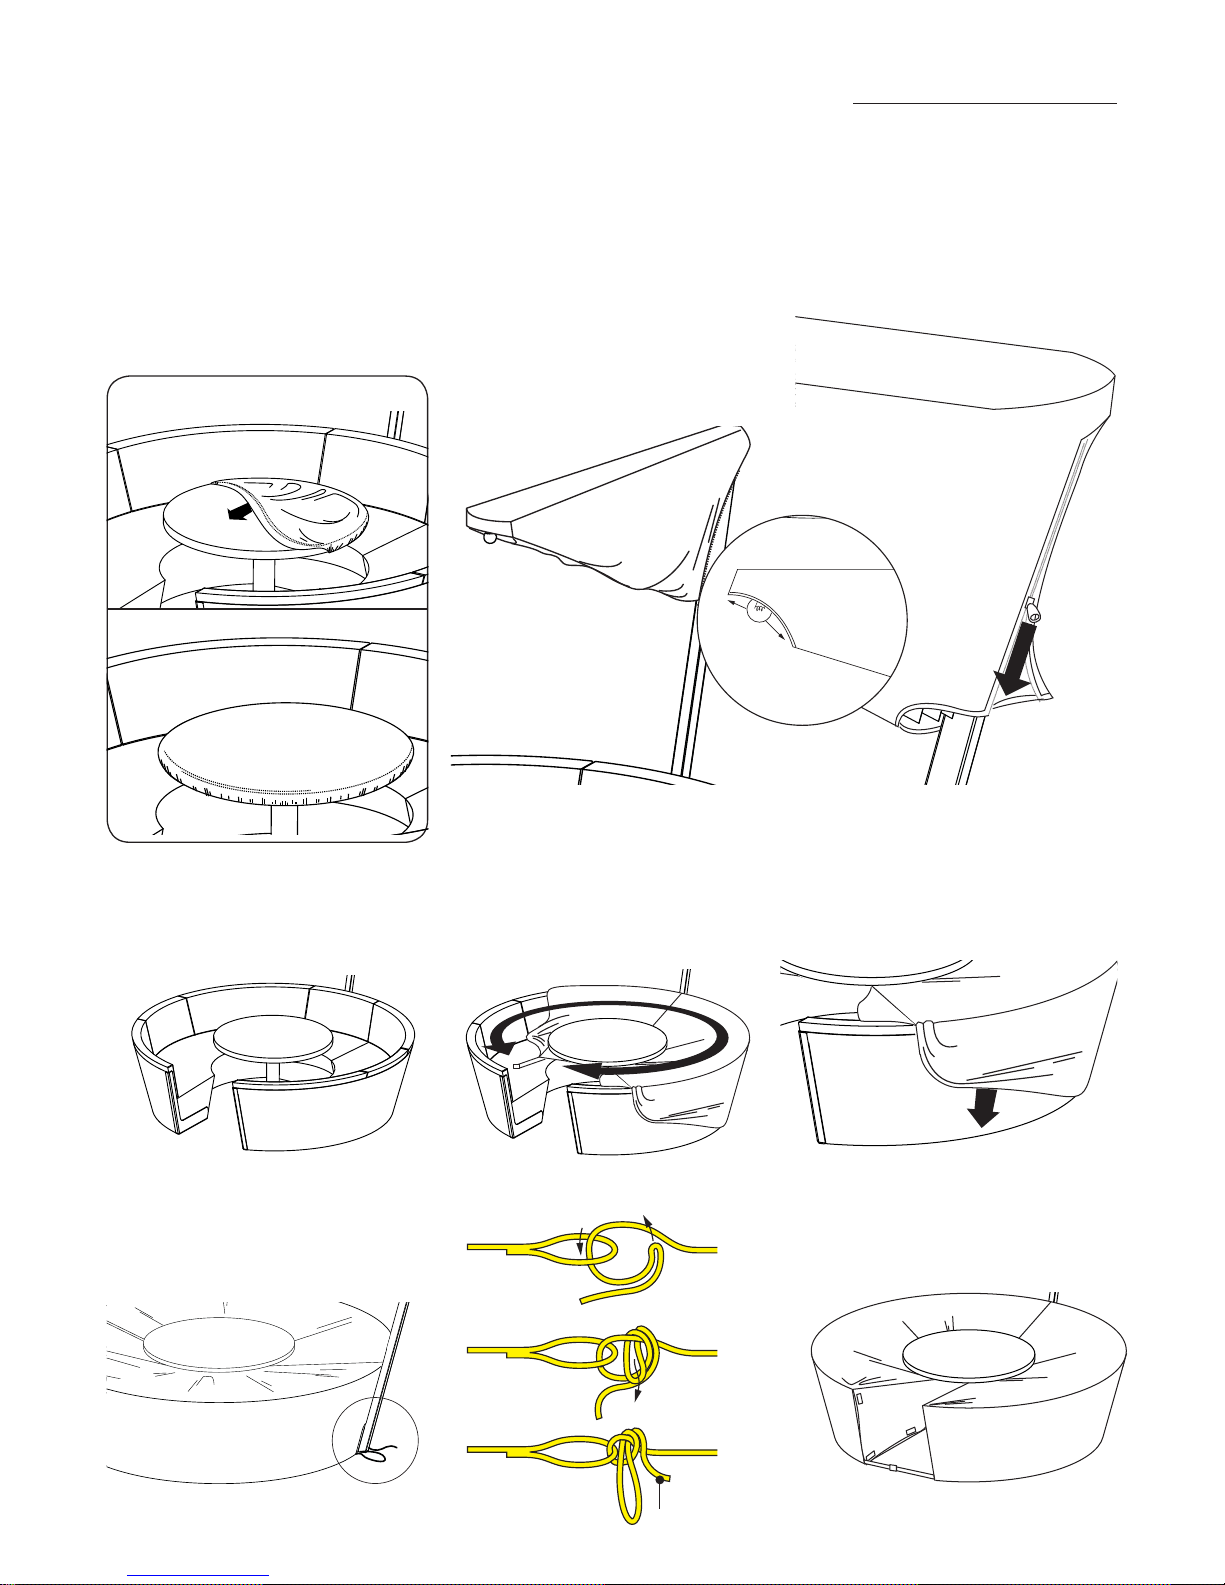
kosmos covers
TABLETOP COVER
1.
2.
CONTENTS
° 1 x seat cover
° 1 x parasol cover
° 1 x table cover
PARASOL COVER
1. Now slide the parasol cover over the
closed parasol. If you have equipped your
Kosmos with a parasol light, take
extreme care not to break the light bulb.
2. Close the parasol zip fastener.
KOSMOS COVER
1. Leave all back cushions in the Kosmos,
and put the table in the highest position.
2. Put the seat cover on the Kosmos with
the pie-shaped opening in the entrance to
the seating. e table is not covered and
the table support is in the tip of the pie
piece.
3. Pull the sides of the cover tight to the
bottom of the cabinet. Position the corner
joints of the cover accurately on top of
the corner pieces of the seating.
4. At the back of the Kosmos knot the
strings under the umbrella pole as shown
beneath.
5. Close the velcro fasteners at the front of
the cover. en tighten the strap.
pull to untie
a)
b)
c)
Page 26
www.extremis.beKOSMOS
PAR ASOL
To clean the parasol fabric and slip-over
cover, rinse them with soapy water and
rub carefully using a soft brush. It is
important to prevent the parasol fabric
from getting really dirty. Use the slip-over
cover as much as possible.
° Never use any high-pressure cleaning
equipment to clean the parasol fabric.
° Always brush very softly and be
particularly careful at the seams. If you
brush too hard, the seams might come
apart.
° After cleaning, always leave the parasol
open to allow the fabric to dry completely.
° Do not use detergents, as they will
remove the fabric’s protective coating.
In case of tenacious stains we recommend
using “HG sunshade, canvas and tent
restorer”. For more information on this
product, please visit the website www.
hg.eu. Strictly follow the instructions on
the bottle!
CUSHIONS
ey are easy to clean with warm water
and a microfibre cleaning cloth. Never
use solvents, bleaching agents, abrasives,
chemical detergents nor waxes. If the
Kosmos is used outdoors, always cover
it completely with the optional cover
when you are not using it, as the cushions
are not 100% waterproof for reasons of
ventilation.
e cushions should be cleaned
periodically in order to maintain its
appearance and to prevent build up of dirt
and bacteria.
Lacquers and inks, strong cleaners,
detergents and solvents such as
thinner, acetone or alcohol can be very
effective in removing stains, but cause
immediate damage and contribute to the
deterioration of the material. e use of
such cleaners is at the owners risk.
TABLE
HPL (high-pressure laminate) is easy to
clean with standard cleaning products
as used for cleaning kitchens. In case of
tenacious stains we use “HG plastic, paint
and wall paper intensive cleaner“. For
more information on this product, please
visit the website www.hginternational.
com.
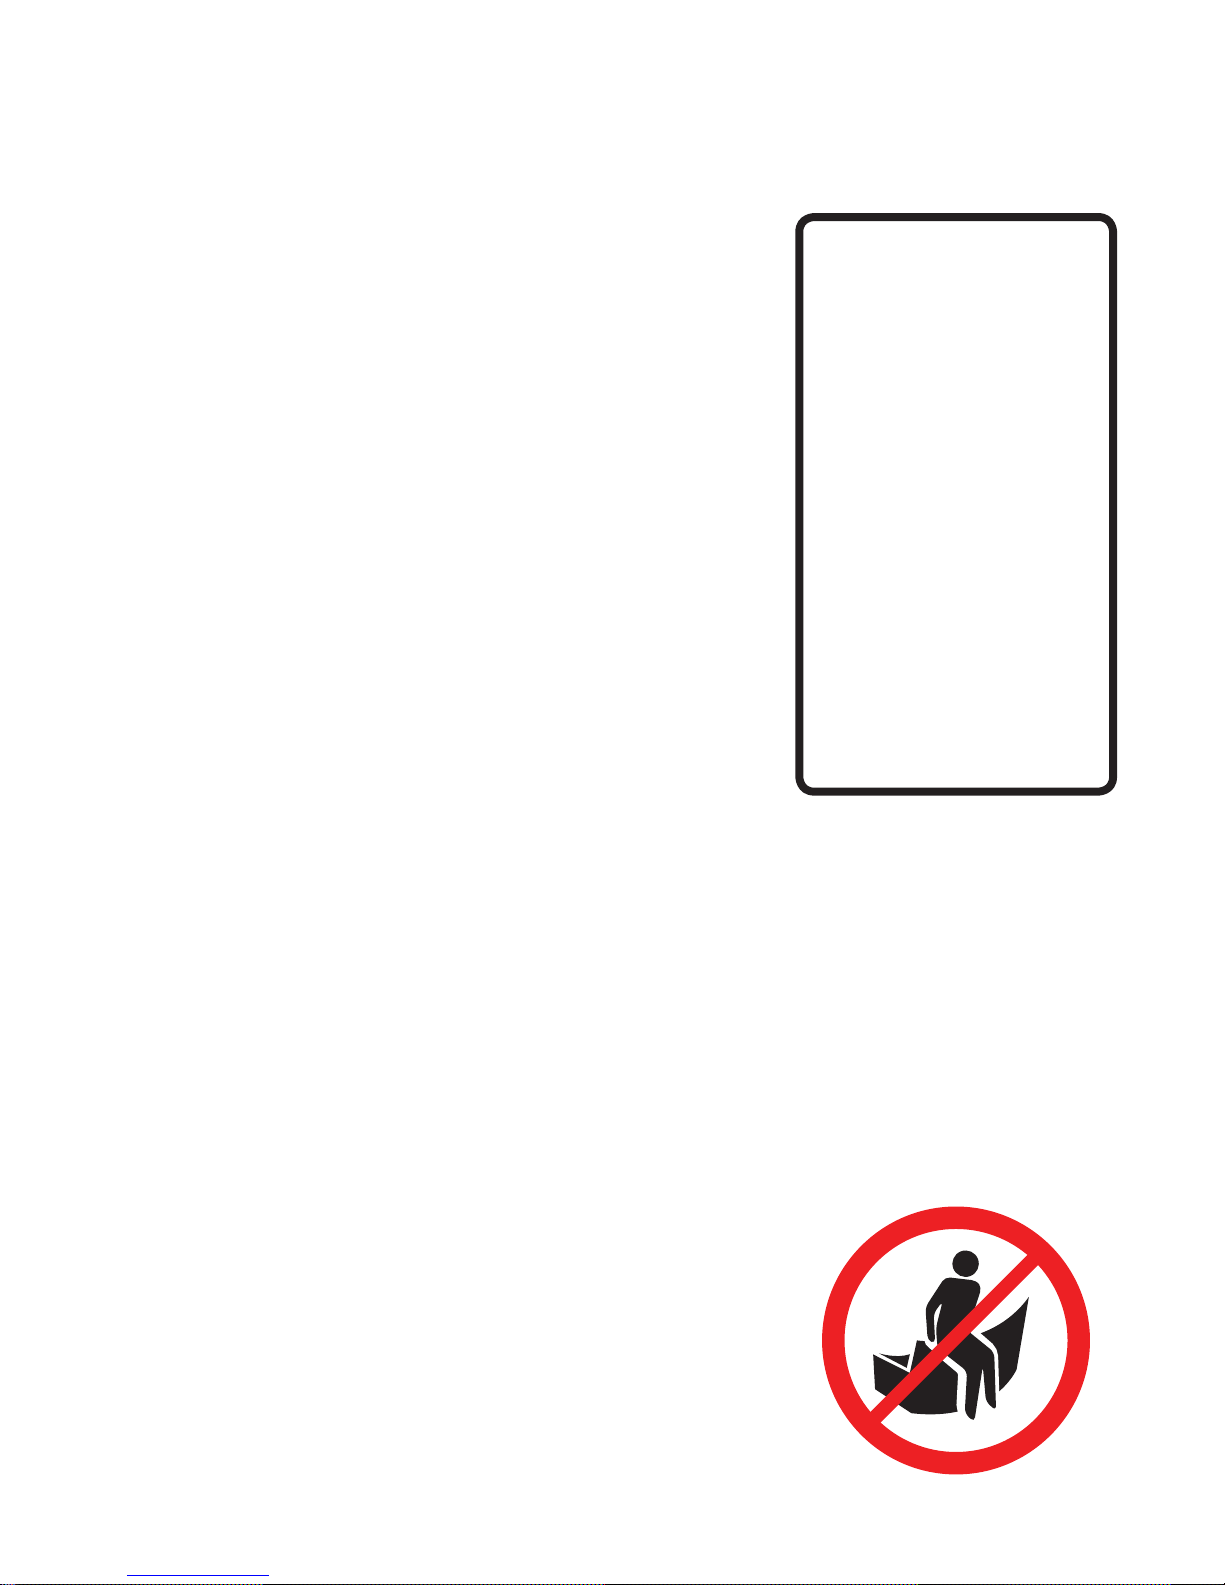
WARNING
Do never sit on the backrest aluminium
plate, to avoid damage to cushions or
aluminium.
CAUTION
In case of strong winds, close the
parasol and use the slip-over cover to
prevent the parasol from opening or
getting dirty.
Never leave the parasol unattended
when opened.
Do not leave the parasol closed if the
fabric is not completely dry. Do not
leave it closed for a long time in damp
conditions.
If you are not planning on using
the parasol for quite a while, store
it as follows: completely dry in dry
conditions.
maintenance
Page 27
27
nederlands
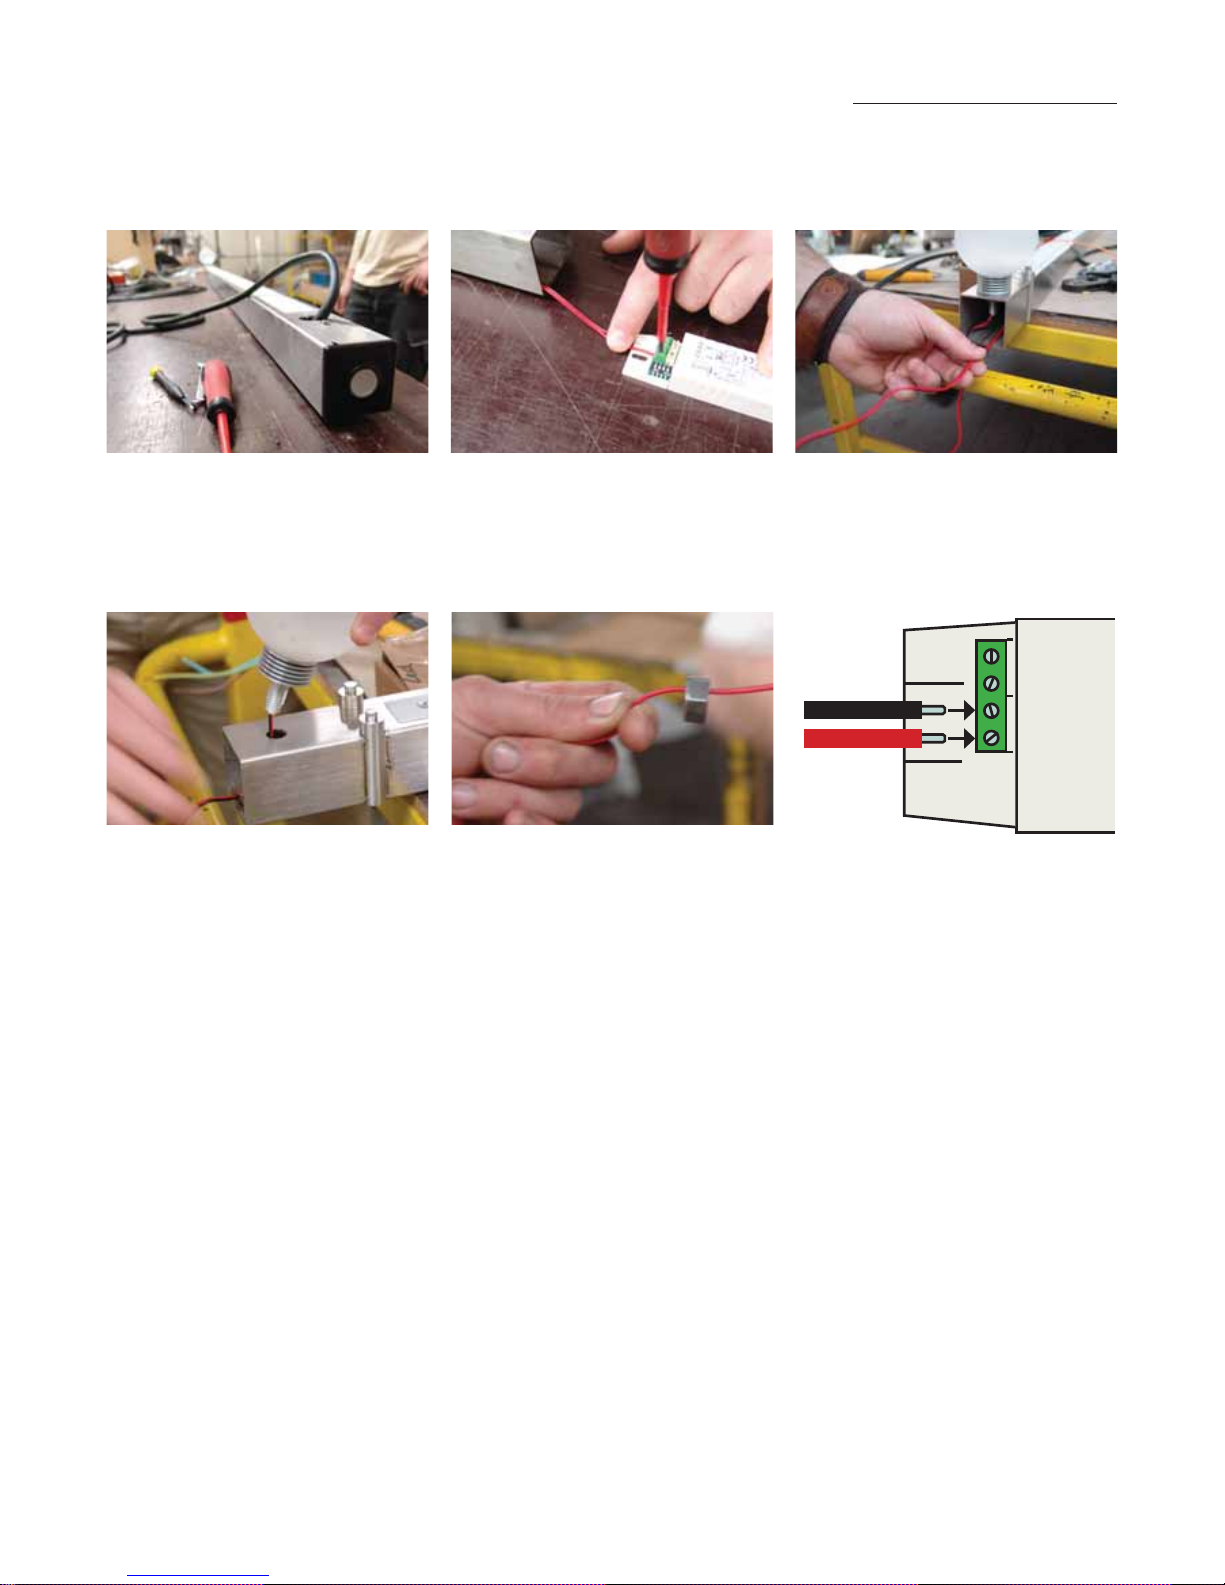
1. Remove the parasol frame’s protective
cap with the switch and remove the LED
adapter from the parasol frame.
2. Detach the red and the black cable from
the adapter.
3. Remove the protective cap at the other
end of the parasol frame. Pull the cable
through the frame and unscrew the nut
holding the light socket.
changing the light bulb
4. Remove the faulty LED light bulb and
unscrew the globe so that you can use it
again with the new LED light bulb. Do
not forget the insert the rubber ring.
5. Install the new LED light bulb, slide the
nut over the cable and tighten the nut.
Push the cable right through the parasol
frame.
6. Attach the 2 cables to the LED adapter
as shown in the drawing above.
7. Fit the protective caps at each end of the
parasol frame.
Page 28
www.extremis.beKOSMOS
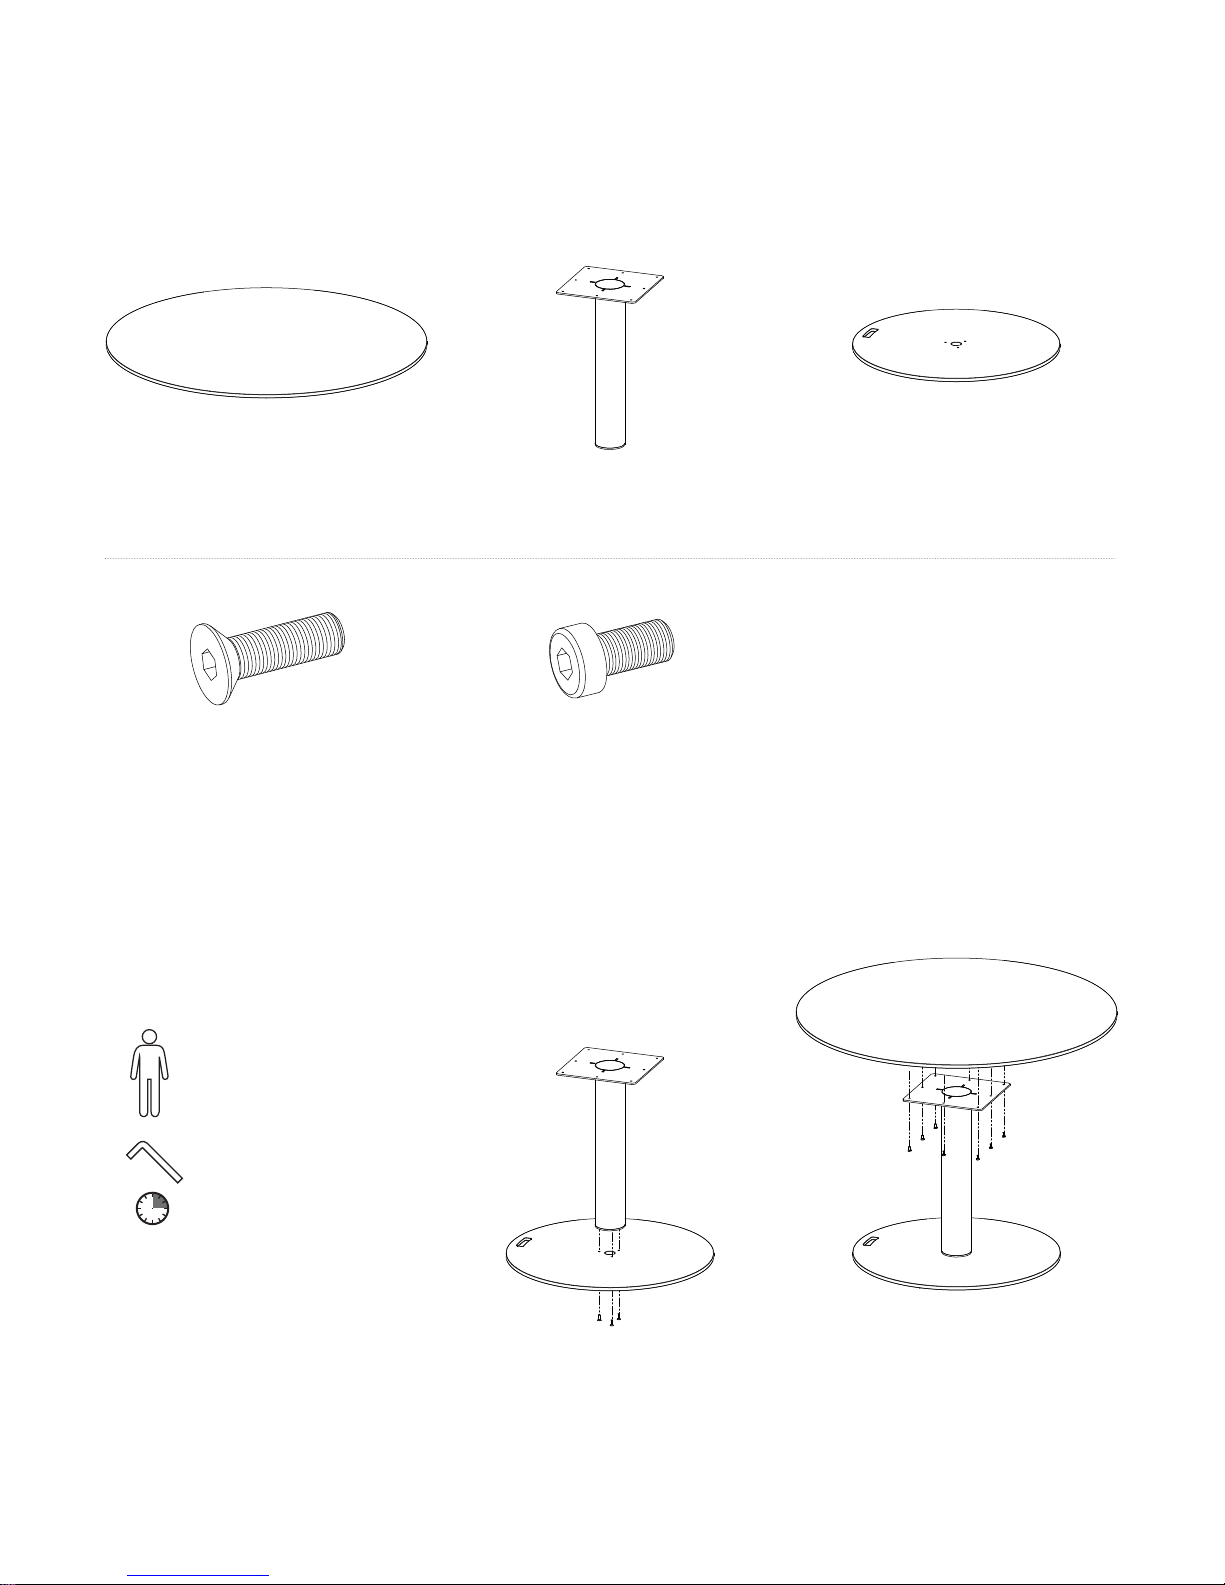
1. Take the base plate and attach this to the
bottom of the tube using 3 M6 x 25
countersunk bolts as shown on in the
figure.
2. Position the tabletop on the tube as
shown in the figure above using 8
M6 x 12 hexagon socket bolts.
kosmos freestanding table
assembly
1 x tabletop
3 x M6 x 25 countersunk bolt
1 x tube
8 x M6 x 12 hexagon socket bolt
1 x base plate
utilities
min. 1 person
+/- 15 min.
hexagon socket wrench no. 4
Page 29

29
english
www.extremis.be
Page 30

tools for togetherness
Page 31

www.extremis.be
Page 32
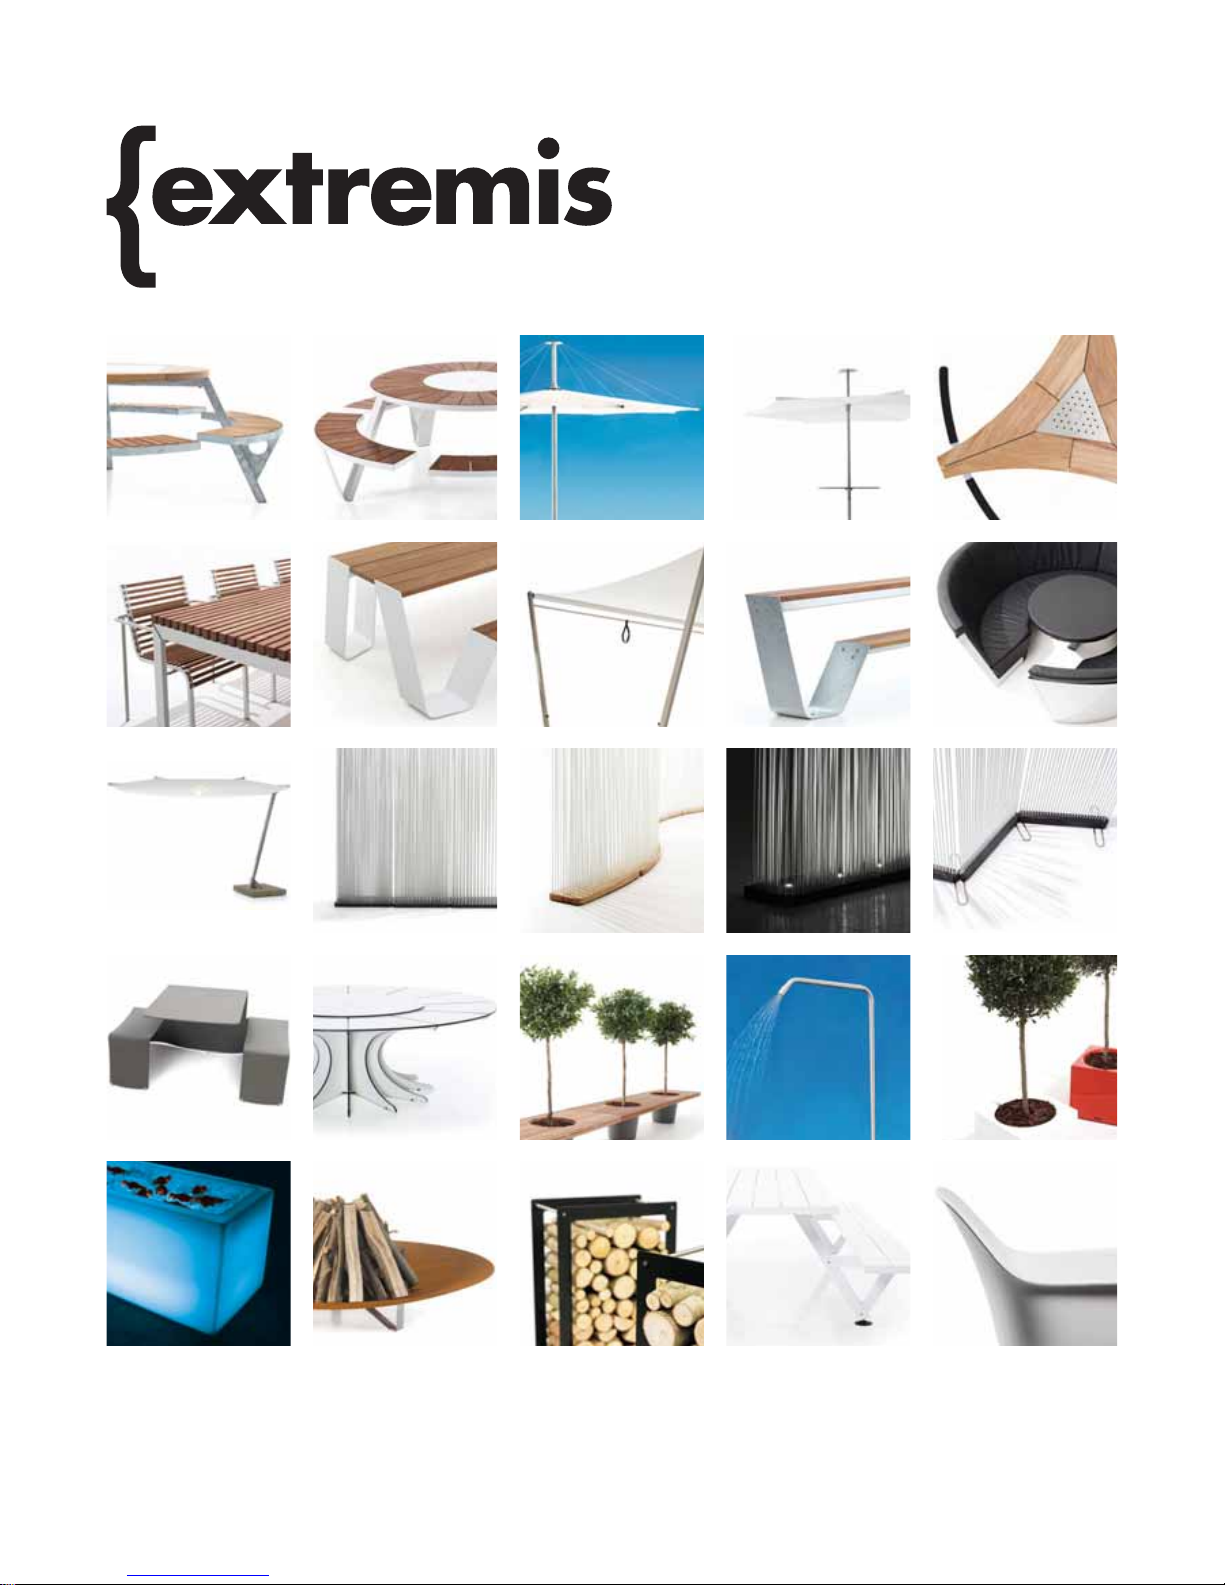
extremis
couthoflaan 20b
b - 8972 poperinge
t +32 57 346020
www.extremis.be
tools for togetherness
gargantua
extempore
kosmos parasol
picnik
icecube
qrater
woodstock
marina
captain’s chair
arthur
romeo & juliet
serpentine alea
sticks sticks curved inline stickssticks enlightened
hopper
hopper shade hopper bench
kosmos
pantagruel inumbra
inumbrina abachus
All images, ideas, designs and design content are the intellectual property of Extremis
and may not be copied, imitated or used, in whole or in part, without the prior written
permission of Extremis.
© extremis 2014
 Loading...