

Extreme Networks ExtremeXOS ScreenPlay User Manual

ExtremeXOS ScreenPlay User
Guide
Published: 2010
Part Number: 100400-00 Rev 01

Copyright © 2001–2013 Extreme Networks
AccessAdapt, Alpine, Altitude, BlackDiamond, Direct Attach, EPICenter, ExtremeWorks
Essentials, Ethernet Everywhere, Extreme Enabled, Extreme Ethernet Everywhere, Extreme
Networks, Extreme Standby Router Protocol, Extreme Turbodrive, Extreme Velocity,
ExtremeWare, ExtremeWorks, ExtremeXOS, Go Purple Extreme Solution, ExtremeXOS
ScreenPlay, ReachNXT, Ridgeline, Sentriant, ServiceWatch, Summit, SummitStack, Triumph,
Unified Access Architecture, Unified Access RF Manager, UniStack, XNV, the Extreme
Networks logo, the Alpine logo, the BlackDiamond logo, the Extreme Turbodrive logo, the
Summit logos, and the Powered by ExtremeXOS logo are trademarks or registered
trademarks of Extreme Networks, Inc. or its subsidiaries in the United States and/or other
countries.
sFlow is the property of InMon Corporation.
Specifications are subject to change without notice.
All other registered trademarks, trademarks, and service marks are property of their
respective owners.
Extreme Networks, Inc.
3585 Monroe Street
Santa Clara, California 95051
(888) 257-3000
(408) 579-2800
http://www.extremenetworks.com

Table of Contents
Chapter 1: ExtremeXOS ScreenPlay User Guide 5
Overview 5
Setting Up ScreenPlay 5
HTTP and HTTPS Setup 5
Web Access Using HTTP 5
Web Access Using HTTPS 6
Client Setup 6
Launching ScreenPlay 6
ScreenPlay Dashboard 8
ScreenPlay Common Functions 9
Menu Bar 10
Dashboard Switch Summary Icons 11
Configuring the Refresh and Timeout and CLI Settings 12
Customizing and Capturing the Tables 12
Dashboard Workspace 13
Configuration 14
Configuration—Ports 14
Modifying Single Ports 14
Modifying Multiple Ports 17
Configuration—VLANs 19
VLAN Configuration Procedures 22
Configuration—Stacking 22
Configuration—SNMP 24
Configuration—Dynamic ACLs 26
Dynamic ACL Procedures 27
Statistics and Monitoring 29
Statistics & Monitoring—Event Log 29
Statistics & Monitoring—Ports 30
Statistics & Monitoring—QoS 34
Administration 34
Administration—User Accounts 35
Administration—User Sessions 39
Administration—CLI Shell 40
Help 41

Table of Contents
ExtremeXOS ScreenPlay User Guide 4

ExtremeXOS ScreenPlay User
1
Guide
Overview
Setting Up ScreenPlay
ScreenPlay Dashboard
Configuration
Statistics and Monitoring
Administration
Help
Overview
ScreenPlay is a web-based device management tool for all ExtremeXOS-based
devices running software version 12.0 or higher. ScreenPlay is launched as a web
page on the device. The ScreenPlay client, loaded onto the web browser, uses
SOAP over HTTP to communicate with the device using XML APIs. ScreenPlay
provides a graphical user interface for the more commonly used CLI commands,
with focus on the statistics and monitoring commands.
NOTE
The screens shown in this chapter were captured from a variety of Extreme Networks switches. In some
cases the information displayed on the screen varies somewhat depending on the switch being used.
Setting Up ScreenPlay
This section describes the setup process required to use ScreenPlay with the
switch and includes the following topics:
■ HTTP and HTTPS Setup on page 5
■ Client Setup on page 6
■ Launching ScreenPlay on page 6
HTTP and HTTPS Setup
Before you can launch ScreenPlay, you must enable the web server on the switch.
You can use either HTTP or HTTPS to access ScreenPlay.
NOTE
You must assign an IP address to a VLAN for management access to the switch. For more information,
see the chapter “Configuring Management Access.”
Web Access Using HTTP
To enable HTTP web access, enter the following command:

ExtremeXOS ScreenPlay User Guide
SummitX450a-48t.1 # enable web http
The switch is now ready for web access using HTTP at the URL "http://
<switch_ip>".
Web Access Using HTTPS
To enable HTTPS web access, you must first check to see if the SSL module is
installed. Enter the following command:
BD-8806.1 # show ssl
If the following displays, the SSL module is not installed:
SSL Module: Not Installed
BD-8806.2 #
The SSL module must be installed to enable HTTPS web access. (Refer to the
ExtremeXOS Concepts Guide “Secure Socket Layer” in the Security chapter and
“Guidelines for Activating SSL” in the Software Upgrade and Boot Options
appendix.)
After the SSL module is installed, create a certificate by entering the following
command:
BD-8806.2 # configure ssl certificate privkeylen 1024 country us
organization extreme common-name name1
To enable HTTPS web access, enter the following command:
SummitX450a-48t.1 # enable web https
The switch is now ready for web access using HTTPS at the URL "https://
<switch_ip>".
Client Setup
You need a standard web browser such as Mozilla Firefox® (version 1.0 or greater)
or Internet Explorer
in installed.
NOTE
ScreenPlay supports up to six concurrent sessions.
®
(version 6.0 or greater) with the Adobe Flash® Player 9 plug-
Launching ScreenPlay
To launch ScreenPlay, enter the URL of the switch in the address window of your
browser. When ScreenPlay launches, the authentication screen displays, as shown
in Figure 1.
ExtremeXOS ScreenPlay User Guide 6
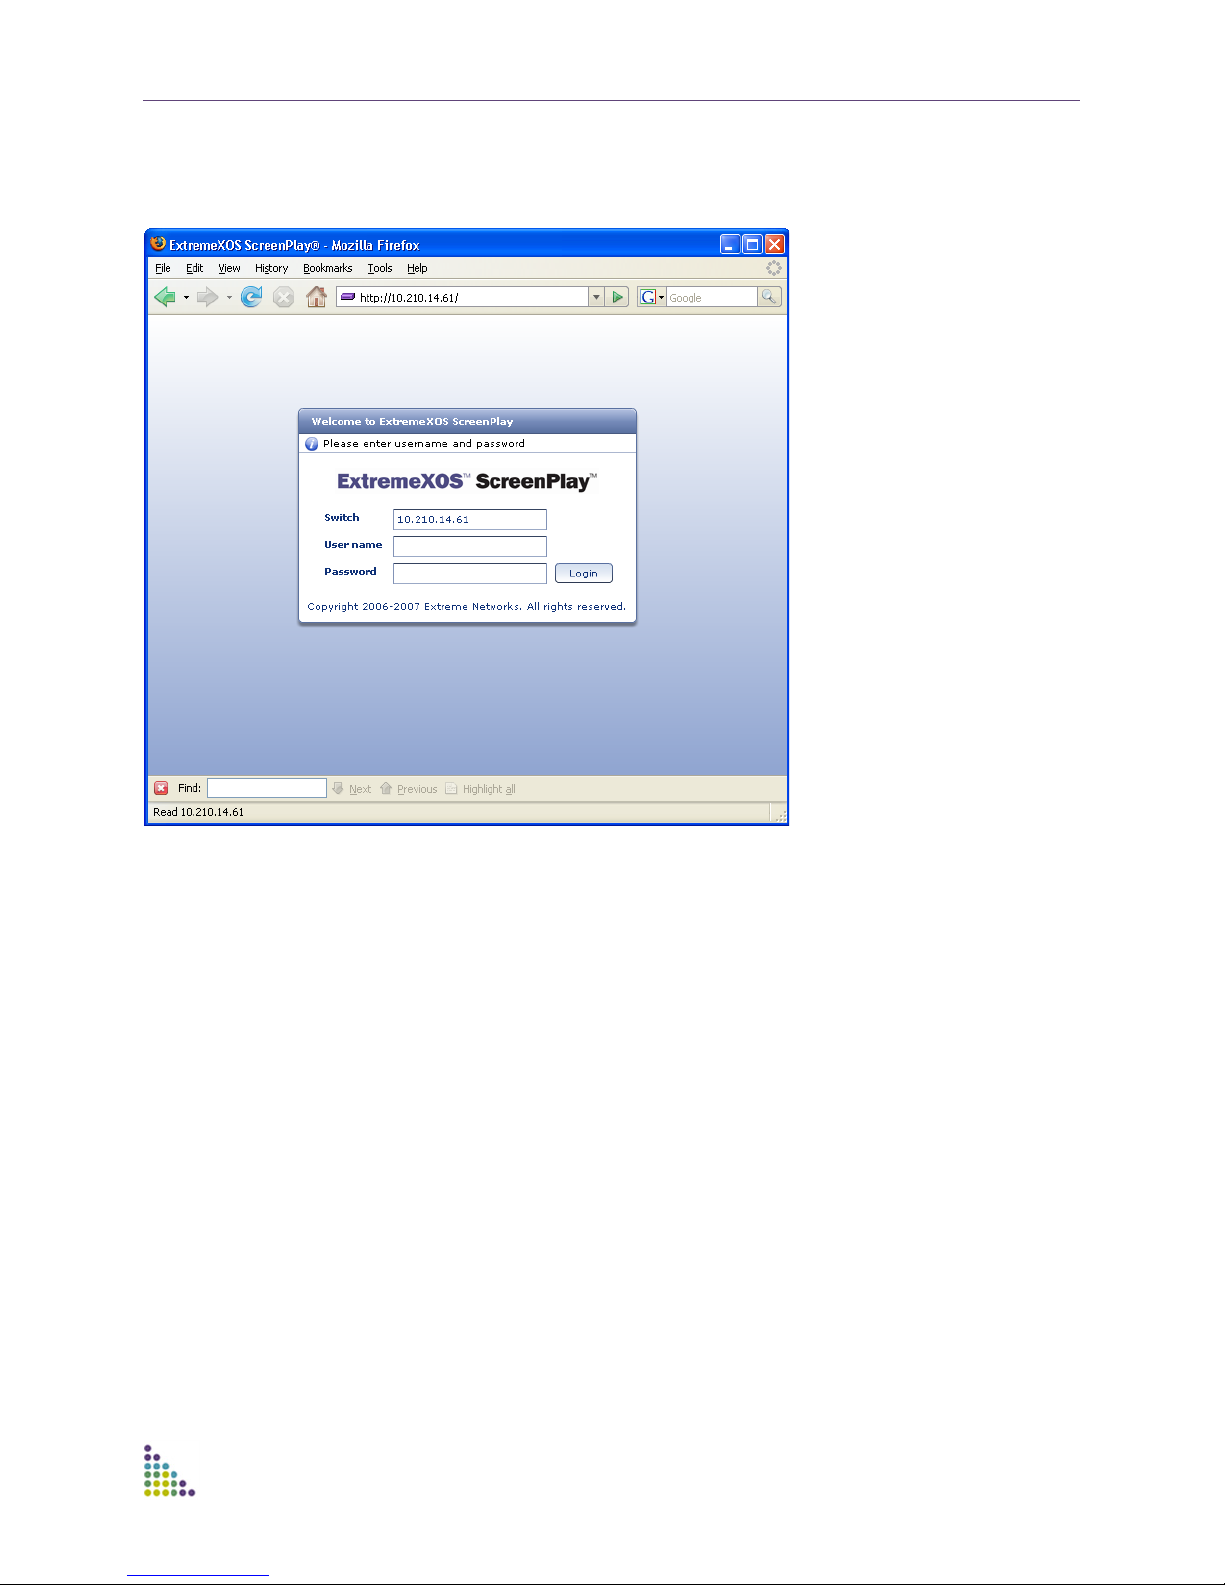
Figure 1: Login Window
ExtremeXOS ScreenPlay User Guide
The ScreenPlay login window displays the switch IP address. You must enter a
user name and password for access. The user name and password used are the
same that you use to access the CLI from a Telnet or SSH session.
ExtremeXOS ScreenPlay User Guide 7
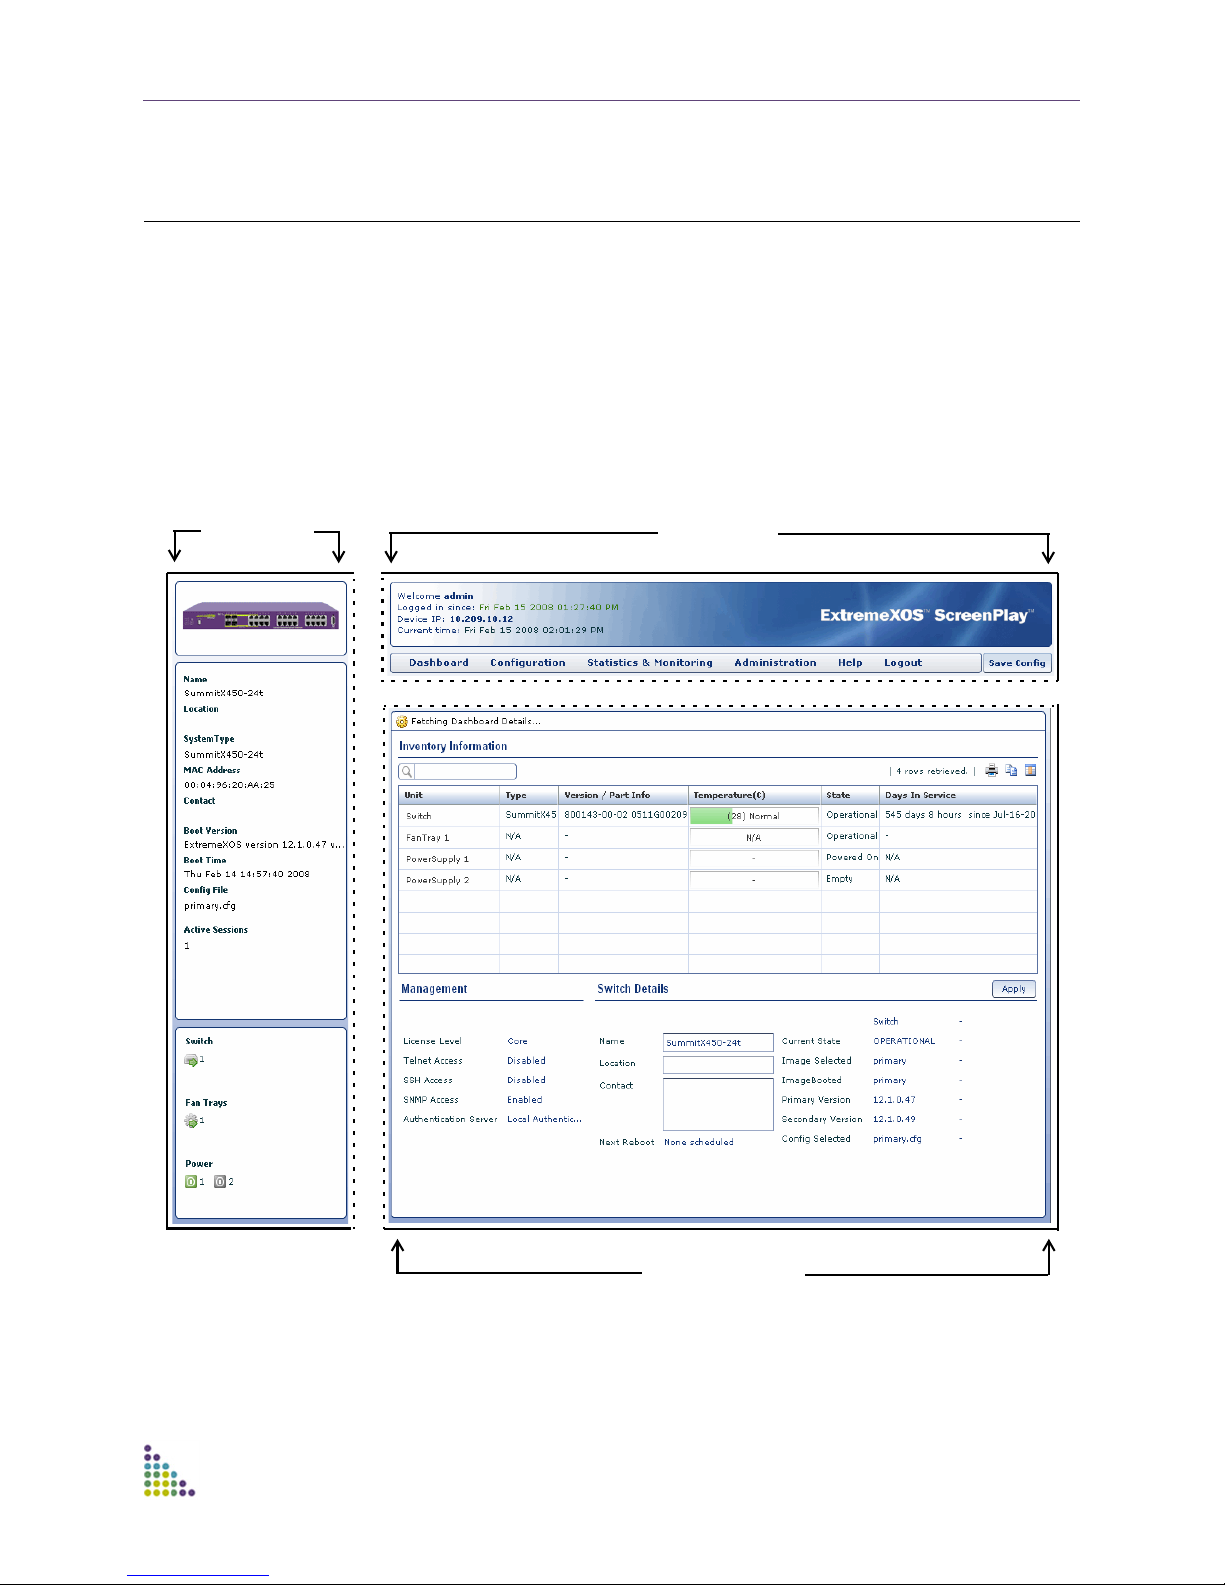
ScreenPlay Dashboard
1- Switch
3 - Workspace
2 - Header
Next, the ScreenPlay Dashboard appears. The dashboard is the home screen, or
opening screen, of ScreenPlay. This screen provides you with a one-glancesnapshot of switch status, inventory, and management details.
The main dashboard is divided into three information panes that are shown in
Figure 2 and described in Tab l e 1 .
Figure 2: Dashboard Details
ExtremeXOS ScreenPlay User Guide
ExtremeXOS ScreenPlay User Guide 8
ExtremeXOS ScreenPlay User Guide
Tab le 1: Da sh bo ar d D e t ai ls
Name Description and Function
1 Switch Summary Contains summary information about the switch, including:
• The switch name, location, system type, MAC address, and boot version.
• Hardware information, such as the number of slots, fan trays, and power modules
in the switch as well as the status of those elements. Click items in this pane to
see more detailed information about the items. For example, clicking a slot
provides you with such slot information as its state, serial number, and
temperature. Refer to Figure 3.
This pane remains consistent across all views.
2 Header Displays information about the current session including:
• The logged in user; the date and time when the user logged in; the switch IP
address; and the current date and time.
• A standard menu bar. Refer to
This pane remains consistent across all views.
3 Workspace Displays the information and work area for the different ScreenPlay features. All
features are accessed via the menu bar with any subordinate functions, usually
available through tabs. Each work area is described in sections to follow.
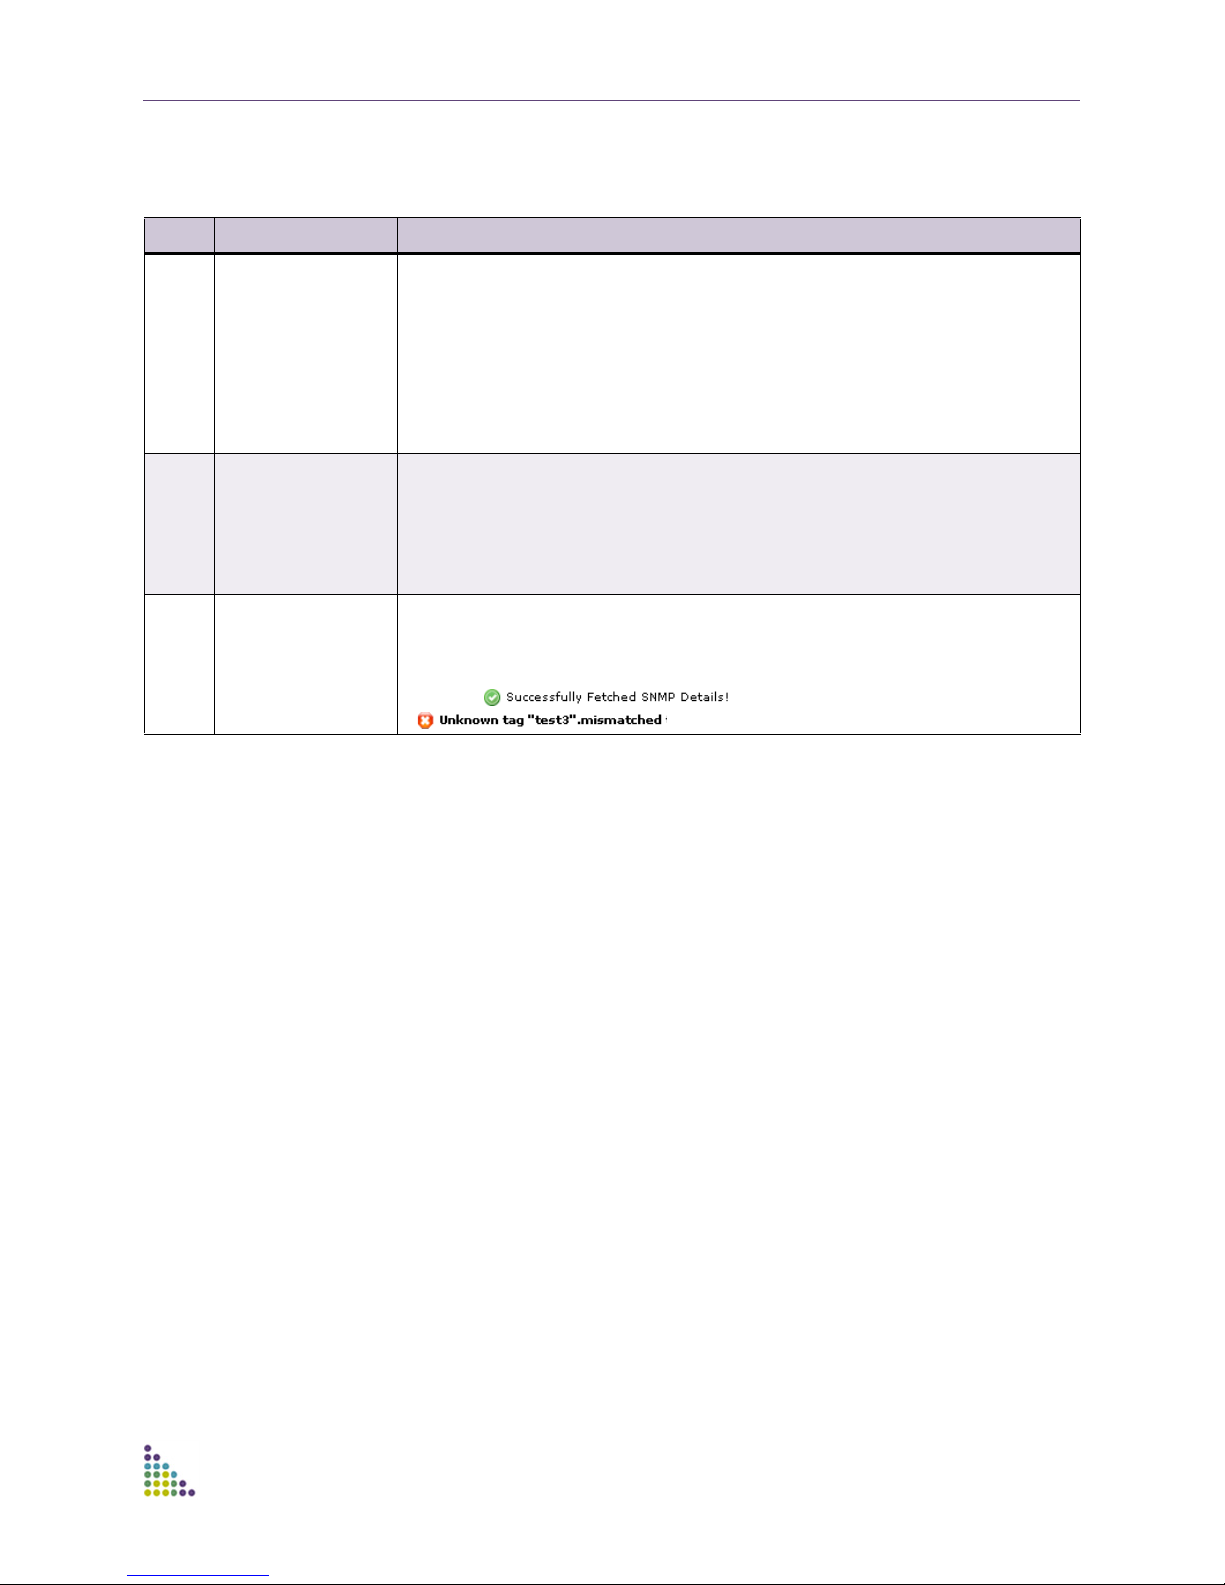
At the top of the pane is a status bar that displays the current activity or condition,
such as, or an error message, such as
Ta b le 2 for additional details.
.
From the device dashboard, you can navigate to any other portion of the
interface. The functions available in ScreenPlay are divided into three major
categories:
■ Configuration, which covers configuration of ports, VLANs, stacking, SNMP and
dynamic ACLs.
■ Statistics and Monitoring, which provides you with the capability to generate
event logs, monitor and generate statistics on ports, and perform QoS
monitoring.
■ Administration, which allows you to perform administrative tasks on user
accounts and user sessions and to issue CLI commands.
ScreenPlay Common Functions
This section describes those ScreenPlay functions that are displayed in all of the
main workspaces (Dashboard, Configuration, Statistics & Monitoring and
Administration). These include the following topics:
■ Menu Bar on page 10
■ Dashboard Switch Summary Icons on page 11
■ Configuring the Refresh and Timeout and CLI Settings on page 12
■ Customizing and Capturing the Tables on page 12
ExtremeXOS ScreenPlay User Guide 9

ExtremeXOS ScreenPlay User Guide
Menu Bar
Ta b le 2 lists and describes the menu and submenu elements.
Table 2: Menu Bar
Menu Item Description
Dashboard The opening screen that provides a one-glance snapshot of switch
details, inventory, and management details. Refer to
Dashboard” on page 8
Configuration
Ports Lists and describes the ports. A Port Details panel provides the
VLANS Lists and describes the VLANs. A VLAN Details panel provides the
Stacking Displays the stacking topology diagram and stacking configuration
SNMP Lists SNMP settings, statistics, users and trap receivers. Refer to
capability to make certain modifications to the port configuration.
Refer to “Configuration—Ports” on page 14.
capability to make certain modifications to the VLAN configuration.
Refer to “Configuration—VLANs” on page 19.
details. This submenu is enabled only on switches that support
stacking. Refer to
“Configuration—Stacking” on page 22.
.
“Configuration—SNMP” on page 24.
Dynamic ACLs Lists the dynamic ACLs on the switch. Provides the capability to
create, edit and apply an ACL to an interface. Refer to
“Configuration—Dynamic ACLs” on page 26.
Statistics and Monitoring
Event Log Provides an event log of the activity on the switch, showing date, time,
and type of event. Refer to
Log” on page 29
Ports Provides port statistics and utilization details in tables and charts. Refer
to
“Statistics & Monitoring—Ports” on page 30.
QoS Displays QoS (Quality of Service) profile information for each port.
Refer to
Administration
User Accounts Lists user account information and provides the capability to create
and modify the settings locally and with RADIUS and TACACS. Refer
to
User Sessions Lists information on the current session and provides a history of
recent session activity. Refer to
“Statistics & Monitoring—QoS” on page 34.
“Administration—User Accounts” on page 35.
Sessions” on page 39
CLI Shell Provides the capability to issue CLI commands from within the
application. Refer to
Help
Services & Technical Support Opens the Services and Support page on Extreme Networks’ web site.
“Statistics & Monitoring—Event
.
“Administration—User
.
“Administration—CLI Shell” on page 40.
http://www.extremenetworks.com/services/serviceshub.aspx
“ScreenPlay
ExtremeXOS ScreenPlay User Guide 10
ExtremeXOS ScreenPlay User Guide
Table 2: Menu Bar (Continued)
Menu Item Description
EXOS Command Reference Guide Links to a PDF copy of the current ExtremeXOS Command Reference
EXOS Concepts Guide Links to a PDF copy of the current ExtremeXOS Concepts Guide.
About Displays client environment information.
Logout Exits ScreenPlay.
Save Config A command button used to save configuration changes. When
Guide.
changes have been made, the button turns orange indicating that a
saving action is required to permanently change the configuration.
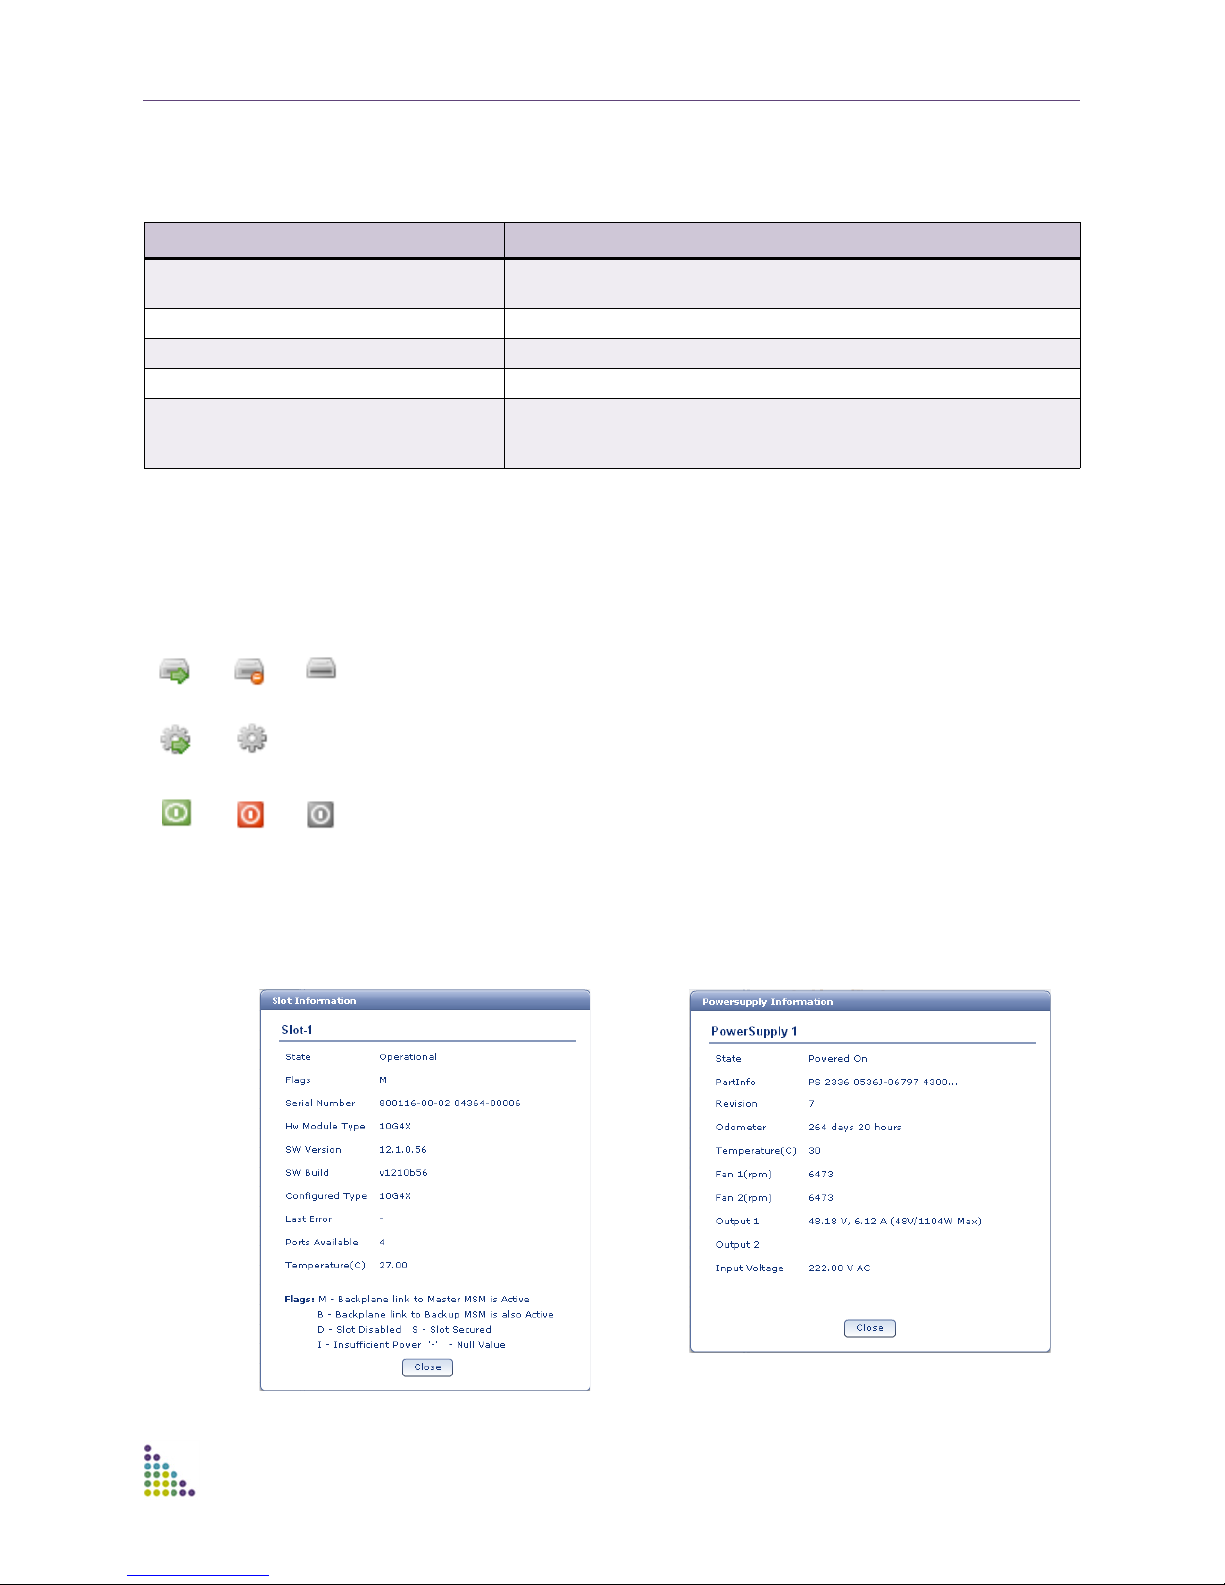
Dashboard Switch Summary Icons
The following lists and describes the icons used on the Dashboard Switch
Summary pane.
Icon Description
Slot - Operational, Failed, and Empty.
Fan Tray - Operational and Empty.
Power Supply - Powered on, Failed, and Empty.
Point to an icon to show the unit type and state. Click the icon to show additional
inventory information. Figure 3 shows two examples of the content.
Figure 3: Unit Information Screen
s
ExtremeXOS ScreenPlay User Guide 11
ExtremeXOS ScreenPlay User Guide
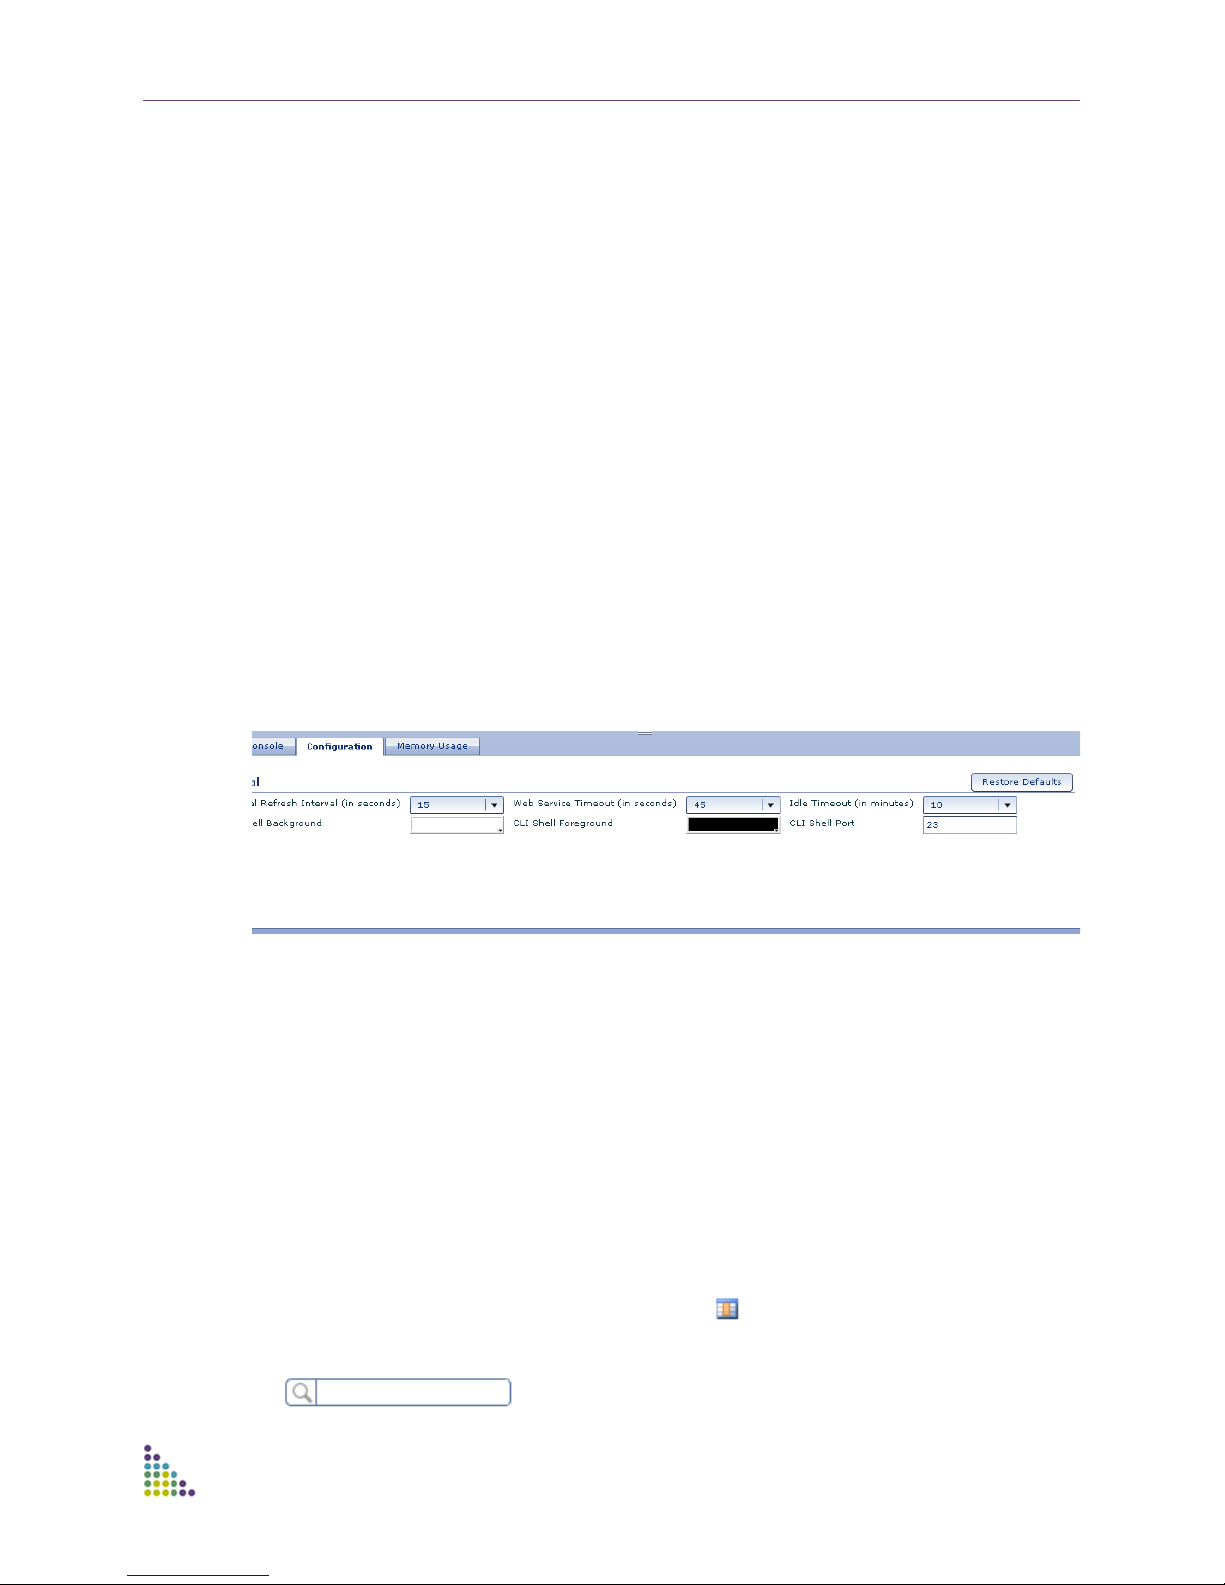
Configuring the Refresh and Timeout and CLI Settings
Following are the defaults for the following refresh, timeout and CLI settings:
■ General Refresh Interval - Default is 15 seconds.
■ Web Service Timeout - Default is 45 seconds.
■ Idle Timeout - Default is 10 minutes. (A warning is given one minute before.)
■ CLI Shell Background - Choose a color from the color pallet. Default is white.
■ CLI Shell Foreground - Choose a color from the color pallet. Default is black.
■ CLI Shell Port - Specify a port.
To reset these settings, use the following procedure:
1 Right-click almost any part of the ScreenPlay window to display one of two
menus that have a “Show Console” choice.
2 From the menu choose Show Console. A console pane is displayed at the
bottom of the Dashboard, Configuration, Statistics & Monitoring, or
Administration windows.
3 Click the Configuration tab as shown in Figure 4.
Figure 4: Console - Configuration Tab
4 From the appropriate dropdown menu, choose another setting for any or all of
the first five selections or enter a port number in the CLI Shell Port text box.
To restore the original default settings, click the Restore Defaults command
button.
Customizing and Capturing the Tables
ScreenPlay allows you to customize the format of a table and then print it or copy
it to another application such as MS Excel.
■ Resize the column width using standard column resizing bars between the
heading cells.
■ Sort rows by clicking in a table heading cell to display an up or down arrow tip.
■ Remove columns by clicking the hide icon and in the displayed Select
Columns box, uncheck the unwanted column name(s).
■ Select specific row entries by typing the relevant text into the search field
ExtremeXOS ScreenPlay User Guide 12
. Entries that do not include the text are hidden.
ExtremeXOS ScreenPlay User Guide
■ Print an original or modified table by clicking the print icon located just
above the table. A standard print box opens. This icon prints the specific table
only and prints it as it appears on the screen; if any cell contents are hidden on
the screen, they are hidden on the printed copy. To print the entire screen, use
the browser print command.
■ Copy the table to another application by clicking the copy icon , opening
the target application and pasting in the table.
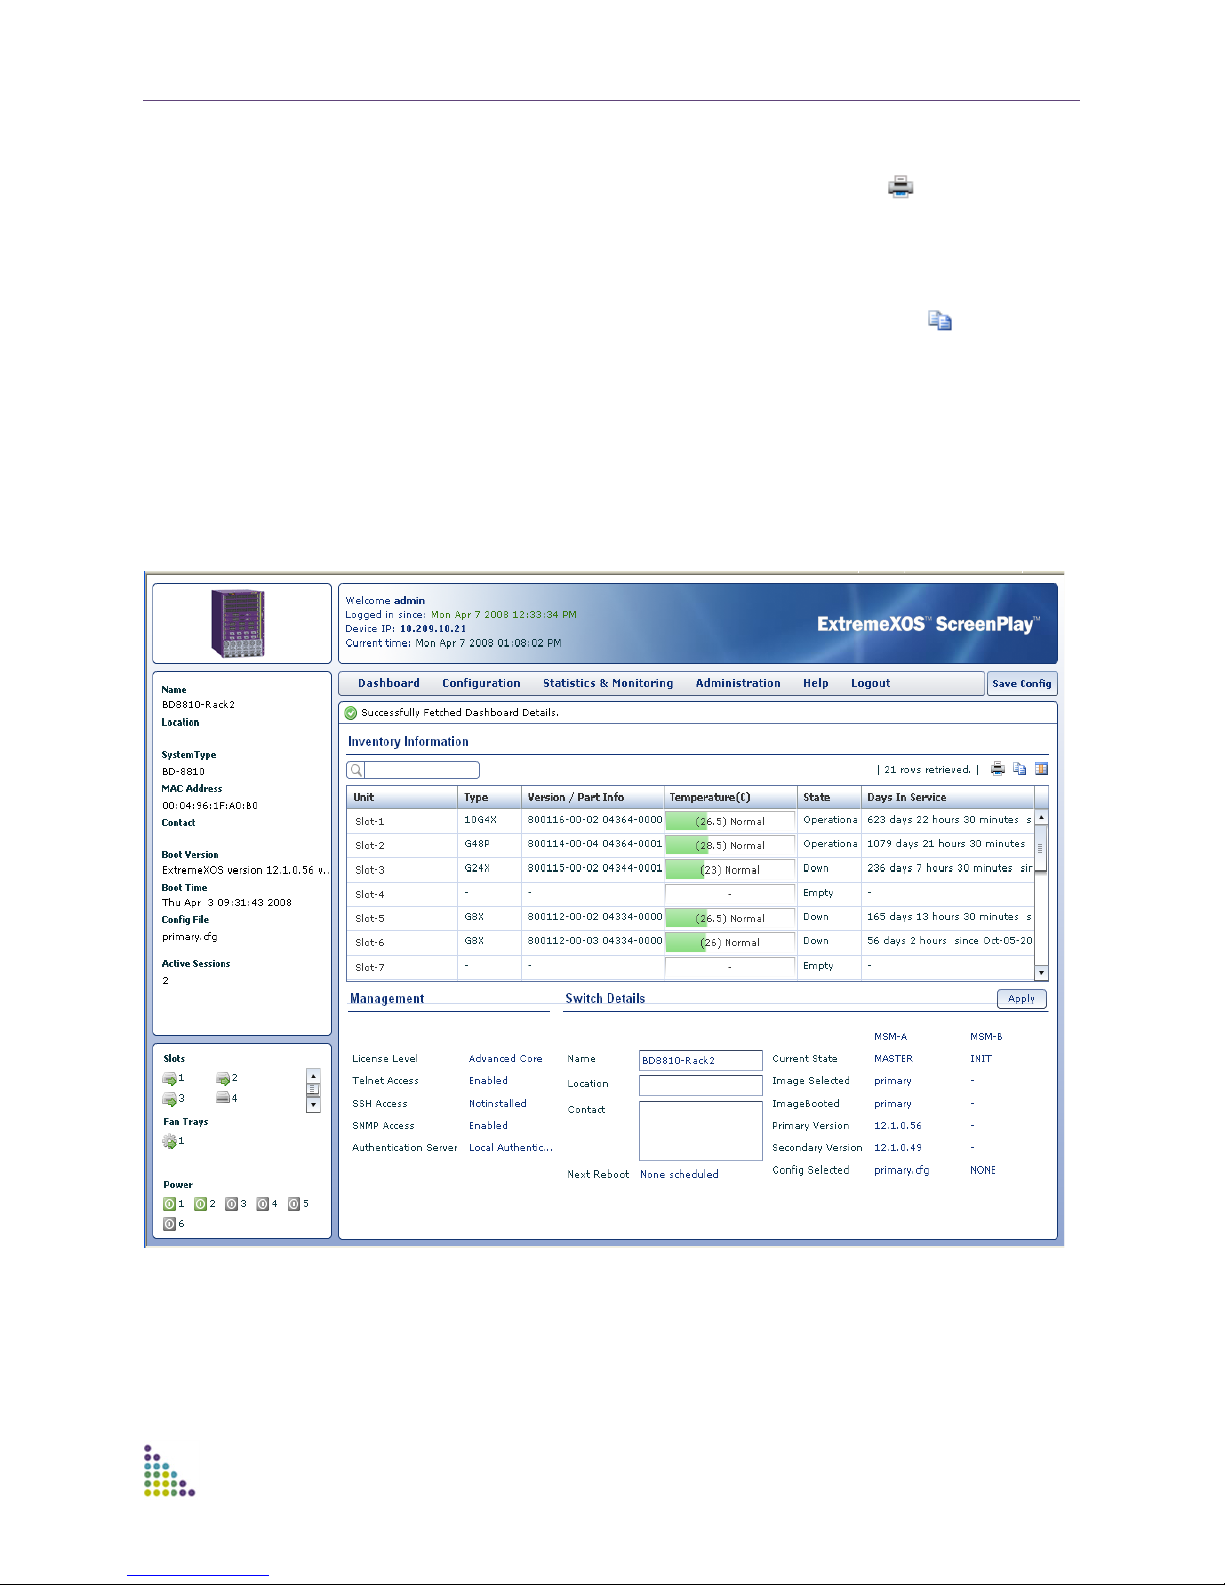
Dashboard Workspace
The Dashboard workspace contains three segments: Inventory Information;
Management; and Switch Details. These are displayed in Figure 5 and are
described in the table that follows it.
Figure 5: Dashboard
ExtremeXOS ScreenPlay User Guide 13
 Loading...