

Page 1
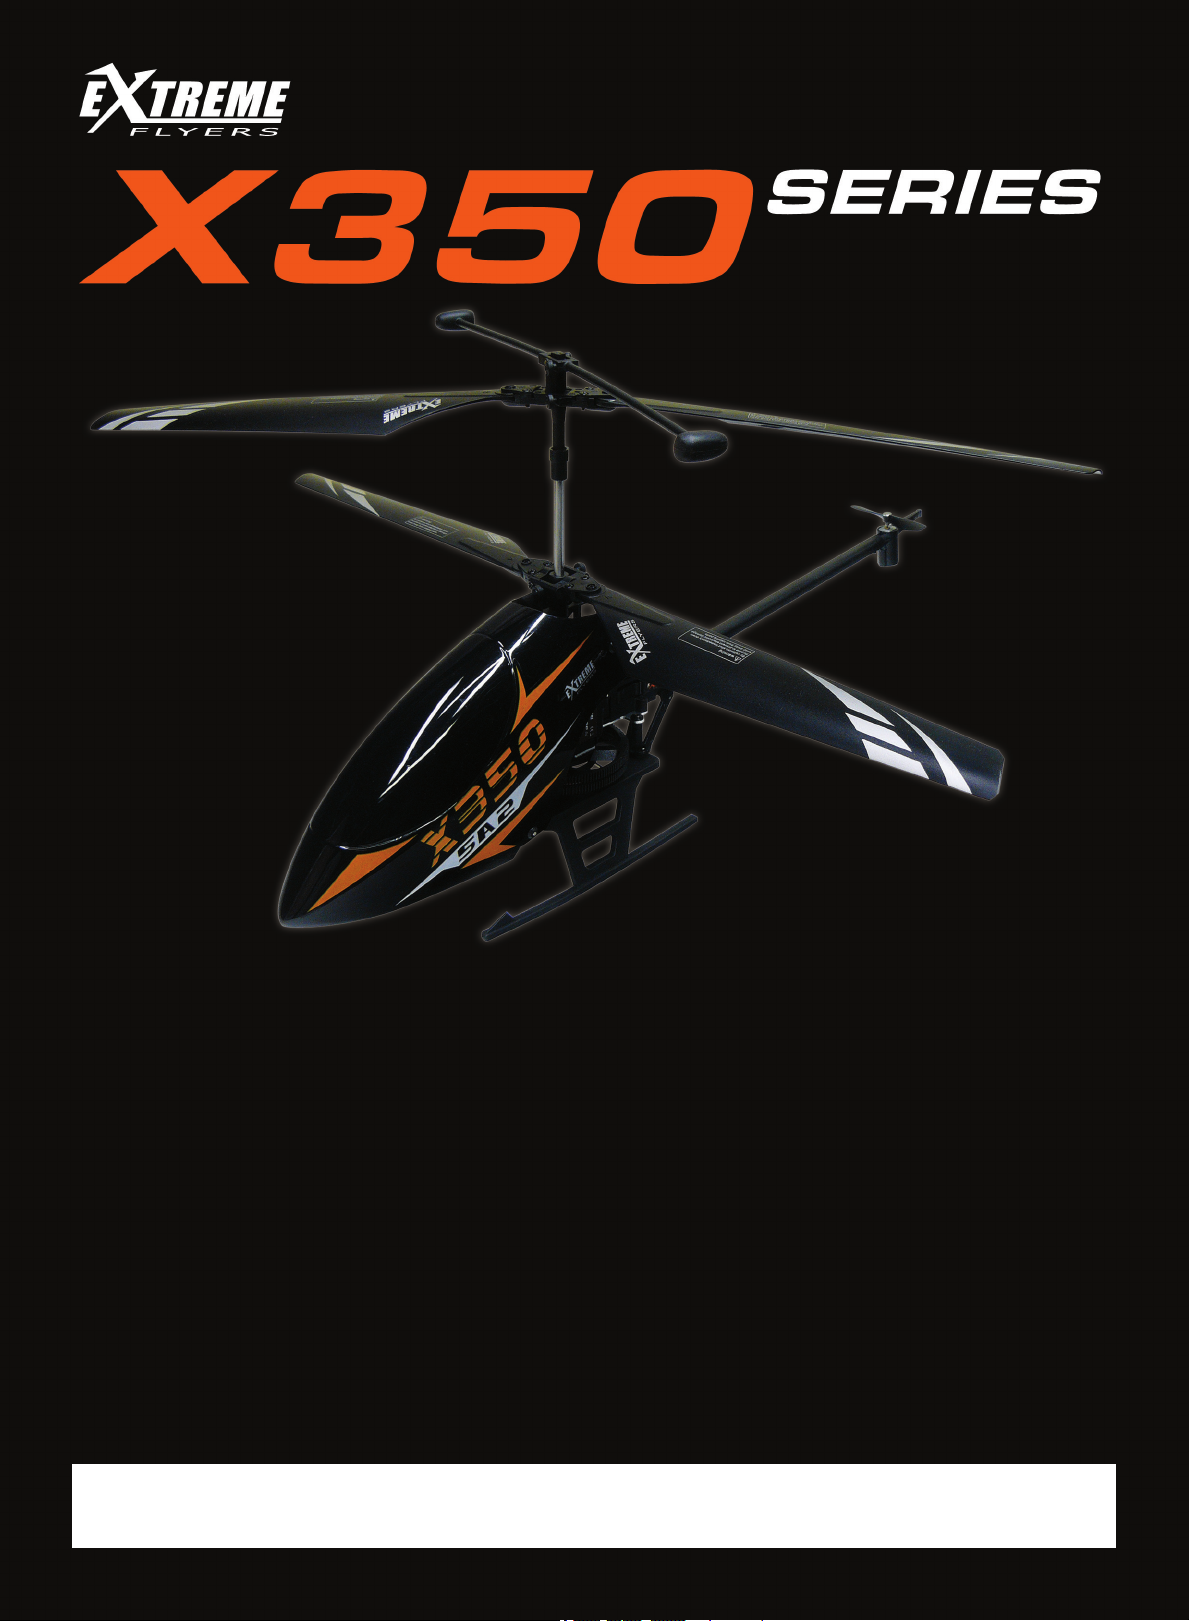
X350 SERIES QUICK-START AND FLYING GUIDE
5-Channel 2.4GHz High-Performance Coaxial Helicopter
QUICK-START
and FLYING GUIDE
If you should have trouble with your X350 Series helicopter, or if you have any questions or require replacement
parts, please contact Customer Service at the address below:
Global Services
18480 Bandilier Circle
Fountain Valley, CA 92708
Phone: (714) 963-0329
Fax: (714) 964-6236
Email: [email protected]
Global Services provides customer service for X350 Series helicopters purchased in North America only. If you
did not purchase your product in North America, please contact the Extreme-Flyers distributor in your region.
This R/C helicopter is not a toy! If misused, it can cause serious bodily harm and/or injury. This product is
not intended for those under 14 years of age! Please read and understand the safety warnings included prior
to operation.
1
Page 2

X350 SERIES QUICK-START AND FLYING GUIDE
The Extreme-Flyers X350 Series is a high-performance 5-channel 2.4GHz coaxial helicopter than can be flown
in a large indoor area or outdoors in winds of up to 8mph, using Extreme-Flyer’s patented Anti-Wind Tail
Control System. The X350 Series helicopter is the perfect choice for both beginner and experienced pilots. Its
larger size and inherently stable design make it ideal for new pilots to learn on, and when flown outdoors using
the Anti-Wind Tail Control System, the helicopter is capable of fast, high-performance flight - perfect for more
experienced pilots.
Read through this Quick-Start Guide to familiarize yourself with your X350 Series helicopter and get flying quickly.
For more in-depth information, please refer to the separate Instruction Manual included.
KIT CONTENTS
Before beginning, make sure that your kit contains the parts listed below:
l
Assembled X350 Series Helicopter
l
5-Channel 2.4GHz Transmitter
l
3S 11.1 Volt 850mAh Li-Po Battery*
l
Li-Po Battery Charger
l
AC Adapter
l
Phillips Head Screwdriver
l
Instruction Manual
*May be packaged separately or already installed in helicopter.
REQUIRED ITEMS
l
4 'AA' Alkaline Batteries for Transmitter
GENERAL SAFETY PRECAUTIONS
l
Just because the X350 Series helicopter is powered by electric motors doesn’t mean that you shouldn’t exercise
caution when flying and operating it. This helicopter flies powerfully at high speed and can be dangerous if you
do not fly in a safe manner or do not pay close attention while flying. You alone are responsible for the actions
of the helicopter during flight.
l
We strongly suggest that when you first begin flying the helicopter that you perform only basic maneuvers,
such as hovering, until you are more familiar with flight characteristics of the helicopter. This will give you time
to feel comfortable with the way the helicopter reacts to control inputs and power.
l
Your helicopter has a safety feature that will prevent the rotor blades from spinning without first cycling the
throttle control stick from low to high and back to low again. This prevents the possibility of the rotor blades
spinning and harming you while plugging the Li-Po battery into the helicopter.
l
ALWAYS unplug the Li-Po battery from the helicopter after use. When unplugging the Li-Po battery from the
helicopter, ensure that you don’t bump the throttle control stick above idle or the rotor blades could spin up.
l
ALWAYS turn the transmitter 'ON' before plugging in the Li-Po battery into the helicopter and always unplug
the Li-Po battery from the helicopter before turning the transmitter 'OFF'.
l
NEVER fly your helicopter from the street or at night. Always fly in an open area free of obstructions. When
flying, make sure any spectators are behind you.
l
ALWAYS be conscious of the spinning rotor blades. Be careful not to allow loose clothing to be drawn into the
rotor blades.
l
Because your helicopter is operated by radio control, it is important to make sure you are always using fresh
and/or fully charged batteries. Never allow the batteries to run low or you could lose control of the helicopter.
l
Do NOT allow any of the electrical components to get wet or electrical damage may occur. NEVER attempt to
disassemble or modify any of the radio control system components.
l
Do NOT use any solvents to clean your helicopter. Solvents may damage the plastic and composite parts.
2
Page 3

X350 SERIES QUICK-START AND FLYING GUIDE
LI-PO BATTERY SAFETY PRECAUTIONS
Your X350 Series helicopter is powered by a Li-Po (Lithium Polymer) battery. Li-Po batteries are significantly
more volatile than Alkaline or Ni-Cd/Ni-MH batteries used in past R/C applications. When using Li-Po batteries
to power your model, all instructions and warnings must be followed closely. Mishandling of Li-Po batteries
can result in fire. Prior to use, please read and understand the Li-Po battery warnings below:
l
Do NOT attempt to charge Li-Po batteries with any charger other than one designed to charge Li-Po batteries.
The Li-Po battery charger you use should include a balancing feature.
l
We recommend using only the charger included with your X350 Series helicopter. It is designed specifically to
safely charge the stock Li-Po battery included with your helicopter.
l
Do NOT use Li-Po batteries if they are hot to the touch.
l
Do NOT leave Li-Po batteries in direct sunlight or in a hot car or storage area, or allow Li-Po batteries to be
exposed to moisture.
l
Do NOT leave Li-Po batteries plugged into your model when not in use. Li-Po batteries should be stored in a
fire-proof container.
l
INSPECT Li-Po batteries before each use for swelling or other malformation. If damaged, they should not be used.
l
Do NOT poke, bend or otherwise damage Li-Po batteries. DO NOT short-circuit.
l
Do NOT allow Li-Po batteries to ever exceed 71ºC (160ºF) for any reason.
l
Li-Po batteries will discharge when left unused for a long period of time. If the voltage of one of the cells drops
below 3.0 volts, damage to the Li-Po battery will occur. To prevent damage to your Li-Po battery, we recommend
that you charge the Li-Po battery prior to safely storing it.
CHARGING THE LI-PO BATTERY
Your X350 Series helicopter comes with a 3S 11.1 volt 850mAh Li-Po battery that can be charged from a 110v
AC power source, using the included charger and power adapter.
Charging Precautions
l
Do NOT use the included charger to charge any other type of battery.
l
Do NOT cover the vents on the bottom of the charger or set the charger on anything (such as carpet) that
covers the vents.
If the charger's vents are covered, the charger could overheat, damaging the charger and/or resulting in fire.
l
Do NOT attempt to charge the Li-Po battery through the battery connector. The Li-Po battery should always be
charged through the Balance connector (white connector).
l
ALWAYS charge Li-Po battery on a fire-resistant surface or in a fire-resistant charging bag.
Fire-resistant charging bags are available separately. See your local hobby retailer for more information.
l
NEVER charge the Li-Po battery near any flammable material.
l
ALWAYS allow the Li-Po battery to cool down after use prior to recharging it.
l
NEVER leave the Li-Po battery unattended during the charging process.
l
After the charging process completes, unplug the Li-Po battery from the charger, then disconnect the charger
from its power source.
l
If the Li-Po battery becomes hot to the touch during the charging process, unplug it from the charger immediately.
3
Page 4
X350 SERIES QUICK-START AND FLYING GUIDE
CHARGING THE LI-PO BATTERY
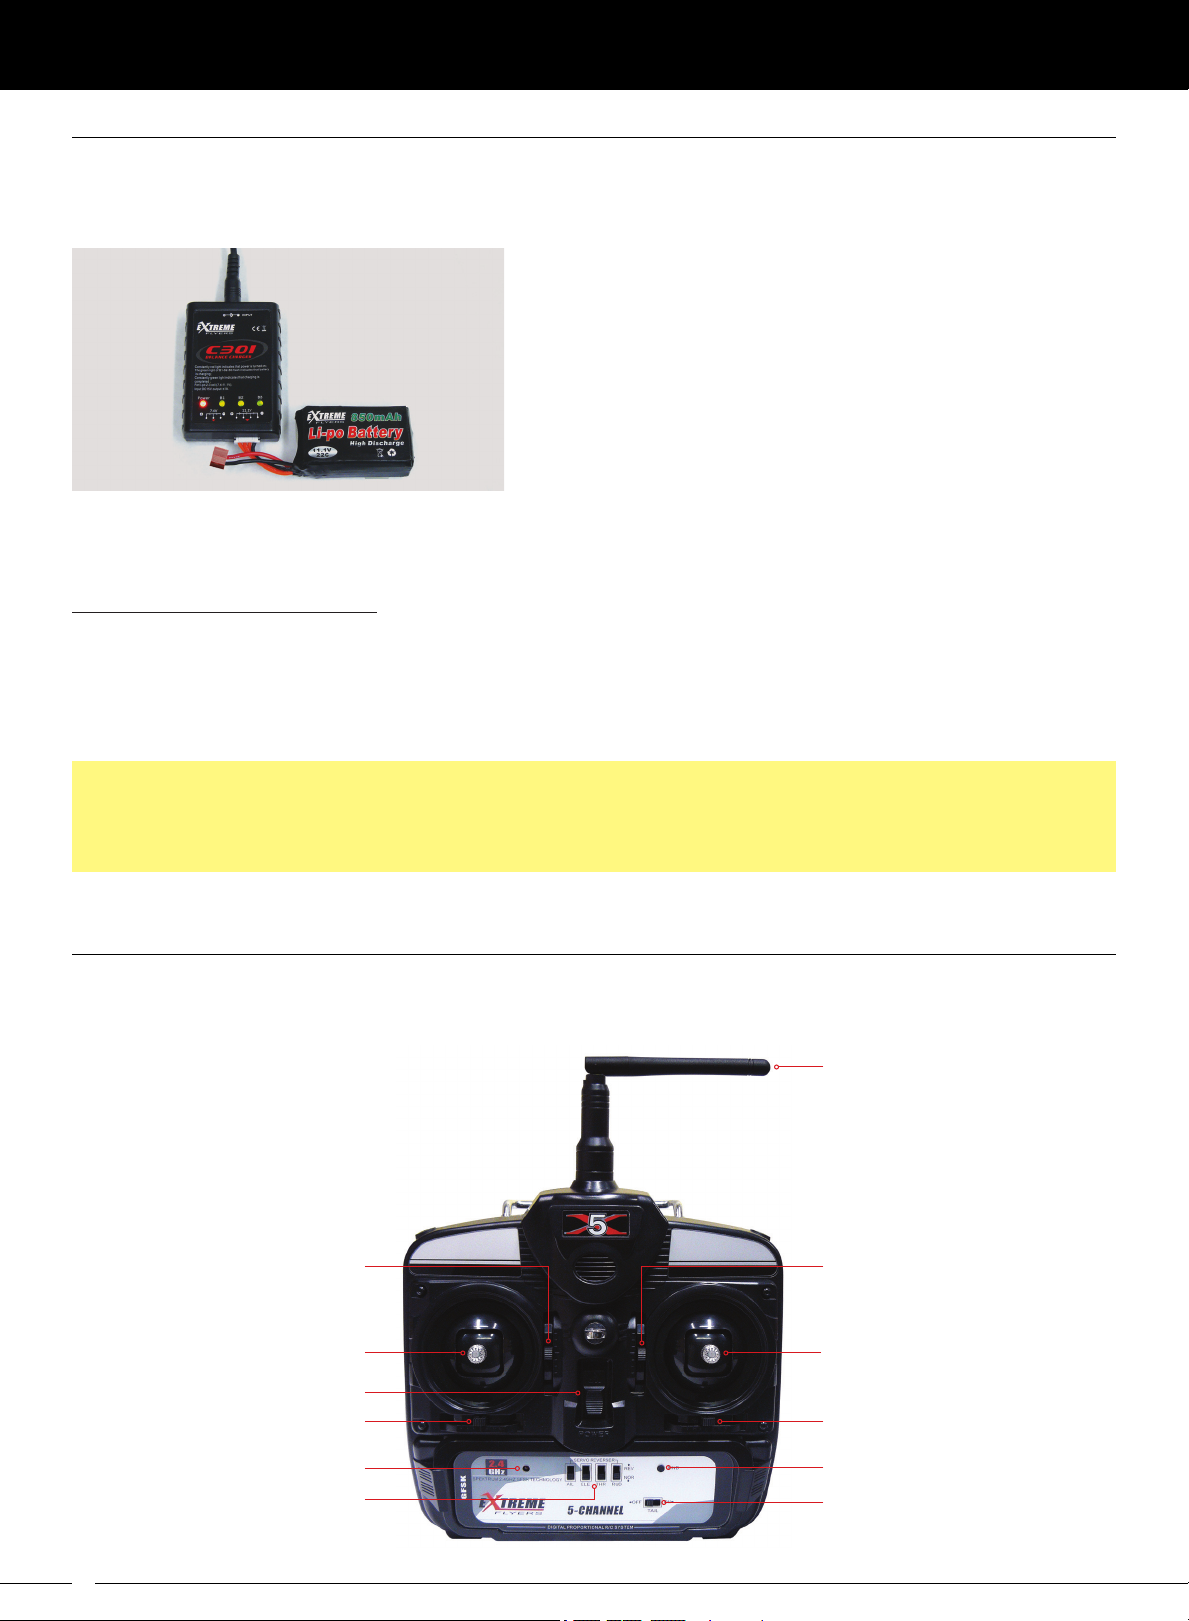
1) Plug the round connector from the AC adapter cord into the Li-Po charger, then plug the AC adapter into
a 110v AC wall socket or power strip. The red Power LED on the charger should illuminate, indicating the
charger is receiving power.
2) Plug the balance connector from the Li-Po battery into the
11.1v charge socket. After a moment, the three green LEDs
will begin to quickly flash, indicating the Li-Po battery is
charging.
3) When the Li-Po battery is fully charged, the three green LEDs will illuminate solid. At this time, unplug the
Li-Po battery from the charger, then disconnect the charger from its power source.
Charger LED Status Indicators
l
Power LED illuminated - Charger is connected to power source and is receiving power.
l
Green LEDs flashing - Li-Po battery is charging.
l
Three green LEDs illuminated solid - Li-Po battery is fully charged.
It will take approximately 40 to 50 minutes to fully charge the Li-Po battery. Near the end of the charging cycle
it’s normal for one or two of the green LEDs to continue to flash while one remains solid. Please wait until all
three green LEDs remain solid prior to removing the Li-Po battery from the charger. This ensures that the three
cells are balanced.
TRANSMITTER OVERVIEW
Your X350 Series helicopter comes with a 5-channel 2.4GHz transmitter. The 2.4GHz connection is determined
by the transmitter and receiver pair. Unlike ordinary crystal-based systems, your model can be used without
frequency control.
Antenna*
Your transmitter features a low voltage alarm that will sound
when the transmitter battery voltage drops below 4 volts. If this
occurs, you should land as soon as is safely possible and
replace the batteries.
*Antenna shown in the collapsed position. Antenna
should be pivoted vertical during flight.
Throttle Trim Tab
Throttle/Rudder
Control Stick
Power Switch
Rudder Trim Tab
Bind LED
Servo Reversing Switches
4
Elevator Trim Tab
Aileron/Elevator
Control Stick
Aileron Trim Tab
Bind Button
Tail Control Switch
Page 5

X350 SERIES QUICK-START AND FLYING GUIDE
TRANSMITTER OVERVIEW
Antenna - Transmits the signal from the transmitter to the receiver in the helicopter. The antenna should be pivoted
into the vertical position during use. When not in use, the antenna should be collapsed into the horizontal position
to prevent damage during handling or storage.
Aileron/Elevator Control Stick - Controls the aileron and elevator axes. Moving the aileron control stick right and
left causes the helicopter to move right and left. Moving the elevator control stick forward and backward causes
the helicopter to move forward and backward.
Elevator Trim Tab - Used to make fine adjustments to the elevator control axis during flight, which makes the
helicopter more stable and easier to fly.
Aileron Trim Tab - Used to make fine adjustments to the aileron control axis during flight, which makes the
helicopter more stable and easier to fly.
Bind Button - Used to bind the transmitter and receiver. The transmitter and receiver binding procedure has
already been performed at the factory, so your transmitter and helicopter are ready to go out of the box.
Tail Control Switch - Used to turn the patented Anti-Wind Tail Control System 'ON' and 'OFF'. The Anti-Wind
Tail Control System is used when flying outdoors at high speeds or outdoors in light winds. When the elevator
control stick is pushed forward, the tail rotor spins up to meet the needs of high-speed flight and improved
performance in light winds.
While learning to fly, even if you're flying outdoors with no wind, or when flying indoors, the Anti-Wind Tail
Control System should be turned 'OFF'.
Throttle Trim Tab - Used to make fine adjustments to the throttle control. It should adjusted so that the rotor
blades don't spin up with the throttle control stick pulled all the way back.
Throttle/Rudder Control Stick - Controls the throttle and rudder axis. Moving the throttle control stick up and
down increases and decreases the speed of the rotor blades, making the helicopter climb and descend. Moving
the rudder control stick right and left causes the nose of the helicopter to pivot right and left.
Power Switch - Turns the transmitter 'ON' and 'OFF'. When turned 'ON', the transmitter will emit two audible
tones and the Bind LED will illuminate.
Rudder Trim Tab - Used to make fine adjustments to the rudder control axis during flight, which makes the
helicopter more stable and easier to fly.
Bind LED - Displays the current status of the transmitter and receiver pair. When illuminated, indicates that the
transmitter and receiver are paired.
Servo Reversing Switches - Used to electronically switch the direction of servo travel. Servo Reversing is featured
on the Aileron (AIL - CH1), Elevator (ELE - CH2), Throttle (THR - CH3) and Rudder (RUD - CH4) channels.
INSTALLING THE TRANSMITTER BATTERIES
1) Verify that the transmitter is turned 'OFF'. The Power switch should be pushed down.
2) Remove the battery cover from the back of the transmitter
and install 4 fresh 'AA' Alkaline batteries into the battery tray,
double-checking to make sure that the polarity (+/-) is
correct. The direction that each battery should be installed
is molded into the battery tray ('+' Positive and '-' Negative).
3) Slide the battery cover back onto the transmitter and push
it firmly until it 'clicks' closed.
5
Page 6
X350 SERIES QUICK-START AND FLYING GUIDE
PREPARING TO FLY YOUR X350 SERIES HELICOPTER
Turning the Transmitter 'ON' and Plugging in the Li-Po Battery
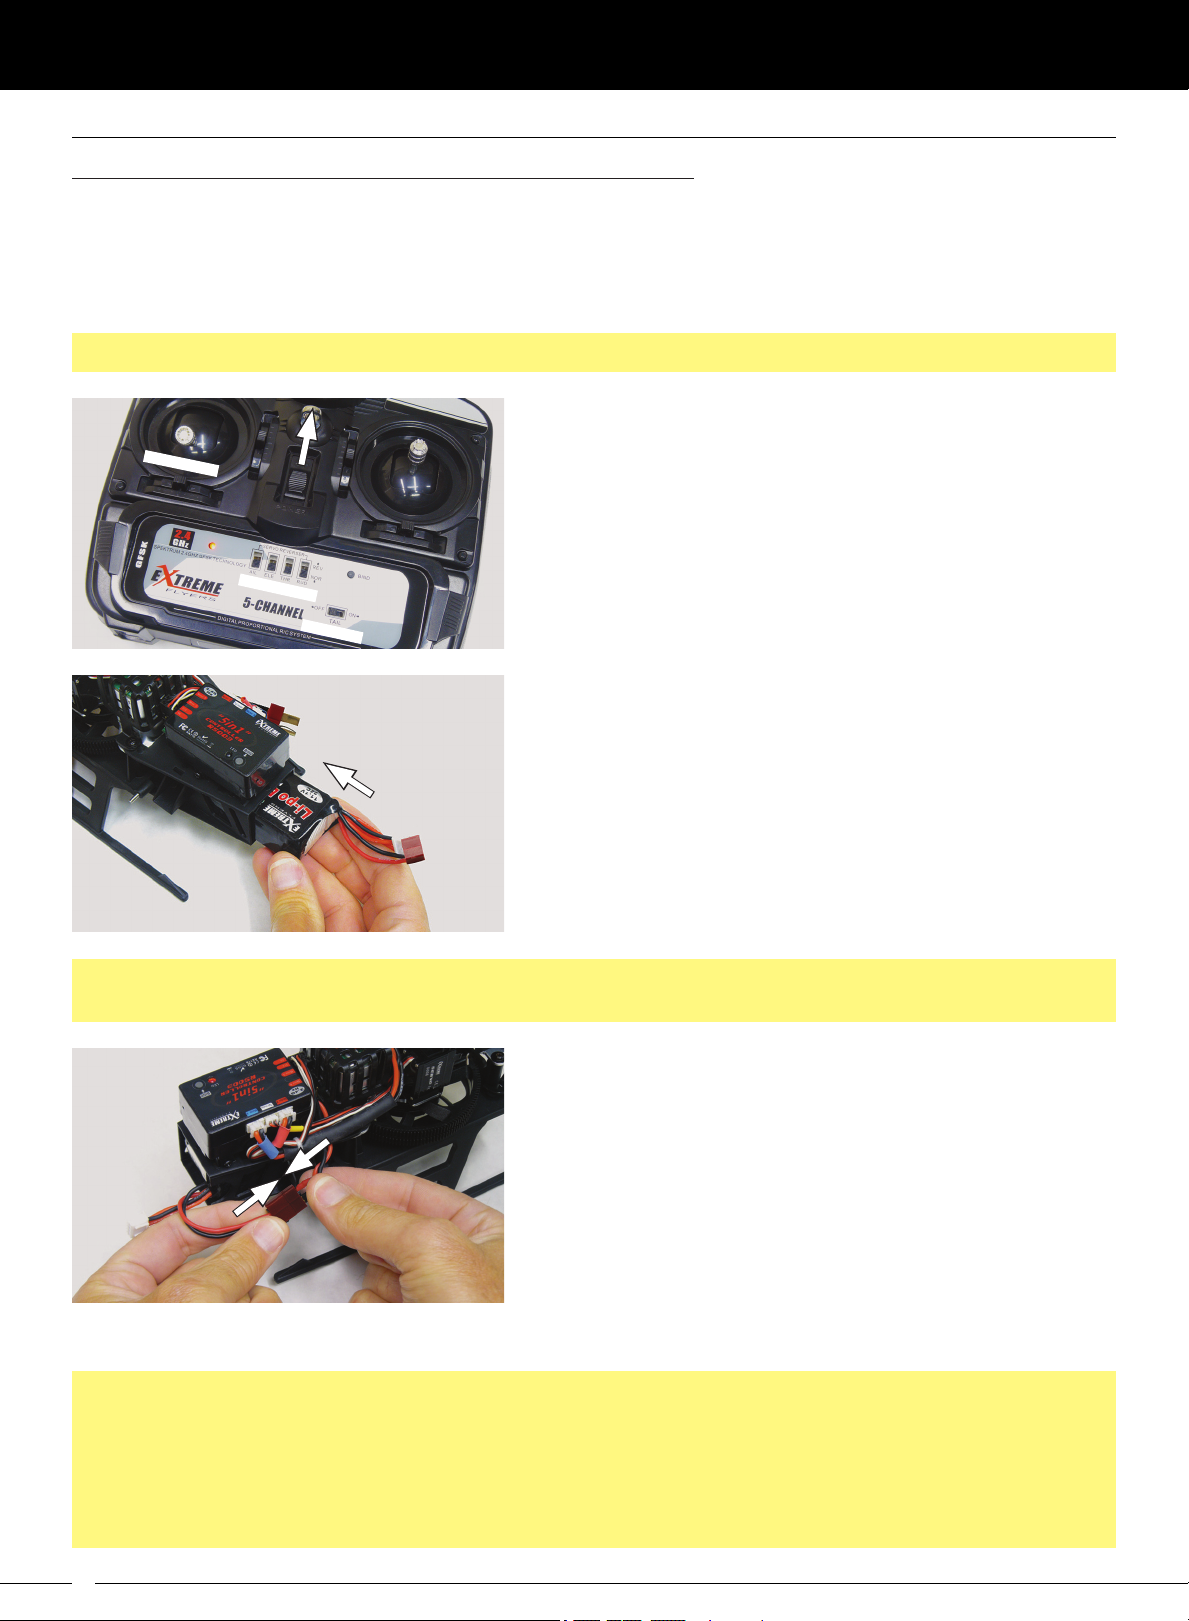
1) Prior to turning the transmitter 'ON', verify that the four Servo Reversing switches are in the 'NOR' (Normal)
position, the Tail Control Switch is in the 'OFF' position and the throttle control stick is pulled all the way down.
2) Carefully remove the canopy from the helicopter by gently pulling the four rubber grommets (two on each
side) off the mounting posts.
The canopy is molded out of thin plastic to save weight, so be careful when taking it on and off.
PULL DOWN
3) Push the Power switch up to turn the transmitter 'ON'. The
transmitter will emit two audible tones and the Bind LED will
illuminate solid.
SET ALL NOR
TURN OFF
4) Push the Li-Po battery firmly into the battery mounting tray
in the front of the helicopter. When pushed all the way into
the mounting tray, friction will hold the battery securely.
To ensure that the gyro calibrates correctly when the helicopter powers up, the helicopter should be sitting on
a flat surface when you plug the Li-Po battery into the helicopter as described in step 5 below.
5) With the helicopter sitting on a flat surface, plug the black
connector on the Li-Po battery into the black connector on
the helicopter. You should hear the servos initialize and the
Bind LED on the 5-in-1 controller will illuminate solid.
6) Reinstall the canopy, making sure to carefully push each of the four rubber grommets onto the mounting posts.
When you plug the Li-Po battery into the helicopter, the helicopter’s airborne components will be powered up
(there is no separate On/Off switch). As a safety precaution, the motors cannot be powered up until they are
electronically armed (described on the next page). This prevents the possibility of the rotor blades spinning
and harming you while plugging the Li-Po battery into the helicopter.
As a safety precaution, always turn the transmitter 'ON' before plugging in the Li-Po battery into the helicopter
and always unplug the Li-Po battery from the helicopter before turning the transmitter 'OFF'.
6
Page 7
X350 SERIES QUICK-START AND FLYING GUIDE
PREPARING TO FLY YOUR X350 SERIES HELICOPTER
Arming the ESC (Electronic Speed Control)
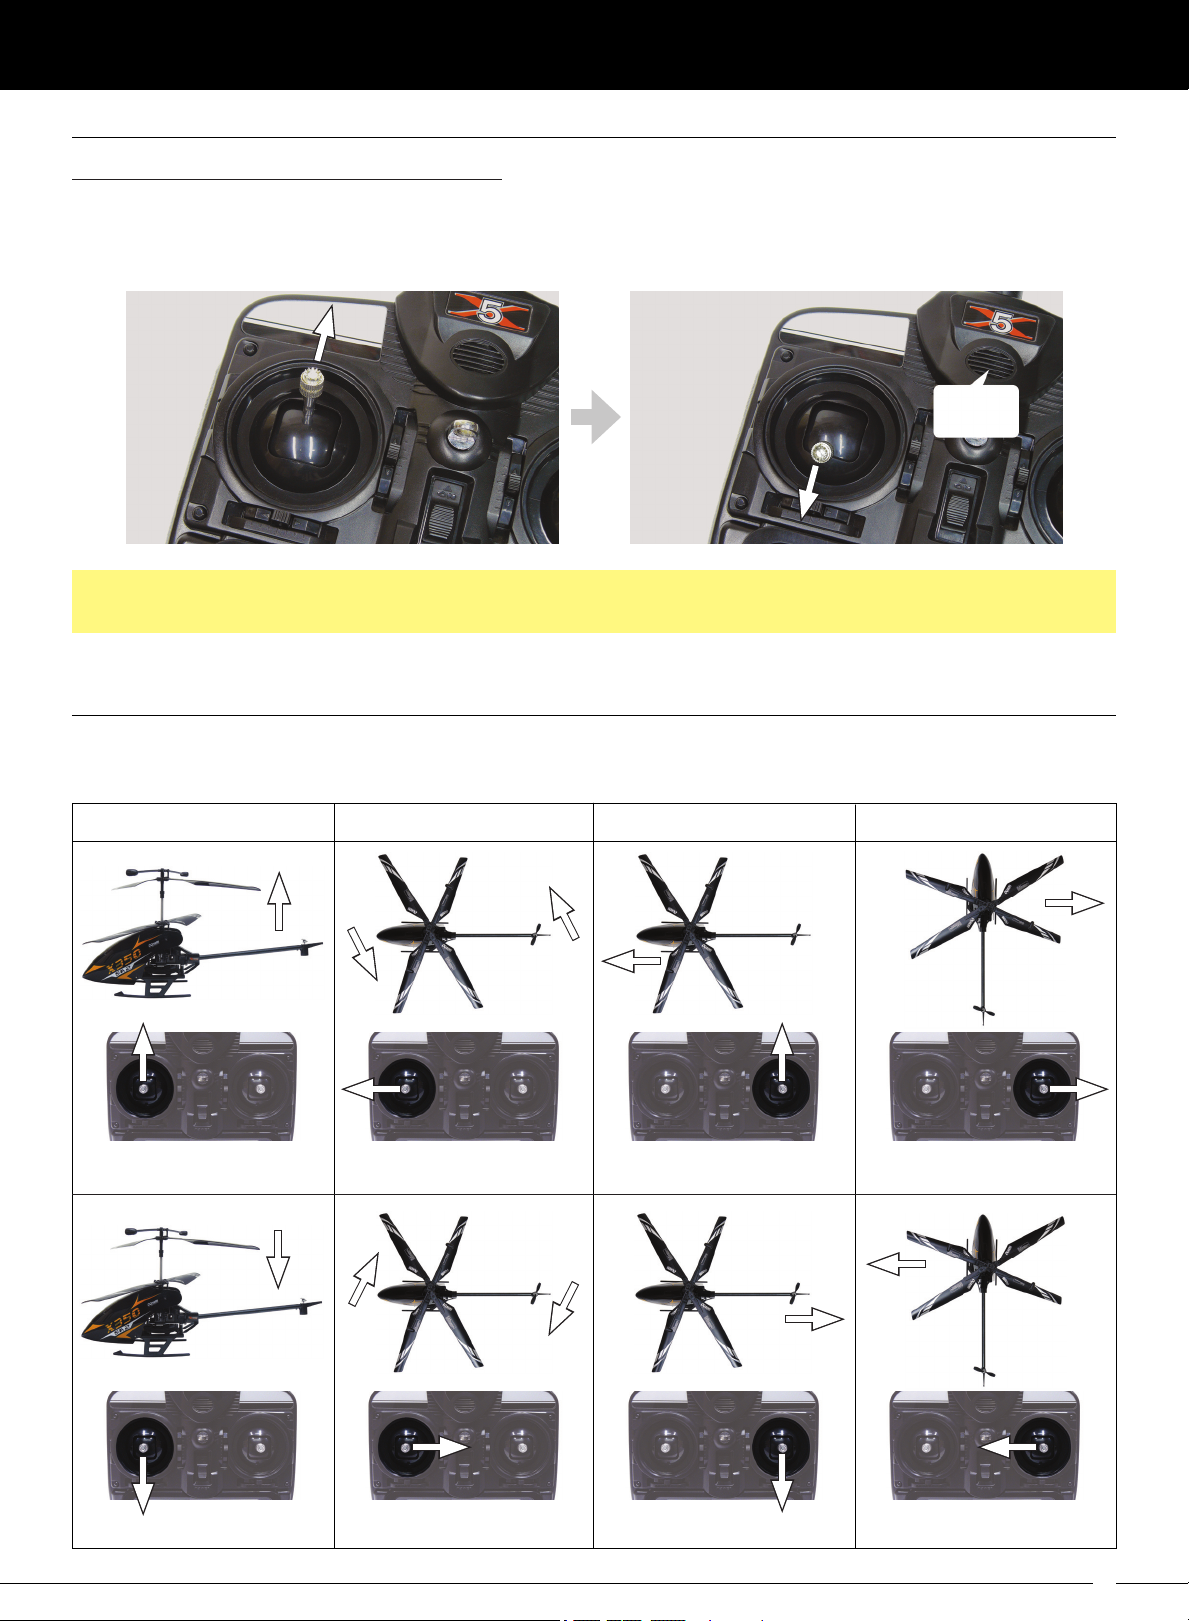
1) After plugging the Li-Po battery into the helicopter, push the throttle control stick all the way forward, then
pull the throttle control stick all the way back. The transmitter will emit 3 audible tones, indicating the ESC is
armed and your helicopter is ready to fly.
Beep
Beep
Beep
Once the ESC is armed, moving the throttle control stick forward will cause the rotor blades to spin up. Please
be cautious of this when carrying your helicopter or working around it.
CONTROL OPERATION
Use the diagrams below to become familiar with how to control your helicopter. Each diagram displays what the
helicopter will do when a control stick is moved either up or down, or right or left.
THROTTLE RUDDER ELEVATOR AILERON
Climb
Pivot Nose Left Move Forward Move Right
Descend
Pivot Nose Right Move Backward Move Left
7
Page 8

X350 SERIES QUICK-START AND FLYING GUIDE
FLYING YOUR X350 SERIES HELICOPTER
Quick Startup / Shutdown Procedure
In the future, follow these quick startup and shutdown procedures to setup and fly your helicopter.
1) Fully charge the Li-Po battery, move the throttle control stick to idle, then turn the transmitter 'ON'.
2) Remove the canopy, then install Li-Po battery and plug it into the helicopter.
3) Reinstall the canopy, arm the ESC (cycle throttle control stick up and down) and fly.
4) After flying, remove the canopy, unplug the Li-Po battery and remove it, then turn the transmitter 'OFF'.
The helicopter's flight time is approximately 10 minutes. When the helicopter noticeably begins to lose power,
you should land as soon as is safely possible. When the Li-Po battery voltage drops below 9 volts, it will no
longer power the helicopter and the Bind LED on the 5-in-1 controller will begin to flash.
Choosing an Area to Fly
When you're ready for your first flight, you want to select a relatively open area that is free of people and
obstructions. The area can be indoors if it's windy outside or it can be outdoors if there is no wind. While it is
possible for experienced pilots to fly the helicopter outdoors in light winds, if you're just learning to fly or if you're
not yet familiar with the flight characteristics of the helicopter, we suggest flying outdoors only if there is no wind.
Flying Tips
l
Your helicopter is flight tested at the factory for a stable hover, however, you will more than likely need to trim
your helicopter during its first few flights. Trimming will make your helicopter easier to fly, and make it easier to
learn to fly. For more information, see the
l
Don't over-control. It's not necessary to move the control sticks very much to achieve the required amount of
Flight Trimming Your X350 Series Helicopter
section on page 10.
control response from the helicopter, especially when you're just learning. Moving the control sticks too much
will make it more difficult to control the helicopter. It's better to make small corrections with the control sticks.
l
When starting, don't worry about being able to fly your helicopter with a lot of skill. It will take a little while to
master if you're just beginning. With practice you will become more confident and your fingers will begin to
react spontaneously to control the helicopter the way you intend. Until then, go slow, being careful not to fly
too high or too fast. The goal is always to stay in control.
l
While learning, don't fly too high. Use the throttle control stick to keep the helicopter a few feet off the ground.
If you feel like the helicopter is getting out of control, simply pull the throttle control stick back to cut the power
and land. You can fly higher once you've mastered basic flying at lower levels.
l
While learning, always try to keep yourself situated behind the helicopter, with the nose of the helicopter
pointing away from you. This will make control orientation easier.
l
Always remember that you should 'fly the nose' of the helicopter, not the tail. This means concentrating on the
position of the nose of the helicopter and not the position of the tail. Getting used to this concept will help with
orientation and the respective control inputs, especially right and left aileron and rudder control inputs when
the helicopter is pointing toward you (see next point below).
l
When the helicopter's nose is pointing toward you, the aileron and rudder controls will seem 'reversed'. This
takes some time to get used to until it becomes second nature. Imagining yourself sitting in the cockpit will
help you get used to this.
l
Try not to fly less than 1 foot or so off the ground for prolonged periods, because the airflow under the rotating
blades cause ground effect and affect normal flying and operations. It's easier to control the helicopter when
it's a few feet off the ground and out of the ground effect.
l
While learning to fly, even if you're flying outdoors with no wind, or flying indoors, do not use the Anti-Wind
Control System. It will make learning to fly the helicopter more difficult. Use the Anti-Wind Control System after
you're comfortable flying the helicopter and only outdoors in light winds.
8
Page 9
X350 SERIES QUICK-START AND FLYING GUIDE
FLYING YOUR X350 SERIES HELICOPTER
The Basics
1) Place the helicopter on the ground in the middle of your flying area. Stand approximately 6 feet away from
the helicopter, behind the tail.
2) To take off, push the throttle control stick up slowly until the helicopter begins to get 'light', then advance the
throttle control stick a little more until the helicopter lifts off. Watch closely at what the helicopter is doing and
make any corrections with the control sticks to keep the helicopter stable and in one general area.
As you increase power and the helicopter begins to lift off, the helicopter will tend to slide left and the nose will
tend to swing left. To counter-act this, as you power up and lift off, move the aileron and rudder control sticks
slightly to the right to keep the nose straight and the helicopter in the middle of your flying area. As the helicopter
gains some altitude and lifts out of the ground effect, it will become more stable and easier to control.
Some people find it easier to get the helicopter up and out of the ground effect quickly, then worry about
keeping the nose straight and the helicopter centered.
3) When you're first beginning, you should learn to hover the helicopter, moving the throttle control stick forward
and backward to control the height of the helicopter. For now, try to always keep the helicopter about 2 to 3
feet off the ground. Move the rudder control stick right or left to keep the nose of the helicopter pointed away
from you. If the helicopter slides to the right or left, move the aileron control stick left or right to keep the
helicopter in one place.
4) To be successful, especially when learning, make small control inputs. Over-controlling is a mistake all new
pilots make. Never move the control sticks more than halfway (except throttle, and only when necessary) and
try to make all movements very small.
5) Follow the practice scenarios below and on the next page to help you in-grain the basics and improve your skills.
We suggest always trying to keep the helicopter about 2 to 3 feet off the ground and in a relatively small flying
area while you're learning, if at any time you feel as if the helicopter is getting out of control, pull the throttle
control stick back to reduce power. The helicopter will quickly descend. In some cases, if you're flying too
high or too fast, this can result in damage to the helicopter, but that's better than crashing into someone or
something.
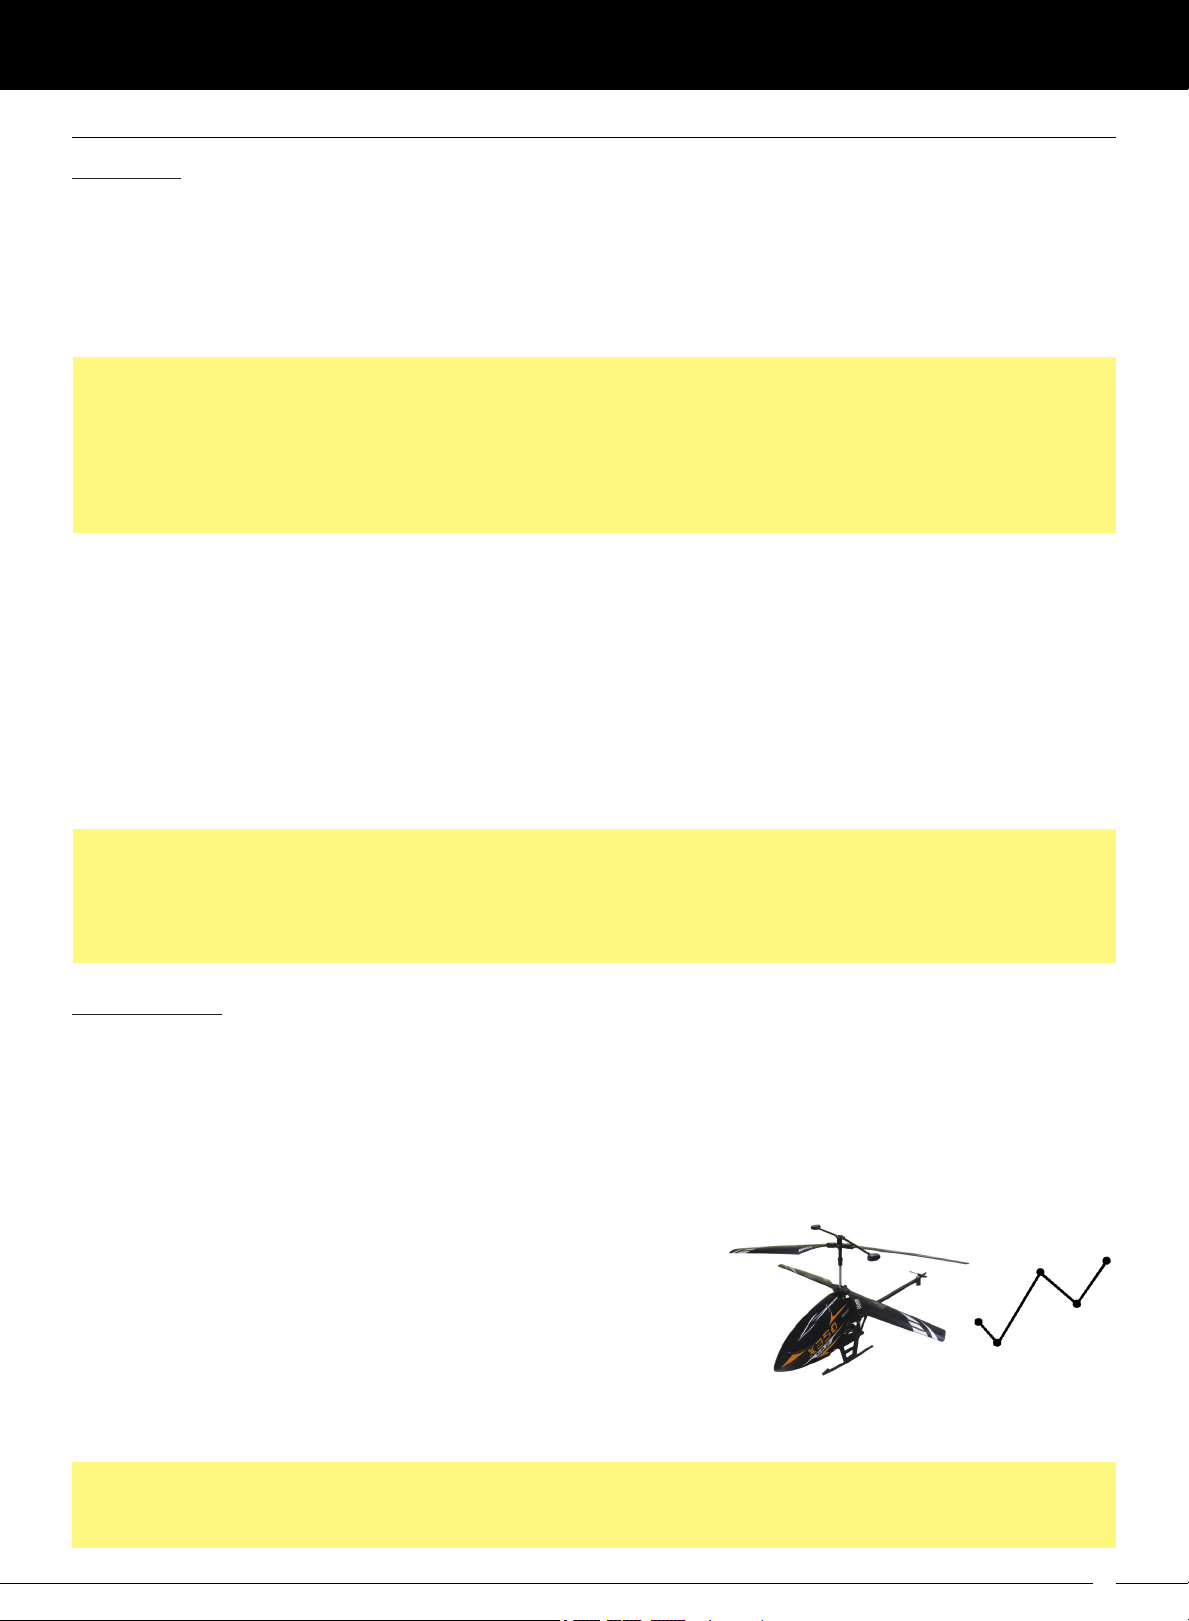
The Frog Jump
The Frog Jump is an ideal method to learn the basics of how control inputs affect the helicopter. It's a series of
short hovers and landings that you repeat over and over, that allows you to learn the basics without allowing the
helicopter to get too far away or too out of control.
Use the Frog Jump to:
l
Learn to extend the time of hover by moving the throttle control stick up and down.
l
Learn to hover the helicopter while standing not only behind
the tail, but moving to the side of the helicopter, then to the
front of the helicopter.
l
Learn to spin the helicopter right and left around its axis by
moving the rudder control stick right and left.
l
Learn to move the helicopter forward and backward, and slide
the helicopter right and left by moving the elevator and aileron control stick forward and backward, and
right and left.
When you move the aileron control stick right and left, the helicopter will slide to the right and left. To actually
turn the helicopter around, you will need to also move the rudder control stick right or left to pivot the nose of
the helicopter right or left.
9
Page 10
X350 SERIES QUICK-START AND FLYING GUIDE
FLYING YOUR X350 SERIES HELICOPTER
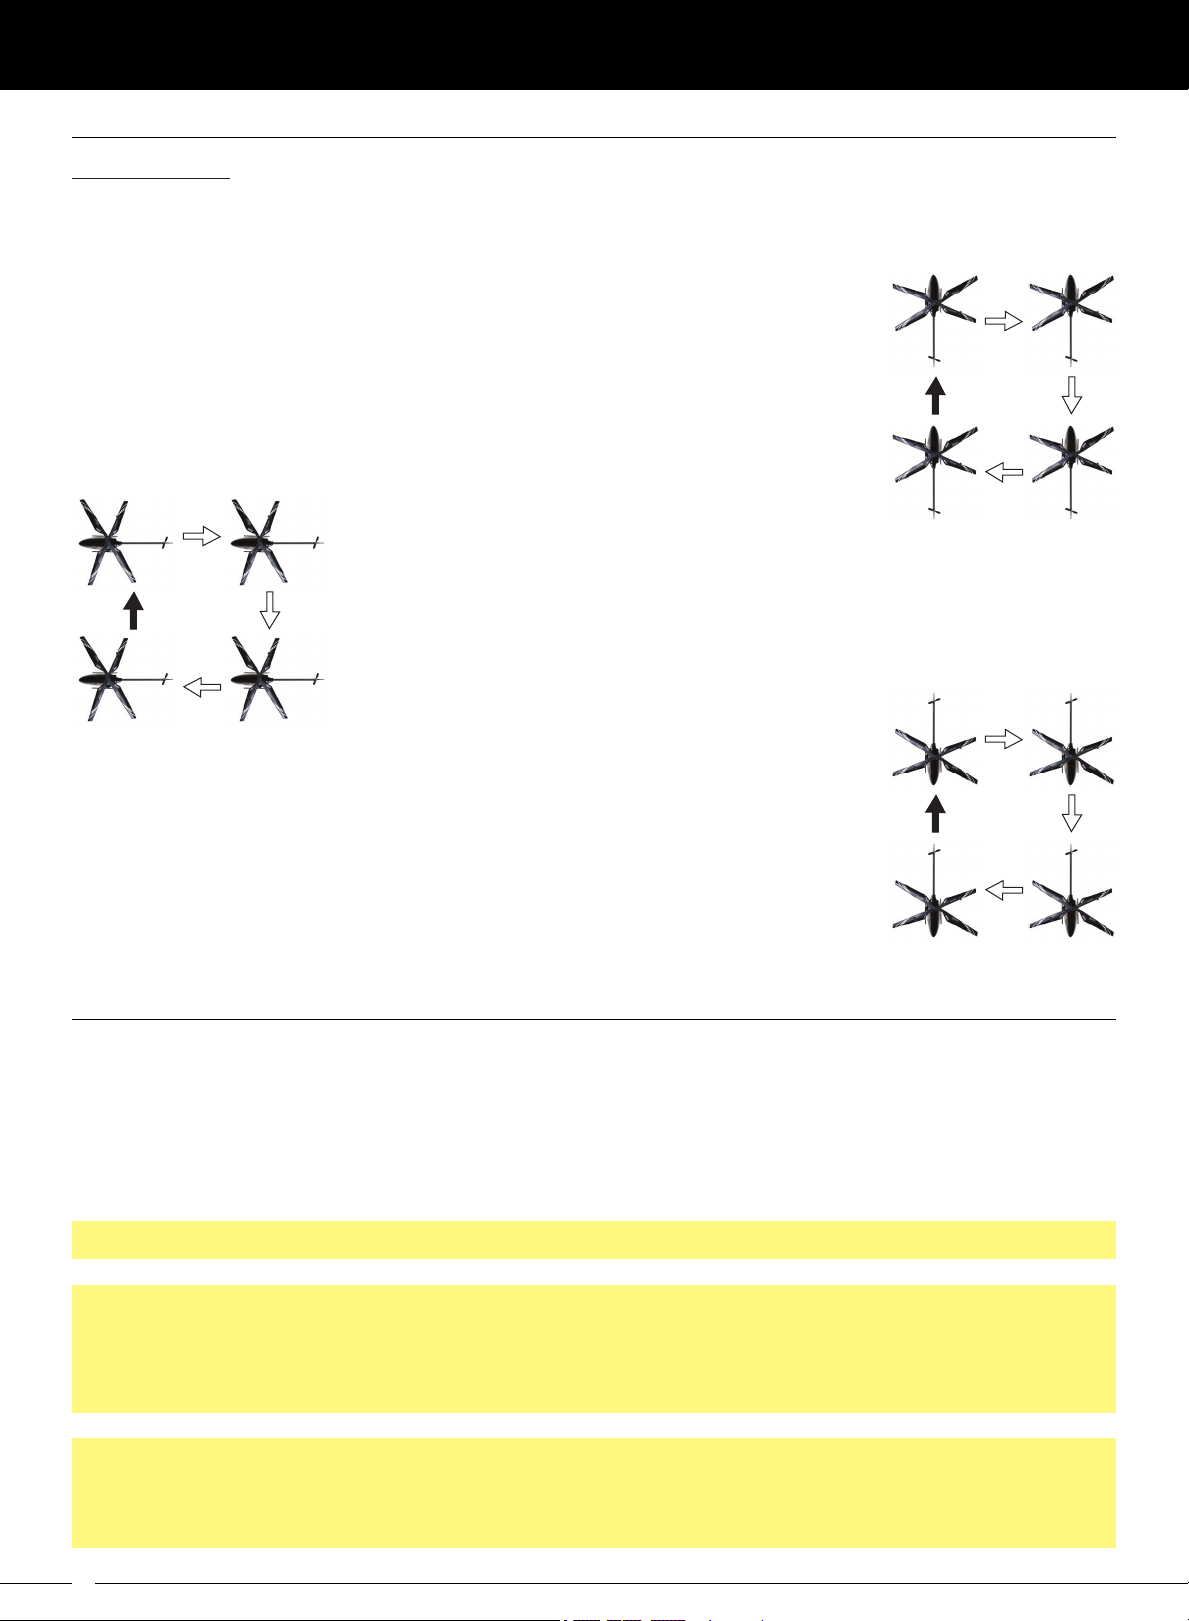
The Box Pattern
Use the Box Pattern technique to learn how to move the helicopter in different orientations around you. This will
help you become proficient at using all the controls at the same time to move the helicopter around.
With the nose of the helicopter pointing away from you, fly the helicopter in a box
pattern. Move the helicopter forward using the elevator control stick, slide the helicopter
to the right using the aileron control stick, move the helicopter backward, using the
elevator control stick, then slide the helicopter left, using the aileron control stick. Use
the rudder control stick to keep the nose of the helicopter straight.
Pilot
Repeat the Box Pattern technique above, but this time while you're facing the
side of the helicopter. The nose of the helicopter will be toward your left. You can
then move to the other side of the helicopter to get practice with the nose of the
helicopter toward your right.
Pilot
Repeat the Box Pattern technique above, but this time with the nose of the helicopter
pointing toward you. This is the most difficult to master, because when the helicopter's
nose is pointing toward you, the aileron and rudder controls will seem 'reversed'.
Imagining yourself sitting in the cockpit will help you get used to this.
Pilot
FLIGHT TRIMMING YOUR X350 SERIES HELICOPTER
Your helicopter is flight tested at the factory for a stable hover, however, you will more than likely need to trim
your helicopter during its first few flights. When your helicopter is trimmed properly, it's more stable and easier
to fly because you won't need to be constantly fighting against out of trim controls.
When you place your helicopter in a stable hover, you may find that it wants to move right or left, or forward or
backward at all times, even though the control sticks are centered. You can use the trim levers on the transmitter
to adjust the controls so that the helicopter stays in place when the control sticks are centered.
The helicopter should be trimmed indoors or outdoors, but only if there is NO wind.
When you push a trim lever, an audible tone will be heard. As the amount of trim reaches its end-point, the
pitch of the tone will decrease and as the amount of trim reaches its center, the pitch of the tone will increase.
When the trim is centered, a single longer audible tone will be heard.
No controls will operate, and no audible trim tones will be heard, until the ESC is armed.
The throttle should not be trimmed during flight. The throttle trim should be set with the helicopter on the ground
and should be adjusted so that the rotor blades don't spin when the throttle control stick is pulled all the way
back. If the rotor blades spin with the throttle control stick pulled all the way back, lower the throttle trim (push
the throttle trim lever down several clicks).
10
Page 11
X350 SERIES QUICK-START AND FLYING GUIDE
FLIGHT TRIMMING YOUR X350 SERIES HELICOPTER
To determine the amount of trim necessary, place the helicopter in a stable hover, about 2 feet off the ground,
then release the control sticks for a couple of seconds. Carefully watch how the helicopter reacts, then trim the
helicopter as described below. When trimmed properly, the helicopter should stay in position with the control
sticks centered.
The rudder should be trimmed first. After trimming the rudder to keep the nose of the helicopter pointing straight,
you can proceed to trim the aileron and elevator axes.
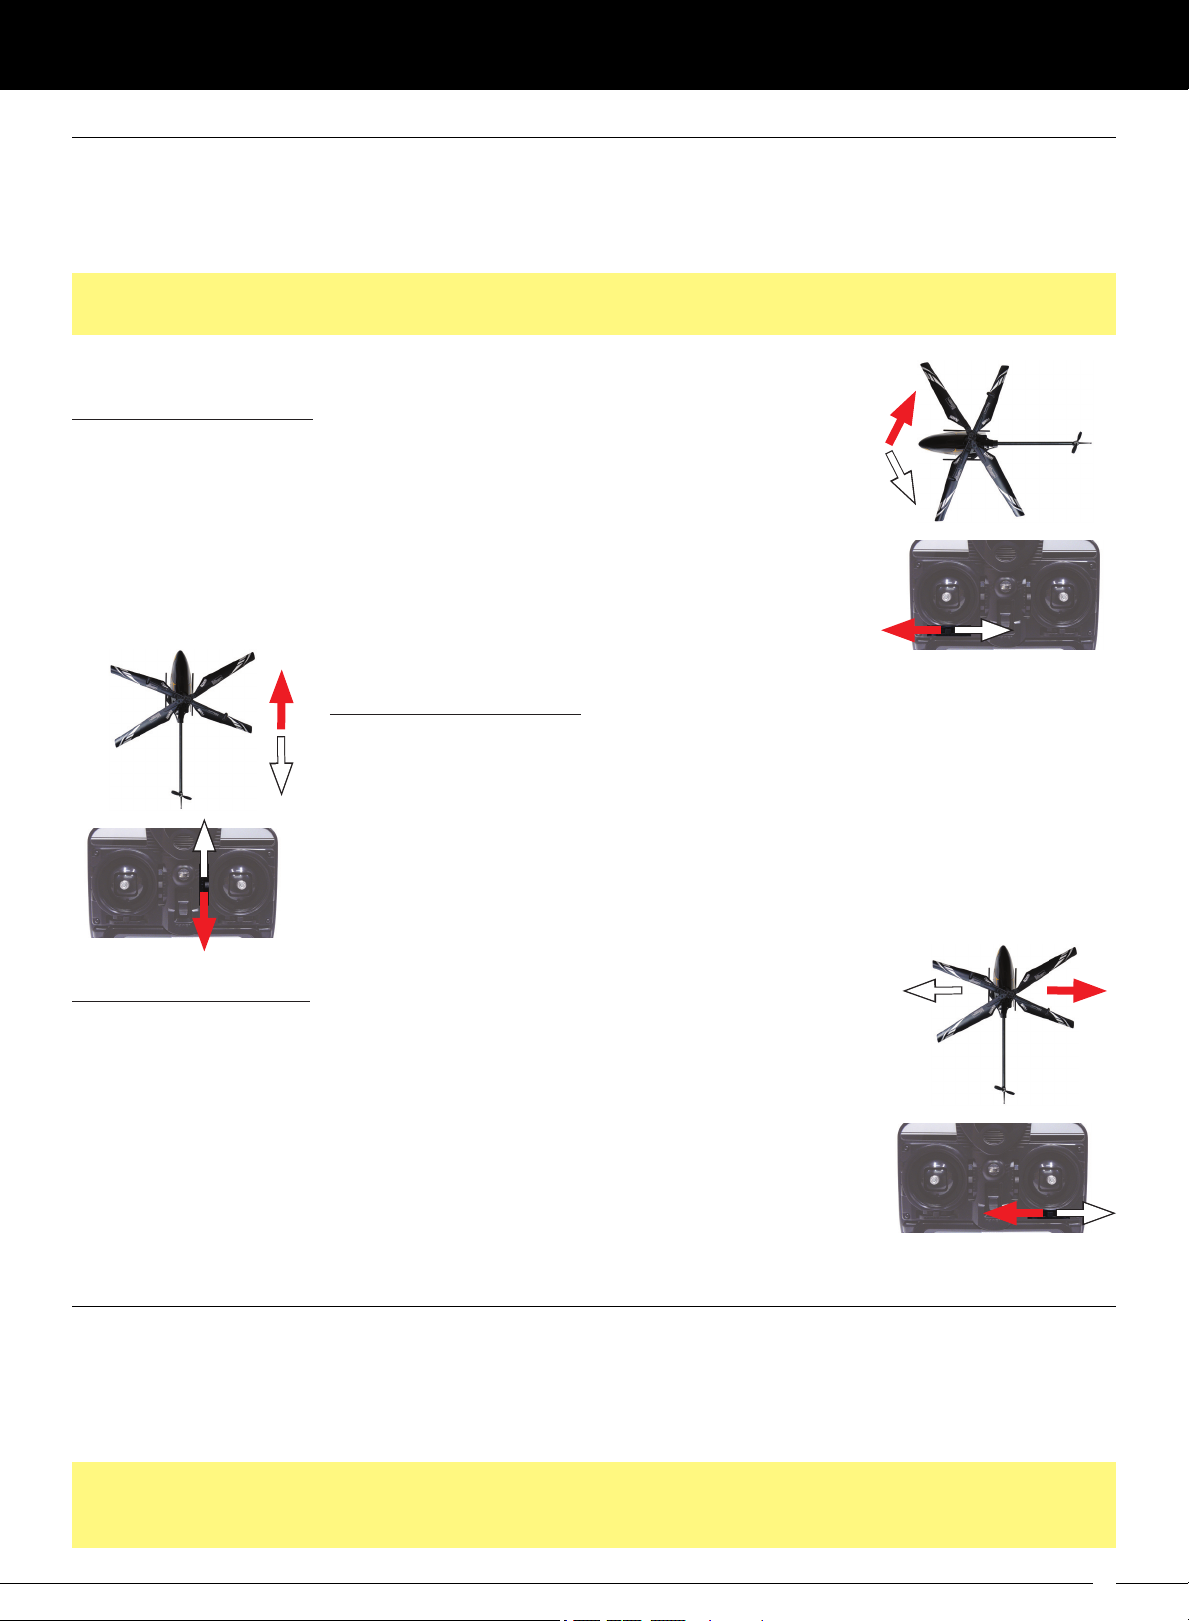
Rudder Trim Adjustment
While hovering, if the helicopter's nose tends to always pivot right or left, the rudder
trim needs to be adjusted.
l
If the nose of the helicopter pivots right, push the rudder trim lever left until the
nose stays straight.
l
If the nose of the helicopter pivots left, push the rudder trim lever right until the
nose stays straight.
Elevator Trim Adjustment
While hovering, if the helicopter tends to always move forward or backward, the
elevator trim needs to be adjusted.
l
If the helicopter moves forward, push the elevator trim lever down until the helicopter
stops moving forward.
l
If the helicopter moves backward, push the elevator trim lever up until the helicopter
stops moving backward.
Aileron Trim Adjustment
While hovering, if the helicopter tends to always move to the right or left, the aileron
trim needs to be adjusted.
l
If the helicopter moves left, push the aileron trim lever right until the helicopter
stops moving left.
l
If the helicopter moves right, push the aileron trim lever left until the helicopter
stops moving right.
USING THE ANTI-WIND TAIL CONTROL SYSTEM
The Anti-Wind Tail Control System is used when flying outdoors at high speeds or outdoors in light winds.
When the elevator control stick is pushed forward, the tail rotor spins up to meet the needs of high-speed
flight and improved performance in light winds.
1) To turn the Anti-Wind Tail Control System 'ON', move the Tail Control Switch on the transmitter to the ON position.
While learning to fly, even if you're learning to fly outdoors with no wind, or when flying indoors, do not use the
Anti-Wind Control System. It will make learning to fly the helicopter more difficult. Use the Anti-Wind Control
System after you're comfortable flying the helicopter and only outdoors in light winds.
11
Page 12

X350 SERIES QUICK-START AND FLYING GUIDE
Extreme-Flyers Hobby
Tel: +86 769 82202588
Fax: +86 769 82206609
http://www.extreme-flyers.com
2/ C, Changping Chamber of Commerce Bldg, Changping Avenue
Changping Town, Dongguan City, Guangdong Province, China 523560
12
Revision 1 - 10.17.2011
 Loading...