

60" Slick 580 ARF
Instruction Manual
Copyright 2015 Extreme Flight RC
1

Please take a few moments to read this instruction manual before beginning assembly. We
have outline d a fast, cle ar and easy method to assem ble this aircraft and familiarizing
yourself with this proce ss will aid in a quick, easy build.
Please read the following paragraph before beginning assembly
of your aircraft!
THIS IS NOT A TOY! Serious injury, destruction of property, or even death may result
from the misuse of this product. Extreme Flight RC is providing you, the consumer, with
a very high quality model aircraft component kit, from which you, the consumer, will
assemble a flying model. It is beyond our control to monitor the finished aircraft you
produce. Extreme Flight RC will in no way accept or assume responsibility or liability for
damages resulting from the use of this user assembled product. This aircraft should be
flown in ac cordance with th e AMA safety code . It is highly recommended that you join
the Academy of Model Aeronautics in order to be properly insured and operate your
model at AMA sanctioned flying fields only. If you are not willing to accept ALL liability
for the use of t his product, please return it to the place of purchase immediately.
Extreme Flight RC, Ltd. guarantees this kit to be free of defects in materials and
workmanship for a period of 30 DAYS from the date of purchase. All warranty claims
must be accompanied by the original dated receipt. This warranty is extended to the
original purchaser of the aircraft kit only. Extreme Flight RC in no way warranties its
aircraft against flutter. We have put these aircraft through the most grueling flight tests
imaginable and have not experienced any control surface flutter. Proper servo selectio n
and linkage set-up is absolutely essential. Inadequate servos or improper linkage set up
may result in flutter and possibly the complete destruction of your aircraft. If you are not
experienced in this type of linkage setup or have questions regarding servo choices, please
contact us at info@extremeflightrc.com or 770-887-1794. It is your responsibility to
ensure the a irworthiness of your model.
2

Items needed for completion:
Masking tape.
Hobby kn if e with #11 blade s.
Thin and medium CA. We highly recommend Mercury M5T thin and M100XF
medium formulas as well as the Mercury glue tips.
30 minute epoxy.
Blue Loctite.
Electric drill with an assortment of small drill bits.
Small flat head and Phil lips head screw drivers.
Standard and needle nose pliers.
Side cutter.
Metric ball driver or allen key set.
Sanding block and sandpaper.
4 x METAL GEARED servos with a minimum of 76oz of torque. All flight testing
was performed with Hitec HS-7245MH.
Dubro Long Super Strength servo arm set. (Dubro part #670 for Futaba, #671 for
JR and #672 for Hitec) .
2 x 6” Servos E xtensions for the Ailerons.
1 x 24” Servo Extension for the elevator servo
Torque 4016T /50 0 MKII Brushless Outrunner.
Airboss Elite 80 Amp ESC.
6S 3300-4000 mah LiPo battery.
16 x 7 prop.
Optional – Pacer c anopy glue and shoe goo adhesive.
3

Tips for Success:
1. Before starting assembly, take a few minutes to read the entire instruction manual
to familiarize yourself with the assembly process.
2. Note that this aircraft is covered using our printed covering technique. Your
aircraft has been sealed with a gloss clearcoat. Due to climate changes, wrinkles
may develop in the covering. These are easily removed with a little bit of heat. Use
your heat gun or a covering iron with a soft cotton iron sock, medium heat, and a
gentle technique. Just like regular covering, you can remove any wrinkles that
develop over the life of your aircraft, but go a little slower and be a bit more careful
for best results. Your iron will feel a bit different gliding over this sealed covering
than regular. Be careful not to use too much heat as the covering may shrink too
much and begin to lift at the edges. Take your time, and the beautiful glossy finish
can be easily maintained.
3. Apply a bead of Pacer Formula 560 Canopy Glue at the intersection of the plastic
canopy and its wood en fram e .
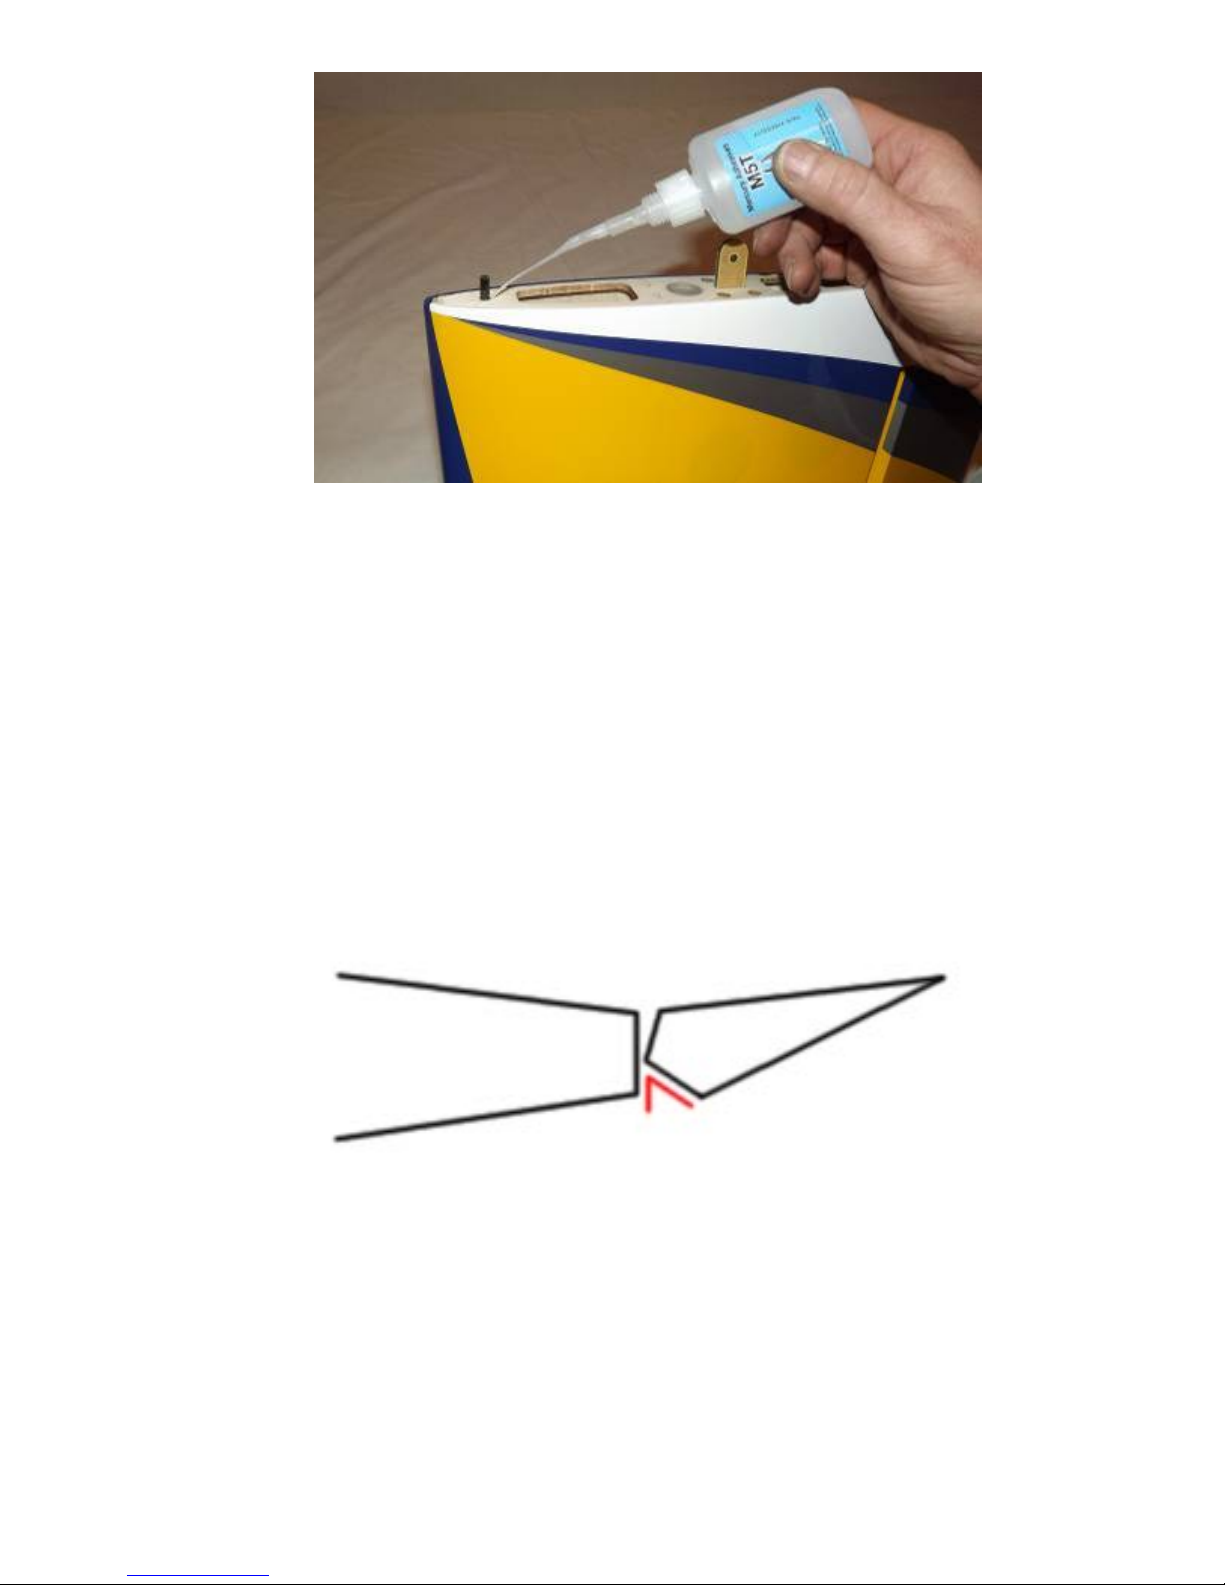
4. Take a few minutes and apply CA to high stress areas such as servo mounting trays,
landing gear mounts, ant i-rotation pin s, and motor b ox joints.
5. By the time your air craft arrives at your door step, it will have been handled by a lot
of people. Occasionally, there are small dings or imperfections on some of the
surfaces. An effective method to restore these imperfections to original condition is
to use a very fine tipped hypodermic needle and inject a drop of water under the
covering material and into the ding in the wood. Apply heat to the area with a
sealing iron and the imperfection will disappear. Deeper marks may require that
this process be repeated a couple of times to achieve the desired result, but you will
be surprised at how well this technique works.
6. Use a high quality epoxy for installing the composite control horns. We highly
recommend a 30 minute Epoxy or Pacer Z-poxy.
7. Take the time to properly balance and trim your aircraft and set up rates and
exponential values. Your flying experience will be greatly enhanced once your plane
is properly dialed in.
NOTE: Some photos in this manual use another of our 50E aircraft, but all of our 50E
sized aerob atic aircraft assem ble nearly identically.
4
Let's begin!
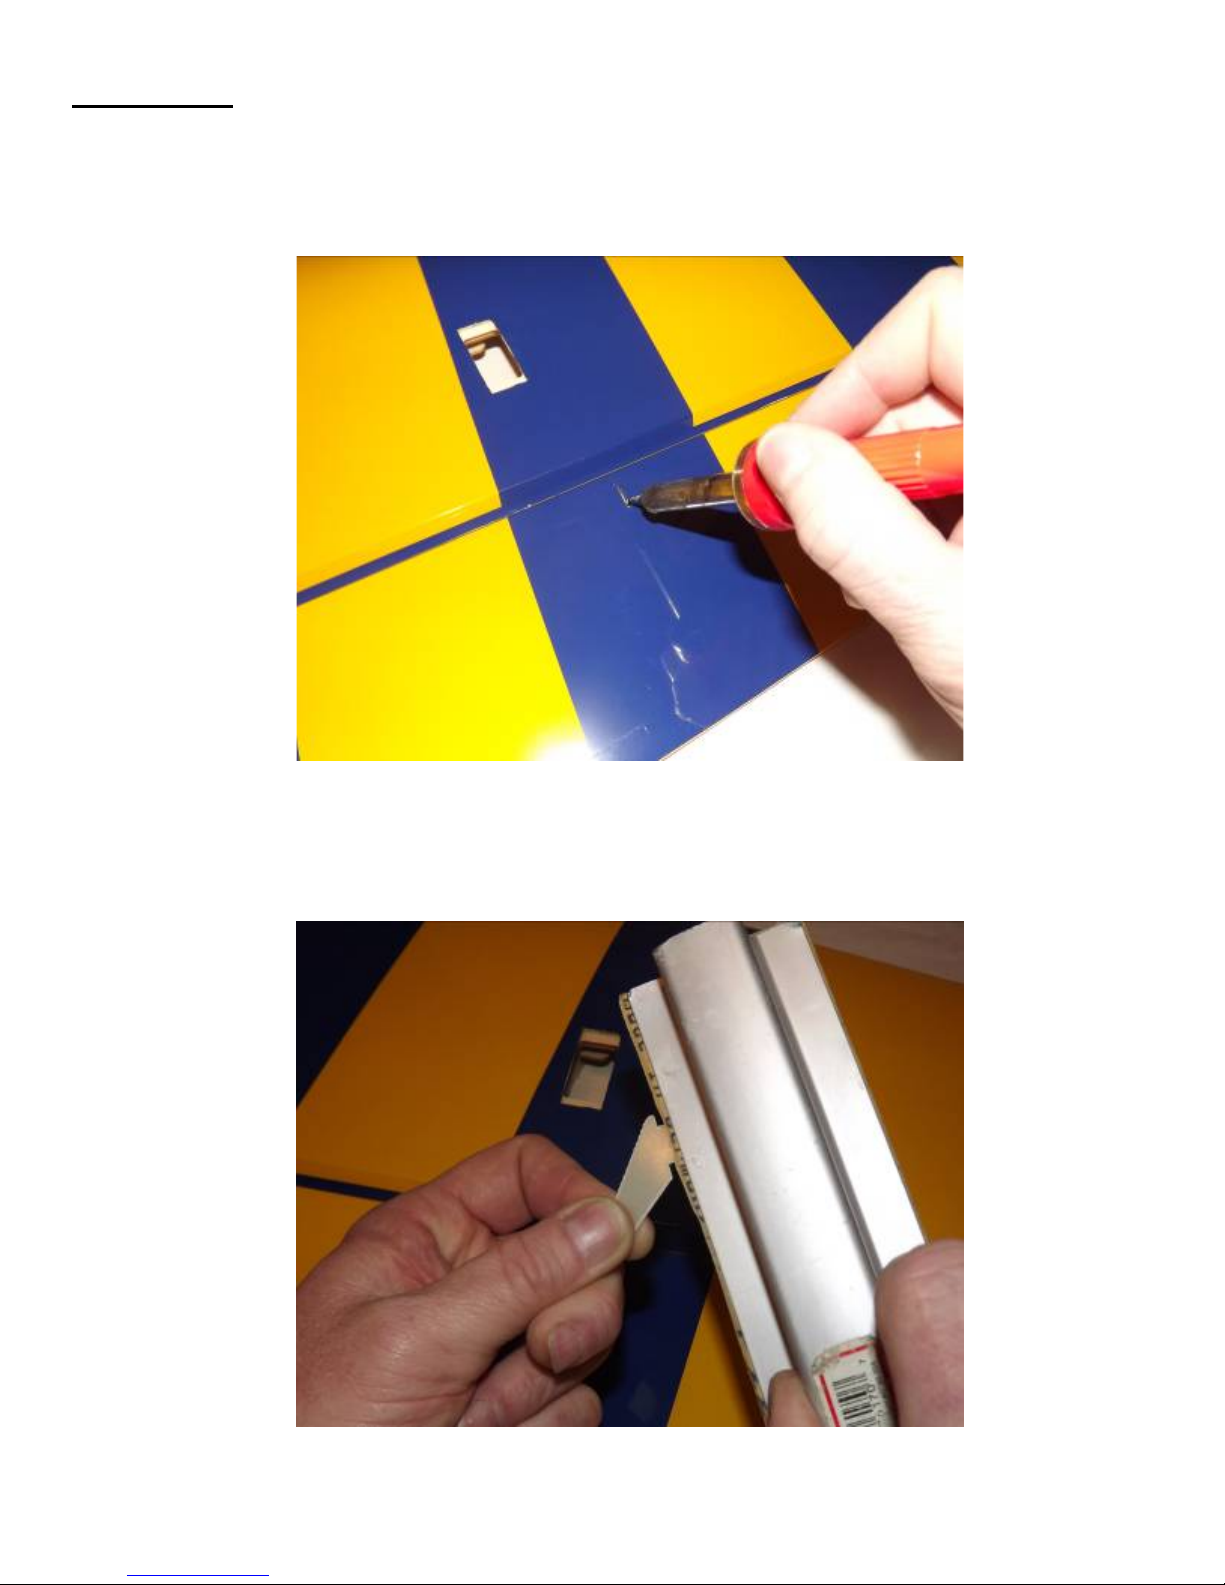
1. Locate the 2 wing panels as well as the composite aileron control horns. Use a
soldering iron or sharp hobby blade to remove the cover ing over the se rv o ope n ing
and the slot for the aileron horn. Make sure you are doing this on the bottom of the
aileron!
2. Use sandpaper to scuff the portion of the horn that will be inserted into the aileron.
Glue the horn into the aileron as shown, making sure adequate epoxy is in the slot for a
good bond. Wipe away any excess epoxy with a cloth soaked in denatur ed alcohol.
5
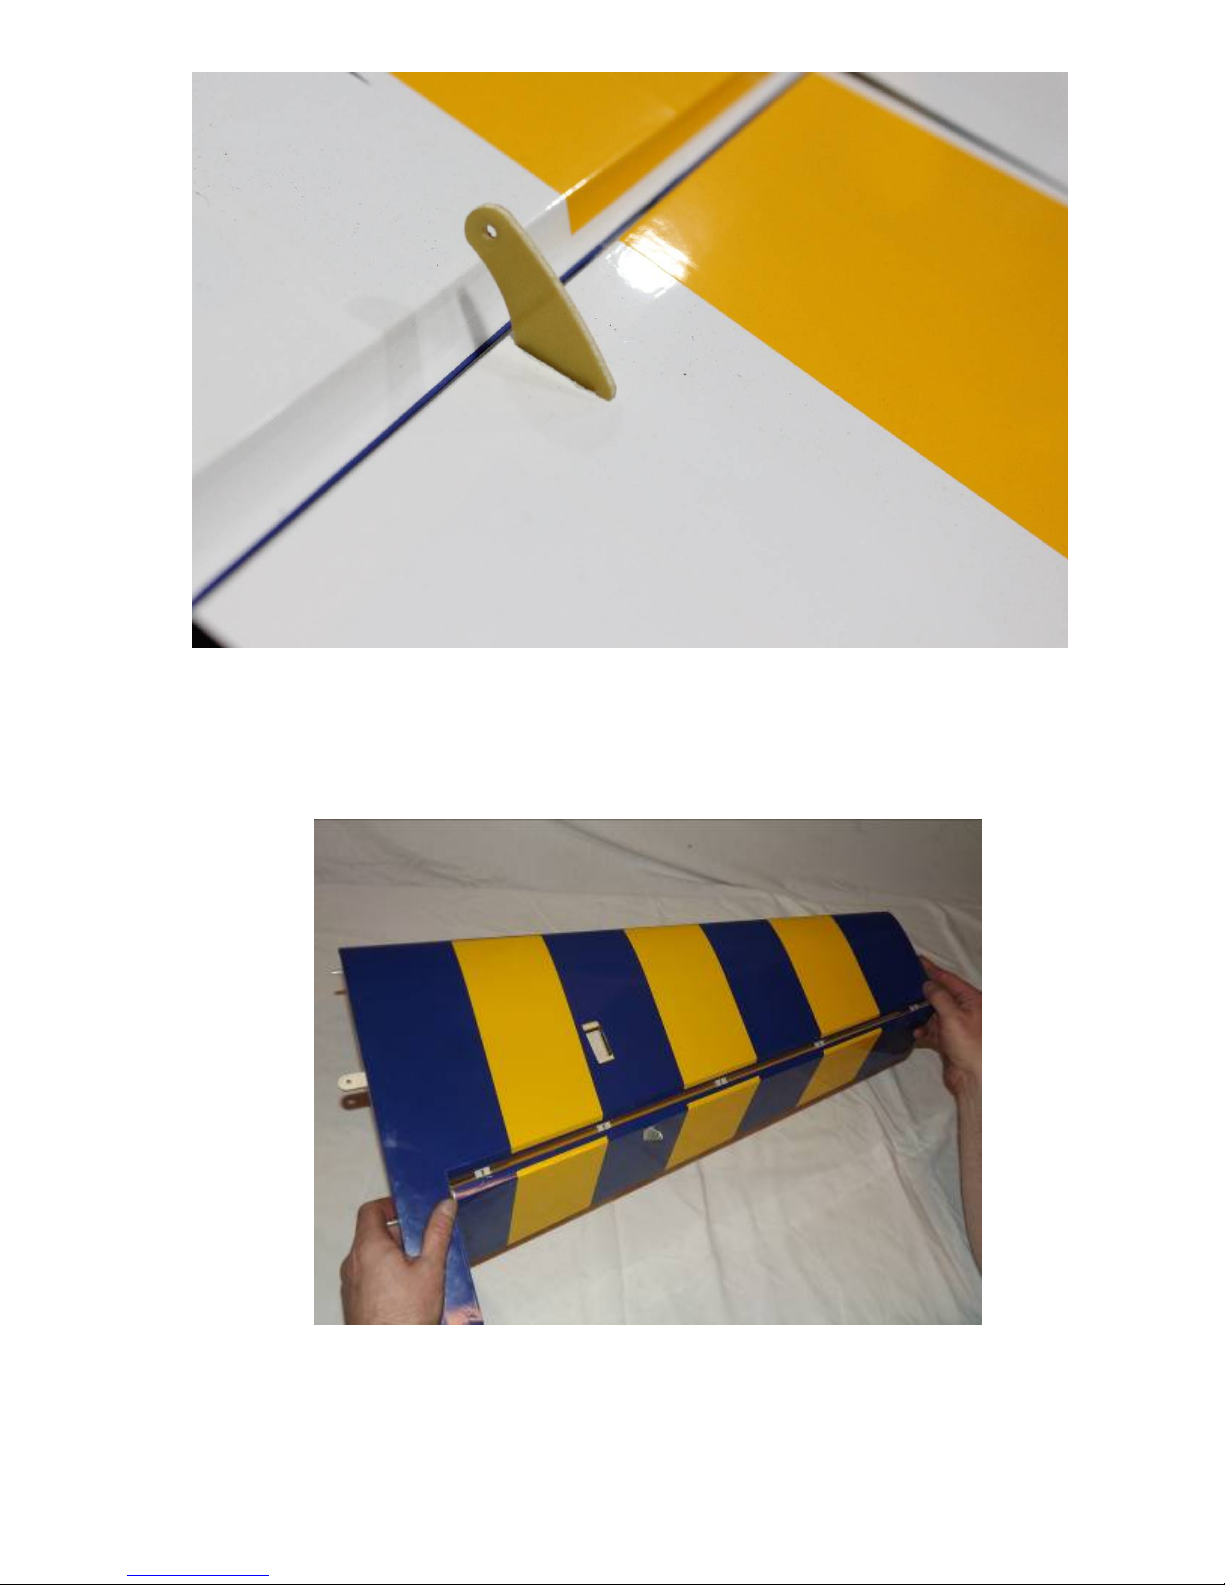
3. Flex the aile rons fully up and down, check for free action.
6
4. Making sure the aileron is properly aligned between the wing root and wing tip,
hold the aileron fully deflected and apply a few d rops of thin CA to each hinge. Flip
the wing over and repeat.
5. Before installing the aileron servo, take a minute and apply some CA to the servo
tray and the anti-rotation pins.
7
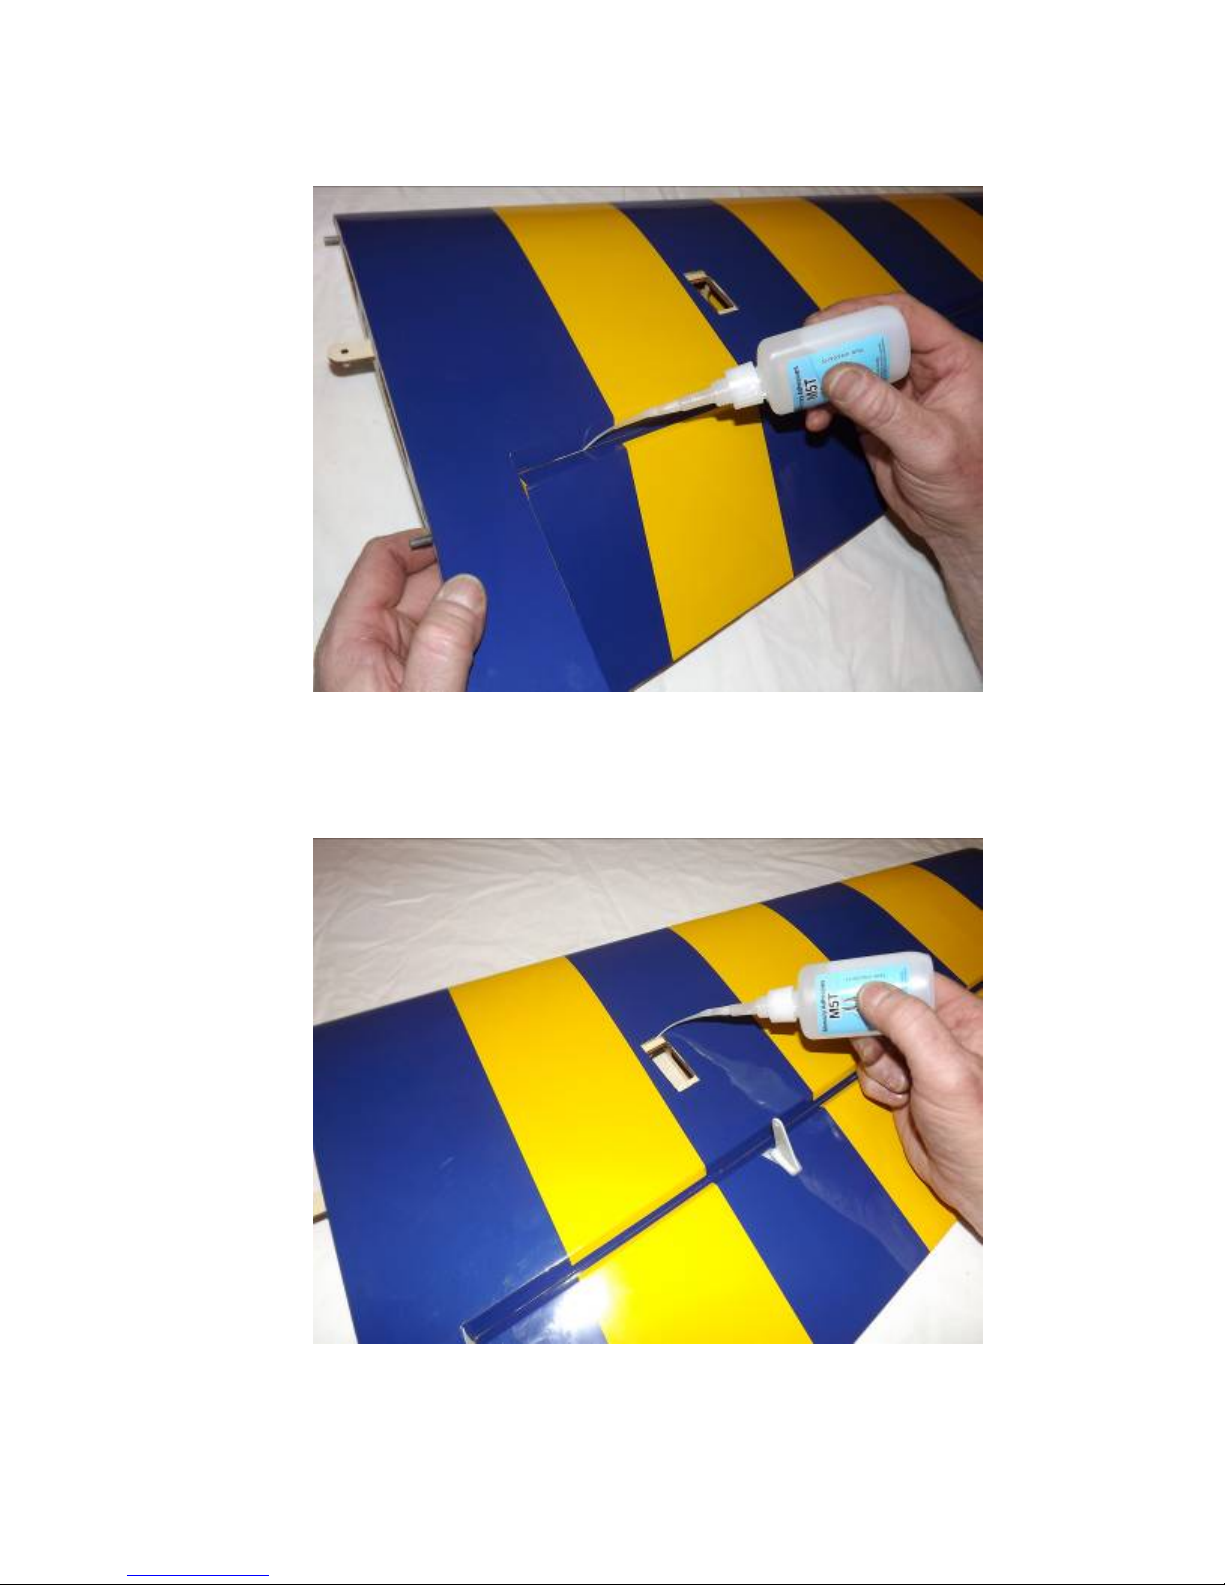
6. Before moving to the next step, it would be a good time to seal the hinge gap with
a strip of Ultracote or Blenderm tape. Be sure to fully deflect the control surface
when sealing the gap to allow for full deflection once the gap is sealed.
Sealing the hinge gaps on your model improves control feel and response, but it is
important that the seal not create too much drag, leading to poor servo
performance. Make sure you ailerons, and any surfaces you seal, move freely after
sealing.
8
7. Attach a 6” servo extension wire to the aileron servo, and make sure it is secured
with tape or heat shrink or a lock. Use the manufacturer supplied mounting
hardware to install the servo as shown. Electronically center the servo and install the
second longest servo arm from the Dubro servo arm kit.
Locate 2 of the short threaded metal pushrods and 4 ball links along with 4 x 2mm
screws, nuts and washers. Thread the ball links onto each end of the pushrods and
secure to the bottom of the servo arm and to the control horn as shown in the picture
below. Repeat this process for the other wing half. Clean the wing panels with a soft
cloth and put them away.
9
Fuselage Assembly
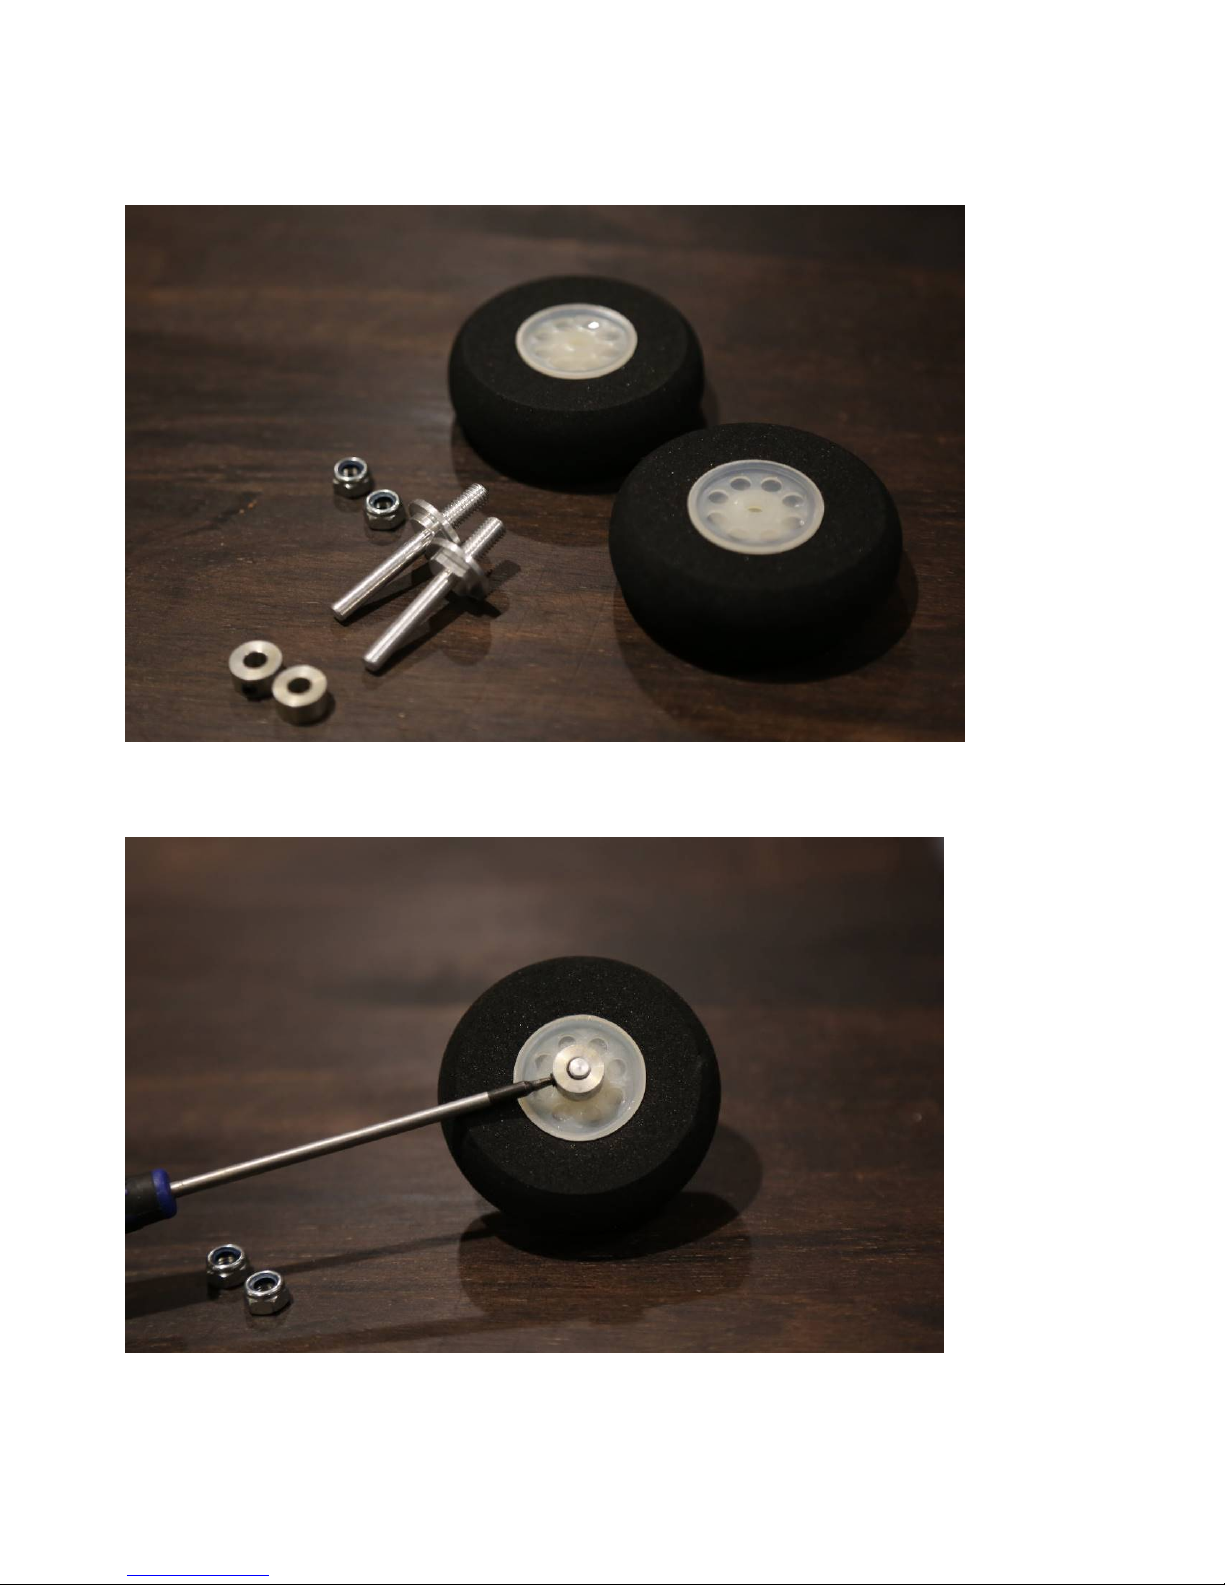
8. Locate the 2 axles, 2 locking nuts, 2 wheels, 2 whe el collars and 2 wheel pants.
Place the wheel on the axle and secure with the wheel collar.
10

9. Place the threaded portion of the axle through the hole in the landing gear and
attach the lock nut and washer onto the axle. NOTE: Note the LG has a tapered edge
and a straight edge; make sure the straight edge faces the front. Slide the wheel pant
into position over the axle and tighten the nut, making sure the wheel pant is
positioned properly. Use the included metal wrench to hold the axle as shown, and
tighten the nut securely.
11

10. Secure the landing gear to the fuselage by inserting the 3mm bolt into a washer,
through the carbon fiber gear and into the pre-installed blind nuts in the fuselage.
Make sure to use a drop of blue Loctite on each bolt to prevent them from backing
out. Note the LG has a tapered edge and a straight edge; make sure the straight edge
faces the front of the fuse.
11. Using epoxy or shoe-goo adh esive, attac h the landing gear cover plate as shown.
12

12. Locate rudder and rudder pull-pull control horn as shown. Remove covering over
slot in rudder for horn as shown. Glue brass tiller piece into rudder as shown. (Note:
the tiller piece is the same part as is used for the end of the rudder pull-pull cables.)
13. Scuff center of rudder control horn with sandpaper and glue into rudder with
epoxy as shown. Allow to cure.
13

14. Check alignment of rudder hinges and slide rudder onto fuselage. Check for free
swinging motion 45 degrees each way, and glue with thin CA glue as you did the
aileron hinges.
15. Locate the hardware for the rudder pull-pull system as shown. Thread the ball
links onto the bras s en ds as sh own .
14

16. Using a piece of masking tape, tape the rudder so that it remains centered while you
build the pull-pull cables. Screw the ball links and ends onto the rudder horn as shown,
placing a washer on the ball-link side of the screw. Thread one of the brass tubes onto
the pull-pull cable and loop the cable as shown. Pinch the tube with pliers to lock the
cable. Add a drop of thin CA to the pinch. Repeat on other side.
The cable con nection is made as shown:
15

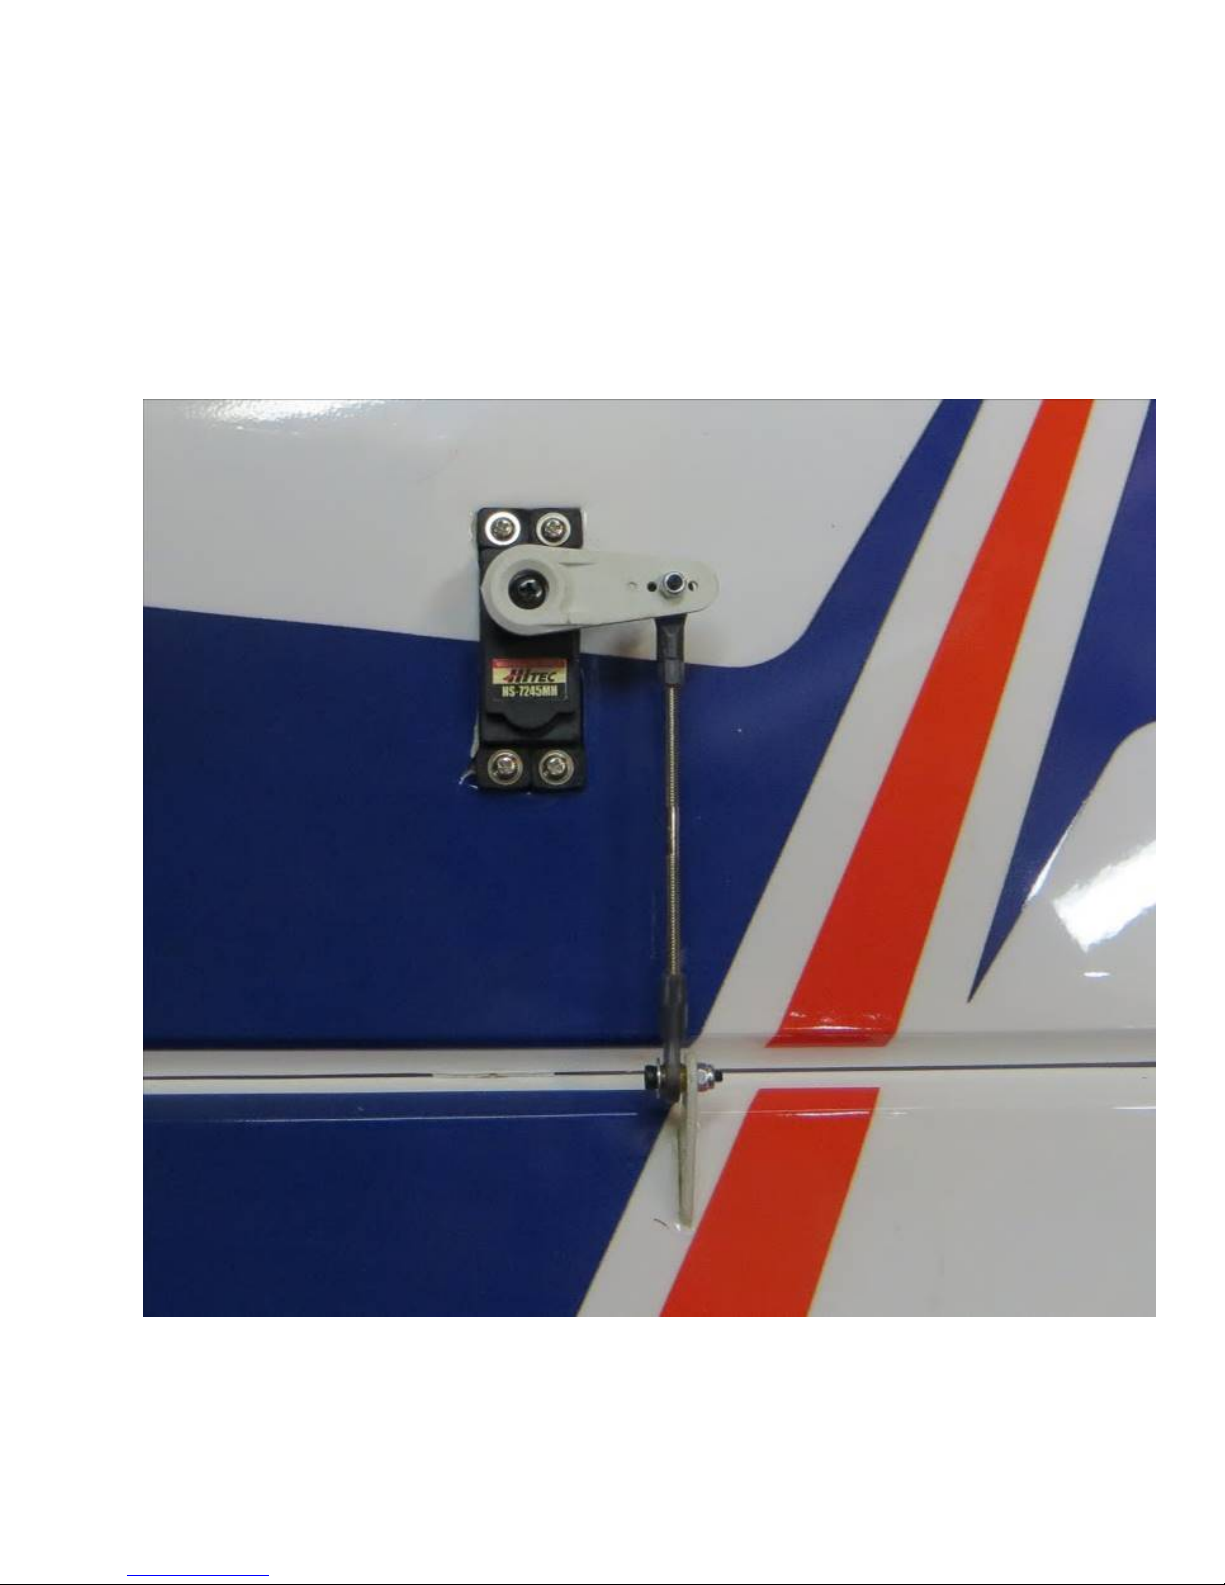
17. Mount the rudder servo as shown. Assemble the pull-pull cable ends as you did on
the runner end, as shown. The cables should be taught, but not so tight as to cause drag
on the servo.
18. Remove covering over the horizont al stabilizer slot in the fu selage as shown.
16

19. Remove the covering over these openings in the fuselage, for the wing tube, wing
pins, and aileron ser vo wi re s.
17

20. Insert the stabilizer into its slot and the carbon fiber wing tube into the fiberglass
sleeve. Use a ruler to insure that the stabilizer is centered in its slot and compare the
stabilizer to the wing tube to make sure it is properly aligned. Sand or shim the slot if
necessary to ensure proper alignment.
18

21. Once satisfied with the alignment, glue the horizontal stab in place by applying CA
along the joint between the stab and fuse. Make sure to apply CA to the top and bottom
of the stab, being careful not to get CA on the covering. Allow to dry.
22. Install the left side elevator (with elevator joine r) as shown. Do not glue hinges yet.
19

23. Test fit the right side elevator, and make sure the elevators are perfectly aligned.
Sand the slot in the right side elevator as necessary to make the elevators align
perfectly. Once the alignment is perfect, remove the right elevator apply epoxy to the
joiner and s lot as shown.
20

24. Re-install the right elevator, check alignment again, check for free movement 50
degrees up and down, glue elevator hinges with thin CA. Tape the elevators to the stab
as shown to ensure perfect alignment while the epox y cures.
25. Remove the covering over the elevator control horn slot and elevator servo mount
as shown.
21

26. Scuff the elevator horn and install with epoxy as on the ailerons and rudder. Build
and install pushrod as shown.
27. Install a 24" servo extension wire on the elevator servo, install into the fuselage as
shown.
22

28. Locate the carbon fiber tailwheel assembly in the hardware package. Secure the
tailwheel bracket to the bottom rear of the fuselage with the provided wood screws,
making sure the pivot point of the assembly is over the hinge line of the rudder. It is a
good idea to remove the set screws from the tailwheel assembly and apply blue Loctite
to them, then re-install.
23

29. Next prepare the Torque outrunner motor for mounting. First, sli de the provided
collar over the motor shaft and secure in place with the set screw. Place a drop of blue
Loctite on th e threads of the set screw s o that it will not back out.
30. Next, secure the radial mount to the motor using the provided short Phillip's head
machine scr ews. Again be su re to use a drop of blue Loctite on each screw.
24

31. Secure the prop adapter using the 4 socket head cap bolts. Blue Loctite should be
applied to each bolt.
32. Using the backplate of the motor as a guide, mark and drill t he 4 motor mounting
holes in the firewall.
25

33. Install the motor with inc luded 4mm screws and nuts.
34. Install the ESC to the side of the motor box using zip ties or Velcro to secure the
ESC. Connect the wires of the ESC and motor together.
26

Mounting the Cowl
35. Tear 4 short pieces of blue painters tape from a roll. Place each piece of tape on
the side of the fuselage so that each piece corresponds with one of the 4 cowl
mounting tabs. Use a fine tipped marker to mark the location of the center of each
mounting tab.
36. Roll the tape back and slide the cowl into position. Install the spinner onto the
motor shaft for reference and once satisfied with the cowl position roll the tape back
into place and secure the c owl.
27

37. Use a 1/16 " drill bit to drill a hole at t he location of t he dot on each piece of tape.
38. Remove the tape and secure the cowl with 4 of the included small wood screws
that have the large head s.
28

39. Use a sharp hobby knife to remove the covering from the openings in the bottom
of the fuselage to allow co oling air to exit the fuselage.
40. Mount your receiver in the fuselage. Use Velcro and a Velcro retention strap to
secure your lipo battery. Slide your lipo as necessary to achieve a CG point 4.5 – 5"
behind the leading edge of the wing where the wing meets the fusela ge.
41. Your kit includes 2 different SFG's to try on your wingtips. One set is a radical
forward-swept XA design. The 60" Slick does not require SFG's for excellent flight
performance, but trying the SFG's can give you different performance in various
maneuvers. Experiment and have fun! When mounting the SFG, place the spacer inbetween the SFG and wing tip. Each SFG mounts using 2 X 3mm screws.
29

30

42. Check your motor rotation direction, make sure your prop is tightened, verify
that your batter y if fully charged, and be certain your wing bolt s are tight.
Trimming your 60" Slick
We highly recommend fine tuni ng your CG using the 45 degree line test. Fly the aircraft
from left to right or right to left, whichever direction you are more comfortable with at 3/4
to full throttle. Pull the aircraft to a 45 degree up line and establish this line and
immediately roll the aircraft inverted. Establish this line and let go of the elevator stick.
Ideally the aircraft will continue to track on that 45 degree line for several hundred feet
before slowly starting to level off. Adjust the position of your battery to achieve this flight
condition. Once satisfied with the location of your CG scribe a mark on the battery tray so
that you can position the battery in the same location each flight and achieve the same feel
and flight characteristics each flight .
I also highly recommend taking the time to properly set up your rates and exponential
settings. Setting up low rates for precision maneuvers and high rates for aggressive
aerobatics and 3D flight will allow you to experience the best attributes of the Slick or any
aircraft for that matter. Here are some suggested rates to get started with. These are the
rates and exponential values I feel comfortable with. They may feel awkward to you and if
so please adjust to your taste.
31

Elevator: L ow rate-8-10 degre es; 15-20% Exponent ial
3D rate-45-50 degrees; 40-50% Exponential
Insane tumble r ate: As much as possible! 65-70% Exponential
Rudder: Low rate-20 degrees; 45-50% Exponential
3D rate- As muc h as possible; 60-70% Exponent ial
Aileron: Low rate-15-20%; 40-45% Exponential
3D rate- As much as possible; 50-60% Exponential
This completes the assembly of the 60 Slick. As a final step clean the entire aircraft with
glass cleaner, then apply a coa t of spray-on wax and b uff the finish to a high gloss with a
microfiber cloth. My favorite product for this is Eagle One Wet Wax AS-U-DRY,
available in the automotive section of most Wal-Marts, K-marts, Sears, Targets, etc.
People ofte n ask me at trade shows how I get the planes to look so shiny, this is my secret.
Thanks again for your purchase of the 3DHobbyShop 60" Slick 580 ARF. I hope you
enjoy assembling and flying yours as much as I have mine.
See you at the flying field!
Chris Hinson
Extreme Flight RC
32

33
 Loading...