

Extralite CyberRear SL 2 Owner's Manual
C y b e r R e a r SL 2
Destination Road use, 130mm frames.
Guideline
Install Cog Lock Ring at a maximum torque of 25-30Nm.
Never use high-pressure spray washing directly onto the hub. Clean hubs externally with warm water and soap.
Periodically clean hub internals (every 6-12 months in normal and dry conditions, every 3 months in wet conditions and
always before leaving the wheel un-used for more than 1 month) see Level1 instructions.
Warning: Water and moisture stagnant inside hub can permanently damage bearings.
Warning: Use only very soft density pure grease as original Alugrease Super1, medium or hard density grease may
cause un-complete pawl engagement and this will seriously damage freewheel mechanism. Most greases contain
chemical additives that may damage OR Seals and, most of all, can break the freewheel OR spring.
Warning: CyberRear mechanisms are suitable for road and cyclocross use (and not MTB), shortest gear ratio 1.00.
Shorter ratios may result in high torque and damage freewheel mechanism.
Owner’s manual
Lubrification and reassembly
1) Slightly grease bearing contact surfaces on Axle.
2) Insert Axle from right side gently pushing it with a plastic mallet.
3) Temporary screw in Micro Tuner for 2to3 turns only. Avoid full turning to prevent damages.
4) Grease freewheel area with 2cc. of very soft density grease as original Alugrease Super1. Never use Lithium, additivated
grease nor thick grease
5) Oil OR-Seal with thin oil. Oils that are thicker than W40 engine oil may increase freewheel resistance.
6) Inserting Freewheel body: check the OR seal, OR Spring and Pawls are correctly positioned, carefully press pawls one by
one and partially insert freewheel. Check that pawls engage ratchet wheel properly then insert completely. Do not pinch
seal OR
7) Grese threads and tighten Right Axle End at 7-8 Nm.
8) Gently push Axle from right side using a plastic mallet.
9) Gently fully screw in Micro Tuner and unscrew it for 1/4 to 1/2 of turn to release excessive preload on bearing balls.
10) Set-up bearing preload with preload tuning, see below.
Disassembly for cleaning. Maintenance (level 1).
1) Extract Left Axle End by pulling it by hands.
2) Insert a 5mm hex wrench into Right Axle End.
3) Fully unscrew and extract Micro Tuner (use a 20mm wrench).
4) Insert a 5mm second hex wrench into left Axle side and unscrew Right Axle End.
5) Pull Freewheel Body and remove it.
6) Extract Axle by pulling it from right side.
7) Clean all parts.
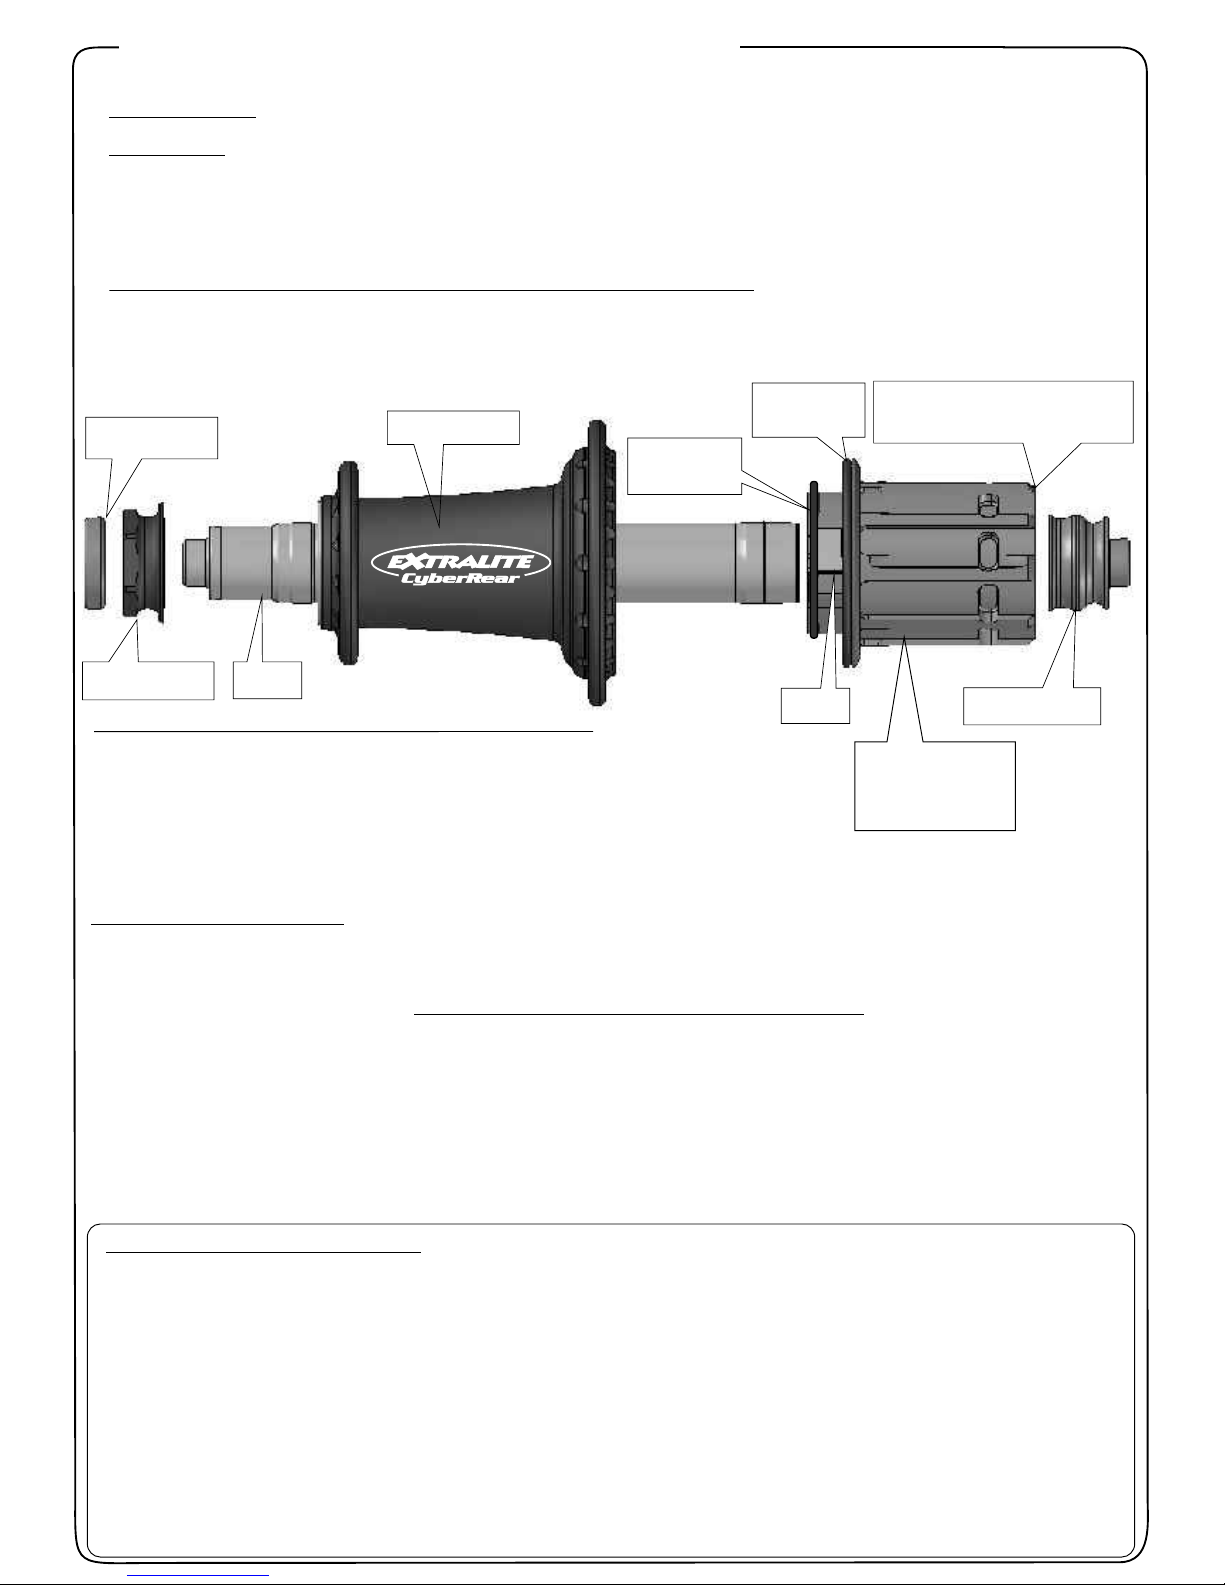
Axle
Lock Ring maximum torque:
25-30Nm
OR Spring
26x1.5
OR Seal
40x1.5mm
Right Axle End
Micro Tuner
Left Axle End
Hub Body
Bearing preload set-up:
Optimal bearing preload is important for a long bearing
life.
Micro Tuner comes pre-adjusted from the factory. Do not
modify its position if not necessary.
Checking
Before modifying bearing preload carefully check the
complete wheel as follows:
1) Install wheel into dropouts and normally lock skewer.
2) Check there is no play at rim diameter.
3) Leave wheel free to completely stop spinning and
carefully control latest instants of movement. Stopping
should be very smooth.
Preload Tuning
If necessary fine tune as follows.
1) Install wheel into dropouts and normally lock skewer.
2) If you feel play at the rim turn in Micro Tuner (clockwise). Use
a 20mm wrench, very delicate torque and manners.
3) Unscrew Micro Tuner for ca 1/4 of turn to release excessive
preload on bearing balls and achieve max rolling
smoothness.
4) Repeat Preload Checking and eventually slightly correct it.
5) The optimal bearing preload cancels play at the rim
without affecting rolling smoothness.
Warning Incorrect bearing preload can damage bearings
and freewheel parts additionally decreases hub performance.
Pawls
SL-2
Freewheel Body
shortest gear
ratio 1.00

Dimension for wheel building
Spoke hole Ø: 2.6mm
Right flange drilling Ø: 52mm
Left flange drilling Ø: 33mm
Center to right flange: 19mm
Center to left flange: 34mm
Frame width: 130mm
WARNINGS:
Never exceed maximum hub spoke tension: 160Kgf.
Reduce tension if the rim manufacturer recommends a lower value.
To prevent galvanic corrosion do not install metal washers between
spokes heads and flange.
20H
24H
28H
Extralite products are warranted against defects in materials and/or workmanship for a period of two years from original date of purchase to the
original o wn e r o n l y.
Any Extralite product that is returned and found by Studio Riva to be defective in materials and/or workmanship will be repaired or replaced at
the sole discretion of Studio Riva. This warranty is the sole and exclusive remedy. Studio Riva shall not be held liable for any indirect, special or
consequential damages. The warranty is expressly limited to repair or replacement of the product that has been returned and found to be
defective by Studio Riva and are the sole remedy of the warranty. No credits or refunds will be issu ed.
The warranty does not cover: normal wear, tear and fatigue; damage or failure due to accident or collision. Improper assembling, poor
maintenance, alterations or modifications, installation of parts not compatible with Extralite products void this warranty. Warranty does not cover
damage arising from crash, abuse and/or misuse or any other circumstances in which the product had been subjected to forces or loads
beyon d its d esign.
Immediately replace the component after crash and violent shock, or after continuos heavy use.
Improper use, modification and/or part changing, including surface finishing, could irreparably damage the component.
All labor charges for warranty service are responsibility of the product owner.
IN S TA LLATI ON WAR NIN G:
Extralite components are extremely performing and lightweight, crafted with ver y high quality, they request adequate installation and
maintenance care. We strongly recommended that a professional bike shop install and service your Extralite components.
Improper assembly and/or adjustment may significantly compromise strength and durability of the component causing serious personal injury.
Carefully che ck proper tig htening torque of ever y bolt. Always respect installation recom mendations.
Extralite components are designed for a specific use X-Country or Road or Downhill, respect product specific destination.
Note: the rider assumes all the risks regarding use and installation of Extralite components.
Extralite Limited Warranty
Wheelbuilder’s manual
Lacing
See www.extralite.com to find pre-calculated spoke lenghts.
Make sure hub is properly assembled and adjusted before lacing.
Respect specific lacing pattern.
Hub maximum spoke tension:
Drive Side 160Kgf
Left Side 90Kgf
In any case never exceed the maximum tension recommended by rim manufacturer .
Studio Riva SRL - Tel: ++39-0371-203059
info@extralite.com
 Loading...