

Page 1

AVVERTENZE
Prima di ogni accensione della macchina veri care sempre che il braciere sia completamente libero
e pulito.
E’ assolutamente vietato introdurre manualmente pellet all’interno del braciere.
All’interno della stufa si trovano 3 confezioni di sali disidratanti da rimuovere de nitivamente prima
di accendere la stufa: 1 all’interno della camera di combustione, 2 all’esterno della stufa.
Per un ottimale funzionamento del prodotto, l’azienda invita l’utilizzatore a regolare l’a usso del
pellet in base al tipo di combustibile utilizzato. Vedi sezione “Regolazione carico pellet” del libretto
istruzioni.
L’apparecchio deve funzionare alla potenza 4 o 5 per 2 o 3 giorni in modo tale che le parti meccaniche
abbiano la possibilità di assestarsi.
WARNING
Always check before lighting the stove that the burning pot is completely free and clean.
Do not insert pellet manually into the combustion pot.
3 packagings dehydrating salts will be found in the stove to be removed completely before starting
the heater: 1 inside the burning chamber, 2 on the outside.
For a correct functioning of this product, the manufacturer kindly asks the nal user to set the pellet
feeding according to the type of combustible. Please read the chapter “Pellet Feeding Adjustment”
in “Use and Maintenance Manual”.
This stove must function at middle power (power 4 or 5) for 2 or 3 days in order to allow a better
settlement of the mechanical components.
ACHTUNG
Vor jeder Anzündung immer kontrollieren, dass die Brennschale frei und sauber ist.
Es ist verboten die Pellet in die Schale mit Händen zu werfen.
Im Pelletsofen sind 3 Packungen Trockensalz zu nden die anlässlich der Inbetriebnahme entfernt
werden müssen:1 in der Brennkamer und 2 sind ausserhalb des Ofens.
Zum dem optimalen Betrieb dieses Produktes bittet Der Hersteller den Benutzer darum, die
Pelletszufuhr gëmaβ dem verwendeten brennsto einzustellen. Lesen Sie bitte den Paragraph
„Reglung der Pellets-Zufuhr“ in der „Bedienungs- und Aufstellungsanleitung“.
Das Gerät soll 2 oder 3 Tage auf Mittelleistung funktionieren (Stufe 4 oder 5) so dass die
mechanischeTeile sich einlaufen können.
ATTENTION
Avant d’allumer le poêle toujours contrôler que le brasier soit complètement libre et propre.
N’introduisez pas pellet manuellement dans le brasier.
A l’intérieur du poêle Vous retrouverez 3 paquets de sels déshydratants à enlever complètement ,
S.V.P., lors de la mise à feu : 1 dans le chambre de combustion, 2 à l’extérieur du poêle.
Pour un emploi optimal du produit, le producteur prie l’usager de bien vouloir régler le chargement
du pellet selon le type de combustible. Veuillez lire le paragraphe « Réglage charge Pellet » dans le
« Manuel d’instructions et entretien ».
L’appareil doit fonctionner à puissance 4 ou 5 pour 2 ou 3 jours, de façon que les parties mécaniques
puissent se tasser.
DUCHESSA IDRO - DUCHESSA IDRO STEEL
Page 2
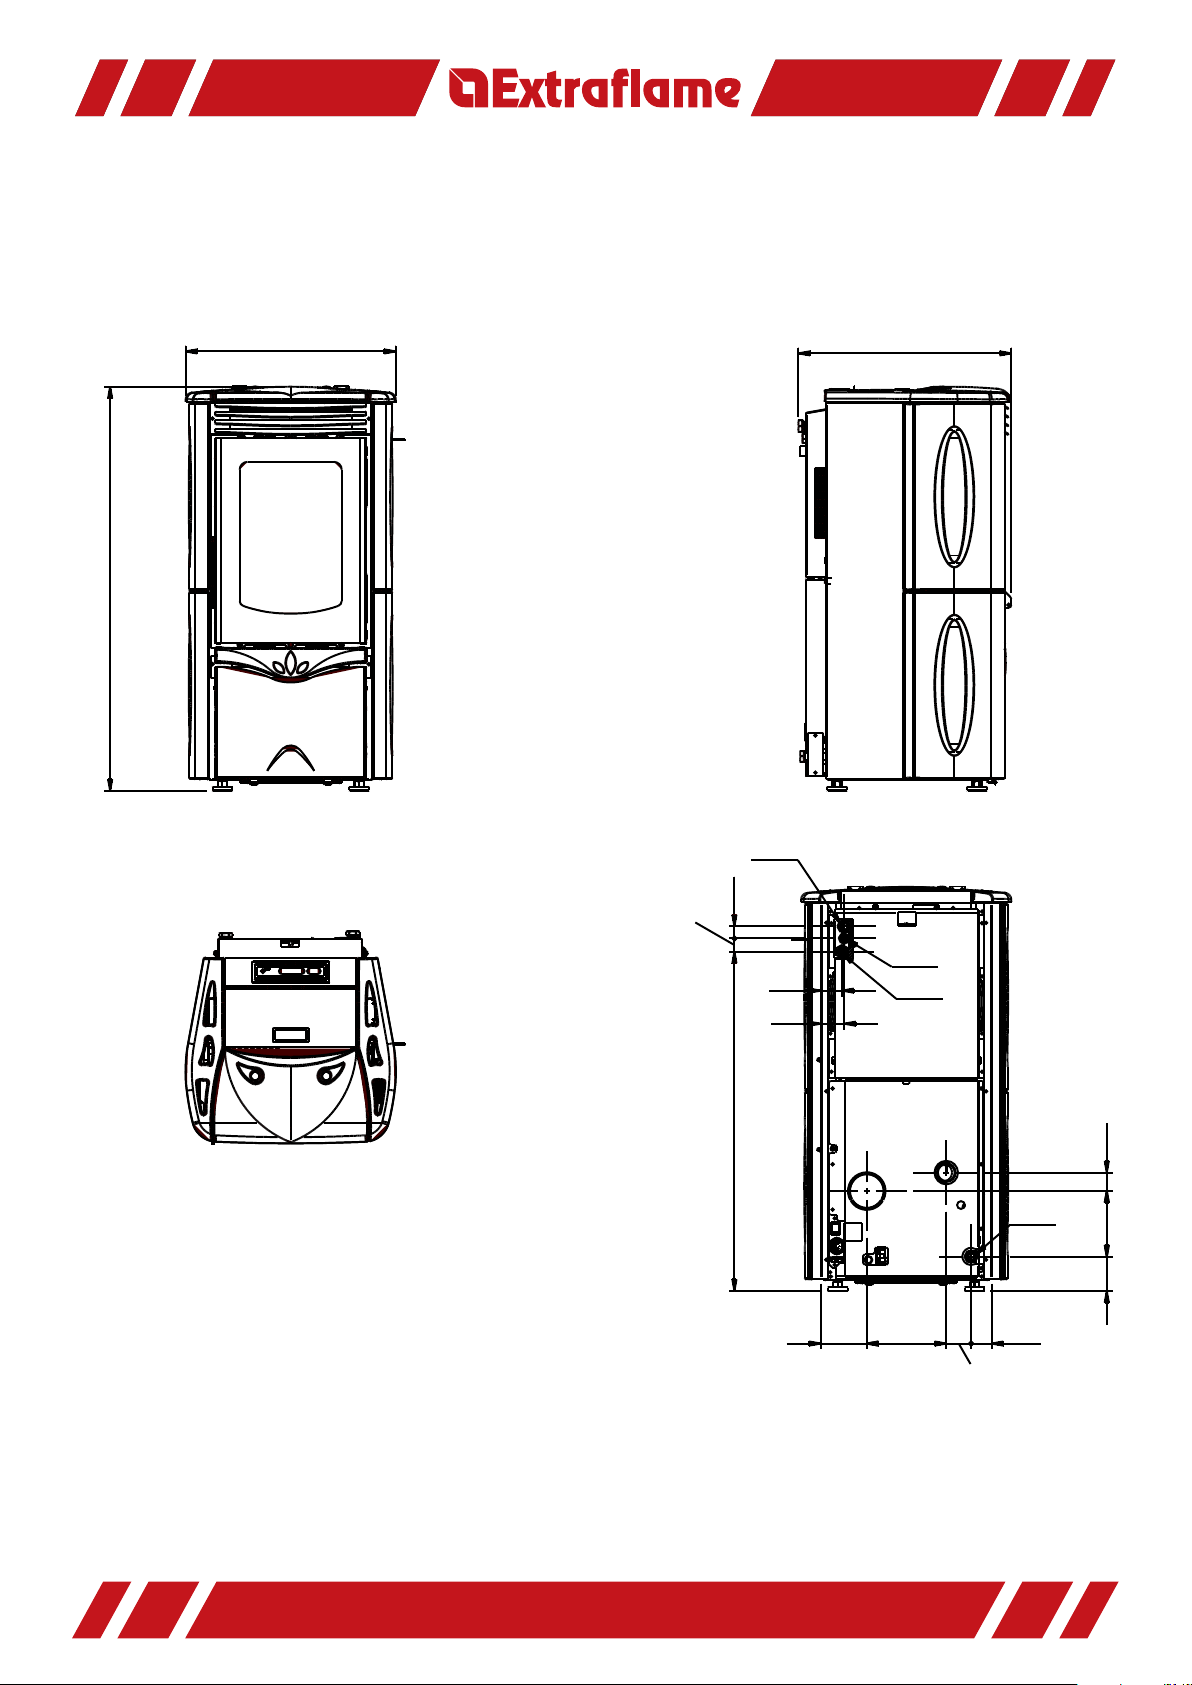
1034
538
545
C
31
34
868
54
59
118
B
203
E
G
A
D
52
63
47
168
88
DUCHESSA IDRO
DUCHESSA IDRO - DUCHESSA IDRO STEEL
Page 3
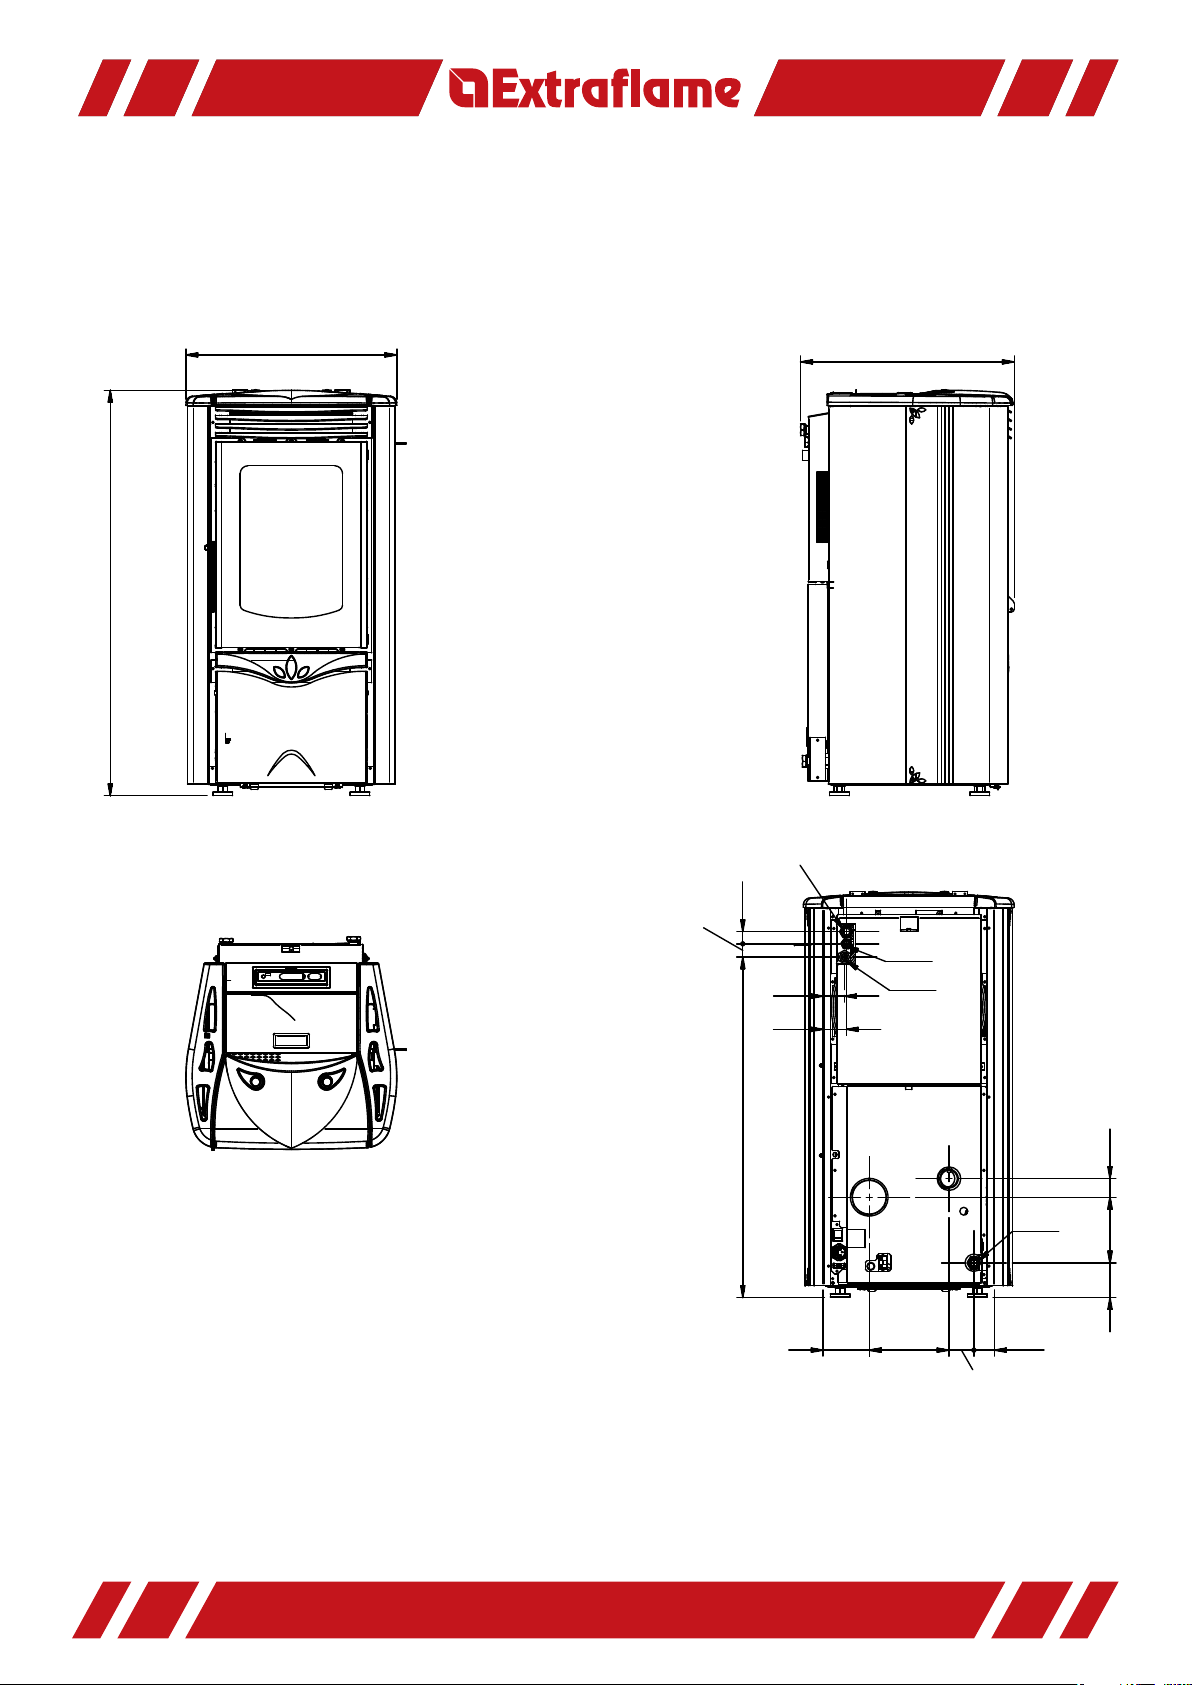
1034
538
545
C
31
34
868
54
59
118
B
E
G
203
A
63
D
52
47
168
88
DUCHESSA IDRO STEEL
DUCHESSA IDRO - DUCHESSA IDRO STEEL
Page 4
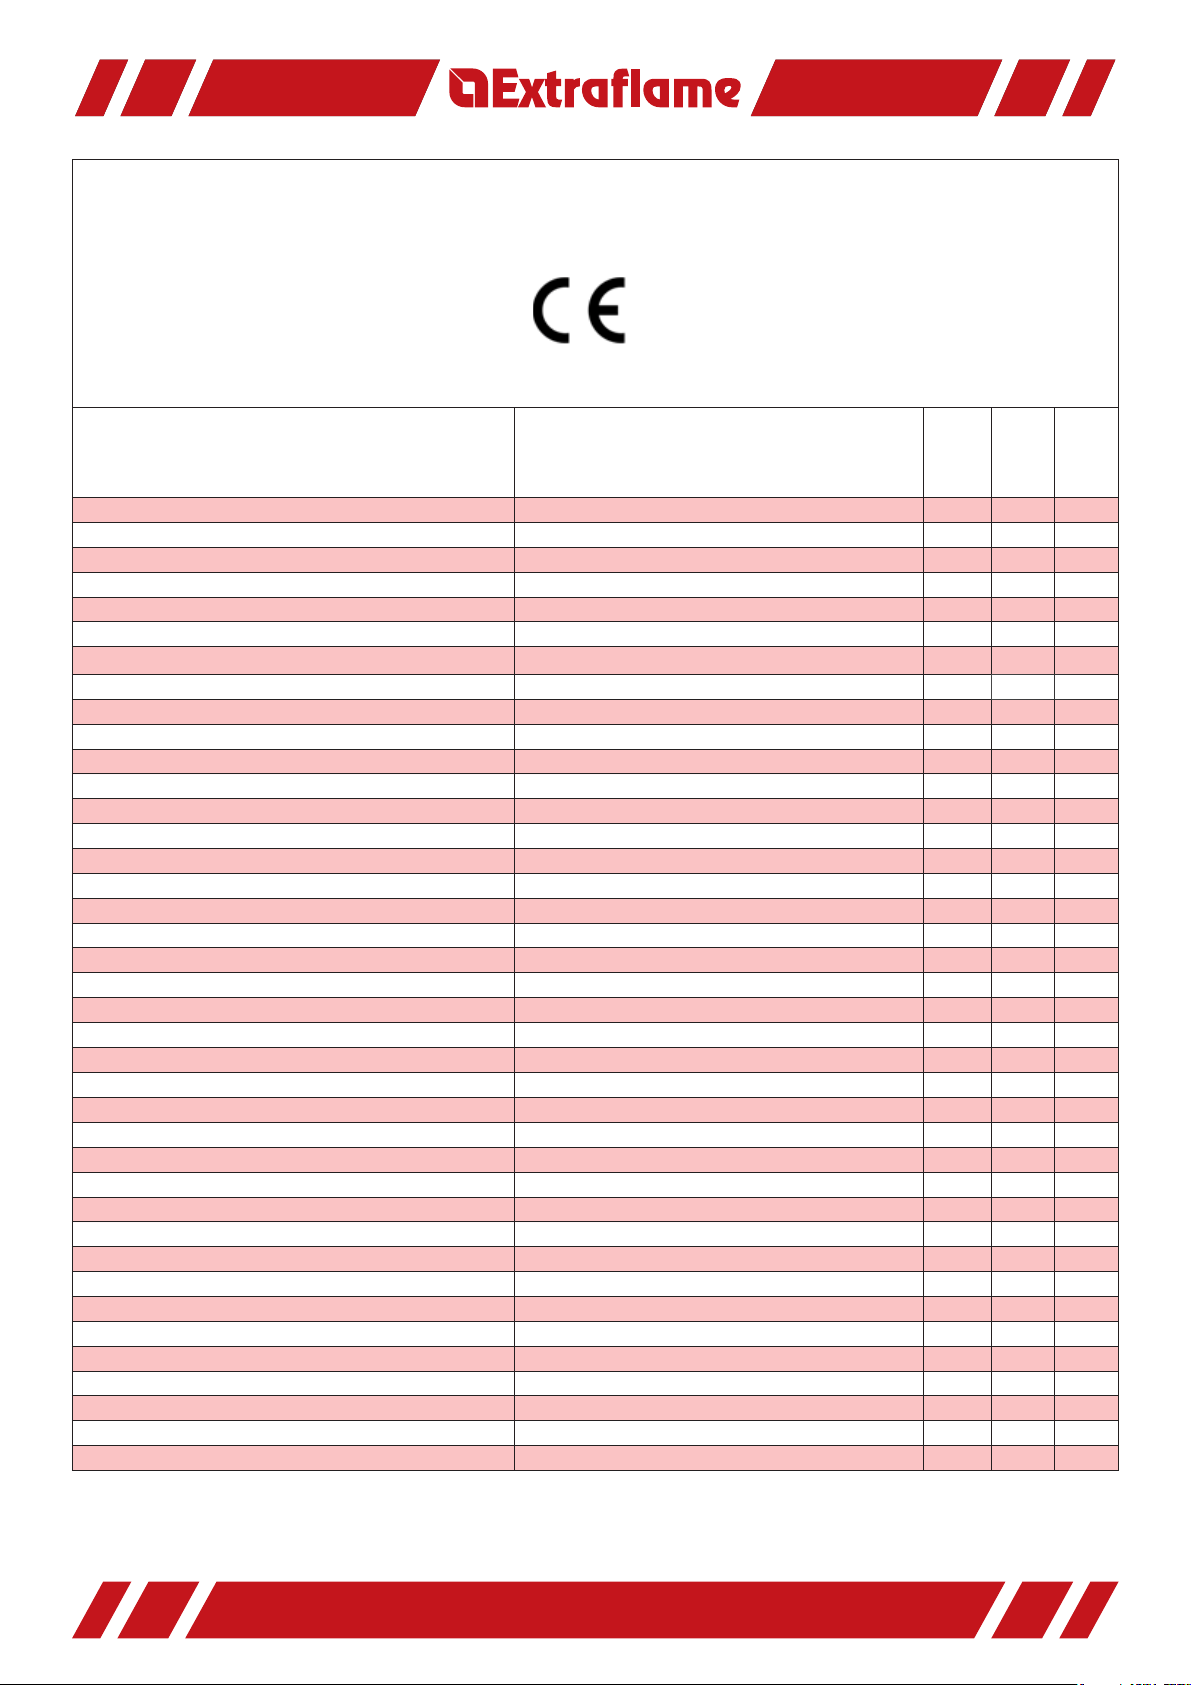
Stufa a pellet modello / pellet stove model : Duchessa Idro - Duchessa Idro Steel
Informazioni marcatura / Marking information
09
EN 14785 : 2006
Caratteristiche Features U.M.
Peso Weight kg 170 158
Altezza Height mm 1034 1034
Larghezza Width mm 538 538
Profondità Depth mm 545 545
Diametro tubo scarico fumi Outlet fumes pipe diameter mm 80 80
Diametro tubo aspirazione aria Air intake pipe diameter mm 50 50
Volume di riscaldamento max Max. heating volume m
Potenza termica globale max Max. overall thermal output kW 13.8 13.8
Potenza termica utile max Max. useful thermal output kW 12.5 12.5
- potenza resa all’aria - power given back to air kW 2.3 2.3
- potenza resa all’acqua - power given back to water kW 10.2 10.2
Potenza termica globale min Min. overall thermal output kW 3.8 3.8
Potenza termica utile min Min. useful thermal output kW 3.5 3.5
- potenza resa all’aria - power given back to air kW 0.5 0.5
- potenza resa all’acqua - power given back to water kW 3 3
Consumo orario combustibile max Max. hourly fuel consumption kg/h 2.8 2.8
Consumo orario combustibile min Min. hourly fuel consumption kg/h 0.8 0.8
Capacità serbatoio Tank capacity kg ~ 20 ~ 20
Tiraggio del camino consigliato Recommended ue pipe draft Pa ~ 10 ~ 10
Tiraggio del camino alla potenza termica utile max Flue pipe draft at max. useful thermal output Pa - Tiraggio del camino alla potenza termica utile min Flue pipe draft at min. useful thermal output Pa - Potenza elettrica nominale Rated electric output W 310 310
Potenza elettrica apparecchio Appliance electric output W
Tensione nominale Rated voltage Vac 230 230
Frequenza nominale Rated frequency Hz 50 50
Diametro tubo entrata/uscita acqua Water intake/outlet pipe diameter “ 3/4 3/4
Diametro tubo scarico automatico Automatic discharge pipe diameter “ 1/2 1/2
Prevalenza pompa Pump head m55
Max pressione idrica di esercizio ammessa Max. admitted operating water pressure bar 2.5 2.5
CO misurato alla potenza termica utile max CO measured at max. useful thermal output % 0.020 0.020
CO misurato alla potenza termica utile min CO measured at min. useful thermal output % 0.050 0.050
Rendimento alla potenza termica utile max Performance at max. useful thermal output %8989
Rendimento alla potenza termica utile min Performance at min. useful thermal output %8585
Temperatura gas di scarico alla potenza termica utile max Exhaust gas temperature at max. useful thermal output °C - -
Temperatura gas di scarico alla potenza termica utile min Exhaust gas temperature at min. useful thermal output °C - -
Massa dei gas emessi alla potenza termica utile max Gas mass given o at max. useful thermal output g/s - -
Massa dei gas emessi alla potenza termica utile min Gas mass given o at min. useful thermal output g/s - -
Emissioni polveri alla potenza termica utile max Dust emissions o at min. useful thermal output mg/m - -
Emissioni polveri alla potenza termica utile min Dust emissions o at min. useful thermal output mg/m - -
Iro
Duchessa
--
310 310
Duchessa
Idro Steel
Prove eseguite usando come combustibile pellet di legno con potere calori co pari a 4.9 kWh/kg.
Tests done using wood pellet (as fuel) by heating power of 4.9 kWh/kg.
DUCHESSA IDRO - DUCHESSA IDRO STEEL
Page 5
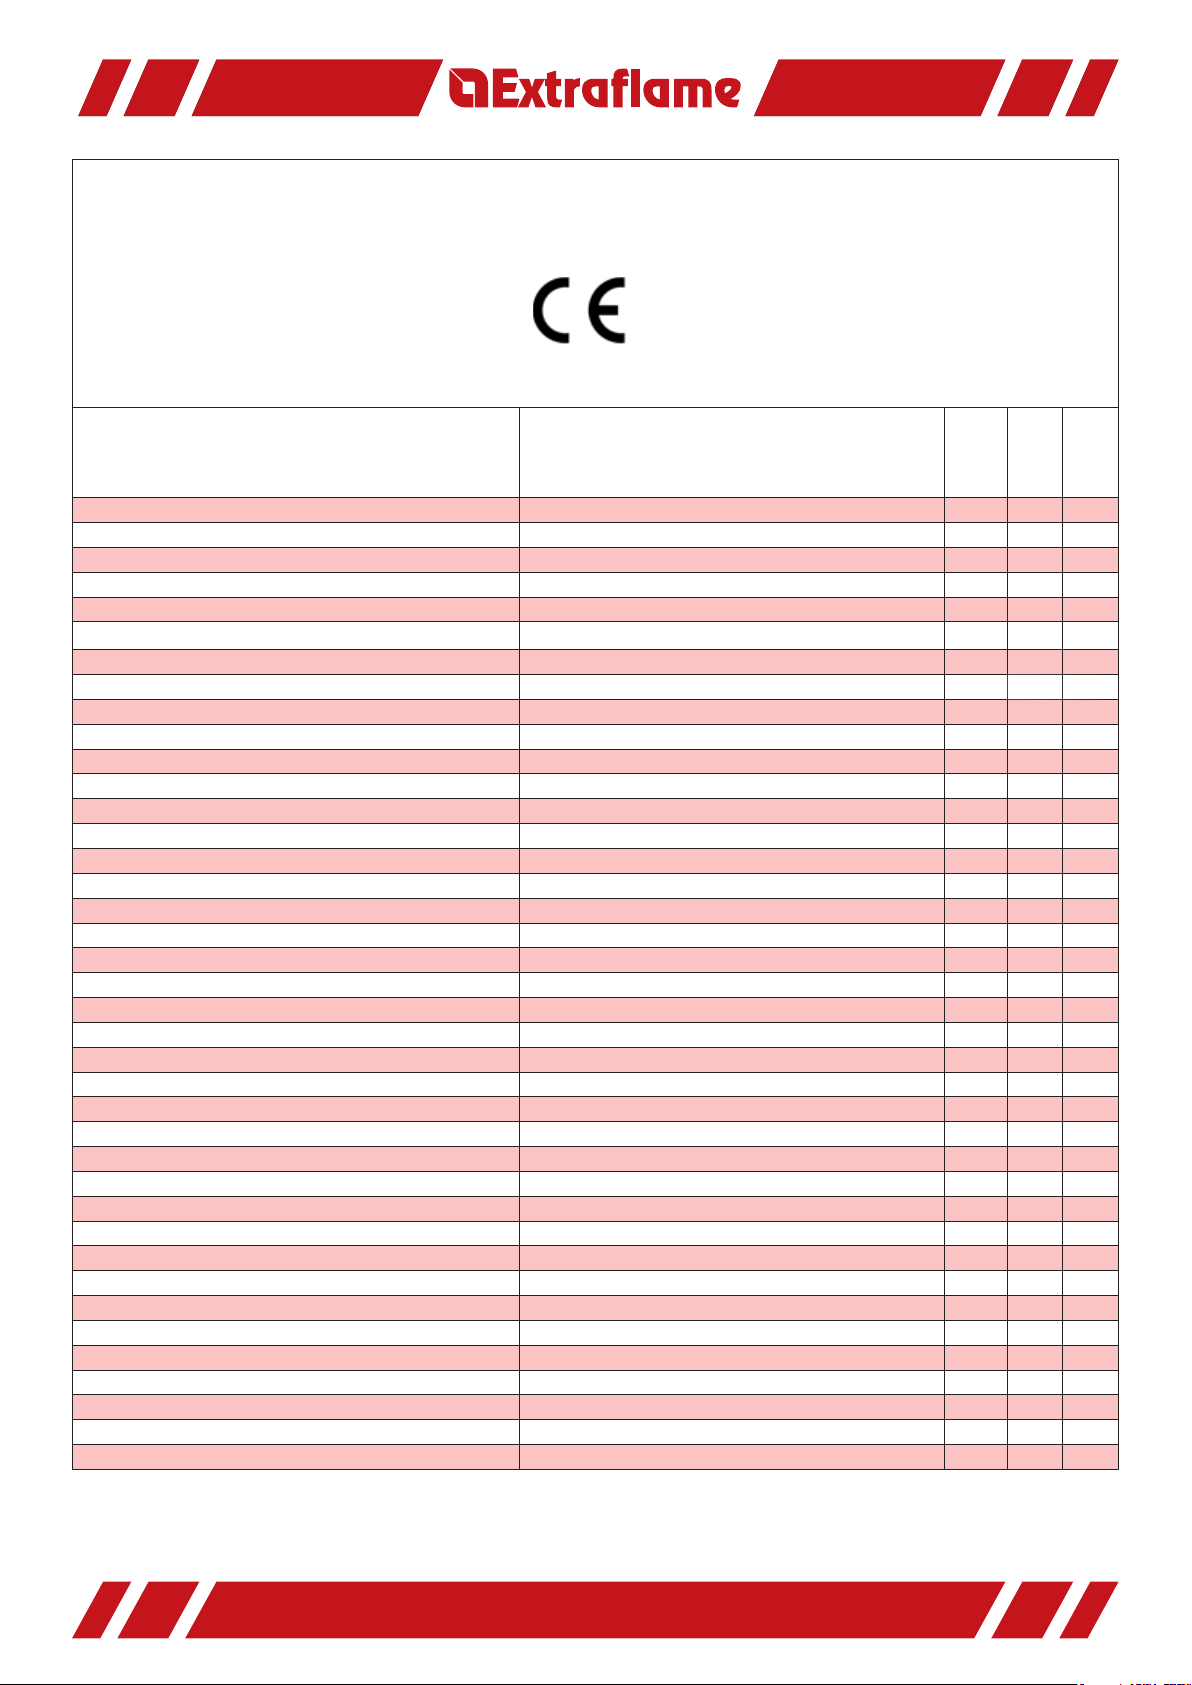
Poêle à pellets modèle / Pelletofenmodell : Duchessa Idro - Duchessa Idro Steel
Informations certi cation / Prüfungsinformation
09
EN 14785 : 2006
Données Eigenschaften U.M.
Poids Gewicht kg 170 158
Hauteur Höhe mm 1034 1034
Largeur Breite mm 538 538
Profondeur Tiefe mm 545 545
Diamètre tuyau évacuation fumées Durchmesser Rauchabzugsrohr mm 80 80
Diamètre tuyau aspiration air Durchmesser Luftansaugrohr mm 50 50
Volume de réchau ement max Max. Heizvolumen m - -
Puissance thermique totale max Max. Brennsto wärmeleistung kW 13.8 13.8
Puissance thermique utile max Max. Nennwärmeleistung kW 12.5 12.5
- puissance rendue à l’air - Luftwärmeleistung kW 2.3 2.3
- puissance rendue à l’eau - Wasserwärmeleistung kW 10.2 10.2
Puissance thermique totale min Min. Brennsto wärmeleistung kW 3.8 3.8
Puissance thermique utile min Min. Nennwärmeleistung kW 3.5 3.5
- puissance rendue à l’air - Luftwärmeleistung kW 0.5 0.5
- puissance rendue à l’eau - Wasserwärmeleistung kW 3 3
Consommation horaire combustible max Maximaler Brennsto verbrauch pro Stunde kg/h 2.8 2.8
Consommation horaire combustible min Mindestbrennsto verbrauch pro Stunde kg/h 0.8 0.8
Capacité réservoir Aufnahmevermögen Pelletspeicher kg ~ 20 ~ 20
Tirage de la cheminée conseillé Empfohlener Zug des Kamins Pa ~ 10 ~ 10
Tirage de la cheminée à la puissance thermique utile max Zug des Kamins bei maximaler Nennwärmeleistung Pa - Tirage de la cheminée à la puissance thermique utile min Zug des Kamins bei minimaler Nennwärmeleistung Pa - Puissance électrique nominale Elektrische Nennleistung W 310 310
Puissance électrique appareil Elektrische Geräteleistung W 310 310
Tension nominale Nennspannung Vac 230 230
Fréquence nominale Nennfrequenz Hz 50 50
Diamètre tuyau entrée/sortie eau Rohrdurchmesser Wassereinlass/-auslass “ 3/4 3/4
Diamètre tuyau évacuation automatique Durchmesser automatisches Rauchabzugsrohr “ 1/2 1/2
Hauteur d’élévation pompe Förderhöhe Pumpe m55
Pression hydrique de service max. admise Maximaler zugelassener Wasserdruck bei Betrieb bar 2.5 2.5
CO mesuré à la puissance thermique utile max CO-Wert bei max. Nennwärmeleistung % 0.020 0.020
CO mesuré à la puissance thermique utile min CO-Wert bei min. Nennwärmeleistung % 0.050 0.050
Rendement à la puissance thermique utile max Leistung bei maximaler Nennwärmeleistung %8989
Rendement à la puissance thermique utile min Leistung bei minimaler Nennwärmeleistung %8585
Temp. gaz d’échappement à la puissance therm. utile max Abgastemperatur bei maximaler Nennwärmeleistung °C - -
Temp. gaz d’échappement à la puissance therm. utile min Abgastemperatur bei minimaler Nennwärmeleistung °C - Masse des gaz émis à la puissance thermique utile max Ausgestoßene Abgasmenge bei max. Nennwärmeleistung g/s - -
Masse des gaz émis à la puissance thermique utile min Ausgestoßene Abgasmenge bei min. Nennwärmeleistung g/s - -
Emissions poussières à la puissance thermique utile max Staubemissionsgrenzwerte bei max. Nennwärmeleistung mg/m - Emissions poussières à la puissance thermique utile min Staubemissionsgrenzwerte bei min. Nennwärmeleistung mg/m - -
Iro
Duchessa
Duchessa
Idro Steel
Combustible utilisé pour e ectuer ces essais : pellets en bois avec un pouvoir calori que de 4.9 kWh/Kg.
Die Testdaten wurden unter folgenden Bedingungen erhoben:
Brennmaterial: Holz-Pellets, Brennwert: 4.9 KWh/kg.
DUCHESSA IDRO - DUCHESSA IDRO STEEL
Page 6
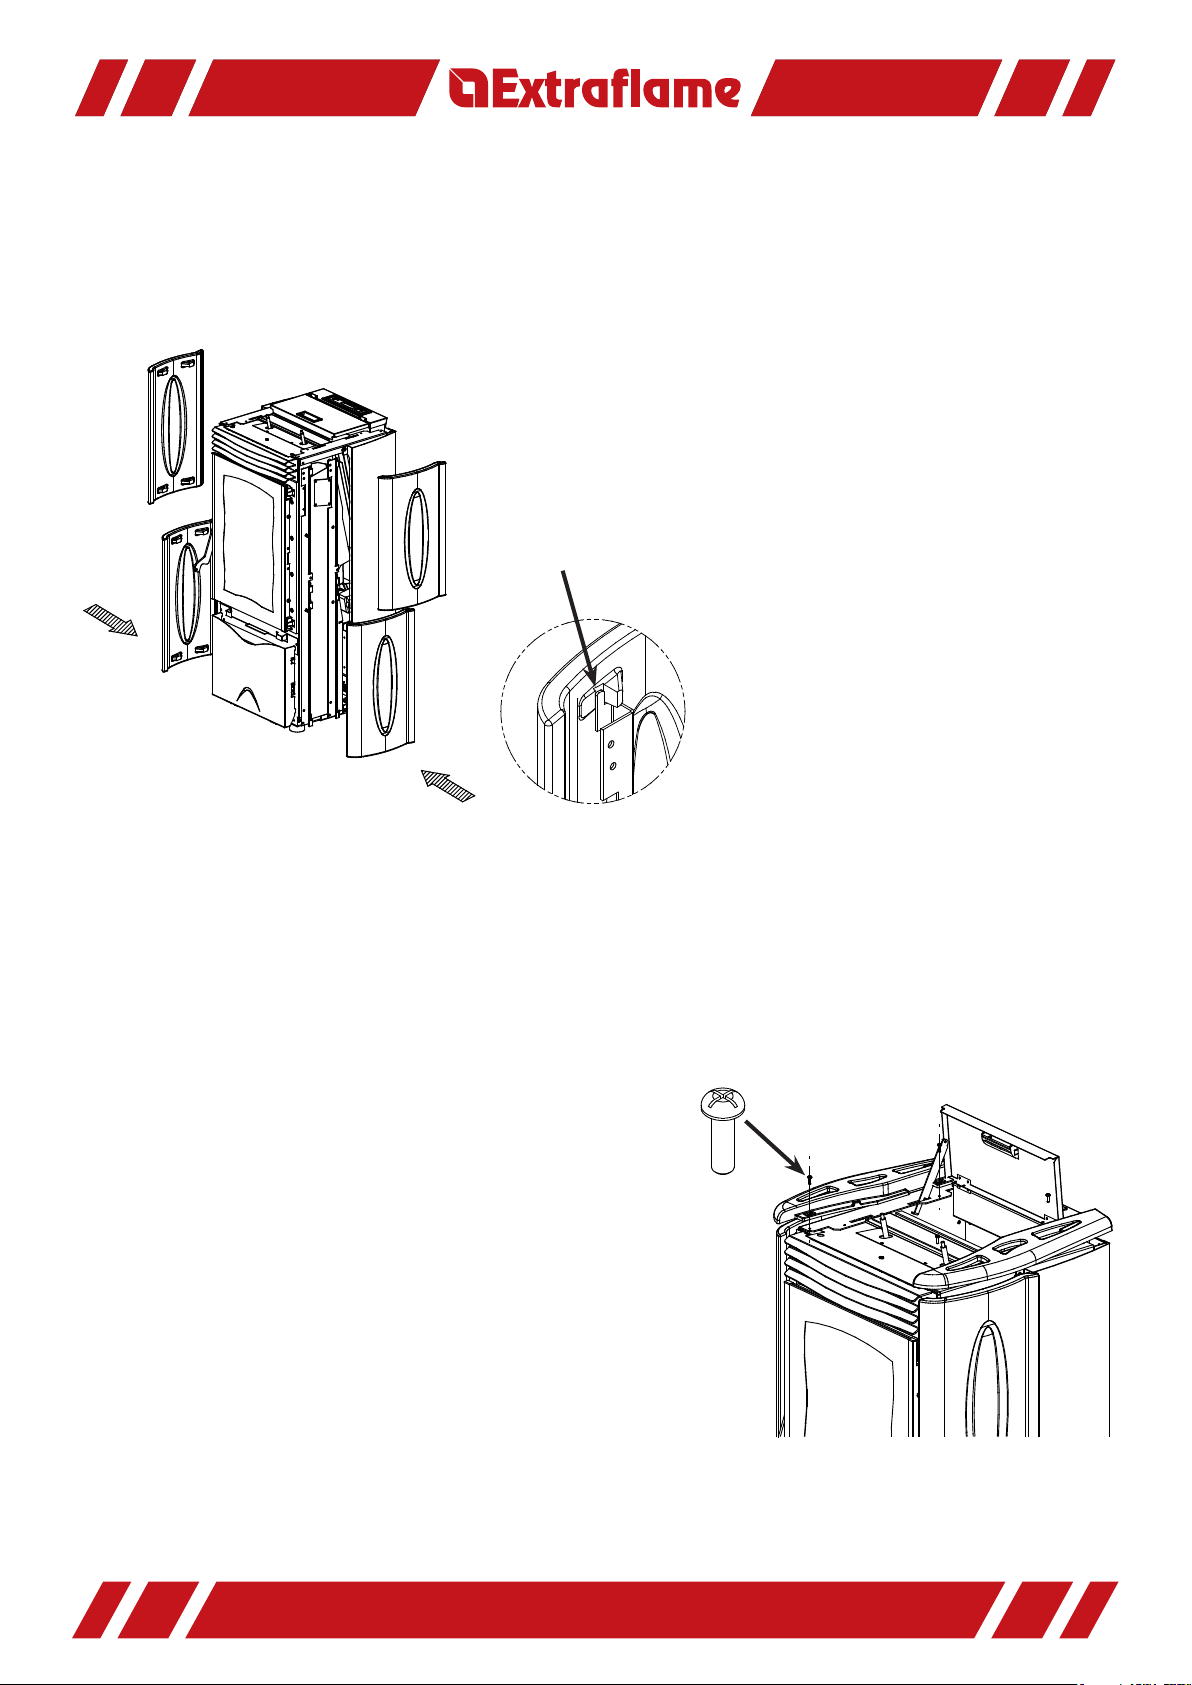
ISTRUZIONI MONTAGGIO PIASTRELLE DUCHESSA
ASSEMBLY INSTRUCTIONS FOR DUCHESSA TILES
INSTRUCTIONS DE MONTAGE DES CARREAUX
MONTAGEANLEITUNG FÜR DIE ABDECKPLATTEN
Aggancio in ferro per
piastrelle laterali
Iron attachment for
lateral tiles
Point d’accrochage en
fer des carreaux latéraux
Haltenase in Metall für
die Seitenabdeckplatten
Agganciare le 2 piastrelle laterali
inferiori negli appositi agganci di
supporto zincati come indicato nel
dettaglio della gura 1. Ripetere la
stessa operazione con le 2 piastrelle
superiori.
N.B. Le 4 piastrelle laterali sono tutte
uguali.
Fasten the 2 lower lateral tiles with the
special galvanised support attachments
as indicated in the detail of gure 1.
Repeat the same operation for the two
upper tiles.
N.B. The 4 lateral tiles are all the
same.
gura
1
Accrochez les 2 carreaux latéraux inférieurs, à l’aide des supports zingués prévus à cet e et, comme indiqué
dans le détail du schéma 1. Répétez l’opération pour le montage des 2 carreaux supérieurs.
N.B. Les 4 carreaux latéraux sont tous les mêmes.
Hängen Sie die beiden unteren Seitenabdeckplatten in den entsprechenden verzinkten Halterungen ein, wie
in der Detailansicht 1 beschrieben. Führen Sie denselben Vorgang für die beiden oberen Seitenabdeckplatten
durch. HINWEIS! Die 4 Seitenabdeckplatten sind alle gleich.
Dopo essersi assicurati che le 4 piastrelle siano ben
agganciate, bisogna ssare i 2 laterali (destro e sinistro)
ssandoli con le 4 viti auto lettanti 4,2x13 zincate tronche
date in dotazione.
After checking that the 4 tiles are well fastened, x the two
sides (right and left) with the 4 truncated 4.2x13 galvanised
self-tapping screws supplied.
Après avoir véri é que les 4 carreaux sont bien accrochés,
xez les 2 revêtements latéraux (droit et gauche) à l’aide
des 4 vis autotaraudeuses 4,2x13 zinguées et à bout plat
fournies.
gura
2
Nachdem Sie sich vergewissert haben, dass die 4 Abdeckplatten fest eingehakt sind, sind die beiden
Seitenabdeckungen (rechts und links) zu befestigen, indem die 4 stumpfen, selbstschneidenden Schrauben
4,2x13 mit Verzinkung aus dem Lieferumfang angeschraubt werden.
DUCHESSA IDRO - DUCHESSA IDRO STEEL
Page 7
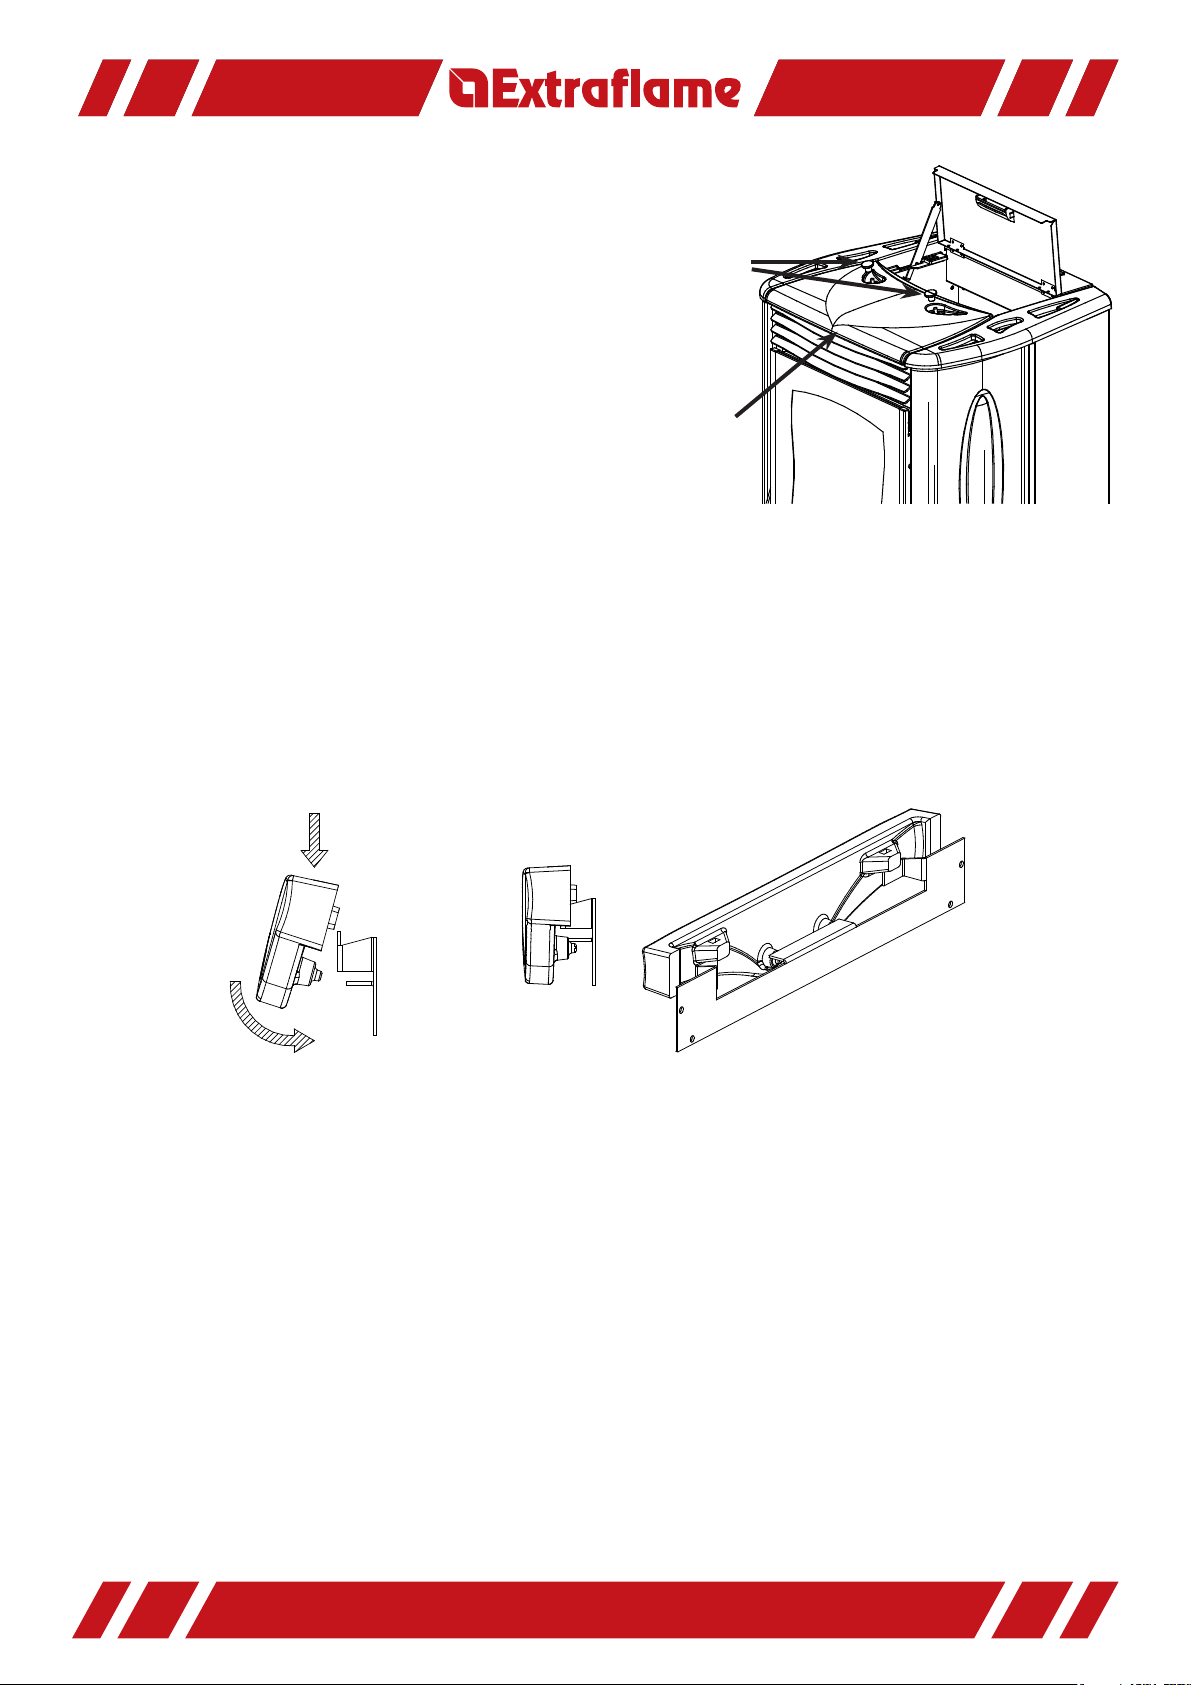
Appoggiare la copertura ceramica
frontale come in gura 3 e ssare i 2
pomoli in plastica sulle 2 aste raschiatori.
Se la copertura ceramica non dovesse
appoggiare perfettamente utilizzare la
guarnizione in dotazione per regolare gli
appoggi.
Place the frontal ceramic cover as shown
in gure 3 and x the 2 plastic knobs onto
the scraper rods. Should the ceramic cover
not rest perfectly, use the supplied seal to
Pomoli in plastica
Plastic knobs
Poignées en plastique
Kunststo -Kugelgri
Copertura ceramica
frontale
Frontal ceramic cover
Couvercle supérieur en
céramique
Frontabdeckung aus
Keramik
adjust the supports.
gura
3
Posez le couvercle supérieur en céramique, comme illustré dans le schéma 3 , et xez les 2 poignées en
plastique sur les 2 racleurs. Au cas où le couvercle en céramique n’adhérerait pas parfaitement au poêle,
utilisez le joint fourni pour adapter les points d’appui.
Legen Sie die Frontabdeckung aus Keramik wie in Abbildung 3 auf, und befestigen Sie die beiden Kugelgri e
auf den beiden Scharreisen. Sollte die Keramikabdeckung nicht richtig sitzen, ist die mitgelieferte Dichtung
zu verwenden, um die Stützpunkte auszugleichen.
gura
4
gura
5
In ne posizionare la piastrella ceramica frontale. Agganciare la piastrella nei 2 agganci zincati inclinandola
come a disegno ( gura 4) e successivamente ruotarla no alla posizione corretta ( gura 5). A particolari
agganciati la stufa risulterà come in gura 6.
Finally, position the frontal ceramic tile. Fasten the tile with the 2 galvanised fasteners inclining it as shown in
gure 4 and then rotate it into the correct position ( gure 5). With particulars attached, the stove will appear as
in gure 6.
Pour nir, mettez en place le carreau en céramique de la partie frontale du poêle. Accrochez le carreau, à
l’aide des 2 supports zingués, en l’inclinant comme sur le schéma 4, puis faites le pivoter jusqu’à sa position
correcte (schéma 5). Une fois tous les éléments montés, le poêle se présentera comme au schéma 6.
Positionieren Sie schlussendlich die Frontplatte aus Keramik. Hängen Sie die Platte in den beiden verzinkten
Haltenasen ein (siehe Abbildung 4), und drehen Sie diese auf die richtige Position (Abbildung 5). Nach dem
Einhängen aller Einzelteile präsentiert sich der Ofen wie in Abbildung 6.
DUCHESSA IDRO - DUCHESSA IDRO STEEL
Page 8
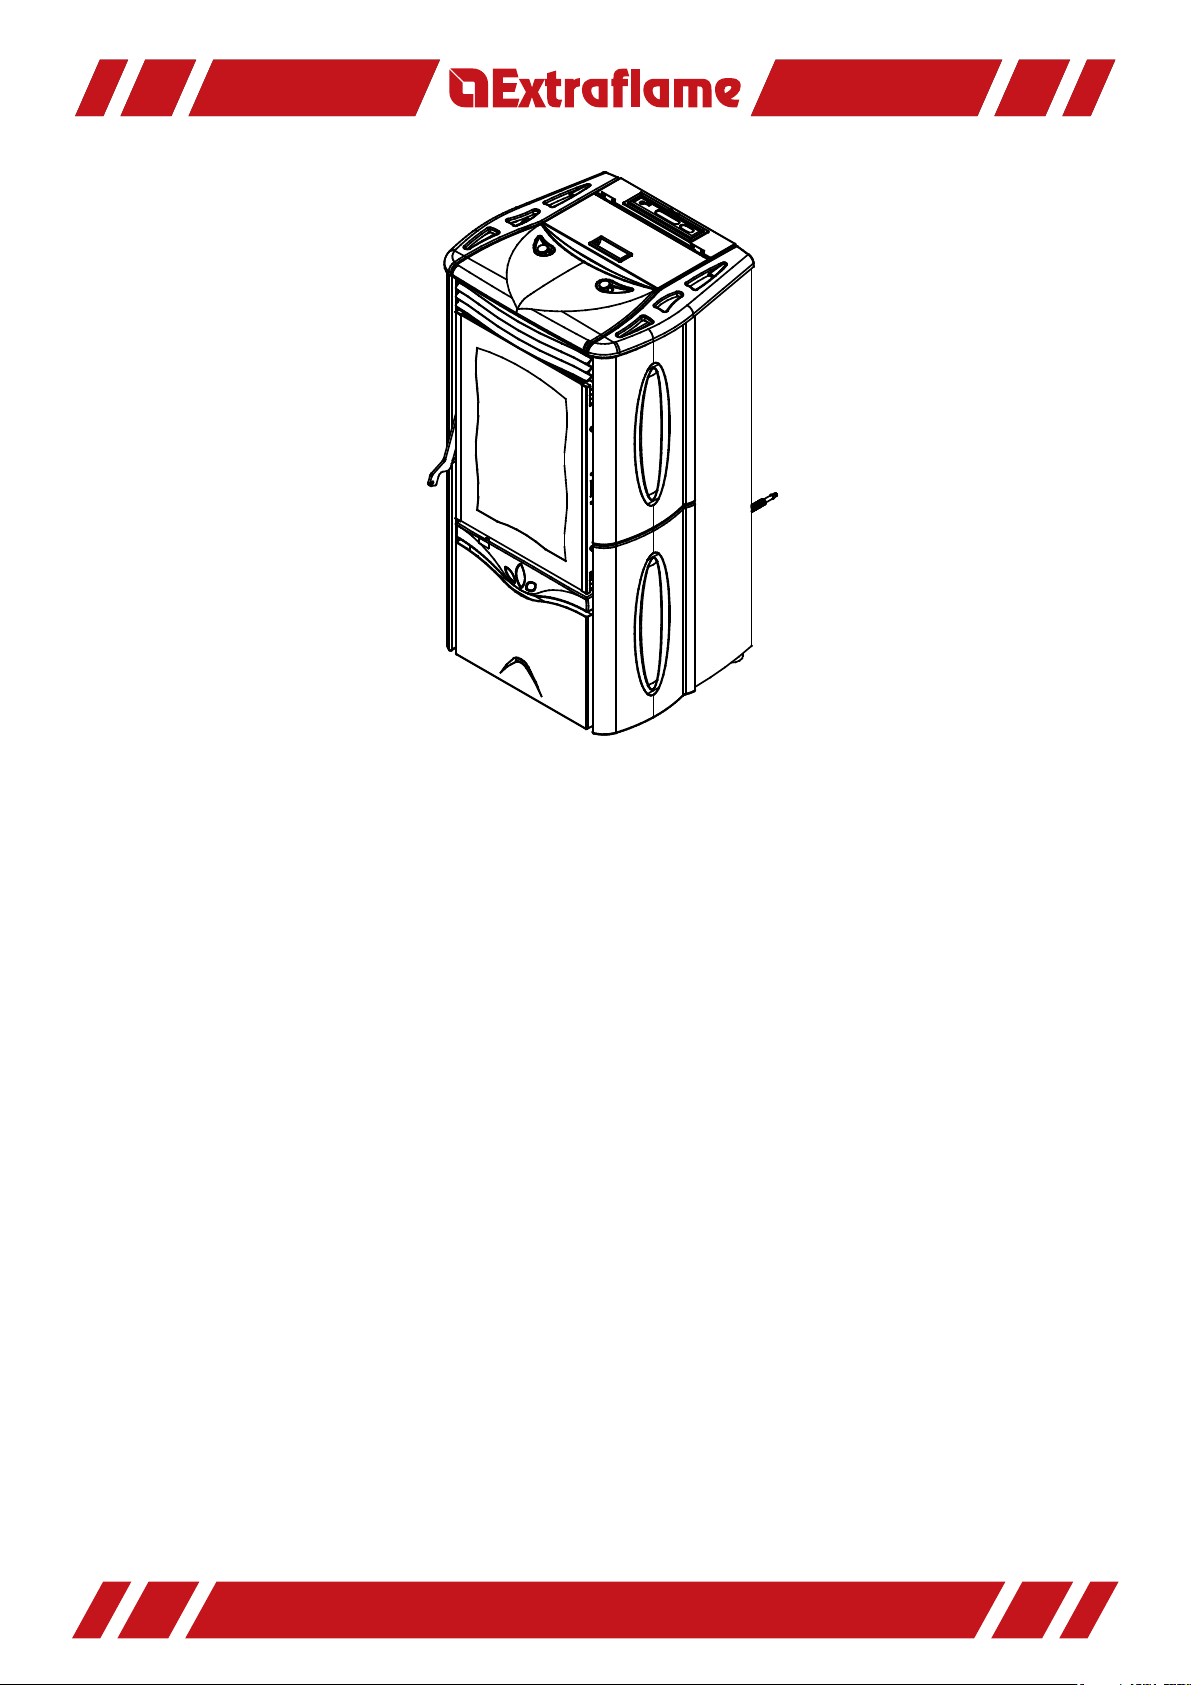
gura
N.B. Controllare se, durante la rotazione, la porta va a toccare le piastrelle laterali. In questo caso
piegare verso l’esterno l’aggancio in ferro descritto nel dettaglio della gura 1.
N.B. Check if the door touches the lateral tiles during rotation. In this case bend the iron fastener
described in the detail of gure 1 towards the outside.
N.B. Véri ez que, en ouvrant la porte, celle-ci ne touche pas les carreaux latéraux. Dans le cas
contraire, pliez vers l’extérieur le support en fer décrit dans le détail du schéma 1.
HINWEIS! Kontrollieren Sie, ob die Tür beim Drehen die Seitenabdeckplatten berührt. Sollte dies der Fall
sein, so ist die Haltenase aus Metall (siehe Abbildung 1) nach außen zu biegen.
6
004275136 Fascicolo istruzioni Duchessa - Duchessa Steel
DUCHESSA IDRO - DUCHESSA IDRO STEEL
 Loading...