

Extraflame COMFORT IDRO L80, COMFORT IDRO 800 Instruction Manual
MANUALE ISTRUZIONI CASSETTO FRONTALE INSERTI
INSTRUCTIONS MANUAL FOR FRONT DRAWER INSERTS
MANUEL D’INSTRUCTION DES PIÈCES ENCASTRABLES DU TIROIR FRONTAL
BEDIENUNGSANLEITUNG VORDERE SCHUBLADE EINSATZSTÜCKE
MANUAL DE INSTRUCCIONE CAJÓN FRONTAL INSERCIONES
Compatibile per - Compatible for - Compatible avec - Kompatibel für - Compatible con:
COMFORT IDRO L80 COMFORT IDRO 800

2
ITALIANO ....................................................................................................................................................................................3
KIT OPZIONALE CARICAMENTO PELLET FRONTALE ................................................................................................................................................. 3
COMPONENTI DEL KIT ...........................................................................................................................................................................................................4
UTILIZZO DEL CASSETTO ..................................................................................................................................................................................................... 9
ENGLISH .................................................................................................................................................................................... 13
OPTIONAL FRONTAL PELLET FEEDING KIT .................................................................................................................................................................13
COMPONENTS OF THE KIT .................................................................................................................................................................................................14
HOW TO USE THE TRAY .......................................................................................................................................................................................................19
FRANÇAIS .................................................................................................................................................................................23
KIT EN OPTION CHARGEMENT FRONTAL DU PELLET .............................................................................................................................................23
COMPOSANT DU KIT ............................................................................................................................................................................................................24
UTILISATION DU TIROIR ......................................................................................................................................................................................................29
DEUTSCH ...................................................................................................................................................................................33
OPTIONALES KIT ZUM FRONTALEN LADEN DER PELLETS....................................................................................................................................33
KOMPONENTEN DES KIT ....................................................................................................................................................................................................34
GEBRAUCH DER SCHUBLADE ...........................................................................................................................................................................................39
ESPAÑOL ...................................................................................................................................................................................43
KIT OPCIONAL CARGA PELLET FRONTAL ....................................................................................................................................................................43
COMPONENTES DEL KIT .....................................................................................................................................................................................................44
UTILIZACIÓN DEL CAJÓN ..................................................................................................................................................................................................49

ITALIANO
KIT OPZIONALE CARICAMENTO PELLET FRONTALE
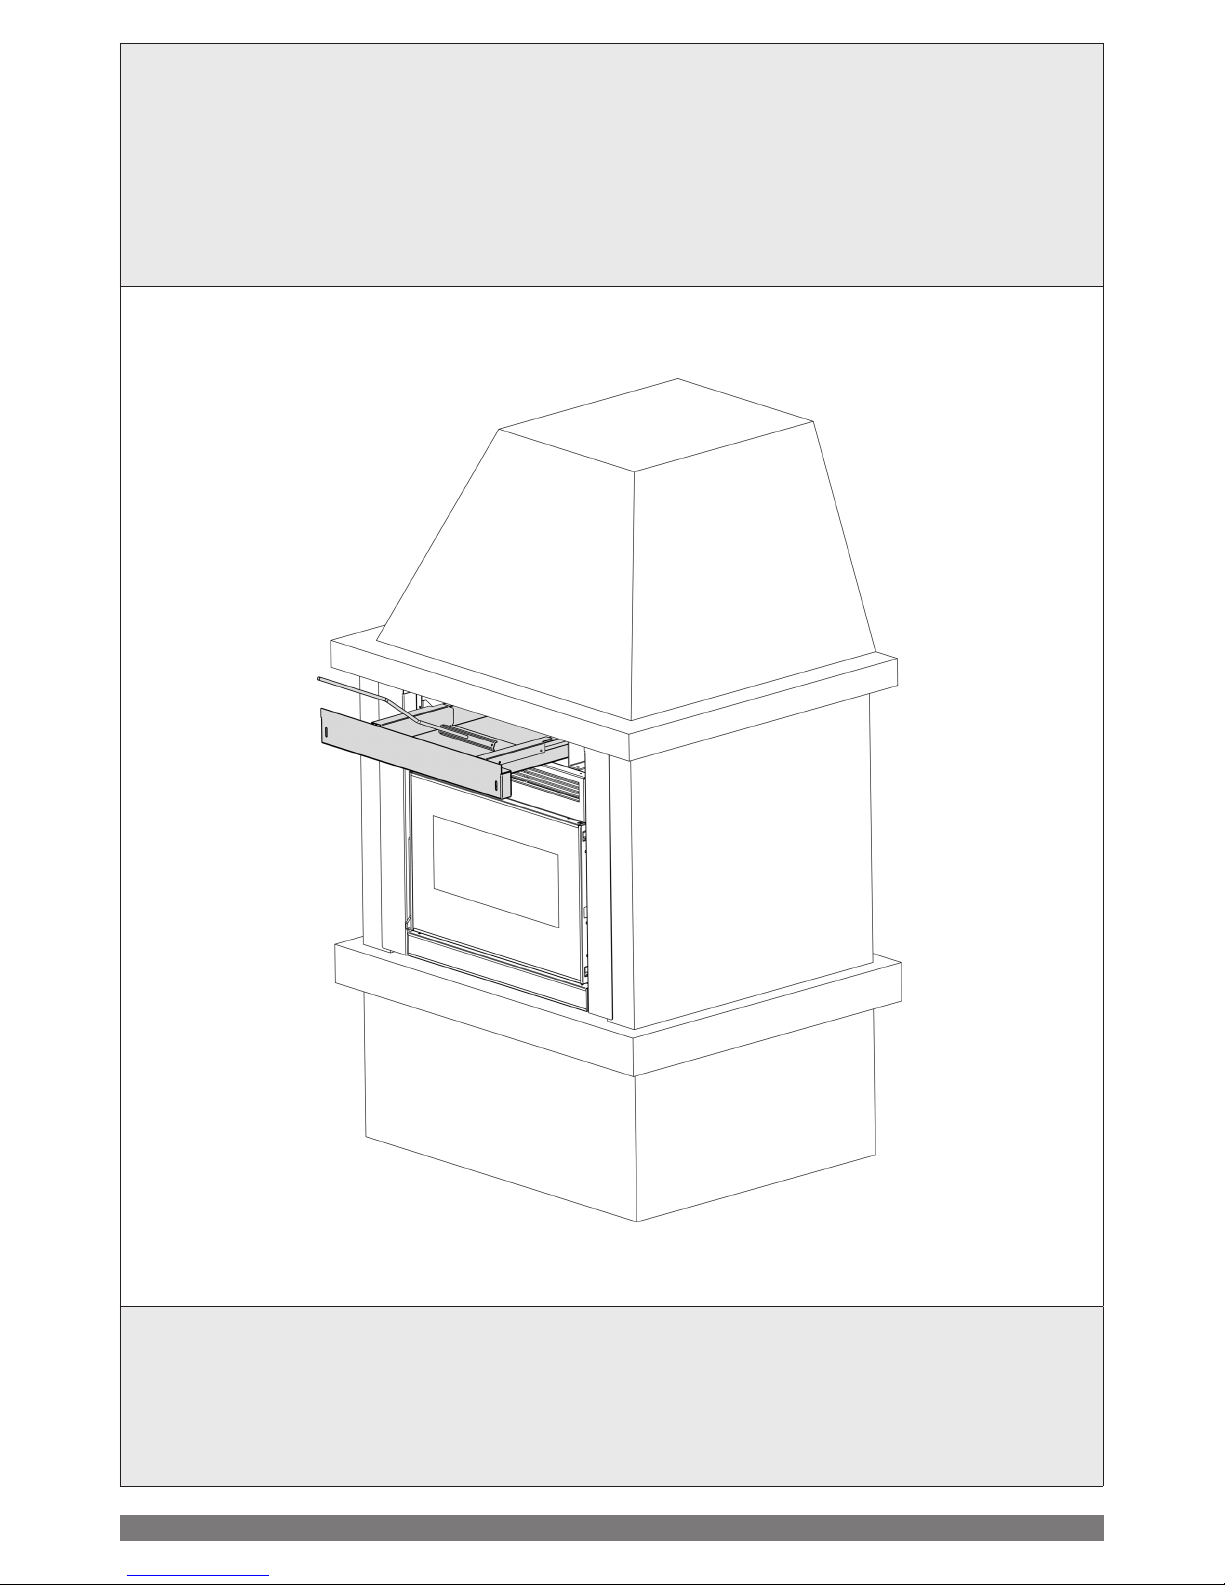
Il kit opzionale di caricamento pellet consente di caricare frontalmente il pellet all’interno del serbatoio senza
dover procedere con l’estrazione dell’inserto (operazione che richiede lo spegnimento della macchina).
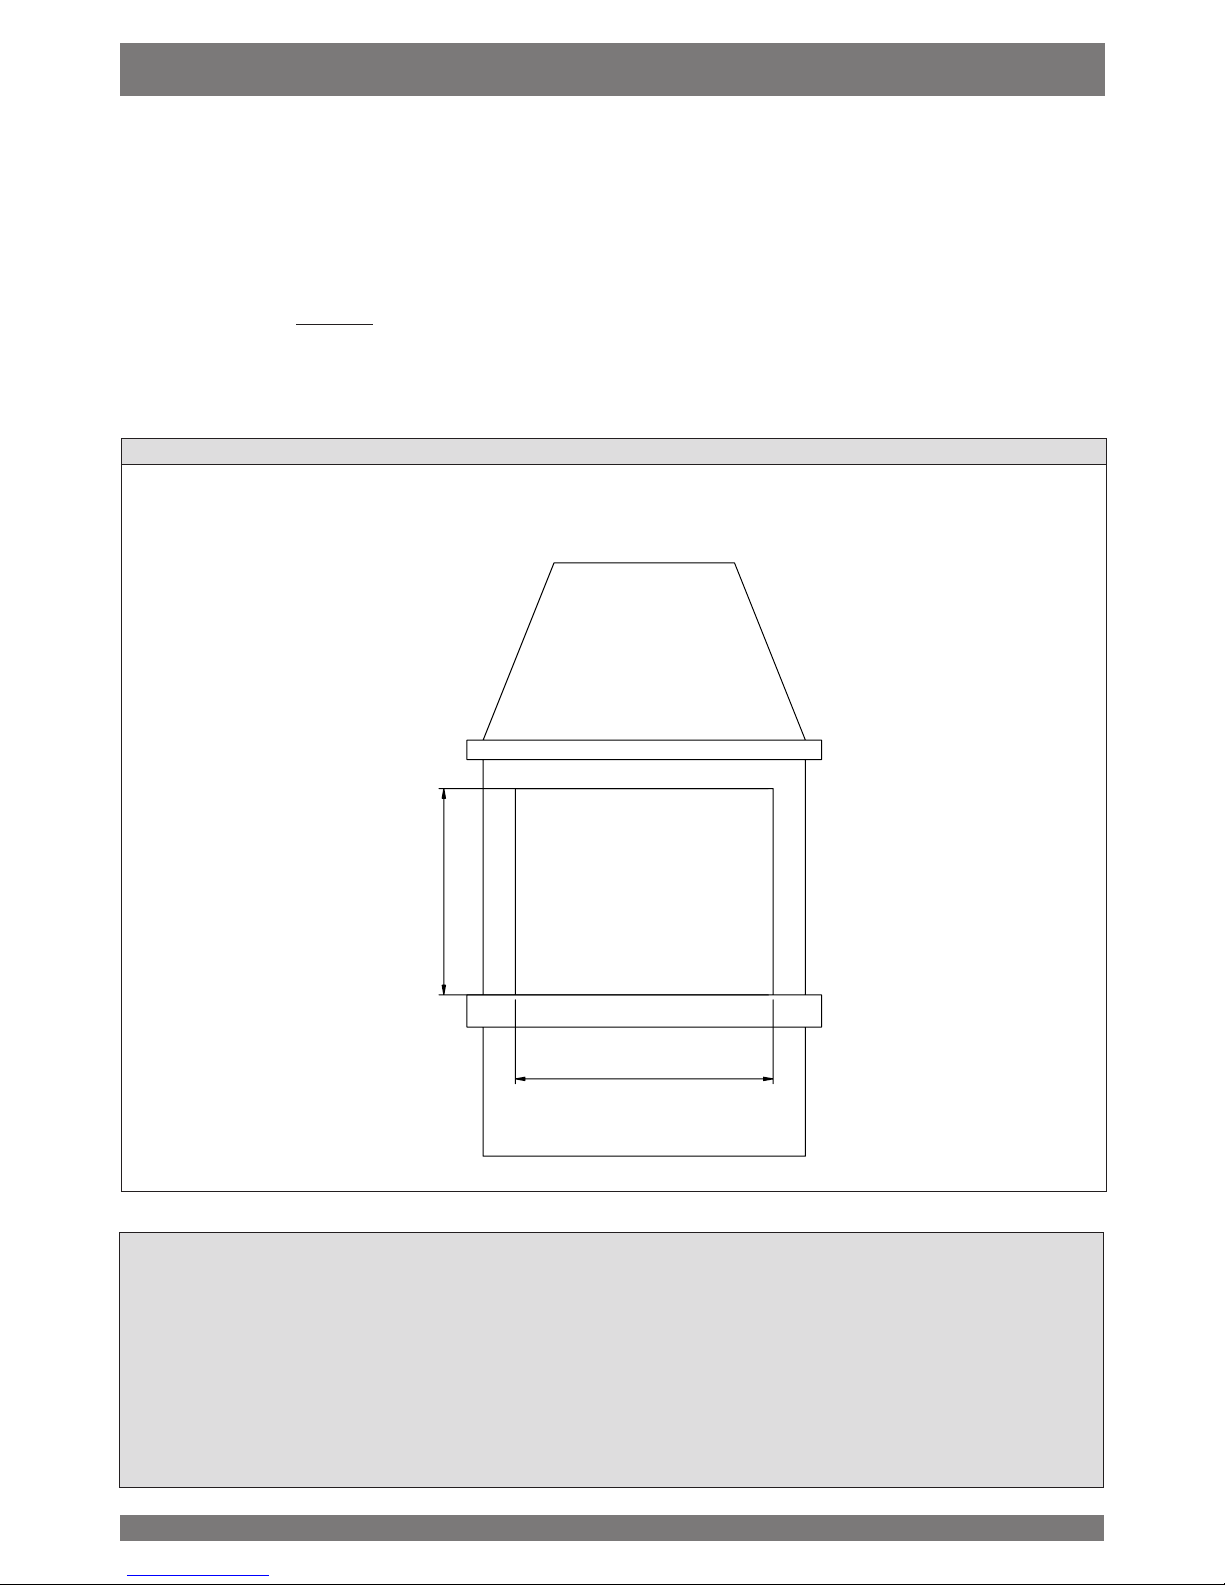
Prima di procedere con l’installazione dell’apparecchio è necessario assicurarsi che la struttura che rivestirà l’inserto garantisca
un foro con le misure minime indicate nella gure sotto.
Nell’immagini sono riportate le misure minime da rispettare tra l’inserto e il rivestimento: tali misure risultano necessarie per
permettere il corretto movimento della cornice e la sua rimozione dalla locazione originaria.
Il montaggio è possibile anche da inserto montato.
COMFORT L80 - IDRO 800
700 X 800 MM CON CASSETTO OPTIONAL
H=
700
L=
800
ATTENZIONE:
ESEGUIRE LE INDICAZIONI SEMPRE NELLA MASSIMA SICUREZZA!
LA STUFA DEVE ESSERE COMPLETAMENTE FREDDA, SPENTA
E SCOLLEGATA LA PRESA ELETTRICA DI RETE.
PER UN CORRETTO FUNZIONAMENTO DELL’INSERTO, IL CASSETTO DEVE RIMANERE SEMPRE
CHIUSO TRANNE DURANTE LA FASE DI CARICO SERBATOIO.
3

ITALIANO
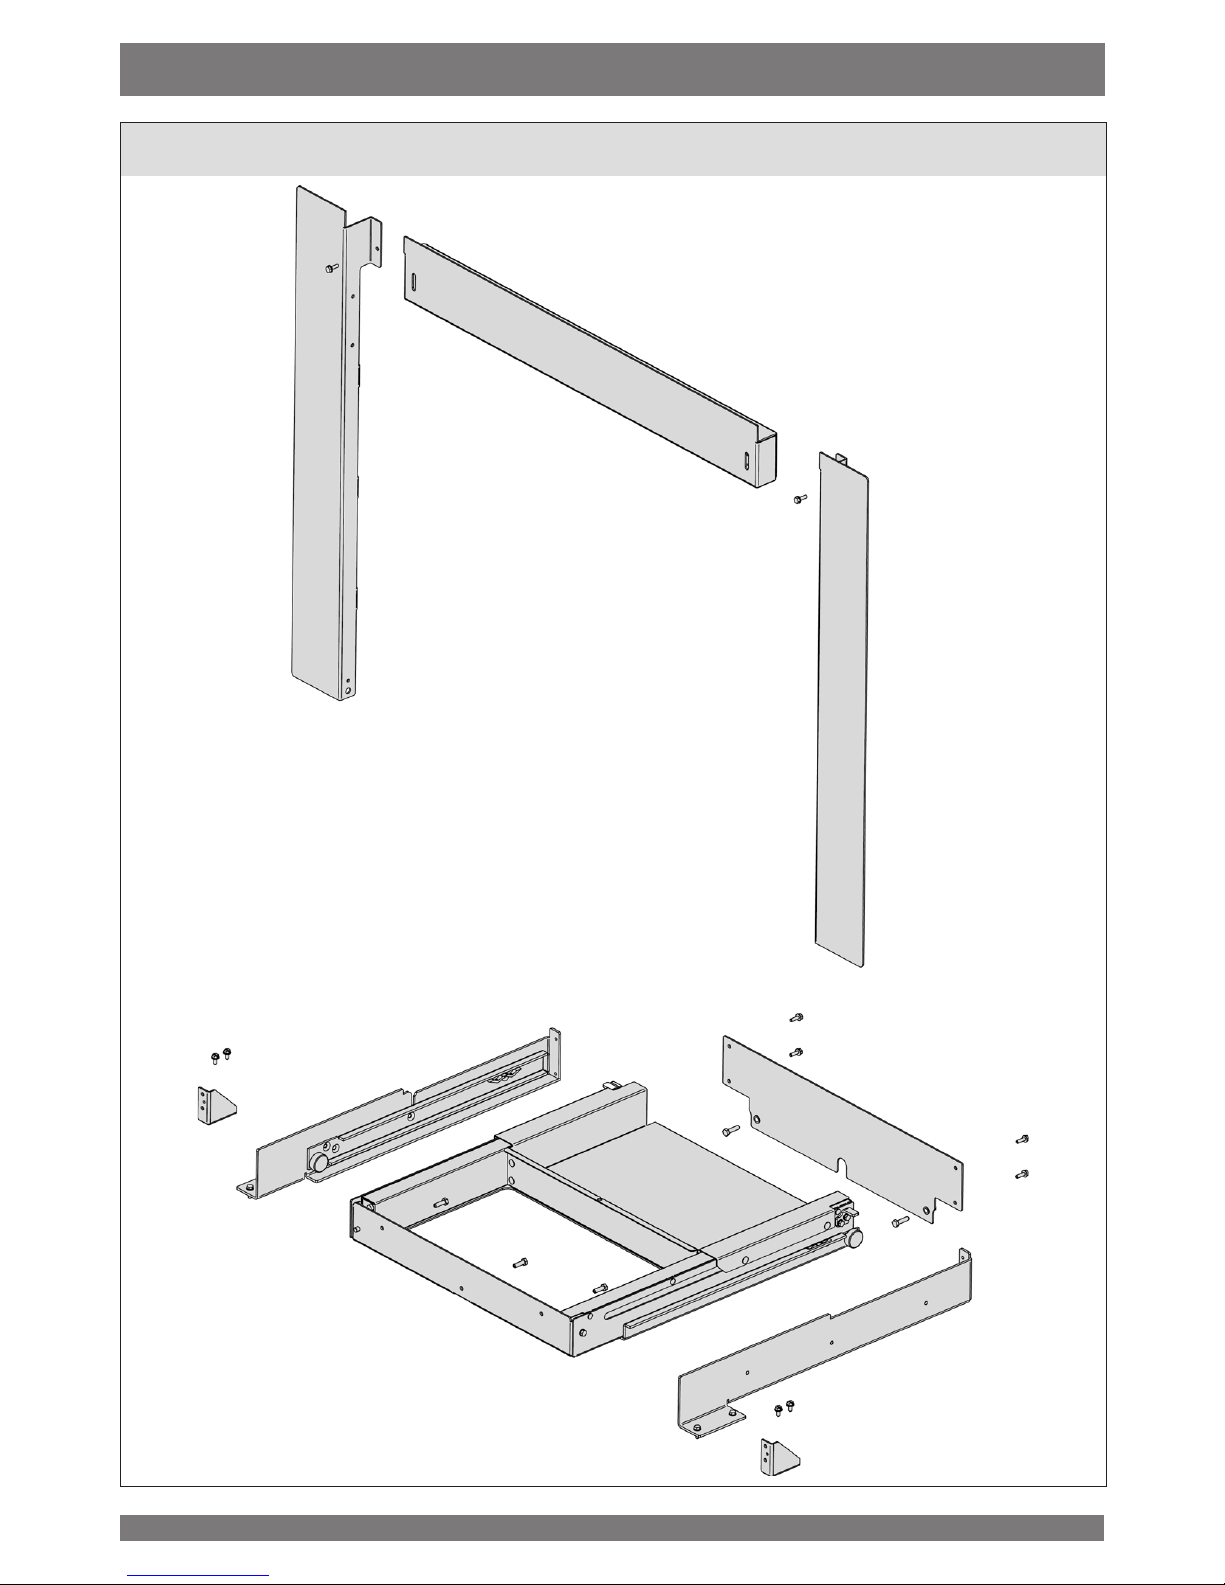
COMPONENTI DEL KIT
4
1
2
ITALIANO
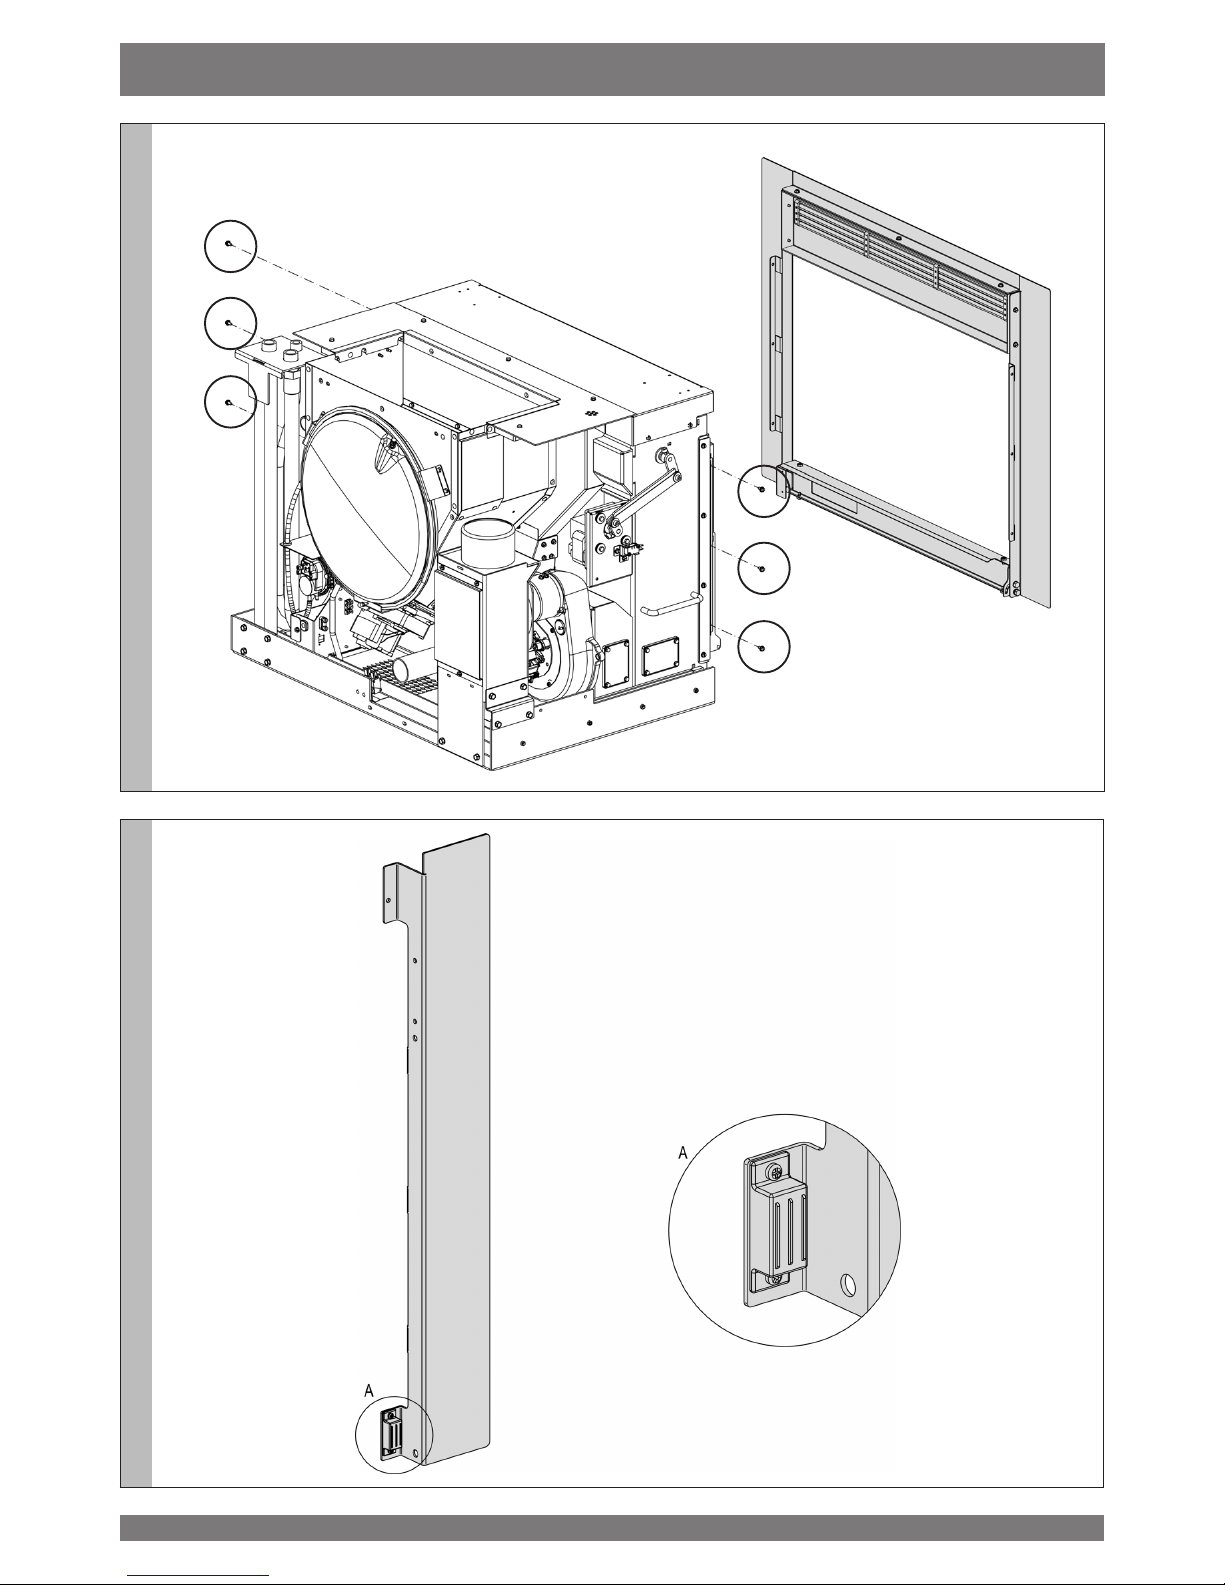
Togliere le 6 viti, e rimuovere la cornice completa con attenzione.
Smontare il magnete dalla corince originale, e montarlo sulla cornice destra
fornita nel kit.
5
3
4
ITALIANO
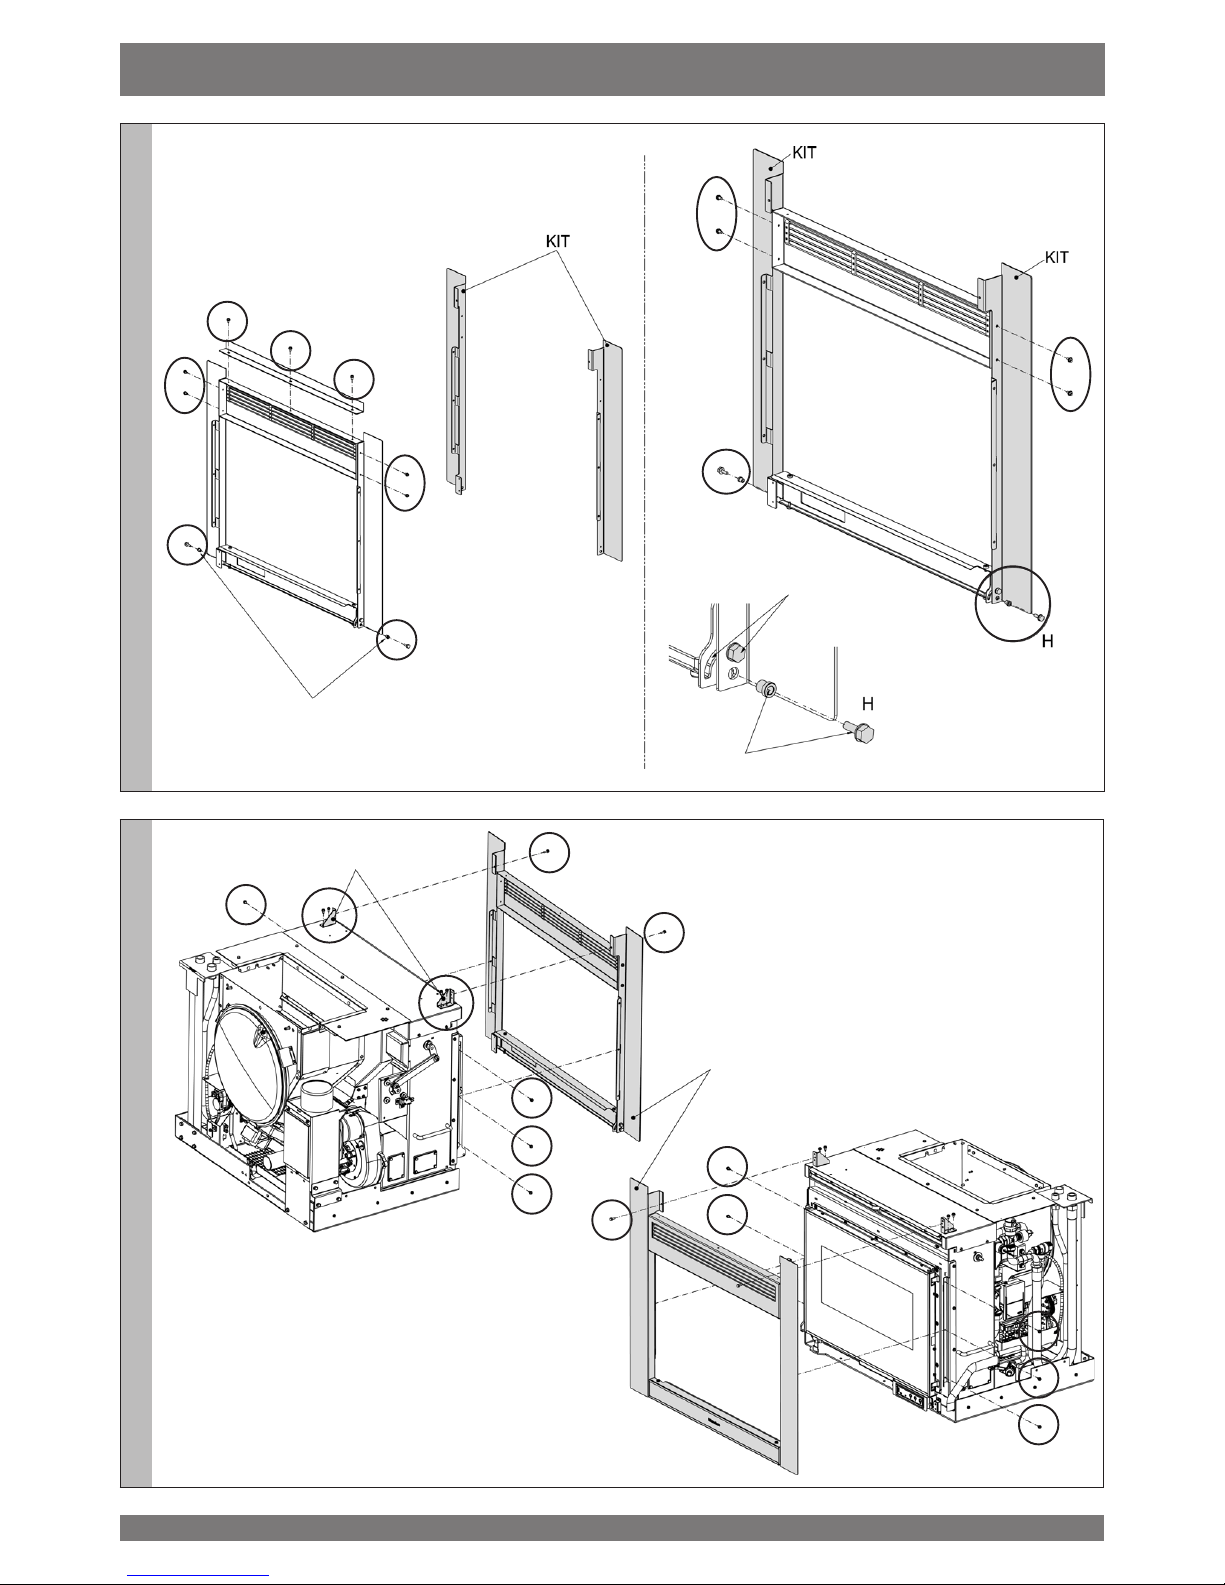
Togliere le cornici e sostituirle con quelle in dotazione per
il kit
Attenzione alle bussole
La vite deve essere
inserita dentro l’asola
Inserire la bussola e ssare la vite
Fissare le viti
Fissare le squadrette
Fissare le viti
Appoggiare la cornice completa
e ssare le viti laterali
6

5
6
ITALIANO
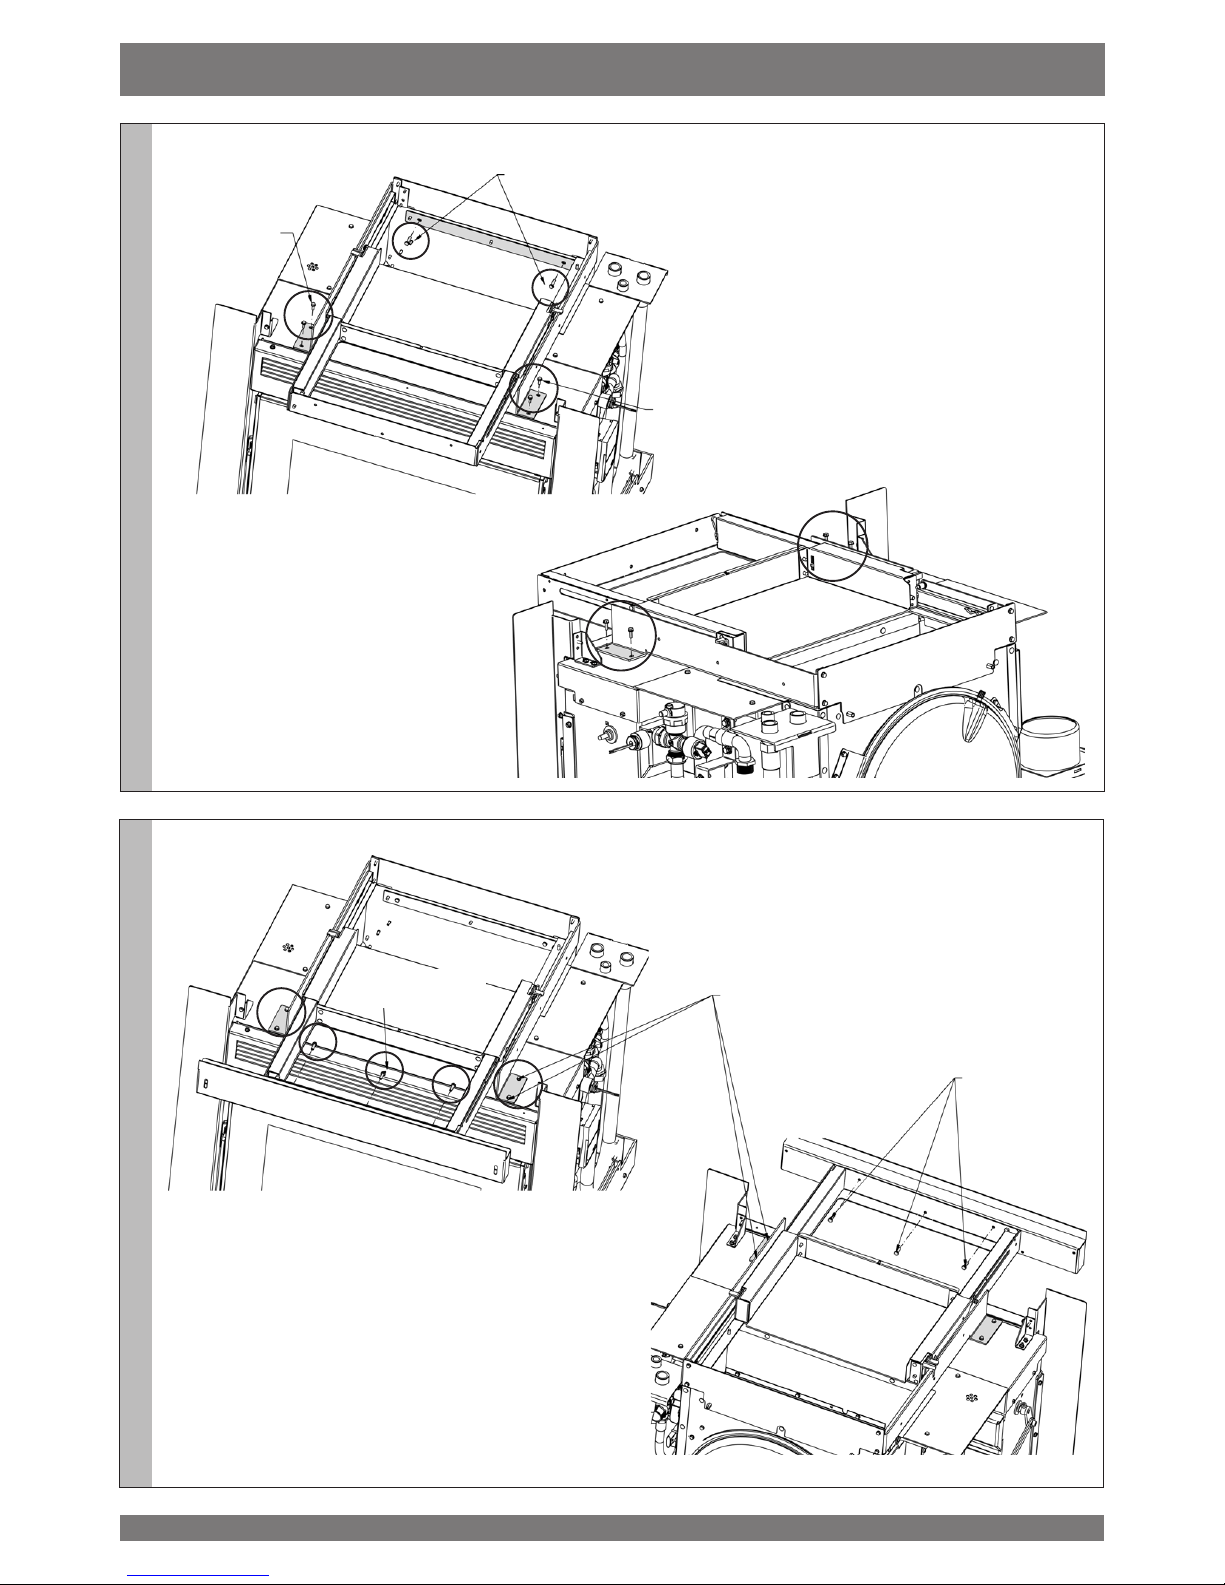
Inserire le rotaie
Inserire le rotaie
Fissare le viti
7
7
8
ITALIANO
Fissare le viti
autolettanti
4.2x9.5
Fissare le viti
autolettanti 4.2x9.5
Fissare le viti TE M5 x 20 ZN
Fissare le viti TE
M5 x 20 ZN
Fissare le viti TE
M5 x 16 ZN
Dopo avere ssato il frontale, regolare lo
scorrimento e il centraggio attraverso le stae di
ssaggio. Le stae sono asolate, allentare le viti e
regolare tutto il kit. - Fissare le viti.
8
A
UTILIZZO DEL CASSETTO
ITALIANO
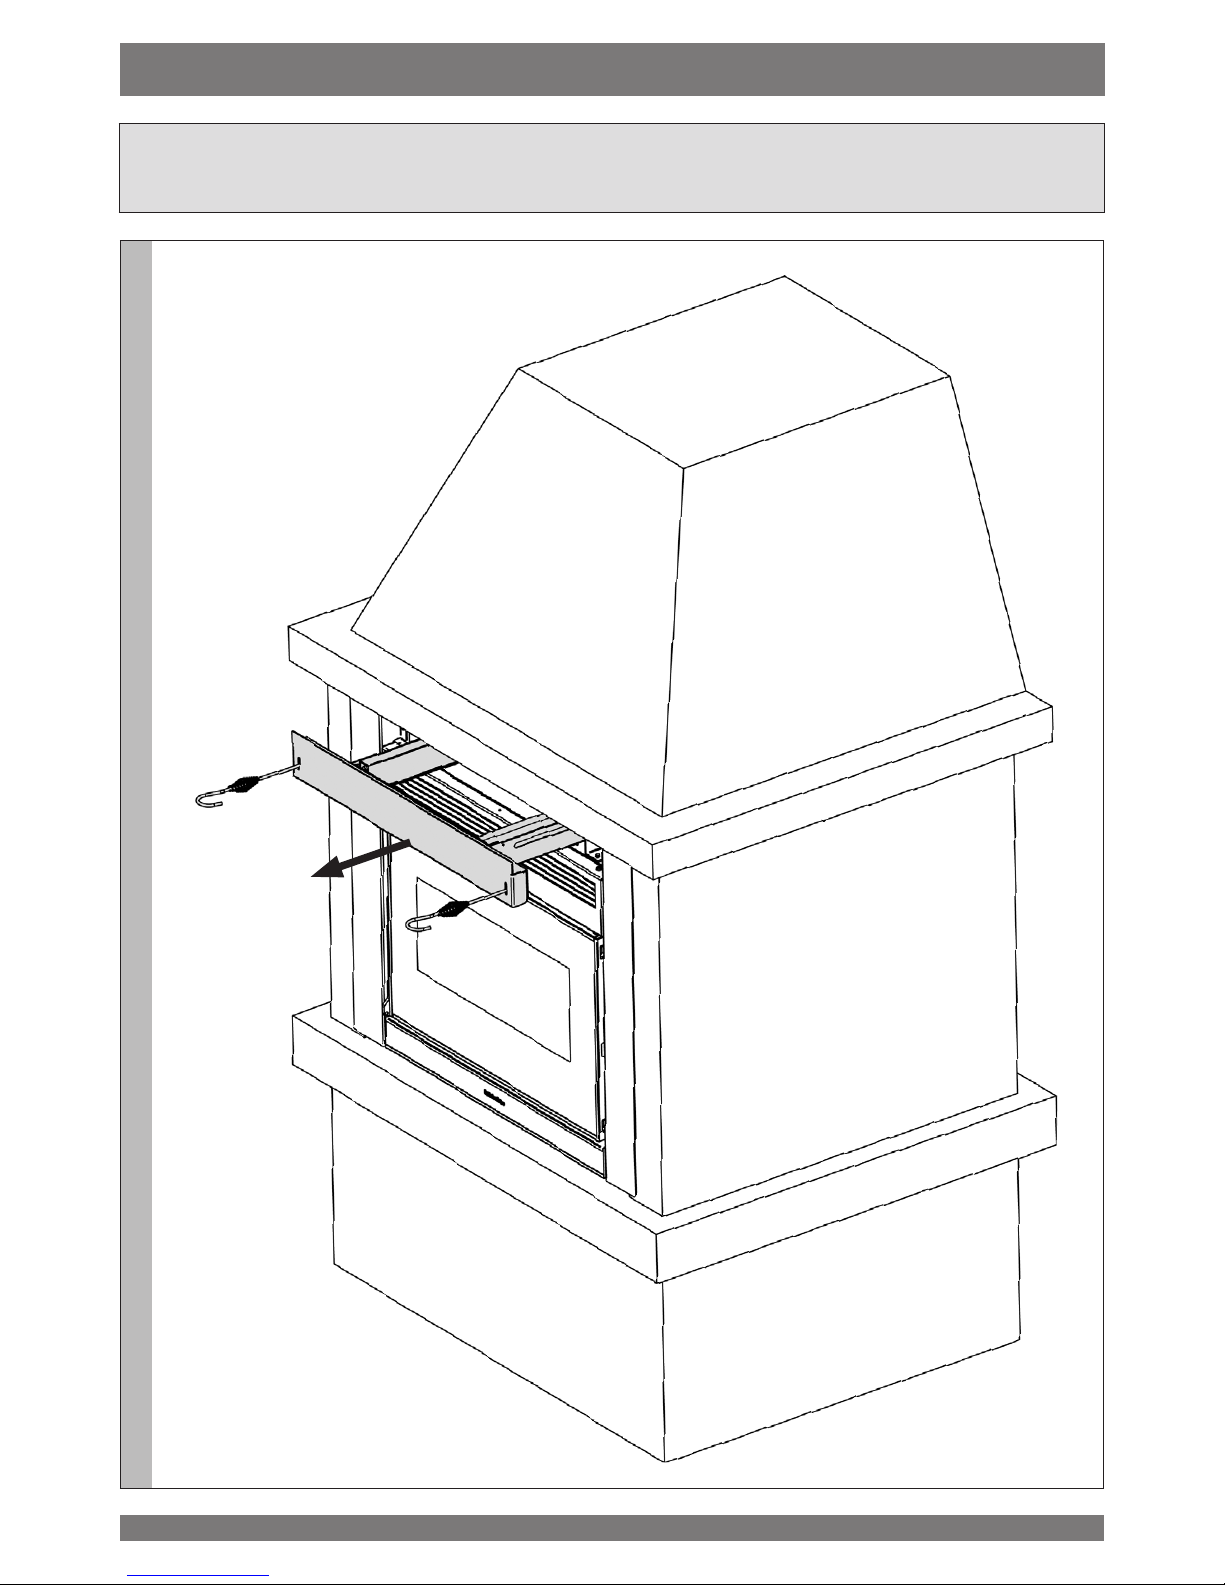
Estrarre il cassetto mediante l'uso dei due attizzatoi in dotazione
9
B
C
ITALIANO
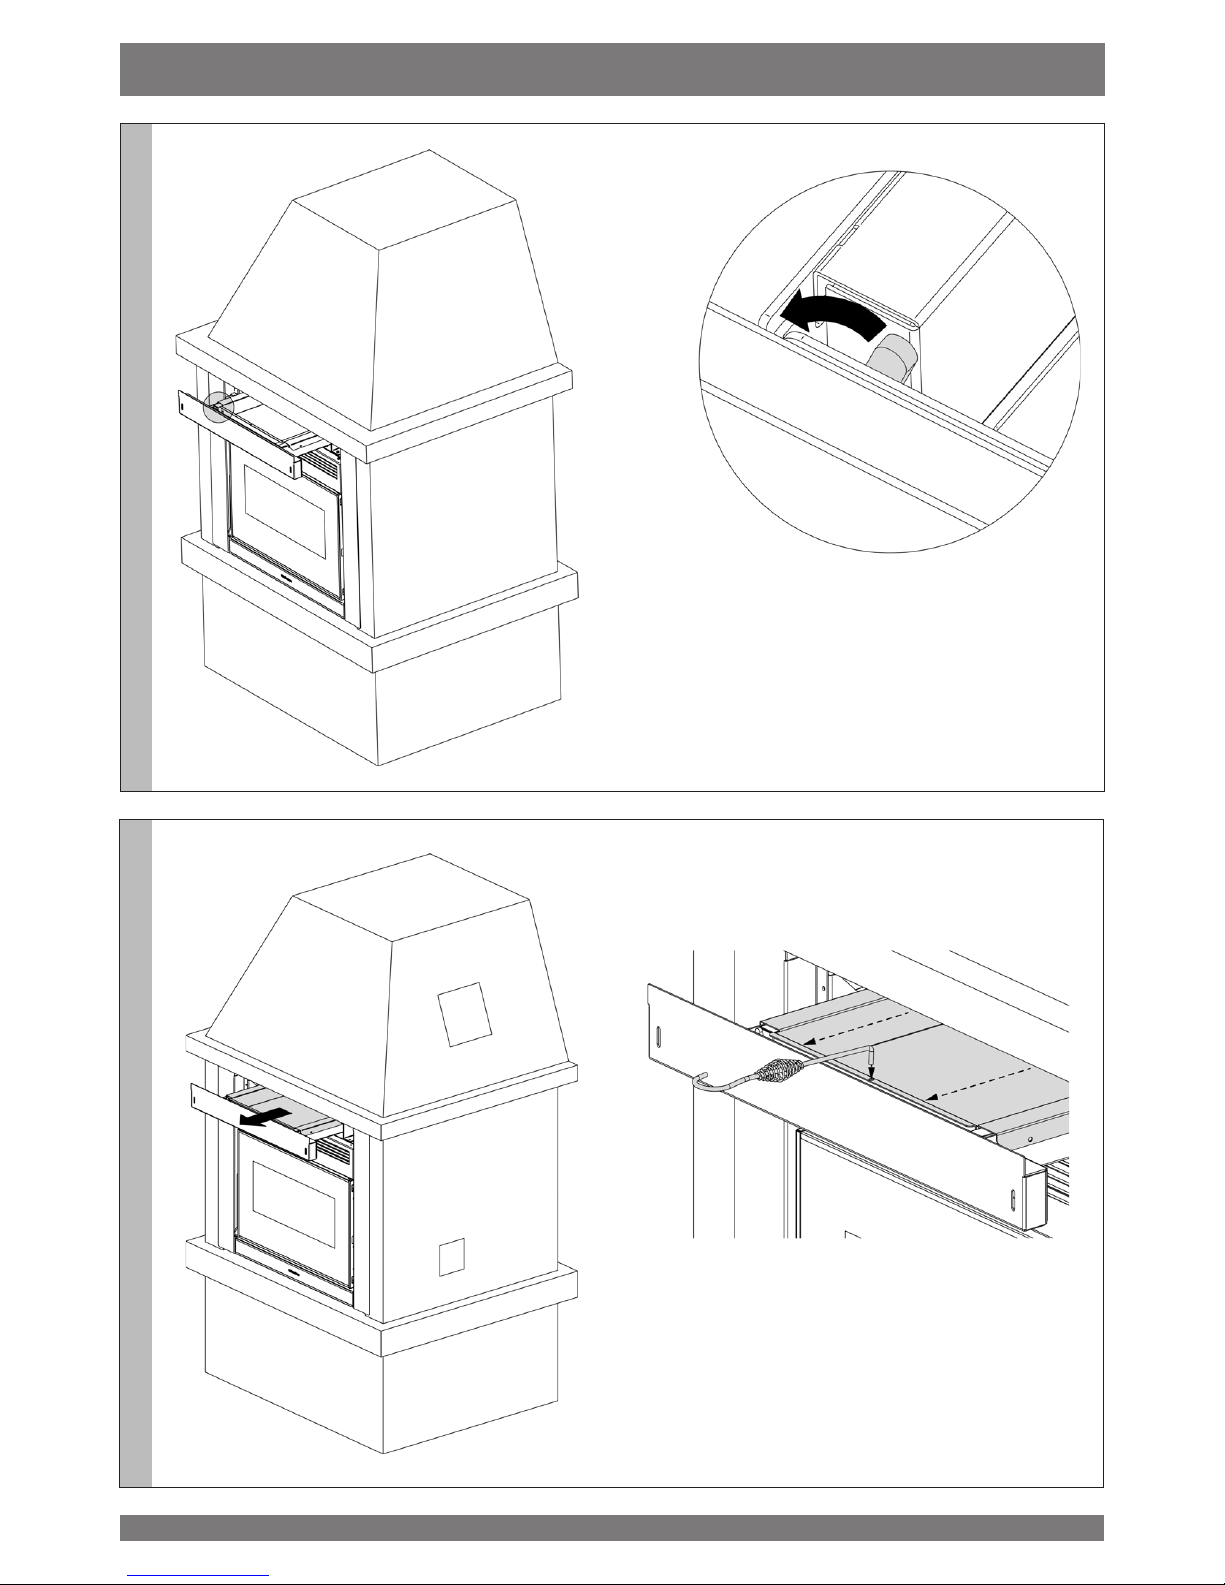
Sbloccare lo scorrimento del cassettino di
caricamento facendo ruotare la leva come in
immagine
Estrarre il cassettino di caricamento mediante l'uso
dell’attizzatoio in dotazione
10
D
E
ITALIANO
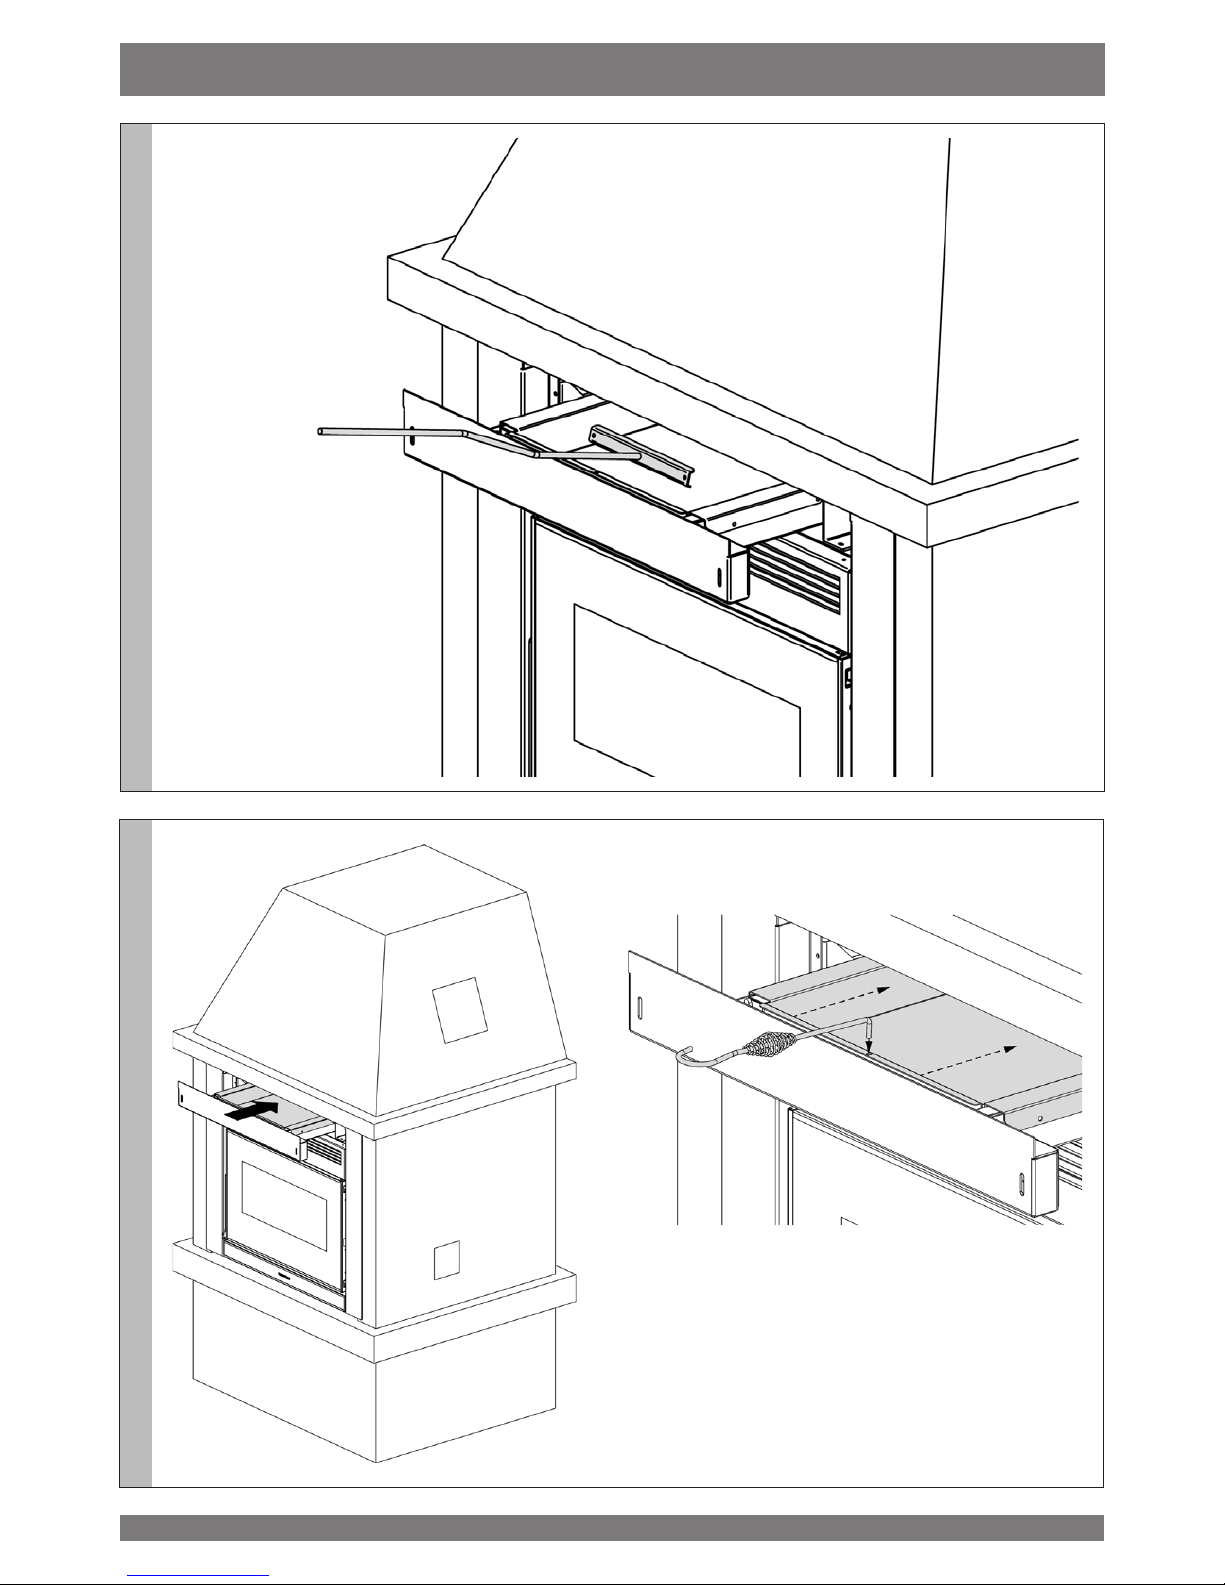
Chiudere il cassettino di caricamento mediante l'uso
dell’attizzatoio in dotazione
Caricare il pellet sul cassettino e
utilizzare il raschietto in dotazione per
spingerlo nel serbatoio retrostante
11
F
G
ITALIANO
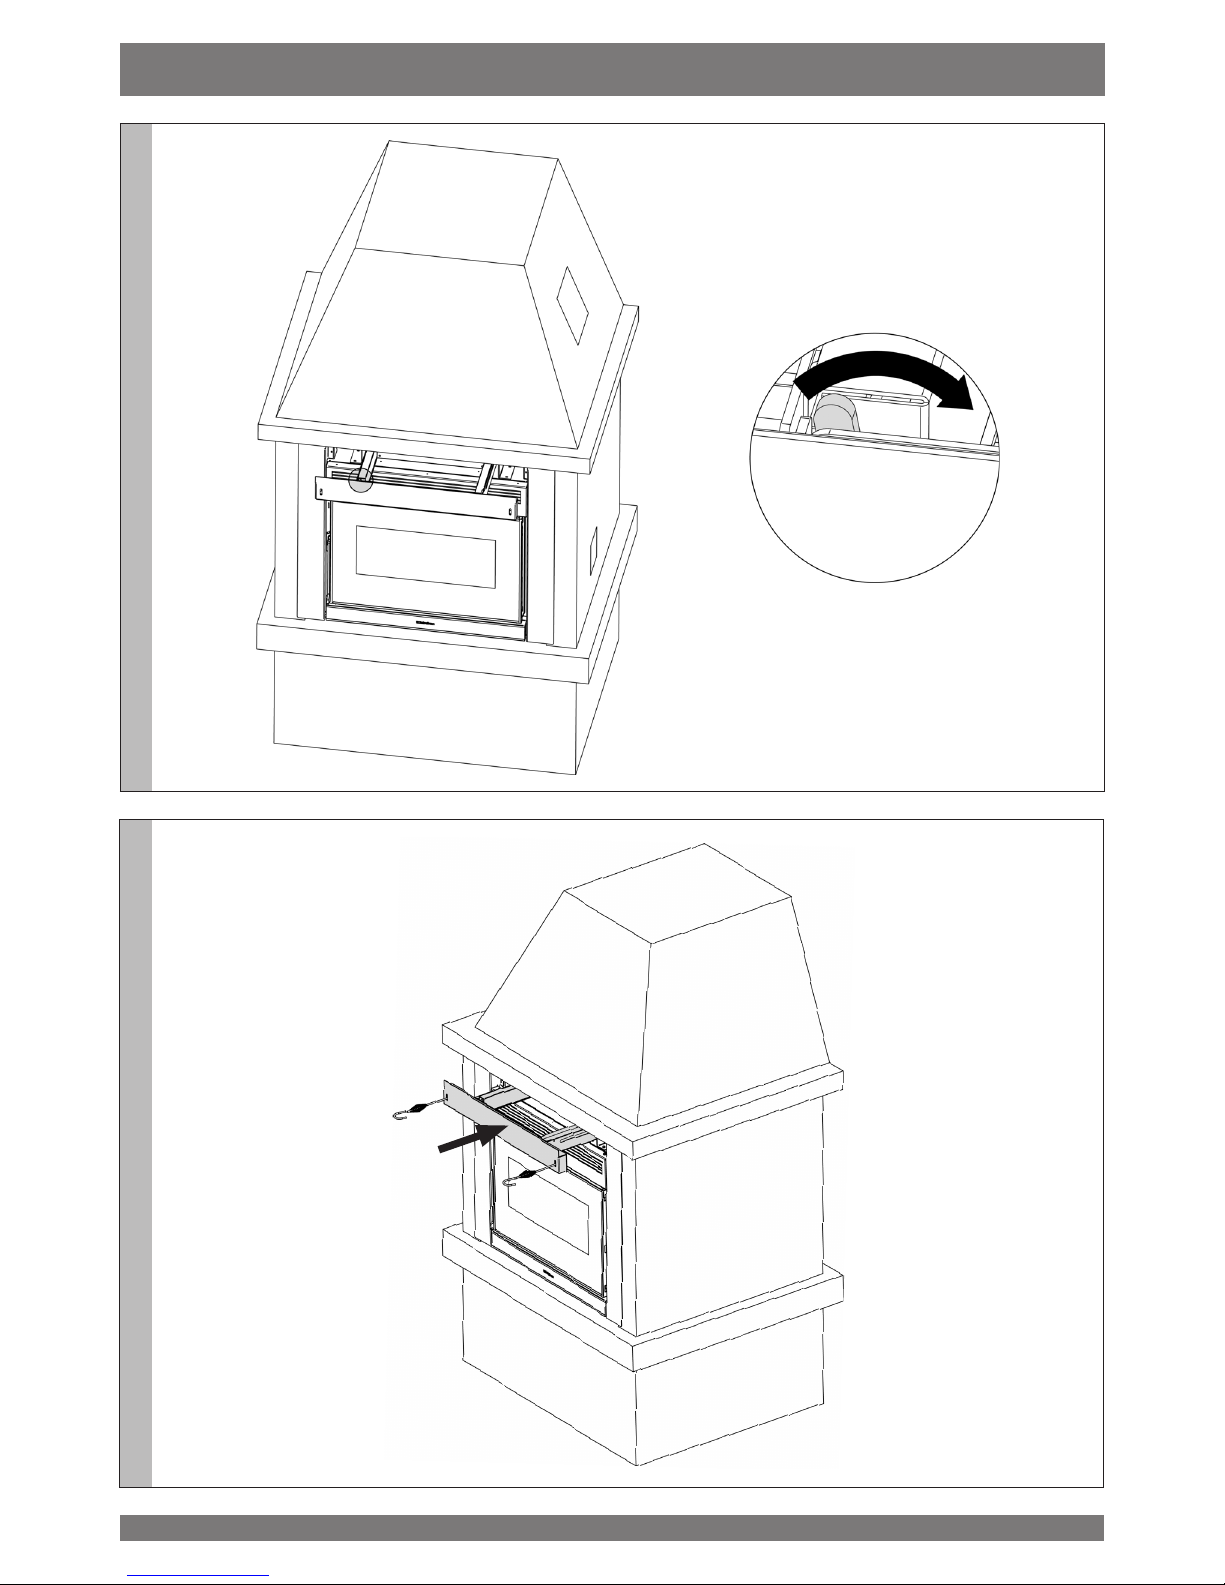
Bloccare lo scorrimento del cassettino di
caricamento facendo ruotare la leva come in
immagine.
Facendo questo sarà possibile richiudere l’intero
cassetto
12
ENGLISH
OPTIONAL FRONTAL PELLET FEEDING KIT
The optional frontal pellet feeding kit allows feeding pellets inside the tank without
having to remove the insert (which requires the shutdown of the machine).
Before proceeding with the installation you must ensure that the structure that will cover the insert ensures a hole with the
minimum dimensions shown in the gure below.
The images shows the minimum sizes to be observed between the insert and the cover: these sizes are necessary to enable the
correct movement of the frame and the removal of the same from its original place.
You can also assemble it with the insert tted.
COMFORT L80 - IDRO 800
700 X 800 MM WITH OPTIONAL TRAY
H=
700
L=
800
ATTENTION:
FOLLOW THE INSTRUCTIONS ALWAYS IN COMPLETE SAFETY!
THE STOVE MUST BE COMPLETELY COLD, SWITCHED OFF
AND UNPLUGGED FROM THE POWER OUTLET.
TO ENSURE THE PROPER OPERATION OF THE INSERT, THE TRAY MUST ALWAYS REMAIN CLOSED
EXCEPT DURING THE RESERVOIRE LOADING PHASE.
13
ENGLISH
COMPONENTS OF THE KIT
14

1
2
ENGLISH
Remove the 6 screws, and remove the complete frame carefully.
Remove the magnet from the original frame, and mount it on the right frame
supplied with the kit.
15

3
4
ENGLISH
Remove the frames and replace them with the ones
supplied with the kit
Be careful with the bushes
The screw should be
inserted in the slot
Insert the bush and fasten the screw
Tighten the
screws
Fix the brackets
Tighten the screws
Place the complete frame and
tighten the side screws
16
 Loading...