


Exterity AvediaPlayer Receiver r93xx Series V5.0
Getting Started Guide

2
Notices
© Exterity Limited 2003-2015
This document contains information that is protected by copyright. Reproduction, adaptation, or translation without prior permission is prohibited, except as under the copyright laws.
Edition
Document Number 1300-0104-0001
Issue 1 July 2015
Exterity Limited, St David’s House, St David’s Drive, Dalgety Bay KY11 9NB
http://www.exterity.com
Products Described by This Guide
AvediaPlayer r9300
AvediaPlayer r9310
Trademarks
AvediaStream, AvediaServer and AvediaPlayer are trademarks or registered trademarks of Exterity Limited.
Microsoft®, Windows®, and Windows Media Player® are U.S. registered trademarks of Microsoft Corporation.
HDMI, the HDMI Logo and High-Definition Multimedia Interface are trademarks or registered trademarks of HDMI Licensing LLC.
Kensington® is a U.S. registered trademarks of ACCO World Corporation.
All other trademarks are the property of their respective owners. All rights reserved.
Disclaimer
The information contained in this document is subject to change without notice.
EXTERITY LIMITED MAKES NO WARRANTY OF ANY KIND WITH REGARD TO THIS MATERIAL, INCLUDING, BUT NOT LIMITED TO, THE IMPLIED WARRANTIES OF MERCHANTABILITY AND FITNESS FOR A PARTICULAR
PURPOSE. Exterity Limited shall not be liable for errors contained herein or for incidental or consequential damages in connection with the furnishing, performance, or use of this material.
Support and Contact Information
Technical Support for Exterity products is provided by authorized Systems Integrators and Resellers. Please contact your Systems Integrator or Reseller with any support issues.
Warranty
A copy of the specific warranty terms applicable to your Exterity products and replacement parts can be obtained from Exterity. To requ est more information or parts, email
support@exterity.com
Safety Notices
Before installing and operating these products, please read the safety information in this guide.

3
Table of Contents
Safety Notices.......................................................................................................................................................................................................................... 5
Important Safety Instructions ..........................................................................................................................................................................................................................................................................5
USA and Canada.............................................................................................................................................................................................................................................................................................. 5
EU and Others ..................................................................................................................................................................................................................................................................................................6
Safety Information.......................................................................................................................................................................................................................................................................................... 6
About This Guide.................................................................................................................................................................................................................... 8
1 About the AvediaPlayer r93xx Series Receivers.....................................................................................................................................................10
Models ................................................................................................................................................................................................................................................................................................................... 10
AvediaPlayer r9300 Receiver.................................................................................................................................................................................................................................................................... 10
AvediaPlayer r9310 Receiver.................................................................................................................................................................................................................................................................... 11
2 Before You Begin...............................................................................................................................................................................................................12
Network Considerations.................................................................................................................................................................................................................................................................................. 12
Physical Location ............................................................................................................................................................................................................................................................................................... 13
Power ..................................................................................................................................................................................................................................................................................................................... 13
User Control......................................................................................................................................................................................................................................................................................................... 14
3 Connection and Power On............................................................................................................................................................................................15
Connect the AV Outputs................................................................................................................................................................................................................................................................................. 15
HDMI................................................................................................................................................................................................................................................................................................................. 15
AvediaPlayer r9310 Only - Component/Composite/Analog Audio.................................................................................................................................................................................................16
Digital Audio........................................................................................................................................................................................................................................................................................................ 17
Connect to a Power Source and the Network......................................................................................................................................................................................................................................... 18
Additional Connections and Functions..................................................................................................................................................................................................................................................... 19
Kensington Lock.......................................................................................................................................................................................................................................................................................... 19
Reset ................................................................................................................................................................................................................................................................................................................. 20

4
Serial TV /ADM .............................................................................................................................................................................................................................................................................................. 20
USB ....................................................................................................................................................................................................................................................................................................................20
4 Basic Configuration..........................................................................................................................................................................................................21
Using a DHCP Server to Determine the Receiver’s IP Address ..........................................................................................................................................................................................................21
Using AvediaServer Director.................................................................................................................................................................................................................................................................... 22
Using the Connected TV and Remote Handset ................................................................................................................................................................................................................................23
Using the Serial Admin Interface ........................................................................................................................................................................................................................................................... 24
Log into the Web Interface....................................................................................................................................................................................................................................................................... 25
Assigning a Static IP Address ........................................................................................................................................................................................................................................................................ 26
Using the Serial Admin Interface ........................................................................................................................................................................................................................................................... 26
Using the Receiver’s Web Interface ....................................................................................................................................................................................................................................................... 27
Configuring the Device’s Name and Location......................................................................................................................................................................................................................................... 28

5
Safety Notices
Before installing and operating these products, please read the safety information in this manual.
Important Safety Instructions
There are no instructions specifically for service personnel in this document. There are no user serviceable parts inside any Exterity product. To prevent
electric shock or fire hazard, do not remove cover. Refer service to qualified service personnel.
This chapter contains important safety information. If you are unsure about any of the information in the section, please contact Exterity.
USA and Canada
1 Read these instructions.
2 Keep these instructions.
3 Heed all warnings.
4 Follow all instructions.
5 Do not use this apparatus near water.
6 Clean only with dry cloth.
7 Do not block any ventilation openings. Install in accordance with the instructions contained in this manual.
8 Do not install near any heat sources such as radiators, heat registers, stoves, or other apparatus (including amplifiers) that produce heat.
9 Do not defeat the safety purpose of the polarized or grounding-type plug. A polarized plug has two blades with one wider than the other. A grounding
type plug has two blades and a third grounding prong. The wide blade or the third prong are provided for your safety. If the provided plug does not fit
into your outlet, consult an electrician for replacement of the obsolete outlet.
The lightning flash with arrowhead symbol within an equilateral triangle is intended to alert
the user to the presence of uninsulated "dangerous voltage" within the product's enclosure
that may be of sufficient magnitude to constitute a risk of electric shock to persons.
The exclamation point within an equilateral triangle is intended to alert the user to the
presence of important operating and maintenance (servicing) instructions in the literature
accompanying the product.

6
10 Protect the power cord from being walked on or pinched particularly at plugs, convenience receptacles, and the point where they exit from the
apparatus.
11 Only use attachments/accessories specified by the manufacturer.
12 Use only with the cart, stand, tripod, bracket, or table specified by the manufacturer, or sold with the apparatus. When a cart is used, use caution when
moving the cart/apparatus combination to avoid injury from tip-over.
13 Unplug this apparatus during lightning storms or when unused for long periods of time.
14 Refer all servicing to qualified service personnel. Servicing is required when the apparatus has been damaged in any way, such as power-supply cord or
plug is damaged, liquid has been spilled or objects have fallen into the apparatus, the apparatus has been exposed to rain or moisture, does not operate
normally, or has been dropped.
15 Do not expose this apparatus to dripping or splashing and ensure that no objects filled with liquids, such as vases, are placed on the apparatus.
16 To completely disconnect this apparatus from the AC Mains, disconnect the power supply cord plug from the AC receptacle.
17 The mains plug of the power supply cord shall remain readily operable.
To reduce the risk of fire or electric shock, do not expose this apparatus to rain or moisture.
EU and Others
Do not proceed beyond a Warning notice until you have understood the hazardous conditions and have taken appropriate steps.
Safety Information
Warning: There are no user serviceable parts inside any Exterity product. To prevent electric shock or fire hazard, do not remove cover. Refer service to qualified
service personnel.
For 230/240 volt operation, be sure to use a harmonized grounded 3 conductor cord, rated 6 Amp minimum. Use a suitable cord for connection to the
equipment and terminating in an IEC.
This equipment relies upon a safety earth for operation, ensure that you always use a power cord with appropriate earth and that the inlet to which is

7
inserted also has the appropriate earth. If in any doubt about the earth provision in your building consult a qualified electrician.
Use only the dedicated power supply or cord supplied for your device.
Exterity products use ventilation holes for cooling. None of the ventilation holes should be blocked. Keep all materials at least 5cm away from all the
ventilation holes.
Do not expose the product to any rain or moisture.
Do not use the product near a naked flame e.g. a candle.
The operating conditions of the product should be 0°C – 40°C with a Relative Humidity of 5 – 95%. The product should not be operated outside of these
conditions.
There are no user-serviceable parts inside these products. Any servicing, adjustment, maintenance, or repair must only be performed by service-trained
personnel.

8
About This Guide
This manual shows you how to perform the first steps of configuring and connecting Exterity AvediaPlayer r93xx Receivers to your TV/display and IP network.
• Refer to the AvediaPlayer r93xx Receiver Administrator’s Guide for detailed information about configuring your AvediaPlayer Receiver(s) for use. All
AvediaPlayer documentation is available from the Exterity website at www.exterity.com > Support > Documentation. (A login is required.)
• Refer to the Installation Solutions Guide for information about installing AvediaPlayer Receivers using the TV mounting plates, enclosures and fixtures
available from Exterity.
• Refer to the AvediaPlayer Receiver Remote Control Handset Administrator’s Guide for information about the configuration and use of the remote control
handset.
Scope
This manual describes the installation, connection and initial configuration of AvediaPlayer r93xx Receivers. For full configuration information refer to the
Administrator’s Guide.
Audience
This manual is intended for use by systems integrators or systems administrators who are installing and setting up Exterity products. The manual assumes
that readers are familiar with installing and configuring network-based and audio-visual products.
Terms and Definitions
The following terms and definitions are used in this document:
Table 1 Terms and definitions
Term Definition Term Definition
DHCP Dynamic Host Configuration Protocol IGMP Internet Group Management Protocol
DNS Domain Name System PoE Power over Ethernet
EDID Extended Display Identification Data SNMP Simple Network Management Protocol

9
Documentation Conventions
The following conventions are used in this guide:
Note: A Note calls attention or adds information that is important for the proper operation of the product.
Courier Font - is used to identify scripts, code examples, or keyboard commands.
SMALL CAPITALS – are used to indicate Remote Control handset buttons and button presses, for example MODE and PLAY.
Emphasis is used when referring to another document, for example AvediaPlayer Receiver Administrator’s Guide.

10
1
About the AvediaPlayer r93xx Series Receivers
AvediaPlayer r93xx Receivers are network devices which display an IP network delivered MPEG-2 transport stream (TS) on a television or other display.
Streams from Exterity TVgateway, Encoder, Transcoder and AvediaServer products are supported, as well as streams from third party products.
Models
AvediaPlayer r93xx Receivers provide the following AV outputs:
• Video: HDMI v1.4b (with HDCP) 1080p, 1080i, 720p (50Hz/59.94Hz/60Hz), 576p, 576i (50Hz), 480p, 480i (59.94Hz/60Hz)
• Audio: HDMI (2 or 6 channel PCM or Bitstream), TOS (2 channel PCM or Bitstream)
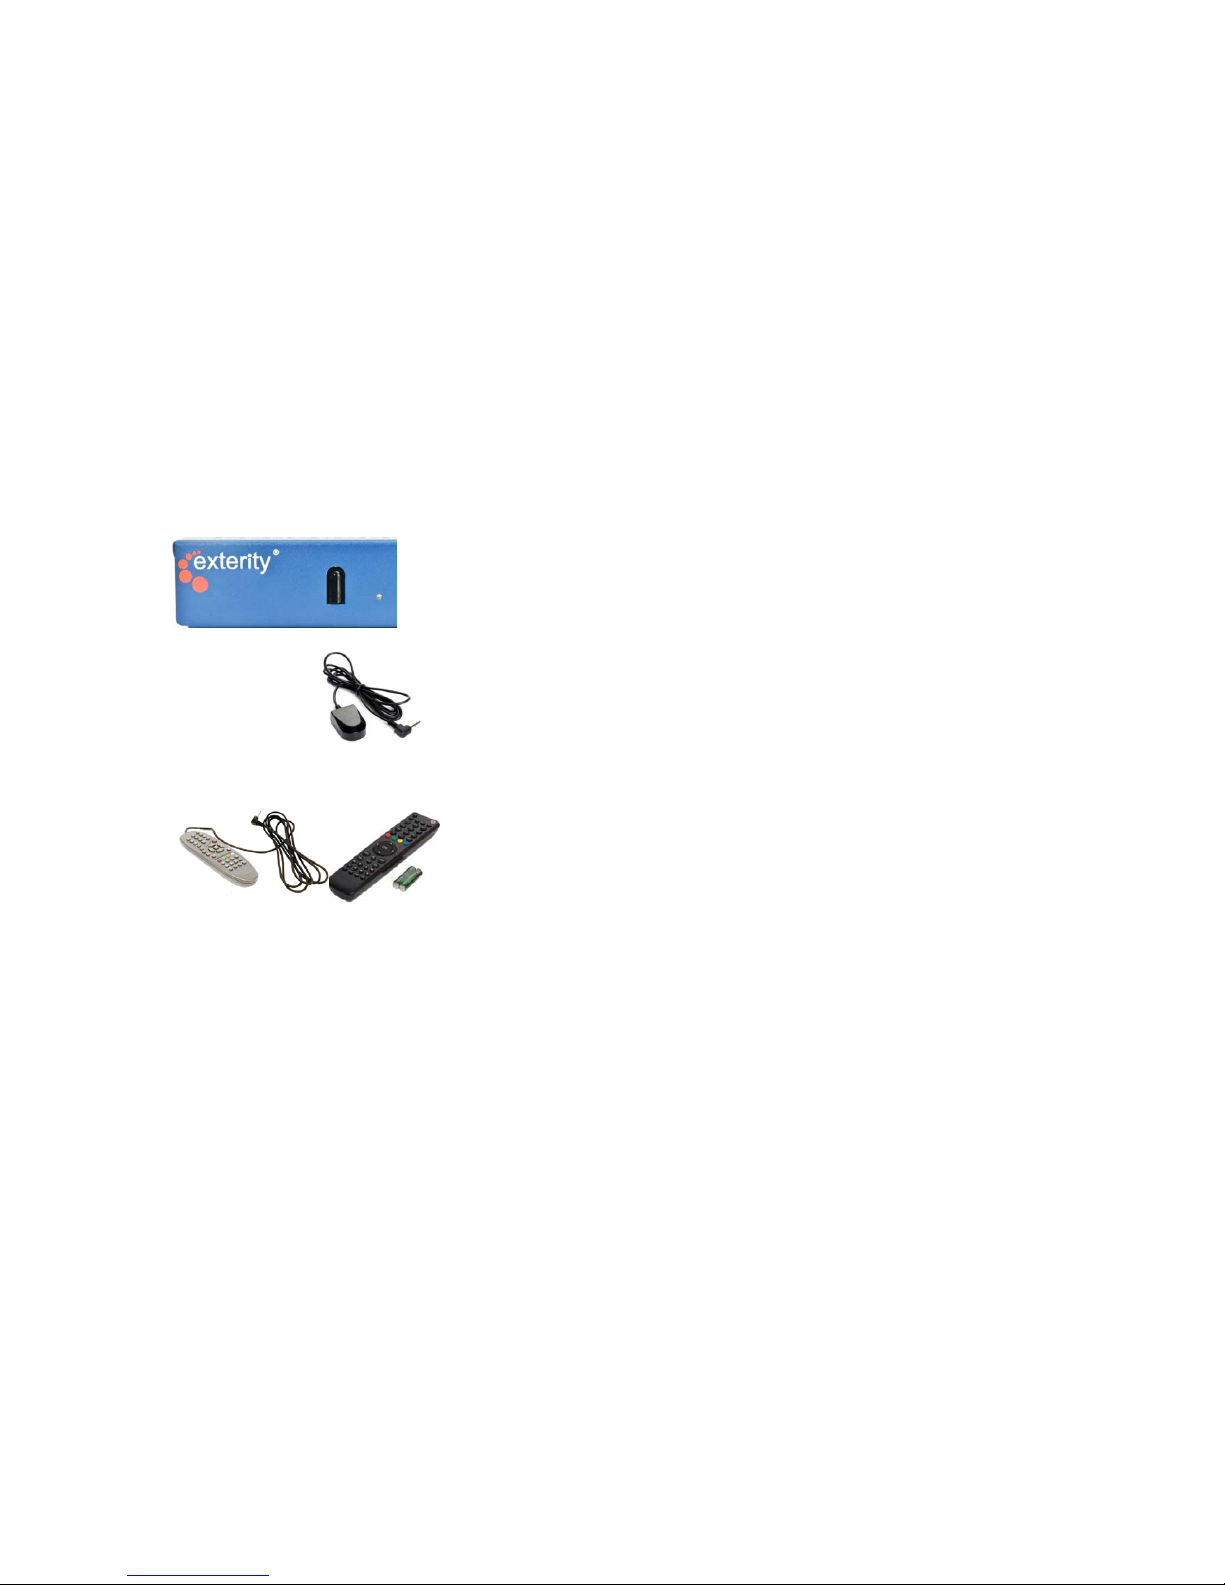
AvediaPlayer r9300 Receiver
The AvediaPlayer r9300 features a single Ethernet port and an HDMI output in a compact form factor and the lowest power consumption of the AvediaPlayer
r93xx Receivers.
Figure 1 AvediaPlayer r9300 receiver

11
AvediaPlayer r9310 Receiver
The AvediaPlayer r9310 Receiver provides the same connections as the AvediaPlayer r9300, plus additional support for analog video and audio outputs. Rear
panel connections provide support for:
• Video: HDMI v1.4b (with HDCP) 1080p,1080i, 720p (50Hz/59.94Hz/60Hz), 576p, 576i (50Hz), 480p, 480i (59.94Hz/60Hz)
• Audio: HDMI (2 or 6 channel PCM or Bitstream), TOS (2 channel PCM or Bitstream)
• Component (YPbPr, 3 x RCA): 1080i, 720p (50Hz/59.94Hz/60Hz), 576p, 576i (50Hz), 480p, 480i (59.94Hz/60Hz)
• Composite (CVBS, RCA): PAL 576i (50Hz), NTSC 480i (59.94Hz)
• Analog unbalanced stereo audio outputs
Figure 2 AvediaPlayer r9310 receiver

12
2
Before You Begin
This section describes the key considerations required before connecting an AvediaPlayer Receiver to a TV and your IP network.
Network Considerations
AvediaPlayer r93xx Receivers accept IP multicast streams from other network devices. This means
that network switches must be multicast-enabled in order to prevent unwanted flooding of traffic
on the network.
For these purposes, “Multicast-enabled” is understood to mean that all network switches carry out
IGMP snooping. One switch must act as the IGMP querier.
Exterity Receivers support version 2 and 3 of IGMP.
The Ethernet port – a 10/100 Mbps interface used to connect the receiver to the network switch
using a standard straight-through Cat 5 cable.
All AvediaPlayer r93xx Receivers are PoE enabled devices. They can be powered using any LAN
switch or mid-span device meeting the 802.3af PoE specifications.
In its default setting the AvediaPlayer r93xx Receiver obtains an IP address automatically from a
DHCP server. If required you can manually configure a static IP address, subnet mask, DNS Servers
and default gateway. This is described in “Assigning a Static IP Address” on page 26.

13
Physical Location
Power
AvediaPlayer Receivers are typically located close to, or attached to the connected TV or display
device. Mounting kits allow you to securely mount any AvediaPlayer r93xx Receiver to a television
and display, or to a wall or under a surface such as a desk or shelf. Refer to the Installation Solutions
Guide for more information. Consult your Exterity sales representative for details of the available
AvediaPlayer r93xx Receiver installation accessories. Please see the Exterity Accessories Datasheet for
details of order codes.
PoE – The receiver can be powered through the network interface by Power over Ethernet (PoE)
using any LAN Switch or Mid-span device meeting 802.3af PoE specifications.
DC Supply – The receiver can be powered through the power jack using the 24V/0.5A external
power adaptor available from Exterity as an accessory. Please see the Exterity Accessories Datasheet
for details of order codes.
14
User Control
Typical user functions such as channel selection and volume control are made using the available remote controls and accessories.
Infra Red (IR) Receiver – The receiver is controlled using the IR Exterity Remote Control handset.
If the receiver’s location means that its IR Window is not easily visible, control functions can be
maintained using an IR Extender connected to the rear panel (see below). The front panel IR
receiver is disabled when a rear panel connection is made.
IR Extender – An IR extender is available to allow IR remote control of the receiver when the front
panel IR receiver is obscured. The IR extender is not supplied with the receiver and must be
ordered separately.
Please note that operation of IR remote control may be impaired by strong IR sources such as
sunlight, certain fluorescent lighting types, and displays. For consistent operation the IR receiver/
extender body may require shielding from direct sunlight, or placed 5-10 cm away from any
possible strong IR sources.
Remote Control Handsets – Two types of handsets are available:
IR Remote Control handset – The IR handset works in conjunction with the front panel IR
receiver and IR Extender. It provides full user operation.
Wired (tethered) Remote Control handset – The wired handset connects to the rear panel input,
providing full user operation. The front panel IR receiver is disabled when the rear panel
connection is made. The wired handset is intended for use when there are multiple receivers
within close range, and when using IR would risk controlling the wrong receiver.
Please see the Exterity Accessories Datasheet for details of order codes.

15
3
Connection and Power On
This section shows you how to connect the receiver to your TV, power it on, and ensure it is correctly configured for connection to your IP network.
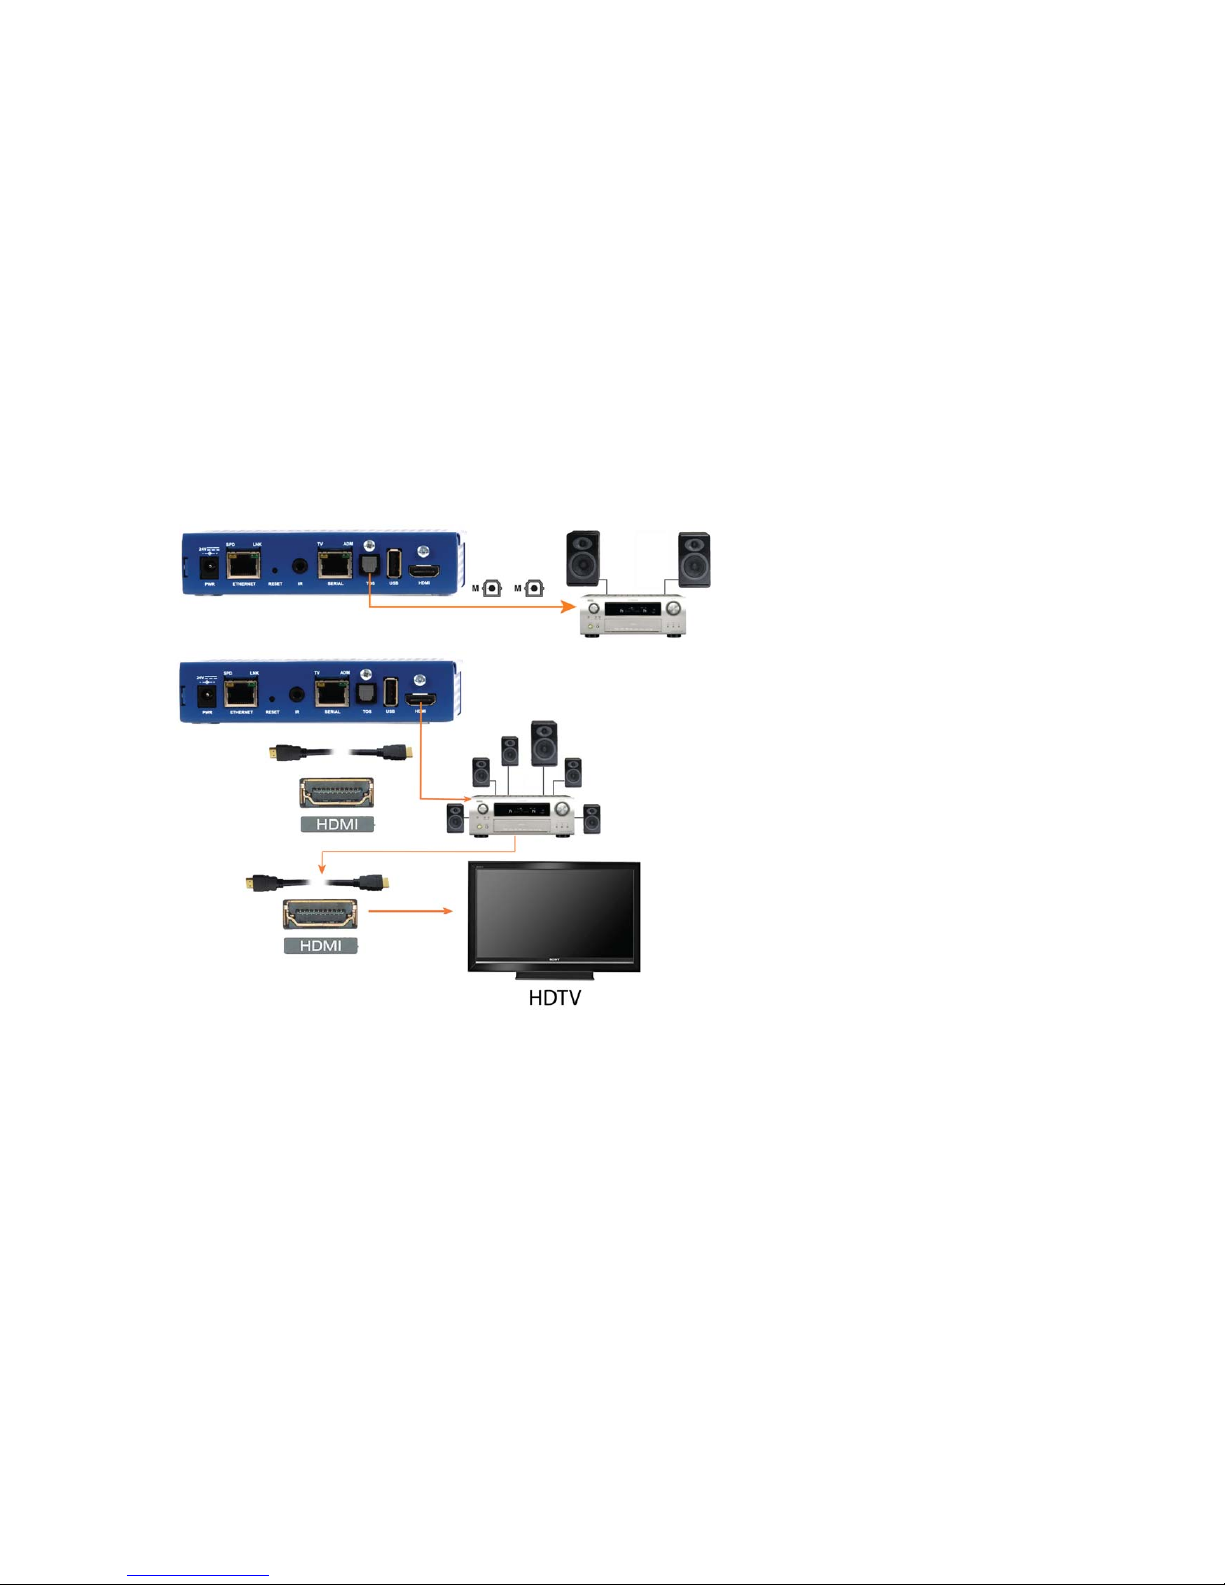
Connect the AV Outputs
Select the connection required for your TV/display and/or audio device:
HDMI
Note: You must use HDMI-compliant cables to connect the receiver to the display device.
Tip: For best performance Exterity recommends the addition of a ferrite on the HDMI cable. A Wurth 742 716 22 S or similar is recommended.
Figure 1 HDMI cable with ferrite bead
HDMI – Use a standard HDMI cable to connect the
receiver to an HD television/display.
When connected to the TV/display using the HDMI
interface, optimum settings for the receiver-TV
combination are determined automatically.

16
AvediaPlayer r9310 Only - Component/Composite/Analog Audio
Component Video – (HD and SD) Use standard
phono cables (RCA).
Composite Video – (SD only) Use a standard
phono cable (RCA).
Analog Audio – Analog audio 1 volt peak-to-peak
maximum. Use standard phono cables (RCA)
(not required if using HDMI).
17
Digital Audio
TOS – Use a standard TOSLINK cable to connect the
2 channel PCM or Bitstream audio output to an
external audio system if required. (Not required if
using HDMI.)
HDMI – Use HDMI cables to attach an external
audio system between the receiver and the TV to
achieve 6 channel PCM or Bitstream audio output.

18
Connect to a Power Source and the Network
The receiver is an IP network device and so must be connected to the LAN for operation. It can also be powered from the LAN connection if Power over
Ethernet (PoE) is available, otherwise use its DC supply.
By default, the receivers are configured to obtain an IP address from the DHCP server on the network. You can subsequently configure a static IP address if
required, or pre-configure a static address prior to connecting to the network. Refer to “Assigning a Static IP Address” on page 26 for more information.
Network Connection and PoE
Make a connection to your LAN using the RJ-45 ETHERNET connection on the receiver’s rear panel. If PoE is available, all rear panel LEDs turn on as soon as the
connection is made. (The front panel LED behaves as described in “During Power On” on page 19.) Without PoE, connect the DC supply as described below.
DC Supply
PoE – All AvediaPlayer r93xx Receivers are PoE-enabled
devices. They can be powered using any LAN Switch or
mid-span device meeting the 802.3af PoE (Power over
Ethernet) specifications.
On the AvediaPlayer r9300 and AvediaPlayer r9310
Receivers, two LEDs show the status of the Ethernet
interface. In normal operation the orange link LED is
permanently lit if the connection is 100Mbps, and not lit if
it is 10Mbps. The green activity LED flickers on when
packets are transmitted or received.
DC Supply - If not using PoE to power the unit, connect the ACDC Power Supply to the mains power supply and the receiver DC
power inlet connector. (The PSU is an optional accessory which
must be ordered separately.)

19
During Power On
.
Note: The LED behavior is a configurable option. Refer to the AvediaPlayer r93xx Receiver Administrator’s Guide for more details.
Additional Connections and Functions
Kensington Lock
During power on the front panel LED flashes according to the startup activity, listed below.
The Status LED flashes during startup or to indicate the receiver is responding to remote control
commands as follows:
Function LED activity
Startup Remains off for around 10 seconds, then on for
around 20 - 30 seconds with periods of rapid
flickering. Followed by IP address acquisition.
Acquiring IP address via DHCP 4 times per second
Standard operation (Default LED status: On) Pulses on and off, blinking briefly off on
reception of remote handset commands.
Standard operation (Default LED status: Off) Always off, blinking on briefly on reception of
remote handset commands.
All AvediaPlayer r93xx Receivers provide a Kensington® lock slot, located to the
rear of the right-side panel.
Kensington
Lock slot

20
Reset
Note: You can also set the Admin/Serial port function using the RESET button. Refer to the AvediaPlayer r93xx Receiver Administrator’s Guide for more details.
Serial TV /ADM
USB
• To reboot the receiver, briefly press a pin or the end of a pen into the RESET
port.
• To return the receiver to factory default settings, press and hold RESET until
both ADM and TV LEDs flash together, then release.
Serial TV /ADM – This serial interface is dual purpose. Its function is configured
on the TV page of the receiver’s web interface. In its default configuration it can
be used to access the command line admin interface to configure basic device
capabilities and to troubleshoot problems – Refer to “Using the Serial Admin
Interface” on page 24. For more details on using this interface, refer to the
AvediaPlayer r93xx Receiver Administrator’s Guide.
It can also be used to allow the receiver to communicate with a serialcontrollable television.
The interface wiring is shown in the AvediaPlayer r93xx Receiver Administrator’s
Guide. Contact your Exterity supplier for more details on supported televisions.
An external storage device (FAT32 format) can be connected to the USB port.
The storage device can be used to hold items such as video content and playlists
to provide failover support, additional fonts, and HTML content for digital
signage.
For details on using this interface, refer to the AvediaPlayer r93xx Receiver
Administrator’s Guide.

21
4
Basic Configuration
Each AvediaPlayer Receiver must have an IP address before you can carry out any configuration. This chapter explains how to:
• Determine the receiver’s IP address when using a DHCP server
• Assign a static IP address
• Configure the receiver’s name and location
Using a DHCP Server to Determine the Receiver’s IP Address
If you have a DHCP server on the network, the receiver’s IP address is allocated automatically. If you are using AvediaServer Director, you can then access the
receiver directly, as shown in “Using AvediaServer Director”. If you do not have access to AvediaServer Director, you must first determine its IP address using
one of the following methods:
• Using the Connected TV and Remote Handset
• Using the Serial Admin Interface
• Using Network scanning software such as Advanced IP Scanner
Once you have determined the receiver’s IP address, you can then enter this into a browser, as described in “Log into the Web Interface” on page 25.

22
Using AvediaServer Director
1
2
Admin – log in using:
username: admin
password: labrador
to access the Web Admin
Interface.
Director – lists all Exterity
devices in your network.
Find the device using its MAC
address.
Click the receiver’s name to
open its web interface.
Enter the IP address
of the AvediaServer
Start the AvediaServer Director application and
select the Receivers tab.

23
Using the Connected TV and Remote Handset
To display the receiver’s IP address on the television screen, click the MODE button on the handset. Scroll down the displayed options and select Network.
Network
DHCP: Enabled
IP address: 18.9.199.22
Network mask: 255.255.0.0
Gateway: 18.9.64.1
Settings
1 Language
2 Audio
3 Subtitles
4 Display
5 Network
6 Remote Mode
7 Device Info

24
Using the Serial Admin Interface
Connect to the receiver as shown below.
Admin – log in using:
username: admin
password: labrador
to access the Serial Admin
Interface.
Enter 3 to view the current IP
address of the receiver.
USB/Serial
Serial port (RJ45)
Exterity access-usb
RJ-45 to USB
Exterity access-srl
RJ-45 to DB9
Start terminal program

25
Log into the Web Interface
Once you have determined the receiver’s IP address, enter it into a browser to carry out configuration.
1
2
Admin – log in using:
username: admin
password: labrador
to access the Web Admin
Interface.
Note that the Status page is
first displayed when you log
in to the receiver.
Enter the IP address
of the receiver

26
Assigning a Static IP Address
This section shows how to assign a static IP address using:
• the Serial Admin interface (if you do not know the receiver’s IP address)
• the receiver’s web interface (if you know the receiver’s IP address).
Using the Serial Admin Interface
Connect to the receiver as shown below.
1
2
Terminal Program such as PuTTY.
Baud rate: 115200
Data bits: 8
Parity: none
Stop bits: 1
Flow control: none
Admin – log in using:
username: admin
password: labrador
to access the Serial Admin Interface.
Enter 4, then configure static IP address by
entering no for Use DHCP? Enter values
when prompted for IP address, gateway, and
subnet mask.
USB/Serial
Serial port (RJ45)
Exterity access-usb
RJ-45 to USB
Exterity access-srl
RJ-45 to DB9
Start terminal program

27
Using the Receiver’s Web Interface
1 Enter the receiver’s IP address into a browser, and log in using the default username and password (admin/labrador).
2Click Network.
Figure 1 Setting a static IP address using the receiver’s web interface
3 In the IP Address Configuration section, select Static.
4 Enter the required values for IP Address, Subnet Mask, Default Gateway and Preferred and alternate DNS Servers in the respective entry fields and click
Apply.

28
Configuring the Device’s Name and Location
Once you have logged into the receiver, you can configure all parameters. This section explains how to configure the name and location only. For further
information on configuring the receiver, please refer to the AvediaPlayer r93xx Receiver Administrator’s Guide.
Exterity recommends that you specify a name and location for each receiver. This allows you to easily identify the device on the network and in a
management application, such as the AvediaServer Director application. For example, when multiple receivers are deployed in a hospitality installation, you
can use the room number and floor as the name and location.
To configure the device’s name and location using the web management interface, log into the receiver as described in “Log into the Web Interface” on
page 25, and click General. The General page displays hardware and software information for the receiver you are using and the status of its connection to
the display device (HDMI only).
Each parameter is detailed below:
Tip: You can also use the AvediaServer Director to specify a
name and location. (For more information refer to the
AvediaServer Director Software Administrator’s Guide,
which is available on the Exterity website at
www.exterity.com > Support > Documentation).

29
Item Description
Product Type The product variant. This can be r9300 or r9310.
Software Version The version of software running on the device.
Description The full unit ID, including the firmware release number, type and date.
MAC Address The unit’s MAC address. This can be found on the underside of the receiver.
Serial Number The receiver’s serial number.
IP Address The IP address assigned to the receiver.
Hardware Type The exact type of hardware module, including the hardware revision and daughtercard type. For example, the hardware type could be shown as AVR-
Tom-B-3-MOR-C-1.
Date The current date and time of the receiver, including time zone.
Uptime The length of time since the last restart.
License A comma-separated list of the licenses that have been deployed on this receiver.
Name The name of the receiver. The default value is the last 6 characters of the receiver’s MAC address.
Location The location of the receiver. The default value is ‘default’.
 Loading...