

Page 1
USER MANUAL
WTH600-E
WTH600-E
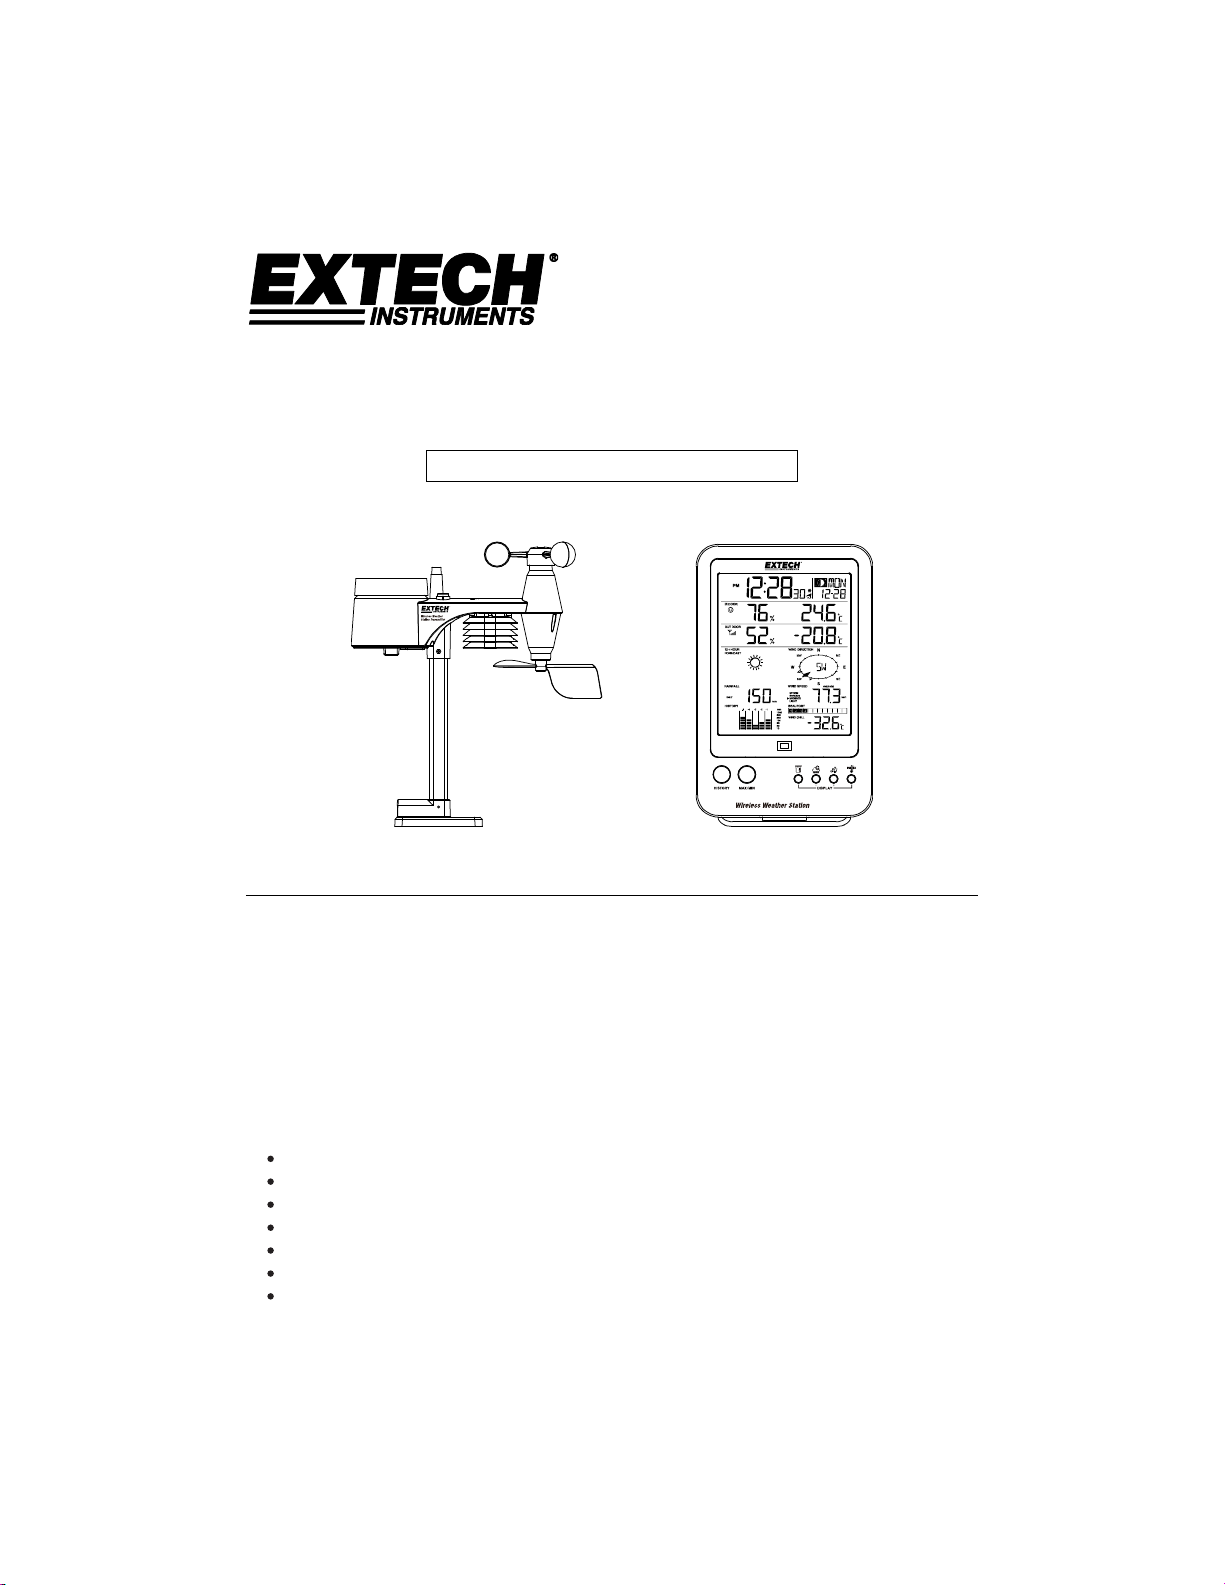
WTH600-E WIRELESS WEATHER STATION
WITH WIRELESS TRANSMITTER SENSOR
FOR USE IN EU and UK ONLY
1. INTRODUCTION
Thank you for selecting the Extech WTH600-E Wireless Weather Station with 5-in-1 wireless
sensor. The sensor includes a self-emptying rain collector for measuring rainfall, an anemometer
for wind velocity, a wind vane for wind direction, a temperature sensor, and a relative humidity
sensor. The WTH600-E comes fully assembled and calibrated for convenience. The sensor transmits
data up to 492 ft. (150m), line of sight, to the main display unit via low power radio frequency. The
main unit displays all of the weather data received from the sensor and the user can recall stored
weather data (24-periods). Includes Radio Controlled Clock feature (MSF/DCF). The WTH600-E is a
powerful and unique personal weather station that, with proper use, will provide years of reliable
service.
FEATURES
Radio Controlled Clock (MSF/DCF)
HI/LO Alarms alert the user when programmed weather limits are exceeded
Barometric pressure is computed and helps forecast the weather and possible storms
Min/Max feature includes date/time stamp
View Rainfall rate and daily/weekly/monthly amounts
Wind-speed levels are shown expressed in Beaufort scale
Wind-chill, Heat Index, Dew point, and Comfort level are computed and displayed
Find Quality Products Online at: sales@GlobalTestSupply.com
www.GlobalTestSupply.com
Page 2

CONTENTS
1. INTRODUCTION 1
2. PHYSICAL DESCRIPTIONS 3
3. DISPLAY DESCRIPTIONS 5
4. SENSOR INSTALLATION, BATTERIES, MOUNTING 7
5. MAIN UNIT OPERATION, BATTERIES, MOUNTING 9
6. WEATHER FORECAST 11
7. BAROMETRIC / ATMOSPHERIC PRESSURE 11
8. RAINFALL 12
9. WIND SPEED / DIRECTION 13
10. BEAUFORT SCALE 13
11. WIND CHILL / HEAT INDEX / DEW POINT 14
12. HISTORICAL DATA (PRIOR 24 HOURS) 15
13. MAXIMUM / MINIMUM MEMORY 15
14. HI / LO WEATHER ALERT 16
15. WIRELESS SIGNAL RECEPTION 16
16. TEMPERATURE/HUMIDITY COMFORT LEVELS 17
17. CLEARING STRAY READINGS 17
18. POINTING SENSOR TO THE SOUTH 17
19. MOON PHASES 18
20. CLEANING 18
21. TROUBLESHOOTING 19
22. PRECAUTIONS 19
23. FCC STATEMENT Error! Bookmark not defined.
24. SPECIFICATIONS 19
EU/UK Version 2 WTH600-E-en-GB_v1.0 4/18
Find Quality Products Online at: sales@GlobalTestSupply.com
www.GlobalTestSupply.com
Page 3
Find Quality Products Online at: sales@GlobalTestSupply.com
www.GlobalTestSupply.com
Page 4
Find Quality Products Online at: sales@GlobalTestSupply.com
www.GlobalTestSupply.com
Page 5
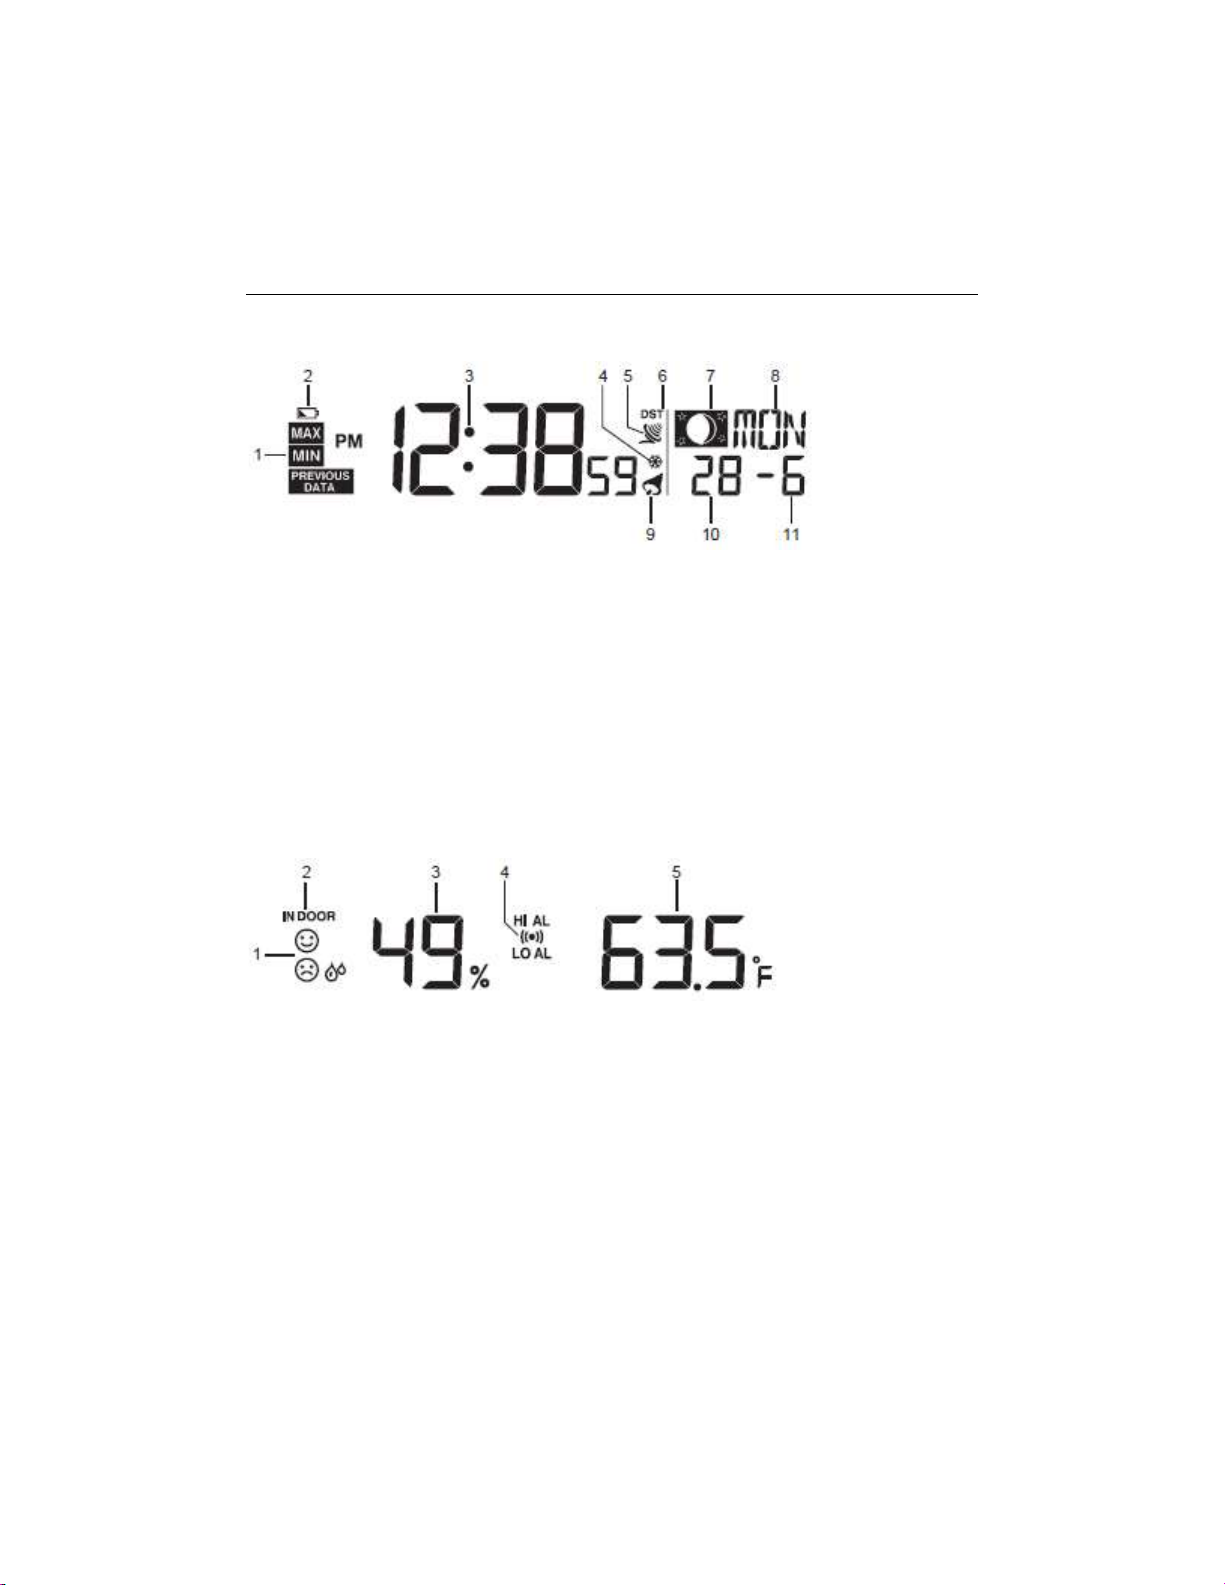
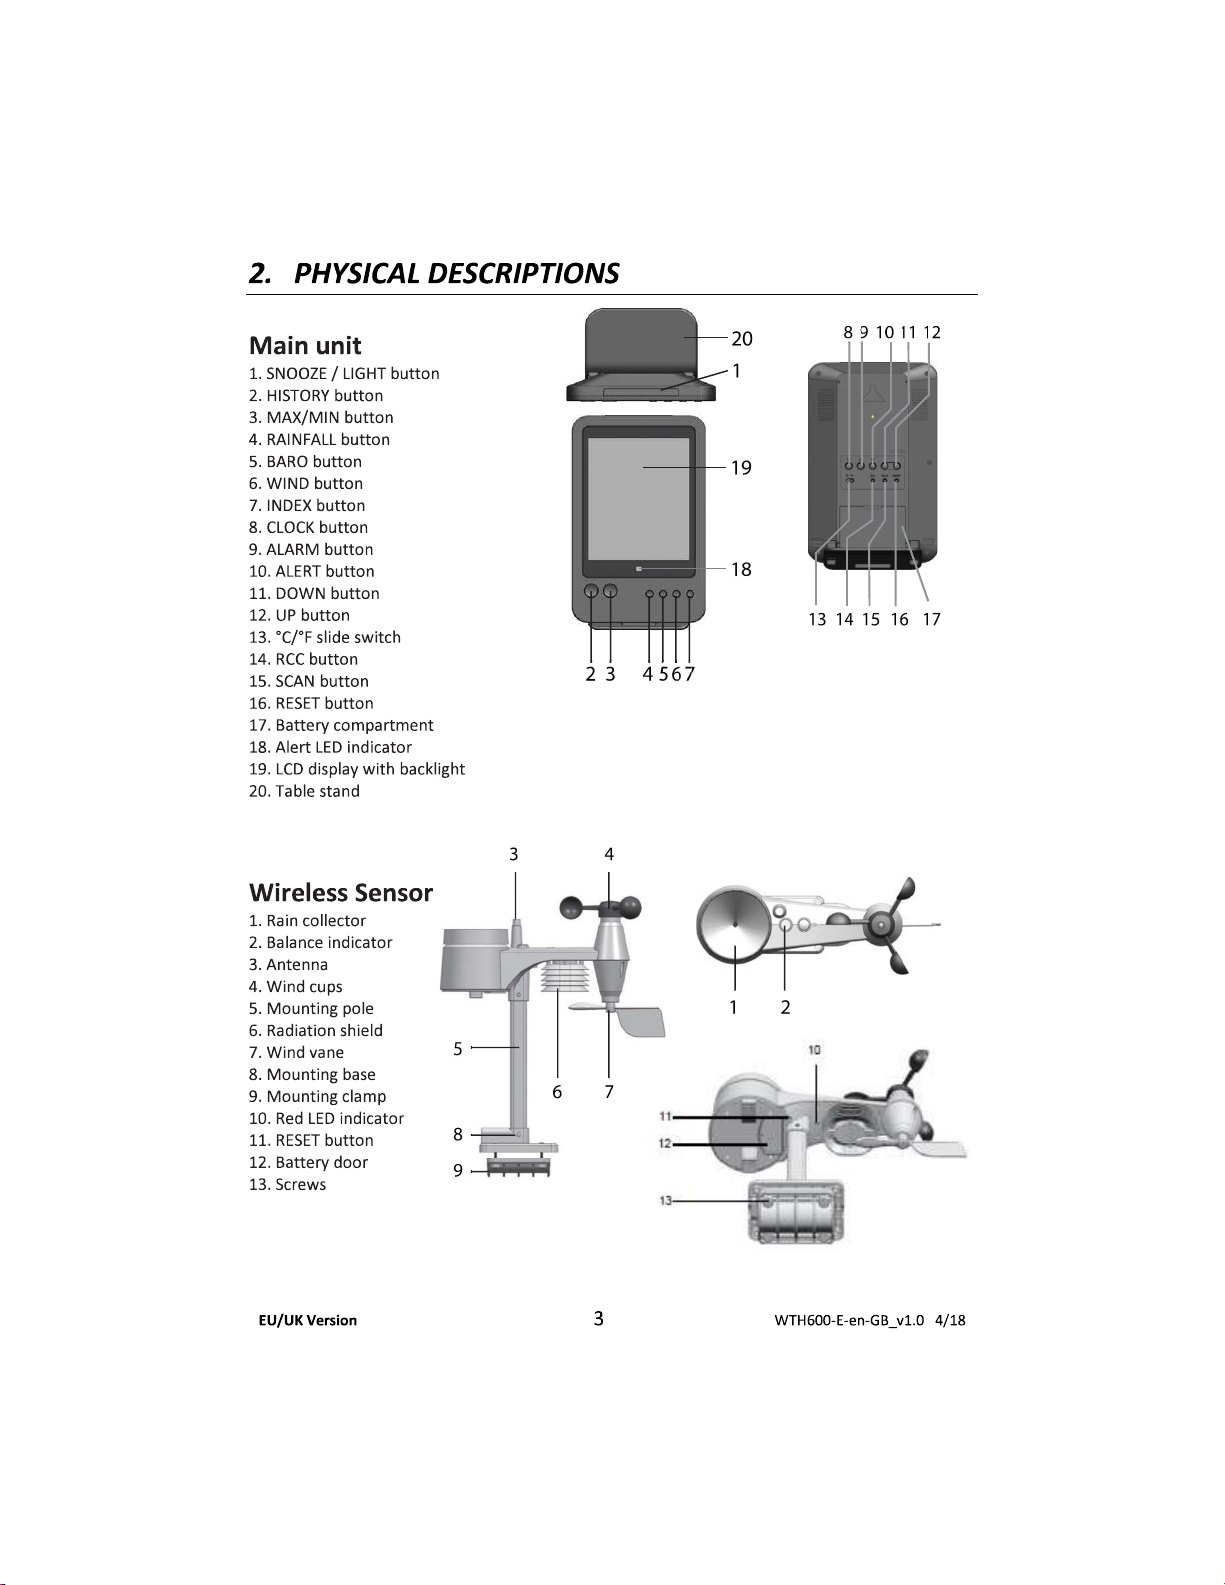
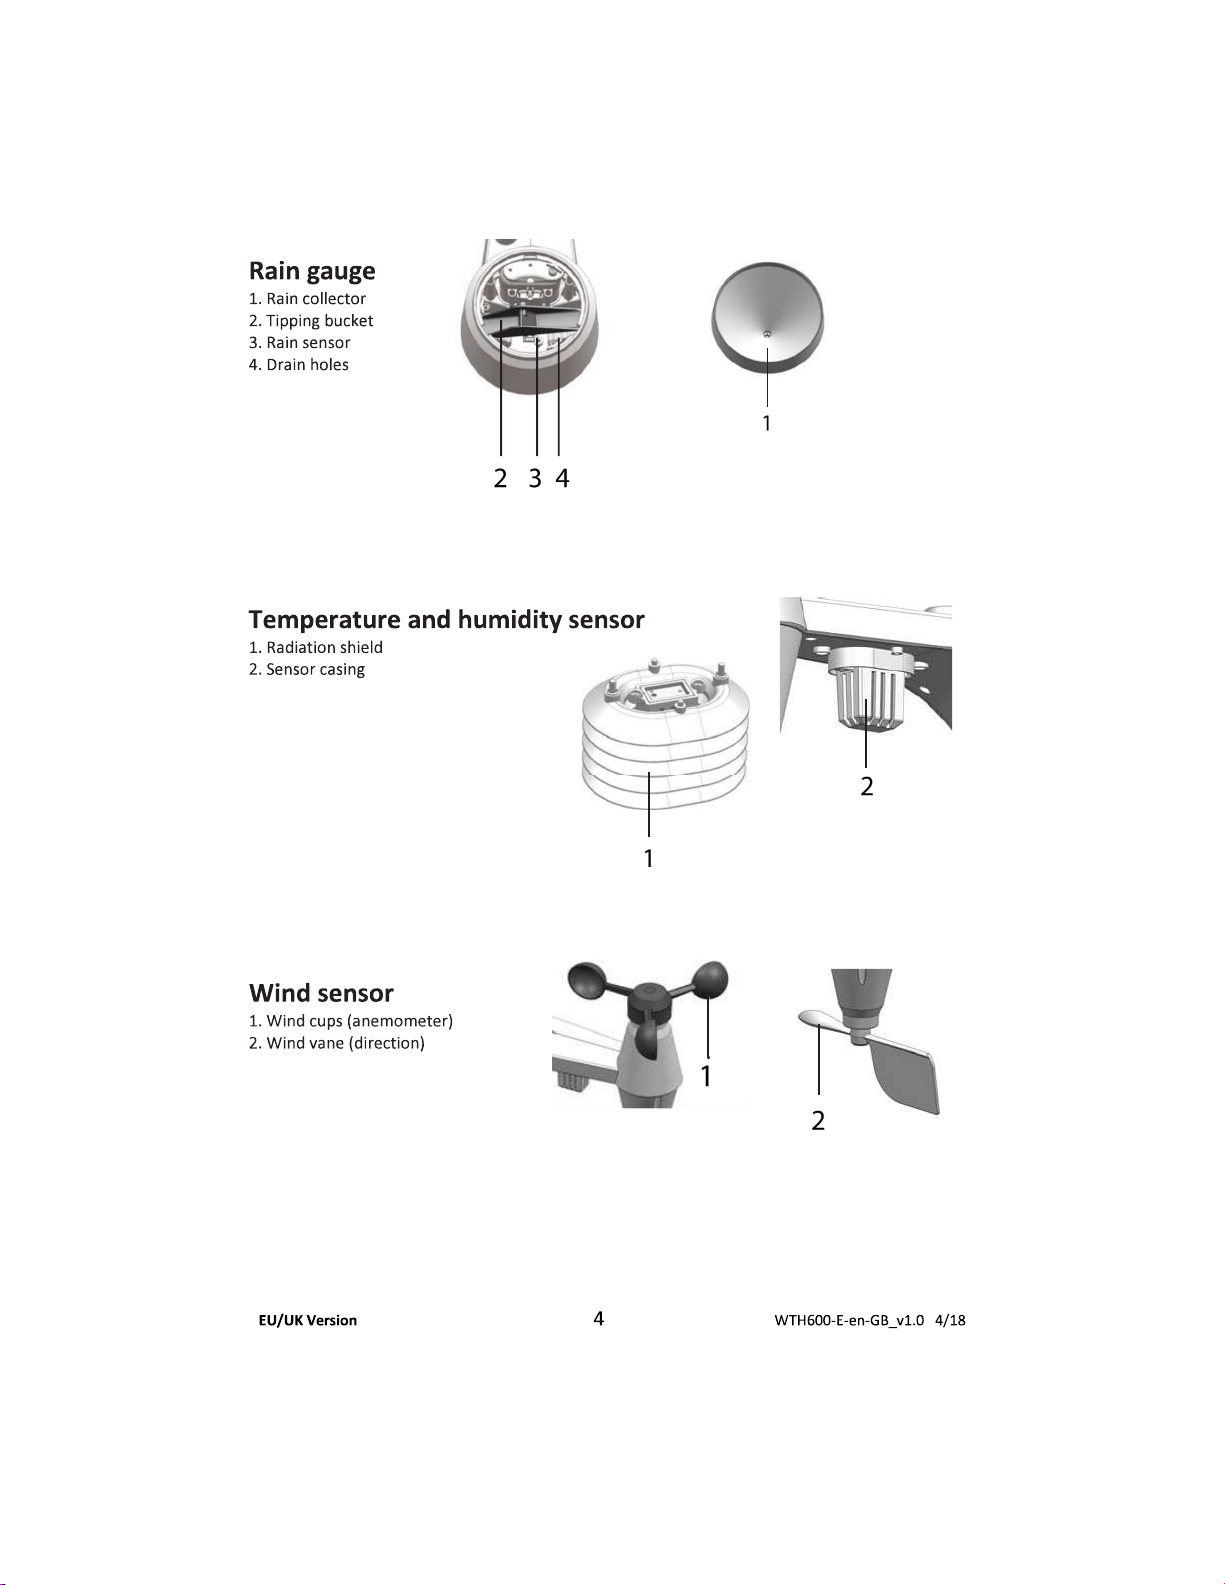
3. DISPLAY DESCRIPTIONS
Main Display
1. Max/Min/Previous indicator
2. Low battery indicator for main unit
3. Time
4. Ice pre-alert on
5. RC Signal strength indicator
6. DST icon
7. Moon phase
8. Day of the week
9. Alarm icon
10. Date
11. Month
Indoor Temperature/Humidity Display
1. Comfort/cold/hot icon
2. Indoor indicator
3. Indoor humidity
4. Hi / Lo Alert and Alarm
5. Indoor temperature
EU/UK Version 5 WTH600-E-en-GB_v1.0 4/18
Find Quality Products Online at: sales@GlobalTestSupply.com
www.GlobalTestSupply.com
Page 6
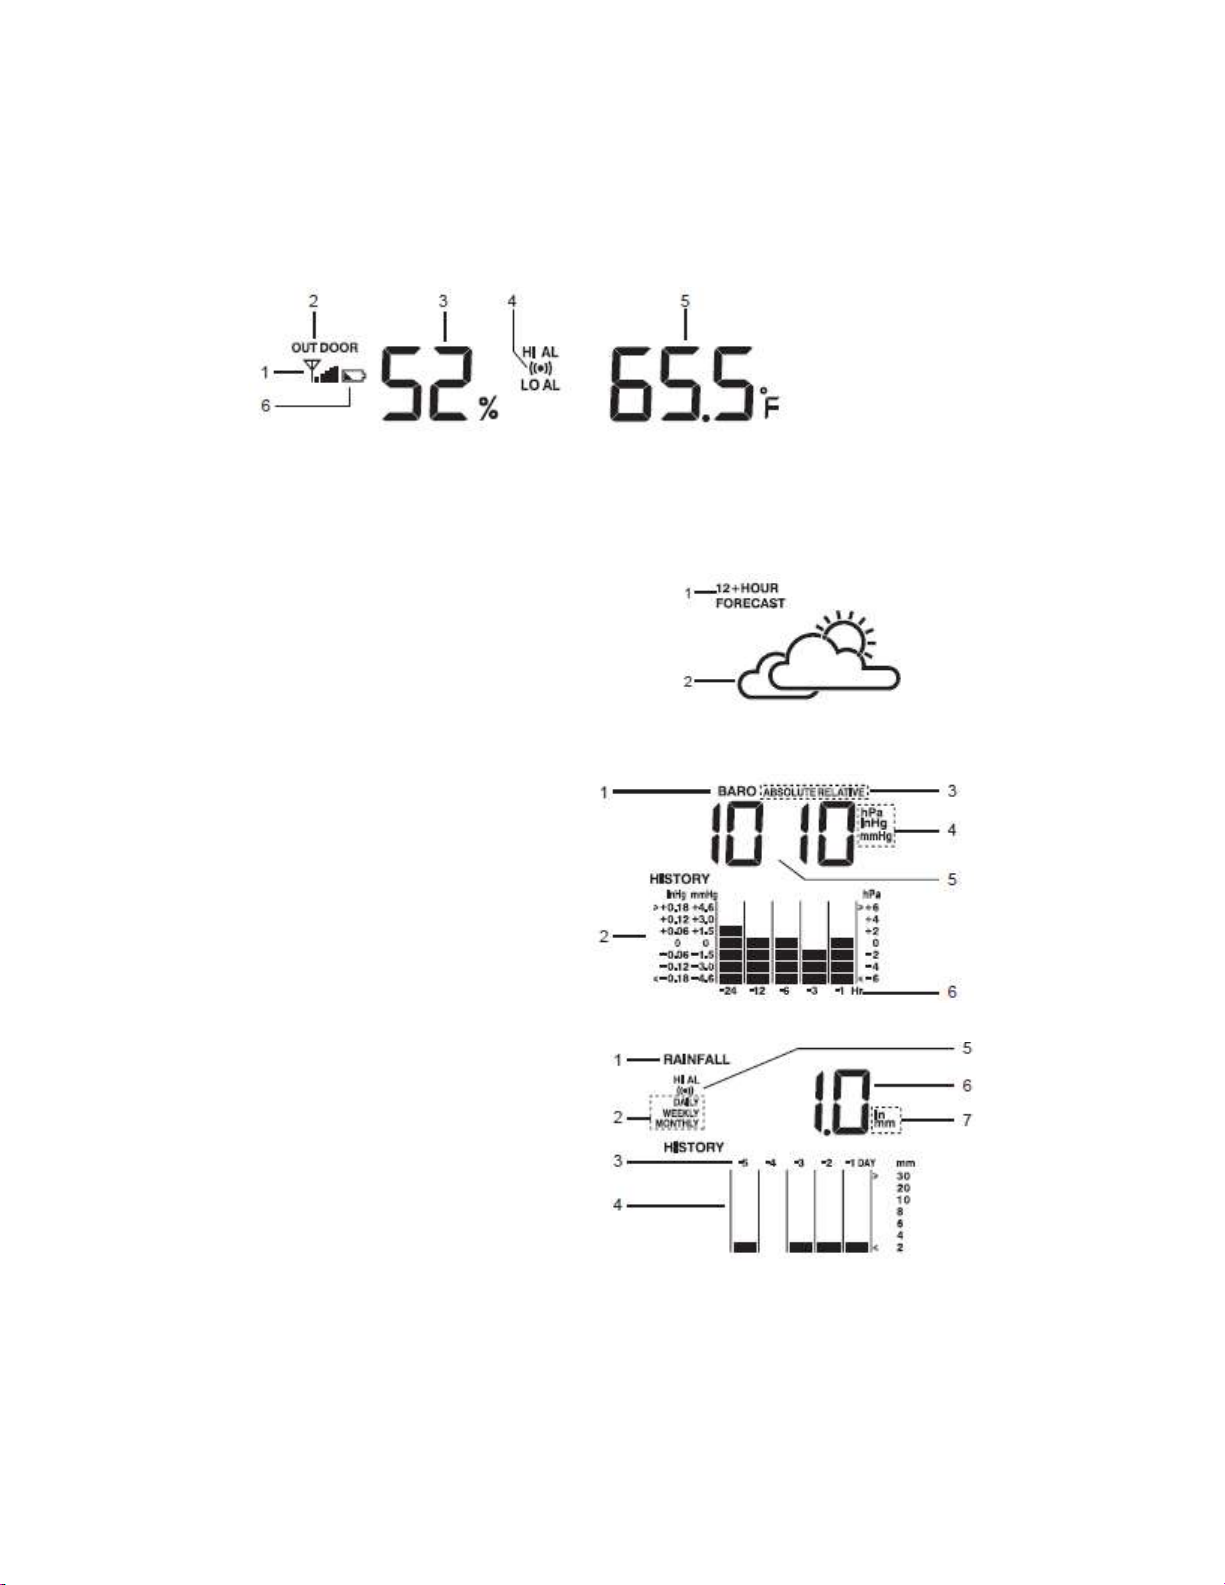
Outdoor Temperature/Humidity Display
1. Outdoor signal strength indicator
2. Outdoor indicator
3. Outdoor humidity
4. Hi / Lo Alert and Alarm
5. Outdoor temperature
6. Low battery indicator for sensor
12+ Hour Forecast Display
1. Weather forecast indicator
2. Weather forecast icon
Barometer Display
1. Barometer indicator
2. Histogram
3. Absolute/Relative indicator
4. Barometer units (hPa / inHg / mmHg)
5. Barometer reading
6. Hourly records indicator
Rainfall Display
1. Rainfall indicator
2. Time range record indicator
3. Day records indicator
4. Histogram
5. Hi Alert and Alarm
6. Current rainfall rate
7. Rainfall unit (in / mm)
EU/UK Version 6 WTH600-E-en-GB_v1.0 4/18
Find Quality Products Online at: sales@GlobalTestSupply.com
www.GlobalTestSupply.com
Page 7
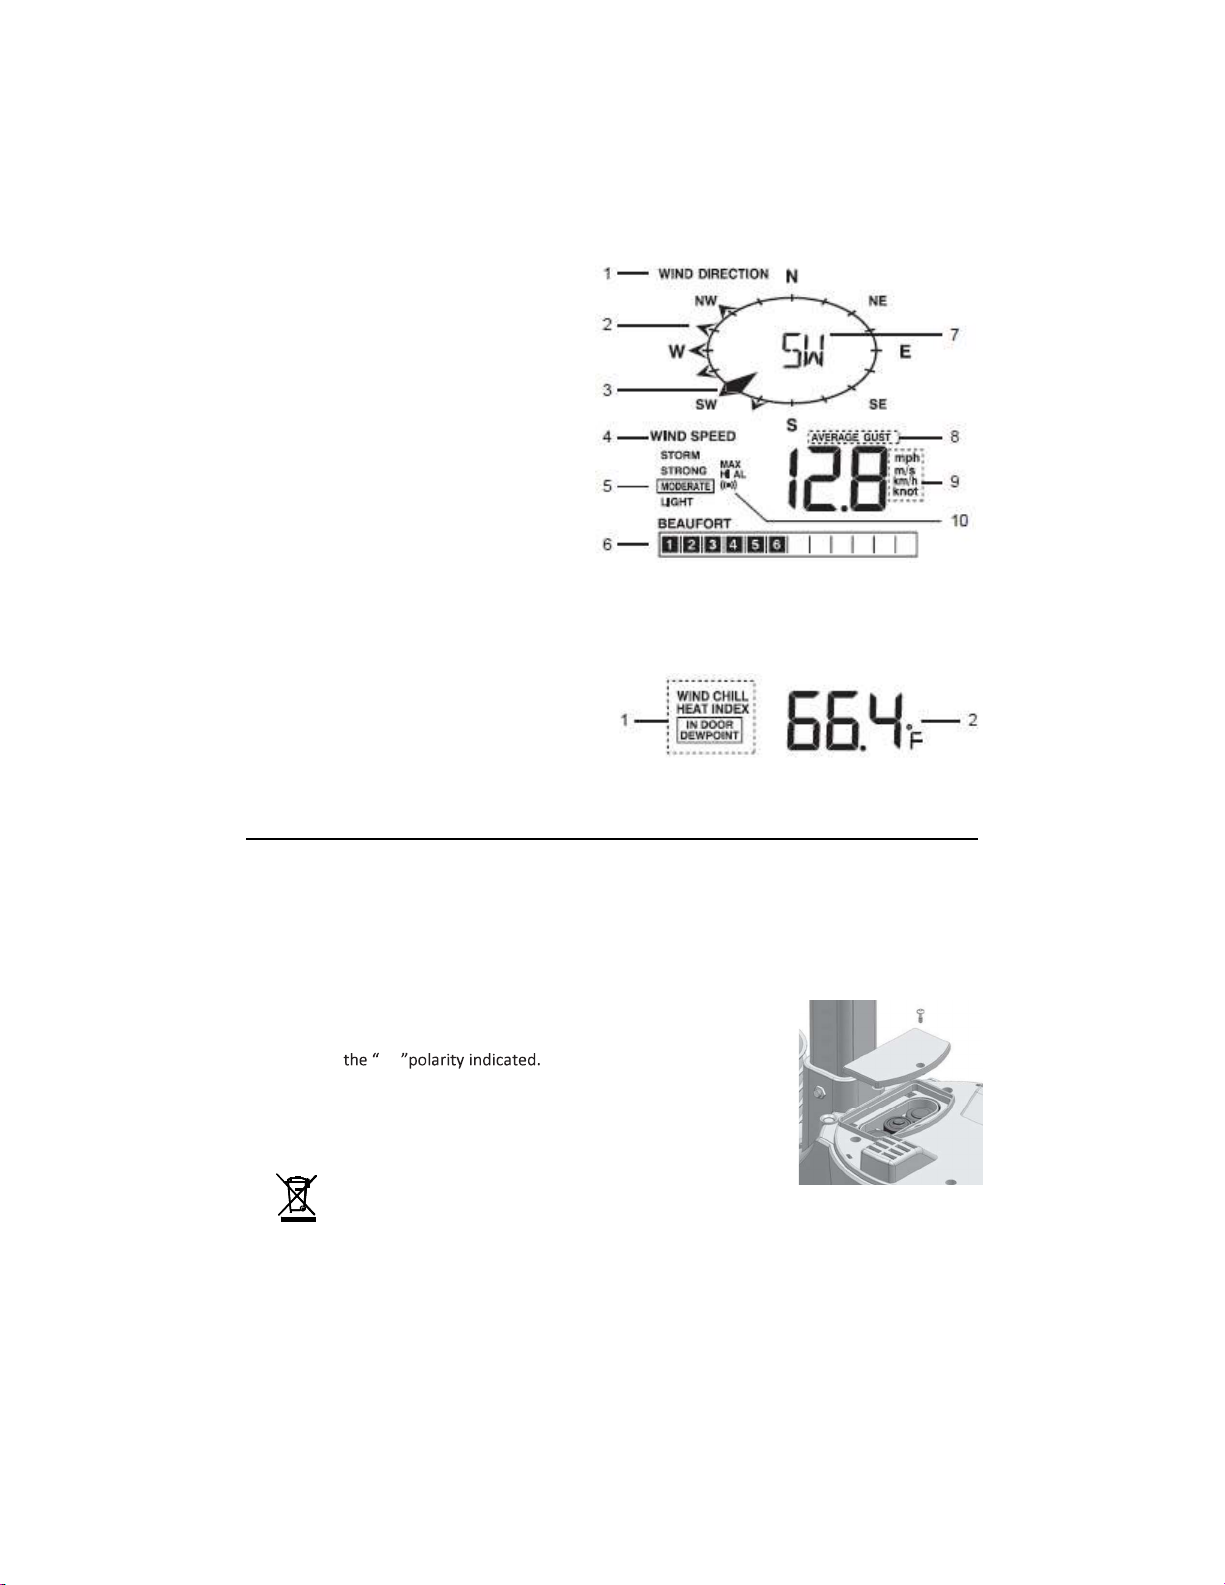
Wind Direction/Wind speed
1. Wind direction indicator
2. Wind direction indicator(s) during last
hour
3. Current wind direction indicator
4. Wind speed indicator
5. Wind levels and indicator
6. Beaufort scale reading
7. Current wind direction reading
8. Average/Gust wind indicator
9. Wind speed units (mph, m/s, km/h, knots)
10. Hi Alert and Alarm
Wind Chill/ Heat index/ Indoor Dew point
1. Wind chill/ Heat index/ Indoor dew point
indicator
2. Wind chill/ Heat index/ Indoor dew point
reading
4. SENSOR INSTALLATION, BATTERIES, MOUNTING
Wireless Sensor
The wireless sensor measures wind-speed, wind-direction, rainfall, temperature and humidity. The
sensor ships fully assembled and calibrated for easy installation.
Battery and installation
Unscrew the battery door at bottom of unit and insert the batteries
according to +/- Screw the battery door
compartment on tightly. Note:
1. Align the watertight O-ring to ensure water-resistance.
2. The red LED will begin flashing every 12 seconds.
Never dispose of used batteries or rechargeable batteries in
household waste. As consumers, users are legally required to take
used batteries to appropriate collection sites, the retail store where the batteries were
Disposal: Do not dispose of this instrument in household waste. The user is obligated to take end-of-life
devices to a designated collection point for the disposal of electrical and electronic equipment.
EU/UK Version 7 WTH600-E-en-GB_v1.0 4/18
purchased, or wherever batteries are sold.
Find Quality Products Online at: sales@GlobalTestSupply.com
www.GlobalTestSupply.com
Page 8

Install the wireless sensor in an open location with no obstructions above and around the sensor
for accurate rain and wind measurement. Install the sensor with the smaller end facing to the
North (proper orientation of the wind direction vane). Secure the mounting stand and bracket
(included) to a post or pole, and allow a minimum distance of 1.5m off the ground.
Mounting guidelines
1. Install the wireless sensor at least 1.5m off the ground for accurate wind measurements.
2. Choose an open area within 150 meters from the Main Unit.
3. Install the wireless sensor as level as possible to achieve accurate rain and wind measurements.
The included leveling device ensures a level installation.
4. Mount the wireless sensor with the wind meter end pointing to the North.
5. Pole mount shown below left and railing mount below right.
EU/UK Version 8 WTH600-E-en-GB_v1.0 4/18
Find Quality Products Online at: sales@GlobalTestSupply.com
www.GlobalTestSupply.com
Page 9

5. MAIN UNIT OPERATION, BATTERIES, MOUNTING
Battery Installation and Mounting
The WTH600-E can be placed on a desktop or can be wall mounted for easy viewing.
1. Remove the battery door of the main unit.
AA +/- ity marks on the battery compartment.
3. Replace the battery door.
4. Once the batteries are inserted all of the LCD segments will be shown briefly before entering the
radio-controlled time reception mode.
5. The RC clock will automatically start scanning for the radio-controlled time signal in 8 seconds.
Note:
1. If no display appears, press the RESET button using a paper clip or other pointed object.
2. In some cases, you may not receive the signal immediately due to atmospheric disturbance.
Pairing the Sensor with the Main Unit
After insertion of batteries, the Main Unit will automatically search for and connect with the
wireless sensor (antenna icon blinking). When successful, the antenna icon and readings for
outdoor temperature, humidity, wind speed, wind direction, and rainfall will appear on the display.
Manual Pairing after Replacing Batteries
batteries, you must perform a manual pairing.
1. Replace the batteries.
2. Press the [SCAN] button.
3. Press the [RESET] button on the sensor (bottom of sensor).
Note:
1. Pressing [RESET] generates a new code for pairing purposes.
2. Please dispose of batteries in an environmentally safe manner and in accordance with all
relevant law and regulations.
Radio-controlled (RC) Time Signal
When the unit receives the RC signal (DCF/MSF), a sync-time symbol will appear on the LCD.
Note that the unit synchronizes daily.
Note:
1. The strength of the signal from the transmitter tower may be affected by geographical location
or surrounding buildings.
EU/UK Version 9 WTH600-E-en-GB_v1.0 4/18
Find Quality Products Online at: sales@GlobalTestSupply.com
www.GlobalTestSupply.com
Page 10

2. Always place the unit away from interfering sources such as TV monitors, computers, etc.
3. Avoid placing the unit on or next to metal plates.
4. Enclosed areas such as airports, basements, or factories are not recommended.
Setting the Date and Time
The unit automatically sets itself accordingly to the Radio Controlled Clock signal it receives. To set
the clock/calendar manually, first disable the reception as explained in the One-Time and
Permanent Disable sections below and then continue with the steps in the next section.
Manually Setting the Clock and Time Zone
2. Use [UP] [DOWN] buttons to adjust, and press [CLOCK] button to continue.
3. Repeat step 2 above for TIME ZONE (North America version only), HOUR, MINUTE, SECOND,
YEAR, MONTH, DATE, and HOUR OFFSET.
Note:
1. If no buttons are pressed within 60 seconds, the unit will automatically exit this setting mode.
2. The HOUR OFFSET range is ± 23 hours. Adjust the offset accordingly to match the DCF/MSF
signal if necessary.
3. The time zone setting applies only to the North American version where the unit is set to receive
the WWVB signal. User can select PST, MST, CST, EST, AST or NST.
4. The language options are English (EN), French (FR), German (DE), Spanish (ES), and Italian (IT).
5. DST (Daylight Saving Time) feature defaults to AUTO. User can set the DST to OFF.
One-Time Disable / Enable RCC Signal Reception
1. Short press the [RCC] button to disable the reception temporarily.
2. Short press the [RCC] button to enable automatic RCC reception.
Permanent Disable / Enable RCC Signal Reception
1. Press and hold [RCC] button for 8 seconds to disable the reception permanently.
2. Press and hold [RCC] button for 8 seconds to enable automatic RCC reception.
EU/UK Version 10 WTH600-E-en-GB_v1.0 4/18
Find Quality Products Online at: sales@GlobalTestSupply.com
www.GlobalTestSupply.com
Page 11
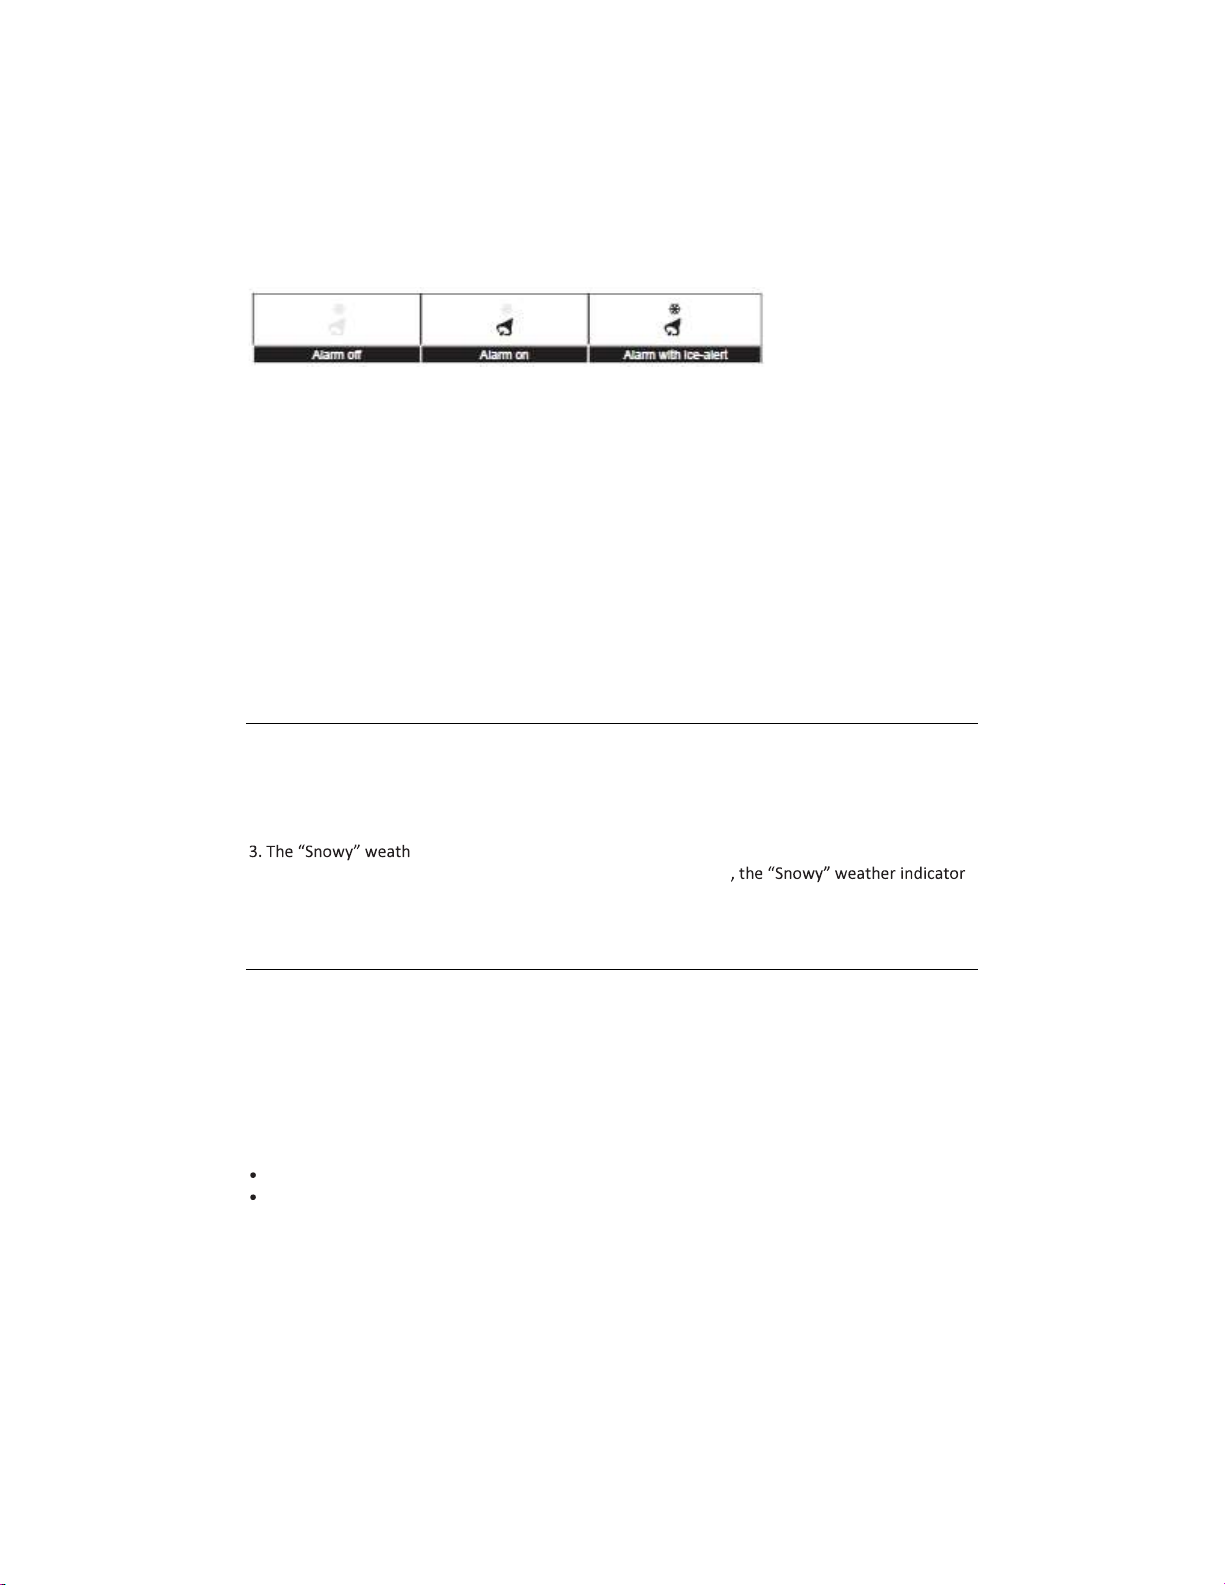
Turn Alarm Clock On/Off (with ice-alert function)
1. Press the [ALARM] button anytime to show the alarm time.
2. Press [ALARM] button to activate the alarm.
3. Press again to activate alarm with ice-alert function.
4. To disable the alarm, press until the alarm icon disappears.
Set the Alarm Clock
1. Press and hold [ALARM] for 2 seconds to enter alarm setting mode. HOUR will begin to flash.
2. Use [UP] [DOWN] buttons to adjust HOUR, and press [ALARM] button to proceed to MINUTE.
3. Repeat step 2 above to set MINUTE, then press [ALARM] button to exit.
Note: Pressing the [ALARM] button twice when alarm time is displayed will activate the
temperature-adjusted pre-alarm (alarm will sound 30 minutes earlier if it detects outside
temperature is below 26°F (-3°C)).
6. WEATHER FORECAST
The WTH600-E includes a sensitive pressure sensor that predicts weather for the next 12 ~ 24
hours within a 19-31 miles (30 to 50km) radius.
Note:
1. The accuracy of a general pressure-based weather forecast is about 70% to 75%.
2. The weather forecast does not necessarily reflect the current weather conditions.
er forecast is not based on atmospheric pressure; it is based on outdoor
temperature. When the outdoor temperature is below 26°F (-3°C)
will be displayed on the LCD.
7. BAROMETRIC / ATMOSPHERIC PRESSURE
Atmospheric Pressure is the pressure at any location of the Earth caused by the weight of the
column of air above it. One atmospheric pressure refers to the average pressure and gradually
decreases as altitude increases. Meteorologists use barometers to measure atmospheric pressure.
Since variation in atmospheric pressure is greatly affected by weather, it is possible to forecast the
weather by measuring the changes in pressure.
Select the Display mode
Press and hold the [BARO] button for 2 seconds to toggle between:
ABSOLUTE the absolute atmospheric pressure of your location
RELATIVE the relative atmospheric pressure based on sea level
EU/UK Version 11 WTH600-E-en-GB_v1.0 4/18
Find Quality Products Online at: sales@GlobalTestSupply.com
www.GlobalTestSupply.com
Page 12

Set the Relative Atmospheric Pressure
1. Obtain the atmospheric pressure data for the sea level (the relative atmospheric pressure for
your current location) through the local weather service, internet or other channel.
2. Press and hold [BARO]
3. Press [UP] [DOWN] buttons
4. Press [BARO] button pheric pressure digit flashes.
5. Press [UP] [DOWN] buttons to change its value.
6. Press [BARO] button to save and exit the setting mode.
Note:
1. The default relative atmospheric pressure value is 29.91 inHg (1013 hPa), which refers to the
average atmospheric pressure.
2. When you change the relative atmospheric pressure value, the weather indicators will change.
3. The built-in barometer detects the environmental absolute atmospheric pressure changes.
Based on the data collected, it can predict weather conditions for the next 12 hours. The weather
indicators will change according to the detected absolute atmospheric pressure after 1 hour.
4. The relative atmospheric pressure is based on the sea level, but it will change with the absolute
atmospheric pressure changes after operating the clock for 1 hour.
Select the Measurement Units for the Barometer
1. Press the [BARO] button to enter the unit setting mode.
2. Use the [BARO] button to change the units to inHg (inches of mercury) / mmHg (millimeter of
mercury) (millibars per hectopascal) /hPa.
3. Press the [BARO] button to confirm.
8. RAINFALL
Select Rainfall Display mode:
The device displays how many mm / inches of rain have accumulated in a one hour time period,
based on current rainfall rate. Press [RAINFALL] button to select from the following:
RATE Current rainfall rate in the past hour
DAILY The DAILY display indicates the total rainfall from midnight
WEEKLY The WEEKLY display indicates the total rainfall from the current week
MONTHLY The MONTHLY display indicates the total rainfall from the current calendar month
Note: Rain rate is updated every 6 minutes, at every hour on the hour, and at 6, 12, 18, 24, 30, 36,
42, 48, 54 minutes past the hour.
Select the measurement unit for rainfall:
1. Press and hold [RAINFALL] button 2 seconds to enter unit setting mode.
2. Use [UP] [DOWN] buttons to toggle between mm (millimeter) and in (inch).
3. Press [RAINFALL] button to confirm and exit.
EU/UK Version 12 WTH600-E-en-GB_v1.0 4/18
Find Quality Products Online at: sales@GlobalTestSupply.com
www.GlobalTestSupply.com
Page 13

9. WIND SPEED / DIRECTION
Read the Wind Direction
Select the Wind Display mode
Press [WIND] button to toggle between:
AVERAGE The AVERAGE wind speed will display the average of all wind speed numbers recorded
in the previous 30 seconds
GUST The GUST wind speed will display the highest wind speed recorded from last reading
The wind level provides a quick reference and is indicated by a series of text icons:
Select Wind Speed Units
1. Press and hold [WIND] button for 2 seconds to enter unit setting mode.
2. Use the [UP] [DOWN] buttons to change the unit between mph (miles per hour) / m/s (meter
per second) / km/h (kilometer per hour) / knots.
3. Press [WIND] button to confirm and exit.
10. BEAUFORT SCALE
Beaufort scale is an international scale of wind velocities from 0 (calm) to 12 (Hurricane force).
Beaufort no.
0 Calm < 1 km/h Calm. Smoke rises vertically.
1 Light air 1.1 5.5 km/h Smoke drift indicates wind direction. Leaves and wind
2 Light breeze 5.6 11 km/h Wind felt on exposed skin. Leaves rustle. Wind vanes
3 Gentle breeze 12 19 km/h Leaves and small twigs constantly moving, light flags
Description Wind speed Land conditions
< 1 mph
< 1 knot
< 0.3 m/s
1 3 mph
1 3 knots
0.3 1.5 m/s
4 7 mph
4 6 knots
1.6 3.4 m/s
vanes are stationary.
begin to move.
EU/UK Version 13 WTH600-E-en-GB_v1.0 4/18
Find Quality Products Online at: sales@GlobalTestSupply.com
www.GlobalTestSupply.com
Page 14

8
12 mph
extended.
710 knot
s
3.5 5.4 m/s
13
17 mph
1116 knot
s 5.5
7.9 m/s
5 Fresh breeze
2938 km/h
Branches of a moderate size move. Small trees in leaf
18
24 mph
1721 knot
s 8.0
10.7 m/s
6
Strong breeze
3949 km/h
Large branches in motion. Whistling heard in
25
30 mph
2227 knot
s 10.8
13.8 m/s
7 High win
d 50
61 km/h
Whole trees in motion. Effort needed to walk against
31
38 mph
2833 knot
s 13.9
17.1 m/s
8
Gale 62
74 km/h
Some twigs broken from trees. Cars veer on road.
39
46 mph
3440 knots 17.2
20.7 m/s
9 Strong gale
7588 km/h
Some branches break off trees, and some small trees
47
54 mph
4147 knot
s 20.8
24.4 m/s
10
Storm 89
102 km/h
Trees are split
or
uprooted, structural damage likely.
4 Moderate breeze 20 28 km/h Dust and loose paper raised. Small branches begin to
55 63 mph
48 55 knots
24.5 28.4 m/s
11 Violent storm 103 117 km/h Widespread vegetation and structural damage likely.
64 73 mph
56 63 knots
28.5 32.6 m/s
12 Hurricane force Severe widespread damage to vegetation and
move.
begin to sway.
overhead wires. Umbrella use becomes difficult.
Empty plastic bins tip over.
the wind.
Progress on foot is seriously impeded.
blow over. Construction/temporary signs and
barricades blow over.
structures. Debris and unsecured objects become
airborne.
s
11. WIND CHILL / HEAT INDEX / DEW POINT
View the Wind Chill
Press the [INDEX] button repeatedly until the WINDCHILL appears.
Note: The wind chill factor is based on the combined effects of temperature and wind speed. The
wind chill displayed is calculated solely from temperature and humidity measured by the wireless
sensor.
EU/UK Version 14 WTH600-E-en-GB_v1.0 4/18
Find Quality Products Online at: sales@GlobalTestSupply.com
www.GlobalTestSupply.com
Page 15
View the Heat Index
Press the [INDEX] button repeatedly until the HEAT INDEX appears.
Note: Heat index is only calculated when temperature is 80°F/27°C or above, and based solely from
the temperature and humidity measured by the wireless sensor.
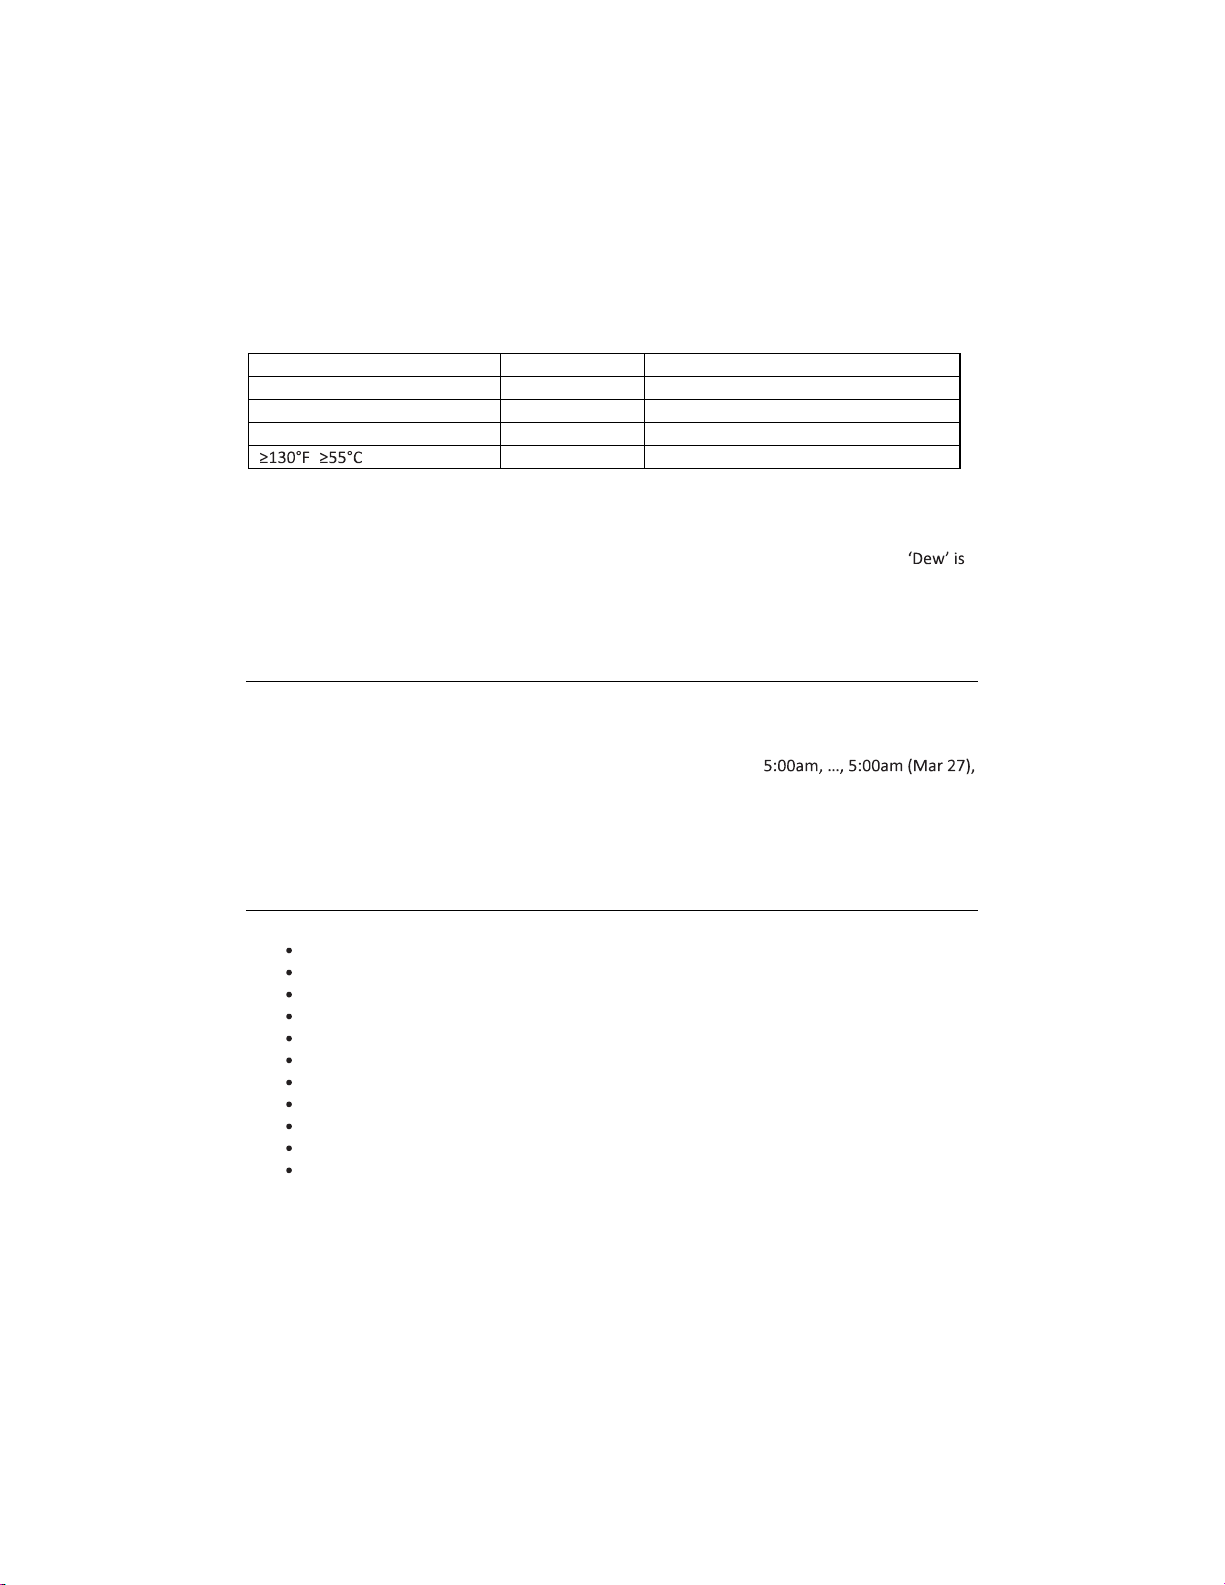
Heat Index Range Warning Explanation
80°F to 90°F (27°C to 32°C) Caution Possibility of heat exhaustion
91°F to 105°F (33°C to 40°C) Extreme Caution Possibility of heat dehydration
106°F to 129°F (41°C to 54°C) Danger Heat exhaustion likely
( ) Extreme Danger Strong risk of dehydration / sun stroke
View Dew point (Indoor)
Press the [INDEX] button repeatedly until DEWPOINT appears.
Note: The dew point is the temperature below which the water vapor in air, at a constant
barometric pressure, condenses into liquid water at the same rate at which it evaporates.
the term used to describe the condensed water that forms on a solid surface. The dew point
temperature is calculated from the indoor temperature/humidity measured at the Main Unit.
12. HISTORICAL DATA (PRIOR 24 HOURS)
The main unit automatically records and displays data from the previous 24 hours on the hour. To
check all of the historical data from the past 24 hours, press the [HISTORY] button. E.g. Current
time 7:25 am, March 28
Press [HISTORY] repeatedly to view prior readings at 7:00am, 6:00am,
6:00am (Mar 27), 7:00am (Mar 27)
The LCD will display the prior indoor and outdoor temperature & humidity, air pressure, wind chill,
wind speed, rainfall along with the time and date.
13. MAXIMUM / MINIMUM MEMORY
Press the [MAX/MIN] button to view the maximum/minimum records in the following sequence:
Outdoor MAX temperature, Outdoor MIN temperature
Outdoor MAX humidity, Outdoor MIN humidity
Indoor MAX temperature, Indoor MIN temperature
Indoor MAX humidity, Indoor MIN humidity
Outdoor MAX wind chill, Outdoor MAX wind chill
Outdoor MAX heat index, Outdoor MIN heat index
Indoor MAX dew point, Indoor MIN dew point
MAX pressure, MIN pressure
MAX average gust
MAX gust
Max rainfall
Press and hold [MAX/MIN] for 2 seconds to reset the MAX/MIN records. Note: The display shows
date/time stamp along with all maximum or minimum readings.
EU/UK Version 15 WTH600-E-en-GB_v1.0 4/18
Find Quality Products Online at: sales@GlobalTestSupply.com
www.GlobalTestSupply.com
Page 16
14. HI / LO WEATHER ALERT
The WTH600-E can alert you to specific weather conditions. When the alert function is active, the
amber LED flashes when certain conditions exist; see table below.
Area Types of Alerts Available
Indoor Temperature HI and LO alert
Indoor Humidity HI and LO alert
Outdoor Temperature HI and LO alert
Outdoor Humidity HI and LO alert
Rainfall HI alert (rainfall since midnight)
Wind speed HI alert
Set the HI / LO alert
1. Press the [ALERT] button to select the desired display field.
2. Use [UP] / [DOWN] buttons to adjust the settings.
3. Press [ALERT] button to confirm and continue to the next setting.
Enable/disable the HI / LO Alarm Alert
1. Press the [ALERT] button to select the desired display field.
2. Use [ALARM] to turn the alert on or off.
3. Press [ALERT] to continue to the next setting.
Note:
1. The unit will automatically exit setting mode in 5 seconds if no button is pressed.
2. When ALERT alarm is on, the area and type of alert that triggered the alarm will be flashing and
the alarm will sound for 2 minutes.
3. To silence the Alert alarm beeper, press the [SNOOZE / LIGHT] / [ALARM] button, or allow the
beeper to automatically turn off after 2 minutes.
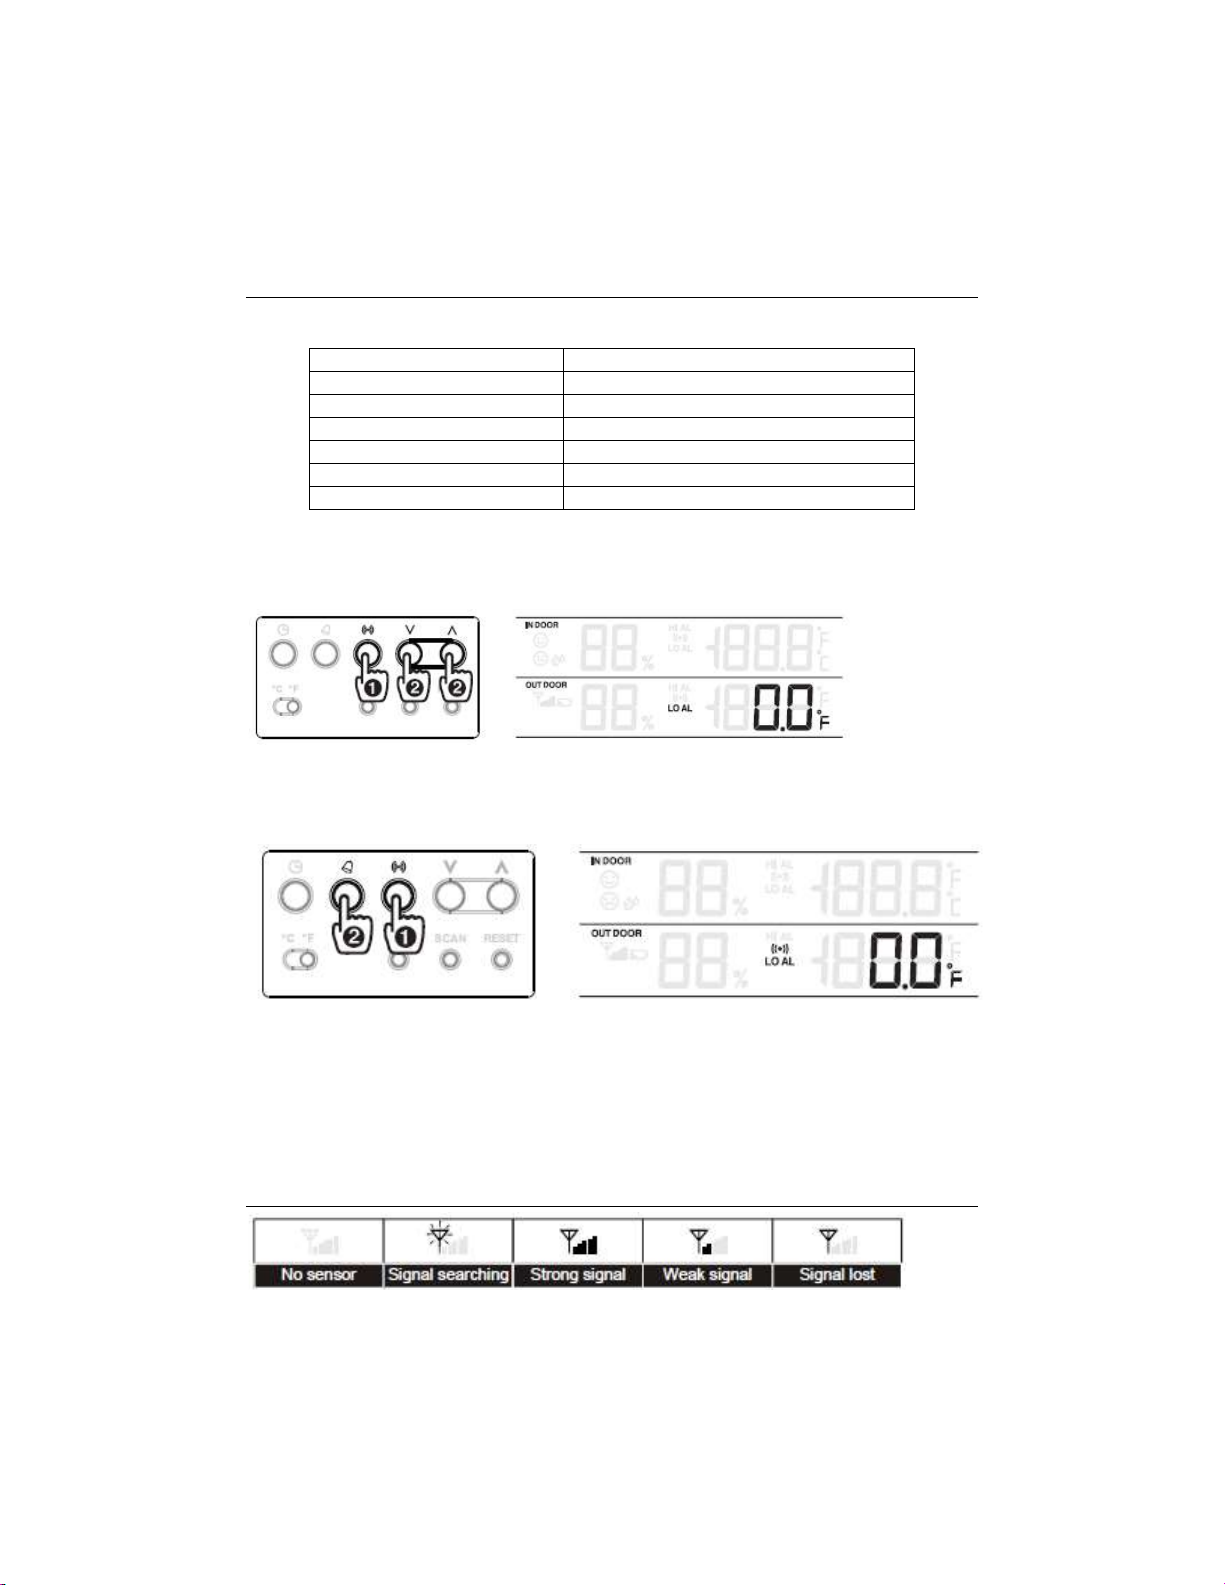
15. WIRELESS SIGNAL RECEPTION
EU/UK Version 16 WTH600-E-en-GB_v1.0 4/18
Find Quality Products Online at: sales@GlobalTestSupply.com
www.GlobalTestSupply.com
Page 17
The sensor transmits data wirelessly over an approximate range of 150m (line of sight).
Occasionally, due to intermittent physical obstructions or other environmental interference, the
signal may weaken or be lost. If the sensor signal is lost completely, please relocate the main unit
or the wireless sensor.
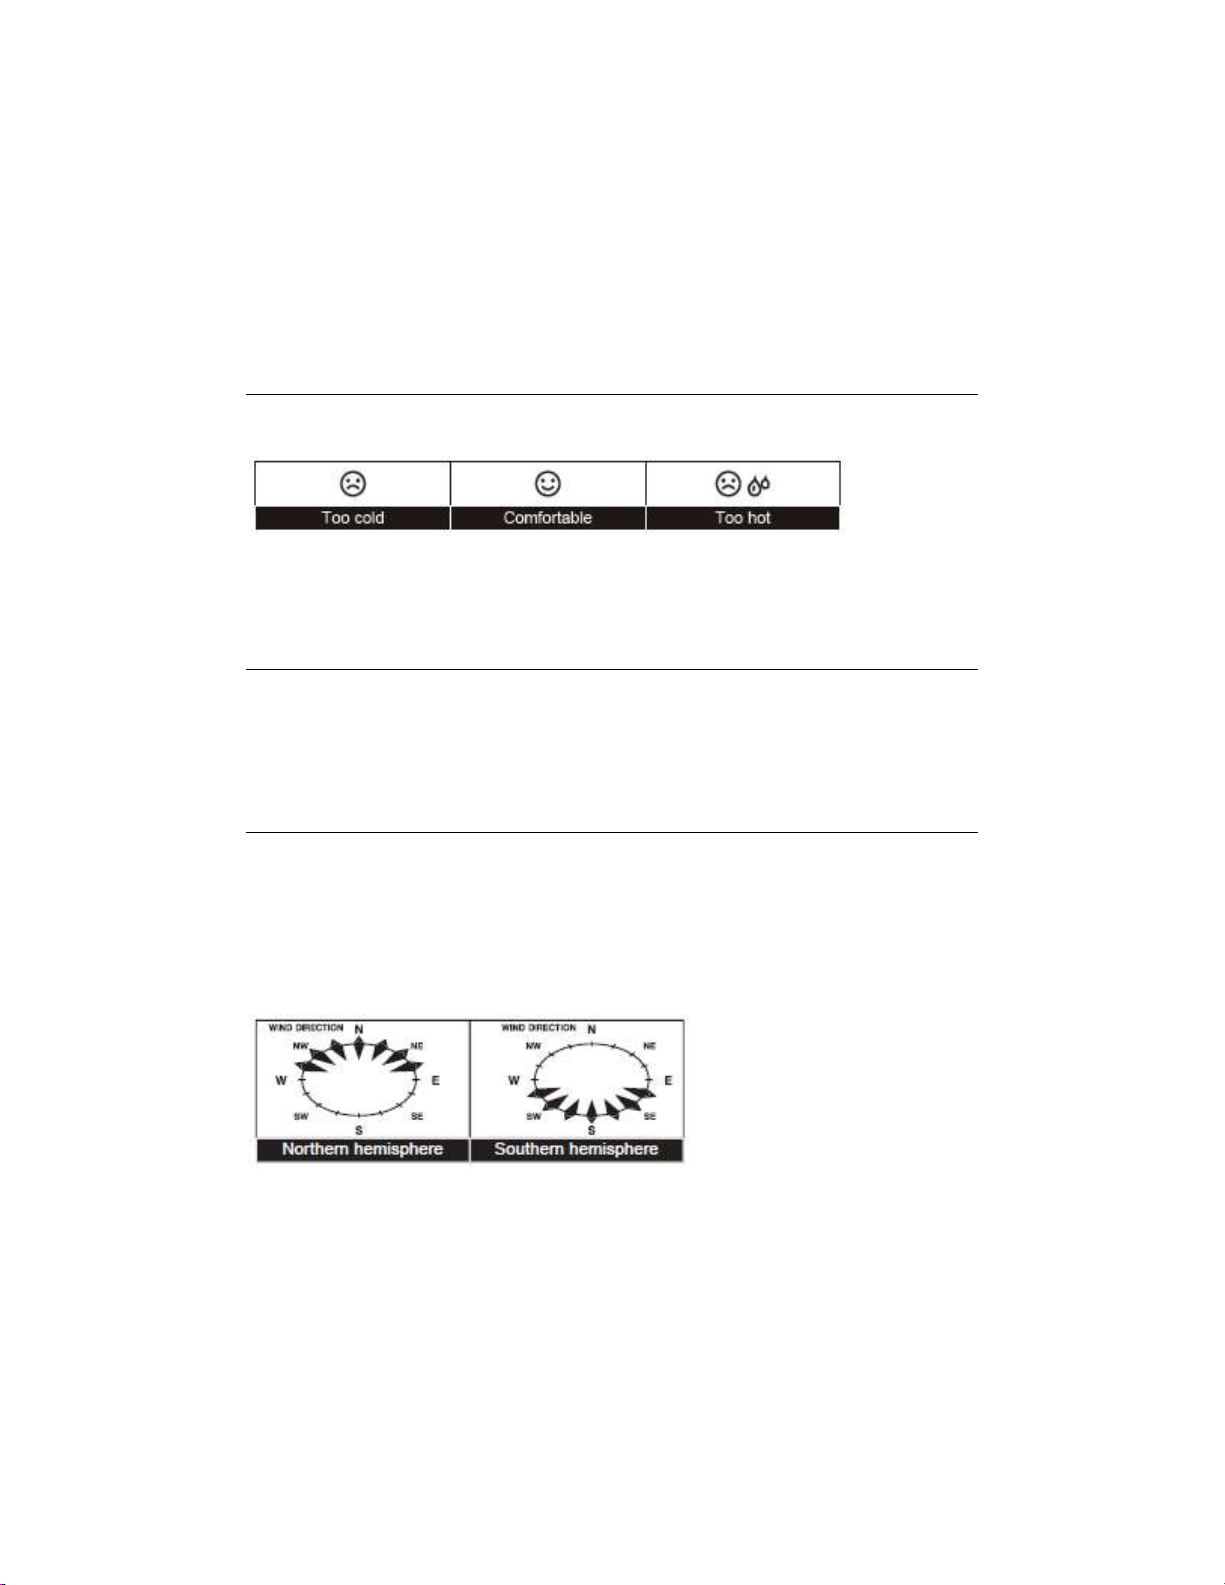
16. TEMPERATURE/HUMIDITY COMFORT LEVELS
Comfort Indication
The comfort pictorial indication is based on indoor air temperature and humidity.
Note:
1. Comfort indication can vary at the same temperature, depending on the humidity.
2. There is no comfort Indication when temperature is below 32°F (0°C) or above 140°F (60°C).
17. CLEARING STRAY READINGS
During installation of the wireless sensor, the sensors are typically triggered which results in
erroneous rainfall and wind measurements. After the installation, the user may clear all of the
erroneous data from the Main Unit, without having to reset the clock and re-establish pairing.
Simply press and hold the [HISTORY] button for 10 seconds. This will clear all data.
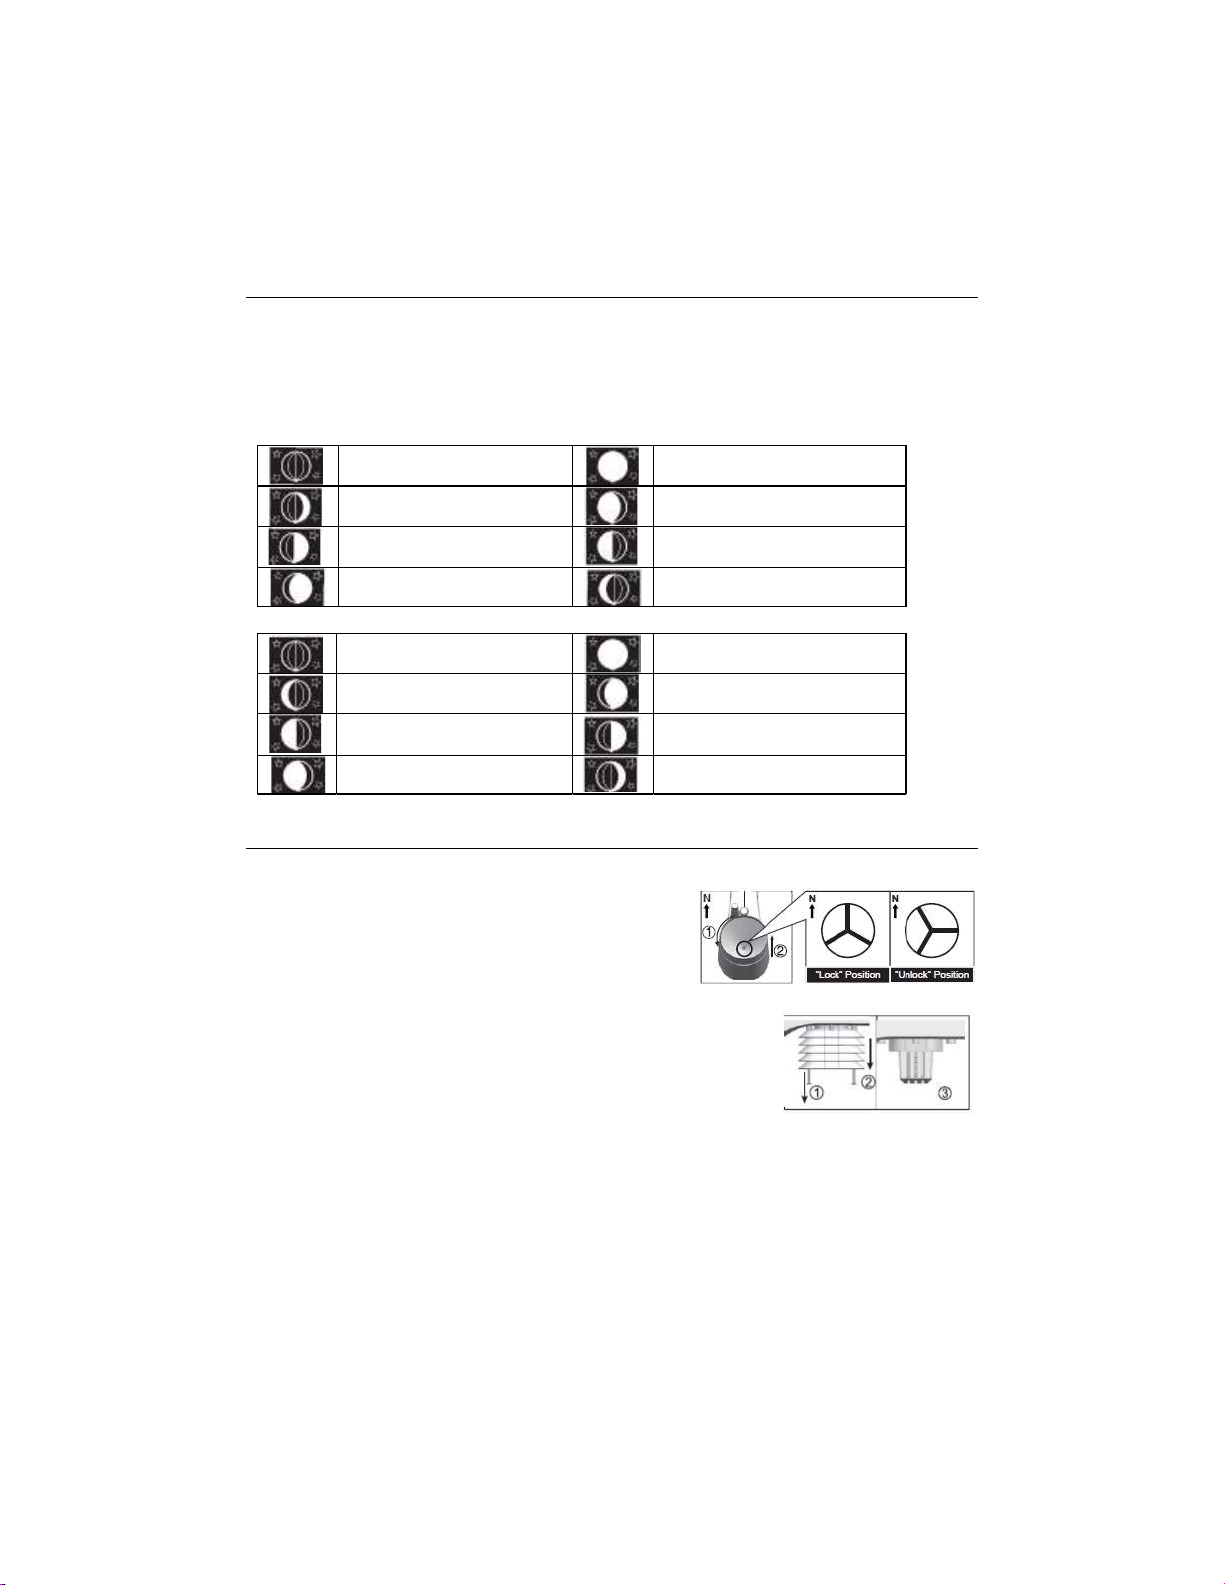
18. POINTING SENSOR TO THE SOUTH
The outdoor sensor is calibrated to be pointing to North by default. However, in some cases, users
may wish to install the product with the arrow pointing towards the South, especially for those
living in the Southern hemisphere (e.g. Australia, New Zealand).
1. Install the outdoor sensor with its arrow pointing to the South.
2. On the main unit, press and hold [WIND] for 8 seconds until the upper part (Northern
Hemisphere) of the compass lights and starts blinking.
3. Use [UP] / [DOWN] buttons to move to the lower part (Southern Hemisphere).
4. Press the [WIND] button to confirm and exit.
Note: Changing hemispheres will automatically switch the direction of the displayed moon phases.
EU/UK Version 17 WTH600-E-en-GB_v1.0 4/18
Find Quality Products Online at: sales@GlobalTestSupply.com
www.GlobalTestSupply.com
Page 18
19. MOON PHASES
New Moon
Full Moon
Waxing Crescent
Waning Gibbous
First quarter
Third quarter
Waxing Gibbo
us
Waning Crescent
New Moon
Full Moon
Waxing crescent
Waning Gibbous
First quarter
Third quarter
Waxing Gibbous
Waning Crescent
In the Northern hemisphere, the moon waxes (the part of the moon we see that glows after the
New Moon) from the right. Hence, the sun-lit area of the moon moves from right to left in the
Northern Hemisphere, while in the Southern Hemisphere, it moves from left to right. Below are
two tables illustrating how the moon phase will appear on the main unit.
Northern hemisphere:
Southern hemisphere:
20. CLEANING
Cleaning the Rain Collector
1. Rotate the rain collector 30° counter-clockwise.
2. Gently remove the rain collector.
3. Clean and remove debris.
4. Allow components to dry before re-assembly.
Cleaning the Thermo-Hygro sensor
1. Unscrew the 2 screws at the bottom of the radiation shield.
2. Gently pull out the shield.
3. Remove carefully any dirt or insects inside the sensor casing (Do
not let the sensors inside get wet).
4. Clean the shield with water and remove any dirt.
5. Re-assemble after fully cleaning and drying.
EU/UK Version 18 WTH600-E-en-GB_v1.0 4/18
Find Quality Products Online at: sales@GlobalTestSupply.com
www.GlobalTestSupply.com
Page 19

21. TROUBLESHOOTING
Problem/Symptom
Solution
Check balance indicator
Unusual or no thermos/Hygro
Check radiation shield
Check sensor casing
Unusual or no wind
Check wind cups (anemomete
r) Check wind vane
Signal lost for 15 minutes
Relocate main unit and sensor close to each other.
Ensure the main unit is placed away from other electrical appliances
Signal lost for 1 hour
Reset bot
h main unit and sensor
Unusual or no rain sensor
measurement
sensor measurement
speed/direction measurement
Check the drain hole on rain collector
that may interfere with wireless communication
22. PRECAUTIONS
Please observe all warnings and follow all instructions.
Do not subject the unit to excessive force, shock, dust, temperature or humidity.
Do not obstruct the ventilation holes.
Do not immerse in water. If the unit gets wet, dry it immediately with a soft, lint-free cloth.
Do not clean the unit with abrasive or corrosive materials.
Use new batteries only. Do not mix new and old batteries.
Dispose of this product responsibly.
Placement of this product on certain types of wood may result in damage to its finish.
Do not attempt to service this device; doing so may result in fire or electric shock.
Dispose of batteries responsibly and in compliance with all regulatory restrictions.
Please note that some units are equipped with a battery safety strip. Remove the strip from the battery
compartment before first use.
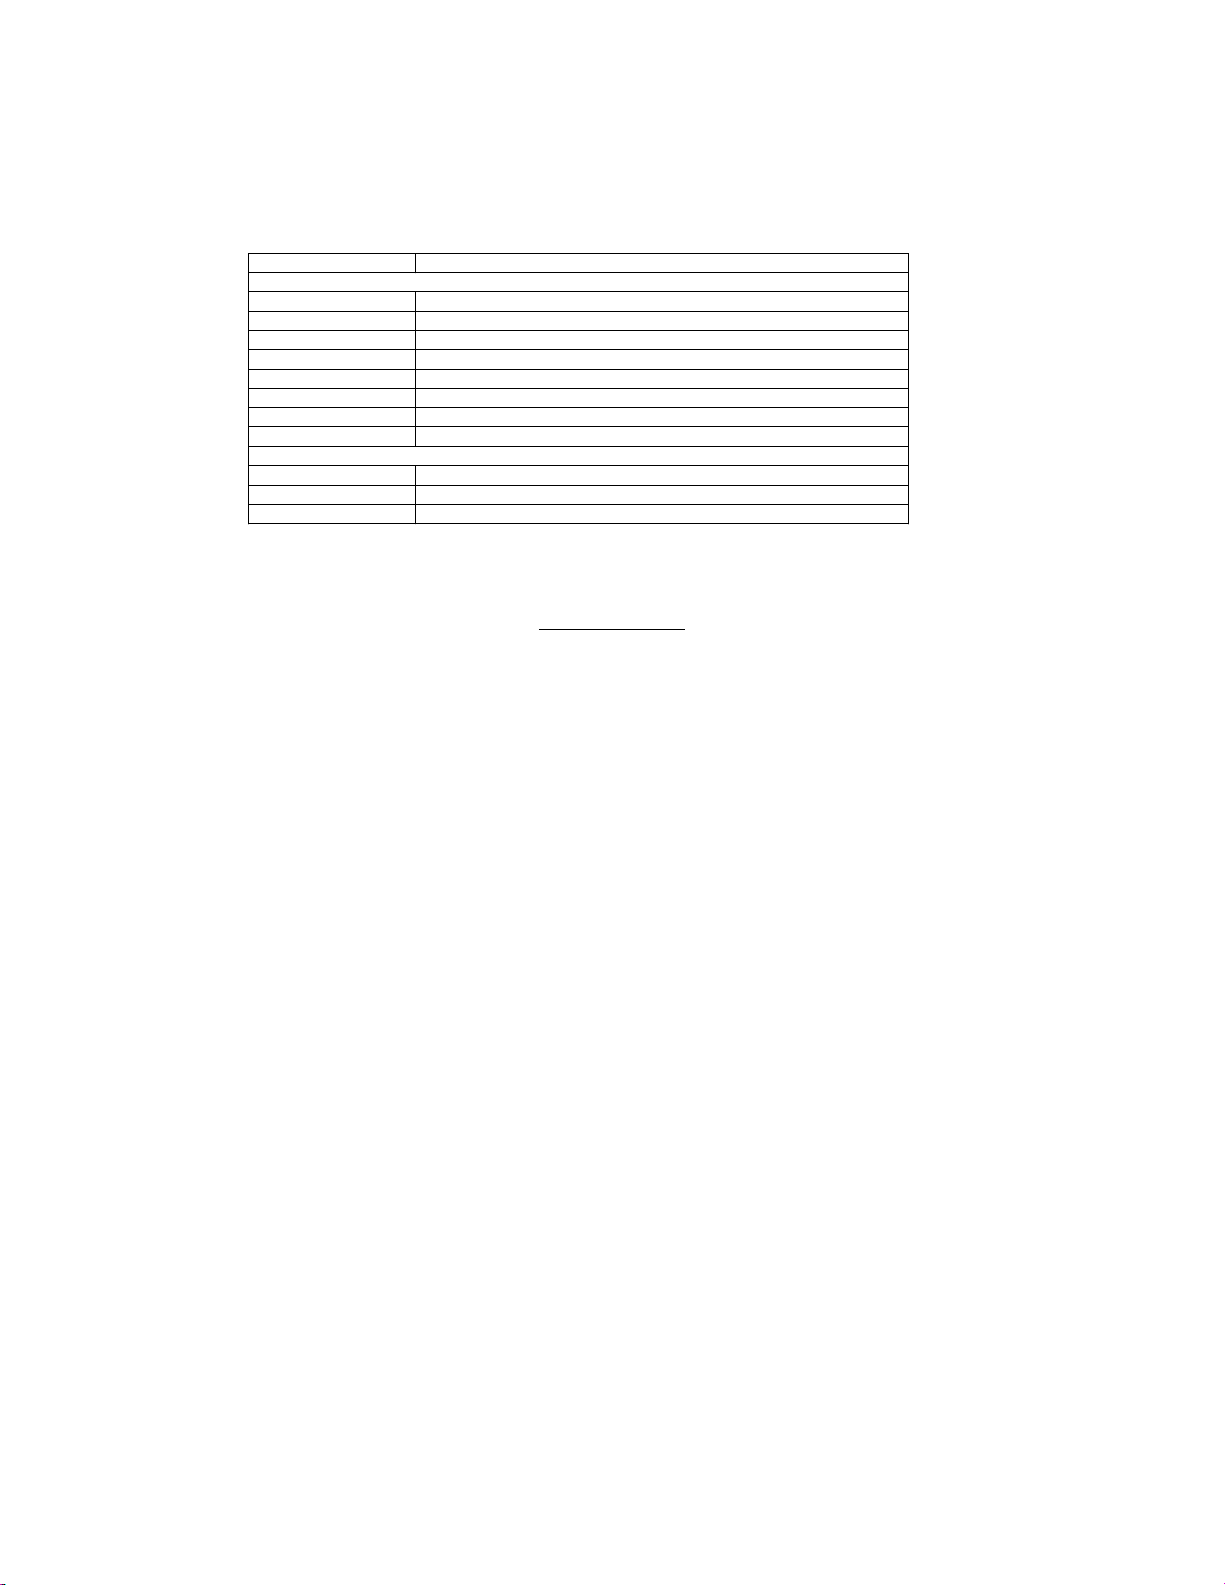
23. SPECIFICATIONS
MAIN UNIT
Dimensions (W x H x D) 120 x 190 x 22 mm ( )
Weight 370g (13.1 oz.) with batteries
Battery power 3 x AA size 1.5V batteries (Alkaline recommended)
Sensor displays Wind speed, Wind direction, Rain gauge, Temp., RH
INDOOR BAROMETER
Barometer units hPa, inHg and mmHg
Measuring Range 540~1100 hPa; 405~825 mmHg; 15.95~32.48 inHg
Resolution 1hPa, 0.01inHg, 0.1mmHg
Accuracy@ 32~122°F
(0~50°C)
Weather forecast Sunny / Clear, slightly Cloudy, Cloudy, Rainy, Rainy / Stormy and Snowy
Display modes Current, Max, Min, Historical data for last 24hrs
Memory modes Max & Min from last memory reset (with time stamp)
INDOOR TEMPERATURE
EU/UK Version 19 WTH600-E-en-GB_v1.0 4/18
540~699hPa ±8 hPa / 700~1100hPa ±4 hPa
405~524 mmHg ±6 mmHg / 525~825 mmHg ±3 mmHg
15.95~20.66 inHg 0.24 inHg / 20.67~32.48 inHg ±0.12 inHg
Find Quality Products Online at: sales@GlobalTestSupply.com
www.GlobalTestSupply.com
Page 20
Temp. units
°F
or °C
Display range
-40°C to 70°C (
-
40°F to 158°
F)
Operating range
-10°C to 50°C
(14°F to 122°F
)
Resolution 0.1°C or 0.1°F
Accuracy
± 1°C or 2°F
typical @
25°C (77°F)
Display modes
Current, Min and Max, Historical data for past 24 hours
Memory modes
Max & Min from last memory reset (with time stamp)
Alarm Hi / Lo Temperature Alert
INDOOR HUMIDITY
Display range
20% to 90% RH (< 20%: LO;
> 90%: HI); Temp.: 0°C~60°C (32°F~140°F)
Operating range
20% to 90%RH
Resolution
1%
Accuracy
+/-
5% typical @
25°C (77°F)
Display modes
Current, Min and Max, His
torical data for past 24 hours
Memory modes
Max & Min from last memory reset (with time stamp)
Alarm Hi / Lo Humidity Alert
RADIO CONTROLLED
CLOCK
Synchronization
Auto or disabled
Clock display
HH:MM:SS / Weekday
Hour format
12hr AM/PM or 24hr
Calen
dar MM/DD
Languages (weekday)
EN, FR, DE, ES, IT
Time signal
DCF
, MSF DST (daylight savings)
AUTO / OFF
WIRELESS SENSOR
Dimensions (W x H x D)
343.5 x 393.5 x 136 mm
(
Weight
673g (
23.7 oz.
) with batteries
Battery power
3 x AA size 1.5V battery (Lithium battery recommended)
Frequency
868 MHz
(EU/UK
)
Transmission
Every 12 seconds
OUTDOOR TEMPERATURE
Temp. units °C or °F
Display range -40°C to 80°C (-40°F to 176°F)
Operating range -40°C to 60°C (-40°F to 140°F)
Resolution 0.1°C or 0.1°F
Accuracy ± 0.5°C (1°F) typical @ 25°C (77°F)
Display modes Current, Min and Max, Historical data for past 24 hours
Memory modes Max & Min from last memory reset (with time stamp)
Alarm Hi / Lo Temperature Alert
OUTDOOR HUMIDITY
Display range 1% to 99% (< 1%: LO; > 99%: HI)
Operating range 1% to 99%
Resolution 1%
Accuracy +/- 3% typical @ 25°C (77°F)
Display modes Current, Min and Max, Historical data for past 24 hours
Memory modes Max & Min from last memory reset (with time stamp)
Alarm Hi / Lo Humidity Alert
RAIN GAUGE
Units mm and in
Range 0~9999mm (0~393.7 inches)
Resolution 0.4mm (0.0157 in.)
Accuracy +/- 7% or 1 tip (whichever is greater)
Display modes Rainfall (Rate / Daily / Weekly / Monthly), Historical data for past 24 hours
Memory modes Total rainfall from last memory reset
EU/UK Version 20 WTH600-E-en-GB_v1.0 4/18
Find Quality Products Online at: sales@GlobalTestSupply.com
www.GlobalTestSupply.com
Page 21
Alarm
Hi Rainfall Alert
WIND SPEED
Wind speed units
mph, m/s, km/h, knots
Wind speed range 0~112mph, 50m/s, 180km/h, 97knots
Wind speed resolution
0.1m
ph or 0.1knot or 0.1m/s
Wind speed accuracy
< 5m/s: +/
-
0.5m/s; > 5m/s: +/
-6%Direction resolution
16
Display modes
Gust/average wind speed & direction, Historical data for past 24 hours
Memory modes
Max gust speed with direction (with time stamp)
Alarm
Hi Wind speed Alert (Average / Gust)
WEATHER INDEX
Wind Chill range
-
40~70°C
(-40~158°F
)
Heat Index range
26~50°C
(78.8~122°F
)
Indoor Dew Point range
-
40~70°C
(-40~158°F
)
All rights reserved including the right of reproduction in whole or in part in any form
Copyright © 2018 FLIR Systems, Inc.
EU/UK Version 21 WTH600-E-en-GB_v1.0 4/18
Find Quality Products Online at: sales@GlobalTestSupply.com
www.GlobalTestSupply.com
 Loading...