

Page 1

S2500THS
USER
GUIDE
VERSION: 2.0 DATE: March 2004
Page 2

Table of Contents
Getting Started:
Declaration of Conformity 3
General Precautions 4
1.1 Unpacking the printer 5
1.2 Installing and Charging the Battery 5
1.3 Reading the LED Status 7
1.4 Attaching Belt Loop System 7
Loading Supplies:
2.1 Adding Paper/Labels 8
2.2 Tearing Paper Supply 8
Using the Printer:
3.1 Initial power up and self-test 9
3.2 Connecting the Printer 10
3.3 Communications: Serial RS232C 12
3.4 Communications: IrDA 12
3.5 Communications: Bluetooth 13
3.6 Using the Magnetic Card Reader 13
3.7 Programming information 14
Printer Maintenance
4.1 Cleaning 16
4.2 Charging the Printer Battery 17
4.3 Verifying Battery Charge State 17
4.4 Battery and Safety Information 18
4.5 Recycling your Batteries 18
4.6 Trouble Shooting 19
4.7 Printer Supplies 20
Specifications:
5.1 Printer Specifications 21
5.2 Supply Specifications 21
5.3 Regulatory Notes 23
2
Page 3

Declaration of Conformity
Name: Extech Instruments Corporation
Manufacturer’s Address 285 Bear Hill Road, Waltham, MA 02451, USA
Telephone: +1 781 890 7440
Declares that the Product
Product Name: Portable Receipt Printer
Model Number: S2500THS;
S1500T
Optionally Containing:
Conforms to the following
regulation and/or standards:
Supplementary Information : • The product complies with EMC Directive
Place: Waltham, MA, USA
Date: July, 2003
Signature:
Bluetooth™ radio short range OEM module from
connectBlue ab, cB-0701-01; FCC ID PVH 070101.
Conforms to R&TTE Directives: 1999/5/EC (EN 300 328-
2), EMC Directive 89/336/EEC (EN 301 489-1 and -17); and
Low Voltage Directive 73/23/EEC (EN 61131-2)
FCC: Part 15 Subpart B, Class B
CE: EN60950
CE: EN55022 Class B;
CE: EN61000-3-2;
CE: EN61000-3-3 ;
CE: EN50024.
89/336/EEC and Low Voltage Directive
73/23/EEC
• The product conforms to ANSI/UL STD 60950 &
Certified to CAN/CSA STD C22.2 No. 60950-00
• CB Certified
• ETL Listed, control # 3046813
• The product is IEC 68 certified
Antony Revis
Antony Revis, General Manager
3
Page 4

General Precautions
• Before using this product be sure to read through this manual. After reading please
keep the manual in a safe place for future reference.
• The information contained herein is subject to change without notice of any type.
• Extech is not responsible for any operational results regardless of missing
information, errors or any misprinting in this manual.
• Extech is not responsible for problems created as a result of using options and
consumables not approved by them.
• This product is designed for servicing at an Authorized Service Center. Other than
routine maintenance described in this manual the user should not attempt to repair,
service or disassemble this product.
• Incorrect operation, handling or improper operating environments may cause
damage or otherwise affect the proper operation of this product. Such actions
invalidate the product warranty.
Safety
In this manual and on the Printer and accessories we make use of
internationally recognized safety symbols as follows:
!
Caution! Refer to the explanation in this Manual
Caution! Risk of electric shock
Double Insulation or Reinforced insulation
DC, Direct Current or Voltage
AC+DC, Current or Voltage
4
Page 5

1. Getting Started
1.1 Unpacking the Printer:
The S2500THS and S1500T portable printers are full featured portable receipt
printers designed for varied job environments including field service, field sales,
hospitality and restaurants, ticketing an d many others where point of service
receipts are required. The package contains:
printer:
battery cartridge,
AC wall mounted charger (may be USA, European or UK style plug), for
charging the battery inside the printer
belt loop system and
roll of paper supply (already loaded in the printer).
Both cabled and wireless communication is possible.
1.2 Installing and Charging the Battery Cartridge:
Note: One battery cartridge is included with the printer. Similar to a
cordless phone battery, the printer’s battery must be charged before using
it.
11..22..11:: IInnssttaalllliinngg tthhee bbaatttteerryy
Note: Refer to the illustration below to install the battery pack in
the printer.
Extech batteries must be cycled several times to achieve maximum
!
capacity. To cycle a battery fully charge it and then allow full
discharge through normal use in the printer.
Unlock the battery door by sliding the battery door locking tab down
Open the battery door
Insert the battery as shown. The battery side with two contact terminals should be
facing down to make contact with the two spring probes inside the battery
compartment.
Close the battery door.
Lock the battery door by sliding the
battery door locking tab up
BBoottttoomm ooff tthhee PPrriinntteerr SShhoowwiinngg
BBaatttteerryy CCoommppaarrttmmeenntt
IInnssttaalllleedd
wwiitthh BBaatttteerryy
5
Page 6

11..22..22 CChhaarrggiinngg tthhee BBaatttteerryy
Charge the battery by inserting the wall mounted charger line cord into the
printer jack (Refer to Figure 4
jack on the printer). Then insert the charger plug into an appropriate wall
socket.
on page (20) for the location of the adaptor
The Yellow/Amber charging LED will illuminate indicating that the battery is
being charged
The battery will be fast charged and after about 180 minutes the LED will go
off
To remove the battery cartridge, open the battery door and tip the battery
out of the printer
Note: To ensure a full charge do not operate the printer while charging.
.
Note: The wall mounted charger is a Class II equipment (
plug configurations comply with most international standards.
S2500T
Input Voltage/Current 100-240 VAC/0.5A
Input Frequency 47-63 Hz
Output Voltage/Current
)
(
Note: The wall mounted charger is not supplied with
plugs for use in Korea.
Do not use a charger not approved by Extech for use with the
!
!
!
S2500THS. Use of an unapproved charger could damage the battery
pack or the printer and will void the warranty.
The battery terminals are well recessed inside the printer. Do not
allow them to contact conductive material since this may create a
short circuit which could cause in jury or start a fire.
When using the wall mounted charger ensure the socket outlet is close
to the printer and easily accessible during the battery recharging
process. Either switch the socket off (if supplied with a socket switch)
or pull out the charger from the socket or disconnect the plug from the
printer in the event of any problems.
10VDC/1A
)
. Multiple
6
Page 7

1.3 Reading the LED Status:
This table explains the LED indicator status. Refer to Figure 4 for the locations
described for ON/OFF and FEED pushbutton switches and AC adaptor socket
.
LED Indicator State Status
Multi Function:
Dual Green & Yellow
or Red
Yellow ON Yellow --- The battery charger is
Green and Red ON Green --- Indicates that MCR is
ON Green --- Printer is on and
ready to receive data.
Yellow --- Indicates low power.
Battery needs recharge.
Red --- Very low power. Printing
not possible.
charging the battery at a fast
rate. If the battery is below
5.0V, the battery is being
“trickle” charged until the
battery voltage reaches 5.0V,
and then the fast charge rate is
started. The LED will turn Off
when the battery is fully
charged.
ready to accept data.
Red --- Indicates a fault
condition or a printer error. The
printer is not ready to accept
data.
Note: Refer to the troubleshooting
guide to determine error or fault
condition.
Table 1 - Reading the LED Status
1.4 Attaching Belt Loop System:
The belt loop system consists of two parts:
A knob located on the back part of the printer just above the battery door
A strap with click on connector
To attach the strap insert the knob located at the bottom of the printer into the slot
of the connector. Pull down until you hear a click. The printer is now secure. Place
the loop over your belt. Allow the printer to hang down on the left or right hip.
To release the printer, press in on the two latches on the connector and pull
the knob clear of the slot.
Note: Do not force or pull the printer from the connector without pressing
in on the two latches
7
Page 8

2. Loading Supplies
2.1 Adding Paper/Labels:
The printer can print text, bar codes and graphics on thermal receipt paper. See
“Supply Specifications” for the width, thickness requirements and approved
vendors. Follow these steps to load printer paper.
Press down on the button on the top cover (next to the Extech label) as
shown in Figure 4
.
The paper door will pop open a short way.
Grip either side of the paper door and open – it will open to 180 degrees.
Place the paper roll into the paper supply well. Make sure the paper supply
unwinds from the bottom as indicated below with the thermal side closest to
the print head.
Unroll about 3 inches of paper from the roll and position between the print
head guides.
Close the paper door.
LLooaaddiinngg tthhee PPaappeerr RRoollll
2.2 Tearing Paper:
The printer’s paper door acts as a tear bar. Pull one edge of the paper against the
tear bar as indicated, then tear down and across against the tear bar to tear the
paper.
!
Caution: The tear bar may have sharp edges.
8
Page 9

Using the tear bar is the only way to tear the paper.
Pulling up and pulling sideways without using the tear bar can cause a
paper jam due to paper misalignment in the printhead mechanism.
TTeeaarriinngg tthhee PPaappeerr
3. Using the Printer
3.1 Initial power up and self-test
Once the Battery is charged and the paper is loaded an initial power up self-test
can be performed.
Press the <On/Off> switch once. This turns printer on. The Green LED
illuminates
After approximately 20 seconds, if no instructions are sent to the
printer, the printer will automatically turn off to conserve battery
life.
If the printer is set for infrared communications (IrDA) mode the
printer will stay on all the time. Pressing the <On/Off> switch again
will turn the printer off.
Press the <On/Off> switch to turn the printer off. The green LED turns off.
To start the self-test, press and hold the <FEED> switch then press th e
<On/Off> switch
The printer will start printing the self-test messages. Release the <FEED>
switch.
Press the <On/Off> or <FEED> switch to stop or cancel the self-
test print.
9
Page 10

The first few lines of self-test show the printer firmware version,
the current printer settings (for example IrDA or Serial mode) and
a list of any optional or special features installed.
3.2 Connecting the Printer
The 2500THS printers support Serial RS232 and IrDA compatible infrared
communication interfaces. Radio frequency (RF) commun ication is also
available as an optional feature.
Serial, IrDA and Bluetooth communication settings can be changed via a DIP
switch located on the control card.
The DIP switch is located inside the battery compartment as illustrated below
indicating the location of this switch. Figure 1A
selection.
shows the DIP switch
The functions assigned to these switches are shown TABLE 2 .
If the Serial interface is selected, the communication Parameters, Baud rate,
Data Bit and Parity, must be set.
Note: Optional serial cable is available for Serial RS232
communication (part # 5892RJD9).
Printer drivers for Windows 95/98/NT/2000 and XP are available from
Extech.
PrinterCE print Control utility is available from Extech for Windows CE
devices.
Printboy Print Utility from Bachmann Software or PalmPrint Utility, from
StevensCreek, are recommended for Palm Pilot devices
33..22..11 LLooccaattiioonn ooff DDiipp SSwwiittcchheess
Infrared Communications
(IrDA):
Dip switch #1 must be in
the <On> position.
Serial and Bluetooth
Communications:
Dip Switch #1 must be in
the <Off> position.
10
Page 11
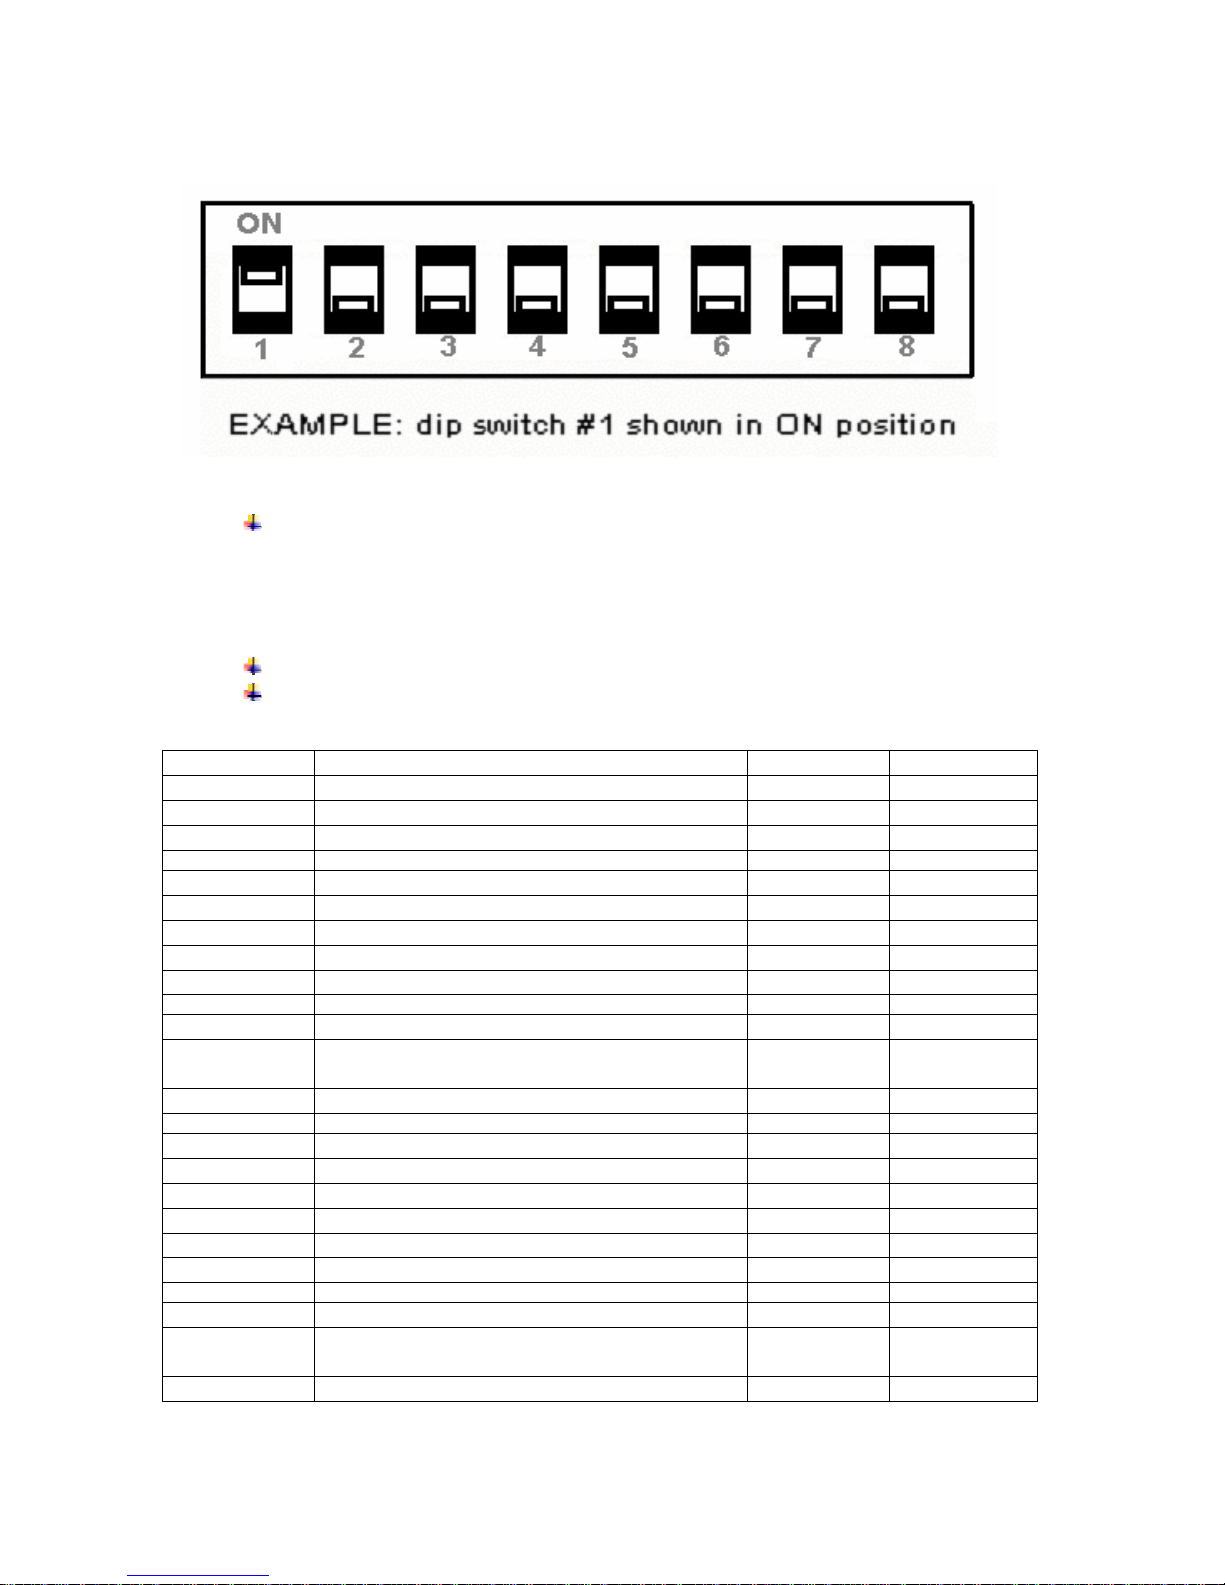
33..22..22 SSeettttiinngg DDiipp SSwwiittcchheess
FFiigguurree 11AA:: DDiipp SSwwiittcchh SSeettttiinnggss ((SShhoowwiinngg sseettttiinngg ffoor
Note: Be careful when changing dip switch settings. Carefully use a
pointer on the dip switch you are going to change. DO NOT use a screw
driver or apply excessive force.
33..22..33 DDiipp SSwwiittcchh FFuunnccttiioonnss
Developer’s refer to Programming Manual for more information
In order for changes to the dip switch configuration to take effect, the
printer power must be reset.
Dip Switch Function Switch # Switch #
1 Communication Interface SW1
RS232/Bluetooth Off
IrDA On
2 & 3 Baud Rate SW2 SW3
38,400 Off Off
19,200 Off On
9,600 On Off
2,400 On On
4 Printer Power Control (Software) SW4
Continuous Power On (can be shut down
by pressing On/Off switch)
Auto Power Off Off
5 Optional SW5
6 & 7 Parity bit SW6 SW7
No Parity Off Off
Odd Parity On Off
Even Parity On On
8 Printer Power Control (Hardware) SW8
Continuous Power On (can be shut down
only by taking the battery out)
Auto Power Off Off
On
On
r IIrrDDAA))
Table 2 – DIP Switch Setting
11
Page 12

3.3 Communications: Serial
The RS232C Interface signals for the 2500THS Series printers are terminated
on a 6 PIN RJ type data connector located on the side of the printer.
Six connections are provided from the Serial Interface to the host computer.
TABLE 3
connector and the connector pi n locations are shown in FIGURE 3
below lists the Serial Interface signals and pin outs on the RJ
.
A minimum two connections are required for operation, RXD – pin 3 and
Common – pin 1.
Note: The communication Parameters: Baud rate, Data Bit and Parity
must be set the same as the host device settings. Dip switch #1 must be
in the OFF position.
FIGURE 3 –
RRJJ DDAATTAA CCOONNNNEECCTTOOR
R
TABLE 3 -
3.4 Infrared Communications (IrDA):
Dip Switch #1 must be in the <ON> position
The printer can be powered up by pressing the power <On/Off> switch
If no IrDA connection is made, the printer will automatically power down to a
lower power level to conserve battery life. It will remain in a “sleep” mode
until an IrDA connection is made, at which time the printer will “wake” up
and print the requested data
Pressing the power switch again will turn the printer <OFF>.
12
22550000TTHHSS SSeerriiaall RRSS223322CC IInntteerrffaaccee ssiiggnnaalls
s
Page 13

3.5 Bluetooth Communications (Option):
All Dip Switches must be in the <OFF> position
Note: Adjust settings to match those of the Bluetooth module in your
computing device
The printer can be powered up by pressing the power <On/Off> switch
When powered up in Bluetooth mode, the printer will not enter a “sleep”
mode and will remain active waiting for the wireless print command
Pressing the power <On/Off> switch again will turn the printer <OFF>.
Note: In Bluetooth mode it is necessary for the mobile computing device
you are using to discover the printer and the printer needs to be set as a
favorite. Refer to instructions provided by the systems integrator.
Note: Systems Integrators: Refer to the Bluetooth manual provided with
your mobile computer and the Bluetooth section of the Developer’s
Manual available for this printer.
3.6 Using the Magnetic Stripe Reader:
The Magnetic Card Reader is a factory-installed option. This option requires
special application software to read and process cards with a magnetic stripe,
such as credit cards or driver’s license
Note: Refer to the Figure 4 if your printer is equipped with the optional
magnetic stripe reader
Quickly swipe the card through the reader either left to right or right to left.
The magnetic stripe must be facing toward the paper supply door as
indicated below while it is passed through the reader
Refer to Table 4 for the description of the LED indicator Status.
LED indicator State Status
Green
Red ON Error reading card’s data.
ON
OFF
Ready/waiting for card to be swiped.
Good swipe - Card data read OR
Card not ready to be swiped.
TTaabbllee 44 -- MMaaggnneettiicc CCaarrdd LLEEDD IInnddiiccaattoorr
13
Page 14
MMaaggnneettiicc CCaarrdd SSwwiippee IIlllluussttrraattiioonn
3.7 Programming Information:
This section lists the printer control commands strings.
Note: System Developers: Please refer to S2500T programmer’s manual
for further details.
Other features may be available and are described in the programmer’s
manual
3.7.1 ASCII CONTROL CHARACTERS:
Character Hex/Dec CONTROL ACTION
EOT 04/04 End Of Text
BS 08/08 Back Space
HT 09/09 Horizontal Tab
LF 0A/10 Line Feed
VT 0B/11 Vertical Tab
FF 0C/12 Form Feed
CR 0D/13 Carriage Return
SO 0E/14 Shift Out
SI 0F/15 Shift In
XON 11/17 Transmitter On.
AUXON 12/18 Printer on.
XOFF 13/19 Printer receiver is off
NORM 14/20 Return to default 42 column mode
AUXOFF 15/21 Printer to Host: printer is off
CANCEL 18/24 Cancel and reset printer BUFFER
ESC 1B/27 Escape
EXTEND 1C/28 Extended print
EXTEND OFF 1D/29 Extended print off/Normal print
14
Page 15
3.7.2 Printer Font Commands – Courier Character Set:
Font Name Character size (W x H) Command String
24 CPI normal 8x23 ESC+'k'+'5'
21 CPI normal 9x23 ESC+'k'+'4'
19 CPI normal 10x23 ESC+'k'+'3'
16 CPI normal 12x23 ESC+'k'+'2'
12 CPI normal 16x23 ESC+'k'+'1'
13 CPI rotated 14x16 ESC+'k'+'0'
3.7.3 Printer Font Commands:
Command String Printer Action
ESC - ‘F’ – 1 Selects International character set
ESC - ‘F’ – 2 Selects PC Line Draw character set
ESC - ‘U’ - ‘1’ Enable emphasized print.
ESC - ‘U’ - ‘0’ Disable emphasized print.
3.7.4 Printer Graphic Commands:
Command String Printer Action
ESC - ‘a’ – n Select dot line spacing between printed lines.
ESC - ‘J’ – n Graphic Line Feed command
ESC - ‘P’ - ‘#’ Select Online mode, characters printed as received.
ESC - ‘P’ - ‘$’ Select Buffer mode, characters are printed on (^ D)
ESC - ‘V’ - n1 – n2 8-bit Graphic command
ESC - ‘v’ - n1 – n2 RLE Compressed Graphic command
3.7.5 Magnetic Card Reader Control Commands:
Command String Printer Action
ESC - ‘M’ - ‘nnm’ - Cr Select MCR with (nn) auto timeout
ESC – ‘C’ Cancel MCR read process
3.7.6 Graphic Logo and Bar code commands:
Command String Printer Action
ESC – L – G –n Prepare printer to load image:
ESC – G - 0x0FF Loading Logo Complete:
ESC – L – g – n Print stored logo image:
ESC - 'z' - n1 – n2 - L - [data] Print Bar Code without visible text
ESC - 'Z' - n1 – n2 - L - [data] Print Bar Code with visible text
ESC - ‘Q’ - ‘J’ – n Reverse Dot Feed
ESC - ‘Q’ - ‘Q’ – n Set Out of Paper Sensitivity
ESC - ‘Q’ - ‘F’ – m Set Forward Black Mark Seek
ESC - ‘Q’ - ‘B’ – m Reverse Black Mark Seek
15
Page 16

3.7.7 Printer Supervisory and Control Commands:
Command String Printer Action
^V Buffer, power timer & battery status
^B Buffer status
ESC - ‘P’ –‘^’ Print Battery Voltage
ESC – ‘P’ – alpha Time and date print and control
ESC – ‘M’ - ‘000’ - Cr disable the power down timer
ESC - ‘M’ - ‘nn0’ - Cr sets the power down timer to nn seconds
ESC – ‘M’ - ‘C’ Reset Auto power down to 20 seconds
ESC – ‘P’ – ‘( ‘ Firmware version query
ESC – ‘ P’ - ‘)’ Hardware model query:
4. Printer Maintenance
4.1 Cleaning:
You may need to clean the print head and platen roller after printing a number of
rolls of paper, whenever you load new supplies or when you see voids in the
printout.
!
Caution: Do not use sharp objects to clean the print head. This may
damage the printer and require service.
Open the paper door by pressing the button on the top cover (next to the
Extech label) as shown in Figure 4. The paper supply door will pop up.
Remove the paper roll.
Moisten a cotton swab with isopropyl alcohol and clean the print head
Clean the platen roller with a dry cloth or small brush
Note: You can also use another cotton swab moistened with isopropyl
alcohol. Turn the platen roller with your finger and run the cotton swab or
dry cloth across it. Make sure the platen roller is clean all the way around.
Moisten another cotton swab with isopropyl alcohol. Rub the swab across the
black mark sensor to remove any build-up
16
Page 17

Moisten another cotton swab and rub the swab across the tear bar to remove
any build-up
Note: You may experience dust build-up depending on the environment
and the quality of the paper supply you use. If this occurs, use a can of
compressed air to blow dust and paper debris out of the printer.
4.2 Charging the Printer Battery:
The printer battery is charged using the wall mount adapter provided. Follow these
steps to charge the battery pack.
Plug the power adapter into an appropriate wall socket; then plug the power
adapter cord into Adapter Plug on the side of the printer (see Figure 4
)
The yellow CHARGE LED will illuminate, to indicate battery is charging
The Charge LED turns off when battery cartridge is fully charged. It takes
about 180 minutes to fast charge the battery cartridge
To insure full charge, printer should not be operated while the battery is
charging.
44..22..11 IImmppoorrttaanntt NNootteess oonn CChhaarrggiinngg BBaatttteerriieess
The model 2500THS printers require an adaptor output of 10VDC/1.4A.
The battery Fast-charge is initiated each time the power adapter is
connected to the printer
The fast-charge controller checks the battery’s voltage and temperature,
before the start of the fast recharge process. If the battery voltage or the
temperature is outside of the fast-charge limits, the charger defaults to
trickle charge at C/10 or 70mA rate
Optional external battery chargers are available for Extech batteries
44..22..22 IImmppoorrttaanntt NNootteess oonn RReeppllaacciinngg BBaatttteerriieess
Check for the correct Extech part number for the battery and only order
that part for your new battery
!
Caution: Risk of explosion if battery is replaced by an incorrect type.
!
Caution: Dispose of used batteries according to instructions in Section
4.5
4.3 Verifying Battery Charge State:
It is strongly recommended testing your printer before returning to Extech. Follow
these steps to identify and correct any battery power problem that may be
encountered. These will help to identify that the fault is with the printer and not
some other part of your system.
To test the AC adaptor use a multi-meter and measure the output. Output
should be 10VDC
Press the <ON/OFF> switch and wait until all LED’s are off
Insert the AC adaptor plug into the printer. If the amber LED goes on, the
battery is not fully charged but the charge circuit is functioning.
17
Page 18

The AC power portion of the circuit appears ok
Disconnect the AC Adapter once the battery has charged for 5 minutes or so.
Press and hold the <FEED> switch, then press and release the <ON/OFF>
switch and then release the <FEED> switch. The printer will print a “self test”
receipt
If the self test receipt is printed, the DC power is ok
Press <ON/OFF> switch and wait until all LED’s are off
Plug the AC adaptor into the printer. Press <ON>; the green LED is
illuminated and after about 20 seconds the LED should go off
If the amber LED is on, this will continue on through this test indicating that
the battery is accepting a charge and that the charge circuit is ok. At the end
of a 180 minute charge cycle the LED will go off.
4.4 Battery and Safety Information:
The printer is powered by a 7.4V Li-Ion battery cartridge.
Charging time in the printer is approximately 3.0 hours
Take the battery out of printer if storing the printer for long periods of time
The battery storage temperature is 40°F to 104°F (4°C to 40°C). Do not
store a fully charged battery at temperatures greater than 104°F (40°C) for
long periods of time – the battery may permanently lose ch arge capacity
Be sure to use a fully charged battery before long or battery intensive
printing sessions. Certain operations (for example, printing receipts with a lot
of bar codes and graphics) drain the battery more quickly than others
Dispose according to your local regulations. Do not throw in trash
Caution: Do not disassemble, short circuit, heat above 80°C, or
incinerate. The battery may explode
The recommended temperature for charging is between 68°F (20°C) to 77°F
(25°C).
4.5 Recycling your Batteries:
The Rechargeable Battery Recycling Corporation (RBRC) is a non-profit organization
created to promote recycling of rechargeable batteries. For more information about
how to recycle batteries in your area, visit www.rbrc.org
.
18
Page 19

4.6 Trouble Shooting:
Problem Action
Does not feed paper or has
a paper jam.
Does not print Check or replace the printer’s battery
Light printing Check or recharge the battery
Voids in printing Clean the print head following the cleaning
Red (Error) LED on Check that paper roll is not out
If the problem is not identified following above trouble shooting guide, contact Extech
Technical Support.
Support numbers and Email addresses are listed at www.extech.com.
Remove any jammed supply
Reload paper supply.
Make sure the paper supply is loaded
correctly, not backwards.
Verify communication between the host
device and the printer by disconnecting
the communication cable and performing
a printer self test.
Adjust the print contrast through print
application.
instruction listed in Cleaning section.
Error reading MCR
After extended printing, print head may
be hot; printer will pause before resuming
printing.
Other than routine cleaning and other maintenance described in Section 4, the printer is
not intended to be serviced by the user. It must be returned to an authorized service center.
Under no circumstances should the user attempt to take the printer apart.
19
Page 20

4.7 Printer Supplies:
Part Number Description
78328I1 S2500THS PKG 120v (US Plug)
78328I1R S2500THS MCR PKG 120v (US Plug)
757060 2500THS Thermal paper pack (2.25”/57 mm, 5
7A1000011 2500THS Li-Ion Battery Cartridge:
157120 Battery charger ad apter 2500THS
157220 Battery charger adapter 2500THS
157240 Battery charger adapter 2500THS
S2500THS-UG-2A.doc User’s Guide - 2500THS
7A060028 Programmer’s Guide - 2500THS
rolls per pack)
7.4VDC– 1800mA
Input 120VAC/Output 10VDC @ 1.4A (US Plug)
Input 220VAC/ Output 10VDC @ 1.4A (Euro Plug)
Input 240VAC/ Output 10VDC @ 1.4A (UK Plug)
Available from Extech Email:
printers@extech.com
Download:
http://www.fieldsoftware.com/PrinterCE.htm
Download
http://www.stevenscreek.com/pilot/dodownload.htm
http://www.bachmannsoftware.com/downloads.htm
5892RJD9 Serial Data Cable – RJ to DB9 PC compatible
Windows 95/98/NT/2000/ Drivers
Windows CE print Utility
Palm Pilot print Utility
PrintBoy for Palm O/S
TABLE A - Printer parts and supplies
20
Page 21

5 Specifications
5.1 Printer Specifications:
Height: 2.56 inches (64mm)
Width: 3.93inches (98mm)
Length: 5.3 inches (135mm)
Weight: w/battery & supply 1.2 lbs. (0.55 g)
Shipping weight: 2.8 lbs. (1.31 kg)
Power: 7.4 V Li-Ion battery
Operating Temp. Limits: 41F to 104F (5 to 40C)
Storage Temp. Limits: -4F to 140F (-20C to 60C)
Operating Humidity Limits: 20% to 85% non-condensing
Storage Humidity Limits: 5% to 95% non-condensing
Print head: 2.25” wide (57mm); 203 dpi (8 dots per mm)
Printing Method: Thermal Direct
Print Speed: Up to 2.0 inches per second
Supported Fonts:
(Bitmap)
Supported Bar Codes: Codabar, Code 39, UCC/EAN – 128, UPC/EAN/JAN,
Memory: 32K SRAM, 128K Flash
Charging Time: Approximately 180 minutes
Communications: RS-232 port; IrDA; Bluetooth option
Print Ratio: 25% black maximum/sq.in.
5.2 Supply Specifications:
Supplies: Thermal direct receipt paper
Supply Thickness: 2.2 to 3.5 mils (receipt paper)
Supply Width: 2.25 inches (58mm)
Supply Length: 1 roll of receipt paper is approx. 600 inches (15,240
Supply Sensing: Black mark (on face of supply)
Paper roll diameter: Outside: 1.5 inches (37.5 mm)
Maximum Print Area: 1.85 inches (72 mm) X 5.3 inches (203mm)
Approved Vendors: Kansaki: P300, P310, P350, P354, P530UV, TO281CA,
Standard (normal and bold)
Large (normal)
Reduced (normal and bold)
Large rotated.
Interleaved 2 of 5, Code 128
mm)
Inside: .56 inches (14 mm)
OP200, TO381N, F180, F380, F550
Jujo: TF-50KS-E2C
Honshu: FH65BV-3
21
Page 22

FIGURE 4 – 2500THS Features
1. Power (Green)/Low Power
(Yellow) dual LED indicator
2. Charge(Yellow) LED indicator
3. MCR(Green)/Fault(Red) dual
LED indicator
4. Paper Door Releas e Button
5. ON/OFF Button
6. Paper Feed Button
7. MCR Swipe
8. AC Adapter Plug
9. RJ (Serial Interface) plug
10. IrDA Interface
22
Page 23

5.3 Regulatory Notes:
55..33..11 FFCCCC PPaarrtt 1155 CCllaassss BB
This equipment has been tested and found to comply with the limits for a Class B digital
device, pursuant to Part 15 of the FCC rules. These limits are designed to provide reasonable
protection against harmful interference in a residential installation. This equipment
generates, uses and can radiate radio frequency energy and, if not installed and used in
accordance with the instructions, may cause harmful interference to radio communications.
However, there is no guarantee that interference will not occur in a particular installation. If
this equipment does cause harmful interference to radio or television reception, which can be
determined by turning the equipment off and on, the us er is enc ouraged to try to c orrect the
interference by one or more of the following measures:
Reorient or relocate the receiving antenna.
Increase the separation between the equipment and the receiver.
Connect the equipment into an outlet on a circuit different from that to
which the receiver is connected.
Consult the dealer or an experienced radio/TV technician for help.
For Bluetooth equipped printers please note:
The printer contains an OEM Serial Port Adapter from connectBlue with FCC
ID: PVH070101. This device complies with Part 15 of the FCC Rules.
Operation is subject to the following two conditions: (1) this device may not
cause harmful interference, and (2) this device must accept any interference
received, including interference that may cause undesired operation.”
55..33..22 WWaarrrraannttyy::
This printer is warranted by Extech Data Systems to be free of defects in parts and
workmanship for a period of one year from date of shipment. This warranty does not apply
to defects resulting from action of the user such as misuse, improper wiring, operation
outside of specification, improper maintenance or repair, or unauthorized modification.
Extech specifically disclaims any implied warranties of merchantability or fitness for a specific
purpose and will not be liable for any direct, indirect, special, incidental or consequential
damages. Extech’s total liability is limited to the repair or replacement of the produc t. The
warranty set forth above is inclusive and no other warranty, whether written or oral is
expressed or implied.
55..33..33 WWaarrrraannttyy aanndd//oorr RReep
A Return Authorization number must be issued before a unit is returned to Extech for repair.
Once a unit has been properly returned to Extech (Note: The customer is responsible for
ensuring proper packing to prevent damage in transit as well as the shipping costs back to
Extech), it will be repaired (estimates are provided first if the repair cost is estimated above
$100.00) and returned via UPS ground. The customer may elect a faster mode of transport
at their cost.
paaiirr SSeerrvviiccee::
23
 Loading...