

Page 1
User Guide
TM
ExStik
pH (PH100 & PH110) and ORP (RE300)
Waterproof Series Pens
Patent Pending
Page 2

Getting Started
• Remove the cap from the bottom of the ExStikTM to expose the electrode bulb and
reference junction
• Before first use or after storage, soak the electrode (with its cap removed) in a pH 4
solution for about 10 minutes (PH100 only)
• White KCL crystals may be present in the cap. These crystals will dissolve in the soak or
they can be simply rinsed with tap water
• Always calibrate close to the expected measurement value
• Twist off the battery compartment cap to access the battery tab; remove this plastic tab
before first use
• To preserve Electrode life keep the sponge in the protective cap soaked with a pH 4
solution (PH100), deionized, distilled water (RE300) when not in use (store vertically)
Specifications
Display Multifunction LCD with Bargraph
Operating conditions 32 to 122
pH Range and Accuracy 0.00 to 14.99 / ± 0.01pH typical
Temp. Compensation Automatic from 32 to 194
Compensation Accuracy ± 0.9
ORP Range / Accuracy ± 999mV / ± 4mV
Temperature Range 23 to 194
Temperature Resolution 0.1
Temperature Accuracy ± 1.8
± 5.4
Measurement storage 15 tagged (numbered) readings
Power Four (4) SR-44 button batteries (See note on page 6)
Low battery indication ‘BAT’ appears on the LCD
Auto power off After 10 minutes of inactivity
Battery Life 200 to 400 tests, assuming test time of < 10 minutes and use of
SR44 silver oxide batteries. Use of LR44 alkaline will reduce
battery life.
o
F (0 to 50oC) / < 80% RH
o
o
F (0.5oC)
o
F (-5 to 90oC)
o
up to 99.9 then 1o thereafter
o
F / 1oC [from 23 to 122oF (-5 to 50oC)]
o
F / 3oC [from 122 to 194oF (50 to 90oC)]
F (0 to 90oC)
Page 2
ExStikTM (PH100, PH110, & RE300) Version 2.6 02/04
Page 3
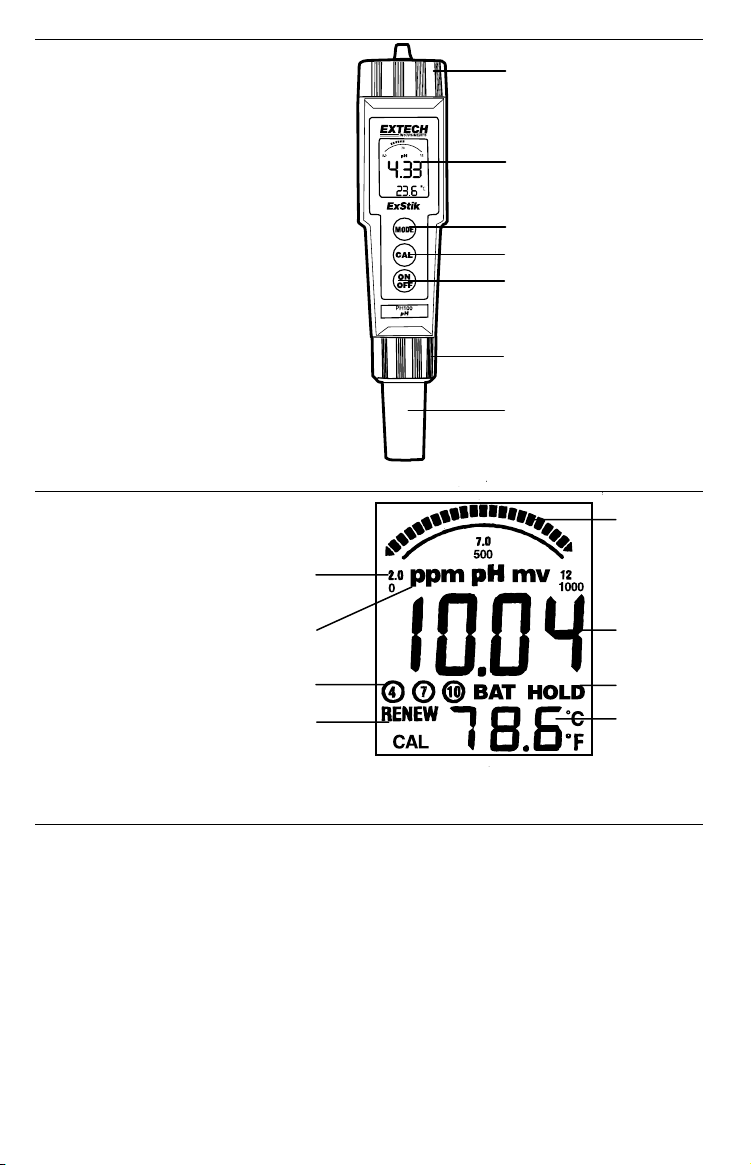
ExStikTM Description
1. Battery compartment cap
2. LCD Display
3. MODE button
4. CAL button
5. ON/OFF button
6. Electrode collar
7. Electrode (refillable on PH110)
(Electrode cap is not shown)
ExStikTM Display
1. Bargraph reading
2. Measurement reading
3. BAT (low battery) and
HOLD (data hold) indicators
4. Temperature display
5. Bargraph scale designations
6. Units of measure
7. Calibration indicators
8. RENEW and CAL indicators
1
2
3
4
5
6
7
5
6
7
8
1
2
3
4
pH Overview
pH is a unit of measure (ranging from 0 to 14pH) indicating the degree of acidity or alkalinity
of a solution. pH tests are the most commonly performed measurements in water analysis,
using the hydrogen ion activity of a solution to determine acidity or alkalinity. Solutions with
a pH less than 7 are considered acidic, solutions with a pH higher than 7 are known as
bases, and solutions with a pH of exactly 7 are neutral.
The pH scale is logarithmic so, for example, if sample A is 1 pH less than Sample B, this
means that Sample A is 10 times more acidic then Sample B. A difference of 1 pH
represents a ten-fold difference in acidity.
Page 3
ExStikTM (PH100, PH110, & RE300) Version 2.6 02/04
Page 4

ORP/REDOX Overview
ORP stands for Oxidation / Reduction Potential and represents the oxidizing or reducing
nature of a solution. The overall “reactive” tendency of a solution can be determined from
ORP measurements. ORP testing is becoming increasingly more common in waste-water
measurement regimens. The unit of measurement for ORP is mV.
Replacing Electrodes
The ExStikTM is shipped with an electrode attached. If the electrode is to be replaced,
follow these steps for removing and connecting electrodes. Note that the PH110 has a
refillable electrode and the PH100 does not.
1. To remove an electrode, unscrew and completely remove the electrode collar (turn the
collar counter-clockwise to remove).
2. Gently rock the electrode from side to side, pulling it downwards, until it disconnects
from the meter.
3. To attach an electrode, carefully plug the electrode into the meter socket (note that the
electrode connector is keyed, ensuring proper connection).
4. Tighten the electrode collar firmly enough to make a good seal (a rubber gasket seals
the electrode with the meter).
Automatic Electrode Recognition
When the ExStikTM is turned on, it recognizes the type of electrode that is connected and
displays the appropriate unit of measure. Attach electrode before turning the ExStik
TM
on.
Powering the ExStikTM
The ExStik
battery compartment must be removed before first use. If the batteries are weak, the ‘BAT’
indicator appears on the LCD. Press the ON/OFF key to turn the ExStik
auto power off feature shuts the ExStik
preserve battery life.
TM
uses four (4) SR-44 batteries (included). The insulating tab located in the
TM
TM
off automatically after 10 minutes of inactivity to
on or off. The
pH Operation
When the electrode is placed in a solution, the main display and bargraph indicate the pH
reading while the lower display reads temperature (readings flash until they have stabilized).
The bargraph is ‘center zero’, i.e. at pH 7 there is no display. As the pH rises, the bar moves
from the center to the right. If the pH drops, the bar moves from the center to the left.
pH Calibration (1, 2, or 3 points)
1. Place the electrode into a buffer solution (4, 7, or 10) and press the CAL key. Typically,
pH 7 is calibrated first then 4 or 10 pH.
2. The ExStik
circled number on the LCD will match the solution). Note that if the solution is more than
1pH off from the 4, 7, or 10pH standard, the ExStik
calibration (CAL and END will be displayed).
3. During calibration, the pH reading flashes on the main display.
4. When calibration is complete, the ExStik
normal operation mode.
5. The appropriate circled indicator (4, 7, or 10) appears on the LCD when a particular
calibration has been completed. When the ExStik
configuration and the calibration data will be memorized.
6. For a two or three point calibration, repeat steps 1-5.
Page 4
TM
automatically recognizes the solution and calibrates itself to that value (the
TM
will assume an error and abort the
TM
automatically displays ‘END’ and returns to
TM
is turned off, the circled indicator
ExStikTM (PH100, PH110, & RE300) Version 2.6 02/04
Page 5

Changing the Displayed Temperature Units
Press and hold the CAL button for approx. 3 seconds. The oC or oF icon will change first and
then the numerical temperature value will change after the button is released. If the
Calibration mode is accidentally accessed (‘CAL’ appears on the LCD) simply turn the
TM
ExStik
off and start again.
ORP Operation
When an ORP electrode is connected and the ExStikTM is turned on, it enters the Automatic
Calibration mode. ‘SELF’ and ‘CAL’ will appear on the LCD while calibration is in progress.
After the calibration is complete, ‘SELF’ and ‘CAL’ will extinguish and both the main display
and bargraph will read ORP in mV units. The bargraph reads 0mV (far left), 500mV (center),
and 1000mV (far right).
Data Hold
Press the MODE button to freeze the current reading. The HOLD display icon will appear
along with the held reading. The held reading will be stored in the next 15-reading storage
location (see below). Press the MODE key to return to normal operation.
15-Reading Measurement Storage
1. Press the MODE button to store the current reading (Data Hold will activate). Press
MODE again to return to normal operation. Repeat step 1 above to store the next
reading and so on.
2. If an attempt is made to store more than 15 readings, the stored readings (starting with
the first reading) will be overwritten.
Recalling Stored Readings
Note: First ensure that the HOLD symbol is not displayed. If it is, exit the HOLD function by
pressing the MODE button.
1. Press the CAL button once and then press the MODE button immediately
displayed; the location number (1 through 15) will flash. If the CAL mode is accidentally
accessed (display flashing), press the CAL button again to exit.
2. The last stored reading taken will be displayed first. To advance through the stored
readings, press the MODE button. The location number is displayed first, followed by the
reading stored in that location.
3. To exit the storage mode, press the CAL button and the ExStik
operation.
TM
will return to normal
after CAL is
CAL Reminder Display
When the ExStikTM is turned on (in pH models) for the 15th time, the ‘CAL’ icon appears on
the LCD indicating that the ExStik
recalibration of the electrode sooner than others. The CAL display is simply a reminder and
will turn off when the pH electrode is recalibrated.
TM
may require calibration. Some applications may require
RENEW Display
A flashing ‘RENEW’ warning indicates that the probe may be nearing the end of its useful
life. If cleaning or recalibration does not cause the RENEW icon to disappear, replace the
probe (see optional accessories below). The RENEW display appears as a result of the pH
electrode slope falling below 75% of a nominal slope.
Page 5
ExStikTM (PH100, PH110, & RE300) Version 2.6 02/04
Page 6

Battery Replacement
TM
1. Twist off the battery compartment cap
2. Replace the four (4) SR-44 button batteries observing polarity
3. Replace the battery compartment cap
Battery Note: For maximum battery life, use battery style SR-44 (Silver Oxide) such
Energizer
TM
Rear
Top View of ExStik
Front (LCD Side)
No. 356 or DuracellTM No. 303/357.
Electrode Refilling
The electrode does not need to be detached from the body of the ExStikTM in order to refill
it as long as the electrode is of the refillable type. Refillable electrodes have a removable
reference junction (slotted) and the word REFILLABLE on the side of the electrode casing.
Instructions for removing the reference junction and filling the electrode are provided with
the refill kit. See ‘Optional Accessories’ below for refill kits and refillable electrodes.
Optional Accessories
• Tripak buffers with 4, 7 & 10 pH capsules (6 each) plus two rinsing solutions (Part
Number: PH103)
• Spare pH Electrode – non-refillable (Part Number: PH105)
• Spare pH Electrode - refillable (Part number PH115)
• Electrode Refill solution (Part number PH113)
• Spare ORP electrode (Part Number: RE305)
• Spare Chlorine electrode (Part Number: CL205)
• Weighted base with 5 solution cups (Part Number: EX006)
Note: If the unit is to be converted for Chlorine use by attaching the chlorine electrode,
please request a CL200 User Guide
Page 6
ExStikTM (PH100, PH110, & RE300) Version 2.6 02/04
Page 7

Measurement and Display Considerations
• If the unit appears to be locked (display frozen). It is possible that the Data Hold mode
has been inadvertently accessed by pressing the MODE button. Simply press the
MODE button again or turn the meter off and restart if the display appears frozen.
• If the meter does latch up and no button presses revive it, remove the batteries and
restart.
• Note that if the batteries are removed, any stored readings will be discarded. Also, the
calibration for pH will be cleared requiring recalibration. Calibration data for ORP or
Chlorine will be retained however.
Warranty
EXTECH INSTRUMENTS CORPORATION warrants this instrument to be free of defects in parts and
workmanship for one year from date of shipment (a six month limited warranty applies on sensors and
cables). If it should become necessary to return the instrument for service during or beyond the warranty
period, contact the Customer Service Department at (781) 890-7440 ext. 210 for authorization or visit our
website at www.extech.com (click on ‘Contact Extech’ and go to ‘Service Department’ to request an RA
number). A Return Authorization (RA) number must be issued before any product is returned to Extech. The
sender is responsible for shipping charges, freight, insurance and proper packaging to prevent damage in
transit. This warranty does not apply to defects resulting from action of the user such as misuse, improper
wiring, operation outside of specification, improper maintenance or repair, or unauthorized modification.
Extech specifically disclaims any implied warranties or merchantability or fitness for a specific purpose and
will not be liable for any direct, indirect, incidental or consequential damages. Extech's total liability is limited
to repair or replacement of the product. The warranty set forth above is inclusive and no other warranty,
whether written or oral, is expressed or implied.
Calibration and Repair Services
Extech offers complete repair and calibration services for all of the products we sell. For periodic
calibration, NIST certification or repair of any Extech product, call customer service for details on services
available. Extech recommends that calibration be performed on an annual basis to ensure calibration
integrity.
Support Hotline (781) 890-7440
Tech support: Ext. 200; Email: support@extech.com
Repair/Returns: Ext. 210; Email: repair@extech.com
Website: www.extech.com
All rights reserved including the right of reproduction in whole or in part in any form.
Copyright © 2003 Extech Instruments Corporation.
Page 7
ExStikTM (PH100, PH110, & RE300) Version 2.6 02/04
Page 8

Notes
Page 8
ExStikTM (PH100, PH110, & RE300) Version 2.6 02/04
 Loading...