

Page 1
User Guide
EasyView Digital Light Meter
Model EA30
99 Washington Street
Melrose, MA 02176
Phone 781-665-1400
Toll Free 1-800-517-8431
Visit us at www.TestEquipmentDepot.com
Page 2
EA30-EU-EN v3.3 08/13
2
Introduction
Thank you for selecting the Extech EasyView Digital Light Meter which measures light level
(luminance). This device measures up to 40,000 Fc and 400,000 Lux. This device is shipped fully
tested and calibrated and, with proper use, will provide years of reliable service.
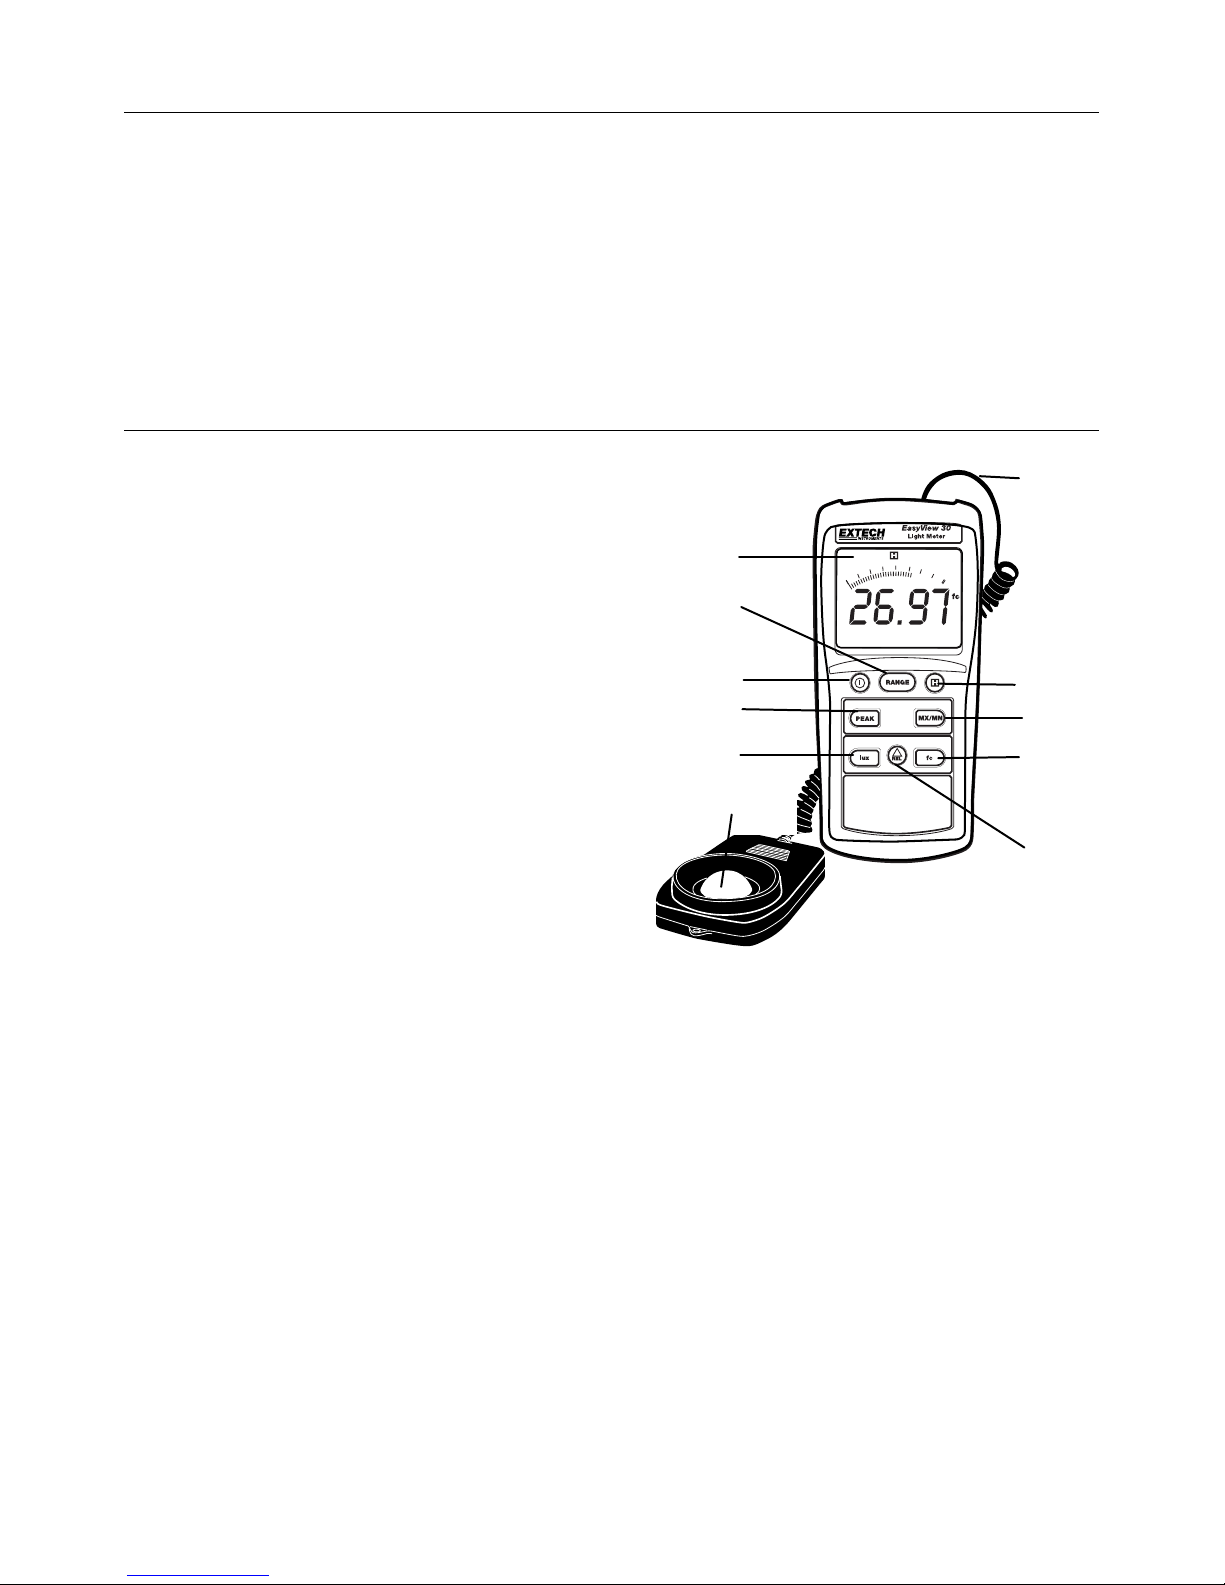
Meter Description
1. LCD display
2. Range button
3.
Power ON/OFF button
4.
Peak hold button
5.
Lux select button
6.
Photo sensor (lens cover not shown)
7.
Sensor input to top of meter
8.
Data HOLD butto
n
9. MAX/MIN
button
10.
fc foot candle select button
11.
RELATIVE function button
Note: Battery compartment is located
on the rear of the instrument
7
8
9
10
11
1
2
3
4
5
6
Page 3

EA30-EU-EN v3.3 08/13
3
Operation
Turn Power ON or OFF
1. Press the button to turn power on or off. The meter will perform a short self-test when
turned on.
Light sensor
1. The light sensor is permanently attached to the meter. A coiled cable attaches the sensor to the
meter.
2. The white domed light sensor lens is a photo diode and resides underneath the protective cap.
3. The meter automatically zeroes, therefore a zero calibration is not necessary.
4. The back of the sensor has a tripod mounting hole.
Taking light measurements
1. Remove the protective cap from the sensor and face the white domed light sensor toward the
source of light to be monitored. For overhead lighting, the sensor can be placed on a desk or
table top.
2. The light being measured must encompass the entire white sensor dome.
3. Read the light level on the LCD. If the light measurement is out of range an “OL” indication will
appear on the display. If the ‘OL’ appears, select another range by pressing the RANGE button.
Selecting Lux or Foot candle units of measure
Press the LUX button to select lux units and the fc button to select foot candle units.
MX MN Function (stores/recalls highest MX and lowest MN readings)
Press the MX/MN button once to put the meter in MX mode. The meter will now display only the
highest reading (MX is displayed on the upper left-hand portion of the LCD). Press MX/MN again to
put the meter in MN mode where the meter displays only the lowest reading (MN icon is displayed).
Press MX/MN again to have the meter continue to record the highest and lowest readings but
display only the current reading (both MX and MN icons appear flashing), then use the MX/MN
button to scroll through the highest and lowest readings. To exit the MX MN mode, press and hold
the MX/MN button until the MX and MN icons completely disappear.
Data Hold
Press the HOLD button to freeze the displayed reading. The 'H' hold icon will appear on the upper
right-hand side of the display. Press the HOLD button again to return to normal operation (the 'H'
hold icon will disappear). When hold function is enabled the analog bar graph will continue to
display level changes.
Peak Hold
The Peak Hold feature allows the meter to captures light level changes that occur in as little time as
100s. Press the PEAK button momentarily and the ‘P+’ icon will appear on the LCD. The meter
can now measure a fast acting light peak and display it on the LCD. To exit the Peak Hold mode,
press the PEAK button.
Relative mode
Measurements can be displayed as a difference between actual light level and a stored reference
value. To store a reading as a reference, press the REL button when the desired reference
measurement is on the LCD (the triangle icon will appear steady in the upper left-hand corner of the
LCD). All subsequent displayed readings will be “relative” to the stored reference value. For
example, if the reference value is 100 and the actual light level is 125, the meter will display 25. To
view the reference value, press the REL button again so that the triangle icon begins to flash. The
displayed value will be the reference value. To exit the Relative mode, press and hold the REL
button until the triangle icon disappears.
Page 4

EA30-EU-EN v3.3 08/13
4
Maintenance
Cleaning and storage
1.
The white plastic sensor dome should be cleaned with a damp cloth when necessary.
2.
Store the meter in an area with moderate temperature and humidity (refer to the oper
ating and
storage ran
ge in the specifications chart earlier in th
is manual).
Batter
y Replacement
When the battery power falls low, the ‘BT’ symbol will appear on the lower left-hand side of the LCD.
Replace the six (6) 1.5 ‘AAA’ batteries by removing the rear (center) battery compartment screw and
accessing the battery compartment. Observe polarity when placing the batteries in the
compartment. Ensure that the compartment cover is securely fastened when finished.
You, as the end user, are legally bound (EU Battery ordinance) to return all used
batteries, disposal in the household garbage is prohibited! You can hand over your
used batteries / accumulators at collection points in your community or wherever batteries
/ accumulators are sold!
Disposal: Follow the valid legal stipulations in respect of the disposal of the device at the
end of its lifecycle
Specifications
Ranges Resolution Accuracy
Lux
40.00,
400.0
4000
0.01
0.1
1
± (3% Reading + 0.5% Full Scale)
40.00k,
400.0kLux
0.01
0.1
if > 10,000 lux
±( 4% Reading + 0.5%Full Scale)
Foot candles
40.00
400
0.01
0.1
± (3% Reading + 0.5% Full Scale)
4000,
40.00kfc
1
0.01
if > 1,000 fc
±( 4% Reading + 0.5%Full Scale)
Display Multi-function 3-3/4 (3999) digit LCD with Bargraph indicator
Over range indication LCD displays ‘OL’
Spectral response CIE photopic (CIE human eye response curve)
Spectral accuracy CIE V function (f
1
6%)
Measure Repeatability ±2%
Temperature coefficient ±0.1% per
o
C
Sampling rate 13.3 times per second (Bargraph); 1.3 times per second (digital display)
Photo detector Silicon photo-diode with spectral response filter
Peak hold Capture light peaks to 100uS
Operating conditions Temperature: 0 to 40
o
C (32 to 104oF); Humidity: < 80% RH
Storage conditions Temperature: -10 to 50
o
C (14 to 140oF); Humidity: < 80% RH
Dimensions 150 x 72 x 33mm (5.91 x 2.8 x 1.4")
Weight Approx. 320g (11.3 oz.) with battery
Low battery indication “BT” appears on the LCD
Power supply 6 ‘AAA’ cells; Battery life approx 400 hours
Page 5

EA30-EU-EN v3.3 08/13
5
Appendix
Typical Light Levels
Lux Foot
Candles
Lux Foot
Candles
Factories
Home
20-75 2-7 Emergency Stairs, Warehouse
100-150 10-15 Washing
75-150 7-15 Exit/Entrance Passages
150-200 15-20 Recreational
Activities
150-300 15-30 Packing Wor
k
200-300 20-30 Drawing Room,
Table
300-750 30-75 Visual Work: Production Line
300-500 30-50 Makeup
750-1,500 75-150 Typesetting: Inspection Work
500-1,500 50-150 Reading, Study
1,500-3,000 150-300 Electronic Assembly, Drafting
1,000-2,000 100-200 Sewing
Office
Restaurant
75-100 7-10 Indoor Emergency Stairs
75-150 7-15 Corridor Stairs
100-200 10-20 Corridor Stairs
150-300 15-30 Entrance,
Wash Room
200-750 20-75 Conference,
Reception Room
300-750 30-75 Cooking Room,
Dining Table
750-1,500 75-150 Clerical Work
750-1,500 75-150 Show Window
1,500-2,000 150-2000 Typing, Drafting
Store
Hospital
75-150 7-15 Indoors
30-75 3-7
Emergency Stairs
150-200 15-20 Corridor/Stairs
75-100 7-10 Stairs
200-300 20-30 Reception
100-150 10-15 Sick Room,
Warehouse
300-500 30-50 Display Stand
150-200 15-20 Waiting Room
500-750 50-75 Elevator
200-750 20-75 Medical Exam
Room
750-1,500 75-150 Show Window,
Packing Table
750-1,500 75-150 Operating Room
1,500-3,000 150-300 Storefront, Show Window
5,000-10,000 500-1000 Eye Inspection
Page 6

EA30-EU-EN v3.3 08/13
6
Spectral Sensitivity
400 450 500 550 600 650 700
Wavelength (nm)
- - - - - Light Meter Response
_____
CIE Response
R
e
l
a
t
i
v
e
R
e
s
p
o
n
s
e
1
0.8
0.6
0.4
0.2
0
 Loading...