

Page 1
User's Manual
Hygro-Thermometer Pen
Models 445580 and 445582 (kit)
1
2
5
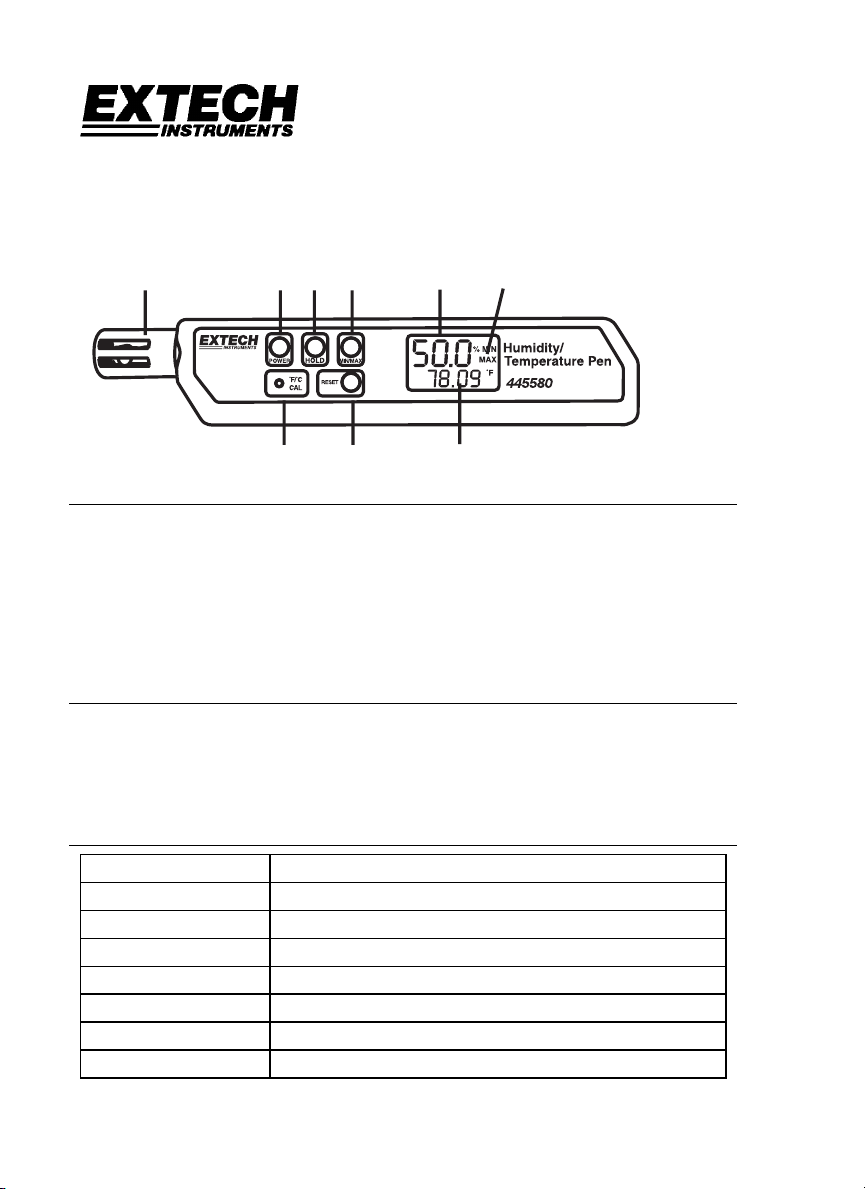
METER DESCRIPTION
1. Humidity/Temperature Sensor
2. POWER ON/OFF button
3. Data HOLD button
4. MIN/MAX Memory button
5. Calibration and units select button
3
4
6
7
8
6. Memory Reset button
7. Humidity Display
8. Temperature Display
9. Function Displays
9
INTRODUCTION
Congratulations on your purchase of the Extech Hygro-Thermometer Pen. This portable
meter can measure Relative Humidity from 10% to 90% and Temperature from 14 to 122
(0 to 50
Display Hold, and Automatic Power Off. The Model 445582 kit includes Relative Humidity
Calibration bottles and hard shell carrying case.
o
C). Advanced features include MIN/MAX Memory, Push-button Calibration,
SPECIFICATIONS
Relative Humidity Sensor High Precision thin-film capacitance type
Temperature Range 14 to 122oF (-10 to 50oC)
Relative Humidity Range 10 to 90% Relative Humidity
Resolution Temperature: 0.1o; Relative Humidity: 0.1%
Accuracy* Temperature: ±1.8oF (±1.0oC); Relative Humidity: ±5%
DC Power 2032 button battery (150 hour battery life)
Response time 120 seconds
Dimensions 6.9 x 1.6 x 0.6" (175 x 42 x 16mm)
* Accuracy applies to the temperature range 32 to 122oF (0 to 50oC)
o
F
Page 2

OPERATION
Measurements
Press the ON/OFF button to turn the meter ON. After a 5 second initialization, the Relative
Humidity reading will appear in the upper display and the Temperature reading will appear
in the lower display. Allow time for measurement readings to stabilize when moving the
meter from one area to another.
Error Messages
An error message will appear on the display if the meter fails an internal diagnostic test.
E2: Calibration error. Recalibration is necessary.
E5: Relative Humidity sensor failure. Repair/replacement is necessary.
Data Hold
1. Press the HOLD button to freeze the displayed reading. The display icon ‘HLD’ and the
held reading will appear on the display.
2. To return the meter to the normal operation mode, press and hold the RESET button
until the ‘HLD’ icon switches off.
MIN/MAX Memory Recall
1. Press and hold the MIN/MAX button until ‘MIN’ appears in the display. The reading will
then represent the lowest humidity and temperature measurements recorded since the
meter was turned on or last reset.
2. Press and hold the MIN/MAX button until the ‘MAX’ appears on the display. The
reading will then represent the highest humidity and temperature measurements
recorded since the meter was turned on or last reset.
3. Press the MIN/MAX key again to return to normal operation.
MIN/MAX Memory Reset
To reset (clear) the MIN/MAX memory, press and hold the RESET button until ‘88.8’
appears in the display.
Automatic Power Off (Sleep mode)
The meter will automatically shut off after a period of approximately 20 minutes. To defeat
this mode, press and hold the MIN/MAX button while turning the meter on. Release the
ON/OFF button after the display initializes. 'n' will appear on the display indicating that the
non-sleep mode has been activated. Sleep mode will be re-activated when the meter is
turned off however.
Setting Temperature Units (C or F)
Caution: Follow this procedure carefully. Accidentally pressing the RESET button during
this procedure will compromise the meter's calibration.
1. Ensure that the meter is off.
2. Press and Hold
press the ON/OFF button. The unit will power up and the display will flash once. When
only the ‘F’ and ‘C’ icons appear together in the display, release the F/C button.
3. The display will then show either ‘C’ or ‘F’. Press the MIN/MAX key to select degrees
‘C’ or ‘F’. The display will reflect the change.
4. Press the recessed F/C button to store the selection. ‘S’ will appear in the display.
5. The display will then show ‘%MIN’. Turn off the meter to complete the operation.
the recessed F/C button (use a paper clip or similar object) and then
2
Models 445580 & 445582 Version 3.2 August 2003
Page 3

CALIBRATION
The following verification and calibration procedures require the 33% and 75% RH
reference bottles which are supplied with the model 445582 kit.
Accuracy Verification
Checking the 33% or 75% RH Calibration
1. Insert meter’s sensor into the 33% or 75% salt reference bottle
2. Place the meter and bottle inside the meter case
3. Check the reading after 40 minutes
4. Verify that the reading is within the accuracy specification.
Relative Humidity Calibration (33% and 75%)
Note: For best results, store the meter and salts in the closed case during the 40-minute
stabilization process.
33% Calibration
1. Make sure the meter is OFF.
2. Insert the meter sensor into the 33% salt reference bottle. Allow the meter to
stabilize for 40 minutes.*
3. While holding down the recessed CAL button (use a paper clip) press and release
the ON/OFF button.
4. Continue to hold the CAL button and the unit will power up and the display will flash
once.
5. When only the ‘F’ and ‘C’ icons appear on the display, release the CAL button. ‘C’ or
‘F’ (whichever was previously selected) will remain on the display.
6. Press and hold RESET for 3 seconds ‘%MIN’ will appear when the key is released.
7. Momentarily press CAL. ‘S’ then ‘%MAX’ will display.
8. Turn power off. The 33% calibration is complete. Leave the meter OFF and proceed
to the 75% Calibration below.
75% Calibration
1. Make sure the meter is OFF.
2. Insert the meter sensor into the 75% salt reference bottle. Allow the meter to
stabilize for 40 minutes.*
3. While holding down the recessed CAL button (use a paper clip), press and release
the ON/OFF button.
4. Continue to hold the CAL button and the unit will power up and the display will flash
once.
5. When only the ‘F’ and ‘C’ icons appear on the display, release the CAL button. ‘C’ or
‘F’ (whichever was programmed earlier) will remain on the display.
6. Press and hold RESET for 3 seconds. ‘%MIN’ will appear in the display after the key
is released.
7. Press and hold RESET again for 3 seconds. ‘% MAX’ will appear in the display after
the key is released
8. Ensure that ‘%MAX’ is displayed then press CAL. ‘S’ will appear briefly and the
meter will return to normal operation.
9. Turn power off. The 75% calibration is now complete.
Note: If the salt at the bottom of the calibration bottles appears dry, the bottles
should be replaced.
* For testing purposes, the 40-minute stabilization period can be shortened.
However, for the most accurate calibration use the 40-minute period.
3
Models 445580 & 445582 Version 3.2 August 2003
Page 4

BATTERY REPLACEMENT
Use a coin to remove the battery compartment cover on the rear of the meter. Replace the
2032 lithium battery installing it face (+) up in the battery compartment.
WARRANTY
EXTECH INSTRUMENTS CORPORATION warrants this instrument to be free of defects in parts and
workmanship for one year from date of shipment (a six month limited warranty applies on sensors and
cables). If it should become necessary to return the instrument for service during or beyond the warranty
period, contact the Customer Service Department at (781) 890-7440 ext. 210 for authorization or visit our
website at www.extech.com (click on ‘Contact Extech’ and go to ‘Service Department’ to request an RA
number). A Return Authorization (RA) number must be issued before any product is returned to Extech. The
sender is responsible for shipping charges, freight, insurance and proper packaging to prevent damage in
transit. This warranty does not apply to defects resulting from action of the user such as misuse, improper
wiring, operation outside of specification, improper maintenance or repair, or unauthorized modification.
Extech specifically disclaims any implied warranties or merchantability or fitness for a specific purpose and
will not be liable for any direct, indirect, incidental or consequential damages. Extech's total liability is limited
to repair or replacement of the product. The warranty set forth above is inclusive and no other warranty,
whether written or oral, is expressed or implied.
Copyright © 2003 Extech Instruments Corporation. All rights reserved
including the right of reproduction in whole or in part in any form.
4
Models 445580 & 445582 Version 3.2 August 2003
 Loading...