

Page 1
User’s Guide
Digital Thermocouple
Calibrator & Thermometer
Models:
42311 Type J
42312 Type K
Introduction
Congratulations on your purchase of Extech model 42311 or 42312 Digital Thermometer and
Calibrator. Properly used, this meter will provide many years of reliable service.
Page 2

V1.5 1/03
2
WARRANTY
EXTECH INSTRUMENTS CORPORATION warrants this instrument to be free of defects in
parts and workmanship for one year from date of shipment (a six month limited warranty
applies on sensors and cables). If it should become necessary to return the instrument for
service during or beyond the warranty period, contact the Customer Service Department at
(781) 890-7440 ext. 210 for authorization. A Return Authorization (RA) number must be
issued before any product is returned to Extech. The sender is responsible for shipping
charges, freight, insurance and proper packaging to prevent damage in transit. This warranty
does not apply to defects resulting from action of the user such as misuse, improper wiring,
operation outside of specification, improper maintenance or repair, or unauthorized
modification. Extech specifically disclaims any implied warranties or merchantability or fitness
for a specific purpose and will not be liable for any direct, indirect, incidental or consequential
damages. Extech's total liability is limited to repair or replacement of the product. The
warranty set forth above is inclusive and no other warranty, whether written or oral, is
expressed or implied.
Safety Precautions
1. Make sure any covers or battery doors are properly closed and secured.
2. Remove the battery from the meter if the meter is to be stored for long periods.
3. Touching the thermocouple to a device which is powered electrically can cause
damage to the meter and may pose a shock hazard.
4. To avoid damage do not make temperature measurements in microwave ovens.
Specifications
Display 3 ½ digit (1999 Count) LCD (Liquid Crystal Display)
Temperature Scale ºC or ºF (user-selectable)
Thermocouple type Model 42311: type J; Model 42312: type K
Measurement and Model 42312: -40º to 2000ºF (-40º to 1350ºC)
Source Ranges Model 42311: -40º to 1400ºF (-40º to 760ºC)
Resolution 1ºC/F or 0.1ºC/F (< 200ºF/C)
Accuracy ±(0.1% rdg + 2ºF) or ±(0.1% rdg + 1ºC)
Temp. Coefficient 0.1 times the applicable accuracy spec per ºC or ºF from
32º to 64ºF and 82º to 122ºF (0º to 18ºC and 28º to 50ºC)
Input Protection 24VDC or 24VAC RMS maximum input voltage
Display Update 2.5 times per second
Input Connector Accepts standard subminiature thermocouple connectors
Battery 9V battery (200 hour typical battery life)
Dimensions/Weight 7.5x3.54x2.1 inches (190x90x53 mm) / 1 lb (440g)
Page 3

V1.5 1/03
3
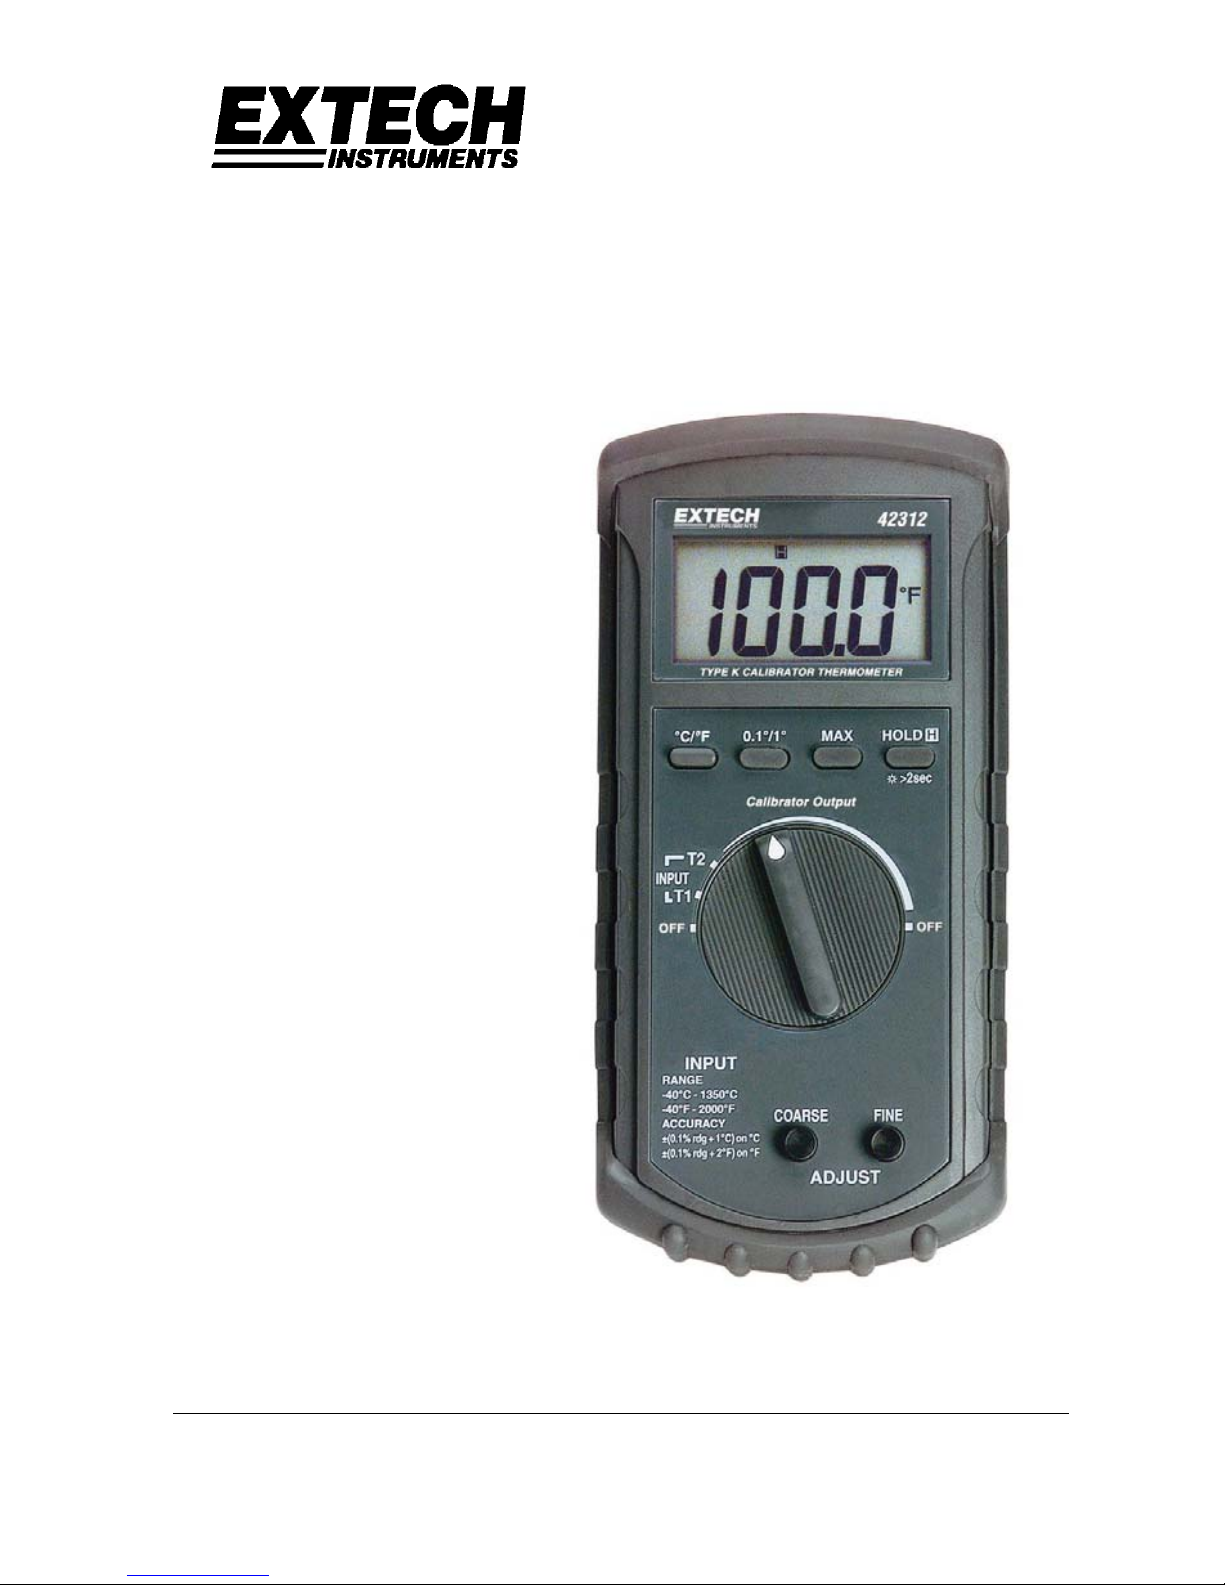
Meter Front Panel Description
1. Display
2. C/F Selector Key
3. Low/High Resolution Key
4. Max Hold Key
5. Hold/Backlight Key
6. Function Switch
7. Course Adjustment Knob
8. Fine Adjustment Knob
Features
Selecting the Temperature Scale
Readings can be displayed in Celsius or Fahrenheit by pressing the ºC/ºF key. The ºC or
ºF annunciator will illuminate on the display depending on which scale you have selected.
Adjustable Resolution
The resolution of the meter can be switched from 0.1º (up to 199.9) to 1º by pressing the
0.1º/1º key.
Max Hold
Max hold will freeze the highest recorded reading on the display. When the MAX key is
pressed the MAX icon will appear in the upper portion of the display. The display will
update every time there is a new maximum reading. Pressing MAX again will disengage
Max hold.
Backlit display
Press the Hold key for 2 seconds to toggle the Backlight ON and OFF. The backlight will
stay on until you press the Hold key for 2 seconds again, or turn the meter off.
Data Hold
The hold function freezes the displayed reading for later viewing. Press the HOLD key
momentarily to activate the Data Hold feature. Press again to exit the Hold mode.
Operation
WARNING: To avoid electrical shock, do not use this instrument when voltages at the
measurement surface exceed 24VAC or DC.
Temperature Measurement
1. Plug a thermocouple into the T1 or T2 input jack.
2. Turn the function switch to the T1 or T2 position depending upon where the
thermocouple is physically connected per step 1 above.
3. Touch the temperature probe to the surface, liquid or gas being measured and
observe the reading on the display.
NOTE: Both T1 and T2 inputs can be used simultaneously, but only one reading can be
displayed at a time. Always move the rotary function switch to the OFF position
when the meter is not in use.
Page 4

V1.5 1/03
4
Tech Support Hotlines
781-890-7440 ext. 200
extech@extech.com
www.extech.com
Temperature Calibration (Source)
NOTE: When calibrating temperatures over 199.9º you must change the resolution to
the 1º scale or the meter will display "OL"
1. Connect a thermocouple cable (Type J for Model 43211 or Type K for Model
43212) to output 1 or 2 at the top of the meter. These jacks have the same signal
available on both output 1 and output 2 terminals.
2. Connect the other end of the thermocouple cable to the instrument(s) to be
calibrated.
3. Using the range switch, coarse and fine adjustment knobs set the meter to the
desired output. See explanation below.
How to use the Range Switch and Coarse/Fine Adjustments
In addition to the T1, T2, and OFF positions, the Rotary switch has 7 output range positions
that move low to high (left to right) underneath the words Calibrator Output on the front panel
(also designated by the white strip over the Rotary switch).
1. Use the Rotary switch to find the closest range of the desired temperature output
2. Note that the meter outputs a mV signal corresponding to the temperature display
which can be routed to a panel meter, recorder, datalogger, controller, another
calibrator, etc.
3. Adjust the Coarse knob to dial in even closer to the desired output temperature
4. Finally, adjust the Fine knob for the exact temperature output
Maintenance
Cleaning and Storage
Periodically wipe the case with a damp cloth and mild detergent; do not use abrasives or
solvents. If the meter is not to be used for periods of longer than 60 days, remove the
battery and store it separately
Battery and Fuse replacement
1. Remove the protective rubber holster from the meter
2. The battery cover is held in place by two Philips head screws, both screws must be
removed in order to remove battery cover.
3. Remove and replace the 9V battery.
4. Replace compartment cover, screws and rubber holster.
Repair and Calibration Services
Extech offers complete repair and calibration services for all of the products we sell. For
periodic calibration, NIST certification or repair of any Extech product, call customer service
for details on services available. Extech recommends that calibration be performed on an
annual basis to ensure calibration integrity.
Copyright © 2000 Extech Instruments Corporation. All rights reserved
including the right of reproduction in whole or in part in any form.
 Loading...