

Page 1
INSTRUCTION MANUAL
NOTE: Units (degrees °C / °F)
Model 40102F/C
Recording Thermometer Clock
• Indoor/Outdoor temperature display
• Real time clock display
• MIN/MAX mode displays
• Selectable °C/°F units
1. INTRODUCTION
Congratulations on your purchase of Extech’s Recording Temperature Clock. This
professional meter, with proper care, will provide years of safe reliable service.
2. SPECIFICATIONS
Measurement ranges
Indoor temperature
Outdoor temperature
Resolution
Accuracy
Power supply One (1) 'AAA' 1.5 V battery
Sensor cable length Outdoor temperature sensor cable length: Approx. 79"
Dimensions/Weight 3.5x3.5x1" (89x89x25mm) / 4.5 oz. (128g)
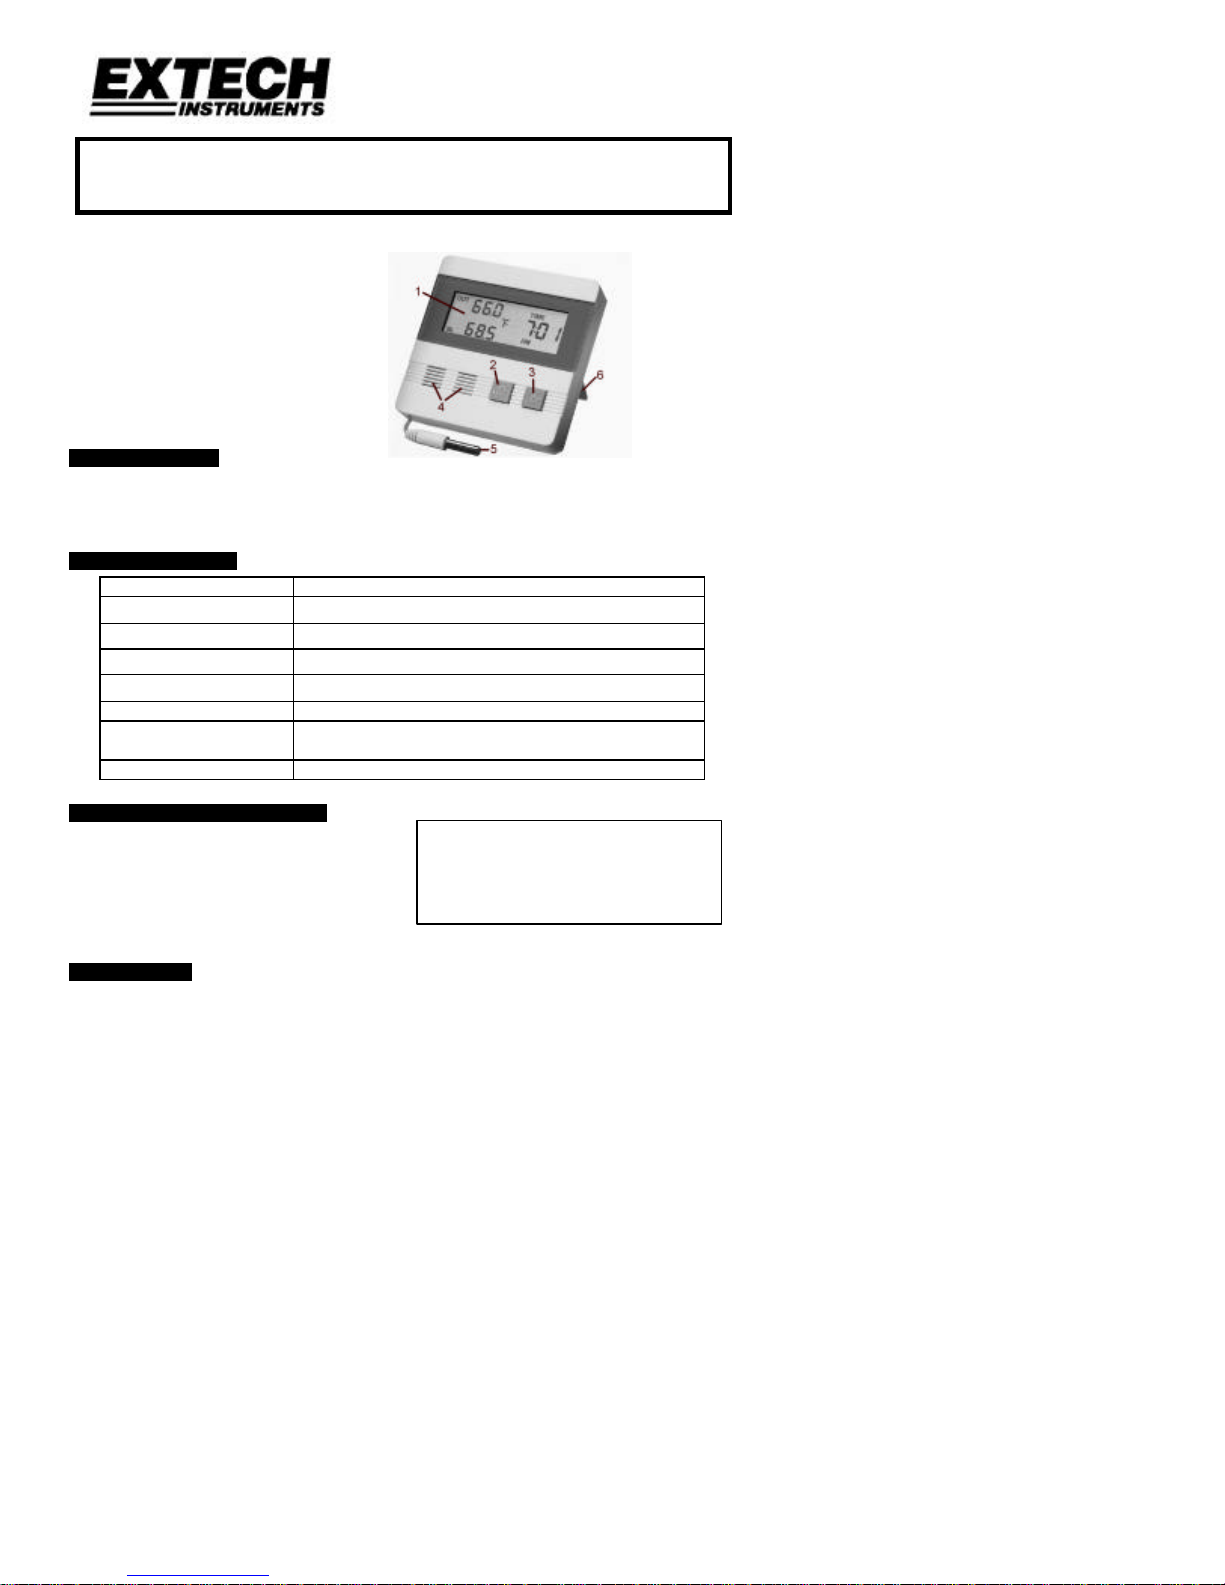
3. FRONT PANEL DESCRIPTION
4. OPERATION
4.1 Powering the unit. The supplied battery is installed in the battery compartment but
has a strip of plastic between the conductors. Remove this strip and reinstall the
battery to power the meter. The meter is now ready to be programmed for proper time
and date. You have approx. 20 seconds to begin programming the meter before it
defaults to the factory setting. Anytime you wish to reprogram the meter, simply
remove and reinstall the battery.
4.2 Programming Time and Date: Once the meter is powered, the "minutes" portion of
the time display will flash. Use the MIN/MAX button to scroll to the present minute
1-LCD Display
2-MIN/MAX Button
3-Date/Input Temp. Toggle Button
4-Indoor sensors
5-Outdoor sensor
6-Tilt Stand
14 to 122°F (-10 to 50°C)
-40 to 176°F (-40 to 80°C)
0.5°F or °C
±1°F or °C
(2m)
Selector Switch, Battery/Sensor
Compartment & Wall Mounting Holes
are on rear of unit
1 40102F Ver. 1.2 03/00
Page 2
value. When done, press the IN/DATE button to scroll over to the "hours" portion of
the time display. Use the MIN/MAX key to set the present hour. When complete, press
the IN/DATE button to scroll over to the "month" portion of the date display. Set the
month number using the MIN/MAX key. When complete, press the IN/DATE button to
scroll over to the "day" portion of the date display. Use the MIN/MAX button to set the
present date. When complete, press the IN/DATE twice to display the indoor/outdoor
temperature and present time.
4.3 Normal Operation: The Indoor temperature sensor is built-in to the meter. The
outdoor temperature sensor terminates the supplied cable. Mount the Outdoor Sensor
using the supplied mounting bracket. The normal display mode indicates outdoor
temperature on the top left of the LCD and indoor temperature on the bottom left of the
LCD (the words OUT and IN appear to the left of their respective readings for
convenience). Real time is displayed to the right of the outdoor and indoor
temperatures. Press the IN/DATE button to toggle between the Indoor temperature
and Date displays.
4.4 MIN/MAX Operation with Time/Date Stamp: The meter can display the highest and
lowest readings for both the Indoor and the Outdoor temperature readings. These are
the highest and lowest readings measured since the meter was powered up or the
memory was cleared (see 4.5 below). Press the MIN/MAX key once to display the
MAX Outdoor temperature, press again to view the MIN Outdoor temperature. Press
again to view the MAX Indoor temperature. Press again to view the MIN Indoor
temperature. Each MAX and MIN reading will be accompanied by a date and time
stamp letting the user know exactly when the MAX or MIN reading was taken.
4.5 Clearing the MIN/MAX Memory: From the normal display mode, press and hold the
MIN/MAX button for 3 seconds. The memory will now be reset.
5. MAINTENANCE
5.1 Battery Replacement: Slide the battery compartment cover off of the rear of the
meter and replace the one 1.5V AAA battery.
5.2 Cleaning: Use only a dry cloth to clean the plastic case.
6. CALIBRATION / REPAIR SERVICES
Extech offers complete repair and calibration services for all of the products we sell. For
periodic calibration, NIST certification or repair of any Extech product, call customer
service for details on services available. Extech recommends that calibration be performed
on an annual basis to insure calibration integrity.
7. WARRANTY
EXTECH INSTRUMENTS CORPORATION warrants this instrument to be free of defects in parts and
workmanship for one year from date of shipment (a six month limited warranty applies on sensors and
cables). If it should become necessary to return the instrument for service during or beyond the warranty
period, contact the Customer Service Department at (781) 890-7440 ext. 210 for authorization. A Return
Authorization (RA) number must be issued before any product is returned to Extech. The sender is
responsible for shipping charges, freight, insurance and proper packaging to prevent damage in transit.
This warranty does not apply to defects resulting from action of the user such as misuse, improper wiring,
operation outside of specification, improper maintenance or repair, or unauthorized modification. Extech
specifically disclaims any implied warranties or merchantability or fitness for a specific purpose and will not
be liable for any direct, indirect, incidental or consequential damages. Extech's total liability is limited to
repair or replacement of the product.
The warranty set forth above is inclusive and no other warranty, whether written or oral, is expressed or
implied.
Copyright © 1999 Extech Instruments Corporation. All rights reserved
including the right of reproduction in whole or in part in any form.
2 40102F Ver. 1.2 03/00
 Loading...