

Page 1

User's Guide
查询"381285"供应商
Handheld MultiScope
Model 381285
MEASUREMENT OF VOLTAGE IN OSCILLOSCOPE MODE
WILL RESULT IN PERMANENT DAMAGE AND POSSIBLE INJURY
GREATER THAN 250VAC OR 360VDC
WARNING
Page 2

Table of Contents
Section Page
Warranty 3
Safety 4
查询"381285"供应商
Specifications 5
Symbols and Annunciators 8
Soft Keys and Sub Menus 8
Operation (Oscilloscope) 10
AC and DC Voltage 10
Time/Div 11
Volt/Div 11
Trigger 11
More 11
Single 11
Glitch 12
Position 12
Cursor 13
Operation (Digital Multimeter) 14
AC and DC Volts 14
Resistance 15
Continuity 15
Diode 15
AC and DC Current 16
Capacitance 16
Relative 17
Avg Min Max 17
Peak Hold 17
Limit 18
Sig. Out 18
Frequency Counter, Duty Cycle and Dwell 19
Automotive RPM 19
Logic Analyzer 19
Set Up 20
Aux 20
Backlight 21
Auto/Manual Range 21
Help 21
Print 21
Tilt Stand 21
RS232 Commuincations 22
Maintenance 23
Battery Replacement 23
Fuse Replacement
2
V2.0 03/05
Page 3

Warranty
EXTECH INSTRUMENTS CORPORATION warrants this instrument to be free of defects
in parts and workmanship for one year from date of shipment (a six month limited
warranty applies on sensors and cables). If it should become necessary to return the
查询"381285"供应商
instrument for service during or beyond the warranty period, contact the Customer
Service Department at (781) 890-7440 ext. 210 for authorization or visit our website at
www.extech.com
RA number). A Return Authorization (RA) number must be issued before any product is
returned to Extech. The sender is responsible for shipping charges, freight, insurance
and proper packaging to prevent damage in transit. This warranty does not apply to
defects resulting from action of the user such as misuse, improper wiring, operation
outside of specification, improper maintenance or repair, or unauthorized modification.
Extech specifically disclaims any implied warranties or merchantability or fitness for a
specific purpose and will not be liable for any direct, indirect, incidental or consequential
damages. Extech's total liability is limited to repair or replacement of the product. The
warranty set forth above is inclusive and no other warranty, whether written or oral, is
expressed or implied.
(click on ‘Contact Extech’ and go to ‘Service Department’ to request an
Calibration and Repair Services
Extech offers repair and calibration services for the products we sell. Extech also provides
NIST certification for most products. Call the Customer Service Department for information
on calibration services available for this product. Extech recommends that annual
calibrations be performed to verify meter performance and accuracy.
Technical support: Extension 200; E-mail: support@extech.com
Repair & Returns: Extension 210; E-mail: repair@extech.com
Product specifications subject to change without notice
For the latest version of this User’s Guide, Software updates, and other
up-to-the-minute product information, visit our website: www.extech.com
Extech Instruments Corporation, 285 Bear Hill Rd., Waltham, MA 02451
Support line (781) 890-7440
All rights reserved including the right of reproduction in whole or in part in any form.
Copyright © 2005 Extech Instruments Corporation
3
V2.0 03/05
Page 4

Safety
This meter has been designed to be safe in use, but the operator must use caution in its
operation. The rules listed below should be carefully followed for safe operation.
1. NEVER apply voltage or current to the meter that exceeds the specified maximum for the
查询"381285"供应商
function selected.
V DC 1000V DC within 10 seconds
Function Maximum Input
V AC 700V AC within 10 seconds
Ohms 250V DC/AC within 10 seconds
mA DC/AC 250V/500mA fused
20A DC/AC 250V/20A fused, 20A for 30 seconds max
Logic Analyzer 50V p-p
2. USE EXTREME CAUTION when working with high voltages.
3. DO NOT measure voltage if the voltage on the "COM" input jack exceeds 500V above
earth ground.
4. NEVER connect the meter leads across a voltage source while the function switch is in the
current, resistance or diode mode. Doing so can damage the meter.
5. ALWAYS discharge capacitors in power supplies and disconnect the power when making
resistance or diode tests.
6. ALWAYS turn off the power and disconnect the test leads before opening the back to
replace the fuse or batteries.
7. NEVER operate the meter unless the back cover is in place and fastened securely.
International Safety Symbols
Input Limits
each 15 minutes
WARNING
CAUTION
This symbol, adjacent to another symbol or terminal, indicates the user must
refer to the manual for further information.
This symbol, adjacent to a terminal, indicates that, under normal use,
hazardous voltages may be present
Double insulation
The WARNING symbol indicates a potentially hazardous situation which, if not
avoided, could result in serious injury or death
The CAUTION symbol indicated a potentially hazardous situation which, if not
avoided, may result in minor or moderate injury
4
V2.0 03/05
Page 5

Specifications
DIGITAL MULTIMETER
查询"381285"供应商
DC Voltage
Range Resolution Accuracy
400mV 0.1mV
4V 0.001V
40V 0.01V
400V 0.1V
1000 V 1V
AC Voltage (True rms)
Range Resolution
400mV 0.1mV ±(1.0%rdg + 10dgt) ±(5.0%rdg + 10dgt) not specified
4V 1mV ±(2.0%rdg + 10dgt)
40V 10mV
400V 100mV
700 V 1V ±(1.0%rdg + 10dgt) not specified not specified
Resistance
Ranges Resolution Accuracy
400 0.1
4k 1
40k 10
400k 0.1k
4M 1M
40M 10M ±(1%rdg + 5dgt)
DC Current
Ranges Resolution Accuracy
40mA 0.01mA
400mA 0.1mA
4A 1mA
20A 10mA
AC Current (True rms)
Ranges Resolution
40mA 0.01mA
400mA 0.1mA
4A 1mA
20A 10mA
MEASUREMENT OF VOLTAGE IN OSCILLOSCOPE MODE
WILL RESULT IN PERMANENT DAMAGE AND POSSIBLE INJURY
GREATER THAN 250VAC OR 360VDC
±(0.75%rdg + 10dgt)
WARNING
±(0.3%rdg + 5dgt)
50Hz to 1kHz 1kHz to 10kHz 10kHz to 30kHz
50Hz to 1kHz 1kHz to 10kHz
±(1.2%rdg + 10dgt) ±(4%rdg + 10dgt)
±(2.0%rdg + 10dgt) ±(4%rdg + 10dgt)
Accuracy
±(1.0%rdg + 10dgt)
±(0.5%rdg + 10dgt)
±(1.2%rdg + 10dgt)
±(1.5%rdg + 10dgt)
Accuracy
±(5%rdg + 5dgt)
5
V2.0 03/05
Page 6

Capacitance
Ranges Resolution Accuracy
40nF 0.01nF
400nF 0.1nF
查询"381285"供应商
4µF 1µF
40µF 10µF
100µF 0.1µF
Frequency Counter
Range Resolution Accuracy
0.5Hz to 45MHz 0.1Hz ±(0.1%rdg + 5dgt)
Signal Output
Range Form Amplitude
2.5Hz to 78kHz Square wave, 50% duty cycle,
Automotive RPM
Range RPM1 RPM2
0 to 12000 rpm DIS electronic type engine (2
Logic Analyzer
Channels Sweep Time Sweep Mode
1 125ns to 2s per division (23 divisions) Auto
Diode Test Open circuit voltage: 5V max
dB (-80 to +80dB) 2, 3, 8, 16, 50, 75, 93, 110, 125, 135, 150, 300, 600, 900, 1000, or 1200
Continuity Buzzer sounds for < 60
Auxiliary Input 400.0mV DC range scaled for direct display of temperature, relative
300/10% steps (approx)
cycle engine)
ohms reference
humidity or current (1 unit per mV)
±(2%rdg + 10dgt)
5V p-p
Distributor type engine
(4 cycle engine)
6
V2.0 03/05
Page 7

DIGITAL STORAGE OSCILLOSCOPE
Channels 1
Bandwidth DC to 5MHz
Sample rate 25Mega samples per second
查询"381285"供应商
Vertical Sensitivity 10mV/div to 200V/div (14 divisions)
Time base 125ns. to 2sec. per division (23 divisions)
Glitch capture 500nsec. (minimum)
Trigger Level adjustable ±2 divisions (in 0.1 steps)
(Positive or negative edge moving trigger)
COMMON SPECIFICATIONS
Display 160x160 pixel graphic LCD with EL backlight
Viewing Area 2.48” x 2.48” (63 x 63mm)
Measurement rate Digital: 4 times/sec. Bargraph: 7 times/sec.
AC Response True rms
Crest Factor 3 at full scale, 5 at half scale
Input Impedance 10M for numerical display, 1M for graphical display
Auto Power Off 30 minutes (with disable feature)
Min/Max/Avg. Displays minimum, average, & maximum readings over time
Hold Captures displayed reading
Overrange Indicates “OVER”
Storage 15 pages (text or graphics)
Dimensions 3.6x7.6x2.2inches (92x192x55mm)
Weight 1.0lbs. (450gm)
Power 6 size AA cells, 6 size AA NiMH batteries, 3 dual cell NiMH Battery
Packs or AC adaptor
Charging time 10 hours approx.
Operating time Alkaline (6hrs approx.), NiMH (6hrs approx.)
Temperature Operating: 32
removed): -4
Charging: 32
O
F to 104OF (0OC to 40OC), Storage (NiMH batteries
O
F to 140OF (-20OC to 60OC),
O
F to 113OF (0OC to 45OC)
7
V2.0 03/05
Page 8
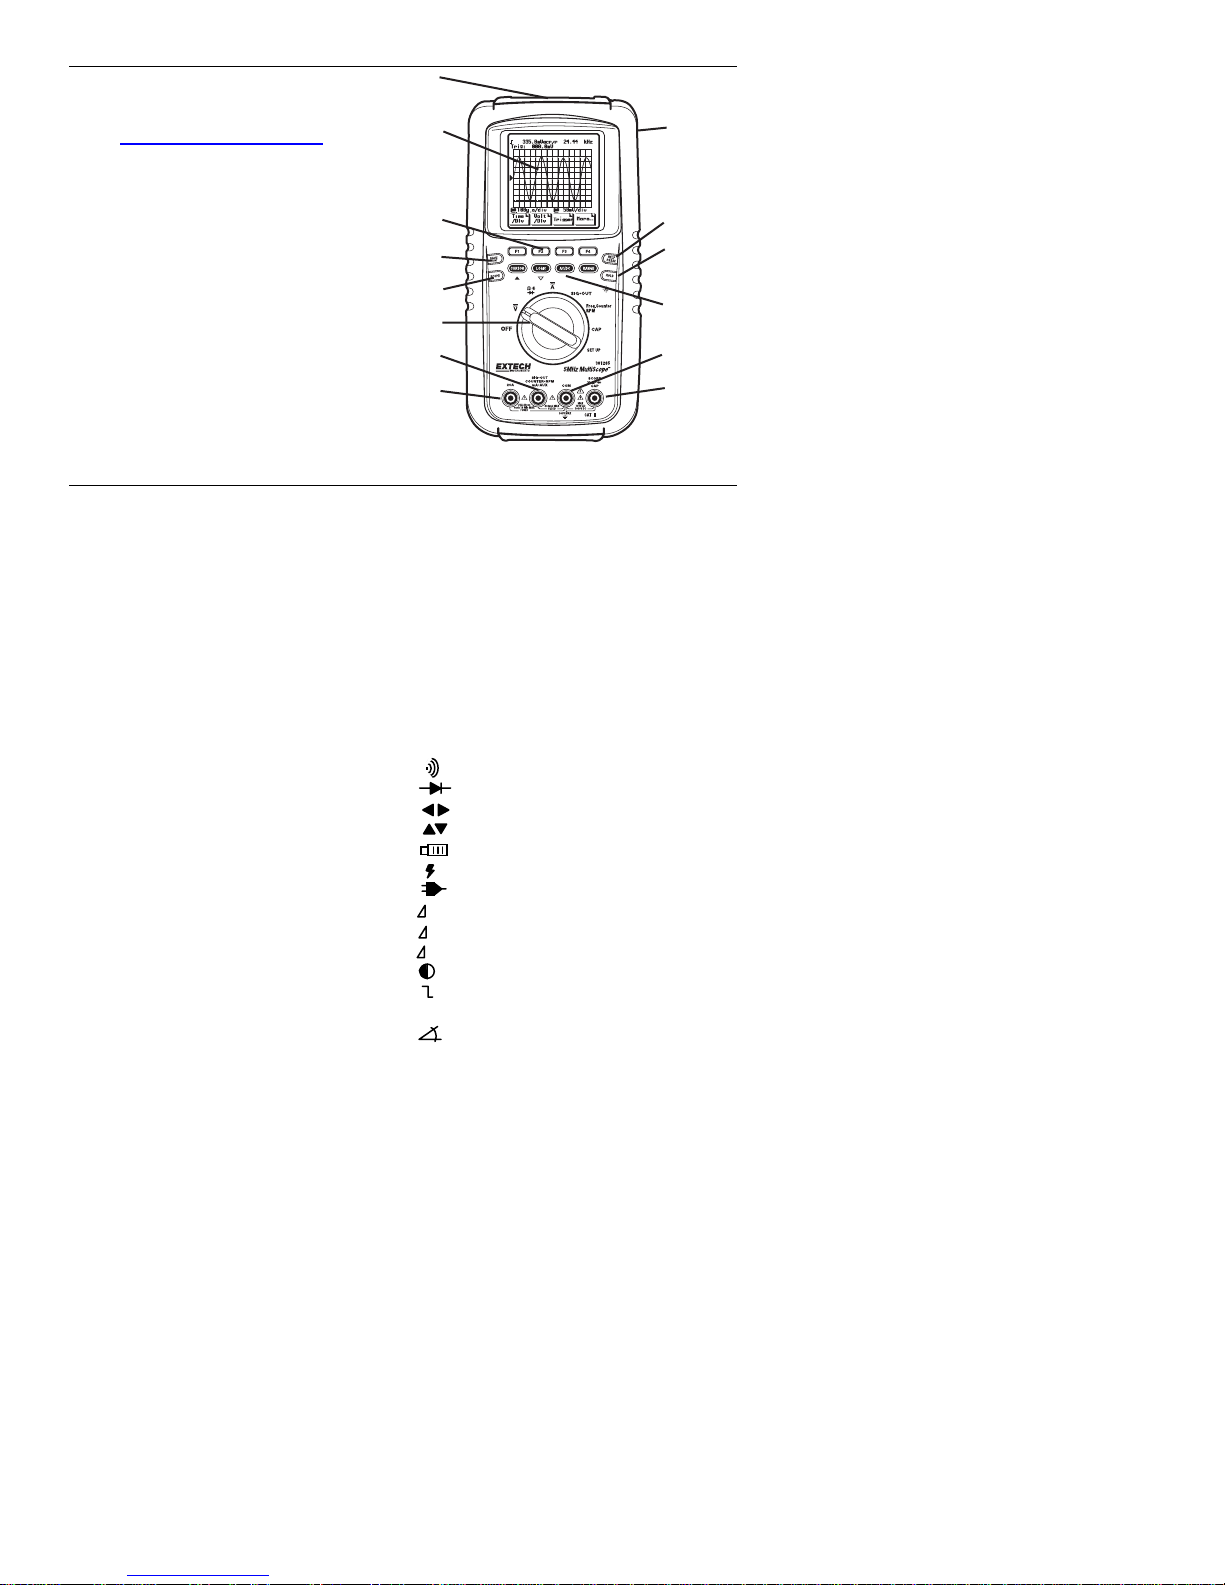
Meter Description
1. RS232 pc interface connector
2. LCD Dot matrix display
查询"381285"供应商
3. Soft function keys
4. Display storage key
5. Scope/multimeter key
6. Function switch
7. Sig. Out, mA, Frequency jack
8. 20A jack
9. AC adaptor jack
10. Help key
11. Hold key
12. Mode keys
13. Com jack
14. Volts, ohms, cap, diode jack
1
2
3
4
5
6
7
8
Symbols and Annunciators
A Ampere
AC alternating current
AUTO autoranging
AVG average
CALL recall stored data
CLEAR remove stored data
dB decibel
DC direct current
F farads(capacitance)
LIMIT compare
GLITCH glitch waveform
Hz hertz(frequency)
MANU manual
RESET reset
MAX maximum
MIN minimum
ms milliseconds
ºC degrees centigrade
ºF degrees fahrenheit
PAUSE pause in min/max
peakhold, single
glitch mode
P-H peak hold
RANGE manual range
REL relative
RPM 1 2 stroke - DIS Engine
RPM 2 4 stroke Engine
RUN restart in peak hold,
min/max mode
SAVE saves present signal
in memory
SINGLE single waveform
SLEEP auto shut-off
TEST self test
TIME manually change time
TRIG frequency trigger
V volts
ohms(resistance)
%Rh relative humidity
buzzer, continuity
diode
cursor ( left or right )
cursor( up or down )
low battery
over range on V & A
AC adaptor in use
t signal pulse width
1/t frequency
V signal amplitude
time to auto power off
trigger slope
% % DUTY CYCLE
Dwell Degree
9
10
11
12
13
14
base
8
V2.0 03/05
Page 9

Soft-Keys and Sub-Menus
Soft keys are located directly below the
LCD display and perform multiple
查询"381285"供应商
operation as indicated on the LCD and
determined by the function selected by
the rotary switch.
Some functions will produce a sub-menu
on the display for further selection
Operation of the menus and sub-menus
is described in the appropriate operation
paragraph.
F1 to F4 Soft keys, function indicated on graphical display.
Toggle between the multimeter and graphical display mode.
also power reset key to re-activate power if the auto-shutoff is in effect
Save and recall measurement data or graphical display.
also press for 3 seconds to print data or the graphical display
Display the basic meter warning, Input jack locations and test procedures
also press for 3 seconds to enable the RS232 interface.
Toggle between AUTORANGE and MANUAL RANGE.
Toggle between AC and DC measurements in V and A functions.
Logic analyzer function.
Operation of the scope function, V, t%, t, 1/t value display.
"Freezes" the reading on the display.
NOTE : Soft key Reaction Time: The soft keys react ONLY AFTER 250msec(millisecond)
for all except in the Oscilloscope Mode ( 500msec).
9
V2.1 03/06
Page 10

Operation (Oscilloscope)
AC and DC VOLTAGE
查询"381285"供应商
MEASUREMENT OF VOLTAGE IN OSCILLOSCOPE MODE
WILL RESULT IN PERMANENT DAMAGE AND POSSIBLE INJURY
WARNING: Risk of Electrocution. The probe tips may not be long enough to contact the
live parts inside some 240V outlets for appliances (contacts can be recessed deep in the
outlets). As a result, the reading may show 0 volts when the outlet actually is live. Make
sure the probe tips are contacting the metal contacts inside the outlet before assuming
that no voltage is present.
CAUTION: Do not measure AC or DC voltages if a motor on the circuit is being
switched ON or OFF. Large voltage surges may occur during the ON or OFF operations
that can damage the meter.
CAUTION: To avoid meter damage, do not apply 700V AC or 1000V DC for more than
10 seconds.
1. Insert the black test lead banana plug into the negative COM jack and the red test
lead banana plug into the positive V jack.
2. Set the function switch to the V position.
3. Select AC or DC voltage using the AC/DC key (default is AC).
4. Press and momentarily hold the SCOPE key to switch to the graphical display.
5. Touch the test probe tips to the circuit under test and observe the waveform.
Peak-peak voltage
Trigger slope
Trigger level
Position
Horizontal (time) scale
GREATER THAN 250VAC OR 360VDC
@
WARNING
Frequency
V:
Cursor width
Waveform
@
Vertical (volt) scale
10
V2.1 03/06
Page 11

/Div
Oscilloscope Functions
Time
/Div
F1 F2 F3 F4
Time
Volt
/Div
Trigger More…
查询"381285"供应商
(F1): Time per division (horizontal).
▲ ▼
F1 F2 F3 F4
Time divisions are selected automatically when in the autoranging mode. The time
division will vary to display the best wave pattern in the autoranging mode or the
time / division can be set manually using the F1 and the sub-menu arrow
(▲▼)keys. The @ symbol indicates that autoranging has been selected.
(F2): Volts per divisions (vertical).
Volt
/Div
▲ ▼
F1 F2 F3 F4
Voltage divisions are selected automatically when in the autoranging mode. The
voltage division will vary to display the best amplitude in the autoranging mode or
volts / division can be set manually using F2 and the sub-menu arrow (▲▼)keys.
The @ symbol indicates that autoranging has been selected.
Trigger
(F3): TRIGGER level.
F1 F2 F3 F4
The F1 slope key selects either a rising ( ) or falling ( )trigger edge.
The F2 ▲ )and F3 ▼ )key adjust the trigger level.
The F3 EXIT key to return to the main screen.
AUTO
MANUAL
AUTO
MANUAL
EXIT
EXIT
▲ ▼ EXIT
More…
(F4): MORE function (The MORE key redefines the function keys)
Single Glitch Position EXIT
F1 F2 F3 F4
Single
(F1): SINGLE shot.
RESET
F1 F2 F3 F4
The SINGLE key will trigger a single measurement when the key is pressed. and
open a sub-menu which allows time expansion or compression for enhanced
waveform viewing.
The F1 RESET key will trigger a new measurement.
The F2 and F3 arrow key will expand or compress the time divisions and trigger a
new measurement.
The F4 EXIT key returns the screen to the “More” menu.
▲ ▼
11
EXIT
V2.1 03/06
Page 12

Glitch
(F2): GLITCH capture.
查询"381285"供应商
The Glitch key sets the meter to trigger a measurement on any single event which
causes an overrange indication or is greater than one vertical division or is greater
than 10% of one horizontal division.
The F1 RESET key will trigger a new measurement. “SEARCHING” will appear on
the display until a pulse arrives that triggers the event.
The F2 and F3 arrow keys adjust the time per division and trigger a new
measurement.
The F4 EXIT key returns the screen to the “More” menu.
Pulse must exceed 10% of one time division
Position
(F3): POSITION
RESET
▲ ▼
EXIT
F1 F2 F3 F4
Trigger Point
RESET
▲ ▼
EXIT
F1 F2 F3 F4
The POSITION key adjusts the vertical position of the waveform.
The F1 RESET key sets the vertical position cursor to the default 0 position.
The F2 and F3 arrow keys adjust the vertical position of the waveform.
The F4 EXIT key returns the screen to the “More” menu.
12
V2.1 03/06
Page 13

CURSOR FUNCTION
The cursor function measures time difference or voltage difference between two
cursors on the screen. Selecting ∆V will produce two horizontal cursors and
selecting one of the ∆t functions will produce two vertical cursors. The amplitude or
time difference between the two cursors is displayed on the screen.
查询"381285"供应商
∆V (F1): Voltage difference.
Measures the voltage difference between the
upper and lower cursor. For example, the
voltage difference cursor function can be
used to measure the peak to peak voltage.
Select “Upper” or “Lower” and press the
arrow keys to set the location of the cursors.
∆t% (F2)::% of one cycle
Measures the time between the left and right
cursor and displays it as a percentage of one
cycle of the input waveform.
Select “Left” or “Right” and press the arrow keys
to set the location of the cursors
∆t (F3): Time difference.
Measures the time difference between the left
and right cursor. For example, the time
difference cursor function can be used to
measure pulse width or the period of one cycle.
Select “Left” or “Right” and press the arrow keys
to set the location of the cursors.
∆1/t : (F4): Frequency.
Measure the frequency between the left and right cursor. For example, the
frequency cursor function can be used while observing a waveform.
Select “Left” or “Right” and press the arrow keys to set the location of the cursors
∆V ∆t% ∆t ∆1/t
F1 F2 F3 F4
Left
T
Upper
V
Lower
Right
13
V2.1 03/06
Page 14

Operation (Digital Multimeter)
AC and DC VOLTAGE
查询"381285"供应商
WARNING: Risk of Electrocution. The probe tips may not be long enough to contact the
live parts inside some 240V outlets for appliances (contacts can be recessed deep in the
outlets). As a result, the reading may show 0 volts when the outlet actually is live. Make
sure the probe tips are contacting the metal contacts inside the outlet before assuming
that no voltage is present.
CAUTION: Do not measure AC or DC voltages if a motor on the circuit is being
switched ON or OFF. Large voltage surges may occur during the ON or OFF operations
that can damage the meter.
CAUTION: To avoid meter damage, do not apply 700V AC or 1000V DC for more than
10 seconds.
1. Insert the black test lead banana plug into the negative COM jack and the red test
lead banana plug into the positive V jack.
2. Set the function switch to the V position.
3. Select AC or DC voltage using the AC/DC key (default is AC).
4. Touch the test probe tips to the circuit under test.
5. Read the voltage in the display. The display will indicate the proper decimal point,
value and appropriate symbols.
Time to
auto-power off
Voltage
Elapsed time
0
TIME:02h52m
REL
Soft keys
60.00
120.2
50%
20
Peak
Limit
Hold
AUTO
400V
Hz
V
100%
40
44.00dBm
W
[ 600 ]
AVG
MIN_MAX
Sub-menu indicator
Range
Frequency
AC/DC
ac
Bargraph
dB
dB reference
14
V2.1 03/06
Page 15

RESISTANCE
WARNING: To avoid electric shock while taking any resistance measurements,
disconnect power to the unit under test and discharge all capacitors. Remove the
查询"381285"供应商
batteries and unplug the line cords.
1. Insert the black test lead into the negative COM jack and the red test lead into the
positive Ω jack.
2. Set the function switch to the Ω position.
3. Touch the test probe tips across the circuit or part under test. It is best to
disconnect one side of the part under test so the rest of the circuit will not interfere
with the resistance reading.
4. Read the resistance in the display. The display will indicate the proper decimal
CONTINUITY
DIODE test
WARNING: To avoid electric shock, do not test any diode that has voltage on it.
point, value and symbols.
WARNING: To avoid electric shock, never measure continuity on circuits or wires that
have voltage on them.
1. Insert the black test lead banana plug into the negative COM jack and the red test
lead banana plug into the positive Ω jack.
2. Set the function switch to the Ω position.
3. Press the F2 key to select the Continuity function.
4. Touch the test probe tips to the circuit or wire you wish to check. If the resistance is
less than 60, the audible signal will sound.
1. Insert the black test lead into the negative COM jack and the red test lead into the
positive jack.
2. Set the function switch to the position.
3. Press the F2 key to select the function.
4. Touch the test probe tips to the diode or semiconductor junction you wish to test.
note the meter reading.
5. Reverse the probes polarity by switching probe position. Note this reading.
6. The diode or junction can be evaluated as follows:
If one reading shows a voltage value (approximately 0.2V to 0.7V) and the other
reading shows "OVER" the diode is good.
If both reading show "OVER", the device is open.
If both reading are very small or 0, the device is shorted.
15
V2.1 03/06
Page 16

AC and DC CURRENT (mA, 20A)
WARNING: To avoid electric shock do not measure AC current on any circuit whose
voltage exceeds 250V AC.
查询"381285"供应商
CAUTION: Do not make current measurements on the 20A scale for longer than 30
seconds once every 15 minutes, Exceeding 30 seconds may cause damage to the meter
and/or the test leads.
1. Insert the black lead into the negative COM jack and the red test lead into the
positive mA or 20A jack.
2. Turn the rotary switch to the A position.
3. Press the AC/DC key to toggle between AC and DC measurements.
4. Press the F3 key to select the mA or 20A function.
5. Connect the test probe tips in series with the circuit under test. The display will
CAPACITANCE
indicate the proper decimal point, value and symbol.
WARNING: To avoid electric shock, disconnect power to the unit under test and
discharge all capacitors before taking any capacitance measurements. Remove the
batteries and unplug the line cords.
1. Insert the black test lead into the negative COM jack and the red test lead into the
positive CAP jack.
2. Turn the rotary switch to the CAP position.
3. The meter will turn on in the capacitance autoranging mode.
4. Touch the test lead to the capacitor to be tested. The display will indicate proper
decimal point, value and symbol.
Note: Manual ranging is not available in the Capacitance function.
16
V2.1 03/06
Page 17

RELATIVE
The Relative feature (available in Voltage, Resistance, Current, Capacitance and the AUX
functions) displays the difference between a stored reference value and the actual measured
value. Actuation of the relative mode automatically switches the meter to manual ranging.
查询"381285"供应商
1. When the F1 REL soft key is pressed the value in the display is stored as the
reference value.
2. A blinking REL icon will appear will appear display indicating the mode is in active.
3. The displayed value will be the difference between the stored reference value and
the measured value.
4. Press the F1 REL to exit relative mode.
AVG/MIN/MAX
The Average/Minimum/Maximum feature (available in Voltage, Resistance and Current)
displays the Max, Avg and Min measured values with the elapsed time. The data is also
plotted as either a bar or line graph. Update is once per second.
1. Press F4 AVG/MIN-MAX soft key to
inililize this feature. The range currently
used will be held.
2. The display will indicate the maximum
value, the average value, and the
minimum value since the feature was
initiated. The meter will “beep” each time
the MAX or MIN value is updated.
3. The elapsed time for each value is
displayed next to the value.
The time format is hrs:min:sec
4. Press F1 Restart to reset the time and
begin recording a new series.
5. Press F2 RUN PAUSE to run or pause
the recording.
6. Press F3 LINE BAR to change the history graph type( line or bar ).
7. Press F4 EXIT to leave the Max/Min/Avg feature.
PEAK HOLD
The Peak Hold feature (available in Voltage and Current) displays the Max and Min
measured values. The data is also plotted as either a bar or line graph. Update is once every
250ms.
1. Press F2 Peak Hold key to enter the this function.
2. The LCD will display the peak value of the measured parameter, the peak max and
peak min values. The meter will beep whenever a new MIN or MAX is captured.
3. Press F1 Restart reset the values for a new run.
4. Press F2 RUN PAUSE to continue measuring or to hold the MIN/MAX values.
5. Press F3 LINE BAR to change the history graph type(line or bar)
6. Press F4 EXIT to return to the initial menu.
17
V2.1 03/06
Page 18

LIMIT (Compare)
The Limit feature (available in Voltage, Resistance and Aux functions) allows for testing or
selection of components between a settable minimum and maximum limit. The measured
value and HIGH, LOW or PASS will be displayed.
查询"381285"供应商
1. Press the LIMIT soft key to enter the LIMIT
mode.
2. Press and arrow keys to select the
Maximum or Minimum digit for editing. The
digit will blink when selected.
3. Press (cursor) up or (logic) down
arrow key to adjust the value of the digit.
4. Press the SET key to store the value and
move to the next digit.
5. Adjust all minimum and maximum digits as
needed to set the limits.
6. If the measured value fall between the
maximum and minimum limits, the display
will indicate “PASS”. .
7. If the measured value is greater than the maximum limit, “HIGH” will be displayed
and if the value is less than the minimum limit “LOW” will be displayed.
SIG.OUT
The Signal Out function generates a 5V pk-pk square
wave of 2.5Hz to 78kHz .
1. Insert the test leads into the positive
“SIG.OUT” and the (COM) jacks
2. Set the function switch to SIG.OUT position.
3. Press F2 or F3 keys to approach the
desired output frequency. Hold the key for
three seconds for rapid adjustment.
4. Press F1 Fine Adjust ey and then use the
arrow keys to select the nearest frequency
Fine
Adjust
Output
available to the desired frequency..
WARNING: Never attempt a Voltage measurement if a test lead is in SIG.OUT position.
Doing so may result in personal injury or meter damage.
18
V2.1 03/06
Page 19

FREQUENY COUNTER, DUTY CYCLE and DWELL
1. Insert the black test Lead into the negative (COM) jack and red test lead into the
positive COUNTER jack
2. Turn the rotary switch to the Freq. Counter position
查询"381285"供应商
3. Press the F1 Frequency key to measure and display the frequency.
4. Press the F2 Duty to see the Duty Cycle in percent and the Dwell Angle in
degrees.
AUTOMOTIVE RPM
LOGIC ANALYZER
WARNING : To avoid meter damage, never measure signals greater than 40V dc when in the
Press the RANGE key to change the number of cylinders.
1. Insert the black test Lead into the negative (COM) jack and red test lead into the
positive COUNTER jack
2. Turn the rotary switch to the RPM position
3. Connect the inductive pick-up to the meter and clamp the secondary ignition wire of
the engine
4. Press the F3 rpm(1) key for distributorless electronic type engine (2 stroke/DIS) or
the F4 rpm(2) key for conventional 4 stroke distributor type engines.
5. Read the rpm on the display.
NOTE : To avoid interference from noise or outside sources, keep the meter away from
spark plugs or coil wires.
Logic Analyzer function.
1, Insert the black test lead into the negative
(COM) jack and the red test lead into the
positive SCOPE input jack.
2. Set the function switch to V and change to
"dc" with AC/DC key.
3. Press the LOGIC key.
4. Read the voltage and frequency, timing
chart.
Press F1 Restart to start the logic chart.
Press F2 to select a rising or falling
trigger slope.
Press F3 Time/Div to change the sweep time.
Time divisions will vary to display the
best wave pattern in the autoranging mode or they can be set manually using
the arrow keys.
Press F4 RANGE to select the logic type. Select from TTL, 3V CMOS or 5V CMOS.
5. Press the LOGIC key to exit logic function.
19
V2.1 03/06
Page 20

SET UP
g
The setup function provides a means to set measurement default conditions and also
provides access to a Self-Test, Auxiliary inputs and a Users Manual.
Press the F1 Next Item key to move the selection pointer to the desired item.
查询"381285"供应商
Press the F2 ◄► key to select the desired condition.
Press the F3 Save key to save the selection.
Printer EPSON M-T102,
Baud rate 1200bps, 2400bps, 4800bps, 9600bps.
Parity bit: NONE
dBm reference : 2Ω, 4Ω, 8Ω, 16Ω, 50Ω, 75Ω, 93Ω, 110Ω, 125Ω,
Beeper: enable, disable.
Sleep mode: enable, disable
ht: OFF, 15s, 30s, 60s, no limit.
Back-li
Press the F4 More key to redefine the function keys.
Press the F1 Self Test key to run a system and memory self test.
Press the F2 Auxiliary key to select auxiliary input from temperature, humidity or high
current multimeter adaptors
Press the F3 UsersManual key to access the built-in users manual.
AUX
The auxiliary selection allows direct display of ºC / ºF, %RH, High DC Currents in the correct
units when the meter is used with an external DC Adapter. The external DC Adapter should
output 1mV DC / unit of measure.
1. Insert the black adapter banana plug into the negative (COM) jack and red adapter
banana plug in to the positive AUX jack.
2. Set the function switch to the SET UP position.
3. Press the F4 More key and then the F2 Auxiliary key
4. Press the F1 ºC / ºF key, F2 %RH key or the F3 High Current key to match the
adaptor being used.
5. Press the F4 EXIT key to return to the previous menu.
135Ω, 150Ω, 300Ω, 600Ω, 900Ω, 1000Ω, 1200Ω.
20
V2.1 03/06
Page 21

BACKLIGHT
Backlighting improves the display visibility in areas with low ambient light. A timeout function
can be set in the SET UP function. Extended use of backlighting will reduce the battery life.
1. Press the HOLD key for 4 seconds to turn the EL backlighting on.
查询"381285"供应商
2. Press the HOLD key for 4 seconds to turn the EL backlighting off.
AUTO RANGE/MANUAL RANGE SELECTION
The meter will turn on in the auto ranging mode. For most application this is the easiest and
most accurate method of measurement. For measurements that require the range to be held:
1. Press the RANGE key. The display will change from "AUTO" to "RANGE" with the
full scale value displayed.
2. Each time the RANGE key pressed, the next available range will be set.
3. To return the AUTO range, hold the RANGE key for 4 seconds.
HELP
Press the HELP key to display any warnings, test lead connection diagrams and instructions
for the function selected. Press the F1 and F4 arrow keys to scroll through the procedures.
Press HELP to exit the screens.
SAVE
In the SAVE mode, 15 digital or graphical displays can be saved in memory.
1. Press the SAVE key to enter this feature.
2. The display will list 15 memory locations and indicates what type of data is stored
in each location. Locations with no data will be left blank.
3. Press the CURSOR ▲ or LOGIC ▼ arrow keys to scroll the arrow cursor up/down
through the 15 memory locations.
4. At the selected memory location:
a. Press the F1 Save key to save the text or graphical display.
b. Press the F2 Call key to recall and display the saved data.
c. Press the F3 Clear key to clear the saved data from memory.
7. Press the SAVE key to exit the feature.
PRINT
The display can be directly printed to the recommended thermal printer.
1. Connect the thermal print cable to the top of the meter.
2. Turn the thermal printer power on.
3. Press the SAVE
TILT STAND
The Tilt Stand can be placed either in the locked stand position for flat surface use or in the
hinged position for hanging use.
1. For use on a flat surface, lift the
stand to approximately a 55 degree
angle and push in until the Stand
locks in the locking notch.
2. To hang the meter, squeeze the
legs of the stand and remove it from
the meter. Turn the stand 180
degrees and replace in the holder. The stand will now swing free over the top of the
meter.
PRINT key for 4 seconds.
Pull to Release
Push to Lock
Locking Notch
21
V2.1 03/06
Page 22

RS232 COMMUNICATIONS
Installation
1. Start the PC.
2. Insert the Software Program diskette into drive A :
3. Select "START" and then "RUN" from the Windows menu bar.
查询"381285"供应商
4. Type "A:\ SETUP” in the OPEN box and select "OK"
5. Follow the installation instructions on the screen.
Initialization
1. Connect the RS232 cable
between the meter and the
PC's serial port.
2. Turn the Rotary Switch to
the measurement function
desired.
3. Press and HOLD the HELP
RS232 key for 4 seconds to
enable the RS232 output. A
blinking “RS232” will appear
on the display
4. Select the "MultiScope"
icon in the
START/PROGRAM menu to
launch the program.
Operation
1. In the "MultiScope" opening screen, select "Setup / Comm port".
2. Select the proper COM port and click " OK"
3. Setup Menu:
a. Select "Setup / Sampling Time" to set the sampling (data record) time for each
measurement. ( 250ms, 500ms, 1s, 2s, 5s, 10s, 30s, 1min, 10min, 30min, 1hr,
10hr, 1day )
b. Select "Setup: dB " to select the dB reference impedance.
c. Select "Setup: Baudrate " to select the communications baud rate.
4. View Menu:
a. Select "View: Bar " to display the data as a bar plot.
b. Select "View: Line " to display the data as a line plot.
c. Select "View: Text " to display the data in a numeric format.
5. Run Menu: Select Star, Stop or Pause to control the datalogging.
6. File Menu:
a. Select "File/Save" to save the recorded data.
b. Select "File/Open" to open an existing file.
c. Select "File/Print" to print the file.
7. To Capture a graphical display:
a. In the View menu, select either the Line or Bar display (Capture will not occur
with Text display selected)
b. On the meter, Press HOLD key. The flashing HOLD icon will appear on the
top center of the display and after a five second delay, the captured graphical
display will appear in the display window of the monitor. (The captured display
can be printed or saved to a file).
c. Capturing a graphical display interrupts the logging session. Press HOLD
once more to exit the capture screen and return to the datalogging screen.
Select RUN then START to resume logging.
22
V2.1 03/06
Page 23

MAINTENANCE
WARNING: To avoid electric shock, disconnect the test leads from any source of voltage
before removing the back cover or the battery cover.
查询"381285"供应商
WARNING: To avoid electric shock, do not operate your meter until the battery cover is in
place and fastened securely.
This multimeter is designed to provide years of dependable service, if the following care
instructions are performed:
1. KEEP THE METER DRY. If it gets wet, wipe it off.
2. USE AND STORE THE METER IN NORMAL TEMPERATURES. Temperature
extremes can shorten the life of the electronic parts and distort or melt plastic parts.
3. HANDLE THE METER GENTLY AND CAREFULLY. Dropping it can damage the
electronic parts or the case.
4. KEEP THE METER CLEAN. Wipe the case occasionally with a damp cloth. DO
NOT use chemicals, cleaning solvents, or detergents.
5. USE ONLY A FRESH BATTERY OF THE RECOMMENDED SIZE AND TYPE.
Remove the old or weak battery so it does not leak and damage the unit.
6. IF THE METER IS TO BE STORED FOR A LONG PERIOD OF TIME, the battery
should be removed to prevent damage to the unit.
BATTERY REPLACEMENT
CAUTION : Do not use non-rechargeable batteries (alkaline, carbon-zinc,etc) with meter's
WARNING: To avoid electric shock, do not operate your meter until the battery covers are in
AC Power adapter. The AC Power adaptor maybe used whether or not the
rechargeable Ni-Cd batteries are installed.
1. Disconnect and remove the test leads.
2. Remove the rubber holster (if installed).
3. Lift the Tilt Stand and remove the two screws using Philips screw driver.
4. Lift the two battery covers up to
remove them.
5. Remove the Tilt Stand.
6. Align the three batteries as shown in
the diagram (observe polarity) and
press down until they snap into the
battery holder.
7. Snap the two battery covers back into place and put the Tilt Stand in place.
8. Replace and tighten the two battery door screws.
NOTE: If your meter does not work properly, check the fuses and battery to make sure
that they are still good and that they are properly inserted
place and fastened securely.
NOTE: When the Battery becomes exhausted or drops below operating voltage the low
battery symbol will appear in the top area of LCD display with a sound.
The alkaline battery should be replaced if alkaline batteries are installed.
If rechargeable batteries (NiMH) are installed, the NiMH batteries will be
automatically recharged when the AC Adapter is connected.
NiMH recharging time will be reduced if the battery is charged with the meter off.
If the NiMH Battery is totally discharged (very rare case) the meter may not
operate properly with the AC Adapter. In this case, recharge the NiMH battery
with the AC Adapter for about 5 minutes with the meter’s rotary switch in the
“OFF” position.
23
Press
V2.1 03/06
Page 24

FUSE REPLACEMENT
WARNING: To avoid electric shock, do not operate your meter until the battery covers are in
place and fastened securely.
NOTE: If your meter does not work properly, check the battery and fuses to make sure that
查询"381285"供应商
they are still good and that they are properly inserted.
1. Disconnect and remove the test leads.
2. Remove the rubber holster (if installed).
3. Lift the Tilt Stand and remove the two battery cover screws.
4. Lift the two battery covers up to remove them, remove the tilt stand and remove the
batteries.
5. Remove the one screw at the rear bottom of the rear case and the two screws in
the battery compartments.
6. Lift the rear case far enough to gain access to the fuses located opposite the input
terminals
7. Replace the blown fuse. There are two fuses: 250V/500mA for the 400mA range
and 250V/20A for the 20A range.
8. Replace the bottom case and secure with three screws. Replace the battery covers
and tilt stand and secure with two screws.
CAUTION : Always replace fuses with fuses of the same size and value.
CAUTION : Do not open the top area of bottom case near the display. The display is
connected with a sensitive pin socket and printed circuit board. Do not touch this
area or attempt to remove any components in this area.
24
V2.1 03/06
 Loading...