

Page 1

User Guide
1Φ/3Φ 1000 Amp True RMS Power Clamp-On
Model 380976
www.GlobalTestSupply.com
Page 2

Introduction
Congratulations on your purchase of the Extech 380976 Power Clamp-On Meter. This device
measures 1Φ/3Φ Power (True, Apparent, and Reactive), Horsepower, Phase Angle, True RMS
Current/Voltage, Resistance, Capacitance, Frequency, & Temperature. Power measurements can
be achieved on 3- or 4-wire configurations. Please read the entire manual to get the most from the
meter’s wide array of capabilities. This meter is shipped fully tested and calibrated and, with
proper use, will provide years of reliable service.
Table of Contents
Warranty .................................................................................................................................. 3
Safety Information .................................................................................................................. 3
Meter Description ................................................................................................................... 4
AC + DC Voltage Measurements ........................................................................................... 5
AC Current Measurements .................................................................................................... 5
1Φ KW, KVA, KVAR, Power Factor & Phase Angle Measurement ..................................... 6
3Φ 3-Wire KW, HP, KVA, KVAR, Power Factor & Phase Angle Measurement .................. 7
3Φ 4-Wire KW, HP, KVA, KVAR, Power Factor & Phase Angle Measurement ................ 10
Resistance and Audible Continuity Measurements .......................................................... 13
Capacitance Measurements ................................................................................................ 14
Diode Tests ........................................................................................................................... 14
Temperature Measurements ................................................................................................ 14
AC and DC µA Current Measurements ............................................................................... 14
Meter Control Keys ............................................................................................................... 15
Automatic Sleep Mode and Battery Replacement ............................................................. 16
Specifications ....................................................................................................................... 17
Calibration, Repair, and Technical Support Services ......... Error! Bookmark not defined.
2
www.GlobalTestSupply.com
380976-EU-EN-V3.2 6/12
Page 3

Warranty
EXTECH INSTRUMENTS CORPORATION warrants this instrument to be free of defects in parts
and workmanship for one year from date of shipment (a six month limited warranty applies to
sensors and cables). If it should become necessary to return the instrument for service during or
beyond the warranty period, contact the Customer Service Department at (781) 890-7440 ext. 210
for authorization or visit our website www.extech.com for contact information. A Return
Authorization (RA) number must be issued before any product is returned to Extech. The sender is
responsible for shipping charges, freight, insurance and proper packaging to prevent damage in
transit. This warranty does not apply to defects resulting from action of the user such as misuse,
improper wiring, operation outside of specification, improper maintenance or repair, or unauthorized
modification. Extech specifically disclaims any implied warranties or merchantability or fitness for a
specific purpose and will not be liable for any direct, indirect, incidental or consequential damages.
Extech's total liability is limited to repair or replacement of the product. The warranty set forth above
is inclusive and no other warranty, whether written or oral, is expressed or implied.
Safety Information
Read the following safety information carefully before attempting to operate or service the
meter.
To avoid damage to the instrument do not exceed the maximum input limits shown in the
technical specifications.
Do not use the meter or test leads if they appear damaged.
Use extreme caution when working around bare conductors or bus bars. Accidental contact
with the conductor could result in electric shock.
Use the meter only as specified in this manual; otherwise, the protection provided by the
meter may be impaired.
Read the operating instructions before use and follow all safety information.
Use caution when working with voltages above 60VDC or 30VAC RMS. Such voltages
represent a shock hazard.
Before taking resistance measurements or testing continuity, disconnect the circuit under test
from the main power supply and remove all loads from the circuit.
Safety symbols
Caution! Refer to this manual before using the meter.
Dangerous voltages.
Meter is protected throughout by double insulation or
reinforced insulation.
When servicing, use only specified replacement parts.
Complies with EN-61010-1, IEC 1010-2-32
3
www.GlobalTestSupply.com
380976-EU-EN-V3.2 6/12
Page 4

Meter Description
1. Transformer Jaws
2. Jaw opening trigger
3. Data Hold & MX/MN button
4. Function Selector
5. Range button
6. Temperature input jack
7. LCD Display
8. ‘COM’ input jack
9. ‘V’ input jack
Ω
µA
10.
input jack
4
www.GlobalTestSupply.com
380976-EU-EN-V3.2 6/12
Page 5
Measurements
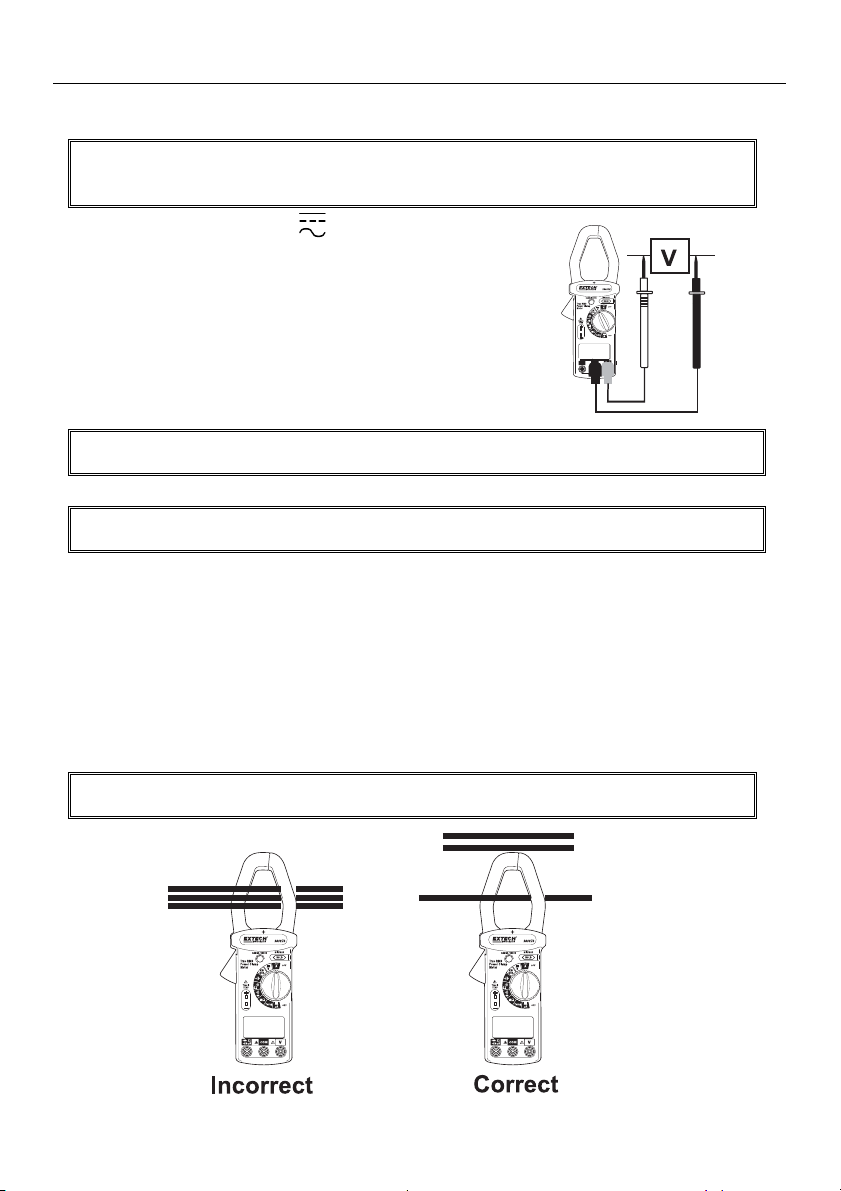
AC + DC Voltage Measurements
WARNING
The maximum input is 600V. Do no attempt voltage measurements above this limit. Exceeding
this limit could cause electrical shock and damage to the meter.
1. Set the rotary switch to the ‘ V’ position.
2. Insert the test leads into the meter’s input jacks. (Black to
‘COM’ and Red to ‘V’)
3. Connect the test leads to the measured circuit.
4. The meter will automatically detect and display AC or DC
voltage. The meter will also automatically select the
appropriate range.
5. Read the voltage (main display) and frequency (upper,
smaller display digits) on the LCD.
NOTE: The sensitivity for Automatic AC/DC Voltage detection is 1V. Voltage below 1V may
indicate DC.
NOTE: The sensitivity for voltage measurements is 1.2V and the frequency range is 40Hz to 1
KHz. If the frequency is less than 40Hz the LCD may display ‘Hz’.
AC Current Measurements
1. Set the rotary switch to the "~A" position.
2. Press the Trigger to open the jaw.
3. Fully enclose the conductor that is being measured in the jaw. No gap should exist between the
two jaw halves. The conductor under test must be a single wire; if there are multiple wires in a
cable the conductor must first be isolated (see diagram below).
4. The meter selects the range automatically.
5. Read the measured current (main display) and frequency (upper display) on the LCD.
NOTE: The sensitivity for current measurements is 6A and the frequency range is 40Hz to
400Hz. If the frequency is less than 40Hz the LCD may display ‘Hz’.
5
www.GlobalTestSupply.com
380976-EU-EN-V3.2 6/12
Page 6

AC Power Measurements
1Φ KW, KVA, KVAR, Power Factor & Phase Angle Measurement
1. Set the rotary switch to the ‘KW/KVA’
position.
2. Insert the test leads to the meter as
follows: Black to ‘COM’ and Red to ‘V’.
3. Connect the black lead to the neutral line.
4. Connect the red lead to the power line
and clamp onto the same lead to which
the red lead is connected.
5. The meter selects the best range
automatically.
6. Select the desired display combination
using the RANGE key. Press RANGE to
scroll through the following combination displays:
kW and HP (horsepower)
kW and PF (power factor)
kW and KVAR (reactive power)
KVA and phase angle (θ)
V and A
Note that LEAD and LAG icons are also displayed on the LCD to inform the user that the voltage is
leading or lagging the current with regard to phase.
Note: Allow 2 seconds after each RANGE key press for the meter to update the display.
1 HP = 746 Watts
KW
PF
= cosθ
KVA
KVA (Apparent Power) = (V*A) / 1000
KVAR (Reactive Power) =
22
(KVA) (KW)
= KVA * sinθ
NOTES
1. The ‘+’ sign printed on the meter must face the power source for best accuracy.
2. If the device under test is a switching mode power supply, the KW, PF, and Phase angle
measurements may not be accurate.
6
www.GlobalTestSupply.com
380976-EU-EN-V3.2 6/12
Page 7
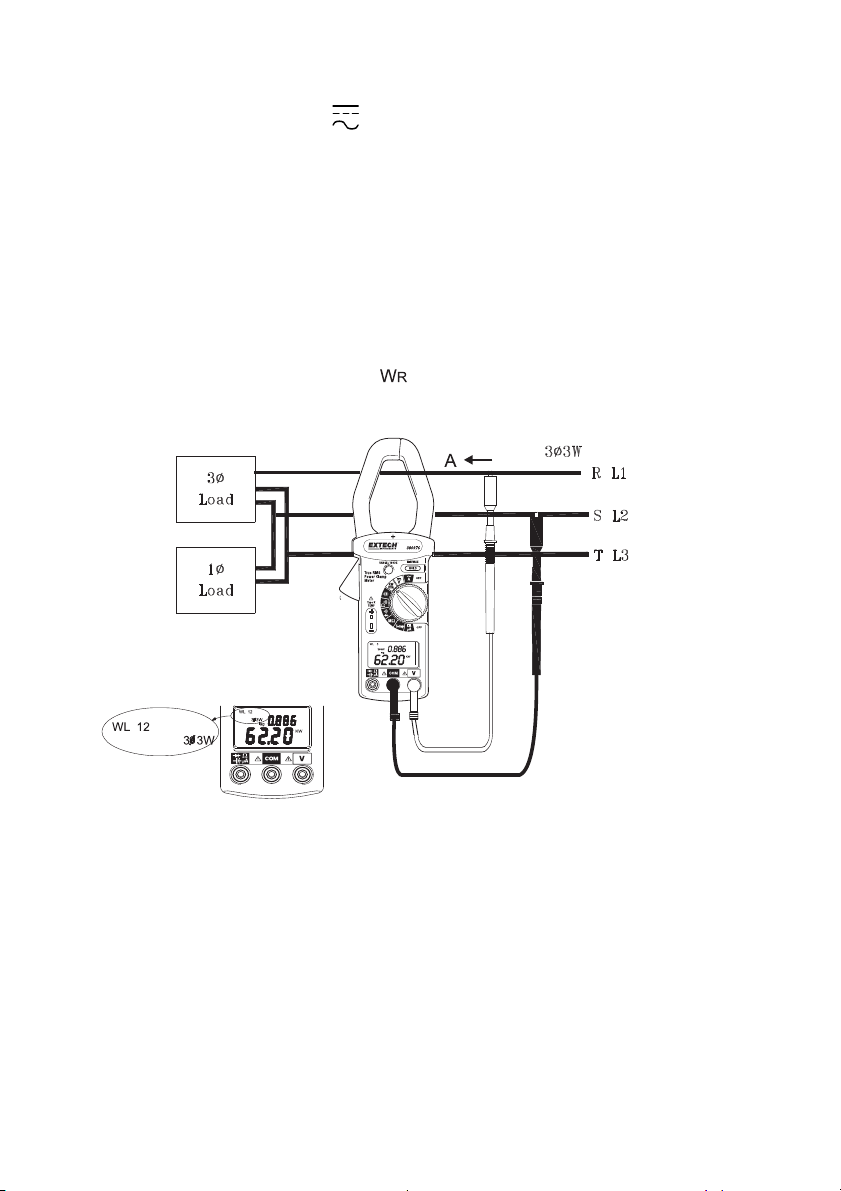
3Φ 3-Wire KW, HP, KVA, KVAR, Power Factor & Phase Angle Measurement
1.
First, measure W
a. Set the rotary switch to the “
(refer to the diagram below).
RS(L1L2)
V ”.
b. Press and hold the “HOLD” key while setting the rotary switch to “KW/KVA”, the 33W and
symbols will appear.
W
L12
c. Insert the test leads into the jacks.
d. Select a phase (e.g. S or L2) as COM and connect the test probe of the COM (black)
terminal to that phase (e.g. S or L2).
e. Connect the test probe of V (red) terminal to the second phase (e.g. R or L1).
f. Clamp the same phase as step e. (e.g. R or L1).
g. The power clamp will automatically select the proper range.
h. Wait until the reading is stable (about 6 seconds). Press the “HOLD” key to store the
measured value. The W
symbol will appear.
L23
2.
Second, measure W
(refer to the diagram that follows the steps below).
TS(L3L2)
a. Disconnect the test probe from the phase where the jaw clamp was set in the previous
measurement.
b. Connect the test probe to the third phase (e.g. T or L3).
c. Clamp the third phase where test probe is connected to (e.g. T or L3)
d. The power clamp will automatically select the proper range.
e. Wait until the reading is stable (about 6 seconds) and then press the “HOLD” key to store
the measured value.
7
www.GlobalTestSupply.com
380976-EU-EN-V3.2 6/12
Page 8

W
3.
The power clamp will process these two sets of data (W
LCD. The W
stored in the meter memory.
symbol will be shown to indicate 33W power. The 33W power (in watts) is
L123
4. To read a single data record, press the “
display then
Factor), KW+KVAR, KVA+θ(Phase Angle) or A+V.
5.
W
33W
press the “RANGE” key to select KW+HP (Horse Power), KW+PF (Power
= W
RS(L1L2)
+ W
TS(L3L2)
L12 , WL23
HOLD
” key to select desired
), and show the result on the
W
, W
L23
or W
L12
L123
2
33
PF
W
33
6. Set the rotary switch to another position to exit this mode and clear the stored data.
KWKVA 33
W
K
KVA
33
33
W
33
W
www.GlobalTestSupply.com
2
8
WKVARW
380976-EU-EN-V3.2 6/12
Page 9

NOTE
Once a phase is selected as COM, users can not change this selection in the
subsequent measurement. For example, if S (or L2) phase is selected, S (or L2)
phase is always connected to the COM during measurement of W
W
(or W
TS
) in 3 3W unbalanced power.
L3L2
(or W
RS
NOTE
1. The "+" sign printed on Panel must face the power source for accurate
measurement.
2. If the device under test is a switching power supply, the meter KW, PF and θ
reading maybe incorrect.
NOTE
For 33W unbalanced power measurements, WRS or WTS could be negative.
Ensure that all connections are correct before accepting a reading as valid.
L1L2
) and
9
www.GlobalTestSupply.com
380976-EU-EN-V3.2 6/12
Page 10

3Φ 4-Wire KW, HP, KVA, KVAR, Power Factor & Phase Angle Measurement
1.
First, measure W
a. Set the rotary switch to the “
(refer to the diagram below).
R(L1)
V ” position.
b. Press and hold the “RANGE” key while setting the rotary switch to the “KW/KVA” position,
the 34W and W
symbols should appear.
L1
c. Insert the test leads into the input jacks.
d. Connect the neutral line to the COM (black) terminal.
e. Connect the test probe of the V (red) terminal to the first phase (e.g. R or L1).
f. Clamp on to the same phase (e.g. R or L1).
g. The power clamp meter will automatically select the proper range.
h. Wait until the reading is stable (about 6 seconds) and then press the “HOLD” key; the W
symbol will clear and the W
symbol will appear in order to instruct users to take the W
L2
measurement.
L1
S(L2)
2.
Second, measure W
(refer to the diagram that follows the steps below)
S(L2)
a. Disconnect the test probe from the phase where the jaw was clamped in the previous
measurement.
b. Connect the test probe of the V (red) terminal to the second phase (e.g. S or L2).
c. Clamp on to the phase where the test probe is connected (e.g. S or L2 phase)
d. The power clamp will automatically select proper range.
e. Wait until the reading is stable (about 6 seconds) and then press the “HOLD” key; the W
symbol will disappear. The W
symbol will appear to instruct users to take the W
L3
T(L3)
L2
measurement.
10
www.GlobalTestSupply.com
380976-EU-EN-V3.2 6/12
Page 11
3.
Third, measure W
(refer to the diagram that follows the steps below)
T(L3)
a. Disconnect the test probe from the phase where the jaws were clamped in the previous
measurement.
b. Connect the test probe of the V (red) terminal to the third phase (e.g. T or L3 phase).
c. Clamp the phase where the test probe is connected to (e.g. T or L3).
d. The power clamp will automatically select the proper range.
e. Wait until the reading is stable (about 6 seconds), and then press the “HOLD” key; The W
symbol will disappear.
L3
11
www.GlobalTestSupply.com
380976-EU-EN-V3.2 6/12
Page 12

4. The power clamp will process these three sets of data (W
The WL
symbol will be shown to indicate the 34W power (refer to diagram).
123
L1, WL2 WL3
The 34W power value in watts is now stored in the meter’s memory.
5. To read a single data record, use the “
display then
press the “RANGE” key to select KW+HP (Horse Power), KW+PF (Power Factor),
HOLD
” key to select WL1, WL2, WL3 or WL123
12
) and show the result on the LCD.
380976-EU-EN-V3.2 6/12
www.GlobalTestSupply.com
Page 13

KW+KVAR, KVA+θ(Phase Angle) or A+V displays.
W
W
6.
W
= W
34W
KVA K
PF
34
+ W
R(L1)
S(L2) WT(L3)
K
W
KVA
7. Set the rotary switch to another position to exit this mode and clear the stored data.
1. The "+" sign printed on meter must face the power source for accurate
measurement.
2. If the device under test is switching power supply, the KW, PF and θ readings
may not be correct.
For 34W power measurements, W
negative power, check the connections.
Resistance and Audible Continuity Measurements
Before taking any in-circuit resistance measurements remove power from the circuit under test
and discharge all capacitors.
1. Set the rotary switch to the
2. Insert the test leads into the input jacks. (Black to ‘COM’ and
3. Connect the test leads to the circuit or component under test.
4. Read the resistance value on the LCD.
5. For measurements < 40
Red to ‘
Ω’
)
2
34
NOTE
NOTE
or WS and WT must be positive. If one shows
R
WARNING
or ‘MΩ
’ position.
34
34
W
2
W
Ω
34
KVARWW W34
‘Ω, ’
’
, the continuity beeper will sound.
13
www.GlobalTestSupply.com
380976-EU-EN-V3.2 6/12
Page 14

Capacitance Measurements
1. Fully discharge the capacitor under test before proceeding.
2. Insert the test leads into the input jacks. (Black to ‘COM’ and
Red to ‘
3. Set the rotary switch to the ‘
’).
’ position.
4. Connect the red and black test leads to the capacitor. For
Electrolytic (polarized) capacitors, connect the red test lead to
the positive side and the black lead to the negative side.
5. Read the capacitance value displayed on the LCD.
Note: Large valued capacitors will take a long period of time to charge and to auto-range to the
correct range. (up to 60 seconds in the worst case). For improved resolution and shortest test
time, manually pre-selecting the proper range is recommended.
Diode Tests
1. Set the rotary switch to the "
2. Insert the test leads into the input jacks. (Black to ‘COM’ and Red to ‘
" position.
’)
3. Touch the test probe tips to the diode or semiconductor junction under test. Note the meter
reading.
4. Reverse the test lead polarity by reversing the red and black leads. Note this reading.
5. The diode or junction can be evaluated as follows:
a. If one reading shows a value and the other reading shows ‘OL’ (overload), the diode is
good.
b. If both readings show ‘OL’, the device is open.
c. If both readings are very small or zero, the device is shorted.
d. Note that the audible continuity function is operational in this mode (<40mV).
Temperature Measurements
1. Set the rotary switch to the "TEMP" position.
2. Press the RANGE button to select the desired unit of measure (C or
F).
3. Insert the Type K Thermocouple into the subminiature input jacks
located to the lower left of the rotary selector switch.
4. Touch the thermocouple sensor to the object under test.
5. Read the temperature value on the LCD.
AC and DC
µA
1. Set the rotary switch to the "
2. Insert the test leads into the input jacks. (Black to ‘COM’ and
Red to ‘
3. Connect the test leads in series with the circuit or device
under test.
4. The meter will automatically select AC or DC and the
appropriate range.
5. Read the current value on the LCD.
Measurements
µA’)
" position.
µA
14
www.GlobalTestSupply.com
380976-EU-EN-V3.2 6/12
Page 15

Meter Control Keys
HOLD - MX/MN Key
Data Hold Function
Press this key momentarily to put the meter into Data Hold mode (HOLD will appear on the LCD).
In this mode, the meter freezes the displayed reading. To exit the Data Hold mode, press the key
again (the HOLD icon will switch off). Note that the Data Hold mode is not available for
Capacitance measurements.
MX/MN (Maximum and Minimum reading mode)
The MX/MN mode permits the user to record and recall the highest and lowest readings. The
MX/MN feature is available for ACA, ACV, DCV, TEMP, and µA functions only. The following
steps outline the MX/MN feature:
1. Take an ACA, ACV, DCV, TEMP, or µA measurement as described earlier.
2. Press and hold the MX/MN key for 2 seconds.
3. The Elapsed Timer (top display) and the MX/MN & ® indicators will appear on the LCD.
4. The Elapsed Timer shows the duration of the measurement session in Minutes and Seconds
(the Elapsed Timer switches to Hours and Minutes after 60 minutes). The maximum
recording time is 100 hours.
5. The ® indicator informs the user that the measurement range is being held. Note that the
AUTO POWER OFF feature is disabled in the MX/MN mode.
6. Press the MX/MN key again to view the highest reading and the time (shown on the Elapsed
Timer) that the reading was taken. The ‘MX’ icon will appear on the LCD.
7. Press the MX/MN key again to view the lowest reading and the time (shown on the Elapsed
Timer) that the reading was taken. The ‘MN’ icon will appear on the LCD.
8. Press again to view the current elapsed time and measurement.
9. To exit this mode, press and hold the MX/MN key until MX/MN indicators switch off.
Using the HOLD button for Power Measurements
Refer to the power measurement section of this manual for details.
RANGE Key
The RANGE Key operation varies from mode to mode. Refer to the information below:
In ACA, ACV, DCV, µA, Capacitance, and Resistance modes:
1. Press RANGE to enter the Manual Range mode (the ® indicator will appear).
2. Press RANGE again to select the desired range manually.
3. Press and hold the RANGE key to exit this mode (the ® indicator switches off).
In KW/kVA mode:
As described earlier, use the RANGE key to select the desired display combination: KW & PF,
KW & KVAR, KVA & Phase angle, or Current / Voltage.
In TEMP mode:
Use the RANGE key to select the desired unit of measure (
o
C or oF).
15
www.GlobalTestSupply.com
380976-EU-EN-V3.2 6/12
Page 16

Automatic Sleep Mode and Battery Replacement
The Meter is powered by a 9V battery. An AUTO SLEEP feature is included to preserve battery life.
Note: The Auto Power OFF feature is disabled when the meter is in the MIN/MAX mode
Note: In the sleep mode the meter continues to draw a small amount of battery current. Always turn
the function switch to the OFF position when storing the meter.
Note: To restore operation after the sleep mode has engaged, turn the function switch to the OFF
position and then back to the function desired.
Auto Sleep Disable
The meter automatically goes to sleep mode after 30 minutes to conserve battery energy. To defeat
this feature:
1. Turn the meter OFF.
2. Press and hold the HOLD key while turning the selector switch to the AC Amps position.
3. Release HOLD when the clock icon appears on the LCD.
Battery Replacement
WARNING
To prevent electrical hazard or shock, turn off the meter and disconnect test
leads before removing the back cover.
When the battery power falls low, the LCD will display the battery icon +.
To replace the 9V battery:
1. Set the Range switch to the OFF position.
2. Remove the back cover by first removing the rear screws and then prying open the housing.
3. Replace the 9V battery.
4. Reassemble the meter housing.
16
www.GlobalTestSupply.com
380976-EU-EN-V3.2 6/12
Page 17

Specifications
General Specifications
Display Dual Display; 4-digit, 10,000 count (0 to 9999) LCD
Jaw Opening 1.6” (42mm)
Max. Input limit Max. voltage between any terminal and ground: 600Vrms
Sampling rate 2.5 times per second (Digital Display); Once every 6 seconds (KW,
Auto Sleep After approx. 30 minutes (feature can be defeated)
Low battery indication Battery symbol appears on the LCD
Power supply 9V Battery
Battery life Approx. 32 hours with alkaline battery
Operating Temperature 32 to 122
Operating Humidity < 80% RH
Operating Altitude 7000 ft. (2000 meters) maximum.
Storage Temperature 14 to 140
Storage Humidity < 70% RH
Temperature coefficient 0.1 x (specified accuracy) /
Dimensions 9.0 x 3.0 x 1.5" (228 x 76 x 39mm)
Weight Approx. 1.0 lb. (465g)
Approvals CE, UL
Safety
This meter is intended for indoor use and protected, against the
UL Listed The UL mark does not indicate that this product has been evaluated
PER IEC1010 OVERVOLTAGE INSTALLATION CATEGORY
OVERVOLTAGE CATEGORY I
Equipment of OVERVOLTAGE CATEGORY I is equipment for connection to circuits in which
measures are taken to limit the transient overvoltages to an appropriate low level. Note –
Examples include protected electronic circuits.
OVERVOLTAGE CATEGORY II
Equipment of OVERVOLTAGE CATEGORY II is energy-consuming equipment to be supplied from
the fixed installation.
Note – Examples include household, office, and laboratory appliances.
OVERVOLTAGE CATEGORY III
Equipment of OVERVOLTAGE CATEGORY III is equipment in fixed installations.
Note – Examples include switches in the fixed installation and some equipment for industrial use
with permanent connection to the fixed installation.
OVERVOLTAGE CATEGORY IV
Equipment of OVERVOLTAGE CATEGORY IV is for use at the origin of the installation.
Note – Examples include electricity meters and primary over-current protection equipment
KVA, and KVAR)
o
F (0 to 50oC)
o
F (-10 to 60oC)
o
C at < 64oF (18oC), > 82oF (28oC)
users, by double insulation per EN61010-1 and IEC61010-1 2nd
Edition (2001) to CAT III 600V; Pollution Degree 2. The meter also
meets UL 61010A-1, First Edition
for the accuracy of its readings.
17
www.GlobalTestSupply.com
380976-EU-EN-V3.2 6/12
Page 18
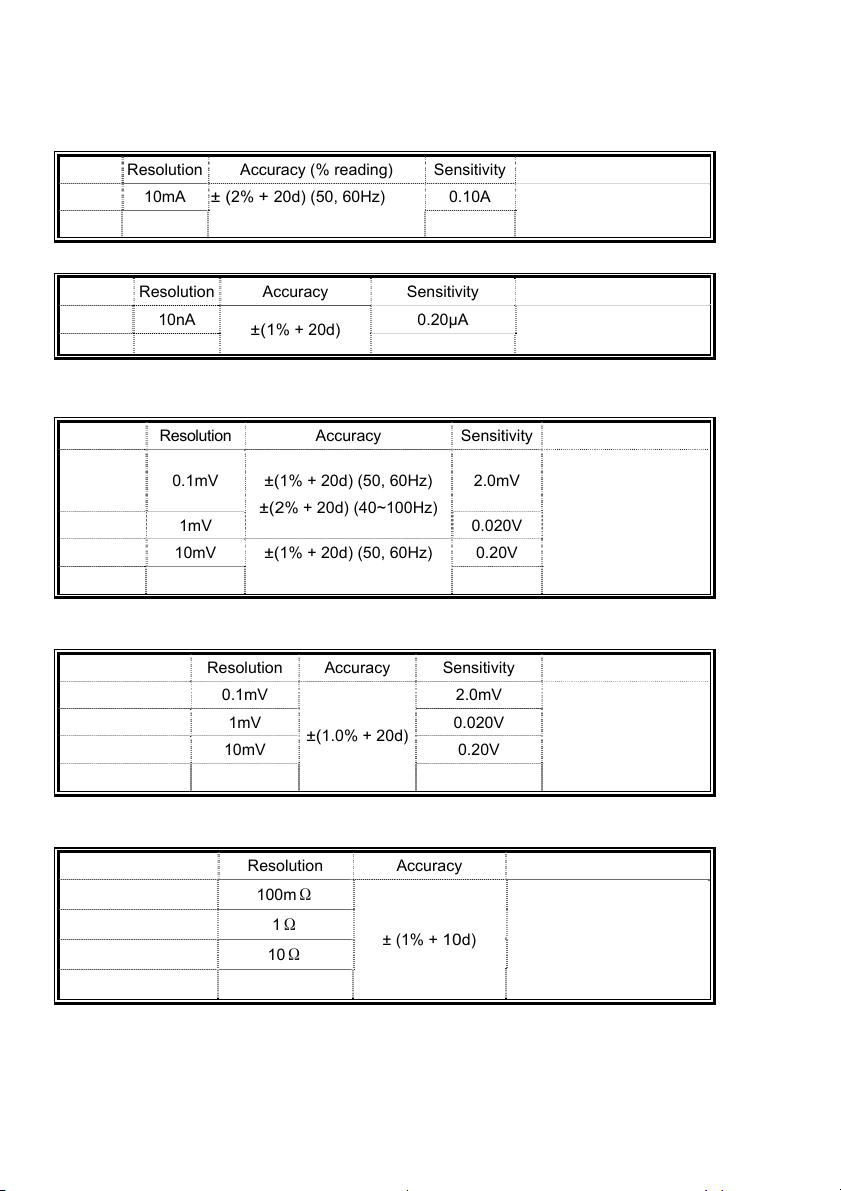
Measurement Specifications
Accuracy: ± (% of rdg + number of digits) from 18
o
C to 28oC (64oF to 82oF) R.H. < 80%
AC Current (50Hz to 400Hz) True RMS
Range Resolution Accuracy (% reading) Sensitivity Overload Protection
99.99A 10mA
999.9A 100mA 1.0A
± (
2% + 20d) (50, 60Hz)
± (4% +
20d) (40~400Hz)
0.10A
1000A
A True RMS (AC+DC)
Range Resolution Accuracy Sensitivity Overload Protection
99.99A
999.9A
10nA
100nA 2.0µA
±(1
% + 20d)
0.20µA
600V
Burden Voltage: 5mV/µA
AC Voltage (50Hz to 400Hz) True RMS
Range Resolution Accuracy Sensitivity Overload Protection
999.9mV 0.1mV
±(
1% + 20d) (50, 60Hz)
±(2
% + 20d) (40~100Hz)
9.999V 1mV 0.020V
99.99V 10mV
600.0V 100mV 2V
Input impedance: 3M
±(
1% + 20d) (50, 60Hz)
±(2
% + 20d) (40~400Hz)
Ω
2.0mV
600V
0.20V
DC Voltage
Range Resolution Accuracy Sensitivity
999.9mV 0.1mV
9.999V 1mV 0.020V
99.99V 10mV 0.20V
±(
1.0% + 20d)
2.0mV
Overload Protection
600V
600.0V 100mV 2V
Input resistance: 3M
Ω
Resistance (Audible Continuity for readings <40on the 999.9 range)
Range Resolution Accuracy Overload Protection
999.9Ω 100mΩ
9.999KΩ 1
99.99KΩ 10Ω
Ω
± (1% +
10
d) 600V
999.9KΩ 100Ω
18
www.GlobalTestSupply.com
380976-EU-EN-V3.2 6/12
Page 19

M(Resistance)
Range Resolution Accuracy Overload Protection
9.999MΩ 1KΩ
99.99MΩ 10KΩ
±(5% +
10
d) 600V
Capacitance
Range Resolution Accuracy
10.000F
100.00F
1000.0F
7000F 1F
1nF
10nF
100nF
±(1.5% +
±(4.5% +
15
5
d)
d)
Overload Protection
600V
Diode (Continuity <40mV)
Range Resolution Accuracy Overload Protection
2.000V 1mV
±(2% + 1
d) 600V
Temperature (K-Type thermocouple)
Range Resolution Accuracy Overload Protection
+
1oC)
-50oC to 900oC 0.1oC
-58oF to 1000oF 0.1oF
1Φ/3Φ TRUE Power (PF > 0.5 or
±(1%
+ 2oF)
±(1%
< 60o) (50/60Hz)
30V
or 60VDC
AC
Range Resolution Accuracy Overload Protection
60.00KW (<100A) 10W
600.0KW (>100A) 100W
1Φ/3Φ
Horse Power (HP) (PF > 0.5 or
±(
5%
+ 20
d)
±(
5%
+ 20
d)
< 60o) (50/60Hz)
600VAC/
1000AAC
Range Resolution Accuracy Overload Protection
80.00HP (<100A) 0.01 HP
800.0 HP (>100A) 0.1 HP
1Φ/3Φ Reactive Power (KVAR) (PF > 0.5 or
±(
5%
+ 20
d)
±(
5%
+ 20
d)
< 60o) (50/60Hz)
600VAC/1000AAC
Range Resolution Accuracy Overload Protection
60.00KVAR (<100A) 10VAR
600.0KVAR (>100A) 100VAR
±(
5%
+ 20
d)
±(
5%
+ 20
d)
600VAC/
1000AAC
19
www.GlobalTestSupply.com
380976-EU-EN-V3.2 6/12
Page 20

1Φ/3Φ
Apparent Power (KVA)
Range Resolution Accuracy Overload Protection
60.00KVA (<100A) 10VA
600.0KVA (>100A) 100VA
±(
2.5%
+ 20
d) 600VAC/1000AAC
Phase Angle (
50/60Hz)
Range Resolution Accuracy Sensitivity
-60° ~ 0° ~ +60° 0.1º
±6.0º
ACV>100V, ACA>10A
Frequency
Range Resolution Accuracy Sensitivity
40Hz/1KHz 0.1Hz ±(0.5% + 2d) ACV>5V, ACA>6A
Copyright © 2012 Extech Instruments Corporation
All rights reserved including the right of reproduction in whole or in part in any form.
www.extech.com
20
www.GlobalTestSupply.com
380976-EU-EN-V3.2 6/12
 Loading...