

Page 1
User’s Manual
Dual Laser Video IR Video Thermometer
MODEL VIR50
Page 2

Introduction
Congratulations on your purchase of the Video IR Thermometer. This meter is capable of making
non-contact (infrared) and contact (thermocouple) temperature measurements. The built-in camera
offers still image and video capturing functionality for documenting measurement locations. The
meter includes a micro SD card slot for offloading still images and video.
The built-in laser pointer increases target accuracy while the backlit LCD and handy push-buttons
combine for convenient, ergonomic operation. This meter is shipped fully tested and calibrated and,
with proper use, will provide years of reliable service.
Features
• 2.2” TFT LCD display
• 640 x 480 pixels Digital Camera
• Micro SD memory card
• Image (JPEG) and video (3gp)
• Humidity and Air Temperature Measurements
• Dual laser targeting
• Type-K thermocouple probe for contact measuremnts
• Adjustable emissivity
• High accuracy
• Fast response time
• Dew-point temperature and Wet bulb temperature functions
Safety
• Use extreme caution when the laser pointer beam is on
• Do not point the beam toward anyone's eye or allow the beam to
strike the eye from a reflective surface
• Do not use the laser near explosive gases or in other potentially
explosive areas
2
VIR50-EU-EN-V2.0 9/11
Page 3
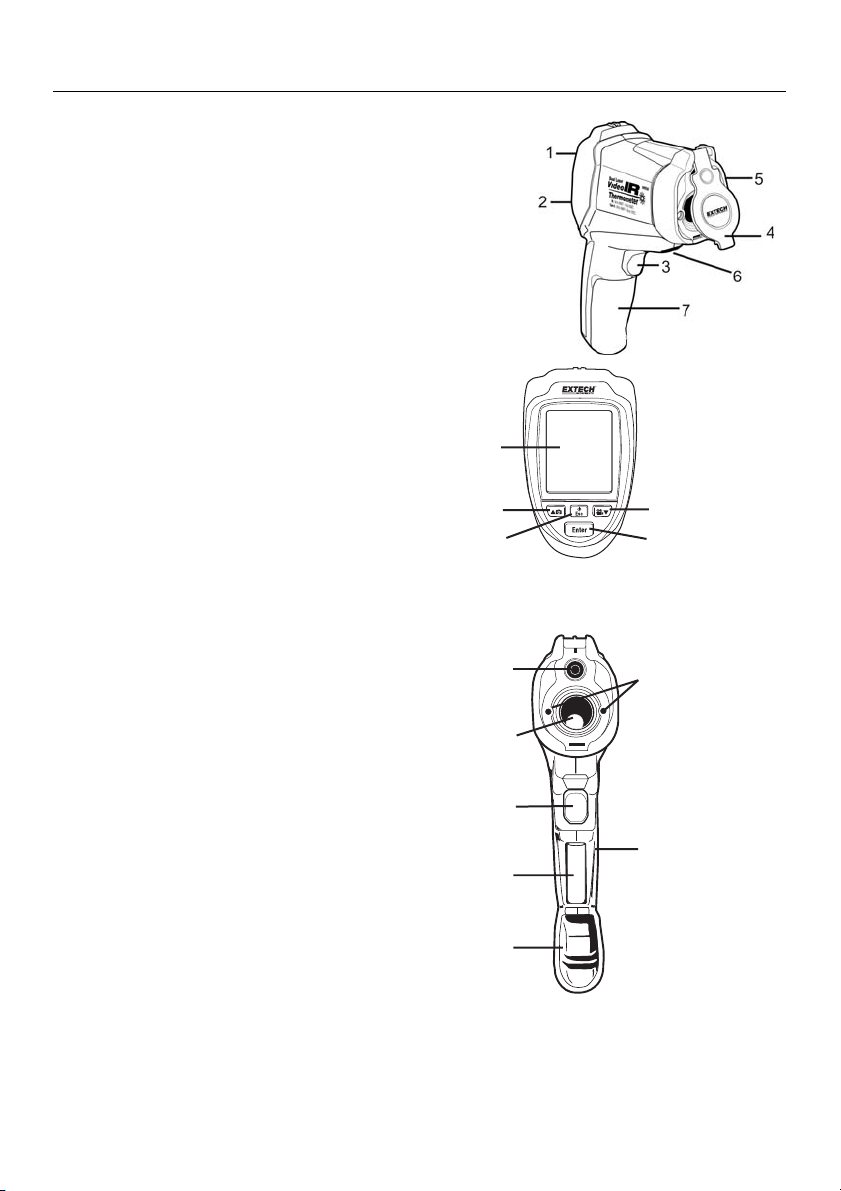
Meter Description
1. LCD Display
2. Push-buttons (UP/Picture, ESC, and DOWN/VIDEO)
3. Measurement Trigger
4. Retractable Lens Cover
5. Camera, Lasers, and IR sensor
6. Compartment for Type-K jack, USB jack, Reset button
7. Handle Grip and cover for Micro SD memory card slot and
Rechargeable Battery
Rear Panel
1 Display
2 ▲ and Camera button
3 Power and ESC button
4 ENTER button
5 ▼ and Video button
Front View
1 Camera lens
2 IR thermometer lens
3 Measurement trigger
4 Battery
5 Battery cover
6 Laser pointers
7 Micro SD card port
Note: A tripod mount is located on the bottom of the handle
1
2
3
1
2
3
4
5
5
4
6
7
3
VIR50-EU-EN-V2.0 9/11
Page 4
Operation
Power ON / OFF / RESET
1. The instrument is powered by one (1) rechargeable battery (3.7V). The battery is housed in the
compartment in the meter’s handle.
2. The supplied battery charger connects to the USB port on the instrument (in the compartment
above the measurement trigger).
3. Once the battery is charged, Press and Hold the
instrument ON.
4. Press and Hold the
5. In the event that the instrument freezes operation (no reaction when pressing any button), insert
a paper clip into the Reset opening to trigger the RESET function.
6. For accurate readings, wait 30 seconds after powering on to allow the meter to stabilize.
button to switch the unit OFF.
Measurement Modes
The meter has four (4) measurement modes: Video + Infrared, Infrared-only, Dew Point, and
Datalogging mode. When the meter is switched ON, the first screen that appears is the mode
selection screen. Use the ▲/▼ buttons to highlight the desired mode and then press the ENTER
button to access the mode.
Video + Infrared mode: the meter functions as an IR meter with the
camera capabilities;
Infrared-only mode: the meter functions as an IR meter only;
Dew Point mode: the meter shows the Dew Point temperature value;
Datalogging mode: the meter functions as a measurement
storage/retrieval device.
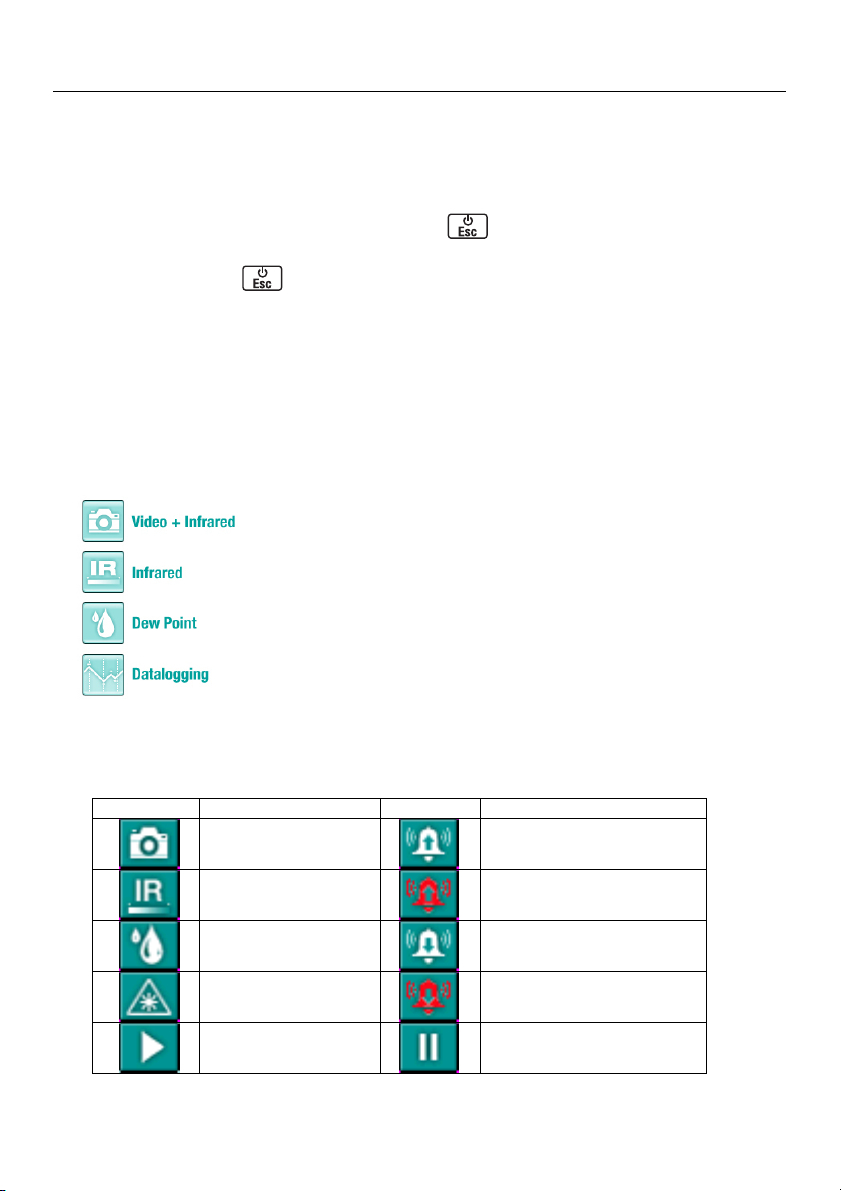
Display Symbols
Symbol Description Symbol Description
Video + IR mode
button for 5 seconds to switch the
High alarm
IR-only mode
Dew Point mode
Laser
Scan
High alarm triggering
Low alarm
Low alarm triggering
Hold
4
VIR50-EU-EN-V2.0 9/11
Page 5

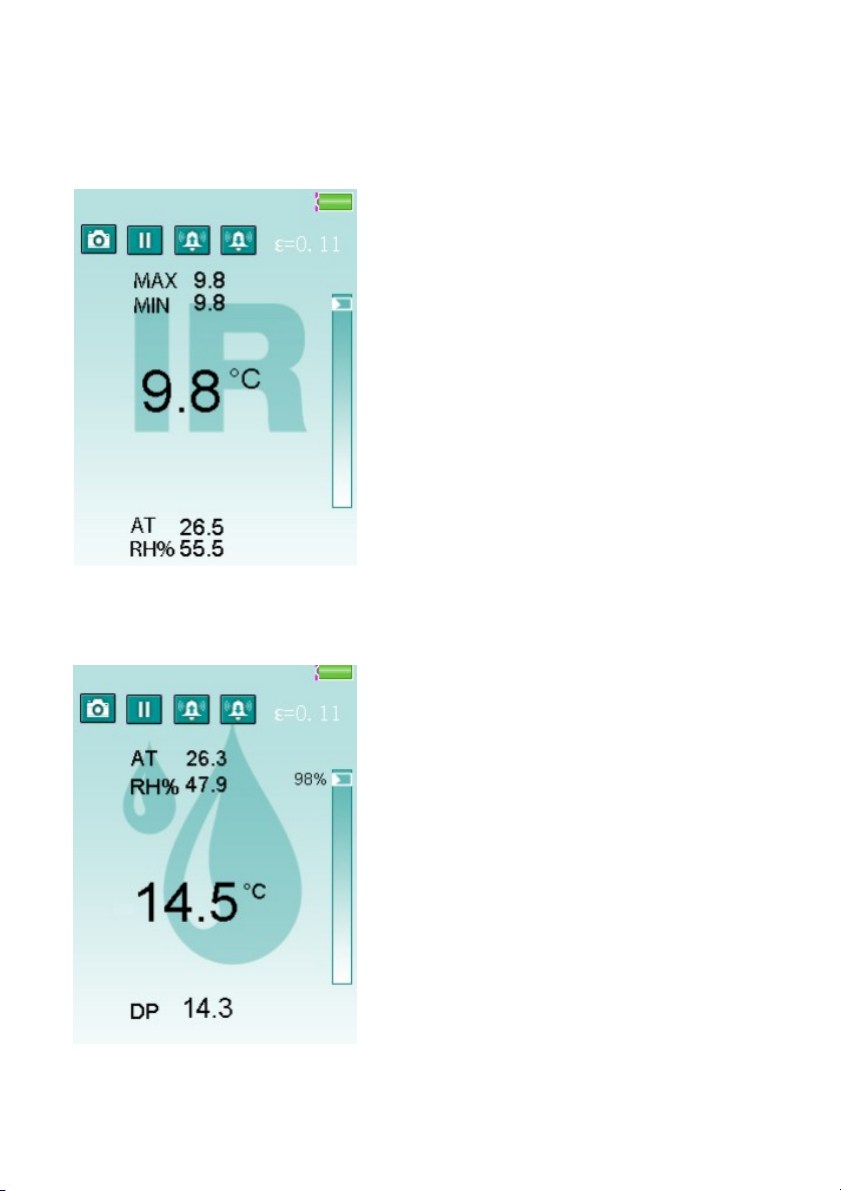
Video + IR mode
In the Video + IR Mode the meter can measure IR temperature, air temperature, humidity, dew-point
temperature, and wet bulb temperature, along with full use of the video camera capabilities. The IR
Maximum (MAX) Temperature, IR Minimum (MIN) Temperature, IR Differential (DIF) Temperature,
and the IR Average (AVG) Temperature can also be displayed. Press and hold trigger to measure
the temperature.
Capturing Still Images (Photographs)
In the Video + IR mode, press the
save the photo (the SAVE soft-key will appear above the up arrow button after the photograph is
taken). Press the ▼button to cancel the photo
.
Capturing Video
In the Video + IR mode, press the
button again to begin recording video. Press the ESC button to exit. Use the ▼button to stop
the video.
button to take a photograph. Press the button again to
button to enter the video capture mode and then press the
5
VIR50-EU-EN-V2.0 9/11
Page 6
IR-only mode
In the IR-only Mode the meter can measure IR temperature, air temperature, air humidity, dew-point
temperature, and wet bulb temperature but without the video camera capabilities. The IR Maximum
(MAX) Temperature, IR Minimum (MIN) Temperature, IR Differential (DIF) Temperature, and the IR
Average (AVG) Temperature can also be displayed. Press and hold trigger to measure the
temperature.
Dew Point Temperature Mode
In the Dew Point mode the meter displays the Dew Point temperature measurement along with the
IR temperature value. Press and hold the measurement
trigger to take a measurement.
In the Dew Point mode the percentage bargraph
indicates how close the IR temperature is to the Dew
Point temperature. At 100%, the two values are identical.
6
VIR50-EU-EN-V2.0 9/11
Page 7

Datalogging Mode
The datalogger automatically records readings to memory at a programmed interval. In the
Datalogging mode, the high/low alarm values, low alarm value, datalogging interval sampling rate
(time), can be configured.
Once configured, press the trigger to start logging. The unit will automatically record data at the
specified sampling time. Press the ESC buttom to exit the DATALOG mode, the meter will
automatically save the data to a file.
Set the high and low alarm values for the datalogger
From the Datalogger screen (shown above) use the arrow keys to select the HIGH or the LOW
alarm value parameter and then press the ENTER button. Use the ▲ and ▼ buttons to adjust the
alarm value, then press the ENTER button to confirm.
Set interval time for the datalogger
From the Datalogger screen use the arrow keys to select the interval TIME parameter and then
press the ENTER button. Use the ▲ and ▼ buttons to adjust the time value (logger sampling rate)
in seconds and then press the ENTER button to confirm.
Select the line color for the datalogger
From the Datalogger screen use the arrow keys to select the COLOR parameter and then press the
ENTER button. Use the ▲ and ▼ buttons to select a line color and then press the ENTER button to
confirm.
7
VIR50-EU-EN-V2.0 9/11
Page 8

System Tools Settings
From the Video + IR, IR-only, or Dew Point modes, press the ENTER button to access the soft-key
screen. The System Tools is the icon on the left. Use the arrow buttons to scroll over to the System
Tools icon if it is not already highlighted.
Press the ENTER button again when the System Tools icon is highlighted to access the System
Tools settings mode. From the datalogger mode scroll down to the Measure Set parameter and press
ENTER to access to the System Tools setting menu.
Use the ▲ and ▼ buttons to select an item and then press the ENTER button to access it.
Item Description
Date/Time Set the current date and time
Units (C/F) Select the temperature unit of measure
Cursor Switch the cursor ON or OFF
Backlight Backlight brightness adjustment
Auto Power off Set the auto-power-off time period
Screen Timeout Set the screen auto-off time period
Keypress Alert Enable or disable the Key-press Alert
Memory Status Display the memory and SD card capacity
8
VIR50-EU-EN-V2.0 9/11
Page 9

Setting the Date and Time
Use the ENTER key to scroll to the desired digit and then use the ▲ and ▼ buttons to change the
number. Use the ESC button to exit this mode and save the date and time.
Setting the temperature units (C/F)
Use the ▲ and ▼ buttons to select the desired unit of measure, press the ESC button to exit and
save.
Setting the Cursor style
Use the ▲ and ▼ buttons to select the cursor style (off, cross or circle), press the ESC button to exit
and save.
Setting the Backlight Brightness
Use the ▲ and ▼ buttons to select the backlight brightness level in %, press the ESC button to exit
and save.
9
VIR50-EU-EN-V2.0 9/11
Page 10

Setting the Auto Power off time
Use the ▲ and ▼ buttons to disable or select an auto-power-off time, press the ESC button to exit
and save.
Setting the Screen Timeout
Use the ▲ and ▼ buttons to disable or select a screen auto-off time, press the ESC button to exit
and save.
Enable/Disable Key-press Alert
Use the ▲ and ▼ buttons to enable or disable the key-press alert feature, press the ESC button to
exit and save.
Memory Status
Use the ▲ and ▼ buttons to select the memory (internal flash or SD card). Press the ESC button to
exit and save If an SD card is inserted in the meter, the SD card will be selected by default
Press the ENTER button to format the internal flash or SD card. Press the ▼ button to cancel the
formatting, and press the ▲ button to confirm the format.
10
VIR50-EU-EN-V2.0 9/11
Page 11

Factory Default Setting
Use the ▲ and ▼ buttons to select either YES (revert to the factory default settings) or NO (cancel).
Press the ESC button to exit and save.
Measurement Settings
From the Video + IR, IR-only, or Dew Point modes, press the ENTER button to access the soft-key
screen. The Measurement Settings mode is represented by the middle icon. Use the arrow buttons
to scroll over to the middle icon (if it is not already highlighted.)
Press the ENTER button again when the middle icon is highlighted to access the Measurement
Settings mode as shown below.
Item Description
Emissivity set Set the emissivity
Alarm High Set the high alarm ON/OFF and set the alarm limit
Alarm Low Set the low alarm ON/OFF and set the alarm limit
Laser Enable or disable the laser pointer
Auto Mode Lock the measurement ON
MAX/MIN Display the highest (MAX) or lowest (MIN) IR temperature
AVG/DIF Display Average temperature or Differential IR temperature
Ambient TEMP/% RH Display the air temperature and relative humidity
Dew-point/wet bulb Display the dew-point and wet bulb temperature
Type K Enable or disable the type-k contact thermocouple input
11
VIR50-EU-EN-V2.0 9/11
Page 12

Emissivity setting
Use the arrow buttons to highlight an emissivity setting and then press ENTER to choose it. Select
emissivity by description (concrete, glass, etc.) or select ε=0.94 to set the emissivity manually using
the arrow buttons. Press the ESC button to exit and save.
Alarm High
Use the ▲ and ▼ buttons enable or disable the alarm. If the high alarm is enabled, press the
ENTER button to adjust its value; use the ▲ and ▼ buttons to adjust the value. Press the ENTER
button to conform and then press the ESC button to exit and save.
Alarm Low
Use the ▲ and ▼ buttons enable or disable the alarm. If the low alarm is enabled, press the
ENTER button to adjust its value; use the ▲ and ▼ buttons to adjust the value. Press the ENTER
button to conform and then press the ESC button to exit and save.
Laser
Use the ▲ and ▼ buttons to enable or disable the laser pointer, press the ESC button to exit and
save.
12
VIR50-EU-EN-V2.0 9/11
Page 13

Auto Mode (Measure Lock)
Use the ▲ and ▼ buttons to enable or disable auto mode, press the ESC button to exit and save.
If auto mode is enabled and the ESC button is then pressed, the meter will enter the Measure Lock
mode where measurements will be made automatically.
To cancel the Measure Lock mode press the ENTER button and then press the UP button
(CANCEL soft-key). Use the DOWN button to switch the laser ON or OFF.
Max/Min
Use the ▲ and ▼ buttons to set the MAX/MIN mode ON or OFF. The MAX/MIN mode displays the
highest (MAX) and lowest (MIN) IR temperature. Press the ESC button to exit and save.
Average/Dif
Use the ▲ and ▼ buttons to switch ON or OFF the Average or Differential IR temperature. Press
the ESC button to exit and save.
Ambient TEMP/% RH
Use the ▲ and ▼ buttons to switch the air temperature and relative humidity displays ON or OFF.
Press the ESC button to exit and save.
Dew-point/wet bulb temperature
Use the ▲ and ▼ buttons to switch the dew-point and wet bulb temperature ON or OFF. Press the
ESC button to exit and save.
13
VIR50-EU-EN-V2.0 9/11
Page 14

Type k
Use the ▲ and ▼ buttons to enable or disable the Type k contact thermocouple input. Press the
ESC button to exit and save.
NOTE: If a Type-k probe is inserted into the meter’s thermocouple jack (in the compartment over
the measurement trigger), ‘Enable’ will be selected by default. Select the Disable setting to prohibit
the LCD from displaying Type-k temperature.
Memory Setting Mode
From the Video + IR, IR-only, or Dew Point modes, press the ENTER button to access the soft-key
screen . The Memory Settings mode is represented by the icon on the right. Use the arrow buttons
to scroll over to the right icon (if it is not already highlighted). Press the ENTER button again when
the right icon is highlighted to access the Memory Settings mode.
Use the ▲ and ▼ buttons to select Picture, Video or Logs and then press the ENTER button to
access the selection.
Use the ENTER button to view a Picture, Video or Data log. Press the ENTER button to delete a
picture, video or log. Use the ▲ button to confirm a deletion and press the ▼ button to cancel a
deletion.
Item Description
Picture Display saved images
Video Playback saved videos
Logs Display datalogger data
14
VIR50-EU-EN-V2.0 9/11
Page 15

Transfer files to a PC
Connect the USB cable from the thermometer to a USB port on the pc or insert the microSD card
into the SD port on the pc.. If the USB cable is used, the USB symbol will appear in the display and
the PC will recognize the unit as a removable drive.
Open the drive to view the three folders:
LOGS: Text files, use the *.txt files
PICTURE: Pictures, use the *.jpg files
VIDEO: Videos, use the *.3gp files
Note: other file types are used by the themometer for internal requirements
Note: If the *.3gp video files will not play on any installed media software, a software plug-in is
available on the supplied CD which will allow compatibility with Media Player.
Battery Charging and Replacement
When the battery display symbol appears empty or close to empty, recharge the
Lithium ion 3.7V/1400mAh rechargeable battery. Connect the supplied USB battery
cable to the mini USB jack in the compartment above the measurement trigger and
then connect the other end of the cable to an AC source. Charge time is approx. 2
hours.
The battery is located in the compartment behind the handle panel and beneath the
meter’s trigger. The panel can be released and folded down as shown in the diagram.
Replace the battery if necessary with one of the same type and specifications and
close the battery compartment cover.
You, as the end user, are legally bound (Battery ordinance) to return all used batteries
and accumulators; disposal in the household garbage is prohibited!
You can hand over your used batteries / accumulators at collection points in your
community or wherever batteries / accumulators are sold!
Disposal: Follow the valid legal stipulations in respect of the disposal of the device at the
end of its lifecycle
15
VIR50-EU-EN-V2.0 9/11
Page 16

IR Measurement Notes
1. The object under test should be larger than the spot (target) size calculated by the field of view
diagram (printed on the side of the meter and in this guide).
2. Before measuring, be sure to clean surfaces that are covered with frost, oil, grime, etc.
3. If an object's surface is highly reflective, apply masking tape or flat black paint to the surface
before measuring. Allow time for the paint or tape to adjust to the temperature of the surface it is
covering.
4. Measurements through transparent surfaces such as glass may not be accurate.
5. Steam, dust, smoke, etc. can obscure measurements.
6. The meter automatically compensates for deviations in ambient temperature. However, it can
take up to 30 minutes for the meter to adjust to extremely wide changes.
7. To find a hot spot, aim the meter outside the area of interest then scan across (in an up and
down motion) until the hot spot is located.
Field of View
The meter’s lasers converge at a distance of 50 inches (127cm) which is the optimum measurement
distance for this meter. At this distance the measurement spot has a 1 inch (2.54cm) diameter. The
Distance to Spot Ratio determines the measured spot size for the distance used. For this meter the
ratio is 50:1 or: 1”(2.54cm) spot @ 50” (1.27m), 2”(5.08cm) spot @ 100”(2.54m) or 0.5”(1.27cm)
spot @ 25”(0.64m).
50” / 127cm
16
VIR50-EU-EN-V2.0 9/11
Page 17

Emissivity and IR Measurement Theory
IR Thermometers measure the surface temperature of an object. The thermometer’s optics sense
emitted, reflected, and transmitted energy. The thermometer’s electronics translate the information
into a temperature reading which is then displayed on the LCD.
The amount of IR energy emitted by an object is proportional to an object's temperature and its
ability to emit energy. This ability is known as emissivity and is based upon the material of the object
and its surface finish. Emissivity values range from 0.1 for a very reflective object to 1.00 for a flat
black finish. For the VIR50, the emissivity is adjustable from 0.1 to 1.00 (see the Measurement
Settings section earlier in this User Guide). Most organic materials and painted or oxidized surfaces
have an emissivity factor of 0.94. When in doubt, set the emissivity to 0.94.
Emissivity Factors for Common Materials
Material under test Emissivity Material under test Emissivity
Asphalt 0.90 to 0.98 Cloth (black) 0.98
Concrete 0.94 Skin (human) 0.98
Cement 0.96 Leather 0.75 to 0.80
Sand 0.90 Charcoal (powder) 0.96
Soil 0.92 to 0.96 Lacquer 0.80 to 0.95
Water 0.92 to 0.96 Lacquer (matt) 0.97
Ice 0.96 to 0.98 Rubber (black) 0.94
Snow 0.83 Plastic 0.85 to 0.95
Glass 0.90 to 0.95 Timber 0.90
Ceramic 0.90 to 0.94 Paper 0.70 to 0.94
Marble 0.94 Chromium Oxides 0.81
Plaster 0.80 to 0.90 Copper Oxides 0.78
Mortar 0.89 to 0.91 Iron Oxides 0.78 to 0.82
Brick 0.93 to 0.96 Textiles 0.90
17
VIR50-EU-EN-V2.0 9/11
Page 18

Specifications
Infrared Thermometer Specifications
Range -58 to 3992oF (-50 to 2200oC)
Resolution 0.1oC/F < 1000; 1oC/F > 1000
Accuracy
Repeatability
Emissivity Adjustable from 0.1 to 1.00
Field of View D/S = Approx. 50:1 ratio (D = distance, S = spot)
Laser power Less than 1mW (Class II)
Spectral response
Response time 150ms
Type K Thermometer Specifications
Range / Resolution -50 to 1370oC (-58 to 2498oF) 0.1oC/F < 1000; 1oC/F > 1000
Accuracy
-50°C to -20°C (-58°F to -4°F) Not specified
-19.9°C to -1°C (-3.9°F to 30°F) ± (2% rdg + 6°F/3.3°C)
-0.9°C to 100°C (30.1°F to 212°F) ± (1.0% rdg + 4°F/2.2°C):
100.1°C to 454°C (212.1°F to 850°F) ± (2.5% rdg + 4°F/2.2°C)
454.1°C to 1000°C (850.1°F to 1832°F) ± (2.5% rdg + 6°F/3.3°C)
1001°C to 2200°C (1833°F to 3992°F) ± (3% rdg + 9°F/5°C)
Note: Accuracy is specified for the following ambient temperature range: 64
to 82°F (18 to 28°C) and at 127cm (50”)
-50°C to 20°C (-58°F to 68°F) ± 1.5°C (2.7°F)
20°C to 1000°C (68°F to 1832°F) ± 0.5% or ±0.5°C (0.9°F):
1000°C to 2200°C (1832°F to 3992°F) ± 1.0%:
8 to 14 μm (wavelength)
0°C to 1370°C (32°F to 2498°F) ± (0.5% + 2.7°F/1.5°C):
-50°C to 0°C (-58°F to 32°F) ±2.5C (4.5F)
Note: Accuracy is specified for the following ambient temperature range:
64 to 82°F (18 to 28°C)
Air Temperature and Relative Humidity Specifications
Air Temperature Range / Resolution 0 to 50oC (32 to 122oF) 0.1oC/F
Dew Point Range / Resolution 0 to 50oC (32 to 122oF) 0.1oC/F
Relative Humidity Range / Resolution 0 to 100% 1%
10°C to 40°C (50°F to 104°F) ± 1°C (1.8°F) Air Temperature Accuracy
All other ranges ± 2°C (3.6°F)
Dew Point Temperature Accuracy Based on temperature and RH specifications
Relative Humidity Accuracy
40 to 60% ± 5.0%RH:
20% to 40% and 60% to 80% ± 5.0%RH
0% to 20% and 80% to 100% ± 6.0%RH
18
VIR50-EU-EN-V2.0 9/11
Page 19

General Specifications
Display 2.2” Color TFT LCD (320 x 240 pixels)
Digital Camera 640 x 480 pixels
Operating Temperature 0°C to 50°C (32°F to 122°F)
Memory Internal flash: 49Mbyte, Micro SD card: Max 8Gbytes
Operating Humidity Max. 90% RH (non-condensing)
Power Supply 3.7V Lithium ion rechargeable battery
Battery life 4 hours (continuous) approx.
Battery charge time 2 hours with AC adaptor or USB connection
Automatic Power Off Programmable: OFF, 3, 15, and 60 minutes
Weight 410g. / 0.9 lbs
Dimensions 205 x 62 x 155mm (8.1 x 2.4 x 6.1”)
Copyright © 2011 Extech Instruments Corporation (a FLIR company)
All rights reserved including the right of reproduction in whole or in part in any form.
19
VIR50-EU-EN-V2.0 9/11
 Loading...