

Page 1

User's Manual
Heavy Duty Pressure Meter
Model 407495
Page 2
Introduction
Congratulations on the purchase of the Extech Heavy Duty Pressure Meter, Model
407495. This meter measures and displays pressure in eight (8) measurement units. Up to
three (3) interchangeable transducers (sold separately) in varying ranges can be used with
this meter. Special features include RS-232 PC Interface, Min/Max Memory, push-button
Zero, Data Hold, and Auto Power-Off. This meter is shipped fully tested and calibrated
and, with proper use, will provide years of reliable service.
Warranty
EXTECH INSTRUMENTS CORPORATION warrants this instrument to be free of defects
in parts and workmanship for three years from date of shipment (a six month limited
warranty applies to sensors and cables). If it should become necessary to return the
instrument for service during or beyond the warranty period, contact the Customer Service
Department at (781) 890-7440 ext. 210 for authorization or visit our website
www.extech.com for contact information. A Return Authorization (RA) number must be
issued before any product is returned to Extech. The sender is responsible for shipping
charges, freight, insurance and proper packaging to prevent damage in transit. This
warranty does not apply to defects resulting from action of the user such as misuse,
improper wiring, operation outside of specification, improper maintenance or repair, or
unauthorized modification. Extech specifically disclaims any implied warranties or
merchantability or fitness for a specific purpose and will not be liable for any direct, indirect,
incidental or consequential damages. Extech's total liability is limited to repair or
replacement of the product. The warranty set forth above is inclusive and no other
warranty, whether written or oral, is expressed or implied.
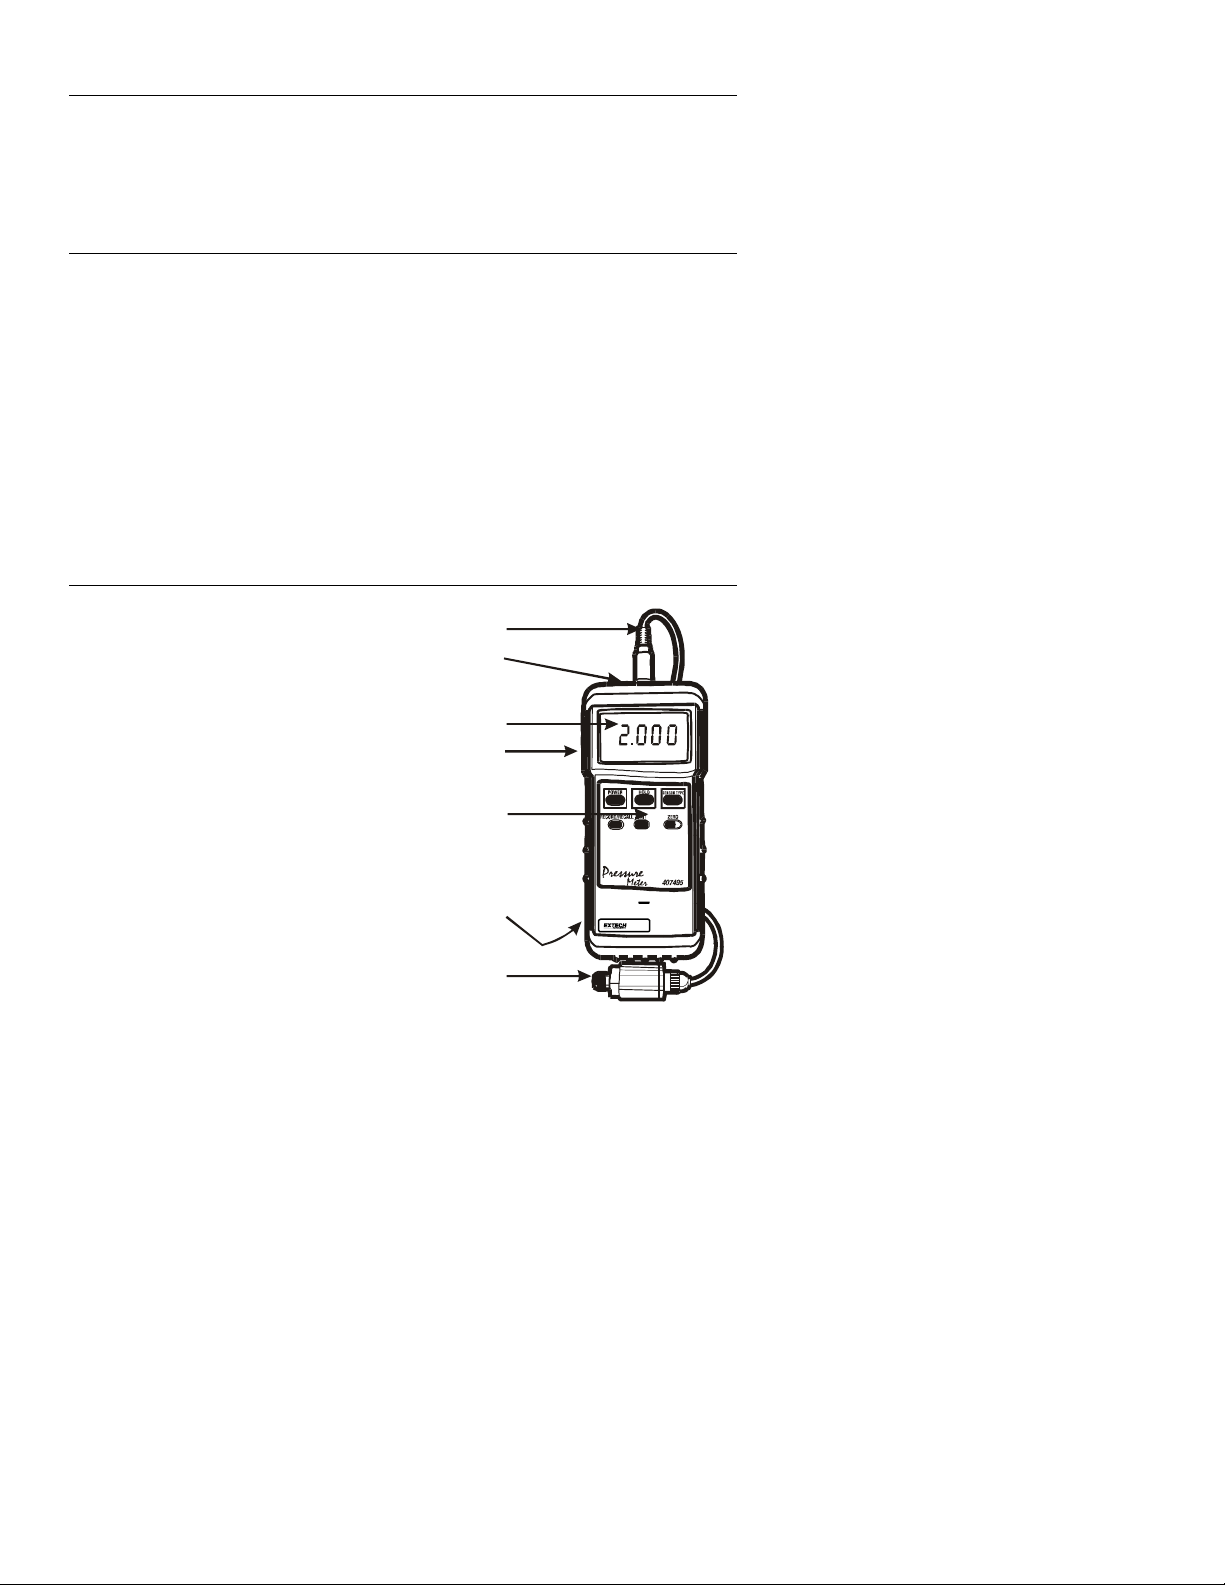
Meter Description
1. Transducer cable shown plugged into meter
input jack
2. RS-232 Output Jack
3. LCD Display
4. Protective rubber holster
5. Keypad
6. Battery compartment on rear of meter
7. Transducer shown attached to meter cable
2
1
2
3
4
5
6
7
407495 V2.1 11/2007
Page 3

Preparation for Use
Measurement Procedure Overview
The following list provides an overview of pressure measurement steps. Each step is
discussed in subsequent paragraphs. Note that the first 4 steps should only be performed
the first time the meter is used and each time the transducer is changed.
1. Select a Transducer model that covers the desired range
2. Plug the Transducer into the meter's input jack
3. Program the Transducer range
4. Select the measurement units
5. Zero the meter
6. Connect the Transducer to the process under test
7. Apply pressure to the process under test
8. Read pressure reading on the meter's LCD
Selecting Transducer Range
1. With the meter turned OFF, simultaneously press and hold the HOLD, SENSOR, &
RECORD buttons down.
2. While holding the three buttons down, press the POWER key momentarily. Release
the 3 buttons when the LCD display switches on.
3. A number will appear on the LCD that represents the Transducer type. Select the
Transducer type by pressing the SENSOR TYPE key until the desired transducer
number appears. Select the transducer from the list below in step 5.
4. Press the ZERO button to store the new transducer type. The meter will memorize the
new type even when the meter is turned OFF.
5. Select the transducer from the following list:
• Select 2 for the 30 psi (2 bars) transducer
• Select 10 for the 150 psi (10 bars) transducer
• Select 20 for the 300 psi (20 bars) transducer
NOTE: The meter does not
Connecting the Transducer to the Meter
1. Press the POWER button to turn the meter OFF.
2. Remove the existing transducer, if necessary, by unplugging it from the meter’s input
jack (top of meter).
3. Plug the new transducer into the meter’s input jack.
Selecting the Unit of Measure
Press the UNIT key to select the desired unit of measure: Bar, psi, Kg/cm
O, inch H2O, or Atmospheres (ATP).
mH
2
need to be recalibrated each time the transducer is changed.
2
, mmHg, inHg,
3
407495 V2.1 11/2007
Page 4

Operation
Push-button Zero
1. Attach a transducer to the meter, turn the meter ON, and select the range that matches
the attached transducer as described in the 'Preparation for Use' section.
2. With the transducer attached to the meter (but not attached to the process) press the
ZERO button. Note that the ZERO button should always be pressed after swapping
transducers.
3. If the display reads zero after pressing the ZERO button proceed to the next section. If
the display does not zero, the transducer may be defective.
Connect Transducer Port to Process
1. Ensure that the process under test is not pressurized
2. Connect the Transducer's ¼” PS, 19 teeth per inch threaded port to the process under
test.
3. Apply pressure to the process.
4. Read the pressure on the meter's LCD.
Data Hold
1. When a reading is on the display that you wish to hold, press the Data Hold button.
2. The reading will freeze and the HOLD icon will appear on the display.
3. Press the Data Hold button again to release the reading and return the meter to normal
operation.
Minimum/Maximum Reading Memory
1. Press the RECORD/RECALL button to start tracking the highest (MAX) and lowest
(MIN) readings. The REC indicator will appear on the LCD.
2. Take pressure measurements.
3. When pressure measurements are complete, press the RECORD/RECALL button to
recall the Maximum reading recorded (the MAX indicator will appear on the LCD).
4. Press the RECORD/RECALL button again to recall the Minimum reading recorded (the
MIN indicator will appear on the LCD).
5. To exit this mode and return the meter to normal operation, press and hold the
RECORD/RECALL button until the REC indicator goes out.
Auto Power-Off
In order to conserve battery life, the meter automatically shuts off after 10 minutes. To
defeat this feature put the meter in the Record mode by pressing the RECORD/RECALL
button; the REC indicator will appear. As long as the REC icon is displayed, the meter will
stay on indefinitely.
RS-232 PC Interface
This meter is equipped with an RS-232 PC Interface output port (meter top). A Data
Acquisition kit that includes Windows
meter-to-PC interface cable can be obtained from Extech for use with this meter. The Part
Number for the kit is 407001A. Instructions for use are supplied with the kit.
TM
95 / 98 / ME / NT / 2000 compatible software and a
4
407495 V2.1 11/2007
Page 5

Specifications
General Specifications
Display Multi-function LCD
Transducers 30, 150 and 300 max. psi (sold separately)
Transducer signal Full scale: 100mVDC
Display units Bar, psi, Kg/cm
Atmosphere
Zero adjust Front panel push-button
Data Hold Displayed reading can be held by front panel push-button
Min/Max Memory Lowest/Highest readings can be stored for later recall
PC Interface kit Built-in RS-232 port for use with optional Windows
acquisition software
Auto Power-Off To conserve battery life, the meter turns OFF automatically
after approx. 10 minutes (programmable over-ride).
Sampling time 0.8 seconds approx.
Power supply 9V Battery
Low battery indication Rectangular battery-life box appears on the left side of LCD.
Power consumption Approx. 7mA
Operating Temperature 32 to 122
Operating Humidity Less than 80% RH
Dimensions 7.1 x 2.8 x 1.3" (180 x 72 x 32mm)
Weight Approx. 0.76 lbs. (345g)
Accessories Protective rubber holster and 9V battery
2
, mmHg, inches Hg, meters H2O, inches H2O,
o
F (0 to 50oC)
TM
data
Transducer Range, Resolution, and Accuracy Specifications
psi bar Kg/cm
2
mm Hg in Hg m H2O in H2O atm
30 2 2.040 1500 59.05 20.4 802 1.974 Range
Resolution
0.02 0.002 0.002 2 0.05 0.02 1 0.002
150 10 10.19 7500 295.2 101.9 4010 9.87 Range
Resolution
0.2 0.01 0.01 10 0.2 0.1 5 0.01
300 20 20.40 15000 590.5 204.0 8020 19.74 Range
Resolution
0.2 0.02 0.02 20 0.5 0.2 10 0.02
Accuracy: Meter only: ± (0.5% reading + 1 digit)
Transducer only: ± 2% full scale
Combined: ± (2.5% full scale + 1 digit)
Accuracy note: Specified accuracy applies to meter at 23
o
C (±5oC)
Calibration note: Re-calibration is not required each time a new transducer is attached.
5
407495 V2.1 11/2007
Page 6

Transducer Specifications
Model Maximum Capacity
PT30 30psi (2 BAR)
PT150 150psi (10BAR)
PT300 300psi (20 BAR)
Overload protection 150% of max capacity
Diaphragm Ceramic
Supply voltage 5V
Thread ¼” PS, 19 teeth per inch
Span (full scale) ± 1% (10 to 40ºC) includes linearity, hysteresis & repeatability
Zero ± 2% Full Scale (10ºC to 40ºC)
Operating Temperature 32ºF to 140ºF (0ºC to 40ºC)
Operating Humidity Max 80% RH
Output Full capacity output = 100 mV DC
Size 30 mm diameter x 85mm
Weight 5.65oz. (160g)
Cable length 39” (1m)
Calibration and Repair Services
Extech offers repair and calibration services for the products we sell. Extech also
provides NIST certification for most products. Call the Customer Service Department for
information on calibration services available for this product. Extech recommends that
annual calibrations be performed to verify meter performance and accuracy.
All rights reserved including the right of reproduction in whole or in part in any form.
Technical Support: Extension 200; E-mail: support@extech.com
Repair & Returns: Extension 210; E-mail: repair@extech.com
Product specifications subject to change without notice
For the latest version of this User Guide, Software updates, and other
up-to-the-minute product information, visit our website: www.extech.com
Extech Instruments Corporation, 285 Bear Hill Road, Waltham, MA 02451
Support line (781) 890-7440
Extech Instruments Corporation.
Copyright ©
2007
6
407495 V2.1 11/2007
 Loading...