

Page 1

1. Introduction
2. Connector Layout
EX-6014WI
RS232 to WiFi Wireless Adapter,
Thank you for purchasing this RS232 to WiFi Wireless Adapter
(hereinafter referred to as “WiFi-Adapter”), it is designed to
communicate with RS232 serial devices over 802.11b/g compatible WiFi
wireless connections. For the application where LAN cable is not
preferred, the WiFi-Adapter delivers a simple, reliable and
cost-effective network connectivity to enable your success.
Features:
One DB9 male RS232 connector to WiFi wireless network
Supports 3-wire RS232 signals over the 5-pin terminal block connector
Fully 2.4GHz, IEEE 802.11b/g compatible WiFi connectivity
Protocols: ARP, IP, ICMP, UDP, TCP, DHCP, HTTP
RS232 baud rate from 1200bps to 115.2Kbps
Signals: TXD, RXD, RTS, CTS, DTR, DSR, DCD, RI
Modes: TCP Server, TCP Client
Supports Virtual COM Port drivers for Windows platforms
Power Requirement: +5V~40VDC over the TB5 or +5VDC from the
standard DC Jack
+5VDC Power
Input DC Jack
w/ Mounting Kit
Push Button to
Restore Default
Settings
RS232
DB9M connector
Heartbeat LED
5-pin Terminal Blocks:
3-wire RS232
and +5~40V DC
power input pins
1
Page 2

RS232 to WiFi Wireless Adapter w/ Mounting Kit
Mounting Kit
Push Button to Restore
Default Settings
+5VDC Power
Input DC Jack
5-pin Terminal Blocks: This pluggable terminal blocks integrates 2
wide-range DC power input pins and 3 RS232 signal pins. You can
choose to power the WiFi-Adapter by either applying +5V on the
DC Jack OR +5V~40V on the Terminal Blocks (but not both
simultaneously).
+5~40V DC
GND
GND
RXD
TXD
Wide Range DC Power Input
GND
GND
RXD (RS232, Output)
TXD (RS232, Input)
Push Button to Restore Default Settings: This switch can be used to
reset the WiFi-Adapter to its factory default settings. Press and hold
the button by a pen or similar tool for several seconds will restore
the default settings immediately.
DC Jack Power Connector: A 5V/2A AC adapter is supplied with
this product. Please connect its power cable to this DC Jack
connector.
LED Indicator: The white color LED is a Heartbeat indicator, it is
blinking when the WiFi-Adapter is powered up and function
properly.
2
Page 3

RS232 to WiFi Wireless Adapter w/ Mounting Kit
3. Installing WiFi-Adapter
1. Configure Web Access
You can access the WiFi-Adapter by using either an access point
with the SSID - Connect (with all encryption disabled, such as WEP
& WPA) or a wireless card with Ad-Hoc mode (with SSID Connect).
2. Installing the WiFi-Adapter Hardware
Connect your PC to the wireless network.
Connect the power to the DC jack OR the terminal blocks of
the WiFi-Adapter.
Connect your serial device to DB9 connector OR the 5-pin
terminal blocks.
3. Power up the WiFi Adapter
When the WiFi-Adapter is powered up, the Heartbeat LED will
be blinking and connect to the SSID Connect. If it cannot find
a SSID of connect it will connect to the first unsecured network
it found.
Find the wireless network icon on your computer (on Windows,
you'll find an icon that looks like 2 computers or a set of bars in
your taskbar on the bottom right of your screen; Macs will have
a wireless symbol in the top right).
View available WiFi networks by either right-clicking the icon
and selecting "View Available Wireless Networks" (Windows XP)
or clicking the icon and selecting to "Connect or disconnect..."
(Windows Vista). On Mac OS X and Windows 7, all you have to
do is click on the WiFi icon to see the list of available networks.
3
Page 4

RS232 to WiFi Wireless Adapter w/ Mounting Kit
Choose the R2WiFi to connect to by clicking the "Connect"
button (or just selecting it on Win7/Mac).
Enter the security key -- if the wireless network is encrypted
(with WEP or WPA), you'll be prompted to enter the network
password or passphrase. This will be stored for you for next time,
so you'll only have to enter it once.
Start browsing the WiFi-Adapter!
You should now be connected
to the WiFi-Adapter; open your browser and visit the WiFi
Adapter at 192.168.2.3 default IP address. Login using admin for
both Username and Password.
4
Page 5

RS232 to WiFi Wireless Adapter w/ Mounting Kit
4. Configuring the WiFi-Adapter
In the Configuration menu, there are Basic, Advanced, Security,
WiFi, WiFi Wizard and Status pages for the settings to work on this
WiFi-Adapter. The most frequently used pages are Basic, Security,
WiFi and WiFi Wizard pages.
A. Basic setting page:
Serial Settings: Please don’t leave Device Name blank,
otherwise it will be rejected when you are saving the new
settings by pressing “Apply” button afterward.
Note:
When you restoring the factory default settings by pressing
the hardware push button at the rear panel of the WiFi-Adapter, the
“Device Name” field will be cleared to Blank, please key in your Device
Name, or you would not be able to save your settings.
5
Page 6

RS232 to WiFi Wireless Adapter w/ Mounting Kit
Network Settings:
The Network Settings provides settings of the WiFi-Adapter
including its IP/Socket, modes (TCP/Server, TCP/Client,
UDP/Server or UDP/Client).
6
Page 7

B. Security Settings
This page is to set login username, password and client IP
control. Each field has its individual “Apply” button so you have
to click it accordingly to save the corresponding settings.
The factory default username is “admin” and its password is
“admin”, too.
The Accessible IP Settings is to allow the service only for the
specific clients on list, there are 4 clients in maximum. To
enable this function, please change the Control option from
Disable to Enable as well.
RS232 to WiFi Wireless Adapter w/ Mounting Kit
7
Page 8

RS232 to WiFi Wireless Adapter w/ Mounting Kit
C. WiFi Settings
This page is to set WiFi System Settings, WEP Encryption Key
Settings, AES/TKIP Encryption Key Settings. There are some fields
for the WiFi Advanced settings at the bottom of the page,
please click “Apply” buttons next to the settings once you
want to update the corresponding settings.
8
Page 9

RS232 to WiFi Wireless Adapter w/ Mounting Kit
WiFi
General Settings
WiFi Advanced Settings
9
Page 10

RS232 to WiFi Wireless Adapter w/ Mounting Kit
5. Configuring the WiFi-Adapter to Access Point
If you are using this WiFi-Adapter with an access point, we
recommend you use the WiFi Wizard to guide you configure the
WiFi settings. Click WiFi Wizard button, choose Infrastructure
Network Mode, follow the Wizard’s instructions to complete the
installation.
4. Examples for Using the WiFi Serial Port
This section introduces an example to communicate with the serial port
of this WiFi-Adapter. We are using a Terminal Emulation Program (such
as HyperTerm or TeraTerm) to send data over the TCP/IP socket port
and receive the loopback data from the same socket port.
Similar to the HyperTerm example, the application software can read
or write data on the TCP/IP socket port through Windows API.
1. Launch the HyperTerm utility, it will create a new connection,
please type the connection name (type “TEST” in this case).
10
Page 11

RS232 to WiFi Wireless Adapter w/ Mounting Kit
2. Enter the WiFi-Adapter’s IP address and port number:
3. Once the connection is built up successfully, the HyperTerm is
ready to send or receive data, add a loopback connector on the
DB9 connector or short the TXD and RXD pins on the 5-pin Terminal
Blocks. Type “Hello!”, if the screen shows the same characters
typed, then serial port is working well!
11
Page 12

RS232 to WiFi Wireless Adapter w/ Mounting Kit
5
. Using Virtual COM Port Drivers
This WiFi-Adapter can work in ether Straight IP mode or Virtual COM
Port mode. The Straight IP mode will be accessed through its TCP/IP
socket port directly. The Virtual COM Port mode emulates a COM port
by installing the CentosSEC Virtual COM Port driver.
The Virtual COM Port software, CentosSEC, is an advanced software to
map your serial port devices (COM ports) to Ethernet so they could be
accessed from anywhere in the world (via Internet or LAN) as if it is
attached directly to the remote PC. When the attached serial port
device sends communication data it is actually transmitted over TCP/IP
network and back from the network to your device.
After installed, the driver allows Windows platform software, using
standard API calls, to be used in an Ethernet application.
Installing CentosSEC
1. Run the Centos_Setup.exe (right click “Centossec_Setup.exe” and
choose “Run as an Administrator”) on the supplied CD, it was
shipped in the following folder:
2. While installing the driver, please enter the password centos1104:
12
Page 13

RS232 to WiFi Wireless Adapter w/ Mounting Kit
3. Follow the on-screen instructions to complete the Installation, you
are ready to launch the software utility.
Launch CentosSEC
After installed the CentosSEC, you will need to navigate either to the
Start Menu and locate the launcher in Programs submenu or
double-click the shortcut created on the desktop. Please note that
CentosSEC should be run as an administrator, for some Windows such
as 2008, Vista and 7, their UAC (User Account Control) will limit the
CentosSEC from working properly if you have only standard user
privileges. In this case, please right-click the CentosSEC shortcut on the
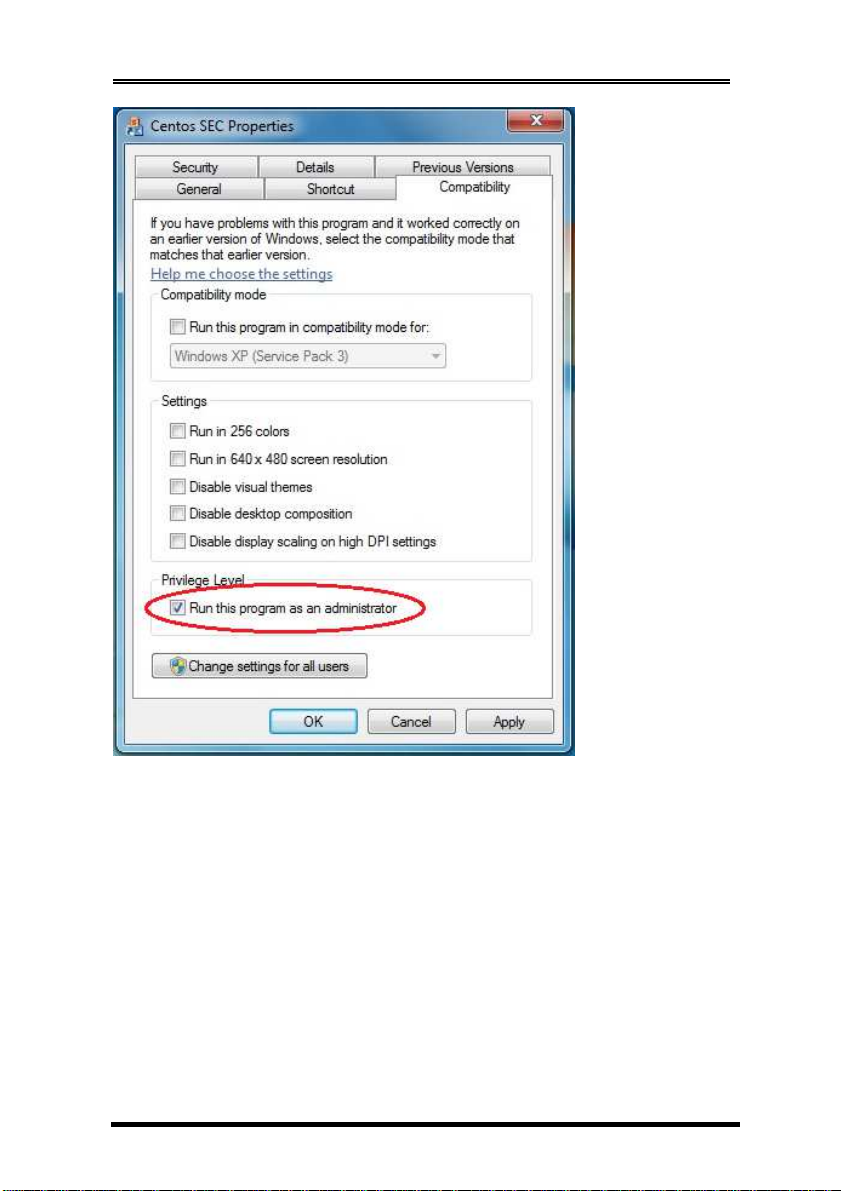
desktop, choose “Properties”, click “Compatibility” tab, enable the
“Run this program as an administrator” option of the privilege level
then click OK. Please see the following screen shot:
13
Page 14
RS232 to WiFi Wireless Adapter w/ Mounting Kit
14
Page 15

RS232 to WiFi Wireless Adapter w/ Mounting Kit
Configuring CentosSEC
1. Running the CentoSEC, the following screen will appear, click the
Help button will list the supported operations and details. You may
need to click Add to create a new COM port then click Update
All to save the settings. You don’t need to reboot the system after
you pressing Update All button for any setting update.
2. To add a new COM port, it is important to set the Net. Protocol to
RAW instead of TELNET for this WiFi-Adapter. After clicked Update
All button, the status field should become “Available”. If it is
“Registered”, it is not working properly. You need to review the
problem. Usually it because you did not run as an Administrator.
15
Page 16

RS232 to WiFi Wireless Adapter w/ Mounting Kit
3. You may use “Load list” button to get the preset configuration file
(WiFi_RAW.dat) for the quick installation.
6. Operation Modes
The WiFi-Adapter can function as a server or Client for TCP and UDP
connections. The application scenarios include TCP Server mode, TCP
Client mode, UDP mode and TCP Server/Client Paired mode (using 2
WiFi-Adapters with one in TCP Server mode and the other one in TCP
Client mode). When in TCP Server/Client Paired mode, the 2
WiFi-Adapters are remotely connected without any need for extra
software or drivers.
16
Page 17

RS232 to WiFi Wireless Adapter w/ Mounting Kit
1. TCP Server mode:
TCP Server mode provides the service at the TCP/IP socket port (factory
default is set at 192.168.2.3 port 5000). The application software works
as a client to this WiFi-Adapter. It can communicate via straight IP
address directly or via a Virtual COM Port driver.
TCP Server with Infrastructure Mode
User Client Application Software
access via 192.168.2.3 port 5000
TCP/IP
Ethernet
PC’s IP: 192.168.2.4
TCP Server with Ad-Hoc Mode
User Client Application Software
access via 192.168.2.3 port 5000
WiFi-Adapter
TCP Server at 192.168.2.3
port 5000
Serial
Device
Serial
Device
WiFi-Adapter
PC’s IP: 192.168.2.4
TCP Server at 192.168.2.3
port 5000
17
Page 18

RS232 to WiFi Wireless Adapter w/ Mounting Kit
The required settings for TCP Server as follows:
18
Page 19

RS232 to WiFi Wireless Adapter w/ Mounting Kit
WiFi-Adapter
WiFi-Adapter
2. TCP Server/Client Paired mode:
The TCP Server/Client Paired mode is designed for 2 WiFi-Adapters to
be connected in back-to-back via WiFi wireless network. The TCP
Server unit provides a service at 192.168.2.3 port 5000, the TCP Client
unit should set its Destination IP to match the Server’s service port
(192.168.2.3 port 5000). In this mode, the serial ports of the Server and
Client are remotely connected without any software support. It’s very
simple and straightforward.
TCP Server/Client Paired with Infrastructure Mode
TCP Server
WiFi-Adapter
TCP/IP
Ethernet
Serial
Device
TCP Server/Client Paired with Ad-Hoc Mode
Serial
Device
TCP Server
WiFi-Adapter
TCP Client
Serial
Device
TCP Client
Serial
Device
19
Page 20

RS232 to WiFi Wireless Adapter w/ Mounting Kit
The TCP required Server settings were mentioned above, the TCP Client
settings as follows, please note that its Destination Host IP and Port
need point to the TCP Server (192.168.2.3 port 5000 in this example).
7. RS232 Male-DB9 Pin Assignment and Wiring
9 Pins Signal
1 DCD
2 RXD
3 TXD
4 DTR
5 GND
6 DSR
7 RTS
8 CTS
9 RI
20
Page 21

RS232 to WiFi Wireless Adapter w/ Mounting Kit
1 TXD
1 TXD
DB9(Male) RS232 to DB9(Male) RS232 Wiring
DB9(USB Adapter) DB9(Serial Device)
1 DCD 1 DCD
2 RXD 2 RXD
3 TXD 3 TXD
4 DTR 4 DTR
5 GND 5 GND
6 DSR 6 DSR
7 RTS 7 RTS
8 CTS 8 CTS
8. TB5 Pin Assignment and Wiring
5-pin Terminal Blocks (TB5) Pin Assignment:
+5~40V DC
GND
GND
RXD
TXD
5- Wide Range DC Power Input
4- GND
3- GND
2- RXD (RS232, Output)
1- TXD (RS232, Input)
TB5 RS232 Cable Wiring:
TB5
5 +5~40V DC
4 GND
3 GND
2 RXD
(RS232 Device)
3 RTS
2 RXD
21
Page 22

RS232 to WiFi Wireless Adapter w/ Mounting Kit
9. Product Specifications
Type Specifications
Ethernet
Data Rate
Radio
Frequency
Channels
Modulations
Antenna
RF Output Power
Receive Sensitivity
IEEE 802.11b/g Wireless Compatible
IEEE 802.11b: 1, 2, 5.5 and 11Mbps
IEE 802.11g: 6, 9, 12, 18, 24, 36, 48 and 54Mbps
Supports TX rate auto fall-back mechanism
2.412 ~ 2.472 GHz
Up to 13 channels. Profiles available include
USA, Canada, Europe, Spain, France, Japan,
China, Taiwan and “Other” (multiple
countries)
802.11b: DSSS with DBPSK, DQPSK and CCK
802.11g: DSSS with DBPSK, DQPSK and CCK
OFDM with BPSK, QPSK, 16QAM and 64QAM
Integrated PCB Antenna
802.11b: 16.5 ±1dBm
802.11g: 14 ± 1dBm @ 54 Mbps;
15 ± 1dBm @ 48 Mbps;
16 ± 1dBm @ 6 ~ 36 Mbps
802.11b: 16.5 ±1dBm 802.11g: 14 ± 1dBm @ 54
Mbps; 15 ± 1dBm @ 48 Mbps; 16 ± 1dBm @ 6 ~
36 Mbps
802.11b: -92dBm @ 1 Mbps; -90dBm @ 2
Mbps; -89dBm @ 5.5 Mbps; -85dBm @ 11
Mbps
802.11g: -82dBm @ 6 Mbps; -82dBm @ 9
Mbps; -82dBm @ 12 Mbps; -82dBm @ 18
Mbps; -79dBm @ 24 Mbps; -76dBm @ 36
22
Page 23

RS232 Serial Port
Connectors
RS232 Signals
Baud Rate:
Data bits
Parity:
Stop bits
Flow Control
Setup Options
Configuration Modes
Configuration Method
Security
Accessories
Power Requirements
Power Input
RS232 to WiFi Wireless Adapter w/ Mounting Kit
Mbps; -71dBm @ 48 Mbps; -70dBm @ 54 Mbps
9-pin D-type male (DB9M, full signal) and
5-pin terminal blocks (TB5, 3-wire signal).
DB9M: TXD, RXD, RTS, CTS, DTR, DSR, DCD,
DSR, RI, GND
TB5: TXD, RXD, GND
1200bps to 115.2Kbps
5, 6, 7, 8
None, Even, Odd
1, 1.5, 2
Hardware RTS/CTS, Software XON/XOFF
Web Configuration
Straight IP (TCP or UDP Sockets)
Virtual COM Port
TCP Server/Client Paired
Any web browser via built-in web server
802.11i security: WEP-64/128, TKIP (WPA-PSK)
and AES (WPA2-PSK)
Wall mount kit and Optional DIN RAIL Clips
5V DC (via DC Jack)
5V~40V DC (via TB-5)
23
Page 24

RS232 to WiFi Wireless Adapter w/ Mounting Kit
Power Consumption
Mechanical
Specifications
Material
Dimensions
Gross Weight
Environmental
Operating Temperature
Storage Temperature
Operating Humidity
250mA @ 5V DC
Plastic
3.24”(L)x1.74”(W)x0.87”(H)
(8.23 x 4.42 x 2.22 cm)
9065g (0.20lb)
0 to 558C (32 to 1318F)
-20 to 858C (-4 to 1858F)
5 to 95% RH
24
 Loading...