

Page 1
Anleitung
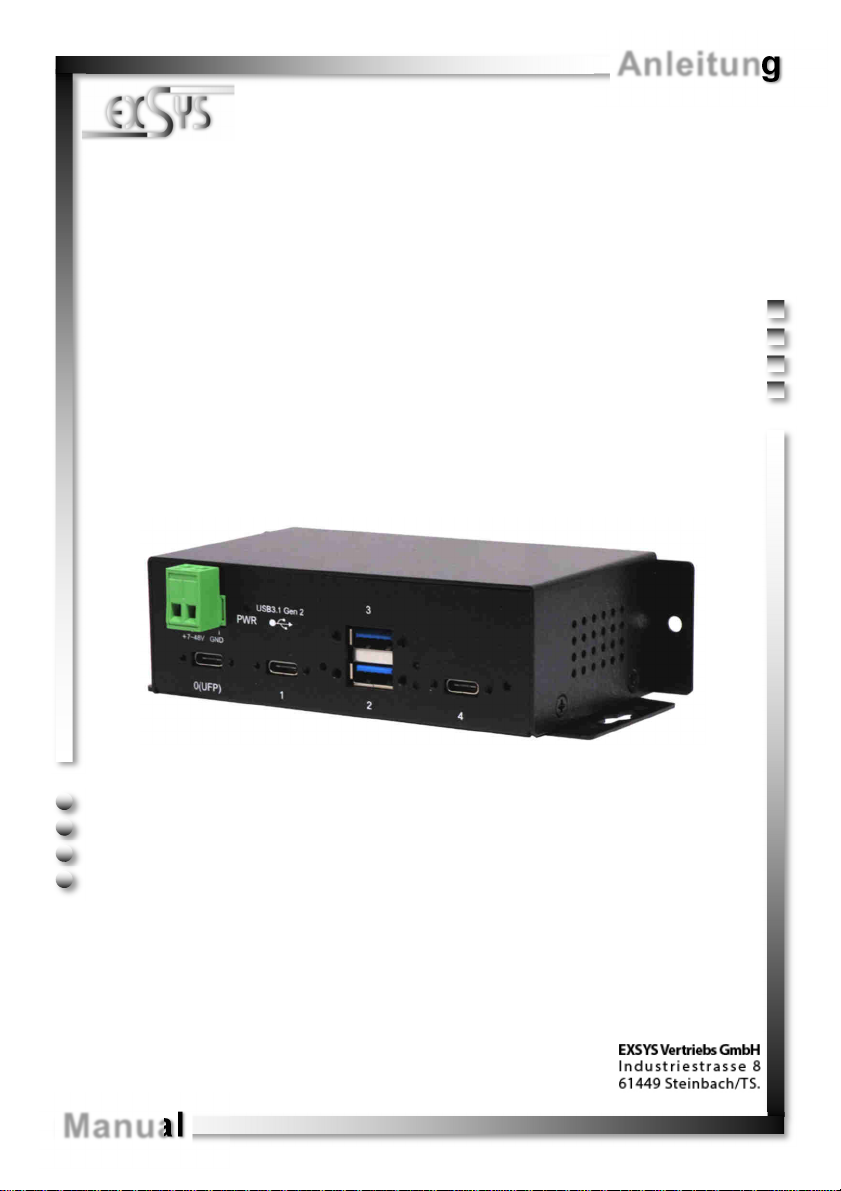
EX-1274HMV
4 Port USB 3.1 (Gen2) Metall HUB
für Trägerschiene
Manual
4 Port USB 3.1 (Gen2) Metal HUB
for DIN-Rail
Vers. 1.0 / 11.09.18
Page 2

EX-1274HMV
Inhaltsverzeichnis
1. Beschreibung ······················································································ 3
2. Lieferumfang ······················································································ 3
3. Aufbau, Anschlüsse, LED‘s & Jumper Einstellungen ································· 4-6
3.1 Aufbau······································································································ 4
3.2 Anschlüsse ······························································································ 4-5
3.3 LED‘s ······································································································· 5
3.4 Jumper Einstellungen ·················································································· 6
4. Hardware Installation ············································································ 7
5. Treiber Installation ··············································································· 7
6. Reinigung ·························································································· 7
7. Technische Daten ················································································ 8
8. Technische Zeichnung ·········································································· 8
Index
1. Description ························································································· 9
2. Extent of Delivery ················································································ 9
3. Layout, Connections, LED’s & Jumper Settings ···································· 10-12
3.1 Layout ····································································································· 10
3.2 Connections ························································································ 10-11
3.3 LED’s ······································································································ 11
3.4 Jumper Settings ························································································ 12
4. Hardware Installation ··········································································· 13
5. Driver Installation ················································································ 13
6. Cleaning ··························································································· 13
7. Technical Information ·········································································· 14
8. Technical Drawing ·············································································· 14
© Copyright 2018 by EXSYS Vertriebs GmbH. All Rights Reserved
2
Page 3
EX-1274HMV Deutsch
1. Beschreibung
Der EX-1274HMV ist ein USB 3.1 (Gen2) Metall HUB für bis zu 4 Endgeräte. Der Hub ist
mit 2 USB-A Buchsen und 2 USB-C Buchse für Endgeräte und 1 USB-C Buchse für den
Anschluss an den PC ausgestattet. Er unterstützt alle USB Anschlüsse von 1.1 bis 3.1.
Durch die Stromversorgung über den Terminal Block können an jedem Port 2,1A zur Verfügung gestellt werden. Der USB 3.1 Bus unterstützt optimal die Leistung des schnellen
VIA Chipsatz. Der EX-1274HMV gewährleistet so eine sichere Datenübertragung und
exzellente Performance von bis zu 10Gbit/s. Er unterstützt den Self Powered und Bus
Powered Modus. Zusätzlich ist der EX-1274HMV mit verschraubbaren USB Anschlüssen
ausgestattet. Der EX-1274HMV unterstützt die Norm IP30. Im Lieferumfang ist das DINRail Kit für die Installation auf eine Trägerschiene enthalten. Das DIN-Rail Kit wird mit
zwei Schrauben auf der Rückseite festgeschraubt. Der EX-1274HMV kann problemlos
mit der im Lieferumfang enthaltenen Wand Montage Halterung an die Wand installiert
werden.
Merkmale:
• Kompatibel zu USB 1.1, 2.0, 3.0 & 3.1
• Bis zu 10Gbit/s
• Es werden alle Betriebssysteme unterstützt
• Alle Anschlüsse sind verschraubbar
• Zertifiziert für
2. Lieferumfang
Bevor Sie den EX-1274HMV an Ihren PC anschließen, überprüfen Sie bitte zuerst den
Inhalt der Lieferung:
• EX-1274HMV
• USB 3.1 (Gen2) Kabel
• DIN-Rail Kit (EX-6096)
• Wandmontagehalterung
• Anleitung
© Copyright 2018 by EXSYS Vertriebs GmbH. All Rights Reserved
3
Page 4

Deutsch EX-1274HMV
3. Aufbau, Anschlüsse, LED‘s & Jumper Einstellungen
3.1 Aufbau
7-48V T-Block
für optionales
externes Netzteil
1x USB 3.1 (Gen2)
Upstream C-Buchse
3.2 Anschlüsse
+7V - 48V T-Block:
+7V - 48V
GND (Ground)
2x USB 3.1 (Gen2)
Betriebs LED
Downstream A-Buchse
1x USB 3.1 (Gen2)
Downstream C-Buchse
ACHTUNG!!!
Schließen Sie niemals Strom an Ground an,
dadurch kann Ihre Hardware zerstört werden!!!
Status LED
für jeden Port
1x USB 3.1 (Gen2)
Downstream C-Buchse
USB 3.1 (Gen2) A-Buchse:
GND_DRAIN
StdB_SSTX +
StdB_SSTX -
VCC
© Copyright 2018 by EXSYS Vertriebs GmbH. All Rights Reserved
D+ D-
GND
StdB_SSTX+
StdB_SSTX -
Achtung!
Stecker niemals
umgekehrt oder mit
Gewalt einstecken.
4
Page 5

EX-1274HMV Deutsch
3. Aufbau, Anschlüsse, LED‘s & Jumper Einstellungen
3.2 Anschlüsse
USB 3.1 (Gen2) C-Buchse:
Hinweis!
Durch die Doppelbelegung der Pins, kann der USB Typ-C Stecker beidseitig in die Buchse
gesteckt werden.
3.3 LED‘s
Status LED‘s:
LED Status LED Funktion
Aus Kein USB Endgerät angeschlossen
Langsames Blinken USB 2.0 Modus
Schnelles Blinken USB 3.1 (Gen1) Modus
Ständig An USB 3.1 (Gen2) Modus
© Copyright 2018 by EXSYS Vertriebs GmbH. All Rights Reserved
5
Page 6

Deutsch EX-1274HMV
3. Aufbau, Anschlüsse, LED‘s & Jumper Einstellungen
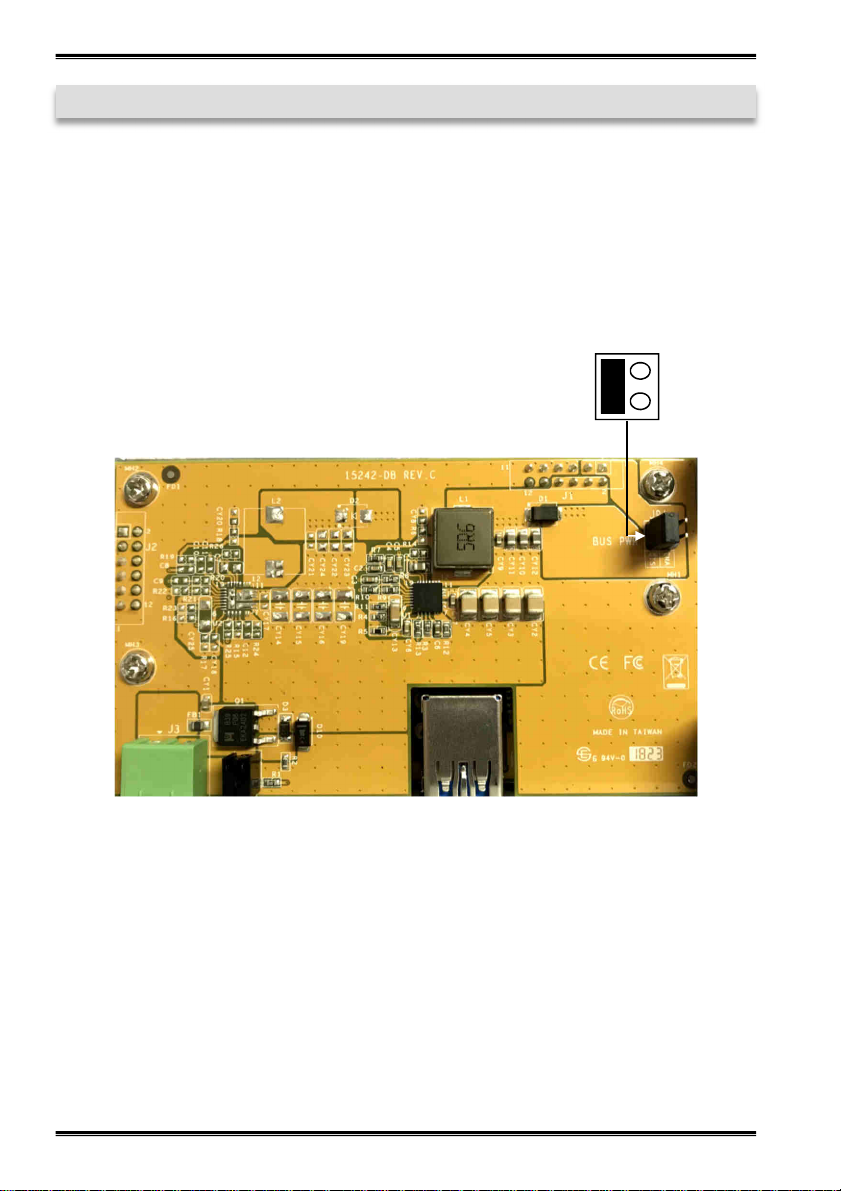
3.4 Jumper Einstellungen
Die EX-1274HMV wird mit der Einstellung Self-Power ausgeliefert. Sie haben aber die
Möglichkeit die EX-1274HMV mit Bus-Power zu versorgen. Dafür müssen Sie zu erst
das Gehäuse mit den vier Schrauben auf den Seiten öffnen. Nun müssen Sie den
Jumper JP1 von DIS (Disable) auf ENA (Enable) setzen. Siehe nachfolgende Abbildung.
ENA
DIS
JP1
© Copyright 2018 by EXSYS Vertriebs GmbH. All Rights Reserved
6
Page 7

EX-1274HMV Deutsch
4. Hardware Installation
Beachten Sie bitte die folgenden Installationshinweise. Da es große Unterschiede zwischen PC‘s gibt, können wir Ihnen nur eine generelle Anleitung zum Einbau der EX1274HMV geben. Bei Unklarheiten halten Sie sich bitte an die Bedienungsanleitung
Ihres Computersystems.
1. Verbinden Sie das mitgelieferte USB Kabel mit der USB C-Buchse des Hub´s.
2. Verbinden Sie jetzt den Stromanschluss des optionalen Netzteils mit dem Terminal
Block des Hub´s und stecken Sie den Netzstecker des Netzteils in eine Steckdose.
3. Verbinden Sie nun das andere Ende (C-Stecker) des mitgelieferten USB Kabels mit
der C-Buchse an Ihrem PC.
5. Treiber Installation
Alle Betriebssysteme
Nach Abschluss der Hardwareinstallation erkennt das Betriebssystem den EX1274HMV automatisch und installiert diesen.
ÜBERPRÜFEN DES INSTALLIERTEN TREIBER
Öffnen Sie den >Geräte-Manager<. Jetzt müssten Sie unter „USB-Controller“ folgende Einträge sehen:
Sind diese oder ähnliche Einträge vorhanden, ist der USB Hub richtig installiert.
6. Reinigung
Zur Reinigung des Gerätes verwenden Sie bitte ausschließlich ein trockenes nicht faserndes Tuch und entfernen Sie die Verschmutzung mit leichtem Druck. Im Bereich der
Anschlüsse bitte darauf Achten, dass keine Fasern des Tuchs in der Buchse hinterlassen werden. Verwenden Sie bitte zu Reinigung in keinem Fall ein feuchtes oder
nasses Tuch!
© Copyright 2018 by EXSYS Vertriebs GmbH. All Rights Reserved
7
Page 8
Deutsch EX-1274HMV
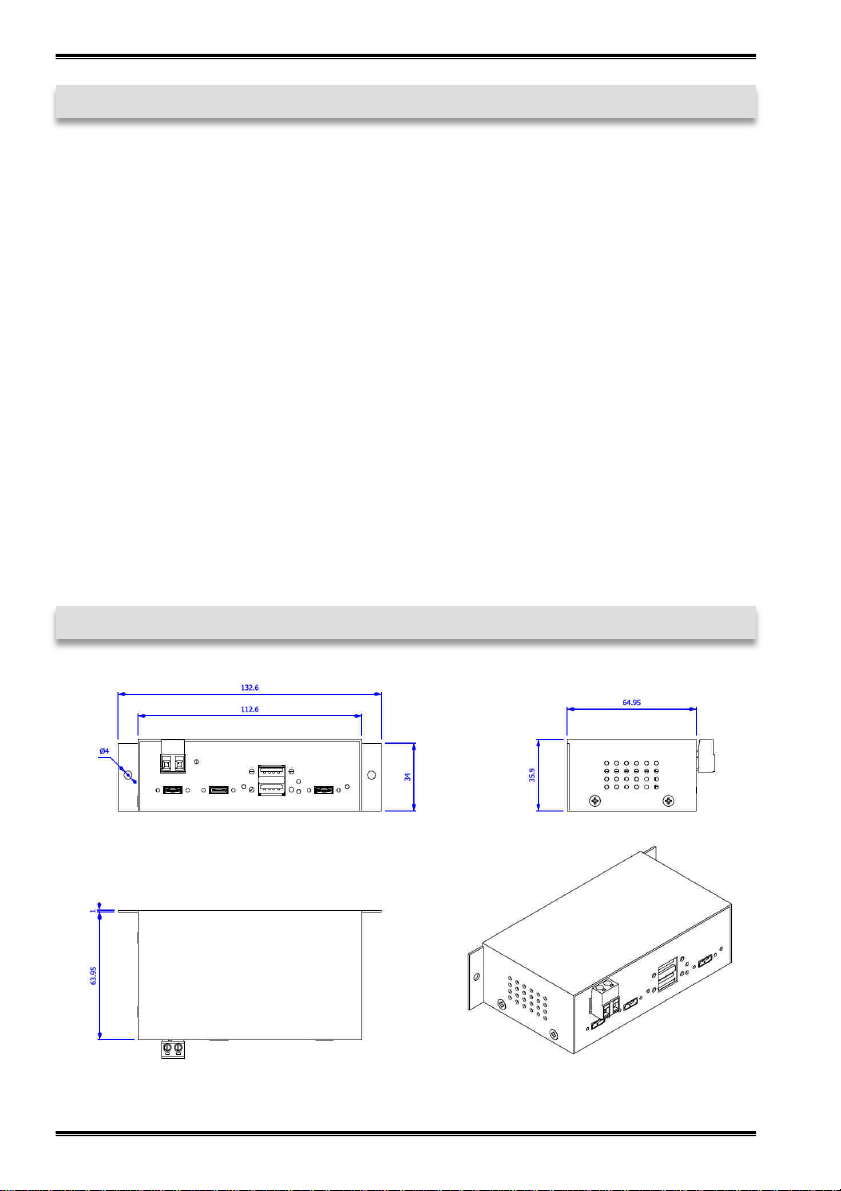
7. Technische Daten
Chip-Set: VIA
Datentransfer-Rate: 10Gbit/s
Anschlüsse: 2x USB 3.1 (Gen2) A-Buchse, 3x USB 3.1 (Gen2)
C-Buchse, 1x Terminal Block 7-48V
Hardwaresystem: USB 1.1, 2.0, 3.0 & 3.1
Betriebssystem: Alle Betriebssysteme
Betriebstemperatur: 0° bis 55° Celsius
Lagertemperatur: -20° bis 85° Celsius
Rel. Luftfeuchtigkeit: 5% bis 95%
Stromversorgung: +7 bis +48 Volt
Abmessung: 151,10 x 62,00 x 34,00 mm
Gewicht: 500g
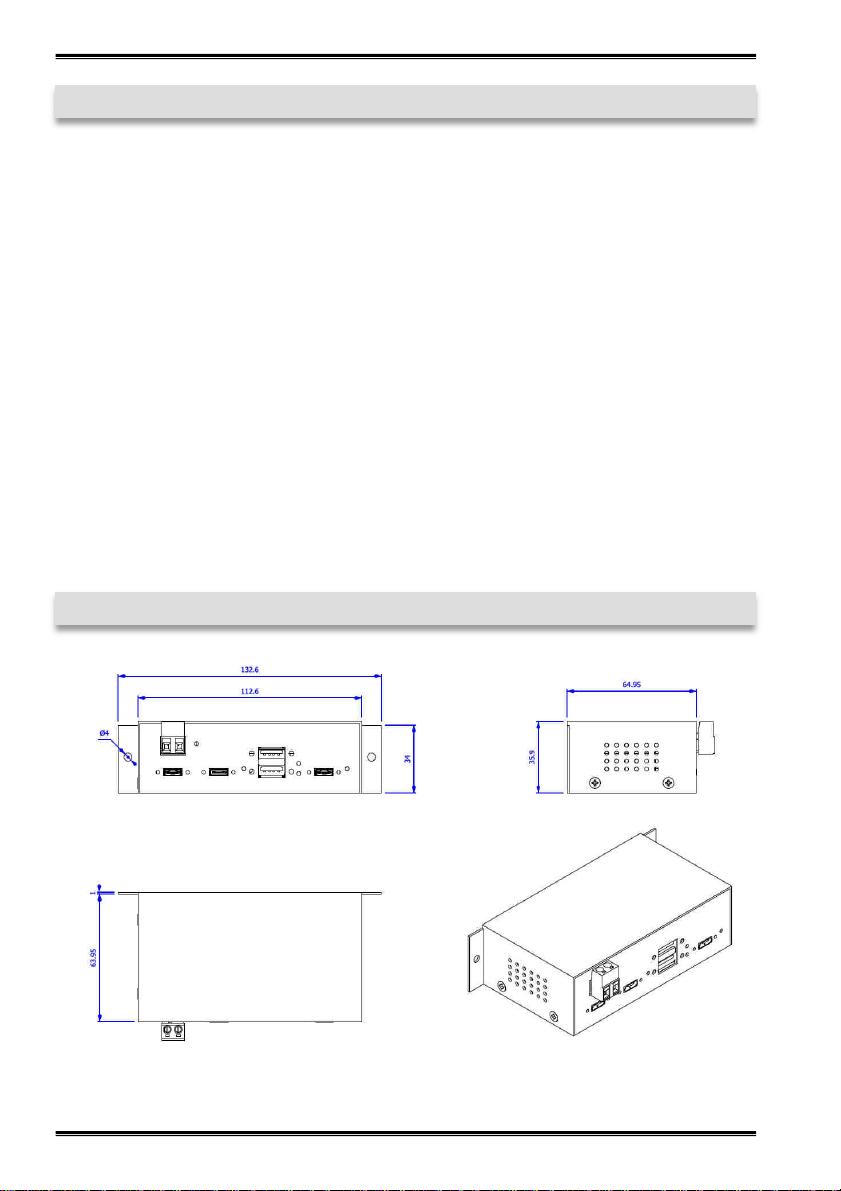
8. Technische Zeichnung
© Copyright 2018 by EXSYS Vertriebs GmbH. All Rights Reserved
8
Page 9
EX-1274HMV English
1. Description
The EX-1274HMV is a plug & play high-speed USB 3.1 (Gen2) metal hub for 4 USB
devices. The EX-1274HMV provides 2 USB-A Ports und 2 USB-C Port for devices and 1
USB-C uplink Port for PC. It supports all USB connections from 1.1 to 3.1. Via a external power supply it is possible to provide a maximum of 2,1A on each USB port. The EX
-1274HMV design fully utilize the VIA chipset, which represents the latest in Super-
Speed USB interface technology. It uses data transfer rates up to 10Gbit/s. It provides a
secure and very high data transfer on each single port. The EX-1274HMV support the
Self Powered and Bus Powered mode. Each port of the EX-1274HMV is additionally
screw lock. The EX-1274HMV is IP30 compliant. The DIN-Rail Kit is included in the
extent of delivery for installation in a 19” Rack. The DIN-Rail kit will be tightened with
two screwed on the back of the EX-1274HMV. The EX-1274HMV can be easily installed on the wall with the included Wall Mounting Bracket.
Features:
• Compatible for USB 1.1, 2.0, 3.0 & 3.1
• Up to 10Gbit/s
• All Operating Systems are supported
• All ports are Screw Lock
• Certificate for
2. Extent of Delivery
Before you connect the EX-1274HMV to your PC, you should first check the contents of
the delivery:
• EX-1274HMV
• USB 3.1 (Gen2) Cable
• DIN-Rail Kit (EX-6096)
• Wall Mounting Bracket
• Manual
© Copyright 2018 by EXSYS Vertriebs GmbH. All Rights Reserved
9
Page 10

English EX-1274HMV
3. Layout, Connections, LED’s & Jumper Settings
3.1 Layout
7-48V T-Block for
optional external
Power Supply
1x USB 3.1 (Gen2)
Upstream C-Port
3.2 Connections
+7V - 48V T-Block:
+7V - 48V
GND (Ground)
Power LED
1x USB 3.1 (Gen2)
Downstream C-Port
ATTENTION!!!
Never connect power to GND, it will destroy your
Hardware!!!
2x USB 3.1 (Gen2)
Downstream A-Port
Status LED
for each Port
1x USB 3.1 (Gen2)
Downstream C-Port
USB 3.1 (Gen2) A-Port:
GND_DRAIN
StdB_SSTX +
StdB_SSTX -
VCC
© Copyright 2018 by EXSYS Vertriebs GmbH. All Rights Reserved
D+ D-
GND
StdB_SSTX+
StdB_SSTX -
Attention!
Never plug in with force
or in wrong direction.
10
Page 11

EX-1274HMV English
3. Layout, Connections, LED’s & Jumper Settings
3.2 Connections
USB 3.1 (Gen2) C-Port:
Note!
By dual assignment of the pins, the USB Type-C plug can be plugged into the port on both
sides.
3.3 LED‘s
Status LED‘s:
LED Status LED Function
Off No USB Device connected
Slow Flash USB 2.0 Mode
Fast Flash USB 3.1 (Gen1) Mode
Steady On USB 3.1 (Gen2) Mode
© Copyright 2018 by EXSYS Vertriebs GmbH. All Rights Reserved
11
Page 12
English EX-1274HMV
3. Layout, Connections, LED’s & Jumper Settings
3.4 Jumper Settings
The EX-1274HMV comes with the setting Self-Power. You also have the possibility
the EX-1274HMV to supply Bus-Power. For this you open the case with the four
screws on the sides. Then you must set the jumper JP1 from DIS (Disable) to ENA
(Enable). See the following picture.
ENA
DIS
JP1
© Copyright 2018 by EXSYS Vertriebs GmbH. All Rights Reserved
12
Page 13

EX-1274HMV English
4. Hardware Installation
Because there are large differences between PC’s, we can give you only a general installation guide. Please refer your computer’s reference manual whenever in doubt.
1. Connect the USB cable to the USB C-Port at the Hub.
2. Connect the optional power supply into the terminal block at the Hub.
3. Now connect the other end from the USB cable (C-Plug) to the C-Port at your PC.
5. Driver Installation
All Operating Systems
After the hardware installation the OS will recognize the device automatically and install
the drivers.
CHECK INSTALLED DRIVER
Open the >Device manager<. Now you should see at „USB-Controller“ the following
new entry's:
If you see this or a similar information the device is installed correctly.
6. Cleaning
For cleaning please use only a dry fluff less cloth and remove the dirt with gently pressure. In the area of the connectors please make sure that no fibres from the cloth remain in the connectors. Attention! Never use a moist or wet cloth for cleaning!
© Copyright 2018 by EXSYS Vertriebs GmbH. All Rights Reserved
13
Page 14
English EX-1274HMV
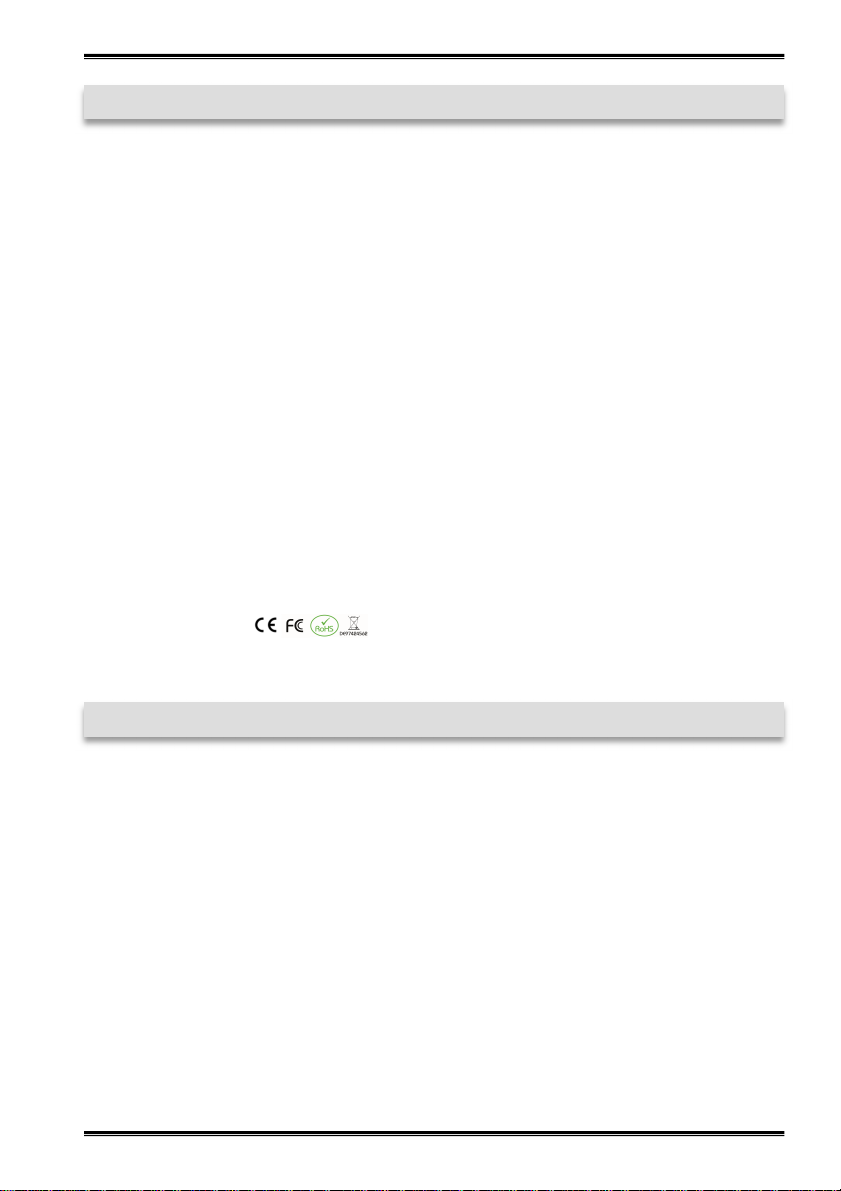
7. Technical Information
Chip-Set: VIA
Data Transfer Rate: 10Gbit/s
Connectors: 2x USB 3.1 (Gen2) A-Port, 3x USB 3.1 (Gen2) C-Port,
1x Terminal Block 7-48V
Hardware System: USB 1.1, 2.0, 3.0 & 3.1
Operating System: All Operating Systems
Operating Temperature: 32°F to 131°Fahrenheit
Storage Temperature: -40°F to 185°Fahrenheit
Rel. Humidity: 5% to 95%
Power: +7 to +48 Volt
Size: 151,10 x 62,00 x 34,00 mm
Weight: 500g
8. Technical Drawing
© Copyright 2018 by EXSYS Vertriebs GmbH. All Rights Reserved
14
 Loading...