

Page 1

User manual Qleaf/Qleaf8
Gebruikershandleiding Qleaf/Qleaf8
Gebrauchsanweisung Qleaf/Qleaf8
Mode d’emploi du Qleaf/Qleaf8
Manual de usuario Qleaf/Qleaf8
Manual de Instruções Qleaf/Qleaf8
Kullanım Kılavuzu Qleaf/Qleaf8
Istruzioni d’uso Qleaf/Qleaf8
Instrukcja obsługi aparatu słuchowego Qleaf/Qleaf8
Användarmanual Qleaf/Qleaf8
ユーザーマニュアル Qleaf/Qleaf8
用戶手冊 Qleaf/Qleaf8
Page 2

Qleaf user manual
English Qleaf user manual 1
Nederlands Qleaf gebruikershandleiding 25
Deutsch Qleaf Gebrauchsanweisung 49
Français Mode d’emploi du Qleaf 73
Español Qleaf manual de usuario 97
Português Manual de Instruções Qleaf 121
Türkçe Qleaf Kullanım Kılavuzu 145
Italiano Istruzioni d’uso Qleaf 169
Polski Instrukcja obsługi aparatu słuchowego Qleaf 193
Svenska Qleaf användarmanu
日本語 Qleafユーザーマニュアル 241
漢語 Qleaf用戶手冊 265
ii 1
al 217
English
Page 3

English
Congratulations on your purchase of the Qleaf.
With the purchase of a Qleaf, you are guaranteed
a product which is composed of high-quality
components. By application of several important
innovations on the eld of hearing aids, the Qleaf
ensures stylish, pleasant hearing adapted for
modern day use.
Table of contentsQleaf
What is Qleaf? 4
Qleaf´s anatomy 6
Qleaf - module (A) 7
Soft tip (B) 8
Battery (C) 8
The daily use of Qleaf 9
Placing the battery 9
Removing the battery 9
Inserting Qleaf in the soft tip 10
Removing Qleaf from the soft tip 11
Placing Qleaf in the ear 12
Removing Qleaf from the ear 13
Fitting procedure and conguration 13
Maintenance and use 14
Cleaning 15
Storage 15
Warnings 16
Information about reparation services 18
Disclaimer 21
The data of your Qleaf 22
Warranty 23
Manufacturer 289
English
2
3
Page 4

English
What is Qleaf?
The Qleaf is a so-called modular (same for each
ear) CIC* device with a standard tting, called a
soft tip.
For the power supply, a cell battery of type 10
(yellow sticker) is required. The device is provided
with an advanced microprocessor, which ensures
the processing and amplication of the sound,
adapted to your particular hearing problem.
The Qleaf uses a soft tip with Large-MediumSmall sizes. The size of the soft tip depends
on the size of your ear canal. The choice of the
correct size is extremely important. If the soft
tip is too large, the device might become less
comfortable to wear. If the soft tip is too small,
the device might exhibit spontaneous whistling.
During tting, your dispenser will try to nd the
size of soft tip that suits you best.
One of the most occurring reasons for reparation
is damaging or clogging of the speaker due to
ear wax. The Qleaf has a built-in system that
prevents the intrusion of ear wax into the device.
As a result, the components in the module will
always remain undamaged and unclogged. In
case the soft tip will be clogged, it can easily be
cleaned or replaced.
The Qleaf is provided with a microprocessor
including the following characteristics:
• An adaptive ‘antifeedback’ system – this
prevents spontaneous ‘whistling’ of the device.
• An adaptive ‘noise reduction’ system – this
improves the hearing performance in noisy
environments.
As a result of the combination of size, shape,
innovative construction and material, Qleaf
oers a range of important advantages:
• Almost invisible.
• Minimal distortion of your own voice
(occlusion).
• High sound gain by positioning of the speaker
close to the ear drum.
• Natural sound, with high directional hearing
thanks to an empty auricle, and minimum
wind noise thanks to deep microphone
positioning.
• Protects against damage caused by ear wax.
• Suitable for cell phone use.
• Suitable for sporting activities.
• Easy to use and maintain.
• Contemporary design.
English
4
* Completely In the Canal
5
Page 5

English
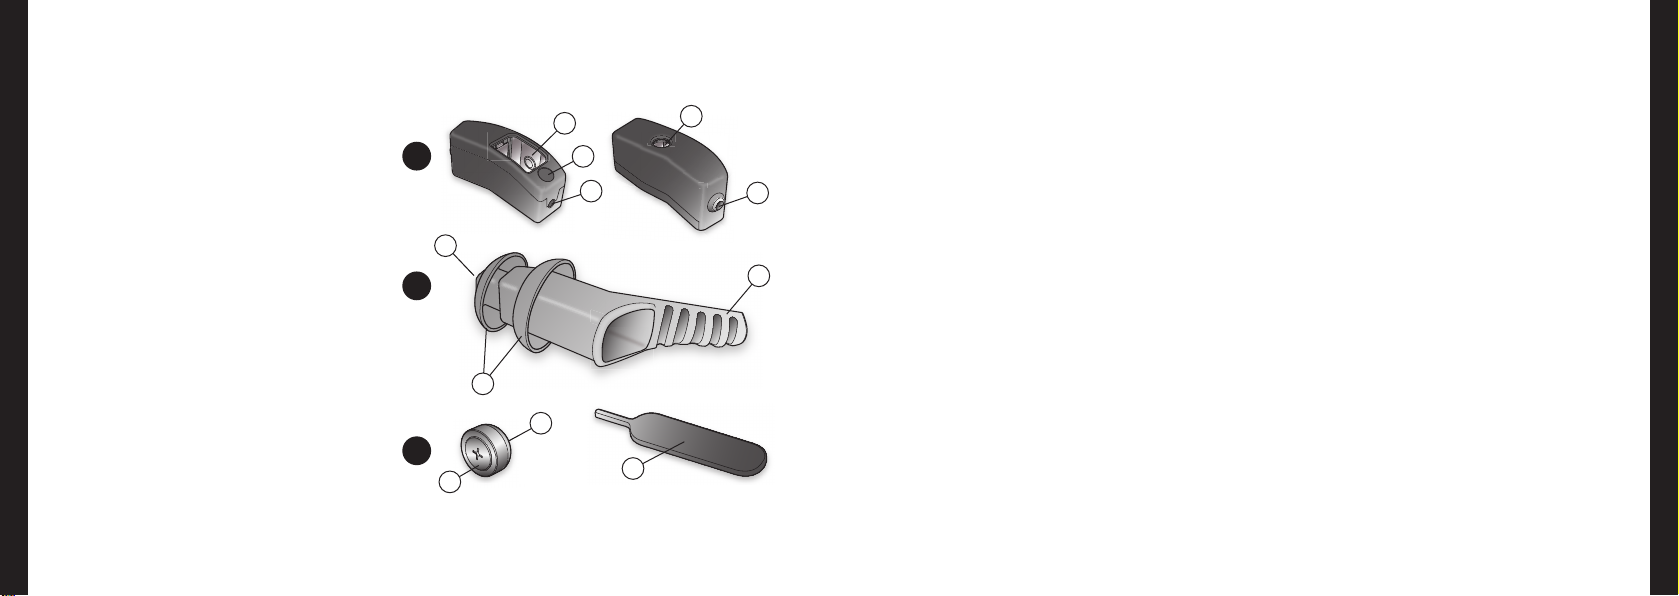
Qleaf´s anatomy
A Qleaf - module (casing)
1 Battery compartment
2 Coloured side indicator
3 Microphone opening
4 Opening for battery removal
5 Speaker opening
B Soft tip
6 Sound opening
7 Domes
8 Pull cord
C Battery (type 10)
9 Plus pole (+)
10 Minus pole (–)
11 Battery removal tool
1
A
6
B
7
C
9
2
3
10
11
4
5
8
Qleaf module (A)
Casing (A)
The casing has been made of durable plastic. For
the maintenance of the casing, please refer to the
chapter ‘Maintenance and use’ (page 14-15).
Battery compartment (1)
This compartment comprises of the battery - a
type 10 cell battery - that provides the power
supply for Qleaf. The device is switched o upon
the removal of the battery.
The battery contacts in the battery compartment
transport the supply voltage from the battery
to the microprocessor inside the device. The
battery contacts also serve as programming
contacts. Your dispenser uses the programming
contacts with a special tool to change the
settings of the Qleaf.
Coloured side indicator (2)
By using two di erent colours, the left and right
ear module can be identi ed.
Microphone opening (3)
Here the microphone is located that picks up the
sound, which is processed and ampli ed by the
Qleaf.
Opening for battery removal (4)
The added battery removal tool is used through
this opening. See chapter ‘Removing the battery’
(page 9).
Speaker opening (5)
The processed and ampli ed sound emits
through this opening and is directed via the soft
tip towards the ear drum.
English
6
7
Page 6
English
Soft tip (B)
The soft tip of the Qleaf is made of a
biocompatible plastic and designed as a
disposable, thus enabling it to be replaced
regularly. For its maintenance and cleaning,
please refer to the chapter ‘Maintenance and use’
(page 14-15). The illustration can be di erent
from your choice of size for soft tip.
Sound opening (6)
The processed and ampli ed sound emits
through this opening and is directed towards the
ear drum.
Domes (7)
The domes ensure a seal, which prevents the
sound of the speaker to interfere with that of the
microphone. Additionally, the domes provide a
good ‘grip’ inside the ear.
Pull cord (8)
To take the Qleaf out of the ear, the pull cord is
used. After insertion of the Qleaf the pull cord
will be situated behind the tragus (page 12),
which makes it nearly invisible.
Battery (C)
Qleaf uses type 10 cell batteries, in the package
indicated with a yellow sticker. The device is
switched o upon the removal of the battery.
The daily use of Qleaf
Before you start any of the actions mentioned in
chapters ‘The daily use of Qleaf’ and ‘Maintenance
and use’, make sure you are using a clean and
horizontal working surface.
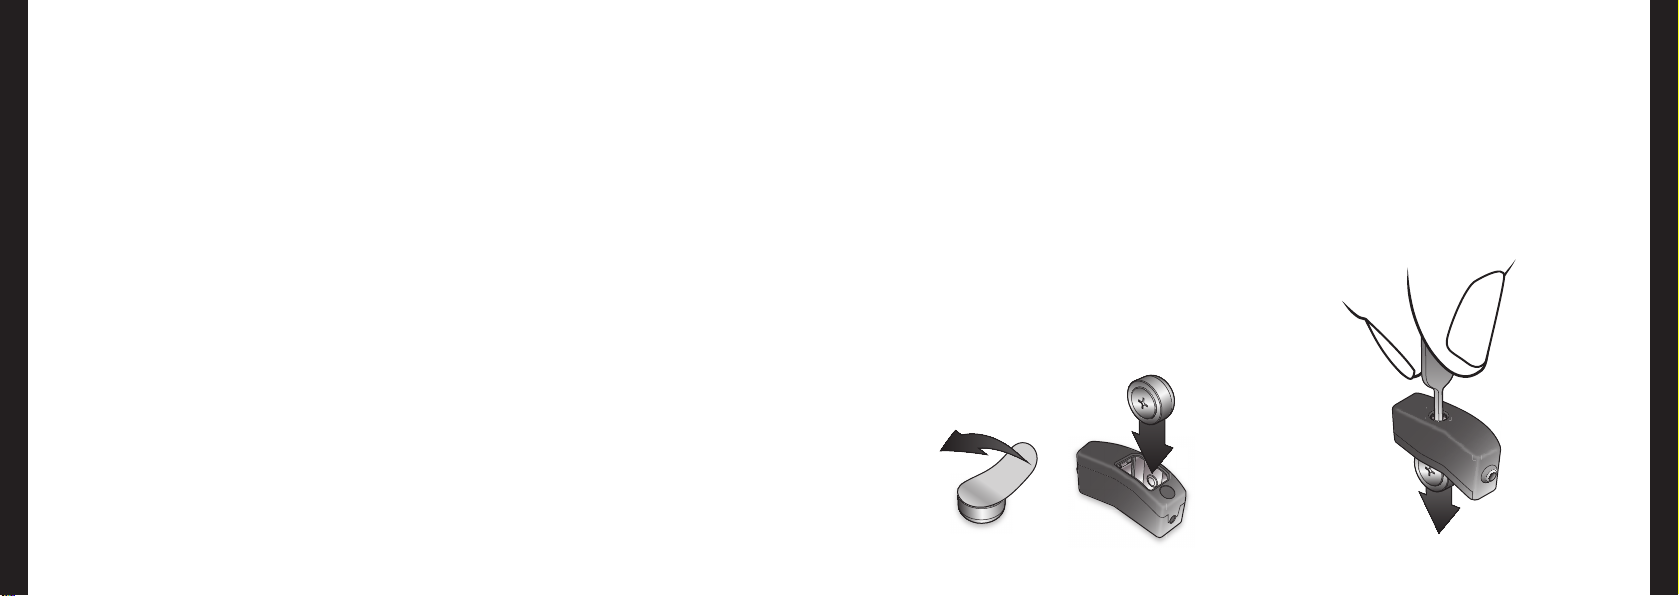
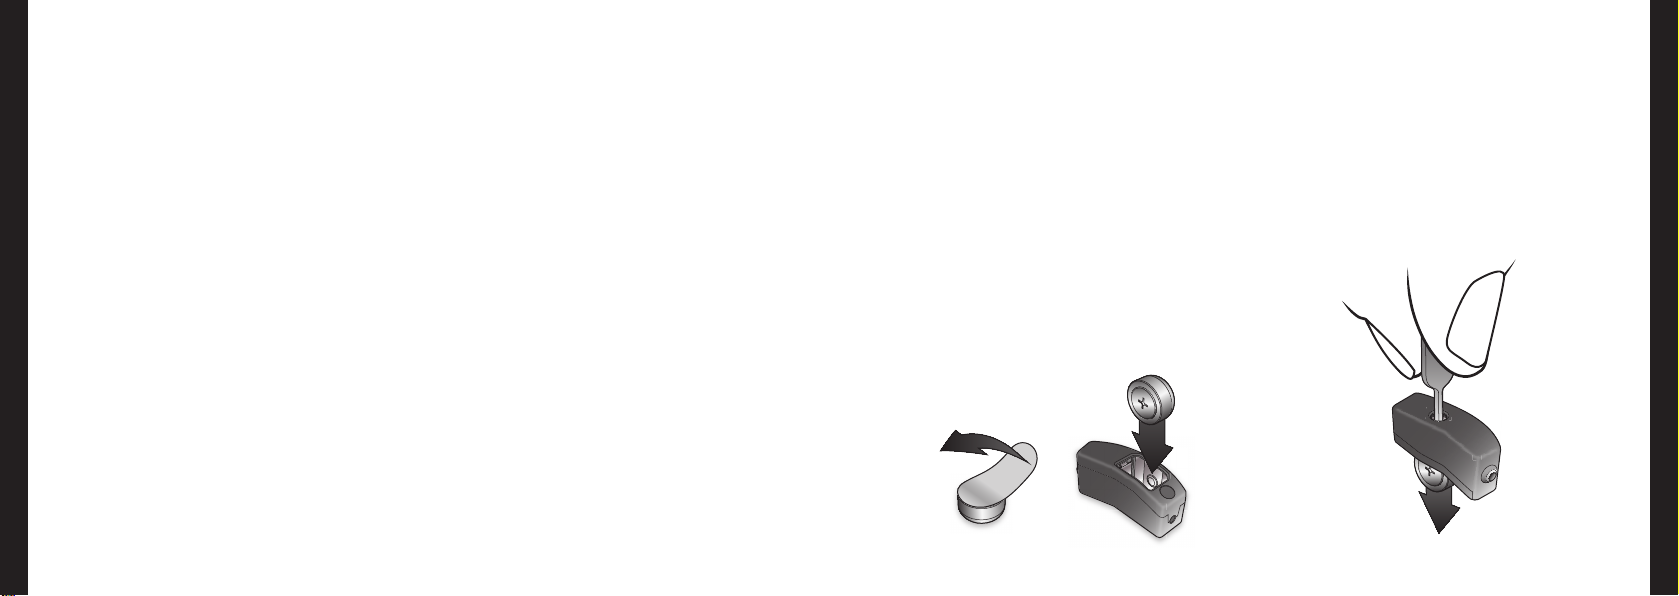
Placing the battery
While using a new battery: rst remove the
sticker from the + pole. Hold the module
(coloured side indicator facing to the right) and
insert the battery as indicated (see image).
English
Removing the battery
Hold the module and remove the battery with the
added tool (see image).
8
9
Page 7
English
English
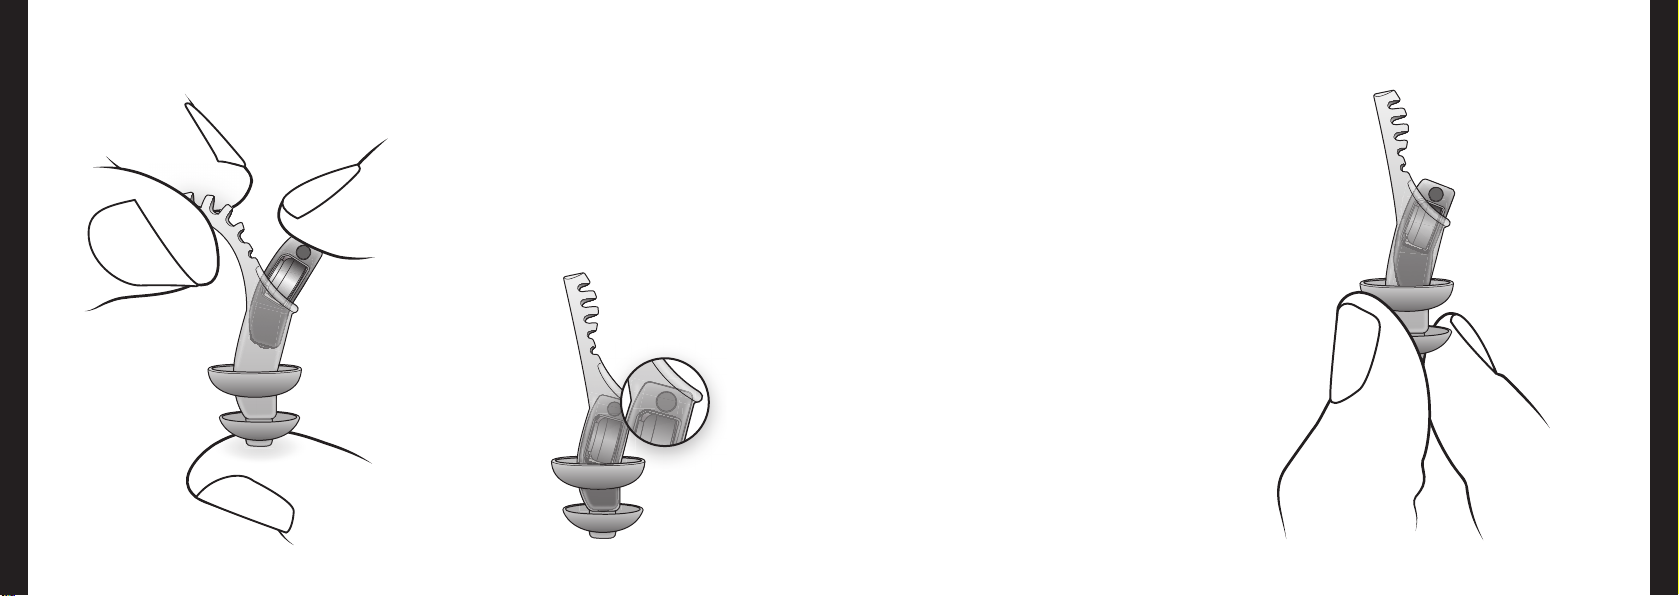
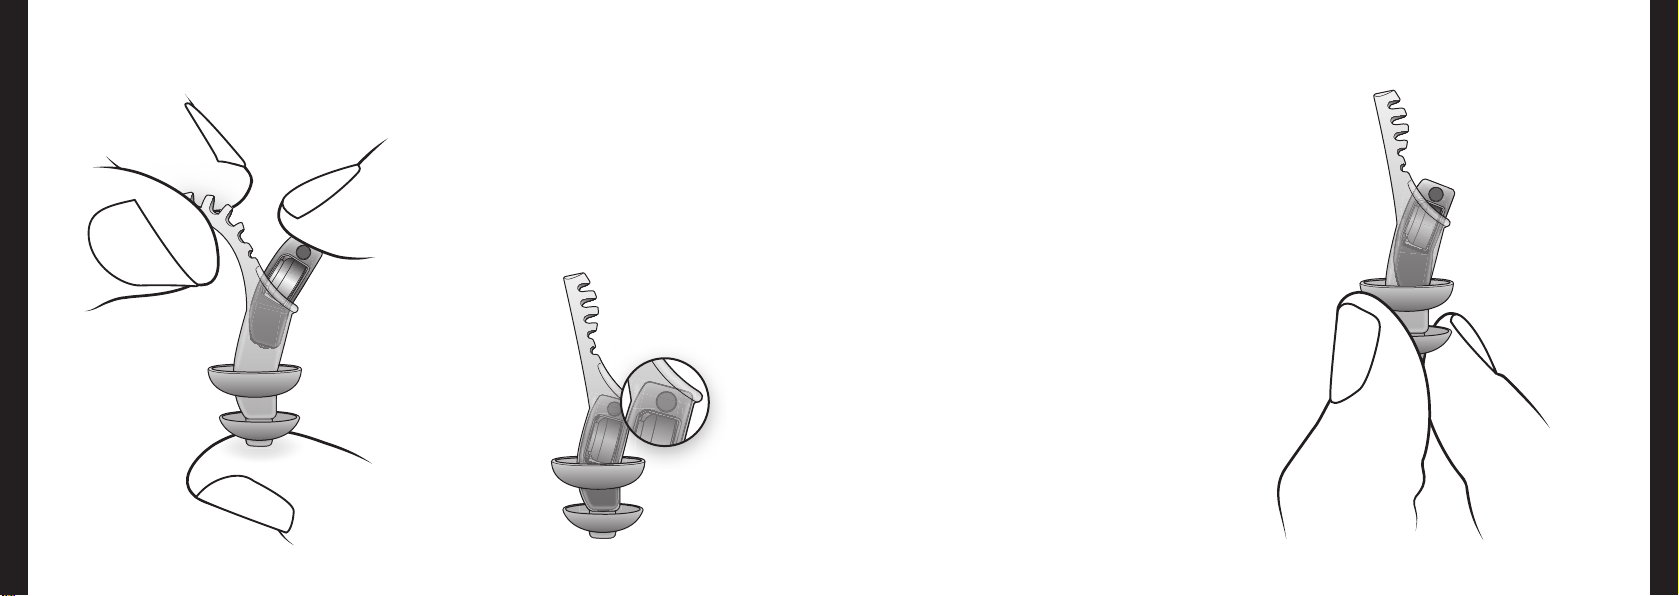
Inserting Qleaf in the soft tip
• Insert the module into the soft tip, facing the
battery, pull cord to the left (see image).
• Insert the module all the way into the soft tip
(see image below).
Removing Qleaf from
the soft tip
‘Squeeze’ the module out of the soft tip by
squeezing the end part of the soft tip with the
small dome (see image).
10
11
Page 8
English
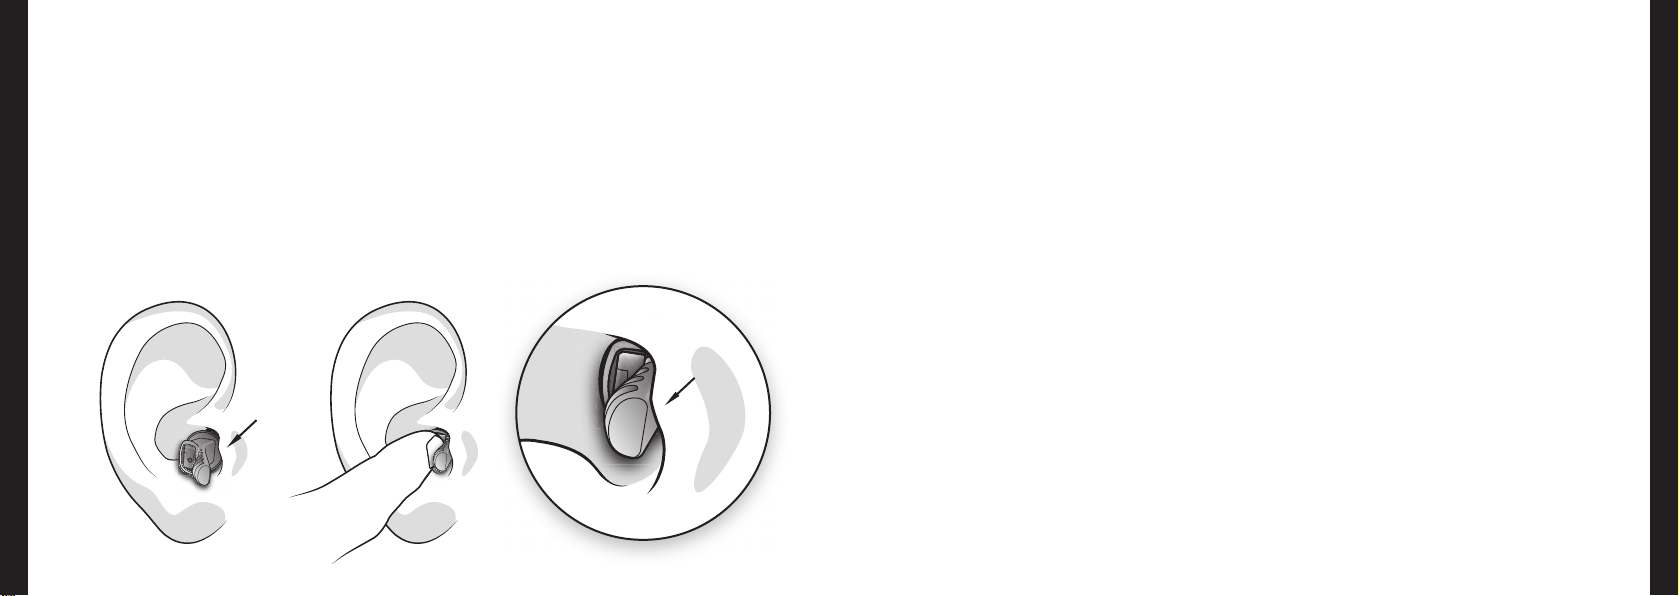
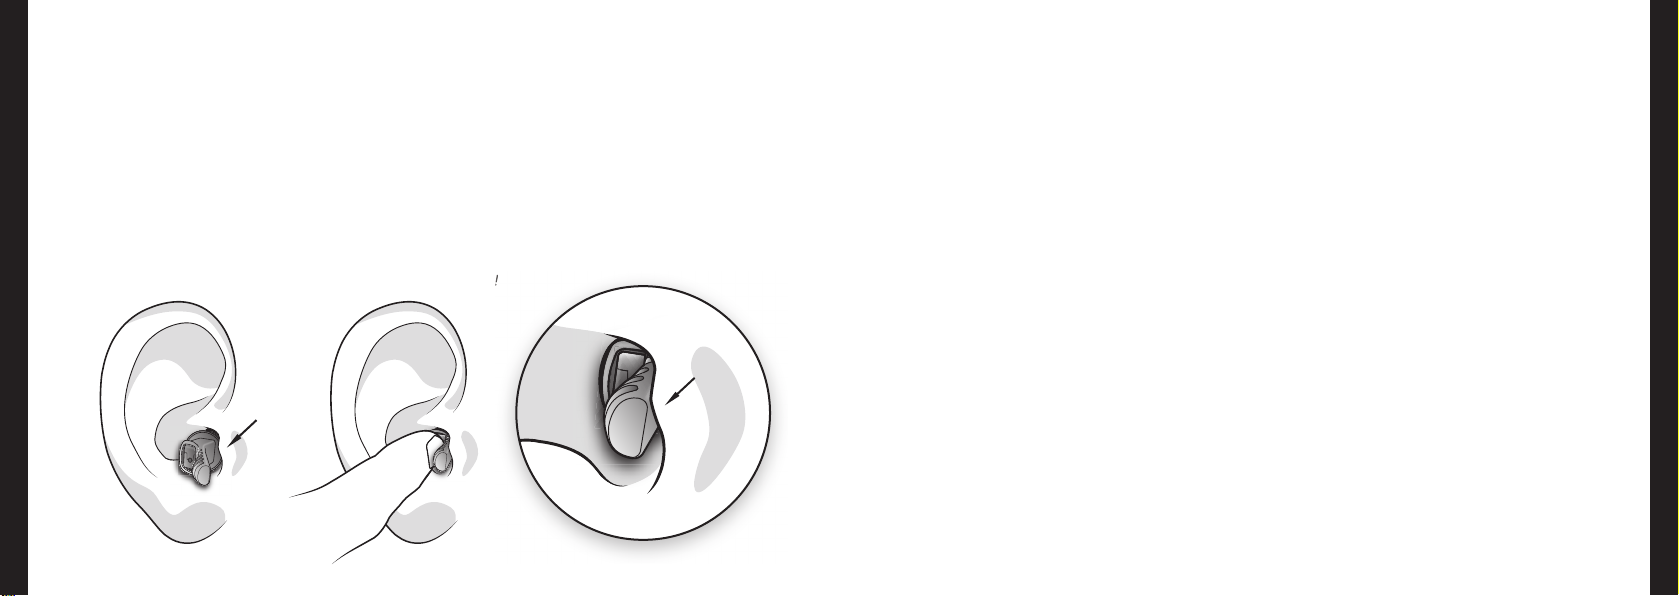
Placing Qleaf in the ear
• Put the end of the soft tip with the dome(s)
loosely in the ear. The pull cord is situated
behind the tragus, directing towards the nose.
• Insert the device into the ear by pressing on
the at side of the device. Now gently push
the device deeper into the ear. If the mouth is
opened wide, insertion will be easier.
tragus
12
Inserting a new soft tip can be a bit bothersome
because the surface of a new soft tip is somewhat
rigid and as a result of the fact that some ears are
quite ‘dry’. Using some lubricant gel or crème can
help in these cases (a tiny amount is su cient).
N.b.: Note that the lubricant does not clog the
sound opening!
tragus
Ideally, the at side of the module (where the
microphone is situated) will be ush to the entry
of the ear canal after insertion. In this way, the
device is practically invisible and the sound
optimal. There are cases where the ear canal is
too small: In that case, it is possible for the device
to protrude a few millimetres.
If the pull cord protrudes after the insertion of
the device, after which it becomes visible, it can
be easily custom-cut by the dispenser.
Make sure your hands are clean while inserting
the Qleaf. Make-up, crème, body oil, gel, hairspray
and likewise products can dirty up the module and
can, for example, contribute to the clogging of the
microphone opening.
English
Removing Qleaf from the ear
Hold the pull cord rmly and pull it - always
slowly - out of the ear.
Fitting procedure and
con guration
The tting procedure and con guration of
the hearing aid is both an important and
individual process. For this reason, consult your
dispenser for any complaints about the tting or
con guration. Your dispenser is the authorized
person to carry out any necessary modi cations.
13
Page 9

English
Maintenance and use
Although the Qleaf module can be used for
both right and left ears, the settings are usually
dierent for the right and left ear. This means that
once the module has been tted, you should not
use it in the other ear. Provided that you use the
same size soft tip in both ears, it doesn’t matter if
you switch soft tips.
The building up of ear wax diers from one
person to another. Therefore it cannot be avoided
completely that the sound outlet of the soft
tip will be clogged with ear wax. Although the
sound volume may reduce because of clogging,
this cannot damage your device. In case you
observe that the sound outlet of the soft tip has
been clogged, you may clean the soft tip (see
paragraph ‘Cleaning’) or replace it.
Check the module(s) and the soft tip(s) daily
for clogs and damages. This guarantees you an
optimal performance and a long operational life.
Always replace the soft tip when damages are
visible. To keep the performance of your device
optimal and minimise the chance of infection, we
advise you to replace the soft tip with a new one
at least once a month. Soft tips are available at
your dispenser.
Cleaning
Module:
• Clean daily with a soft and dry tissue.
• In case of severe dirt, wipe with special (moist)
cleaning tissues for hearing aids.
Soft tip:
• Clean daily with a soft and dry tissue.
• In case of severe dirt, you may clean it either
with special (moist) cleaning tissues, with
soluble cleaning tablets for hearing aid
products or you may alternatively have it
cleaned with an ultrasound cleaner.
• Clogged soft tips can be rinsed o under
streaming tepid water. In case of severe or
persistent dirt, if a change in the properties
or damage of the material occurs, the soft tip
should always be replaced.
N.b.: Never use aggressive cleaning products,
abrasives or solvents! This can cause irrevocable
damage to the soft tip or the module.
English
Storage
At night:
We recommend that you remove the soft tip
from the module during the night: Remove the
battery from the device and store it in a secure
place outside its box. In this way, you increase the
operational life of the battery and also allow for
the evaporation of moisture possibly present in
the device.
Short-term storage:
You may use the carrying box, when you want to
remove the device from the ear temporarily.
Long-term storage:
When you don’t use your hearing aid over a
longer period of time, clean the module and soft
tip before storing them inside the carrying box.
Always remove the battery from the device in
this situation.
14
15
Page 10

English
Warnings
The soft tip is an essential part of the
Qleaf. Without the soft tip, the Qleaf
will not be able to function properly
and this could cause irreversible dirtying of the
module. For this reason, never use the module
without the soft tip.
Once the device has been tted, you should not
wear it in the other ear. This generally leads to a
deterioration of hearing performance and could
sometimes even result in hearing loss.
Never use damaged or dirtied soft tips. This can
negatively aect the hearing performance or
result in an uncomfortable t, which in turn could
lead to infections of the ear.
Replace the soft tip of your device regularly, even
if it is not visibly damaged or dirtied, see chapter
‘Maintenance and use’ (page 14-15).
When using Qleaf for the rst time, begin with
a continuous wearing period of 4 hours and
subsequently increase wearing time with one
hour a day. If you suer from pain, continuous
irritation or itching, don’t use the devices before
you receive specialist advice. If your complaints
persist, consult a physician. Have your ears and
your hearing checked regularly, both during the
beginning period and afterwards.
If for some reason it is not possible to remove
Qleaf from your ear, consult your dispenser or a
physician. Removing Qleaf from your ear without
the right tools can damage the soft tip or the
module.
Do not use the Qleaf in the following cases:
• A medical history of the ear.
• Exostoses (bulging bone growth) in the ear
canal.
• Heavy ear wax secretion.
The device should not be:
• dropped.
• exposed to moisture or water.
• immersed in water.
• used while swimming, taking shower, bathing
or in the sauna.
• cleaned wet.
• exposed to extreme high temperatures, such
as when using a hair dryer.
• worn in mines or other environments where
explosion risk is high.
• exposed to X-ray radiation or strong magnetic
elds, such as during medical investigation.
• worn in the places where hairspray
(hairdresser) or solvents (such as dye) are used.
Care should be taken in using make-up, crème,
body oil, gel, hairspray and similar products,
while you are wearing or inserting the Qleaf.
They can dirty up your device and, for example,
contribute to the clogging of the microphone
opening.
Keep the Qleaf away from small children
and pets. In case of swallowing one of the
components, there is a choking hazard to small
children.
Empty batteries and old hearing aids
should be collected and disposed as
chemical waste.
English
16
17
Page 11

English
Information about reparation services
The Qleaf has been developed by ExSilent BV,
Overschiestraat 63, Amsterdam. For your
complaints or reparation requests, you should
contact the provider from whom you purchased
your device. Complaints and reparations
settlement may vary by provider.
Limited Manufacturer’s Warranty.
This limited guarantee will be applicable in any
part of the ExSilent European Region unless
there is a local guarantee. ExSilent BV (”ExSilent”)
guarantees that this ExSilent product (”Product”)
is free from defects in materials, design and nish
at the time of its original purchase subject to the
following provisions and conditions:
1. This limited guarantee is given to the end
user of the Product (”Client”). It is given
without exclusion or restriction of (i) any of
the Client’s binding statutory rights or (ii)
any of the Client’s rights against the seller/
concessionaire of the Product.
2. The guarantee period is twenty four (24)
months from the date on which the rst
Client purchased the Product. In the event
of a successive purchase or other change
of owner/user, the guarantee period will
continue for the remaining part of the
twenty four (24)-month period and remain
unaected in all other respects. This limited
guarantee is only applicable and enforceable
in the following countries: Bosnia, Bulgaria,
all members of the European Union, Iceland,
Israel, Croatia, Macedonia, Norway, Rumania,
Serbia/Montenegro, Turkey and Switzerland.
3. During the guarantee period, ExSilent or
its approved service provider will repair or
replace the defective Product (fully at the
discretion of ExSilent). ExSilent will return
the repaired Product or another Product to
the Client in good condition. All components
or other equipment which are replaced will
become the property of ExSilent.
4. A replaced product will be given an
extended or renewed guarantee period. In
case of a repaired product, the old guarantee
will continue to apply.
5. This limited guarantee does not cover
painted covers or other comparable
personalised components.
6. This limited guarantee is not applicable
to damage caused by normal wear and
use. Neither will this limited guarantee be
applicable if:
(i) the defect was caused by the fact that
the Product was subjected to: use
in conict with the owner’s or user
directions, rough treatment, exposure to
moisture, damp or extreme thermal or
environmental conditions or rapid changes
in such conditions, corrosion, oxidation,
nonpermissible alterations or connections,
non-permissible openings or repairs, repairs
made with non-permissible replacement
parts, incorrect use, improper installation,
accidents, force majeure, spilling of food or
liquids, the inuence of chemical products
or other facts over which ExSilent cannot
reasonably have control (including but
not limited to defects in consumable
components, such as batteries which only
have a limited life by nature) unless the
defect has been caused directly by defects in
materials, design or nish;
(ii) ExSilent or its approved service provider
received no notication of the defect
from the Client within thirty (30) days of
the occurrence of the defect within the
guarantee period;
(iii) the Product was not returned to ExSilent or
its approved service provider within thirty
(30) days of the occurrence of the defect
within the guarantee period;
(iv) the serial number was removed, erased,
damaged, changed or is illegible;
(v) the defect was caused by the fact that the
Product was used with or was connected
to an additional component which was not
manufactured or supplied by ExSilent or
used for a purpose other than that for which
it was intended;
(vi) The defect was caused by the fact that the
battery was subjected to a short-circuit or
English
18
19
Page 12

English
that the connecting pieces of the battery
housing or cells were broken or show
evidence of tampering or that the battery
was used in another device than that for
which it is intended.
7. In order to make a claim under the limited
guarantee, the Client must send a legible
and unaltered, fully-completed original
guarantee card to ExSilent or its authorized
service provider within two weeks of
purchasing the Product.
8. This limited guarantee is the sole and
exclusive remedy available to the Client
against ExSilent and the sole and exclusive
liability of ExSilent towards the Client for
defects in or poor functioning of the Product.
This limited guarantee replaces all other
guarantees and liabilities, including verbal,
written, (non binding) statutory, contractual,
unlawful and otherwise. ExSilent is not liable
for any indirect, secondary or consequential
damage, costs or expenses. Neither is
ExSilent liable for any direct damage, costs or
expenses, if the Client is a legal entity.
9. Any amendment or change to this limited
guarantee requires the prior written approval
of ExSilent.
Disclaimer
Copyright © 2010 ExSilent. All rights reserved.
Illegal reproduction, transfer, distribution or
holding of this document, or a part hereof, in one
way or another, without the prior written consent
of ExSilent is forbidden.
ExSilent reserves the right to change and make
improvements in its products that are described
in this document without prior notication.
In no case, ExSilent can be held liable for any loss
of data, neither for income, nor for any special
incidental, nor for indirect damage.
The content of this document is provided
without any warranty. Unless the applicable
law requires otherwise, neither explicitly nor
implicitly nor guarantee will be given in regard
to the exactitude, reliability and content of this
document. This includes but is not limited to
implicit warranties regarding its marketability
and suitability to attain a certain goal.
ExSilent reserves the right at any time to change
and to revoke this document without prior
notication.
English
20
21
Page 13
English
The data of your Qleaf Warranty
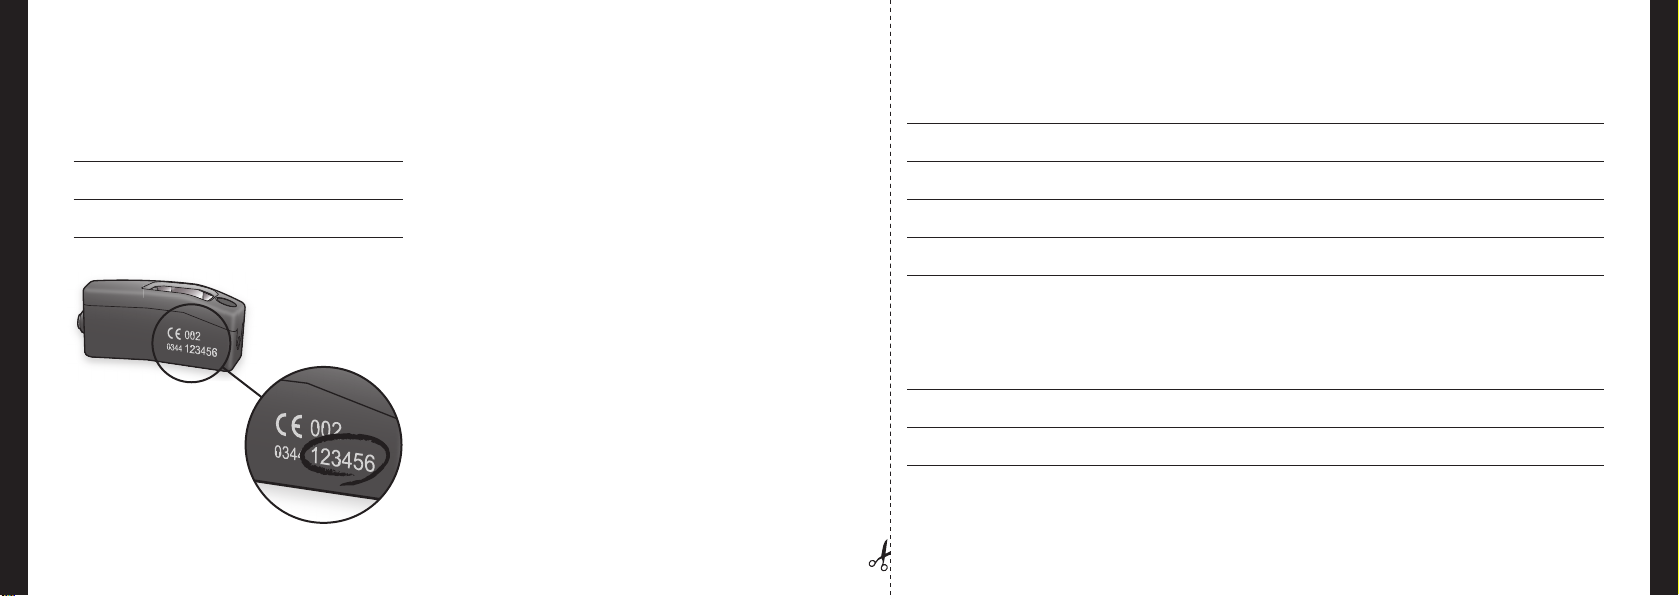
Please note the data of your Qleaf below.
Name:
English
Date of purchase:
Serial number of Device - Right:
Serial number of Device - Left:
Serial number (6 digits)
22
Address: Zip code:
City: Country:
Phone: Date of purchase:
Serial number - Right: Serial number - Left:
City and country of purchase
Name of the store:
Address of the store: Zip code:
City: Country:
23
Page 14

Nederlands
Qleaf gebruikershandleiding
Nederlands
24
25
Page 15

Nederlands
InhoudsopgaveQleaf
Gefeliciteerd met uw aanschaf van de Qleaf.
Met de aanschaf van een Q bent u verzekerd
van een product dat is samengesteld uit
hoogwaardige componenten. Door toepassing
van diverse belangrijke innovaties op
hoortoestelgebied staat de Q garant voor stijlvol
luistergenot, aangepast aan deze tijd.
26
Wat is de Qleaf? 28
Anatomie van de Qleaf 30
Qleaf - module (A) 31
Softtip (B) 32
Batterij (C) 32
Het dagelijks gebruik van de Qleaf 33
Plaatsen van de batterij 33
Verwijderen van de batterij 33
Qleaf in de softtip inbrengen 34
Qleaf uit de softtip nemen 35
Qleaf in het oor plaatsen 36
Qleaf uit het oor nemen 37
Aanpassing en instelling 37
Onderhoud en gebruik 38
Reiniging 38
Opbergen 39
Waarschuwingen 40
Informatie over reparatieservice 42
Disclaimer 45
De gegevens van uw Qleaf 46
Garantie 47
Fabrikant 289
27
Nederlands
Page 16

Nederlands
Wat is de Qleaf?
De Q is een zogenaamd modulair (voor elk
oor gelijk) CIC* toestel met een standaard
aanpasdeel, de softtip.
Voor de stroomvoorziening wordt een knoopcel
van het type 10 (gele sticker) gebruikt. Het
toestel is voorzien van een geavanceerde
microprocessor die zorgt voor de bewerking en
versterking van het geluid, aangepast aan uw
persoonlijke hoorprobleem.
28
De Q maakt gebruikt van een softtip in de maten
Large - Medium - Small. De maat van de softtip
is afhankelijk van de grootte van uw hoorkanaal.
Het is belangrijk dat de goede maat gekozen
wordt. Wanneer de softtip te groot is, kan het
toestel minder comfortabel zitten. Wanneer de
softtip te klein is, kan het toestel spontaan gaan
piepen. Tijdens de aanpassing zal uw audicien
nagaan welke maat softtip voor u het meest
geschikt is.
Een veelvoorkomende oorzaak van reparaties is
verstopping of beschadiging van de luidspreker
door oorsmeer. De Q beschikt over een
ingebouwd systeem dat binnendringen van
oorsmeer in het toestel voorkomt. Hierdoor
blijven de componenten in de module altijd
beschermd tegen beschadiging of verstopping.
Indien door vervuiling de softtip verstopt
raakt, dan kan deze gemakkelijk worden
schoongemaakt of worden vervangen.
* Completely In the Canal; volledig in het oorkanaal
De Q is voorzien van een microprocessor met
onder meer de volgende eigenschappen:
• Een adaptieve (zelf-aanpassende)
‘antifeedback’ schakeling - deze voorkomt
spontaan ‘piepen’ van het toestel.
• Een adaptieve ‘spraak-in-rumoer’ schakeling
- deze verbetert de luisterprestaties in
rumoerige omgevingen.
Door de combinatie van kleine afmeting, vorm,
innovatieve constructie en materialen, biedt de
Q een aantal belangrijke voordelen:
• Nagenoeg onzichtbaar.
• Minimale vervorming van de eigen stem
(occlusie).
• Hoge geluidsopbrengst door plaatsing van de
luidspreker dicht bij het trommelvlies.
• Natuurlijk geluid, met verhoogde
richtinggevoeligheid door vrijblijvende
oorschelp en een minimale windruis door
diepe microfoonplaatsing.
• Bescherming tegen beschadiging door
oorsmeer.
• Bruikbaar met mobiele telefoon.
• Bruikbaar tijdens sporten.
• Makkelijk in gebruik en onderhoud.
• Eigentijds design.
29
Nederlands
Page 17
Nederlands
Anatomie van de Qleaf
A Qleaf module (behuizing)
1 Batterijruimte
2 Gekleurde links-rechts indicatie
3 Microfoonopening
4 Opening voor verwijderen van batterij
5 Luidsprekeropening
B Softtip
6 Geluidsopening
7 Lamellen
8 Trekkoordje
C Batterij (type 10)
9 Pluspool (+)
10 Minpool (–)
11 Batterijverwijdertool
30
1
A
6
B
7
C
9
2
3
10
11
4
5
8
Qleaf module (A)
Behuizing (A)
De behuizing is gemaakt van duurzaam
kunststof. Voor onderhoud van de behuizing, zie
hoofdstuk ‘Onderhoud en gebruik’ (pag.38-39).
Batterijruimte (1)
In deze ruimte zit de batterij - knoopcel type
10 - die voor de stroomvoorziening van de Qleaf
zorgt. Het toestel wordt uitgeschakeld door
verwijderen van de batterij.
De batterijcontacten zorgen voor het transport
van de stroom van batterij naar microprocessor.
De batterijcontacten dienen eveneens als
programmeercontact. Uw audicien gebruikt een
speciale adapter om de instellingen van de Qleaf
aan te passen.
Gekleurde links-rechts indicatie (2)
Door gebruik van twee kleuren kunnen het linker
en rechter toestel worden onderscheiden.
Microfoonopening (3)
Hierin ligt de microfoon die het geluid opneemt
dat door de Qleaf wordt bewerkt en versterkt.
Opening voor verwijderen batterij (4)
De meegeleverde batterijverwijdertool wordt
door deze opening gestoken. Zie hoofdstuk
‘Verwijderen van de batterij’ (pag. 33).
Luidsprekeropening (5)
Door deze opening treedt het bewerkte en
versterkte geluid naar buiten en verplaatst zich
via de softtip richting trommelvlies.
31
Nederlands
Page 18
Nederlands
Het dagelijks gebruik van de Qleaf
Softtip (B)
De softtip voor de Qleaf is gemaakt van een
bio-compatibele kunststof en ontworpen als
disposable, zodat deze regelmatig vervangen
kan worden. Voor onderhoud en reiniging zie
hoofdstuk ‘Onderhoud en gebruik’ (pag. 38-39).
De afbeelding kan afwijken van de voor u
geselecteerde maat.
Geluidsopening (6)
Door deze opening treedt het bewerkte
en versterkte geluid naar buiten richting
trommelvlies.
Lamellen (7)
De lamellen zorgen voor afsluiting, zodat geluid
van de luidspreker gescheiden blijft van de
microfoon. Bovendien zorgen de lamellen voor
een goede ‘grip’ in het oor.
32
Trekkoordje (8)
De Qleaf wordt aan het trekkoordje uit het oor
genomen. Na het inbrengen van de Qleaf zit het
trekkoordje achter de tragus (pag. 36), waardoor
het niet of nauwelijks zichtbaar is.
Batterij (C)
Qleaf gebruikt een knoopcel type 10 batterij die
in de verpakking aangeduid wordt met een gele
sticker. Het toestel wordt uitgeschakeld door
verwijderen van de batterij.
Alvorens te beginnen met de instructies uit ‘Het
dagelijks gebruik van de Qleaf’ en ‘Onderhoud
en gebruik’ is het belangrijk dat u een schoon en
horizontaal werkoppervlak tot uw beschikking
heeft.
Plaatsen van de batterij
Verwijder bij een nieuwe batterij eerst het
stickertje van de + pool. Houd de module met de
kleurindicator naar rechts gericht vast en plaats
de batterij in de module zoals aangegeven (zie
afbeelding).
Verwijderen van de batterij
Houd de module vast en verwijder de batterij met
bijgeleverde tool (zie afbeelding).
Nederlands
33
Page 19
Nederlands
34
Qleaf in de softtip inbrengen
• Houd de softtip vast met het trekkoortje
naar links en plaats de module zoals op de
afbeelding in de softtip.
• Plaats de module geheel in de softtip en druk
het zachtjes aan (zie afbeelding hieronder).
Qleaf uit de softtip nemen
‘Knijp’ de module als het ware uit de softtip door
zachtjes in het uiteinde van de softtip te drukken
(zie afbeelding).
Nederlands
35
Page 20
Nederlands
Qleaf in het oor plaatsen
• Plaats het uiteinde van de Q met de lamellen
losjes in het oor. Het trekkoortje bevindt zich
hierbij achter de Tragus (richting neus).
• Druk nu het toestel voorzichtig dieper in
het oor door op de platte kant van het
toestel te drukken. Het wijd openen van de
mond kan het inbrengen van het toestel
vergemakkelijken.
tragus
36
Het inbrengen van een nieuwe softtip kan soms
een beetje lastig zijn omdat het oppervlak
enigszins stroef is en als gevolg van het feit dat
sommige oren wat ‘droog’ zijn. Dit probleem kan
in de meeste gevallen echter eenvoudig opgelost
worden door een klein beetje gel of crème te
gebruiken.
N.b.: Let op dat hierdoor de luidsprekeropening niet
verstopt!
tragus
In het ideale geval is de vlakke kant van de
module met de microfoon na het inbrengen
gelijk aan de ingang van het gehoorkanaal. Op
deze manier is het toestel namelijk nagenoeg
onzichtbaar en de geluidskwaliteit optimaal. Het
kan echter voorkomen dat een oorkanaal te klein
is. In dit soort gevallen kan het toestel een paar
millimeter uitsteken.
Indien het trekkoortje na plaatsing van het
toestel iets naar buiten steekt waardoor het
zichtbaar wordt, kan dit door de audicien
afgeknipt worden.
Zorg dat uw handen schoon zijn wanneer u de
Qleaf inbrengt in uw oor. Producten zoals makeup, crème, body-oil, gel en haarlak kunnen ertoe
leiden dat de module vuil wordt met als gevolg dat
bijvoorbeeld de microfoon opening verstopt raakt.
Qleaf uit het oor nemen
Hou het trekkoortje stevig vast en trek de
module - altijd langzaam - uit het oor.
Aanpassing en instelling
Het aanpassen en instellen van het hoortoestel
is een belangrijk en individueel proces. Neem
daarom contact op met uw audicien als u vragen
of opmerkingen heeft omtrent het aanpassen
en de instelling van uw Qleaf. Uw audicien
is de aangewezen persoon om eventuele
aanpassingen aan het toestel te maken.
Nederlands
37
Page 21

Nederlands
Onderhoud en gebruik
Hoewel de Qleaf gebruikt kan worden voor
zowel het rechter- als het linkeroor, verschillen
de instellingen meestal per oor. Dit betekent
dat als een toestel eenmaal geprogrammeerd is
voor een van uw oren, u het niet in het andere
kunt gebruiken. Indien u in beide oren dezelfde
maat softtips gebruikt kunt u deze wel onderling
wisselen.
De opbouw van oorsmeer in de oren verschilt
per persoon. Het is dan ook niet te voorkomen
dat er een bepaalde hoeveelheid oorsmeer in
de luidsprekeropening komt. Hoewel hierdoor
de geluidskwaliteit enigszins verminderd,
kan oorsmeer niet uw toestel als zodanig
beschadigen. Als u merkt dat de softtip verstopt
is kunt u de softtip schoonmaken (zie ‘Reiniging’)
of vervangen.
38
Controleer dagelijks of de module(s) en de
softtip(s) verstopt of beschadigd zijn. Hiermee
garandeert u zowel optimale prestaties van het
toestel als een lange levensduur. Vervang altijd
de softtip indien u beschadigingen opmerkt.
Voor een optimaal rendement van uw toestel
en minimaal risico op infectie adviseren wij
u de softtip minstens een maal per maand te
vervangen. Softtips zijn verkrijgbaar bij uw
audicien.
Reiniging
Module:
• Maak dagelijks schoon met een zachte, droge
tissue.
• In geval van sterke vervuiling, schoonmaken
met speciale (vochtige) reinigingsdoekjes voor
hoortoestellen.
Softtip:
• Maak dagelijks schoon met een een zachte,
droge tissue.
• In geval van sterke vervuiling, schoonmaken
met speciale (vochtige) reinigingsdoekjes
voor hoortoestellen of reinigingscapsules
voor gehoortoestellen. Uw audicien kan het
eveneens voor u reinigen in een ultrasoon bad.
• Verstopte softtips kunnen ook gereinigd
worden onder stromend lauw water. In geval
van ernstige of hardnekkige vervuiling of
verandering in eigenschap of beschadiging
van het materiaal, de softtip echter altijd
vervangen.
N.b.: Gebruik nooit agressieve schoonmaakproducten, schuur- of oplosmiddelen. Hiermee kunt u de
softtip of de module onherstelbaar beschadigen.
Opbergen
‘s nachts:
Wij adviseren u de softtip van de module af te
halen zodra u het toestel ’s avonds niet meer
gebruikt: Haal de batterij eruit en leg het toestel
op een veilige plek weg. Hierdoor verlengt u
de levensduur van de batterij en kan eventueel
aanwezig vocht in het toestel verdampen.
Tijdelijk opbergen:
U kunt het opbergdoosje gebruiken indien u het
toestel tijdelijk uit uw oor wilt halen.
Lang opbergen:
Indien u uw toestel voor langere duur niet
gebruikt moet u de module en de softtip
reinigen alvorens deze in het opbergdoosje weg
te leggen.
Nederlands
39
Page 22
Nederlands
Waarschuwingen
De softtip is een essentieel onderdeel
van de Qleaf. Zonder de softtip kan
de Qleaf niet goed functioneren en
onherstelbaar beschadigen door vervuiling van
de module. Gebruik de module daarom nooit
zonder de softtip.
Draag het toestel alleen in het oor waarvoor uw
audicien het heeft geprogrammeerd. Indien u
het toestel in het andere oor draagt kan dit tot
een verminderde hoorkwaliteit en in sommige
gevallen zelfs tot gehoorverlies leiden.
Gebruik nooit beschadigde of vervuilde softtips.
Dit kan de hoorkwaliteit benadelen of ertoe
leiden dat het toestel minder comfortabel in het
oor zit en kan leiden tot oorinfecties.
Vervang de softtip van uw toestel regelmatig,
zelfs als deze niet zichtbaar beschadigd of vuil
is. Zie hoofdstuk ‘Onderhoud en gebruik’ (pag.
38-39).
40
Draag de Qleaf 4 uur achtereen als u het
toestel voor het eerst gebruikt. Verleng de
draagtijd vervolgens met een uur per dag. Staak
het gebruik van de Qleaf en raadpleeg een
specialist als u pijn, doorlopende irritatie of jeuk
ervaart. Raadpleeg uw arts indien de klachten
aanhouden. Laat uw oren en gehoor regelmatig
controleren, zowel gedurende de beginperiode
als daarna.
Neem contact op met uw audicien of arts als het
u niet lukt de Qleaf uit uw oor te halen. Door de
Qleaf zonder de juiste gereedschappen uit uw
oor te halen loopt u het risico de softtip of de
module te beschadigen.
Gebruik de Qleaf niet in de volgende situaties:
• Een medische achtergrond met betrekking tot
de oren.
• Exostosen (botuitstulpingen) in het oorkanaal.
• Overmatige oorsmeerproductie.
Het toestel mag niet:
• vallen op een harde ondergrond.
• blootgesteld worden aan vocht of water.
• ondergedompeld worden in water of een
andere vloeistof.
• gebruikt worden tijdens het zwemmen,
douchen, een bad of in de sauna.
• nat schoongemaakt worden.
• blootgesteld worden aan extreem hoge
temperaturen, zoals bij gebruik van een
haarföhn.
• in mijnen of andere explosieve ruimten
gedragen worden.
• blootgesteld worden aan röntgenstralingen
of sterke magnetische velden, bijvoorbeeld
gedurende een medisch onderzoek.
• gedragen worden in situaties waar haarlak
(kapper) of oplosmiddelen (zoals verf )
gebruikt worden.
Zorg dat uw handen schoon zijn wanneer u de
Qleaf in uw oor plaatst. Producten zoals make-up,
crème, body-oil, gel en haarlak kunnen ertoe
leiden dat de module vuil wordt met als gevolg
dat bijvoorbeeld de microfoonopening verstopt
raakt.
Hou de Qleaf uit de buurt van kinderen en
huisdieren. Bij het inslikken van componenten
direct uw arts raadplegen.
Lege batterijen en oude hoortoestellen
dienen te worden ingeleverd als klein
chemisch afval.
Nederlands
41
Page 23

Nederlands
Informatie over reparatieservice
De Qleaf is ontwikkeld door ExSilent BV,
Overschiestraat 63, Amsterdam. Indien u
klachten of reparatieverzoeken heeft, moet u
contact opnemen met de verkooplocatie waar u
uw toestel heeft gekocht. Klachten en reparatie
schikkingen kunnen per aanbieder verschillen.
Beperkte fabrieksgarantie.
Deze beperkte garantie is in ieder deel van de
ExSilent Europese Regio van toepassing, tenzij
er sprake is van een locale garantie. ExSilent
BV (”ExSilent”) garandeert dat dit ExSilent
product (”Product”) ten tijde van verkoop vrij
van fouten in materiaal, ontwerp en afwerking
is, en is daarbij onderhevig aan de volgende
voorwaarden en bepalingen:
1. Deze beperkte garantie wordt aan de
eindgebruiker van het Product gegeven
(”Cliënt”). Deze beperkte garantie is niet
van invloed op (i) de rechten van de
Cliënt met betrekking tot de koop van
consumentenproducten op grond van het
geldende nationale recht of (ii) de rechten
42
van de Cliënt ten opzichte van de verkoper/
licentiehouder van het Product.
2. De garantieperiode loopt vierentwintig (24)
maanden vanaf de aankoopdatum van het
Product door de eerste Cliënt. In het geval
van een daaropvolgende wederverkoop
of andere wijziging van eigenaar zal de
garantieperiode doorlopen voor het
resterende deel van de vierentwintig (24)
maanden en zal gedurende deze periode
in ieder opzicht ongewijzigd blijven. Deze
beperkte garantie is alleen van toepassing en
uitvoerbaar in de volgende landen: Bosnië,
Bulgarije, alle lidstaten van de Europese
Unie, IJsland Israel, Kroatië, Macedonië,
Noorwegen, Roemenie, Servië/ Montenegro,
Turkije en Zwitserland.
3. Gedurende deze garantieperiode zal ExSilent
of een erkende aanbieder het defecte
Product repareren of vervangen (geheel
naar eigen inzicht van ExSilent). ExSilent
zal het gerepareerde Product of een ander
Product in goede orde aan de Cliënt leveren.
Alle vervangen componenten of andere
vervangen onderdelen worden eigendom
van ExSilent.
4. Een vervangen product krijgt een verlengde
of vernieuwde garantieperiode. Indien
het product gerepareerd is blijft de oude
garantie van kracht.
5. Deze beperkte garantie is niet van toepassing
op bedrukte covers of andere vergelijkbare
gepersonaliseerde componenten.
6. Deze beperkte garantie is niet van
toepassing op slijtage ontstaan door
normaal dagelijks gebruik. Deze beperkte
garantie is evenmin van toepassing indien:
(i) het defect veroorzaakt is door het feit dat
het Product blootgesteld is geweest aan:
oneigenlijk gebruik van de instructies,
ruwe omgang, blootstelling aan damp,
vocht of extreme temperaturen of
omgevingscondities of snelle wisselingen
van dergelijke condities, corrosie, oxidatie,
niet toegestane wijzigingen of verbindingen,
niet toegestaan openen of repareren,
reparaties uitgevoerd met niet toegestane
vervangende onderdelen, onjuist gebruik,
onjuiste installatie, ongelukken, overmacht,
morsen van voedsel of vloeistof, de invloed
van chemische producten of andere feiten
waar ExSilent redelijkerwijs geen invloed op
uit kan oefenen (inclusief maar niet beperkt
tot defecten in verbruikbare componenten,
zoals batterijen die van nature een beperkte
levensduur hebben), tenzij het defect
rechtstreeks veroorzaakt is door een gebrek
in het materiaal, ontwerp of afwerking;
(ii) ExSilent of erkende aanbieder niet binnen
dertig (30) dagen na het ontstaan van het
defect en binnen de garantieperiode een
melding hiervan hebben ontvangen van de
Cliënt;
(iii) het Product niet binnen dertig (30) dagen
na het ontstaan van het defect en binnen de
garantieperiode geretourneerd is aan
ExSilent of een erkende aanbieder;
(iv) het serienummer verwijderd, vernietigd,
beschadigd, gewijzigd of onleesbaar is;
Nederlands
43
Page 24

Nederlands
Disclaimer
(v) het defect veroorzaakt is door het feit dat
het Product gebruikt werd of verbonden was
met een component van derden en niet
van ExSilent, of gebruikt werd voor andere
doeleinden dan waar het voor bedoeld is;
(vi) het defect veroorzaakt is door een
opzettelijke kortsluiting met de batterij
of dat de verbindende onderdelen van
de batterijbehuizing gebroken of mee
gemanipuleerd zijn, of dat de batterij in een
ander toestel gebruikt is dan waar het voor
bedoeld is.
7. Om onder deze beperkte fabrieksgarantie
een claim te maken dient de Cliënt binnen
twee weken na aanschaf van het Product een
leesbaar en onveranderd, volledig ingevuld
en origineel garantiebewijs te sturen naar
ExSilent of erkende aanbieder.
8. Deze beperkte garantie is uw enige en
uitsluitende rechtsmiddel tegen ExSilent
en ExSilents enige en uitsluitende
aansprakelijkheid voor de gebreken in
het Product. Deze beperkte garantie
44
vervangt alle andere ExSilent-garanties en
-aansprakelijkheden, mondeling of schriftelijk,
(met niet-bindend karakter) bij wet of
contractueel bepaald, uit onrechtmatige daad
of anderszins (inclusief, maar niet beperkt
tot en waar toegestaan door van toepassing
zijnde regelgeving, eventuele impliciete
voorwaarden, garanties of andere bepalingen
met betrekking tot voldoende kwaliteit of
geschiktheid voor een bepaald doel). Voor
zover wettelijk is toegestaan, aanvaardt
ExSilent geen aansprakelijkheid voor
verlies van of schade aan of aantasting van
gegevens, winstderving, verlies van gebruik
van Producten of verlies van functionaliteit,
verlies van contracten, verlies van inkomsten
of verlies van verwachte besparingen,
gestegen kosten of uitgaven of voor welke
indirecte schade, gevolgschade of bijzondere
schade dan ook.
9. Voor amendement of wijziging aan
deze beperkte garantie is voorafgaande
schriftelijke toestemming van ExSilent nodig.
Copyright © 2010 ExSilent. Alle rechten
voorbehouden.
Onrechtmatige reproductie, overdracht,
distributie of opslag van dit document of
een gedeelte ervan in enige vorm zonder
voorafgaande geschreven toestemming van
ExSilent is verboden.
ExSilent behoudt zich het recht voor zonder
voorafgaande kennisgeving wijzigingen en
verbeteringen aan te brengen in de producten
die in dit document worden beschreven.
ExSilent kan in geen geval aansprakelijk gesteld
worden voor directe of indirecte schade van
welke aard dan ook, onder meer verloren data
en zaken, gederfde omzet, winst of ander
economisch nadeel.
Hoewel ExSilent tracht juiste, volledige en
actuele informatie aan te bieden, verstrekt
ExSilent expliciet noch impliciet enige garantie
dat de inhoud van dit document juist, volledig of
actueel is. Dit is inclusief, maar niet beperkt tot
garanties of andere bepalingen met betrekking
tot voldoende kwaliteit of geschiktheid voor een
bepaald doel.
ExSilent behoudt zich te allen tijde het recht
voor zonder voorafgaande kennisgeving dit
document te wijzigen of te herroepen.
Nederlands
45
Page 25
Nederlands
De gegevens van uw Qleaf Garantie
Registreer de gegevens van uw Qleaf hieronder.
Datum van aankoop:
Serienummer van toestel - Rechts:
Serienummer van toestel - Links:
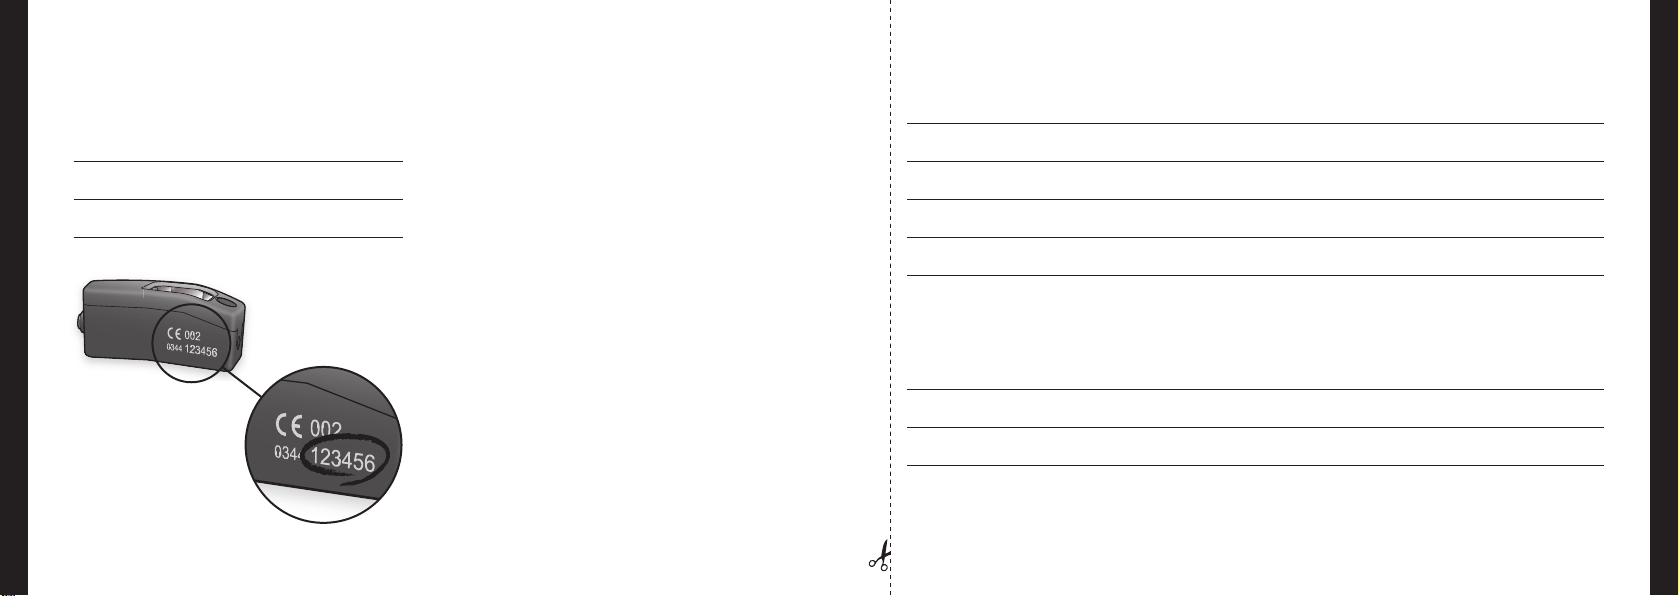
Serienummer (6 nummers)
46
Naam:
Adres: Postcode:
Stad: Land:
Telefoonnummer: Datum van aankoop:
Serienummer - Rechts: Serienummer - Links:
Stad en land van aankoop
Naam verkooplocatie:
Adres verkooplocatie: Postcode:
Stad: Land:
Nederlands
47
Page 26

Deutsch
Qleaf Gebrauchsanweisung
Deutsch
48
49
Page 27

Deutsch
Gratulation zum Kauf des Qleafs!
Mit dem Kauf eines Qleaf garantieren wir
Ihnen ein Produkt, das aus hochwertigen
Komponenten besteht. Durch die Anwendung
der zahlreichen, wichtigen Innovationen auf dem
Gebiet der Hörgeräte sichert Qleaf eine elegante
und angenehme Versorgung in der täglichen
Nutzung.
InhaltsverzeichnisQleaf
Was ist Qleaf? 52
Anatomie des Qleafs 54
Qleaf - Modul (A) 55
Softtip (B) 56
Batterie (C) 56
Der tägliche Einsatz von Qleaf 57
Das Einsetzen der Batterie 57
Das Entfernen der Batterie 57
Einsetzen von Qleaf in den Softtip 58
Entfernen von Qleaf aus dem Softtip 59
Einsetzen von Qleaf in das Ohr 60
Entfernen von Qleaf aus dem Ohr 61
Fitting Verfahren und Konguration 61
Instandhaltung und Anwendung 62
Reinigung 62
Lagerung 63
Warnungen 64
Informationen über Reparaturservice 66
Haftungsausschluß 69
Die Daten Ihres Qleaf 70
Die Gewährleistung 71
Hersteller 289
Deutsch
50
51
Page 28

Deutsch
Was ist Qleaf?
Das Qleaf ist ein so genanntes modulares ImOhr-Gerät (CIC*) mit einem Standard-Passstück,
dem Softtip.
Für die Stromversorgung ist eine Batterie vom
Typ 10 (gelber Aufkleber) erforderlich. Das Gerät
ist mit einem hochentwickelten Mikroprozessor
ausgestattet, der die Verarbeitung und die
Verstärkung der Signale an Ihre Hörprobleme
anpasst.
Qleaf verwendet einen Softtip, der in drei Größen
groß/mittelgroß/klein erhältlich ist. Die Größe der
Softtip hängt von der Größe Ihres Gehörgangs
ab. Die Wahl der richtigen Größe ist sehr wichtig.
Wenn der Softtip zu groß ist, könnte das Tragen
des Gerätes unangenehm sein. Wenn der Softtip
zu klein ist, könnte das Gerät spontan zu Pfeifen
beginnen. Bei der Anpassung (Fitting) wählt Ihr
Akustiker, die genaue Größe Ihres benötigten
Softtips.
Ein möglicher Grund für einen Reparaturservice
ist ein Defekt oder die Verschmutzung des
Lautsprechers durch Cerumen (Ohrenschmalz).
Qleaf hat ein eingebautes System, das
das Eindringen von Ohrenschmalz in das
Gerät verhindert. Als Ergebnis sollten die
Komponenten des Moduls immer unbeschädigt
und ohne Verstopfung bleiben. Falls der Softtip
verstopft wird, kann dieser leicht gereinigt oder
ersetzt werden.
Qleaf besitzt einen Mikroprozessor , der mit
folgenden Eigenschaften ausgestattet ist:
• Adaptive “Rückkopplungsunterdrückung“
- dies verhindert spontanes “Pfeifen” des
Gerätes.
• Adaptives “StörschallreduzierungsSystem” - dies verbessert die Hörleistung in
geräuschvoller Umgebung
Als Ergebnis der Kombination von Größe, Form,
innovativer Konstruktion und Material bietet
Qleaf eine Reihe von wichtigen Vorteilen:
• Fast unsichtbar.
• Geringe Verfremdung der eigenen Stimme
(Okklusion).
• Hohe Verstärkung durch die Positionierung
des Lautsprechers vor dem Trommelfell.
• Natürliche Klangqualität mit hoher
Richtwirkung der eigenen Ohrmuschel sowie
geringe Windgeräusche aufgrund der tiefen
Positionierung des Mikrofons im Gehörgang
(natürliche Schallaufnahme).
• Hoher Schutz vor Schäden, die durch
Ohrenschmalz verursacht werden.
• Geeignet für die Benutzung mit
Mobiltelefonen.
• Geeignet für sportliche Aktivitäten.
• Einfache Benutzung und Handhabung.
• Modernes Design.
Deutsch
52
* Completely In the Canal - völlig im Gehörgang
53
Page 29
Deutsch
Anatomie des Qleafs
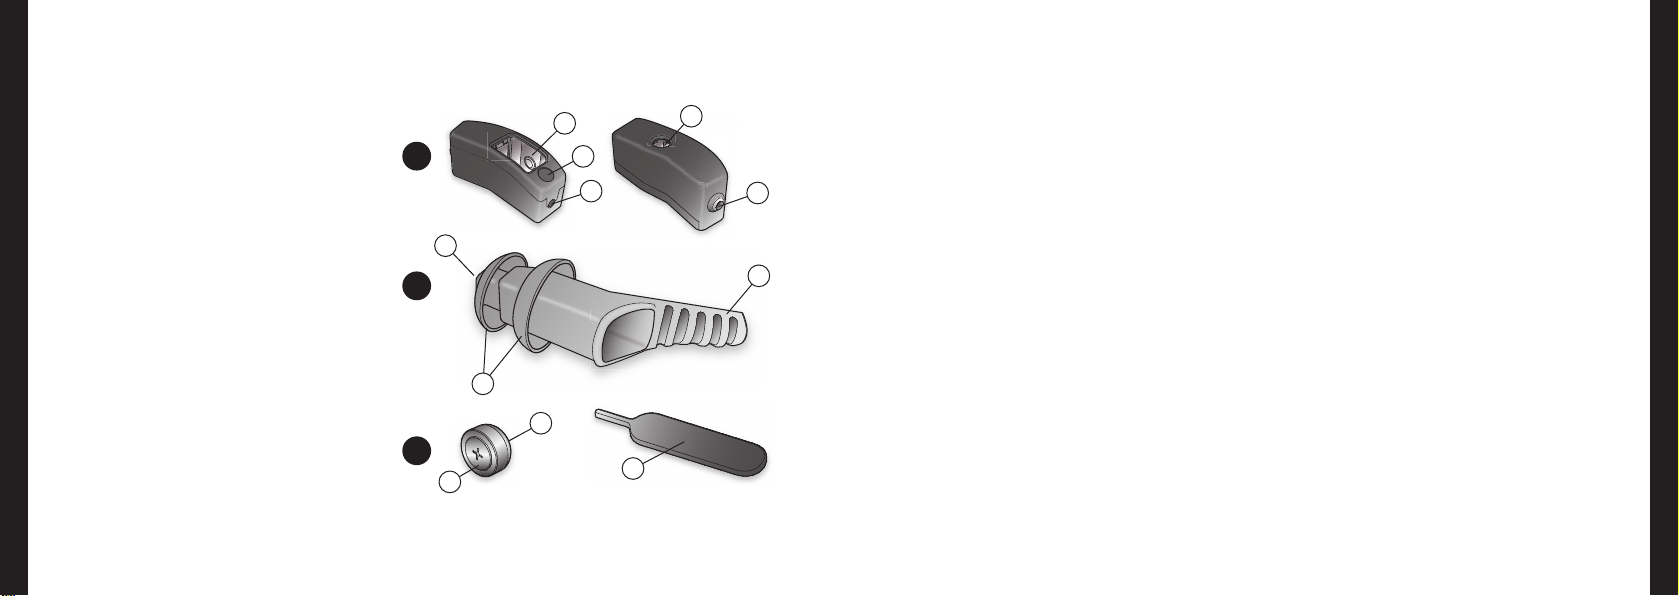
A Qleaf - Modul (Gehäuse)
1 Batteriefach
2 Farbige Seitenmarkierungen
3 Mikrofonö nung
4 Ö nung für das Entfernen der Batterie l
5 Lautsprecherö nung
B Softtip
6 Schallö nung
7 Kuppel
8 Die Zuglippe
C Batterie (Typ 10)
9 Pluspol (+)
10 Minuspol (–)
11 Hilfsmittel zum Entfernen der Batterie
1
A
6
B
7
C
9
2
3
10
11
4
5
8
Qleaf Modul (A)
Gehäuse (A)
Das Gehäuse ist aus hautfreundlichem Kunststo
hergestellt. Für die Behandlung des Gehäuses
sehen Sie bitte das Kapitel “ Instandhaltung und
Anwendung “ (Seite 62-63).
Batteriefach (1)
Dieser Teil hält die Batterie vom Typ 10, die die
Stromversorgung für Qleaf zur Verfügung stellt.
Das Gerät ist während der Entnahme der Batterie
abgeschaltet.
Die Batterieanschlüsse im Batteriefach
transportieren der Versorgungsspannung
von der Batterie an den Mikroprozessor des
Gerätes. Die Batterieanschlüsse dienen auch als
Programmier-Kontakte. Der Akustiker benutzt
diese Anschlüsse mit einem speziellen Gerät, um
die Einstellungen des Qleaf zu ändern.
Farbige Seitenmarkierungen (2)
Durch die Verwendung von zwei verschiedenen
Farben kann das linke und rechte Ohr-Modul
identi ziert werden.
Mikrofonö nung (3)
Hier be ndet sich das Mikrofon, das den Schall
aufnimmt, der durch die Qleaf verstärkt und
verarbeitet wird.
Ö nung für das Entfernen der Batterie (4)
Um die Batterie zu entfernen, wird ein
zusätzliches Werkzeug durch diese Ö nung
verwendet. Siehe Kapitel “Das Entfernen der
Batterie” (Seite 57).
Lautsprecherö nung (5)
Der verarbeitete und verstärkte Schall wird durch
diese Ö nung ausgegeben und über den Softtip
zum Trommelfell geleitet.
Deutsch
54
55
Page 30
Deutsch
Softtip (B)
Der Softtip des Qleafs besteht aus einem
biokompatiblen Kunststo und ist als
Wegwerfartikel vorgesehen, so dass er
regelmäßig ersetzt werden kann. Für die Wartung
und Reinigung sehen Sie bitte das Kapitel
“Instandhaltung und Anwendung“ (Seite 62-63).
Die Darstellung kann abweichend von Ihrer Wahl
der Größe des Softtip sein.
Schallö nung (6)
Der verarbeitete und verstärkte Schall wird durch
diese Ö nung ausgegeben und zum Trommelfell
geleitet.
Kuppel (7)
Die Kuppel verhindert eine Rückkopplung der
Signale vom Lautsprecher zum Mikrofon und
garantiert einen guten Sitz im Ohr.
Die Zuglippe (8)
Mit der Zuglippe kann das Qleaf aus dem Ohr
entnommen werden. Nach dem Einsetzen des
Qleafs wird die Zuglippe kaum sichtbar hinter
dem Tragus (siehe Seite 60) gelegt.
Batterie (C)
Qleaf verwendet Batterien vom Typ 10, die in
der Verpackung mit einem gelben Aufkleber
markiert sind . Das Gerät ist während de
Entnahme der Batterie abgeschaltet.
Der tägliche Einsatz von Qleaf
Bevor Sie mit den erwähnten Tätigkeiten in den
Kapiteln “ Der tägliche Einstaz von Qleaf” und
der “ Instandhaltung und Anwendung” beginnen,
stellen Sie sicher, dass Sie eine saubere und ache
Arbeits äche haben.
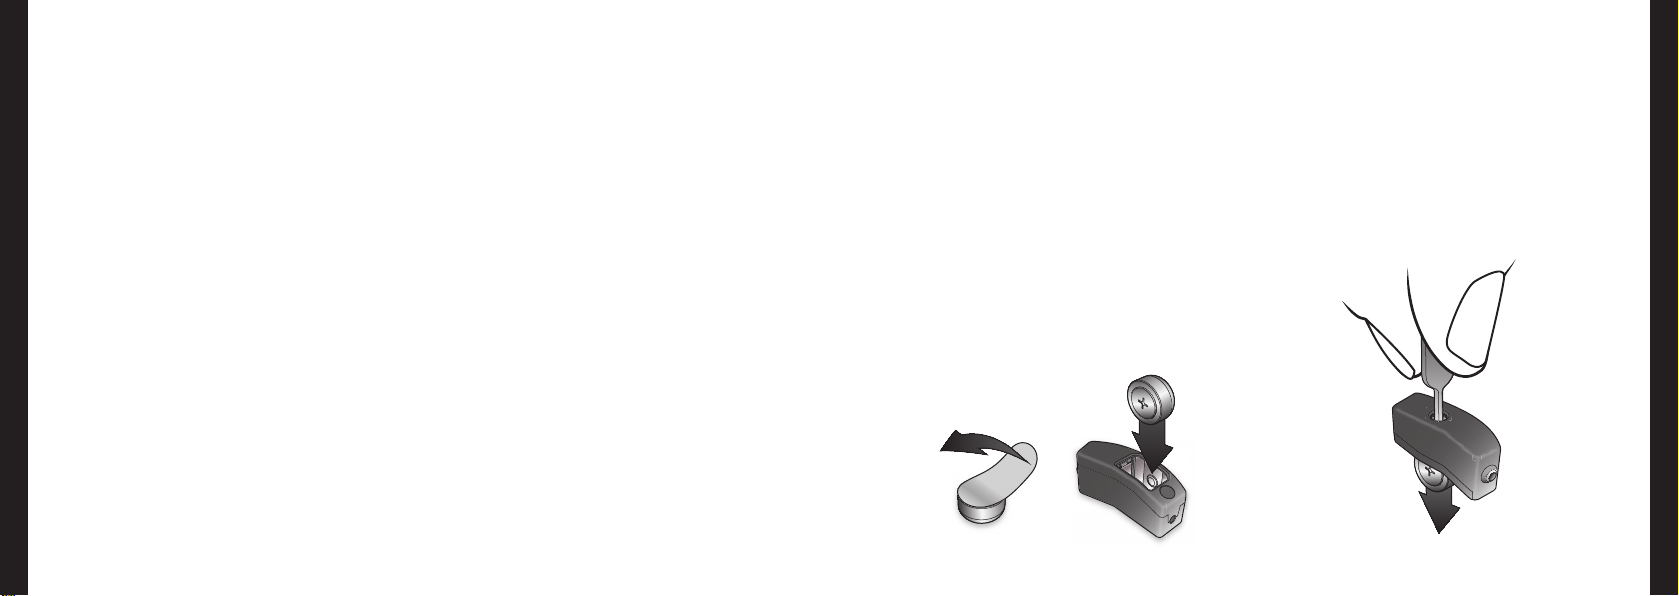
Das Einsetzen der Batterie
Bei der Benutzung einer neuen Batterie: Zuerst
entfernen Sie den Aufkleber von dem + Pol.
Halten Sie das Modul (die farbige
Seitenmarkierung zur rechten Seite) und setzen
Sie die Batterie wie im Bild zu sehen ein.
Das Entfernen der Batterie
Halten Sie das Modul und entfernen Sie die
Batterie mit Hilfe des zusätzlichen Werkzeugs
(siehe Bild).
Deutsch
56
57
Page 31
Deutsch
58
Einsetzen von Qleaf in
den Softtip
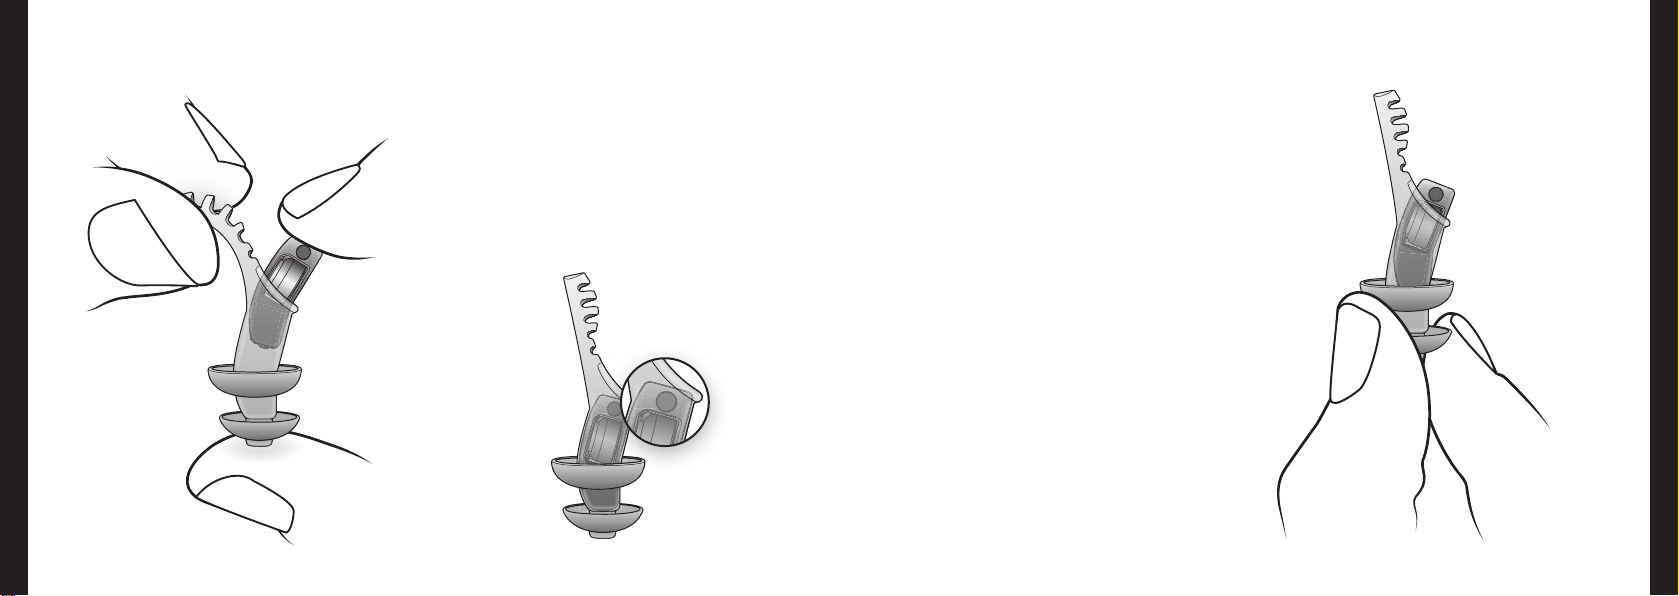
• Setzen Sie das Modul in den Softtip mit
Richtung auf die Batterie, Zuglippe auf der
linken Seite (siehe Bild).
• Legen Sie das Modul ganz in den Softtip ein
(siehe Bild unten).
Entfernen Qleaf aus dem
Softtip
Drücken Sie das Endteil des Softtip mit der
kleinen Kuppel und entnehmen Sie das Modul
aus dem Softtip. (siehe Bild).
Deutsch
59
Page 32
Deutsch
Einsetzen Qleaf in das Ohr
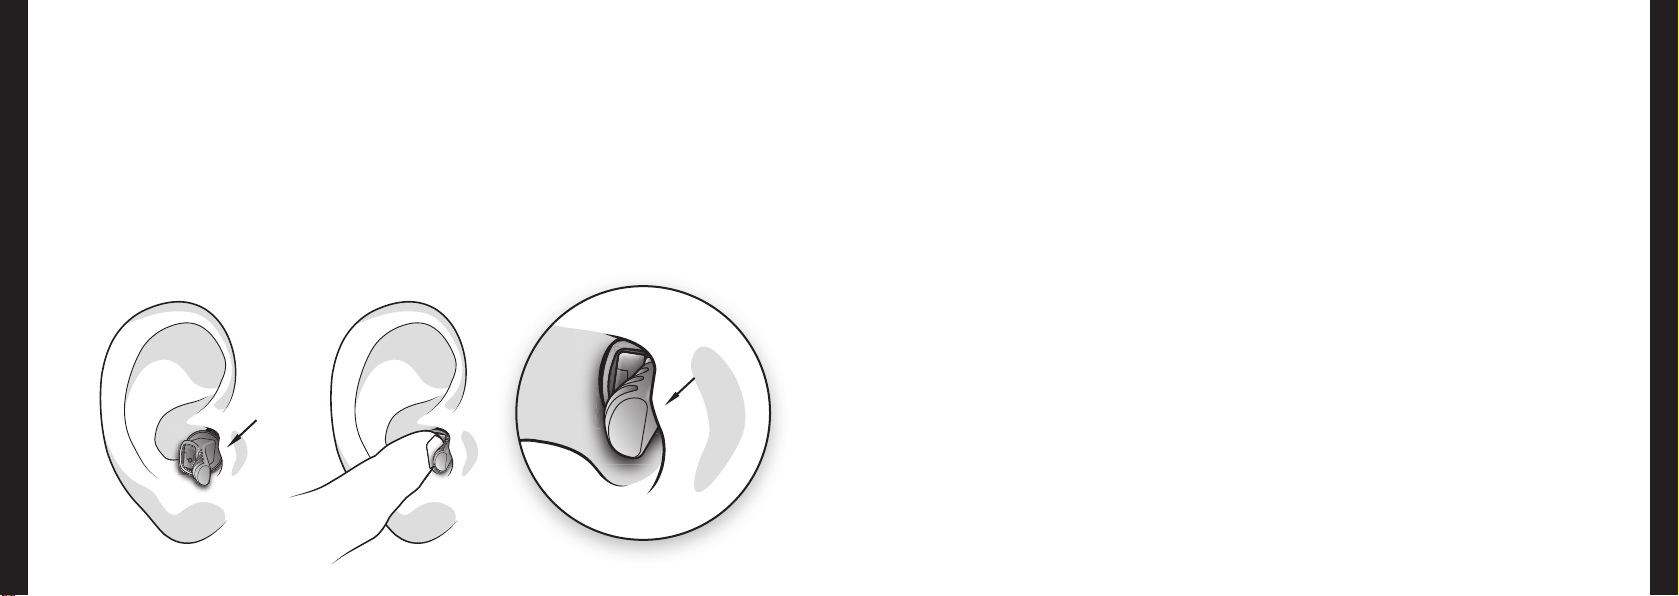
• Legen Sie das Endteil des Softtips mit der
Kuppel locker in das Ohr. Die Zuglippe liegt
hinter dem Tragus in der Richtung der Nase.
• Drücken Sie die breite Seite des Geräts,
um das Gerät in das Ohr einzusetzen. Nun
schieben Sie das Gerät langsam tiefer in den
Gehörgang. Durch Ö nung des Mundes, wird
das Einsetzen erleichtert.
tragus
60
Das Einsetzen eines neuen Softtip kann bei
trockenen Ohren schwerer sein, weil die
Ober äche eines neuen Softtip rauer ist. Die
Benutzung eines Gleitmittels, Gels oder Creme
kann in diesen Fällen hilfreich sein. (eine kleine
Menge reicht).
Anmerkung: Achten Sie darauf, dass das Gleitmittel
nicht die Schallöff nung verstopft!
tragus
Im idealen Fall wird die ache Seite des Moduls
(wo sich das Mikrofon be ndet) nach dem
Einsetzen am Anfang des Gehörgangs eng
anliegen und abschließen. Auf diese Weise wird
das Gerät praktisch unsichtbar und es wird
ein optimaler Klang erreicht. Es gibt Fälle, in
denen der Gehörgang zu klein ist: In diesem
Fall ist es möglich, das Gerät ein paar Millimeter
herausstehen zu lassen.
Wenn die Zuglippe nach dem Einsetzen des
Geräts zu weit heraus ragt, kann diese leicht von
dem Akustiker abgeschnitten werden.
Stellen Sie sicher, dass Ihre Hände beim Einsetzen
des Qleafs sauber sind. Make-up, Creme, Körper-Öl,
Gel, Haarspray und ähnliche Produkte können das
Modul beschmutzen und die Mikrofon-Öff nung
blockieren.
Entfernen des Qleaf aus
dem Ohr
Halten Sie die Zuglippe fest und ziehen Sie esimmer langsam - aus dem Ohr.
Anpassung und Einstellung
Die Anapssung und Einstellung des Hörgerätes
ist ein wichtiger und individueller Prozess. Bei
Problemen mit dem Sitz oder für die Änderung
der Einstellung kontaktieren Sie Ihren Akustiker.
Er ist Ihr Ansprechpartner für alle Fragen rund um
Ihre Hörgeräteversorgung.
61
Deutsch
Page 33

Deutsch
Instandhaltung und Anwendung
Obwohl das Qleaf Modul für beide Ohren
verwendet werden kann, sind die Einstellungen
normalerweise für das rechte und linke Ohr
unterschiedlich. Das bedeutet, wenn das Modul
einmal angepasst wurde, sollte das Modul nicht
vertauscht werden. Wechseln Sie den Softtip bei
Bedarf.
Die Produktion des Ohrenschmalzes
unterscheidet sich von einer Person zur anderen.
Es kann daher nicht vollständig ausgeschlossen
werden, dass die Schallönung des Softtip
mit Ohrenschmalz verstopft wird. Obwohl die
Lautstärke wegen der Verstopfung reduziert sein
kann, kann dies nicht das Gerät beschädigen.
Wenn Sie feststellen, dass die Schallönung
des Softtip verstopft ist, können Sie den Softtip
reinigen (siehe “Reinigung”) oder ersetzen.
Prüfen Sie die Module und die Softtips täglich auf
Verstopfung und Schäden. Dies garantiert Ihnen
eine optimale Leistung und lange Betriebszeit.
Wenn die Schäden sichtbar sind, wechseln
Sie immer den Softtip. Zur Reduzierung der
Wahrscheinlichkeit einer Infektion, empfehlen
wir Ihnen, den Softtip mindestens einmal
im Monat zu ersetzen. Softtip sind bei Ihrem
Akustiker erhältlich.
Reinigung
Modul:
• Reinigen Sie täglich mit einem weichen und
trockenen Taschentuch.
• Wenn es sehr verunreinigt ist, reinigen Sie es
mit speziellen, feuchten Reinigungstücher für
Hörgeräte.
Softtip:
• Reinigen Sie täglich mit einem weichen und
trockenen (Papier)Taschentuch.
• Wenn es sehr verunreinigt ist, reinigen Sie es
mit speziellen, feuchten Reinigungstücher, mit
löslichen Reinigungstabletten für Hörgeräte
oder alternativ mit einem Ultraschall-Reiniger.
• Verstopfte Softtip können mit lauwarmem
Wasser abgespült werden. Im Falle von
schweren oder hartnäckigem Schmutz, wenn
eine Änderung in der Übertragung oder
Beschädigung des Materials auftritt, sollten die
Softtipsimmer ersetzt werden.
Anmerkung: Verwenden Sie nie aggressive
Reinigungsmittel, Scheuermittel oder
Lösungsmittel! Dies kann zu unwiderruichen
Schäden der Softtips oder des Moduls führen.
Lagerung
In der Nacht:
Wir empfehlen, dass Sie in der Nacht das Modul
aus dem Softtip entfernen: Entfernen Sie die
Batterie aus dem Gerät und bewahren Sie an
einem sicheren Ort außerhalb der Tasche auf. Auf
diese Weise verlängern Sie die Betriebszeit der
Batterie und ermöglichen auch die Verdunstung
der Feuchtigkeit, die sich möglicherweise im
Gerät gebildet hat.
Kurzfristige Lagerung:
Wenn Sie das Gerät aus dem Ohr vorübergehend
entfernen möchten, können Sie es in der
Tragedose lagern.
Langfristige Lagerung:
Wenn Sie das Gerät für einen längeren Zeitraum
nicht benutzen möchten, reinigen Sie das
Modul und den Softtip vor der Lagerung in der
Tragedose. In diesem Fall entfernen Sie immer
die Batterie aus dem Gerät.
Deutsch
62
63
Page 34

Deutsch
Warnungen
Die Softtip ist ein wesentlicher
Bestandteil des Qleafs. Ohne die
Softtips kann Qleaf nicht richtig
funktionieren und dies könnte irreversiblen
Verschmutzung des Moduls verursachen. Aus
diesem Grund verwenden Sie bitte nie das Modul
ohne die Softtips.
Sobald das Gerät zum ersten Mal eingebaut
wurde, sollte es nicht in dem anderen Ohr
getragen werden. Dies kann möglicherweise
zu einer Verschlechterung der Hörleistung und
manchmal sogar zur Hörverlust führen.
Verwenden Sie bitte nie eine beschädigte oder
beschmutzte Softtip. Dies kann eine negative
Auswirkung auf die Hörleistung haben oder
wegen der unbequemenen Anpassung zur
Infektionen des Ohrs führen.
Ersetzen Sie bitte die Softtip des Geräts
regelmäßig, auch wenn sie nicht beschädigt
oder verschmutzt sind. Sehen Sie das Kapitel
“Instandhaltung und Anwendung” (Seite 62-63).
Wenn Sie mit der Verwendung des Qleafs
beginnen, starten Sie mit einer Tragezeit von 4
Stunden und erhöhen Sie die Tragezeit um eine
Stunde pro Tag. Wenn Sie unter Schmerzen,
anhaltender Reizung oder Juckreiz leiden, sollten
Sie die Geräte nicht ohne fachliche Beratung
verwenden. Wenn Ihre Probleme bestehen
bleiben, suchen Sie bitte einen HNO-Arzt auf.
Lassen Sie Ihre Ohren und Ihr Gehör regelmäßig
sowohl am Anfang als auch später untersuchen.
Wenn es aus irgendeinem Grund nicht möglich
ist, Qleaf aus dem Ohr zu entfernen, setzen Sie
sich bitte mit dem Akustiker oder mit einem Arzt
in Verbindung. Entfernen des Qleafs aus dem Ohr
ohne die richtigen Werkzeuge kann den Softtip
oder das Modul beschädigen.
Verwenden Sie Qleaf nicht in den
folgenden Fällen:
• Vorerkrankung des Ohres.
• Exostosen (Knochenwachstum) im Gehörgang.
• Überproduktion von Ohrenschmalz.
Das Gerät sollte nicht:
• runterfallen.
• Starker Feuchtigkeit oder Wasser ausgesetzt
werden.
• ins Wasser fallen.
• beim Schwimmen, unter der Dusche, beim
Baden oder in der Sauna verwendet werden.
• nass gereinigt werden.
• in extreme Temperaturen z. B. Fönen
ausgesetzt werden.
• im Bergbau oder anderen Umgebungen
getragen werden, in denen Explosionsgefahr
besteht.
• Röntgen-Strahlung oder starken
Magnetfeldern, wie bei einer medizinischen
Untersuchung, ausgesetzt werden.
• in solchen Orten getragen werden, wo
Haarspray (Friseur) oder Lösungsmittel (wie z.
B. Farbsto) verwendet werden.
Beim Tragen oder Einsetzen des Qleafs seien Sie
bitte vorsichtig und achten Sie auf die Make-up,
Crème, Körper-Öl, Gel, Haarspray und ähnliche
Produkte, die Ihr Gerät verschmutzen können.
Diese Produkte können beispielweise die
Önung des Mikrofons blockieren.
Halten Sie das Qleaf von kleinen Kindern und
Haustieren fern. Beim Verschlucken einer der
Komponenten besteht Erstickungsgefahr für
kleine Kinder.
Leere Batterien und alte Hörgeräte
sollten gesammelt und als chemische
Abfälle entsorgt werden.
Deutsch
64
65
Page 35

Deutsch
Informationen über Reparaturdienst
Qleaf wurde von ExSilent BV, Overschiestraat 63,
Amsterdam entwickelt. Bei Beschwerden oder
Reparaturen sollten Sie sich an den Anbieter
wenden, von dem Sie das Gerät gekauft haben. Die
Behandlung von Beschwerden und Reparaturen
kann sich je nach Anbieter unterscheiden.
Beschränkte Herstellergarantie.
Diese beschränkte Garantie wird in jedem Teil
der ExSilent Europäischen Region anwendbar
sein, außer dass es es eine lokale Garantie gibt.
ExSilent BV ( “ExSilent”) garantiert, dass diese
ExSilent Produkt “(Produkt”) mangelfrei von
Materialen, Design und Fertigung zum Zeitpunkt
der ursprünglichen Kauf ist, vorbehaltlich der
folgenden Bestimmungen und Bedingungen:
1. Diese beschränkte Garantie ist für den
Endbenutzer des Produkts ( “Endkunden”)
gültig. Es ist ohne Ausschlusse oder die
Einschränkungen von (i) einer verbindlichen
gesetzlichen Rechte des Kunden oder (ii)
der Rechte des Kunden gegenüber dem
Verkäufer / Konzessionär des Produkts.
2. Die Gewährleistungsfrist beträgt
vierundzwanzig (24) Monaten von dem Tag,
an dem das Produkt erstmals von einem
Endkunden erworben wird. Im Falle eines
nachfolgenden Kaufs oder anderweitigen
Wechsels des Eigentümers / Benutzers wird
die Garantiefrist für die noch verbleibende
Teil des vierundzwanzig (24) Monatzeitraums
gültig und im Übrigen unberührt bleiben.
Diese beschränkte Garantie ist nur in
den folgenden Ländern anwendbar und
durchsetzbar: Bosnien, Bulgarien, alle
Mitglieder der Europäischen Union, Island,
Israel, Kroatien, Mazedonien, Norwegen,
Rumänien, Serbien / Montenegro, der Türkei
und der Schweiz.
3. Während der Garantiezeit wird ExSilent oder
ihre autorisierten Dienstleister die Reparatur
oder Ersatz des defekten Produkts (im
vollen Ermessen von ExSilent) durchführen.
ExSilent wird das reparierte Gerät oder ein
Ersatzgerät dem Kunden in gutem Zustand
zurückgeben und ExSilent erwirbt das
Eigentum an allen Teilen des Produktes oder
anderen Ausstattungsgegenständen, die
ExSilent ersetzt hat.
4. Wenn das Gerät ersetzt wird, wird die
Gewährleisungsfrist des Geräts verlängert
oder erneuert. Im Falle eines reparierten
Produktes bleibt die alte Garantie weiterhin
gültig.
5. Diese beschränkte Garantie gilt nicht für
bemalte Abdeckungen oder für andere
vergleichbare personalisierte Komponenten.
6. Diese beschränkte Garantie gilt weder für
Schäden, die durch normalen Verschleiß
verursacht wurden noch wenn:
(i) der Mangel durch die Tatsache, dass das
Produkt im Bezug auf: den Einsatz in
Konikt zwischen den Eigentümer oder
Gebrauschanweisungen, rauhe Behandlung,
Nässe, Feuchtigkeit oder extremen
Temperatur und Umweltbedingungen
oder einem raschen Wechsel derselben,
Korrosion oder Oxidation, nicht zulässige
Änderungen oder Verbindungen, nicht
zulässige Önungen oder Reparatur
oder Reparaturen mit nicht-zulässigen
Ersatzteile, unsachgemäße Verwendung,
unsachgemäße Installation, Unfälle, höhere
Gewalt, Nahrungsmittel oder Flüssigkeiten
darüber verschüttet wurden oder
chemische Substanzen eingewirkt haben
oder andere Tatsachen, über die ExSilent
vernünftigerweise nicht kontrollieren kann,
(einschließlich, aber nicht nur für Mängel an
Verbrauchsmateriallen wie Batterien, die eine
begrenzte Betriebszeit hat) außer, dass der
Mangel wegen der mangelhaften Material-,
Konstruktions-oder Verarbeitungsmängel
verursacht wurden;
(ii) ExSilent oder ihre autorisierten Dienstleister
keine Meldung von dem Kunden über das
Mangel innerhalb von dreißig (30) Tagen
nach dem Auftreten des Mangels innerhalb
der Gewährleistungsfrist bekommt;
(iii) das Produkt nicht zu ExSilent oder ihre
autorisierten Dienstleister binnen dreißig
(30) Tagen nach dem Auftreten des
Deutsch
66
67
Page 36

Deutsch
Mangels innerhalb der Gewährleistungsfrist
zurückgegeben wird;
(iv) die Seriennummer entfernt, gelöscht,
verunstaltet oder verändert wurde oder in
irgendeiner Form unlesbar ist;
(v) der Mangel durch die Tatsache, dass das
Produkt mit einer zusätzlichen Komponente
verwendet wurde oder verbunden war,
die nicht durch ExSilent geliefert oder
hergestellt wurde oder für einen anderen
Zweck verwendet wurde, für den es nicht
vorgesehen war.
(vi) das Shaden wegen eines Kurzschlusses der
Batterie verursacht wurde oder die Stutzen
der Batteriegehäuse oder Zellen zerbrochen
oder manipuliert wurde, oder die Batterie in
einem anderen Gerät eingesetzt wurde, für
das sie nicht bestimmt war.
7. Um einen Anspruch aus der Eingeschränkten
Garantie geltend zu machen, muss der
Kunde eine leserliche und unveränderte,
vollständige ausgefüllte originale
Garantiekarte zu ExSilent oder zu einem
autorisierten Dienstleister innerhalb von zwei
Wochen nach Kauf des Produkts schicken.
8. Diese beschränkte Garantie ist die einzige
und ausschließliche Rechtsmittel, die der
Kunde gegen ExSilent hat und die einzige
und ausschließliche Haftung von ExSilent
gegenüber dem Kunden für Mängel oder
unzulängliche Funktion des Produkts. Diese
Eingeschränkte Herstellergarantie ersetzt
jede anderweitige Garantie und Haftung,
unabhängig davon, ob solche mündlich,
schriftlich, oder aufgrund gesetzlicher (nicht
zwingender) Bestimmungen, ungesetzlich
oder vertraglich eingeräumt worden sind.
ExSilent haftet nicht für irgend einen
indirekten Folgeschaden, Kosten oder
Aufwendungen. ExSilent haftet auch nicht
für einen direkte Schaden, Kosten oder
Aufwendungen, wenn der Kunde eine
juristische Person ist.
9. Jede Ergänzung oder Änderung dieser
Einschränkte Garantie bedürfe der vorherigen
schriftlichen Zustimmung von ExSilent.
Haftungsausschluß
Das Urheberrecht © 2010 ExSilent. Alle Rechte
vorbehalten.
Die illegale Vervielfältigung, Übertragung,
Verteilung und Betrieb dieses Dokuments oder
einen Teil davon in eine oder andere Weise ohne
die vorherige schriftliche Zustimmung von
ExSilent ist verboten.
ExSilent behält sich das Recht vor, um
die Änderungen und Verbesserungen an
seinen Produkten, die in diesem Dokument
beschrieben sind, ohne vorherige Ankündigung
vorzunehmen.
ExSilent haftet auf keinem Fall für den Verlust
von Daten, Verlust des Einkommens oder
außergewöhnliche gelegentliche Verluste oder
indirekte Schäden.
Der Inhalt dieses Dokuments ist ohne jegliche
Garantie zur Verfügung gestellt. Außer, dass das
anwendbare Recht anfordert, weder ausdrücklich
noch bedingungslose keine Garantie in Bezug
auf die Genauigkeit, Zuverlässigkeit und Inhalt
dieses Dokuments gegeben werden. Dieses
schließt ein, aber wird nicht auf implizite
Garantien im Bezug auf seine Marktfähigkeit und
Eignung begrenzt, um ein bestimmtes Ziel zu
erreichen.
ExSilent behält sich das Recht vor, jederzeit diese
Dokumente ohne vorherige Ankündigung zu
ändern und zu widerrufen.
Deutsch
68
69
Page 37
Deutsch
Die Daten Ihres Qleaf Die Gewährleistung
Bitte notieren Sie die Daten Ihres Qleaf unten.
Name:
Deutsch
Kaufdatum:
Seriennummer der Geräte - Rechts:
Seriennummer der Geräte - Links:
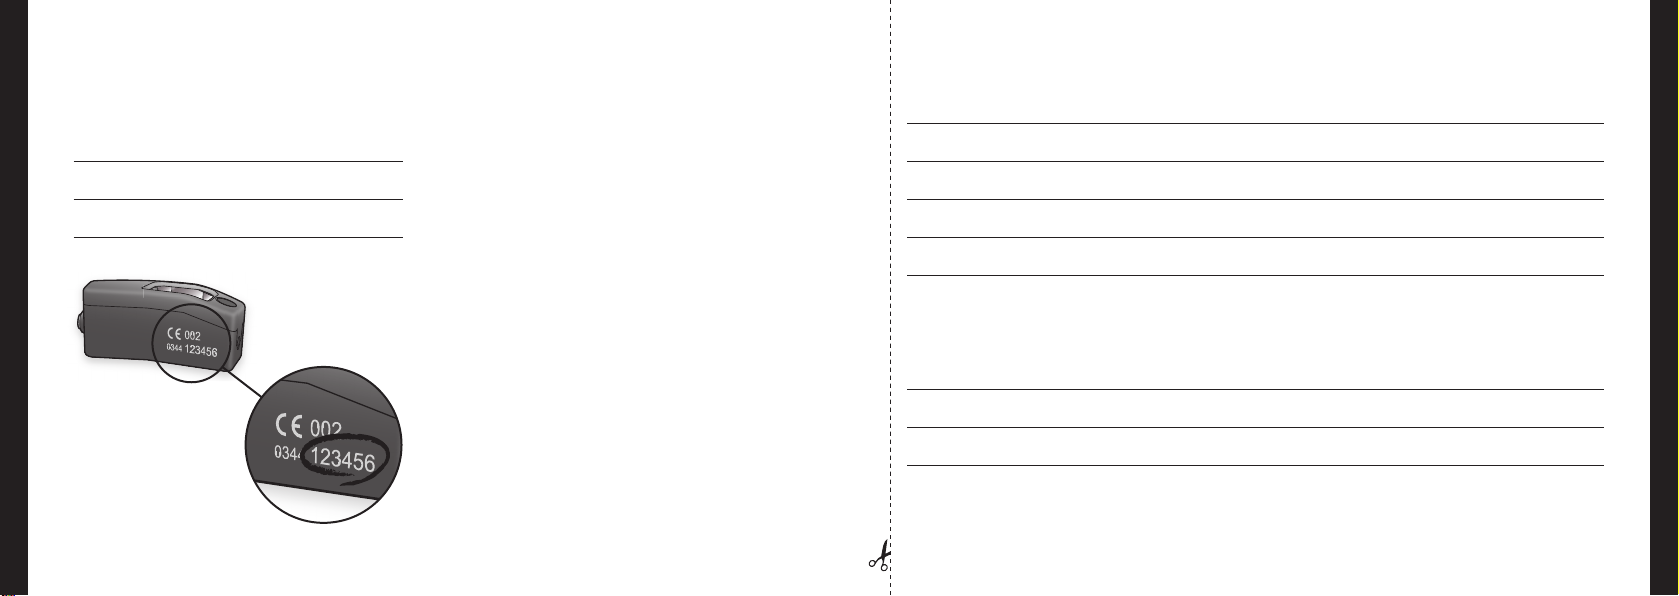
Seriennummer (6-stellige)
70
Adresse: PLZ:
Ort: Land:
Telefon: Kaufdatum:
Seriennummer - Rechts: Seriennummer - Links:
Stadt und Land des Kaufs
Name des Geschäftes:
Adresse des Ladens: PLZ:
Ort: Land:
71
Page 38

Français
Mode d’emploi du Qleaf
Français
72
73
Page 39

Français
Félicitations pour votre achat d’un Qleaf.
En achetant un Qleaf, vous avez la garantie d’un
produit doté de composants de haute qualité.
Grâce à plusieurs innovations majeures dans le
domaine des audioprothèses, Qleaf vous procure
une audition agréable, tout en style pour une
utilisation moderne.
SommairesQleaf
Qleaf : dénition 76
Anatomie du Qleaf 78
Qleaf - module (A) 79
Embout souple (B) 80
Pile (C) 80
Utilisation quotidienne du Qleaf 81
Installer la pile 81
Enlever la pile 81
Insérer Qleaf dans l’embout souple 82
Retirer Qleaf de l’embout souple 83
Positionner Qleaf dans l’oreille 84
Retirer Qleaf de l’oreille 85
Procédure de réglage et conguration 85
Entretien et utilisation 86
Nettoyage 86
Conservation 87
Avertissements 88
Information sur les services de réparations 90
Responsabilités 93
Les données de votre Qleaf 94
Garantie 95
Fabricant 289
Français
74
75
Page 40

Français
Qleaf : dénition
Qleaf est un appareil modulaire (identique
pour chaque oreille) de type CIC* (à insèrer
complètement dans le canal auditif) qui tient
dans l’oreille à l’aide d’un embout souple
standard.
Qleaf est alimenté par une pile bouton de type
10 (autocollant jaune). L’appareil est équipé d’un
microprocesseur perfectionné qui se charge
du traitement et de l’amplication du son an
de l’adapter spéciquement à votre problème
auditif.
Qleaf nécessite un embout souple de petite,
moyenne ou grande taille. La taille de l’embout
souple dépend de la taille de votre canal auditif.
Choisir la bonne taille est essentiel. Si l’embout
souple est trop grand, le port de l’appareil risque
d’être désagréable. Si l’embout est trop petit,
l’appareil risque de sier. Au cours du réglage,
votre audioprothésiste vous aidera à choisir
l’embout souple le mieux adapté à votre oreille.
Les dommages ou l’obstruction du hautparleur par le cérumen sont les causes les plus
fréquentes de réparation. Qleaf est équipé d’un
système intégré qui empêche le cérumen de
pénètrer dans l’appareil. Ainsi, les composants
du module sont protégés des dommages et
obstructions. Si l’embout souple se bouche, il
vous sut de le nettoyer ou de le remplacer.
Qleaf contient un microprocesseur aux
caracteristiques suivantes :
• Système “anti-larsen” adaptatif – évite le
“siement” spontané de l’appareil.
• “Réducteur de bruit” adaptatif – améliore les
performances auditives dans un environement
bruyant.
Grâce à sa taille, sa forme, sa construction
innovante et ses matériaux, Qleaf vous ore de
multiples avantages :
• Pratiquement invisible.
• Distortion minime de votre propre voix
(occlusion).
• Gain de son élevé grâce au positionnement du
haut-parleur au plus près du tympan.
• Le son est naturel, l’audition directionelle
est intacte grâce à un pavillon auriculaire
libre et le bruit du vent est minimisé par le
positionnement profond du microphone.
• Protègé des eets néfastes du cérumen.
• Comptabile avec l’utilisation d’un téléphone
portable.
• Compatible avec les activités sportives.
• Facile d’utilisation et d’entretien.
• Desgin contemporain
Français
76
* Entièrement dans le canal auditif
77
Page 41
Français
Anatomie du Qleaf
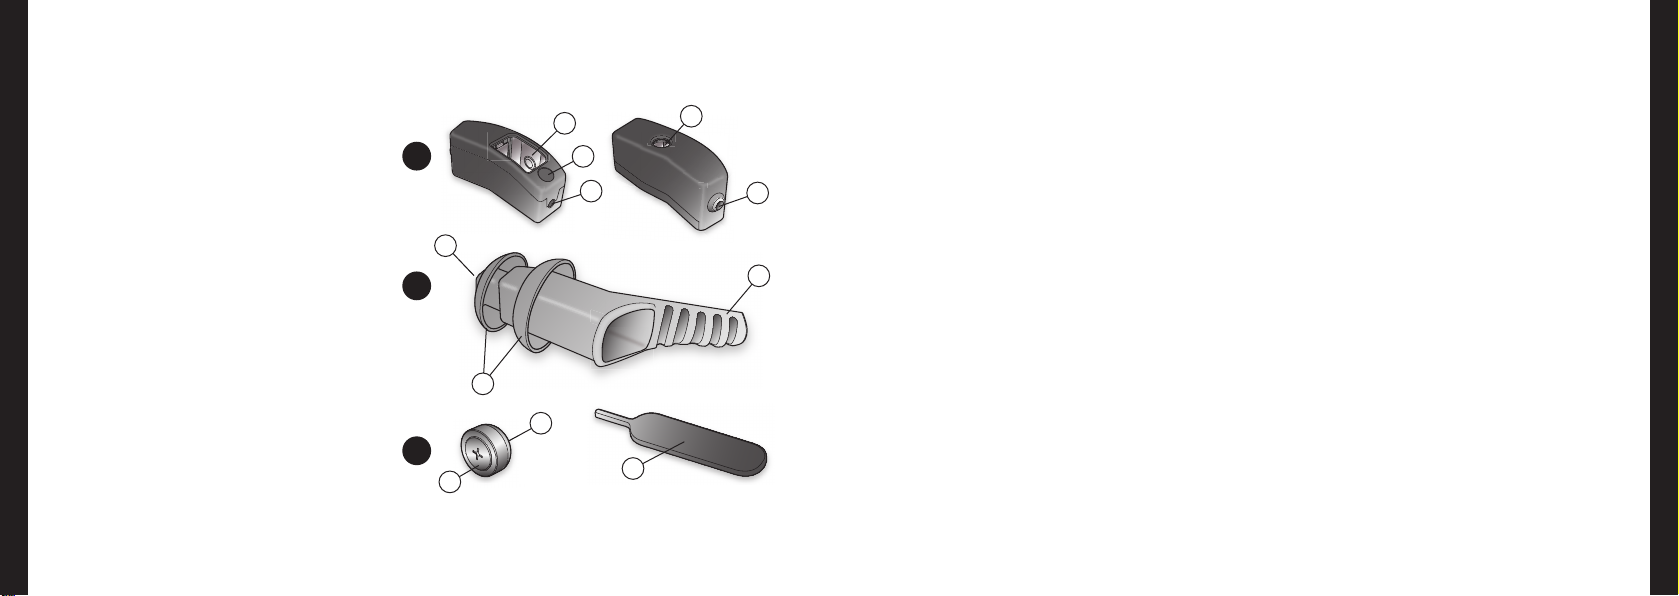
A Qleaf - module (boîtier)
1 Compartiment de pile
2 Indicateur coloré de côté
3 Ouverture du microphone
4 Ouverture du compartiment de pile
5 Ouverture du haut-parleur
B Embout souple
6 Ouverture pour le son
7 Dômes
8 Fil d’extraction
C Pile (de type 10)
9 Pôle positif (+)
10 Pôle négatif (–)
11 Outil d’extraction de pile
1
A
6
B
7
C
9
2
3
10
11
4
5
8
Qleaf - module (A)
Boîtîer (A)
Le boîtier est en plastique durable. Pour
l’entretien du boîtier, veuillez consulter le
chapitre “Entretien et utilisation” (pages 86-87).
Compartiment de pile (1)
Ce compartiment abrite la pile – pile bouton de
type 10 – qui sert à alimenter Qleaf. L’appareil
s’éteint en cas de retrait de la pile.
Les points de contact du compartiment de
pile transportent l’électricité de la pile au
microprocesseur situé à l’intérieur de l’appareil.
Les points de contact sont également utilisés
pour la programmation de l’appareil. Votre
audioprothèsiste utilise un appareil spécial qu’il
relie aux points de contact pour changer les
réglages du Qleaf.
Indicateur coloré de côté (2)
Deux couleurs di érentes permettent d’identi er
l’appareil qui correspond au côté droit et
l’appareil qui correspond au côté gauche.
Ouverture du microphone (3)
Le microphone qui transmet le son au Qleaf pour
traitement et ampli cation se trouve ici.
Ouverture du compartiment de pile (4)
L’outil fourni qui permet d’enlever la pile doit
être introduit dans cette ouverture. Consulter le
chapitre “Enlever la pile” (page 81).
Ouverture du haut-parleur (5)
Le son traité et ampli é est retransmis à travers
cette ouverture et passe à travers l’embout
souple pour atteindre le tympan.
Français
78
79
Page 42
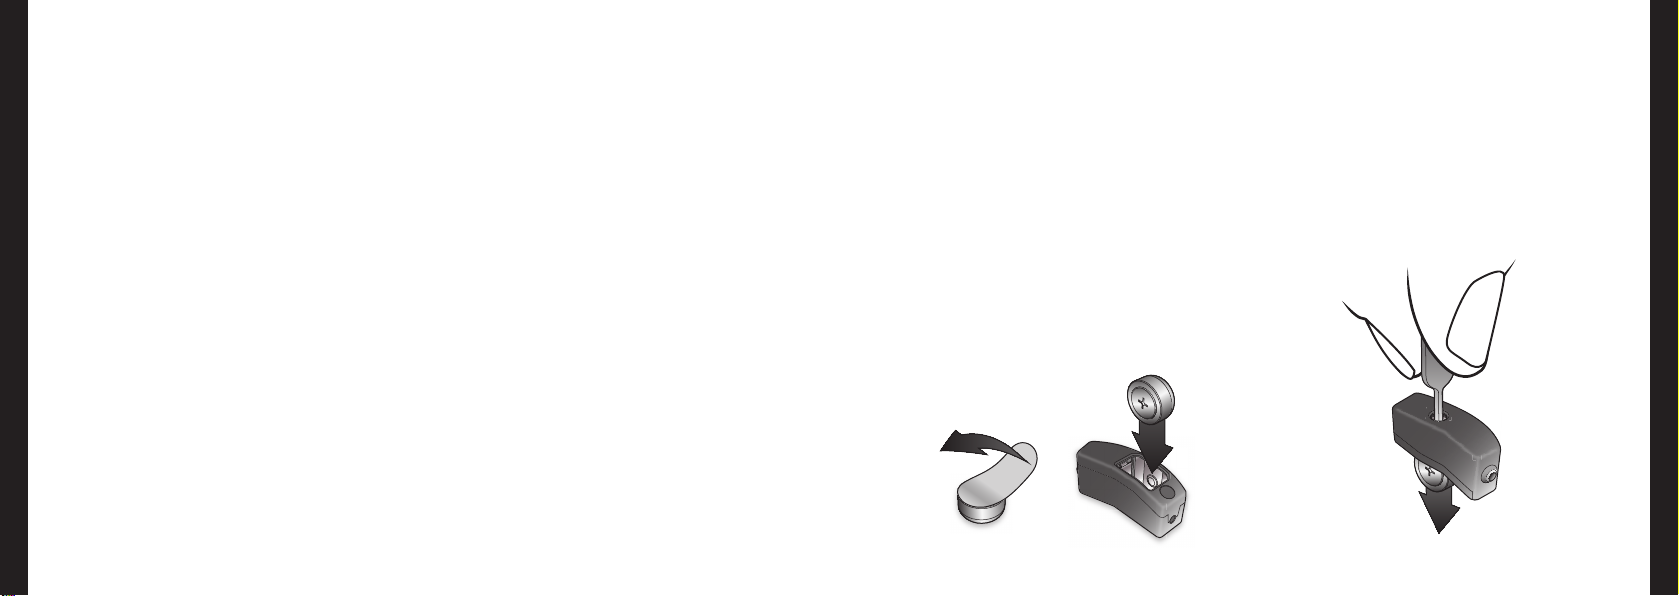
Français
Embout souple (B)
L’embout souple du Qleaf est en plastique
biocompatible, il est jetable, vous pouvez donc
en changer régulièrement. Pour l’entretien et le
nettoyage de l’embout souple, veuillez consulter
le chapitre “Entretien et utilisation” (pages
86-87). L’illustration est peut-être di érente de
l’apparence de votre embout souple en terme
de taille.
Ouverture pour le son (6)
Une fois traité et ampli é, le son est retransmis
par cette ouverture puis se dirige vers le tympan.
Dômes (7)
Les dômes font o ce de scellés pour que le
son du haut-parleur n’interfère pas avec le
microphone. Les dômes permettent également
au Qleaf d’être solidement xé dans l’oreillle.
Fil d’extraction (8)
Pour retirer Qleaf de l’oreille, tirez sur le l
d’extraction. Après l’insertion du Qleaf dans
l’oreille, le l se trouvera derrière le tragus (page
84), le rendant pratiquement invisible.
Pile (C)
Qleaf fonctionne avec une pile bouton de type 10
(voir autocollant jaune sur l’emballage). L’appareil
s’éteint en cas de retrait de la pile.
Utilisation quotidienne du Qleaf
Avant d’entreprendre l’une des actions décrites dans
les chapitres “Utilisation quotidienne du Qleaf”
et “Entretien et utilisation”, installez-vous sur une
surface de travail propre et plate.
Installer la pile
S’il s’agit d’une pile neuve : commencez par
enlever l’autocollant du pôle +. Tenez le module
(indicateur coloré de côté tourné vers la droite) et
insérez la pile comme indiqué (voir image).
Enlever la pile
Tenez le module et enlevez la pile grâce à l’outil
fourni (voir image).
Français
80
81
Page 43
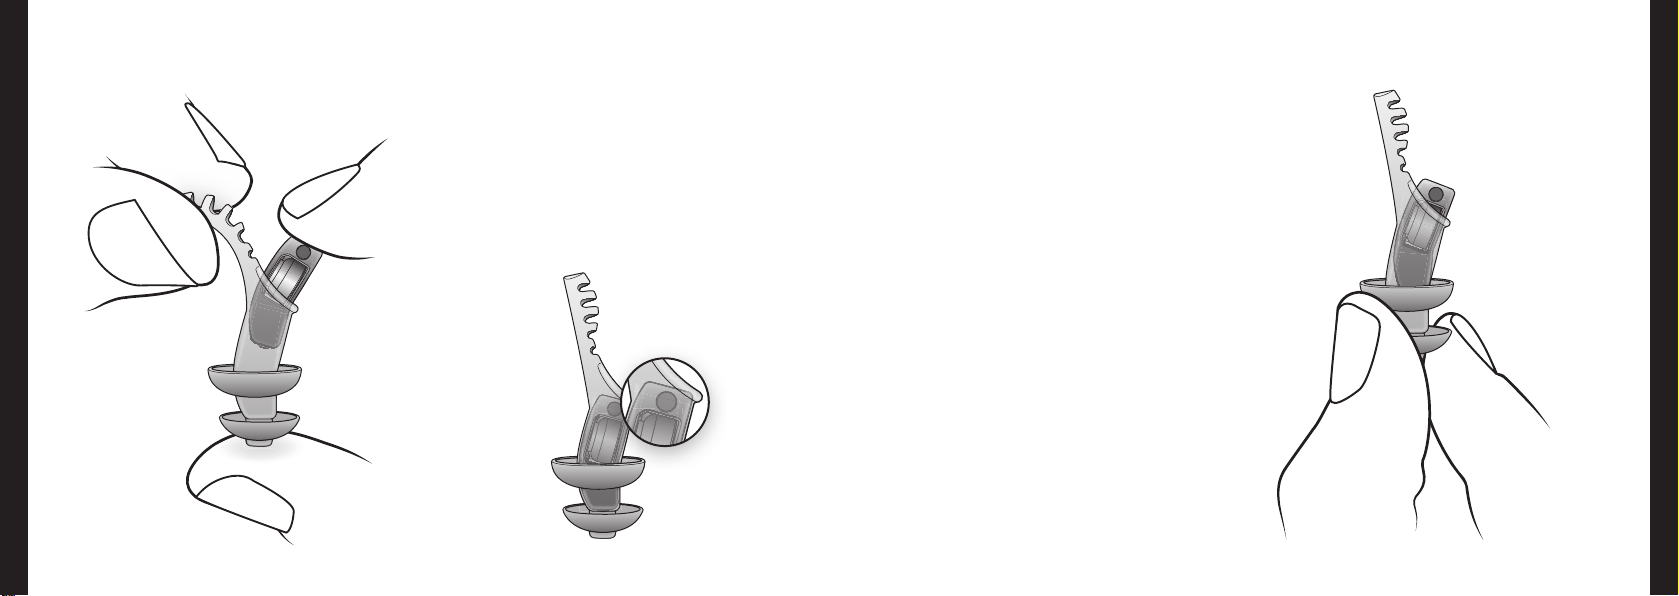
Français
82
Insérer Qleaf dans l’embout
souple
• Insérez le module dans l’embout souple, face à la
pile, l d’extraction vers la gauche (voir image).
• Insérez entièrement le module dans l’embout
souple (voir image ci-dessous).
Retirer Qleaf de l’embout
Français
souple
“Pincez” l’extrémité de l’embout souple sur
laquelle se trouve le petit dôme (voir image) pour
séparer le module et l’embout souple.
83
Page 44
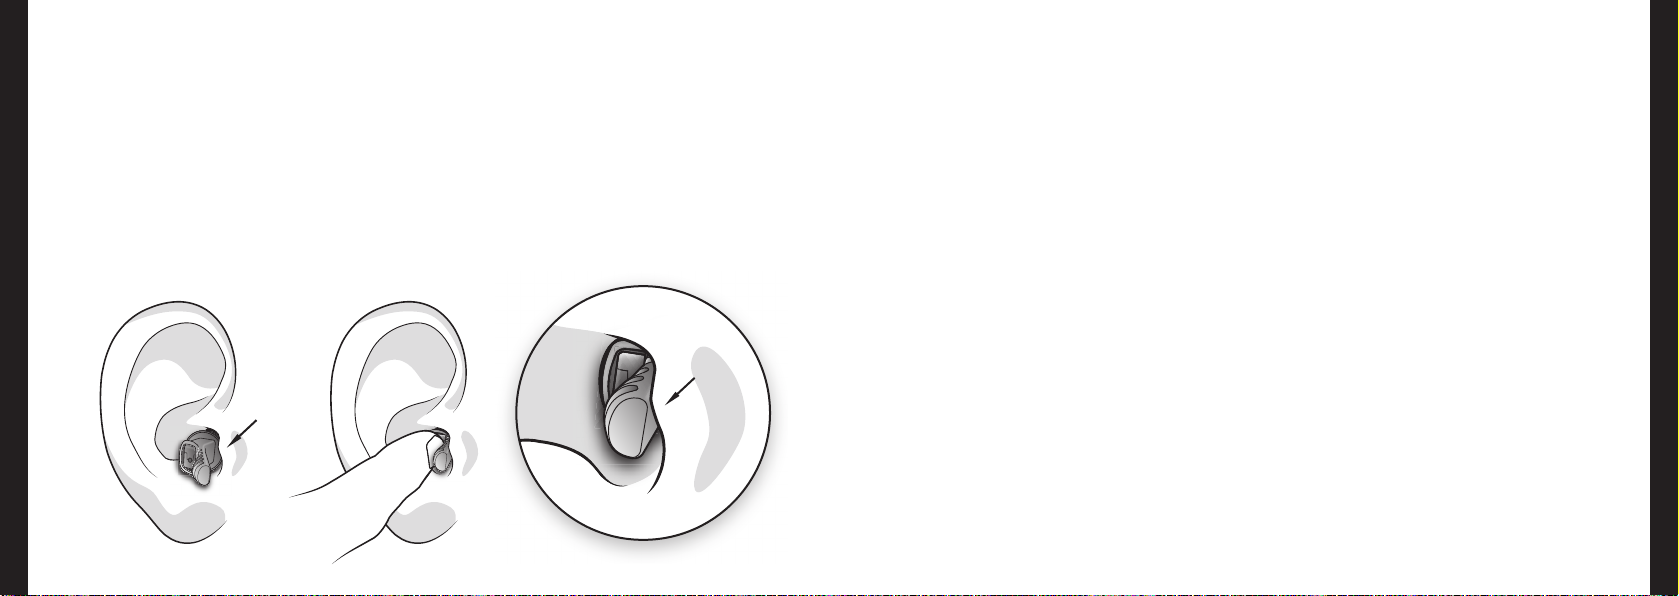
Français
Positionner Qleaf dans l’oreille
• Placez l’extrémité de l’embout souple sur
laquelle se trouve le(s) dôme(s) dans l’oreille,
sans forcer. Le l d’extraction se trouve
derrière le tragus.
• Insèrez l’appareil dans l’oreille en appuyant
sur la face plate. Ensuite, enfoncez doucement
l’appareil plus profondément dans l’oreille.
Ouvrir la bouche en grand facilite l’insertion.
le tragus
84
Insèrer un nouvel embout souple est parfois
moins facile car la surface d’un nouvel embout
est un peu rigide et certaines oreilles sont plutôt
“sèches”. Dans ce cas, appliquer un peu de gel
lubri ant ou de crème facilite l’insertion (une
quantité minuscule su t).
N.b.: Le lubri ant n’obstrue pas l’ouverture pour le
son !
le tragus
Dans l’idéal, la face plate du module (abritant le
microphone) se trouvera juste à l’entrée du canal
auditif après insertion dans l’oreille. L’appareil
sera ainsi pratiquement invisible et le son sera
optimal. Dans certains cas, l’oreille est trop petite
: l’appareil risque donc de dépasser de quelques
millimètres.
Si le l d’extraction dépasse après insertion de
l’appareil, votre audioprothésiste peut facilement
le couper à la bonne longueur.
Assurez-vous que vos mains soient propres avant
d’insérer le Qleaf. Le maquillage, la crème, les huiles
corporelles, le gel, la laque et les produits similaires
sont susceptibles de salir le module et, par exemple,
de contribuer à obstruer l’ouverture du microphone.
Retirer Qleaf de l’oreille
Tenez fermement le l d’extraction et tirez-le,
doucement, hors de l’oreille.
Procédure de réglage et
con guration
La procédure de réglage et la con guration
de l’audioprothèse est un processus capital et
individuel. Pour cette raison, consultez votre
audioprothésiste en cas de problème de réglage
ou de con guration. Seul votre audioprothésiste
est habilité à e ectuer d’éventuelles
modi cations.
Français
85
Page 45

Français
Entretien et utilisation
Bien qu’il soit possible d’utiliser le module Qleaf
indiéremment dans l’oreille droite ou dans
l’oreille gauche, les réglages sont généralement
diérents pour chaque oreille. Cela signie
qu’après réglage du module, vous ne devez pas
l’utiliser dans l’autre oreille. Intervertir les deux
embouts souples ne pose aucun problème à
condition qu’ils soient de la même taille.
L’accumulation de cérumen varie selon les
personnes. Il est donc impossible d’éviter que
le cérumen n’obstrue l’ouverture pour le son
située sur l’embout souple. L’obstruction risque
d’aaiblir le volume du son, sans toutefois
endommager votre appareil. Si vous remarquez
que l’ouverture pour le son située sur l’embout
souple est obstruée, vous pouvez nettoyer
l’embout souple (voir le paragraphe “Nettoyage”)
ou le remplacer.
Prenez soin de vérier quotidiennement que
le(s) module(s) et embouts ne sont ni obstrués,
ni endommagés. Vous obtiendrez ainsi des
performances optimales de la part de votre
appareil et lui assurerez une longue durée de
vie. Changez systématiquement tout embout
souple qui vous semble endommagé. Pour
que les performances de votre appareil soient
toujours optimales et an de minimiser le
risque d’infection, nous vous recommandons
de changer votre embout souple au moins
une fois par mois. Vous pouvez vous procurer
des embouts souples neufs chez votre
audioprothésiste.
Nettoyage
Module :
• Nettoyez-le quotidiennement à l’aide d’un
chion doux et sec.
• S’il est vraiment sale, nettoyez-le à l’aide d’un
chion spécial (humide) pour audioprothèses.
Embouts souples :
• Nettoyez-les quotidiennement à l’aide d’un
chion doux et sec.
• En cas de saleté importante, nettoyez-le
à l’aide d’un chion spécial (humide), de
comprimés nettoyants eervescents pour
audioprothèses ou d’un nettoyeur ultrasons.
• Vous pouvez rincer vos embouts obstrués sous
le jet d’eau tiède du robinet. En cas de saleté
importante ou persistante, si vous constatez
des dommages visibles ou une modication
des propriétés de votre embout souple,
remplacez-le immédiatement.
N.b.: N’utilisez jamais de produits nettoyants
agressifs (abrasifs ou solvants) ! Ils risquent de
causer des dommages irréparables à l’embout
souple ou au module.
Conservation
La nuit :
Nous vous conseillons de retirer l’embout souple
du module pendant la nuit. Enlevez la pile de
l’appareil et rangez-le à l’abri, en-dehors de l’étui.
De cette façon, vous augmentez la durée de vie
de la pile et favorisez l’évaporation de l’humidité
susceptible d’être présente dans l’appareil.
Conservation à court terme :
Vous pouvez utiliser l’étui de transport lorsque
vous souhaitez retirer temporairement l’appareil
de l’oreille.
Conservation à long terme :
Lorsque vous n’utilisez par votre audioprothèse
pendant une période de temps prolongée,
nettoyez le module et l’embout souple puis
rangez-les dans l’étui de transport. Veillez
également à systématiquement enlever la pile de
l’appareil avant de le ranger.
Français
86
87
Page 46

Français
Avertissements
L’embout souple est un composant
essentiel du Qleaf. En l’absence
d’embout souple, votre Qleaf ne
fonctionnera pas correctement. Cela pourrait
entraîner l’apparition de saletés permanentes
au niveau du module. Veillez donc à ne jamais
utiliser le module sans son embout souple.
Une fois l’appareil réglé, nous vous conseillons
de ne pas le porter dans l’autre oreille. En
général, cela provoque une déterioration des
performances auditives, voire même, dans
certains cas, une perte d’audition.
N’utilisez jamais un embout souple sale ou
endommagé. Cela pourrait avoir un impact négatif
sur les performances auditives ou vous être
inconfortable et causer une infection de l’oreille.
Remplacez régulièrement l’embout souple de
votre appareil, même s’il ne semble pas sale ou
usé. Consultez le chapitre “Entretien et utilisation”
(pages 86-87).
Lors de la première utilisation du Qleaf, portez-le
de façon ininterrompue pendant 4 heures puis
augmentez progressivement la période de port
à raison d’une heure supplémentaire par jour. Si
le port du Qleaf est source de douleur, irritation
permanente ou démangeasion, cessez de porter
l’appareil en attendant de pouvoir demander
conseil. Si vos problèmes persistent, consultez
un médecin. Faîtes régulièrement contrôler vos
oreilles et votre audition lorsque vous commencez
à porter l’appareil mais aussi par la suite.
Si pour quelconque raison vous ne parvenez
pas à retirer Qleaf de votre oreille, consultez
votre audioprothèsiste ou un médecin. Retirer
Qleaf de l’oreille sans les outils appropriés risque
d’endommager l’embout souple ou le module.
N’utilisez pas Qleaf dans les cas suivants :
• antécédents médicaux de problèmes de l’oreille.
• exostoses (excroissances osseuses) dans le
canal auditif.
• sécrétion importante de cérumen.
L’appareil ne doit pas être :
• laissé tomber.
• exposé à l’eau ou à l’humidité.
• immergé dans l’eau.
• porté en nageant, dans le bain, la douche ou le
sauna.
• nettoyé lorsqu’il est humide.
• exposé à des températures très élevées,
notamment lorsque vous vous sèchez les
cheveux.
• porté dans une mine ou un environement où
le risque d’explosion est important.
• exposé à des radiations, des rayons X ou à
des champs magnétiques puissants, dans un
examen médical par ex.
• porté dans un environnement où la laque
(coieur) et les solvants (teinture) sont
couramment utilisés.
Lors de l’insertion et pendant le port du Qleaf,
utilisez le maquillage, les crèmes, les huiles
corporelles, le gel, la laque et autres produits
similaires avec précaution. Ils peuvent salir
votre appareil et contribuer à l’obstruction de
l’ouverture du microphone.
Tenez Qleaf hors de portée des enfants et des
animaux. Il existe un risque d’etouement
pour les enfants en cas d’avalement de l’un des
composants.
Les piles usagées et les audioprothèses
que vous n’utilisez plus doivent être
collectées et éliminées comme des
déchets chimiques.
Français
88
89
Page 47

Français
Information sur les services de réparations
Qleaf a été développé par ExSilent BV,
Overschiestraat 63, Amsterdam. Pour toute
réclamation ou demande de réparation, veuillez
contacter votre revendeur. Le règlement des
réclamations et des réparations est susceptible
de varier selon le revendeur.
Garantie limitée du fabricant.
La présente garantie limitée s’appliquera dans
l’ensemble de la Région Européenne de ExSilent
sauf en cas de garantie locale. ExSilent BV
(”ExSilent”) garantie que ce produit ExSilent
(”Produit”) est exempt de tout défaut de
matériaux, de conception et de fabrication lors
de son achat, aux termes et conditions suivantes :
1. La présente garantie limitée est accordée à
l’utilisateur nal du Produit (”Client”). Elle est
accordée sans remise en cause (i) des droits
statutaires du Client ou (ii) des droits du
Client contre le revendeur du Produit.
2. La période de garantie est de vingt-quatre
(24) mois à partir de la date à laquelle le
premier Client a acheté le Produit. En cas de
revente ou de toute autre changement de
propriétaire ou d’utilisateur, la garantie sera
applicable pour le reste de la période des
vingt-quatre (24) mois selon les conditions
originales. La présente garantie limitée est
applicable uniquement dans les pays suivants
: Bosnie, Bulgarie, tous les pays membres de
l’Union Européenne, Islande, Israël, Croatie,
Macédoine, Norvege, Roumanie, Serbie/
Montenegro, Turquie et Suisse.
3. Pendant la période de garantie, le Produit
défectueux sera réparé ou remplacé (à
l’entière discretion de ExSilent) par ExSilent
ou par un réparateur agréé par lui. ExSilent
renverra au Client le Produit réparé ou un
autre Produit en bon état. Tout composant
ou autre équipement qui aura été remplacé
deviendra la propritété de ExSilent.
4. Tout produit échangé bénéciera d’une
extension de la période de garantie ou
d’une nouvelle période de garantie. En cas
de réparation, la garantie originale restera
applicable.
5. Cette garantie limitée ne couvre pas les
caches décoratifs et autres éléments
personalisés similaires.
6. Cette garantie limitée ne couvre pas les
dommages liés à l’usure normale du Produit.
Cette garantie limitée ne sera pas appliquée
si :
(i) le défaut résulte d’une utilisation contraire
aux recommandations du mode d’emploi,
de mauvais traitements, d’une exposition à
l’humidité, de températures extrêmes, d’un
environnement extrême, d’un changement
brutal de ces conditions, de la corrosion, de
l’oxidation, d’alterations ou de connections
non autorisees, de l’ouverture ou de
réparations non autorisées, de réparations
eectuées avec des pièces de rechange non
autorisées, d’une mauvaise installation ou
utilisation, d’un accident, d’un cas de force
majeure, d’un contact avec de la nourriture
ou un liquide, de l’inuence de produits
chimiques, ou de tout autre évènement
sur lequel ExSilent ne peut exercer aucun
controle (incluant, mais non limité aux
défauts des composants consommables
tels que les piles, qui ont une durée de vie
naturellement limitée), sauf si le défaut
est le résultat direct d’un défaut au niveau
des materiaux, de la conception ou de la
fabrication ;
(ii) ExSilent ou son réparateur agréé n’ont pas
reçu notication du défaut par le Client dans
les trente (30) jours suivant l’apparition du
défaut dans la période de garantie ;
(iii) le Produit n’a pas été renvoyé à ExSilent ou
à son réparéateur agréé dans les trente (30)
jours suivant l’apparition du défaut dans la
période de garantie ;
(iv) le numéro de série a été retiré, eacé,
endommagé, modié ou est illisible ;
(v) le défaut résulte du fait que le Produit a été
utilisé ou connecté avec un autre composant
qui n’était pas fabriqué ou fourni par ExSilent
ou a été utilisé dans un but autre que celui
pour lequel il était prévu ;
(vi) le défaut a été causé par un court-circuit
Français
90
91
Page 48

Français
de la pile ou parce-que les éléments de
branchement du compartiment de pile
ou des cellules ont été endommagés ou
présentent des signes d’altération ou que la
pile a été utilisée dans un autre appareil que
celui pour lequel elle était prévue.
7. An de pouvoir porter réclamation au titre
de la garantie limitée, le Client doit envoyer
à ExSilent ou à l’un de ses réparateurs agréés
une carte de garantie originale dûment
remplie de façon lisible et inchangée dans
les deux semaines suivant l’achat du Produit.
8. La présente garantie limitée est le seul et
unique recours du Client contre ExSilent et
la seule et unique responsabilité de ExSilent
vers le Client concernant les défauts ou le
mauvais fonctionnement du Produit. La
présente garantie limitée remplace toute
autre garantie ou responsabilité, y compris
verbale, écrite (sans engagement), ocielle,
contractuelle, sans valeur légale ou autre.
ExSilent ne peut être tenu pour responsible
des dommages indirects, secondaires ou
consécutifs, ni des coûts ou des dépenses.
De plus, ExSilent ne peut être tenu pour
responsible de dommages directs, coûts
ou dépenses si le Client est une personne
morale.
9. Tout amendement ou modication de cette
garantie limitée doit faire l’objet d’un accord
préalable écrit de ExSilent.
Responsabilités
Copyright © 2010 ExSilent. Tous droits reservés.
Toute reproduction illégale, transfert, distribution
ou conservation d’une partie ou de l’intégralité
de ce document, de quelque manière que
ce soit, sans avoir préalablement obtenu le
consentement écrit de ExSilent est interdite.
ExSilent se réserve le droit de modier ou
d’améliorer les produits décrits dans le présent
document sans préavis.
ExSilent ne peut être tenu pour responsable de
toute perte de données, de revenus, ou pour tout
dommages fortuits ou indirects.
Le contenu de ce document est fourni sans
aucune forme de garantie. En aucun cas,
sauf si la loi en vigueur l’exige, une garantie
concernant l’exactitude, la qualité et le contenu
de ce document ne sera donnée, implicitement
ou explicitement. Cela inclut mais n’est pas
limité aux garanties implicites concernant sa
commercialisation et sa capacité à atteindre un
objectif déni.
ExSilent se réserve le droit de changer ou
d’annuler ce document à tout moment sans
préavis.
Français
92
93
Page 49
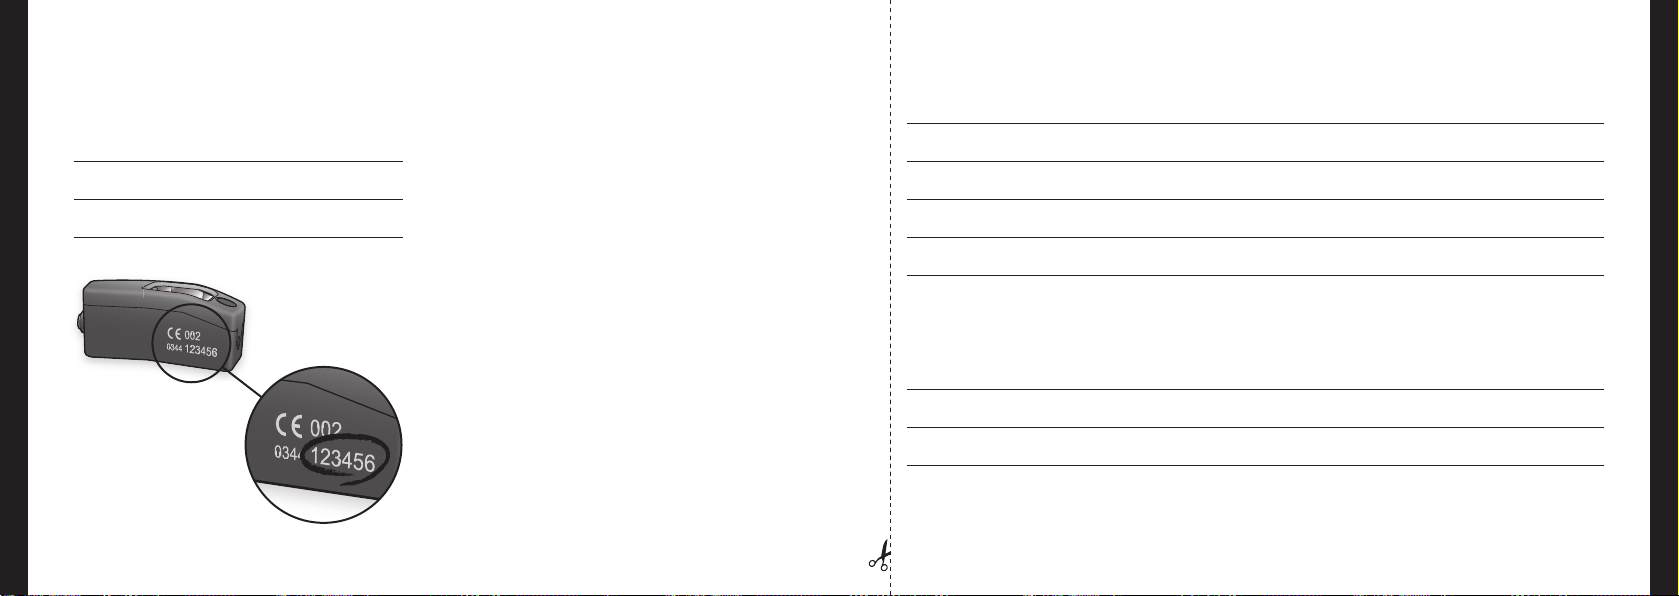
Français
Les données de votre Qleaf Garantie
Veuillez remplir les informations ci-dessous.
Nom :
Français
Date d’achat :
Numéro de série de l’appareil – Droit :
Numéro de série de l’appareil – Gauche :
Numéro de série (6 chi res)
94
Adresse : Code postal :
Ville : Pays :
Téléphone : Date d’achat :
Numéro de série – Droit : Numéro de série – Gauche :
Ville et pays de l’achat :
Nom du revendeur :
Adresse du revendeur : Code postal :
Ville : Pays :
95
Page 50

Español
Qleaf manual de usuario
Español
96
97
Page 51

Español
Tabla de contenidosQleaf
Felicidades por tu compra de Qleaf.
Con tu compra de Qleaf se te garantiza un
producto compuesto de componentes de
gran calidad. Debido a la aplicación de varias
innovaciones importantes en el campo de los
audífonos, el Qleaf asegura una audición con
estilo y placentera, adaptada al uso en tiempos
modernos.
¿Qué es Qleaf? 100
Anatomía de Qleaf 102
Qleaf - módulo (A) 102
Molde blando (B) 104
Batería (C) 104
El uso diario de Qleaf 105
Colocando la pila 105
Quitando la pila 105
Insertando Qleaf en el molde blando 106
Quitando Qleaf del molde blando 107
Colocando Qleaf en el oído 108
Quitando Qleaf del oído 109
Proceso de ajuste y conguración 109
Mantenimiento y uso 110
Limpieza 110
Guardado 111
Advertencias 112
Información sobre servicios de indemnización 114
Renuncia de responsabilidad 117
Los datos de su Qleaf 119
Garantía 119
Fabricante 289
Español
98
99
Page 52

Español
¿Qué es Qleaf?
El Qleaf es lo que se llama un aparato CIC*
modular (igual para cada oído) con un ajuste
estándar llamado molde blando.
Como fuente de energía se requiere una pila del
tipo 10 (etiqueta amarilla). El aparato incluye
un microprocesador avanzado que asegura
el procesamiento y amplicación del sonido,
adaptado a tu problema auditivo particular.
El Qleaf usa un molde blando con tamaños
Grande-Mediano- Pequeño. El tamaño del
molde blando depende del tamaño de tu
canal auditivo. La elección del tamaño correcto
es extremadamente importante. Si el molde
blando es demasiado grande, el aparato puede
resultar menos cómodo de llevar. Si el molde
blando es demasiado pequeño, el aparato podría
presentar pitido espontáneo. Durante el ajuste,
su especialista te ayudará a encontrar el tamaño
de molde blando que mejor te convenga.
Una de las razones de reparación más frecuentes
es por daño u obstrucción del altavoz o parlante
debido a cerumen del oído. El Qleaf tiene un
sistema interno que previene la intrusión del
cerumen del oído dentro del aparato. Como
resultado, los componentes del módulo siempre
estarán sin daños u obstrucciones. En caso de
que el molde blando se obstruya, se puede
limpiar o reemplazar fácilmente.
El Qleaf se entrega con un microprocesador que
incluye las siguientes características:
• Un sistema adaptativo ‘anti-acoplamiento’
– esto previene el ‘silbido’ espontáneo del
aparato.
• Un sistema adaptativo de ‘reducción de ruido’
– esto mejora el rendimiento auditivo en
ambientes ruidosos.
Como resultado de la combinación de tamaño,
forma, construcción y material innovador, Qleaf
ofrece una gama de importantes ventajas:
• Casi invisible.
• Mínima distorsión de tu propia voz (oclusión).
• Alta ganancia de sonido por el
posicionamiento del altavoz cerca del
tímpano.
• Sonido natural, con alta delidad, direccional
gracias a una auricula vacía, y ruido de viento
mínimo gracias al posicionamiento profundo
del micrófono.
• Protege contra el daño causado por el
cerumen del oído.
• Adecuado para el uso de teléfonos móviles.
• Adecuado para actividades deportivas.
• Fácil de usar y mantener.
• Diseño contemporáneo.
Español
100
* Completamente en el Canal
101
Page 53
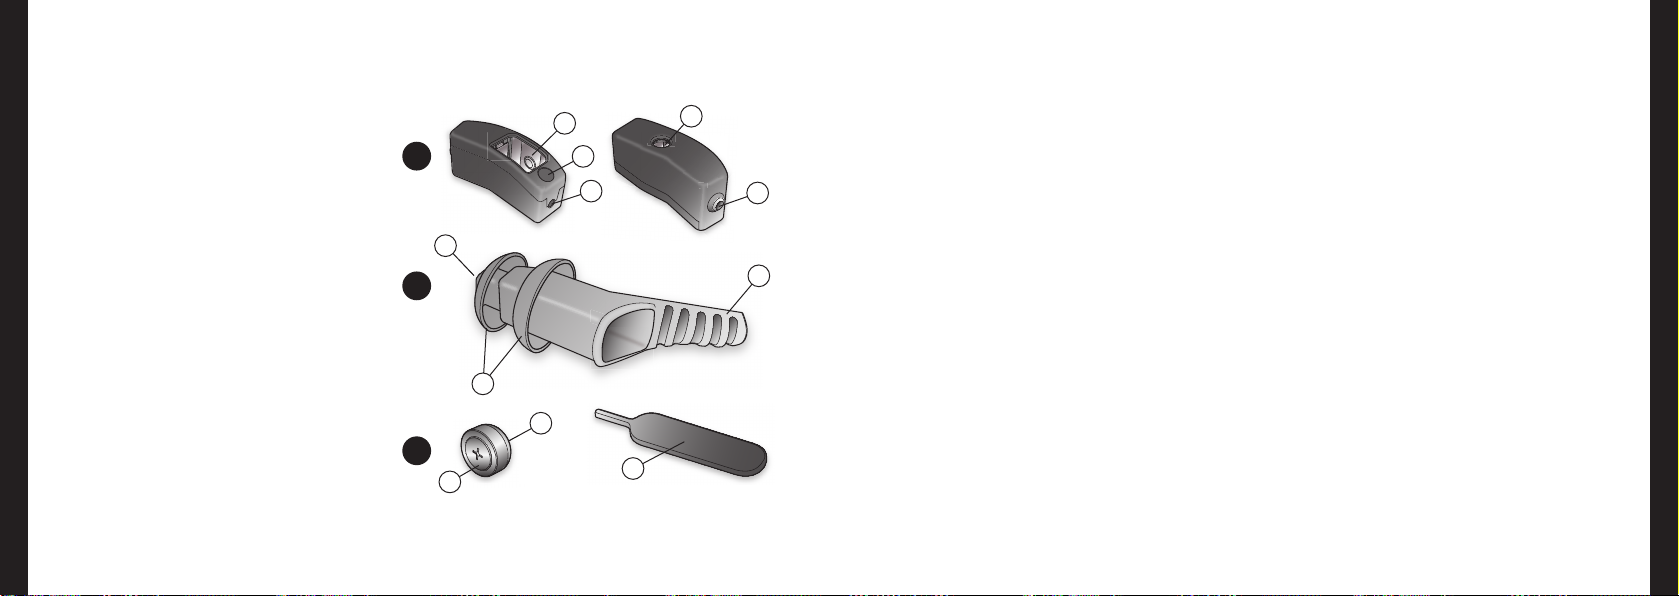
Español
Anatomía de Qleaf’s
A Qleaf - módulo (carcasa)
1 Compartimento de la pila
2 Indicador coloreado lateral
3 Apertura del micrófono
4 Apertura para quitar la batería
5 Apertura del altavoz
B Molde blando6 A
6 Apertura de sonido
7 Domos
8 Cordel
C Pila (tipo 10)
9 Polo positivo (+)
10 Polo negativo (–)
11 Herramienta para quitar la batería
1
A
6
B
7
C
9
2
3
10
11
4
5
8
Qleaf - módulo (A)
Carcasa (A)
La carcasa se ha hecho de plástico duradero.
Para el mantenimiento de la carcasa, por favor
consulta el capítulo ‘Mantenimiento y uso’
(página 110-111).
Compartimento de la pila (1)
Este compartimento está compuesto por la pila
– una pila de botón de tipo 10 – que proporciona
la energía a Qleaf. El aparato se apaga en cuanto
se quita la pila.
Los contactos de la pila en el compartimento
de pila transportan los voltajes requeridos de
la pila al microprocesador dentro del aparato.
Los contactos de la pila también hacen de
contactos de programación. Tu especialista
dependiente usa los contactos de programación
con una herramienta especial para cambiar la
con guración de Qleaf.
Indicador coloreado lateral (2)
Al usar dos colores diferentes, se pueden
identi car los módulos para el oído izquierdo y
derecho.
Apertura del micrófono (3)
Aquí se encuentra el micrófono que recoge el
sonido, el cual es procesado y ampli cado por el
Qleaf.
Apertura para quitar la pila (4)
La herramienta añadida para quitar la pila se usa
a través de esta apertura. Consulta el capítulo
‘Quitando la pila’ (página 105).
Apertura del altavoz (5)
El sonido procesado y ampliado se emite a través
de esta apertura y es dirigido a través del molde
blando hacia el tambor auditivo.
Español
102
103
Page 54
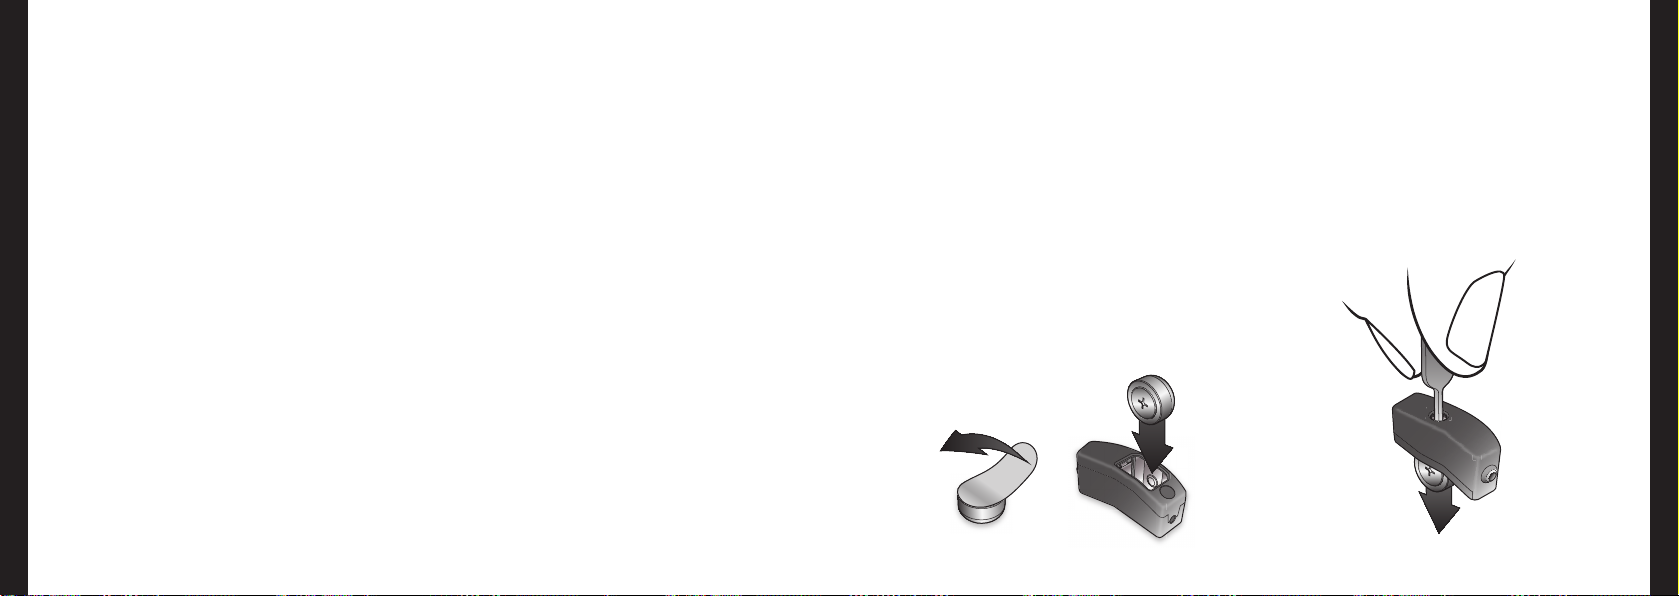
Español
Molde blando (B)
El molde blando del Qleaf está hecho de
un plástico bio-compatible y está diseñado
como elemento desechable, posibilitando así
su recambio regular. Para su mantenimiento
y limpieza, por favor consulta el capítulo
‘Mantenimiento y uso’ (páginas 110-111). La
ilustración puede ser diferente de tu elección de
tamaño para el molde blando.
Apertura de sonido (6)
El sonido procesado y ampliado se emite a través
de esta apertura y es dirigido hacia el tambor
auditivo.
Domos (7)
Los domos aseguran un sellado, que previene
que el sonido del altavoz inter era con el del
micrófono. Además, los domos aseguran un buen
‘agarre’ dentro del oído.
Cordel (8)
Para sacar el Qleaf del oído se usa la aletilla. Una
vez que se ha insertado el Qleaf, la aleta quedará
detrás del trago (página 108), lo cual hace que
sea casi invisible.
Pila (C)
Qleaf usa pilas de botón de tipo 10, indicadas
en el envoltorio con una etiqueta amarilla. El
aparato se apaga en cuanto se quita la pila.
El uso diario de Qleaf
Antes de empezar cualquiera de las acciones
mencionadas en los capítulos ‘El uso diario de
Qleaf’ y ‘Mantenimiento y uso’, asegúrate de usar
una super cie de trabajo limpia y horizontal.
Colocando la pila
Cuando uses una nueva pila: primero quita la
etiqueta del polo +. Sujeta el módulo (con el
indicador coloreado lateral hacia la derecha) e
inserta la pila como se indica (ver imagen).
Quitando la pila
Español
Sujeta el modulo y quita la pila con la herramienta
añadida de rosca (ver imagen).
104
105
Page 55
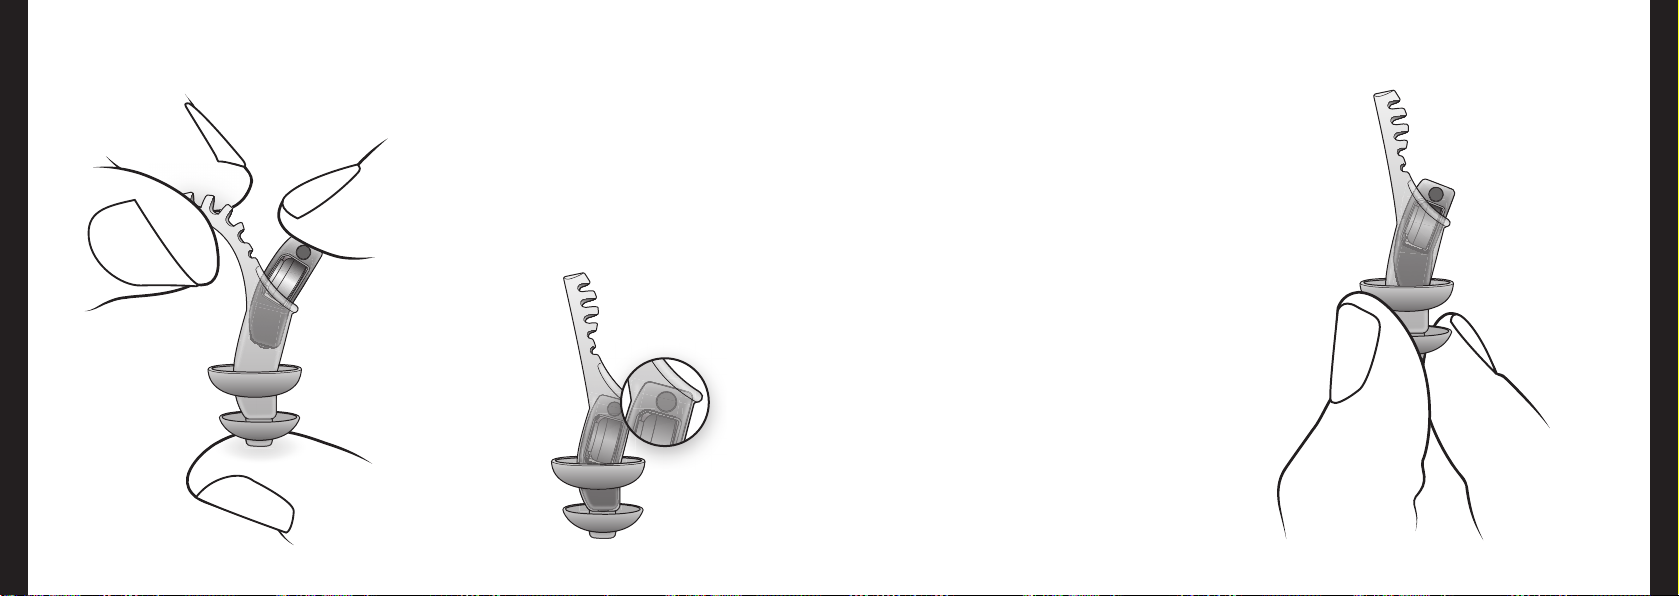
Español
106
Insertando Qleaf en el
molde blando
• Inserta el módulo en el molde blando, con la pila
de frente, el cordel hacia la izquierda (ver imagen).
• Inserte el módulo profundamente en el molde
blando (ver imagen abajo).
Quitando Qleaf del molde
Español
blando
‘Saque’ el módulo del molde blando apretando el
extremo del molde blando con el domo pequeño
(ver imagen).
107
Page 56
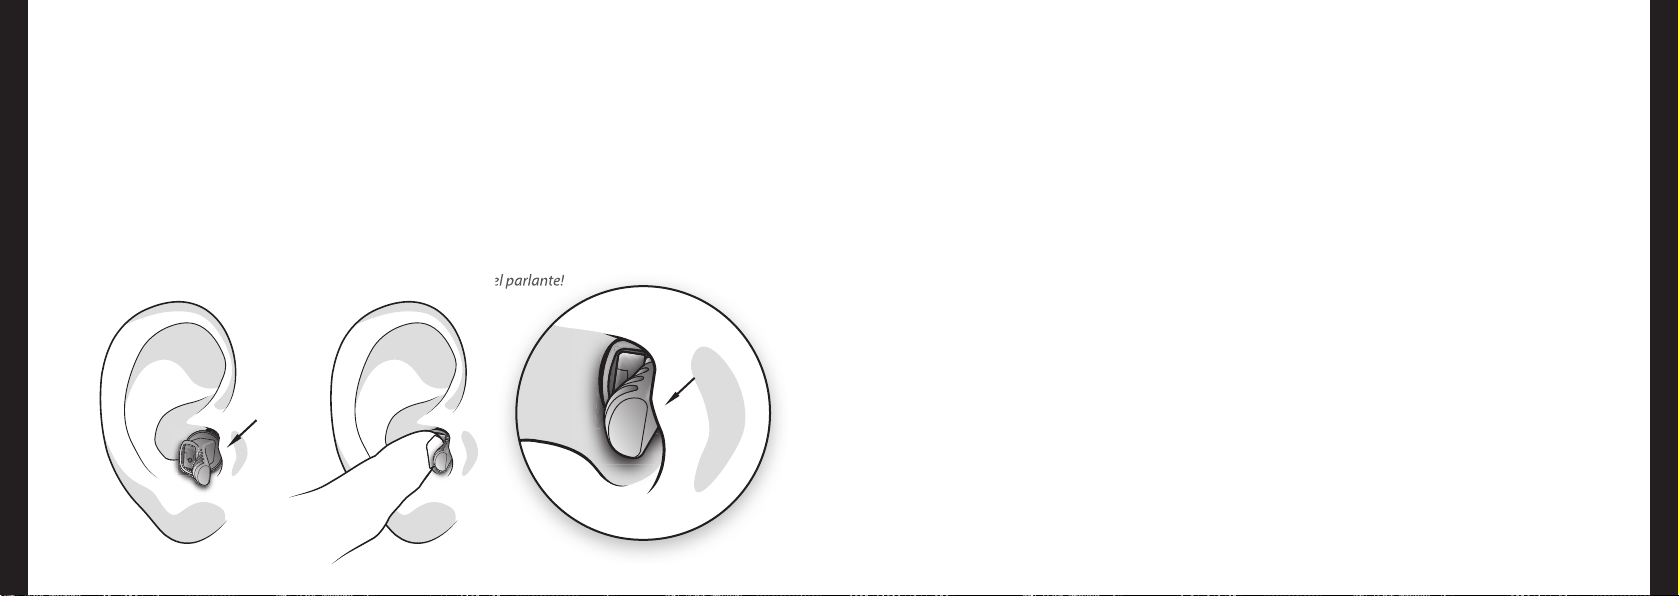
Español
Colocando Qleaf en el oído
• Pon el extremo del molde blando con el
domo(s) en el oído sin apretar. La aleta está
situado detrás del trago, en dirección a la nariz.
• Inserta el aparato en el oído apretando el lado
plano del aparato. Ahora empuja el aparato
con suavidad hacia adentro del oído. Si se abre
la boca la inserción será más fácil.
trago
108
Insertar un nuevo molde blando puede ser un poco
complicado porque la super cie de un molde blando
nuevo es algo rígida y porque algunos oídos son
bastante “secos”. Usar algún gel o crema lubricante
puede ayudar en estos casos (una cantidad pequeña
es su ciente media gota del liquido, de preferencia
aceite mineral esparcirlo en el molde.
N.b.:¡ Cuidado que el lubricante no obstruya la
salida del parlante!
trago
Lo ideal es que el lado del módulo (donde está
situado el micrófono) esté alineado a la entrada
del canal auditivo después de la inserción.
De esta manera, el aparato es prácticamente
invisible y el sonido es óptimo. Hay casos en los
que el canal auditivo es demasiado pequeño: en
ese caso, es posible que el aparato sobresalga
unos cuantos milímetros.
Si la aleta sobresale después de la inserción del
aparato, lo cual a hace visible, puede ser cortada
a medida fácilmente por su especialista.
Asegúrate que tienes las manos limpias cuando
insertes el Qleaf. Maquillaje, crema, aceite corporal,
laca y productos similares pueden ensuciar el
módulo y pueden, por ejemplo, contribuir a la
obstrucción de la apertura del micrófono.
Quitando Qleaf del oído
Español
Sujete la aleta rmemente y estírelo –siempre
despacio – hacia fuera del oído.
Proceso de ajuste y
con guración
El proceso de ajuste y con guración del
audífono es un proceso importante e individual.
Por esta razón, consulta a tu especialista para
cualquier queja sobre el ajuste o la con guración.
Tu especialista es la persona autorizada para
llevar a cabo cualquier modi cación necesaria.
109
Page 57

Español
Mantenimiento y uso
A pesar que el módulo Qleaf puede ser usado
tanto para el oído derecho como el izquierdo,
la conguración normalmente es diferente para
el oído derecho o izquierdo. Esto signica que
una vez el módulo ha sido ajustado, no deberías
usarlo en el otro oído. Siempre que uses el
mismo tamaño de molde blando, no importa si
intercambias los moldes blandos.
El aumento de cerumen de oído diere de una
persona a otra. Así pues, no se puede evitar del
todo que la salida del sonido del molde blando
se obstruya con cerumen de oído. A pesar de
que el volumen de sonido puede reducirse a
causa de la obstrucción, esto no puede dañar tu
aparato. En caso de que observes que la salida de
sonido del molde blando se ha obstruido, puedes
limpiar el molde blando (ver parágrafo ‘Limpieza’)
o reemplazarlo.
Comprueba el módulo(s) y el molde(s) blando(s)
diariamente por si hay obstrucciones o daños.
Esto te garantiza un funcionamiento óptimo y
una vida operacional larga. Siempre reemplaza
el molde blando cuando haya daños visibles.
Para mantener el funcionamiento óptimo de tu
aparato y minimizar la posibilidad de infección,
te aconsejamos que reemplaces el molde blando
por uno nuevo por lo menos una vez al mes. Los
moldes blandos están disponibles en tu tienda
habitual.
Limpieza
Módulo:
• Limpiar diariamente con un pañuelo suave y
seco.
• En caso de suciedad severa, limpiar con
pañuelos de limpieza especiales (húmedos)
para audífonos.
Molde blando:
• Limpiar diariamente con un pañuelo suave y
seco.
• En caso de suciedad severa, puedes limpiarlo
con pañuelos de limpieza especiales
(húmedos), con pastillas solubles para
productos de audición o, alternativamente,
puedes hacer que lo limpien con un limpiador
de ultrasonidos.
• Los moldes blandos obstruidos pueden
enjuagarse bajo agua corriente tibia. En caso
de suciedad severa o persistente, si ocurre
un cambio en las propiedades o daños en el
material, el molde blando siempre debe ser
reemplazado.
N.b.: ¡Nunca uses productos de limpieza agresivos,
abrasivos o solventes! Esto puede causar daños
irreparables al molde blando o al módulo.
Guardado
Por la noche:
Recomendamos quitar el molde blando del
módulo por la noche: quita la pila del aparato
y guárdala en un sitio seguro fuera de su caja.
De esta manera, aumentas la vida operacional
de la pila y también permites la evaporación
de humedad que pueda estar presente en el
aparato.
Guardado de corta duración:
Puedes usar la caja de embalaje cuando quieras
quitar el aparato de tu oído temporalmente.
Guardado de larga duración:
Cuando no uses tu audífono durante un periodo
largo de tiempo, limpia el módulo y el molde
blando antes de guardarlos dentro de la caja de
embalaje. Siempre quita la pila del aparato en
esta situación.
Español
110
111
Page 58

Español
Advertencias
El molde blando es una parte esencial
del Qleaf. Sin el molde blando, el Qleaf
no podrá funcionar correctamente. Y
esto podría causar ensuciamiento irreversible del
módulo. Por esta razón, nunca uses el modulo sin
el molde blando.
Una vez se ha ajustado el aparato, no deberías
llevarlo en el otro oído. Esto generalmente lleva
al deterioro del rendimiento auditivo y a veces
puede incluso resultar en pérdida de audición.
Nunca uses moldes blandos dañados o
ensuciados. Esto puede afectar negativamente
el rendimiento auditivo o resultar en un
ajuste incómodo, que puede, a su vez, llevar a
infecciones del oído.
Reemplaza el molde blando de tu aparato
regularmente, incluso si no está dañado
o ensuciado visiblemente, ver capítulo
‘Mantenimiento y uso’ (página 110-111).
Cuando uses Qleaf por primera vez, empieza
llevándolo un periodo continuo de 4 horas e
increméntalo posteriormente una hora al día. Si
sufres dolor, irritación continua o picor, no uses
los aparatos hasta que recibas asesoramiento de
un especialista. Si tus quejas persisten, consulta
a un médico. Pasa revisiones regulares de oído
y audición, tanto en el periodo inicial como
después.
Si por alguna razón no es posible quitar Qleaf de
tu oído, consulta a tu dependiente o a un doctor.
Quitar Qleaf de tu oído sin las herramientas
necesarias puede dañar el molde blando o el
módulo.
No use Qleaf en los siguientes casos:
• Un historial médico del oído.
• Exostosis (crecimiento abultado del hueso) en
el canal del oído.
• Secreción fuerte de cerumen de oído.
El aparato no debe ser:
• dejado caer.
• expuesto a humedad o agua.
• sumergido en agua.
• usado mientras nadas, tomas una ducha, te
bañas o en la sauna.
• lavado con líquidos.
• expuesto a temperaturas extremadamente
altas, como cuando se usa un secador de pelo.
• llevado en minas u otros ambientes donde el
riesgo de explosión es alto.
• Expuesto a radiación de rayos X o campos
magnéticos fuertes, como durante
investigaciones médicas.
• Llevado en sitios donde se use laca (sprays de
pelo) o solventes (como tintes).
Se debe tener cuidado al usar maquillaje, crema,
aceite corporal, gel, laca y productos similares,
mientras llevas o insertas el Qleaf. Pueden
ensuciar el aparato y, por ejemplo, contribuir a la
obstrucción de la apertura del micrófono.
Mantén el Qleaf alejado de niños pequeños
y mascotas. En caso de tragar uno de los
componentes, hay peligro de atragantamiento
en niños pequeños.
Las pilas usadas y los audífonos viejos
deben ser recogidos y tirados como
basura química.
Español
112
113
Page 59

Español
Información sobre los servicios de indemnización
El Qleaf ha sido desarrollado por ExSilent BV,
Overschiestraat 63, Amsterdam. Para quejas
o peticiones de servicios de indemnización,
deberías contactar al proveedor al que
compraste tu aparato. Los acuerdos por quejas o
indemnizaciones pueden variar dependiendo del
proveedor.
Garantía Limitada del Fabricante.
Esta garantía limitada será aplicable en cualquier
parte de la Región Europea de ExSilent a
menos que haya una garantía local. ExSilent BV
(”ExSilent”) garantiza que este producto ExSilent
(”Producto”) está libre de defectos en materiales,
diseño y acabados a la hora de su compra original
sujeto a las siguientes provisiones y condiciones:
1. Esta garantía limitada es entregada al usuario
nal del Producto (”Cliente”). Es entregada
sin exclusión o restricción de (i) cualquiera
de los derechos vinculantes por ley del
Cliente o (ii) cualquiera de los derechos del
Cliente contra el vendedor/concesionario del
Producto.
2. El periodo de garantía es veinticuatro (24)
meses desde la fecha en la que el primer
cliente compró el Producto. En caso de una
compra sucesiva u otro cambio de dueño/
usuario, el periodo de garantía continuará
durante el resto del periodo de veinticuatro
(24) meses y permanecerá no afectado
en todos los otros respetos. Esta garantía
limitada solo es aplicable y ejecutable
en los siguientes países: Bosnia, Bulgaria,
todos los miembros de la Unión Europea,
Islandia, Israel, Croacia, Macedonia, Noruega,
Rumania, Serbia/Montenegro, Turquía y
Suecia.
3. Durante el periodo de garantía, ExSilent o
su proveedor aprobado de servicio reparará
o reemplazará el producto defectuoso (a
la entera discreción de ExSilent). ExSilent
devolverá el Producto reparado u otro
Producto al Cliente en buenas condiciones.
Todos los componentes u otro equipamiento
que sea reemplazado pasarán a propiedad
de ExSilent.
4. A un producto reemplazado se le dará un
periodo de garantía extendido o renovado.
En caso de un producto reparado, la Antigua
garantía seguirá en uso.
5. Esta garantía limitada no cubre
carcasas pintadas y otros componentes
personalizados comparables.
6. Esta garantía limitada no es aplicable
a daños causados por uso normal. Esta
garantía limitada tampoco será aplicable si:
(i) el defecto fue causado por el hecho
que el Producto fue sujeto a: uso en
conicto con las direcciones del usuario
o propietario, maltratamiento, exposición
a humedad o condiciones termales
o ambientales extremas o cambios
rápidos en dichas condiciones, corrosión,
oxidación, alteraciones o conexiones no
permitidas, aperturas o reparaciones no
permitidas, reparaciones hechas con partes
reemplazables no permitidas, uso incorrecto,
instalación incorrecta, accidentes, fuerza
mayor, vertido de líquidos o comida, la
inuencia de productos químicos u otros
hechos sobre los que ExSilent no pueda
tener control razonable (incluyendo, pero no
limitado a, defectos en los componentes de
consumo, como las pilas que sólo tienen una
vida limitada por naturaleza) a menos que el
defecto haya sido causado directamente por
defectos en materiales, diseño o acabado;
(ii) ExSilent o su proveedor aprobado de
servicio no recibió noticación del defecto
por parte del Cliente dentro de un periodo
de treinta (30) días de la ocurrencia del
defecto dentro del periodo de garantía;
(iii) el Producto no fue devuelto a ExSilent o
su proveedor aprobado de servicio dentro
de un periodo de treinta (30) días de la
ocurrencia del defecto dentro del periodo de
garantía;
(iv) el número de serie fue quitado, borrado,
dañado, cambiado o es ilegible;
(v) el defecto fue causado por el hecho que el
Producto fue usado o estaba conectado a un
componente adicional que no fue fabricado
Español
114
115
Page 60

Español
Renuncia de responsabilidad
o suministrado por ExSilent o usado para
otro propósito que aquel para el que fue
hecho;
(vi) El defecto fue causado por el hecho que
la pila fue sujeta a un corto-circuito o que
las piezas de conexión de la pila o células
estaban rotas o muestran evidencia de
alteración o que la pila fue usada en otro
aparato diferente a aquel para el que fue
hecho.
7. A n de hacer una reclamación bajo la
garantía limitada, el cliente debe enviar una
tarjeta de garantía original rellenada por
completo, legible e inalterada a ExSilent o su
proveedor aprobado de servicio dentro de
un periodo de dos semanas de la compra del
Producto.
8. Esta garantía limitada es la única y exclusiva
indemnización disponible al Cliente contra
ExSilent y la sola y exclusiva responsabilidad
de ExSilent hacia el Cliente por defectos en,
o pobre funcionamiento del, Producto. Esta
garantía limitada reemplaza todas las otras
garantías y responsabilidades, incluyendo
las verbales, escritas, (no vinculante) legales,
contractuales, ilegales y otras. ExSilent no
es responsable de cualquier daño, costo o
gasto indirecto, secundario o consecuente.
Tampoco es ExSilent responsable por
cualquier daño, costo o gasto directo, si el
Cliente es una entidad legal.
9. Cualquier enmienda o cambio a esta garantía
limitada requiere la previa aprobación por
escrito de ExSilent.
Copyright © 2010 ExSilent. Todos los derechos
reservados.
La reproducción, transferencia, distribución o
tenencia ilegal de este documento, o una parte
de él, de cualquier modo, sin el consentimiento
previo por escrito de ExSilent, está prohibida.
ExSilent se reserve el derecho a cambiar y hacer
mejoras en sus productos que están descritos en
este documento sin previa noticación.
En ningún caso ExSilent puede ser hecho
responsable por cualquier pérdida de datos, o de
salario, o por cualquier incidente especial o daño
indirecto.
El contenido de este documento no lleva
ninguna garantía. A menos que la ley aplicable
requiera lo contrario, no se entregará garantía,
explícita o implícita, en relación con la exactitud,
abilidad y contenido de este documento.
Esto incluye, pero no está limitado a, garantías
implícitas en relación a su comercialidad y
adecuación para lograr un objetivo concreto.
ExSilent se reserve el derecho en cualquier
momento a cambiar y revocar este documento
sin previa noticación.
Español
116
117
Page 61
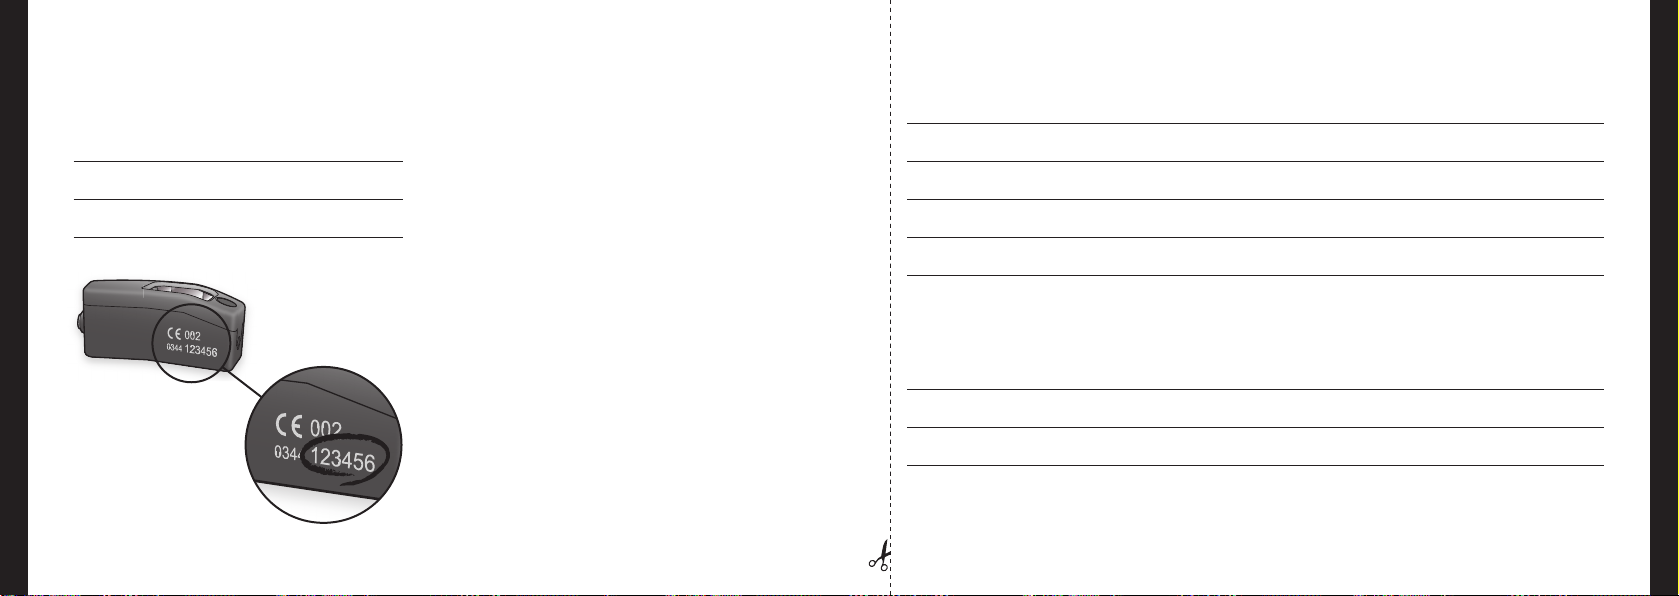
Español
Los datos de tu Qleaf Garantía
Por favor, anota los datos de tu Qleaf abajo.
Nombre:
Español
Fecha de compra:
Número de serie de Aparato - Derecho:
Número de serie de Aparato - Izquierdo:
Número de Serie (6 dígitos)
118
Dirección: Código Postal:
Ciudad: País:
Teléfono: Fecha de compra:
Número de serie- Derecho: Número de serie- Izquierdo:
Ciudad y país de compra:
Nombre de la tienda:
Dirección de la tienda: Código postal:
Ciudad: País:
119
Page 62

Português
Manual de Instruções Qleaf
Português
120
121
Page 63

Português
ÍndiceQleaf
Parabéns pela compra do Qleaf.
Com a compra de um Qleaf, voce tem a garatia
de um produto feito com componentes de
alta qualidade. Ao aplicar muitas inovações
importantes no campo dos aparelhos auditivos,
o Qleaf assegura uma forma agradável e fácil de
adaptar-se ao uso diário moderno.
122
O que é o Qleaf? 124
Anatomia do Qleaf 126
Qleaf - módulo (A) 127
Oliva (B) 128
Bateria (C) 128
Uso diário do Qleaf 129
Colocar a bateria 129
Retirar a bateria 129
Inserir o Qleaf na oliva 130
Retirar o Qleaf da oliva 131
Colocar o Qleaf no ouvido 132
Retirar o Qleaf do ouvido 133
Procedimento de adaptação e conguração 133
Manutenção e uso 134
Limpeza 134
Armazenamento 135
Avisos 136
Informação sobre os serviços de reparação 138
Condições 141
O dados do seu Qleaf 142
Garantia 143
Fabricante 289
123
Português
Page 64

Português
O que é o Qleaf?
O Qleaf é o tão falado dispositivo CIC* (o mesmo
para cada ouvido) com encapsulamento padrão,
chamado de oliva.
Para o fornecimento energético, é necessária
uma bateria tipo 10 (selo amarelo).O dispositivo
é disponibilizado com um microprocessador
avancado, que garante o processamento e
amplicação do som, adaptado ao seu problema
auditivo.
124
O Qleaf utiliza olivas com tamanhos Grandes,
Médios e Pequenos. O tamanho da oliva
depende do tamanho do seu canal auditivo. A
escolha do tamanho correto é extremamente
importante. Se a oliva for muito grande, o
dispositivo irá ser menos confortável. Se a oliva
for pequena, poderá vericar-se microfonia.
Durante a adaptação, o seu fornecedor do
disppositivo tentará encontrar o tamanho ideal
para a adaptação.
Uma das razões mais recorrentes para reparo
é o microfone car danicado ou entupido
com a cera do ouvido. O Qleaf tem um sistema
embutido que previne a intrusão de cera do
ouvido no dispositivo. Em resultado disso,
os componentes do módulo permanecerão
intactos. No caso da oliva car entupida, poderá
facilmente ser limpa ou substituída.
* Completamente no canal
O Qleaf possui um microprocessador com as
seguintes características:
• Um sistema ‘antifeedback’ adaptável – isto
previne “assobios” espontâneos no dispositivo.
• Um sistema de ‘redução de ruido’ adaptativo
– isto possibilita uma melhor audição em
ambientes ruidosos.
Como resultado da combinação de tamanho,
forma, contrução inovadora e material, o Qleaf
oferece uma série de vantagens importantes:
• Praticamente invisível.
• Mínima distorção da sua própria voz (oclusão).
• Grande ganho de som pelo posicionamento
do microfone próximo do canal auditivo.
• Som natural, com audição direcional elevada
graças a um auriculo vazio, e reduzido ruído
do vento graças ao posicionamento profundo
do alto-falante.
• Protege contra danos causados pela cera do
ouvido.
• Adequado para uso com telefone celular.
• Adequado a atividades desportivas.
• Fácil de usar e manter.
• Design contemporâneo.
125
Português
Page 65
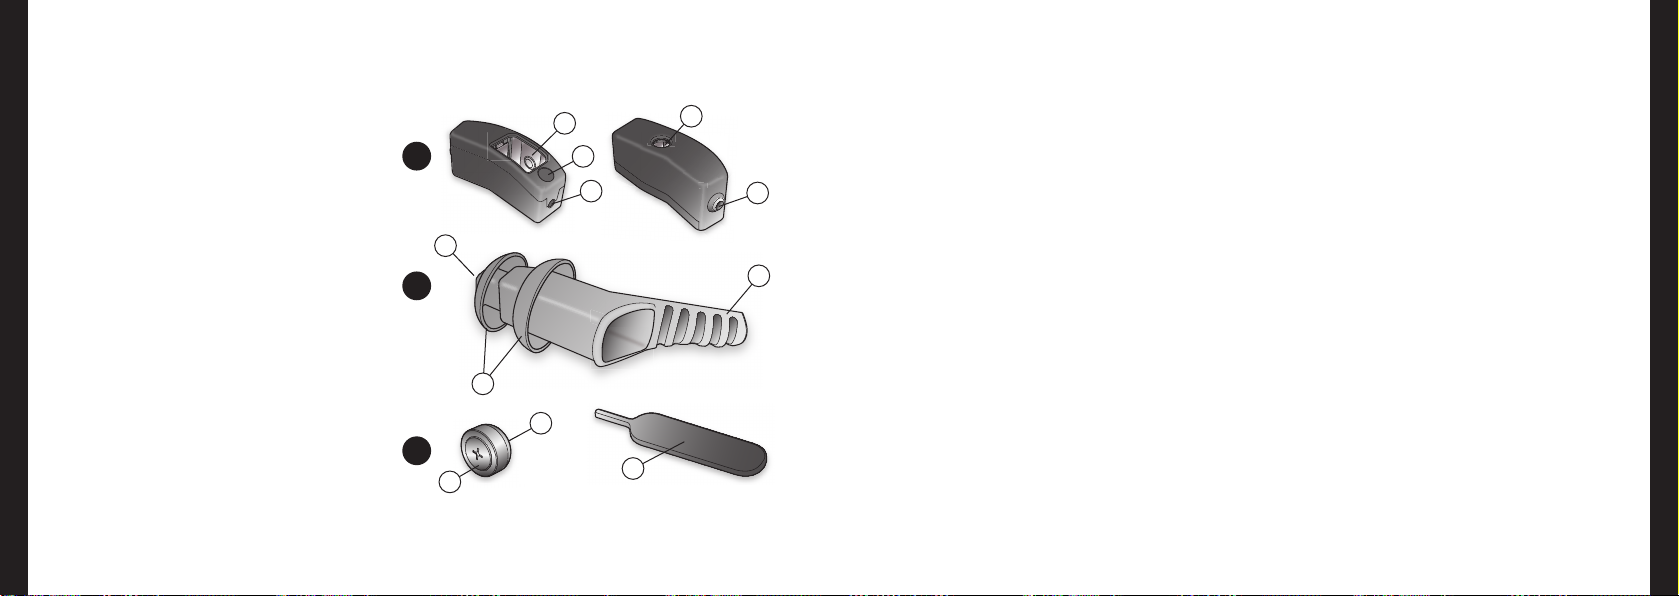
Português
Anatomia do Qleaf
A Qleaf - módulo (invólucro)
1 Compartimento da bateria
2 Indicador de lado colorido
3 Abertura do microfone
4 Abertura para retirar bateria
5 Abertura do alto-falante
B Oliva
6 Abertura de som
7 Aletas
8 Puxador
C Bateria (tipo 10)
9 Polo Positivo (+)
10 Polo Negativo (–)
11 Ferramenta de remoção de bateria
126
1
A
6
B
7
C
9
2
3
10
11
4
5
8
Qleaf - Módulo (A)
Invólucro (A)
O invólucro foi feito de plástico durável. Para a
manutenção do involucro, consulte o capítulo
‘Manutenção e Uso’ (páginas 134-135).
Compartimento da bateria (1)
Este compartimento compreende a bateria –tipo
10 – que fornece a energia ao Qleaf. O dispositivo
é desligado com a remoção da bateria.
Os contatos da bateria no compartimento
transportam a voltagem necessária da bateria
ao microprocessador dentro do dispositivo. Os
contatos da bateria também servem de contatos
para a programação. O fornecedor do aparelho
usa os contatos de programação com uma
ferramenta especial para alterar as de nições do
Qleaf.
Indicador colorido lateral (2)
Ao usar duas cores diferentes, os módulos
esquerdo e direito podem ser identi cados.
Abertura do Microfone (3)
Onde está localizado o microfone que apanha o
som, que é processado e ampli cado pelo Qleaf.
Abertura para remoção de bateria (4)
A ferramenta fornecida para remoção da bateria
é usada através desta abertura. Veja o capítulo
‘Remoção da Bateria’ (página 129).
Abertura do Alto-falante (5)
O som processado e ampli cado é emitido
através desta abertura e é direcionado através da
oliva para o ouvido.
127
Português
Page 66
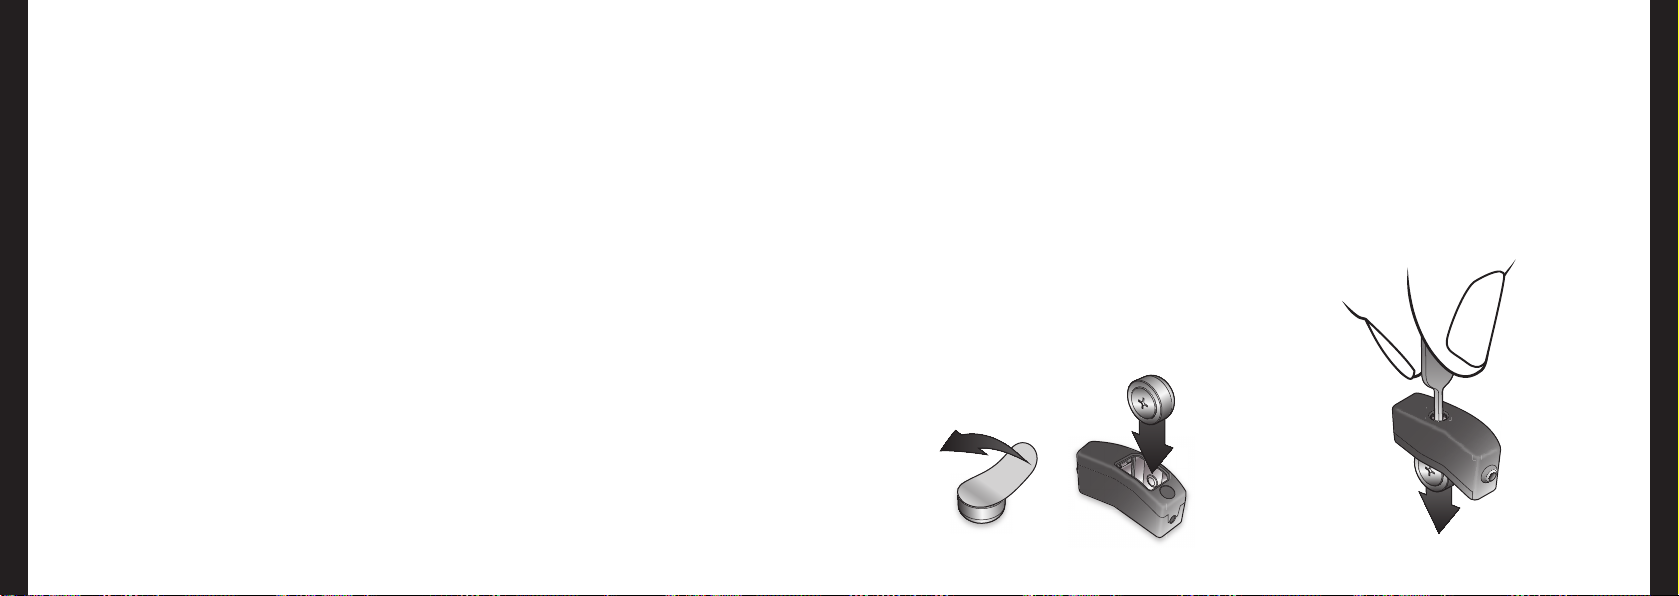
Português
Uso diário do Qleaf
Oliva (B)
A ponta macia do Qleaf é feita com plástico
biocompatível e projetado como sendo
descartável, permitindo assim ser substituído
regularmente. Para sua manutenção e limpeza,
consulte o capítulo “Manutenção e Uso” (páginas
134-135). A imagem pode ser siferente da sua
escolha dependendo do tamanho da oliva.
Abertura de som (6)
O som processado e ampli cado é emitido
através desta abertura e é direcionado através do
canal auditivo.
Aletas (7)
Os domes asseguram uma vedação, que
previne que o som do alto-falante inter ra
com o do microfone. Adicionalmente, as aletas
proporcionam uma boa aderencia dentro do
ouvido.
128
Cordão Puxador (8)
Para retirar o Qleaf do ouvido, é usada a corda
de puxar. Depois da colocação do Qleaf a corda
de puxar irá car situada atrás do targus (página
132), o que a torna praticamente invisível.
Bateria (C)
O Qleaf usa baterias tipo 10, na cartela
assinaladas com um selo autocolante amarelo. O
dispositivo desliga-se quando se retira a bateria.
Antes de começar alguma das ações mencionadas
nos capítulos “Uso diário do Qleaf” e “Manutenção
e Uso”, assegure-se de utilizar uma super cie limpa
e horizontal.
Colocar a bateria
Use uma bateria nova: primeiro remova o selo
autocolante do polo positivo (+). Segure o
módulo (lado colorido com indicador para a
direita) e insira a bateria como indicado (ver
imagem).
Remover a bateria
Segure o módulo e remova a bateria com a
ferramenta incluída (ver imagem).
Português
129
Page 67
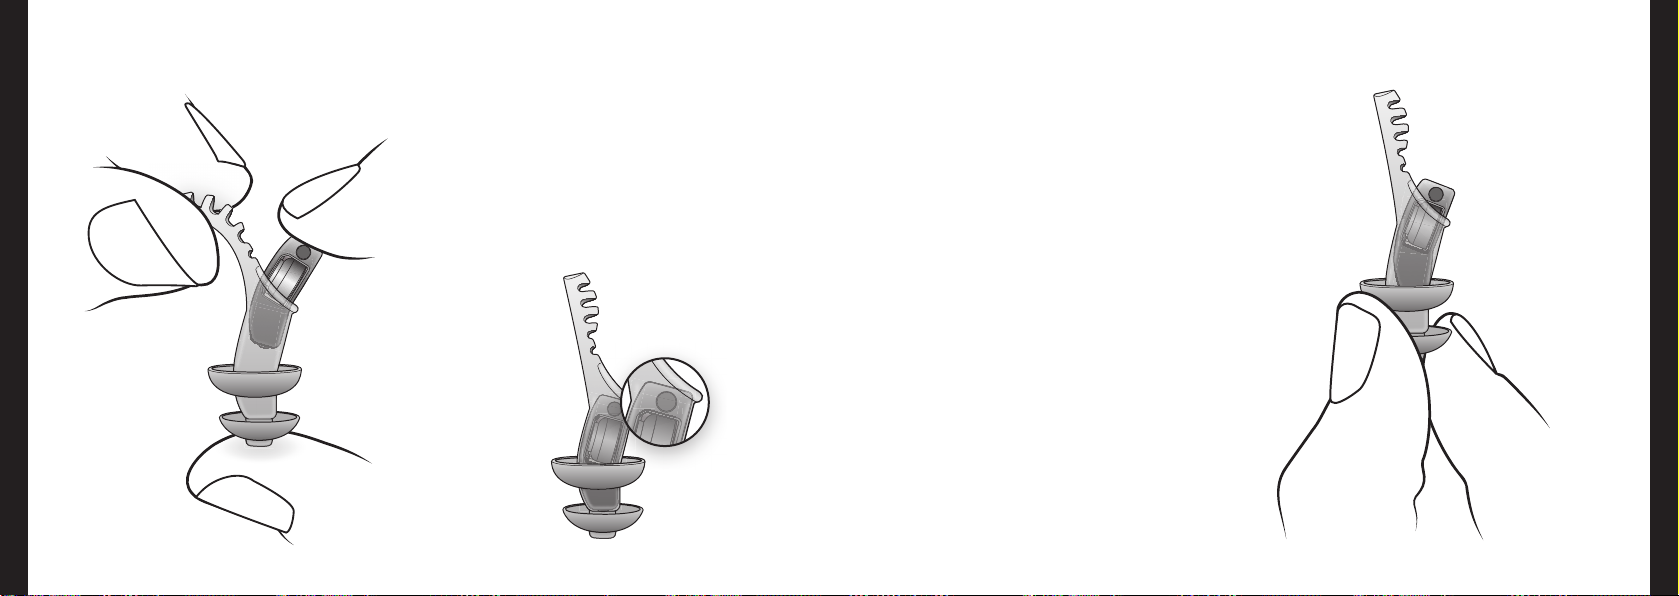
Português
130
Inserir o Qleaf na oliva
• Insira o módulo na oliva, na direção da bateria,
puxe a corda para a esquerda (ver imagem).
• Insira o módulo na oliva (ver imagem abaixo).
Remover o Qleaf da ponta
macia
‘Esprema’ o módulo fora da ponta macia
apertando a parte nal da ponta macia com o
dome pequeno (ver imagem).
Português
131
Page 68
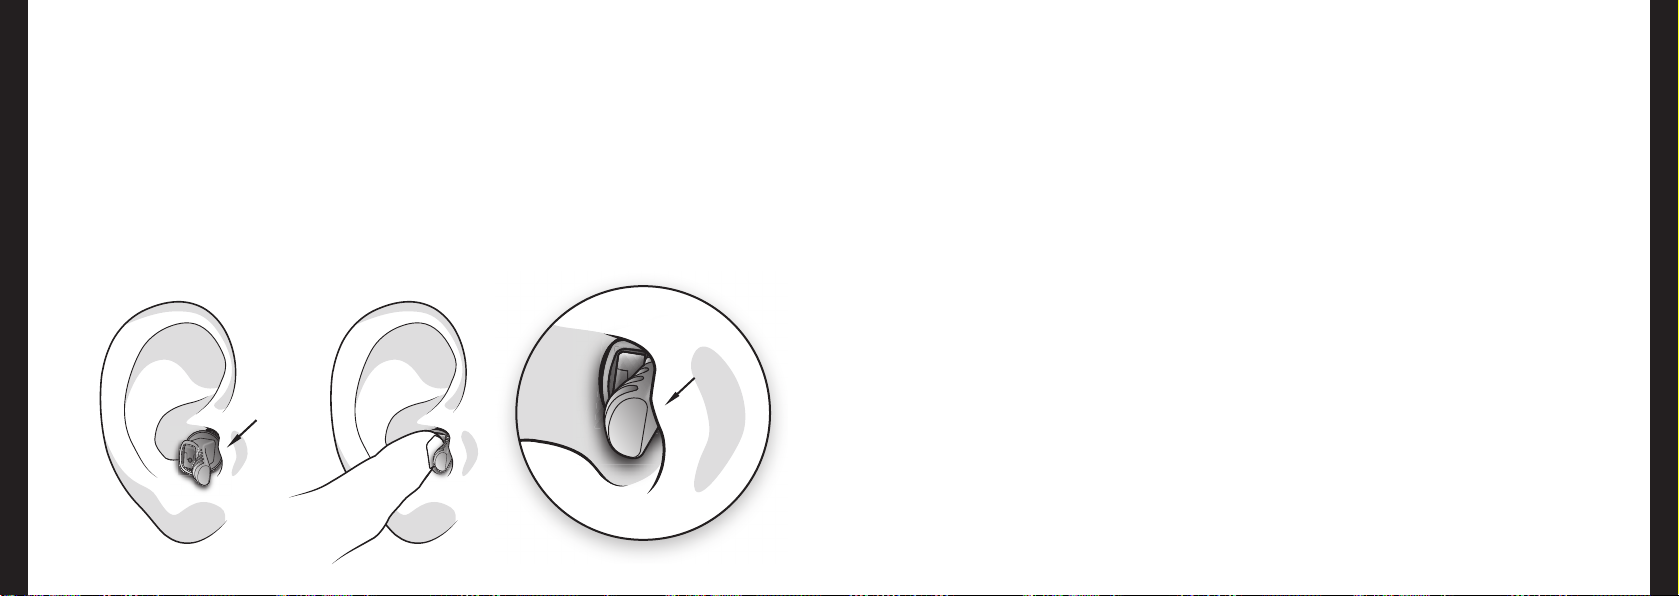
Português
Colocar o Qleaf no ouvido
• Coloque o m da oliva com a(s) aleta(s) no
fundo da cúpula do ouvido. O cordão puxador
ca atrás do tragus, em direção ao nariz.
• Insira o dispositivo no ouvido pressionando
no lado plano do mesmo. Agora, gentilmente
empurre o dispositivo para dentro do ouvido.
Se a boca estiver bem aberta, a inserção será
mais fácil.
tragus
132
Inserir uma nova oliva pode ser aborrecido
porque a super cie de uma oliva nova é de
alguma forma rigida em resultado de alguns
ouvidos serem um pouco “secos”. Usar algum gel
lubri cante ou creme pode ajudar nesses casos
(um pequeno montante é su ciente).
N.b.: Tenha em atenção que o lubri cante não
entupa a abertura do som!
tragus
O ideal é que o lado plano do módulo (onde está
situado o microfone) seja posicionado para a
entrada do canal auditivo após a inserção. Desta
forma, o dispositivo é praticamente invisivel
e o som otimizado. Existem casos que o canal
auditivo é demasiadamente pequeno: Nesse
caso, é possível que o dispositivo sobressaia
alguns milimetros.
Se o cordão puxador se sobressair depois da
inserção do dispositivo, de forma a car visivel,
poderá facilmente ser cortado pelo fornecedor.
Tenha a certeza que as suas mãos estão limpas
enquanto coloca o Qleaf. Maquiagem, cremes, oleo
corporal, gel, laca e produtos idênticos podem sujar
o módulo e podem, por exemplo, contribuir para o
entupimento da abertura do microfone.
Remover o Qleaf do ouvido
Segure o cordão puxador rmemente e puxe –
sempre devagar – fora do ouvido.
Procedimento de adaptação
e con guração
O procedimento de adaptação e con guração do
dispositivo auditivo é um processo importante
e individual. Por essa razão, consulte o seu
fornecedor por qualquer queixa sobre ajustes
ou con guração. O seu fornecedor é a pessoa
autorizada para levar a cabo as modi cações
necessárias.
133
Português
Page 69

Português
Manutenção e Uso
Apesar do módulo Qleaf poder ser usado
para o ouvido direito e para o esquerdo, as
congurações são normalmente diferentes para
o ouvido direito e para o esquerdo. Isto signica
que uma vez que o módulo esteja congurado,
não se deve usá-lo no outro ouvido. Calculando
que usa o mesmo tamanho de pontas macias
nos dois ouvidos, não há problema em trocar as
olivas.
A criação de cera de ouvido é diferente de
pessoa para pessoa. No entanto não é possível
impedir que a saída de som que entupida com
a cera. E embora o som possa ser reduzido pelo
entupimento da cera, isto não pode danicar o
seu dispositivo. No caso de vericar que a saída
de som da oliva cou entupida, deve-se limpar a
oliva (ver parágrafo “Limpeza”) ou substituí-la.
134
Verique o módulo(s) e a(s) oliva (s) diáriamente
por causa dos entupimentos e danos. Isto
garante-lhe uma ótima performance e uma vida
operacional longa. Substitua a oliva sempre
que haja danos visiveis. Para manter a ótima
performance do seu dispositivo e minimizar
as hipoteses de infecção, aconselhamos-o a
substituir a oliva por uma nova uma vez por
mês. As olivas estão disponíveis junto a seu
fornecedor.
Limpeza
Módulo:
• Limpar diariamente com um lenço seco e
macio.
• No caso de muita sujeira, limpe com lenços
especiais de limpeza para dispositivos
auditivos.
Oliva:
• Limpar diariamente com um lenço seco e
macio.
• No caso de muita sujeira, pode limpar ou com
lenços especiais de limpeza para dispositivos
auditivos, com comprimidos soluveis de
limpeza para dispositivos auditivos ou em
alternativa limpe-a com um limpador de
ultrasons.
• Olivas entupidas podem ser limpas debaixo
de água morna corrente. Em caso de muita
sujeira e sendo a mesma persistente, se existir
alteração das propriedades ou danos do
material, a oliva deve sempre ser substituída.
N.b.: Nunca use produtos de limpeza agressivos,
abrasivos ou solventes! Isto poderá causar danos
irreparáveis às olivas ou ao módulo.
Armazenamento
De noite:
Recomendamos que remova a oliva do módulo
durante a noite: Remova a bateria do dispositivo
e armazene em local seguro fora da sua caixa.
Desta forma, aumenta a vida operacional da
bateria e também permite a evaporação da
umidade possível presente no dispositivo.
Armazenamento a curto prazo:
Usar a caixa de transporte, quando
quiser remover o dispositivo do ouvido
temporariamente.
Armazenamento a longo prazo:
Quando não usar o seu dispositivo auditivo por
um longo período de tempo, limpe o módulo e
a ponta macia antes de os armazenar dentro da
caixa de transporte. Remova sempre a bateria do
dispositivo nesta situação.
135
Português
Page 70

Português
Avisos
A oliva é uma parte essencial do Qleaf.
Sem a oliva, o Qleaf não irá funcionar
corretamente e poderá causar sujeira
irreversivel no módulo. Por este motivo, nunca
use o módulo sem a oliva.
Uma vez que o dispositivo seja congurado, não
deve usá-lo no outro ouvido. Isto geralmente leva
a deterioção da performance auditiva e pode às
vezes resultar em perda de audição.
Nunca use olivas sujas ou danicadas. Isto pode
afetar negativamente a performance auditiva ou
resultar em desconfo, que por sua vez poderá
levar a infecções do ouvido.
Substitua a oliva do seu dispositivo
regularmente, mesmo que não esteja
visivelmente danicada ou suja, veja capítulo
“Manutenção e Uso” (páginas 134-135).
136
Quando utilizar o Qleaf pela primeira vez,
comece com um período continuo de 4 horas
e vá aumentando o tempo de utilização por
uma hora por dia. Se tiver dores, irritação
continua ou comichão, não use o dispositivo
antes de consultar um especialista. Se a sua
queixa persistir, consulte um médico. Verique
regularmente os seus ouvidos e a sua audição,
ambos durante o período inicial e depois deste.
Se por alguma razão não for possível remover o
Qleaf do ouvido, consulte o seu fornecedor ou
médico. Remover o Qleaf do seu ouvido sem as
ferramentas corretas pode danicar a oliva ou o
módulo.
Não use o Qleaf nos seguintes casos:
• Histórico medico no ouvido.
• Exostose (abaulamento no crescimento ósseo)
no canal auditivo.
• Muita secreção de cera auditiva.
O dispositivo não pode:
• Cair.
• Ser exposto a humidade ou água.
• Ser imerso em água.
• Ser usado enquanto se nada, se toma banho
ou em saunas.
• Ser limpo com água.
• Ser exposto a temperaturas elevadas, como
por exemplo como se usa secador de cabelo.
• Ser usado em minas ou outros ambientes
onde o risco de explosão é alto.
• Ser exposto a raio-x ou campos magnéticos
fortes, como procedimentos médicos.
• Ser usado em locais onde são usados lacas
(cabeleireiro) ou solventes (como corantes).
Deve ter cuidado quando usa maquiagem,
cremes, oleo corporal, gel, laca ou produtos
similares, quando se usa ou coloca o Qleaf. Estes
podem sujar o seu dispositivo e, por exemplo,
contribuir para o entupimentos da entrada do
microfone.
Mantenha o Qleaf longe do alcance das
crianças e animais. Em caso de engolir um dos
componentes, há um risco de choque para
crianças pequenas.
As baterias vazias e os dispositivos
auditivos antigos devem ser recolhidos e
dispensados como lixo químico.
Português
137
Page 71

Português
Informação sobre Serviços de reparação
O Qleaf foi desenvolvido pela ExSilent BV,
Overschiestraat 63, Amsterdam. Para qualquer
queixa ou reparação necessária, deverá contactar
o fornecedor onde comprou o seu dispositivo.
Acordos de reparação e queixas podem variar de
acordo com o fornecedor.
Garantia Limitada do Fabricante.
Esta garantia limitada sera aplicável em todas as
Regiões Europeias ExSilent a não ser que exista
uma garantia local. A ExSilent BV (”ExSilent”)
garante que o produto ExSilent (”Produto”)
está livre de defeitos em design e acabamentos
na altura da sua compra sujeito às seguintes
provisões e condições:
1. Esta garantia limitada é dada ao utilizador
nal do Produto (“Cliente”). È dada sem
exclusões ou retrições de (i) qaulquer
ligação do Cliente com os direitos estatais
ou (ii) quaisquer direitos do Cliente contra o
vendedor/concessionário do Produto.
2. O periodo da garantia é de vinte e quarto
(24) meses a contra da data de compra do
138
Produto pelo primeiro Cliente. No caso de
existir uma compra sucessiva ou alteração
de proprietário/utilizador, a garantia irá
continuar pelo periodo remanescente até ao
nal dos vinte e quatro (24) meses em todos
os aspectos. Esta garantia limitada é apenas
aplicável e executável nos seguintes países:
Bósnia, Bulgária, todos os membros da União
Europeia, Islândia, Israel, Croácia, Macedônia,
Noruega, Romênia, Sérvia / Montenegro,
Turquia e Suíça.
3. Durante o periodo da garantia, a ExSilent
ou o fornecedor de serviço autorizado irão
reparar ou substituir o produto com defeito
(totalmente a critério da ExSilent). A ExSilent
irá devolver o Produto reparado ou outro
Produto em boas condições ao Cliente.
Todos os componentes ou equipamentos
substituídos serão propriedade da ExSilent.
4. A um produto substituido sera dada uma
garantia renovada. No caso de produtos
reparados, a antiga garantia irá continuar a
aplicar-se.
5. Esta garantia não cobre capas pintadas
ou outros componentes comparáveis
personalizados.
6. Esta garantia limitada não se aplica a danos
causados pelo uso normal. Esta garantia
também não sera aplicável se:
(i) O defeito foi causado pelo fato do Produto
ter sido sujeito a: uso em conito com o
proprietário ou contra as indicações do
proprietário, tratamento bruto, exposição
a humidade, névoas ou ambientes termais
ou alterações bruscas nas condições
atmosféricas, corrosão, oxidação, alterações
ou ligações não permitidas, aberturas ou
reparações não permitidas, reparações
feitas com components não permitidos, uso
incorreto, instalação imprópria, acidentes,
força maior, derrame de liquidos ou
alimentos, inuência de produtos químicos
ou outros fatos sobre os quais a ExSilent
não tem controle (incluindo não limitação
a defeitos em consumiveis, como baterias
que tem um periodo de vida limitado por
natureza ) a não ser que o defeito tenha
sido causado diretamente por defeitos em
materiais, design ou acabamentos;
(ii) A ExSilent ou o seu fornecedor autorizado
não recebam noticação do defeito do
Cliente nos trinta (30) dias à ocorrência do
mesmo dentro do período da garantia;
(iii) o Produto não tenha sido enviado à ExSilent
ou ao fornecedor autorizado após trinta (30)
dias da ocorren cia do defeito no período de
garantia.
(iv) o número de série tenha sido removido,
apagado, danicados, alterado ou esteja
ilegível;
(v) o defeito tenha sido causado pelo fato do
produto ter sido usado com ou ligado a
um componente adicional que não tenha
sido fabricado ou fornecido pela ExSilent
ou usado para outro objetivo que não o
suposto;
(vi) O defeito tenha sido causado pelo fato da
bateria ter sofrido um curto-circuito ou
as peças de ligação da bateria ou celulas
139
Português
Page 72

Português
Condições
estejam partidas ou mostrem evidência de
adulteração ou que a bateria tenha sido
usada em outro dispositivo para além dos
que foi criada para.
7. De forma a fazer uma queixa dentro da
garantia limitada, o cliente deverá enviar
o cartão original de garantia da ExSilent,
completamente inalterado e legível ou
ao fornecedor autorizado dentro de duas
semanas da compra do produto.
8. Esta garantia limitada é o unico e exclusivo
meio que o Cliente tem contra a ExSilent e a
única e exclusiva forma de responsabilidade
da ExSilent com o Cliente, em relação a
defeitos ou mau funcionamento do Produto.
Esta garantia limitada substitui todas as
garantias e responsabilidades, incluindo
verbais, escritas, (não vinculativa) legal,
contratual, ilegais e outras. A ExSilent não
é responsável por nenhum dano indireto,
secundário ou consequencial, custos
ou despesas. A ExSilent também não é
responsável por nenhum dano direto, custos
140
ou despesas, se o cliente for uma entidade
legal.
9. Qualquer emenda ou alteração desta
garantia limitada requer aprovação escrita da
ExSilent.
Copyright © 2010 ExSilent. Todos os Direitos
reservados.
A reprodução ilegal, transferencias, distribuição
ou posse deste documentos, ou parte deste,
sem consentimento prévio escrito da ExSilent é
proíbido.
A ExSilent reserva o direito de alterar e fazer
melhorias nos seus produtos que são descritos
neste documentos sem noticação prévia.
Em nenhum caso, a ExSilent pode ser
considerada responsável por qualquer perda de
informação ou rendimento, nem por quaisquer
danos especiais, nem por danos indiretos.
O conteúdo deste documento é providenciado
sem nenhuma garantia. A menos que a lei exija
o contrário, nem explícita nem implicitamente,
nenhuma garantia será dada em relação à
precisão, conabilidade e conteúdo deste
documento. Isso inclui, mas não está limitado
a garantias implícitas relativamente à sua
comercialização e adequação para atingir um
determinado objetivo.
A ExSilent reserve-se o direito de a qualquer
momento alterar e revogar este documento sem
noticação prévia.
141
Português
Page 73
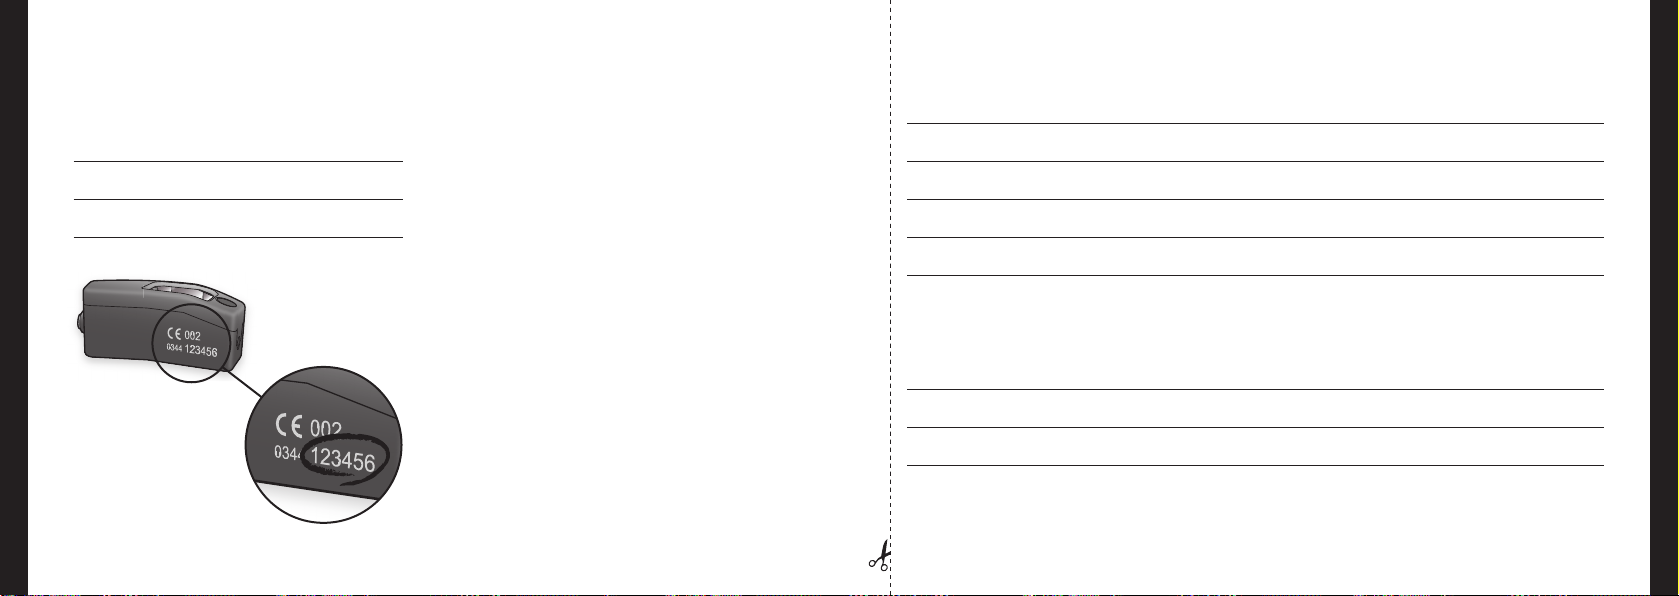
Português
Dados do seu Qleaf Garantia
Por favor consulte os dados do seu Qleaf abaixo.
Data da compra:
Número de série do dispositivo – Direito:
Número de série do dispositivo – Esquerdo:
Número de Série (6 digitos)
142
Nome:
Endereço: Código Postal:
Cidade País:
Telefone: Data de compra:
Número de série - Direita: Número de série - Esquerdo:
Cidade e país de compra:
Nome da loja:
Endereço da Loja: Código Postal:
Cidade: País:
Português
143
Page 74

Türkçe
Qleaf Kullanım Kılavuzu
Türkçe
144
145
Page 75

Türkçe
İçerikQleaf
Türkçe
Qleaf satın aldığınız için tebrik ederiz.
Qleaf satın almakla beraber, çok yüksek kalite
parçalardan yaratılmış bir ürün garantisi
alıyorsunuz. İşitme cihazları alanında birkaç çok
önemli yenilikleri uygulayarak, Qleaf modern
zamanda kullanım için şık, hoş bir işitme
sunmakta.
Qleaf nedir? 148
Qleaf anatomisi 150
Qleaf - modül (A) 151
Ymuşak Uç (B) 152
Pil (C) 152
Qleaf günlük kullanımı 153
Pilin Takılması 153
Pilin Çıkarılması 153
Yumuşak uca Qleaf takılması 154
Yumuşak uçtan Qleaf çıkarılması 155
Qleaf’in kulağa takılması 156
Qleaf’in kulaktan çıkarılması 157
Takma prosedürü ve Yapılanış 157
Bakım ve Kullanım 158
Temizlik 158
Muhafaza 159
Uyarılar 160
Tamir hizmetleri hakkında Bilgi 162
Feragat 165
Qleaf’inizin bilgisi 166
Garanti 167
Üretici 289
146
147
Page 76

Türkçe
Qleaf Nedir?
Türkçe
Qleaf yumuşak uç olarak adlandırılan, standart
takma ile modüler (iki kulak için aynı) CIC* bir
cihazdır.
Güç kaynağı için tip 10 (sarı etiket) pil
gerektirmektedir. Cihaz sizin özel işitme
sorununuza adapte olabilen, sesin işlenmesini
ve amplikasyonunu sağlayan, ileri seviyede bir
mikroişlemci ile donatılmıştır.
Qleaf Büyük-Orta-Küçük boylarda yumuşak uç
kullanmaktadır. Yumuşak ucun boyutu sizing
kulak kanalınızın boyutuna gore seçilir. Doğru
boyuttaki yumuşak ucun seçimi çok önemlidir.
Yumuşak uç fazla büyük ise kulak içinde
rahatsızlık verebilir. Yumuşak uç fazla küçük
ise, cihaz spontane ıslık sesi verebilir. Takma
esnasında, satıcınız size en uygun ucu tespit
etmeye çalışacaktır.
İşitme cihazlarında tamir için en fazla gerçekleşen
sebeplerden biri hoparlörün kulak kiri nedeniyle
zarar görmesi veya tıkanmasıdır. Qleaf içerisinde
kulak kiri nedeniyle gerçekleşek sorunları
engelleyen bir iç system mevcuttur. Sonuç
olarak, modülün içindeki parçalar her zaman
hasarsız ve tıkanmamış kalacaklardır. Yumuşak
ucun tıkanması halinde, kolayca temizlenebilir
veya değiştirilebilir.
Qleaf aşağıdaki özelliklere sahip olan bir mikro
işlemci ile donatılmıştır:
• Adapte olabilen “antigeribildirim” sitemi – bu
cihazda spontane ıslığı engeller.
• Adapte olabile “gürültü indirme” sistemi – bu
gürültülü ortamlarda işitme performansını
geliştirir.
Boy, şekil, yenilikçi yapı ve materyal
kombinasyonu sonucunda Qleaf çok önemli
avantajlar sunmakta:
• Hemen hemen görünmez.
• Sesinizin minimal bozulması (oklüzyon).
• Hoparlörün kulak zarına yakın yerleştirlmesi ile
yüksek ses kazancı.
• Hoparlörün derine yerleştirilmesinden
dolayı doğal ses elde edersiniz.
• Kulak kiri tarafından oluşan hasara karşı
koruma
• Cep telefonu kullanımına uygun.
• Spor aktiviteleri için uygun.
• Kolay kullanım ve bakım.
• Çağdaş tasarım.
148
* Tamamen kanal içi
149
Page 77
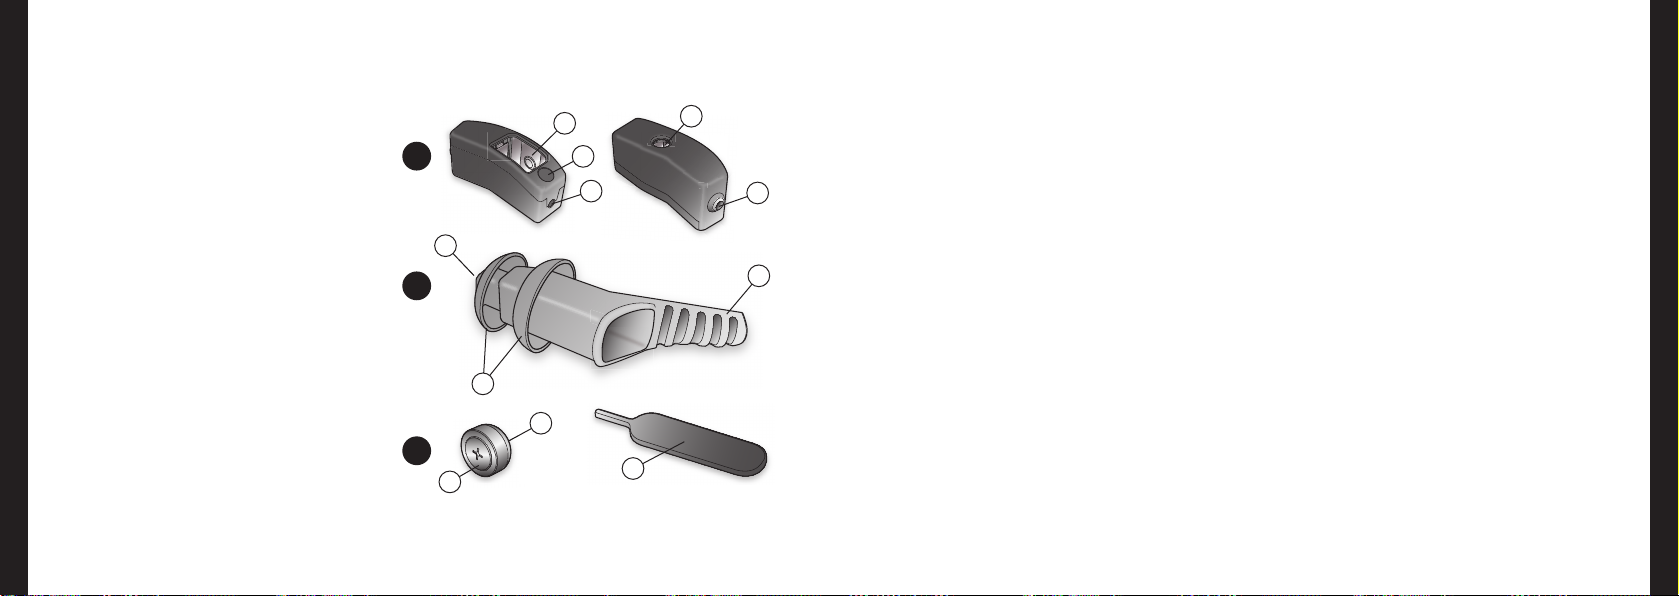
Türkçe
Qleaf anatomisi
Türkçe
A Qleaf - modül (muhafaza)
1 Pil Bölümü
2 Renkli Yan Gösterge
3 Mikrofon açıklığı
4 Çıkarmak için Pilin açılması
5 Hoparlör açıklığı
B Yumuşak Uç6
6 Ses açıklığ
7 Kubbeler
8 Çekme Kordonu
1
A
6
B
2
3
4
5
8
Qleaf - modül (A)
Muhafaza (A)
Muhafaza dayanıklı plastikten yapılmıştır.
Muhafazanın bakımı icin lütfen “Bakım ve
Kullanım” bölümüne bakın (sayfa 158-159).
Pil Haznesi (1)
Bu haznede Qleaf için güç sağlayan pil – tip 10
pil – bulunmaktadır. Cihaz pilin çıkarılması ile
kapanır.
Renkli Yan Göstergeler (2)
İki arklı renk kullanarak, sol ve sağ kulak modülü
tespit edilir.
Mikrofon Açıklığı (3)
Burada Qleaf tarafından tespit edilen, işlenen ve
yükseltilen miktorfon bulunmaktadır.
Çıkarmak için Pil açma (4)
Pil çıkarma aleti bu açıklıkta kullanılır “Pilin
Çıkarılması” bölümüne bakın (sayfa 153).
C Pil (tip 10)
9 Artı Ucu (+)
10 Eksi Ucu (–)
11 Pil çıkarma aleti
150
Pil haznesi içindeki pil uçları mikro işlemci
aracılığı ile voltajı iletir. Pil uçları ayrıca
7
10
C
9
11
programlama uçları vazifesini görür. Satıcınız
özel bir alet ile Qleaf ayarlarını değiştirmek için
programlama uçlarını kullanır.
Hoparlör Açıklığı (5)
İşlenen ve yükseltilen ses bu açıklıktan geçer ve
yumuşak uçtan kulak zarına doğru yönlendirilir.
151
Page 78
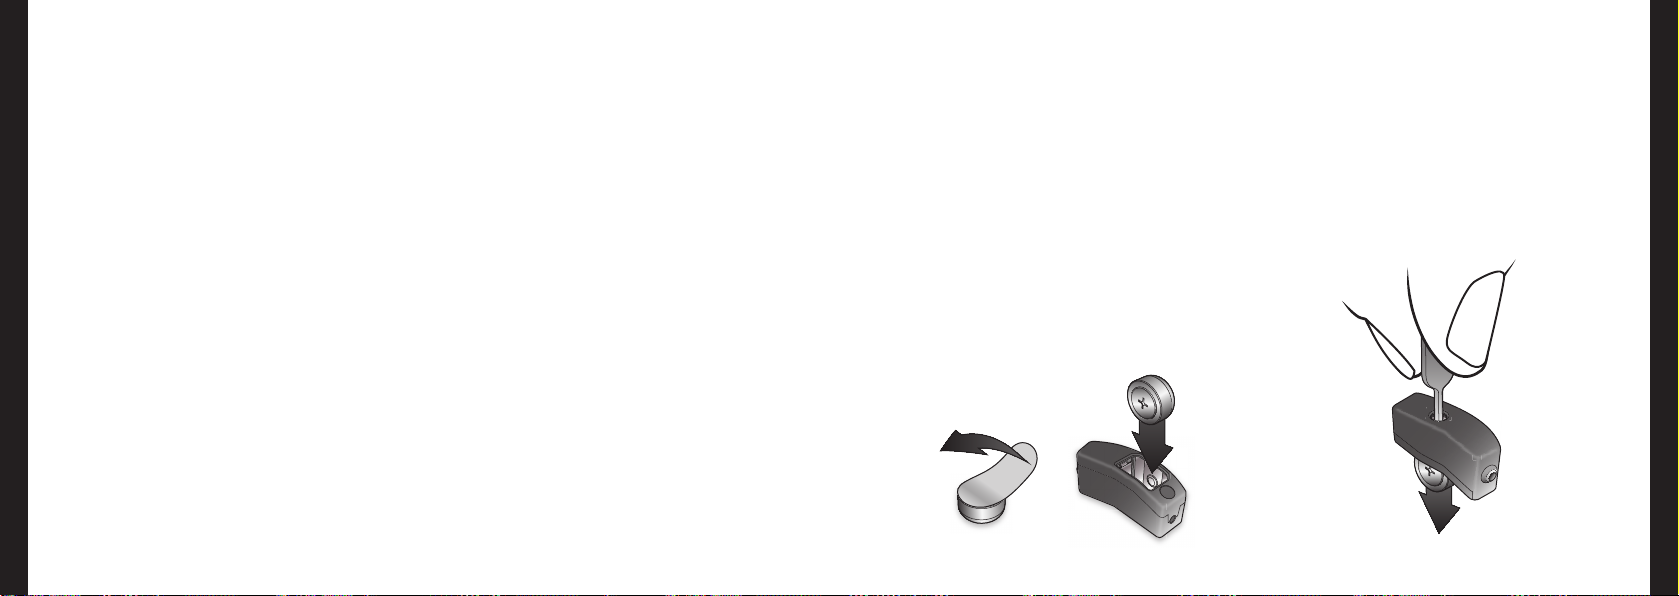
Türkçe
Qleaf günlük kullanımı
Türkçe
Yumuşak Uç (B)
Qleaf yumuşak ucu bio-uyumlu plastikten ve
atılabilir olarak tasarlanmıştır ki böylece düzenli
olarak değiştirilebilir. Bakım ve temizlik için lütfen
“Bakım ve Temizlik” bölümüne bakın (sayfa 158-
159) İlüstrasyon sizing yumuşak ucunuzdan farklı
olabilir.
Ses Açıklığı (6)
İşlenen ve yükseltilen ses bu açıklığından girer ve
kulak zarına doğru yönlendirilir.
Kubbeler (7)
Kubbeler, hoparlörün mikrofon sesini
etkilememesini sağlamak amacıyla mühür
vazifesi görür. Ek olarak kubbeler kulak içinde
tutkaç vazifesi görür.
Çekme Kordonu (8)
Qleaf’i kulaktan çıkarmak için, çekme kordonu
kullanılır. Taktıktan sonra çekme kordonu tragus
arkasına gelir (sayfa 156), böylece hemen hemen
görünmezdir.
Pil (C)
Qleaf paket içerisinde sarı etiket ile gösterilen tip
10 pil kullanır. Cihaz pilin çıkarılması ile kapanır.
“Qleaf Günlük Kullanımı” ve “Bakım ve Kullanım”
bölümlerinde belirtilen aktiviteleri yapmadan önce,
temiz ve düz bir çalışma yüzeyi kullandığınızdan
emin oldun
Pili Takma
Yeni pil kullanırken: + ucundan etiketi çıkarın. Ve
gösterildiği şekilde pili takın (bak resim)
Pilin Çıkarılması
Modülü tutarak pili verilen gereç ile çıkarın (bak
resim)
152
153
Page 79
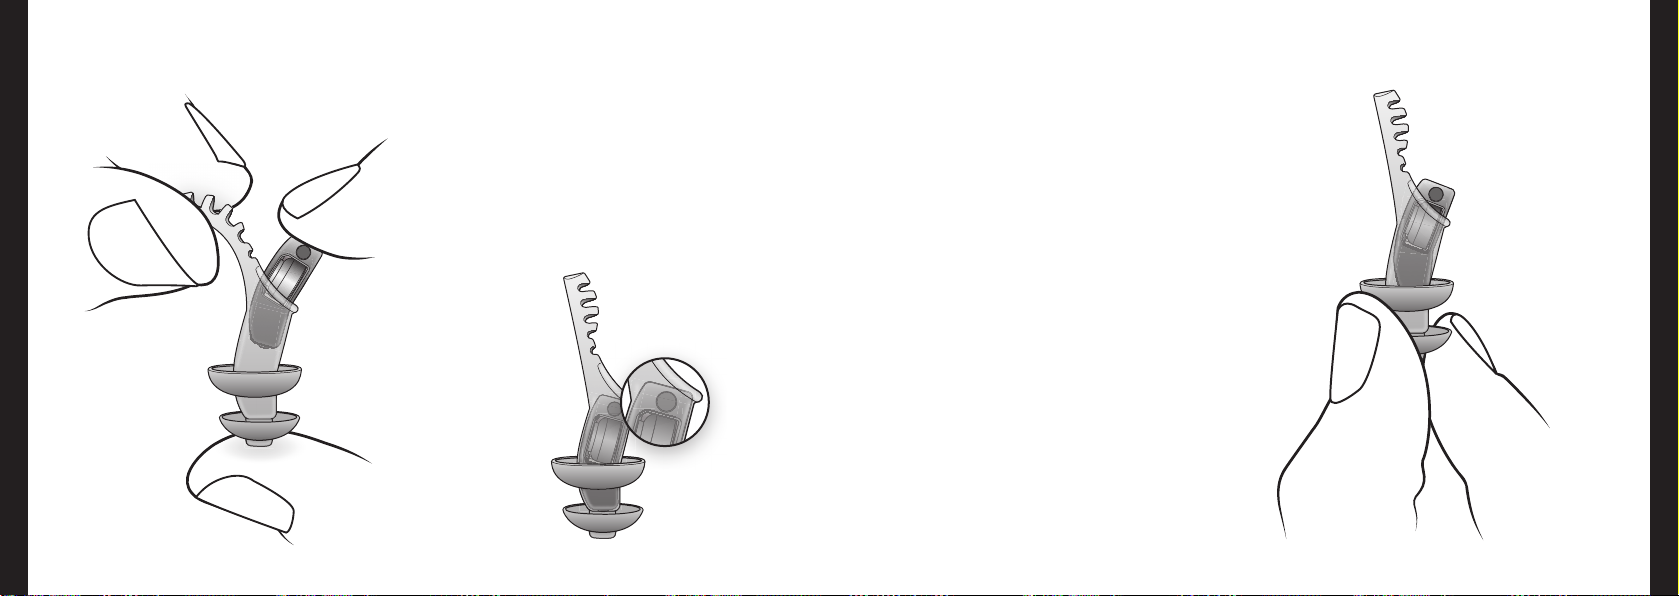
Türkçe
Türkçe
Qleaf’in yumuşak uca
takılması
Qleaf’in Yumuşal Uçtan
Çıkarılması
154
• Modülü yüzü pile dönük olarak yumuşak uca
sokun, ucu sola doğru çekin (bak resim)
• Modülü tamamen yumuşak ucun içine itin
(bak alttaki resim)
Ufak kubbe ile yumuşak ucun dibine baskı
yaparak modülü yumuşak uçtan dışarı “sıkınız”.
(bak resim)
155
Page 80
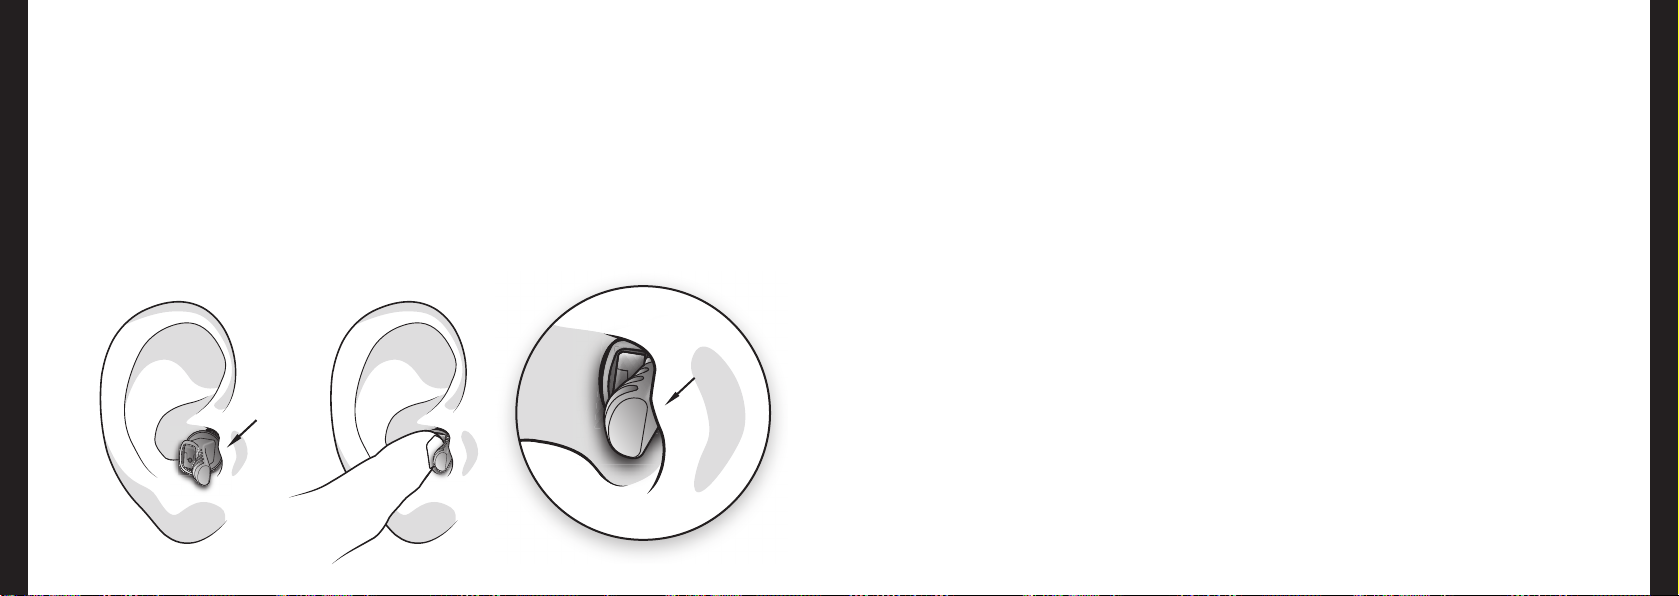
Türkçe
Türkçe
Qleaf’in yumuşak uca
takılması
• Yumuşak ucun dibini kubbe(ler) ile birlikte
kulağa gevşekce yerleştirin. Çekme ucu
buruna dönük olarak tragus’un arkasındadır.
• Cihazın yassı tarafına bastırarak cihazı kulağa
yerleştirin. İtina ile kulağın içine itin. Ağız iyice
açık olursa kulağın içine yerleştirme daha kolay
olur.
tragus
Yeni bir yumuşak uç yerleştirmek biraz zoruk
verebilir, zira yeni bir yumuşak ucun esnekliği
sınırlıdır ve bazı kulaklar “kuru”dur. Kaydırıcı bir
jel veya krem böyle durumlarda yardımcı olabilir
(bir damla yeterlidir)
Önemli Not: Kaydırıcının ses girişini tıkamamasına
özen gösterin!
tragus
İdeal olarak mdülün yassı yüzü (mikrofonun
olduğu taraf) kulağa yerleştiğinde kulan
kanal girişi ile tam hizada olacaktır. Böylece
cihaz görülmez ve ses optimal olacaktır Kulak
kanalının küçük olduğu durumlar vardır: bu
hallerde cihaz bir iki millimetre taşabilir.
Cihaz yerleştirildikten sonra çekme kordonu
sarkıyor ve gözüküyorsa satıcı tarafından
gerektiği kadar kesilebilir.
Qleaf’İ yerleştirirken ellerinizin temiz olmasına
özen gösterin. Makyaj, eş ve vücut kremi, saç spreyi
v.s.gibi mamüllerin kalıntıları modülü kirletir ve
öreneğin mikrofon girişini tıkar.
Qleaf’in Kulaktan Çıkarılması
Çekme kordonunu sıkıca tutup – daima yavaşca –
kulaktan dışarı çekin.
Takma Prosedürü ve
Yapılanış
İşitme cihazının provası ve yerleştirilmesi önemli
ve kişiye özel bir işlemdir. Bu nedenle herhqangi
bir şikayetiniz olduğunda satıcınızla temasa
geçin. Herhangi bir ayarlama gerekli olduğunda
yetkili kişi satıcınızdır.
156
157
Page 81

Türkçe
Bakım ve Kullanım
Türkçe
Qleaf modülü hem sağ, he msol kulağada
kullanılabildiği gibi, genelde sağ ve sol kulak
ayarları değişiktir. Bu demektir ki, modül bir
kulağa yerleştirildikten sonra öbür kulağınızda
kullanmayınız. Şayet iki kulakta da aynı boy
yumuşak uç kullanılıyorsa yumuşak uçları bir
kulaktan ötekine değiştirmekte mahsur yoktur.
Kulak mumu birikimi kişiden kişiye değişir.
Bu nedenle yumuşak ucun ses çıkışının kulak
mumukaplanması tamamen önlenemez
Tıkanmadan dolayı ses hacmi düşebilir
fakat cihaz zarar görmez. Yumuşak ucun ses
çıkışının tıkanmış olduğunu gördüğünüzde,
yumuşak ucu temizleyebilir (bak Temizlik) veya
değiştirebilirsiniz.
Modül(ler) ve yumuşak uç(lar) hergün tıkanma
ve zarar açısından control ediniz Böylece azami
performans ve uzun çalışma ömrü sağlanmış olur.
Zedelenme gördüğünüzde yumuşak ucu mutlaka
değiştirin Cihazınızın çalışmasını azamide
tutmak ve enfeksiyon riskini asgaride tutmak için
yumuşak ucu ayda bir defa yenilemenizi öneririz.
Satıcınızda yumuşak uçlar bulunmaktadır.
Temizlik
Modül:
• Hergün yumuşak, kuru bir kağıt mendil ile
temizleyin.
• Çok fazla kir varsa cihazlar için özel (nemli)
mendil ile siliniz.
Yumuşak Uç:
• Hergün yumuşak, kuru bir kağıt mendil ile
temizleyiniz.
• Yoğun pislik olduğunda özel kulak işitme
cihazı nemli mendili, işitme cihazları için suday
eriyen özel tabletler ile temizleyebilir veya
ultrason temizleyici ile temizletebilirsiniz.
• Tıkanmış yumuşak uçlar akar ılık su ile
çalkalanablir. Aşırı ve inatçi kirden dolayı
materyalde bir değişim veya bozulma olursa
yumuşak uç mutlaka değiştirilmelidir.
Önemli Not : Asla haşin temizleyiciler, zımpata veya
sovent kullanmayınız! Bunlar yumuşak uç veya
module tamiri imkansız zarar verir.
Muhafaza
Gece:
Gece yumuşak ucu modülden çıkarmanızı
öneririz. Pili cihazdan çıkarığ kutusunun dışında
güvenli bir yerde saklayın Böylece hem pilin
kullanım süresini uzatmış, hem de birikmiş
olabilecek nemin buharlaşmasını sağlamış
olursunuz
Kısa SDüreli Muhafaza:
Cİhazı kulağınızdan geçici olarak çıkarmak
istediğinizde taşıma kutusunu kullanabilirsiniz.
Uzun Süreli Muhafazı:
İşitme cihazınızı uzunca bir sure
kullanmayacaksanız taşıma kutusuna koymadan
önce modül ve yumuşak ucu temizleyiniz. Pili
cihazdan çıkarınız.
158
159
Page 82

Türkçe
İkazlar
Türkçe
Yumuşak uç Qleaf’in hayati bir
parçasıdır. Qleaf yumuşak uç olmadan
gereği gibi çalışamaz ve modülün
tamir olamayacak kadar pislenmesine need nolur.
Bu nedenle modülü asla yumuşak uç olmadan
kullanmayınız.
Cihaz bir defa kulağa yerleştirlince öteki kulağa
takmayınız Bu genelde, işitme performasında
düşüşe neden olur, hatta, bazen işitme kaybına
neden olabilir.
Asla zedelenmiş veya kirlenmiş yumuşak uç
kullanmayınız Bu işitme performansını olumsuz
etkiler veya yerleşimi bozar ve o da enfeksiyona
neden olabilir.
Cihazınızın yumuşak unucu muntazaman
değiştirin (bak Bakım ve Kullanım sayfa 158-159)
Qleaf’I ilk defa kullanırken 4 saat aralıksız
kullanım ile başlayın ve her takip eden gün bu
süreyi 1 saat uzatın. Şayet ağrı, devamlı iritasyon
veya kaşıntı olursa uzmanınıza danışmadan
kullanmayınız. Şikayetleriniz devam etmekte
ise bir doktora danışın. Başlangıç süreci ve daha
sonra kulaklarınızı ve işitmenizi sistemli olarak
control ettiriniz.
Herhangi bir sebepten dolayı Qleaf kulağınızdan
çıkamıyorsa satıcınıza veya doktora danışın.
Doğru aletler olmadan Qleaf’i çıkarmaya çalmak
yumuşak uç veya module zarar verebilir.
Aşağıdaki hallerde Qleaf’i kullanmayınız:
• Geçmişte bir kulak rahatsızlığ.
• Kulak kanalında Eksostoses (kemik çıkıntısı).
• Yoğun kulak mumu salgısı.
Cihaza yapılmayacaklar:
• düşürmek.
• Nem veya suya maruz bırakmak.
• Suya dalrdırmak.
• Yüzerken, duş alırken, banyo yaparken veya
saunada
• Islak temizlik.
• Yüksek ısıya maruz bırakmak, örneğin saç
kurutma makinesi kullanırken.
• Maden gibi, patlama riski yüksek alanlarda.
• X ışını veya tıbbi muayene sırasında güçlü
manyetik alanlara maruz kalınmak.
• Saç spreyi (berber/kuaför) ve solventler
(örneğin boya) kullanıldığı yerlede.
Makyaj yaparken, krem, vücut losyonu, jel saç
spreyi ve benzeri mamüller kullanırken Qleaf
kulakta ise veya takılmakta ise çok dikkatli
olunmalıdır. Cİhazınızı kirletir ve örneğin
mikrofonu tıkayabilir.
Qleaf’i küçük çocuklar ve evcil hayvanlardan
uzak tutunuz. Cihazın parçalarından birini yutan
küçük çocuklar boğulma tehlikesi ile karşı karşıya
kalabilirler.
Boşalmış piller ve eski işitme cihazları
kimyasal atık gibi toplanıp atılmalıdır.
160
161
Page 83

Türkçe
Tamir hizmetleri hakkında bilgi
Türkçe
Qleaf ExSilent BV, Overschiestraat 63, Amsterdam
tarafından geliştirilmiştir Şikayetlerinizi veya
tamirat taleplerinizi cihazınızı mübayağa
ettiğiniz dağıtıcıya iletiniz Şikayet veya tazminat
çözümleri dağıtıcıya gore değişebilir.
İmalatçının Sınırlı Garantisi
Yöresel garanti olmadığı hallerde ExSilent’ın bu
sınırlı garantisi Avrupa Bölgesinin her yerinde
geçerli olacaktır. ExSilent BV (“ExSilent”) bu
ExSilent mamülünün (“Mamül”) materyal, çizim
ve son tasarımında ilk original mübayasında,
aşağıdaki provizyon ve şartlar çerçevesinde
kusursuz olduğunu garanti eder:
1. Bu sınırlı garanti Mamülün son kullanıcısına
(“Müşteri”) verilir. Müşterinin bağlayıcı
kanuni hakları (i) veya Mamülün satıcısı/
imtiaz sahibine karşı haklarını (ii) dışlamadan
ve sınırlandırmadan verilmiştir.
2. Garanti süresi Müşteinini Mamülü aldığı
tarihten itibaren yirmi dört (24) aydır. İkinci
bir satışı veya başka herhangi bir sahip/
kullanıcı değişikiliğinde garanti yirmi dört
(24) ayın kalan süresince geçerli olacaktır.
Bu sınırlı garanti sadece Bosna, Bulgaristan,
Avrupa Birliği, İzlanda, İsrail, HIrvatistan,
Makedonya, Norveç, Romanya, Sırbistan/
Montanegro, Türkiye ve İsviçrede geçerlidir.
3. Garanti süresince ExSilent veya yetkili
servis vericisi kusurlu Mamülü tamir edecek
veya değiştircektir. (tamamen ExSilent’ın
taktirinde). ExSilent tamir edilmiş Mamülü
veya başka Mamülü Müşteriye iyi durumda
iade edecektir. Değiştirilmiş olan tüm
parçalar ExSilent’ın mülkü olacaktır.
4. Değiştirilmiş mamül için uzatılmış veya
yenilenmiş bir garanti süreci verilecektir.
Tamir edilmiş mamül için eski garanti geçerli
olacaktır.
5. Bu sınırlı garanti boyalı kılıarı veya benzeri
kişiselleştirilmiş parçaları kapsamaz.
6. Bu sınırlı garanti normal takılma ve
kullanılmadan doğacak eskimeyi kapsamaz.
Ayrıca, işbu sunurlı garanti aşağıda belirtilen
hallerde geçerli değildir:
(i) Mamül sahip veya kullanıcı talimatına uygun
kullanılmadı ise, haşin kullanıma uğradı ise,
nem, rutubet, şiddetli termal ve çevresel
etkilere maruz kaldı ise veya bu şartlarda ani
değişikilikler oldu ise, korozyon, oksidasyon,
izinsiz değişiklikler veya bağlantılar, izinsiz
açılmalar veya tamirler, izinsiz parçalarla
tamiratlar, yanlış kullanım, uygunsuz
yerleştirme, kaza, fors majör, üstüne yiyecek,
içecek dökülmesi, kimyasal maddeler
etkisinde kalma gibi ExSilent’ın control
edemeyeceği durumlarda (pil gibi sınırlı
kullanım süreci olan parçalarda olabilecek
kusurlar dahil fakat onunla sınırlandırmadan)
kusur doğrudan materyal, çizim veya nişten
kaynaklanma halleri istisna teşvik eder.
(ii) ExSilent veya onun yetkili servis sağlayıcısı,
garanti süreci içinde Müşteri tarafından
kusur görüşmesinden otuz (30) gün zarfında
haberdar edilmelidir;
(iii) Mamül, kusur görülmesinden otuz (30)
gün zarfında ExSilent veya yetkili servis
sağlayıcısına iade edilmesi ise;
(iv) seri numarası yok edilmiş, silinmiş,
zedelenmiş, değiştirilmiş veya okunamıyorsa;
(v) mamülün bozulma nedeni ExSilent
tarafından imal edilip verilmiş olmayan başka
bir parka ile birlikte veya ona bağlı olarak
kullanılmaktan veya işlevi dışında bir parça
ile kullanılmış ise;
(vi) Bozulma nedeni pilin kısa devre ypamsı
veya pil yuvasının veya peteklerinin
bağlantılarının kırılmış olması veya müdahale
edilmiş olması veya pilin başka bir aygıtta
kullanılmış oldupunda garanti geçerli
değildir.
7. Sınırlı garanti kapsamında bir talepte
bulunmak için Müşteri okunaklı, değişiklik
yapılmamış, tümüyle doldurulmuş
original garanti kartını Mamülü aldıktan
iki hafta içinde ExSilent veya yetkili hizmet
sağlayıcısına iletmekle mükelleftir.
8. Bu sınırlı garanti ExSilent’I Müşteriye karşı
Mamülün kusurları veya iy çalışmamsı
halinde mükellef kılan tek belgedir. Bu
sınırlı garanti tüm diğer garanti ve
mükelleyetlerin yerine geçer Bunlar ister
162
163
Page 84

Türkçe
Feragat
Türkçe
sözlü, yazılı, (bağlayıcı olmayan) hukuki,
kontratlı, kanunsuz vs. olsun, ExSilent,
müşteri jukuki bir varlık ise hiçbir dolaylı,
ikinci derece veya önemli zarar veya
masraftan mükellef değildir.
9. Bu sınırlı garantiye yapılacak herhangi bir
ilave ve değişiklik için önceden ExSilent’ın
yazılı onayı gerekmektedir.
Copyright © 2010 ExSilent. Tüm hakları saklıdır.
ExSilent’ın önceden onayı olmadan bu belgenin
herhangi bir şekilde, tümünün veya bir
bölümünün gayrı yasal reprodüksiyonü, transferi,
dağıtımı veya saklanması yasaktır.
ExSilent bu belgede belirtilen ürünlerinde daha
önceden bildirmeden değişiklik ve geliştirme
hakkını korur.
Hiçbir durumda, ExSilent bilgi kaybı, gelir kaybu,
özel masraf veya direct olmayan zarardan
sorumlu tutulamaz.
Bu belgenin içeriği hiçbir garanti olmadan
sunulmuştur. Yasal olarak aksi gerektirmedikçe
sarahaten, sımnen veya doğruluk doğrultusunda
garanti, güvenilirlik ve içerik bu doküman için
verilmez. Buna pazarlanabilirlik ve belirli bir
heden elde edilmesi için zımnen garantiler dahil
olup bunlarla sınırlı değildir.
ExSilent daha önceden bildirmeksizin bu belgeyi
değiştirebilir veya geri çekeblir.
164
165
Page 85
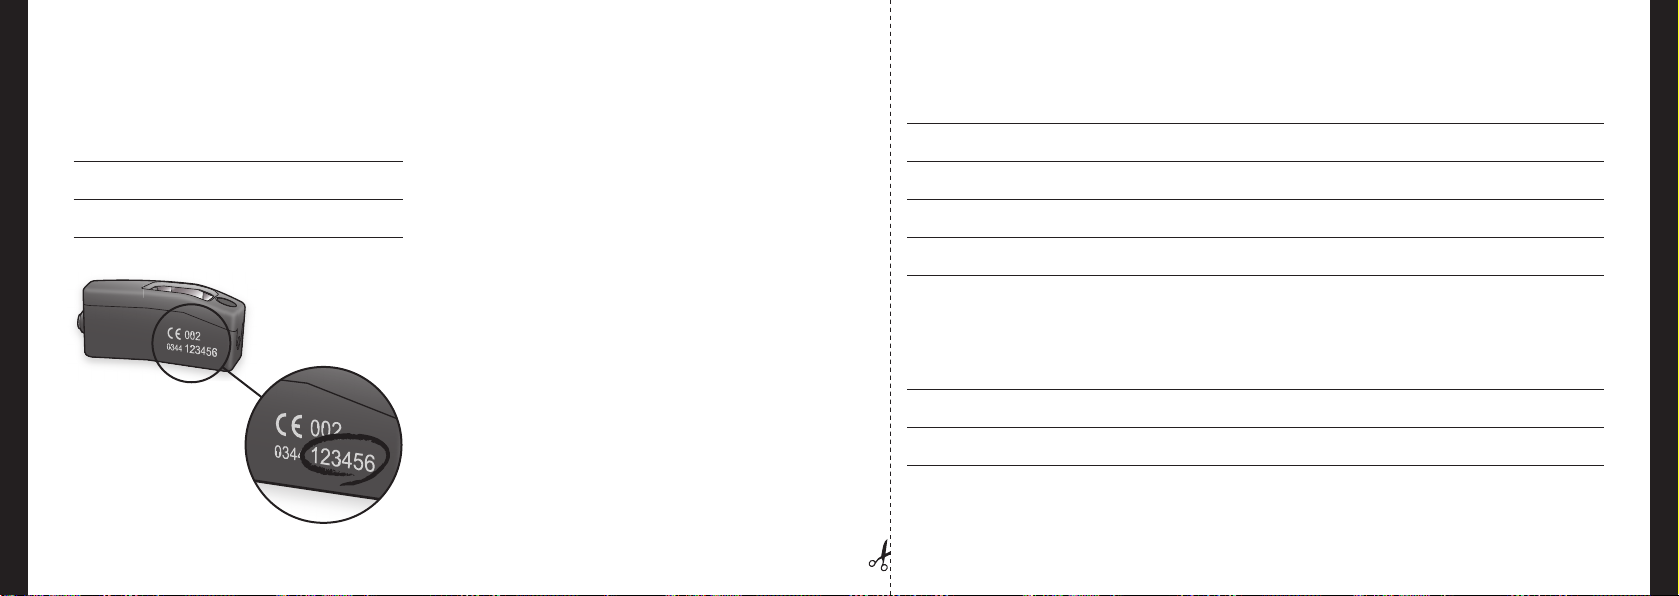
Türkçe
Qleaf’inizin bilgileri Garanti
Türkçe
Lütfen Qleaf’inizin aşağıdaki bilgilerini not ediniz
İsim:
Satın Alma Tarihi:
Cihaz Seri Numarası – Sağ:
Cihaz Seri Numarası – Sol:
Seri Numarası (6 haneli)
166
Adres: Posta Kodu:
Şehir: Ülke:
Telefon: Satın Alma Tarihi:
Seri Numarası – Sağ Seri Numarası:
Satın Almanın Yapıldığı Şehir veÜlke:
Satıcı Adı:
Satısı Adresi: Posta Kodu:
Şehir: Ülke:
167
Page 86

Italiano
Istruzioni d’uso Qleaf
Italiano
168
169
Page 87

Italiano
Congratulazioni per aver acquistato Qleaf!
Con l’acquisto di Qleaf, avete scelto un prodotto
costruito con componenti di alta qualità. Grazie
alle innovazioni tecnologiche nell’ambito della
produzione di apparecchi acustici, Qleaf assicura
alla propria clientela la massima qualità sonora
adattabile alle diverse situazioni quotidiane.
IndiceQleaf
Caratteristiche di Qleaf 172
Struttura di Qleaf 174
Qleaf - modulo (A) 175
Soft tip (B) 176
Batteria (C) 176
Utilizzo quotidiano di Qleaf 177
Inserimento della batteria 177
Rimozione della batteria 177
Inserimento modulo Qleaf nella cupoletta 178
Rimozione modulo Qleaf dalla cupoletta 179
Inserimento di Qleaf 180
Rimozione di Qleaf 181
Impostazione e congurazione 181
Uso e manutenzione 182
Pulizia 182
Conservazione 183
Avvertenze 184
Informazioni sul servizio riparazioni 186
Liberatoria 189
Dati identicativi del vostro Qleaf 190
Garanzia 191
Azienda produttrice 289
Italiano
170
171
Page 88

Italiano
Caratteristiche di Qleaf
Il Prodotto Qleaf è un dispositivo modulare
CIC* (uguale per lato destro e sinistro) con
adattamento standard, chiamato anche “soft tip”.
Per l’alimentazione dell’apparecchio è necessaria
una batteria di tipo 10. L’apparecchio è dotato
di un avanzato microprocessore, il quale
assicura una amplicazione eccellente dei suoni,
adattabile alla vostra particolare perdita uditiva.
Qleaf è corredato di soft tip con 3 misure: piccola,
media e grande. La misura del soft tip dipende
dalla dimensione del condotto uditivo. La scelta
della misura giusta è estremamente importante.
Nel caso la misura del soft tip fosse troppo
grande, l’utilizzo dell’apparecchio potrebbe
risultare scomodo e fastidioso. Nel caso opposto
–in cui la misura fosse troppo piccola-, potrebbe
insorgere il problema dei schi. Durante la
fase di prova e di adattamento del dispositivo,
l’audioprotesista stabilirà la giusta misura del
soft tip.
Una delle cause più frequenti di riparazione
degli apparecchi acustici è il danneggiamento
e/o occlusione del ricevitore dovuti al cerume.
Questo prodotto è dotato di un particolare
sistema che impedisce l’intrusione di cerume
nel dispositivo, riducendo sensibilmente gli
interventi di assistenza. Se il soft tip dovesse
intasarsi di cerume, potrà essere facilmente
pulito e/o sostituito.
Qleaf include le seguenti caratteristiche:
• sistema anti-feedback adattivo (consente di
eliminare i schi);
• riduzione del rumore adattiva (migliora la
prestazione dell’apparecchio in ambienti
rumorosi).
Grazie alla combinazione di dimensioni, design,
tecnologia e materiali, Qleaf è in grado di orire
notevoli vantaggi:
• pressoché invisibile;
• distorsione minima della propria voce
(occlusione);
• ottima amplicazione dei suoni grazie al
posizionamento del ricevitore vicino al
timpano;
• naturalezza del suono e direzionalità con
padiglione libero, e minimizzazione dell’eetto
vento grazie al posizionamento in profondità
del microfono;
• protezione dai danni causati dal cerume;
• adatto all’uso con telefono cellulare;
• adatto all’uso durante l’attività sportiva;
• Facile da usare e conservare;
• design moderno.
Italiano
172
* Completamente nel condotto
173
Page 89
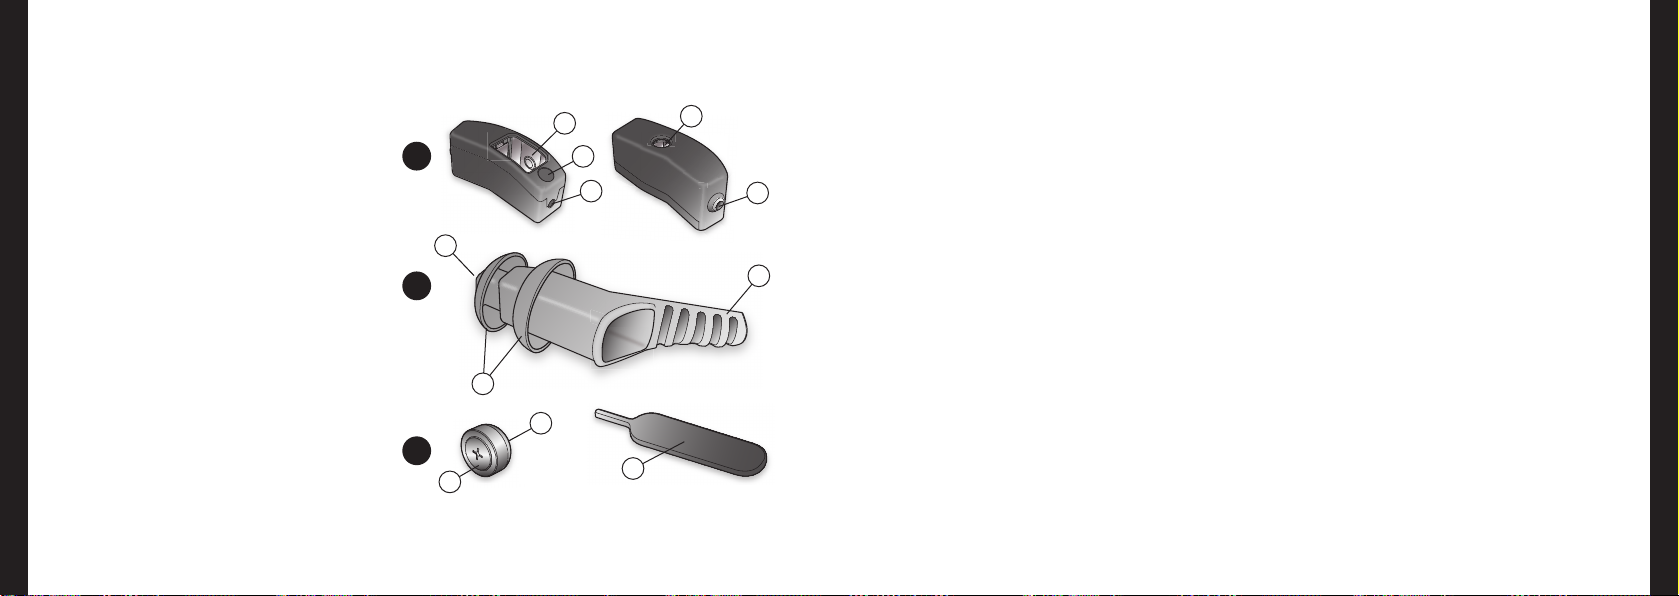
Italiano
Struttura di Qleaf
A Qleaf - modulo (alloggiamento)
1 Vano batteria
2 Indicatore lato (rosso/blu)
3 Apertura microfono
4 Apertura per rimozione batteria
5 Uscita ricevitore
B Soft tip
6 Uscita suono
7 Cupolette
8 Filo di estrazione
C Batteria (tipo 10)
9 Polo positivo (+)
10 Polo negativo (–)
11 Accessorio per la rimozione della batteria
1
A
6
B
7
C
9
2
3
10
11
4
5
8
Qleaf - modulo (A)
Alloggiamento (A)
L’alloggiamento è realizzato in plastica resistente.
Per la manutenzione dell’alloggiamento fate
riferimento al capitolo “Uso e manutenzione”
(pagine 182-183).
Vano Batteria (1)
Il vano comprende la batteria di tipo 10, la quale
fornisce l’alimentazione a Qleaf. Rimovendo la
batteria, l’apparecchio si spegne.
I contatti del vano batteria conducono
l’energia dalla batteria al microprocessore. I
contatti servono anche alla programmazione
dell’apparecchio. L’audioprotesista è in grado di
riprogrammare le impostazioni di Qleaf grazie ad
un dispositivo speciale collegato ai contatti del
vano batteria.
Indicatore lato (2)
È possibile identi care il lato destro e il lato
sinistro grazie all’utilizzo di due colori diversi.
Apertura microfono (3)
Il microfono è situato in questa posizione e
serve per la ricezione dei suoni che verranno poi
ampli cati da Qleaf.
Apertura per rimozione batteria (4)
Il dispositivo per la rimozione della batteria si
utilizza tramite questa apertura. Vedete capitolo
“Rimozione batteria” (pagina 177).
Uscita ricevitore (5)
Il suono elaborato ed ampli cato viene condotto
tramite questa apertura attraverso il soft tip verso
il timpano.
Italiano
174
175
Page 90
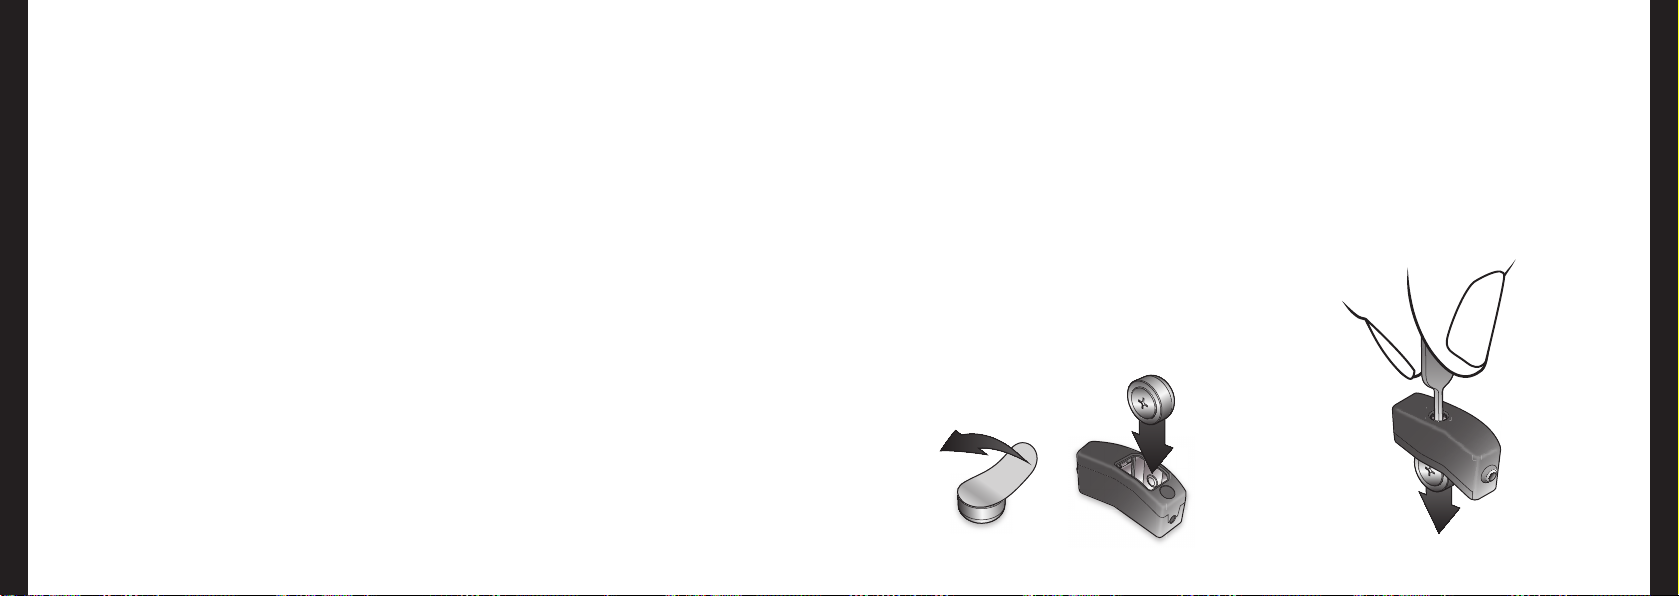
Italiano
Soft tip (B)
Il soft tip di Qleaf è realizzato in materiale
plastico bio-compatibile e monouso, in modo
da permetterne la regolare sostituzione. Per
le operazioni di manutenzione e pulizia, fate
riferimento al capitolo “Uso e manutenzione”
(pagine 182-183). L’illustrazione può di erire dal
soft tip scelto in base alla dimensione del vostro
condotto uditivo.
Uscita suono (6)
Il suono elaborato ed ampli cato viene condotto
tramite questa apertura verso il timpano.
Cupolette (7)
Le cupolette fungono da isolante, in quanto
impediscono il sorgere di interferenze tra il
microfono e il ricevitore. Inoltre, le cupolette
assicurano la stabilità del dispositivo all’interno
del condotto uditivo.
Filo di estrazione (8)
Il lo di estrazione serve per estrarre il Qleaf dal
condotto uditivo. Dopo aver indossato Qleaf, il
lo di estrazione verrà a trovarsi dietro al trago
(pagina 180) e sarà quindi pressoché invisibile.
Batteria (C)
Qleaf è alimentato da batterie di tipo 10 –
comprese nella confezione e contrassegnate
da adesivo giallo. Rimovendo la batteria,
l’apparecchio si spegne.
Utilizzo quotidiano di Qleaf
Prima di procedere a quanto speci cato nei
capitoli “Utilizzo quotidiano di Qleaf” e “Uso e
manutenzione”, assicuratevi che l’apparecchio sia
posto su una super cie piana e pulita.
Inserimento della batteria
Prima di inserire una nuova batteria rimuovete
l’adesivo dal polo positivo +. Tenete il modulo in
modo che l’indicatore del lato sia rivolto verso
destra, e inserite la batteria come illustrato
nell’immagine.
Rimozione della batteria
Rimuovete la batteria utilizzando il dispositivo di
estrazione in dotazione (vedi immagine).
Italiano
176
177
Page 91
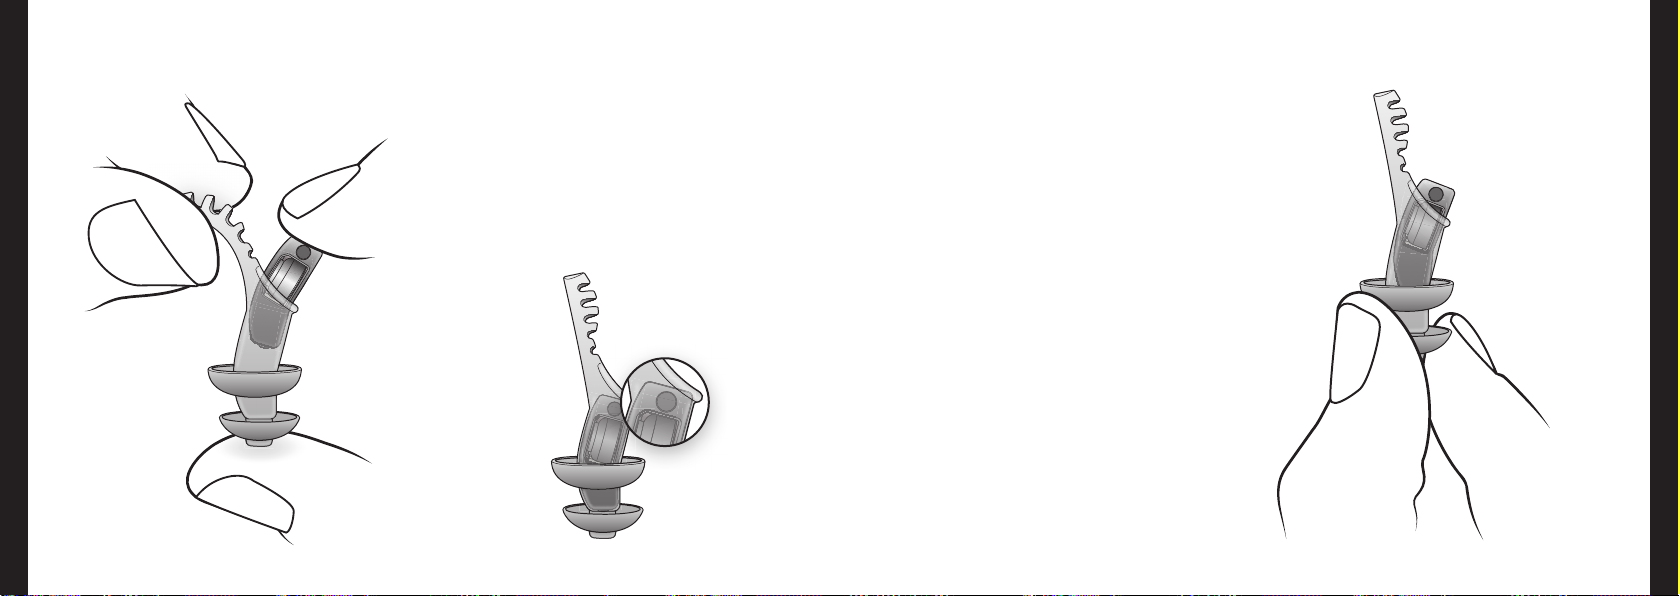
Italiano
Italiano
Inserimento modulo Qleaf
nel soft tip
Rimozione modulo Qleaf
dal soft tip
178
• Inserite il modulo nel soft tip nella direzione
della batteria e tenendo il lo di estrazione sul
lato sinistro (vedi immagine).
• Inserite completamente il modulo nel soft tip
(vedi immagine sotto).
Estraete il modulo dal soft tip esercitando
una leggera pressione sulla cupoletta (vedi
immagine).
179
Page 92
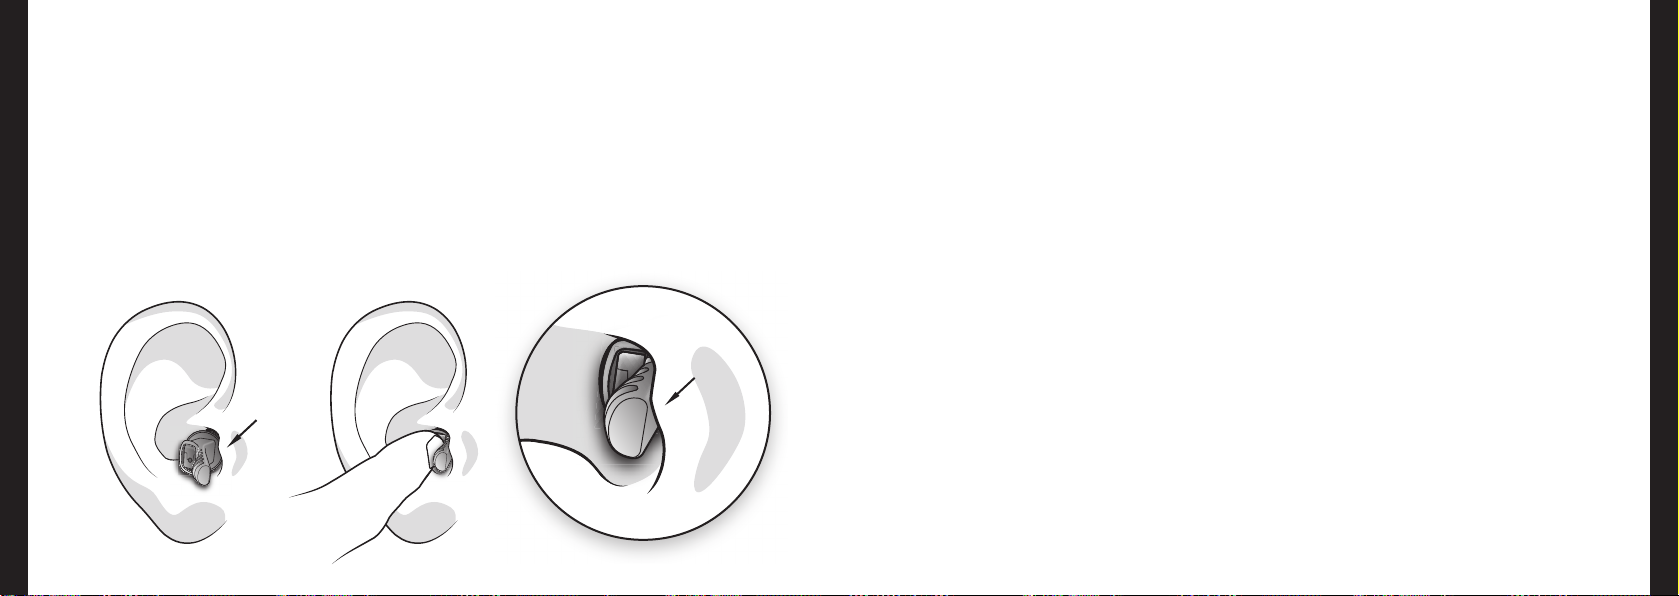
Italiano
Inserimento di Qleaf
• Posizionate la cupoletta del soft tip facendola
scorrere nell’orecchio. Il lo di estrazione deve
essere situato dietro il trago e in direzione del naso.
• Inserite il modulo nell’orecchio esercitando una
lieve pressione sulla parte piatta del modulo
stesso. A questo punto, inserite con cautela
il modulo all’interno del condotto uditivo.
Spalancando la bocca, si facilita l’inserimento.
trago
180
L’inserimento di un nuovo soft tip può essere
lievemente fastidioso, poiché la super cie del soft
tip è leggermente rigida e per il fatto che alcuni
condotti uditivi sono piuttosto asciutti. È possibile
ovviare a questo inconveniente applicando una
minima quantità di crema o gel lubri cante.
N.b.: assicuratevi che il prodotto lubri cante non
ostruisca l’uscita del suono!
trago
L’inserimento ottimale avviene quando la parte
piatta del modulo (in cui è situato il microfono)
penetra in profondità nel condotto uditivo. In
questo modo, il dispositivo sarà praticamente
invisibile e le prestazioni acustiche ottimali. Nei
casi in cui il condotto uditivo fosse troppo stretto,
il dispositivo potrebbe sporgere di qualche
millimetro.
Se fosse il lo di estrazione a sporgere –dopo
l’inserimento del dispositivo-, questo potrà
essere accorciato dall’audioprotesista.
Lavatevi bene le mani prima di inserire Qleaf
nell’orecchio. Trucco, creme, lozioni, gel, lacca e
prodotti simili possono sporcare il modulo e, di
conseguenza, ostruire l’uscita microfono.
Rimozione di Qleaf
Italiano
A errare il lo di estrazione e tirare
delicatamente.
Impostazione e
con gurazione
Le procedure di impostazione e con gurazione
sono procedimenti individuali e della
massima importanza. Per questa ragione
vi raccomandiamo di rivolgervi al vostro
audioprotesista nel caso si veri cassero
problemi di impostazione e/o con gurazione
dell’apparecchio acustico. Il vostro
audioprotesista è autorizzato ad apportare le
modi che necessarie all’ottimizzazione delle
prestazioni.
181
Page 93

Italiano
Uso e manutenzione
Sebbene il modulo Qleaf possa essere utilizzato
per entrambe le orecchie, le impostazioni
sono di norma dierenti per il lato destro e
lato sinistro. Questo signica che una volta
eseguito l’adattamento sarà necessario rispettare
l’indicazione destra/sinistra. Se usate la stessa
misura di soft tip per entrambe le orecchie, un
eventuale scambio di soft t non ha alcuna
conseguenza.
La formazione di cerume varia da persona
a persona. Per questo motivo, l’occlusione
dell’uscita suono del soft tip a causa del cerume
non può essere evitata del tutto. Tuttavia,
sebbene la qualità sonora possa essere soggetta
ad alterazioni, è da escludere il danneggiamento
dell’apparecchio acustico. In caso di problemi
dovuti all’occlusione dell’uscita –per esempio
un calo di volume-, sarà possibile pulire il soft
tip (vedi paragrafo “Pulizia”) o eventualmente
sostituirlo.
Vericate quotidianamente lo stato
dell’apparecchio acustico e del soft tip per
assicurarvi che non sia danneggiato e/o occluso.
Questo semplice controllo garantirà prestazioni
ottimali e la longevità del dispositivo. Sostituite
sempre il soft tip in caso di danneggiamenti
visibili. Per mantenere ottimale la prestazione del
modulo ed evitare infezioni all’apparato uditivo,
si consiglia di sostituire il soft tip almeno una
volta al mese. I soft tip sono disponibili presso
l’audioprotesista.
Pulizia
Modulo:
• Pulire quotidianamente con un panno
morbido e asciutto.
• Per un’ulteriore pulizia, potete utilizzare
i prodotti specici per la pulizia degli
apparecchi acustici disponibili in commercio
(salviette igienizzanti).
Soft tip:
• Pulire quotidianamente con un panno
morbido e asciutto.
• Per un’ulteriore pulizia, potete utilizzare
i prodotti specici per la pulizia degli
apparecchi acustici disponibili in commercio
(salviette igienizzanti, pastiglie igienizzanti
solubili, dispositivi di pulizia a ultrasuoni).
• Se occluso dal cerume, il soft tip può essere
sciacquato sotto l’acqua tiepida e corrente. Si
consiglia di sostituire sempre il soft tip in caso
di sporcizia persistente, se le proprietà del
materiale dovessero modicarsi.
N.b.: non usate prodotti aggressivi, abrasivi o
solventi! Ciò potrebbe danneggiare in modo
irreversibile l’apparecchio lo e/o il soft tip.
Conservazione
Italiano
Di notte:
Si consiglia di rimuovere sempre il soft tip dal
modulo durante la notte. Rimuovete inoltre
la batteria dal dispositivo e conservatela
in un luogo sicuro. Ciò contribuirà ad una
maggiore durata della batteria e a permettere
l’evaporazione dell’umidità eventualmente
presente nell’apparecchio acustico.
Breve termine:
Se desiderate rimuovere il dispositivo per
breve tempo, utilizzate la custodia originale in
dotazione.
Lungo termine:
Se non utilizzate l’apparecchio acustico per un
periodo di tempo più lungo, pulite con cura i
componenti (modulo e soft tip) e conservateli
nell’apposita custodia in dotazione. Assicuratevi
di aver rimosso la batteria.
182
183
Page 94

Italiano
Avvertenze
Il soft tip è un componente essenziale
di Qleaf. Senza il soft tip, Qleaf non
funzionerà in modo ottimale, oltre a
sporcarsi irreversibilmente. Per questa ragione, vi
raccomandiamo di non utilizzare mai il modulo
senza il soft tip.
Una volta eseguito l’adattamento del dispositivo,
è necessario rispettare l’indicazione del lato
destro e sinistro. In caso contrario, la prestazione
acustica potrebbe deteriorarsi, e la perdita
uditiva potrebbe aggravarsi.
Non usate mai soft tip sporchi o danneggiati.
Questo, infatti, potrebbe comportare
un’alterazione della prestazione acustica, un
senso di fastidio nell’indossare l’apparecchio e
addirittura infezioni dell’apparato uditivo.
Sostituite regolarmente i soft tip, anche se non
sono visibilmente sporchi o danneggiati. Fate
riferimento al capitolo “Uso e manutenzione”
(pagine 182-183)
Se utilizzate Qleaf per la prima volta, si consiglia
di indossarlo inizialmente per circa quattro ore
al giorno, per poi incrementare questo periodo
di un’ora al giorno. In caso di dolore, irritazione
o prurito, non usate l’apparecchio acustico
e rivolgetevi ad un medico. Sottoponetevi a
controlli regolari del vostro apparato uditivo sia
durante il periodo iniziale sia successivamente.
Se riscontrate dicoltà nella rimozione di Qleaf
dall’orecchio, rivolgetevi all’audioprotesista.
Una rimozione errata e/o senza l’ausilio
del dispositivo di rimozione adeguato può
comportare un danneggiamento del soft tip e/o
dell’apparecchio acustico.
Qleaf non deve assolutamente essere utilizzato
nei seguenti casi:
• parere contrario del medico specialista/mancanza
di una storia clinica dell’apparato uditivo;
• esostosi (crescita anomala di tessuto nel
condotto uditivo);
• eccessiva secrezione di cerume.
L’apparecchio non deve essere:
• gettato a terra;
• esposto a umidità o acqua;
• immerso in acqua;
• utilizzato durante il nuoto, la doccia, il bagno e
la sauna;
• pulito con panni umidi;
• esposto ad alte temperature (per esempio
usando l’asciugacapelli);
• utilizzato in ambienti in cui il rischio di
esplosione è elevato (ad esempio, in miniere);
• esposto a radiazioni (raggi X) o a forti campi
magnetici (visite specialistiche come TAC ecc.);
• utilizzato in ambienti in cui vengono utilizzati
spray per capelli e solventi (ad esempio, dal
parrucchiere).
Si consiglia di prestare particolare attenzione
durante l’applicazione di trucco, creme, lozioni,
gel, lacche per capelli e prodotti simili quando
indossate l’apparecchio acustico. Questi prodotti
possono infatti sporcare l’apparecchio acustico
(causando ad esempio l’occlusione dell’uscita
microfono).
Tenete Qleaf lontano dalla portata di bambini
e animali domestici. L’ingestione di uno
dei componenti può comportare rischio di
soocamento per i bambini più piccoli.
Le batterie scariche e i vecchi apparecchi
acustici devono essere smaltiti
correttamente negli appositi contenitori
per riuti chimici.
Italiano
184
185
Page 95

Italiano
Informazioni sul servizio riparazioni
Qleaf è un prodotto sviluppato da ExSilent
BV, Overschiestraat 63, Amsterdam. In caso di
reclami o di richieste di riparazione, contattate
il rivenditore presso il quale è stato acquistato il
prodotto. Le condizioni concernenti reclami e/o
richieste di riparazioni possono variare a seconda
del rivenditore.
Limitazione dei termini di garanzia.
La garanzia limitata è valida per tutti i paesi della
CEE in cui la ExSilent è rappresentata, a meno
che non sussistano contratti di garanzia locali.
ExSilent Bv (“ExSilent”) garantisce che i prodotti
ExSilent sono esenti da difetti di fabbricazione
(materiale e design) unicamente al momento
dell’acquisto e alle seguenti condizioni:
1. la garanzia limitata è applicabile all’utente
del prodotto (”Cliente”). Essa è concessa
senza esclusioni o restrizioni di (i) qualsiasi
diritto legale diretto da parte del cliente
nei confronti del produttore o del cliente
(ii) verso il rivenditore/concessionario
riconosciuto dall’Azienda.
2. Il periodo di copertura della garanzia è di
24 (ventiquattro) mesi dalla data di acquisto
del prodotto. In caso di sub-acquisto e/o
cambio di proprietà e/o utenza, il periodo
di copertura della garanzia si protrarrà no
alla parte restante dei 24 (ventiquattro)
mesi dalla data del primo acquisto, senza
alterazione degli altri aspetti contrattuali.
Questa garanzia è valida e applicabile
unicamente nei seguenti Paesi: Bosnia,
Bulgaria, tutti i Paesi membri dell’Unione
Europea, Islanda, Israele, Croazia, Macedonia,
Norvegia, Romania, Serbia/Montenegro,
Turchia e Svizzera.
3. Durante il periodo di garanzia, ExSilent o
il rivenditore autorizzato provvederà alla
riparazione o alla sostituzione del prodotto
riscontrato difettoso (a totale discrezione di
ExSilent). ExSilent si impegna a riconsegnare
al cliente il prodotto riparato o sostituito e
in buone condizioni. Tutti i componenti o
dispositivi sostituiti divengono proprietà
esclusiva di ExSilent.
4. Il prodotto sostituito godrà di una copertura
di garanzia estesa o rinnovata. In caso di
semplice riparazione, rimarrà in vigore il
contratto di garanzia originario (quello
decorrente dalla data di acquisto del
prodotto).
5. Questo contratto di garanzia non prevede la
copertura a parti colorate, accessori e/o parti
annesse.
6. Questo contratto di garanzia non prevede
la copertura di danneggiamenti dovuti al
normale utilizzo. Inoltre, non prevede la
copertura nei casi in cui:
(i) il difetto è stato causato dal fatto che il
prodotto è stato soggetto a: uso improprio
e contrario alle direttive del proprietario/
utente, uso sconsiderato, esposizione ad
umidità, vapore o condizioni termiche
ambientali estreme o cambio repentino
di tali condizioni, corrosione, ossidazione,
alterazioni o connessioni non consentite,
apertura dell’alloggiamento o riparazioni
non consentite, riparazioni eettuate
sostituendo componenti non compatibili,
uso non corretto, installazione non adeguata,
incidenti, forza maggiore, intrusione di
alimenti e/o liquidi, interazione all’eetto
di agenti chimici o in casi di altri fatti in cui
ExSilent non è in grado di assumersi alcuna
responsabilità (incluso ma non limitato
a difetti dovuti all’usura dei componenti,
ad esempio le batterie, le quali hanno per
natura una vita limitata), a meno che il
difetto non sia stato causato direttamente da
materiali difettosi, design o riniture;
(ii) ExSilent o chi da essa autorizzato non
ricevano notica entro 30 (trenta) giorni
dalla data in cui il difetto è stato riscontrato –
sempre nell’ambito del periodo di copertura
della garanzia;
(iii) il prodotto non è stato inviato a ExSilent o
al rivenditore autorizzato, entro 30 (trenta)
giorni dalla data in cui il difetto è stato
riscontrato –sempre nell’ambito del periodo
di copertura della garanzia;
(iv) il numero di matricola sia stato rimosso,
Italiano
186
187
Page 96

Italiano
cancellato, danneggiato, cambiato o reso
illeggibile;
(v) il difetto è stato causato dalla connessione
con un dispositivo ausiliario non prodotto
o distribuito da ExSilent o nel caso in cui il
prodotto sia stato usato per un uso diverso
dal quale è destinato;
(vi) il difetto sia stato causato da un corto
circuito della batteria o da contatti difettosi
della stessa batteria o nel caso in cui la
batteria sia evidentemente rotta o venga
impiegata una batteria per un uso diverso
dalla sua destinazione.
7. Al ne di reclamare il diritto sancito dal
presente contratto di garanzia, il cliente
dovrà inviare il certicato (leggibile,
inalterato, e interamente compilato) a
ExSilent o al rivenditore autorizzato entro
due settimane dalla data di acquisto del
prodotto.
8. Questo contratto di garanzia è l’unico
documento valido di cui il cliente si possa
avvalere nei confronti di ExSilent e l’unico
documento che comprova la responsabilità
esclusiva di ExSilent nei confronti del cliente
nel caso venissero riscontrati difetti o un
malfunzionamento del prodotto. Questo
contratto di garanzia sostituisce in modo
completo qualsiasi altro accordo di garanzia
e/o responsabilità, inclusi quelli verbali,
scritti, accordi non vincolanti, contrattuali,
illeciti e simili. ExSilent non è in alcun modo
responsabile per eventuali danneggiamenti,
costi e/o spese, siano essi indiretti, secondari
o consequenziali. Inoltre, ExSilent non è
in alcun modo responsabile per eventuali
danneggiamenti, costi e/o spese, siano essi
indiretti, secondari o consequenziali, nel caso
in cui il cliente sia un Ente giuridico.
9. Qualsiasi emendamento e/o cambiamento
di questo contratto di garanzia è soggetto a
previa approvazione da parte di ExSilent.
Liberatoria
Copyright © 2010 ExSilent. Tutti i diritti riservati.
Sono severamente vietati riproduzione illegale,
trasferimento, distribuzione o detenzione di
questo documento –o parte di esso e in qualsiasi
modo avvenga- senza previa autorizzazione da
parte di ExSilent.
ExSilent si riserva il diritto di apportare modiche
e/o miglioramenti ai prodotti descritti in questo
documento senza previa notica.
In nessun caso ExSilent sarà da ritenersi
responsabile in caso di perdita dati, di
mancato guadagno, di incidenti eccezionali o
danneggiamenti indiretti.
Il contenuto di questo documento non è
vincolante. A meno che la legge non stabilisca
altrimenti, nessuna rilevanza esplicita, implicita
ne’ garanzia verrà fornita al ne di avvalorare
l’esattezza, l’attendibilità ed il contenuto di
questo documento. Ciò include ma non è
limitato alle implicite garanzie riguardanti la
commercializzazione, al ne di conseguire un
determinato obiettivo.
ExSilent si riserva il diritto di cambiare e/o
revocare questo documento in ogni momento e
senza previa notica.
Italiano
188
189
Page 97
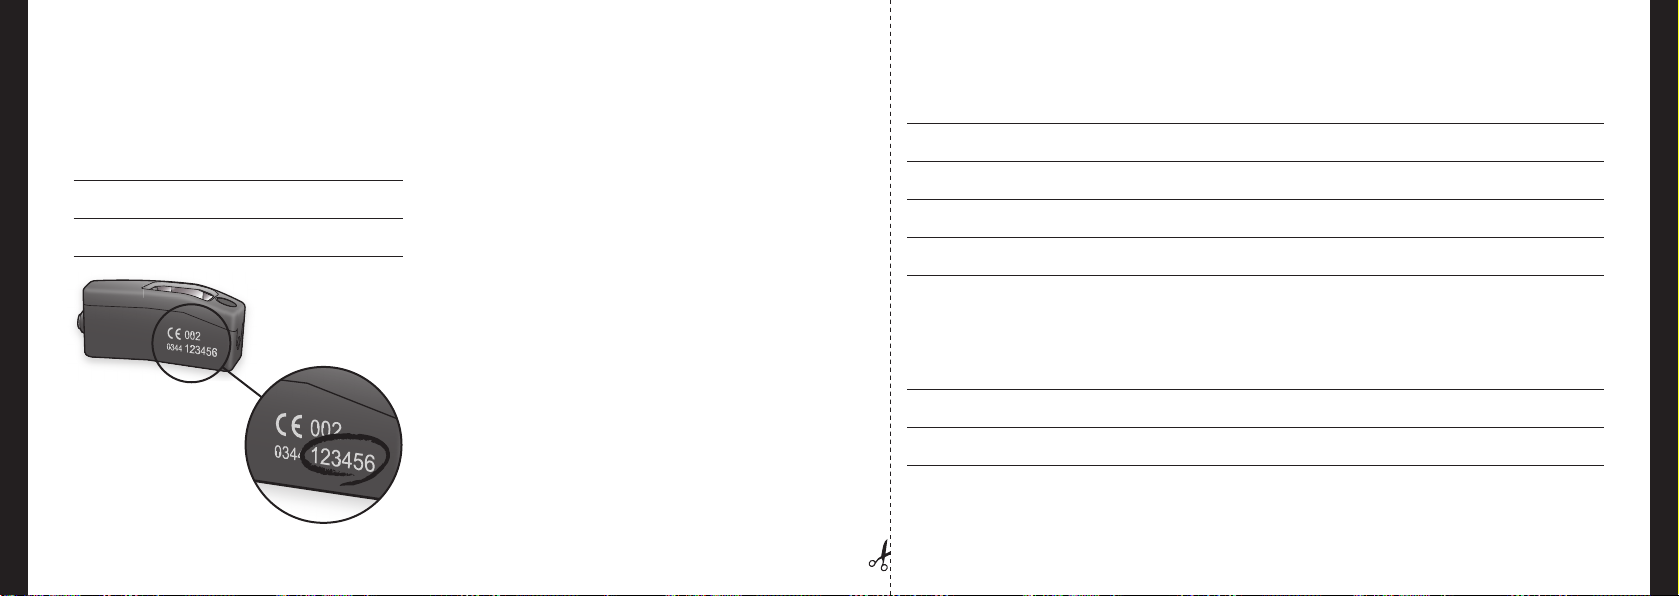
Italiano
Dati identi cativi del vostro Qleaf Garanzia
Si consiglia di prendere nota dei dati identi cativi
del vostro Qleaf riportati qui sotto.
Data di acquisto:
Numero di matricola - Destro:
Numero di matricola - Sinistro:
Nome e cognome:
Indirizzo: CAP:
Città: Paese:
Telefono: Data di acquisto:
Numero di matricola – Destro: Numero di matricola – Sinistro:
Luogo e Paese di acquisto:
Nome del rivenditore:
Italiano
Numero di matricola (6 cifre)
190
Indirizzo del rivenditore: CAP:
Città: Paese:
191
Page 98

Polski
Instrukcja obsługi aparatu słuchowego Qleaf
Polski
192
193
Page 99

Polski
Gratulujemy zakupu aparatu słuchowego Qleaf.
Zakup ten daje Państwu gwarancję posiadania
produktu składającego się z najwyższej jakości
komponentów. Dzięki zastosowaniu licznych,
znaczących innowacji w dziedzinie aparatów
słuchowych, Qleaf zapewnia stylowe i przyjemne
noszenie, dostosowane do nowoczesnego stylu
życia.
Spis treściQleaf
Czym jest Qleaf? 196
Budowa aparatu Qleaf 198
Qleaf - moduł (A) 199
Miękka nakładka (B) 200
Bateria (C) 200
Aparat Qleaf w codziennym użyciu 201
Wkładanie baterii 201
Wyjmowanie baterii 201
Wkładanie aparatu do miękkiej nakładki 202
Wyjmowanie aparatu z miękkiej nakładki 203
Wkładanie Qleaf do ucha 204
Wyjmowanie Qleaf z ucha 205
Procedura dopasowania i konguracja 205
Użytkowanie i konserwacja 206
Czyszczenie 206
Przechowywanie 207
Ostrzeżenia 208
Informacja na temat serwisu 210
Wyłączenia odpowiedzialności 213
Dane dotyczące Qleaf użytkownika 214
Gwarancja 215
Producent 289
Polski
194
195
Page 100

Polski
Czym jest Qleaf?
Qleaf to tak zwany modułowy (taki sam dla
każdego ucha) aparat wewnątrzkanałowy - CIC*
ze standardowym elementem dopasowującym,
nazywanym miękką nakładką.
Do jego zasilania potrzebna jest bateria do
aparatów słuchowych typu 10. Aparat posiada
zaawansowany mikroprocesor, który zapewnia
obróbkę i wzmocnienie sygnału, odpowiednio do
ubytku słuchu użytkownika.
W Qleaf zastosowano miękką nakładkę w
rozmiarach dużym, średnim i małym. Rozmiar
miękkiej nakładki zależy od rozmiaru przewodu
słuchowego. Dobór właściwego rozmiaru jest
niezwykle ważny. Jeżeli miękka nakładka jest
za duża, aparat może być mniej wygodny w
noszeniu. Jeżeli miękka nakładka jest za mała,
aparat może popiskiwać – sprzężenie zwrotne.
Podczas dopasowywania aparatu, dystrybutor
będzie starał się dobrać najodpowiedniejszą dla
Państwa miękką nakładkę.
Jedną z najczęstszych przyczyn napraw jest
uszkodzenie lub zanieczyszczenie słuchawki
woskowiną. Aparat Qleaf posiada wbudowany
system zabezpieczający przed dostaniem się
woskowiny do jego wnętrza. Dzięki temu,
elementy w module są zawsze czyste i w dobrym
stanie. W przypadku zatkania miękkiej nakładki,
łatwo ją wyczyścić lub wymienić.
Qleaf posiada mikroprocesor oferujący m.in.
następujące funkcje:
• System adaptacyjnej redukcji sprzężenia
zwrotnego – zapobiega spontanicznym
“gwizdom” aparatu.
• System adaptacyjnej “redukcji szumu”
– podnoszący skuteczność słyszenia w
hałaśliwym otoczeniu.
Dzięki kombinacji rozmiarów, kształtu,
innowacyjnej budowy i materiałów, aparat
Qleaf oferuje szereg znaczących korzyści:
• Jest prawie niewidoczny.
• Minimalizuje zniekształcone słyszenie
własnego głosu użytkownika (efekt okluzji).
• Dobrze wzmacnia dźwięki, dzięki usytuowaniu
słuchawki blisko błony bębenkowej.
• Daje naturalny dźwięk, z dobrym słyszeniem
kierunkowym, dzięki odsłoniętej małżowinie
usznej oraz ograniczeniu do minimum
słyszenia szumu wiatru, dzięki głębokiemu
umiejscowieniu mikrofonu.
• Chroni przed uszkodzeniami spowodowanymi
woskowiną.
• Można go używać z telefonami komórkowymi.
• Można go używać podczas zajęć sportowych.
• Jest łatwy w użyciu i utrzymaniu.
• Ma nowoczesne wzornictwo.
Polski
196
* Całkowicie schowany w przewodzie słuchowym
197
 Loading...