

USER MANUAL
!

The information in this document is subject to change without notice and does
not represent a commitment on the part of Expressive SAS.
“Expressive E”, “Touché SE”, "Lié" and associated logos are registered trademarks
of Expressive SAS.
Ableton is a trademark of Ableton AG.
!
Mac, MacOS, OS X, GarageBand, Logic, are registered trademarks of Apple Inc.
!
All other trademarks are the property of their respective owners and use of them
does not imply any affiliation with or endorsement by them.
Document authored by the Expressive E team.
EXPRESSIVE SAS
Atrium
104 Avenue de la Résistance
93100 MONTREUIL
France
www.expressivee.com"
Expressive E
Touché SE User Manual v.1
Page of 2 36

1. Introduction 5
1.1. Downloads & Updates 5
1.2. Installation 5
2. Touché SE 6
2.1. Overview 6
2.1.1. What is Touché SE ? 6
2.1.2. Slave and Standalone 6
2.1.3. Default Behaviour 6
2.2. Mechanism 7
2.2.1. Concept 7
2.2.2. Shiings 7
2.2.3. Skin 8
2.2.4. Cylinders 8
2.2.5. Slider 8
2.3. Controls 9
2.3.1. Buttons 9
2.3.2. Encoder 9
2.3.3. LEDs 9
2.4. Connectivity 10
2.4.1. Ports 10
3. Lié 11
3.1. Overview 11
3.1.1. What is Lié ? 11
3.1.2. System Requirements 11
3.1.3. Plug-in Formats 11
3.2. Interface 12
3.2.1. Menu 12
3.2.2. Settings 13
3.2.3. Browser 15
3.2.4. Slot Center 16
3.2.5. Plug-In Preset Specificities 17
3.2.7. MIDI Setup 18
3.2.8. Scope 19
3.2.9. Sensitivity Curve Editor 20
4. Workflow 21
4.1. DAW Setup 21
Expressive E
Touché SE User Manual v.1
Page of 3 36

4.1.1. Ableton Live 21
4.1.2. Logic Pro 22
4.1.3. Cubase 23
4.1.4. Presonus Studio One 25
4.1.5. GarageBand 26
4.1.6. Fruity Loop 26
4.1.7. Reaper 28
4.1.8. Bitwig Studio 29
4.2. Creating a new Plugin preset 31
4.5. Adjusting your sensitivity 34
4.5.1. By Parameter 34
4.5.2. For the Top and Bottom Shiings 34
4.5.3. For the Le and Right Shiings 34
5. Troubleshooting 35
5.1. Touché SE behavior 35
5.1.1. My Touché SE does not turn on when I plug it. 35
5.1.2. My Touché SE does not seem to go back to zero when I do not press. 35
5.1.3. I hear a background noise in my speakers when I use my Touché SE. 35
5.1. Lié behavior 35
5.2.1. With Lié standalone, Lié does not recognize my Touché SE. 35
5.2.2. On Windows, Lié opens an error message on opening. 35
5.2.3. I can not update the firmware of my Touché SE. 36
Expressive E
Touché SE User Manual v.1
Page of 4 36
1. Introduction
1.1. Downloads & Updates
Touché SE comes with Lié, its companion soware. When you receive Touché SE, you need to update its firmware to
make it work properly with Lié.
You can find the latest version here : https://www.expressivee.com/downloads
1.2. Installation
Once Lié is downloaded, you can start the installation : Double click on "Lié.dmg" (“Lie.exe“ for Windows users) to
open it.
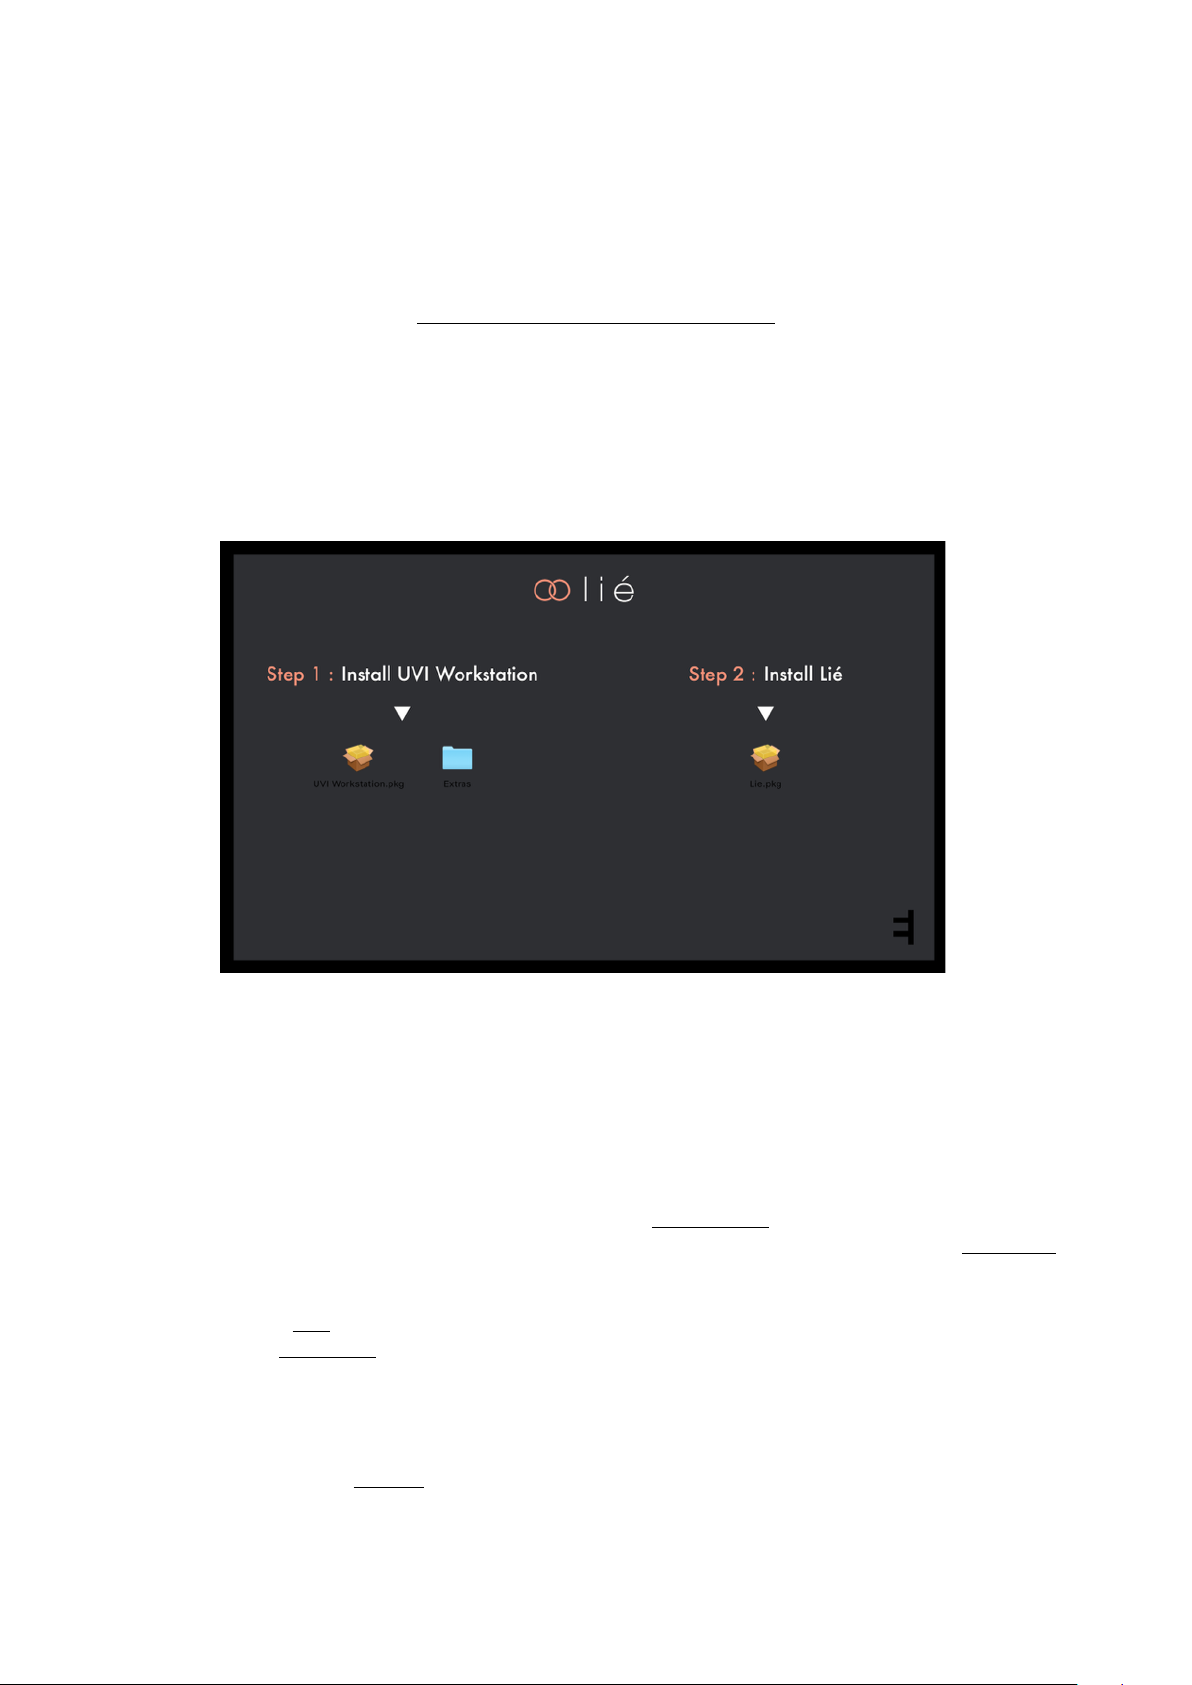
Inside the installation folder you will find this screen :
•
"UVI Workstation.pkg" : You will need this file If you want to install Lié’s factory presets.
•
"Lié.pkg" : You will need this file to install Lié.
In order to have Lié’s factory presets, double click on "UVI Workstation.pkg" to install it, and follow the instructions
(this part is included in the Windows installer of Lié) . Then, double click on "Lie.pkg" and follow the instructions as
well.
Once Lié is installed, launch your DAW. Lié should appear in your Plug-in folder. If not, it might be because your
DAW doesn’t automatically scan for new plug-ins. Scan them to refresh your plug-in list (learn more at DAW Setup).
The rest position of your Touché SE is calibrated when you power Touché SE. Therefore, when plugging Touché SE
to your computer, please make sure that Touché SE is in a stable position (not moving, on a horizontal surface, and
without touching the Skin). This process is automatically done each time you power Touché SE, either from a
computer or from a standalone power source.
Then, on your computer, open Lié in a DAW, It will invite you to update Touché SE’s firmware and to scan your
Plugins (Caution : When performing the firmware update, your Touché SE needs to be connected directly to one of
your computer’s USB ports using the Expressive E USB cable that comes with the unit). If you skip those steps, you
still can perform them in the Settings.
You are now ready to discover Touché SE !"
Expressive E
Touché SE User Manual v.1
Page of 5 36
2. Touché SE
2.1. Overview
2.1.1. What is Touché SE ?
Touché SE is an instrument that gives you a unique tactile approach for virtual instruments. Shaping and controlling
their sound with a simple pressure of your hands, Touché SE gives you a powerful and natural connection with your
music.
Touché SE controls your plugins with four independent Shiings : Two vertical and two lateral Shiings.
These four Shiings are extremely precise and sensitive, reacting to the smallest pressure, the slightest movement
of your fingers.
This opens up a wide variety of genuine instrumental gestures : progressive slides, subtle vibratos, percussive taps,
hand-made LFOs, etc. Each of the four Shiings can be independently mapped to one or several parameters of your
plugins.
2.1.2. Slave and Standalone
You can use your Touché SE in Slave mode when using it with Lié,or as a Standalone.
•
Slave : Touché SE is connected to Lié. Touché SE behaves as specified in Lié.
•
Standalone : Touché SE is not connected to Lié. Touché SE behaves as specified in the internal
configuration (learn more in the MIDI Setup section).
2.1.3. Default Behaviour
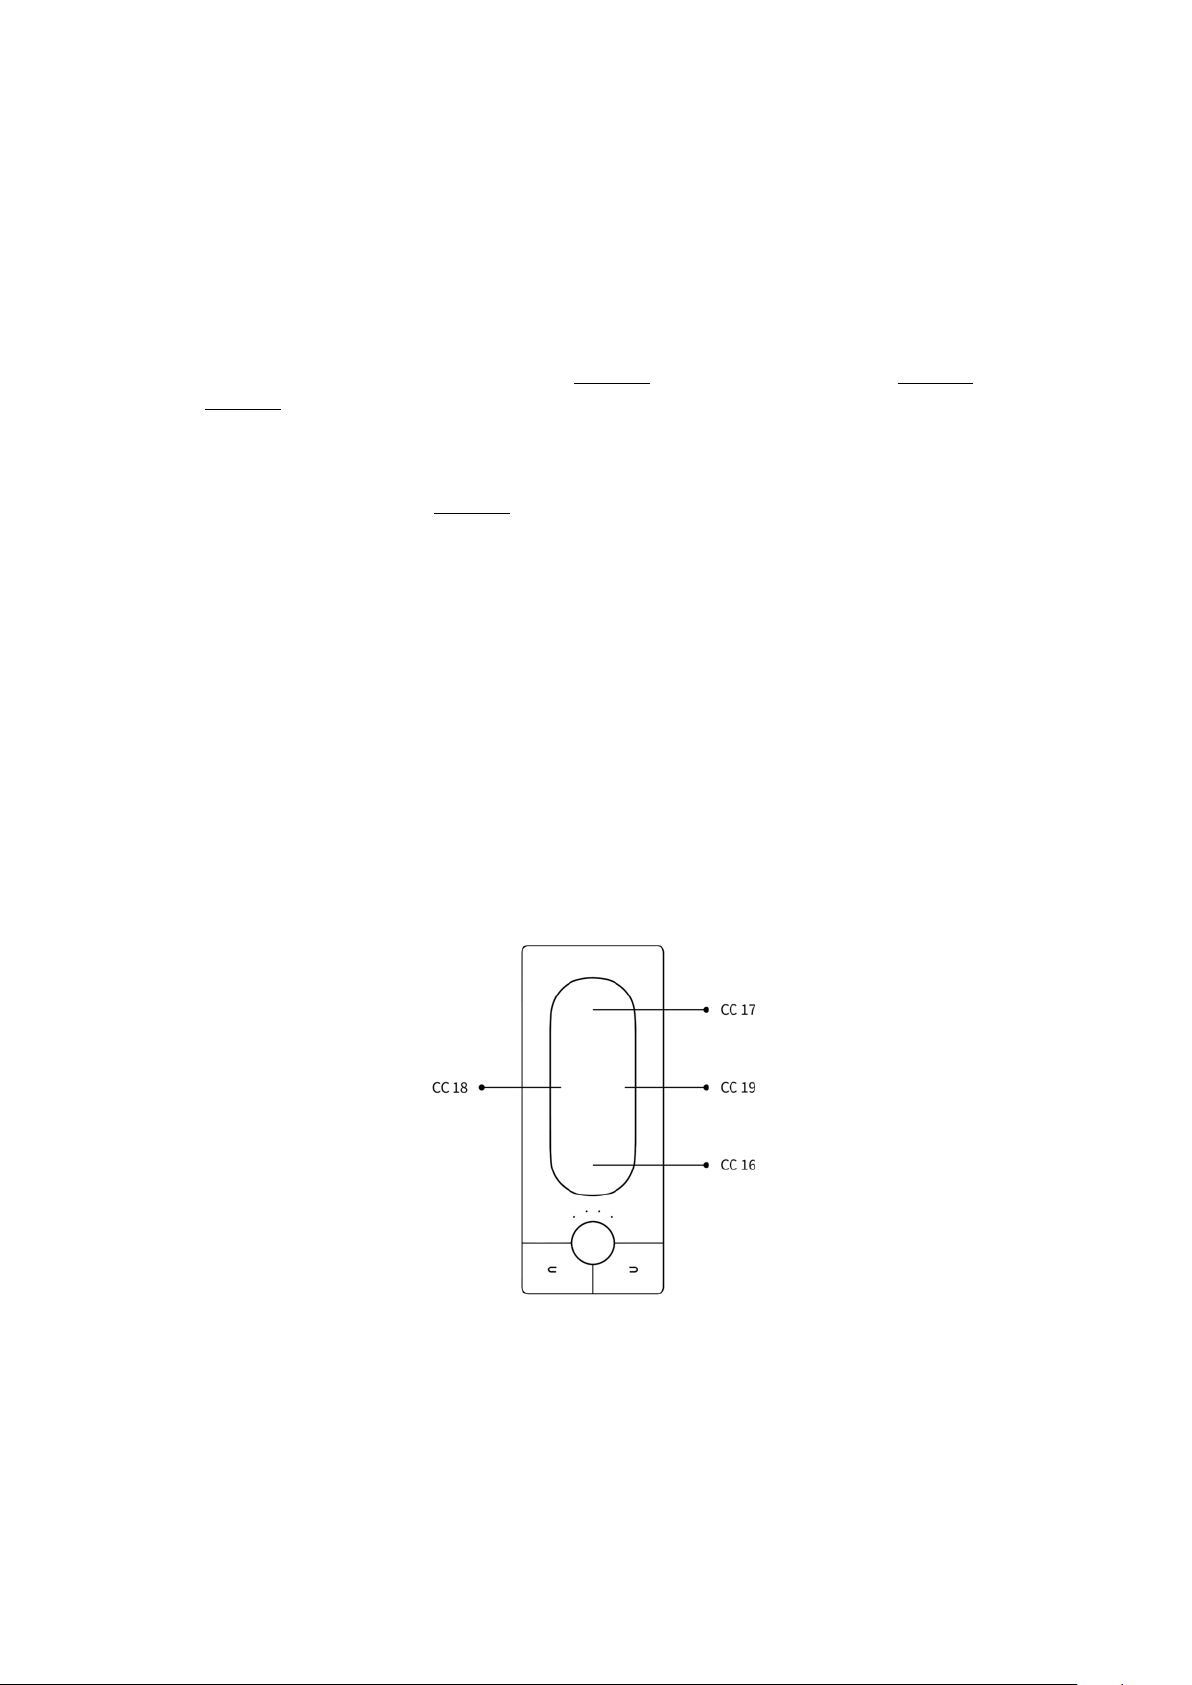
Aer the firmware update, all the slots of Touché SE’s internal memory are filled with the default preset :
Expressive E
Touché SE User Manual v.1
Page of 6 36
USB and MIDI
top shiing : CC17
bottom shiing : CC16
le shiing is CC18
right shiing is CC19
2.2. Mechanism
2.2.1. Concept
Touché SE reacts to the pressure and gestures you apply to the touch plate, which is called the Skin.
It possesses two pairs of complementary Shiings : Top and bottom / le and right.
Those need to be calibrated before you play, it is automatically done when you plug Touché SE. Plug your Touché SE
to your computer, and make sure that it is in a stable position (not moving, on a horizontal surface, and without
touching the Skin), because it will be calibrated from this position. In other words, the rest position will be
calibrated when you power Touché SE. This process is automatically done each time you power Touché SE, either
from a computer or from any other USB power source. You can also re-calibrate Touché SE by pressing the le and
right buttons simultaneously until the LEDs start blinking.
2.2.2. Shiings
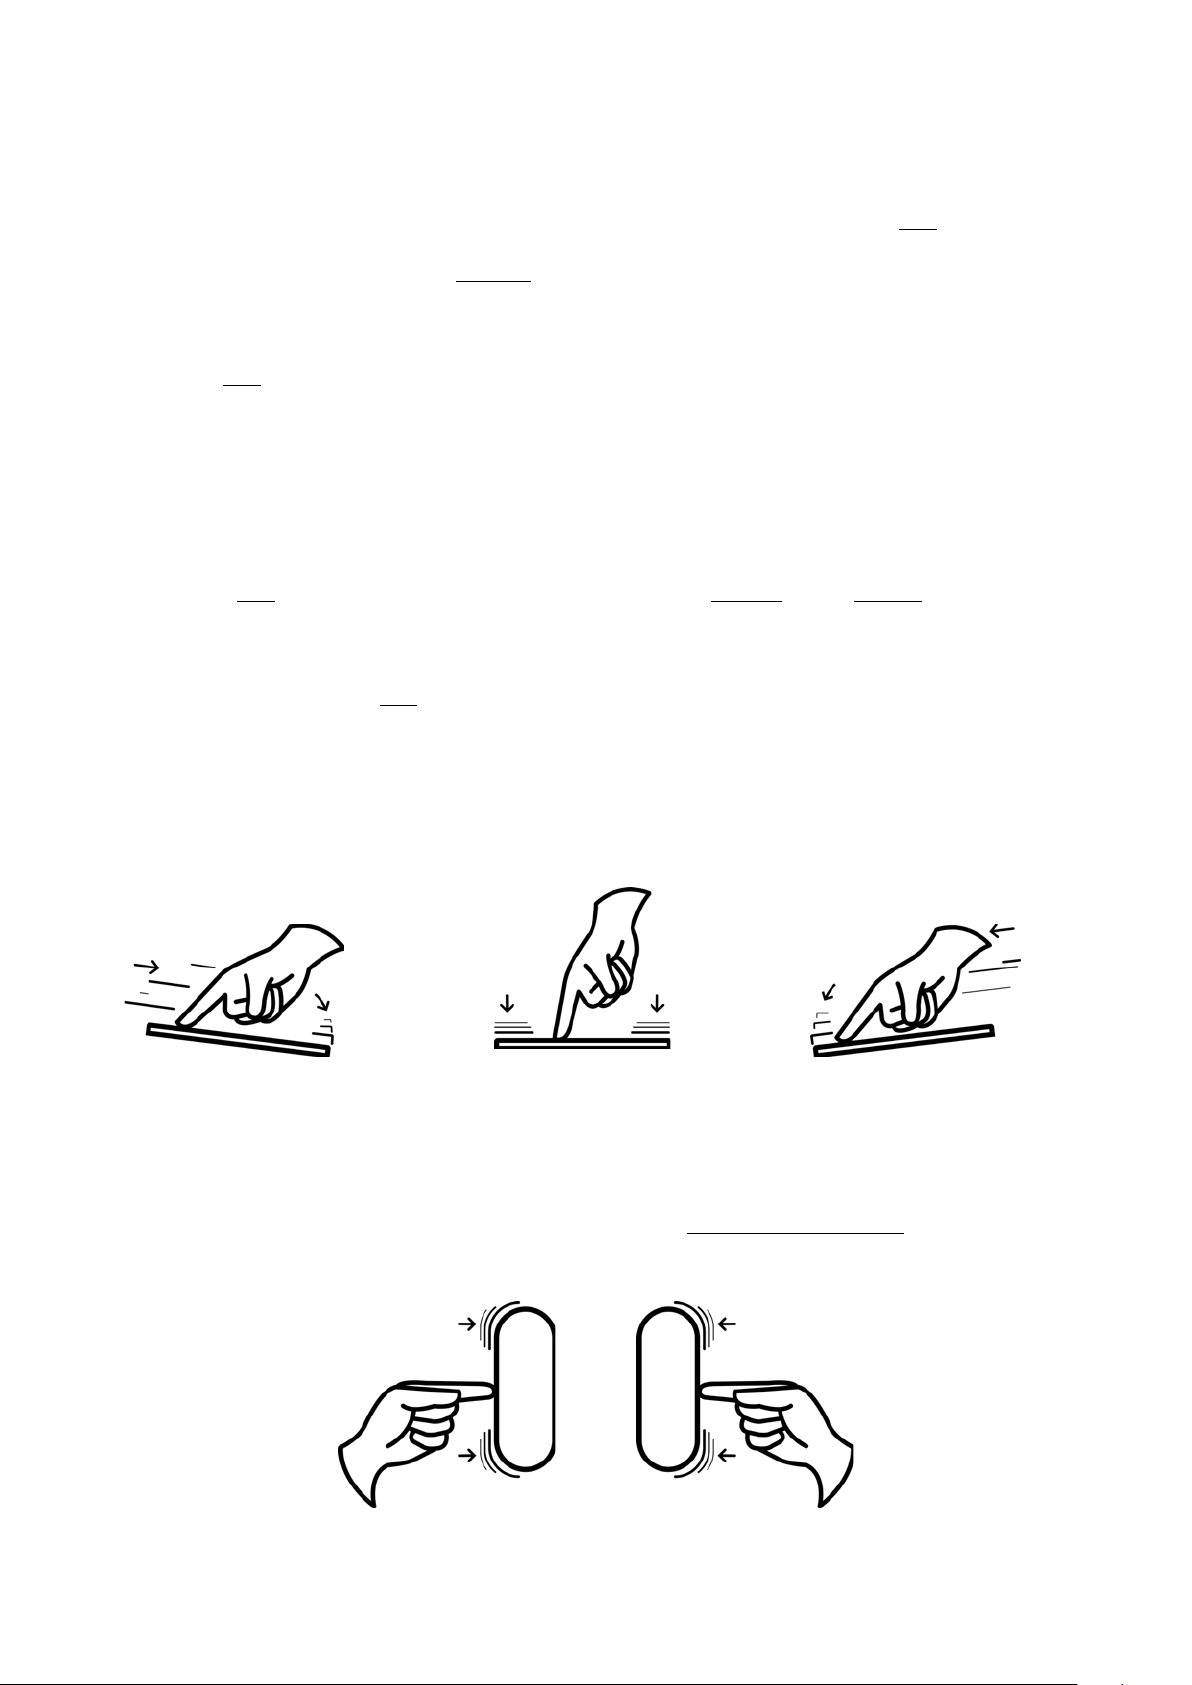
Top and bottom Shiings work with vertical pressure. You can play with the top or bottom Shiings by pressing on
one end of the Skin or the other (the "bottom" is the end close from the Encoder and the Buttons, the "top" is the
opposite). You can also play with both at the same time by pressing in the middle. Aer pressing , if you release all
pressure, it will naturally recover its equilibrium position.
Depending on which part of the Skin you apply pressure on, the pressure will be more or less distributed onto the
top or bottom Shiings thanks to a lever arm mechanism. It gives you a great precision and control over the
blending of both Shiings.
You can for instance slide from the top to the bottom Shiing in a smooth and progressive way, or quickly hit one
end in a more percussive style.
Le and right Shiings, on the other hand, work with a horizontal movement, sliding from one side to another. They
don’t blend together as with the top and bottom Shiings, which is very useful to control parameters as pitch for
instance, letting you do nice and subtle vibratos.!
!
You can change the sensitivity of the four Shiings (learn more in theAdjusting your sensitivity section).
Expressive E
Touché SE User Manual v.1
Page of 7 36
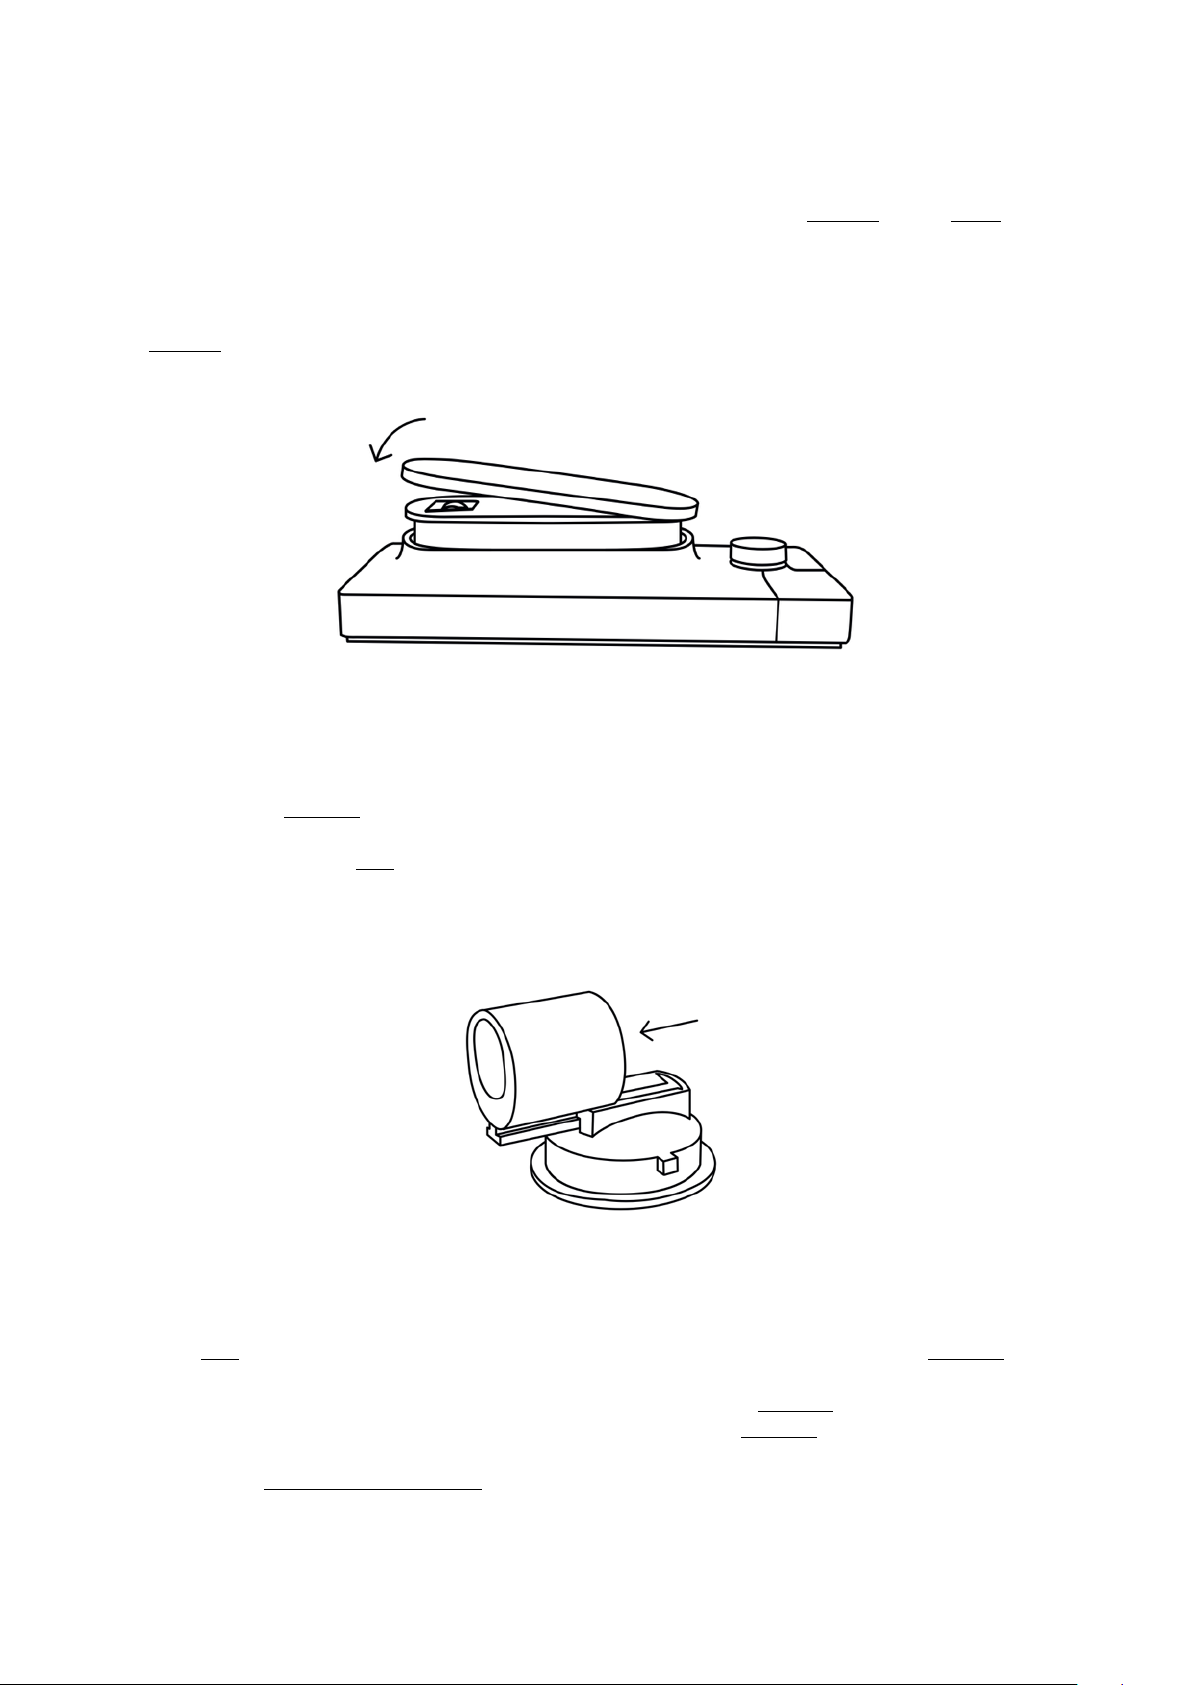
2.2.3. Skin
The touch plate at the top of Touché SE is conceived to give you a great, smooth instrumental touch. This skin is
magnetized in order to be removed and locked easily, making an easy access to the Cylinder and the Slider
underneath.
Be careful when replacing it, it must be put in the right position.
The Cylinder must face the two little plastic parts, otherwise the skin won't be properly magnetized.
2.2.4. Cylinders
The top and bottom Shiings use cylinders, which are responsible for Touché SE's pressure feedback.
One is located just under the Skin , another is underneath Touché SE, inside the little trapdoor.
Both cylinders can be removed from their support by releasing them from their rail. Do not try to take them off
directly by pulling them or you might irreversibly damage them.
2.2.5. Slider
Under the Skin, you will find a Slider which allows you to adjust the sensitivity of the le and right Shiings.
•
By placing the Slider on the bottom position, it will loosen the right and le Shiings.
•
By placing the Slider on the upper position, it will stiffen the right and le Shiings
Learn more in the Adjusting your sensitivity section.
Expressive E
Touché SE User Manual v.1
Page of 8 36

2.3. Controls
2.3.1. Buttons
In Slave mode, You can use the right and le buttons to navigate through Lié’s presets. Pressing le and right
buttons until the LEDs start blinking will re-calibrate Touché SE.
Moreover, in Slave mode, the Buttons send the following CCs :
•
Le : CC 80
•
Right : CC 81
2.3.2. Encoder
In both Slave and Standalone mode, the Encoder allows you to define Touché SE’s sensitivity. Turning it towards
the right will increase sensitivity, turning it to the le will decrease it. The Encoder has 8 sensitivity steps, and the
four LEDs will display the sensitivity steps whenever you turn the Encoder, by being incrementally lit from le to
right (Learn more in the Adjusting your sensitivity section).
The Encoder also gives you a special feature called “Freeze” : pushing the Encoder will freeze the data sent from the
four Shiings. Touché SE shows that it is freeze mode when its four LEDs are blinking. If you release your hand from
Touché SE while it is in Freeze mode, or press it in any way, it will maintain the controlled parameters at the frozen
value. Pushing again the Encoder will unfreeze Touché SE. In the same way, push the encoder for 2 seconds to put
Touché SE into standby mode. No LEDs will shine and you’ll just need to push one of the buttons to wake Touché SE
up again. Standby mode enables you to switch off your Touché SE without having to unplug it.
2.3.3. LEDs
LEDs gives you a visual feedback on different aspects :
•
White LEDs display sensitivity levels ; there are 8 different levels of sensitivity going from low (le) : one LED on
intermediate brightness, to high (right) : all LED on maximum brightness. Slave mode always displays sensitivity.
•
Orange LEDs display Touché SE sensitivity in Standalone mode.
•
Pink LEDs display the bootloader mode : Touché SE is installing or waiting for a new firmware.
•
Blinking light indicate that Touché SE is frozen : Pushing the Encoder will freeze the data sent from the four
Shiings. Pushing again the Encoder will unfreeze Touché SE.
•
Fast blinking white LEDs for a short period of time confirms the re-calibration of Touché SE.
•
No shinning LEDs (although Touché SE is connected to a power source) indicates that the Touché SE is in a
standby mode. You’ll just need to push one of the buttons to switch the Touché SE back on."
Expressive E
Touché SE User Manual v.1
Page of 9 36

2.4. Connectivity
2.4.1. Ports
USB
Touché SE is USB powered. You can power it by plugging it to a compute. 0.1A from your USB port is required to
power Touché SE.
In order to connect Touché SE, we recommend to use the USB cable supplied. You can use any suitable USB cable
but we strongly recommend to use short USB cables (less than 2 meters), labeled with an identification code that
ends with "24/2C", "24AWGX2C" or "AWG24X2C".
Expressive E
Touché SE User Manual v.1
Page of 10 36

3. Lié
3.1. Overview
3.1.1. What is Lié ?
Lié is a powerful soware with a simple design. Lié works hand in hand with Touché SE in a clear, simple workflow.
Lié is a host of plug-ins and is available in both VST and AU flavours, making it compatible with all major DAWs.
!
Lié has advanced features like sensitivity curves, speedmapping, min/max values, preset recalling, tags...
All of Lié’s provided soware presets were made in partnership with UVI Falcon, and are ready to be played within
UVI Workstation, included in Lié’s package.
3.1.2. System Requirements
Minimum required to run Lié :
•
Processor : MacOS : Intel Core i5 1.4Ghz (or equivalent) / Windows : Core Duo (or later)
•
RAM : MacOS : 4GB memory / Windows : 4GB
•
MacOS : macOS 10.10 or later / Windows : Windows 10 64-bit
Minimum required to UVI Workstation :
•
Processor : Intel Core i5 2.5Ghz (or equivalent)
•
RAM : 4GB memory (recommended: 8GB)
•
1GB hard drive space
3.1.3. Plug-in Formats
Lié is compatible with any DAW that supports VST or AU plug-in formats. Lié can then itself host any VST. To learn
how to host a VST with Lié, please refer to the Settings section.
For more informations about configuring Lié with your DAW, please refer to the DAW Setup section.
Expressive E
Touché SE User Manual v.1
Page of 11 36

3.2. Interface
Lié is divided into four main parts :
1.
Menu : Allows you to create and save presets, and access to Settings.
2.
Browser : Displays access your library of presets.
3.
Slot Center : Allows to link a parameter of your synth to a Shiing of Touché SE.
4.
Scope : Displays the pressure you’re applying on Touché SE. This area can also display the Sensitivity Curve
Editor.!
3.2.1. Menu
You can access the Menu by clicking on the icon. The Menu contains the following functions :
•
NEW PLUGIN PRESET : Opens an empty plug-in preset in order to use Lié
with your soware instruments.
•
SAVE PRESET : Saves changes of an existing preset. It will overwrite the current
preset file.
•
SAVE AS PRESET : Saves your current preset to a new file, which will be
displayed in the Browser.
•
LOAD PRESET : Lets you load a preset from the Finder.
•
MIDI SETUP : It allows you to change the unique internal Midi configuration for
standalone use.
•
SETTINGS : Opens Lié Settings.
Note : clicking on the icon button will give you informations about Lié’s and
Touché SE’s versions.
Expressive E
Touché SE User Manual v.1
Page of 12 36

3.2.2. Settings
You can access the Settings from the Menu. In the Settings window you can see five different sections :
•
Plugins : Displays the plug-in folder. This is the place where you scan your VST Plug-ins in order to use them in Lié.
To scan your VST Plug-ins, click on “Options” at the bottom of the “Available Plugins” window, then select “Scan
for new or updated VST plug-ins”. Your VST Plug-ins will be scanned with the specified default folder. You can
choose a custom folder by clicking on the icon. Scanning may take a few moments. Once it’s finished, “Plug-in
Folder” window will display the list of your Plug-ins in black. If some of your Plug-ins are listed in red, they may
have a compatibility issue with Lié : You can try to use “Force-scan” in “Options”; However this procedure may
cause instability issues with your DAW.
•
Preset - Open the preset folder : Displays the preset folder in the Finder. Presets available in the Browser are
saved in this folder.
•
Preset - Refresh the preset list : Updates Lié’s Browser. Updating the Browser is useful when you make changes
in the Preset Folder whilst Lié is still open.
Expressive E
Touché SE User Manual v.1
Page of 13 36

•
Copy the logfiles to the desktop : Creates a system report file when you click on “Get Logger file”. The file will be
created on the desktop, named “expressiveeLogfile.zip”. It is an useful file to join if you report a bug.
•
Install Firmware : Click on “Install firmware” to start the update. Do not unplug Touché SE or quit Lié while the
firmware is updated. This operation may take a few moment. While the firmware is updated, Touché SE’s LEDs are
pink, meaning that Touché SE is in bootloader mode. If the firmware’s update fails, Touché SE will stay in this
mode, waiting for a new firmware. You can force Touché SE to switch to bootloader mode by pressing both
Buttons and the Encoder at the same time when plugging Touché SE. If you’re using a DAW within Windows and
you try to perform a firmware update, it is possible that Lié sends you a message saying you have to disable the
MIDI inputs of Touché SE within your DAW MIDI settings. This is because your DAW is blocking the MIDI connection
which needs to be used exclusively by Lié in order to perform the update. To solve this issue, please head to the
preference menu of your DAW, choose the MIDI section and deactivate the inputs & outputs named
“TOUCHE_BOOTLOADER”.
•
Disable check about preset modification : disable the pop-up window which appears when you change a
modified preset without saving it."
Expressive E
Touché SE User Manual v.1
Page of 14 36

3.2.3. Browser
1. Preset List
All the presets from your Preset folder are visible on this preset list. By default, they are sorted by alphabetical
order. Clicking on “NAME” on the top of the list will rank them either by increasing or decreasing alphabetical order.
Right clicking on any of the presets in the list shows the option to rename it or delete it.
2. Filters & Tags
A system of filters and tags is available to easily browse between presets.
•
INSTRUMENT : This filter allows you to refine your search by selecting one or more instrument. For example,
selecting Diva and UVI Workstation will show all the presets created with Diva and UVI Workstation.
•
TAG : Tags allow you to find presets by types of sound. If you select several tags, only the presets which contains
all the tags will appear in the preset list . For example, when the first two tags from the list are selected (BASS and
BRASS), only presets which are tagged with both BASS and BRASS will be displayed. You can assign tags to your
presets to find them easily. To assign a tag, select a preset (you don’t have to load it), open the list of tags by
clicking on “ALL”, and then on “EDIT”. Now you can choose all the Tags you wish to assign to the selected preset.
Click on "SAVE" when you’re done, and your preset will be edited."
Expressive E
Touché SE User Manual v.1
Page of 15 36
2
1

3.2.4. Slot Center
In this area, you can control all the parameters of your instrument, by assigning Shiings and designing curves.
Slots
1.
Parameter Selection : A drop-down list above each slot makes it possible to choose the parameter you want to
attribute to this slot.
2.
Shiing Selection : To select a Shiing, click on its position on the slot. When selected, the shiing is displayed
in colour. You have 4 different Shiings, and you can have le and right at the same time.
3.
Min & Max : When a parameter is assigned to a slot, a grey slider appear, which controls the parameter value.
When a Shiing is selected, the original position of the parameter is shown by a colour arrow. Furthermore, two
sliders appear : They allow you to modify the min and max values of the parameter controlled by Touché SE.
4.
Curves : Click on this button to display the Sensitivity Curve for the chosen Slot. Click on the displayed curve to
open the Sensitivity Curve Editor. If the curve on the slot isn’t the default linear curve, the icon button is
displayed in colour. Learn more in the Sensitivity Curve Editor section."
Expressive E
Touché SE User Manual v.1
Page of 16 36

Toolbar
1.
Instrument View : Displays the interface of the hosted plug-in.
2.
Random : Sets random assignations for each Slot. If you wish to keep the current assignations, please save your
configuration as a preset before proceeding.
3.
Flip Curves : Shows sensitivity curves for all 8 Slots.
4.
Autoset : Allows the automatic adjustment of the values of the min/max sliders, according to the current value
of the parameters from the hosted plug-in. Activating this option lets you browse through the presets from the
hosted plug-in without manually adjusting the min/max of the assigned parameters, in order to keep the
default sound from the preset.
5.
Clear : Resets all curves and assignations. If you wish to keep the current settings, please save your
configuration as a preset before proceeding.
3.2.5. Plug-In Preset Specificities
1. Instrument Selection
Click on the drop down list at the top right of the Slot Center to display the list of your scanned plug-ins. Then, click
on the name of a plug-in to load it. You must scan your plug-in before selecting an instrument. Learn more about
plug-in scanning in the Settings section.
2. Parameter Selection
The parameters you can choose depends on those accessible in the plug-in selected. When a preset is empty, no
parameter is selected and “NONE” is displayed. Click on the "NONE" to display the list of the available parameters
in a drop-down list. Some plug-ins may have non-explicit names for their parameters. "
Expressive E
Touché SE User Manual v.1
Page of 17 36
1
2
3

3. Instrument View
You can also select parameters by opening your plug-in interface. For that you need to click on the button.
Above your plug-in interface, you can see 8 numbers.
Each number corresponds to a Slot. Click on a number then move one of the parameters from your plug-in (a knob,
a slider …). The chosen parameter is now mapped to the corresponding Slot, as indicated by the new colour line
surrounding the number.
To go faster, you can use the speedmapping : clicking on it allows you to directly select 8 parameters from your
plug-in interface, and link them -in the order you selected them- to each Slot.
You can un-map any parameter by clicking on the colour circle.
3.2.7. MIDI Setup
The MIDI Setup allows you to assign MIDI messages to Touché SE shiings when you use Touché SE without Lié.
Click on “MIDI Setup” button in the Menu to open it.
For each slot you can assign a sensor of Touché SE to a specific CC message by selected it from the drop-down list
above each slots. Like in a soware preset, you will be able to access shiing selection, min/max and curves.
In this panel, you can also select the MIDI channel output of Touché SE for this configuration in standalone mode.
When you’re glad of your configuration, click on SAVE SETUP to save it in the device.
When you open the MIDI SETUP, the panel display the actual configuration of your Touché SE."
Expressive E
Touché SE User Manual v.1
Page of 18 36

3.2.8. Scope
The Scope is a visual display of Touché SE’s Shiings. Whenever you press on Touché SE, the Scope will display the
amount of force you’re applying. You can also monitor useful things like the influence of different sensitivity levels.
The scope can also be hidden in favour of the Sensitivity Curve Editor.
!
Pitch Bend Button
When the pitchbend button is on, the le and right Shiings control the pitch parameter : A movement to the right
will increase the pitch, and a movement to the le will decrease it.
The pitchbend range depends of the hosted plug-in.
To deactivate the pitch bend button, simply click on it again.
Expressive E
Touché SE User Manual v.1
Page of 19 36

3.2.9. Sensitivity Curve Editor
You can access the Sensitivity Curve Editor by clicking on the little curve icon just below each Slot, and then clicking
on the curve displayed..
The Sensitivity Curve Editor lets you change Touché SE’s sensitivity by changing each Slot’s sensitivity curve. This
curve show you how the parameter will vary depending on your movement.
The horizontal axis represents the amount of pressure you apply, and the vertical axis the parameter value output. A
dot will move, showing you at which point of the curve you are. In other words, the more you press, the more the
dot will go to the right, following the colour line.
1.
Drop-down list : Displays a selection of pre-defined curves.
2.
Bending : Allows you to switch from a linear formula to an exponential or logarithmic formula.
3.
Hand-Draw : allows you to draw a curve directly by hand
4.
Min/Max : Lets you fine tune the minimum and maximum values.
5.
Flip Curve : Inverts the curve, thus inverting the parameter’s response to the Shiings.
6.
Clicking on this icon will hide the Sensitivity Curve Editor in favour of the Scope.
Expressive E
Touché SE User Manual v.1
Page of 20 36

4. Workflow
4.1. DAW Setup
4.1.1. Ableton Live
To use Lié within Ableton Live, you must load Lié on a new MIDI Track. Make sure that your track is armed, and set
the MIDI IN of your Track to "All MIDI Input". You can now play with Touché SE and Lié.
If Touché SE is not communicating with Lié, check that your track is armed, and make sure that the audio engine is
on. If not, choose an audio device from Live's audio Preferences. (Live > Preferences > Audio). You can also check
that the “Track” MIDI input of Touché SE is "On" (Live > Preferences > Link/MIDI).
If you can't find Lié in your Plug-in list, make sure that you have set the right plug-in path in Live’s preferences (Click
on Live > Preferences > File/Folder)
Expressive E
Touché SE User Manual v.1
Page of 21 36

4.1.2. Logic Pro
To use Lié in Logic Pro, you must load Lié on a new MIDI Track. Make sure your track is armed and the MIDI IN of
your Track is on "All MIDI Input". You can now play with Touché SE and Lié.
If you can't find Lié in your Plug-ins, make sure Lié is activated (click on Preferences > Audio Unit Manager)"
Expressive E
Touché SE User Manual v.1
Page of 22 36

4.1.3. Cubase
To load Lié in Cubase , you must add a new MIDI track or click on the instrument selection from an existing track.
Choose the synth part layer and select Lié.
Make sure that your track is armed and that the MIDI IN of your Track is on "All MIDI Input".
Expressive E
Touché SE User Manual v.1
Page of 23 36

If you can't find Lié in the instrument selection, make sure Cubase has the right plug-in path ( Devices > Plug-in
Manager > VST Instruments > Settings ).
If Touché SE is not communicating with Lié, check that your track is armed, and make sure that the MIDI IN of
Touché SE is active in Device > Device Setup > MIDI > MIDI Port Setup."
Expressive E
Touché SE User Manual v.1
Page of 24 36

4.1.4. Presonus Studio One
First, add Touché SE as a new midi device. To do this, go to Preferences>External Devices>Add.Select “New
Keyboard”, then select TOUCHE for “Receive From” and “Send To”.
Then, load Lié on a new Instrument Track. Make sure your track is armed and the MIDI IN of your Track is on "All MIDI
Input". You can now play with Touché SE and Lié.
Expressive E
Touché SE User Manual v.1
Page of 25 36

4.1.5. GarageBand
To open Lié in GarageBand, click on SmartControl (1), then on Inspector (2) and select Lié in AU Instruments
4.1.6. Fruity Loop
Scan Plugin to find Lié
Options > Manage Plugin. Select your Plugin Path and "Start Scan".
Expressive E
Touché SE User Manual v.1
Page of 26 36

Enable Touché SE as MIDI Device
Options > MIDI Settings. Clic on "Enable" for Touché SE input and select a Port.
Loading Lié
Load Lié on a track and clic on "VST wrapper settings" (gearing and speakers icon)
"
Now select the same MIDI Input Port as Touché SE.
Expressive E
Touché SE User Manual v.1
Page of 27 36

4.1.7. Reaper
First of all, in Reaper’s préférences, check that the MIDI input of Touché is enable for control messages.
Insert virtual instrument on new track, make sure that your track is armed, and set the MIDI IN of your Track to "All
MIDI Input».
Expressive E
Touché SE User Manual v.1
Page of 28 36

4.1.8. Bitwig Studio
To use Lié within Bitwig Studio, you must load Lié on a new MIDI Track.
If Touché is not communicating with Lié, check that your track is armed, and make sure that the audio engine is on.
If you can't find Lié in your Plug-in list, make sure that you have set the right plug-in path in Bitwig’s preferences
(Click on File > Settings > File/Folder).
Expressive E
Touché SE User Manual v.1
Page of 29 36

Expressive E
Touché SE User Manual v.1
Page of 30 36

4.2. Creating a new Plugin preset
1.
Click on “NEW PLUGIN PRESET” in the Menu
2.
Select your Plugin
Expressive E
Touché SE User Manual v.1
Page of 31 36

3.
For one or several of the 8 Slots, choose the parameter you wish to control either by selecting it in the dropdown list above the chosen Slot.
4.
Or by clicking on the Instrument View in the Toolbar to use our mapping features
5.
Assign the chosen parameter to one of the four Shiings for each Slot you wish to use."
Expressive E
Touché SE User Manual v.1
Page of 32 36

6.
Play with your newly created preset, and adjust the min/max values and curve of each Slot if needed.
Once you’re happy with your sound, you can save your new preset by clicking on “SAVE AS PRESET” in the Menu.
Once you’re glad of your sound, you can save your new preset by clicking on “SAVE AS PRESET” in the Menu.
Expressive E
Touché SE User Manual v.1
Page of 33 36

4.5. Adjusting your sensitivity
Lié and Touché SE offer several ways to adjust the sensitivity of Touché SE. Note that the sensitivity of Touché SE
can be affected by how it is calibrated. Touché Self-calibrates each time you power it with its USB cable (learn more
in the Concept section).
4.5.1. By Parameter
You can adjust Touché SE’s sensitivity by changing each Slot’s curve (see Sensitivity Curve Editor). This allows you
to have different sensitivity responses for different parameters, and build really complex and organic sounds, with
layers triggering at different pressure thresholds.
4.5.2. For the Top and Bottom Shiings
You can adjust the sensibility level of top and bottom Shiings by turning the Encoder.
Increasing sensitivity will decrease the amount of pressure needed to reach the Shiing’s peak value : with a higher
level of sensitivity, you will need a smaller depth to reach the maximum of the Shiing. At maximum sensitivity, a
slight push (only a few millimetres) is enough to reach the maximum value of the Shiing, whereas at minimum
sensitivity it requires a strongest push for the same effect. A high sensitivity is oen suitable for percussive playing,
while progressive and precise movements which demands more control may need a lower sensitivity level.
4.5.3. For the Le and Right Shiings
Changing the Slider position will change the stiffness of le and right Shiings. By placing the Slider on the bottom
position, it will loosen the right and le Shiings and thus increase sensitivity. By placing the Slider on the upper
position, it will stiffen the right and le Shiings and thus increase control and precision.
Expressive E
Touché SE User Manual v.1
Page of 34 36

5. Troubleshooting
5.1. Touché SE behavior
5.1.1. My Touché SE does not turn on when I plug it.
You can force Touché to switch to bootloader mode by pressing both buttons and the encoder at the same time
when plugging Touché. If Touché SE switches to bootloader mode, LEDs should turn pink. You’re now able to reupload the firmware with Lié.
5.1.2. My Touché SE does not seem to go back to zero when I do not
press.
If your Touché SE does not return to zero but continues to send values although you are not touching it, please
press and hold the two buttons of your Touché SE for two seconds while the unit is in a neutral position and placed
on an even surface. You will see the LEDs flashing, indicating your unit is recalibrated.
5.1.3. I hear a background noise in my speakers when I use my Touché
SE.
If you hear some noise/hum from your speakers when you have Touché SE connected, you probably experience a
ground loop issue. A ground loop is an unwanted background noise or hum that can arise when one connects
different devices together with different power supplies. If you experience this kind of problem, we recommend to
use the anti-ground loop adapter supplied. Connect the anti-ground loop adapter to Touché SE as follows :
Plug the longest segment of the two male connectors to an electrical outlet and the shortest segment to your
computer, then plug the female connector to Touché SE’s standard coat USB Cable.
5.1. Lié behavior
5.2.1. With Lié standalone, Lié does not recognize my Touché SE.
If you open the standalone version of Lié and your Touché SE does not seem to be recognized by Lié, open the
Options page, and then check Touché SE in the MIDI inputs.
5.2.2. On Windows, Lié opens an error message on opening.
When using Lié as a plugin within your DAW, you might get shown a message, warning you about a conflict between
Lié and the DAW regarding the MIDI inputs. To solve this problem, head to the MIDI preferences of your DAW and
disable the inputs of "TOUCHE" as well as "TOUCHE_BOOTLOADER". You could also just close your DAW and
perform the firmware update within the standalone version of Lié.
Expressive E
Touché SE User Manual v.1
Page of 35 36

5.2.3. I can not update the firmware of my Touché SE.
If you encounter problems during the firmware update, please check that your Touché SE is not connected via a
USB hub or any other USB interface. Your Touché SE must be connected directly to your computer with the USB
cable provided with the Touché SE.
If the firmware update does not start, or if your Touché SE remains in standalone mode, do not hesitate to force the
unit into bootloader mode (refer to section 5.1.1).
In general, for any questions, you can refer to the "help" tab of the ExpressiveE website at www.expressivee.com .
Expressive E
Touché SE User Manual v.1
Page of 36 36
 Loading...