


osmose - quick start guide
introduction
Congratulations and thank you for purchasing OSMOSE!
Osmose is one of the most expressive synthesizers ever created. It is a complete
standalone polyphonic synthesizer featuring our patented Augmented Keyboard Action
mechanism, where the keybed responds polyphonically to pressure, aftertouch, and
note bend.
It features the EaganMatrix by Haken Audio, a deep modular sound design engine,
giving access to incredible sounds ready to explore right out of the box. On top of this,
Osmose can also be used as an advanced controller for external hardware and
software synthesizers.
By default, Osmose is very sensitive, the lightest touch can control the sound. You can
decrease this huge sensitivity, but we encourage you to discover this new approach to
enrich your playing experience with a multitude of new nuances!
disclaimer
Osmose is a constantly evolving product, so the information contained in this quick
start guide is subject to change without notice and does not represent a commitment
on the part of Expressive E.
Osmose QuickStartGuide v1.0 | published Dec 23, 2022 | firmware version 1.0
© Expressive SAS, 104 Avenue de la Résistance, 93100 Montreuil

before you start
box content
● 1x Osmose expressive synthesizer
● 1x printed Quick Start Guide
● 1x product safety manual. Please read it before using Osmose.
● 1x USB cable
● 1x power supply with international adapters
lockable power supply connector
⚠
Osmose’s power supply has a locking connector to prevent accidental
disconnection. When inserting, first align the power connector’s wings so they
match the horizontal notches on the power input. Push firmly, then rotate the
barrel clockwise to secure it to the casing.
keyboard calibration
The rest position of Osmose’s keys is calibrated while the unit is booting. Please make
sure nothing is touching the keys during this step.
register your device
Please enter the activation code from the printed leaflet that came with your unit on the
product registration page of your user account.
firmware update
We recommend that you always install the latest firmware available on your device.
The current firmware can be downloaded from our website after registering your
product. The procedure is explained here.
quick start video
Watch Osmose’s quick start video for an overview of the internal sound engine mode.
online manual
If you need more in-depth information than what is offered in this guide, please refer to
Osmose’s online user manual.
technical support
If you need assistance or just want to share your feedback with us, please get in touch
by creating a support ticket here.

main control interface
The left side of Osmose is built around an interactive graphic interface that provides
access to all onboard parameters. The navigation works via five buttons and six
clickable encoders whose functions change depending on the current screen.
1. MODE Button - allows switching between Sound Engine mode and External MIDI
mode.
2. MENU Buttons - access one of the four menus of a mode.
3. TAB Selector - scrolls through the tabs of a menu. When in Sensitivity or Playing
menu, pressing the Tab Selector freezes the settings of the menu to retain them
even when switching presets.
4. PARAMETER Selector - scrolls through parameters inside a tab. When in Playing
menu, pressing the Parameter Selector starts or pauses the Arpeggiator or
switches Pressure Glide on and off.
5. VALUE Encoders 1-4 - change the value of the parameter displayed above or
scroll through a list of options. Pressing a Value Encoder might perform another
special operation depending on the context.

mode selection screen
Press the Mode button, then turn and press Value Encoder 1 to switch between
controlling the internal Haken Audio EaganMatrix sound engine and configuring the
behavior of the External MIDI mode.
A symbol in the upper left corner will indicate the currently selected mode at all times:
global settings
Pressing Value Encoder 4 while in Mode Selection screen opens the global settings of
Osmose. They allow you to change the global tuning, calibrate pedals, display the
firmware versions, change the screen brightness, etc.

sound engine mode
presets menu
The Presets menu allows you to browse the sounds of the internal EaganMatrix sound
engine and save user presets.
factory tab : access the factory library
user tab : access the user presets
save tab : save your current preset into the user preset memory
The currently loaded sound is highlighted in green color. If a playing feature is
activated, a press glide or arp icon appears on the left side of the screen. Value
Encoder 4 scrolls through the preset list. You’ll need to click the encoder to actually load
a sound.
You can narrow down the preset list by selecting a type and character. Turning Value
Encoder 1 or 2 lets you scroll through a list of filters. Click the encoder to activate a filter.

synth menu
The Synth menu allows you to adjust the sound of each selected preset individually. It
also lets you change the behavior of the sliders and pedals for that sound.
macros tab : tweak predefined macros for subtle to drastic changes to the
sound. Macros are chosen by our sound designers on a per-preset basis and
have entirely different effects depending on the preset.
global fx tab : select the preset’s global reverb or delay effect and adjust its
parameters
eq tab : access a shelving equalizer to change the frequency balance between
lows and highs
comp & gain tab : configure the pre-gain, the compressor settings, and the post
gain
voice tab : set the pitch slider range
assign tab : define the parameters controlled by the modulation slider and the
pedals.
⚠
The ‘Analog Echo’ effect within the global fx tab is able to produce very loud
feedback when its ‘feedback’ parameter is increased above a value of 75. Be ready to
lower the volume when experimenting with this effect.
ℹ
If you wish to save the changes you have made, use the save tab inside the presets
menu.

sensitivity menu
The Sensitivity Menu allows the user to change the response of the Augmented
Keyboard Action.
bending tab : change the response of the lateral movement on each key, incl.
the pitch bend range and the amount of stabilization.
pressure tab : change the response of the first part of the key travel. ‘note on’
determines the position where a key actually triggers a note.
aftertouch tab : change the response of the second part of the key travel.
For each of the three axis motions, Value Encoder 1 allows to quickly choose between a
set of predefined responses that affect all parameters of a tab.
default sensitivity tab : lets you save the current sensitivity setting as the default
setting. Once saved, the setting will be used for all factory sounds and for all user
presets that don’t have a specific sensitivity setting saved with them.
❄
Freeze Sensitivity function:
Pressing the Tab Selector in Sensitivity Menu switches the Sensitivity Freeze on and off.
When Freeze is enabled, the current sensitivity settings will be kept across preset
changes, no matter the default sensitivity and no matter whether there is a custom
sensitivity saved in a user preset.

playing menu
The Playing menu gives access to advanced features that interpret your playing in
intelligent ways, enhancing your experience even further. Turn Value Encoder 1 to
choose either Pressure Glide, the Arpeggiator, or no playing feature at all.
❄
Freeze Playing function:
Pressing the Tab Selector in Playing Menu switches the Playing Freeze on and off. When
Freeze is enabled, the current playing settings will be kept across preset changes, no
matter what is saved in the preset you dial up.
pressure glide
The pressure glide feature lets you define a pitch interval within which two keypresses
are interpreted as a legato line instead of polyphonic playing.
Unlike regular portamento which makes the pitch glide to a new note within a fixed
amount of portamento time, Haken Audio’s Pressure-weighted Portamento reacts to
the pressure ratio between the two notes. The pitch will dynamically glide between the
notes in real-time, reacting to how you distribute pressure between them.
ℹ
Important note when intending to play chords:
Two notes pressed simultaneously within the interval that you have set will always be
joined into one pitch. For instance, with a pressure glide interval of 2 semitones, you can
play chords with stacked thirds or wider voicings, but as soon as you play seconds, you
will end up with one note with an averaged pitch instead of two discrete notes.
Activate or deactivate Pressure Glide with a click on the Parameter Selector.
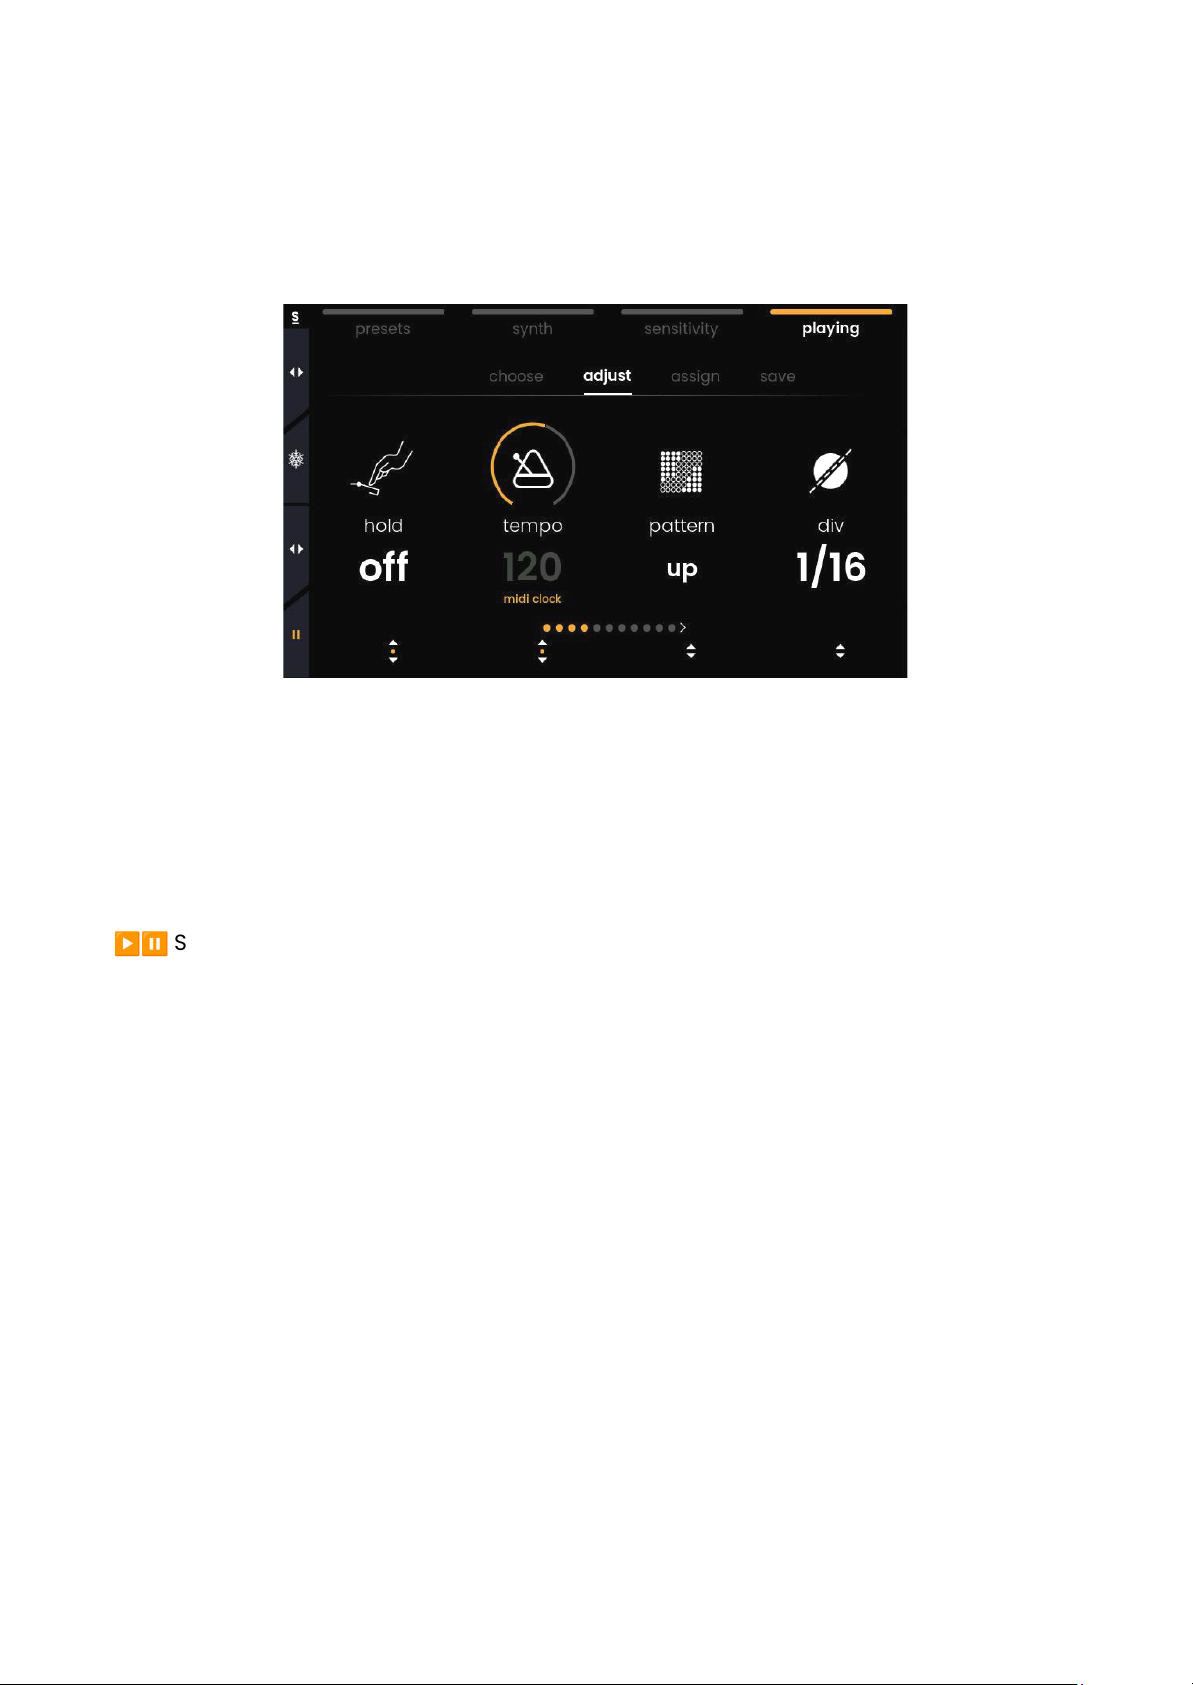
arpeggiator
Our MPE Arpeggiator has the classic parameters that you would expect, but on top of
that, your gestures can introduce a myriad of variations to your pattern by modulating
every single note independently with your fingertips.
choose tab : load an arpeggiator preset
adjust tab : set the arpeggiator parameters. Click the Value Encoder below
Tempo to switch between internal and external MIDI clock.
assign tab : let gestures and controllers modulate arpeggiator parameters
save tab : save the current arp settings as an arp preset
▶⏸
Start or pause the Arpeggiator with a click on the Parameter Selector.

external midi mode
introduction
In addition to being a standalone synthesizer, Osmose can act as an expressive MIDI
controller. All functions of the External MIDI mode work independently and in parallel to
what is set up for the internal sound engine.
Please be aware that some synthesizers and DAWs might not support the new kind of
interactions that Osmose offers, or only support them to a certain extent.
connect osmose to your computer
When you connect Osmose to your computer, two USB MIDI ports will appear:
external midi port
‘Osmose Play/Port 1’ [macOS] or ‘Osmose’ [Windows]
Sends data according to the configuration chosen in External MIDI Mode (MPE by
default). Use this port to control any external synth.
haken audio port
‘Osmose Haken/Port 2’ [macOS] or ‘MIDIIN2/MIDIOUT2 (Osmose)’ [Windows]
Sends data of the internal synth engine in MPE+ format. Use this port to make the
connection with the Haken Editor and to record performances using the internal engine
in an external sequencer to replay or edit them.
By default, Osmose doesn’t send any data on the Haken Audio port. This avoids
⚠
receiving every message twice in applications that activate all recognized MIDI ports
by default. You can activate the Haken Audio port in the Global Settings -> midi i/o ->
haken usb mode.

a word on mpe
Osmose is part of a family of MIDI Polyphonic Expression (MPE) instruments and
controllers that strive to tear down the expressive restrictions of common electronic
instruments. When starting to control external instruments from Osmose, it’s useful to
understand the way legacy MIDI communication is set up and how the MPE extension
builds upon this.
In a classic MIDI environment, all MIDI messages that belong to a sound are sent on one
single MIDI channel. Any modulations (such as pitch bend or changes in timbre) are
sent per channel and thus affect all notes of that sound in the exact same way. If other
MIDI channels are used, then this is commonly done to address a separate instrument
or track of a multitimbral sound engine, e.g. in a hardware workstation or in your DAW.
MPE is an official extension to the MIDI standard where multiple MIDI channels are used
to control the same sound. One channel is retained for global messages (master
channel), but every single note that is played is granted its own MIDI channel. This way,
per-channel modulation can be applied to each note individually, giving you much
more control over your polyphonic performance.
backwards compatibility
Even if the external software or hardware instrument that you hook up to Osmose
doesn’t support MPE, you can still intuitively shape their sound directly via the keys of
Osmose’s Augmented Keyboard Action. Pressure and Aftertouch motion axes can
continuously control any parameter inside the synth on a global basis. Bending can
perform a pitch bend of all the notes you play as a whole.
In a non-MPE context, this global value of a motion axis will affect all the notes you play
in the same manner, just as if you would move a knob or a fader on a standard MIDI
controller. Osmose lets you define whether the global value sent by a motion axis is
calculated as an average of the individual values of all keys pressed, or whether it is
derived from the pressure or bending you apply to a specific single key (highest note,
most pressed down, etc.).
ℹ
Monophonic lines on external synths can always be played very expressively from
Osmose. For monophonic sounds, there’s always one dedicated channel per voice,
even in a legacy monochannel setup.

config menu
The Config menu gives you access to 4 standard configurations that help match the
messages sent by Osmose with what is supported by your external synthesizers. Those
configurations also contain a dedicated sensitivity setting.
mpe
is the default for controlling MPE-compatible software and hardware. Sends MIDI
messages across all 16 MIDI channels according to the MIDI Polyphonic Expression
standard.
classic keyboard
is the best choice for full backwards compatibility. It sends mono-channel MIDI
messages like a legacy MIDI keyboard would do. The ‘Note On’ threshold is moved down
further along the key travel to mimic traditional keyboard actions.
poly aftertouch
is perfect for software and hardware that offers polyphonic aftertouch. It behaves just
like the Classic Keyboard configuration, but sends Polyphonic Aftertouch instead of
Channel Pressure for the Aftertouch axis motion.
multi-channel
is useful for imitating the advantages of MPE with non-compatible software and
hardware. It behaves just like the MPE configuration, where one MIDI channel is used to
transmit one voice each, but lacks a channel for global messages.
ℹ
External MIDI configurations can be fine-tuned via the Adjust and Sensitivity menus.

adjust menu
The Adjust menu lets you determine the MIDI channel(s) used, as well as which MIDI
message is sent by which key axis motion or controller.
gestures tab : set what is sent by the pressure and aftertouch axes
controllers tab : set what is sent by the mod slider and the two pedals
mode tab : choose the MIDI configuration and MIDI channel(s) used
sensitivity menu
In External MIDI mode, the velocity/press tab features additional velocity parameters.
Internally, Osmose doesn’t use MIDI Velocity at all, but for controlling external devices,
MIDI Velocity is derived from the Pressure axis motion.
ℹ
The bending range inside the bending tab isn’t shown as a number of semitones but
as a fraction. It works together with the maximum bending range that can only ever be
set inside the external software or hardware that you control.
 Loading...