

Page 1
High fidelity engineering
1 Installation
4 Operation
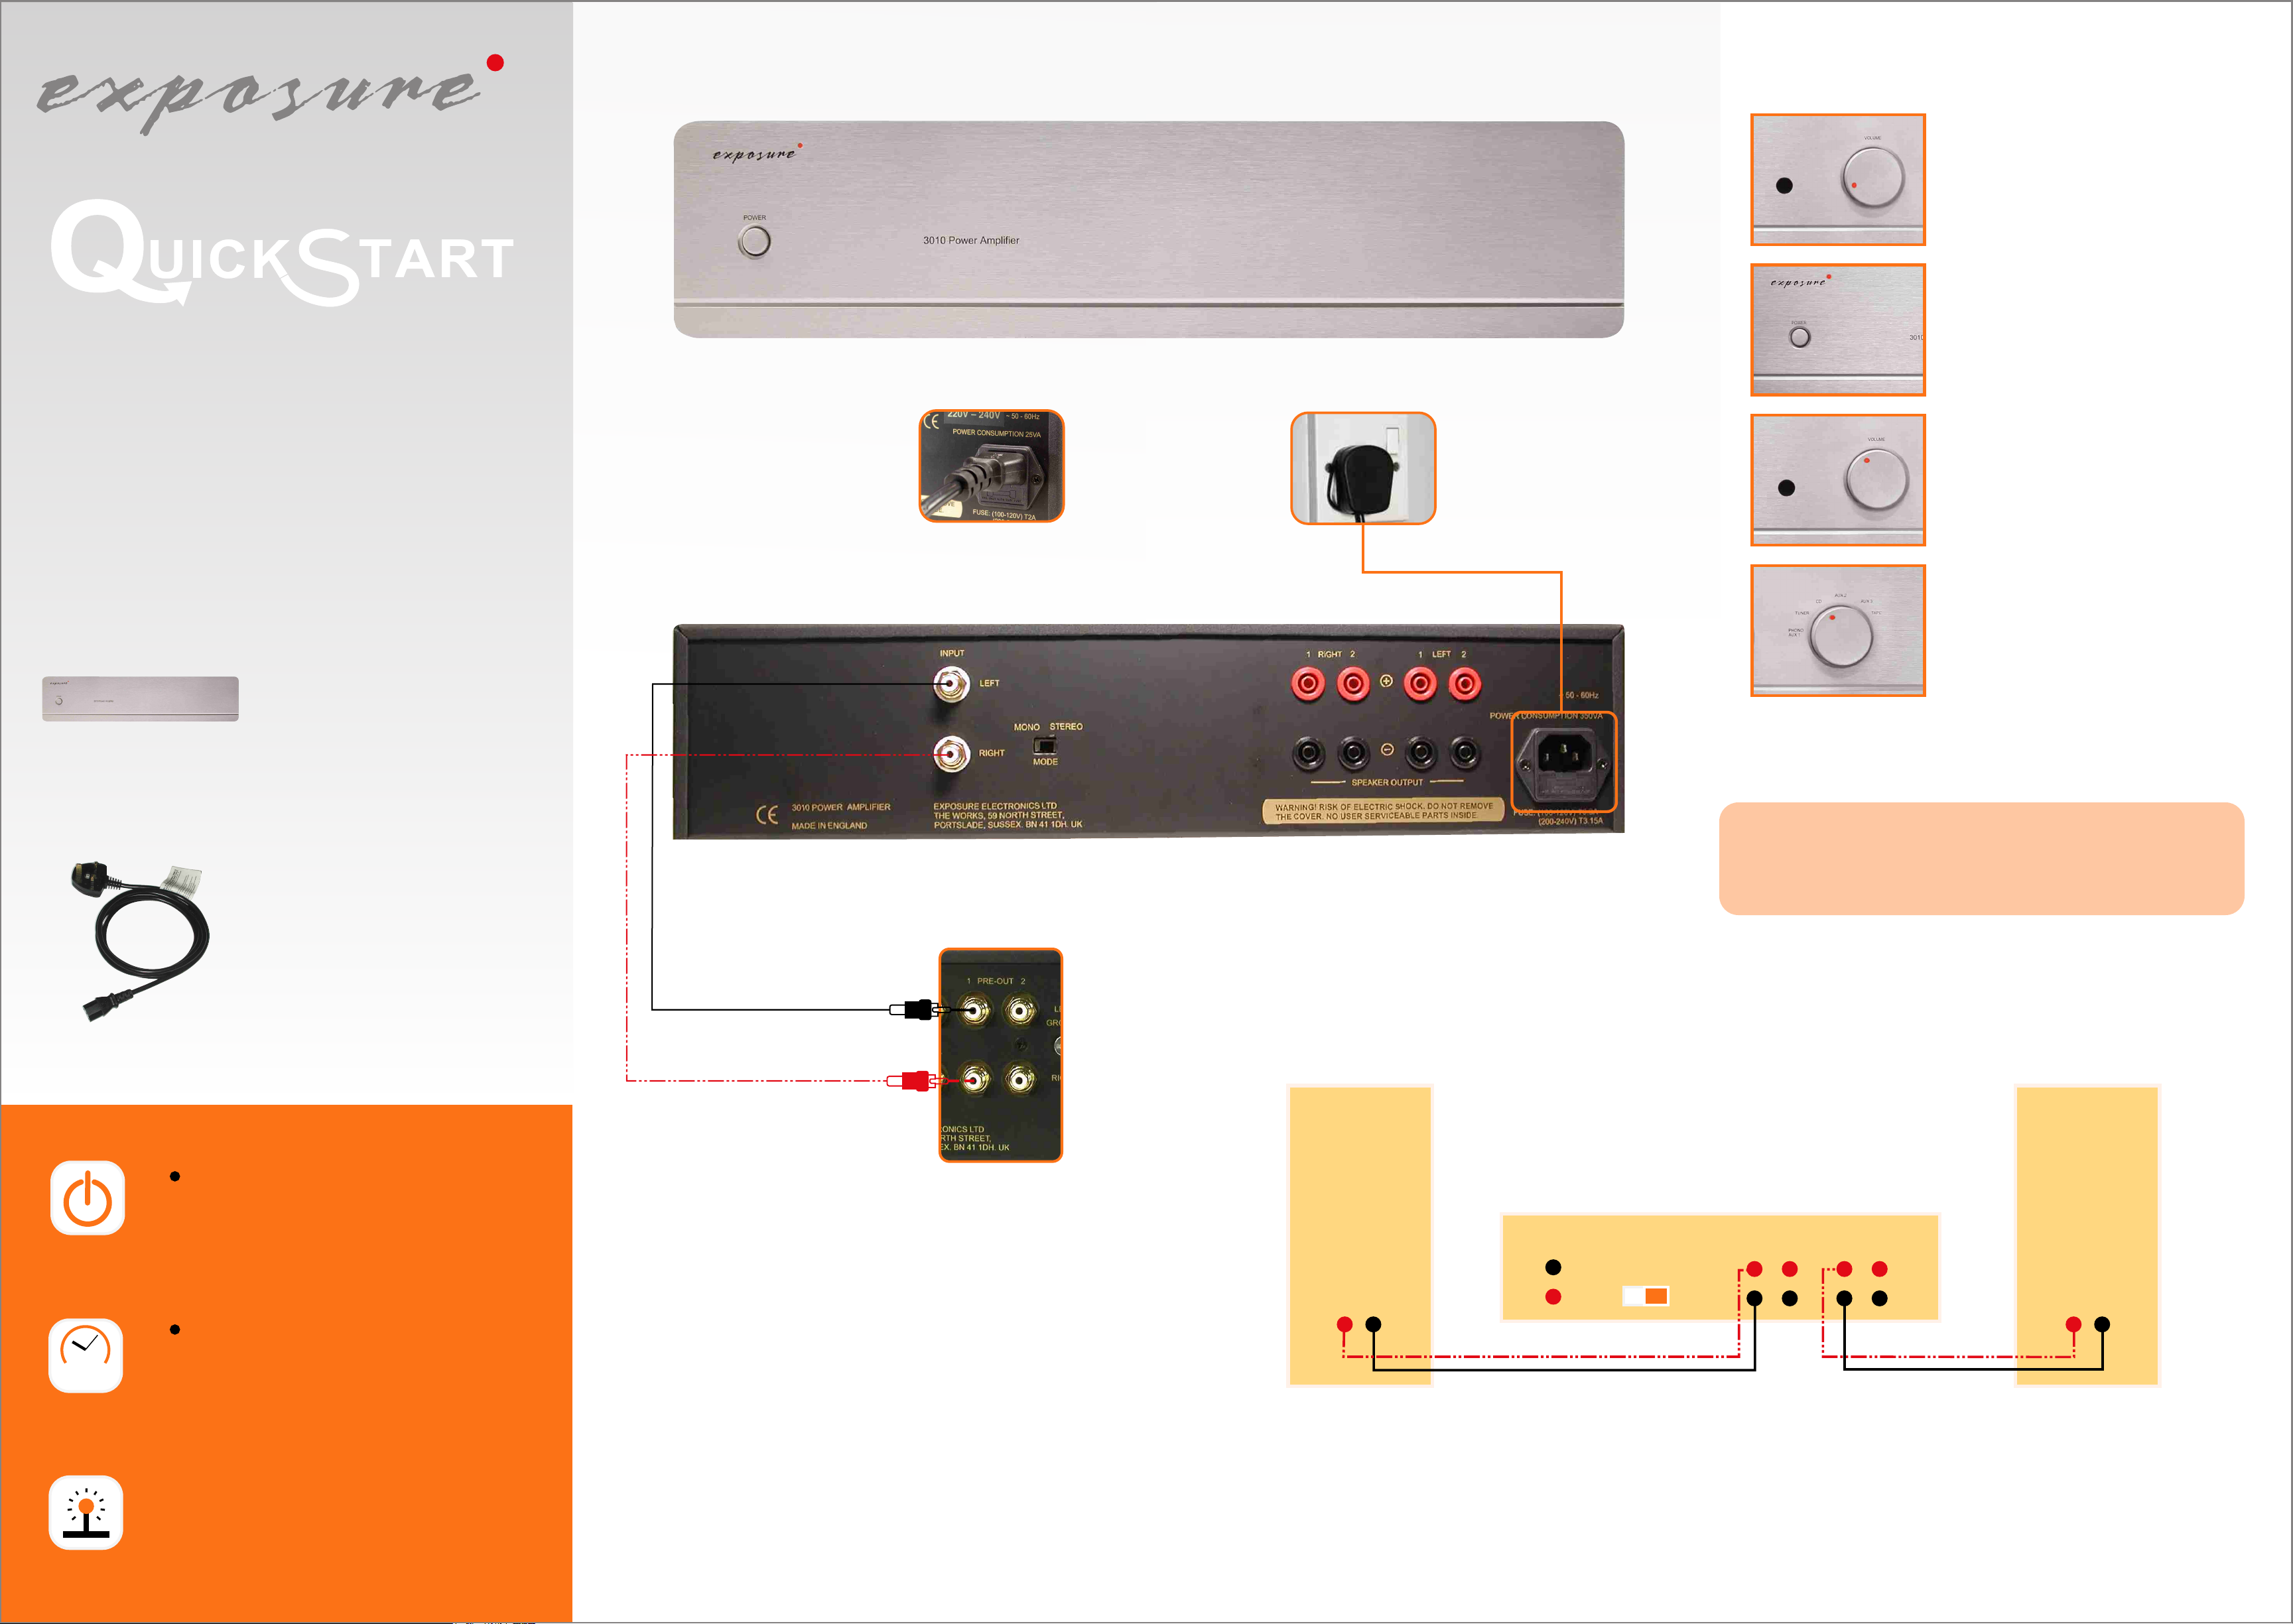
a) Turn the Integrated Amplifier or
pre-amplifier volume control to minimum.
b) Press power switch. The LED power
indicator will light up.
EXPOSURE 3010 Power Amplifier
Thank you for buying the Exposure 3010 Power Amplifier,
designed to enhance your musical enjoyment.
Before you start
Contents:
Exposure 3010 Power Amplifier: Front View
a) Connect the
mains cable to the
IEC mains input
socket.
b) Connect to the
mains outlet on
the wall. DO NOT
switch on until all
output connections
are made.
c) Without playing any CD Player/Tuner
/Tape/Disc Recorder/Turntable
/Video Player, turn the volume control knob
slowly clockwise to around 30%. You
should only hear a faint hiss.
d) Select a live source component (CD/Player
/Tuner/Tape/Disc Recorder/Turntable
/Video Player) on the system’s integrated
amplifier or pre-amplifier.
e) Audio should now be heard when the
source component is played.
1) Exposure 3010 Power Amplifier
2) Mains Cable
• Ensure that your unit is switched off and that the
volume control on the system’s integrated amp or
pre-amp is set at its minimum.
Exposure 3010 Power Amplifier: Back View
Bi-wiring
Bi-wiring may provide a useful gain in subjective performance. Should you
choose this option, please refer to the “Extended Set-Up” section overleaf for
detailed instructions.
3 Loudspeaker Connection
RIGHT SPEAKER LEFT SPEAKER
BACK VIEW OF 3010 POWER AMPLIFIER
48hr!
• Please note that your Exposure 3010 Power Amplifier
may take up to 48 hours to "run-in" before
reaching its optimal performance. Each subsequent
"run-in" will then take about 20 minutes.
Note: The Exposure 3010 Power Amplifier has a heat
sensor which will automatically switch off the power
amplifier section when an abnormally high
temperature is reached. To reset the output, switch
off the amplifier and allow to cool for 10 to
15 minutes.
2 Pre-Amp/Integrated Amp Connection
a) Connect cables from RCA Phono inputs of power amp to the PRE-OUT
sockets of pre-amp/integrated amp.
b) Ensure left and right channels are connected appropriately. (Right channels
are marked in red)
c) If the Power Amplifier is used in mono mode, only the left input sockets
should be used. See section on Operational Modes in “Extended Set-Up”
overleaf for further details.
+
+
-
LEFT
+
-
INPUT
RIGHT
SPK 1 SPK 2 SPK 1 SPK 2
+
-
a) Connect left and right loudspeakers to corresponding left and right speaker
outputs on amplifier.
b) Connect (+) terminal of loudspeaker to (+) terminal of the amplifier.
c) Connect (-) terminal of loudspeaker to (-) terminal of the amplifier.
-
Page 2
Exposure 3010 Power Amplifier: Extended Set-Up
Loudspeaker compatibility
Although the Exposure 3010 Power Amplifier is able to drive almost any loudspeaker system, the best results will most likely be
achieved with speakers rated at 8 ohms. For loudspeakers rated below 4 ohms, the use of two Exposure 3010 Power Amplifier
operating in Mono mode should be considered. See section on Operational Modes for further details.
Speaker Cable compatibility
While the Exposure 3010 Power Amplifier is compatible with most types of loudspeaker cables, the type of cables used can
influence the sonic performance of your system. Please ask your Exposure dealer for advice on loudspeaker cable compatibility
and how to get the best from your Exposure 3010 Power Amplifier.
Note: The Exposure 3010 Power Amplifier is internally protected against damage from short circuits. However, no such protection
is infallible, and damage may occur if positive and negative speaker cables are inadvertently connected together.
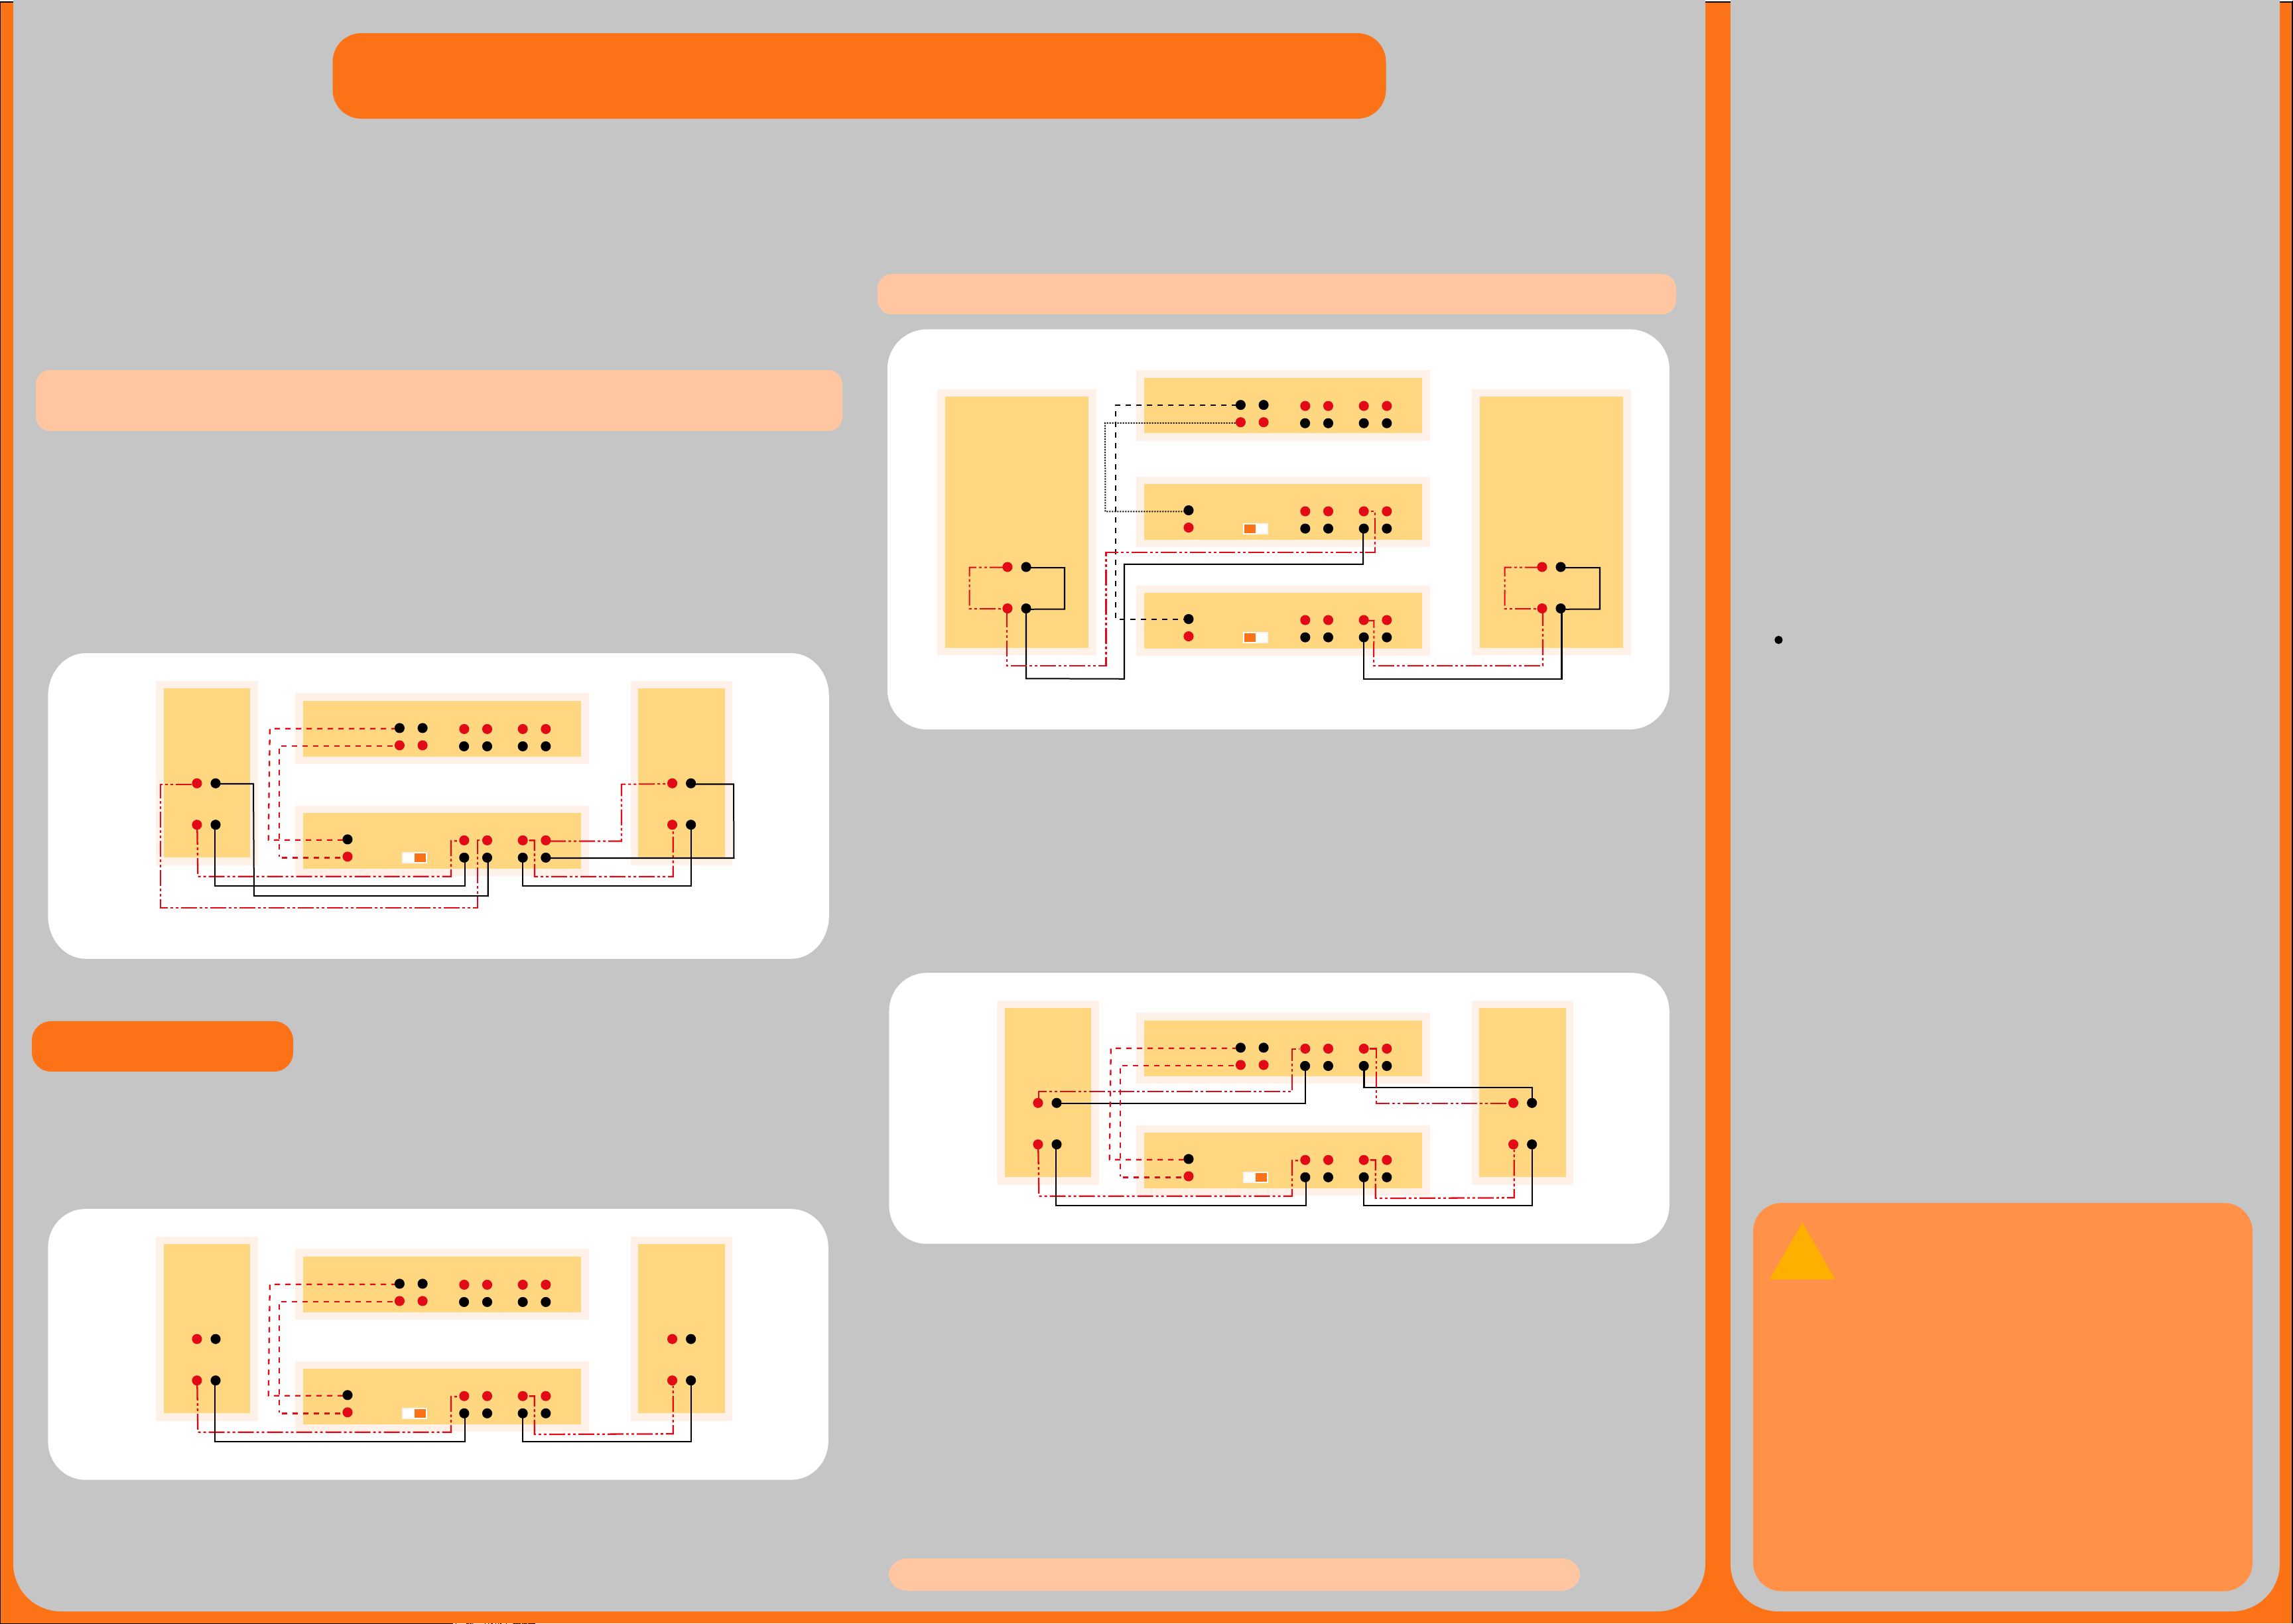
Mono Mode
When selected to the Mono mode at the back of the Exposure 3010 Power Amplifier, it operates as a high current mono amplifier.
In this mode, both channels are combined into one single channel of twice the current rating.
Mono mode enables the Exposure 3010 Power Amplifier to drive low impedance speakers to high levels, with greater accuracy
and clarity.
Note: In Mono mode, the left input socket is only used. You need to purchase another Exposure Power Amplifier to operate in
stereo. See diagram for connecting a pair of loudspeakers in mono mode.
REAR OF EXPOSURE 3010 INTEGRATED AMPLIFIER
RIGHT SPEAKER LEFT SPEAKER
PRE-OUT
1 2
RIGHT
SPK 1SPK 2 SPK 1SPK 2
L
R
LEFT
+
-
Technical Specifications
Power Output (Stereo): 100 Watts per channel at
1KHz into 8 Ohms
Power output (bridged mono): 110 Watts at 1KHz into 8 Ohms
Input Impedance: 18K ohms
Frequency Response: 20Hz - 20 KHz ±0.5dB
Total Harmonic Distortion: <0.015% at rated output,
ref 1 KHz
Signal to noise: >100 dB ref rated output
Channel Separation: >60dB, 20Hz - 20KHz
Mains Supply: 110/120V or 220/240V,
50/60Hz (factory set)
Power Consumption: <350VA, 8 ohm load both
channels driven
Dimensions (H x W x D): 115 mm x 440 mm x 300 mm
Net Weight (unpacked): 11 Kg
Gross Weight (packed): 13 Kg
Exposure Warranty Policy
1.The Exposure warranty entitles you to FREE repair of this unit for the first
three (3) years from the date of purchase.
Bi-Wiring
The Exposure 3010 Power Amplifier is fitted with two sets of 4mm loudspeaker connection output sockets for bi-wired connection
of loudspeaker.
Another pair of speaker wires is required for this operation for each loudspeaker.
1. Ensure that the links at the speaker terminals between the high frequency and the low frequency are removed on
both loudspeakers.
2. Follow the diagram below for connecting a pair of loudspeakers in bi-wiring mode.
Please refer to the manufacturer of your loudspeaker for advice on the practicality and potential benefits of bi-wiring.
RIGHT SPEAKER LEFT SPEAKER
REAR OF EXPOSURE 3010 INTEGRATED AMPLIFIER
LEFT
+
-
HIGH FREQUENCY
-
+
LEFT
LOW FREQUENCY
+
-
HIGH FREQUENCY
-
+
LOW FREQUENCY
PRE-OUT
1 2
REAR OF EXPOSURE 3010 POWER AMPLIFIER
INPUT
L
R
Stereo
RIGHT
SPK 1SPK 2 SPK 1SPK 2
L
R
RIGHT
SPK 1SPK 2 SPK 1SPK 2
REAR OF EXPOSURE 3010 POWER AMPLIFIER
LEFT
+
-
HIGH FREQUENCY
-
+
LEFT
LOW FREQUENCY
+
-
HIGH FREQUENCY
-
+
LOW FREQUENCY
INPUT
L
R
REAR OF EXPOSURE 3010 POWER AMPLIFIER
INPUT
L
R
• Connecting a pair of loudspeakers in Mono mode
Mono
Mono
RIGHT
SPK 1SPK 2 SPK 1SPK 2
RIGHT
SPK 1SPK 2 SPK 1SPK 2
BI-Amping Mode
The Exposure 3010 Integrated Amplifier can also be used as a pre-amplifier for the Exposure 3010 Power Amplifier.
The power amplifier section of the Exposure 3010 Integrated Amplifier will still be operational, and can be used in conjunction
with the Exposure 3010 Power Amplifier in Stereo mode to provide bi-amping capabilities for suitable loudspeaker:
1. Check your loudspeaker user manual for the wiring connections.
2. Connect the pre-out sockets on the Exposure 3010 Integrated Amplifier to the input sockets of the Exposure 3010 Power
Amplifier
2. This warranty is valid only if the unit is purchased from an authorised Exposure
dealer, registered with the authorised agent in your country of residence and
issued with a recognised warranty card.
3.The agent accepts no responsibility for defects arising from accident, misuse,
abuse, wear and tear, neglect or through unauthorised adjustment and or
repair or replacement of any components, nor will they accept responsibility
for damage or loss occurring during transit to or from the person making a
claim under the warranty.
4. The Exposure warranty covers:
Parts and labour costs for three (3) years from the date of purchase.
Please retain your original receipt as proof of purchase and purchase date.
The guarantee is extended only to the original purchaser and is not
transferable.
When making claims under this warranty:
1.The unit should be suitably packed and returned to the dealer from
whom it was purchased, or directly to the local distributor, together with proof
of purchase or a copy of the dated sales receipt.
2. If necessary, the unit should be sent carriage pre-paid by a reputable carrier,
NOT by post.
3. No responsibility is accepted for the unit whilst on transit to the dealer or
agent, and customers are advised to insure the unit against loss or damage
whilst in transit.
• Connecting a pair of loudspeakers in bi-wiring mode
Operational Modes
The Exposure 3010 Power Amplifier can be operated in one of three different modes. These are:
Stereo Mode (Factory Default)
The Exposure 3010 Power Amplifier by default is selected to Stereo mode at the back of the unit. It operates as a conventional
stereo amplifier with each channel fully independent of the other. The majority of 3010 Power Amplifier applications will employ
this mode.
RIGHT SPEAKER LEFT SPEAKER
REAR OF EXPOSURE 3010 INTEGRATED AMPLIFIER
LEFT
+
-
HIGH FREQUENCY
-
+
LEFT
LOW FREQUENCY
+
-
HIGH FREQUENCY
-
+
LOW FREQUENCY
PRE-OUT
1 2
REAR OF EXPOSURE 3010 POWER AMPLIFIER
INPUT
L
R
• Connecting a pair of loudspeakers in Stereo mode
Stereo
RIGHT
SPK 1SPK 2 SPK 1SPK 2
L
R
RIGHT
SPK 1SPK 2 SPK 1SPK 2
3. See diagram for connecting a pair of loudspeakers in bi-amp mode.
Your dealer or local distributor will be able to offer further advice.
RIGHT SPEAKER LEFT SPEAKER
REAR OF EXPOSURE 3010 INTEGRATED AMPLIFIER
LEFT
+
-
HIGH FREQUENCY
-
+
LEFT
LOW FREQUENCY
+
-
HIGH FREQUENCY
-
+
LOW FREQUENCY
PRE-OUT
1 2
REAR OF EXPOSURE 3010 POWER AMPLIFIER
INPUT
L
R
• Connecting a pair of loudspeakers in bi-amping mode
Stereo
RIGHT
SPK 1SPK 2 SPK 1SPK 2
L
R
RIGHT
SPK 1SPK 2 SPK 1SPK 2
Safety
Incorrect installation or inappropriate use of the Exposure 3010 Power Amplifier may result in injury due to electrical shock.
• Ensure that the voltage rating on the rear panel of this unit matches that of your local mains supply.*
• Ensure that the mains cable and plug supplied with this unit are also correct. (Contact your dealer immediately if this is not
the case).
• This unit is protected by a mains fuse, which is accessible as part of the IEC socket on the rear panel.
• Fuse replacement specifications:
220/240V units T3.15A fuse
110/120V units T6.3A fuse
• Protect unit against all forms of liquid. Never expose unit to dripping or splashing, or place objects filled with water, such as
vases, on the device.
• Unplug unit from mains when not in use for prolonged periods.
• Do not open this unit - there are NO user serviceable parts inside
• Reduce the volume control to minimum before turning this unit on or off.
• Ensure that this unit is switched off when connecting or disconnecting speaker and interconnect cables.
4. The warranty card MUST be produced when making claims against this
guarantee.
5. Any tampering or alteration made to the warranty card or to the serial number
on the unit will invalidate the warranty.
6.The dealer or the agent shall notify the customer when the repairs have been
completed. The customer must claim the unit within fourteen days from
the date of notice, failing which, the Company reserves the right to impose
storage charges.
7.The Company reserves the right to dispose of the unit after 90 days
from the date of notice in a manner that it sees fit and without
compensation to the customer.
!
Caution
For a long and trouble-free life of your Exposure 3010 Power Amplifier, please
ensure the following:
* Do not short circuit the speaker terminals.
* Do not remove the cover of the unit or dismantle the case.
* Protect unit against all forms of liquid. Never expose unit to dripping or
splashing, or place objects filled with water, such as vases, on the unit.
* Do not operate the unit in damp environment or allow liquids
to enter the unit.
* Do not attempt to bypass the mains fuse or replace the fuse with one of a
different specification.
* Do not place the unit in a position which restricts cooling
airflow around its case.
* Do not use abrasive or solvent - based cleaning fluids on the
unit’s case.
* Contact your Exposure dealer or distributor for advice on moving your unit to another country or territory.
Failure to observe these precautionary measures may void your warranty.
 Loading...