

Page 1
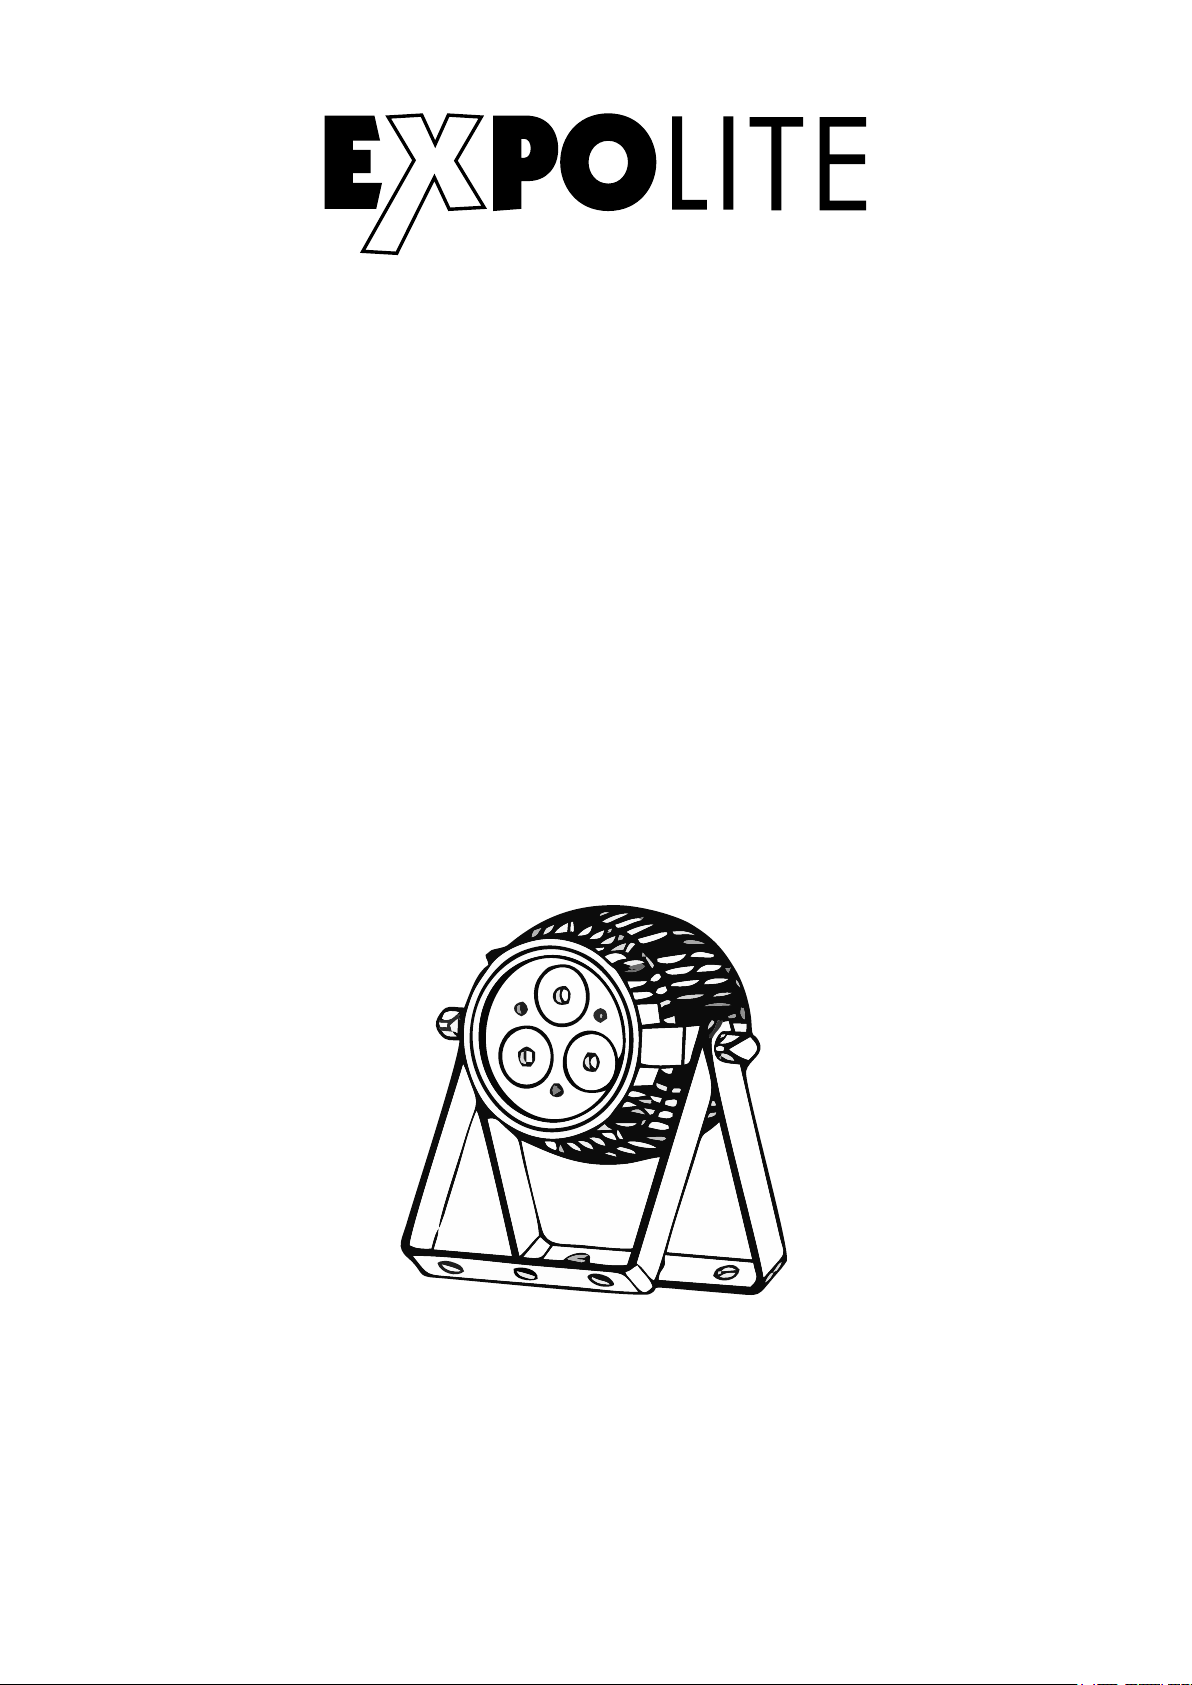
TourPar 18
Bedienungsanleitung
User Manual
Art.Nr.: led51100
Eigenschaften
Bedienelemente
Steuerung
Specifications
Menu
Control
Bedienungsanleitung bitte aufbewahren
Keep this Manual for later queries
Änderungen sind ohne Ankündigung möglich.
Changes are possible without prior notice.
Rev. 2019-01-41
Page 2
Die beiliegenden Bedienhinweise für Expolite
Geräte sind Bestandteil dieser Bedienungsanleitung. Lesen Sie diese sorgfältig, bevor
Sie das Gerät in Betrieb nehmen.
The enclosed General Information for Expolite
Units are part of these user manual. Read them
carefully before operating the device.
by
FOCON SHOWTECHNIC
Vertriebsgesellschaft mbH
Teichweg 4+6
D-49504 Lotte/Wersen
Telefon: ++49 (0) 541-77095-0
Fax: ++49 (0) 541-77095-27
[email protected]
www.focon-showtechnic.com
Page 3
Inhalt - Content
DE
ENG
Inhalt - Content
Lieferumfang
Technische Daten
Abmessungen
Installation
Bedienung
Steuerung mit DMX512
Delivery
Product Information
Dimensions
Installation
Operation
Using DMX512 Controller
Seite / Page
D-04
D-05
D-06
D-07
D-09
D-14
E-18
E-19
E-20
E-21
E-22
E-28
Page 4

Lieferumfang
- Expolite TourPar 18
- Anschlusskabel für Spannungsversorgung
- Bedienhinweise für Expolite Geräte
- Bedienungsanleitung
Expolite Geräte werden vor dem Versand sorgfältig geprüft. Sollte der
Lieferumfang dennoch nicht vollständig sein, wenden Sie sich bitte umgehend
an Ihren Vertriebspartner.
D-04
Page 5

Technische Daten
Spannungsversorgung
Maximale Leistungsaufnahme
Abmessungen
Gewicht
Anschlüsse
Betriebstemperatur
Luftfeuchtigkeit*
Schutzklasse
Gehäuse
LEDs
Abstrahlwinkel
Steuerung
DMX-Kanäle
100V - 240V AC 50/60Hz
40W
181 x 130 x 201mm
1,8kg
Power In/Out | DMX In/Out
-20°C - 45°C
< 80%
IP 65
Aluminiumdruckguss Gehäuse
3x 12W RGBAWUV**
25°
Stand-Alone / DMX512
4 - 12 (4/5/6/7/9/12)
* Siehe Allgemeine Bedienhinweise für Expolite Geräte - Hinweise zu Kondenswasserbildung im Geräteinneren
** Toleranzbereich der Farbtemperatur entsprechend Herstellerangabe +/- 10%.
D-05
Page 6
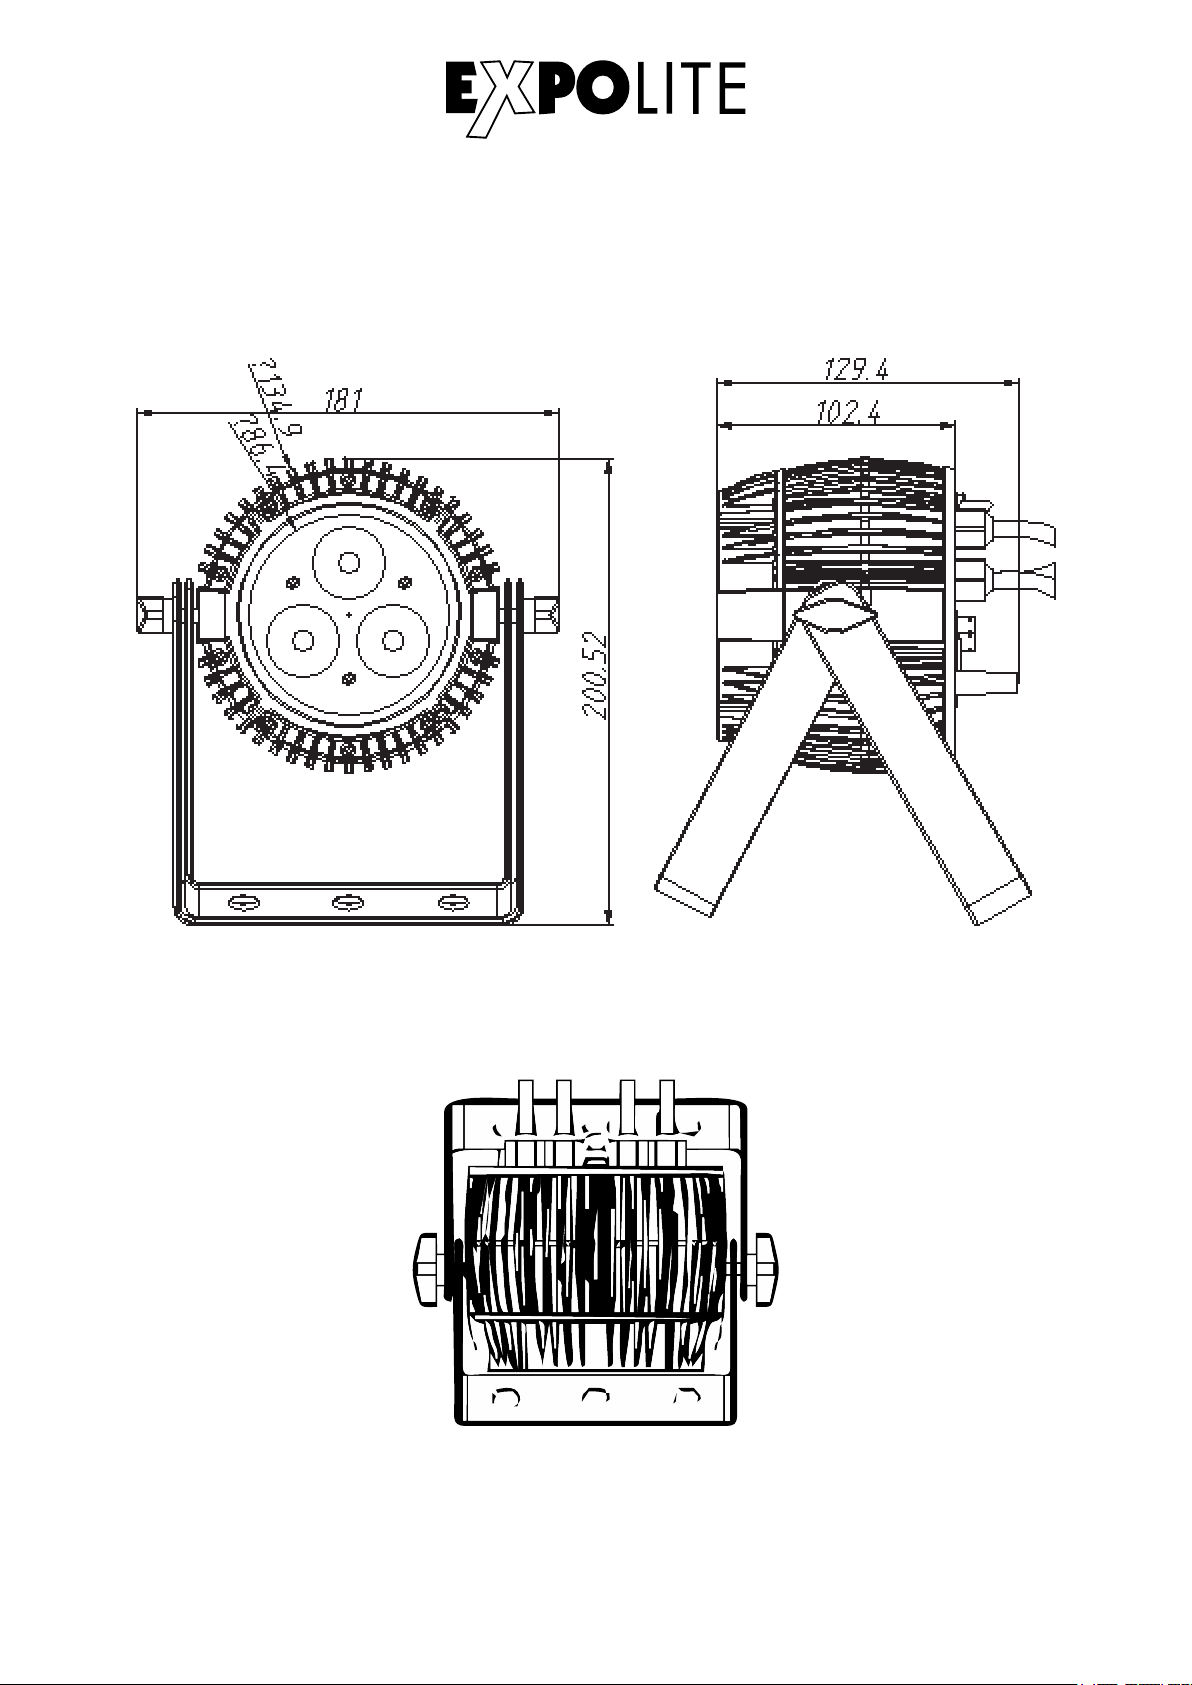
Abmessungen
D-06
Page 7
Installation
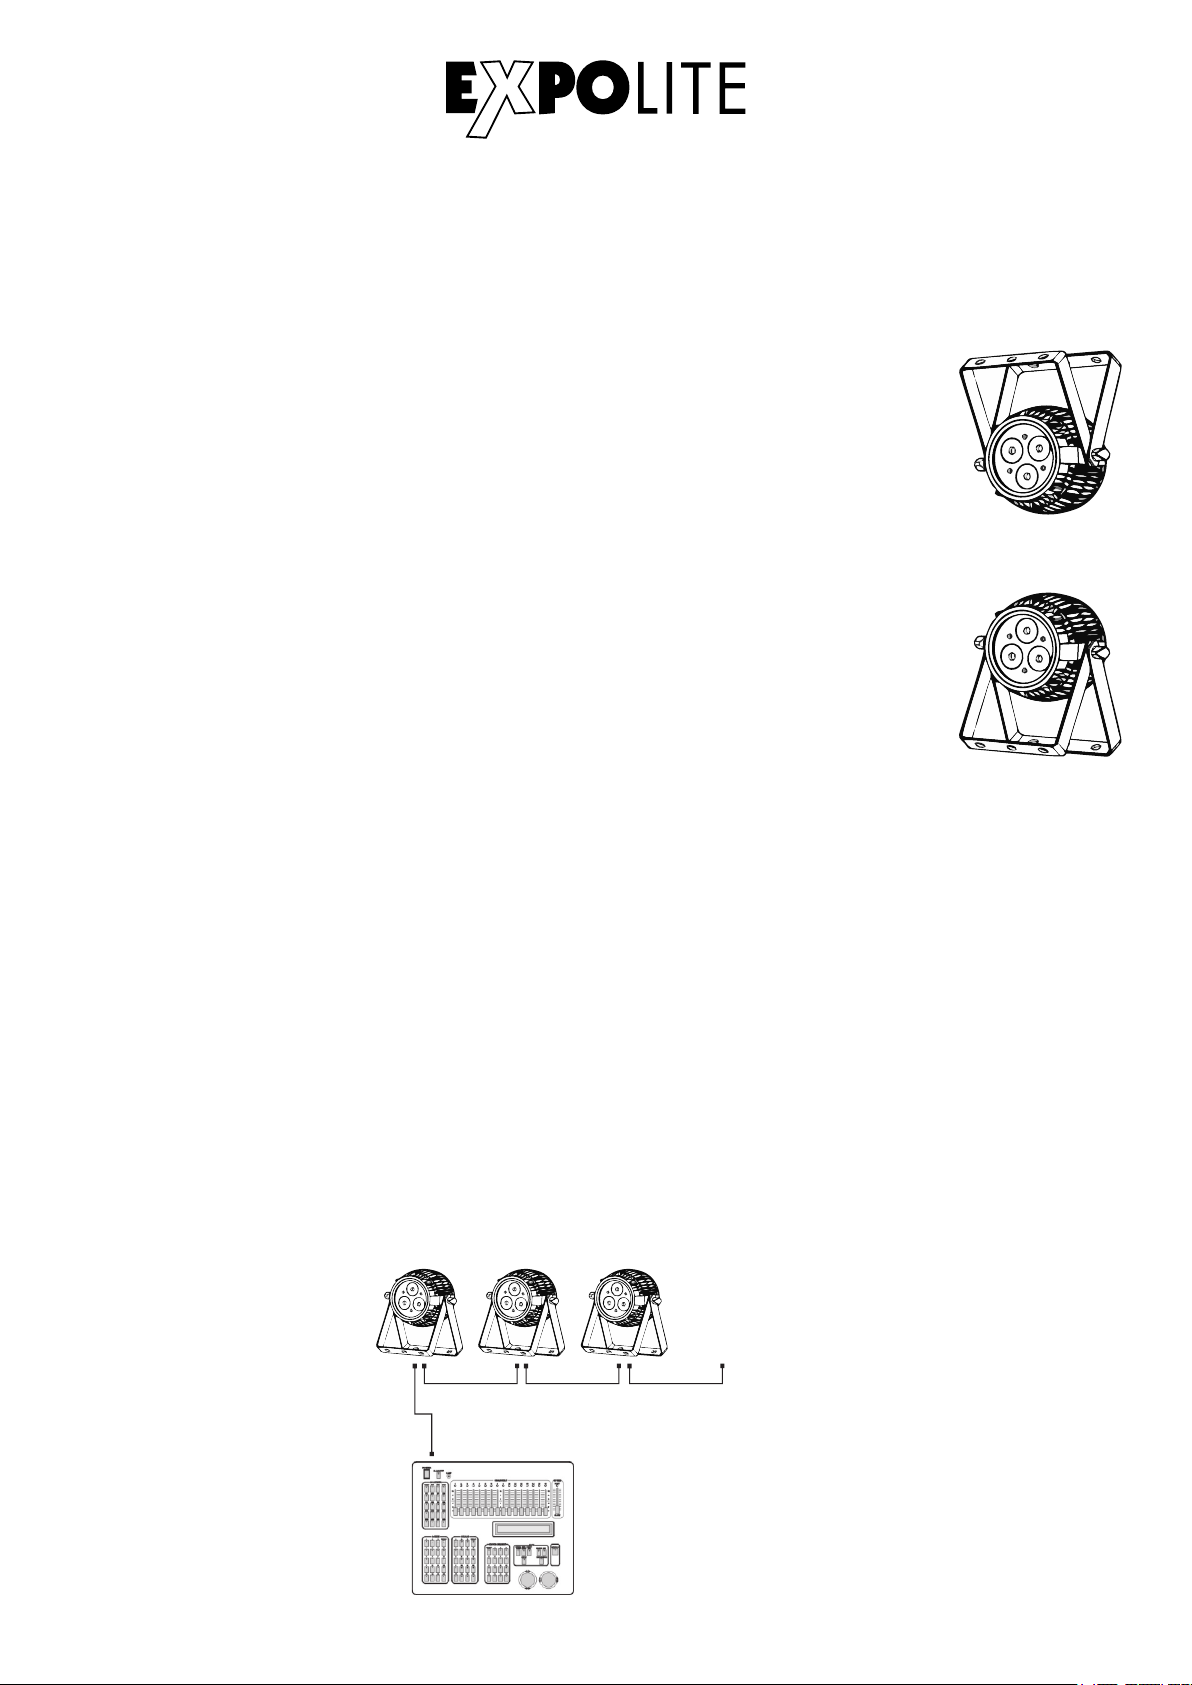
Montage
Hängend
Das Gerät kann in jeder beliebigen Position verwendet werden. An dem
Montagebügel sind Bohrungen vorhanden, durch die gängige Halterungen
sicher montiert werden können. Geräte müssen entsprechend der jeweils
gültigen Vorschriften sicher montiert und mit einer zweiten Sicherung gegen
herabfallen versehen werden. Hierzu ist am Gerät eine Öse für Safeties
angebracht.
Stehend
Das Gerät kann direkt auf den montierten Bügel gestellt werden. Hierzu muss
dieser bis in den mechanischen Anschlag aufgeklappt werden.
HINWEIS
Das LED Modul kann in jeder beliebigen Lage betrieben werden.
Verbindung der Spannungsversorgung
Bei 230V Netzspannung: maximal 42 Geräte in Reihe.
Bei 120V Netzspannung: maximal 21 Geräte in Reihe.
DMX-Verbindung
Die Geräte mit geeigneten DMX-Kabeln miteinander und mit dem Kontroller verbinden.
Die vorgesehenen DMX-Adressen und Personalities an den Geräten einstellen.
DM X Addr .1 DM X Addr .(N x1) +1 DM X Addr .(N x2) +1
............
DMX 512
CON TROLL ER
D-07
Page 8
Bedienung
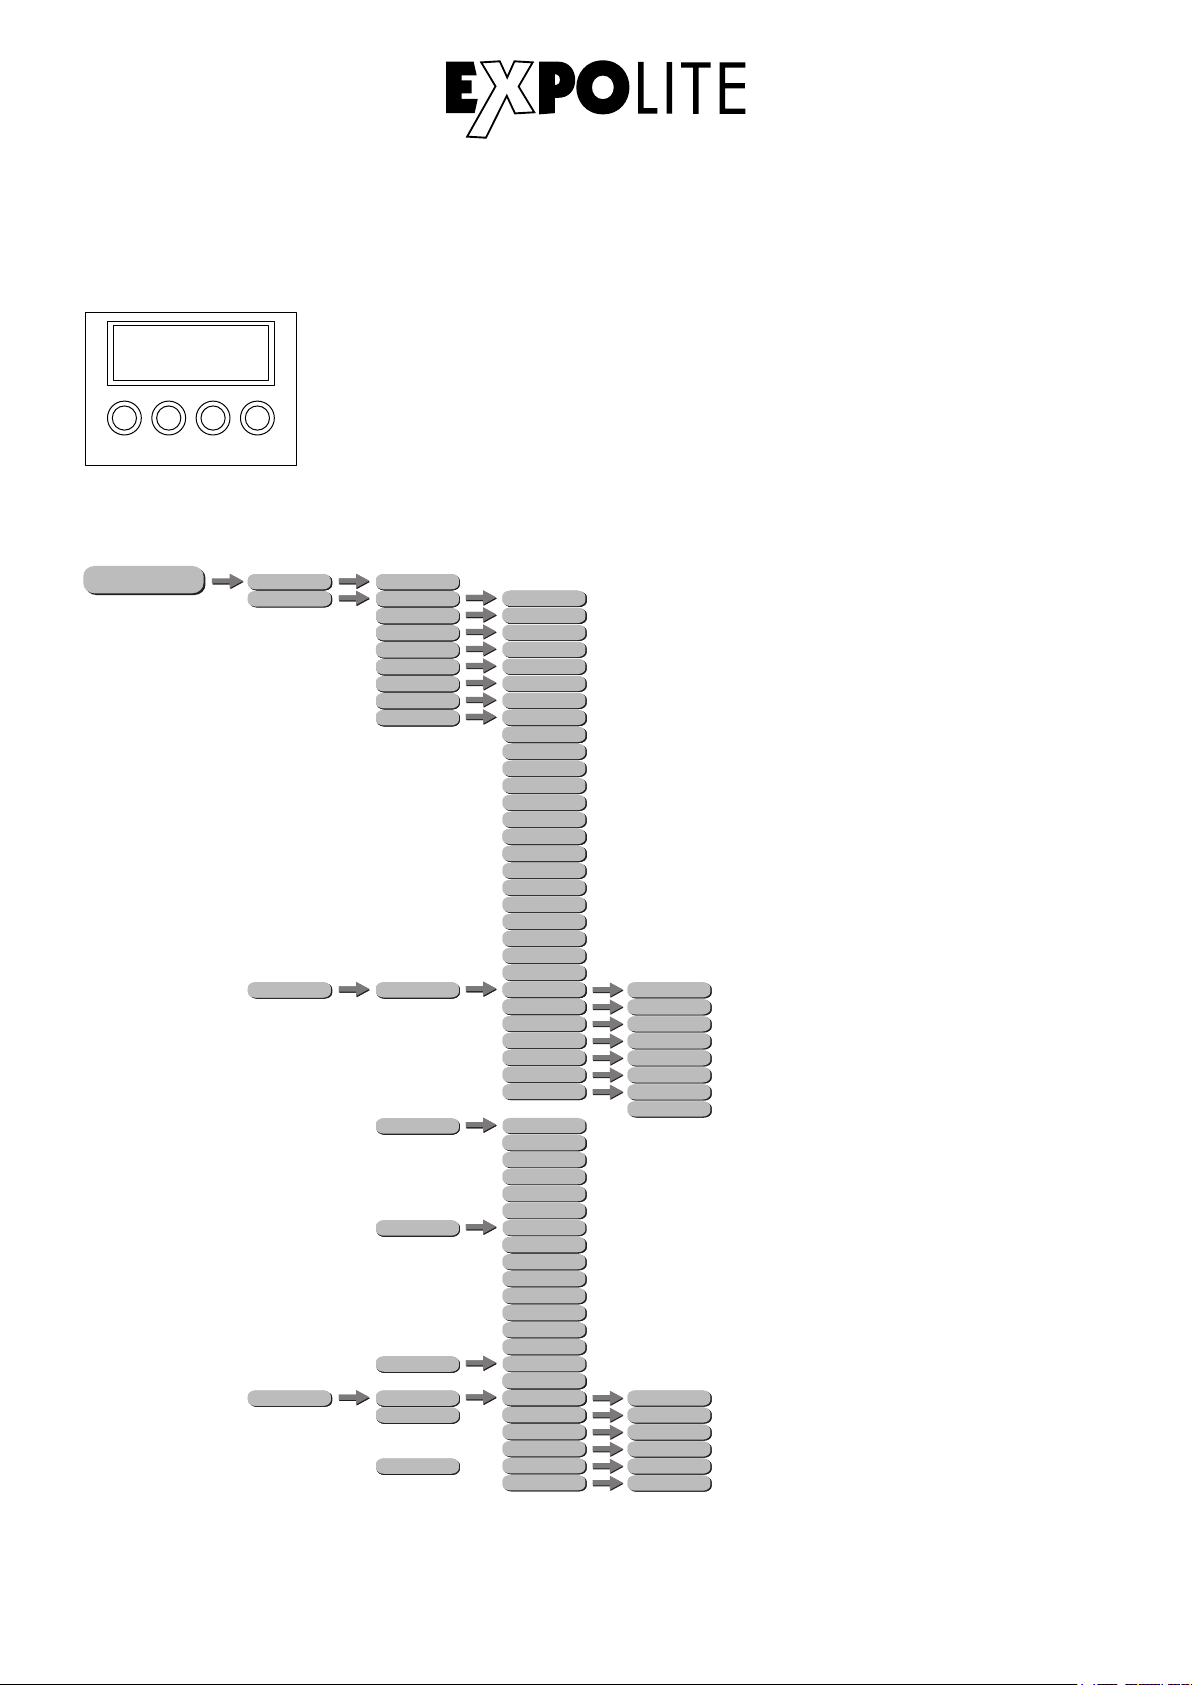
Bedienelemente am Gerät
MEN U
ENT ER UP
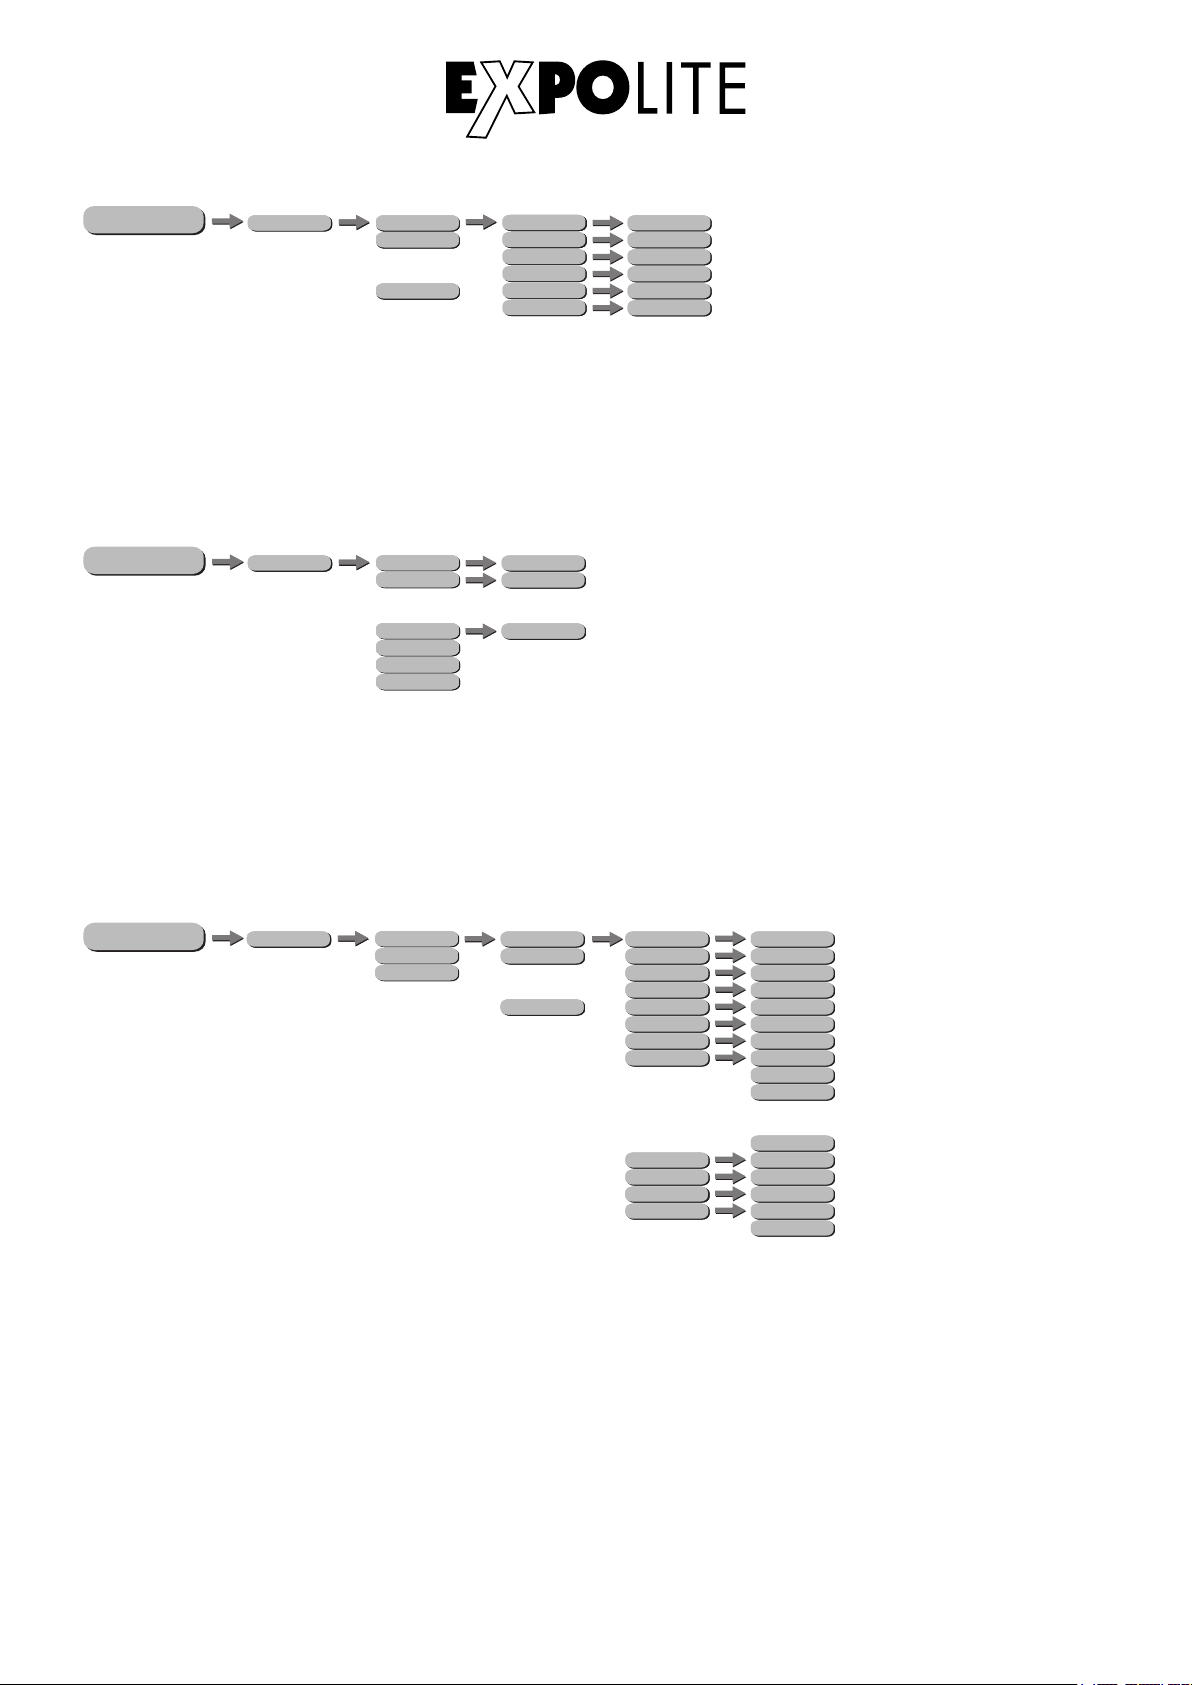
Menüstruktur
ME NU
DOW N
ADDR HSIC
PERSON
STAT
PERSON
SET CAL
PERSON
CTST
PERSON
MENU - Taste:
ENTER-Taste:
UP-Taste:
DOWN-Taste
001 - 512
HSIC
R
G
HSICB
HSIC
A
HSICW
UV
HSIC
SHUT
HSIC
PRSC
HSIC
HSIC
CHMD
HSIC
HSICDIM
DISY
HSIC
HSIC
CT 01
CT 02
HSIC
o
o
o
HSIC
CT 10
Eine Menüebene aufwärts
In gewähltes Menü springen; Eingabe bestätigen
Aufwärts blättern; Wert erhöhen
Abwärts blättern; Wert verringern
0 - 255
0 - 255
0 - 255
0 - 255
0 - 255
0 - 255
0 - 255
0 - 255
0 - 25
0 - 255
Red
0 - 255
Green
Blue
Amber
White
Pink
Cyan
Orange
0 - 255
0 - 255
Violet
Golden Amber
2700K
3200K
4000K
5500K
6500K
RGBW
0 - 255
R
0 - 255
G
B
A
W
UV
USE
12CH
0 - 255
9CH
7CH
6CH
5CH
4CH
LIN
SQR
0 - 255
ISQR
SCUR
LIN.
SQR.
ISQR.
SCUR.
ON
0 - 255
2MIN
0 - 255
R
0 - 255
G
B
A
W
UV
0 - 255
0 - 255
0 - 255
0 - 255
0 - 255
0 - 255
YES
NO
0 - 255
0 - 255
0 - 255
0 - 255
0 - 255
0 - 255
D-08
Page 9
ME NU
AUTO
PERSON
PROG
PERSON
INFO
PERSON
LOAD
PERSON
SEND
PERSON
AT 01
AT 02
o
o
o
AT 05
CHS1
CHS2
CHS3
CHS1
CHS2
CHS3
SOFT
POW
ST L
PR L
YES
NO
0-255
0-255
0-255
SC 01
SC 02
o
o
o
SC 20
Vx.x
100%
80%
50%
YES
NO
YES
NO
R
G
B
A
W
UV
SHUT
AUTO
ATSP
TIME
WAIT
USE
0-255
0-255
0-255
0-255
0-255
0-255
0-255
NONE
AT 01
AT 02
o
o
o
AT 05
0-255
0-255
0-255
YES
NO
D-09
Page 10
DMX-Adresse einstellen
ME NU
PERSON
HSICADDR 001-512
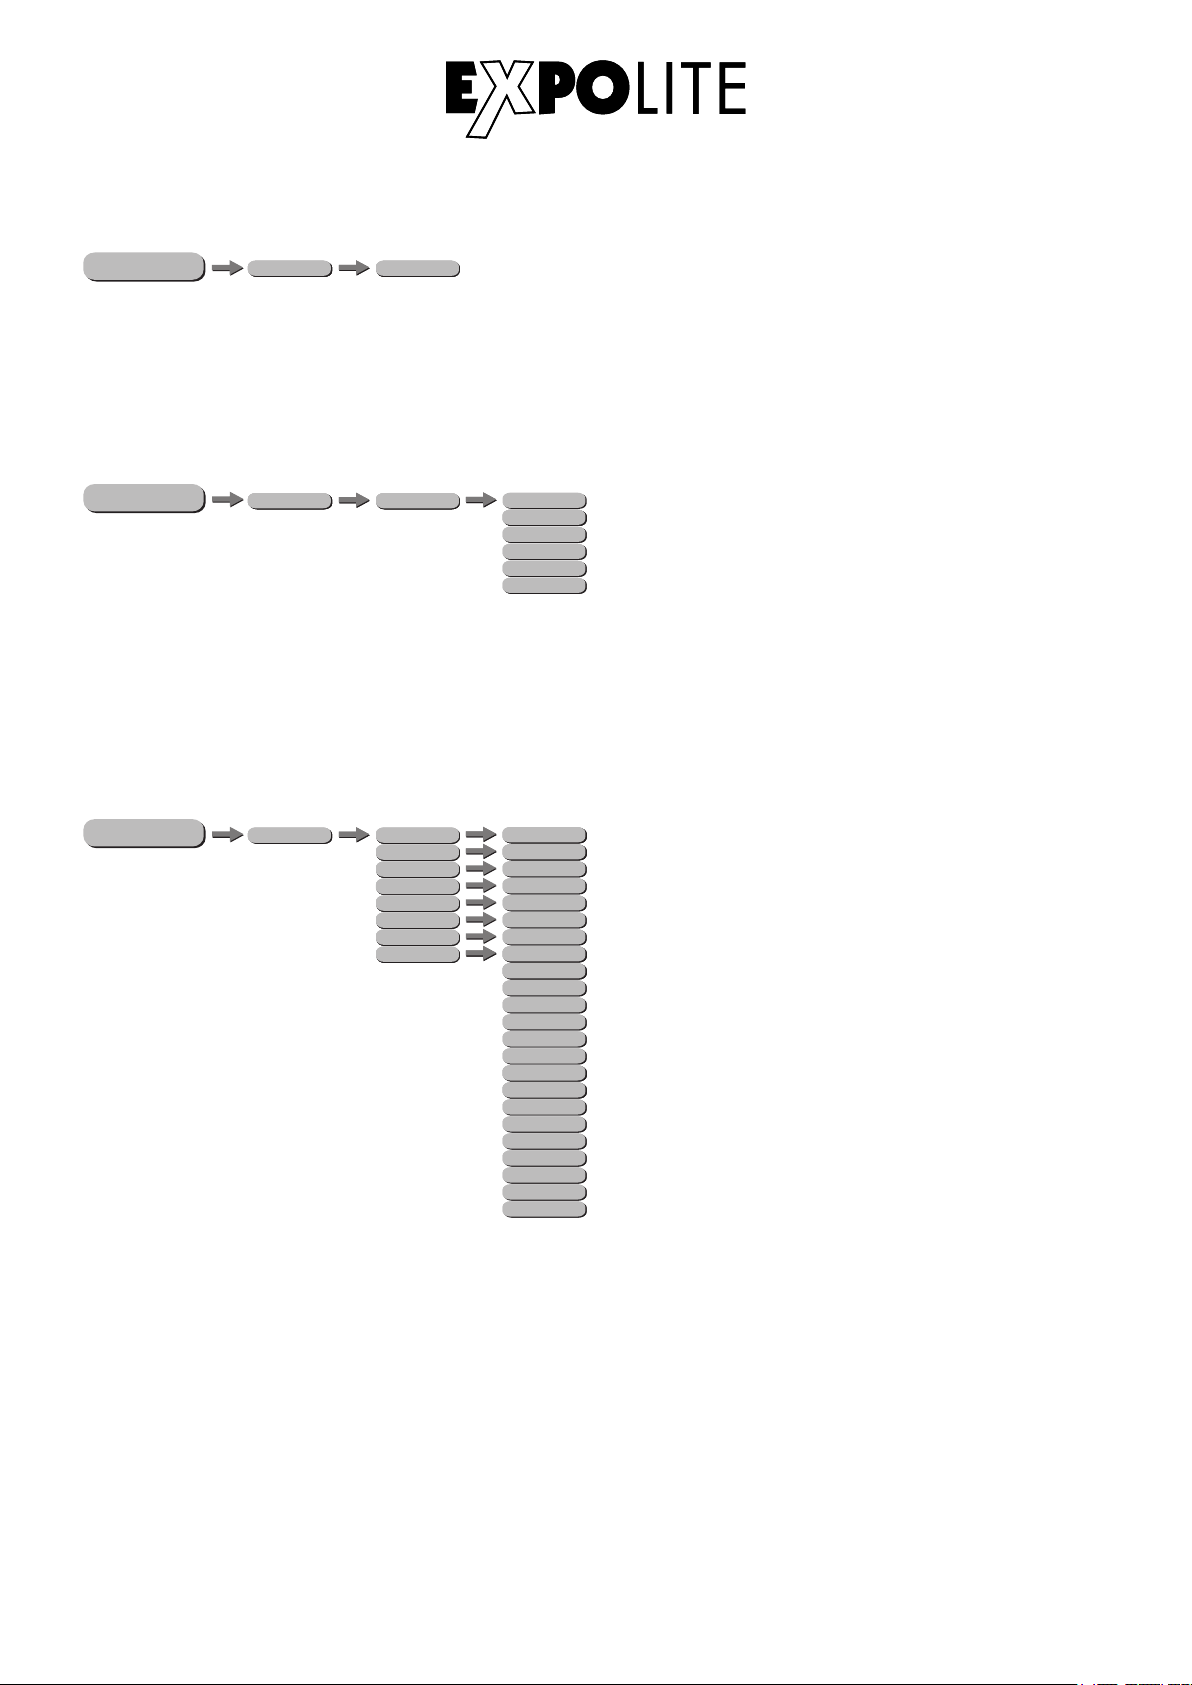
Im Menü wird im Punkt ADDR die DMX-Startadresse des Gerätes eingestellt. Diese bleibt auch bei
dem Wechsel der Personality erhalten.
DMX-Kanalbelegung einstellen
ME NU
SET
PERSON
CHMD
HSIC
12CH
0 - 255
9CH
7CH
6CH
5CH
4CH
Im Menü SET, Untermenü CHMD wird die Belegung der DMX-Kanäle des Gerätes festgelegt. Es
stehen die Modi 12CH (12 Kanäle), 9CH (9 Kanäle), 7CH (7 Kanäle), 6CH (6 Kanäle), 5CH
(5 Kanäle) und 4CH (4 Kanäle) zur Verfügung.
Statische Farbe einstellen
0 - 255
ME NU
STAT
PERSON
HSIC
HSICB
HSIC
HSICW
HSIC
SHUT
HSIC
PRSC
HSIC
R
G
A
UV
0 - 255
0 - 255
0 - 255
0 - 255
0 - 255
0 - 255
0 - 255
0 - 25
0 - 255
Red
0 - 255
Green
Blue
Amber
White
Pink
Cyan
Orange
0 - 255
0 - 255
Violet
Golden Amber
2700K
3200K
4000K
5500K
6500K
RGBW
Im Menü werden im Punkt STAT statische Farben für den Stand-Alone Betrieb eingestellt. Diese
werden anhand der DMX-Werteskala 0-255 für Rot (R), Grün (G), Blau (B), Gelb (A), Weiß (W) und
UV, sowie dem Stroboskopwert (SHUT) 0-25Hz gemischt. Zusätzlich kann unter PRSC aus 16
vorgefertigten Farben ausgewählt werden.
D-10
Page 11
ME NU
CTST
PERSON
HSIC
CT 01
CT 02
HSIC
HSIC
CT 10
R
0 - 255
o
o
o
G
B
A
W
UV
0 - 255
0 - 255
0 - 255
0 - 255
0 - 255
0 - 255
0 - 255
Des Weiteren können im Menü CTST zehn verschiedene statische Farben (CT 01 - CT 10) aus den
Einzelfarben Rot (R), Grün (G), Blau (B), Gelb (A), Weiß (W) und UV vom User selbst gemischt
werden.
Automatikprogramme abspielen
ME NU
AUTO
PERSON
AT 01
AT 02
o
o
o
AT 05
CHS1
CHS2
CHS3
0-255
0-255
0-255
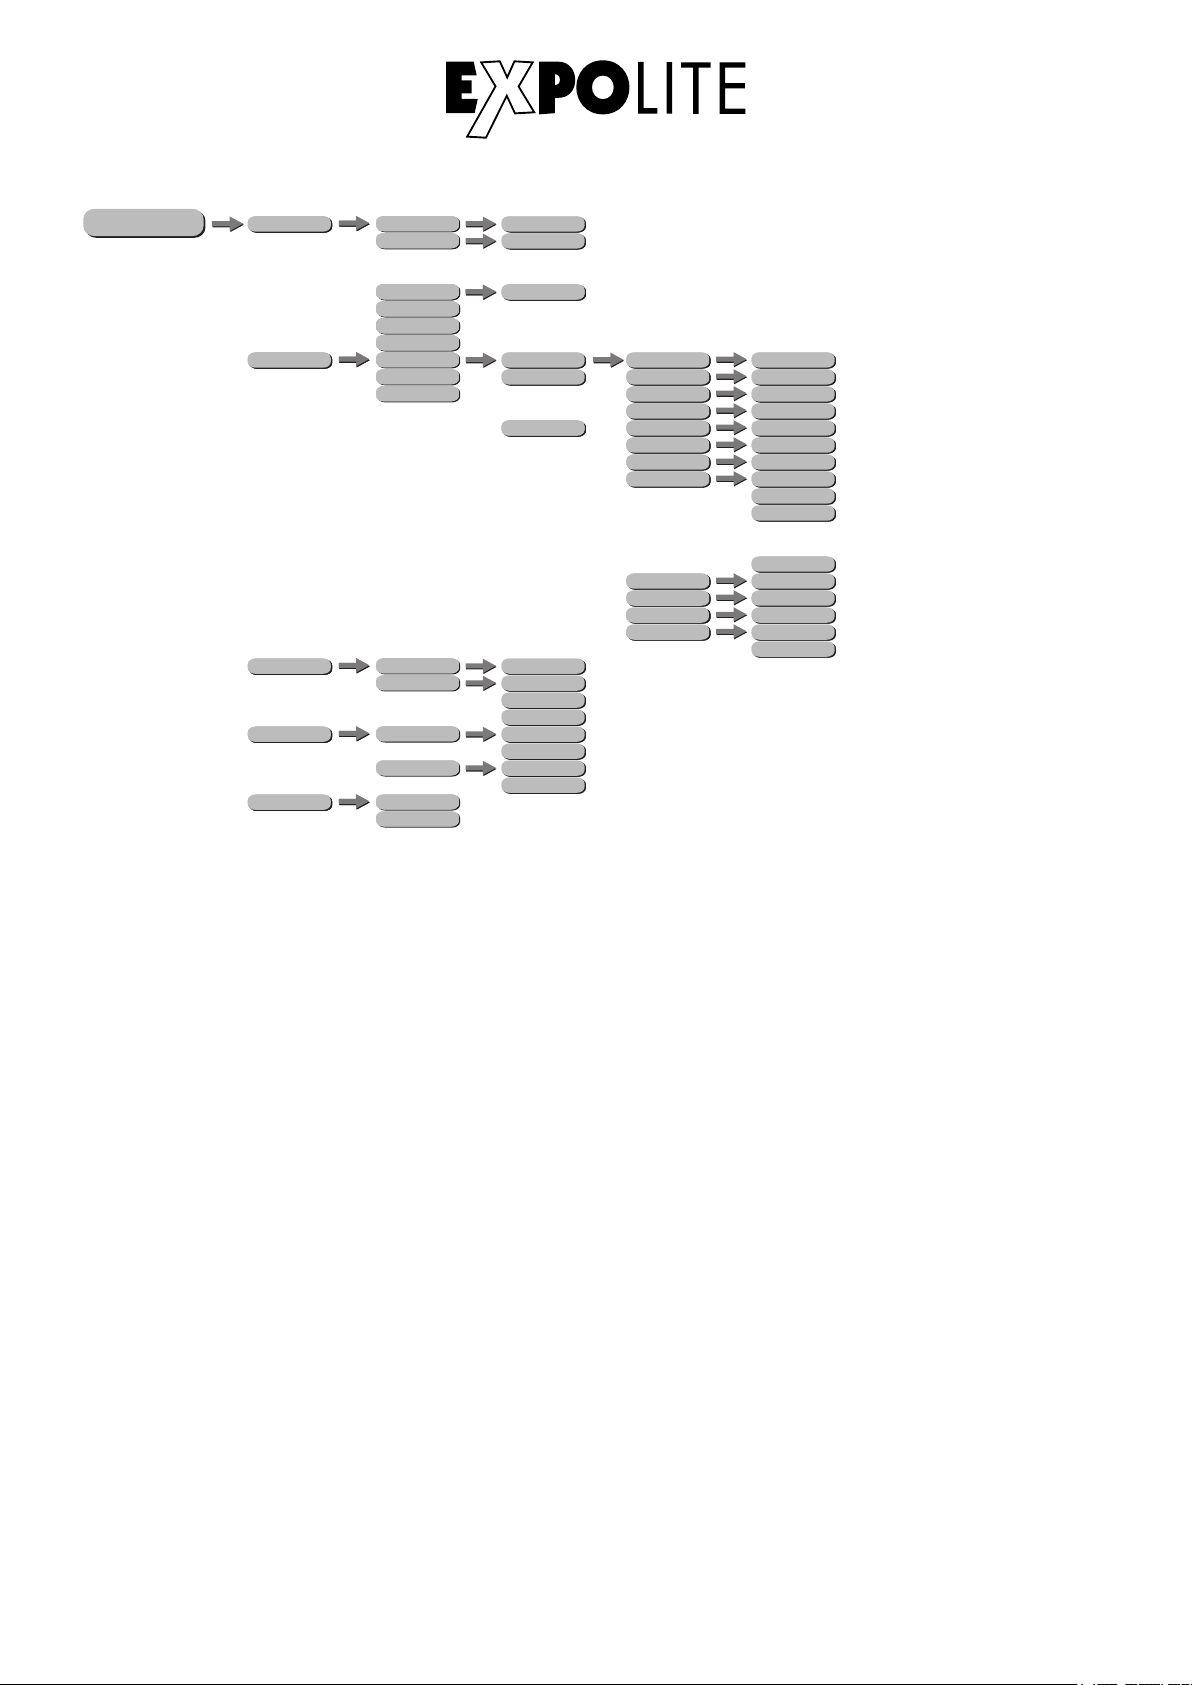
Im Menü werden im Punkt AUTO die im Gerät gespeicherten Automatikprogramme abgespielt. Die
Programme AT 01 bis AT 05 sind fest im Gerät hinterlegt. Die Programme CHS1, CHS2 und CHS3
sind editierbar. Dies wird unter Editieren benutzerdefinierter Programme beschrieben.
Editieren benutzerdefinierter Programme
ME NU
PROG
PERSON
CHS1
CHS2
CHS3
SC 01
SC 02
SC 20
R
o
o
o
G
B
A
W
UV
SHUT
AUTO
ATSP
TIME
WAIT
USE
0-255
0-255
0-255
0-255
0-255
0-255
0-255
NONE
AT 01
AT 02
o
o
o
AT 05
0-255
0-255
0-255
YES
NO
Im Menü PROG werden die Benutzerprogramme CHS1, CHS2 und CHS3 editiert. Jedes Programm
kann aus bis zu 20 Schritten bestehen. Jeder Schritt besteht aus den Parametern Farbe RGBAWUV,
Stroboskop (SHUT) „0-25Hz“, wahlweise den im Gerät gespeicherten Autoprogrammen und deren
Laufgeschwindigkeit (AUTO und ATSP), der Dauer des Steps (TIME) und der Überblendzeit (WAIT).
Einzelne Schritte können unter USE aktiv (YES) oder inaktiv (NO) gesetzt werden.
D-11
Page 12
Schrittweise Programmierung des Custom-Stand-Alone Programmes mit bis zu 20 verschiedenen
Schritten:
HINWEIS: Für weniger als 20 Schritte müssen TIME und WAIT des letzten Schrittes auf 0 gesetzt
werden.
Beispiel für Time-Settings eines Stand-Alone Programmes mit 3 Schritten:
Step 1 TIME = 4 WAIT = 3 USE = YES
Step 2 TIME = 5 WAIT = 2 USE = YES
Step 3 TIME = 0 WAIT = 0 USE = YES
Verschiedene Einstellungen
ME NU
SET CAL
PERSON
HSIC
HSICDIM
DISY
HSIC
0 - 255
R
0 - 255
G
B
A
W
UV
USE
LIN
SQR
0 - 255
ISQR
SCUR
LIN.
SQR.
ISQR.
SCUR.
ON
0 - 255
2MIN
0 - 255
0 - 255
0 - 255
0 - 255
0 - 255
0 - 255
YES
NO
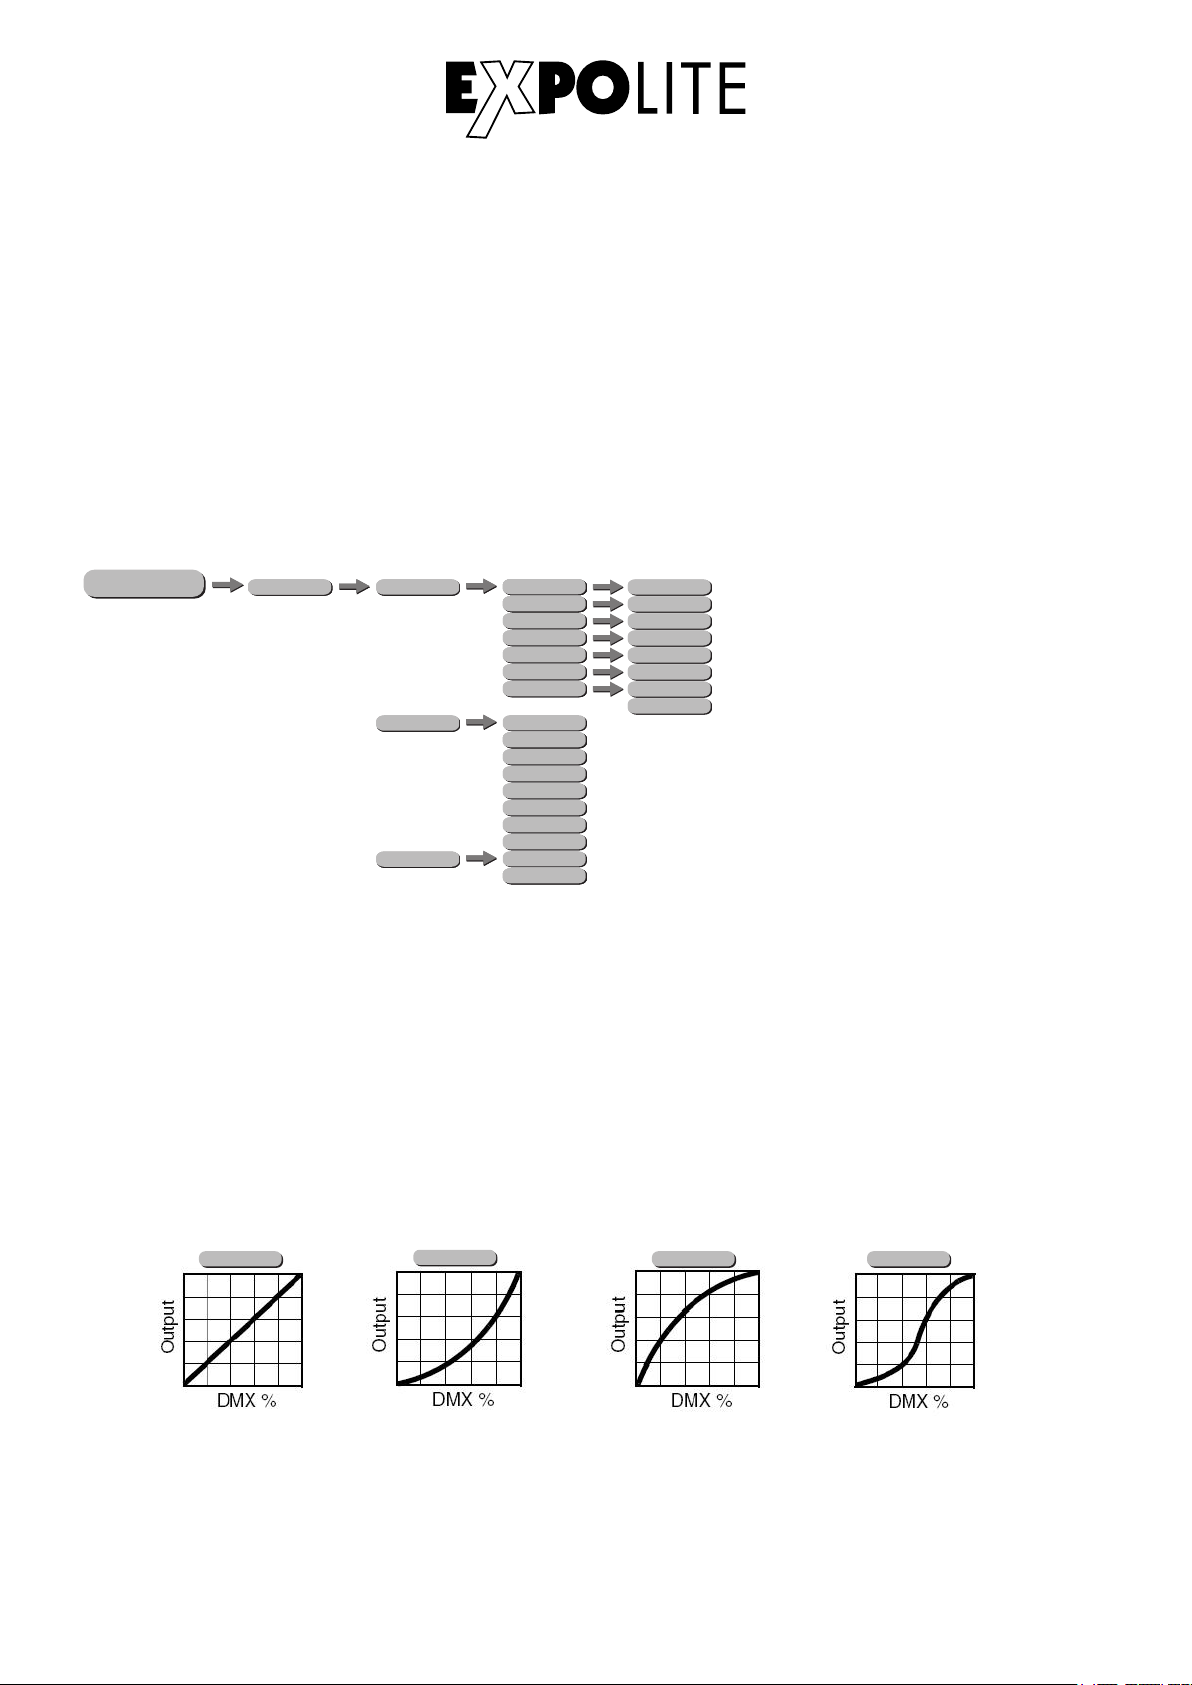
Im Menü SET können folgende Einstellungen vorgenommen werden:
CAL: Im Untermenü CAL wird der Weißwert für die Eingabe der maximalen DMX-Werte eingestellt.
Wenn diese Kalibrierung aktiviert (USE=YES) ist und das Gerät die DMX-Werte RGBAWUV = 255,
255, 255, 255, 255, 255 empfängt, wird das hier hinterlegte Weiß ausgegeben.
HINWEIS: Der Maximalwert kann auf „0" begrenzt werden. In diesem Fall reagiert ein Farbkanal
nicht auf einen gesendeten DMX-Wert. Dies kann als Gerätefehler fehlinterpretiert werden.
DIM: Im Menü DIM können verschiedene Dimmerkurven gewählt werden. Bei den Dimmerkuven mit
einem „.“ am Ende wird zusätzlich ein Delay im Dimmer aktiviert.
LIN
SQR
ISQR
SCUR
Im Menü SET\DISY kann die Dauer der aktiven Displaybeleuchtung nach der letzten Eingabe
eingestellt werden. Das Display kann wahlweise auf automatisches Abschalten nach 2 Minuten
(2 MIN), oder generellen Betrieb (ON) gestellt werden.
D-12
Page 13
Info - Menü
ME NU
INFO
PERSON
SOFT
POW
Vx.x
100%
80%
50%
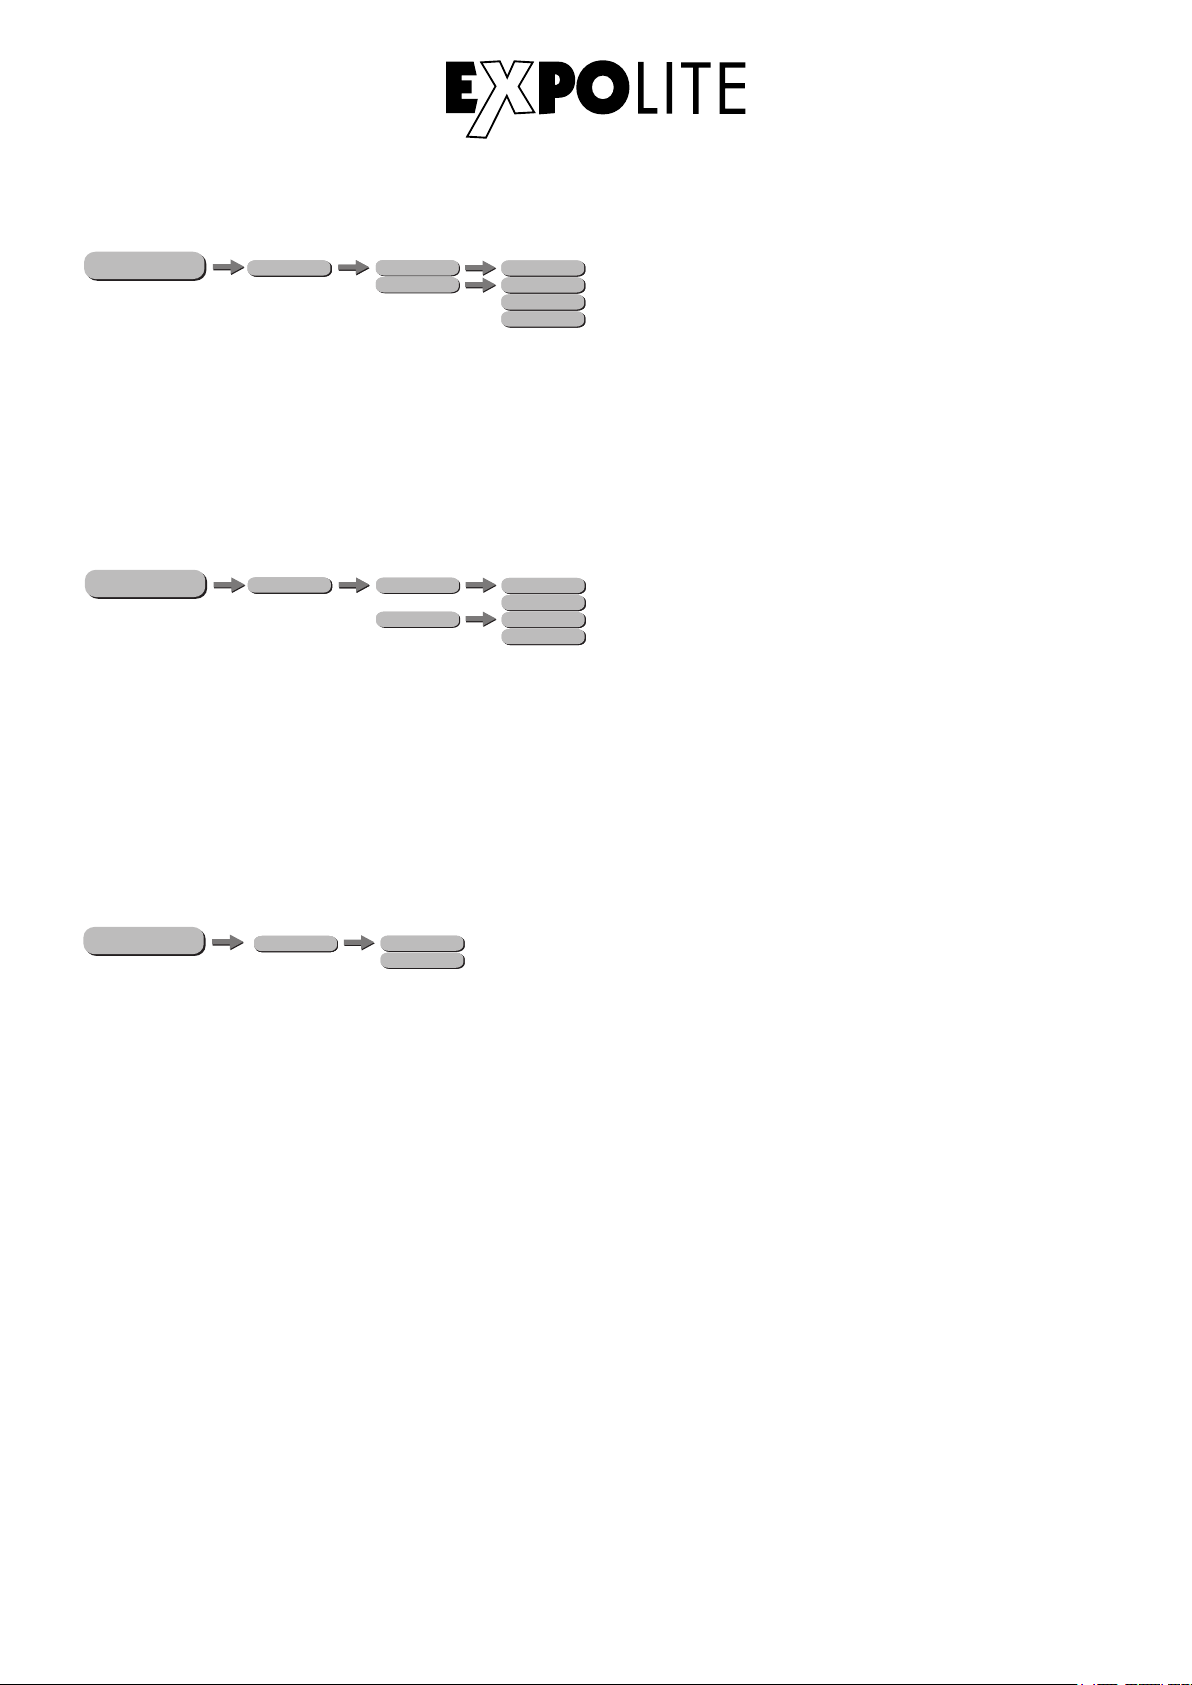
Im Menü INFO\SOFT wird die aktuell installierte Softwareversion des Gerätes angezeigt
Im Menü INFO\POW wird die z.Zt. aktive Leistungsreduktion bei Überhitzung des LED-Einheit
angezeigt.
Zurücksetzen auf Werkseinstellungen
ME NU
LOAD
PERSON
ST L
PR L
YES
NO
YES
NO
Im Menü LOAD, Untermenü ST L können die eingestellten Parameter des Gerätes einem Reset
unterzogen werden. Davon ausgenommen sind die Werte ADDR, CTST und PROG.
Im Untermenü LOAD/PR L können die vom User editierbaren gespeicherten Programme zurückgesetzt werden (YES).
Geräteeinstellungen an andere Geräte senden
ME NU
HSIC
SEND
YES
NO
Im Menü SEND können die Geräteparameter an andere Geräte auf der selben DMX-Linie gesendet
werden (YES).
- Andere Geräte (auch das Lichtstellpult) sollten nach Möglichkeit aus der Linie getrennt
werden.
- Die Parameter ADDR, und CAL können nicht übertragen werden.
- Nach der korrekten Übertragung der Parameter fährt das Gerät einen Reset.
D-13
Page 14
Steuerung mit DMX512
1 0-255 Red
2 0-255 Green
3 0-255 Blue
4 0-255 White
4CH Mode
1 0-255 Master Dimmer
2 0-255 Amber
3 0-255 White
4 0-255 UV
Virtual Colour Whe el
0-10 No Effect
11
Blue
12-50
Full Blue + Green Increasing
51
Cyan
52-90
Full Green + Blue Decreasing
91
Green
92-130
Full Green + Red Increasing
131
Yellow
132-170
Full Red + Green Decreas ing
171
Red
172-210
Full Red + Blue Increas ing
211 Magenta
212-250 Full Blue + Red Decreasing
251-255 Blue
5CH Mode
5
1 0-255 Red
2 0-255 Green
3 0-255 Blue
4 0-255 Amber
5 0-255 White
6 0-255 UV
6CH Mode
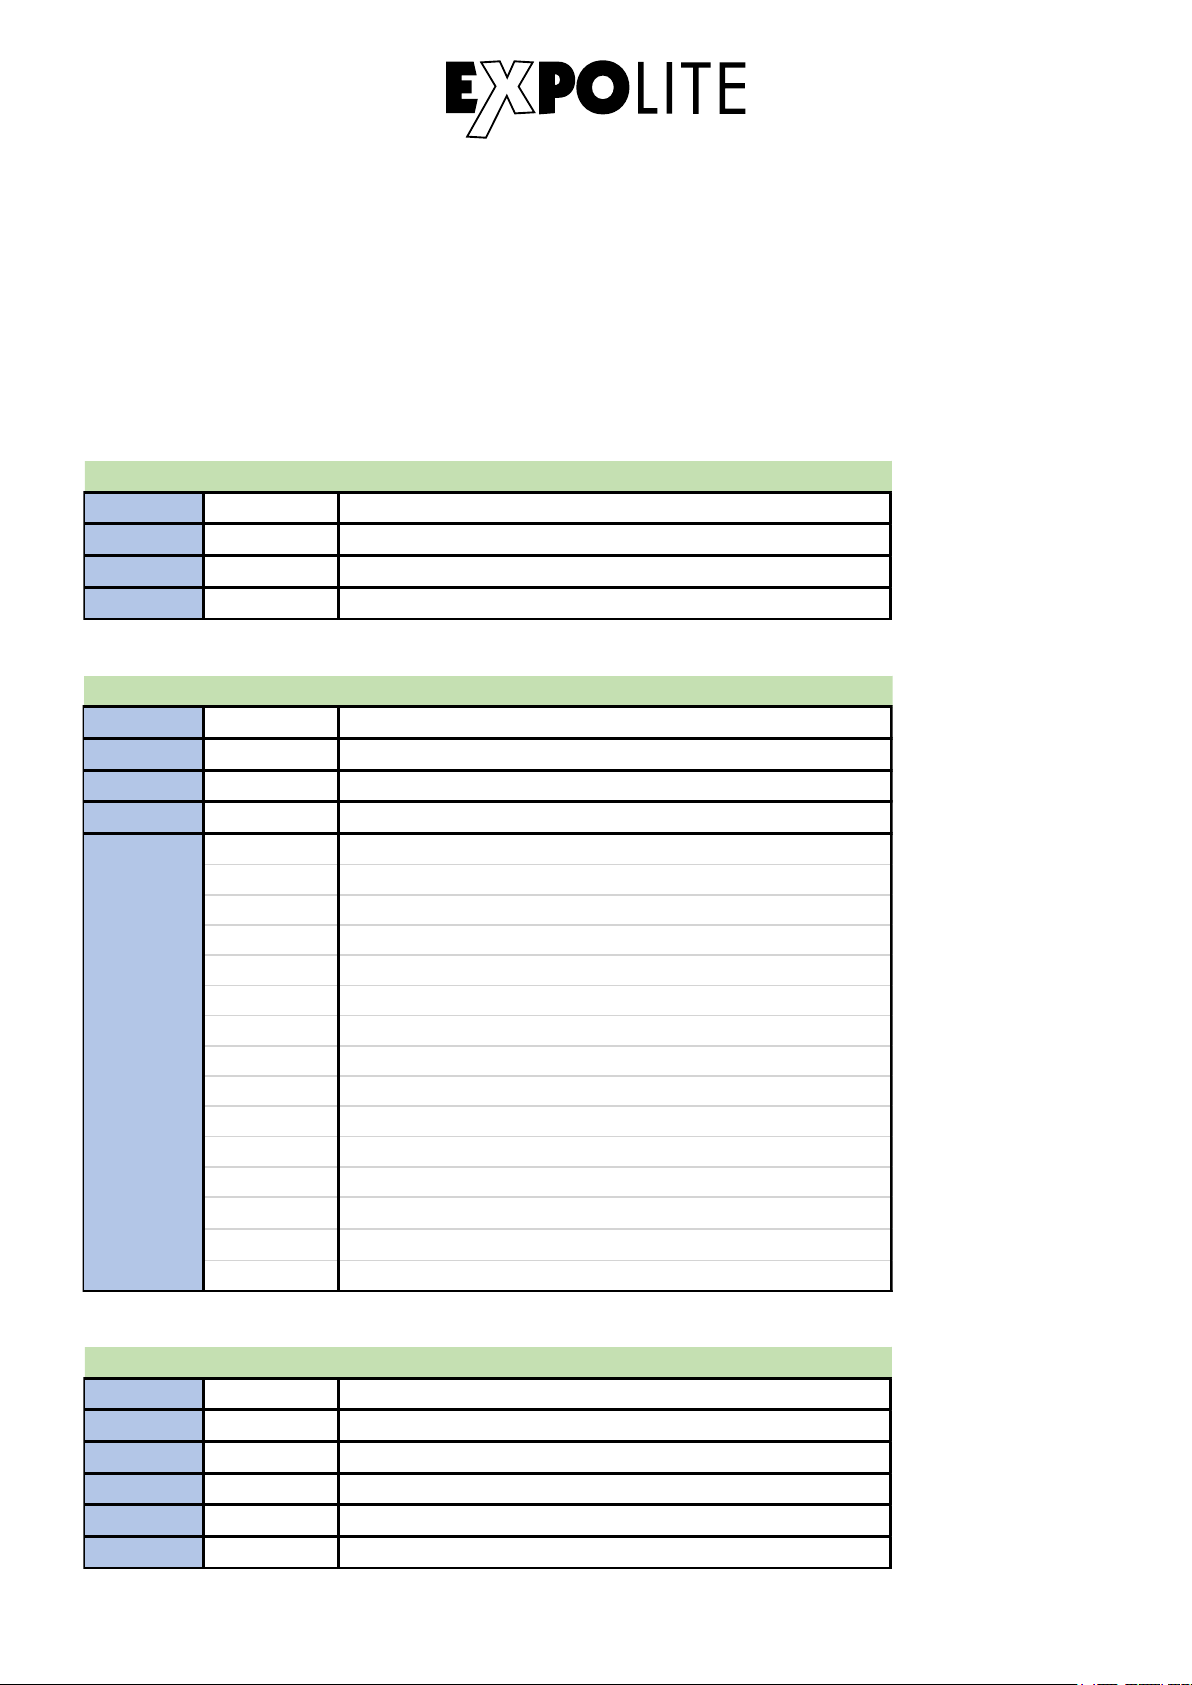
DMX-Kanalbelegung
Dieses Gerät verfügt über verschiedene DMX-Personalities. Bei diesen werden unterschiedlich viele
DMX-Kanäle belegt und die Reaktion des Gerätes unterscheidet sich entsprechend. Es sind 6
DMX-Personalities (4-/5-/6-/7-/9-/12-Kanäle) wählbar.
Durch Änderungen in der Gerätesoftware kann es zu weiteren oder geänderten Funktionen kommen. Auf der Website
steht das aktuellste Dokument „DMX-Channels“ als pdf zum Download zur Verfügung.
D-14
Page 15
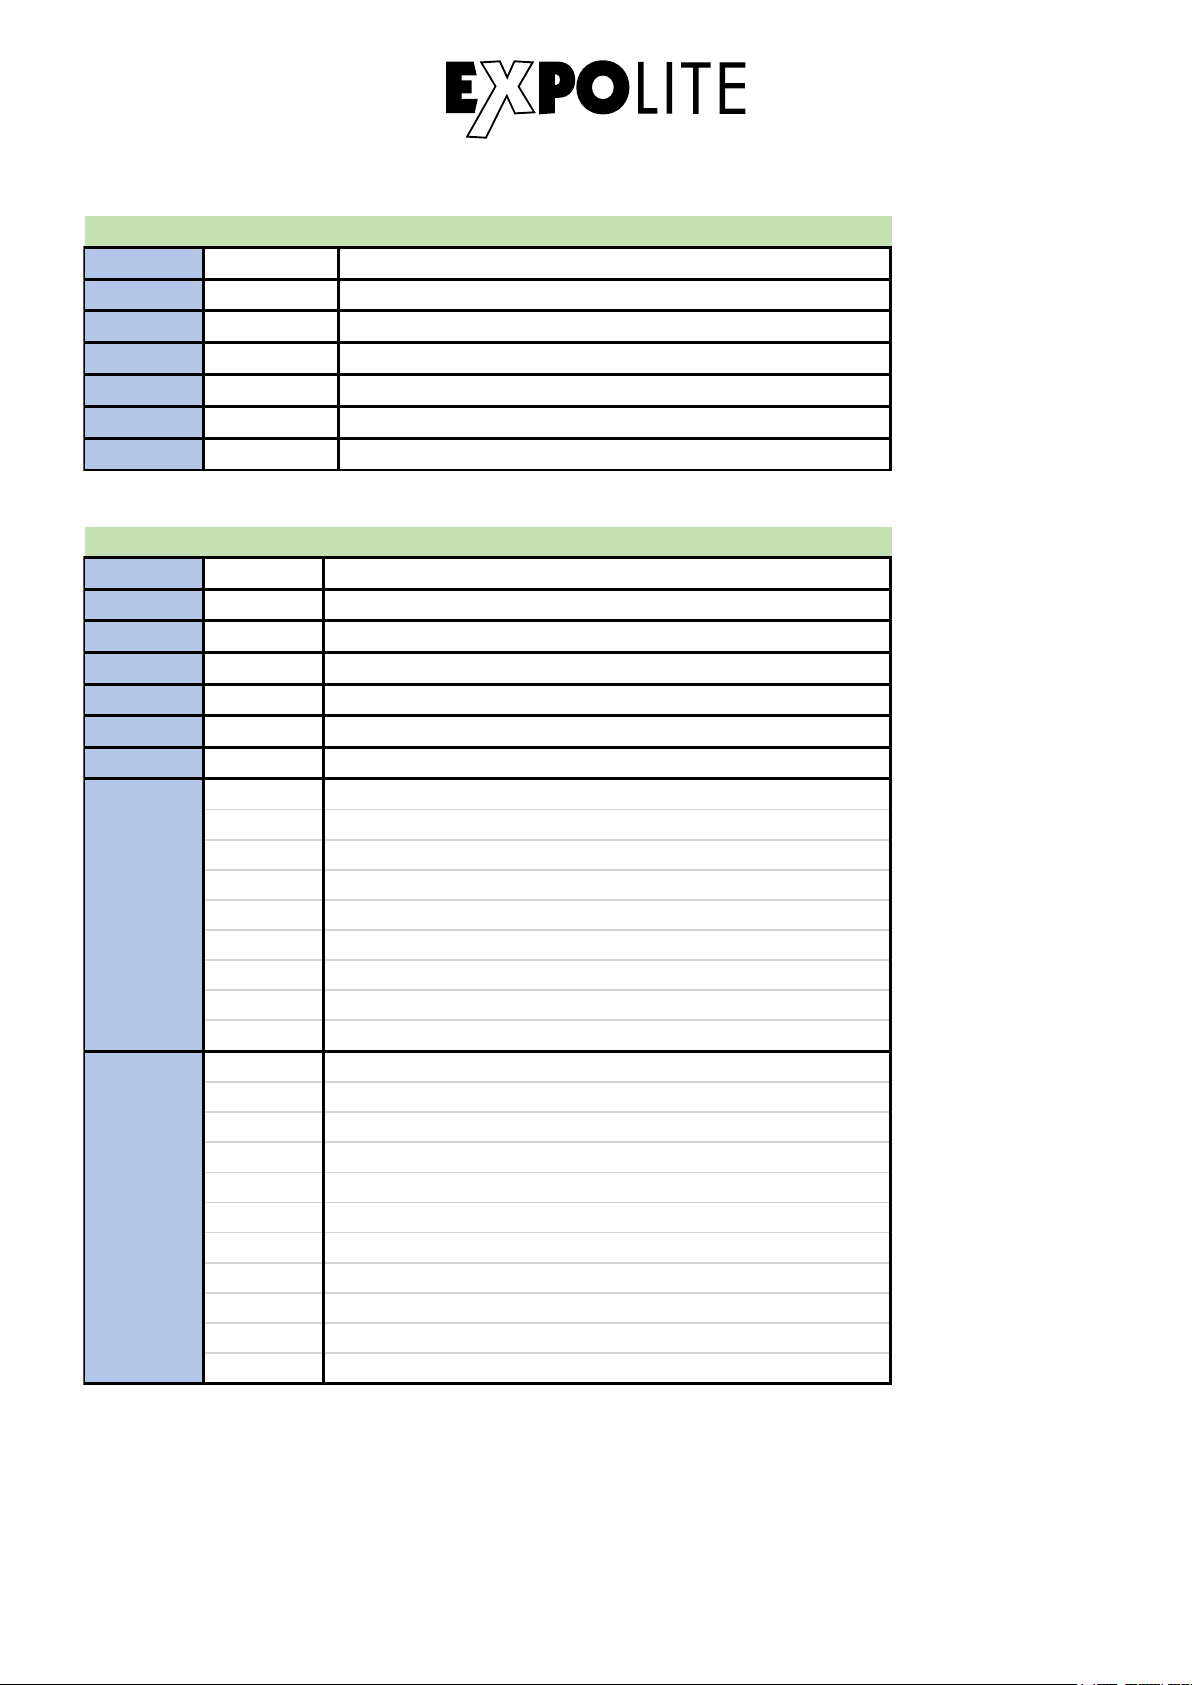
1 0-255 Master Dimmer
2 0-255 Red
3 0-255 Green
4 0-255 Blue
5 0-255 Amber
6 0-255 White
7 0-255 UV
7CH Mode
1 0-255 Master Dimme r
2 0-255 Red
3 0-255 Green
4 0-255 Blue
5 0-255 Amber
6 0-255 White
7 0-255 UV
Strobe
0-5 No Strobe
6-20
Not Synchronous Strobe (slow to fast)
21-60
Synchronous Strobe (slow to fast)
61-100
Electronic Sine Wave (slow to fast)
101-140
Random Strobe (slow to fast)
141-180
Opening Pulse (slow to fast)
181-220
Closing Pulse (slow to fas t)
221-255 Electronic Square Wa ve (slow to fast)
Dimmer Mode
0-10
Dimmer Mode selected in the menu
11-20
Linear Curve (not smooth)
21-30
Square Law Curve (not smooth)
31-40
Inverse Square Law Curve (not smooth)
41-50
S-Curve (not smooth)
51-60
Linear Curve (smooth)
61-70
Square Law Curve (smooth)
71-80
Inverse Square Law Curve (smooth)
81-90
S-Curve (smoo th)
91-255 Dimmer Mode selected in the menu
9
8
9CH Mode
D-15
Page 16
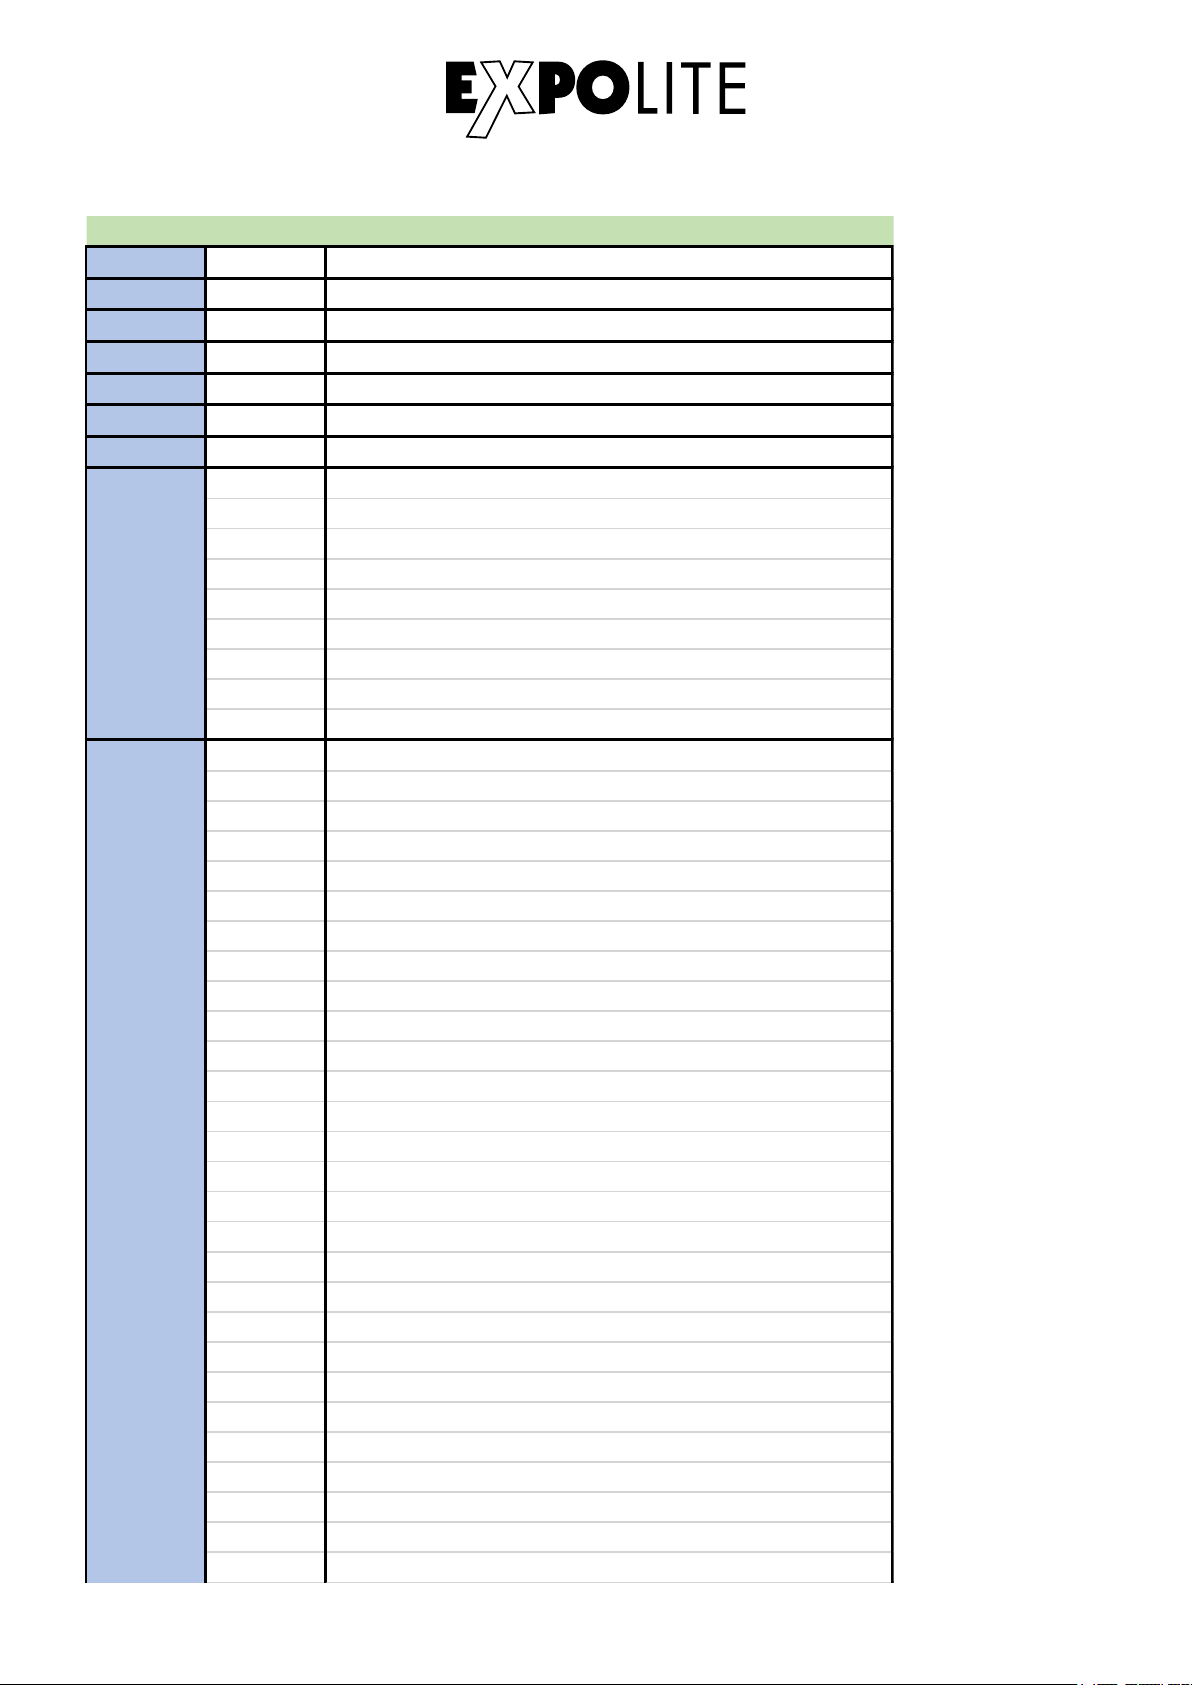
1 0-255 Master Dimme r
2 0-255 Red
3 0-255 Green
4 0-255 Blue
5 0-255 Amber
6 0-255 White
7 0-255 UV
Strobe
0-5 No Strobe
6-20
Not Synchronous Strobe (slow to fast)
21-60
Synchronous Strobe (slow to fast)
61-100
Electronic Sine Wave (slow to fast)
101-140
Random Strobe (slow to fas t)
141-180
Opening Pulse (slow to fast)
181-220
Closing Pulse (slow to fast)
221-255 Electronic Square Wave (slow to fast)
Auto Programs
0-10 No Effect
11-15
CT01 (Custo m Colour CT01)
15-20
CT02
21-25
CT03
26-30
CT04
31-35
CT05
36-40
CT06
41-45
CT07
46-50
CT08
51-55
CT09
56-60
CT10
61-65
Auto 1
66-70
Auto 2
71-75
Auto 3
76-80
Auto 4
81-85
Auto 5
86-90
Chase 1
91-95
Chase 2
96-100
Chase 3
101-110
Reserved
Preset Colours
111-115
Red
116-120
Green
121-125
Blue
126-130
Amber
131-135
White
136-140
UV
8
9
12CH Mode
D-16
Page 17
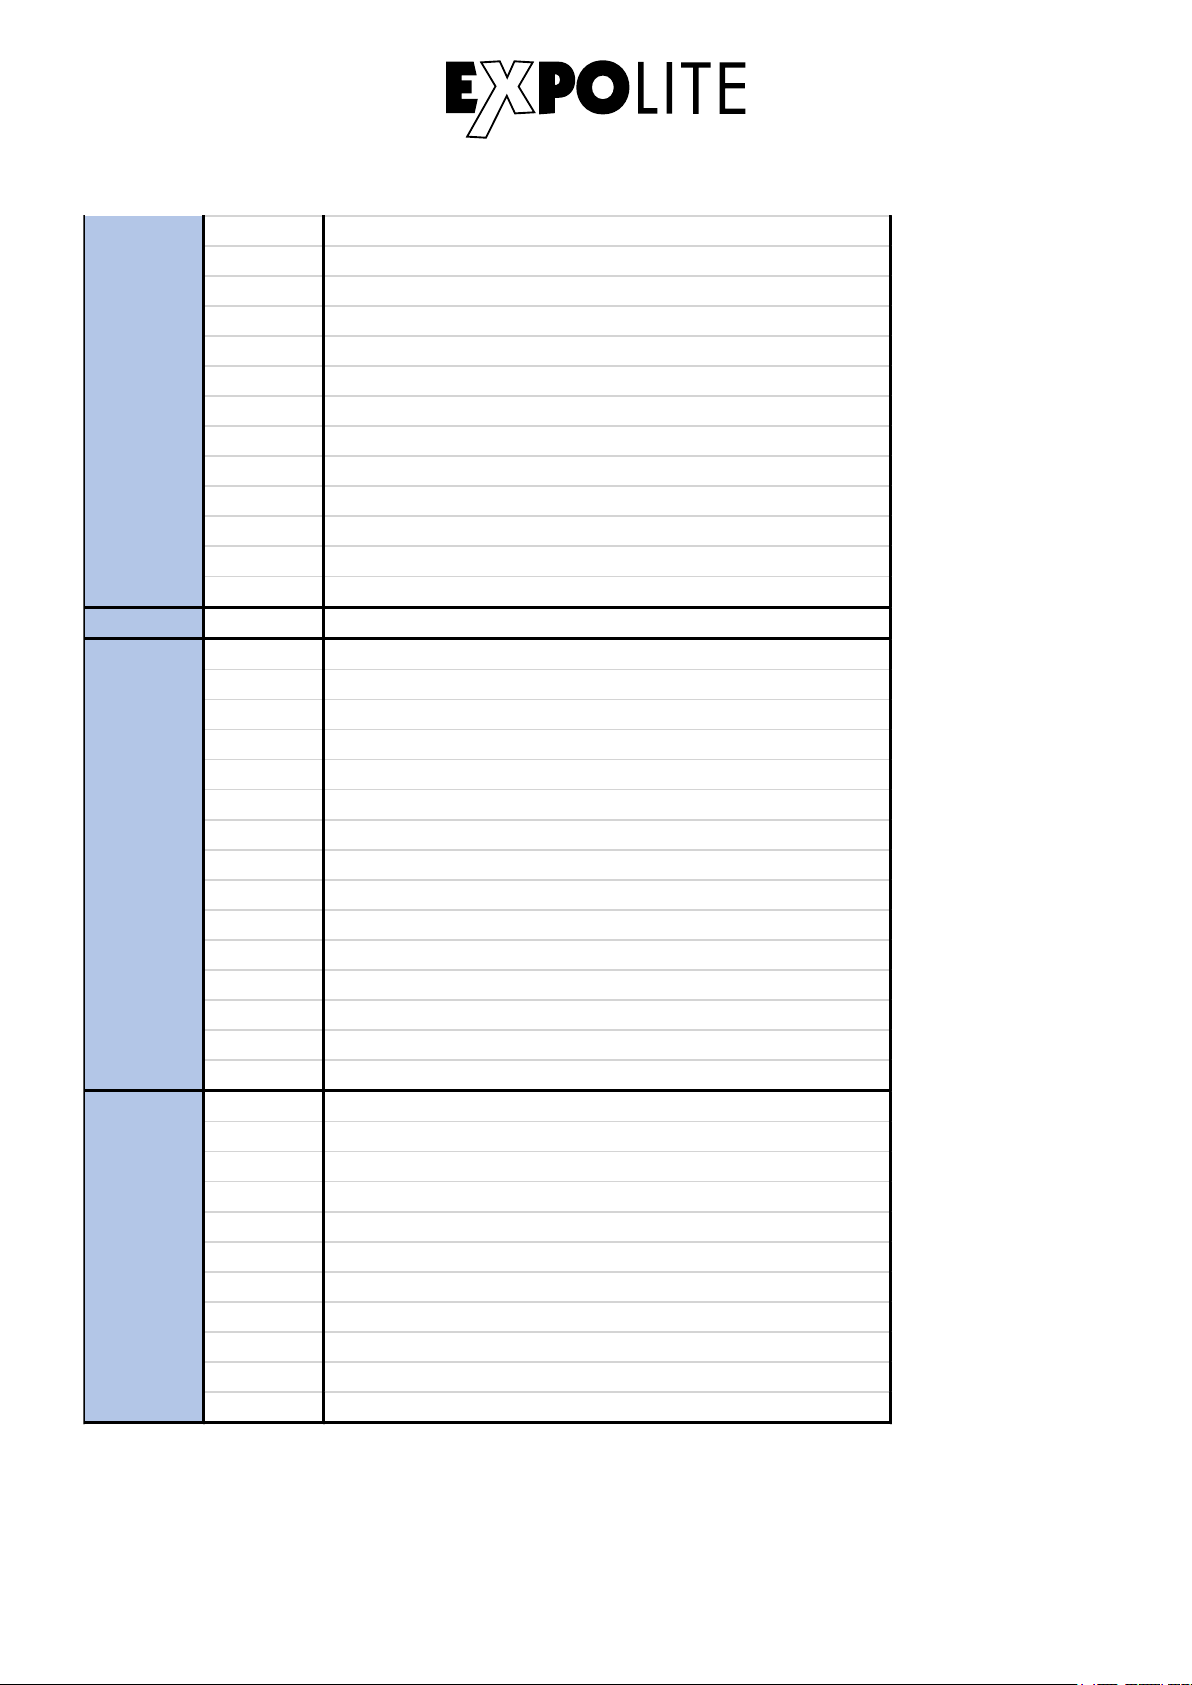
141-145
Yellow
146-150
Pink
151-155
Cyan
156-160
Orange
161-165
Violet
166-170
Golden Amber
171-175
2700K
176-180
3200K
181-185
4000K
186-190
5500K
191-195
6500K
196-200
RGBW
236-255 Rese rved
10 0-255 Auto Spee d
Virtual Co lour Whee l
0-10 No Effect
11
Blue
12-50
Full Blue + Green Increa sing
51
Cyan
52-90
Full Green + Blue Decreas ing
91
Green
92-130
Full Green + Red Increasing
131
Yellow
132-170
Full Red + Gree n Decreasing
171
Red
172-210
Full Red + Blue Increasing
211
Magenta
212-250
Full Blue + Red Decreasing
251-255 Blue
Dimmer Mode
0-10
Dimmer Mode selecte d in the menu
11-20
Linear Curve (not smoo th)
21-30
Squa re Law Curve (not smooth)
31-40
Inverse Square La w Curve (not smooth)
41-50
S-Curve (not smooth)
51-60
Linear Curve (smooth)
61-70
Squa re Law Curve (smoo th)
71-80
Inverse Square La w Curve (smooth)
81-90
S-Curve (smoo th)
91-255 Dimmer Mode selecte d in the menu
11
9
12
D-17
Page 18

Delivery
- Expolite TourPar 18
- Power connection cable
- General Information for Expolite Units
- User Manual
Expolite devices are carefully checked before shipment. If the delivery is not complete,
please contact your distributor immediately.
E-18
Page 19

Product Information
Voltage
Power Consumption
Dimensions
Weight
Connectors
Ambient Temperature
Humidity*
Protection
Housing
LEDs
Optics
Control
DMX-Channels
100V - 240V AC 50/60Hz
40W
181 x 130 x 201mm
1,8kg
Power In/Out | DMX In/Out
-20°C - 45°C
< 80%
IP 65
Die Cast Aluminium Housing
3x 12W RGBAWUV**
25°
Stand-Alone / DMX512
4 - 12 (4/5/6/7/9/12)
* take note to General Informations for Expolite Units - Notes for Condensation inside Housing.
** Tolerance in colour temperature according to LED manufacturer +/- 10%.
E-19
Page 20
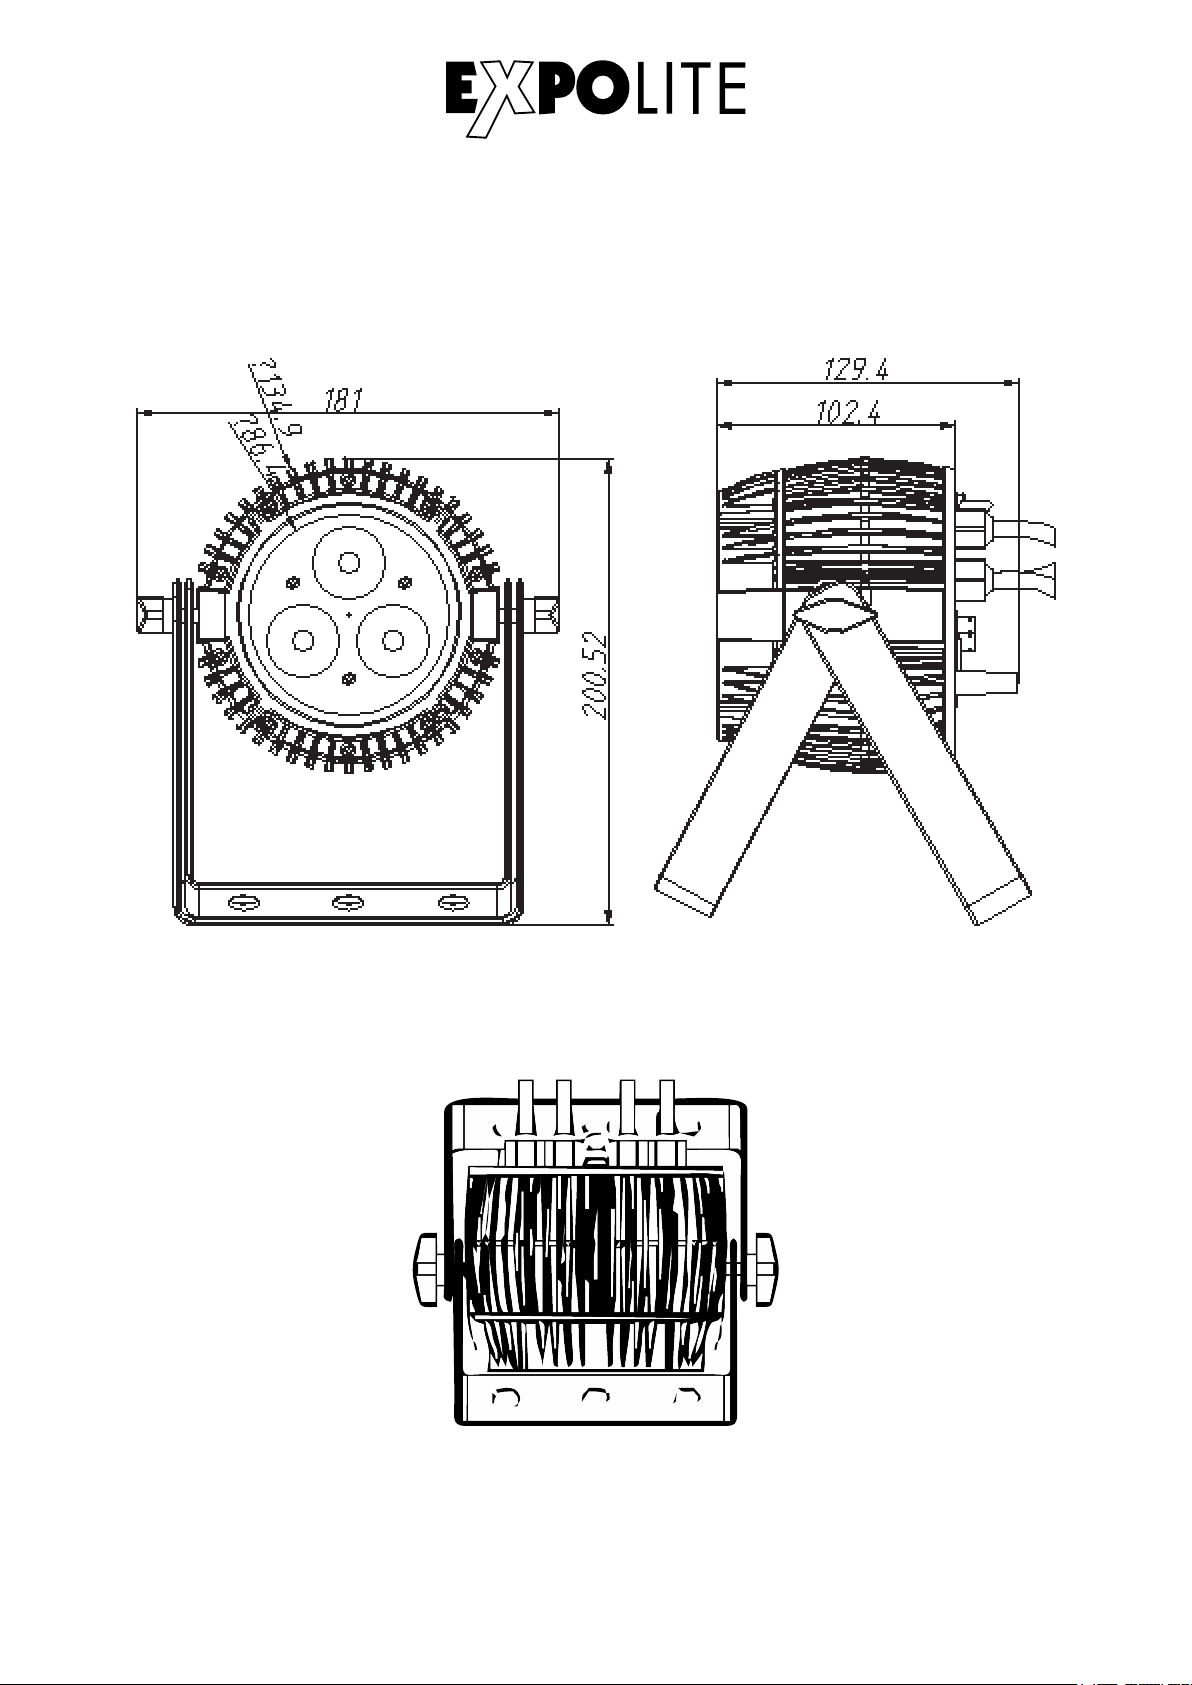
Dimensions
E-20
Page 21
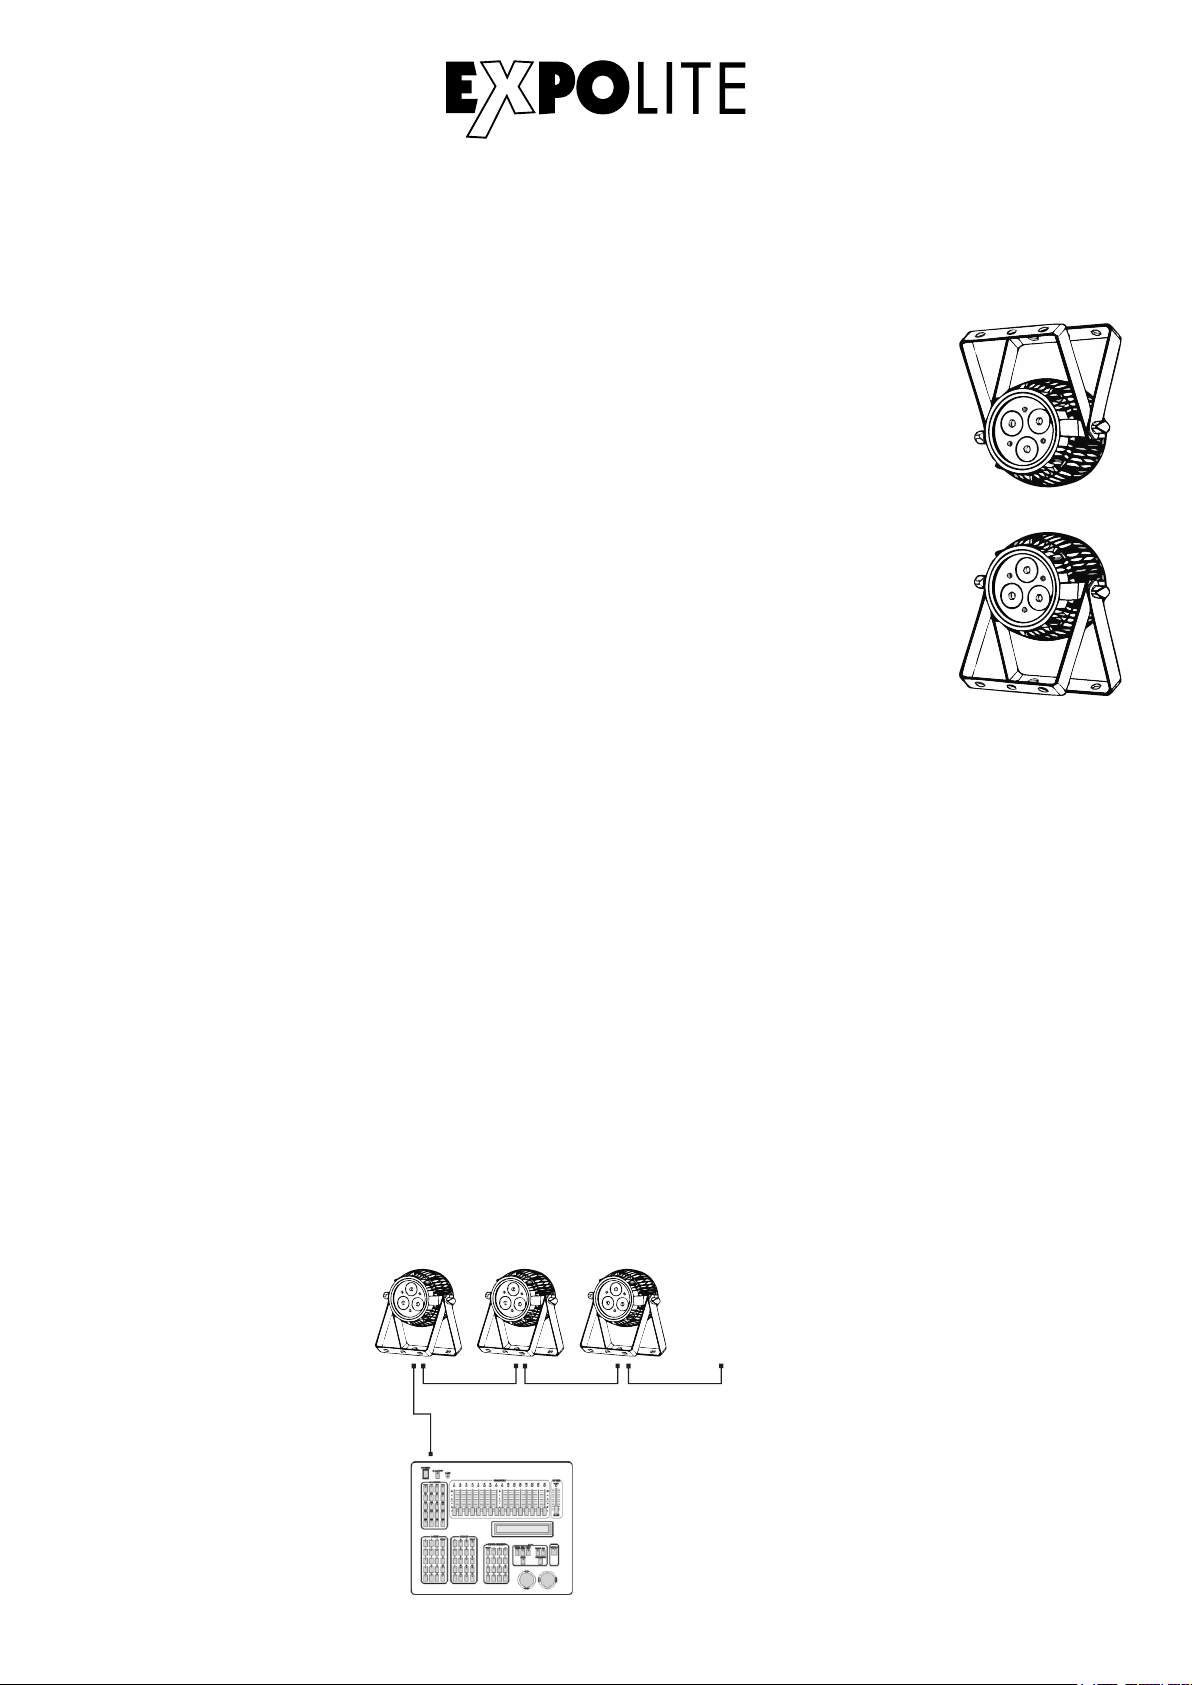
Installation
Mounting
Hanging
The device can be used in any position. On the mounting bracket are holes
available, for attaching standard brackets. Fixture must be safe mounted in
accordance with the relevant regulations and provided with a safetycord to
prevent falling. For this purpose, an eyelet for safeties is attached to the device.
Standing
The device can be placed directly on the mounted bracket. For this purpose,
it must be opened up to the mechanical stop.
NOTE
The LED module can be operated in any position.
Powerconnection
230V: max. 42 fixtures in a row.
120V: max. 21 fixtures in a row.
DMX-Connection
Use specified DMX-cables to connect the units to each other and to connect them to the controldesk. Enter the addresses and personalities to the units.
DM X Addr .1 DM X Addr .(N x1) +1 DM X Addr .(N x2) +1
............
DMX 512
CON TROLL ER
E-21
Page 22
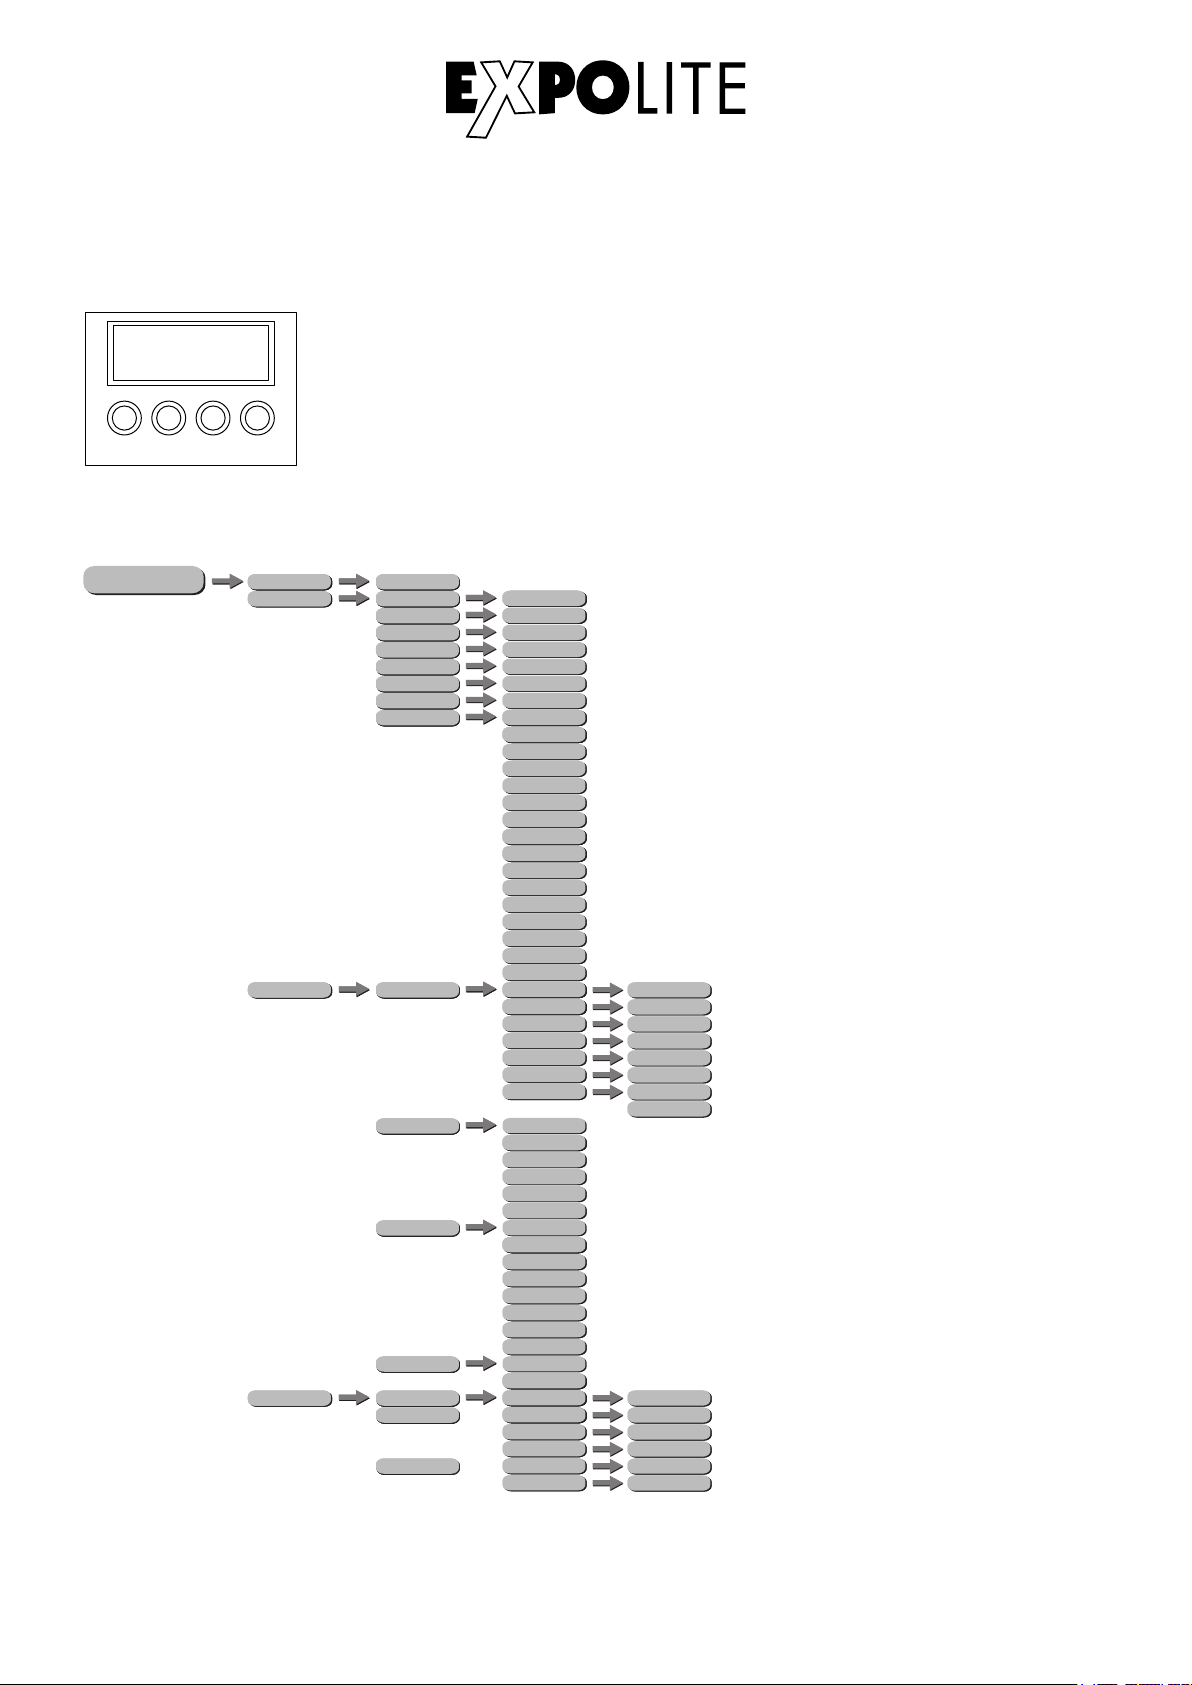
Operation
Display Operation
MEN U
ENT ER UP
Menüstruktur
ME NU
DOW N
ADDR HSIC
PERSON
STAT
PERSON
SET CAL
PERSON
CTST
PERSON
MENU - Taste:
ENTER-Taste:
UP-Taste:
DOWN-Taste
001 - 512
HSIC
R
G
HSICB
HSIC
A
HSICW
UV
HSIC
SHUT
HSIC
PRSC
HSIC
HSIC
CHMD
HSIC
HSICDIM
DISY
HSIC
HSIC
CT 01
CT 02
HSIC
o
o
o
HSIC
CT 10
Return to previous menu
Enter currently selected menu
Scroll Up, Increase value
Scroll down, Decrease value
0 - 255
0 - 255
0 - 255
0 - 255
0 - 255
0 - 255
0 - 255
0 - 255
0 - 25
0 - 255
Red
0 - 255
Green
Blue
Amber
White
Pink
Cyan
Orange
0 - 255
0 - 255
Violet
Golden Amber
2700K
3200K
4000K
5500K
6500K
RGBW
0 - 255
R
0 - 255
G
B
A
W
UV
USE
12CH
0 - 255
9CH
7CH
6CH
5CH
4CH
LIN
SQR
0 - 255
ISQR
SCUR
LIN.
SQR.
ISQR.
SCUR.
ON
0 - 255
2MIN
0 - 255
R
0 - 255
G
B
A
W
UV
0 - 255
0 - 255
0 - 255
0 - 255
0 - 255
0 - 255
YES
NO
0 - 255
0 - 255
0 - 255
0 - 255
0 - 255
0 - 255
E-22
Page 23
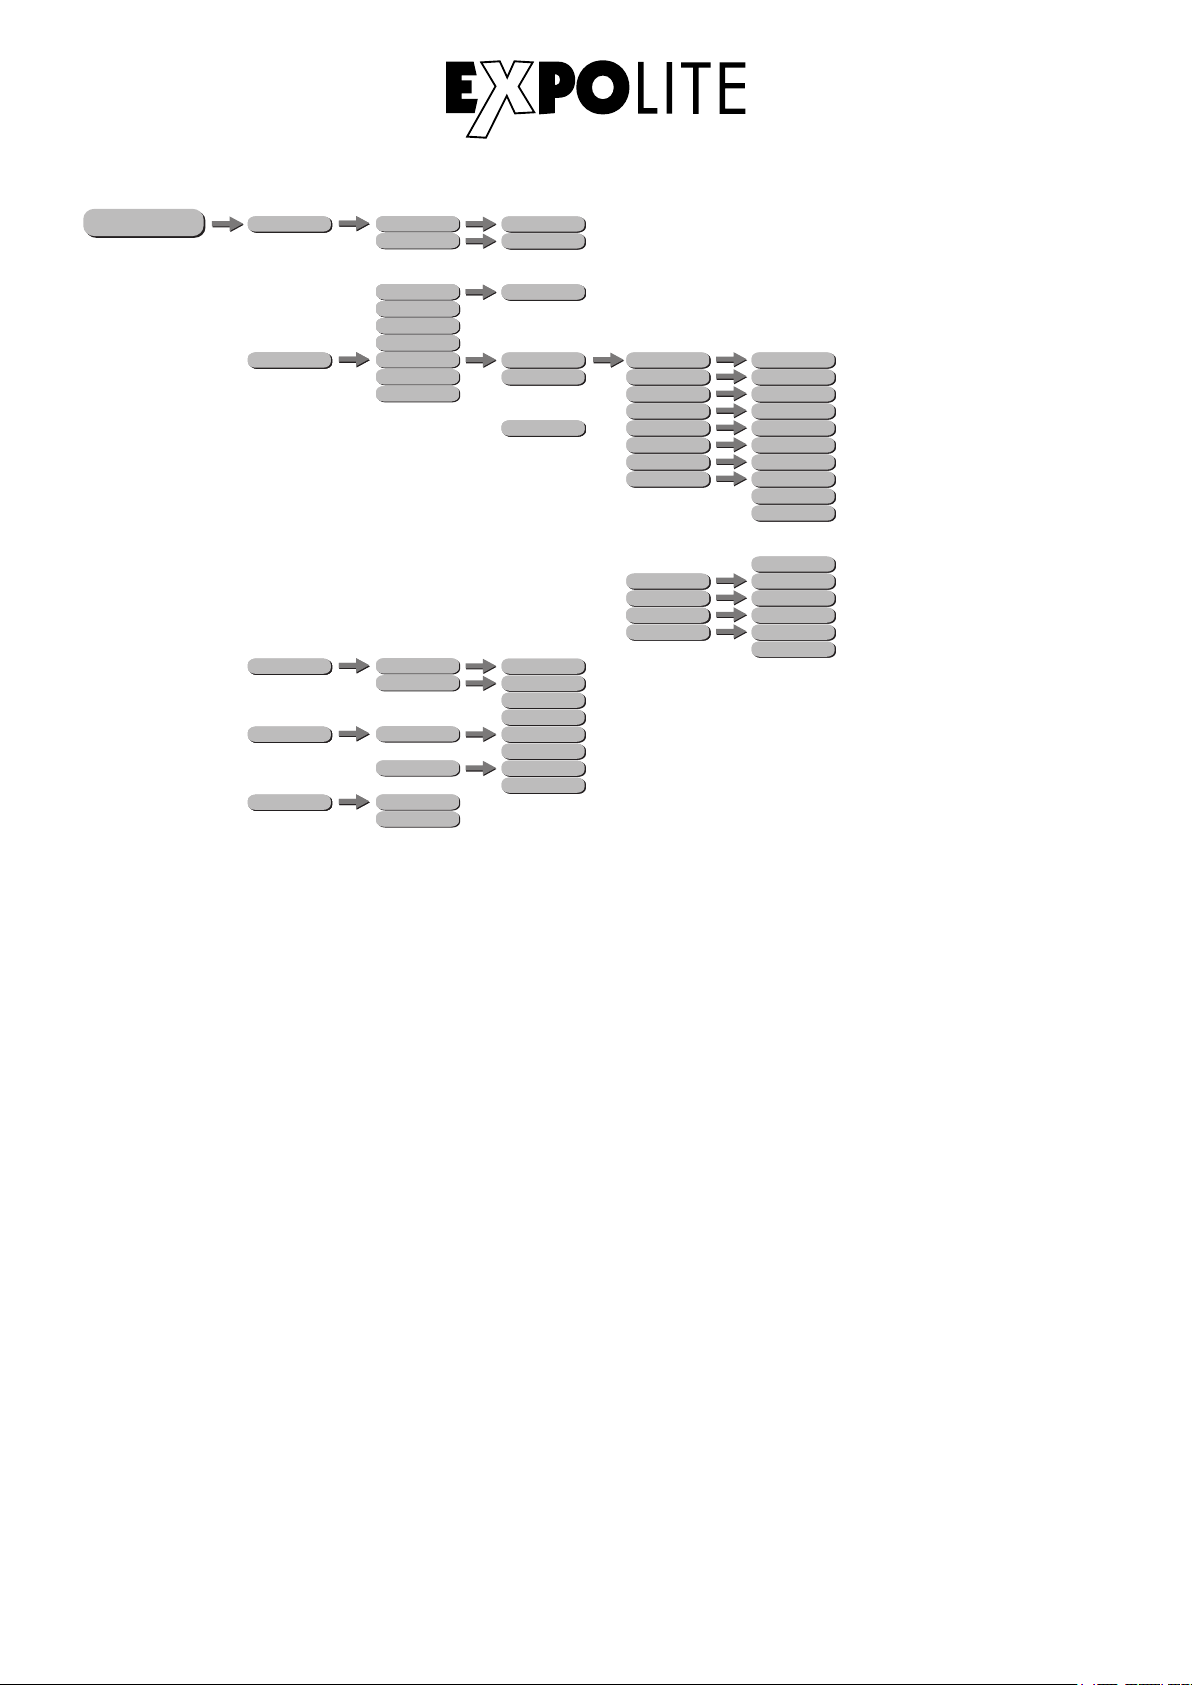
ME NU
AUTO
PERSON
PROG
PERSON
INFO
PERSON
LOAD
PERSON
SEND
PERSON
AT 01
AT 02
o
o
o
AT 05
CHS1
CHS2
CHS3
CHS1
CHS2
CHS3
SOFT
POW
ST L
PR L
YES
NO
0-255
0-255
0-255
SC 01
SC 02
o
o
o
SC 20
Vx.x
100%
80%
50%
YES
NO
YES
NO
R
G
B
A
W
UV
SHUT
AUTO
ATSP
TIME
WAIT
USE
0-255
0-255
0-255
0-255
0-255
0-255
0-255
NONE
AT 01
AT 02
o
o
o
AT 05
0-255
0-255
0-255
YES
NO
E-23
Page 24
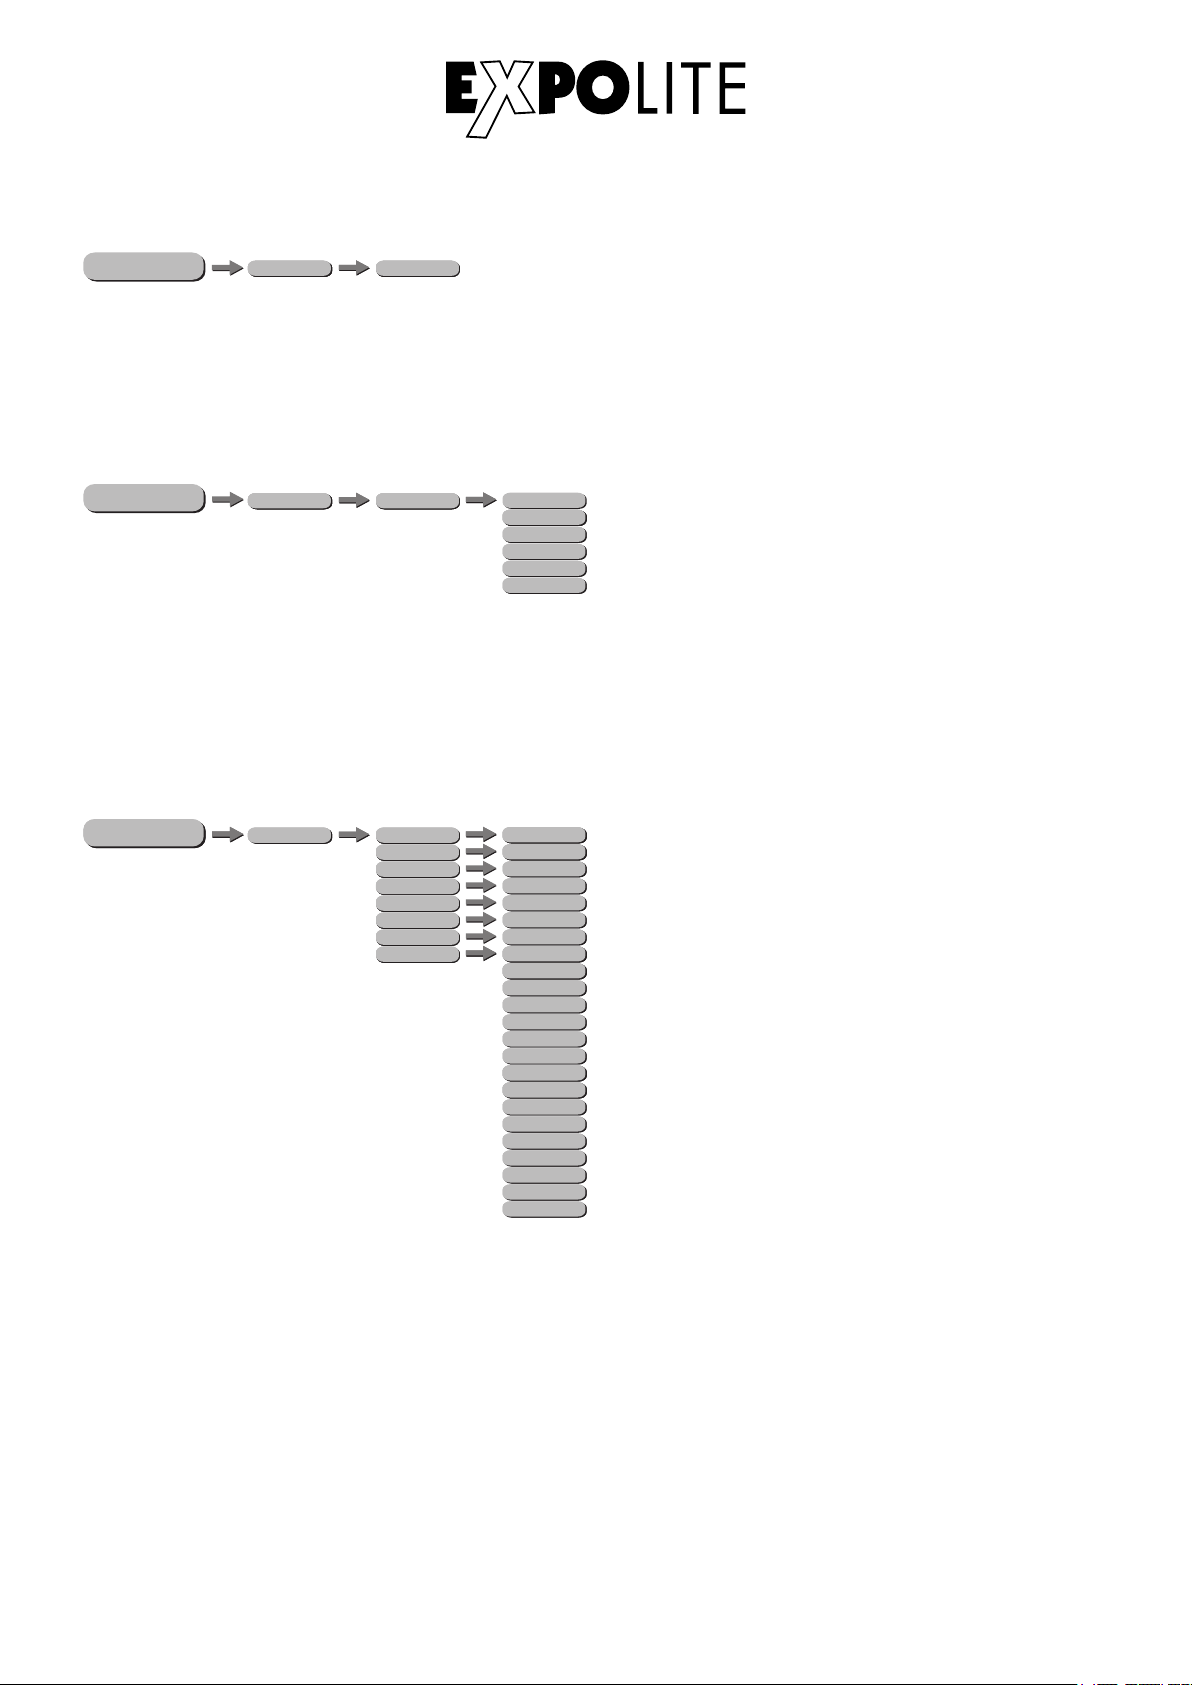
Setting DMX-Address
ME NU
PERSON
HSICADDR 001-512
The DMX start address of the fixture is set in the menu ADDR. This is retained even when changing
the personality.
Setting DMX-Personality
ME NU
SET
PERSON
CHMD
HSIC
12CH
0 - 255
9CH
7CH
6CH
5CH
4CH
The personality is set in the menu SET, submenu CHMD. There are six different modes which can be
chosen: 12CH, 9CH, 7CH, 6CH, 5CH and 4CH.
Edit Static Colours
0 - 255
ME NU
ME NU
STAT
PERSON
HSIC
HSICB
HSIC
HSICW
HSIC
SHUT
HSIC
PRSC
HSIC
R
G
A
UV
0 - 255
0 - 255
0 - 255
0 - 255
0 - 255
0 - 255
0 - 255
0 - 25
0 - 255
Red
0 - 255
Green
Blue
Amber
White
Pink
Cyan
Orange
0 - 255
0 - 255
Violet
Golden Amber
2700K
3200K
4000K
5500K
6500K
RGBW
Static colours for stand-alone operation are set in STAT. These are mixed using the DMX value scale
0-255 for Red (R), Green (G), Blue (B), Amber (A), White (W) and UV, as well as the strobe value
(SHUT) 0-25Hz. It is also possible to choose out of 16 preset static colours in the submenu PRSC.
E-24
Page 25
ME NU
CTST
PERSON
HSIC
CT 01
CT 02
HSIC
HSIC
CT 10
R
0 - 255
o
o
o
G
B
A
W
UV
0 - 255
0 - 255
0 - 255
0 - 255
0 - 255
0 - 255
0 - 255
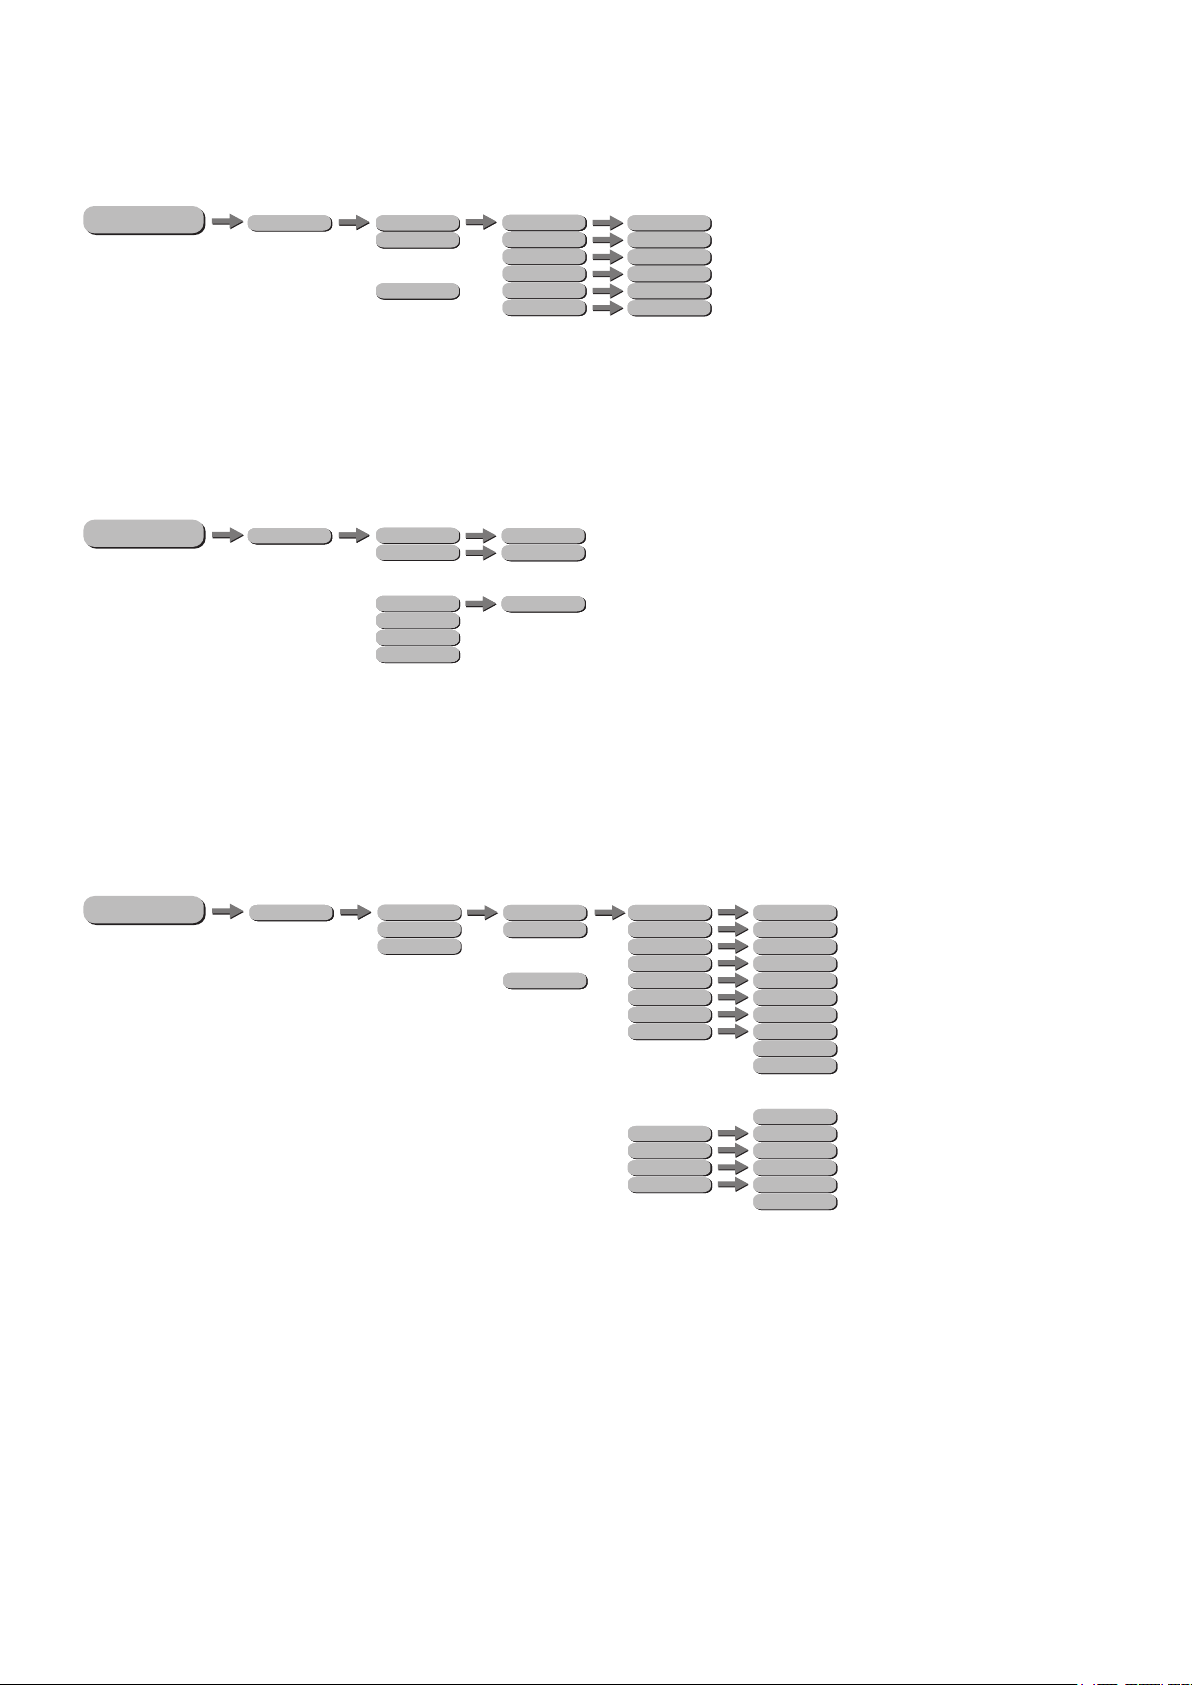
Ten different static colours (CT 01 - CT 10) can also be mixed by the user in the menu CTST out of
Red (R), Green (G), Blue (B), Amber (A), White (W) and UV.
Activating Auto Programs
ME NU
AUTO
PERSON
AT 01
AT 02
o
o
o
AT 05
CHS1
CHS2
CHS3
0-255
0-255
0-255
In the menu AUTO the automatic programs stored in the device are activated. The programs AT 01
to AT 05 are permanently stored in the device. The programs CHS1, CHS2 and CHS3 are editable.
This is described under Edit User Programs.
Edit User Programs
ME NU
PROG
PERSON
CHS1
CHS2
CHS3
SC 01
SC 02
SC 20
R
o
o
o
G
B
A
W
UV
SHUT
AUTO
ATSP
TIME
WAIT
USE
0-255
0-255
0-255
0-255
0-255
0-255
0-255
NONE
AT 01
AT 02
o
o
o
AT 05
0-255
0-255
0-255
YES
NO
In the menu PROG the user programs CHS1, CHS2 and CHS3 can be edited. Every program can
have up to 20 steps (scenes). Every step can persists of the parameter colours RGBAWUV, Strobe
(SHUT), the preset auto programs and their speed (AUTO and ATSP), TIME and WAIT. Single steps
can be set active (YES) or inactive (NO) in the submenu USE.
Step-by-step programming of the custom stand-alone programs with up to 20 different steps:
NOTE: For less than 20 steps the TIME and WAIT of the last step needs to be set to 0.
Example for time settings of a stand-alone programm with 3 steps:
Step 1 TIME = 4 WAIT = 3 USE = YES
Step 2 TIME = 5 WAIT = 2 USE = YES
Step 3 TIME = 0 WAIT = 0 USE = YES
E-25
Page 26
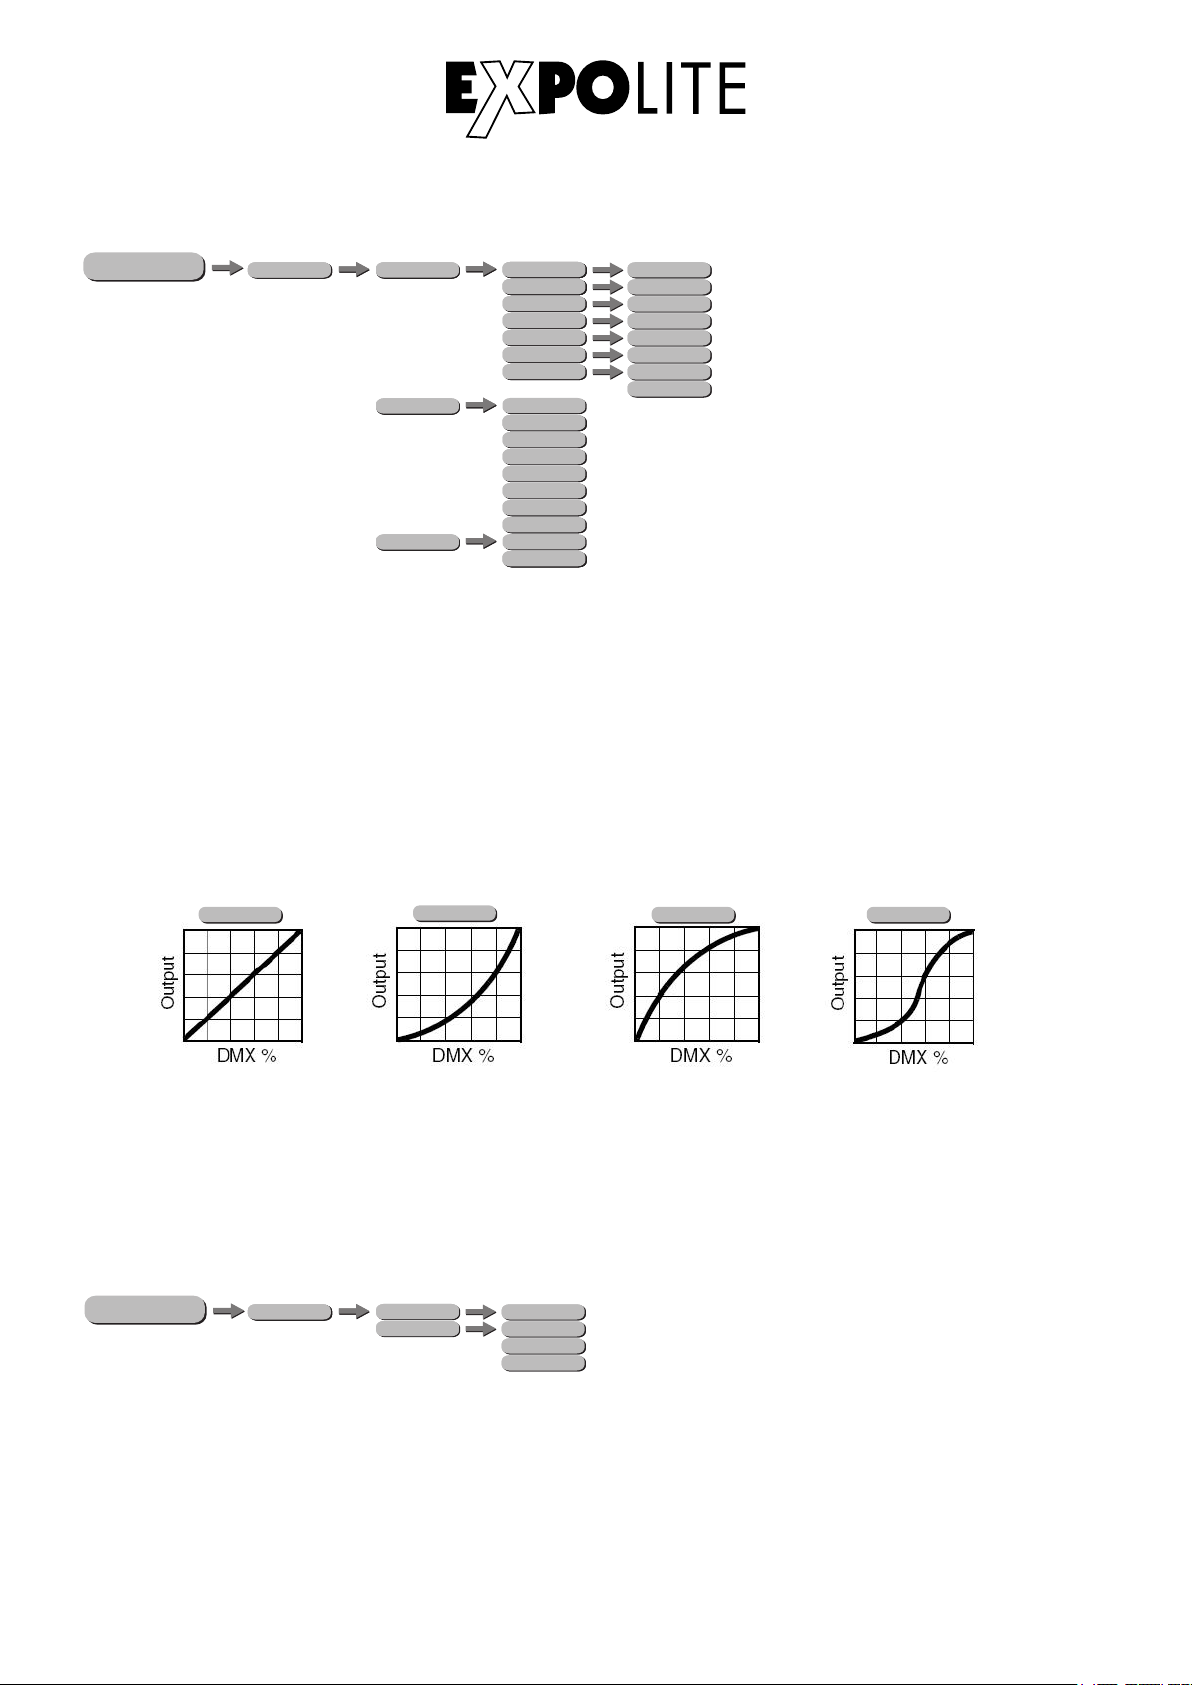
Miscellaneous Settings
ME NU
SET CAL
PERSON
HSIC
HSICDIM
DISY
HSIC
0 - 255
R
0 - 255
G
B
A
W
UV
USE
LIN
SQR
0 - 255
ISQR
SCUR
LIN.
SQR.
ISQR.
SCUR.
ON
0 - 255
2MIN
0 - 255
0 - 255
0 - 255
0 - 255
0 - 255
0 - 255
YES
NO
In the menu SET the following settings can be done:
CAL: in the menu CAL a custom colour calibration is stored which limits the maximum brightness of
the colour channels at the DMX value "255" if activated (USE=YES).
NOTE: the maximum value can be limited to 0. In this case, a colour channel does not respond
to a sent DMX value, which can be misinterpreted as a device error.
DIM: in the menu DIM it is possible to set different dim curves. Dim curves with „.“ at the end activate
an additional dimming delay.
LIN
SQR
ISQR
SCUR
DISY: in the menu DISY it is possible to control the illumination of the display after the last display
input. The display can be set to turn off automatically after two minutes (2 MIN) or to stay illuminated
generally (ON).
Info - Menü
ME NU
INFO
PERSON
SOFT
POW
Vx.x
100%
80%
50%
In the submenu INFO\SOFT the currently installed software version of the fixture is shown.
in the submenu INFO\POW the current reduction of the led brightness because of overheating is
shown.
E-26
Page 27
Factory Defaults
WAIT
ME NU
LOAD
HSIC
SETTING LOAD
SETTING LOAD
SETTING LOADST L
SETTING LOAD
SETTING LOAD
SETTING LOAD
PR L
WAIT
USE
USE
WAIT
WAIT
USE
USE
YES
YES
NO
NO
YES
YES
NO
NO
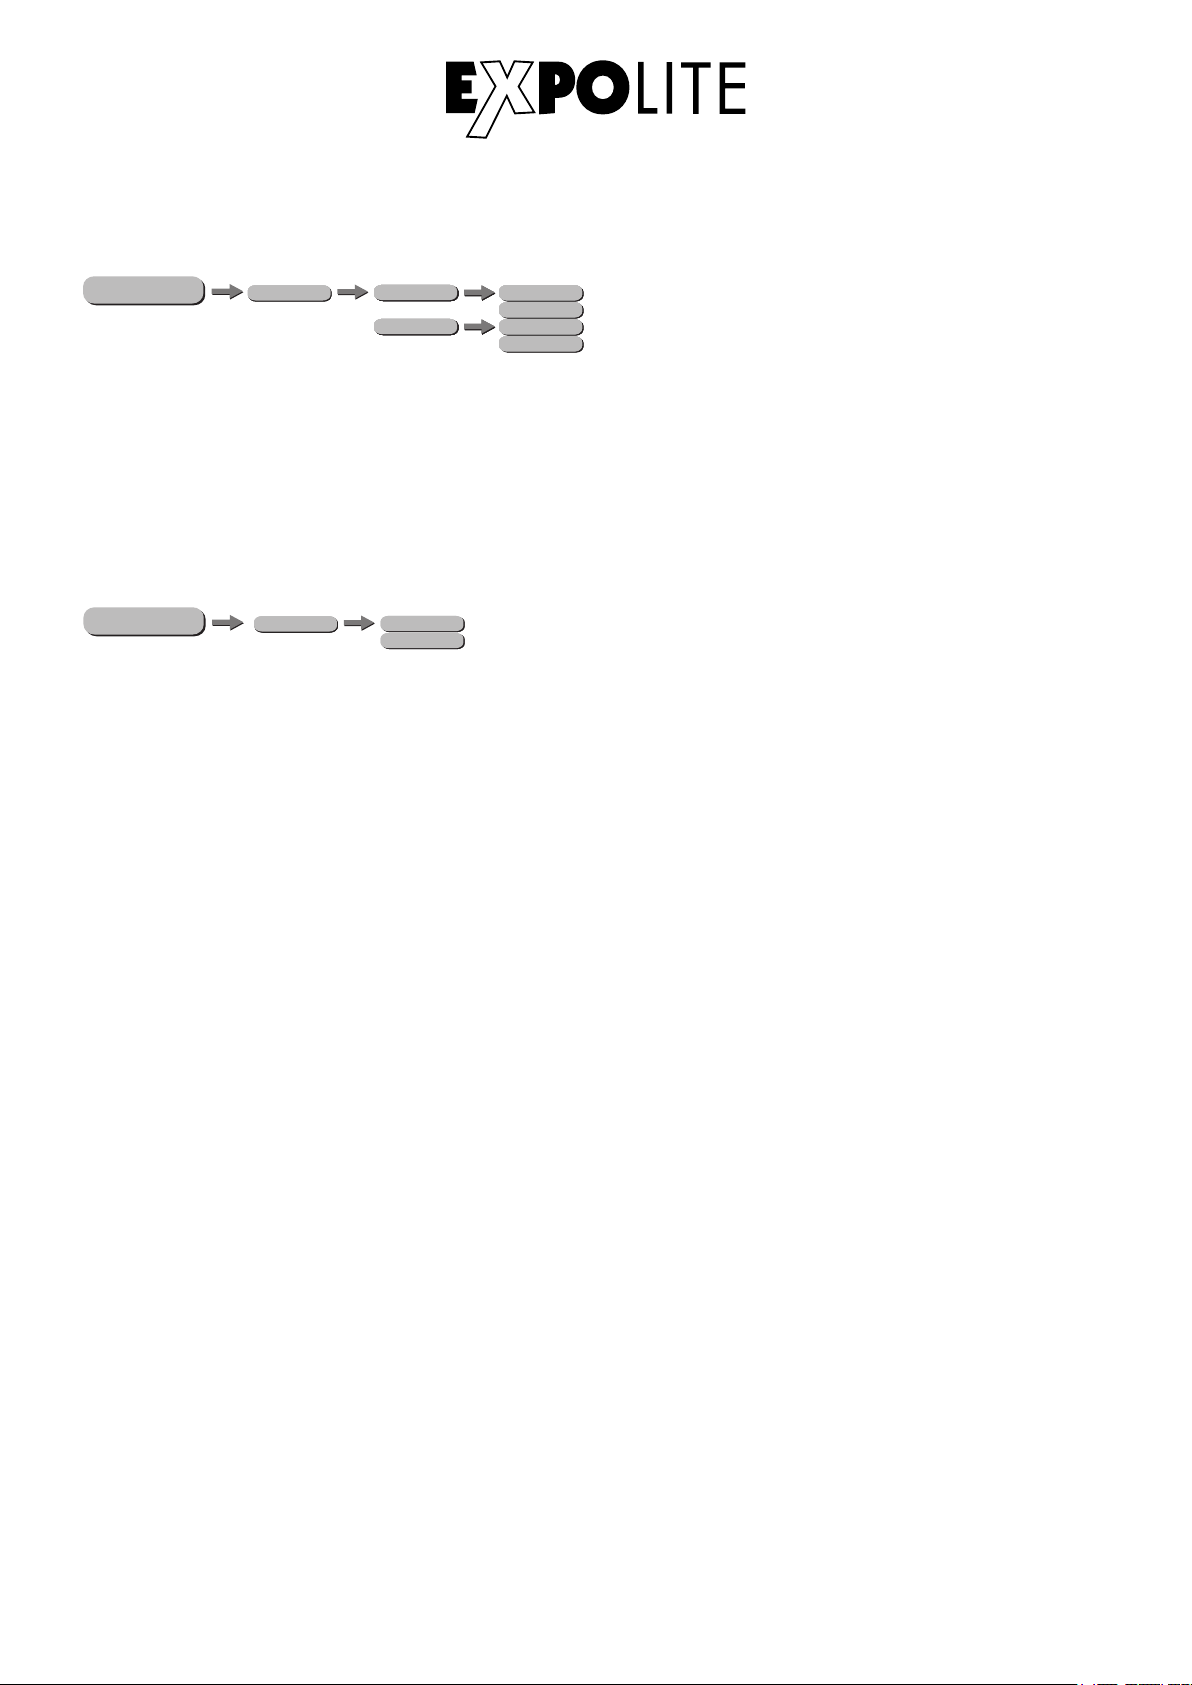
In the submenu LOAD/ST L the changed values of the fixture can be reset to factory defaults. This
doesn‘t affect the values of ADDR, CTST und PROG.
In the submenu LOAD/PR L the edited parameters of the user programs can be reset.
Sending Parameters to other Fixtures
ME NU
HSIC
SEND
YES
NO
In the menu SEND fixture paramters can be send to other fixtures on the same DMX-line. (YES).
- All other fixtures (also the lighting desk) should be disconnected if possible.
- The parameters ADDR and CAL can not be sent to other fixtures.
- After the correct transfer of the parameters, the receiving fixtures will run a reset.
E-27
Page 28
Using DMX512 Control
1 0-255 Red
2 0-255 Green
3 0-255 Blue
4 0-255 White
4CH Mode
1 0-255 Master Dimmer
2 0-255 Amber
3 0-255 White
4 0-255 UV
Virtual Colour Whe el
0-10 No Effect
11
Blue
12-50
Full Blue + Green Increasing
51
Cyan
52-90
Full Green + Blue Decreasing
91
Green
92-130
Full Green + Red Increasing
131
Yellow
132-170
Full Red + Green Decreas ing
171
Red
172-210
Full Red + Blue Increas ing
211 Magenta
212-250 Full Blue + Red Decreasing
251-255 Blue
5CH Mode
5
1 0-255 Red
2 0-255 Green
3 0-255 Blue
4 0-255 Amber
5 0-255 White
6 0-255 UV
6CH Mode
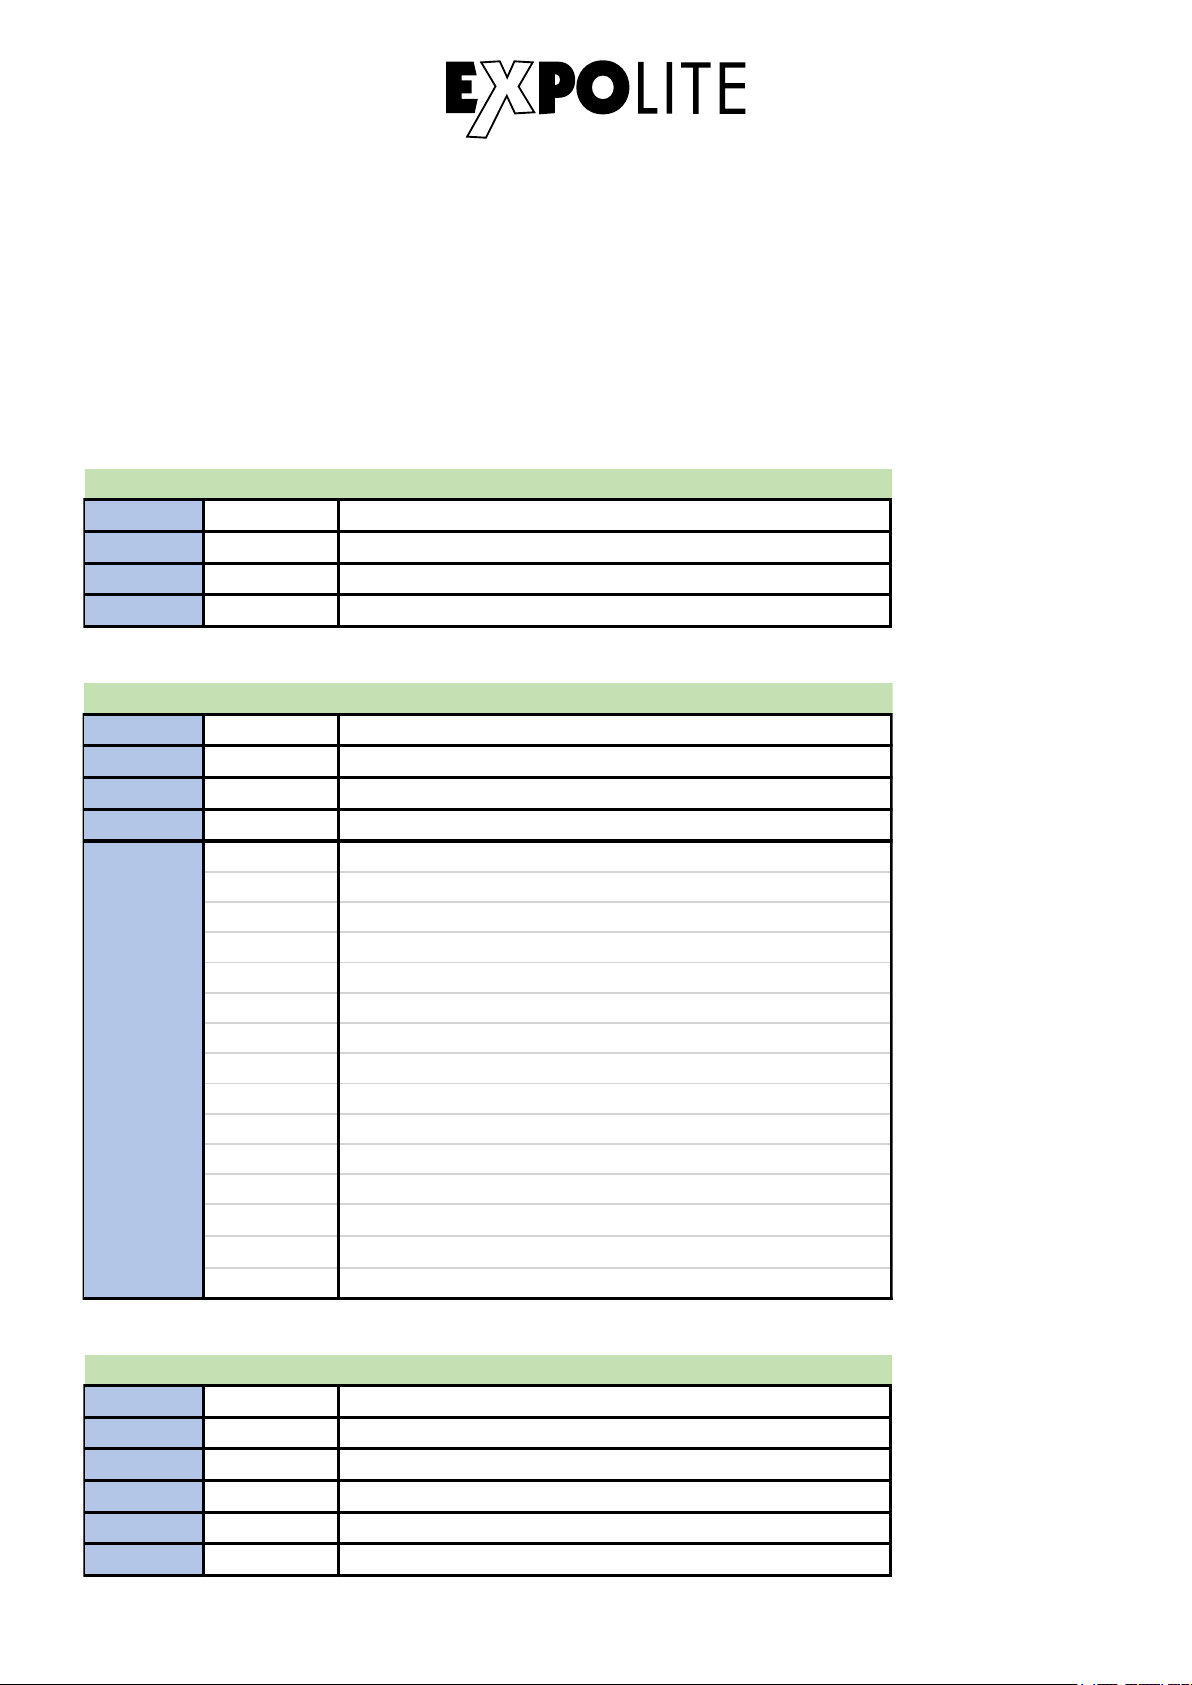
DMX-Channel assignment
This device has several DMX personalities. In each personality a different number of DMX channels
is used and the reaction of the device differs accordingly. There are six DMX personalities with 4, 5,
6, 7, 9 and 12 channels selectable.
Because of changes in the firmware of the fixture, functions can be added or changed. You can find the current version
„DMX-Channels“ as PDF-file on the website, ready to download.
E-28
Page 29
1 0-255 Master Dimmer
2 0-255 Red
3 0-255 Green
4 0-255 Blue
5 0-255 Amber
6 0-255 White
7 0-255 UV
7CH Mode
1 0-255 Mas ter Dimmer
2 0-255 Red
3 0-255 Green
4 0-255 Blue
5 0-255 Amber
6 0-255 White
7 0-255 UV
Strobe
0-5 No Strobe
6-20
Not Synchronous Strobe (slow to fas t)
21-60
Synchronous Strobe (slow to fast)
61-100
Electronic Sine W ave (slow to fas t)
101-140
Random Strobe (slow to fast)
141-180
Opening Pulse (slow to fast)
181-220
Closing Pulse (slow to fast)
221-255 Electronic Square Wave (slow to fast)
Dimmer Mode
0-10
Dimmer Mode selecte d in the menu
11-20
Linear Curve (not smoo th)
21-30
Squa re Law Curve (not smooth)
31-40
Inverse Square La w Curve (not smooth)
41-50
S-Curve (not smooth)
51-60
Linear Curve (smoo th)
61-70
Squa re Law Curve (smoo th)
71-80
Inverse Square La w Curve (smooth)
81-90
S-Curve (smoo th)
91-255 Dimmer Mode selecte d in the menu
9
8
9CH Mode
E-29
Page 30
1 0-255 Master Dimme r
2 0-255 Red
3 0-255 Green
4 0-255 Blue
5 0-255 Amber
6 0-255 White
7 0-255 UV
Strobe
0-5 No Strobe
6-20
Not Synchronous Strobe (slow to fast)
21-60
Synchronous Strobe (slow to fast)
61-100
Electronic Sine Wave (slow to fast)
101-140
Random Strobe (slow to fas t)
141-180
Opening Pulse (slow to fast)
181-220
Closing Pulse (slow to fast)
221-255 Electronic Square Wave (slow to fast)
Auto Programs
0-10 No Effect
11-15
CT01 (Custo m Colour CT01)
15-20
CT02
21-25
CT03
26-30
CT04
31-35
CT05
36-40
CT06
41-45
CT07
46-50
CT08
51-55
CT09
56-60
CT10
61-65
Auto 1
66-70
Auto 2
71-75
Auto 3
76-80
Auto 4
81-85
Auto 5
86-90
Chase 1
91-95
Chase 2
96-100
Chase 3
101-110
Reserved
Preset Colours
111-115
Red
116-120
Green
121-125
Blue
126-130
Amber
131-135
White
136-140
UV
8
9
12CH Mode
E-30
Page 31
141-145
Yellow
146-150
Pink
151-155
Cyan
156-160
Orange
161-165
Violet
166-170
Golden Amber
171-175
2700K
176-180
3200K
181-185
4000K
186-190
5500K
191-195
6500K
196-200
RGBW
236-255 Rese rved
10 0-255 Auto Spee d
Virtual Co lour Whee l
0-10 No Effect
11
Blue
12-50
Full Blue + Green Increa sing
51
Cyan
52-90
Full Green + Blue Decreas ing
91
Green
92-130
Full Green + Red Increasing
131
Yellow
132-170
Full Red + Gree n Decreasing
171
Red
172-210
Full Red + Blue Increasing
211
Magenta
212-250
Full Blue + Red Decreasing
251-255 Blue
Dimmer Mode
0-10
Dimmer Mode selecte d in the menu
11-20
Linear Curve (not smoo th)
21-30
Squa re Law Curve (not smooth)
31-40
Inverse Square La w Curve (not smooth)
41-50
S-Curve (not smooth)
51-60
Linear Curve (smooth)
61-70
Squa re Law Curve (smoo th)
71-80
Inverse Square La w Curve (smooth)
81-90
S-Curve (smoo th)
91-255 Dimmer Mode selecte d in the menu
11
9
12
E-31
Page 32
© 2018 by Focon Showtechnic Vertriebsgesellschaft mbH
 Loading...