

Page 1

R
TM_EN
Part No.: 1764198_04
QUARTZ
ONE TOUCH
TECHNICAL MANUAL
Page 2

2
QUARTZ
ONE TOUCH
CONTENT
CONTENT ................................................................................................................................................................................2
SYMBOL DESCRIPTION ..................................................................................................................................................4
Hazard intensity levels ...................................................................................................................................................................................................................... 4
TECHNICAL SPECIFICATIONS ...................................................................................................................................5
OVERVIEW OF COMPONENTS ................................................................................................................................6
DIMENSION SKETCH ........................................................................................................................................................7
TRANSPORT ...........................................................................................................................................................................8
Packaging .............................................................................................................................................................................................................................................. 8
Delivery inspection ........................................................................................................................................................................................................................... 8
Positioning ........................................................................................................................................................................................................................................... 8
INSTALLATION AND START-UP ................................................................................................................................9
Electrical connection ......................................................................................................................................................................................................................... 9
Pressure and temperature ............................................................................................................................................................................................................... 9
Connecting to the domestic water supply .................................................................................................................................................................................10
Installing the drip tray drain...........................................................................................................................................................................................................11
Starting the machine ........................................................................................................................................................................................................................12
USER PROGRAMMING .................................................................................................................................................13
Button functions ...............................................................................................................................................................................................................................13
Display functions ..............................................................................................................................................................................................................................14
Machine status ..................................................................................................................................................................................................................................14
Accessing the user menu functions .............................................................................................................................................................................................14
Programming the drink dosages ...................................................................................................................................................................................................15
Accessing the display day and time ..............................................................................................................................................................................................15
Machine automatic ON/OFF .........................................................................................................................................................................................................16
Day off ................................................................................................................................................................................................................................................16
Cappuccino ON/OFF ......................................................................................................................................................................................................................16
Cappuccino dispensing order ........................................................................................................................................................................................................17
Cappuccino milk frothiness ...........................................................................................................................................................................................................17
Cappuccino milk steam timing ......................................................................................................................................................................................................18
Cappuccino end wash .....................................................................................................................................................................................................................18
Cafe Crema .......................................................................................................................................................................................................................................19
Black coffee .......................................................................................................................................................................................................................................19
Prebrewing time ...............................................................................................................................................................................................................................20
Prebrewing pause time ...................................................................................................................................................................................................................20
Cleaning interval ...............................................................................................................................................................................................................................21
Initial flushing .....................................................................................................................................................................................................................................21
Advanced cleaning ON/OFF ..........................................................................................................................................................................................................22
Advanced cleaning times - T1, T2, T3, T4 .................................................................................................................................................................................22
Timed flushing ...................................................................................................................................................................................................................................23
Accessing and resetting the partial counter, accessing the total counters.........................................................................................................................24
Exiting the User Menu ....................................................................................................................................................................................................................24
STORAGE AND DISPOSAL ........................................................................................................................................ 25
Storing the machine .........................................................................................................................................................................................................................25
Machine disposal ..............................................................................................................................................................................................................................25
Original instructions
Page 3

3
QUARTZ
ONE TOUCH
CONTENT
SERVICE PROGRAMMING ....................................................................................................................................... 26
Accessing the service menu functions .....................................................................................................................................................................................26
Language selection ........................................................................................................................................................................................................................26
Editing the greeting message ......................................................................................................................................................................................................26
Setting the service phone number ............................................................................................................................................................................................27
Enable/disable user programming ..............................................................................................................................................................................................27
Adjusting the boiler level probe sensitivity .............................................................................................................................................................................27
Maintenance cycles .......................................................................................................................................................................................................................28
Setting the display temperature format ...................................................................................................................................................................................29
Adjusting the boiler operating temperature ...........................................................................................................................................................................29
Adjusting the capsule storage alarm .........................................................................................................................................................................................30
Adjusting the water filter service alarm ..................................................................................................................................................................................30
Resetting to factory default settings .........................................................................................................................................................................................31
Exiting the service programming ...............................................................................................................................................................................................31
Exiting standby mode ...................................................................................................................................................................................................................31
MESSAGES AND ALARMS ........................................................................................................................................ 32
CLEANING AND MAINTENANCE ....................................................................................................................33
Removing the capsule group ......................................................................................................................................................................................................33
Replacing the pinch chamber kit ...............................................................................................................................................................................................37
Replacing the capsule holder kit ................................................................................................................................................................................................37
Replacing the group gasket .........................................................................................................................................................................................................38
SERVICE INTERVALS ..................................................................................................................................................... 39
ELECTRICAL DIAGRAM ............................................................................................................................................40
EXPLODED VIEWS ........................................................................................................................................................ 41
Electrical components ..................................................................................................................................................................................................................41
Machine front .................................................................................................................................................................................................................................42
Machine ...........................................................................................................................................................................................................................................44
Water schematic ...........................................................................................................................................................................................................................46
Boiler ...............................................................................................................................................................................................................................................48
Thermic assembly .........................................................................................................................................................................................................................50
Cappuccino distributor ................................................................................................................................................................................................................52
Cappuccino set ..............................................................................................................................................................................................................................54
Manifold system .............................................................................................................................................................................................................................56
Capsule group chassis ..................................................................................................................................................................................................................58
Capsule group Caffitaly................................................................................................................................................................................................................60
Capsule group Lavazza .................................................................................................................................................................................................................62
Tank inlet ........................................................................................................................................................................................................................................64
Vibration pump ..............................................................................................................................................................................................................................65
Water tank .....................................................................................................................................................................................................................................66
Water tap .......................................................................................................................................................................................................................................68
Steam wand ....................................................................................................................................................................................................................................70
Page 4

4
QUARTZ
ONE TOUCH
SYMBOL DESCRIPTION
There are three different levels of hazard intensity, identied by the signal words DANGER, WARNING and
IMPORTANT. The level of hazard is determined by the following denitions.
Additionally, NOTE indicates useful information that all users should be aware of.
Observe these statements to ensure user safety and prevent injury and/or material damage.
Important:
Alerts against unsafe practices. Observe to ensure drink quality, machine performance, food
safety, to prevent minor personal injury or damage to the machine.
WARNING!
Indicates a potentially hazardous situation which, if not avoided, could result in scalding, serious
injury and even death.
DANGER!
INDICATES AN IMMINENTLY HAZARDOUS SITUATION WHICH, IF NOT
AVOIDED, WILL RESULT IN SERIOUS INJURY AND EVEN DEATH.
Note:
Gives additional information which may be helpful during the cleaning procedure or operation of
the machine.
i
Hazard intensity levels
Page 5

5
QUARTZ
ONE TOUCH
TECHNICAL SPECIFICATIONS
Data sheet
FACTS QUARTZ ONE TOUCH
Drink selection options
Continuous Brewing
Short Espresso
Long Espresso / Cafe Crema
Cappuccino / Long Espresso
Coffee with Milk / Black Coffee
Brewing mechanism Capsule
Capsules supported Caftaly, Lavazza
User interface Capacitive touchpad with display
Temperature control PID regulation
Height adjustable outlet Adjustable from 65 to 110mm
Used capsule drawer
15 capsules with sensor
Energy saving mode Yes
Dimension (height, width, depth) 410, 260, 400mm
Internal water tank 1.8 L with water lter
Minimum inlet water pressure 1 bar
Boiler volume 1,7 L
Power rating
220-240 V 1N ~ 1950W 50-60Hz
(EAEB-B71C-13AL)
Cold water connection
1
/2" external thread or water tank
Drip tray Level viewer & option for drainage connection
Dispenser Automatic cappuccino, water/ steam manual taps
Ambient noise < 70 dB
Machine weight 16 kg
Page 6
6
QUARTZ
ONE TOUCH
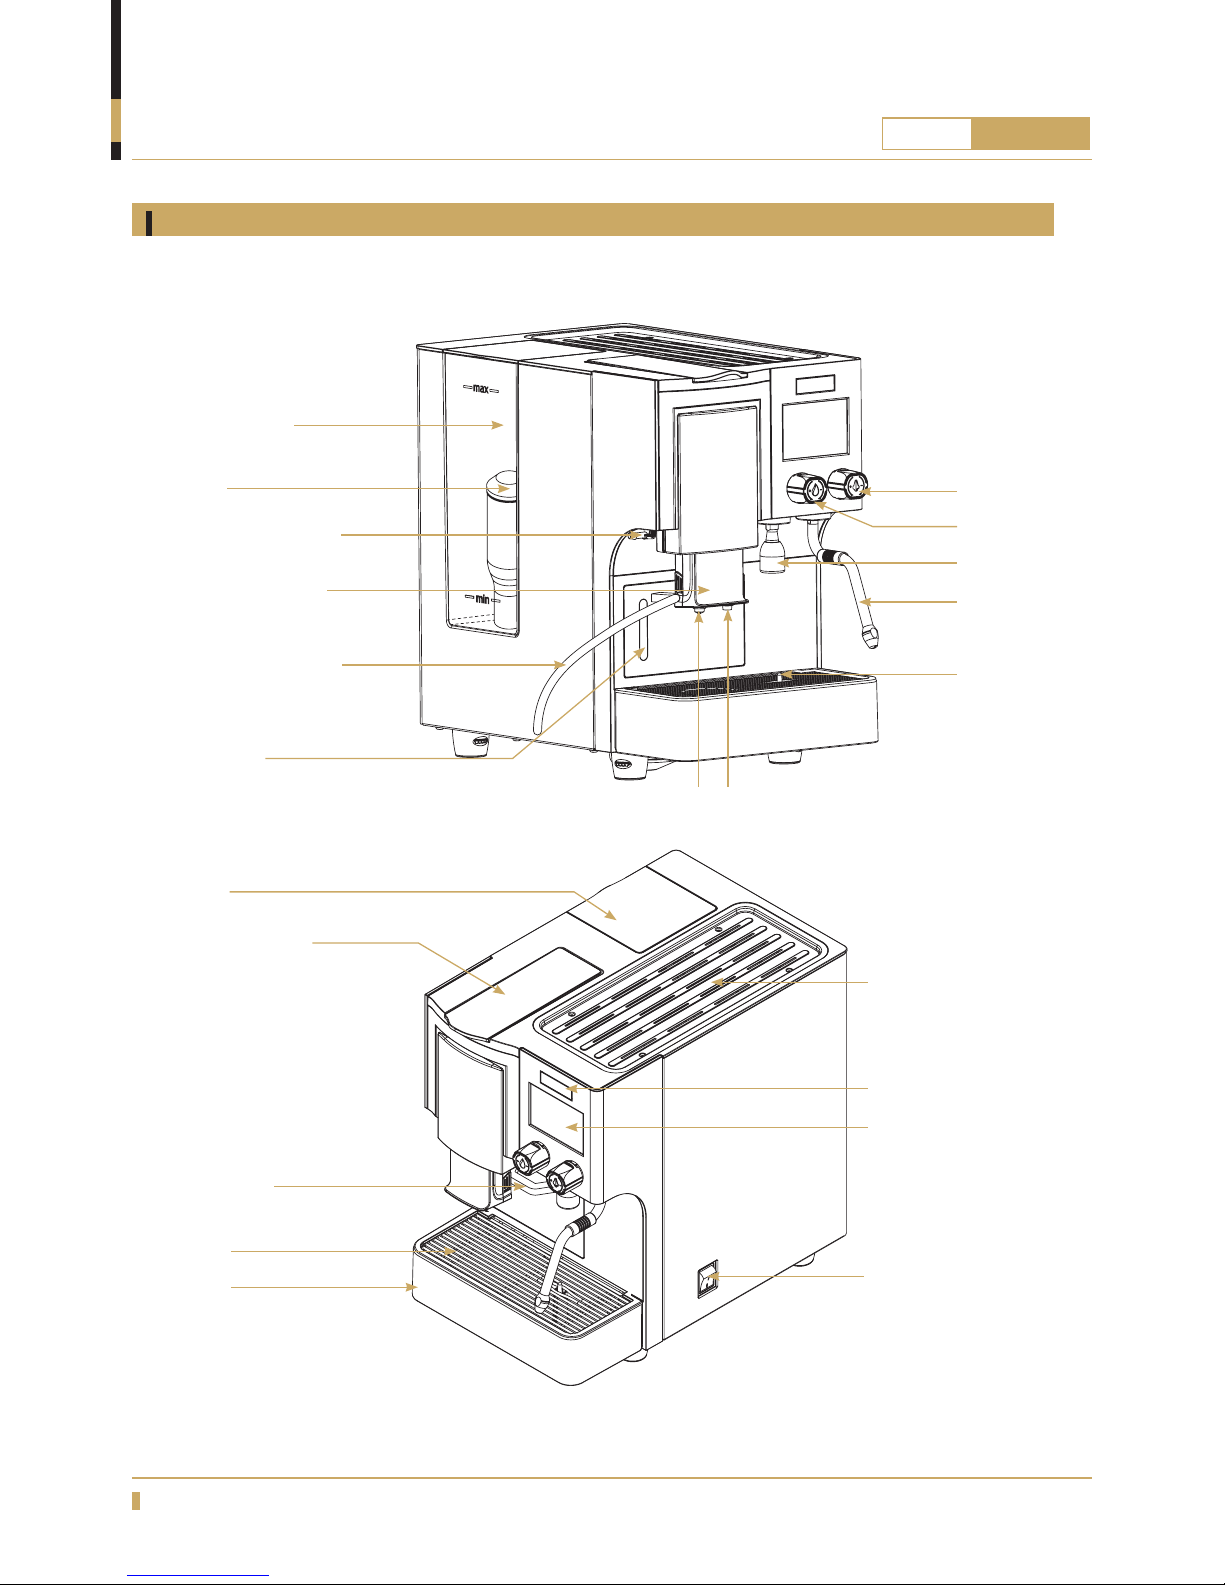
OVERVIEW OF COMPONENTS
Front view
Cup shelf
Capsule group lever
Tank lid
Internal water tank
Display
Touch pad
Steam tap
Steam pipe
Main switch
Drip tray
level float
Drip tray
Drip grid
Coffee outlet Milk outlet
Hot water outlet
Hot water tap
Water filter
(optional)
Milk system cleaning inlet
connector
Height-adjustable outlet
Capsule drawer
with window
Cappuccino milk inlet tube
Drawer handle
Page 7
7
QUARTZ
ONE TOUCH
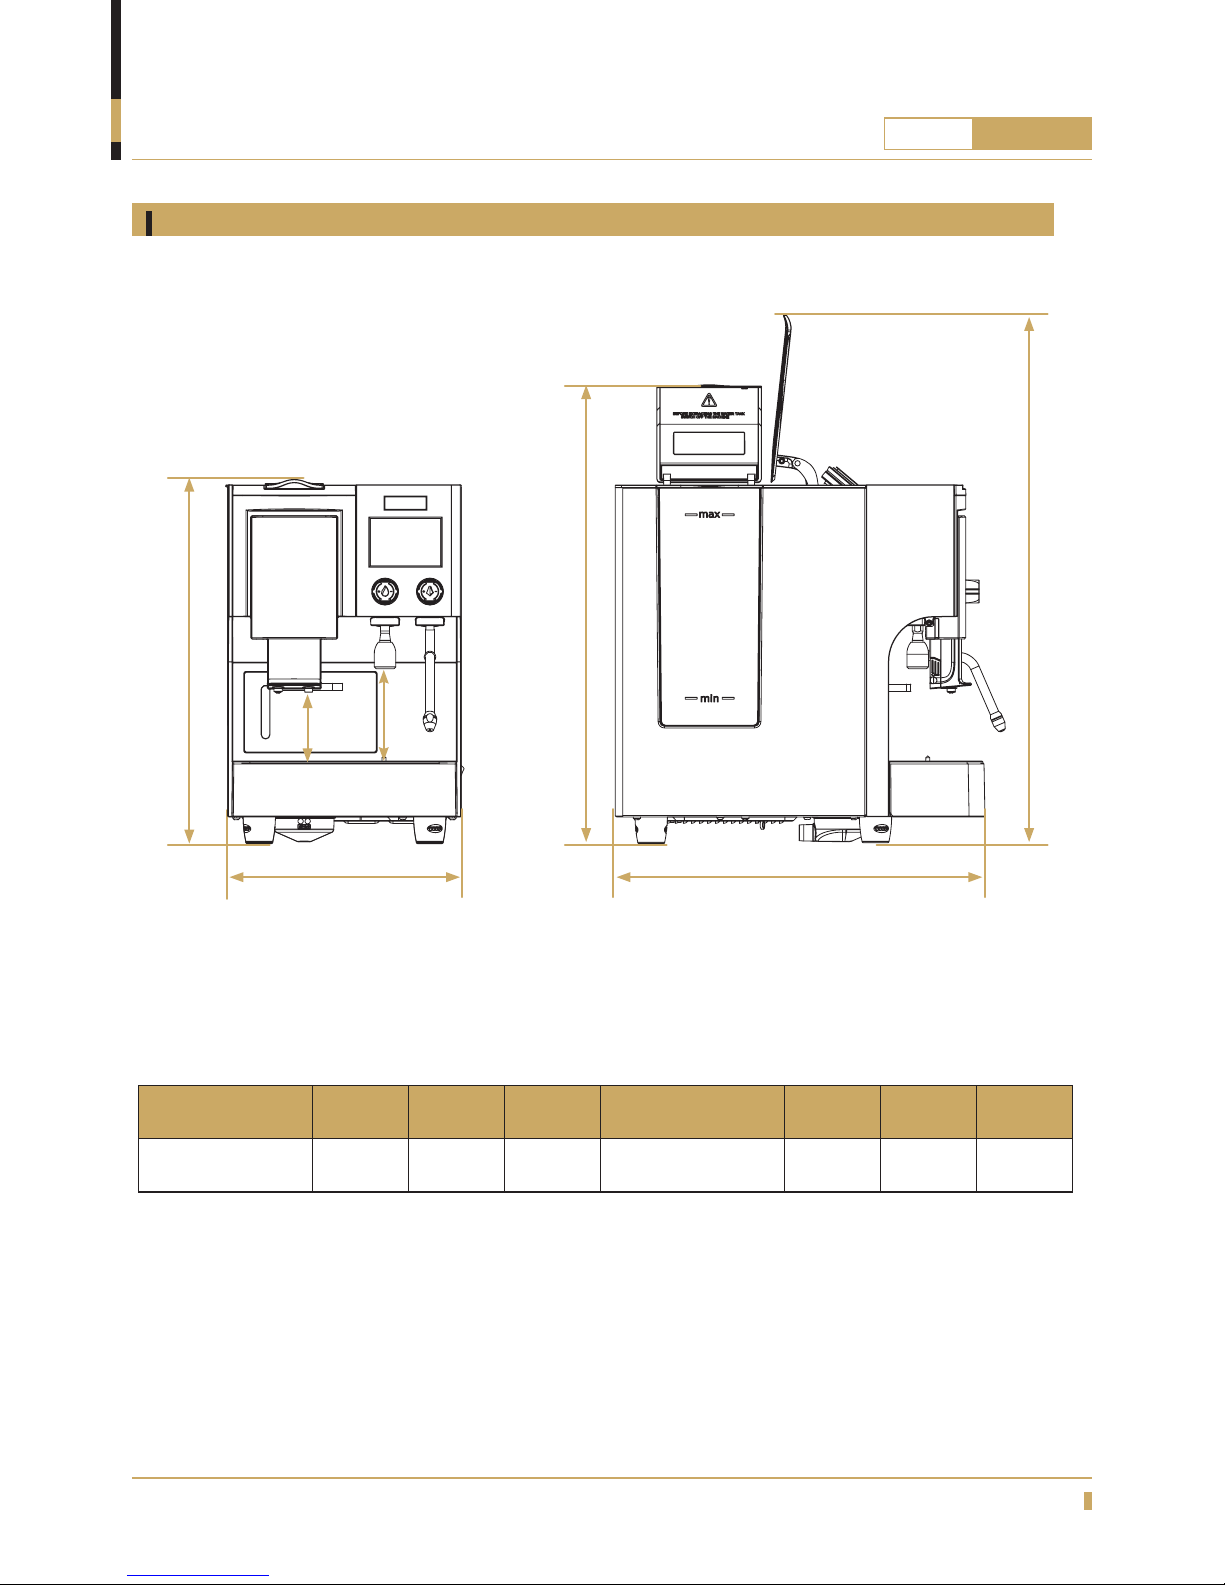
DIMENSION SKETCH
QUARTZ
D
A
F
G
B
C
Model A B C D (Min~ Max) E F G
ONE TOUCH 400 mm 260 mm 410 mm 65 mm ~ 110 mm 92 mm 510 mm 590 mm
E
Page 8
8
QUARTZ
ONE TOUCH
Packaging
Delivery inspection
Positioning
INSTALLATION AND START-UP
TRANSPORT
The machine is shipped in a custom-designed carton which utilizes model-specic polystyrene
cushions to protect it from damage.
The machine’s carton features standardized handling symbols to explain proper shipping and storage methods.
The machine must remain in a horizontal position during the transport. Do not store or handle the machine
except on its feet.
During transport protect the carton and machine from impact drops, crushing, shocks, moisture and exposure
to extreme temperature.
Upon receipt and delivery ensure that the machine is in the exact condition described in the enclosed
documentation, and that all accessories are included. Missing items should be reported to the manufacturer or
dealer immediately.
Damage caused during transport should be reported to the shipping agent and the machine’s distributor
immediately.
Packaging materials are potentially dangerous and should be kept away from children.
The carton and all packing materials are recyclable and should be returned to a recycling center for
disposal.
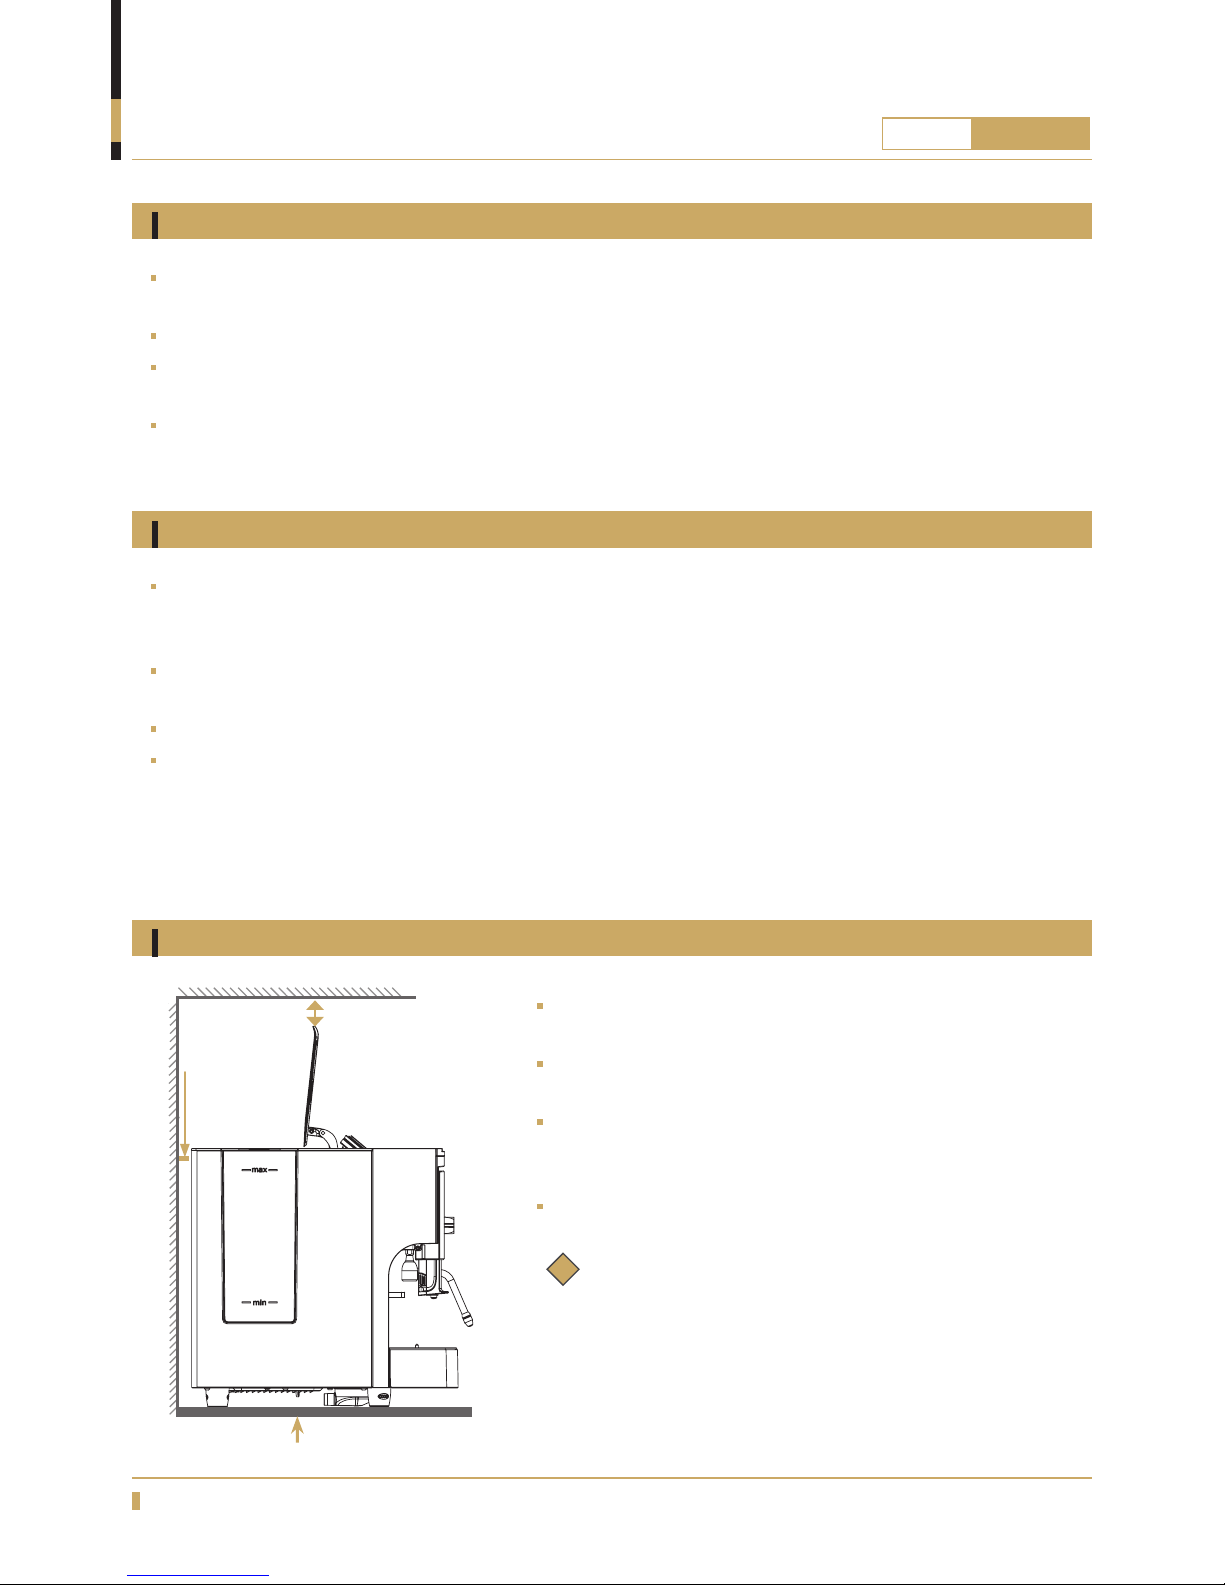
MIN. 10cm
MIN. 30cm
Minimum dimensions for machine placement are 360 mm
wide x 510mm depth x 890mm high.
Position the machine on a at, stable surface and away from
water and heat sources.
This machine should only be stored and used in a dry
environment, since excessive humidity will damage the
machine.
Do not cover the machine with plastic lm or rags.
Install within 0-3º horizontal.
i
Note:
Leave an air gap of at least 30cm above the machine
and 10cm behind it to ensure adequate ventilation. The
machine must be installed within 3º of horizontally level
front-to-back and side-to-side to ensure proper hydraulic
function and drainage. Conrm with a spirit level or digital
angle gauge.
Page 9
9
QUARTZ
ONE TOUCH
INSTALLATION AND START-UP
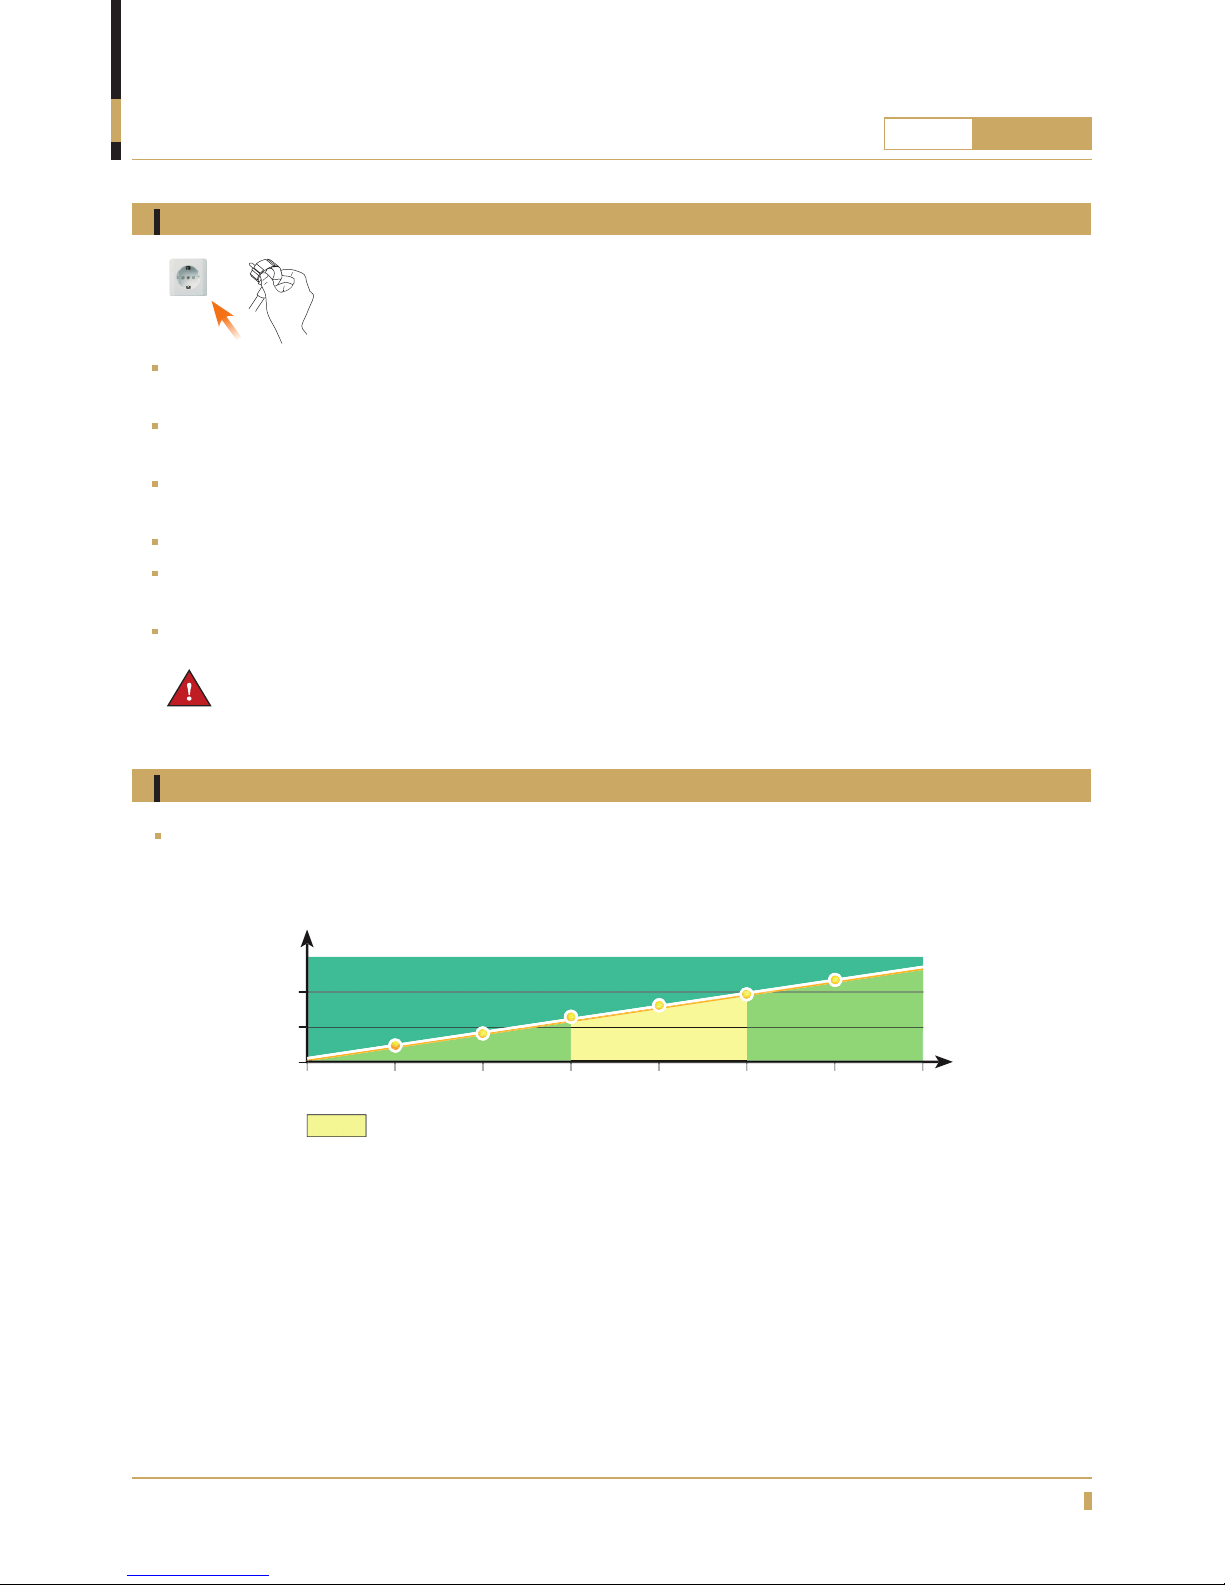
Electrical connection
Pressure and temperature
Boiler pressure is directly related to water temperature. The chart below demonstrates pressure
increase as a result of temperature rise:
Standard pressure and temperature
Pressure to temperature relationship within boiler
110
115
120
125
0.7 0.8 0.9 1.0 1.1 1.2
BAR
O
C
This machine must be connected to an earth grounded wall socket. See page 5 of
this manual for electrical specications.
Verify that the electrical specications on the nameplate are compatible with the operating conditions of the
area where you will install the machine.
This machine must be connected to a earth grounded wall socket. Ensure that the grounding system is
sufcient and conrms with local regulations.
This machine must be connected to an electrical supply protected by a circuit breaker appropriate for the
power consumption of the machine, specied on its nameplate.
A residual current circuit breaker must be installed in accordance with local regulations.
Ensure that the power rating of the installation location and the electrical system are suitable for the power
demands of the machine.
Do not use an extension cord, plug adapter or multi-socket device to power this machine.
DANGER!
If the power cable or plug is damaged, it must be replaced by the manufacturer, its service agent or
similarly qualied person to avoid
SERIOUS INJURY OR DEATH!
Page 10
10
QUARTZ
ONE TOUCH
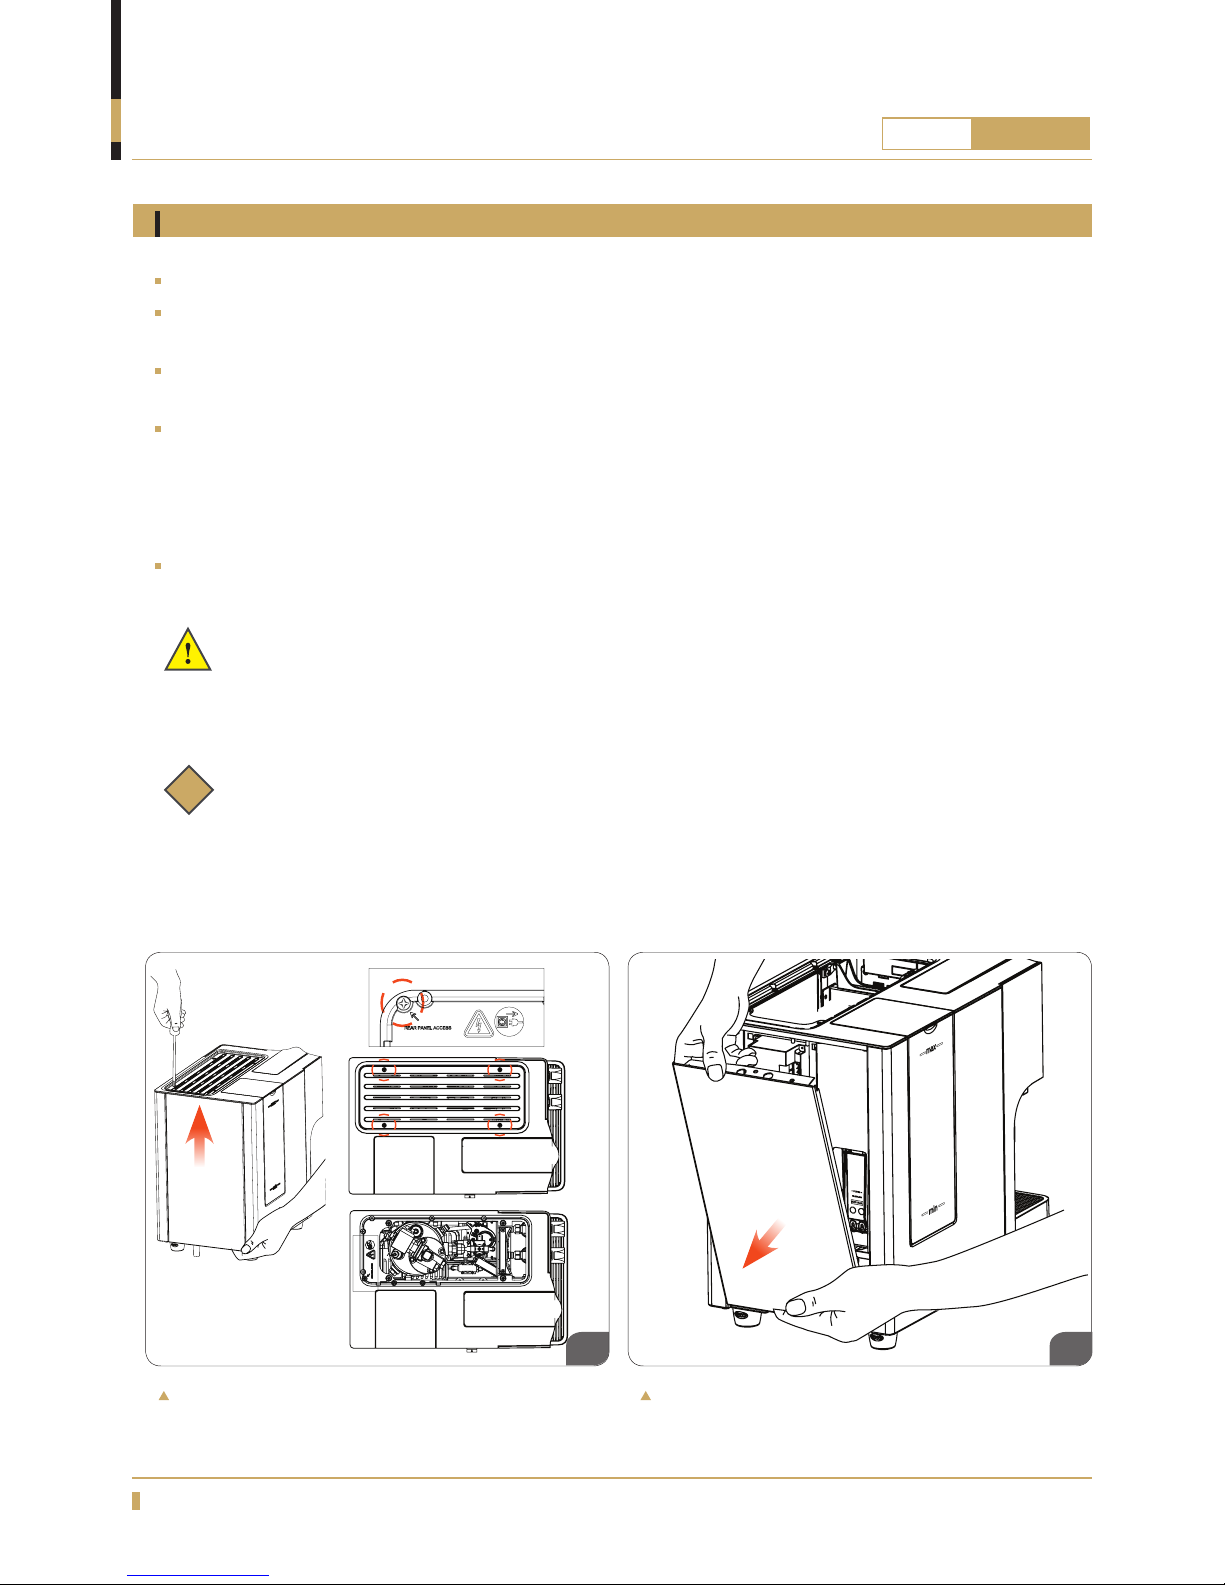
Important:
Be careful to not damage any panels and electronic components while disassembling the machine.
The power cord must be unplugged when disassembling the machine.
Remove the four screws form the cup shelf. Remove the screw at the top of the rear panel,
then remove it.
INSTALLATION AND START-UP
Note:
If you want to disconnect the machine from the mains water supply and start using only the internal
water tank again, make sure to replace the inlet valve cover plug. The machine will leak if this plug is
not reinstalled.
01 02
i
To prepare the machine for connection to an external water supply follow the connection procedure
explained below.
Connecting the machine to the domestic water supply must performed by a qualied person.
Run about 20 liters of water from the domestic water supply before connecting the machine to make sure
there are no contaminants in the plumbing system.
Connect the exible inlet hose (included in the accessory box) to the domestic water supply and tighten it
with a wrench. The hose only connects to a ½” male connection.
Only use safe drinking water with a hardness rating between 5 - 8ºTH (French hardness degress) / 2.8 -
4.5ºdH (German hardness degrees ) / 3.5 - 5.6ºe (English hardness degrees) / 50 - 80 ppm (parts per million)
of calcium. If the hardness value is below this limit, corrosion of hydraulic components is likely. If the value is
higher, lime-scaling inside the boiler will occur. In both cases, the proper function of the machine and quality
and taste of the coffee will be negatively affected.
If you choose to connect the machine to an external water connection, it is strongly recommend to connect
the drip tray to an external drain. See page 11 for more information.
Connecting to the domestic water supply
Page 11
11
QUARTZ
ONE TOUCH
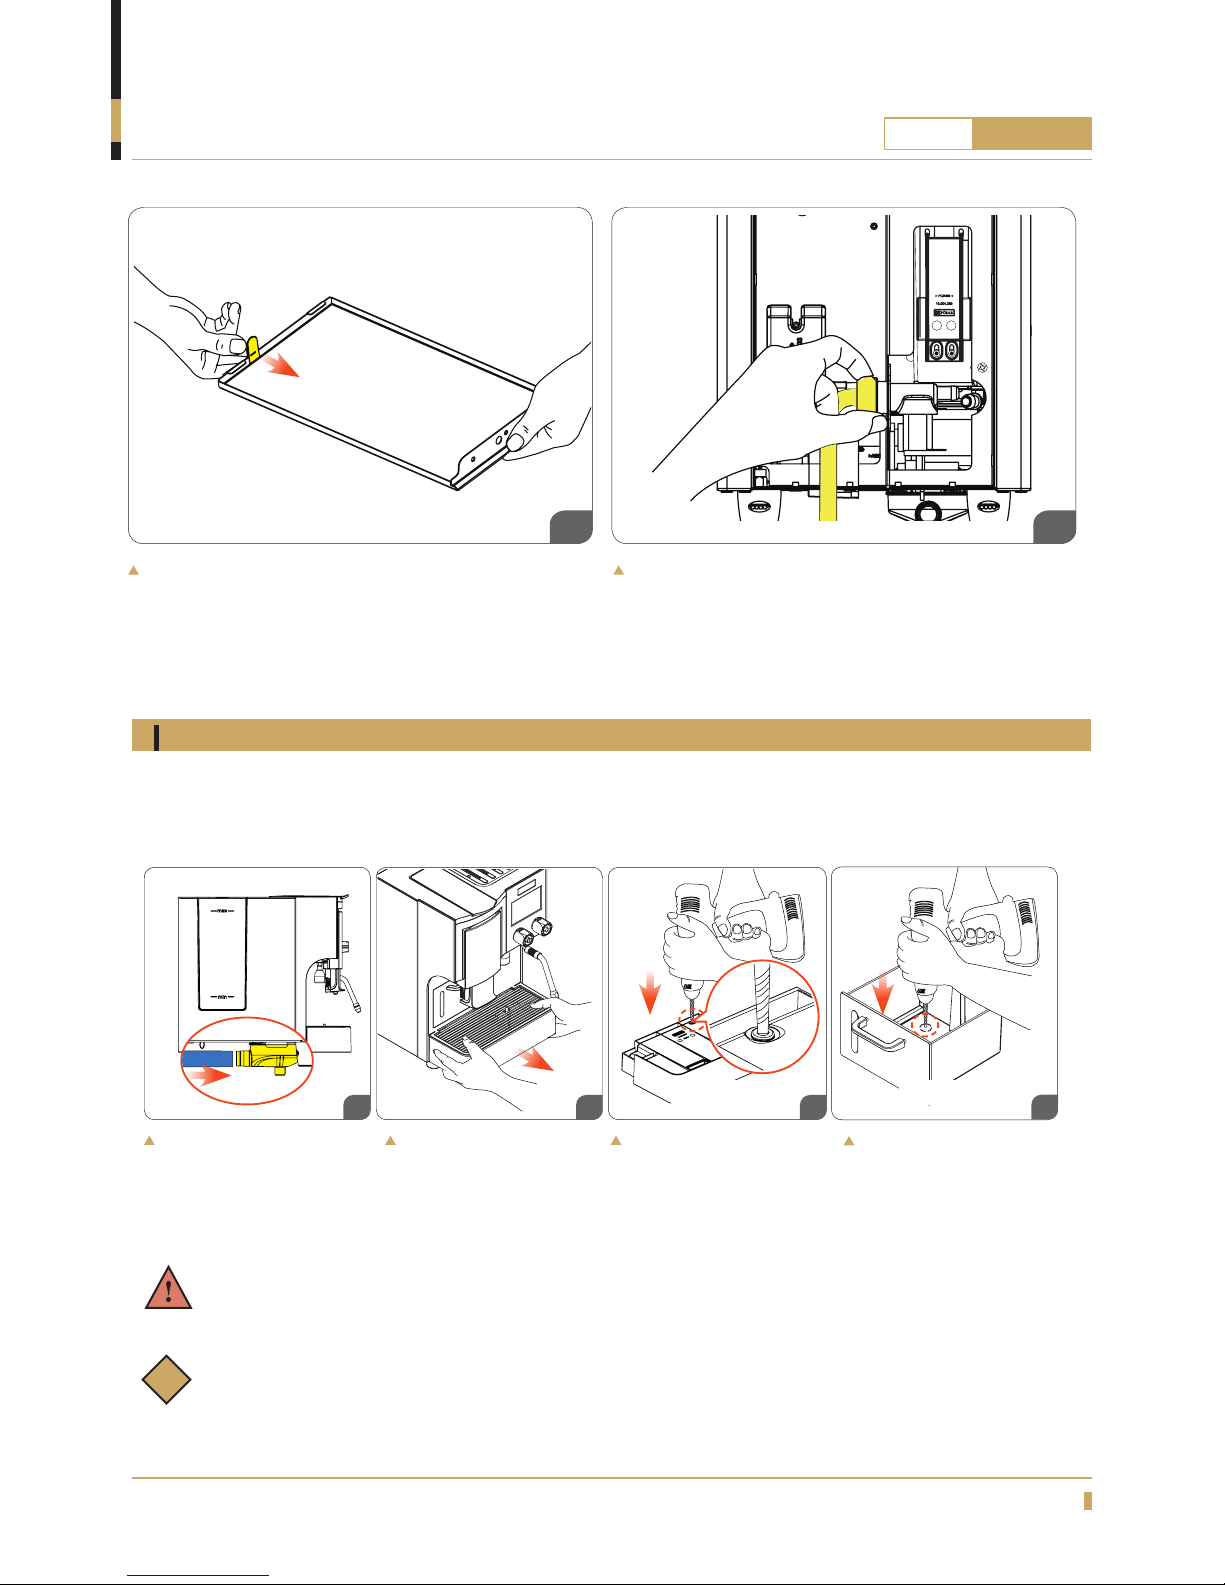
Remove the cover plug for the inlet valve and connect
the included inlet hose. The machine will now
automatically ll the internal water tank to
minimum level + 40mm, when water goes below
minimum level it will rell again, etc.
Bend the ange (shown in yellow) inward to make
room for the inlet tube.
03 04
INSTALLATION AND START-UP
Installing the drip tray drain
The drip tray can be connected to a plumbing drain, allowing the tray to be emptied much less frequently
(a domestic drain connection is required for this). To use this feature, follow the connection procedure
explained below.
Note:
The drain pipe system can be used when the machine is connected to the domestic water supply
or the internal water tank.
WARNING!
The holes drilled in the drip tray or capsule drawer should be ≤3mm to avoid leaks.
Remove the drip tray.
Drill a 3mm hole in the
bottom of the capsule
box as shown above.
Reinstall the capsule
box when nished.
Connect the included
corrugated drain tube
to the drain cup.
Drill a 3mm hole in
the bottom of the drip
tray as shown above.
Reinstall the drip tray
when nished.
01 02 03
04
i
Max. Ф: 3mm Max. Ф: 3mm
Page 12
12
QUARTZ
ONE TOUCH
INSTALLATION AND START-UP
Starting the machine
Note:
Keypad functions and explanations are found on page 13.
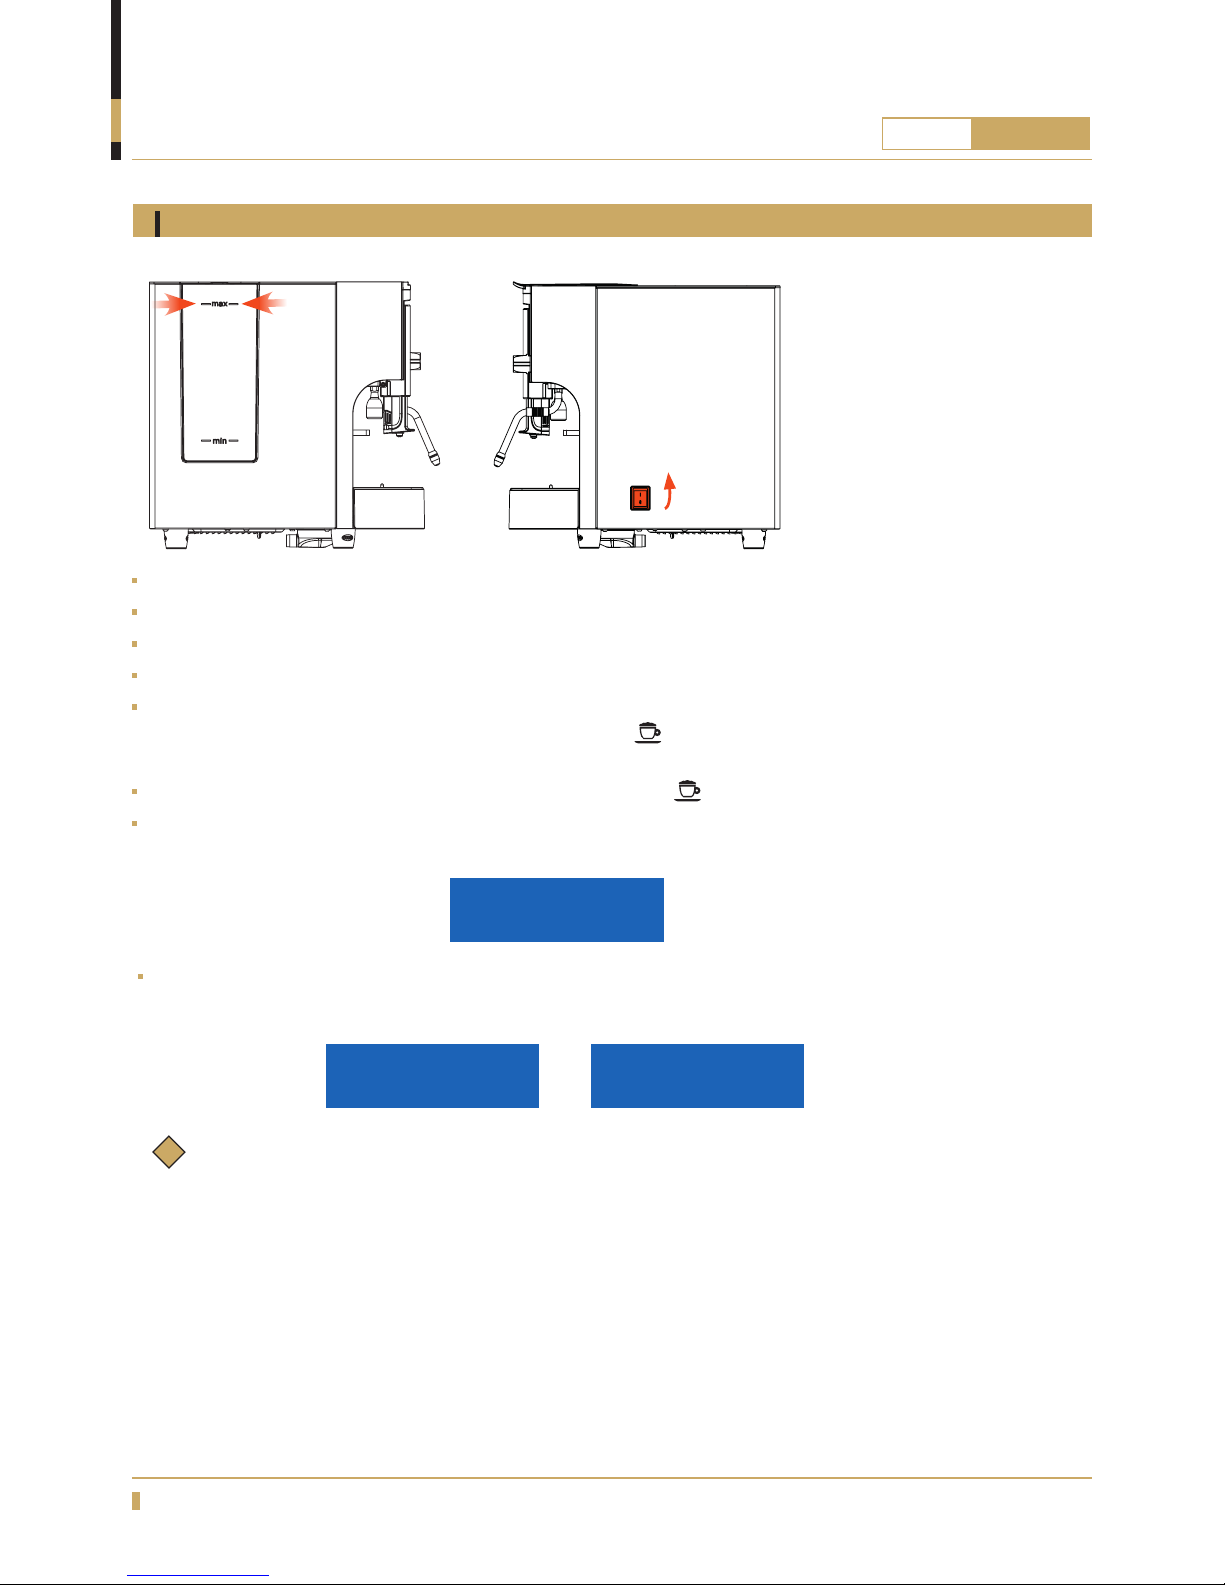
Fill the water tank to the max level (A).
If the machine is connected to the domestic water supply, water lling will begin automatically.
Connect the machine’s plug to the electrical outlet (this should be done by a qualied person).
Turn on the main power switch (B).
When the machine is switched on, it may automatically go into STANDBY mode. To determine if the machine
is in STANDBY mode, conrm if the OK and Cappuccino
buttons are ashing simultaneously. If this is the
case, the machine must be changed to ON
mode.
To change to ON mode, simply press the OK and Cappuccino buttons simultaneously.
When the machine is in ON mode, ve of the buttons will light up and the one remaining unlit button will begin
to cycle. The display will show PREHEATING XXX
o
C until the boiler reaches operating temperature (C).
When all the drink buttons are lit continuously (none ashing) the machine is ready for use.
The display will show the water temperature, time, (D) and EXPOBAR QUARTZ ONE TOUCH (E).
A
B
i
C
D
E
PREHEATING
XXX
o
C
118oC 07:53
ENJOY YOUR DRINK
EXPOBAR
QUARTZ ONE TOUCH
Page 13
13
QUARTZ
ONE TOUCH
USER PROGRAMMING
Button functions
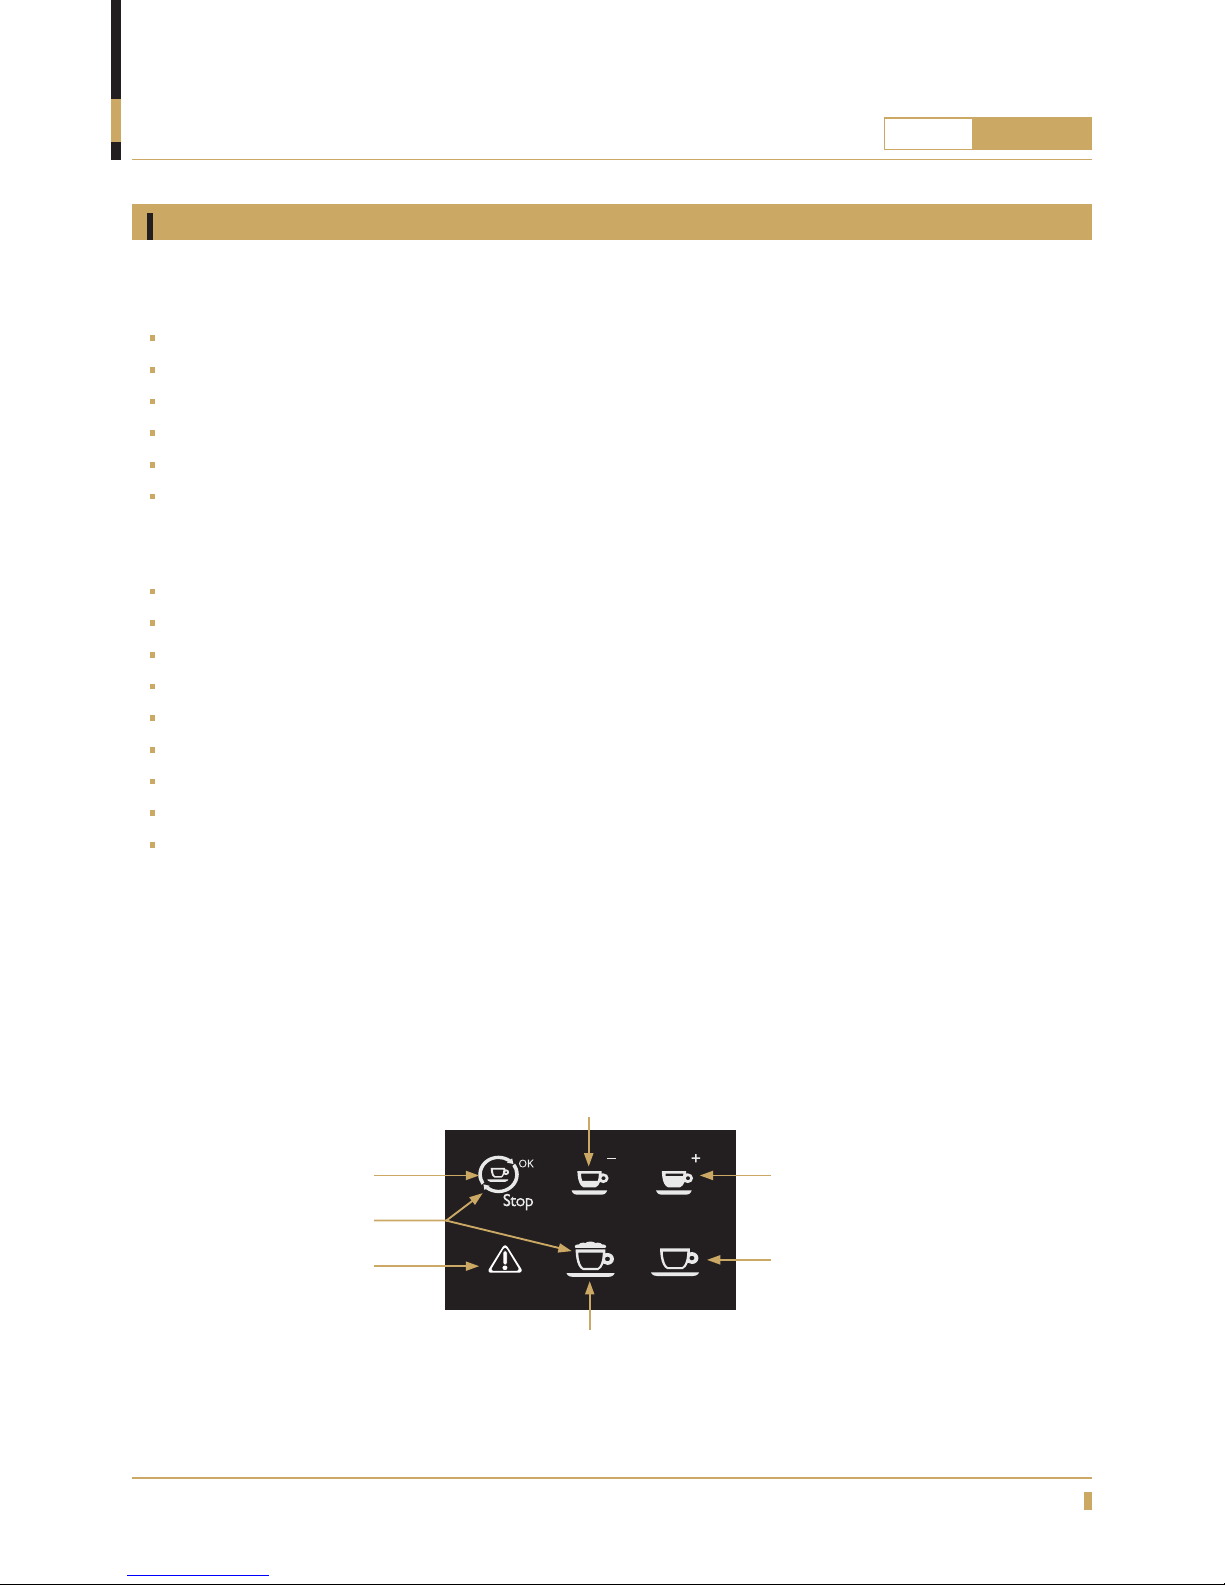
OK / Stop /
Continuous Brewing
& Programming menu
Standby (simultaneously
press for standby off & on)
Alarm
Cappuccino / Long Coffee
Coffee with Milk / Black Coffee
Long Espresso / Cafe Crema &
Move up in program menu
Short Espresso &
Move down in program menu
From the touch pad you can perform the following functions-
User Programming:
Volume control for four different espresso drinks.
Automatic lling and level control of the boiler.
Automatic lling and level control of the water tank (for machines with external water supply).
Automatic switch off of the heating element when water level is low.
System supervision through alarms.
Semi-automatic cleaning of the milk system.
Service Programming:
Set the display language.
Edit the greeting message.
Input the service phone number.
Enable and disable the user programming function.
Adjust the boiler and drip tray sensor sensitivities.
Set the maintenance cycle, water lter service, and empty capsule box alarm intervals.
Control the display temperature units.
Adjust the boiler operating temperature.
Restore all settings to factory defaults.
The control panel is by default programmed with 4 standard drinks (these can be reprogrammed as desired) and
a continuous dispensing option. The four drink buttons (Short Espresso, Long Espresso / Cafe Crema, Coffee
with Milk / Black Coffee, Cappuccino / Long Coffee) brew the programmed volume and then stop automatically,
the button (Continuous/OK/Stop) brews continuously until the user stops it by pressing it again.
Page 14

14
QUARTZ
ONE TOUCH
XXX ºC HH:MM
STANDBY
XXX ºC HH:MM
USER PROGRAMMING
Display functions
Machine status
Accessing the user menu functions
Fig. 01
Fig. 02
Fig. 03
Fig. 05
Scroll forward within the Service Menu
Scroll back within the Service Menu
Adjust automatic daily on/off timer (stand-by).
Adjust clock settings (current time and date).
Change display greeting message.
View the number of coffees dispensed.
View digital boiler-temperature display and control.
Access programming and settings help system.
Reset visual water-softener regeneration alarm.
Change display language.
The machine has three operating statuses:
ON:
The machine is ready for use. This is the normal machine status after turning
on the power switch after the boiler is heated up. (see Fig. 01).
STANDBY:
The power switch is on, but the display shows STANDBY (see Fig. 02). This
means that the machine is in energy-saving mode. To enter this mode, press
OK and the Cappuccino
button simultaneously for at least 5 seconds.
To exit this mode and turn the machine back on, press the same two buttons
simultaneously again. (They will be ashing already.)
OFF:
The coffee machine is turned off at the main power switch.
Press OK for 5 seconds, or until the button starts to ash and the
display shows DOSE PROGRAMMING, (see Fig. 03), then press OK
again to enter the User Menu.
Within the User Menu, press + to scroll through the menu’s functions
and press OK to enter your desired menu option, or press
- to scroll
back (See Fig. 04).
To exit the User Menu, scroll to the end, the display will show
EXIT (See Fig. 05), then press OK. The display will show DOSE
PROGRAMMING (See Fig. 03). Wait 30 seconds and the machine will
return to normal use ON mode.
XXX ºC HH:MM
EXPOBAR
QUARTZ ONE TOUCH
DOSE PROGRAMMING
IN 30 SEC.
EXIT
Greeting message
Current time
Boiler temperature
Fig. 04
Via the machines display you can read or control the following functions:
Follow the steps below to access the machine’s User Menu functions:
Enter
Page 15

15
QUARTZ
ONE TOUCH
USER PROGRAMMING
Accessing the display day and time
Programming the drink dosages
TIME ADJUST
XX:XX / DAY
Fig. 03
1. Within the User Menu (see Fig. 02), press
+ and - to scroll through the menu’s
functions until TIME ADJUST XX:XX / DAY OF WEEK is shown (see Fig. 03), then
press OK to begin adjusting the time.
2. Press OK to begin to edit the hours, minutes and date. The number will ash
when it is ready to be edited. Press
+ or - to change the time or date’s number,
then press the OK to accept the input and move to the next number.
3. When the desired times are set press OK to save your setting. When no elds are
ashing press
+ to return to the User Menu.
Follow the steps below to adjust the time on the machine’s display:
Fig. 02
DOSE PROGRAMMING
IN 30 SEC.
Important:
Use always a new capsule when programming each new dose, a used or missing capsule during
programming will affect the strength, volume and avor of subsequent drinks.
Note:
For Coffee with Milk and Cappuccino drinks, you can set the milk and coffee
dosages separately. This is easiest when the machine is set to rst dispense
coffee then milk (see Cappuccino Dispensing order on page 18 for instructions
on how to congure this setting). Then start the DOSE PROGRAMMING and
pay attention to the coffee dosage rst and stop it at your desired volume by
pressing OK, then the machine will continue the drink. Simply watch the milk
volume and press OK again to set the stop the milk and save the new drink
dosage.
i
Follow the steps below to change the dosage for each of the machine’s programmed drink buttons:
1. Insert a new coffee capsule into the capsule group, and place a clear coffee cup under the outlet.
2. Press OK for 5 seconds, or until the button starts to ash and the display shows DOSE PROGRAMMING (see
Fig. 01 below)
3. Press the drink button you want to program: Short Espresso, Long Espresso/Cafe Crema, Cappuccino or Coffee
with Milk/Black Coffee (see page 13 for drink button diagrams). The selected drink’s button and the OK button
will light up.
4. The machine will begin dispensing coffee. When the desired volume is reached in the cup, press the OK button
to stop dispensing. This dosage will be saved for all drinks using this button.
5. Repeat this process for all of the drink buttons that you want to reprogram. Then press OK to access
the User Menu, or simply wait 30 seconds for the machine to return to normal mode.
Fig. 01
DOSE PROGRAMMING
IN 30 SEC.
Page 16

16
QUARTZ
ONE TOUCH
1. Within the User Menu (see Fig. 01), press + and - to scroll through the menu’s
functions until the currently programmed ON - OFF times are shown (See Fig.
02), then press OK to begin adjusting the time.
2. Press OK to begin to edit the ON hour and minute. The number will ash
when it is ready to be edited. Press
+ or - to change the ashing input, then
press the OK to accept and move to the minute input.
3. When the desired times are set press OK to save your setting. When no elds
are ashing press
+ to return to the User Menu.
1. Within the User Menu (see Fig. 03), press
+ and - to scroll through the
menu’s functions until ON-OFF DAY OFF and the current day off is shown
(See Fig. 04).
2. Press OK, the current day off will start to ash. Press
+ or - to scroll to the
desired day you want to set as the day off.
3. Press OK to save your setting then press
+ to return to the User Menu.
Machine automatic ON/OFF
Day off
USER PROGRAMMING
ON - OFF
--:-- --:--
ON-OFF DAY OFF
WEEKDAY
Fig. 02
Fig. 04
Fig. 01
Fig. 03
DOSE PROGRAMMING
IN 30 SEC.
DOSE PROGRAMMING
IN 30 SEC.
Follow the steps below to adjust when the machine automatically turns ON and OFF everyday:
Follow the steps below to set one day per week that the machine does not automatically turn ON:
Cappuccino ON/OFF
CAPPUCCINO
YES / NO
Fig. 06
1. Within the User Menu (see Fig. 05), press
+ and - to scroll through the menu’s
functions until CAPPUCCINO YES or NO is shown (See Fig. 06), then press
OK to enter the menu.
2. Press
+ or - to select YES or NO. The default setting is YES
3. Press OK to save your setting then press
+ to return to the User Menu.
Follow the steps below to turn the ability to make cappuccinos on or off:
Fig. 05
DOSE PROGRAMMING
IN 30 SEC.
i
Note:
The ability to deactivate cappuccinos as a drink option can be useful if the drinks desired includes Short
Espresso, Cafe Crema, Long Coffee, and Black Coffee (Americano), since the Long Espresso button will
default to Cafe Crema, the Coffee with Milk button will default to a Black Coffee (Americano) button, and the
Cappuccino button will default to a Long Coffee button. The dose volumes can then be adjusted using the Dose
Programming to create the perfect ratio of espresso to hot water for each drink.
i
Note:
To deactivate the automatic ON/OFF function simply set the clock to read ON --:-- and OFF --:-- as shown
in Fig. 02. This will force the machine to stay on whenever the main power switch is turned on, with the only
exception being if the machine is programmed for a day off.
Page 17

17
QUARTZ
ONE TOUCH
USER PROGRAMMING
Cappuccino milk frothiness
1. Within the User Menu (see Fig. 04), press + and - to scroll through the menu’s
functions until CAPP. STEAM XX % is shown (see Fig. 05), then press OK to
enter the menu.
2. Press
+ to increase the amount of air in the froth, or - to reduce it. The
default setting is 50%.
3. Press OK to save your setting then press
+ to return to the User Menu.
i
Note:
The higher the percentage (%) setting, the more air is concentrated in the milk and the frothier it will be. This
programming function is not available when the cappuccino function is turned off.
CAPP. STEAM
XX %
Fig. 05
Fig. 04
DOSE PROGRAMMING
IN 30 SEC.
Follow the steps below to set your preferred amount of milk froth for cappuccinos:
Cappuccino dispensing order
DOSE PROGRAMMING
IN 30 SEC.
CAPPUCCINO MODE
CAPPUCCINO MODE
COFFEE -> MILK
CAPPUCCINO MODE
MILK -> COFFEE
CAPPUCCINO MODE
COFFEE <--> MILK
Fig. 01
Fig. 02
Fig. 03
There are 3 milk and coffee dispensing options for
cappuccinos:
Dispense coffee rst, then add milk.
Dispense milk rst, then add coffee.
Dispense coffee and milk simultaneously.
Follow the steps below to program the milk and coffee dispensing order for
cappuccinos:
1. Within the User Menu (see Fig. 01), press
+ and - to scroll through the menu’s
functions until CAPPUCCINO MODE is shown (see Fig. 02), then press OK
to enter the menu.
2. Press
+ or - to scroll to the desired milk and coffee dispensing order; coffee
then milk, milk then coffee, or coffee and milk simultaneously (see Fig. 03).
3. Press OK to save your setting then press
+ to return to the User Menu.
Note:
This programming function is not available when the Cappuccino function
is turned off.
Note:
Coffee with Milk drinks will always be dispensed as milk rst, then coffee.
This function is not adjustable.
i
i
Page 18

18
QUARTZ
ONE TOUCH
USER PROGRAMMING
Cappuccino milk steam timing
1. Within the User Menu (see Fig. 01), press + and - to scroll through the
menu’s functions until PUMP & STEAM TIMES X,X S is shown (see Fig. 02),
then press OK to enter the menu.
2. Press
+ to increase the pump cycle time, or - to reduce it (time is
adjustable from -2.0 to 2.0 seconds). Default is 0.0 seconds.
3. Press OK to save your setting then press
+ to return to the User Menu.
i
Note:
Selecting a longer (positive) pump time will create a foamier cappuccino, selecting a shorter (negative/delayed)
time will create in a milkier, less foamy cappuccino. Your specic milk fat/cream content, viscosity, temperature
and storage methods all impact foaming characteristics, so trying a few different pump times until you nd your
perfect foam/hot milk ratio is recommended. This programming function is not available when the Cappuccino
function is turned off.
PUMP&STEAM TIMES
X.X s
Fig. 02
Fig. 01
DOSE PROGRAMMING
IN 30 SEC.
Follow the steps below to set the ratio of foam/hot milk for cappuccinos:
Cappuccino end wash
1. Within the User Menu (see Fig. 03), press + and - to scroll through the menu’s
functions until CAPP. END WASH X,XX S is shown (see Fig. 04), then
press OK to enter the menu.
2. Press
+ to increase the amount of end wash time, or - to reduce it in 0.25
second intervals from 0.00 (no end wash) to 1.00 second. Default is 0.50.
3. Press OK to save your setting then press
+ to return to the User Menu.
i
Note:
The end wash should be made longer if your machine only receives limited use each day (just one or two
cappuccinos or coffees with milk per hour) to ensure the milk system stays clean. If it is used regularly all day
long, then the end wash can be adjusted shorter or turned off. This programming function is not available when
the Cappuccino function is turned off.
CAPP. END WASH
0,XX s
Fig. 04
Fig. 03
DOSE PROGRAMMING
IN 30 SEC.
Follow the steps below to set the preferred amount of wash time after each cappuccino or coffee with milk:
Page 19

19
QUARTZ
ONE TOUCH
USER PROGRAMMING
Cafe Crema
Black coffee
1. Within the User Menu (see Fig. 01), press + and - to scroll through the
menu’s
functions until CAFE CREMA NO or XX % is shown (see Fig. 02), then
press OK to enter the menu.
2. Press
+ and - to set the desired amount of crema (choose none, or
between 60 and 100%).
3. Press OK to save your setting then press
+ to return to the User Menu.
1. Within the User Menu (see Fig. 03), press
+ and - to scroll through the
menu’s functions until BLACK COFFEE NO or XX % is shown (see Fig. 04),
then press OK to enter the menu.
3. Press
+ and - to set the desired amount of pre-extraction (choose none,
or between 60 - 100%).
4. Press OK to save your setting then press
+ to return to the User Menu.
i
Note:
The higher the percentage (%) setting, the more pre-extraction there will be in the brew and the more crema
there will be on the top of the nished coffee.
i
Note:
The higher the percentage (%) setting, the more pre-extraction there will be and the stronger the brew will taste.
CAFE CREMA
NO / XX %
BLACK COFFEE
NO / XX %
Fig. 02
Fig. 04
Fig. 01
Fig. 03
DOSE PROGRAMMING
IN 30 SEC.
DOSE PROGRAMMING
IN 30 SEC.
Follow the steps below to set your preferred amount of crema for espressos:
Follow the steps below to set your preferred amount of pre-extraction for the black coffee:
Page 20

20
QUARTZ
ONE TOUCH
USER PROGRAMMING
Prebrewing time
Prebrewing pause time
1. Within the User Menu (see Fig. 01), press + and - to scroll through the
menu’s functions until PREBREWING ON is shown (see Fig. 02), then press
OK to enter the menu.
2. Press
+ to increase the amount of prebrewing desired, or - to reduce it in
0.5 second intervals from 0.00 (no prebrewing dosing) to 5.00 seconds.
Default is NO.
3. Press OK to save your setting then press
+ to return to the User Menu.
1. Within the User Menu (see Fig. 03), press
+ and - to scroll through the
menu’s functions until PREBREWING OFF is shown (see Fig. 04), then
press OK to enter the menu.
2. Press
+ to increase the amount of prebrewing desired, or - to reduce it
in 0.5 second intervals from 0.00 (no prebrewing pause) to 5.00 seconds.
Default is NO.
3. Press OK to save your setting then press
+ to return to the User Menu.
i
Note:
Prebrewing allows the coffee/espresso to develop a little more avor by moistening the grounds for a few
seconds (depending on the setting) before pressurizing the capsule and nishing the brew. Different coffee
brands and roasts will taste best with different prebrew dose times. Test a few times with your favorite coffee to
nd the prebrew time that tastes best to you.
i
Note:
Prebrewing pausing allows the coffee/espresso to extract maximum avor by soaking the grounds for a few
seconds after the prebrewing cycle, then repressurizing the capsule and nishing the brew. Different coffee
brands and roasts will taste best with different prebrew pause times. Test a few times with your favorite coffee
to nd the prebrew time that tastes best to you.
PREBREWING ON
NO / 0X, X s
PREBREWING OFF
NO / 0X, X s
Fig. 02
Fig. 04
Fig. 01
Fig. 03
DOSE PROGRAMMING
IN 30 SEC.
DOSE PROGRAMMING
IN 30 SEC.
Follow the steps below to set the preferred amount of prebrewing dosing for stronger avor extraction:
Follow the steps below to set the preferred amount of prebrewing pause time for stronger avor extraction:
Page 21

21
QUARTZ
ONE TOUCH
USER PROGRAMMING
Cleaning interval
1. Within the User Menu (see Fig. 01), press + and - to scroll through the
menu’s functions until CLEAN INTERVAL XX is shown (see Fig. 02), then
press OK to enter the menu.
2. Press
+ to increase the number of drinks between cleanings, or - to
reduce the reminder interval from 0 (no cleaning reminder) to 50 drinks.
Default is 50.
3. Press OK to save your setting then press + to return to the User Menu.
i
Note:
The advanced cleaning should be done everyday (or every 2-3 hours if ambient temperature is very warm) to
prevent milk spoilage inside the machine.
CLEAN. INTERVAL
XX
Fig. 02
Fig. 01
DOSE PROGRAMMING
IN 30 SEC.
Follow the steps below to set the preferred cleaning interval (number of milk-based drinks between reminders
to perform the milk system cleaning):
Initial flushing
1. Within the User Menu (see Fig. 03), press + and - to scroll through the menu’s
functions until INITIAL FLUSH NO or XX S is shown, then press OK to
enter the menu (see Fig. 04).
2. Press
+ to set the desired ushing time, between 5 and 20 seconds. Default is
10 seconds.
3. To turn the initial ush off, press
- until the display reads INITIAL FLUSH NO.
4. Press OK to save your setting then press
+ to return to the User Menu.
Follow the steps below to adjust or deactivate the initial ush function:
Note:
Initial ushing should only be set to OFF if the machine receives very heavy usage. For lighter usage
a longer ushing time should be selected, for moderate usage a shorter one can be used. Insufcient
ushing will negatively affect the taste of the drinks due to an unsanitary coffee spout.
i
DOSE PROGRAMMING
IN 30 SEC.
INITIAL FLUSH
NO / XX s
Fig. 03
Fig. 04
Page 22

22
QUARTZ
ONE TOUCH
Note:
When performed daily, the pump times are recommended to be
set at 5 seconds each.
Note:
If you select YES to activate the Advanced Cleaning function, you must follow the instructions on the
display when the machine reminds you to do the Milk Cleaning starting from the next scheduled cleaning
cycle. Alternatively, if you select NO then the advanced cleaning will be disabled and the system will only
be periodically ushed with hot water, so it is important that you perform the cleaning steps found in the
User Manual at least once per day to ensure the coffee spout and milk system are clean.
Advanced cleaning times - T1, T2, T3, T4
Advanced cleaning ON/OFF
Fig. 04
Fig. 02
Fig. 06
Fig. 07
i
i
1. Within the User Menu (see Fig. 01), press + and - to scroll through the menu’s
functions until ADVANC. CLEAN T1 Xs is shown, then press OK to enter
the menu (see Fig. 04).
2. Press
+ or - to set the desired ushing time (between 5 and 20 seconds, the
machine is set to 5 seconds by default).
3. Press OK to save your setting then press
+ to return to the User Menu.
4. After returning to the User Menu, scroll to the ADVANC. CLEAN T2 (see Fig.
05), ADVANC. CLEAN T3 (see Fig. 06), and ADVANC. CLEAN T4 (see Fig. 07)
and repeat steps 2, 3, and 4 to program each pump time conguration.
1. Within the User Menu (see Fig. 01), press
+ and - to scroll through the menu’s
functions until ADVANC. CLEANING YES or NO (See Fig. 02) is shown, then
press OK to enter the menu.
2. Press OK and when the YES or NO option is ashing
+ or - to activate or
deactivate the cleaning function (depending on its current status).
3. Press OK to save your setting then press
+ to return to the User Menu.
If the advanced cleaning option (shown above) is selected, follow the steps below to program the four
cleaning cycle function pump times: (Each time is programmed separately from within the User Menu.)
Follow the steps below to activate or deactivate the machine’s semi-automatic milk cleaning system:
Fig. 03
Fig. 01
Fig. 05
DOSE PROGRAMMING
IN 30 SEC.
DOSE PROGRAMMING
IN 30 SEC.
ADVANC. CLEANING T2
X s
ADVANC. CLEANING T1
X s
ADVANC. CLEANING T1
X s
ADVANC. CLEANING T3
X s
ADVANC. CLEANING T4
X s
The pump times correspond to the following cleaning functions:
T1: initial steam cleaning time
T2: milk cleaning solution intake time (5 seconds = approx. 150ml)
T3: hot water from boiler ush time
T4: air intake time, to dry cleaning system
USER PROGRAMMING
Page 23

23
QUARTZ
ONE TOUCH
i
USER PROGRAMMING
Note:
The timed ushing provides a programmed dose of hot water to prevent milk spoilage inside the
machine. A shorter ushing interval time is advised for locations with warmer ambient temperatures,
and frequent automatic ushes will help reduce the need for frequent advanced cleaning cycles.
Timed flushing
Fig. 02
Fig. 04
Fig. 05
1. Within the User Menu (see Fig. 01), press
+ and - to scroll through the menu’s
functions until TIMED FLUSHING NO / X h is shown (see Fig. 02), then press
OK to enter the menu.
2. Press
+ to increase the ushing interval time, or - to reduce it (time is
adjustable from NO/off to 24 hours) in 1 hour increments. Default is NO.
3. Press OK to save your setting then press + to return to the User Menu or
to set the T STEAM, T WATER, and T AIR times. T STEAM default is 5
seconds, T WATER default is 10 seconds, T AIR default is 5 seconds.
4. If a timed ushing is selected, then the T STEAM, T WATER, and T AIR
settings (see Fig. 03-05) will be activated and can be set from individually
from 1-20 seconds each.
Follow the steps below to set the preferred ushing time interval (amount of time between automatic ushes
to ensure the milk system stays clean):
Fig. 01
Fig. 03
DOSE PROGRAMMING
IN 30 SEC.
T STEAM
X s
TIMED FLUSHING
NO / X h
T WATER
X s
T AIR
X s
The pump times correspond to the following cleaning functions:
T STEAM: milk pump intake run time (5 seconds = approx. 25ml)
T WATER: hot water from boiler internal ush time
T AIR: air intake time (to dry the cleaning system)
Longer pump times provide more thorough cleaning, but are not necessarily
needed if the machine is used heavily, as the milk system will be constantly
refreshed after each use.
Page 24

24
QUARTZ
ONE TOUCH
1. Within the User Menu (see Fig. 01), press + and - to scroll through the menu’s
functions until PARTIAL COUNTERS is shown (See Fig. 02), then press OK to
view each counter for each drink.
2. To reset each drink counter individually press OK for at least 5 seconds until
the drink counter resets to 000000000.
3. Press OK to save your setting then press
+ to return to the User Menu.
4. After returning to the User Menu, scroll to the TOTAL COUNTERS (See Fig.
03) and repeat steps 2 and 4. The total counters cannot be reset.
Accessing and resetting the partial counter, accessing the total counters
PARTIAL COUNTERS
TOTAL COUNTERS
Fig. 02
Fig. 03
Fig. 01
DOSE PROGRAMMING
IN 30 SEC.
Follow the steps below to access and reset the partial drinks counters:
Exiting the User Menu
1. Within the User Menu press + scroll to the end, the display will show EXIT
(See Fig. 04), then press OK.
2. The display will show DOSE PROGRAMMING (See Fig. 05).
3. Wait 30 seconds and the machine will return to normal use ON mode.
DOSE PROGRAMMING
IN 30 SEC.
Fig. 05
Fig. 04
EXIT
Follow the steps below to exit the User Menu:
USER PROGRAMMING
Page 25

25
QUARTZ
ONE TOUCH
Before storage be sure to:
Perform all weekly and periodic cleaning procedures described in this manual (see pages 18-26).
Disconnect and roll up the power cord.
Disconnect the machine’s water inlet hose from the domestic water supply (if applicable) and drain the boiler (this
should be performed by a qualied person).
Clean the drip tray and exterior of the machine to remove any coffee or other residue and empty and clean the
capsule drawer.
Cover / re-pack the machine in its original carton and store it in a dry place where it will not be exposed to
extreme temperatures or humidity.
When returning the machine to service after long-term storage, perform all weekly and periodic
cleaning procedures before use.
Before disposal be sure to:
Perform all weekly and periodic cleaning procedures described in this manual (see
pages 18-26).
Disconnect and roll up the power cord.
Disconnect the machine’s water inlet hose from the domestic water supply
(if applicable) and drain the boiler (this should be performed by a qualied person).
Pack and send the machine to a certied recycling center.
STORAGE AND DISPOSAL
Storing the machine
Machine disposal
Page 26

26
QUARTZ
ONE TOUCH
Accessing the service menu functions
Language selection
Fig. 04
Fig. 05
Fig. 06
Fig. 07
Editing the greeting message
SERVICE PROGRAMMING
1. Set the machine to STANDBY mode by pressing OK and Cappuccino
simultaneously for 5 seconds (see Fig. 01).
2. Within the STANDBY mode, press OK for 8 seconds, the display will
show LANGUAGE XX (see Fig. 03), which is the rst option of the
Service Menu.
Follow the steps below to access the machine’s service menu functions:
XXX ºC HH:MM
STANDBY
LANGUAGE
XX
LANGUAGE
XX
LANGUAGE
XX
MESSAGE 1
EXPOBAR
MESSAGE 2
QUARTZ ONE TOUCH
Fig. 02
Fig. 03
Fig. 01
Press simultaneously.
1. Enter the Service Menu, when LANGUAGE (see Fig. 04) appears press OK.
2. The currently selected language will ash. English is the default.
3. Press
+ to scroll to the desired language, then press OK to conrm and
press + to move to the next menu option. Available languages: English, French,
German, Spanish.
1. Within the Service Menu (see Fig. 05), press + and - to scroll through
the menu’s functions until MESSAGE 1 is shown (see Fig. 06).
2. Press OK to begin to edit the greeting message.
3. Press
+ and - to change each ashing character, then press OK to move the
next one.
4. When the desired message is input, press OK to scroll to the end (no
characters will be ashing) then press + to conrm the new message and
move to the second line of the greeting message (see Fig. 07), Repeat steps
2 and 3.
Follow the steps below to change the display language:
Follow the steps below to change the greeting message:
Page 27

27
QUARTZ
ONE TOUCH
SERVICE PROGRAMMING
Enable/disable user programming
Adjusting the boiler level probe sensitivity
Setting the service phone number
1. Enter the Service Menu menu (see Fig. 01).
2. Press + until the display shows SERVICE PHONE (see Fig. 02),
3. Press OK. The bottom line will be activated. Press
+ to add characters one
at a time. Press OK to move to the next character.
3. When the desired message is input, press OK to scroll to the end (no
characters will be ashing) then press + to return to the Service Menu.
1. Enter the Service Menu menu (see Fig. 03).
2. Press + until the display shows ENABLE PROGRAMM. YES or NO (see
Fig. 04),
3. Press OK. The bottom line will ash. Press
+ or - to change the setting.
3. When the desired setting is input, press OK to conrm then press + to
return to the Service Menu.
1. Enter the Service Menu menu (see Fig. 05).
2. Press + until the display shows BOILER SENSIB. LOW, MEDIUM or HIGH
(see Fig. 06),
3. Press OK. The current setting will ash. Press
+ or - to change it.
3. When the desired setting is input, press OK to conrm then press + to
return to the Service Menu.
SERVICE PHONE
ENABLE PROGRAMM.
YES
BOILER SENSIB.
MEDIUM
Fig. 02
Fig. 04
Fig. 06
Fig. 01
Fig. 03
Fig. 05
LANGUAGE
XX
LANGUAGE
XX
LANGUAGE
XX
Follow the steps below to set the helpline phone number:
Follow the steps below to enable or disable user programming capabilities:
Follow the steps below to adjust the boiler temperature probe sensitivity:
Note:
By default, the boiler sensitivity is set to medium and normally it will not require modication. If your
water is very pure, with very low dissolved salt content then it may need to be adjusted to high.
Conversely, for water with high dissolved content, the setting may need to be adjusted to low.
i
Page 28

28
QUARTZ
ONE TOUCH
SERVICE PROGRAMMING
Maintenance cycles
1. Enter the Service Menu menu (see Fig. 01).
2. Press + until the display shows MAINTENAN. CYCLES NO or X000 (see
Fig. 02).
3. Press OK. The current setting will ash. Press
+ or - to change it. The
maintenance interval is adjustable from NO to 10,000 coffees, at
1,000 coffee intervals.
4. When the desired setting is input, press OK to conrm then press + to
return to the Service Menu.
MAINTENAN. CYCLES
NO
Fig. 02
Fig. 01
LANGUAGE
XX
Follow the steps below to adjust the number of beverages between maintenance alerts: (The machine can still be
used after the alarm sounds simply by silencing the alarm. The alarm is only intended to alert the user that the
routine maintenance is due.)
Note:
By default, the routine maintenance alarm is turned off (setting: NO). The setting should be determined
based on your intended use of the machine (coffees per day, public or wait staff-only accessibility, vendor
leasing or private ownership, etc.) Routine maintenance is intended to include replacement of shower
plates, gaskets, and other wearable items inside the group, and guarantees the machine continues to make
high-quality, well-extracted coffee.
i
Page 29

29
QUARTZ
ONE TOUCH
SERVICE PROGRAMMING
Setting the display temperature format
1. Enter the Service Menu menu (see Fig. 01).
2. Press + until the display shows TEMPERATURE ºC / F
(see Fig. 02),
3. Press OK. The current setting will ash. Press
+ or - to adjust it.
4. When the desired setting is input, press OK to conrm, then press + to
return to the Service Menu.
TEMPERATURE ºC / F
ºX
Fig. 02
Fig. 01
LANGUAGE
XX
Follow the steps below to set the display temperature units (Celsius or Fahrenheit):
Adjusting the boiler operating temperature
1. Enter the Service Menu menu (see Fig. 03).
2. Press + until the display shows BOILER TEMP. XXX ºC / F (see Fig. 06),
3. Press OK. The current temperature setting will ash. Press
+ or - to
change it.
4. When the desired setting is input, press OK to conrm then press + to
return to the Service Menu.
BOILER TEMP.
XXXºC XXXºF
Fig. 04
Fig. 03
LANGUAGE
XX
Follow the steps below to adjust the normal boiler operating temperature:
Note:
By default, the boiler operating temperature is set to 118ºC / 244ºF. Any adjustments should be based
on the elevation that the machine will be used at (higher elevations may require lower temperatures)
and the type/brand of coffee capsule to be used.
i
Page 30

30
QUARTZ
ONE TOUCH
SERVICE PROGRAMMING
Adjusting the water filter service alarm
Adjusting the capsule storage alarm
1. Enter the Service Menu menu (see Fig. 01).
2. Press + until the display shows CAPSULE STORAGE XX
(see Fig. 02),
3. Press OK. The current setting will ash. Press
+ or - to adjust it.
3. When the desired setting is input, press OK to conrm, then press + to
return to the Service Menu.
1. Enter the Service Menu menu (see Fig. 03).
2. Press + until the display shows H2O FILTER NO / XX L
(see Fig. 04),
3. Press OK. The current setting will ash. Press
+ or - to adjust it.
3. When the desired setting is input, press OK to conrm, then press + to
return to the Service Menu.
CAPSULE STORAGE
XX
H2O FILTER
NO
Fig. 02
Fig. 04
Fig. 01
Fig. 03
LANGUAGE
XX
LANGUAGE
XX
Follow the steps below to set the number of capsules required in the box to activate the capsule box alarm:
Follow the steps below to set the required number of liters of water cycled to activate the water
lter service alarm:
Note:
By default, the alarm is set to 15 capsules. This setting is adequate for most standard capsules and should
not be adjusted unless a smaller or larger-than-average capsule is selected (capsules must be compatible
with the machine’s capsule group) or a waste funnel or an aftermarket, oversized capsule drawer is being
used. Adjusting the setting so that the box is very full of used capsules when the alarm is activated is
not advised, since the box will be difcult to remove and empty, will be very messy, and can cause used
capsules to become jammed inside the machine.
If a waste funnel or an aftermarket, oversized capsule drawer is being used then the alarm can be
deactivated by setting the number to 0 (zero). When deactivating the alarm, it is the responsibility of the
user to make sure that the machine is never blocked/clogged by used capsules.
Note:
By default, the alarm is set to NO (turned off). When turned on, the alarm is adjustable from 50 to 500
liters, in 5 liter increments. Adjustment to the number of liters required to activate the alarm should
always take into consideration the cleanliness/quality and pH rating of the local water supply.
i
i
Page 31

31
QUARTZ
ONE TOUCH
SERVICE PROGRAMMING
Resetting to factory default settings
Exiting the service programming
1. Enter the Service Menu menu (see Fig. 01).
2. Press + until the display shows PRESET (see Fig. 02).
3. Press OK for at least 5 seconds until DONE appears on the display (see
Fig. 03).
1. Enter the Service Menu menu (see Fig. 03).
2. Press + until the display shows EXIT (see Fig. 04).
3. Press OK. The STANDBY mode message will show on the display (see Fig.
03).
1. Exit STANDBY mode by pressing OK and Cappuccino
simultaneously for 5 seconds (see Fig. 06).
2. The machine will return to normal operating mode and the boiler
will begin to heat up. Wait until the greeting messages are displayed
before dispensing a coffee.
PRESET
EXIT
XXX ºC HH:MM
STANDBY
PRESET
DONE
Fig. 02
Fig. 04
Fig. 05
Fig. 03
Fig. 01
Fig. 03
LANGUAGE
XX
LANGUAGE
XX
Follow the steps below to reset all machine to factory default settings:
Follow the steps below to exit the Service Menu and return to Standby Mode:
Follow the steps below to exit Standby Mode and return to normal operation:
Note:
Resetting the machine to factory default preset settings affects
all programming menu parameters: User and Service. Any
adjustments made to individual program settings and values
will be reverted back to as-delivered status.
i
Exiting standby mode
Fig. 06
Press simultaneously.
Page 32

32
QUARTZ
ONE TOUCH
MESSAGES AND ALARMS
ALARM POSSIBLE CAUSE SOLUTION
PREHEATING
The machine is not nished lling
up or heating the boiler.
Wait until the boiler is full and reaches
normal operating temperature.
LOADING TIMEOUT
1.) The machine is exceeding the
preset boiler ll time because a
tube is loose and the machine is
leaking water.
Turn OFF and unplug the machine and contact technical support for assistance.
2.) The machine is exceeding the
preset boiler ll time because
there is no water in the tank or
the boiler.
Fill the tank and restart the machine
(switch the machine OFF then back ON).
FILL WATERTANK There is no water in the tank. Fill the water tank.
FAIL FLOWMETER
1.) The capsule’s coffee grind is
too ne.
Change capsule/coffee.
2.) Not enough water to make a
coffee.
Fill the water tank.
3.) There is air inside the water
system.
Switch the machine OFF and use the hot
water tap to empty the boiler and purge
the air. Then ll the water tank and switch
the machine back ON.
STANDBY STANDBY mode is activated.
Press OK and Cappuccino buttons
simultaneously to disable STANDBY mode.
EMPTY CAPS. BOX
The capsule drawer is full. The
maximum number of capsules has
been reached (15 capsules).
Empty the capsule drawer. The capsule
counter will be reset to zero (drawer must
be removed for at least 5
seconds to reset).
NTC DISCONNECTED
The NTC is disconnected or
broken.
Turn OFF and unplug the machine and contact technical support for assistance.
WATER TANK OPEN
1.) The water tank is removed or
not installed correctly.
Remove and replace the water tank.
2.) The water tank sensor is not
functioning correctly.
Call technical support for assistance.
CAPSULE BOX OPEN
1.) The capsule box is
removed or not installed correctly.
Remove and replace the capsule box.
2.) The capsule box sensor is not
functioning correctly.
Call technical support for assistance.
H20 FILTER
The water lter/softener needs
to be changed.
Exchange the water lter with a new one.
Press the Continuous and Alarm buttons
simultaneously for 5 seconds to reset the
counter.
Page 33

33
QUARTZ
ONE TOUCH
Revisiones
Rev Descripción Fecha Aprobado
Removing the capsule group
CLEANING AND MAINTENANCE
Remove the cup warming panel by removing the
four screws seen in the picture above.
Remove the two screws at the top of the rear
panel (A) and remove it.
Raise the group lever and remove the two
caps and screws in the picture above (A). Then
remove the water tank and remove the 2 caps
and screws as shown (B).
WARNING!
The boiler may be very hot, let it cool down and make sure there is no pressure in the boiler by
opening the steam or water tap before any service is performed.
Remove the plastic top frame covering the machine
by removing the screws in the picture above.
01
03
04
02
A
A
B
Important:
The cleaning instructions included in this manual are to serve as a complement to the cleaning instructions
explained in the user’s manual.
Page 34

34
QUARTZ
ONE TOUCH
Remove the screw in position A, then lift
the top panel off (B).
To remove the milk spout
panel simply pull it
forward (it attaches
magnetically).
Release the capsule group by removing the four screws seen
in the picture above.
Revisiones
Rev Descripción Fecha Aprobado
05
06
Push the buttons on both sides
of the panel back(A), and push
down slightly to release it.
Remove the outlet cover by
pulling straight out.
CLEANING AND MAINTENANCE
07
08
A
B
09
Page 35

35
QUARTZ
ONE TOUCH
Wash the coffee spout and milk outlet under
warm running water, using a brush to clean inside
all the small crevices to remove any milk residue.
Do not wash/wipe the lubricating grease off of the
mounting tabs.
12
11
13
Disconnecting the milk tube from the milk outlet.
WARNING!
Make sure the speed fitting is cool before you remove the tube, normally this part is hot and can cause
burns or scalding.
10
CLEANING AND MAINTENANCE
Disconnect the water inlet hose via the 13mm
tting located in the bottom front side of the group.
Lift the capsule group out of the machine then
disconnect the wires to the microswitch located on
the side of the group.
Page 36

36
QUARTZ
ONE TOUCH
Cleaning of the capsule group
CLEANING AND MAINTENANCE
Important:
Once all cleaning and rinsing is complete,
replace all necessary parts according to
the service interval on page 39.
Note:
Reassembly of the group should be
performed in reverse order.
16
17
ii
Clean the complete capsule group by immerse
it in a container with hot water and professional
cleaning agent. Leave it soaked for around 15
minutes.
After all necessary parts have been replaced and
before you reassemble the group in the machine,
apply a light coating of grease to the moving parts
and areas shown in yellow the picture to ensure
smooth operation of the group.
Note:
Only use professional cleaning
powder for espresso machines.
It’s available from your distributor.
Part #: 1104162
Important:
After cleaning, rinse the capsule group thoroughly
with cool water to ensure all remains of cleaning
agent is removed.
The group is now totally disconnected and can be
separated from the machine.
Disassemble the micro switch by removing the
two screws as shown above.
14
15
Page 37

37
QUARTZ
ONE TOUCH
Replacement kits for capsule group
Replacing the pinch chamber kit
Replacing the capsule holder kit
02
03
Remove the screws and then
pull out the axles holding the
pinch chamber.
Remove the old chamber
and replace with a new pinch
chamber kit.
Align the chamber, reinsert the
axles and fasten all screws.
01
Use a small screwdriver to
remove the lock washers on
the guide shafts. Pull the shafts
out on the left side to release
the chamber.
Remove the old chamber and
replace it with a new capsule
chamber kit.
Align the chamber and clip
in the guide shafts to lock it
into position, replace all lock
washers to secure the guide
shafts.
02
03
01
Note:
When removing the screws you must use two torx-drivers, one on each side you to counter the
rotation of the axle when unscrewing the opposite screw.
i
CLEANING AND MAINTENANCE
Page 38

38
QUARTZ
ONE TOUCH
Replacing the group gasket
01 02 03
Push the metal tension ring
back (shown in blue), using
thumbnails or a plastic tool,
until it slides off of the gasket.
After the tension ring releases,
pull the gasket forward from
one edge until it releases from
the capsule holder.
Turn the machine off at the
main power switch and then
open up the capsule group.
i
Note: To remove the group gasket, the
machine must cool to room temperature.
WARNING! Beware of the sharps inside the
capsule holder to avoid injury.
CLEANING AND MAINTENANCE
Page 39

39
QUARTZ
ONE TOUCH
SERVICE INTERVALS
Components Part No.
Months (Cycles)
6 (6000) 12 (12000) 18 (18000) 24 (24000)
Boiler
Group Solenoid Valve C60000112 Replace
Non Suction Valve C65000200 Replace Replace
Capsule group
Main Capsule Group Gasket C50000060 Replace Replace Replace Replace
Capsule Holder Kit
Caftaly: CESC81000
Lavazza: CESC81005
Clean Clean Clean Replace
Capsule Pinch Chamber
Caftaly: CESC82000
Lavazza: CESC82005
Clean Clean Clean Replace
Taps
Steam Tap Body C15000336 Clean Replace
Steam Pipe No Burn C35010086 Clean Clean
Water Tap Body C15000336 Replace
Vibration pump
220V 50HZ Ofce Pump C60000040 Check Check
Inlet/Outlet Assemblies
Slider Spout 1264248 Clean Clean
Silicone Milk Inlet Hose C35021000 Replace Replace
Cappuccino Set 70000030 Replace Replace
Water Tank Inlet System
O-Ring Silicone D17x3 Sh60A+/-5A C50000134 Replace Replace
Round Filter Mesh C70000005 Clean Clean
Water Tank
Tank Valve Kit 2760265 Replace Replace
Page 40

40
QUARTZ
ONE TOUCH
ELECTRICAL DIAGRAM
POS. Part No. Description
1 C60100076 Touchpad
2 1660107 Peristaltic Pump
3 C60100060 Flowmeter
4 1660091 PCB
5 1660092 PCB Cappuccino
6 C60000112 Group Solenoid Valve
7 C60000105 Boiler Water Inlet Solenoid Valve
8 C60000100 Inlet Valve 3/4 - Tube
9 C60000112 Steam Solenoid Cappuccino
10 C166009 Water Solenoid Cappuccino
11 ---------- Ground
12 C60900043 Rocker Switch
13 ---------- Line
14 C60100039 Capsule Group Microswitch
15 C60100034 Tank Safety Microswitch
16 C60900043 Pump (Vibratory)
17 ---------- Neutral
18 C38020001 Heating Element
19 C60800101 Solid State Relay AC
20 C60100043 Capacitive Level Detection
21 C60100040 Water Level Probe
22 C60103025 EMI Suppression Capacitor
23 C60100076 Boiler Temperature Probe
24 6162014 Capsule Drawer Microswitch
2000W-230V
(3-32V)
N - O
L1 - R
+ -o
02
17
12
22
131411
06
18
07
10
19
01
23
20
04
05
21
241503
08
09
16
Page 41

41
QUARTZ
ONE TOUCH
EXPLODED VIEWS
Part Part No. Description
1660091 PCB Control Board Quartz Touch
1660092 PCB Cappuccino Quartz One Touch
C60800101 Static Relay 4-32
C60100043 Adaptive Level Detection
C60900043 Black Power Switch
Electrical components
Page 42

42
QUARTZ
ONE TOUCH
Machine front
EXPLODED VIEW
Drawing
01
070605
111009
13
14
02
04
17
18
19
22
08
21
03
20
16
28
15
12
232627
24
25
Page 43

43
QUARTZ
ONE TOUCH
EXPLODED VIEW
Machine front
Spare parts list
POS. PCS Part No. Description
01 1 1264345 Chromed Front Cover
02 1 1264229 Front Clip Right
03 1 1264256 Front Clip Left
04 1 1264249 Chromed Slider Trim Two Spout
05 1 1264248 Chromed Slider Front Two Spout
06 2 C200100220 Sheetmetal Slides
07 1 1264343 Front Panel
08 4 C70000061 Magnets
09 1 1264233 Top Front Cleaning Port Adapto日
10 1 1264354 Splash Panel
11 1 1264348 Coffee Spout
12a 1 1264342 Display Trim Panel White
12b 1 1264258 Display Trim Panel Black
13 1 1660094 Touchpad
14 1 1264349 Touchpad Cover
15 1 1264263 Display Cover
16 1 1660095 Keypad
17 1 1264337 Group Jet Breaker (One Touch)
17 1 C30000046 Group Jet Breaker (Classic)
18 1 6165032 Microswitch
19 1 1264220 Microswitch Housing
20 1 1264346 Lower Front Cover
21 1 70000030 Cappuccino Set (One Touch only)
22 1 C70000027 Chromed Handle
23 1 1264350 Capsule Box
24 1 1364085 Drip Grill
25 1 10003126 Drip Tray Float
26 1 1264347 Drip Tray
27 1 2760311 Milk System Cleaning Connector w/300mm Sil. Hose
28 1 C35021000 Silicon Milk Inlet Hose Dia. 4*7mm x 600mm
Page 44

44
QUARTZ
ONE TOUCH
Machine
Drawing
EXPLODED VIEW
06
09
10
11
08
121415
13
010304
05
16
02
07
Page 45

45
QUARTZ
ONE TOUCH
Machine
Spare parts list
EXPLODED VIEW
POS. PCS Part No. Description
01 1 261656 Side Panel Left
02 2 C50000052 End Gasket d.11
03 1 2760096 Top Frame Assy.
04 1 C10004180 Cup Tray Stainless Steel
05 1 C10004100 Back Panel
06 1 261655 Side Panel Right
07 1 C70001005 Drain Cup
08 1 261654 Chassis Base
09 1 N/A Chassis Assembly
10 1 C10004260 Capacitive Level Probe Support Sys.
11 1 C20010240 Miniswitch Support Tank Cover Quartz
12 1 C70001002 Threadless Drain Cup
13 1 2760201 Tube Guide Assy.
14 4 C70000041 Leg-d-30
15 1 1264344 Tank Divider Panel
16 1 261652 Support Panel Electrical
Page 46

46
QUARTZ
ONE TOUCH
Water schematic
Drawing
01
02
15151011
12
16
EXPLODED VIEW
04
06
05
07
13
14
Silicone tube ø10mm
Silicone tube ø 6mm
Tube PTFE ø 4mm
Tube PTFE ø 6mm
WATER INLET
09
08
17
17
03
212019
18
22
24
23
25
Page 47

47
QUARTZ
ONE TOUCH
Water schematic
Spare parts list
POS. PCS Part No. Description
01 1 See Pg. 58-61 Capsule Group Caftaly
02 1
See Pg. 58-59,
62-63
Capsule Group Lavazza
03 1 2760068 Boiler Assy.
04 1 See Pg. 64 Tank Inlet Valve Assy.
05 1 See Pg. 66-67 Tank Assy.
06 1 120620 Valve Inlet Single 1.8L
07 1 1505042 Inlet Hose With Connect
08 1 1206123 Non Return Valve Complete
09 1 C60100060 Flow-Meter
10 1 See Pg. 65 Vibration Pump Assy.
11 1 1801103 T Connector (4-4-4mm)
12 1 See Pg. 56-57 Manifold System
13 1 See Pg. 70-71 Steam Wand Assy.
14 1 See Pg. 68-69 Water Tap Assy.
15 1 See Pg. 54-55 Cappuccino Set
16 1 C30600009 Automatic Elbow Racor G1/8F-Tube4
17 2 C30600016 Automatic Straight Racorg1/4F-Tube6
18 - 1505021 Silicon Hose 10mm (sold in 100cm lengths)
19 - C35021015 Tube PTFE 4-6 (sold in 100cm lengths)
20 - C35021000 Tube Silicon 4-7 (sold in 100cm lengths)
21 - C35021016 Teon Tube 2*4 (sold in 100cm lengths)
22 1 See Pg. 50-51 Thermic Assy.
23 1 See Pg. 52-53 Cappuccino Distributor
24 1 1860059 Y Connector (4-4-4mm)
25 1 1660107 Peristaltic Pump
EXPLODED VIEW
Page 48

48
QUARTZ
ONE TOUCH
Boiler
Drawing
EXPLODED VIEW
01
12
13
020304
05
06
08
09
10
05
07
11
Page 49

49
QUARTZ
ONE TOUCH
Boiler
Spare parts list
POS. PCS Part No. Description
01 1
1860019 Straight Tube Connector G1/4 - 6
02 1 30600013 Automatic Elbow Racor G1/4 M
03 1 25093320 Hexagonal Head Screw 8*20
04 1 1660101 Element 2000W 240V
05 5 25012530 Flat Washer M-8 Din-125
06 1 50010030 40*52*2 Element Teon Gasket
07 1 1362003 Boiler Tank
08 1 25093350 Hexagonal Head Screw 8X16
09 1 60100040 Water Level Probe 1/4
10 1 60100040 Water Level Probe 1/4 Brass
11 1 C65000200 Non Suction Valve
12 1 C50010020 13.2*18.2*2.5 1/4 TEFLON GASKET
13 1 2760184 Cappuccino Valve
EXPLODED VIEW
Page 50

50
QUARTZ
ONE TOUCH
Thermic assembly
Drawing
EXPLODED VIEW
01
02
03
05
06
07
08
09
10
11
12
13
14
15
16
171819
20
21
22
04
Page 51

51
QUARTZ
ONE TOUCH
Thermic assembly
Spare parts list
POS. PCS Part No. Description
01 1 1264230 O-Ring Dia 44.44*3.5Mm Fkm Fda
02 1 C30000066 Boiler Ring Dia35mm
03 1 C35020001 Thermic Exchanger Dia35mm
04 2 1264231 O-Ring Dia 28*2.5Mm Fkm Fda
05 1 C30000090 Thermic Main Body D 35
06 4 25091240 Allen Screw 6*16 Din 912
07 1 1264232 Isolation Thermic Exchanger
08 1 25091212 Allen Srew 4*20 Din 912
09 1 60000112 Electrov. Group Parker 220V
10 1 1860051 Connector Lg1_8tube Silicon
11 4 50000100 Viton Electrovalve Gasket
12 1 1364047 Plug Thermic Exchanger
13 1 50010020 13.2*18.2*2.5 1/4 Teon Gasket
14 1 70000009 Tubular Group Filter
15 1 35010020 Copper Tube Diam 6*8*126
16 2 1264251 O-Ring Dia 3.68X1.75mm
17 2 1860050 Thermic Oring Holder
18 2 1264252 O-Ring Dia 7.5X1.5mm
19 2 1860046 Pressure Fitting Tube 4 Conic
20 2 1860045 Connector G1/4 M Press Conic
21 2 35021016 Teon Tube 2*4
22 1 1264316 Bushing Gasket Teon
EXPLODED VIEW
Page 52

52
QUARTZ
ONE TOUCH
Cappuccino distributor
Drawing
EXPLODED VIEW
01
02
04
03
05
06
07
08
09
Page 53

53
QUARTZ
ONE TOUCH
Cappuccino distributor
Spare parts list
POS. PCS Part No. Description
01 1 1860067 Pump Tube 6, Male Bend
02 1 1660099 Solenoid Valve 2 Way 230V Plastic
03 1 30700000 Pin 1/8 Tube 6
04 1 1660129 Electrov. Group Parker 220V
05 2 50000100 Viton Electrovalve Gasket
06 4 25091210 Allen Screw 4X12 Din 912
07 1 1364059 Solenoid Cappuccino Holder
08 1 1860052 Connector G3_8 Solenoid Cappuccino
09 1 1860055 Connector Base 4 Way
EXPLODED VIEW
Page 54

54
QUARTZ
ONE TOUCH
Cappuccino set
Drawing
EXPLODED VIEW
0206070309
01
10
08
05
04
Page 55

55
QUARTZ
ONE TOUCH
Cappuccino set
Spare parts list
POS. PCS Part No. Description
01 1 70000034 Front Cappuccino Set
02 2 70000033 Body Cappuccino Set
03 1 70000035 Lid Cappuccino Set
04 1 70000031 Inlet Air & Steam Cappuccino Set
05 1 50000117 Gasket D7x2.5 Vmq-70
06 3 50000100 Viton Electrovalve Gasket
07 1 70000032 Milk Inlet Cappuccino Set
08 2 25200003 Screw For Plastic 3 X 8
09 1 70000061 Magnet D10x5
10 1 1364082 Milk Temperature Regulator M6
EXPLODED VIEW
Page 56

56
QUARTZ
ONE TOUCH
Manifold system
Drawing
EXPLODED VIEW
01
10
10
11
12
13
11
03
04
05
06
07
02
Page 57

57
QUARTZ
ONE TOUCH
Manifold system
Spare parts list
POS. PCS Part No. Description
01 1 1264253 Distributor Quartz 1Gr
02 1 N/A Bypass Closer
03 1 N/A Flat Sealing Gasket Nbr 60 Sh Fda (D6x3)
04 1 N/A Gasket Seat Of Bypass
05 1 N/A Bypass Spring
06 1 N/A Setting Screw Of Bypass
07 1 N/A O-Ring 7.2 X 1.9 Fkm Green
08 1 N/A Catridge Tube 6mm Legris
09 1 N/A Shell Tube 6mm
10 2 N/A Catridge Tube 4mm Legris
11 2 N/A Shell Tube 4mm
12 1 60000105 Electrov.Base Plate Parker 220V
13 2 C25091211 Allen Screw M4x16 DIN 912
EXPLODED VIEW
Page 58

58
QUARTZ
ONE TOUCH
Capsule group chassis
Drawing
01
12
11
11
10
131516
17
18
22
23
252627
21
02
03
04
05
06
07
08
09
EXPLODED VIEW
242014
19
Page 59

59
QUARTZ
ONE TOUCH
Capsule group chassis
Spare parts list
POS. PCS Part No. Description
01 2 C25093331 Hexagon Head Screws M3*16
02 1 C60900031 Autoexp. Miniswitch 83160 G.
03 8 C25679906 Retaining Washers
04 1 C30210136 Stop Bushing D22x7
05 1 1364078 Spring Lock Left Capsule Group
06 2 1461044 Step screw M4, SUS430
07 2 C30210230 Stop Nut M4
08 2 C30210103 Articulated Arm Of Autoeject
09 2 C25798440 Hex Socket Head Cap Screws M4x10
10 1 C30210091 Right Panel Capsule Group
11 1 C30210121 Slide Axis D6x84
12 4 C30210135 Guide Cap D 8X11 Auto-Eject
13 1 C25012521 Stainless Steel Knob Washer
14 2 C30210120 Axis D 6*80 Auto-Eject Group
15 12 C25091200 Allen Screw 4X8 Din-912
16 10 C25209952 Disc Springs 5.2*10*0.4 Din2093
17 5 C30210110 Group Pin M4x77
18 2 C30210150 Insert Screw M4x8
19 1 C30210060 Group Rear Panel
20 1 C30210082 Group Lever Joint
21 1 C55020005 Torsion Spring Right
22 1 C30210124 Axis D 8*80 Auto-Eject Group
23 1 C25148124 Slotted Spring Pins 2,5X10 - Din
24 1 C30210070 Group Rear Cam
25 1 C55020006 Torsion Spring Left
26 2 C25091409 Allen Screw M6*10 Din914-A2
27 1 C30210122 Axis D6x54 Group Hinge
EXPLODED VIEW
Page 60

60
QUARTZ
ONE TOUCH
Capsule group Caftaly
Drawing
EXPLODED VIEW
06
081311
12
10
09
07
01
14
02
03
04
05
02
01
15
Page 61

61
QUARTZ
ONE TOUCH
Capsule group Caftaly
Spare parts list
EXPLODED VIEW
POS. PCS Part No. Description
01 1 ESC81000 PORTACAPSULES CFT KIT AUTO-EJECT GROUP
02 1 ESC82000 CHAMBER CFT KIT AUTO-EJECT GROUP
03 1 30600009 AUTOMATIC ELBOW RACOR G1/8F - TUBE 4 FKM
04 1 50000112 GASKET D7x2 VMQ-70 (RED)
05 1 75200059 INF. NEEDLE AUTOEJECT GROUP
06 1 50000060 RETENTION GASKET AUTO-EJECT GROUP CFT
07 1 30210134 RETENTION RING AUTO-EJECT
08 1 75200057 NEEDLE SUPPORT CAPSULE CFT AUTOEJECT.
09 1 65000301 SETA VALVE PTFE EMULSIFYING
10 1 55000050 SPRING GASKET MUSHROOM TYPE
11 1 30370075 STEAM/WATER PIPE ROD
12 1 30210170 EXIT EMUL GROUP AUTO-EJECT
13 3 25200003 SCREW FOR PLASTIC 3 X 8
14 1 C30210081 GROUP LEVER
15 1 ESC80000 KIT GROUP AUTO-EJECT CAPSULE CFT
Page 62

62
QUARTZ
ONE TOUCH
Capsule group Lavazza
EXPLODED VIEW
Drawing
01
14
07
13
12
11
03
04
10
09
08
05
06
02
01
02
15
Page 63

63
QUARTZ
ONE TOUCH
Capsule group Lavazza
Spare parts list
EXPLODED VIEW
POS. PCS Part No. Description
01 1 ESC81005 PORTACAPSULES LVZ KIT AUTO-EJECT GROUP
02 1 ESC82005 CHAMBER LVZ KIT AUTO-EJECT GROUP
03 1 30600009 AUTOMATIC ELBOW RACOR G1/8F - TUBE 4 FKM
04 1 50000112 GASKET D7x2 VMQ-70 (RED)
05 1 25096510 SCREW PHILIPS 4*8 (DIN 965)
06 1 75000015 SHOWER POD D-34
07 1 50000063 RETENTION GASKET AUTO-EJECT GROUP LVZ
08 1 30210134 RETENTION RING AUTO-EJECT
09 1 65000301 SETA VALVE PTFE EMULSIFYING
10 1 55000050 SPRING GASKET MUSHROOM TYPE
11 1 30370075 STEAM/WATER PIPE ROD
12 1 30210170 EXIT EMUL GROUP AUTO-EJECT
13 3 25200003 SCREW FOR PLASTIC 3 X 8
14 1 C30210081 GROUP LEVER
15 1 ESC80005 KIT FOR LVZ CAPSULE AUTOEXP.
Page 64

64
QUARTZ
ONE TOUCH
Tank inlet
Drawing
Spare parts list
POS. PCS Part No. Description
01 1 C30369202 Tank Distributor Cover
02 1 C50000134 Silicone O-Ring 17X3mm
03 1 C30369201 Tank Distributor Button
04 1 C70000005 Filter
05 1 C30369200 Tank Distributor Valve
06 1 C65000220 Tank Distributor Inlet Valve Assy.
EXPLODED VIEW
02
04
030501
06
Page 65

65
QUARTZ
ONE TOUCH
Vibration pump
Drawing
Spare parts list
05
01
03
POS. PCS Part No. Description
01 1 C60000040 Ofce pump 220V 50Hz
02 1 1264340 Connector T for Vibration Pump
03 1 1860061 Connector L male G1/8-Tube 4 Rotate
04 1 C1264324 Support Rubber Vibration Pump
05 1 C1264181 Pump Cover
EXPLODED VIEW
04
02
Page 66

66
QUARTZ
ONE TOUCH
Water tank
Drawing
01
02
03
EXPLODED VIEW
04
Page 67

67
QUARTZ
ONE TOUCH
Spare parts list
POS. PCS Part No. Description
01 1 10004250 Tank Handle
02 1 1264355 Water Tank
03 1 2760265 Tank Valve Kit
04 1 2760065 Tank Assembly
Water tank
EXPLODED VIEW
Page 68

68
QUARTZ
ONE TOUCH
01
02
07
06
0205
040308
Water tap
Drawing
09
10
EXPLODED VIEW
13
12
11
Page 69

69
QUARTZ
ONE TOUCH
Water tap
Spare parts list
POS. PCS Part No. Description
01 2 N/A Tap Shaft Gasket
02 1 N/A Tap Closing Disc
03 1 N/A Tap Steam/Water Gasket Teon
04 1 N/A Spring Steam/Water Tap
05 1 N/A Tap Steam/Water Gasket Brass
06 1 N/A O-Ring 12.1X2.7mm
07 1 N/A Nut 3/8
08 1 N/A O-Ring 8 X 1.9
09 1 C40000071 Steam/Water Tap Knob
10 1 C30370122 Monogrammed Knob
11 1 C15000336 Tap Body Assy.
12 1 C30000050 Nozzle Assy.
13 1 C15000331 Water Tap Assy.
EXPLODED VIEW
Page 70

70
QUARTZ
ONE TOUCH
Steam wand
Drawing
EXPLODED VIEW
14
12
13
01
02
06
0205
04
03
07
08
09
15
16
10
11
Page 71

71
QUARTZ
ONE TOUCH
Steam wand
Spare parts list
POS. PCS Part No. Description
01 2 N/A Tap Shaft Gasket
02 1 N/A Tap Closing Disc
03 1 N/A Tap Steam/Water Gasket Teon
04 1 N/A Spring Steam/Water Tap
05 1 N/A Tap Steam/Water Gasket Brass
06 1 N/A O-Ring 12.1X2.7mm
07 1 N/A Nut 3/8
08 1 N/A Internal Spring (7X146x0,5)
09 1 N/A Tube PTFE 4-6
10 1 N/A O-Ring 6X1
11 1 C30370185 Steam Tap Nozzle 2H M8.5 With O-ring
12 1 C35010086 Steam Pipe
13 1 C15000339 Steam Wand Assy.
14 1 C15000336 Tap Body Assy.
15 1 C40000071 Steam/Water Tap Knob
16 1 C30370132 Monogrammed Knob
EXPLODED VIEW
Page 72

TECHNICAL SERVICE
Please contact your supplier
Your Dealer:
For the warranty to be valid the conditions for maintenance must have been followed according
to our instructions, proper precautions have been taken, and warranty claim has been issued
without delay.
The affected equipment shall not be used while awaiting service if there is any risk that the
damage or defect could worsen.
The warranty shall not cover consumable supplies such as glassware, or normal maintenance
such as cleaning of lters. Additionally, damages of an external nature, such as contaminants in the
water, limescaling, incorrect voltage or power surges, and water supply issues such as pressure
changes or service disconnection are not covered by this warranty.
The warranty will not cover damages or defects caused by incorrect handling or operation of the
appliance.
www.creminternational.com
ASSEMBLED IN CHINA BY CREM INTERNATIONAL
CREM INTERNATIONAL (SHANGHAI) CO.,LTD
Building 5, No.521-551, Kangyi Road, Kangqiao Industrial Zone
Pudong New Area, Shanghai, China
Post Code: 201315
Phone: +86 021 681 87 010
Fax: +86 021 681 870 20
 Loading...