

Page 1
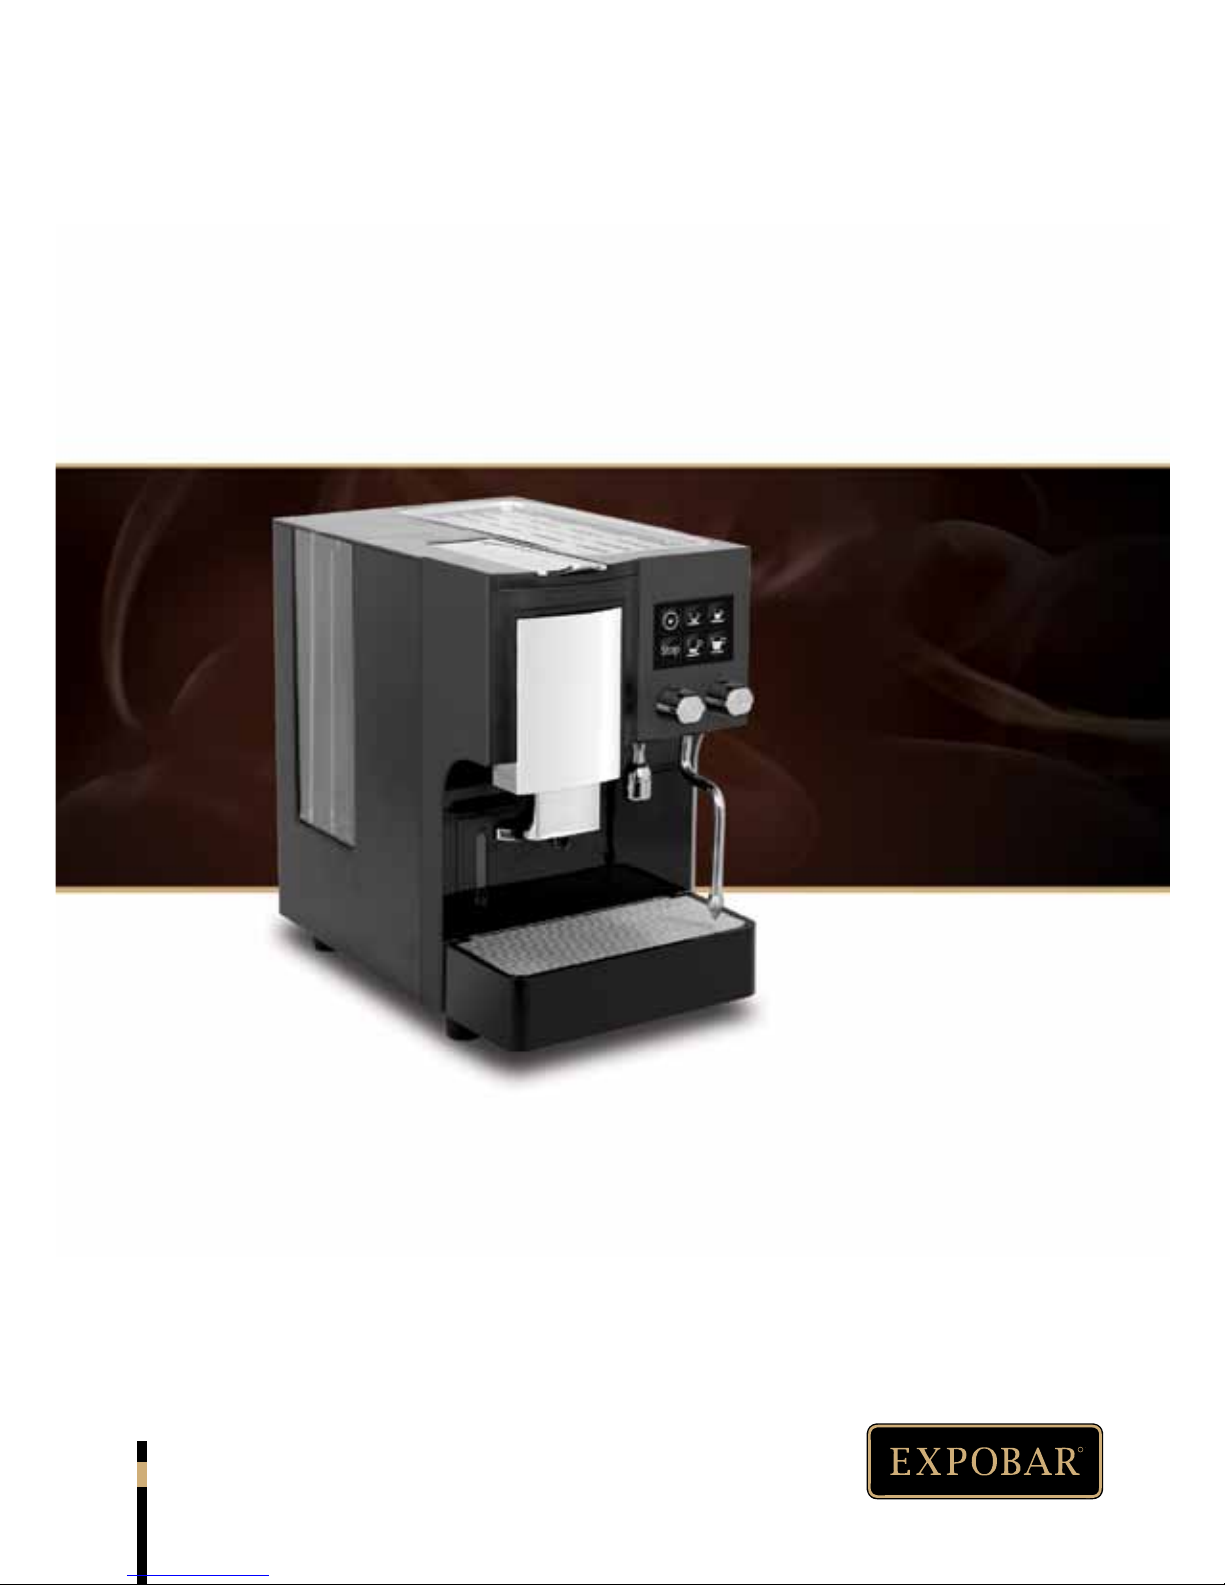
QUARTZ CLASSIC
USER MANUAL
R
UM_EN
Part No.: 1764263_02
Page 2

2
R
QUARTZ
CLASSIC
CONTENT
CONTENT .................................................................................................................................................................. 2
SYMBOL DESCRIPTION .................................................................................................................................... 4
Hazard intensity levels ..................................................................................................................................................... 4
GENERAL ..................................................................................................................................................................... 5
Introduction ....................................................................................................................................................................... 5
General instructions ......................................................................................................................................................... 5
Warnings ............................................................................................................................................................................. 5
Precautions ......................................................................................................................................................................... 6
Intended use ....................................................................................................................................................................... 6
Data sheet........................................................................................................................................................................... 7
OVERVIEW OF COMPONENTS .................................................................................................................. 8
Front view ........................................................................................................................................................................... 8
DIMENSION SKETCH .......................................................................................................................................... 9
Quartz Classic ................................................................................................................................................................... 9
TRANSPORT ..........................................................................................................................................................10
INSTALLATION AND START-UP ............................................................................................................... 10
Packaging ........................................................................................................................................................................... 10
Delivery inspection ........................................................................................................................................................ 10
Positioning.........................................................................................................................................................................10
Electrical connection ...................................................................................................................................................... 11
Water connection ........................................................................................................................................................... 11
Pressure and temperature ............................................................................................................................................11
Drip tray drainage ........................................................................................................................................................... 12
Starting the machine ....................................................................................................................................................... 13
OPERATION ........................................................................................................................................................... 14
How to dispense a drink ............................................................................................................................................... 14
Steaming and frothing milk ............................................................................................................................................15
Dispensing hot water ..................................................................................................................................................... 15
Filling the water tank .................................................................................................................................................... 16
Original instructions
Page 3

3
R
QUARTZ
CLASSIC
CONTENT
CLEANING AND CARE ........................................................................................................................ 17
Coffee machine cleaning ...................................................................................................................................... 17
Daily cleaning procedures ................................................................................................................................... 17
Weekly cleaning procedures............................................................................................................................... 17
Rinsing the capsule group .................................................................................................................................... 18
Cleaning the capsule group ................................................................................................................................. 19
Cleaning the coffee spout ................................................................................................................................... 20
Emptying the capsule drawer ............................................................................................................................. 20
Additional handling of the machine ................................................................................................................... 21
PROGRAMMING ....................................................................................................................................... 22
Keypad ..................................................................................................................................................................... 22
Programming the drink volume ......................................................................................................................... 22
STANDBY mode ................................................................................................................................................... 22
STORAGE AND DISPOSAL ................................................................................................................ 23
Storing the machine .............................................................................................................................................. 23
Disposal of the machine ...................................................................................................................................... 23
TROUBLESHOOTING .......................................................................................................................... 24
ALARMS AND INDICATIONS .......................................................................................................... 25
Page 4
4
R
QUARTZ
CLASSIC
SYMBOL DESCRIPTION
Hazard intensity levels
There are three different levels of hazard intensity, identified by the signal words DANGER, WARNING and
IMPORTANT. The level of hazard is determined by the following definitions.
Additionally, NOTE indicates useful information that all users should be aware of.
Observe these statements to ensure user safety and prevent injury and/or material damage.
Important:
Alerts against unsafe practices. Observe to ensure food safety, to prevent minor personal
injury, or damage to the machine.
WARNING:
Indicates a potentially hazardous situation which, if not avoided, could result in serious injury
and even death.
DANGER:
INDICATES AN IMMINENTLY HAZARDOUS SITUATION WHICH, IF NOT
AVOIDED, WILL RESULT IN SERIOUS INJURY OR EVEN DEATH.
Note:
Provides additional information which may be helpful during cleaning or operation of the
machine.
i
Page 5

5
R
QUARTZ
CLASSIC
GENERAL
Introduction
Read this user manual carefully before starting
to use the machine.
This manual contains important instructions
regarding safe intended use of the machine.
Do not discard this manual, it will be useful for
future reference. If damaged or lost, request a
copy from the manufacturer.
Machine installation and certain maintenance
operations should only be performed by
qualified service personnel.
All safety instructions and warnings contained
in this manual should be observed at all
times to ensure safe installation, use, and
maintenance.
Do not attempt to remove covers or safety
shields to access the interior of this machine
or make repairs. Repairs should be made by an
authorised technician or service centre.
Owners are liable for ensuring that users have
been properly trained to operate the machine
and understand the potential risks involved.
The owner or installer will be liable for all
unauthorised modification of the machine.
Unauthorised alteration or modification
of the machine will immediately void the
manufacturer’s warranty.
This manual references the machine at the
time of sale. The commercial availability of
subsequent versions including modifications,
upgrades or adaptations does not oblige
the manufacturer to apply any changes to
this machine, nor is it obliged to update the
documentation supplied.
The manufacturer reserves the right to
withdraw currently available manuals whenever
deemed appropriate and reasonable.
Periodically, some updates and changes may
be required for this machine. In this event, a
technician will be responsible for ensuring the
change is made in accord with manufacturer’s
specifications.
Install the machine in a horizontal position and
away from heat sources and flammable objects.
This machine should only be installed on a
water-resistant work surface that is capable of
adequately supporting the machine’s weight.
Place the machine in a location accessible only
to personnel trained to operate it.
Keep all hazardous packaging materials, such as
plastic bags, styrofoam, and staples, out of reach
of children.
Plug the machine into a properly installed, earth
grounded electrical outlet with line voltage that
matches the specifications for the machine.
Ensure that the power supply voltage does not
fluctuate by more than 6%.
Position the power cable so that users cannot
trip over it. Keep the power cable away from
sharp edges and heat sources.
Children should never be allowed to play with
the machine.
This appliance is not suitable for installation in
an area where a pressure washer may be used.
Do not use the machine outdoors, where
it would be exposed to severe weather or
extreme temperatures.
If the power cable is damaged, it may only be
replaced by the manufacturer or its approved
service technician.
Do not remove or disable any of the
mechanical, electrical, or thermal protection
safety equipment.
General instructions
Warnings
Note:
The manufacturer is not liable for damage to persons or property resulting from failure to
follow the instructions and warnings listed below when installing and using this machine.
Thank you for choosing the QUARTZ CLASSIC espresso machine.
We hope you enjoy it !
Page 6

6
R
QUARTZ
CLASSIC
GENERAL
In case of emergency, (e.g., the machine catches
fire or becomes unusually hot or noisy),
disconnect the power immediately and turn off
the water supply.
If the machine is not going to be used for an
extended period of time, disconnect the power.
When disconnecting the power, pull the plug
rather than the cable.
When packed for storage, store the machine
in a dry place with an ambient temperature
above 5ºC. Boxes may be stacked up to three
units high of the same model. Do not place
other heavy items on top of the box.
If the machine is likely to be exposed to
temperatures below 0ºC during handling and
transport, make sure that service personnel
empties the boiler and water system. (The
machine’s boiler and water system is empty
when delivered from the factory.)
To ensure fault-free machine operation, only
use manufacturer-approved replacement parts
and accessories.
The coffee machine has been designed and
manufactured to make espresso coffee and
other hot drinks (e.g., steaming and frothing
milk). Do not use it for any other purpose.
The machine is intended to be used by trained
personnel for preparing foodstuffs.
This machine is not intended for use in
industrial kitchens, domestic kitchens, or similar
locations.
The manufacturer will not be held liable
for damage to persons or property due to
incorrect, improper or negligent use by nonprofessional personnel.
To ensure optimal performance, install the
machine in a location where these parameters
will not be exceeded:
- Maximum permissible inlet water pressure:
600 KPa (6 Bar)
- Minimum permissible inlet water pressure:
200 KPa (2 Bar)
- Maximum inlet water temperature: 40ºC
- Ambient temperature is between +10ºC
(min.) and +40ºC (max.).
Precautions
Intended use
Before performing maintenance and/or moving
the machine, disconnect the machine from the
power supply and wait for it to cool down.
Do not place any liquids on the machine.
This appliance must not be cleaned with a
pressure washer.
Never immerse the machine, plug or power
cable in water, as there is a risk of electric
shock.
Do not touch the machine’s hot surfaces or
dispensing equipment.
Do not touch the machine if your hands or feet are
wet.
Do not operate the machine if any part except
the dispensing equipment is wet.
Place the machine out of reach of children.
This appliance can be used by children age 8
and above and persons with reduced physical,
sensory, or mental capabilities or with lack of
experience and knowledge if they have been
given supervision or instruction concerning use
of the appliance in a safe way and understand
the hazards involved.
Children shall not play with the appliance.
Cleaning and user maintenance shall not be
made by children without supervision.
Do not use the machine if the power cable
or plug is damaged, or the machine has been
dropped. Contact a service technician for
repairs or to ensure that it is safe for use.
Do not block the vents with rags or other
objects.
Do not insert foreign objects into the vents.
Check the drain regularly to make sure that
waste water is emptying properly.
Page 7
7
R
QUARTZ
CLASSIC
GENERAL
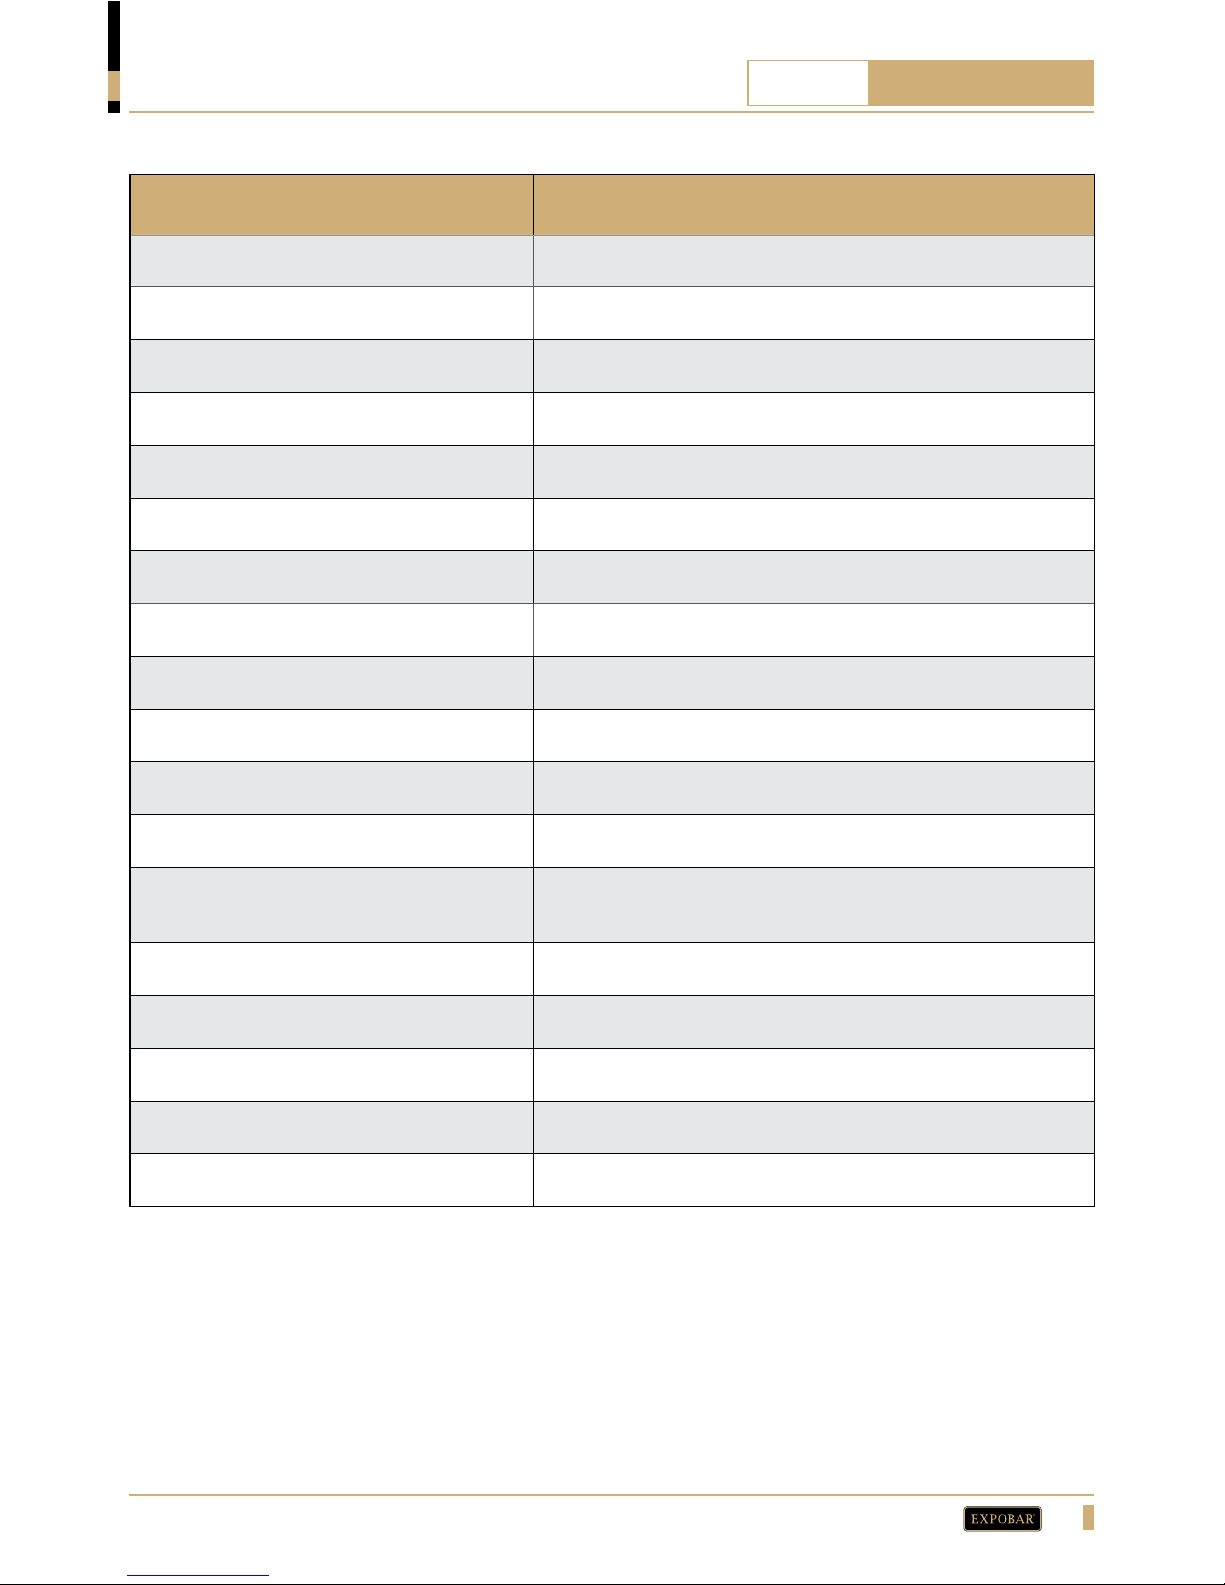
FACTS QUARTZ
Drink selection options
4 Coffee Drinks & Continuous Brewing
Brewing mechanism
Capsule
Capsules supported
Caffitaly, Lavazza
User interface
Capacitive touchpad
Temperature control
PID regulation
Height adjustable outlet
Adjustable from 65 to 110mm
Used capsule drawer capacity
15 capsules
Energy save mode
Ye s
Dimension (height, width, depth)
400, 260, 410mm
Internal water tank
1.8 L with water filter option
Minimum inlet water pressure
1 bar
Boiler volume
1,7 L
Power rating
(Compliance code)
220-240 V 1N ~ 1950W 50-60Hz
(EAEB-B51C-13AL)
Water connection
1
/2" NPT (external) or water tank (internal)
Drip tray
Level viewer & option for drainage connection
Dispenser
Automatic espresso, water/steam manual taps
Ambient noise
< 70 dB
Machine weight
16 kg
Data sheet
Page 8
8
R
QUARTZ
CLASSIC
OVERVIEW OF COMPONENTS
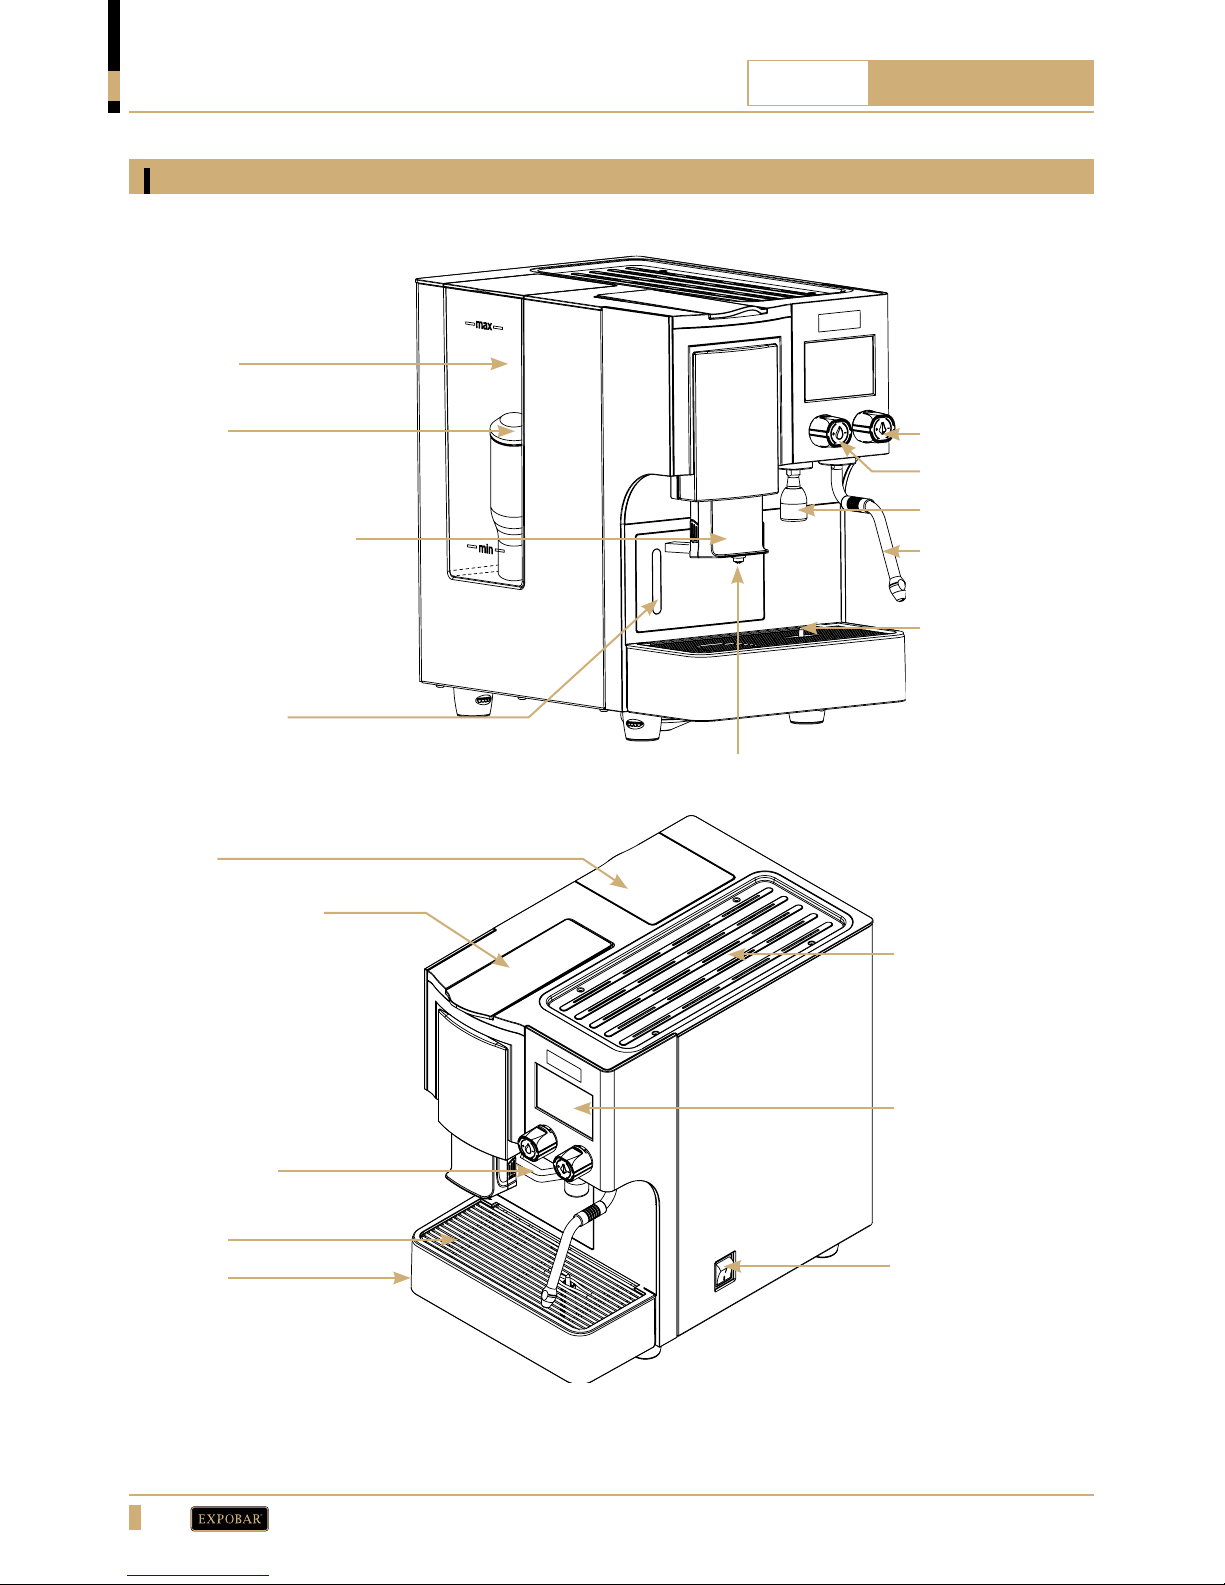
Front view
Cup shelf
Capsule group lever
Tank lid
Water tank
Touch pad
Steam tap
Steam pipe
Main switch
Drip tray
level float
Drip tray
Drip grid
Coffee outlet
Hot water outlet
Hot water tap
Water filter
(optional)
Height-adjustable outlet
Capsule drawer
with window
Drawer handle
Page 9
9
R
QUARTZ
CLASSIC
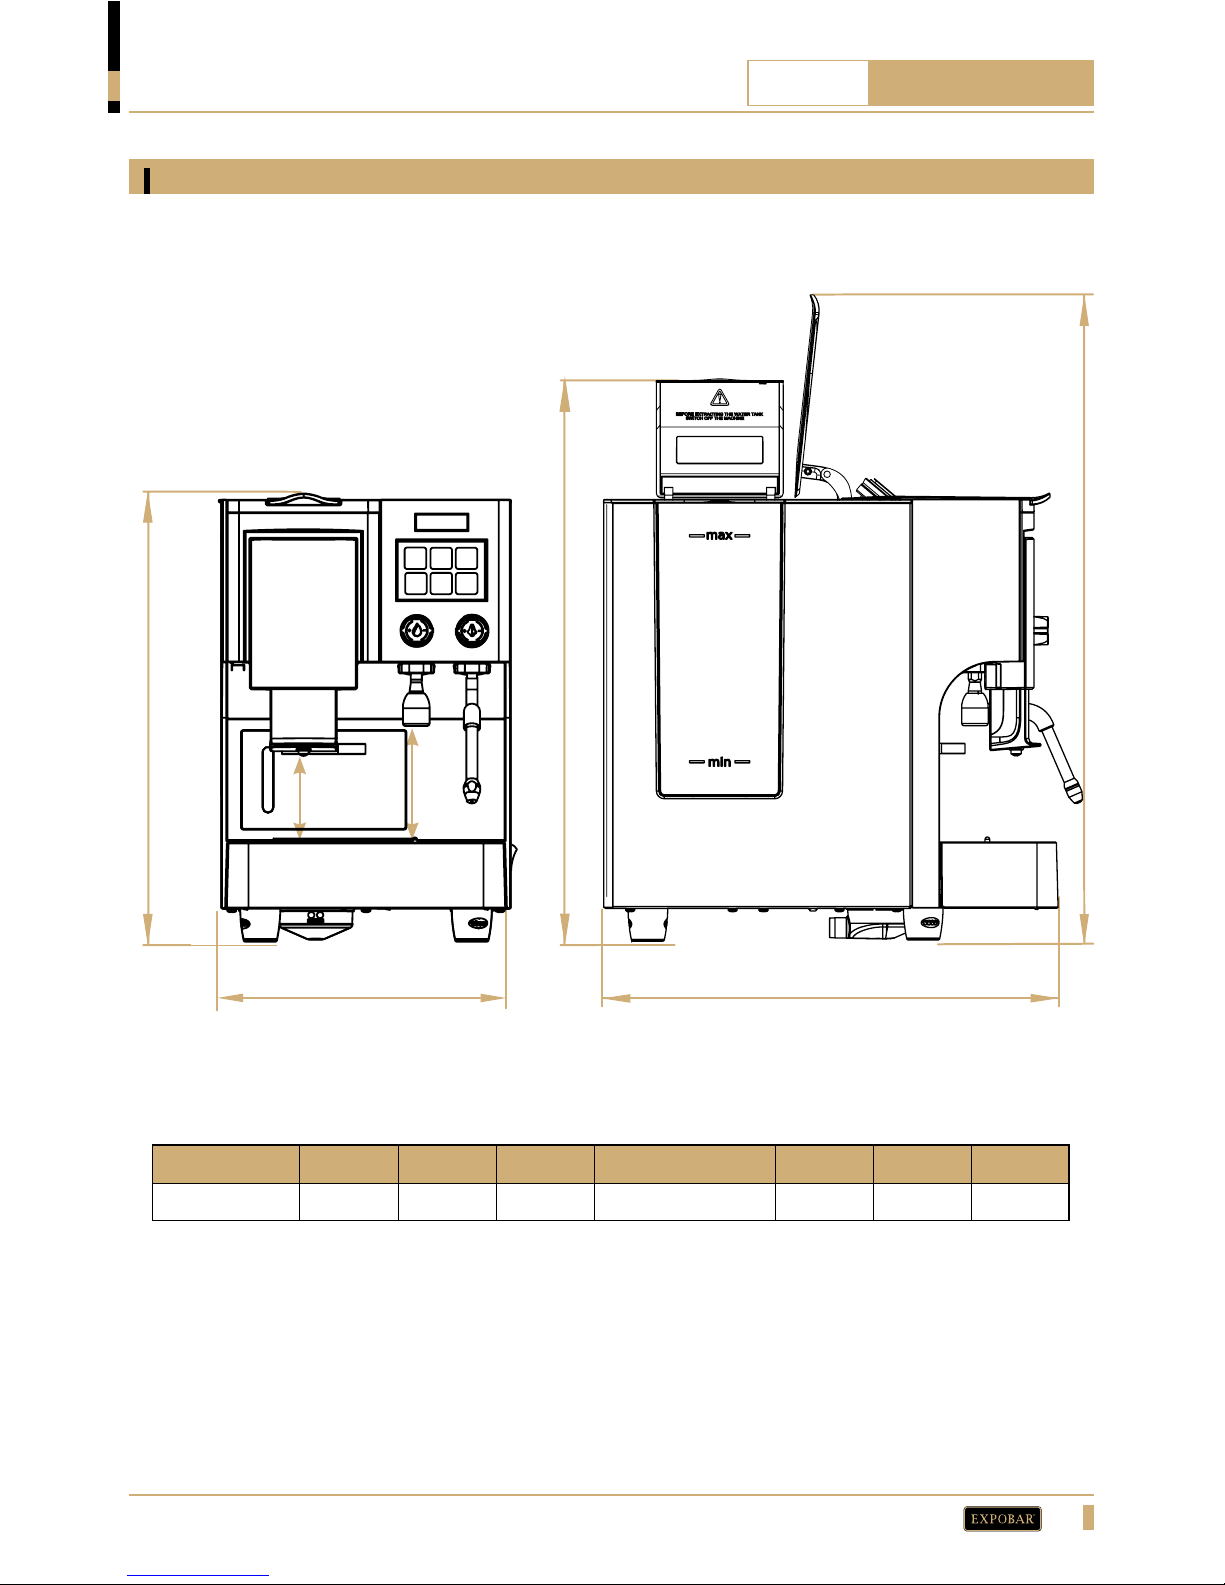
DIMENSION SKETCH
Quartz Classic
D
E
Model
A B C D (Min~ Max) E F G
CLASSIC
400 mm 260 mm 410 mm 65 mm ~ 110 mm 92 mm 510 mm 590 mm
A
F
G
B C
Page 10
10
R
QUARTZ
CLASSIC
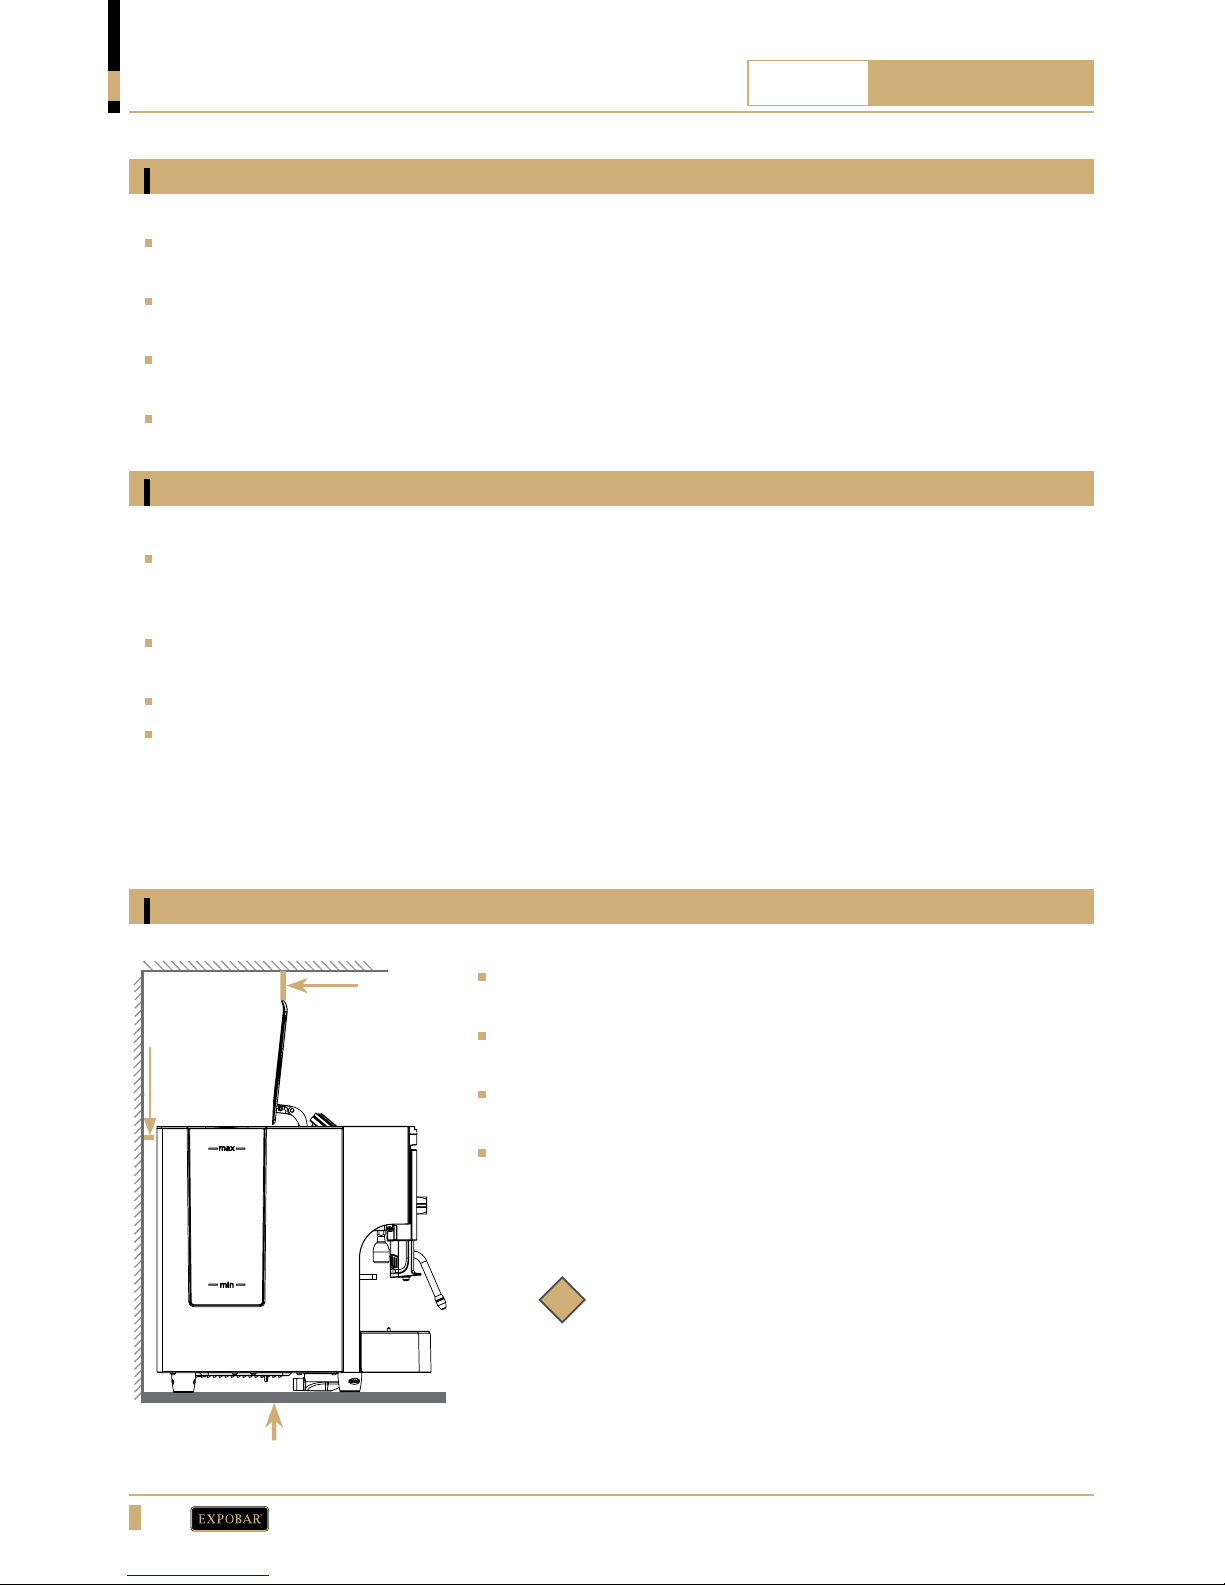
MIN. 10cm
MIN. 30cm
INSTALLATION AND START-UP
TRANSPORT
Packaging
Delivery inspection
The machine is shipped in a custom-designed carton which utilizes model-specific polystyrene
cushions to protect it from damage.
The machine’s carton features standardized handling symbols to explain proper shipping and storage
methods.
The machine must remain in a horizontal position during the transport. Do not store or handle the
machine except on its feet.
During transport protect the carton and machine from impact, drops, crushing, shocks, moisture and
exposure to extreme temperature.
Upon receipt and delivery ensure that the machine is in the exact condition described in the enclosed
documentation, and that all accessories are included. Missing items should be reported to the manufacturer
or dealer immediately.
Damage caused during transport should be reported to the shipping agent and the machine’s distributor
immediately.
Packaging materials are potentially dangerous and should be kept away from children.
The carton and all packing materials are recyclable and should be returned to a recycling centre for
disposal.
Minimum dimensions for machine placement are 360 mm wide x
510mm depth x 890mm high.
Position the machine on a flat, stable surface and away from water
and heat sources.
This machine should only be stored and used in a dry environment,
since excessive humidity will damage the machine.
Do not cover the machine with plastic film or rags.
Positioning
i
Install within 0-3º horizontal.
Note:
Leave an air gap of at least 30cm above the
machine and 10cm behind it to ensure adequate
ventilation. The machine must be installed within 3º
of horizontally level front-to-back and side-to-side
to ensure proper hydraulic function and drainage.
Confirm with a spirit level or digital angle gauge.
Page 11
11
R
QUARTZ
CLASSIC
INSTALLATION AND START-UP
Electrical connection
Verify that the electrical specifications on the nameplate are compatible with the operating conditions of
the area where you will install the machine.
This machine must be connected to a earth grounded wall socket. Ensure that the grounding system is
sufficient and confirms with local regulations.
This machine must be connected to an electrical supply protected by a circuit breaker appropriate for the
power consumption of the machine, specified on its nameplate.
A residual current circuit breaker must be installed in accordance with local regulations.
Ensure that the power rating of the installation location and the electrical system are suitable for the
power demands of the machine.
Do not use an extension cord, plug adapter or multi-socket device to power this machine.
DANGER!
If the power cable or plug is damaged, it must be replaced by the
manufacturer, its service agent, or similarly qualified person to avoid
SERIOUS INJURY OR DEATH!
Water connection
Connecting the machine to the domestic water supply must performed by a qualified person.
Run about 20 liters of water from the domestic water supply before connecting the machine to make sure
there are no contaminants in the plumbing system.
Connect the flexible inlet hose (included in the accessory box) to the domestic water supply and tighten it
with a wrench. The hose only connects to a ½” male connection.
Only use safe drinking water with a hardness rating between 5 - 8ºTH (French hardness degress) / 2.8
- 4.5ºdH (German hardness degrees ) / 3.5 - 5.6ºe (English hardness degrees) / 50 - 80 ppm (parts per
million) of calcium. If the hardness value is below this limit, corrosion of hydraulic components is likely. If
the value is higher, lime-scaling inside the boiler will occur. In both cases, the proper function of the machine
and quality and taste of the coffee will be negatively affected.
If you choose to connect the machine to an external water connection, it is strongly recommend to
connect the drip tray to an external drain. See page 12 for more information.
Important:
Only use the hoses supplied with the machine. Never reuse damaged hoses.
Ensure that the drainage tube is not twisted and that it is below the level of the drain cup.
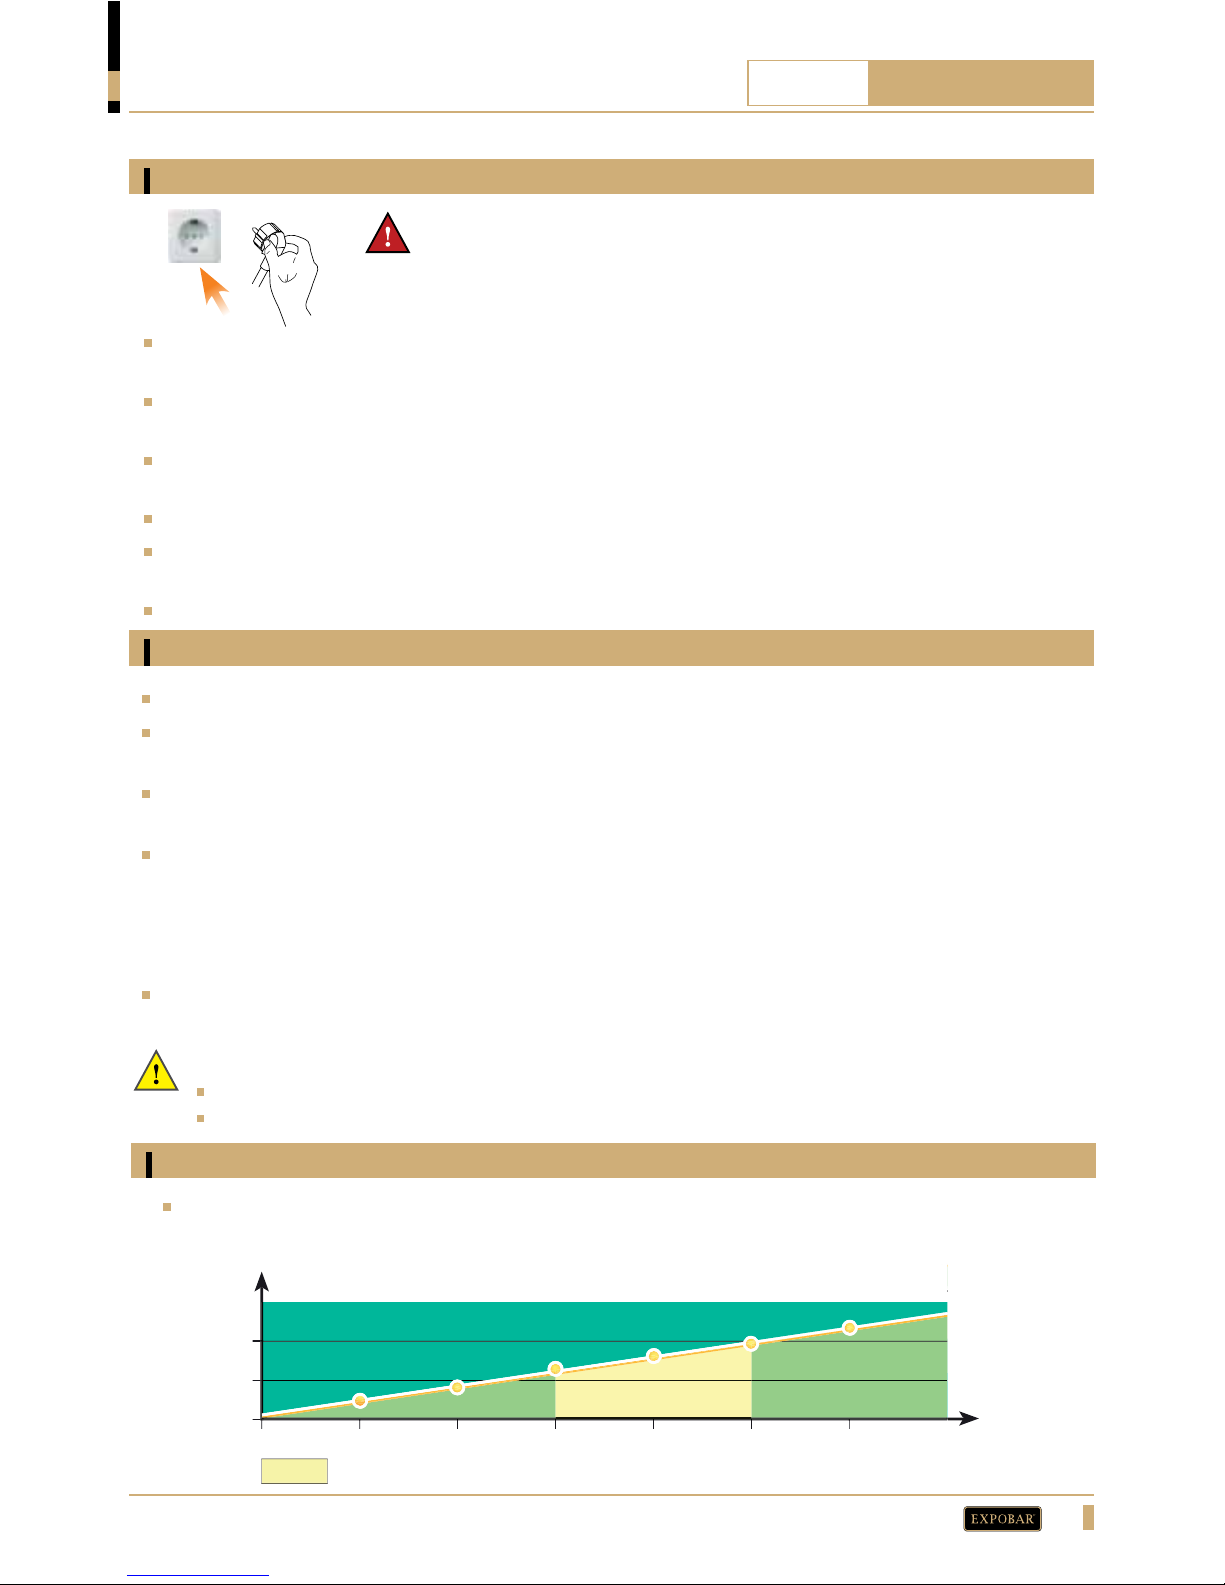
Pressure and temperature
Standard pressure and temperature
Pressure to temperature relationship within boiler
110
115
120
125
0.7 0.8 0.9 1.0 1.1 1.2
Boiler pressure is directly related to water temperature. The chart below demonstrates pressure
increase as a result of temperature rise:
BAR
O
C
Page 12
12
R
QUARTZ
CLASSIC
INSTALLATION AND START-UP
Note:
The drain pipe system can be used
when the machine is connected to
either the domestic water supply
or the internal water tank.
WARNING!
The holes drilled in the drip tray
or capsule box should be ≤3mm
to avoid leaks.
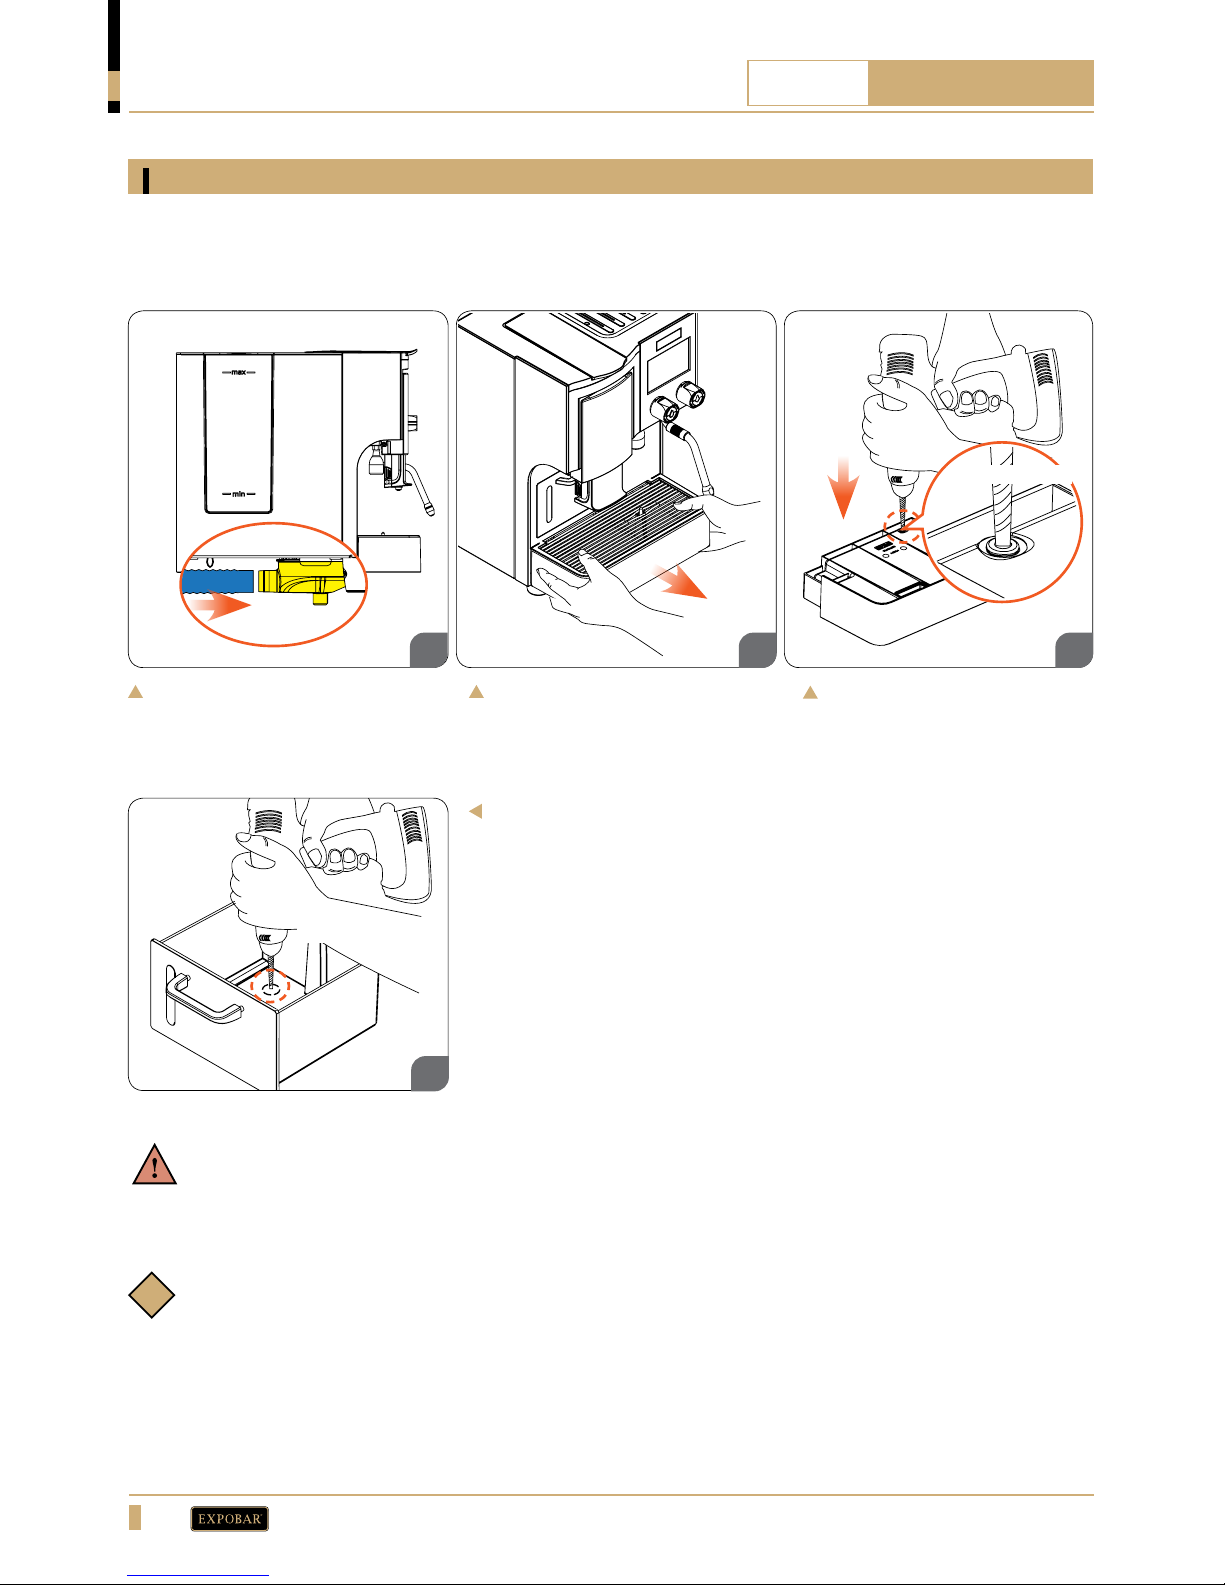
Remove the drip tray.
Drill a 3mm hole in the
bottom of the capsule
box as shown to the left.
Reinstall the capsule box
when finished.
Connect the included corrugated
drain tube to the drain cup.
Drill a 3mm hole in the bottom
of the drip tray as shown above.
Reinstall the drip tray when
finished.
The drip tray can be connected to a plumbing drain, allowing the tray to be emptied much less frequently
(a domestic drain connection is required for this). To use this feature, follow the connection procedure
explained below.
Drip tray drainage
01 02 03
04
i
Max. Ф: 3mm
Max. Ф: 3mm
Page 13
13
R
QUARTZ
CLASSIC
INSTALLATION AND START-UP
Note:
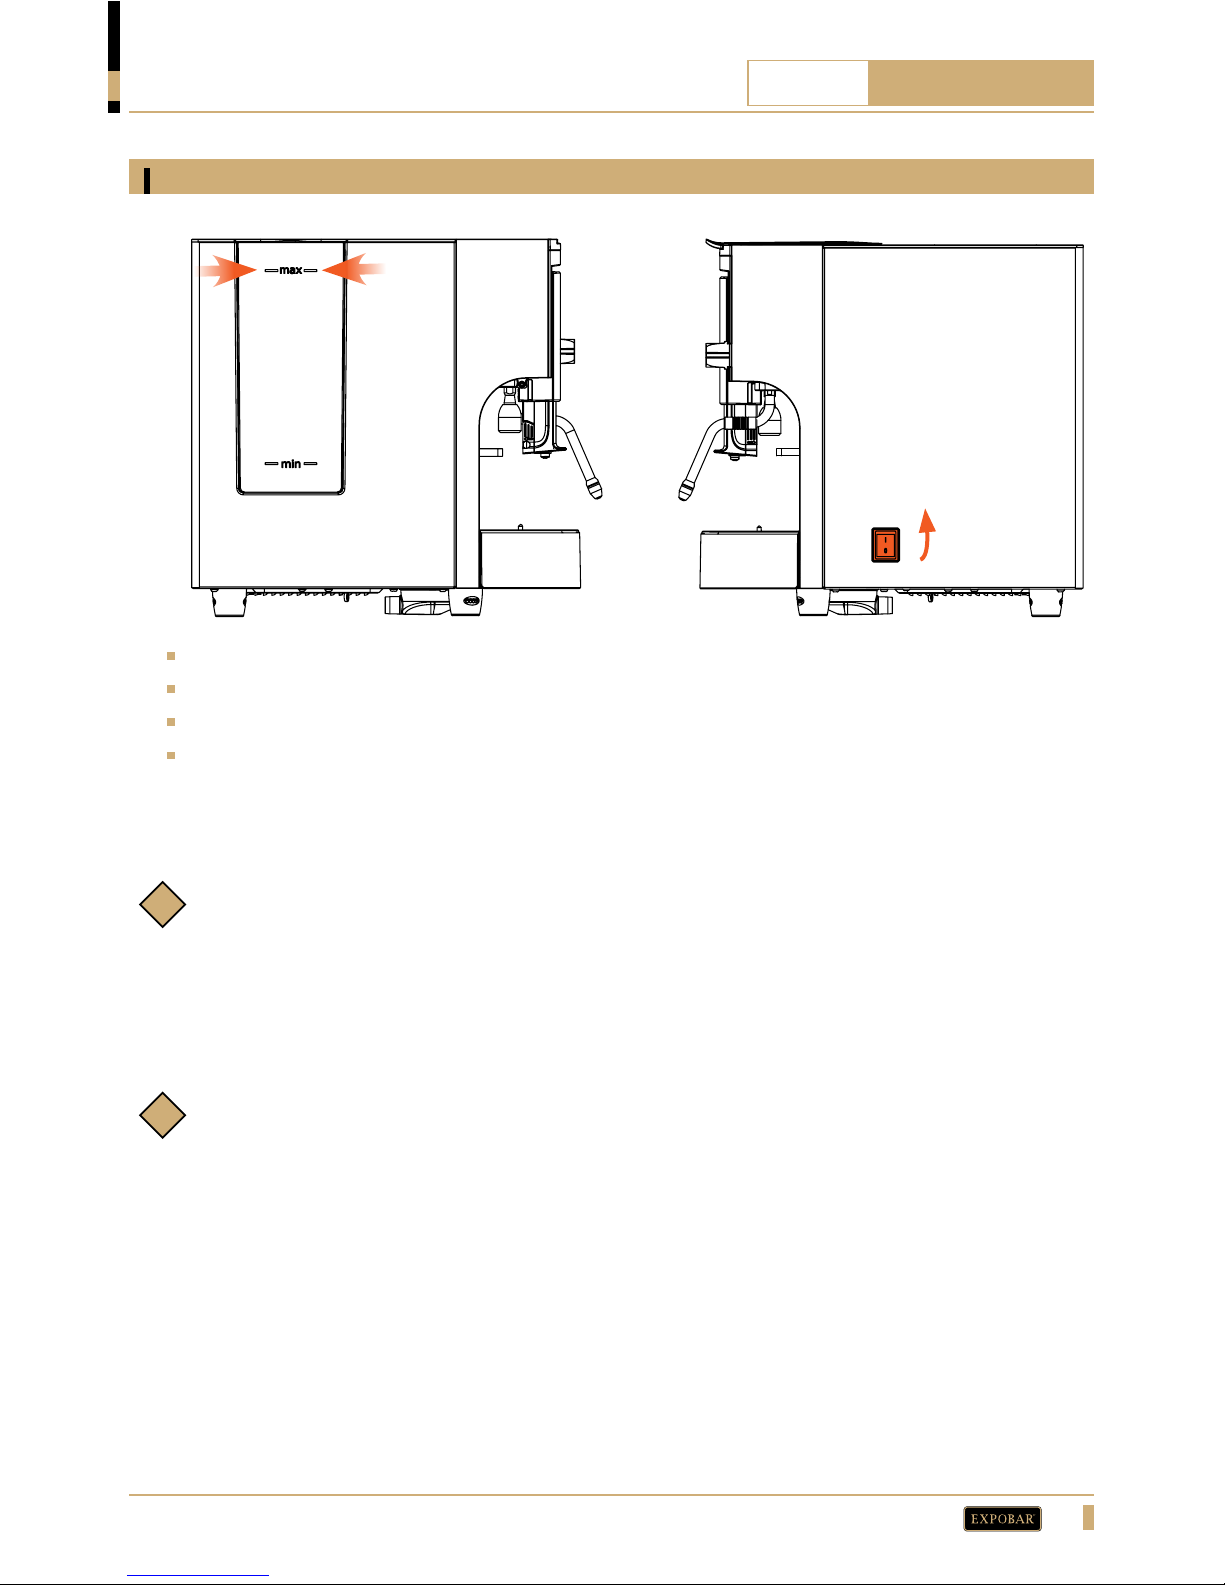
When the machine is switched on, it may automatically go into STANDBY mode. To determine if the
machine is in STANDBY mode, confirm if all of the drink buttons are flashing simultaneously. If this is
the case, the machine must be changed to ON mode.
To exit STANDBY mode and switch to ON mode, simply press the K3 and K5 buttons simultaneously
for one second.
Note:
Keypad functions and explanations are found on page 22.
Fill the water tank to the max level (A).
If the machine is connected to the domestic water supply, water filling will begin automatically.
Connect the machine’s plug to the electrical outlet (this should be done by a qualified person).
Turn on the main power switch (B).
Starting the machine
A
B
i
i
Page 14
14
R
QUARTZ
CLASSIC
OPERATION
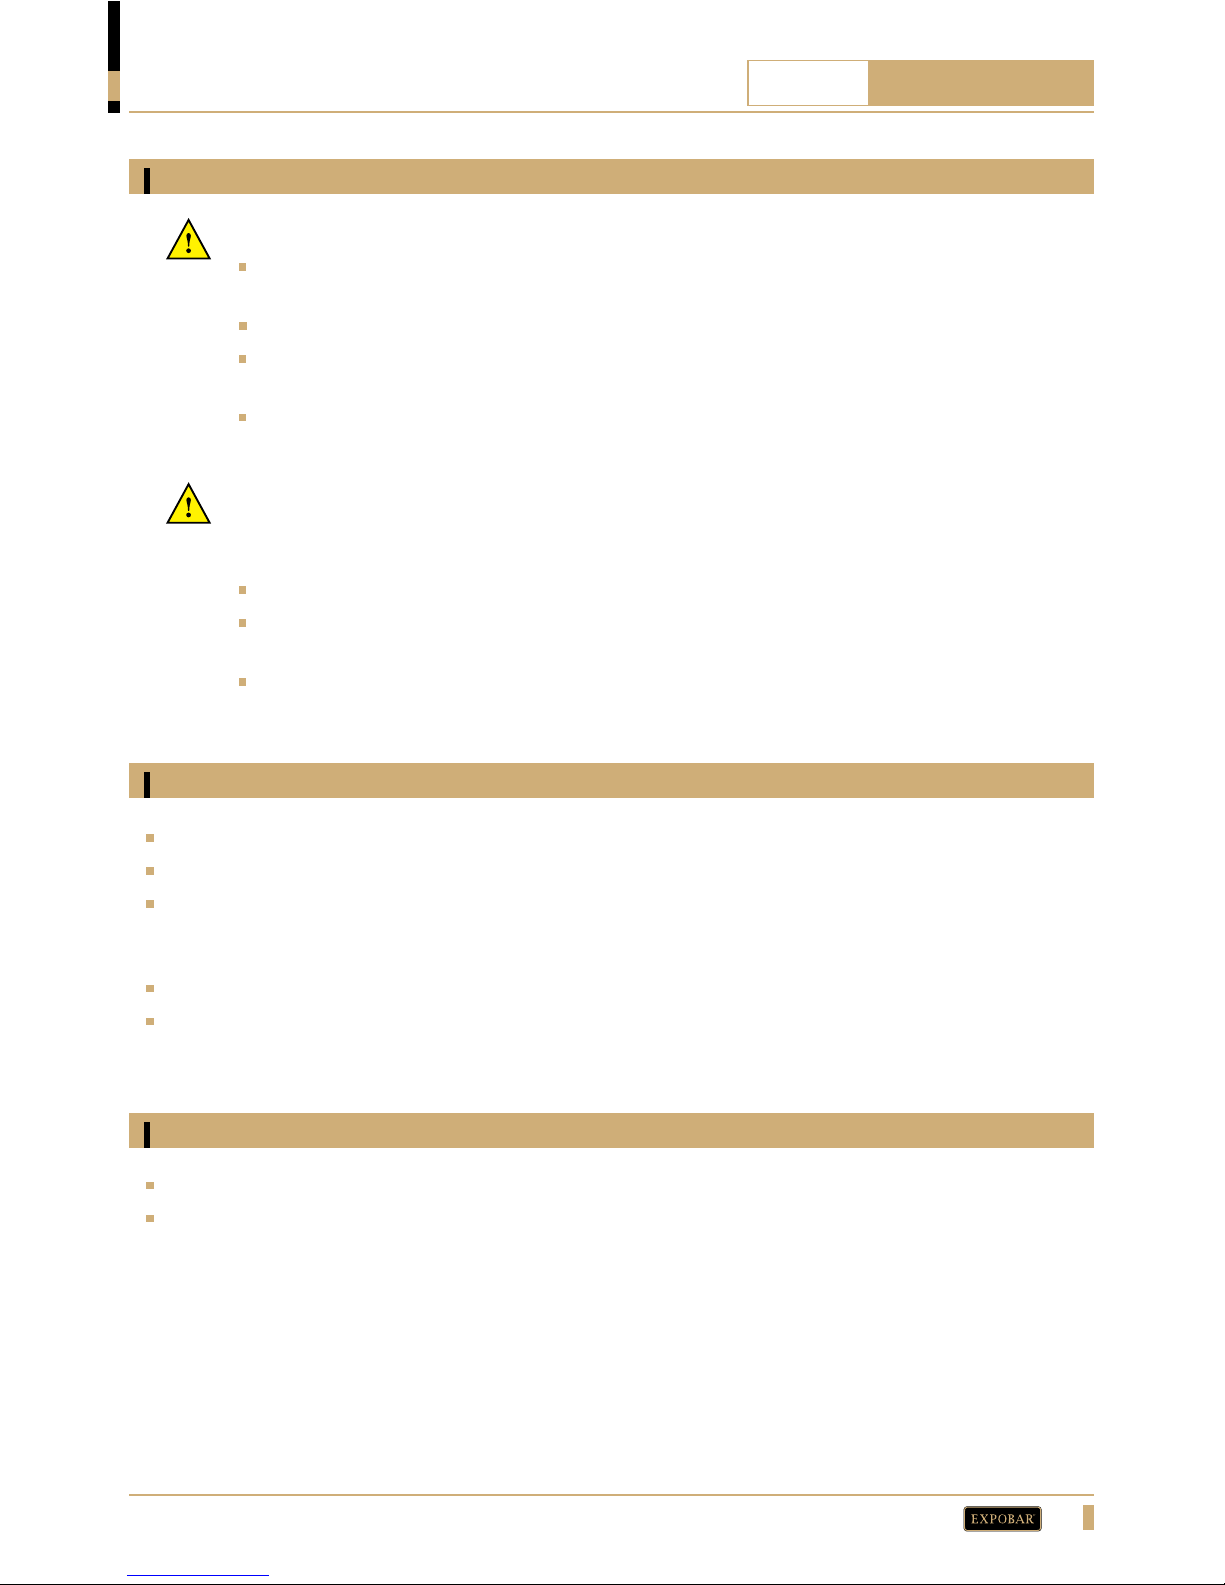
How to dispense a drink
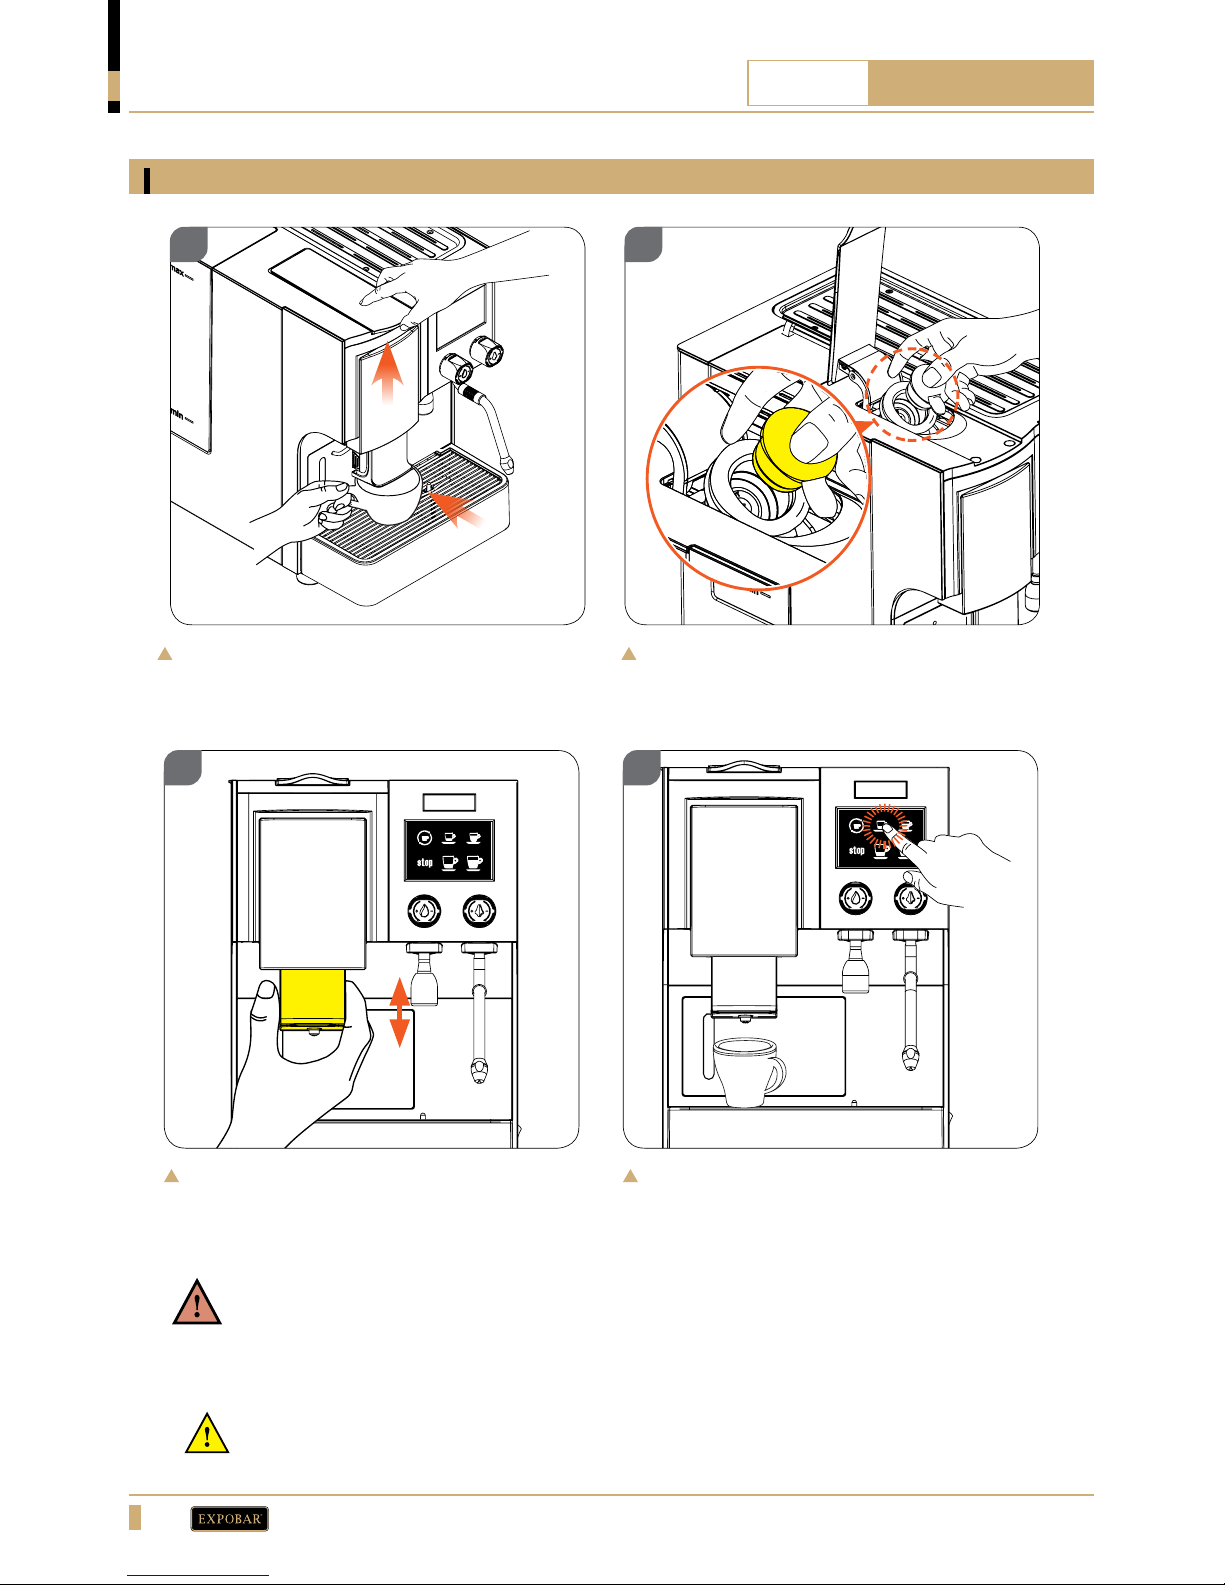
Lift the capsule group lever(A) and place a cup
centred under the outlet(B).
Select the desired drink from the keypad. The
machine will start automatically.
Insert a capsule in the capsule group as shown
above and push the lever into the locked
position.
Adjust the height of the coffee outlet if
necessary. The outlet should be about 1cm
from the top of the cup.
Important:
This machine is only designed for use with the original manufacturer’s new capsules. Using
mismatched capsules can cause leaking, jamming, or machine damage.
A
01 02
03 04
WARNING!
Never open the capsule group while the machine is dispensing a drink, the pressurized hot
water and steam could cause scalding or serious injury. After dispensing has finished, wait at
least 3 seconds before opening the capsule group.
B
Page 15
15
R
QUARTZ
CLASSIC
OPERATION
Steaming and frothing milk
Dispensing hot water
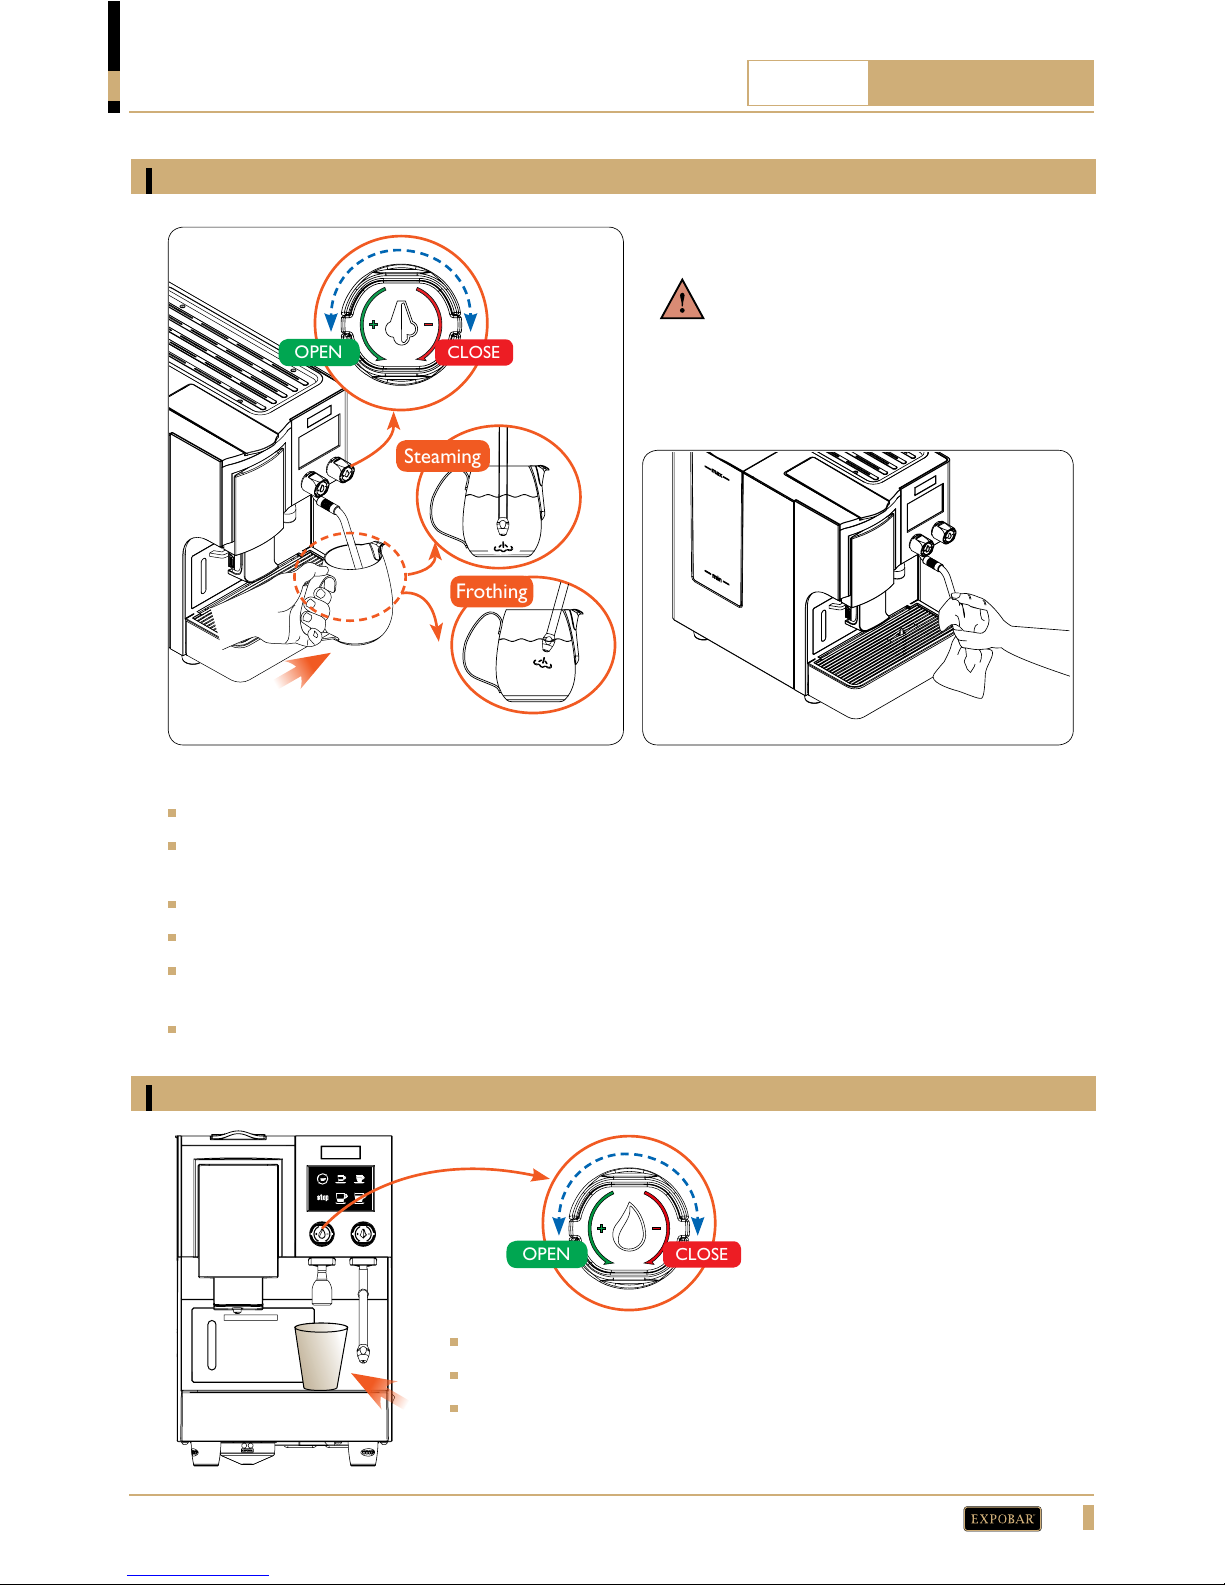
To use the steam wand correctly, proceed as follows:
Point the steam wand toward the drip tray.
Slowly open the steam tap for around 2 seconds to flush the steam wand, a small jet of water and steam
will emerge.
Close the steam tap and place the wand into a jug about 2/3 full of milk.
Ensure the wand tip is covered by the milk, then reopen the steam tap to start steaming or frothing.
When the milk has reached the desired temperature and consistency close the tap. When steaming has
completely stopped, remove the steam wand from the jug.
Point the wand down towards the drip tray and open the steam tap to flush any excess milk from the
wand. Always wipe the steam wand with a clean, damp cloth to avoid tainting the taste of future drinks.
Place a cup under the hot water outlet.(A)
Open the water tap (B) to dispense water.
When the desired volume has been dispensed, close the water tap (C).
Steaming
Frothing
B C
CLOSE
OPEN
CLOSE
OPEN
WARNING!
Never put hands and fingers under the
steam nozzle when operating the steam
wand to avoid scalding or serious burns.
A
Page 16
16
R
QUARTZ
CLASSIC
OPERATION
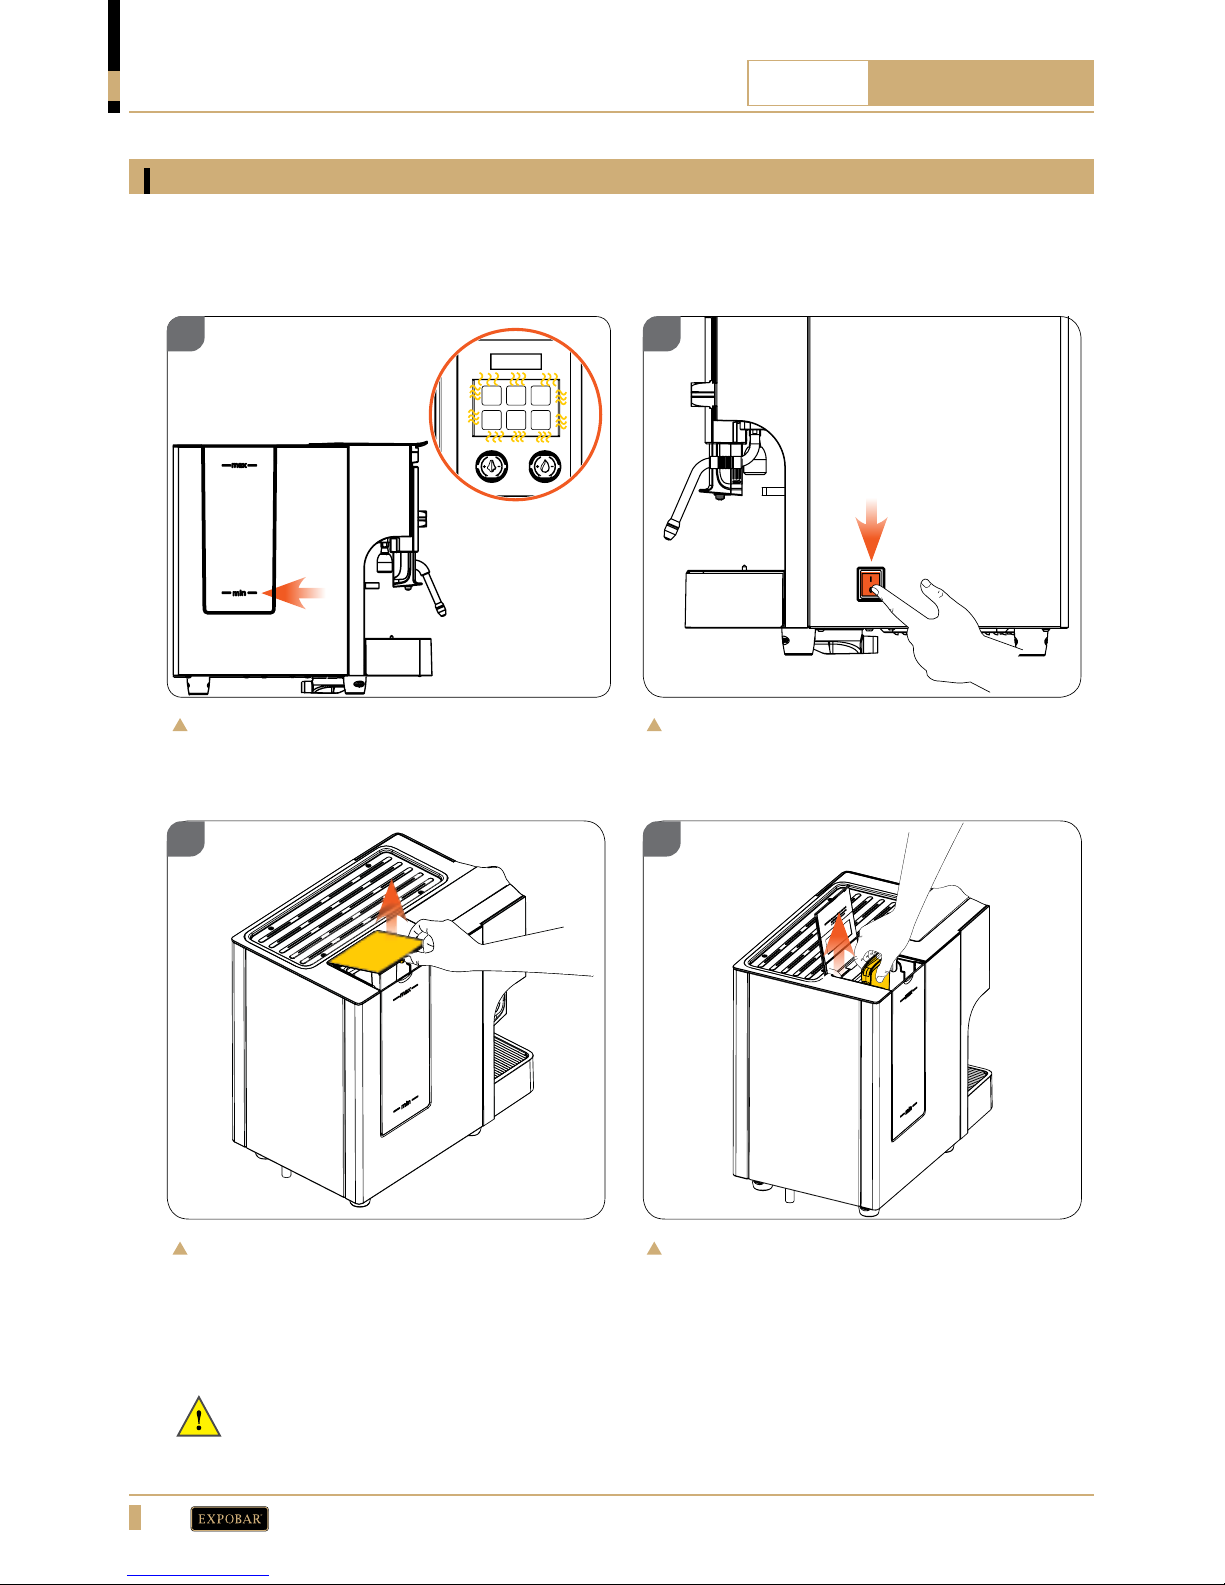
If the water level of the tank is below the
minimum level(A), all buttons will begin to flash
(B).
Switch off the machine at the power switch.
Raise up the tank handle, then pull the tank
straight up until it is free from the machine.
Fill the tank with fresh tap water to the
maximum level indication and replace it in the
machine.
Raise the tank lid.
Filling the water tank
For machines connected to a tank, if the water level of the tank reaches the minimum level while trying to
dispense a drink, the brewing will stop and the keypad will begin to flash. Proceed as follows:
Important:
Always switch the machine off before removing the tank.
A
B
01
03 04
02
Page 17
17
R
QUARTZ
CLASSIC
CLEANING AND CARE
Coffee machine cleaning
Daily cleaning procedures
Weekly cleaning procedures
Important:
For best efficiency, quality and performance of the machine, always follow the cleaning and care
instructions provided in this manual.
Always turn off the main power switch when cleaning the exterior of the machine.
All external surfaces should be cleaned with a damp lint-free cloth that will not scratch the
machine.
Do not use aggressive cleaning detergents, solvents or degreasers. These may damage the
machine.
Important:
Once a day, or 8 hours after dispensing the last coffee, the following cleaning tasks must be
performed to maintain the quality and performance of the machine’s water system:
Capsule group flushing: Brew a continuous coffee without a capsule for around one minute.
Steam wand cleaning: Point the wand down towards the drip tray and open the steam tap for
20 seconds.
Hot water outlet flushing: Place a container under the water outlet and open the tap for 20
seconds.
Rinse the capsule group with hot water (see page 18).
Clean the external surfaces of the machine.
Clean the steam wand and the water tap. Be sure that the nozzles are not blocked or partially blocked with
milk residue. If the steam wand must be removed to be cleaned, take care not to deform or damage any of
the components.
Clean the drip tray and the stainless steel grid under running water with a brush.
If the drip tray is connected to the drain, you can slowly pour one litre of hot water into the drain cup to
dissolve and remove coffee residue that may have accumulated inside the drain cup and tubes.
Clean the capsule group with professional cleaning powder or a cleaning capsule (see page 19).
Clean the coffee spout (see page 20).
Page 18
18
R
QUARTZ
CLASSIC
CLEANING AND CARE
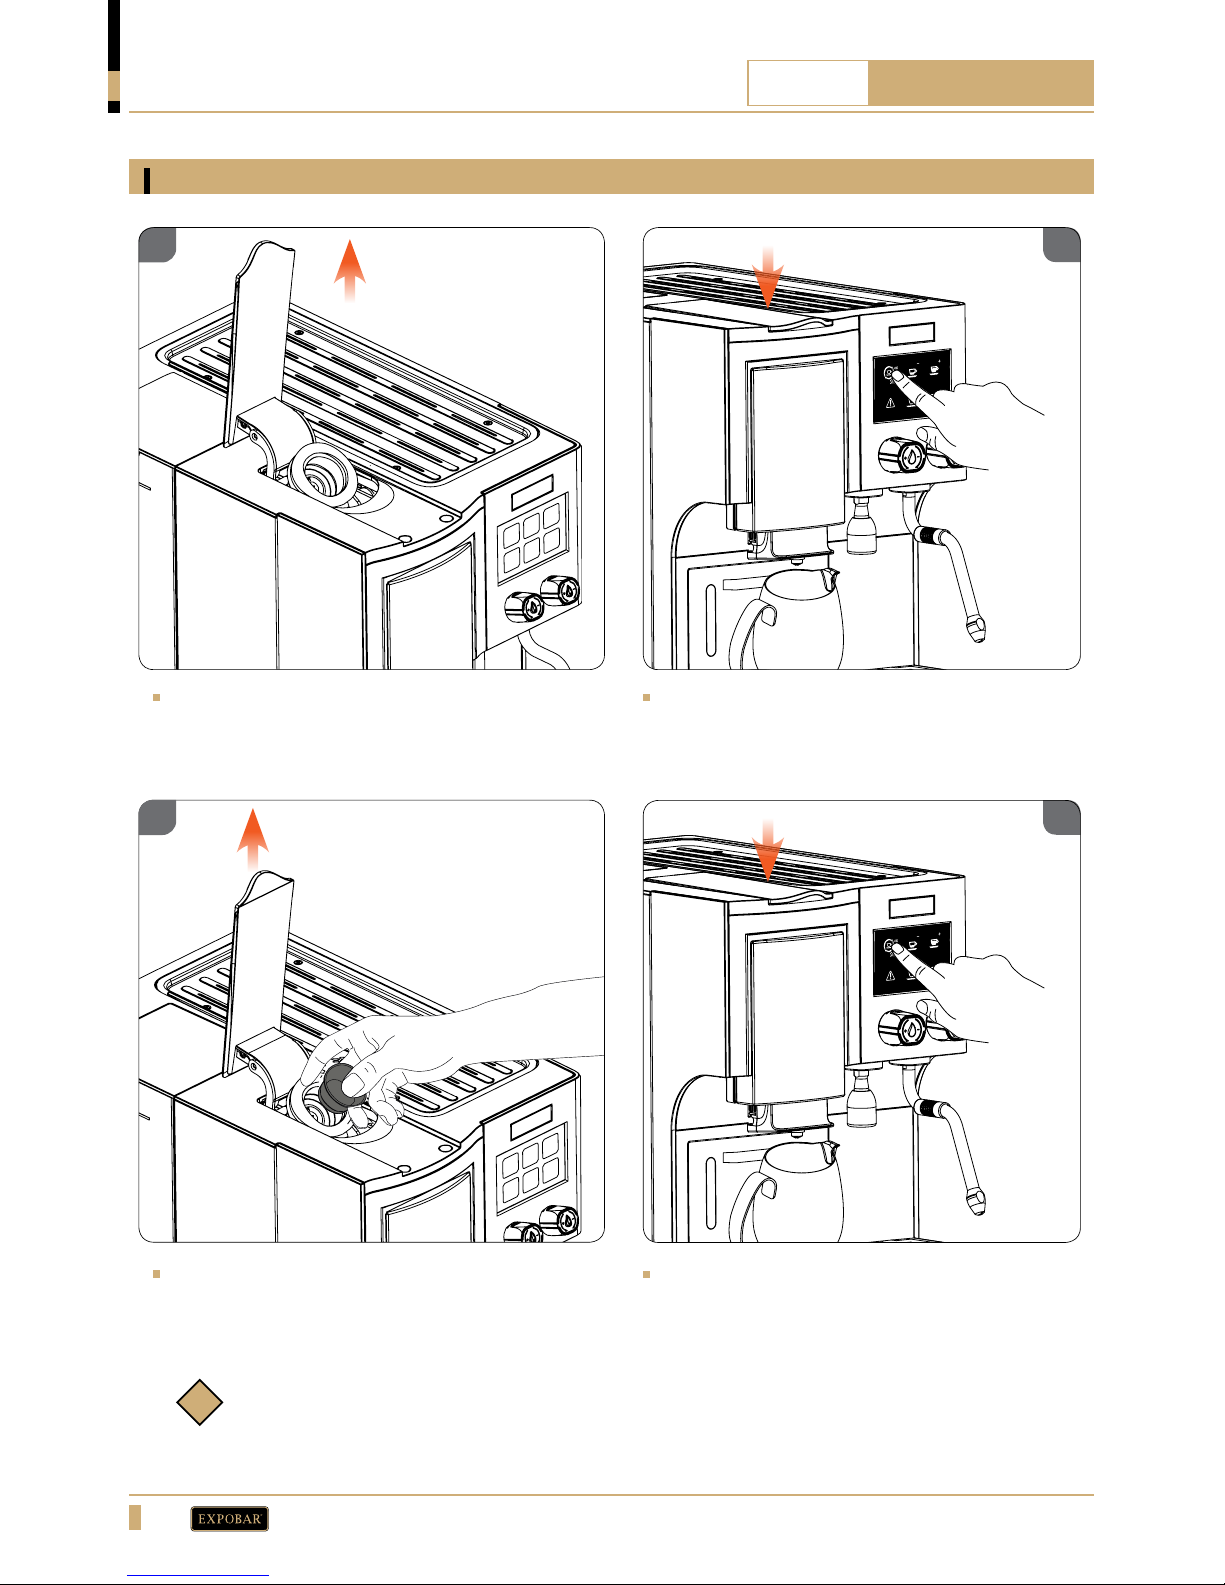
Rinsing the capsule group
Raise the capsule lever so that the last used
capsule falls into the capsule drawer and the
group is empty.
Reopen the lever and place a clean, empty capsule
in the group, then close the lever. (This will rinse
the pressure side of the capsule group.)
Lower the lever into the locked position. Press
the Continuous button and allow it to run for
30 seconds. Repeat this process 3 times.
Lower the lever into the locked position. Press
the Continuous button and allow it to run for
30 seconds. Repeat this process 3 times.
Note:
A used coffee capsule can be opened up, cellophane cover removed, and used coffee cleaned
out for use in steps 3 and 4.
01
03
02
04
i
Page 19
19
R
QUARTZ
CLASSIC
CLEANING AND CARE
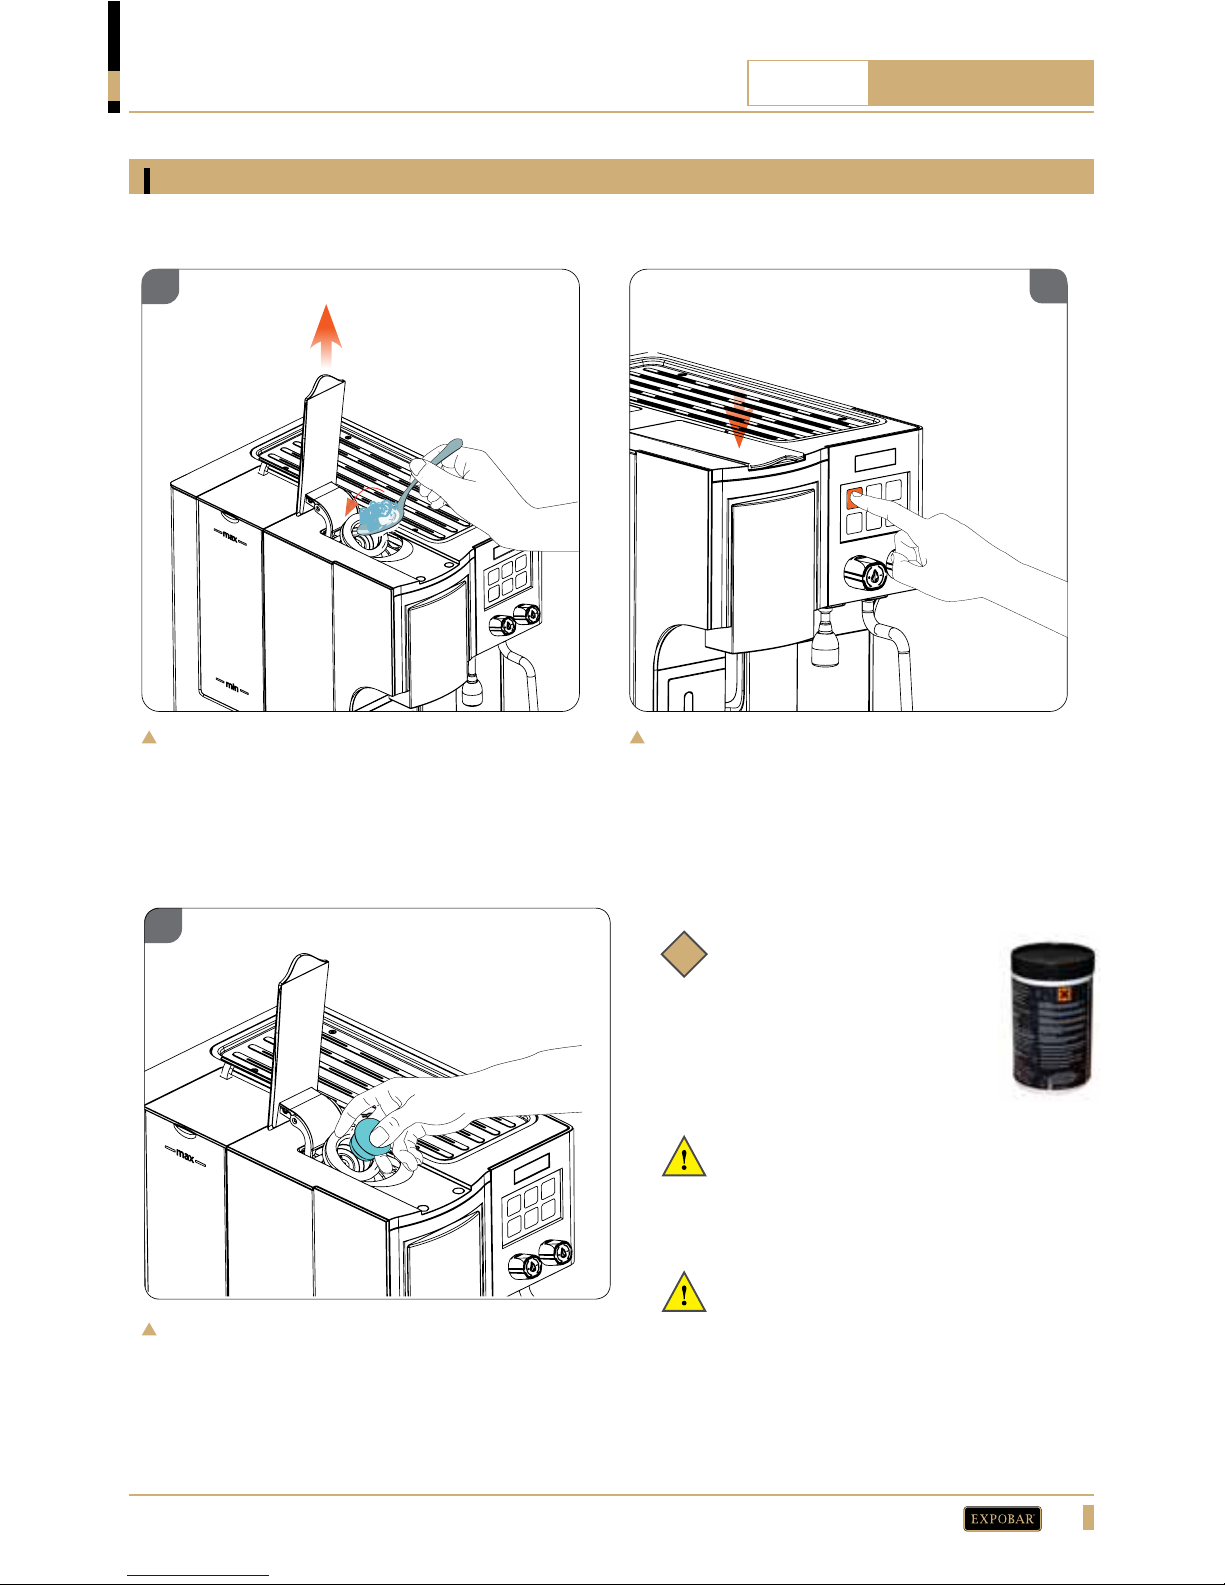
Cleaning the capsule group
Open the lever so the last used capsule falls
into the capsule drawer and the group becomes
empty. Fill the capsule group halfway with
cleaning powder for espresso machines.
Lower the lever into the locked position. Press
the Continuous button and allow it to run for
20 seconds. Repeat this process 5 times.
Note:
Only use professional cleaning
powder for espresso machines.
It’s available from your
distributor.
Part no: 1104162
Open the lever so the last used capsule falls into
the capsule drawer and the group becomes empty.
Insert the cleaning capsule in the group and lower
the lever into the locked position. Press the
Continuous button and allow it to run for
20 seconds. Repeat this process 5 times.
Important:
Always rinse the group after every
cleaning procedure.
Important:
We recommend to clean and rinse the
machine at least once a week.
i
01
03
Cleaning with powder
Cleaning with capsule
02
Page 20
20
R
QUARTZ
CLASSIC
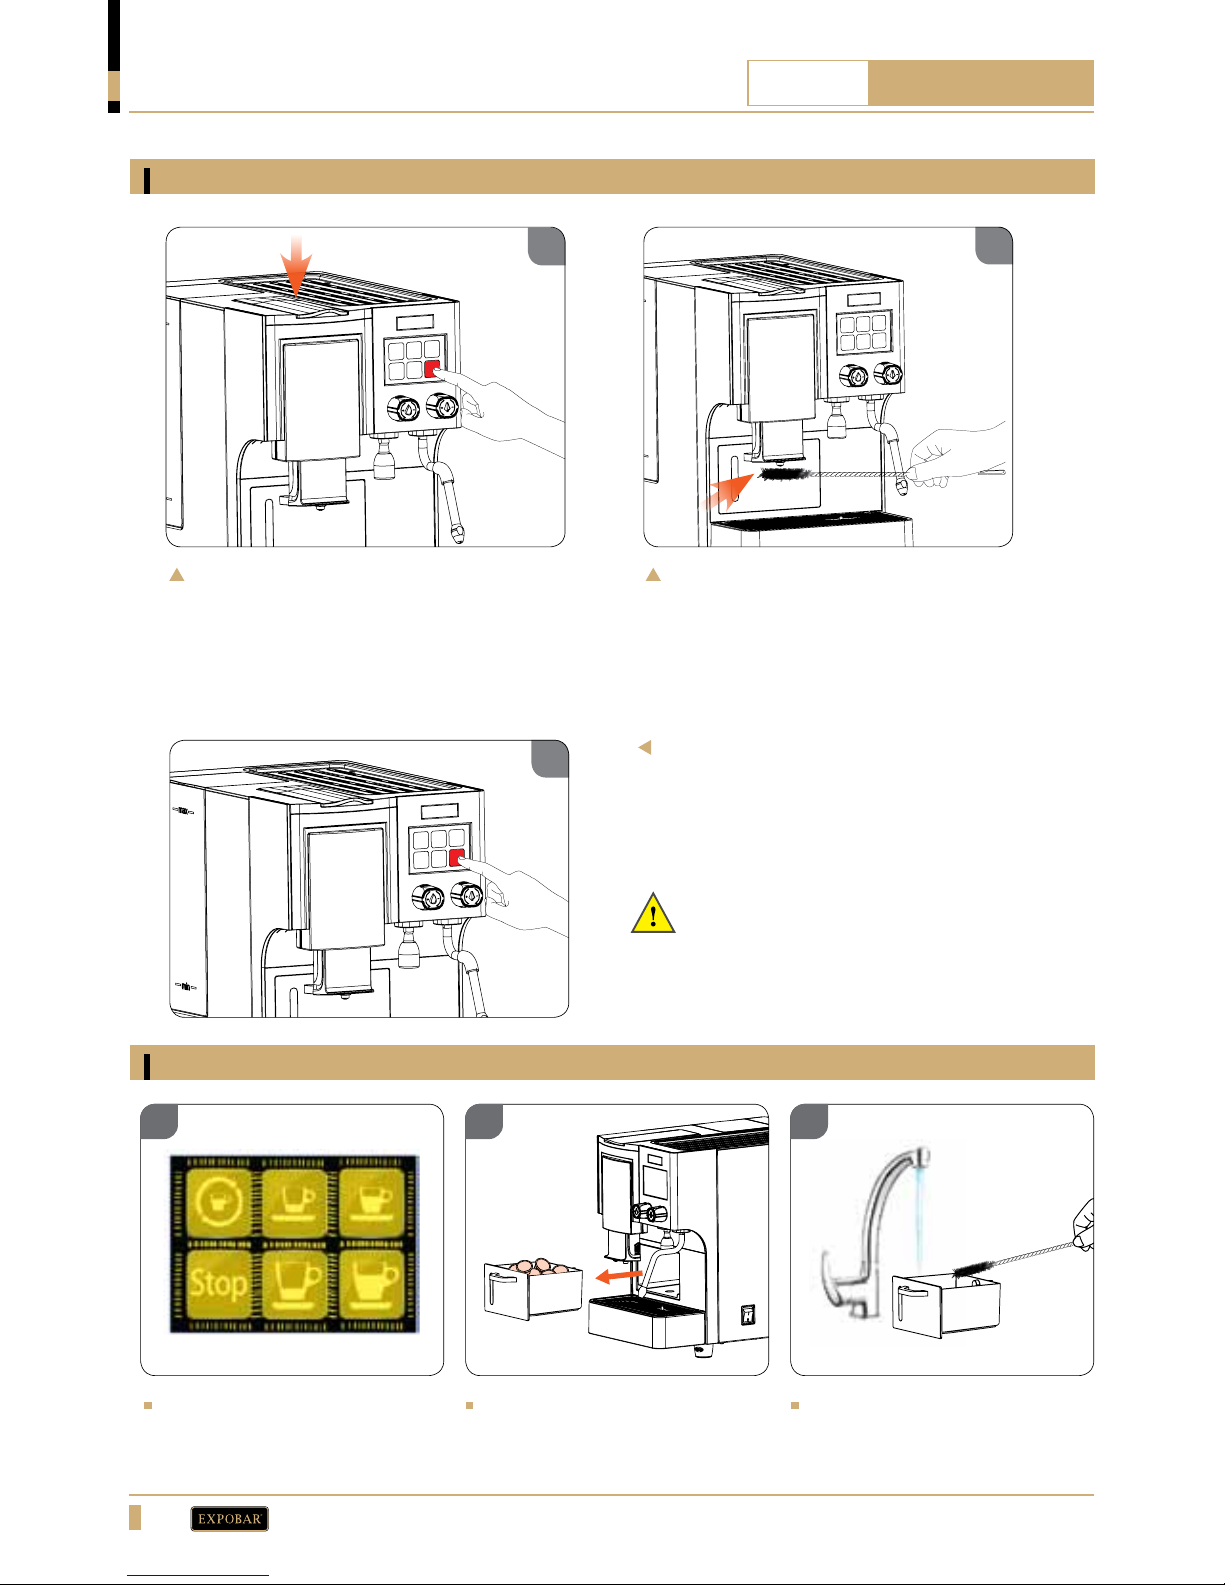
Raise and lower the capsule lever to
empty the group, pull the adjustable
drink spout down to its lowest position
and press the K4 button, then let the
brew finish without a capsule.
Use the cleaning brush which is included
in the accessory box, scrub the coffee
spout a few times to remove any buildup
of coffee residue.
To rinse the spout after cleaning, press the
bottom- right side button, then let the
brew finish without a capsule. Repeat this
process 3 times.
02
Important:
It is recommended to perform this cleaning
daily to keep the machine sanitary and
maintain excellent coffee taste.
Cleaning the coffee spout
CLEANING AND CARE
02
01
03
When the capsule drawer
is full, the keypad will flash
intermittently.
Remove the capsule drawer and
empty it.
Wash the capsule drawer under
running water with a brush. Dry
before reinstalling, then press
STOP to reset the counter.
Emptying the capsule drawer
01 02 03
Page 21
21
R
QUARTZ
CLASSIC
Additional handling of the machine
CLEANING AND CARE
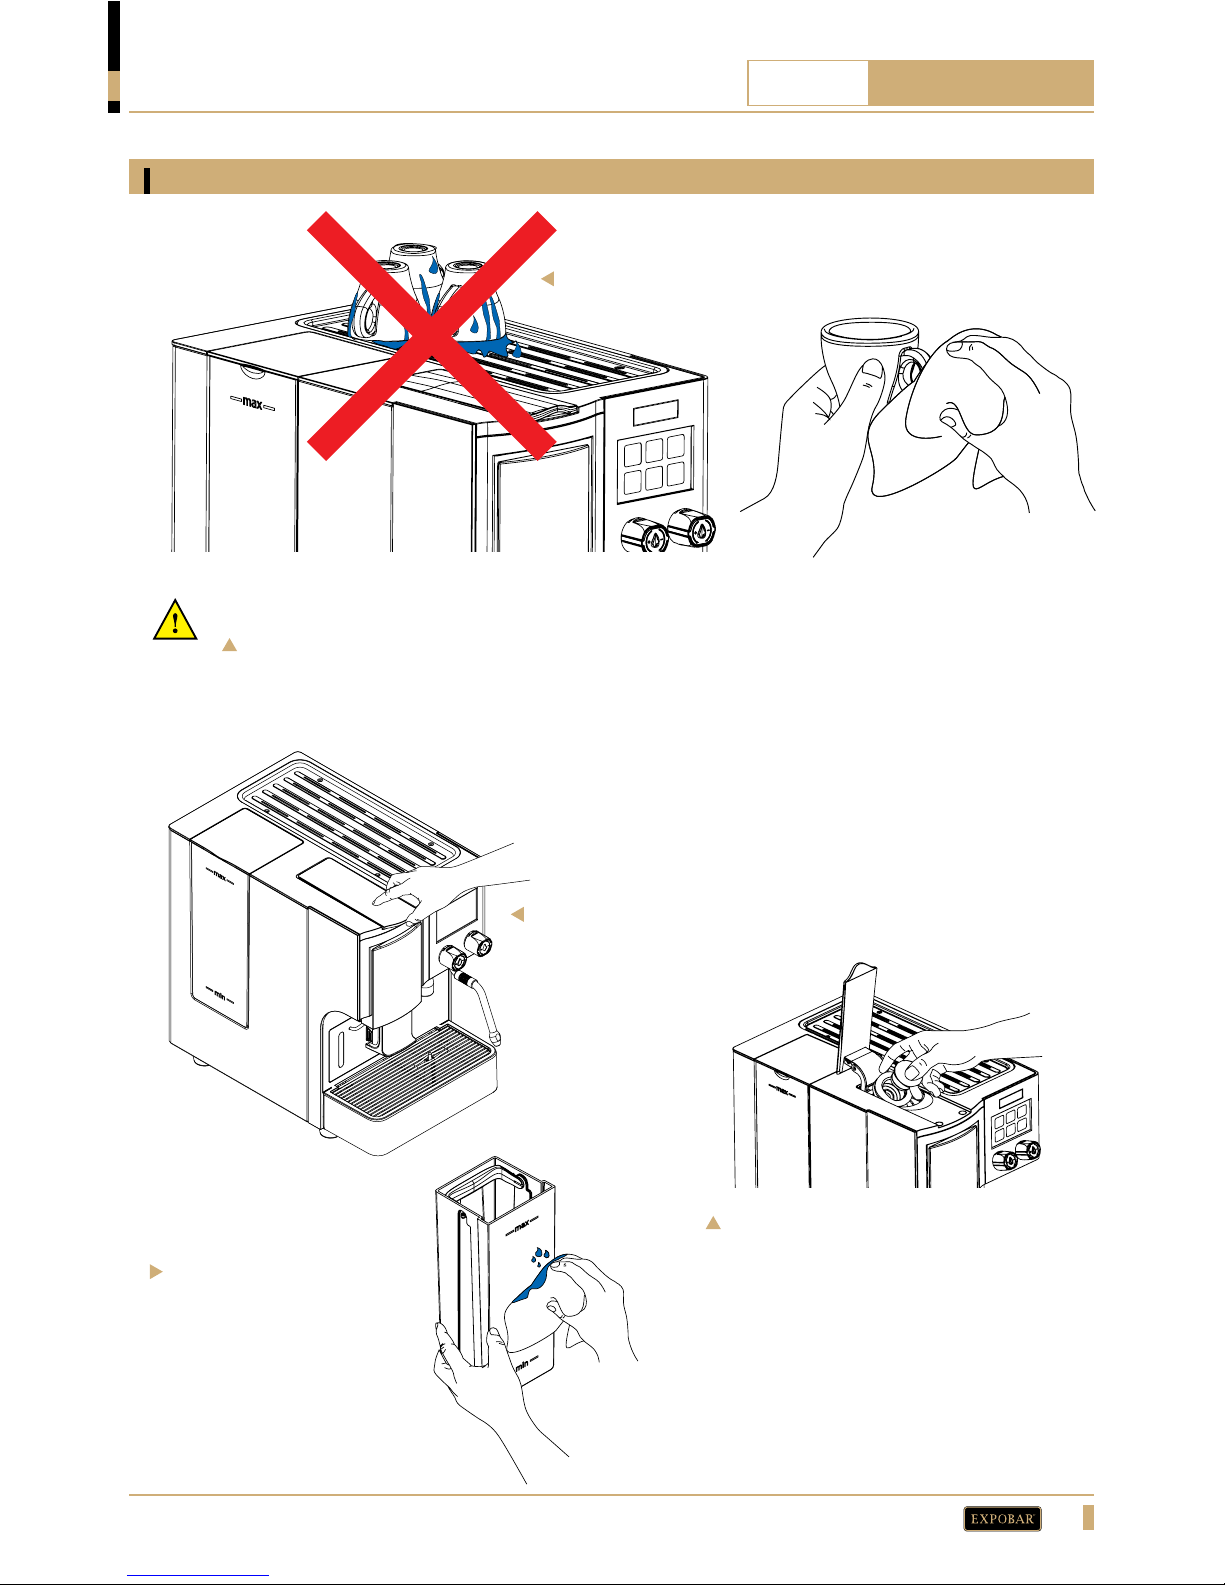
Important:
Do not place wet cups on the cup shelf,
allowing water to drip into the machine can
cause machine damage or failure.
Only place dry cups on the cup shelf.
Always raise and lower the
capsule lever slowly. Never
force it.
To prevent malfunctioning, only use
original capsules that the machine is
designed for. Do not use other similar
capsules, since many appear similar
but the sizes differ. The wrong size
capsule can cause the machine to leak
water or create other problems.
The tank must be cleaned
at least once a month. Do
not use harsh detergent.
After cleaning, dry the
outside of the tank to avoid
getting water inside the
machine.
Page 22
22
R
QUARTZ
CLASSIC
K5K5K1K1K2
K2K4K4K3K3
K6
K6
Programming the drink volume
STANDBY mode
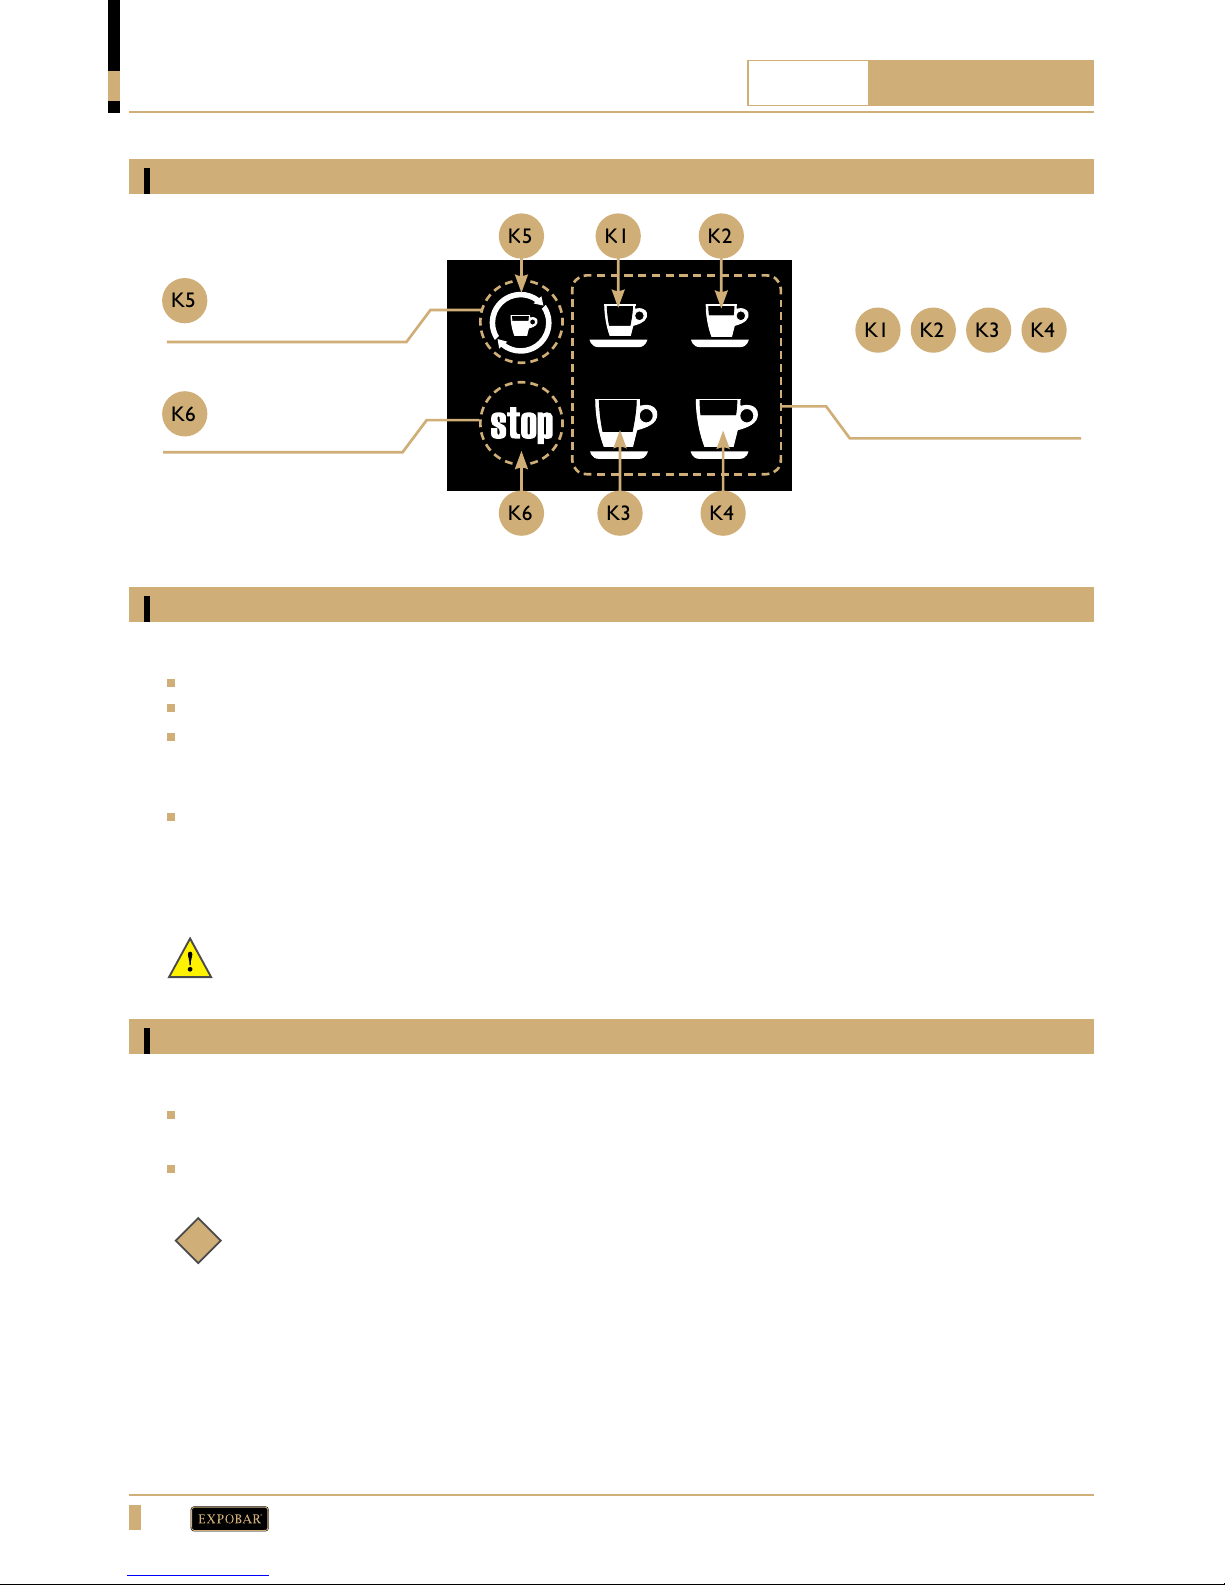
Keypad
Continuous
brewing.
Stop brewing.
Programmable drink
buttons.
To adjust the drink volume, proceed as follows:
Insert an new capsule into the group and close it.
Press and hold the K5 button for five seconds until all the buttons begin to flash.
With the buttons flashing, press the button of the drink to be programmed (K1, K2, K3, K4). Once
pressed, the coffee will start to brew. Watch carefully as the coffee brews and when the desired volume
of coffee is reached, press the K6 button once to stop the brew.
When the brewing stops, the K5 button will flash for five seconds to confirm that the volume has been
stored.
Repeat this process for all of the drink button volumes that you want to reprogram (K1, K2, K3, K4). To
exit this program simply wait 10 seconds until the display returns to normal function.
To enter or exit the STANDBY mode, proceed as follows:
Press and hold the K3 and K5 buttons simultaneously for one second to activate STANDBY mode.
When activated, the K3 and K5 buttons will flash intermittently.
To exit STANDBY mode, press and hold the K3 and K5 buttons simultaneously again for one second.
PROGRAMMING
Important:
Always use a new capsule when programming each new dose.
Note:
• STANDBYmodelowerstheboilertemperaturetosaveenergyduringlowusageperiods.
• Tosavemoreenergy,particularlyovernight,itisrecommendedtoturnthemachineoffatthe
main power switch.
i
Page 23
23
R
QUARTZ
CLASSIC
Storing the machine
Disposal of the machine
Before storage be sure to:
Perform all weekly and periodic cleaning procedures described in this manual (see pages 17-21).
Disconnect and roll up the power cord.
Disconnect the machine’s water inlet hose from the domestic water supply (if applicable) and drain the boiler
(this should be performed by a qualified person).
Clean the drip tray, capsule drawer, and exterior of the machine to remove any coffee or other residue.
Cover / re-pack the machine in its original carton and store it in a dry place where it will not be
exposed to extreme temperatures or humidity.
When returning the machine to service after long-term storage, perform all weekly and periodic
cleaning procedures before use.
Before disposal be sure to:
Perform all weekly and periodic cleaning procedures described in this manual (see
pages 17-21).
Disconnect and roll up the power cord.
Disconnect the machine’s water inlet hose from the domestic water supply
(if applicable) and drain the boiler (this should be performed by a qualified person).
Pack and send the machine to a certified recycling center.
STORAGE AND DISPOSAL
Page 24
24
R
QUARTZ
CLASSIC
TROUBLESHOOTING
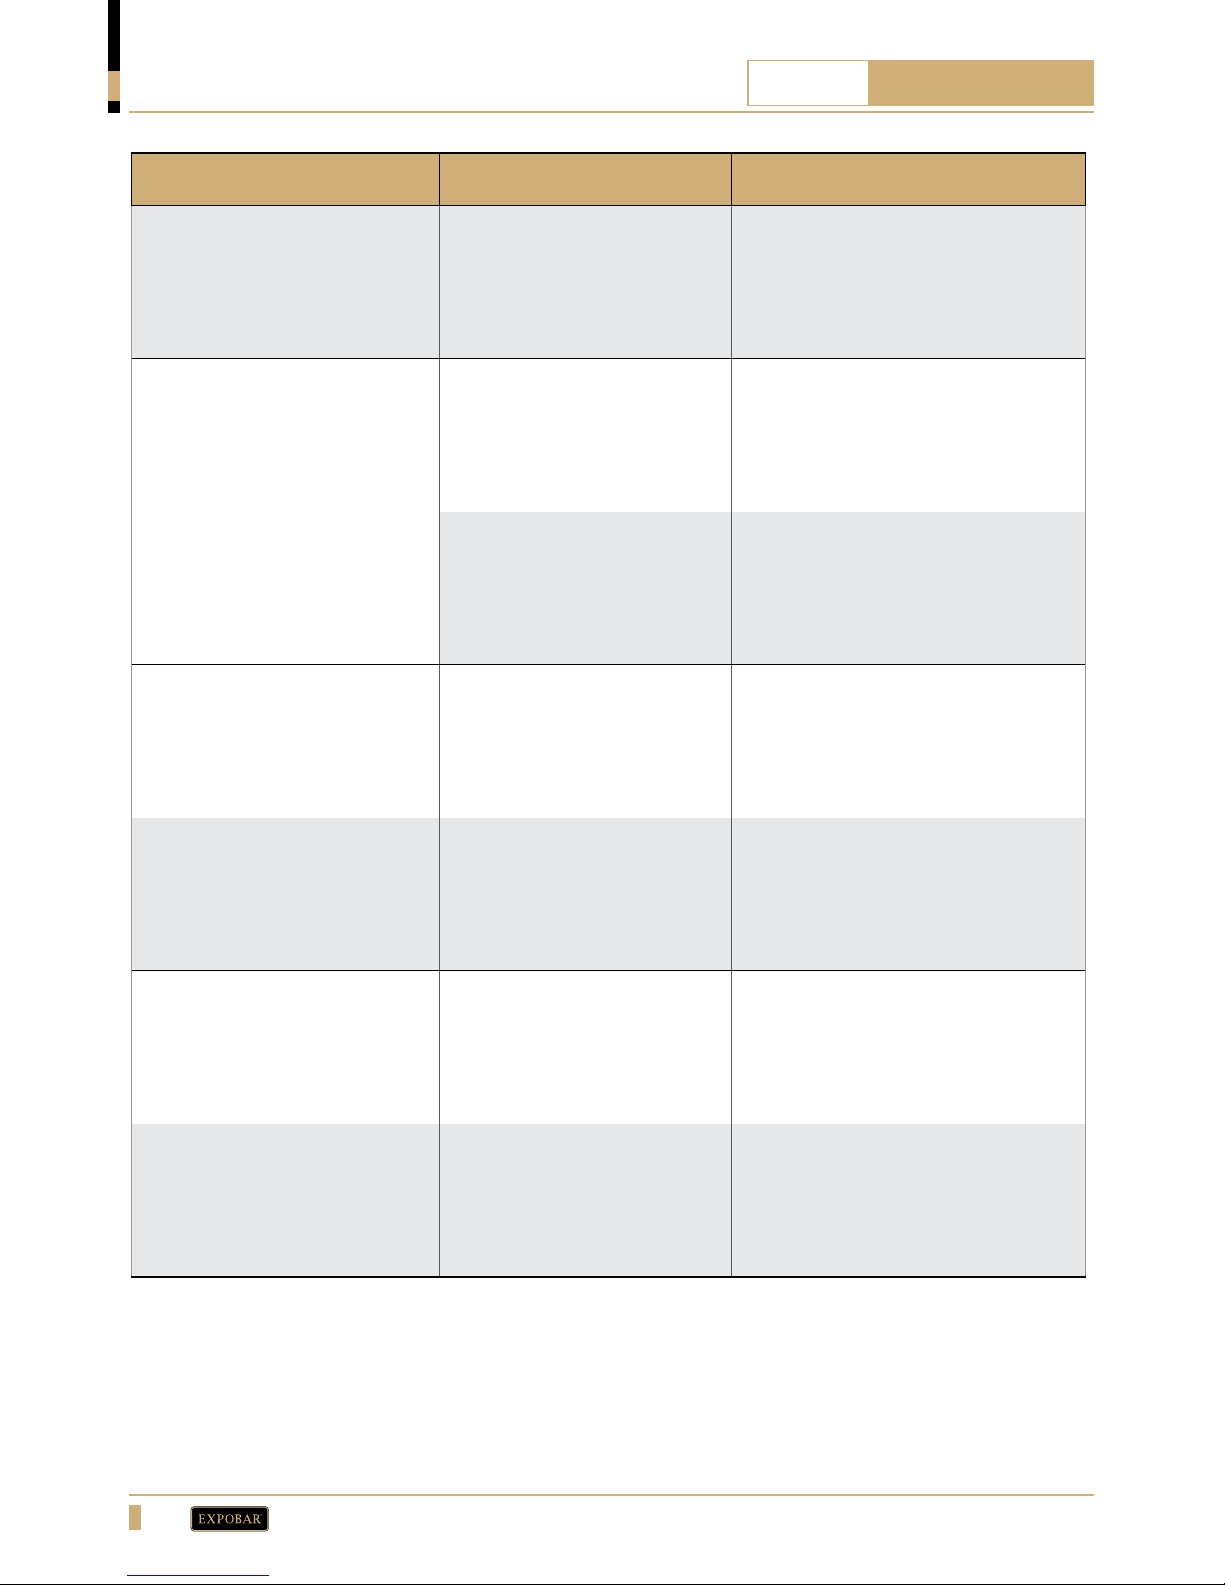
PROBLEM POSSIBLE CAUSE SOLUTION
The machine does not start
up.
The plug is not correctly
inserted into the socket.
Check that the plug is correctly
plugged in and that the socket is
working.
The pump can be heard
working but the machine
does not brew or dispense
any coffee.
1.) There is air inside the
hydraulic system.
Switch the machine OFF and use the
hot water tap to partially empty the
boiler and purge the air. Then fill the
water tank and switch the machine
back ON.
2.) Something is blocking the
hydraulic system.
Call technical support for assistance.
The machine does not
automatically stop
dispensing coffee at the
preset volume.
The flowmeter is not
functioning correctly.
Call technical support for assistance.
The coffee’s cream/nish
is not as high-quality as
normal.
The coffee outlet is clogged
or dirty.
Clean the coffee spout. (Call technical
support for assistance if needed.)
No steam comes out of the
steam wand.
The steam nozzle is clogged
with milk residue.
Clean the wand and nozzle, if necessary remove the nozzle and clean the
holes with a pin or needle.
Water drips from the capsule group.
The group gasket is worn out
or damaged.
Replace the group gasket.
(Call technical support for assistance
if needed.)
Page 25
25
R
QUARTZ
CLASSIC
ALARMS AND INDICATIONS
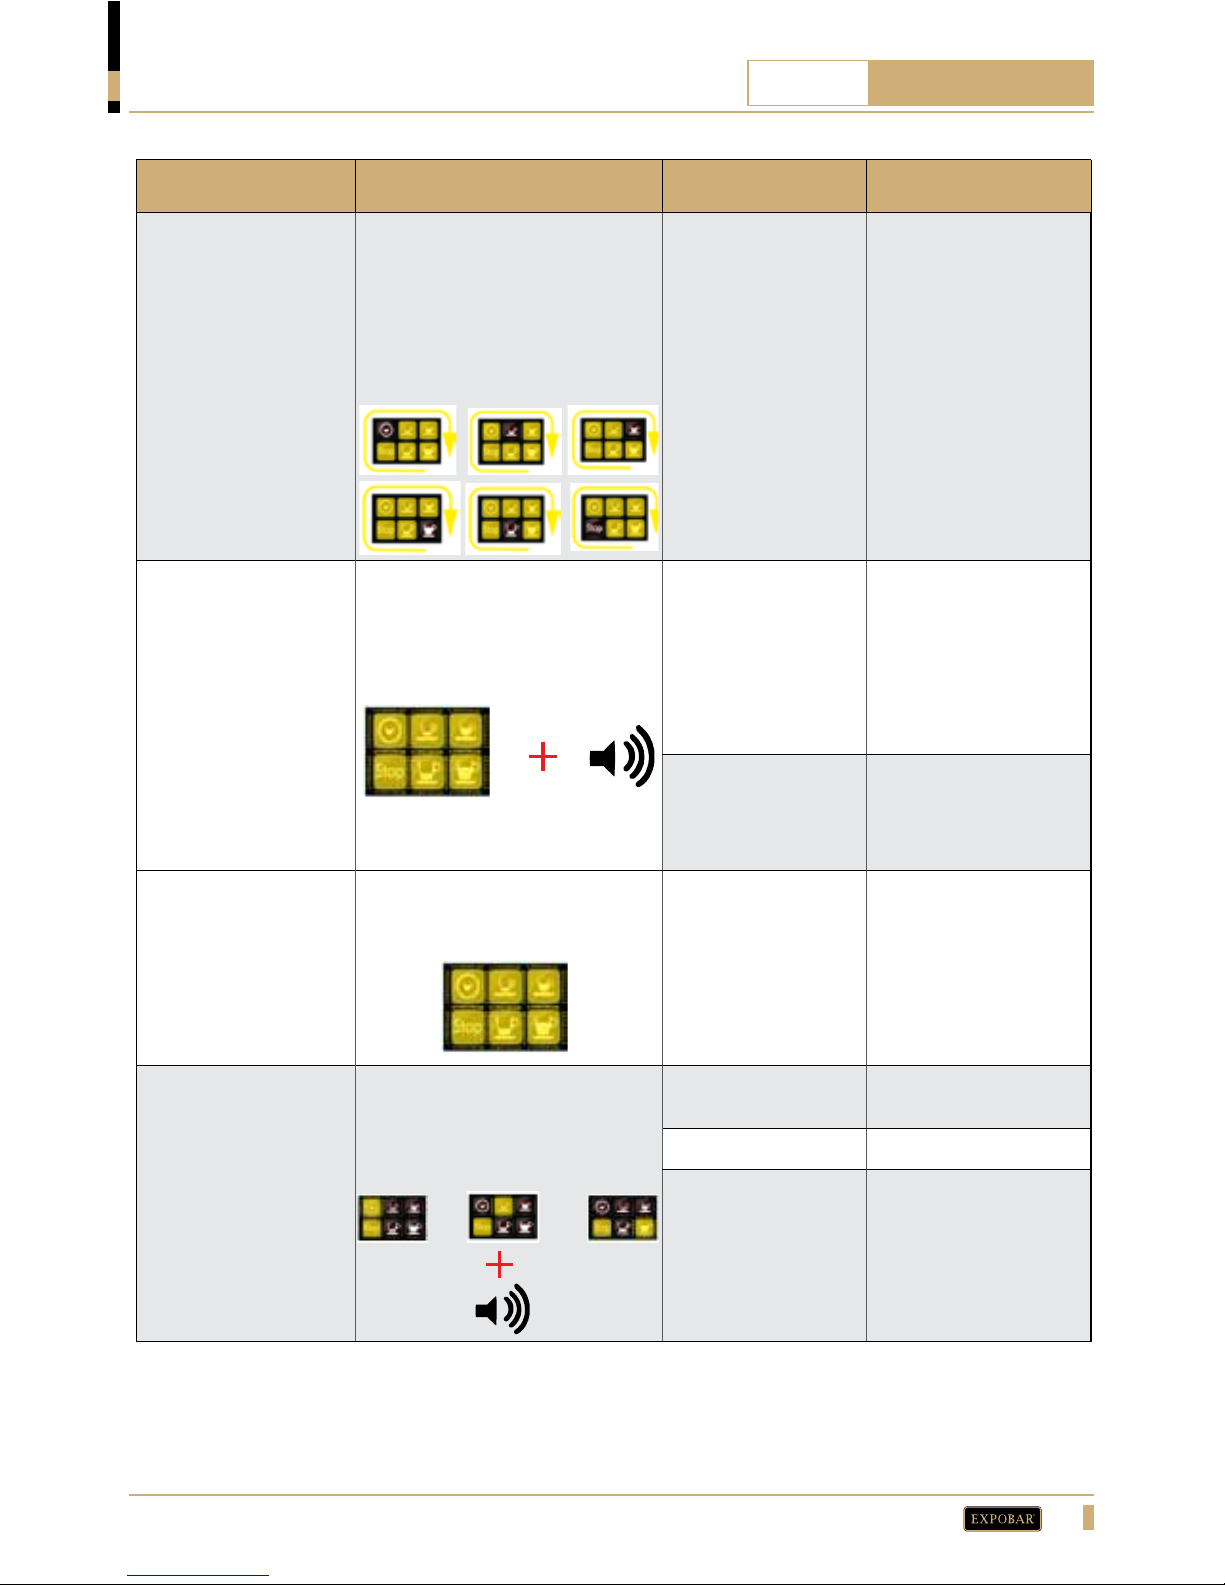
ALARM DESCRIPTION POSSIBLE CAUSE SOLUTION
HEATING & FILLING
When the machine is filling with
water or heating, all buttons will
flash simultaneously in 3 second
intervals. It will start to flash
from button K5 and continue
one by one to button K6.
The machine is filling
with water or heating the boiler.
Wait until the boiler is
full and reaches normal
operating temperature.
FILLING TIMEOUT
All the lights of the touchpad
are flashing and the alarm is
sounding.
The boiler fill time is
exceeded because a
tube is loose and the
machine is leaking
water.
Turn OFF the machine
and contact technical
support.
The boiler fill time
is exceed because
there is no water in
the tank and boiler.
Fill the tank and restart
the machine(Switch Off
and On).
NO WATER IN TANK
All the lights of the touchpad are
flashing and the machine doesn’t
respond.
There is no water
in the tank.
Fill the water tank.
FLOWMETER
TIMEOUT
DISPENSE TIMEOUT
When you make a coffee, the
selected drink starts to flash, the
STOP button lights up, and the
alarm is sounding.
Coffee powder is
too fine.
Change capsule.
Not enough water. Fill the water tank.
There is air inside
the hydraulic system.
Switch the machine
OFF then use the hot
water tap to partially
empty the boiler. Refill
the tank and switch the
machine back on.
Page 26
26
R
QUARTZ
CLASSIC
ALARM DESCRIPTION POSSIBLE CAUSE SOLUTION
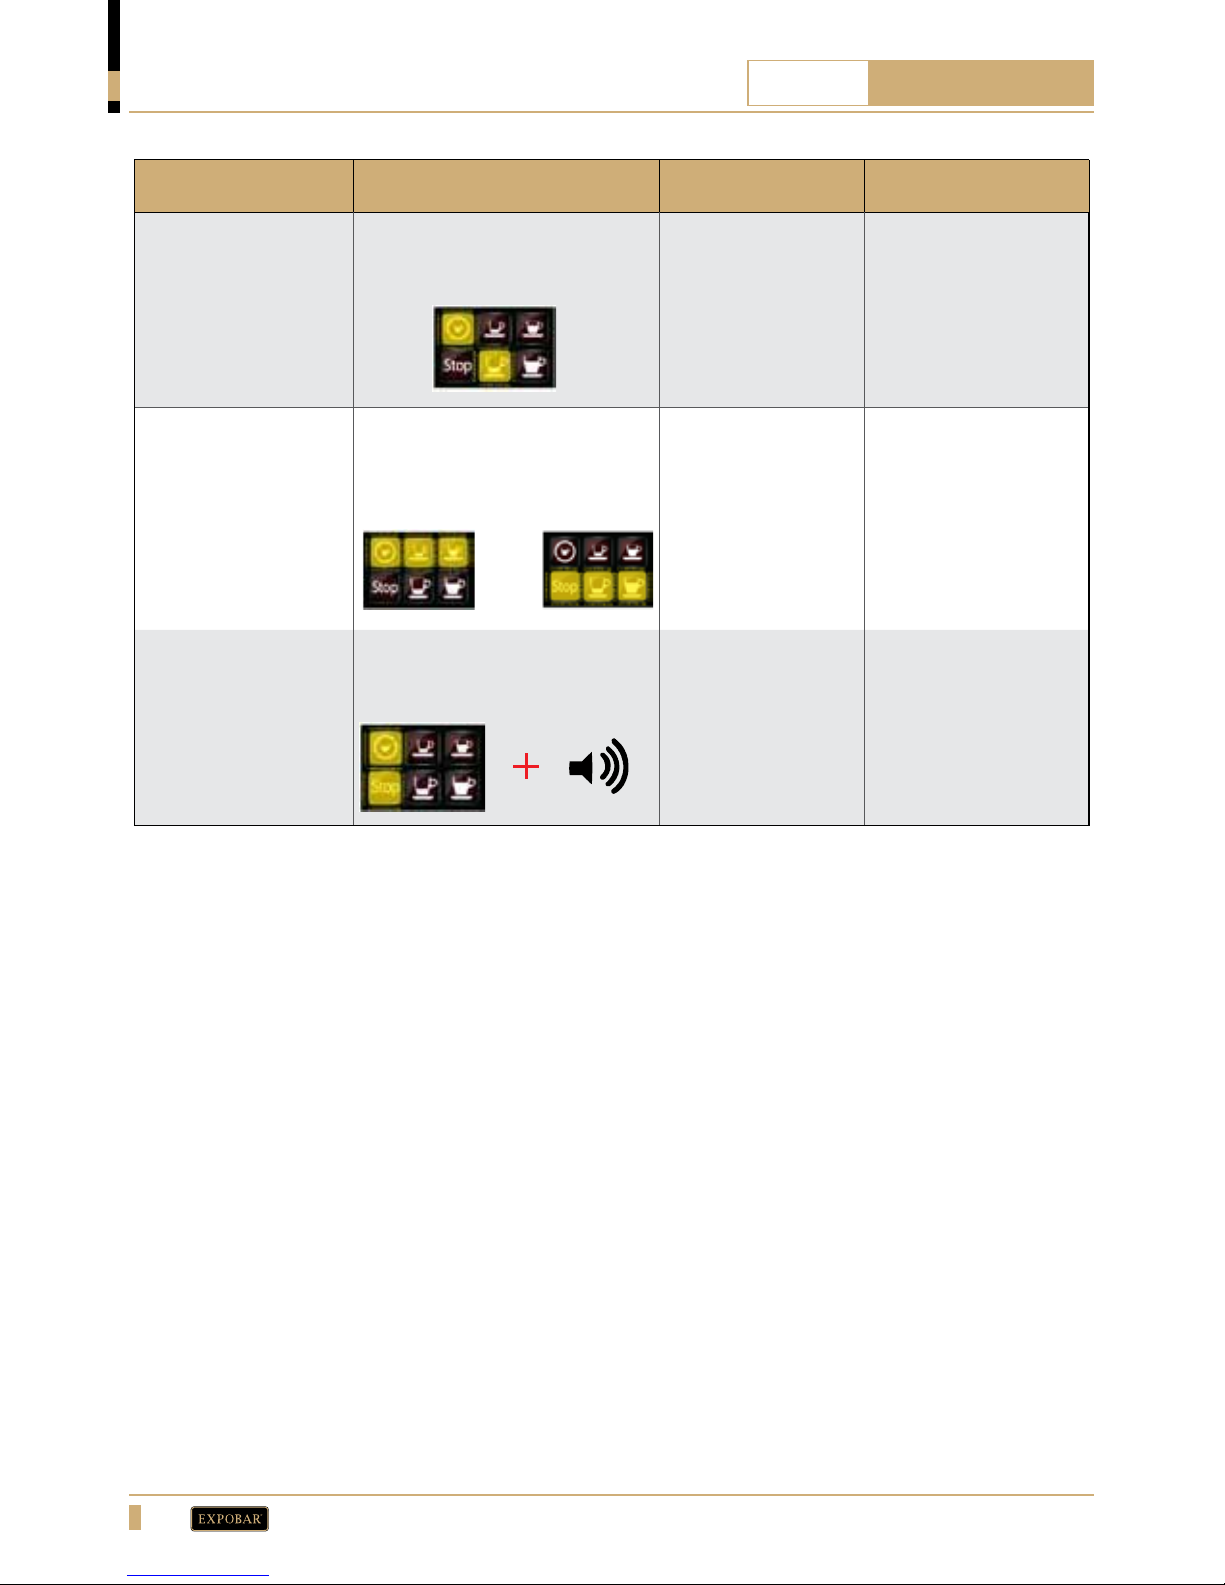
STANDBY
Buttons K3 and K5 are flashing and the machine does not
respond.
STANDBY mode is
activated.
Press buttons K3 and
K5 simultaneously to
exit STANDBY mode.
FULL CAPSULE
DRAWER
The keypad flashes intermittently,
the first row alternating with
the second row at one second
intervals.
The capsule drawer
is full. The maximum
number of capsules
has been reached (15
capsules).
Empty the capsule
drawer and press the
STOP button. The
capsule counter will
reset to zero and the
machine will return to
normal operation.
NTC
DISCONNECTED
OR BROKEN
Buttons K5 and K6 are flashing
and the alarm is sounding.
The NTC is disconnected or broken.
Turn the machine OFF
and contact technical
support.
ALARMS AND INDICATIONS
Page 27
R
Your Dealer
TECHNICAL SERVICE
Please contact your supplier
For the warranty to be valid the conditions for maintenance must have been followed
according to our instructions, proper precautions have been taken, and warranty claim
has been issued without delay.
The affected equipment shall not be used while awaiting service if there is any risk that
the damage or defect could worsen.
The warranty shall not cover consumable supplies such as glassware, or normal
maintenance such as cleaning of filters. Additionally, damages of an external nature, such
as contaminants in the water, limescaling, incorrect voltage or power surges, and water
supply issues such as pressure changes or service disconnection are not covered by this
warranty.
The warranty will not cover damages or defects caused by incorrect handling or
operation of the appliance.
ASSEMBLED IN SPAIN BY CREM INTERNATIONAL
www.creminternational.com
Models covered by this manual:
EAEB-B51C-13AL
 Loading...