

Page 1
QUARTZ
USER MANUAL
UM_EN
Part No.: C*70000275EN_04
Date: 131108
R
Page 2

CONTENT
Original instructions
CONTENT ..................................................................................................................................................................2
SYMBOL DESCRIPTION ....................................................................................................................................4
Hazard intensity levels ..................................................................................................................................................... 4
GENERAL .....................................................................................................................................................................5
Introduction ....................................................................................................................................................................... 5
Warnings ............................................................................................................................................................................. 5
Precautions ......................................................................................................................................................................... 5
Intended use ....................................................................................................................................................................... 5
Data sheet........................................................................................................................................................................... 6
OVERVIEW OF COMPONENTS .................................................................................................................. 7
Front view ........................................................................................................................................................................... 7
DIMENSION SKETCH ..........................................................................................................................................8
TRANSPORT .............................................................................................................................................................9
Packaging ............................................................................................................................................................................. 9
Delivery inspection .......................................................................................................................................................... 9
INSTALLATION AND START-UP ..................................................................................................................9
Positioning........................................................................................................................................................................... 9
Electrical connection ...................................................................................................................................................... 10
Water connection ...........................................................................................................................................................10
Drip tray drainage ........................................................................................................................................................... 11
Pressure and temperature ............................................................................................................................................11
Starting the machine ....................................................................................................................................................... 12
QUARTZ
OPERATION ........................................................................................................................................................... 13
How to dispense a drink ............................................................................................................................................... 13
Steaming and frothing milk ............................................................................................................................................14
Dispensing hot water ..................................................................................................................................................... 14
Filling the internal water tank ..................................................................................................................................... 15
CLEANING AND CARE .................................................................................................................................. 16
Coffee machine cleaning ................................................................................................................................................ 16
Daily cleaning ................................................................................................................................................................... 16
Weekly cleaning ............................................................................................................................................................... 16
Rinsing the capsule group ..............................................................................................................................................17
Cleaning the capsule group ........................................................................................................................................... 18
2
R
Page 3

CONTENT
Disassemble the group gasket ............................................................................................................................ 19
Cleaning the group gasket and capsule holder ............................................................................................... 19
Reassembly the group gasket ............................................................................................................................. 19
Cleaning the coffee spout ................................................................................................................................... 20
Additional handling of the machine ................................................................................................................... 21
PROGRAMMING ....................................................................................................................................... 22
Keypad ..................................................................................................................................................................... 22
Programming the drink volume ......................................................................................................................... 22
Adjusting boiler temperature ............................................................................................................................. 22
STORAGE AND DISPOSAL OF MACHINE .............................................................................. 23
TROUBLESHOOTING .......................................................................................................................... 23
How to store the machine ................................................................................................................................. 23
Disposal of machine ............................................................................................................................................. 23
ALARMS AND INDICATIONS .......................................................................................................... 24
QUARTZ
R
3
Page 4
SYMBOL DESCRIPTION
Hazard intensity levels
There are three different levels of hazard intensity, identified by signal words DANGER, WARNING and
IMPORTANT. The level of hazard is determined by the following definitions.
Observe the statements to ensure safety, performance, prevent injury and machine damage.
Important:
Alerts against unsafe practices. Observe to ensure drink quality, machine performance,
food safety, to prevent minor personal injury or damage to the machine.
WARNING!
Indicates a potentially hazardous situation which, if not avoided, could result in scalding,
serious injury and even death.
DANGER!
INDICATES A IMMINENTLY HAZARDOUS SITUATION WHICH, IF NOT
AVOIDED, WILL RESULT IN SERIOUS INJURY AND EVEN DEATH.
Note:
i
Gives additional information which may be helpful during the cleaning procedure or
operation of the machine.
QUARTZ
4
R
Page 5

GENERAL
Introduction
Thank you for choosing the QUARTZ espresso machine. We hope you enjoy it !
Read the user manual before using the machine.
This guide contains important instructions for using
the capsule group machine correctly and safely.
Always keep this manual close at hand for future
reference.
To protect against fire, electric shock and injury
to persons from misuse, please read and follow
instructions.
Warnings
Never immerse the machine, plug or mains cable
in water, as there is a danger of electric shock.
Avoid spillage on the connector.
This appliance can be used by children aged from
8 years and above and persons with reduced
physical, sensory or mental capabilities or lack of
experience and knowledge if they have been given
supervision or instruction concerning use of the
appliance in a safe way and understand the hazards
involved.
Children should be supervised to ensure they do
not play with the appliance.
Cleaning and user maintenance shall not be made
by children.
Do not use the machine if the machine, its mains
cable or the plug is damaged or the machine has
been dropped.
If the mains cable is damaged, it must be replaced
by the manufacturer, its service agent or a similarly
qualified person in order to avoid a hazard.
Plug the machine into a properly installed, earthed
wall socket, whose line voltage matches the
technical data for the machine.
Precautions
Do not use the machine outdoors, where it would
be exposed to adverse weather (rain, snow, frost).
This will cause material damage to the machine.
Do not try to open the machine or repair it in
any way. To avoid danger, only have the machine
repaired in a technical workshop, in the Service
Centre or by a qualified person.
Remove the mains cable from the socket, when
the machine is not in use for long periods. To do
this, pull the plug, not the cable.
This appliance must be placed in a horizontal position
which is resistant to any water that may leak.
Position the mains cable so that people cannot
trip over it. Keep it away from sharp edges and
heat sources.
Place the machine out of the reach of children.
Use the new hose-sets supplied with this
appliance; old hose-sets must not be re-used.
This appliance is not suitable for installation in an
area where a pressure washer may be used.
This appliance must not be cleaned with a
pressure washer.
Heating element surface is subject to residual heat
after use.
Appiliance shall be disconected from its power
source during service and when replacing parts.
The removal of the plug has to be in a way that
the operator can see that it remains unplugged.
QUARTZ
Intended use
This appliance is intended for domestic use and
similar applications such as:
- Staff kitchen areas in shops.
- Offices and other commercial working
environments.
- On agricultural/farm estates.
- By clients in hotels, motels and other residential
type environments.
- Bed and breakfast type environments.
To ensure optimal performance, install the machine
in a location where these parameters will not be
exceeded:
- Maximum permissible inlet water pressure:
800 KPa (8 Bar)
- Minimum permissible inlet water pressure:
200 KPa (2 Bar)
- Maximum inlet water temperature: 40ºC
- Ambient temperature is between +10 ºC (min
and +40 ºC (max.).
R
5
Page 6

GENERAL
Data sheet
QUARTZ
FACTS QUARTZ
Drink selection options
Brewing mechanism
Capacitive touchpad
Temperature control
Height adjustable outlet
Used capsule drawer
Saving energy mode
Height
Width
Depth
Internal water tank
Boiler volume
Power rating
Cold water connection
5
Yes, Capsule
Ye s
PID regulation
Ye s
15 capsules
Ye s
399mm
260mm
410,5mm
1.8 L
1,7 L
220-230 V 1N ~ 1915W 50/60Hz
1
/2" external thread
Noise emission when machine is in
operation
MODEL/NAME WEIGHT
QUARTZ
6
R
< 70 dB
16 kg
Page 7
OVERVIEW OF COMPONENTS
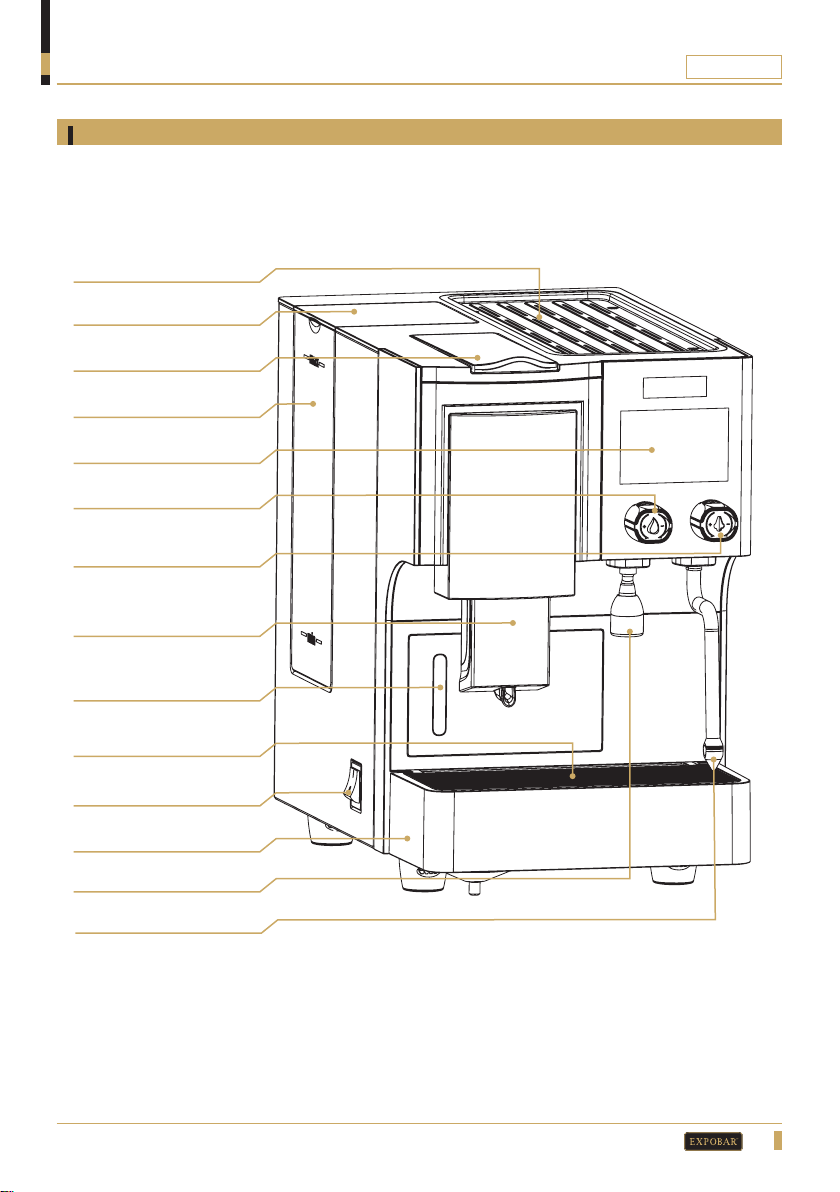
Front view
Cup shelf
Tank lid
Capsule group lever
Internal water tank
Capacitive keypad
Water tap
Steam tap
Height adjustable outlet
QUARTZ
Capsule drawer
Drip grid
Power switch
Drip tray
Hot water outlet
Steam wand
R
7
Page 8

DIMENSION SKETCH
QUARTZ
A
D
QUARTZ
F
E
Model
QUARTZ
8
B C
A B C D (Min~ Max) E F
399 mm 260 mm 410.5 mm 63 mm ~ 115 mm 510.15 mm 590 mm
R
Page 9

TRANSPORT
QUARTZ
Packaging
The machine is shipped in a unique carton box which uses expanded polystyrene paddings.
The machine box is provided with conventional symbols that can be perfectly visible during the handling
and storage tasks.
The machine box must stay in a vertical position during the transport. Do not tip or try to place the box
tilted sideways in any way.
During transportation the box must be protected from hits, impacts, shocks and exposure of bad weather
elements.
Delivery inspection
After the delivery, check that the machine is in the exact condition described in the documentation of the
transport, accessories included.
Check that the machine does not have any damage caused by transportation. If this happens, inform to the
shipper and the distributor of the machine.
The packaging materials are potentially dangerous and should be kept away from children.
Make sure to leave the materials of the box and packaging at a suitable recycling center.
INSTALLATION AND START-UP
Positioning
MIN. 10cm
MIN. 30cm
The minimum dimensions for the place of the machine must be 360
mm wide x 415mm depth x 620 mm high.
Position the machine on a flat and stable surface, away from water
and sources of heat.
It should be located in a dry environment, since excessive humidity
will affect the machine.
Do not cover the machine with plastic film or cloths.
This machine can be connected to the mains water supply.
For more information, see the technical manual.
Note:
i
Make sure that air is able to circulate behind the machine
(minimum 10cm).
R
9
Page 10

INSTALLATION AND START-UP
QUARTZ
Electrical connection
Connect the machine to a earthed wall socket. Check the correct voltage and
frequency in this user manual.
Verify that the electric data of the nameplate are compatible with the operating conditions of the area
where you will install the machine.
The wall socket must be equipped with an earth contact. Make sure the earth system is efficient and in
conformity with current safety rules. It is mandatory to earth the machine.
You should protect the electric line of the installation with a circuit breaker switch appropriated for the
power consumption of the machine, specified on its nameplate.
A residual current circuit breaker must be installed in accordance with the characteristics of the area of
the installation.
Check the characteristics, power rating of the system and that the diameter of the cables are suitable for
the power used by the machine.
Do not use any extension cable, plug adapter nor multiple wall sockets.
DANGER!
If the mains cable or plug is damaged, it must be replaced by the manufacturer, its service agent or
similarly qualified persons in order to avoid SERIOUS INJURY OR DEATH!
Water connection
The Installation of the machine to a water mains connection must be done by a qualified person.
Rinse around 20 liters of water from the main water supply before connecting the machine to the water
connection.
Connect the inlet hose to the main water supply which should have a ½” male connection, tighten it with a
wrench. Use the flexible hose that is included in the accessory box of the machine.
Use safe drinking water with hardness between 5ºfH and 8ºfH (French hardness degrees). If the value is
below this limit, the presence of corrosion of hydraulic components is a possibility. If the value is higher
than this limit, the presence of lime in the boiler will increase. In both cases the operation of the machine
and coffee quality will be affected negatively.
If you connect the machine to a water mains connection, we recommend connecting the dip tray to
drainage. It is explained in the next section.
Important:
In this section we explain the recommendations about the water operating characteristics. How
to connect the machine to water mains is further explained in the technical manual. Normally the
machine is used with the internal water tank, follow the procedure found on page 12.
10
R
Page 11

INSTALLATION AND START-UP
Drip tray drainage
QUARTZ
The machine drip tray can be connected to a larger drain, allowing the tray to be emptied less frequently.
suitable location is required for this. To use this feature, follow the connection procedure explained below.
01 02 03
Remove the drip tray. Connect the corrugated tube to
the drain cup.
Note:
i
The drainage can be used regardless if the machine is
connected to the water mains or the internal water tank.
Use a drill to make a hole at the
mark shown on the lower part
of the tray.
Pressure and temperature
A
There is a direct relation between the boiler pressure and temperature. Shown on the graphic bellow:
O
C
Pressure-Temperature relation on the boiler
125
120
115
110
0.7 0.8 0.9 1.0 1.1 1.2
Standard pressure and temperature
BAR
R
11
Page 12

INSTALLATION AND START-UP
Starting the machine
A
Fill the tank to the maximum level.(A)
If the machine is connected to the water mains, filling will be done automatically.
Connect the machine to the electricity supply.
Switch on the machine at the power switch. (B)
It may be that when the machine is switched on, it goes into standby mode
If the machine is in
K3 will flash simultaneously. In this case, the machine must be changed to `
To do this, press buttons K5 and K3 at the same time
It is easy to recognise when the machine is in ON mode since the 6 LEDs of the
buttons will light up, except one unlit button that will cycle. This indicates that the
machine is heating up the boiler.
Once all the buttons are lit (none is flashing) the machine is ready to dispense coffee.
‘standby’
QUARTZ
B
mode, this can be easily recognised since buttons K5 and
‘standby’
ON`
mode.
.
Note:
i
Keypad explanations can be found on page 22.
12
R
Page 13

OPERATION
How to dispense a drink
01 02
A
B
QUARTZ
Lift up the lever for the group(A), place a cup
under the outlet(B).
03 04
Adjust the height of the espresso outlet if
necessary.
Insert the capsule in the correct position as
shown in the picture and push down the lever
into locked position.
Select the desired drink by pressing any of the
buttons.
WARNING!
Never open the capsule group whilst the machine is dispensing a drink, as the pressurized hot
water could cause scalding or serious injury. Once dispensing has finished, wait about 3 seconds
before opening the capsule group.
Note:
i
The machine will be locked after 15 brews since the capsule drawer has capacity of 15 capsules.
The first and last row of the keypad will begin to flash at the same time. To unlock the machine,
empty the capsule drawer and press the “STOP” button.
R
13
Page 14

OPERATION
Steaming
Frothing
CLOSE
OPEN
CLOSE
OPEN
QUARTZ
Steaming and frothing milk
WARNING!
Never expose hands and fingers directly
under the steam nozzle when operating
the steam wand to avoid scalding or
serious burns.
To use the steam wand correctly, proceed as follows:
Point the steam wand toward the drip tray.
Slowly open the steam tap for around 2 seconds, a small jet of water and steam will emerge.
After 2 seconds close the steam tap and then put the wand into the jug containing the milk.
Once the wand has been imersed into the milk you may reopen the steam tap to start frothing.
Once the milk has reached the desired temperature, close the tap until the flow of steam has completely
stopped. Remove the steam wand out of the jug.
Direct the wand toward the tray and turn on the tap to remove any leftover milk in the wand. Now
clean the outside of the wand with a soft cloth.
Dispensing hot water
14
R
B
Place a cup under the hot water outlet.(A)
Turn the water tap anticlockwise (B) to start dispense water.
A
When desired volume has been dispensed, turn off the water by
turning the water tap clockwise (C) until it stops.
C
Page 15

OPERATION
QUARTZ
Filling the internal water tank
For machines connected to a tank, if the water level of the tank reaches the minimum level while trying to
dispense a drink, the brewing will stop and the LEDs on the keypad will begin to flash.
Proceed as follows:
01
02
B
A
If the water level of the tank is below the
minimum level(A), All buttons will begin to flash
as seen in picture(B).
03 04
Switch off the machine by pressing the power
switch.
Lift up the tank lid.
Important:
Always switch the machine off before removing the tank.
Turn the handle that secures the tank upwards,
pull it straight up until it release from the
machine. Fill it with fresh tap water to the
maximum level indication.
R
15
Page 16

CLEANING AND CARE
Coffee machine cleaning
Important:
To obtain the best efficiency, quality and performance of the machine, you should always follow
the cleaning and care instructions provided in this manual.
Turn off the power switch when cleaning the exterior of the machine.
All external surfaces should be cleaned with a wet cloth that will not get out fibers, threads or
scratch the machine.
Do not use aggressive cleaning detergents, solvents or degreasers. They can damage the machine.
Important:
Once a day or after 8 hours from the last dispensing of coffee, the following cleaning tasks must be
performed for maintaining the quality and performance of the water system in the machine:
Capsule group: Brew a continuous coffee without capsule for around one minute.
Steam wand: Position the wand outside the drip tray and open the steam tap for around one
minute.
Hot water outlet: Place a container under the water outlet and open the tap for 20 seconds.
QUARTZ
Daily cleaning
Rinse the capsule group with hot water (see page 17).
Clean the external surfaces of the machine.
Clean the steam wand and the water tap. Be sure that the nozzles are not blocked or half blocked with for
example milk residue. If it’s necessary to clean, be careful not to deform or damage any of the components.
Clean the dip tray and the stainless steel insert grid under running water with a brush. If the drip tray is
connected to the drain, you can slowly pour 1L of hot water into the drain cup to dissolve and remove
coffee residue that have accumulated inside the cup and tubes.
Weekly cleaning
Clean the capsule group with professional cleaning powder or cleaning capsule (see page 18).
Clean the group gasket (see page 19).
Clean the coffee spout (page 20).
16
R
Page 17

CLEANING AND CARE
Rinsing the capsule group
QUARTZ
01
Open the lever so the last used capsule falls
into the capsule drawer and the group becomes
empty.
03
02
Push down the lever into locked position.
Start the continuous brewing and stop after 30
seconds. Repeat this process 3 times.
04
Reopen the lever and put an empty capsule
without any cleaning agent in the group.
Note:
i
You can take a used coffee capsule and open it up and
remove the coffee powder inside to use in step 3.
Push down the lever into locked position. Start
the continuous brew for 30 seconds. Repeat this
process 3 times.
R
17
Page 18

CLEANING AND CARE
Cleaning the capsule group
Cleaning with powder
QUARTZ
01
Open the lever so the last used capsule falls
into the capsule drawer and the group becomes
empty. Fill half of the capsule group with special
cleaning powder for espresso machines.
Cleaning with capsule
03
Push down the lever into locked position.
Start the continuous brewing and stop after 20
seconds. Repeat this process 5 times.
Note:
i
Only use professional cleaning
powder for espresso machines.
It’s avalible from your
distributor.
Part no: 1104162
02
Open the lever so the last used capsule falls into
the capsule drawer and the group becomes empty.
Insert the special cleaning capsule, start the
continuous brewing and stop after 20 seconds.
Repeat this process 5 times
18
R
Important:
We recommend to clean and rinse the
machine at least once a week.
Important:
Always rinse the group after a cleaning
procedure.
Page 19

CLEANING AND CARE
Disassemble the group gasket
QUARTZ
Switch off the machine and
open up the capsule group.
Use your fingers to push the
metal tension ring backwards
until it releases from the
gasket.
Cleaning the group gasket and capsule holder
Clean the gasket and capsule holder with a brush, clean the gasket
under a water tap with running water.
Reassembly the group gasket
01 02
Important:
The widest part of
the gasket must be
facing forward when
reassembling the
gasket.
Once the metal ring had been
released, use your fingers/nails
to grab the gasket and pull it
straight out until it releases
from the capsule holder.
1. Keep the group open by holding the lever with your hand, at the same time push the gasket into position
on the capsule holder. Push the lower part of the gasket on first, then work your way all around until it is
completely fitted.
2. Pull the metal ring all the way up to keep the gasket in place.
R
19
Page 20

CLEANING AND CARE
Cleaning the coffee spout
QUARTZ
Push the K4 button and let the brewing
finish without a capsule.
01
02
Use the cleaning brush which is included
in the accessory box, rub it back and forth
inside the coffee spout a few times to
remove any buildup of coffee residue.
03
02
Important:
We recommend to perform this cleaning
daily to ensure good hygiene and coffee
taste.
To rinse the spout make another brewing
without capsule by pressing K4 button,
repeat this process 3 times.
20
R
Page 21

CLEANING AND CARE
Additional handling of the machine
Important:
Avoid placing wet cups directly on the cup
shelf, it may drip into the machine and cause
machine damage.
QUARTZ
Dry the cups before putting them on
the cup shelf.
The tank must be cleaned
once a month. Do not use
harsh detergents. After
cleaning, dry the outside
to avoid problems inside
the machine.
When raising and lowering
the lever to insert a capsule,
do so slowly. Never force
the lever.
To prevent the machine from
malfunctioning, it is necessary to
use the original capsules for which
the machine is designed. Do not use
other similar capsule formats. The
machine might not work properly and
can leak water.
R
21
Page 22

K5K5K1K1K2
K2K4K4K3K3
K6
K6
PROGRAMMING
K5K1K2
10ºC
1ºC
Keypad
Continuous
brewing of coffee.
Programmable drink
Stop brewing coffee.
Programming the drink volume
To adjust the drink volume, proceed as follows:
Insert an unused capsule into the group and close it.
Press and hold button K5 for five seconds until the LED behind the button begins to flash.
When K5 flashes, press the button for the desired drink (K1, K2, K3, K4). Once the desired button has
been pressed, the coffee will start to brew. Now watch carefully until the desired volume of coffee is
reached. Press button K6 to stop the brewing of coffee.
When the machine stops brewing, button K5 will flash for five seconds to confirm that the volume has
been memorized.
Repeat the same operation to program the remaining drinks that have not been set (K1, K2, K3, K4).
buttons.
QUARTZ
Important:
Always use an unused capsule when programming the volume.
Adjusting boiler temperature
It is possible to adjust the temperature of the boiler in the range
between 110ºC and 128ºC.
1. Set the machine to “Stand-by” mode (press the buttons K3 and
100ºC
Note:
i
• Thetemperatureindicationrepresentstheboiler,notthetemperatureofthefinaldrink.
• Therecommendedtemperatureisbetween118ºC to 122ºC
22
R
K5 simultaneously)
2. Now press the buttons K3 and K4 simultaneously, directly when this is
done the LED’s of the keypad will start to flash and show the operating
temperature of the boiler. In order to understand the meaning of the
flashes you should add all flashes together as shown below.
Button K5 represent hundreds, K1 represent tens and
K2 single units. Sum up all values of each button ash
to get the exact temperature of the boiler.
3. Increase the temperature by pressing button K4, decrease the
temperature by pressing button K3.
4. Switch the machine OFF and ON again to save the changes before
you use the machine.
Page 23

STORAGE AND DISPOSAL OF MACHINE
How to store the machine
Make all the cleaning procedures described in this manual.
Disconnect and roll up the power cord.
Disconnect the inlet hose from the machine if it’s connected to the water mains (this should be
performed by a qualified person).
Empty the capsule drawer, drip tray, water tank and boiler.
Cover / pack the machine and store it in a dry place where it isn’t exposed to bad weather conditions.
If the machine should be used after a long period of storage, make sure to run all cleaning procedures
before using the machine again.
Disposal of machine
Make all the cleaning procedures described in this manual.
Disconnect and roll up the power cord.
Disconnect the inlet hose from the machine if it’s connected to the water mains
(this should be performed by a qualified person).
Empty the capsule drawer, drip tray, water tank and boiler.
Pack and send the machine to a certified recycling center.
TROUBLESHOOTING
QUARTZ
PROBLEM POSSIBLE CAUSE SOLUTION
The machine does not start up.
The machine does not brew
any coffee. The pump can be
heard working but no coffee is
dispensed.
The cream of the coffee have
lower quality than normal.
No steam comes out of the
wand
Water drips from the capsule
group
The plug is not correctly
inserted into the wall socket.
There is air inside the water
System.
The coffee outlet is clogged
or dirty. Temperature setting is
not adjusted according to your
capsule requirements.
The steam nozzle is clogged
with milk residue.
The group gasket is worn out.
Check that the plug is correctly
plugged in and that the socket is
working correctly.
Switch off the machine, use the hot
water tap to empty the boiler, fill the
tank and switch it back on.
Clean the coffee spout. Check that
correct temperature setting is used.
Clean the wand and nozzle, if necessary remove the nozzle and clean the
holes with a pin or needle.
Replace the gasket.
(call technical support for assistance)
R
23
Page 24

ALARMS AND INDICATIONS
ALARM DESCRIPTION POSSIBLE CAUSE SOLUTION
When the machine is filling
HEATING & FILLING
FILLING TIMEOUT
NO WATER IN TANK
FLOWMETER
TIMEOUT
DISPENSE TIMEOUT
STANDBY
water or heating, each button
will flash one at the time with 3
seconds interval. It will start to
flash at button 1 and continue
one by one to button 6.
All the lights of the touchpad
are flashing and a beep is heard.
All the lights of the touchpad are
flashing and the machine doesn’t
respond.
When you make a coffee, the
selected drink starts to flash and
‘STOP’ button is lit up.
The machine makes an alarm
sound.
Buttons K5 and K3 are flashing.
Machine does not respond.
The machine is filling
water or heating the
boiler.
The time of filling
boiler is exceed
because some tube
is loose and machine
is leaking water.
The time of filling
boiler is exceed
because there is no
water in tank and
boiler.
There is no water
In the tank.
Coffee powder is
to fine.
Not enough water Fill the water tank.
There is air inside
the water system.
STANDBY mode is
activated.
QUARTZ
Wait until the boiler is
full and reach the operating temperature.
Turn OFF the machine
and contact technical
support.
Fill the tank and restart
the machine(Switch Off
and On).
Fill the water tank.
Change capsule.
Switch off the machine,
use the hot water tap
to empty the boiler, fill
the tank and switch it
back on.
Press buttons K5
and K3 to disable
STANDBY mode.
FULL CAPSULE
DRAWER
NTC
DISCONNECTED
OR BROKEN
24
R
The keypad flashes intermittently,
the first row alternating with
the second row at one second
intervals.
Buttons K5 and K6 are flashing
and the machine makes an alarm
sound.
The capsule drawer
is full. The maximum
number of capsules
has been reached (15
capsules).
NTC is disconnected
or broken.
Empty the capsule
drawer and press
STOP button. The
capsule counter will
be reset to zero.
Turn OFF the machine
and contact technical
support.
Page 25

ALARMS AND INDICATIONS
HEATING & FILLING
FILLING TIMEOUT
NO WATER IN TANK
FLOWMETER TIMEOUT
DISPENSE TIMEOUT
QUARTZ
STANDBY
FULL CAPSULE DRAWER
NTC DISCONNECTED OR
BROKEN
R
25
Page 26

R
For the warranty to be valid, the conditions for maintenance must have been followed
in accordance with our instructions, proper care must have been taken and any claim
against the warranty must be sent without delay.
The equipment in question may not be used while awaiting service if there is any risk
that the damage or defect would worsen.
The warranty will not cover the consumption of supplies such as glassware, normal
maintenance such as the cleaning of filters, water contamination, lime scale or problems
associated with incorrect voltages, pressure or amounts of water.
The warranty will not cover damages of defects caused by the incorrect handling and
operation of the appliance.
ASSEMBLED IN CHINA BY CREM INTERNATIONAL
CREM INTERNATIONAL (SHANGHAI) CO.,LTD
Building A, No.521-551, Kangyi Road, Kangqiao Industrial Zone
Pudong New Area, Shanghai, China
Post Code: 201315
Phone: +86 021 681 87 010
Fax: +86 021 681 870 20
Models coverd by this manual:
EAAB-B51C-13AL
TECHNICAL SERVICE
Please contact your supplier
Your Dealer
www.creminternational.com
 Loading...