

Page 1

USER MANUAL
R
UM_EN
MB27A
05/2018
Original Instructions
Page 2

R
CONTENT
NOTIFICATIONS ....................................................................3
Introduction ...................................................................................................4
Warnings ........................................................................................................4
Precautions ...................................................................................................5
Intended use ................................................................................................. 6
OVERVIEW OF COMPONENTS ............................................8
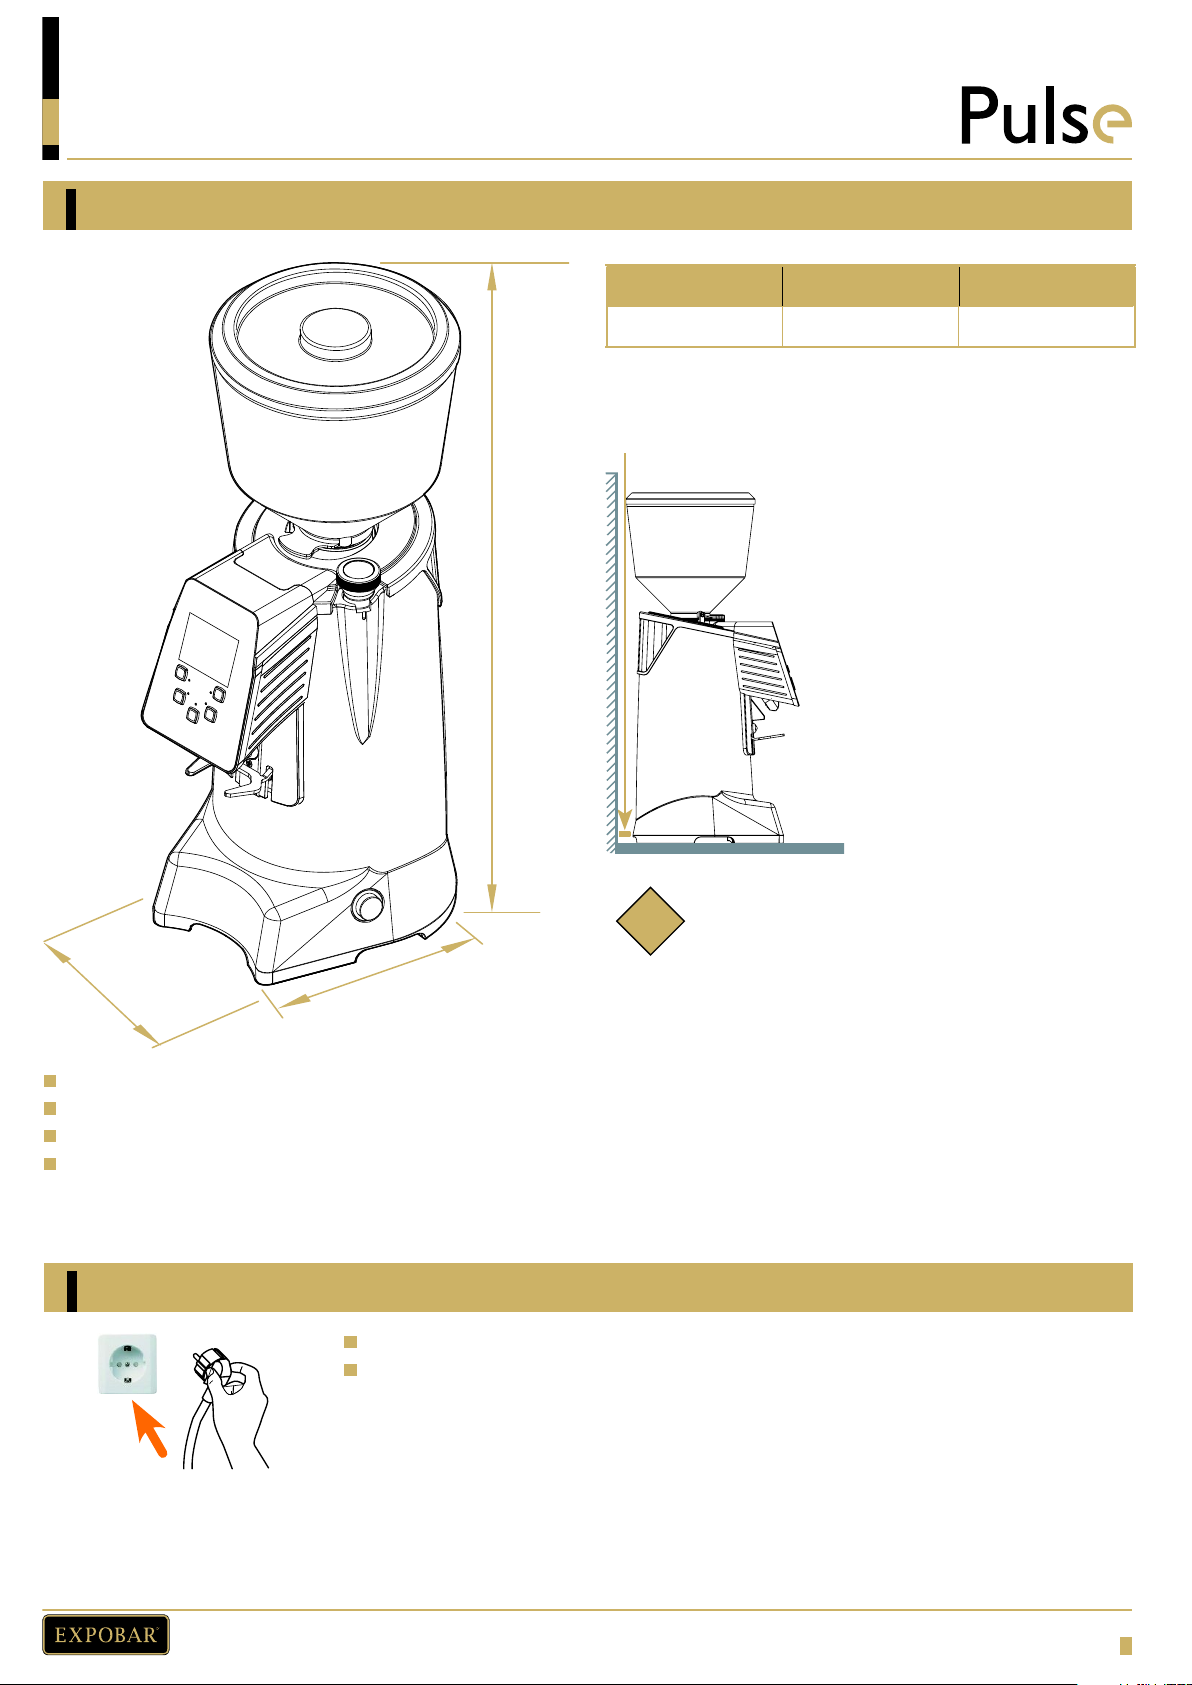
DIMENSION SKETCH
INSTALLATION AND START-UP .............................................9
Positioning .....................................................................................................9
Electrical connection ................................................................................... 9
Starting the grinder ..................................................................................... 10
OPERATION ........................................................................11
Grinder fneness adjustment ..................................................................... 11
Spout orientation adjustment dispensing ................................................11
Filter holder fork height adjustment .......................................................... 12
Maintenance of the grinder ...................................................................... 12
CLEANING AND CARE ......................................................12
Daily cleaning - clean the dispensing spout ..........................................13
Weekly cleaning - bean hopper .............................................................. 13
Weekly cleaning - clean with Grindz ....................................................... 14
PROGRAMMING ................................................................15
Grinder setting ............................................................................................ 15
Appliance switch-on .................................................................................. 15
Dose dispensing and setting (display) ..................................................... 15
“Manual Mode” dispensing mode activation ......................................... 16
Resetting dose counters ............................................................................16
Function block ............................................................................................ 16
Enter service menu .................................................................................... 16
2
Page 3
R
NOTIFICATIONS
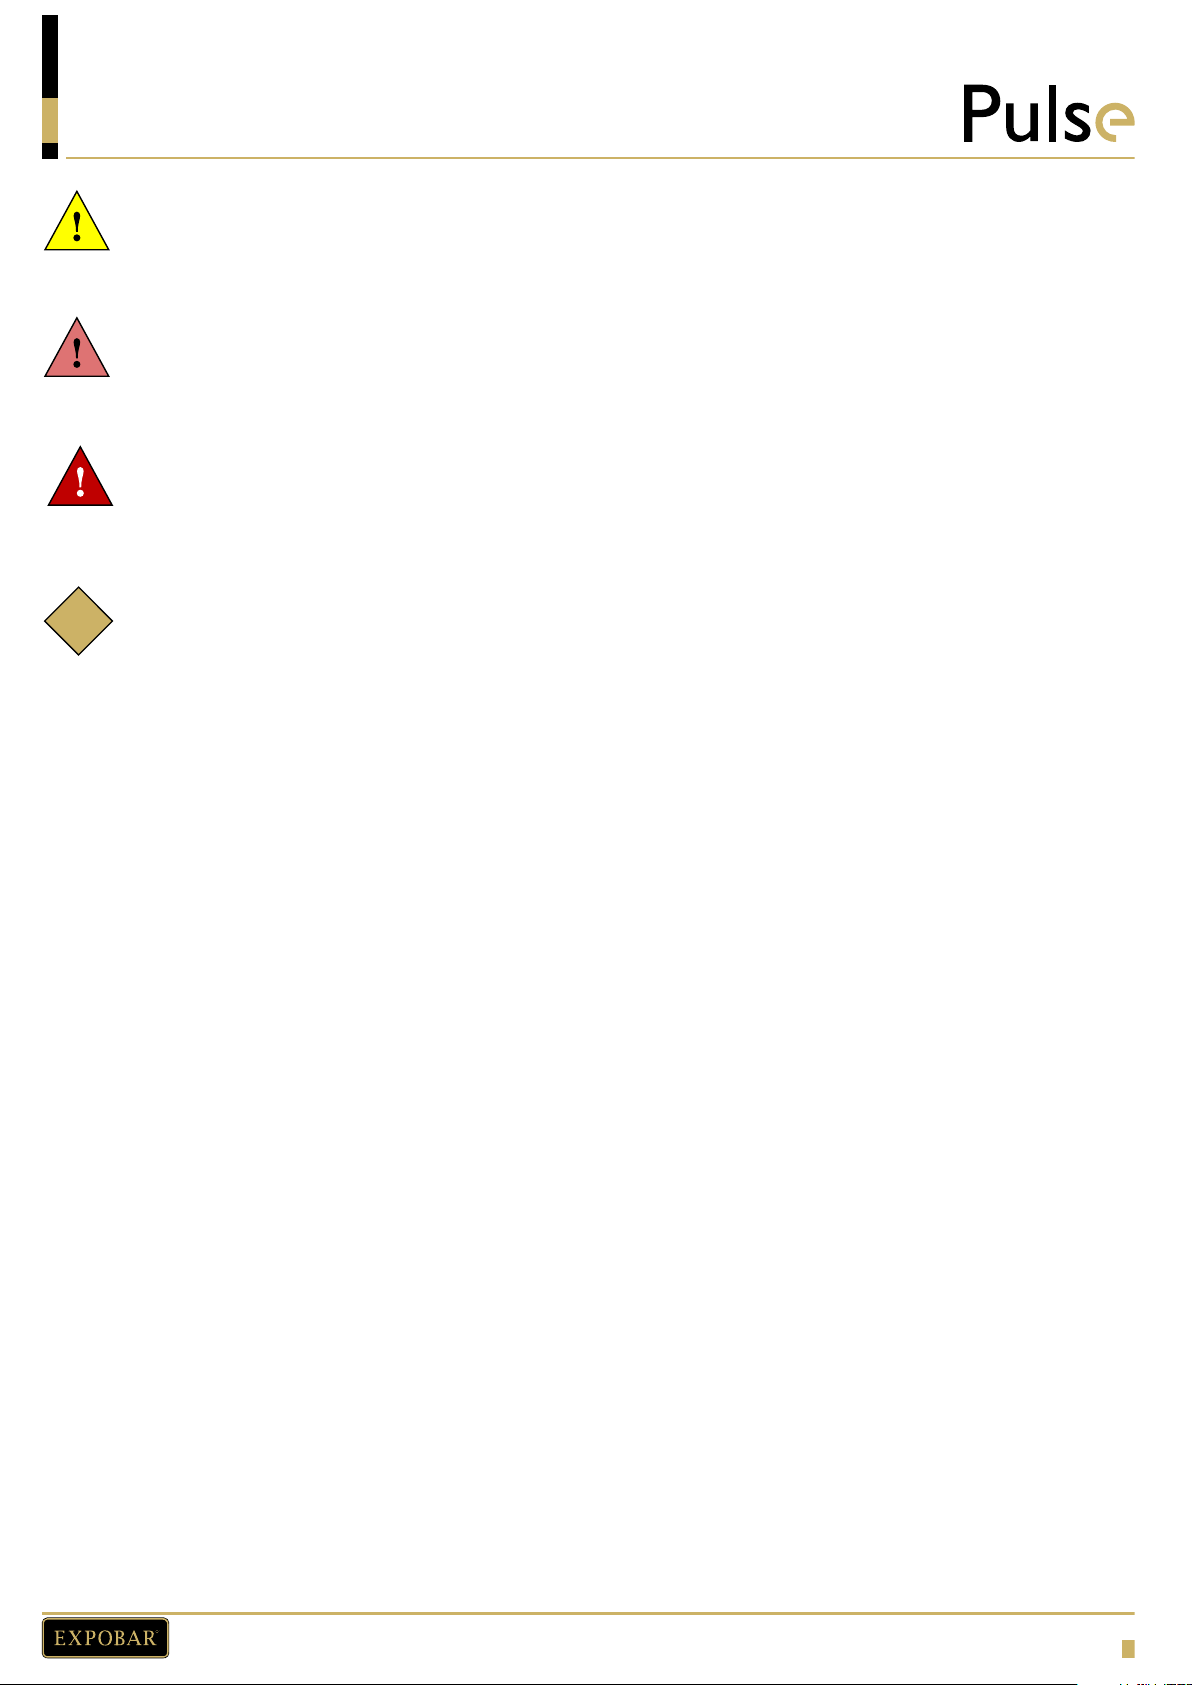
Important:
Alerts against unsafe practices. Observe to ensure drink quality, machine performance, food safety, to prevent
minor personal injury or damage to the machine.
WARNING!
Indicates a potentially hazardous situation which, if not avoided, could result in scalding, serious injury and
even death.
DANGER!
Indicates a imminently hazardous situation which, if not avoided, will result in serious injury
and even death.
Note:
i
Gives additional information which may be helpful during the cleaning procedure or operation of the machine.
3
Page 4

R
Introduction
Thank you for choosing the EXPOBAR Pulse
We hope you enjoy it!
NOTIFICATIONS
Read the user manual before using the
machine.
This guide contains important
instructions for using the grinder
correctly and safely.
Always keep this manual close at hand
for future reference.
This guide must be looked after with
care for the entire working life of the
coffee grinder.
Warnings
Never touch the machine with damp or
wet hands.
Never use the machine when barefoot.
Never attempt to unplug the machine by
This guide refect the current state of
the grinder technology and shall not
be considered obsolete solely because
update at a later date on the basis of
acquired experience. The manufacturer
reservestherighttomakemodifcations
to this manual with no obligation to
update previous version (except in
exceptional cases).
Always unplug the machine from the
power supply before performing any
cleaning or maintenance operations.
Do not use water jets or non-suitable
pulling the power cord or the machine
itself.
Do not use the machine outdoors so it
can be exposed to weather (rain, snow,
frost). It will cause material damage to
the machine.
The appliance is not intended for use
by persons (including children) with
reduced physical, sensory or mental
capabilities, or lack of experience and
knowledge, unless they have been given
supervision or instruction concerning
the use of the appliance by a person
responsible for their safety.
Always use the appliance on a fat,
steady surface that is able to support its
detergents for cleaning.
In the case of machine breakdown or
malfunction switch the machine off and
do not tamper with it.
For repairs contact an authorized
service center and request the use of
original spare parts.
Not observing of the above precautions
may make the machine unsafe for future
use.
Do not leave the machine switched
on when it is not in use. Unplug the
machine when not in use.
Do not obstruct the ventilation and/
or heat dissipation openings and/or
slits nor introduce water or any other
weight.
4
liquids into same.
Page 5
R
NOTIFICATIONS
Never insert spoons, forks or other
utensils into the pouring lip, or into
the hopper for any reason whatsoever
while the appliance is operating.
Always switch off the appliance before
removing blockages from the pouring
lip.
Never immerse the machine, plug or
Precautions
Always handle the machine with care to
avoid the risk of machine failure.
The packing materials (carton,
cellophane, staples, polystyrene, etc..)
can cut, wound or create hazards if used
mains cable in water or another liquid.
. Should a foreign object stop the motor,
switch the machine off immediately and
contact an authorized service center.
your local council offce, local refuse
disposal service or the retailer from
whom you purchased the appliance.
Before carrying out any installation or
adjustment work, make sure to read and
improperly or handled carelessly. Store
such materials out of reach of children
and persons with reduced physical,
sensory or mental capabilities, or lack
of experience and knowledge.
This symbol on the appliance
or package means that
the appliance must not
be considered as normal
household refuse. It must
be handed over to an appropriate
collection centre for recycling of
electric and electronic appliances. Make
sure that this appliance is disposed of
correctly and you will be making your
contribution to the prevention of
thoroughly understand the warnings in
this manual.
The company cannot be held liable
for any damage to people or property
resulting from failure to respect
the instructions concerning safety,
installation and maintenance enclosed
in this manual.
If the power cord of this appliance is
damaged, switch off the appliance and
contact a professional and qualifed
technician for having it replaced.
Should you decide to no longer use
this appliance, we recommend that you
make it inoperative by unpluging the
appliance from the mains socket and cut
negative health effects and harm to the
environment. Recycling materials helps
to preserve our natural resources.
For more information about how to
recycle this product, you can contact
off the power cord.
All defects and/or abnormal machine
behaviour shall be reported immediately
to an authorized installation and/or
maintenance technician.
5
Page 6

R
NOTIFICATIONS
Before connecting the machine, check
that the electrical power supply
corresponds to the specifcations on
the data plate.
Should the machine plug not be
compatible with your socket, have the
plug replaced with a suitable type by
a qualifed technician, who should also
check that the power outlet is suitable
for the machine power requirements.
Avoid the use of multiple-plug adapters
and extension cords.
Intended use
The ground wire must be connected;
the electrical system must meet the
standards set by local safety laws and
regulations.
The machine must be installed by
authorizedandqualifedpersonnel.
Check that the machine components
have suffered no damage during shipping.
In the case defects or abnormalities are
found, abort the installation and request
a replacement.
This grinder dispenser has been
designed for professional use by trained
personnel.
The grinder/dispenser must be used
only for the application for which it was
designed; that is, grinding roasted coffee
beans. Any other use are considered
improper and potentially dangerous.
The manufacturer shall not be held
responsible for damages deriving from
improper or erroneous use of the
machine.
The appliance must not be used by
children or people with reduced,
physical, sensorial or mental abilities.
It must also never be used by people
The machine is not designed for use in
environmental conditions outside the
-5 °C to +40 °C range.
The user must respect the general safety
regulations in force in the country in
which the machine is installed and shall
be responsible for ensuring that periodic
machine maintenance is correctly done.
The persons installing and using the
machine and doing machine maintenance
shall inform the manufacturer of any
defects or damages due to wear that
might jeopardize the original safety
features of the machine.
The installer shall be responsible for
checking that the machine is installed
without the necessary skills and
experience unless under supervision or
during training.
Do not allow children to play with this
equipment at any time.
6
and operated in a suitable environmental
condition thus not creating health
or safety hazards for those using the
machine.
Page 7
R
NOTIFICATIONS
Any responsibility deriving from
components manufactured and installed
on the machine shall be assumed by the
respective manufacturers; responsibility
attributable to the persons authorized
to use the machine shall be assumed by
the customer.
Note.
i
Machines with the “EL MOTOR WITH THERMAL PROTECTION” sign are equipped
with a device which protects the motor from overheating.
When this device is activated, do not attempt to operate the machine: isolate the machine
from the power supply and eliminate the cause of the problem before re-starting.
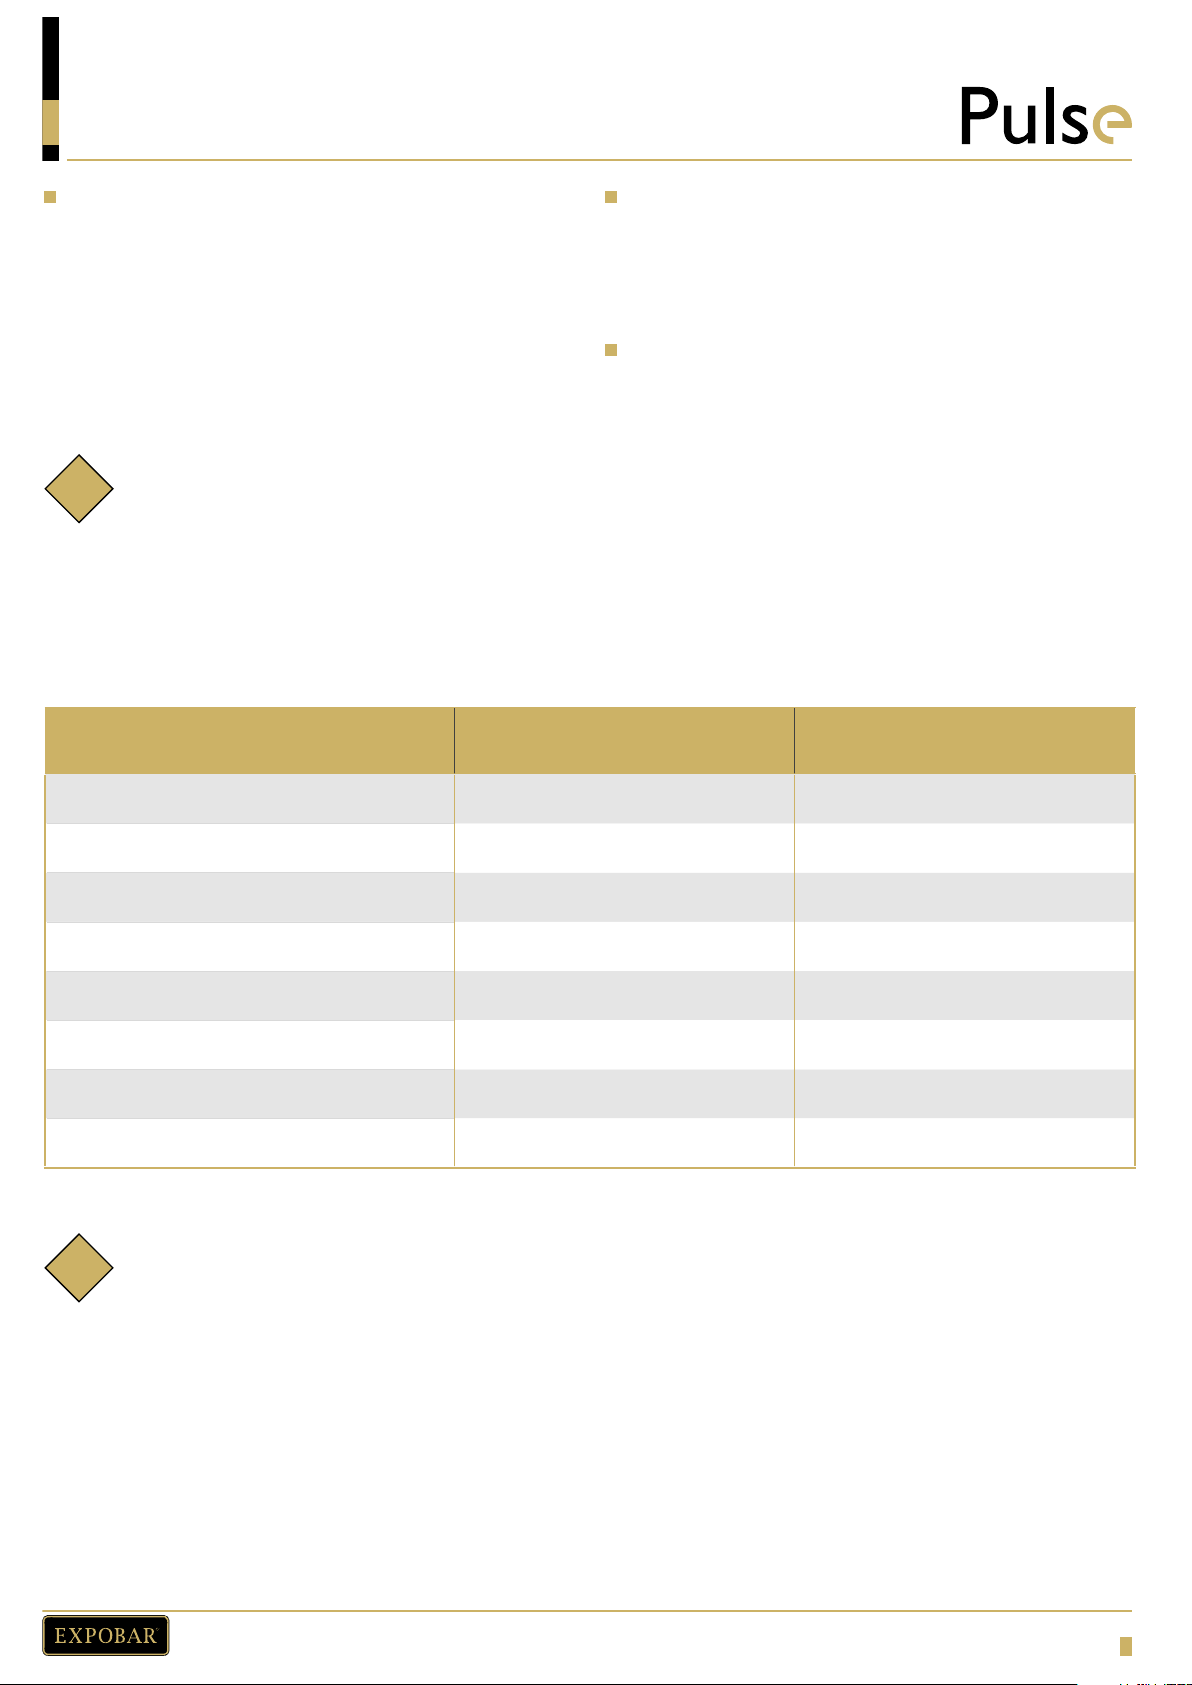
DESCRIPTION PULSE 65
The machine is designed for 24-hour
intermittent service. The machine
components are designed and built to
ensure at least 1000 hours’ operation.
Good cleaning and maintenance also
contribute to ensure long machine life.
PULSE 75
HIGH SPEED
Voltage (V) 220/240 110/120 220/240 110/120
Frequency (Hz) 50/60 60 50/60 60
Current (A) _ _ 4 _ _ 6,2
Power consumption (W) 350 900
Motor power (W)* 246 250
RPM
Productivity (g/s) 2,7/3,7 4,5/5,5
Weight when empty (kg) 11,5 11,5
(*) The value given is for the actual revolutions of the grinding discs.
1290 1650 1400 1700
Note:
i
In order to identify the appliance, read the code after “MATRICOLA” (serial number) on the label
applied on this manual or on the appliance itself and select the corresponding voltage.
7
Page 8
R
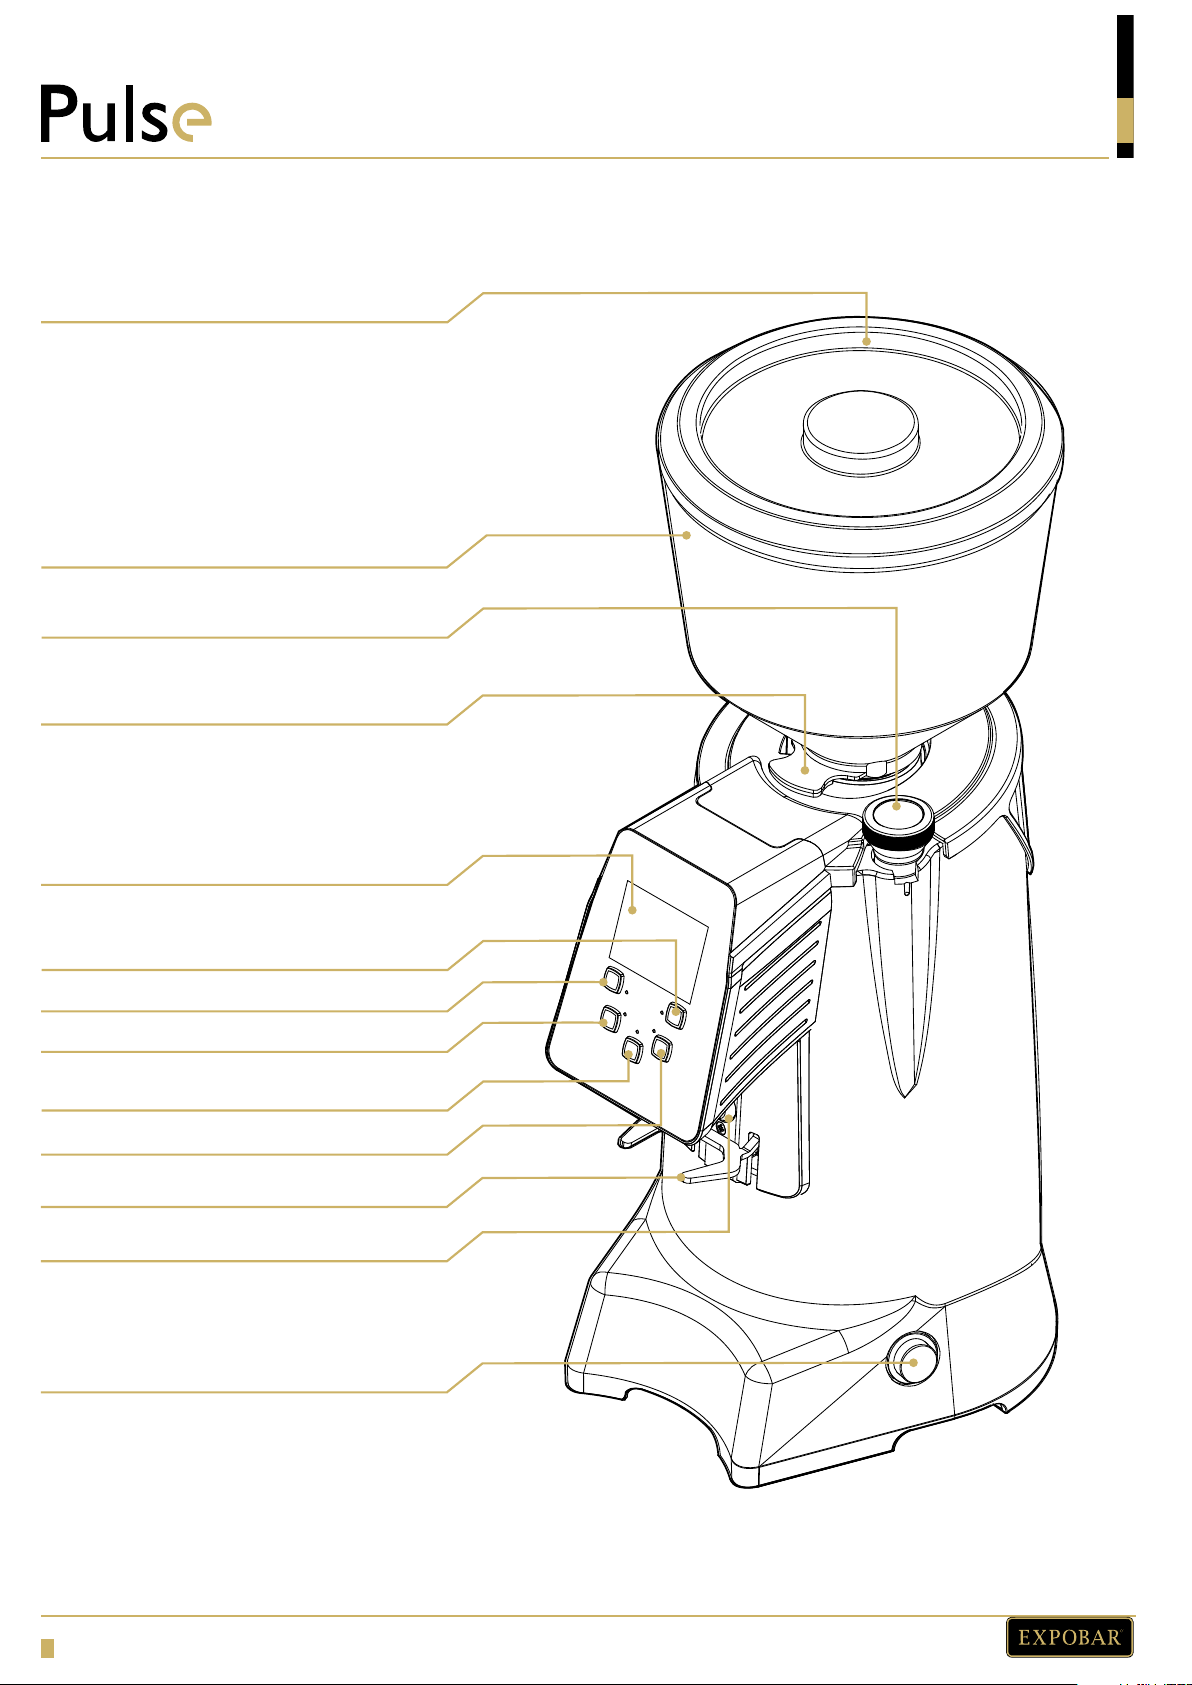
Hopper lid
Bean hopper
Grinding adjustment knob
Tab to open/close the hopper
OVERVIEW OF COMPONENTS
LCD display
Increasing key
Decreasing key
1 coffee dose key
Manual grinding key
2 coffee doses key
Filter folder fork
Grinding start key
ON/OFF switch
8
Page 9
R
DIMENSION SKETCH
INSTALLATION AND START-UP
Positioning
L H Z
221 mm 554 mm 264 mm
MIN. 10 cm
H
i
L
The minimum dimensions for the place of the machine must be 230 mm wide x 270 mm depth x 600 mm high.
Positionthemachineonafatandstablesurface, awayfromwaterandsourcesofheat.
It should be located in a dry environment, since excessive humidity will affect the machine negatively.
Donotcoverthemachinewithplasticflmorcloths.
Z
Make sure that air is able to circulate behind
the machine (minimum 10 cm).
Electrical connection
Only connect the machine to a grounded power supply.
Check the correct voltage and frequency on the technical data plate.
Note:
9
Page 10
R
〳〴〵
〶
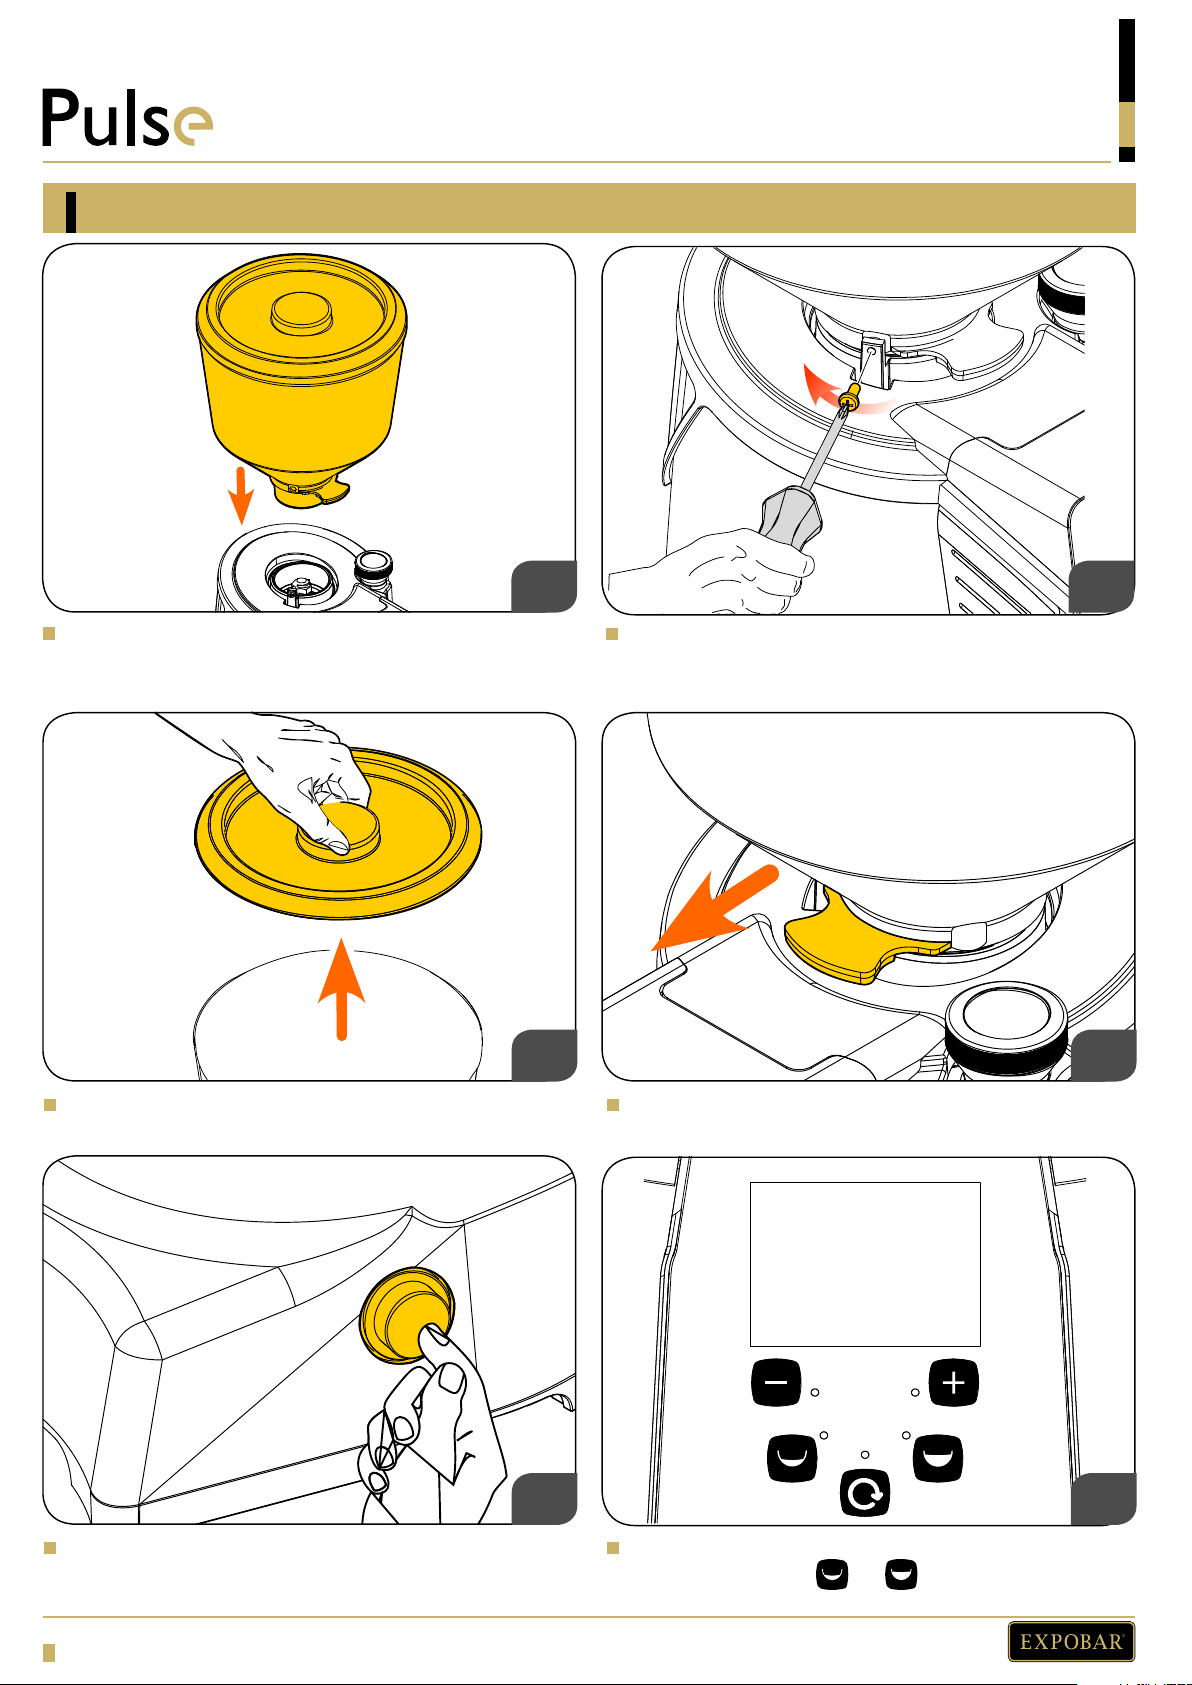
Starting the grinder
〱
〲
INSTALLATION AND START-UP
Insert the hopper into its seat; positioning it so that
the hole lines up with the screw on the back part of
grinder.
Remove the cover from the hopper and fll it with
coffee beans.
Tighten the lock screw.
Connect the machine to the mains socket and pull the
tab at the bottom of the hopper to open it.
After havingflled thehopper,switchONthegrinderonthe
ON/OFF switch.
10
Select single or double dose by pressing the
corresponding keys or .
Page 11
R
INSTALLATION AND START-UP
〷
Increase Decrease
OPERATION
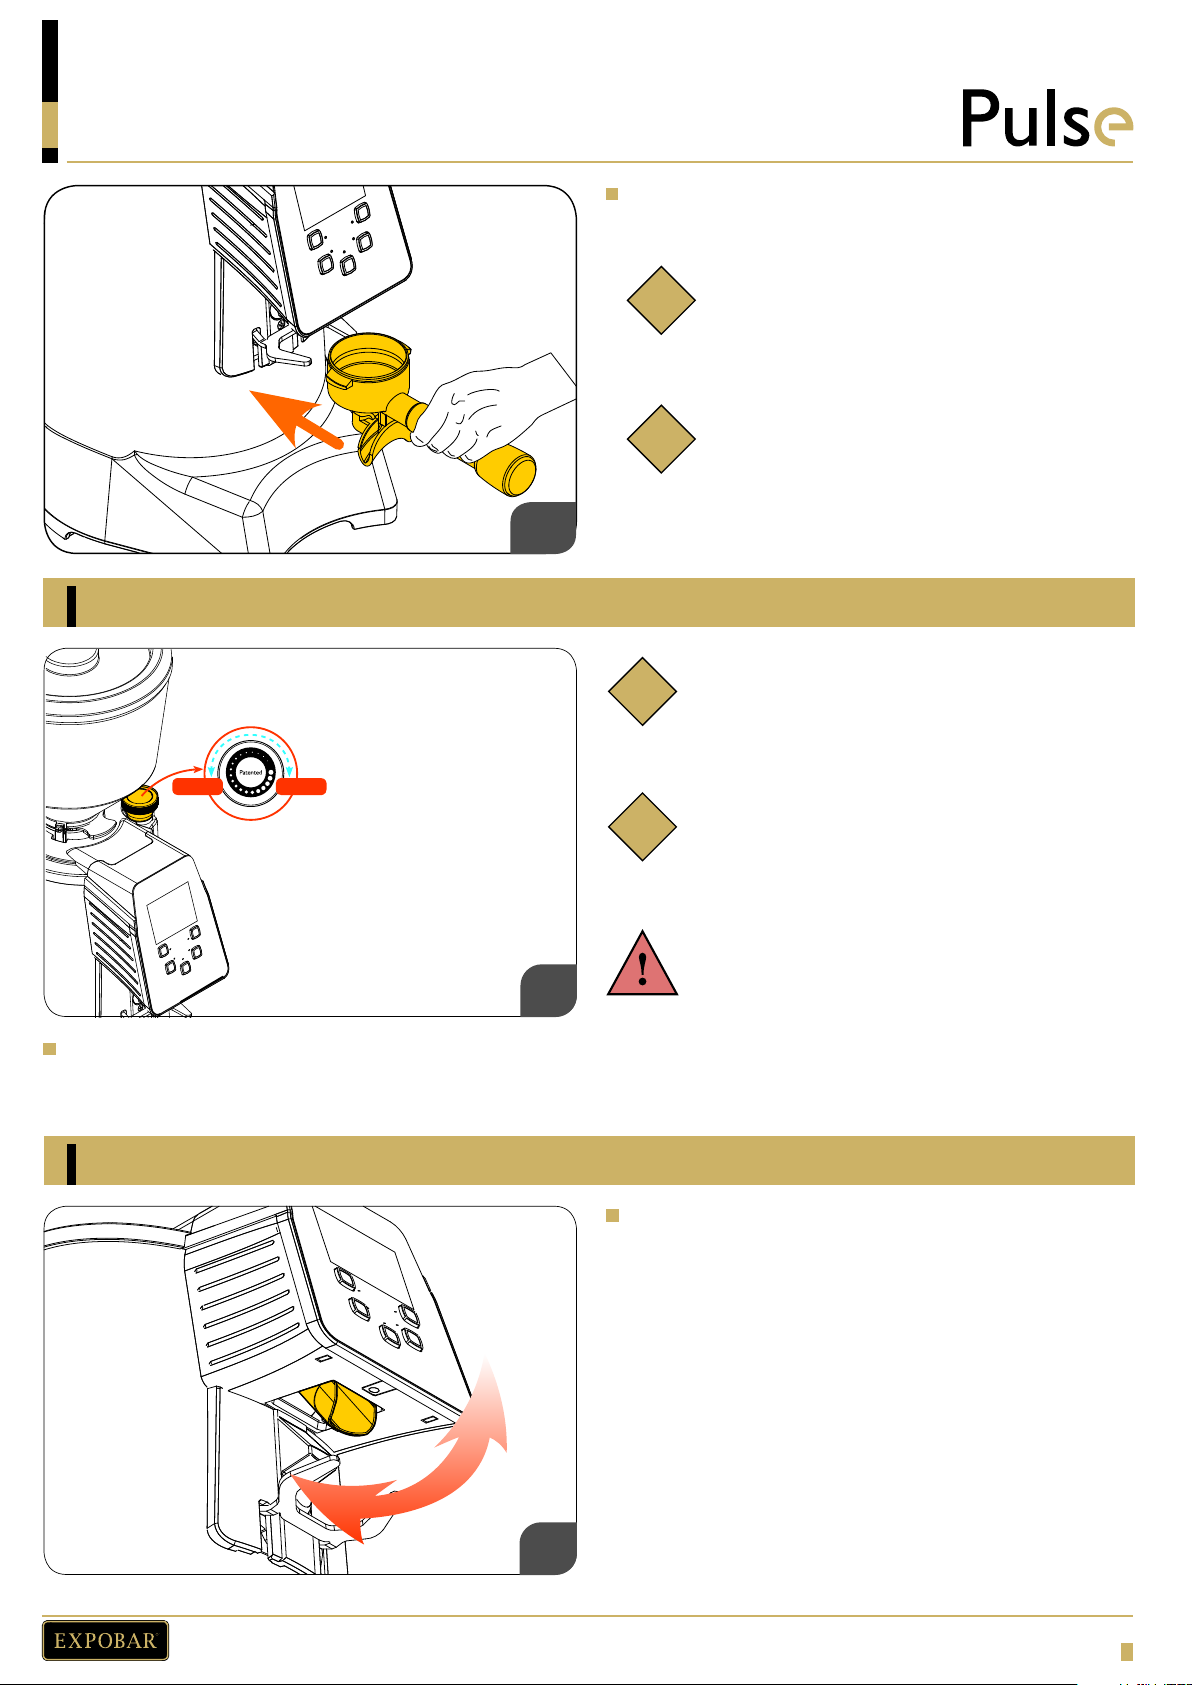
Place the flter holder onto the fork and insert it
againsttheflterholderrestraint.
Grinderfnenessadjustment
i
Dispensing stops once the preset time has
elapsed.
Note:
Note:
i
Theapplianceisequippedwithaflter holder
retaining device.
Note:
i
Turn the adjusting knob clockwise to increase
grinding fneness or counter-clockwise to
increase the grain size.
Note:
i
This setting is stepless and needs to be
gradually changed. Grind some coffee between
every two notches change.
01
Use the grinding adjustment knob to set the grinding
fneness.
Spout orientation adjustment dispensing
Adjust the orientation of the dispensing spout to suit
WARNING!
If the knob is rotated one turn with a stationary
motor, the grinder may stop.
theflterholderused.
01
11
Page 12
R
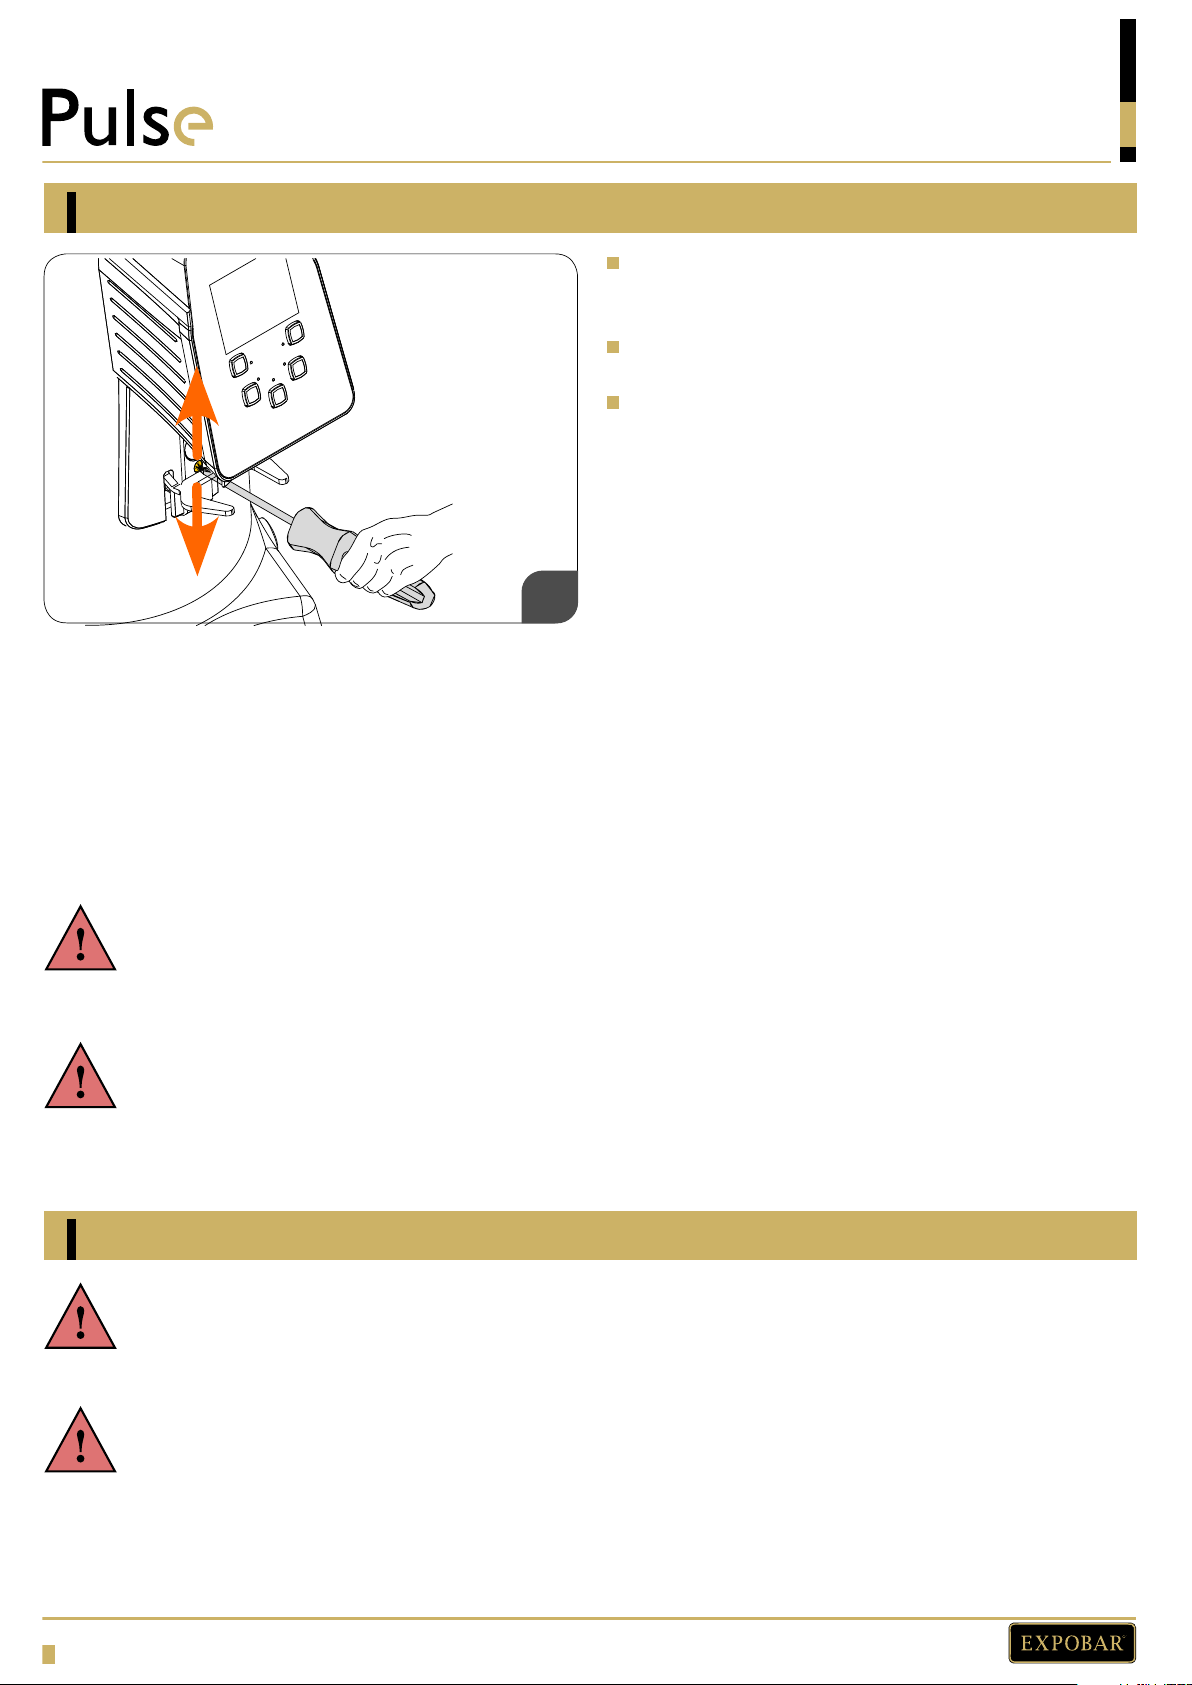
Filter holder fork height adjustment
01
OPERATION
CLEANING AND CARE
Use a screwdriver to loosen the fastening screw on the
flter holderforkItisrecommendednottounscrew
the screw completely.
Raise or lower the fork in order to adjust it according
toflterholderused.
Once having set the correct position, tighten the fork
fastening screw.
Cleaning is fundamentally important to the good operation of the grinder and doser.
Neglecting to clean the grinder and doser will allow aromatic oil substances from the coffee to turn rancid which will
have a negative effect on coffee taste. A lack of proper cleaning will also impair the precision of the grinder causing
irregular grinding size and doses.
Before cleaning, make sure that the appliance is disconnected from the mains power.
WARNING!
Always unplug the appliance from the mains power supply before carrying out any cleaning or maintenance operation.
WARNING!
Never pull on the power cord or the appliance when removing the plug from the mains power socket.
Maintenance of the grinder
WARNING!
Maintenance operations must only be performed by qualifed service engineer s, author ised to perform such operations
by the manufacturer.
WARNING!
Never perform makeshift or precarious repairs and never use non-original spare parts.
For good appliance operation, it is necessary to check and if required, replace the grinders burrs for every 350 kg of
coffee grinded.
12
Page 13
R
〱
CLEANING AND CARE
〱
〲
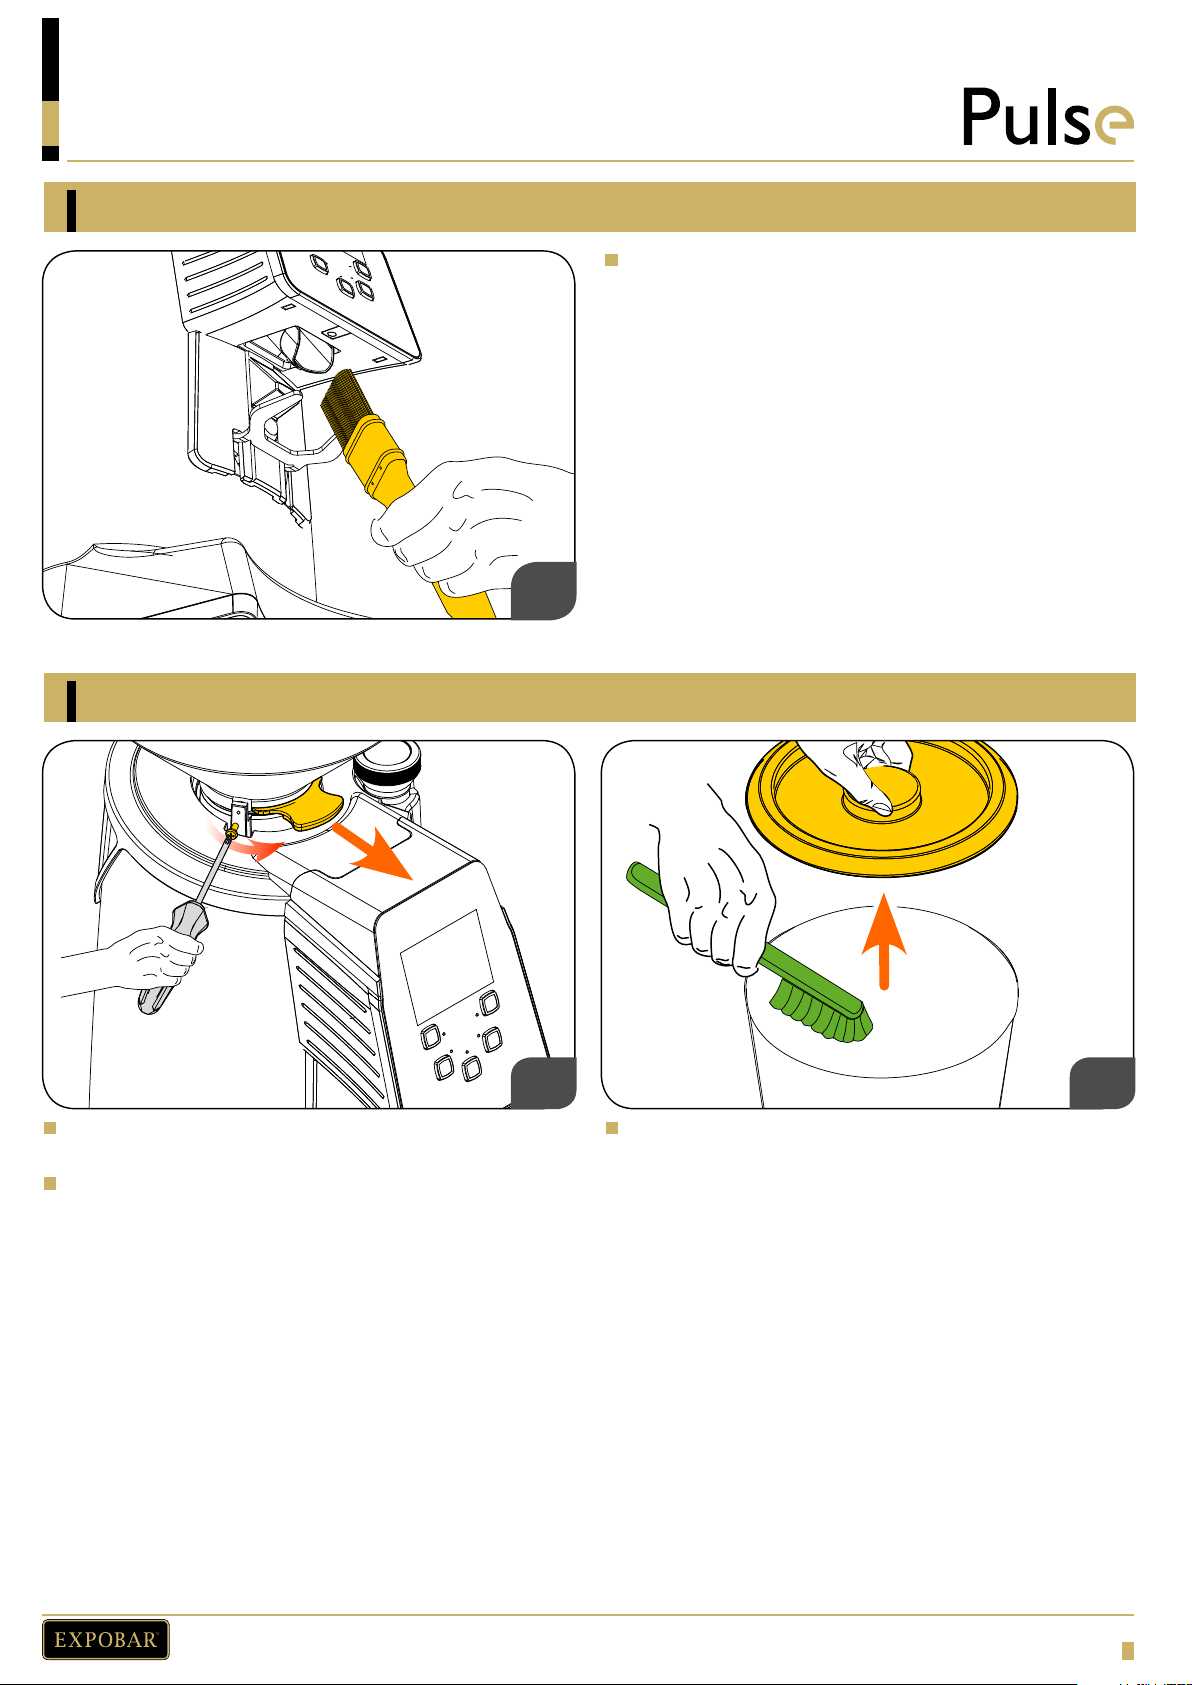
Daily cleaning - clean the dispensing spout
Clean the dispensing spout using a brush.
Weekly cleaning - bean hopper
Close the hopper by pulling the tab then loosen the
fastening screw on the side.
Use a clean cloth to wipe away oil from the inside of
the hopper.
Lift the lid and clean with a brush.
13
Page 14
R
1°
2°
〳
2°
1°
〴
CLEANING AND CARE
〵
〶
〱
〲
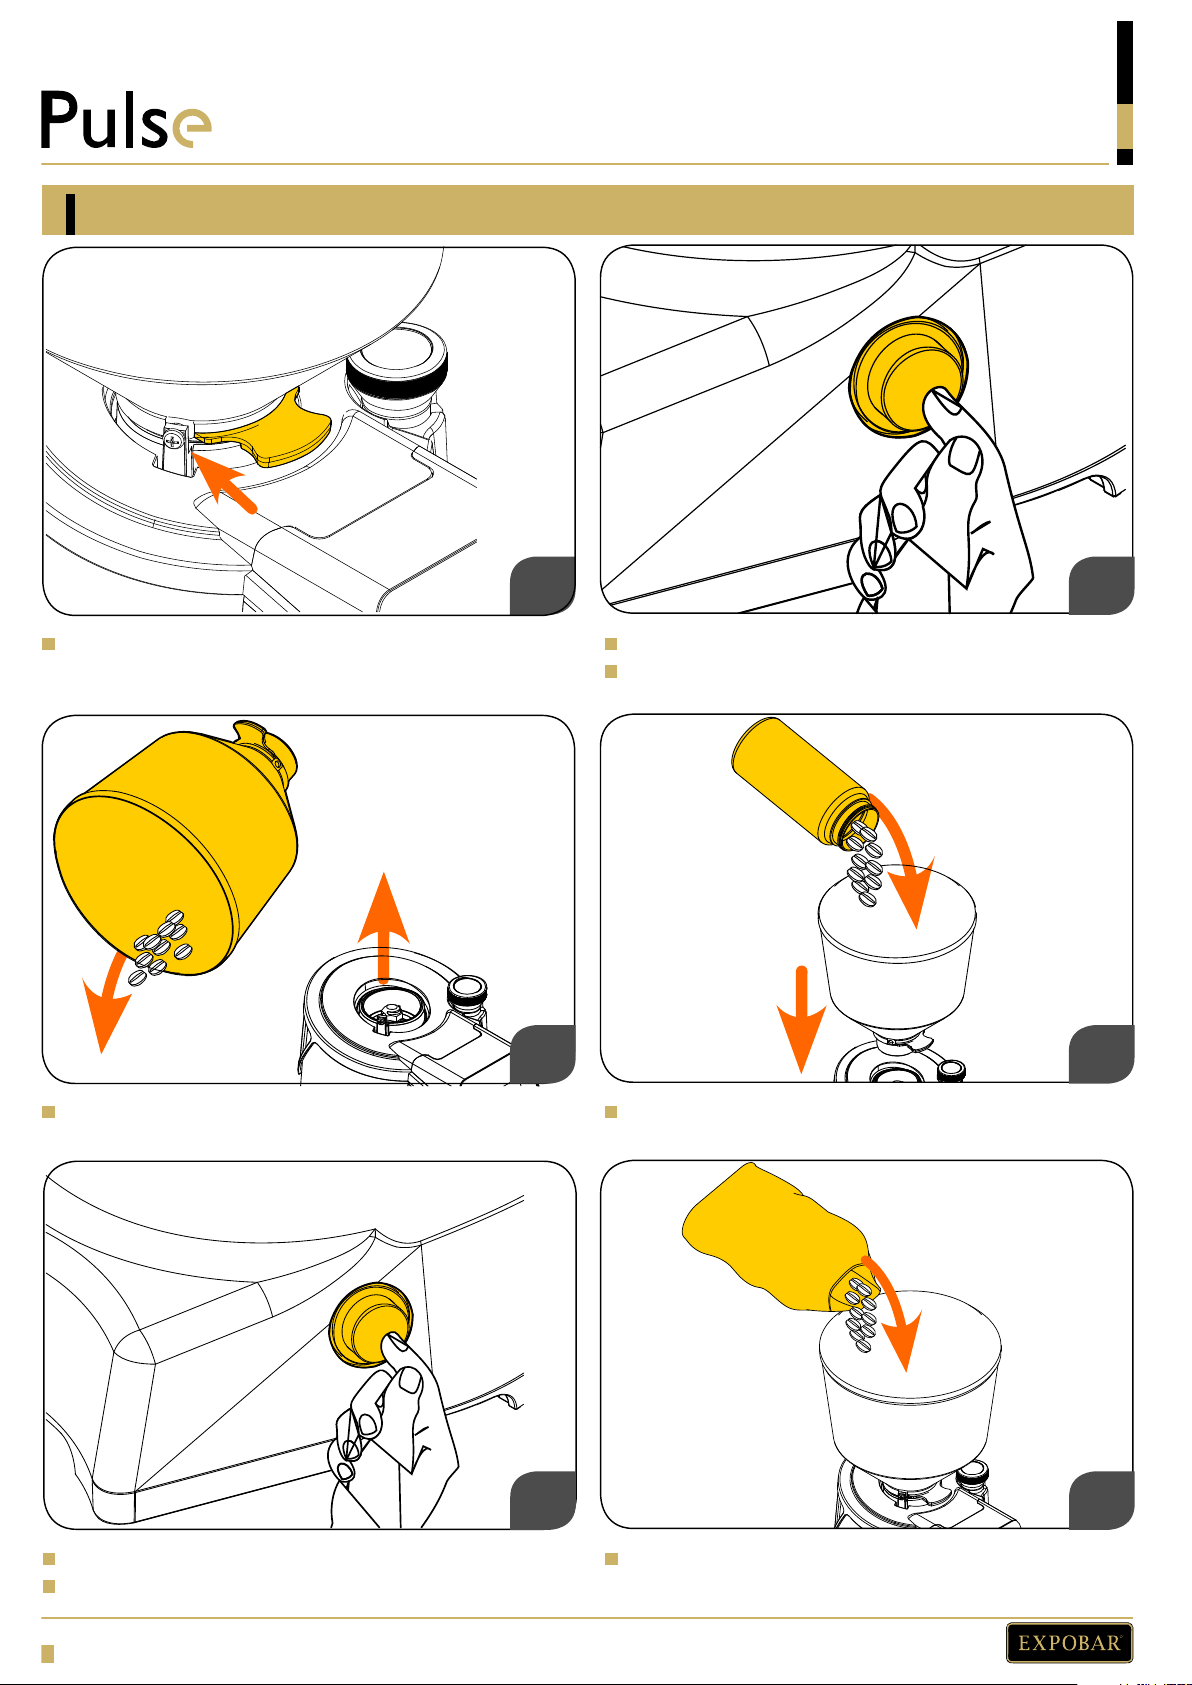
Weekly cleaning - clean with Grindz
Close the bean stop in bottom of the bean hopper. Start grinder by pressing the ON/OFF switch.
Run grinder until no more espresso comes out of the
grinder outlet.
Turn OFF the grinder, remove the bean hopper and
pour out the remaining coffee beans.
Start the grinder again by pushing the grinder start key.
Run until no more cleaning espresso come out of the grinder.
14
Reassemble bean hopper and fll with one cap of
Grindz cleaning tablets and reopen bean stop.
Refllthebeanhopperwithfreshcoffeebeans.
Page 15
R
CLEANING AND CARE
PROGRAMMING
GrindtwoorthreeservingsofespressotofushthegrinderandoutletofanyremainingGRINDZresidues.
Do not use these servings for brewing!
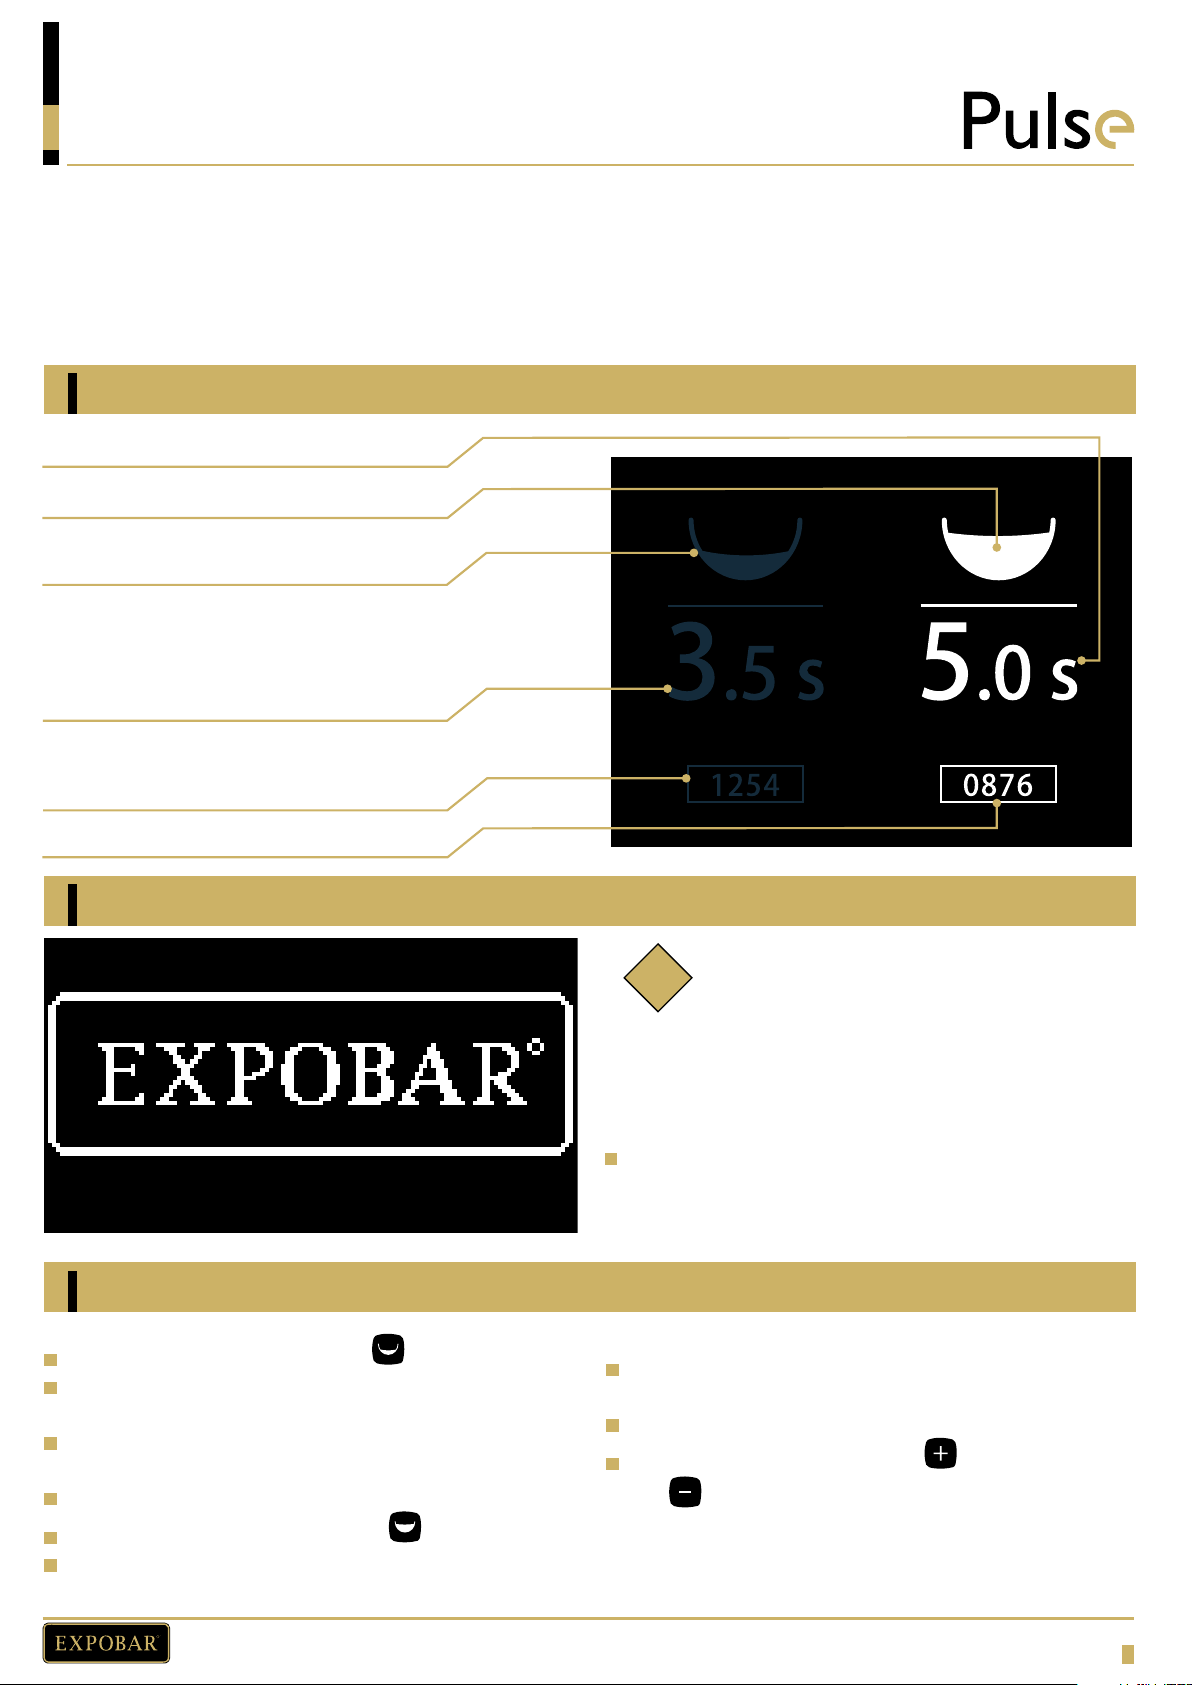
Grinder setting
2 coffee doses dispensing time
2 coffee doses icon
1 coffee dose icon
1 coffee dose dispensing time
1 coffee dose counter
2 coffee doses counter
Appliance switch-on
i
When switching the appliance on, the following screen
is shown for a few seconds.
When switching the appliance on for the
frst time it is confgured with factory
settings. Change of settings will be
automatically saved and user defned
settings will be loaded automatically if the
grinder is restarted.
Note:
Dose dispensing and setting (display)
By pressing the key for one dose this icon lights up.
By pressing the grinding start key, dispensing and
countdown until zero are started.
Once dispensing is completed, the countdown zero
returns to its set value for a new grinding.
The single dose counter is increased of 1.
By pressing the key for two doses this icon lights.
By pressing the grinding start key, dispensing and
countdown until zero are started.
Once dispensing is completed, the countdown zero
returns to its set value for a new grinding.
The double dose counter is increased of 1.
By pressing the increasing key or the decreasing
key the dispensing time of the selected dose is
increased or decreased.
15
Page 16
R
PROGRAMMING
i
It’spossibletostoptheautomaticdispensingbeforeit’sfnished thegrindingtime.Duringdispensing,press
withtheflterholderthegrindingstartkeytomanuallystopdispensing:
Press the grinding start key to resume delivery for the remaining time.
Press the dose button (blinking) to stop dispensing. The grinding time returns to the set value.
“Manual Mode” dispensing mode activation
Note:
By pressing the manual mode is activated. To start
MANUAL MODE
dispensing:
Press to start dispensing and press it again to stop
dispensing.
Insert the flter holder until press the grinding start
key; remove the flter holder to release the grinding
start key and stop dispensing.
3.5 s
By pressing the keys or the appliance returns to
the relative dispensing mode.
Resetting dose counters
From the dispensing programmed doses screen, long press the button to reset partial counters of doses
delivered.
Function block
By pressing both keys and the time dispensing
setting in locked. On the display appear the lock icon.
Press again both keys and to unlock the
appliance functions.
Enter service menu
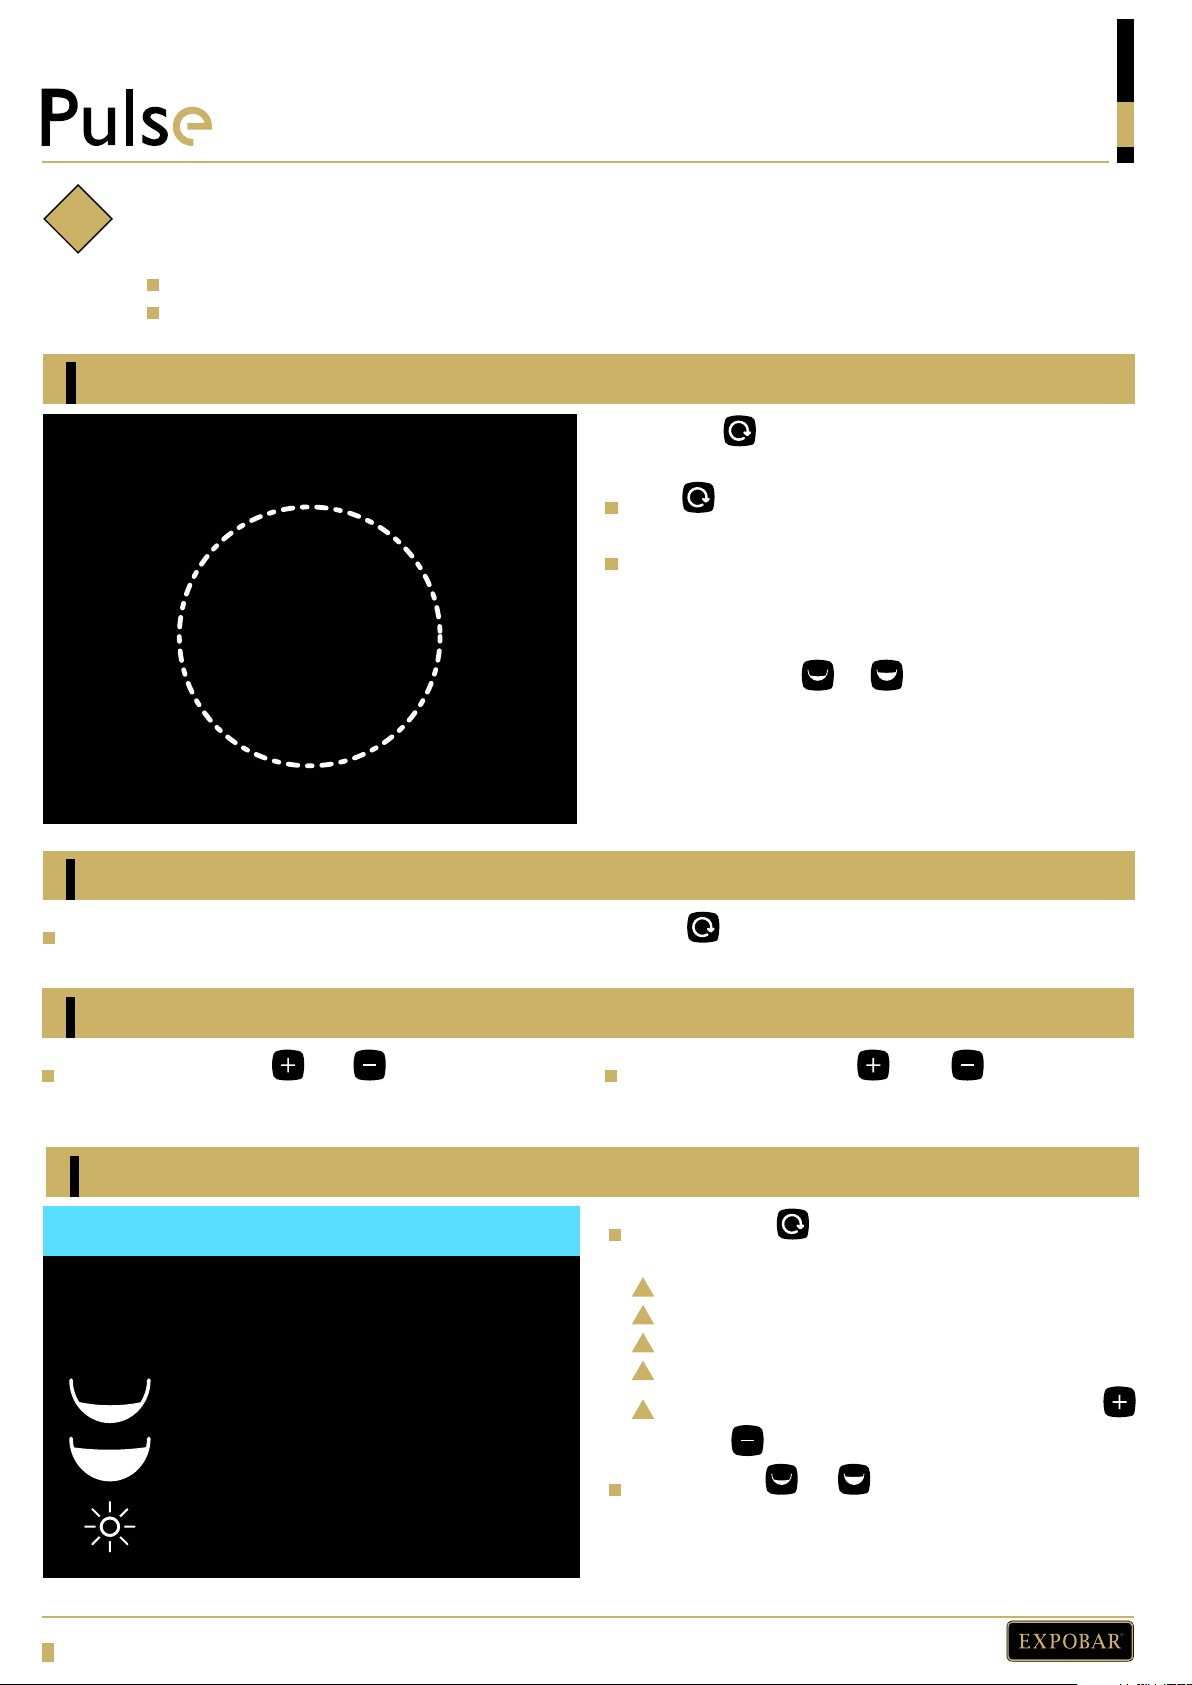
INFO
Model: PULSE
Firmware: X.XX
0
3
100% Time: 0
Press the key and switch on the appliance, to
access the following screen:
Appliance model.
Firmware version.
1 and 2 dose total counter (cannot be reset).
Counter total of manual grind time.
Display brightness, adjustable with the keys
and .
Press the key or to return to the dispensing
dose screen.
16
Page 17

R
For the warranty to be valid, the conditions for maintenance must have been followed in accordance with our
instructions, proper care must have been taken and any claim against the warranty must be sent without delay.
The equipment in question may not be used while awaiting service if there is any risk that the damage or defect
would worsen. The warranty will not cover problems associated with incorrect voltages or supplies related to normal
maintenance such as grinder burrs. The warranty will not cover damages or defects caused by the incorrect handling
and operation of the appliance.
Para que la garantía sea válida, deben haberse seguido las condiciones de mantenimiento de acuerdo con nuestras
instrucciones, deben haberse prestado los cuidados adecuados y cualquier reclamación deberá enviarse sin retraso.
El equipo en cuestión no podrá ser usado mientras se espera la realización del mantenimiento si hubiera algún riesgo
de causar daños o si el defecto pudiera empeorar. La garantía no cubre problemas asociados con tensiones incorrectas
o cuestiones relacionadas con el mantenimiento normal, como rebabas del molinillo. La garantía no cubrirá daños o
defectos causados por un uso incorrecto de la aplicación.
MADE IN ITALY FOR CREM INTERNATIONAL BY
CONTIV ALERIO S.R.L.
Via Luigi Longo 39/41 - SESTO FIORENTINO (FI) ITALY
Post Code: 50019
TECHNICAL SERVICE
Please contact your supplier
Your Dealer
www.creminternational.com
 Loading...