

Page 1
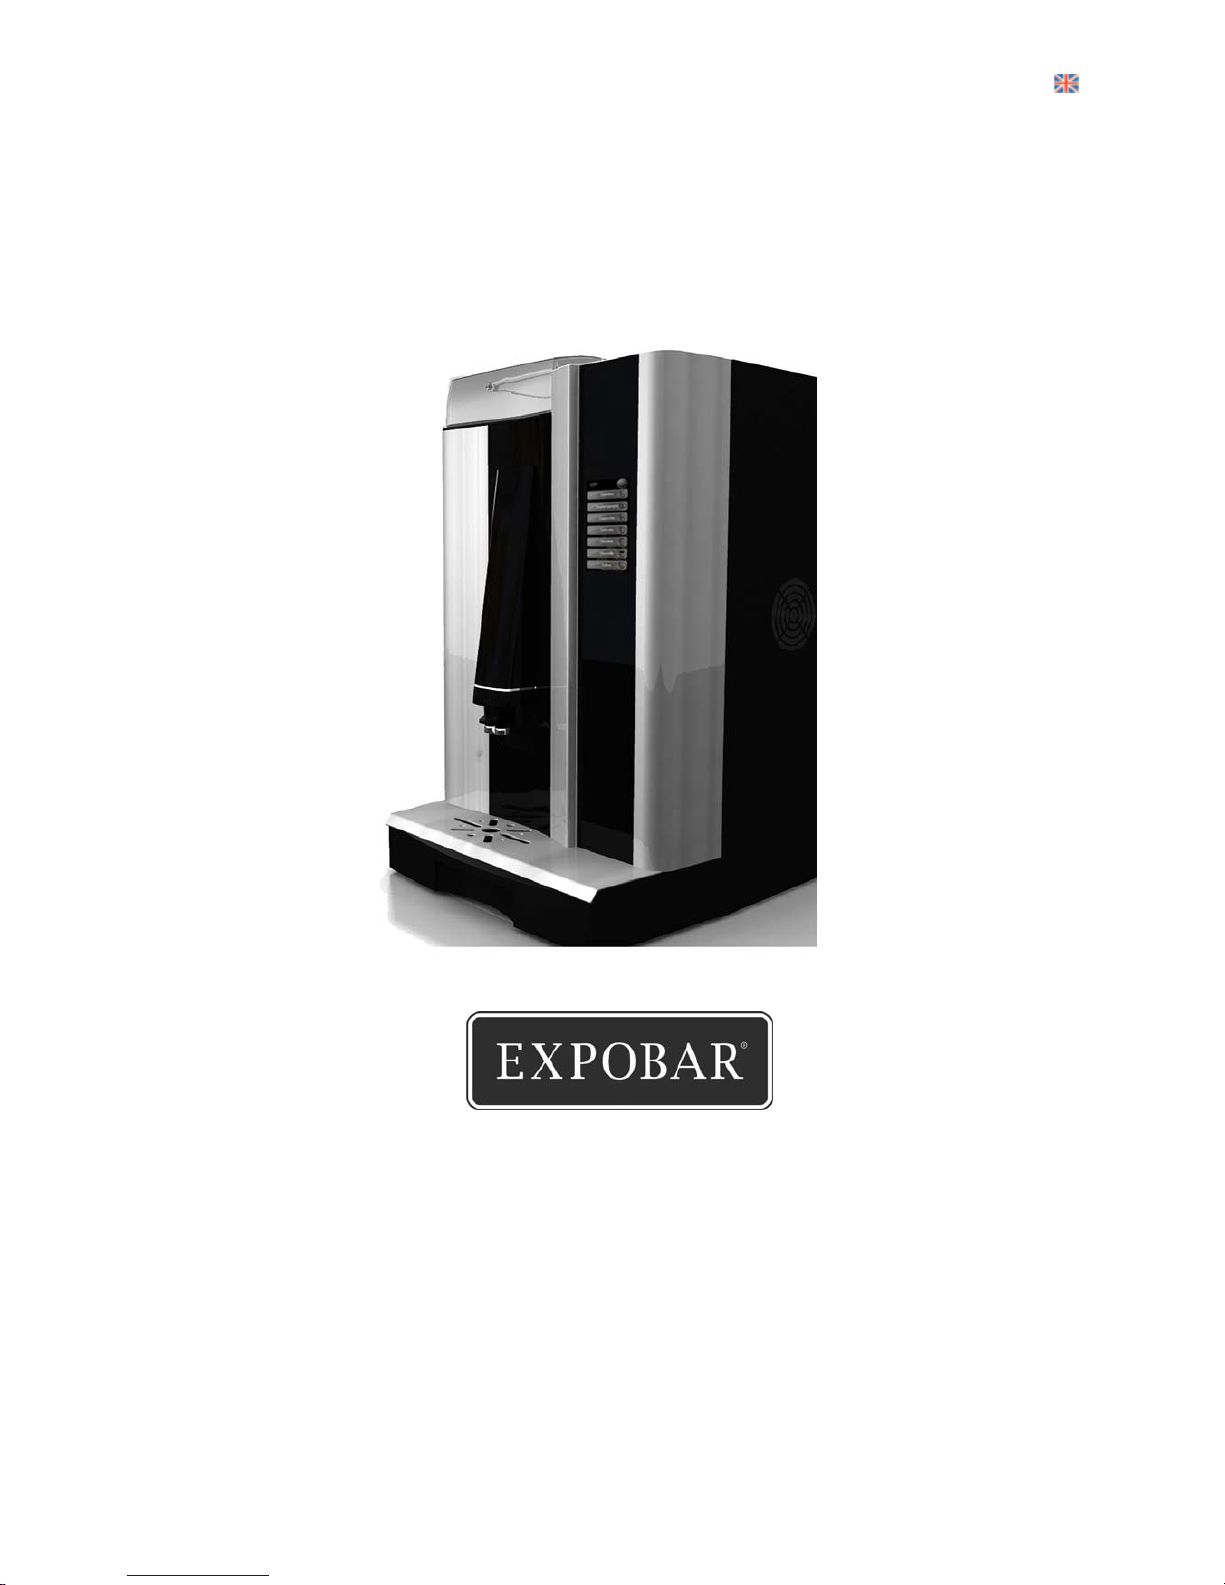
BRILLIANCE User Manual / EN
Article no. 1730058 Rev. 090506
CREM International AB
Box 960, 671 29 ARVIKA (Suecia)
Tel.:
:
+46 (0)570-477 00; Fax: +46 (0)570-47719
[email protected] www.creminternational.com
Page 2

Brilliance Manual
Page 2
1 INDEX
1 INDEX ........................................................................................................................................2
2 MACHINE DESCRIPTION: ...................................................................................................4
2.1 FRONT AND SIDE................................................................................................................... 4
2.2 REAR SIDE &OPEN DOOR VIEW.............................................................................................5
3 MACHINE INSTALLATION..................................................................................................5
3.1 SUITABLE LOCATIONS........................................................................................................... 5
3.2 WATER CONNECTION............................................................................................................5
3.3 E
LECTRICAL CONNECTION.................................................................................................... 6
3.4 I
NITIALIZATION..................................................................................................................... 6
3.5 WATER SOFTENER ................................................................................................................ 6
4 INTERFACE: ............................................................................................................................6
4.1 BUTTONS .............................................................................................................................. 6
5 TECHNICAL PROGRAMMING............................................................................................ 7
5.1 GETTING INTO THE SETTINGS MENU...................................................................................... 7
5.2 NOTE ....................................................................................................................................7
5.3 GENERAL SCHEME OF THE SETTINGS MENU.......................................................................... 7
5.4 INFO MENU......................................................................................................................... 8
5.5 MENU DOSES PROGRAM.......................................................................................................8
5.5.1 Doses Adjustment ........................................................................................................ 8
5.6 DOSES ADJUSTMENT TIME SCHEME ...................................................................................10
5.7 DOSES RECOMMENDATIONS (EXAMPLES): .......................................................................... 10
5.8 MACHINE PARAMETERS MENU........................................................................................... 11
5.8.1 Language:..................................................................................................................11
5.8.2 Boiler Temperature units...........................................................................................11
5.8.3 Boiler Temperature.................................................................................................... 11
5.8.4 Stand-by state ............................................................................................................ 11
5.8.5 Espresso group enabling/disabling...........................................................................12
5.8.6 Grounds counter........................................................................................................ 12
5.8.7 Pre-infusion...............................................................................................................12
5.8.8 Pre-grinding / extra speed.........................................................................................12
5.8.9 Keyboard number inversion ...................................................................................... 13
5.8.10 Smart Card enabling ................................................................................................. 13
5.9 COIN BOX MENU.................................................................................................................13
5.9.1 Coin Box enabling / disabling...................................................................................13
5.9.2 Number of decimals in pricing .................................................................................. 13
5.9.3 Prices setting ............................................................................................................. 14
5.9.4 Coin value (lines) setting...........................................................................................14
5.10 RINSING..............................................................................................................................14
5.11 EMPTYING AIRBREAK ......................................................................................................... 14
5.12 FULL SCHEME OF THE SETTINGS MENU..............................................................................15
6 MACHINE FUNCTION......................................................................................................... 17
6.1 S
TART UP PROCESS ............................................................................................................. 17
Page 3

Brilliance Manual
Page 3
6.2 GRINDER ADJUSTER............................................................................................................ 17
6.3 GRINDED COFFEE DOSER ADJUSTMENT ...............................................................................17
6.4 FILLING CANISTERS ............................................................................................................ 18
6.5 FILLING COFFEE HOPPER....................................................................................................18
7 HYGIENE AND MAINTENANCE....................................................................................... 19
7.1 CLEANING........................................................................................................................... 19
7.2 CLEANING THE MIXING SYSTEM.......................................................................................... 19
7.3 REASSEMBLY OF MIXER SYSTEM......................................................................................... 20
7.4 REMOVING THE ESPRESSO GROUP....................................................................................... 21
7.4.1 Push down Spout holder................................................................................................ 21
7.4.2 Release the espresso conduct .................................................................................... 21
7.4.3 Release the Holding Hooks........................................................................................ 21
7.4.4 Remove the group.......................................................................................................... 21
7.5 RE-ASSEMBLING THE COFFEE GROUP IN PLACE................................................................... 22
7.6 CLEANING THE GROUP........................................................................................................ 22
7.7 REMOVING THE DRIP TRAY .................................................................................................24
7.8 REMOVING THE GROUNDS TRAY ......................................................................................... 24
7.9 CLEANING THE MACHINE.................................................................................................... 25
7.9.1 Outside cleaning;........................................................................................................... 25
7.9.2 Inside cleaning........................................................................................................... 25
8 CARD READER......................................................................................................................25
8.1 NEW SMART CARDS & DATA SMARTCARDS:..................................................................... 26
8.1.1 Money SmartCard...................................................................................................... 26
8.1.2 Free services..............................................................................................................26
8.2 RS232 ................................................................................................................................ 26
9 ALARMS & DISPLAY MESSAGES....................................................................................27
9.1 TEMPORARY WARNINGS & MESSAGES ................................................................................27
9.1.1 Insuff. Credit..............................................................................................................27
9.1.2 Empty Coffee Tray..................................................................................................... 27
9.1.3 Alarm Coffee Tray .....................................................................................................27
9.1.4 Take Cup....................................................................................................................27
9.1.5 Please wait Boiler FillingUp.....................................................................................27
9.2 F
IXED ALARMS ................................................................................................................... 27
9.2.1 “No Coffee”............................................................................................................... 27
9.2.2 Stop irregular cycle...................................................................................................28
9.2.3 T.Probe Unconnect....................................................................................................28
9.2.4 Time-out alarm Filling Up ........................................................................................ 28
9.2.5 No water .................................................................................................................... 28
9.2.6 Coffee doser error ..................................................................................................... 28
9.2.7 Security anti flooding................................................................................................. 28
9.2.8 Alarm temperature Boiler.......................................................................................... 28
9.3 WHAT TO DO IF................................................................................................................... 29
9.3.1 Outgoing speed of espresso decreases ...................................................................... 29
9.3.2 The mixer “clogs”.....................................................................................................29
9.3.3 Water under the machine........................................................................................... 29
9.4 R
EMARKS: ..........................................................................................................................29
Page 4
Brilliance Manual
Page 4
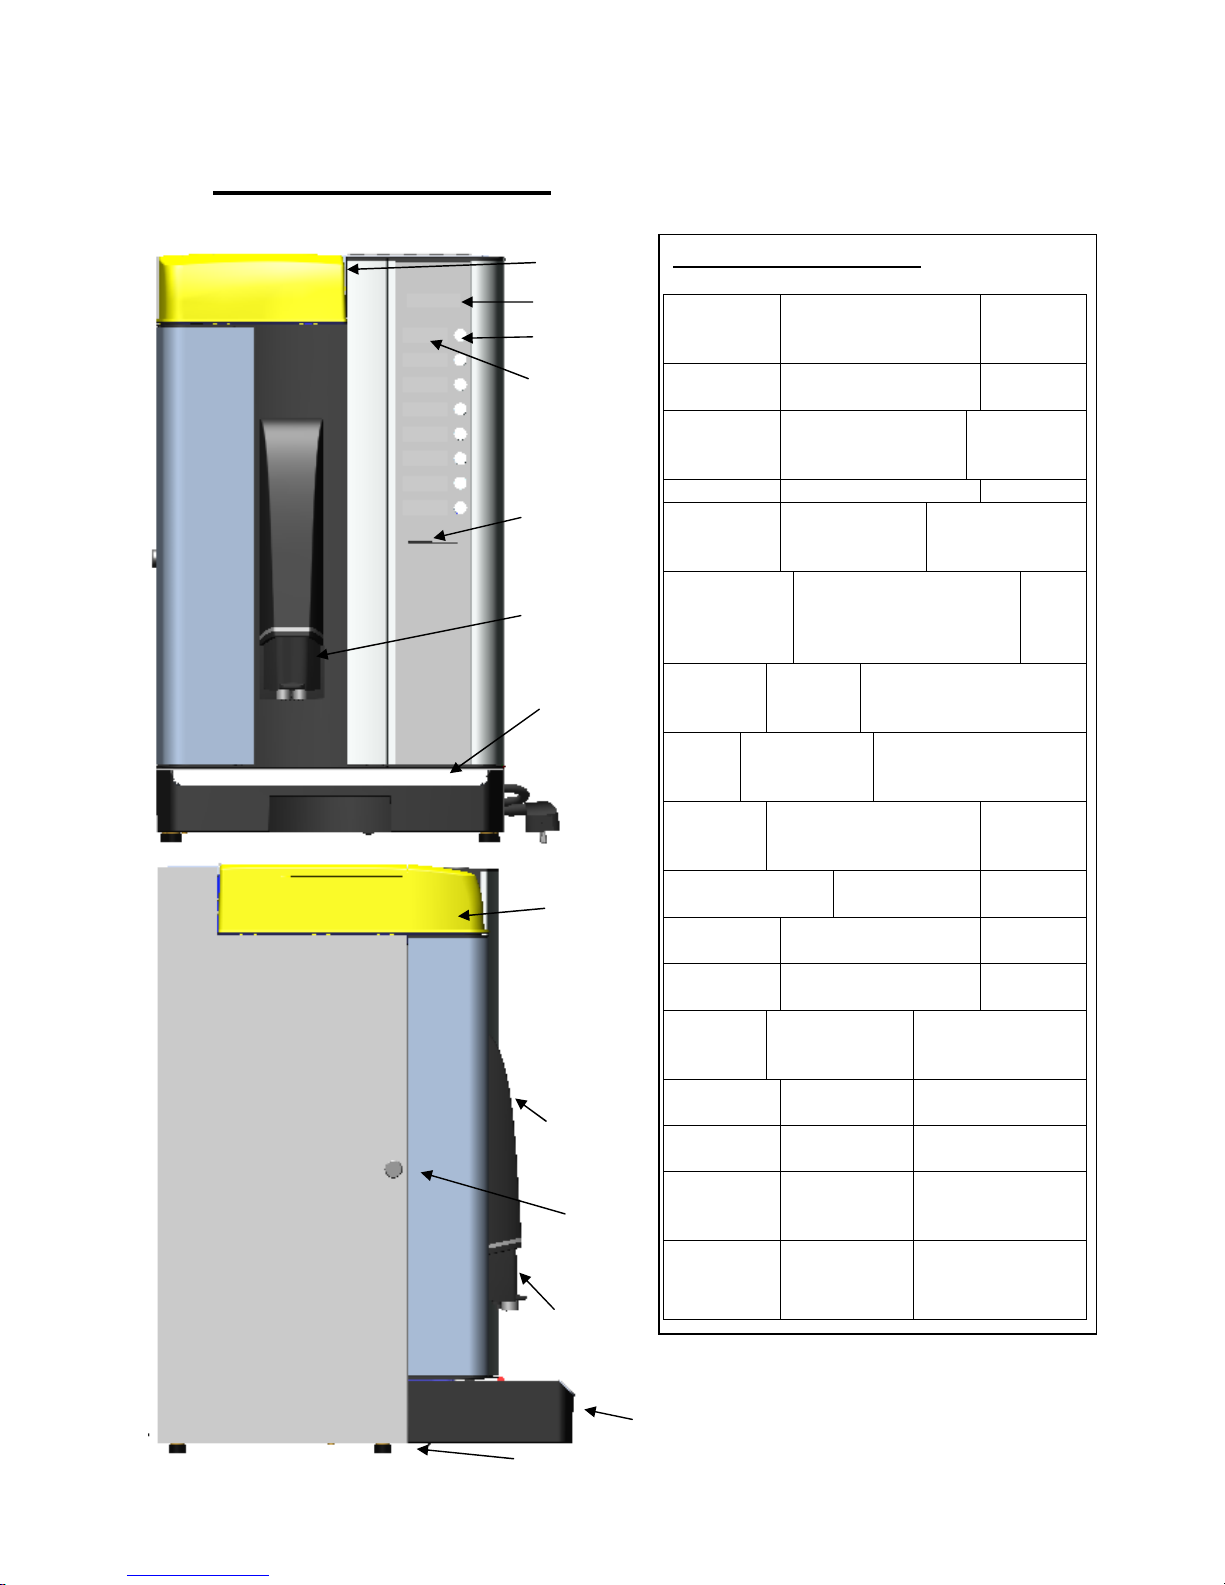
2 MACHINE DESCRIPTION:
2.1 Front and side
Technical characteristics:
Dimension Height
Width
Depth
664 mm
394 mm
474 mm
Weight Empty
Full
Kg 35
Kg 39
Water
connection
Connection
Incoming pressure
½”outside
thread
1,5 - 8 bars.
Internal deposit Electrical
Supply
Power supply
Power
230V~ 50Hz
16A
1250 W
Transformer Primary 230V +/- 10%
220VA
Sec. 18VAC VA / 26V
90VA / 30V 120VA
230V
50Hz
Grinder Voltage
Power
Fuse
240 VAC / 117 VAC
103W-(240VAC 0.46A)
- 110W-(117VAC 0.95A)
Pump Power supply
Power
pump
220V 50 Hz /117V 60Hz
50 W
Max 15 bar
Pressure
boiler
Heating element power
Content
Rise time
1000 W
0,7 Liter
2 minutes
Soluble products
gear motor
Power supply 24 V Dc
Mixing
Motor
Power Supply 24 V DC
Coffee
Dosage
Power Supply
Dosage
24V Dc
7-9 gr.
Water
tank
Capacity
Capacity Brita
Filter
Liter
~145L / 10° kH
Max 4 weeks
Coffee
Container
Capacity
Beans
~ 2 Kg
Chocolate
Container
Capacity
Chocolate
~ 1 kg
Milk/Toppi
ng
Container
Capacity
Topping/milk
powder
~ 0,6 kg
Payment Ready to
receive Coin
Validator
Open Collector
with a DIL 10
pins connector.
D
oor
Lock
Bean Hopper
Height-adjustable
Spouts
Driptray
Height-adjustable feets
Selection button
Product label
Display
Bean Hopper
Height-adjustable
Spouts
Driptray
Smart-Card Reader
Page 5
Brilliance Manual
Page 5
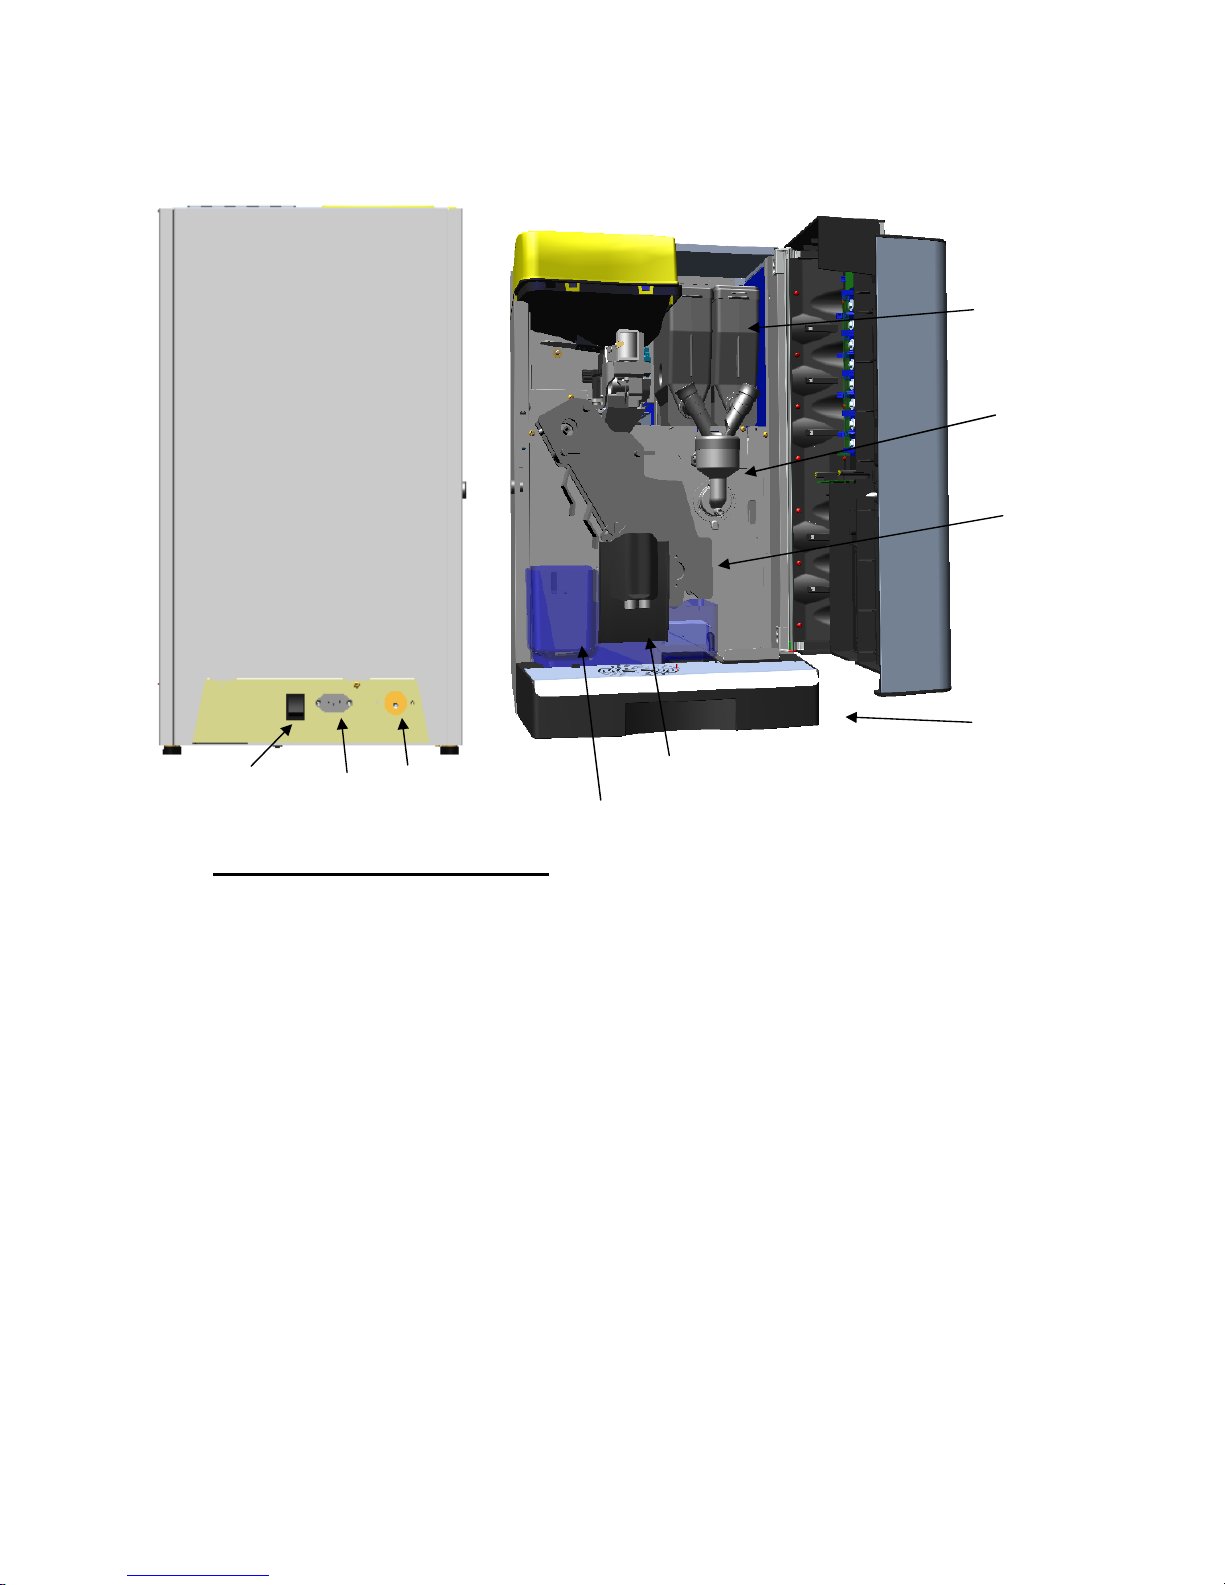
2.2 Rear side &Open door view
3 MACHINE INSTALLATION
3.1 Suitable locations
This distributor is not suitable for outdoors service.
The machine must be installed in dry locals, and should not be cleaned projecting water against it.
Machine should not be exposed to temperatures under 1ºC.
When installing the machine near a wall, make yourself sure that the door can be wide open and
ensure yourself as well, that the fan’s grill at the right side of the machine, is not covered.
Don’t ever cover the machine with plastic film or cloths.
3.2 Water connection
After unpacking the machine and placing the machine in its final location:
Level the machine by turning its rotating feets.
Connect the machine to a water inlet of drinkable water. We recommend to have a valve to cut the
water to the machine if necessary. Pressure arriving to the machine should be between 1,5 and 8
bars.
Make sure that the water hose not are kinked anywhere when machine is
pushed into place.
Note: It is advised, to split some water out of the water outlet being used, as to let possible dirt out
of it.
Water inlet
Electric inle
t
Main switch
Mixer Bowl
Espresso group
Soluble canisters
Height-adjustable Spouts
Driptray
Grounds container
Page 6
Brilliance Manual
Page 6
3.3 Electrical connection
Connect the machine to a grounded 230VAC 50Hz connection or a grounded
110VAC 60Hz connection (depending on the model); check the adequate
voltage and frequency at the back of the machine.
3.4 Initialization
When the machine is new received, its boiler is not completely full of water. And the Airbreak (a
small deposit open to air inside the machine) will be empty. So prior to normal service, the
machine’s system has to be filled up. As to do that; follow the next procedure:
1.- First, install the machine correctly in its final location.
2.- Connect the machine; and without waiting it to warm up, just press any selection that has
espresso on its recipe, or the selection for water for infusion; It is important to use one of these as
to really fill up the boiler; filling would not work as well with only soluble drinks.
3.- Repeat selecting an espresso / water for tea selection, till water comes out from the coffee or the
“water for tea”, nozzle. When this happens, boiler is ready.
3.5 Water softener
It is strongly recommended to use a water softener / filter to supply water to the machine. This will
remove estrange flavors from the water, and will avoid any limescale to build up and provoke
problems.
4 INTERFACE:
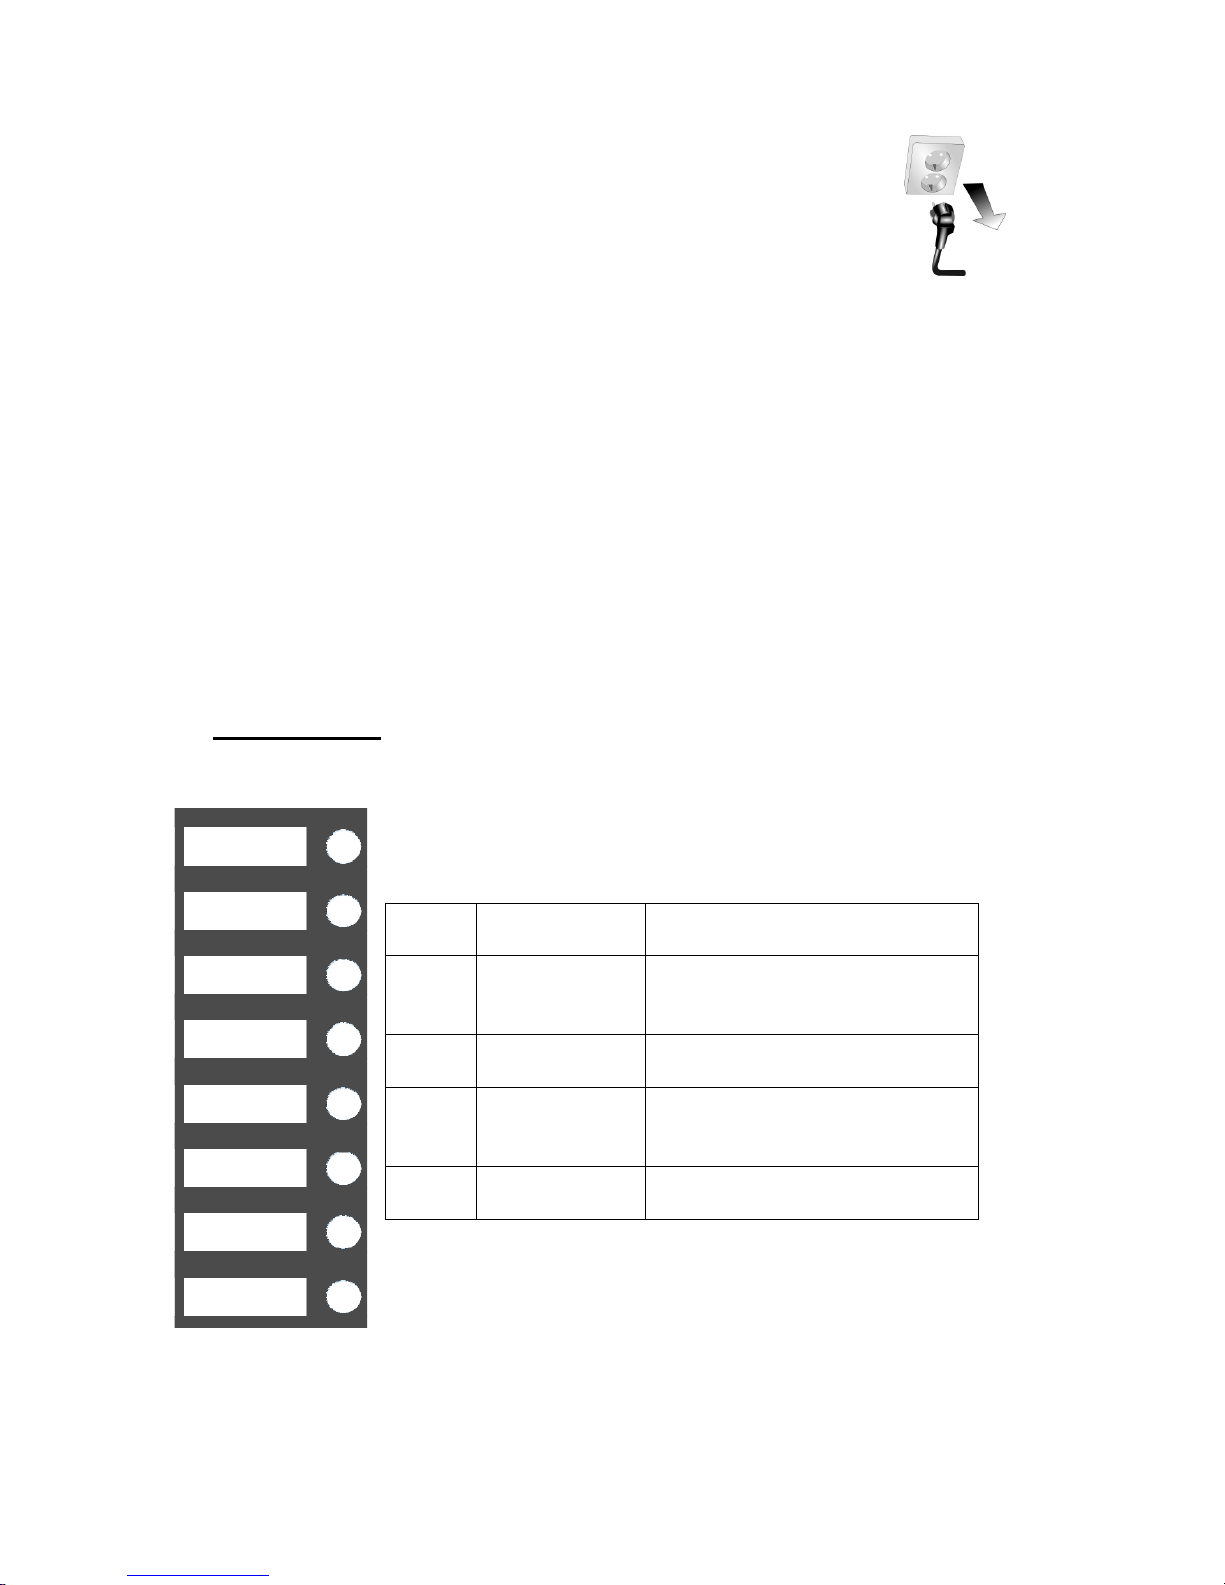
4.1 Buttons
Eight buttons are available as to select 8 different beverages.
Moreover, this buttons have some supplementary functions as below (while
in settings menu):
Button Supplementary
function
Function description
K1 - (Minus) Decreases the numerical value or
the selection of the option on the
screen on that moment
K2 Canc Exits the actual menu; on the main
menu, exits settings menu
K5 + (plus) Increases the numerical value or
the selection of the option on the
screen on that moment
K6 Enter Confirms the option on the screen
on that moment
Note: An option exists on the settings menu, that inverts the position of the
keys on the keyboard (see the keyboard number inversion section on this
manual). If the Keyboard is not responding as expected, check that this
option is not enabled.
-
+
Page 7

Brilliance Manual
Page 7
-
+
Canc
Enter
K1
K2
K3
K4
K5
K6
K7
K8
5 TECHNICAL PROGRAMMING
To set which button makes what on the machine, set prizing, and adjust different parameters of the
machine.
5.1 Getting into the settings menu
With the door open and
the power switched off,
hold buttons 1&5
pressed and connect the
power of the machine.
Wait for the display of
the machine to show
“info” (it will take 1
sec. Aprox.), then you
can release the 1 & 5
buttons. Now you are
in the settings menu.
Some times, it is hard
to maintain pressed
both buttons at the
same time. If when
trying to access the
settings menu, you get in the display “Please Wait” or
any other message than “INFO”, please begin again
from turning off the machine as to get into the
settings menu.
5.2 Note
On the following explanations we
will often represent the Screen of the
machine and the information shown
on it at each moment as follows:
A group of screens under a certain option,
to make a clearer scheme, will be shown as:
5.3 General Scheme of the
settings menu
Once entered the settings menu, the
first menu shown at the display is
the INFO menu:
Being in the Info menu, to proceed to the following
menu, we will have to push the “+” button. To return
to the previous menu, we will have to push the “-“
button. To get into the selected menu, press “enter”.
To go to the normal start up of the machine, just press
the “Cancel” button.
INFO
Normal Start up
+
INFO
Ca
DOSES
PROGRAM
-
MACHINE
PARAM
-
Enter
Ca
Enter
Canc
Enter
Canc
COIN BOX
-
Enter
Canc
EMPTYING
-
Ca
Ca
Ca
Ca
+
+
+
RINSING
-
Enter
Canc
-
Ca
+
Page 8
Brilliance Manual
Page 8
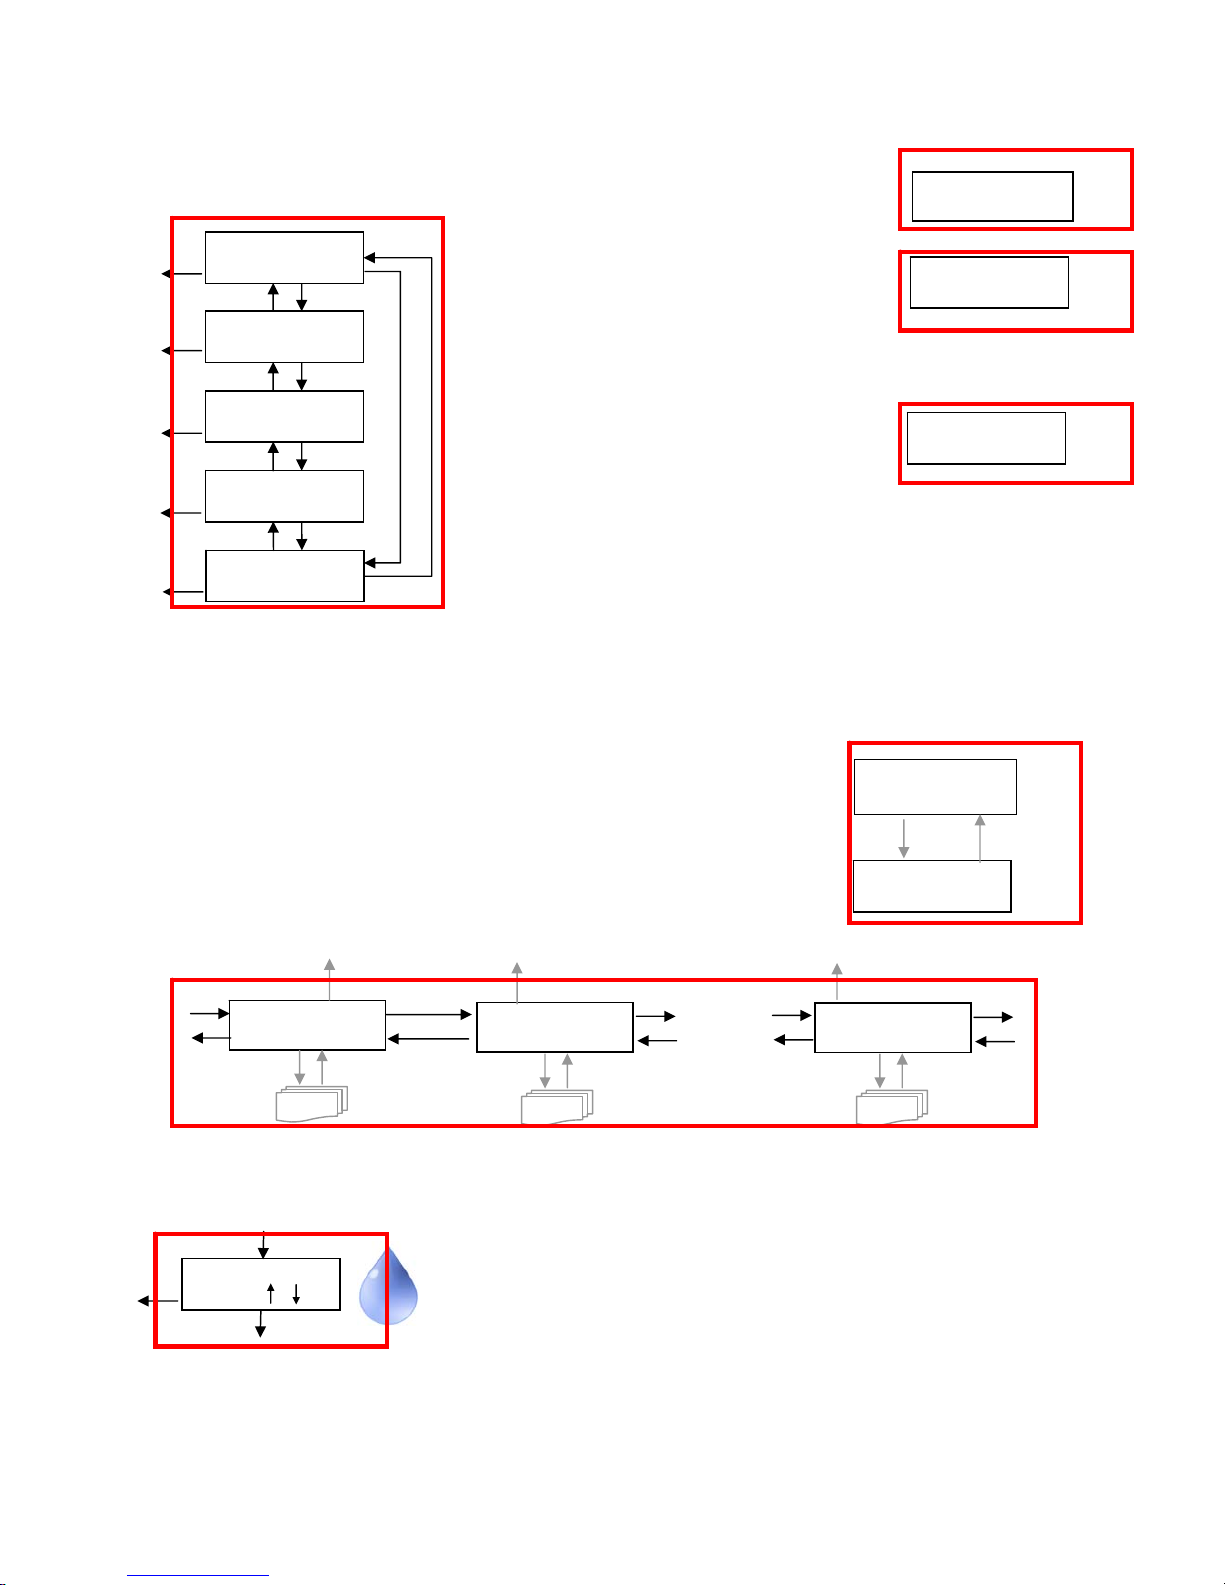
5.4 INFO Menu
The Info Menu is the first one to appear in the settings menu:
Now accepting with button K6(Enter),
the general totals of the erogations made
by the machine are shown. On the
display we get:
Where NR. is the total number of erogations made by the
machine.
Pressing the “+” or the “enter” button the
menu will move to the counter of the
button 1. Showing us the total amount of
services made with this selection.
Pressing the “+” button or the “enter” button the menu will
proceed to the next counter.
Pressing “-“ will go back to the previous counter.
Whenever we want to return to the main menu, we just have
to press the “exit” button.
Note that the maximum value for NR. is 65535; once arrived to this amount, the counter will begin
again the count.
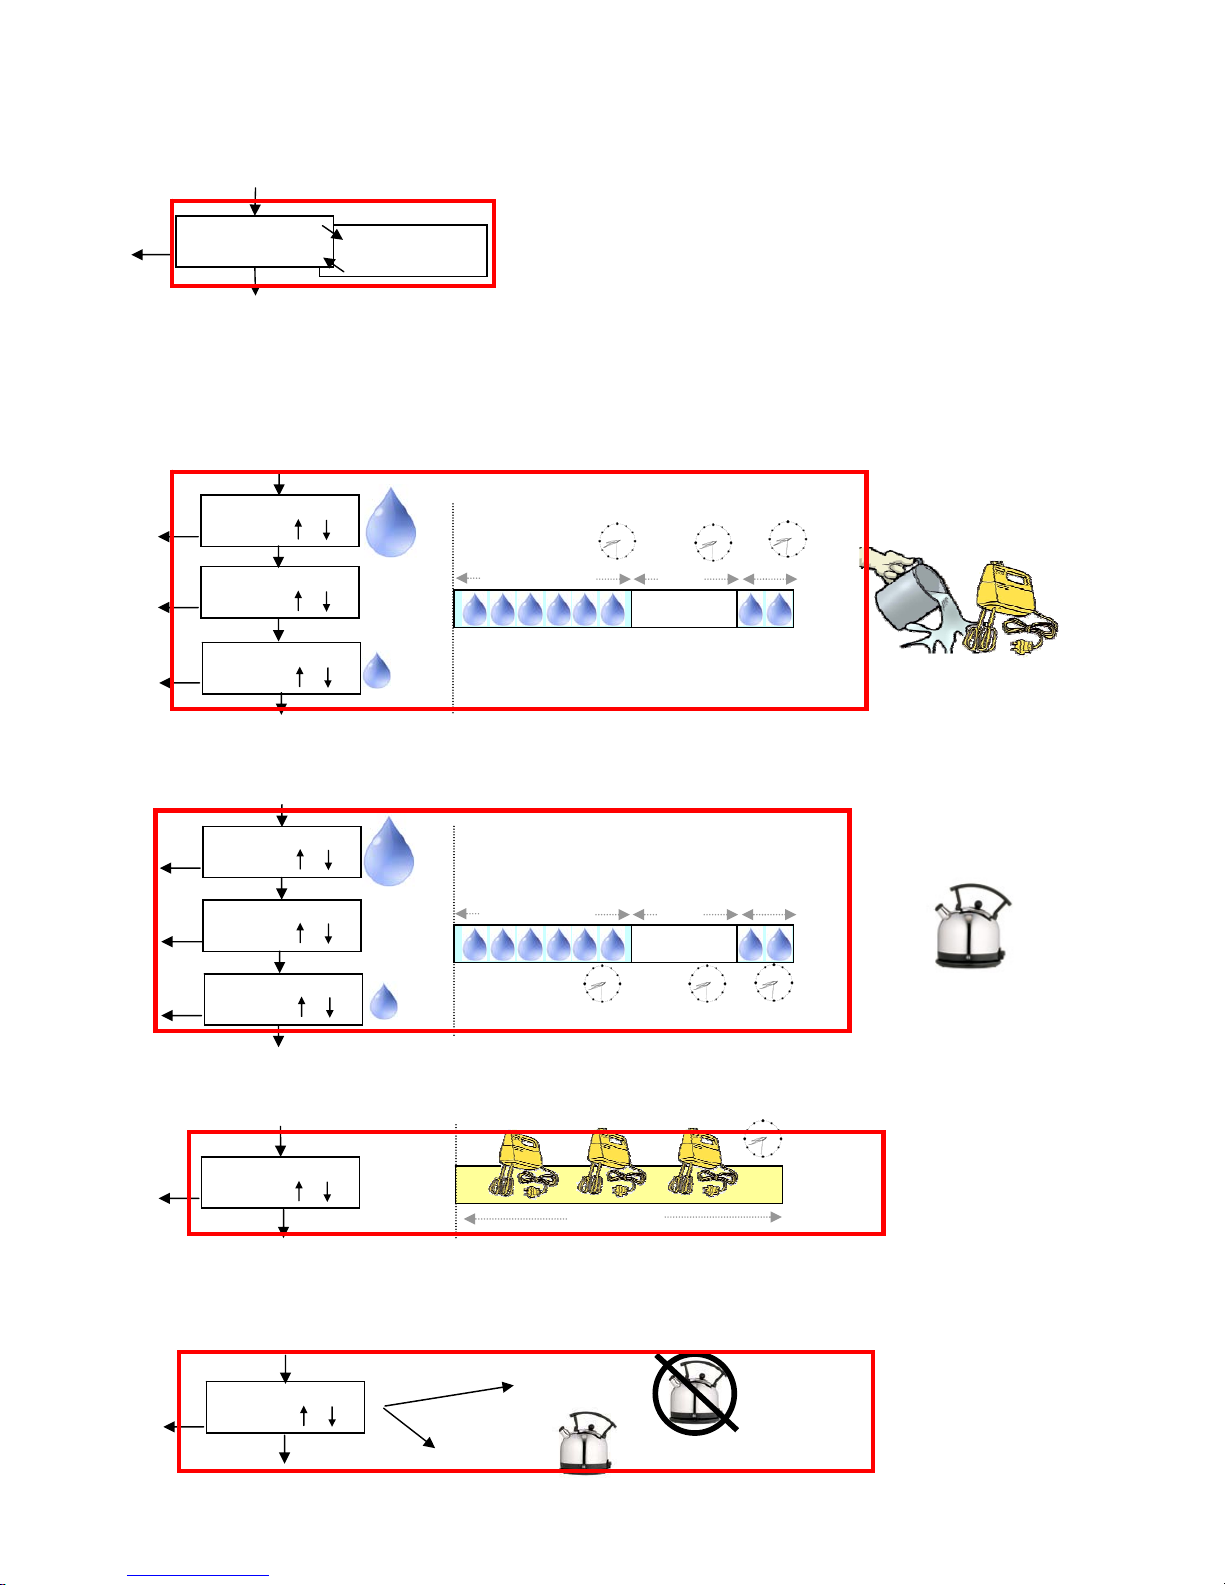
5.5 Menu Doses Program
This menu allows the adjustment of the ingredients and doses of them
used in each of the available selections.
We access to this menu through the following screen: “Doses program”:
Pressing the “Enter” button, we get into the menu. The display shows
then the selection “1” available to be adjusted:
Now we can either press “canc” and begin to adjust the “recipe” of
selection nr. 1, or press “esc” (button K2) and go back to the superior
menu, or move to the next/previous selection to be adjusted by pressing “+” / “-“:
5.5.1 Doses Adjustment
Supposing we just pressed “enter” having “dose program 1” on the screen, we begin the adjustment
of the different parameters of button 1(We could return to superior menus, by pressing “canc”).:
The first adjustment available is the “Coffee Water Vol.”. With it the
volume of water pumped to brew the espresso is set. With “+” and “ ”, the volume is adjusted. With “enter” the quantity set is accepted, and
next parameter will be shown on the screen. The volume is measured
in Cubic centimeters.
Accordingly to this setting, during normal service of the machine, when button 1 is selected, the
machine will automatically grind the needed beans of coffee, and brew the espresso with the set
Global Counter
Doses NR.
INFO
Key Total 1
NR.
Key Total 1
NR.
Key Total 2
NR.
Enter / +
Enter / +
-
-
Key Total ...
NR.
Enter / +
Enter / +
-
-
Can
Global Counter
Doses NR.
Key Total 8
NR.
Enter / +
-
Can
Can
Canc
Canc
Enter
Coffee water Vol
Key 1 ## cc
Canc
Enter
DOSES PROGRAM.
DOSE PROGRAM.
1
Enter
Canc
DOSE PROGRAM.
1
DOSE PROGRAM.
2
DOSE PROGRAM.
8
+
-
+
-
+
-
Canc
Enter
Canc
Enter
Canc
Enter
....
Canc
Canc
Canc
+
-
+
-
Page 9
Brilliance Manual
Page 9
volume of water. If the quantity is set to 0, no espresso will be brewed on the selection, neither
grinding will be performed.
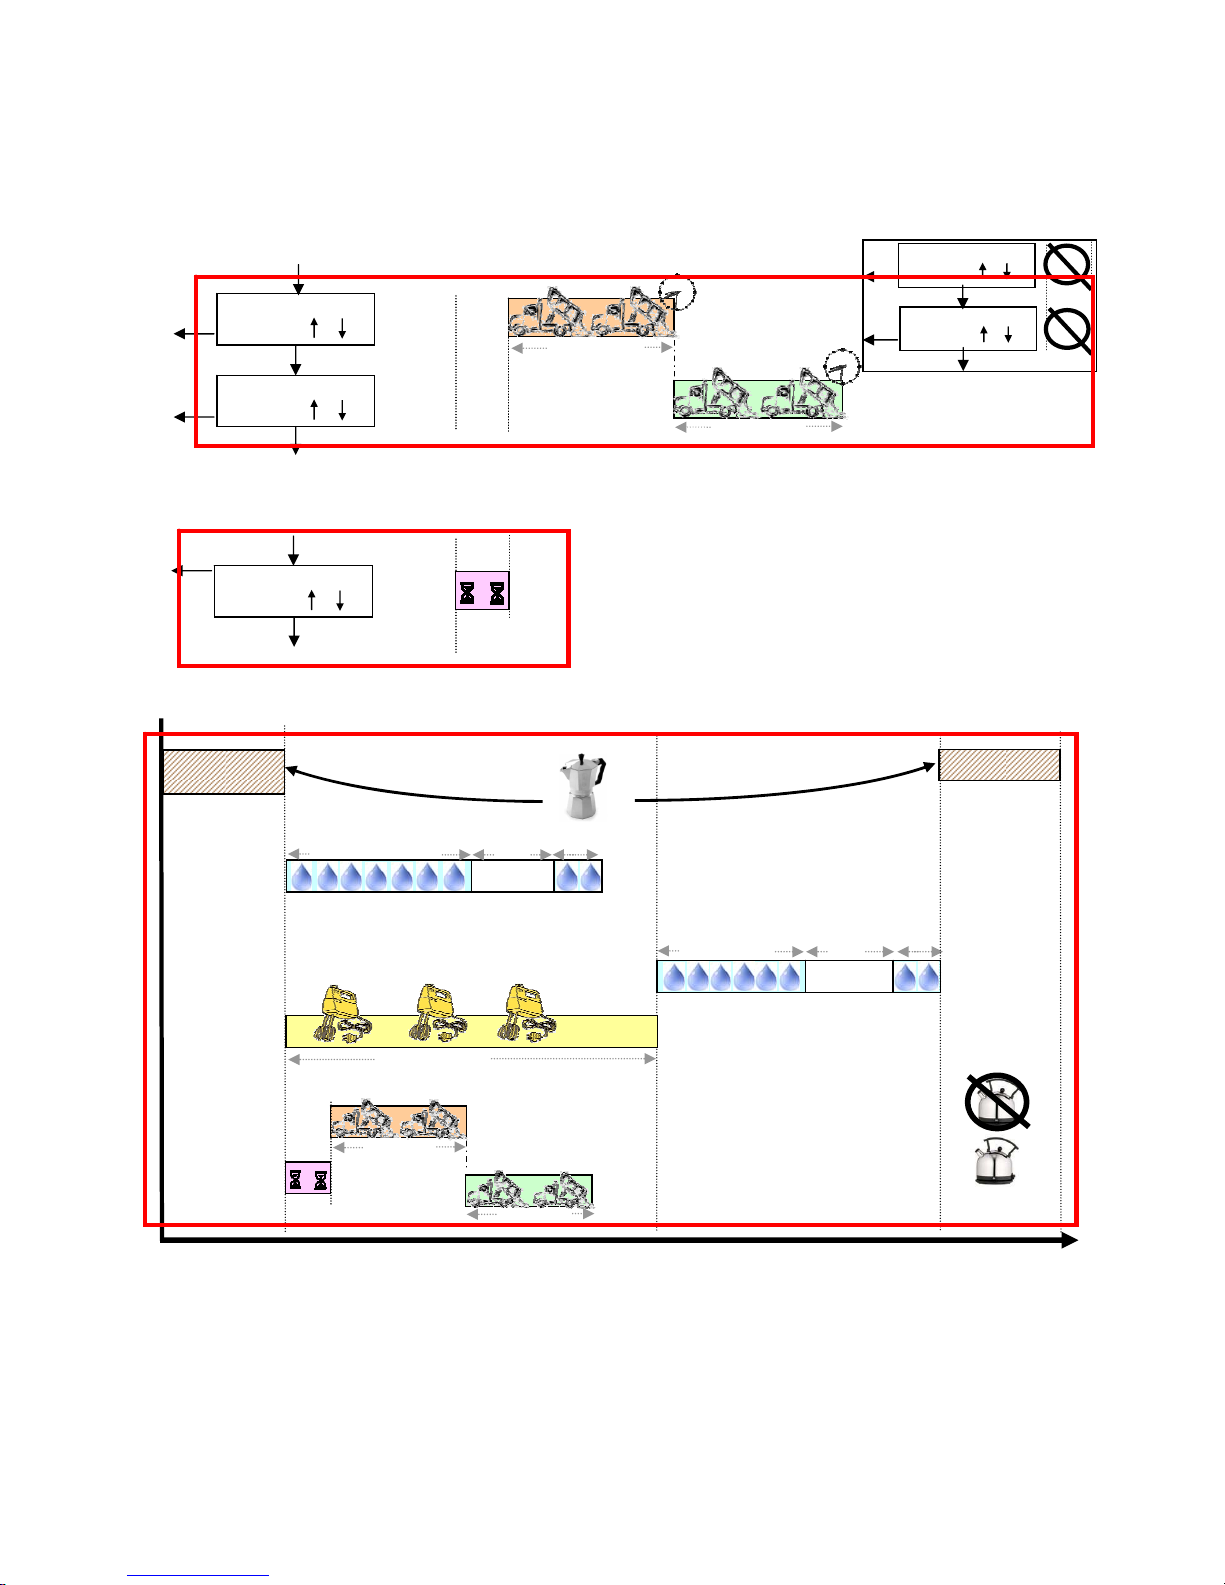
Next setting, will adjust if the brewing of the espresso will be
done before, or after having brewed the part of soluble drinks.
One or the other option can be set by pressing “+” or “-“.With
“enter” the selection set is accepted, and next parameter will be
shown on the screen.
Now it comes the time to set the water times for the soluble drinks brewed on the mixer. These
times set the quantity of water used to brew the selection. With buttons “+” and “-“ we adjust the
times; with “enter” we accept the set times, and proceed to the next adjustment. The Time 1, sets
the time to get the main quantity of water for the brewing; the time 2, adjust the amount of water to
flush the mixer clean. Between them the pause can be adjusted with the time for “Pause Water 1”.
The amount of water set here will be mixed with the soluble powders set in following parameters.
The next three parameter set the hot water coming out from the hot water spout. This water will not
be mixed with any soluble. Here we can set the “Pause Water2” and the “Time2Water2” to 0. With
“Enter” we will accept the different settings and proceed to following
Now we will set the times for the mixer (Mixer Time 1). This time setting, adjusts how long will
the mixer run while receiving the water and the powder. With buttons “+” and “-“ we adjust the
time; with “enter” we accept the setting, and proceed to the next adjustment
The following parameter (Mixer time 2) controls if water will come out or not from infusion water
spout; set it to 0 as to stop water from coming out the hot water for infusion spout. Make it bigger
than 0 as to allow the machine to dispose the hot water from this spout. With buttons “+” and “-“
adjust the desired value; with enter proceed to the next parameter.
Enter
Enter
Canc
Brewing coffee 1
BEFORE SOLUBILE
Brewing coffee 1
AFTER SOLUBILE
+
-
Mixer time 1
Key 1 #.# s.
Enter
Canc
Enter
Mixer Time 1
Mixer time 2
Key 1 #.# s.
Enter
Enter
Canc
Mixer Time2 = 0
Mixer Time2 > 0
Time 1 Water 1
Key 1 #.# s.
Enter
Pause Water 1
Key 1 #.# s.
Enter
Enter
Time 2 Water 1
Key 1 #.# s.
Enter
Canc
Canc
Canc
Time 1 Water 1 Pause Water 1 Time 2 Water1
Water1
Time 1 Water 2
Key 1 #.# s.
Pausa Water 2
Key 1 #.# s.
Enter
Time 2 Water 2
Key 1 #.# s.
Canc
Canc
Canc
Enter
Time 1 Water 2 Pause Water 2 Time 2 Water2
Water2
Enter
Page 10
Brilliance Manual
Page 10
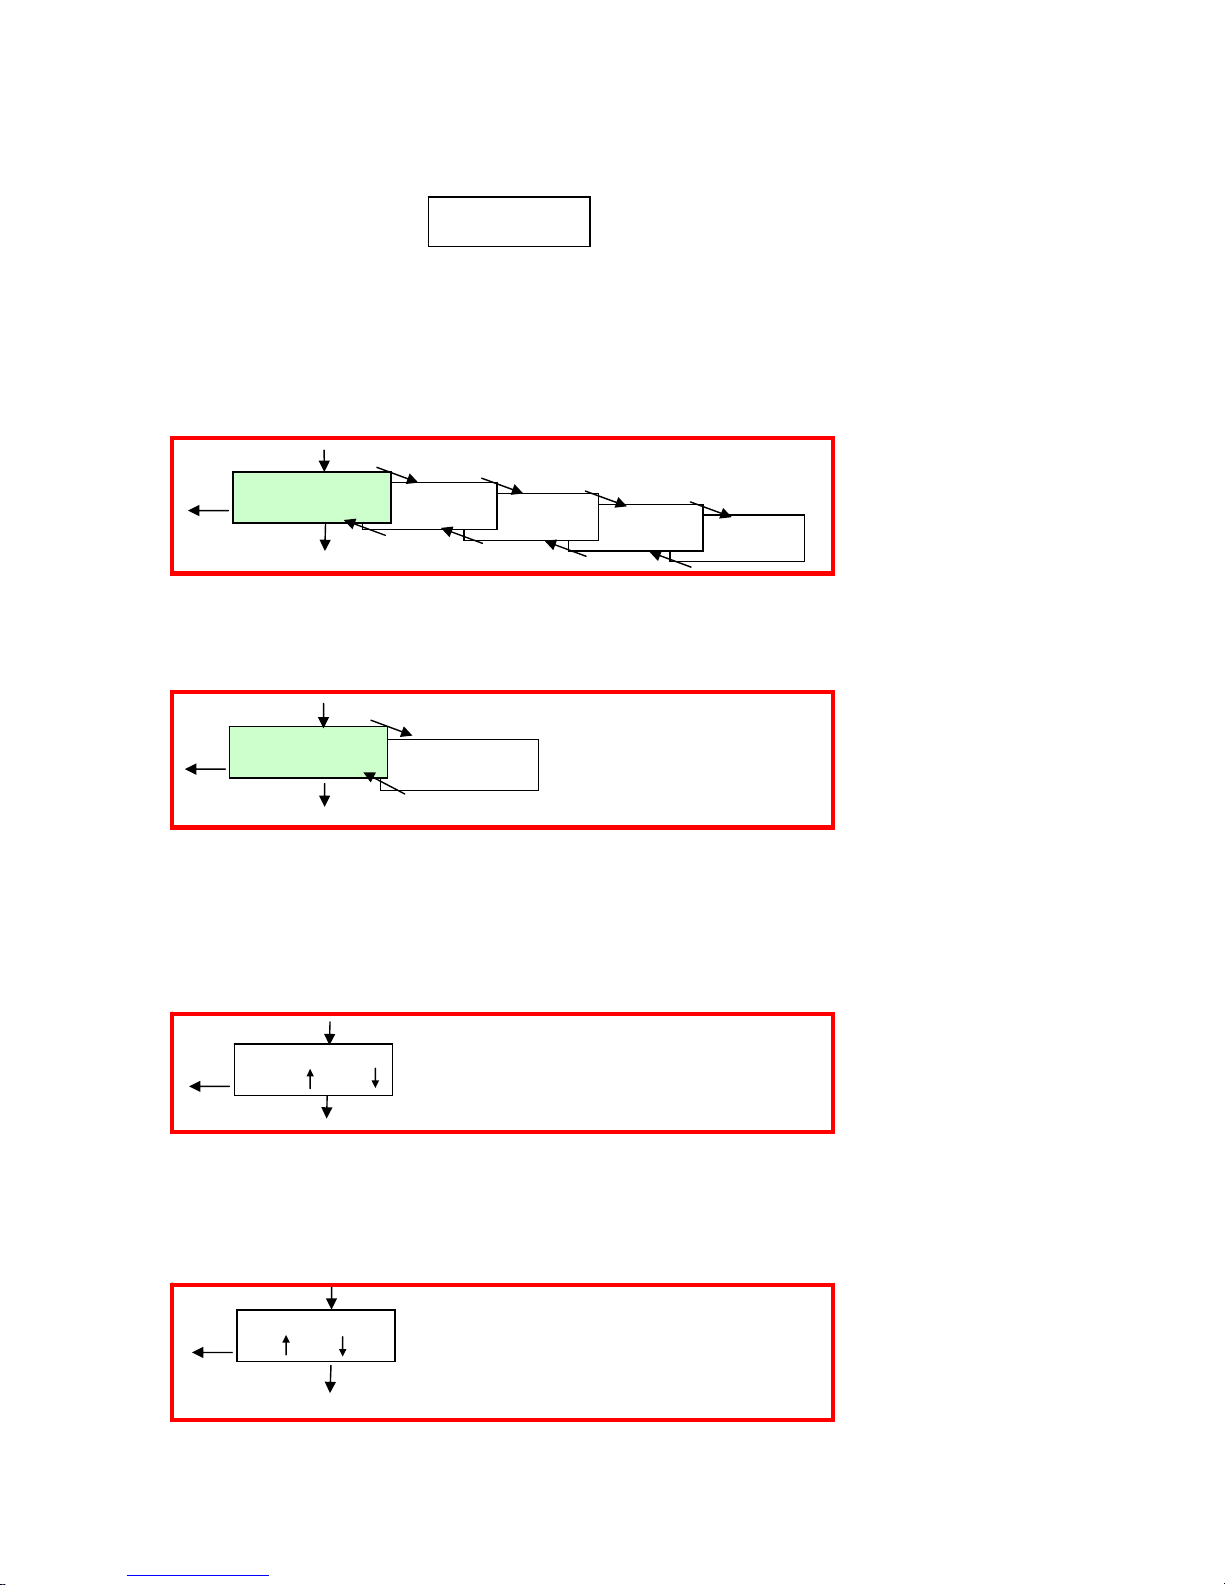
Now it comes the adjusting of the soluble ingredients. The quantity of soluble powder that will be
added to the actual recipe. Two canisters are available. Soluble time 3&4 are not used in this
machine: keep them set to 0. Each amount of product is set by increasing (pressing “+”) or
decreasing (pressing “-“) the time during which the soluble is added.
Finally we have to set the delay with which the solubles will be brewed. With buttons “+” and “-“
adjust the desired value; with “enter” we would begin adjusting parameters of button “2”. With
“Canc” we would come back to the superior menu.
5.6 Doses Adjustment Time Scheme
Each one of the 8 selections can be adjusted, modifying the following parameters:
5.7 Doses recommendations (examples):
On an attached document, different adjusting sets will be found depending on the country.
Note: Set the times as for the soluble ingredients to stop always around 1 second before the stop of
the pumping of water.
Set as well the mixer to work always around 2 seconds longer than the stop of the water and/or the
soluble ingredients. Not respecting this rules, will cause the mixer to clog.
Enter
Soluble Delay
Key 1 #.# s.
Canc
Enter
Soluble Delay
Time 1 Water 2 Pause Water 2 Time 2 Water2
Wate
Soluble time
Soluble
Time 1 Water 1 Pause Water 1 Time 2 Water1
Wate
Mixer Time
T
BEFORE
SOLUBILE
AFTER SOLUBLE
Brewing coffee
AFTER
Brewing coffee
BEFORE
Coffee Water Vol
Coffee Water Vol
Mixer Time2 = 0
>
Soluble Time 3
Ke
y
1 #.#
Enter
Soluble Time 4
Ke
y
1 #.# s.
Canc
Canc
Enter
Enter
Soluble Time 1
Key 1 #.# s.
Soluble Time 2
Key 1 #.# s.
Enter
Enter
Canc
Canc
Soluble time 1
Soluble time2
Page 11
Brilliance Manual
Page 11
5.8 Machine Parameters Menu
After the doses menu, we arrive to the Machine Parameters menu:
In this menu we will be able to adjust important parameters of the machine.
Pressing the “Enter” button, we get into the menu and the display shows the first parameter
available to be adjusted:
5.8.1 Language:
With buttons “+” and “-“ we select the different languages; with “enter” we accept the selected
language, and proceed to the next adjustment.
5.8.2 Boiler Temperature units
This parameter sets the units for the temperature of the boiler. With buttons “+” and “-“ we change
between Celsius “ºC” and Fahrenheit “ºF”; with “enter” we accept the selected language, and
proceed to the next adjustment.
5.8.3 Boiler Temperature
In this screen we can see the actual temperature of the boiler, and adjust the temperature that we
wish for it. On the left of the display the actual temperature of the boiler can be seen. On the right
hand and flashing, the temperature to which we wish to adjust the boiler. With buttons “+” and “-“
we adjust this setting; with “enter” we accept the value, and proceed to the next adjustment.
The temperature can be set between 60 and 107ºC. The adequate temperature depends on the type
of coffee beans that will be used in the machine. A recommended value is 97ºC.
5.8.4 Stand-by state
After the machine has been idle for 4 minutes, to compensate the loss of temperature in the espresso
group, the temperature of the boiler will be increased accordingly with this parameter. This is the
“StandBy DT”, which can be adjusted between 0 and 5ºC. With buttons “+” and “-“ we adjust this
setting; with “enter” we accept the value, and proceed to the next adjustment.
MACHINE PARAM.
LANGUE
FRANCAIS
LINGUA
ITALIANO
SPRACHE
DEUTSCH
LENGUA
ESPANOL
+
+
+
+
-
-
-
-
Enter
Canc
LANGUAGE
ENGLISH
Enter
Temperature
ºF
Temperature
ºC
Enter
Canc
+
-
Enter
T.act.= Actual Boiler Temperature
Set Temp= Temp. to which boiler is set
Boiler Temperat.
T.act. Set Temp
Canc
Enter
Enter
Recomended 97ºC
StandBy DT.
Set DT
Canc
Enter
Enter
Recomended 4ºC
Page 12
Brilliance Manual
Page 12
5.8.5 Espresso group enabling/disabling
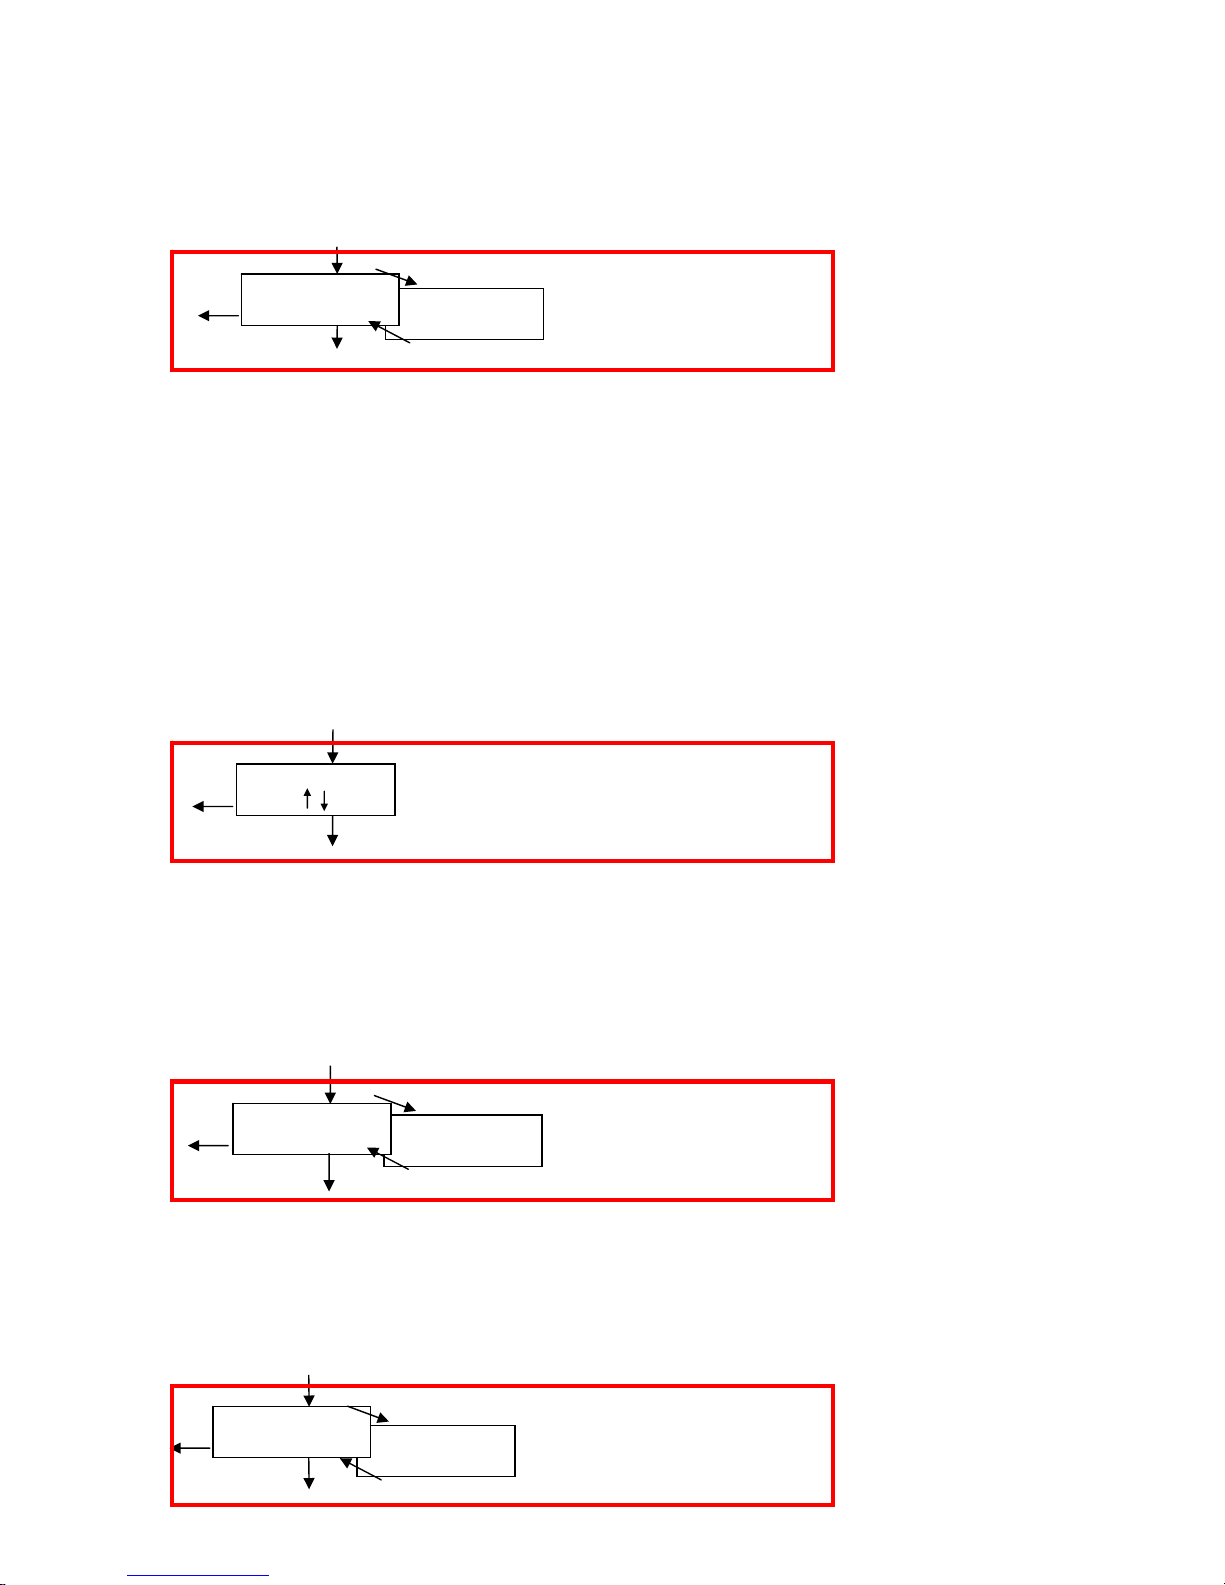
The next screen enables the Express group. This setting must be set to “enabled”, as to allow the
express group to work. With buttons “+” and “-“ we change between “enabled” and “disabled”;
with “enter” we accept the selected language, and proceed to the next adjustment.
5.8.6 Grounds counter
We will now adjust the “Grounds program”. This is a setting that enables a counter that takes care
of not overflowing the grounds container. It should be adjusted to 90 when using the standard inner
container of the machine. When the machine has brewed that number of services involving
espresso, it will prevent any more brewing of beverages involving espresso until the coffee grounds
tray is emptied.
If we are using the cabinet for the machine, we have to set the Grounds program to 0. This will turn
off the counter and allow uncounted services to be brewed.
With buttons “+” and “-“ we adjust this setting; with “enter” we accept the value, and proceed to the
next adjustment.
Note: As to empty the Grounds container once the error “empty grounds container”, open the door
of the machine and remove and empty the grounds container always with the machine connected
(on), otherwise, the machine cannot detect that the container was removed, and will not reset the
counter.
5.8.7 Pre-infusion
Next parameter is the pre-infusion setting: This setting allows a little pause at the beginning of the
erogation of the espresso (a little pause in the pumping). This lets the necessary time to the coffee as
to reach the right moistureness allowing to get the best quality out of it. Disabling this f unction will
save a little of time; but quality of erogated coffee will be affected. With buttons “+” and “-“ we
change between “enabled” and “disabled”; with “enter” we accept the selected language, and
proceed to the next adjustment.
5.8.8 Pre-grinding / extra speed
his setting enables the pre-grinding function; which saves some erogation time, by having always
ready the grinded coffee dose for the next espresso. This means that the machine grinds the coffee
after erogating the espressos. So always is ready to begin erogating the next one. With buttons “+”
and “-“ we change between “enabled” and “disabled”; with “enter” we accept the selected language,
and proceed to the next adjustment.
Express Group
Disabled
Enter
Express Group
Enabled
Canc
+
-
Enter
Grounds program
#
Enter
Enter
Canc
Preinfusion
DISABLED
Preinfusion
ENABLED
Canc
+
-
Enter
Enter
Extra Speed
Disabled
Extra Speed
Enabled
Canc
+
-
Enter
Enter
#=0 Counter disabled
#=90 Standard Capacity of the Grounds Container
Page 13
Brilliance Manual
Page 13
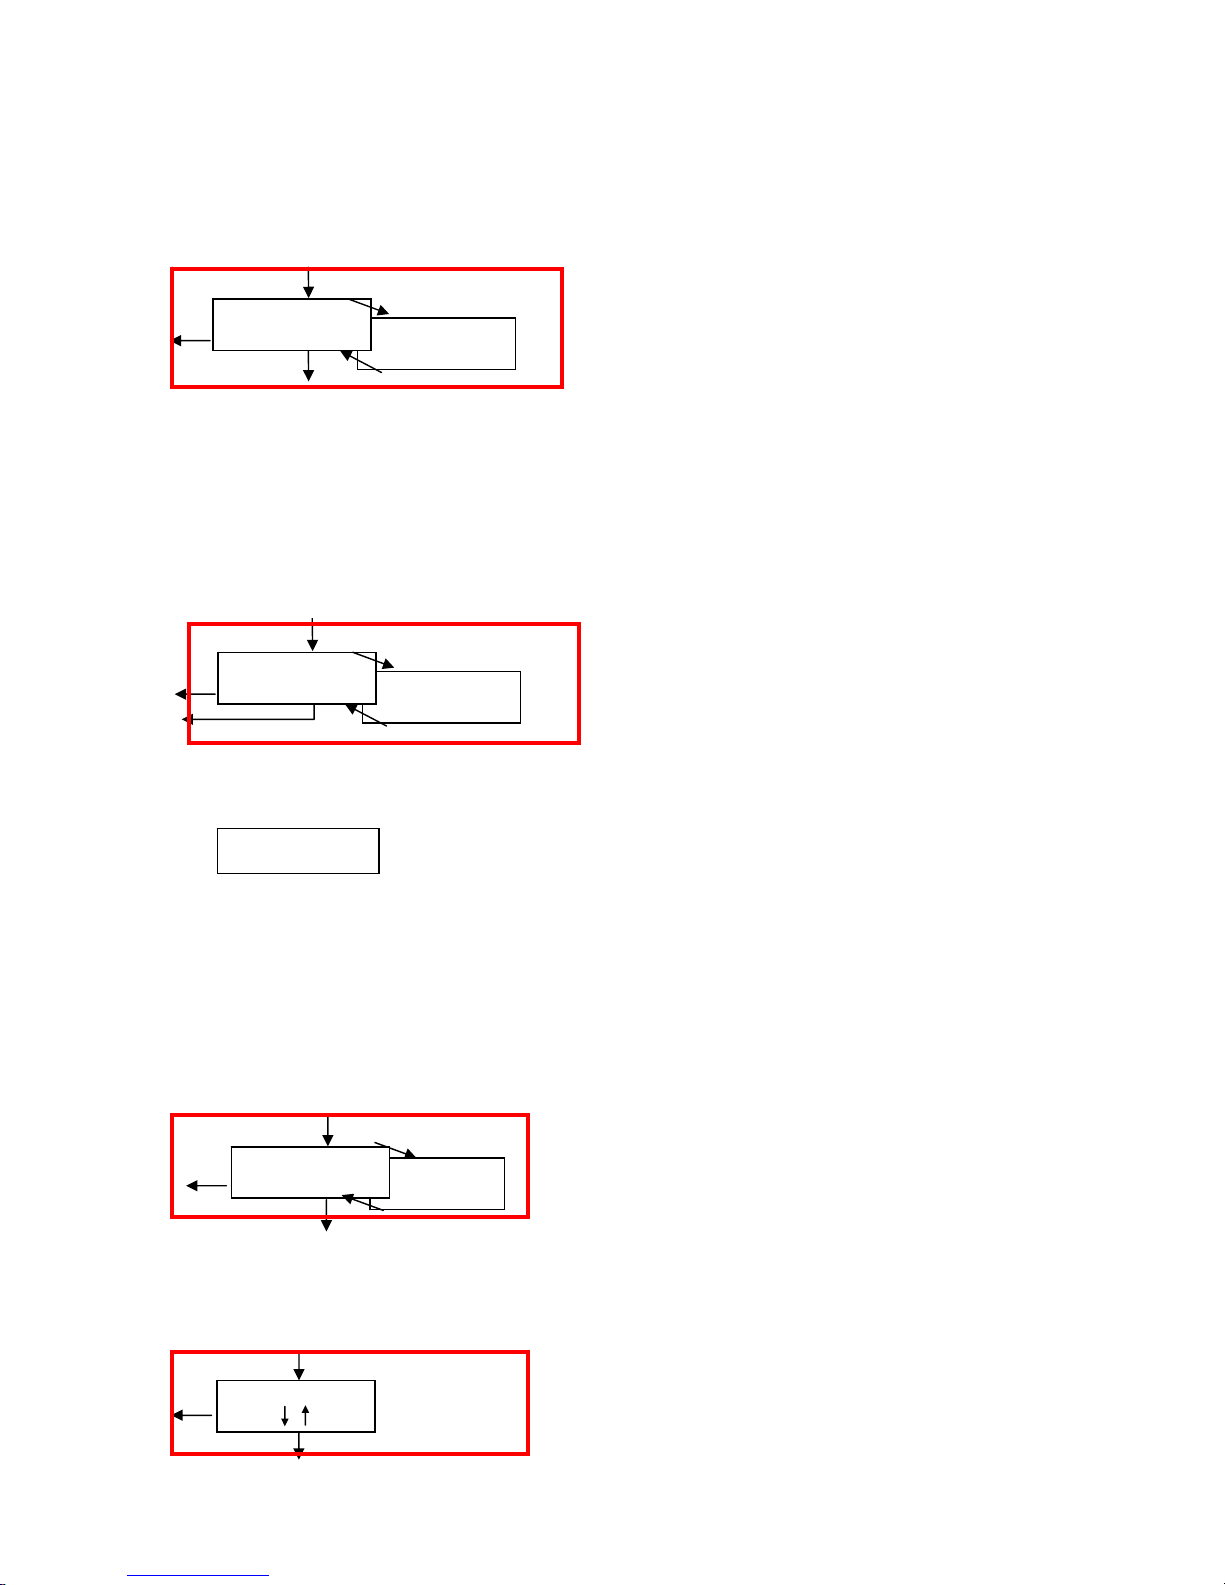
5.8.9 Keyboard number inversion
This setting invert the numeration of the keyboard. This means that button nr. 1 becomes button
nr.8; button nr. 2 becomes button nr. 7, and so on. With buttons “+” and “-“ we change between
“enabled” and “disabled”; with “enter” we accept the setting, and proceed to the next adjustment.
The activation of this function will be effective when exiting the settings menu.
5.8.10 Smart Card enabling
The option of enabling / disabling the Smartcard is set in this screen. The utilities and further
explanations regarding the “Smart Cards” are explained in another point of the manual.
Once again, with buttons “+” and “-“ we change between “enabled” and “disabled”; with “enter”
we accept the selected language, and return to the superior menu as this is the last option.
Note that when the Smart Card is Enabled, the prices set in the Coin Box section are effective. If the
machine should work without the need of inserting credit, consult the section Free Services.
5.9 Coin Box menu
After the Parameters menu, we arrive to the Coin Box menu:
In this menu we will be able to adjust payment parameters of the machine.
Pressing the “Enter” button, we get into the menu and the display shows the first parameter
available to be adjusted:
5.9.1 Coin Box enabling / disabling
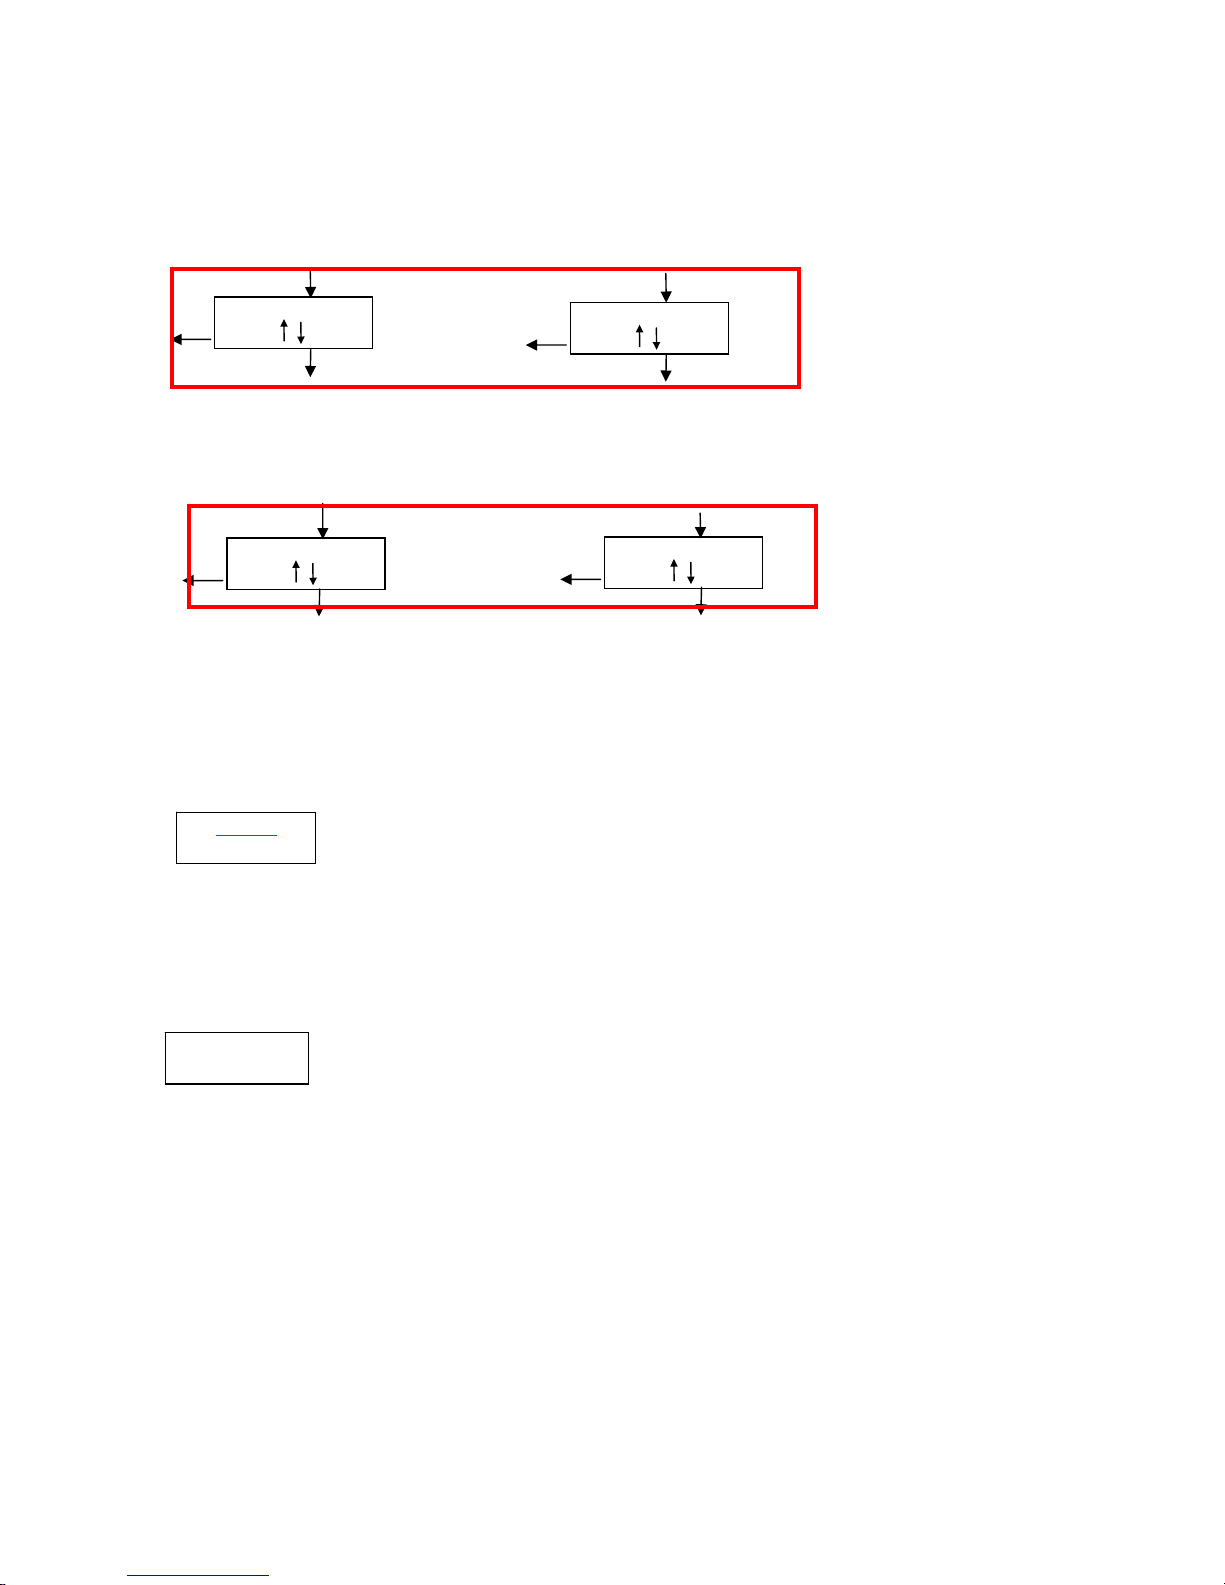
In this setting we will enable /disable the coin mechanism; if we leave it disabled, no more setting
options will appear next to this first setting. We can enable / disable this mechanism by “+” and “-“
buttons. With “enter” we accept the selection and if we chose “enabled” it will move to the next
available setting; if we selected “disabled”, it will return to the superior menu.
5.9.2 Number of decimals in pricing
In this setting, we will set the number of decimals to set the prices. Typically this will be set to 2
decimals. With buttons “+” and “-“ we adjust this value; with “enter” we accept the value, and
proceed to the next adjustment.
COIN BOX
Invertion keys
ENABLED
Invertion keys
DISABLED
Canc
+
-
Enter
Enter
Smart Card
Disabled
Smart Card
Enabled
Canc
+
Enter
Enter
COIN BOX
DISABLED
+
-
Enter
-
Canc
COIN BOX
ENABLED
Enter
Decimal Price
#
Enter
Canc
Enter
Page 14
Brilliance Manual
Page 14
5.9.3 Prices setting
Now it comes the adjusting of each selection’s price. On the first row of the display we see which
selection price (from 1 to 9) we are adjusting. At the second row, we see the price assigned to it.
With buttons “+” and “-“ we adjust this value; with “enter” we accept the value, and proceed to the
next. After accepting the price setting for the last selection, we will begin with the next setting.
5.9.4 Coin value (lines) setting
At this point the 6 comunications lines with the coin validator will be adjusted. Each value has to
match the set value of the validator mechanism. With buttons “+” and “-“ we adjust this values;
with “enter” we accept the value set, and proceed to the next.
When we are finished adjusting the line values, and accept the last setting, the superior menu will
appear again.
5.10 Rinsing
The rinsing function facilitates a utility for a routine cleaning of the outlet conducts of the machine.
This utility flushes the different outlet conducts of the machine, beginning on the mixer conducts,
and finishing by the espresso group conducts.
Just press “enter” to execute this function, and wait till the cycle is over. The
process can be canceled by pressing “canc”.
This function takes about 1min 15secs, and pours around 150cc of water.
5.11 Emptying airbreak
As to facilitate small transportations / movements of the machine, a function is available as to
reduce the amount of water in the AirBreak (the small, inner, open-air deposit), avoiding the
dripping inside the machine when moving.
To execute the function just press “enter”. The process can be canceled by pressing
“canc”. When finished “EMPTYING completed” will be shown on the screen. To
return to normal functioning of the machine, turn off and again on the power.
Warning: Never use this function with empty airbreak. Making the pump work without water, will
damage it in a very short time.
Dose Price N
#
Enter
Canc
Enter
Dose Price N
#
Enter
Canc
Enter
...
...
Enter
Line Value 1
#
Enter
Canc
Line Value N
#
Enter
Canc
Enter
...
...
RINSING
EMPTYING
Page 15
Brilliance Manual
Page 15
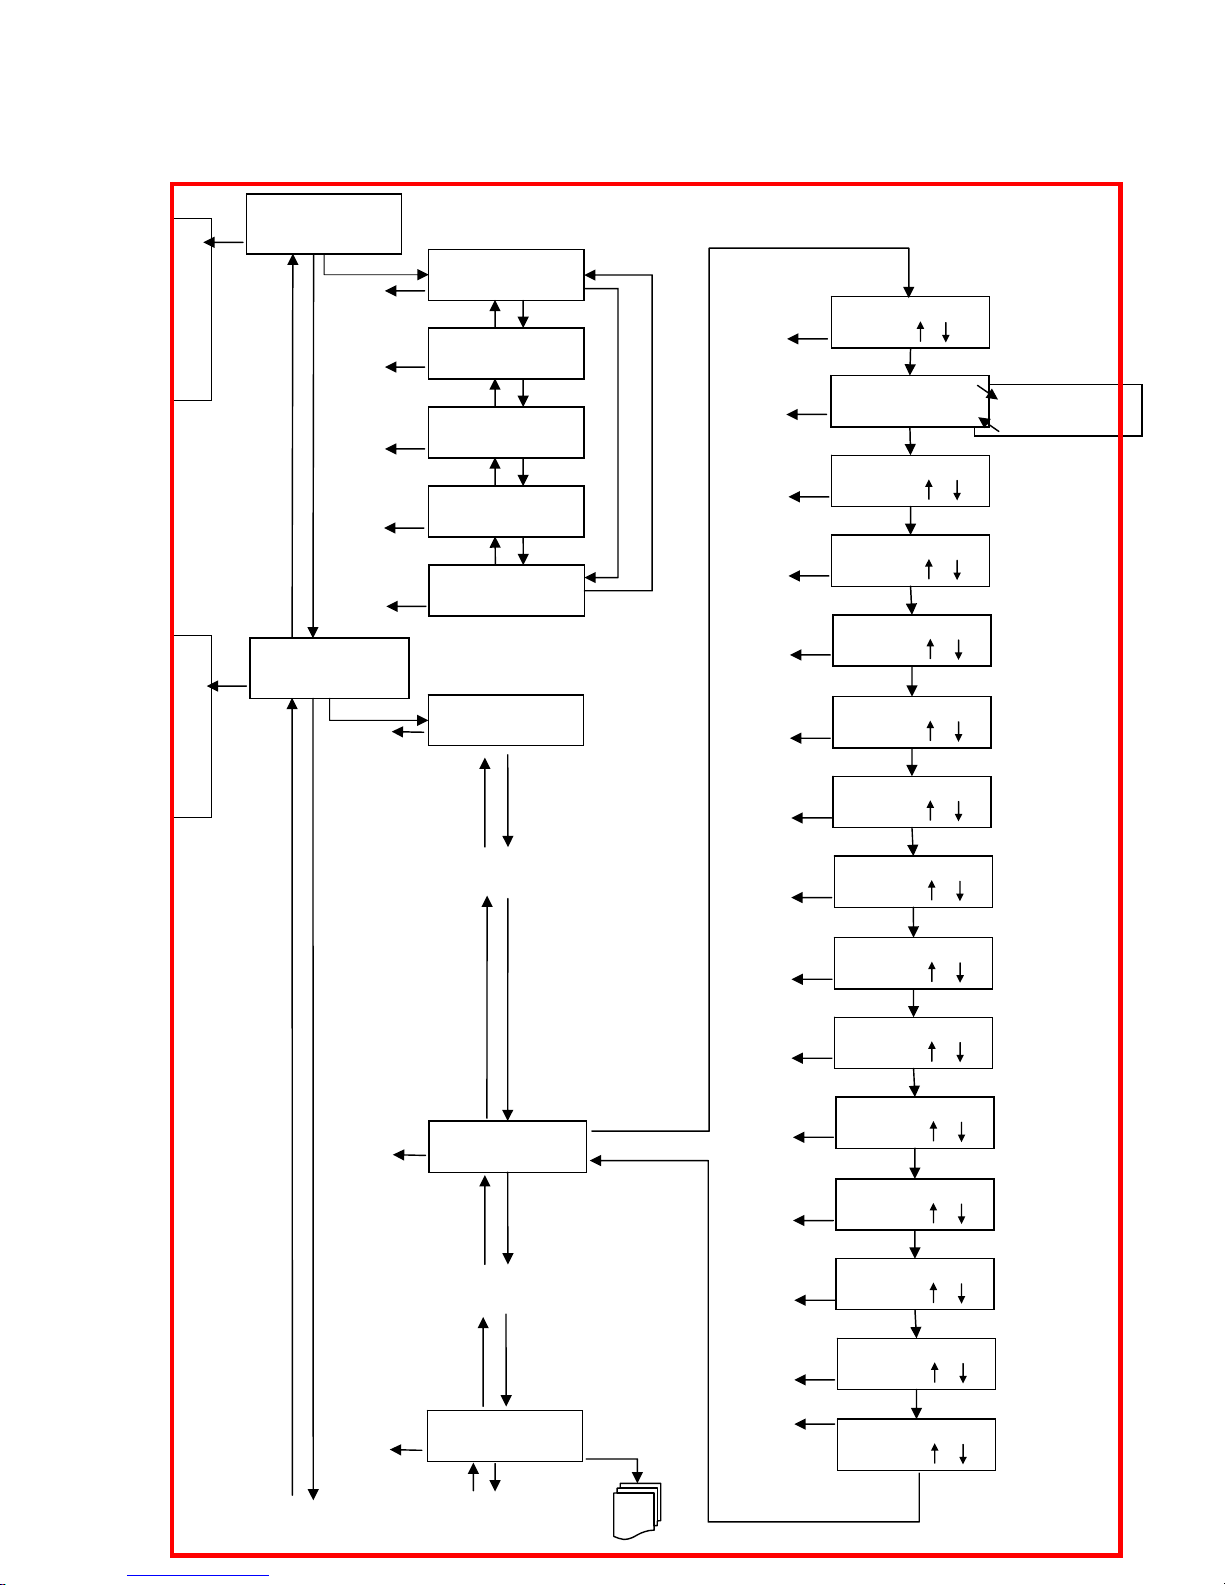
5.12 Full Scheme of the Settings Menu
Normal Start up
Normal Start up
Key Total 1
NR.
Key Total 2
NR.
Enter /
Enter /
-
-
Key Total ...
NR.
Enter /
Enter /
-
-
Enter
Can
Enter
Can
+
-
Global Counter
Doses NR.
Key Total 8
NR.
Enter / +
-
DOSES PROGRAM.
Info
Can
Can
Can
Can
-
Can
DOSE PROGRAM.
1
DOSE PROGRAM.
8
+
+
-
Can
Can
Ente
Time 1 Water 1
Key N #.# s.
Enter
Enter
Pausa Water 1
Key N #.# s.
Enter
Enter
Time 2 Water 1
Key N #.# s.
Coffee water Vol
Key N ## cc
Canc
Canc
Brewing coffee N
BEFORE SOLUBILE
Brewing coffee N
AFTER SOLUBILE
+
-
Time 1 Water 2
Key N #.# s.
Enter
Pausa Water 2
Key N #.# s.
Enter
Enter
Time 2 Water 2
Key N #.# s.
Canc
Canc
Canc
Canc
Canc
Canc
Mixer time 1
Key N #.# s.
Enter
Mixer time 2
Key N #.# s.
Enter
Enter
Soluble Time 1
Key N #.# s.
Soluble Time 2
Key N #.# s.
Enter
Soluble Time 3
Key N #.# s.
Enter
Enter
Soluble Time 4
Key N #.# s.
Can
Can
Canc
Canc
Canc
Canc
Enter
Soluble Delay
Key N #.# s.
Canc
Enter
DOSE PROGRAM.
N
....
Canc
....
-
Ente
....
....
+
Page 16
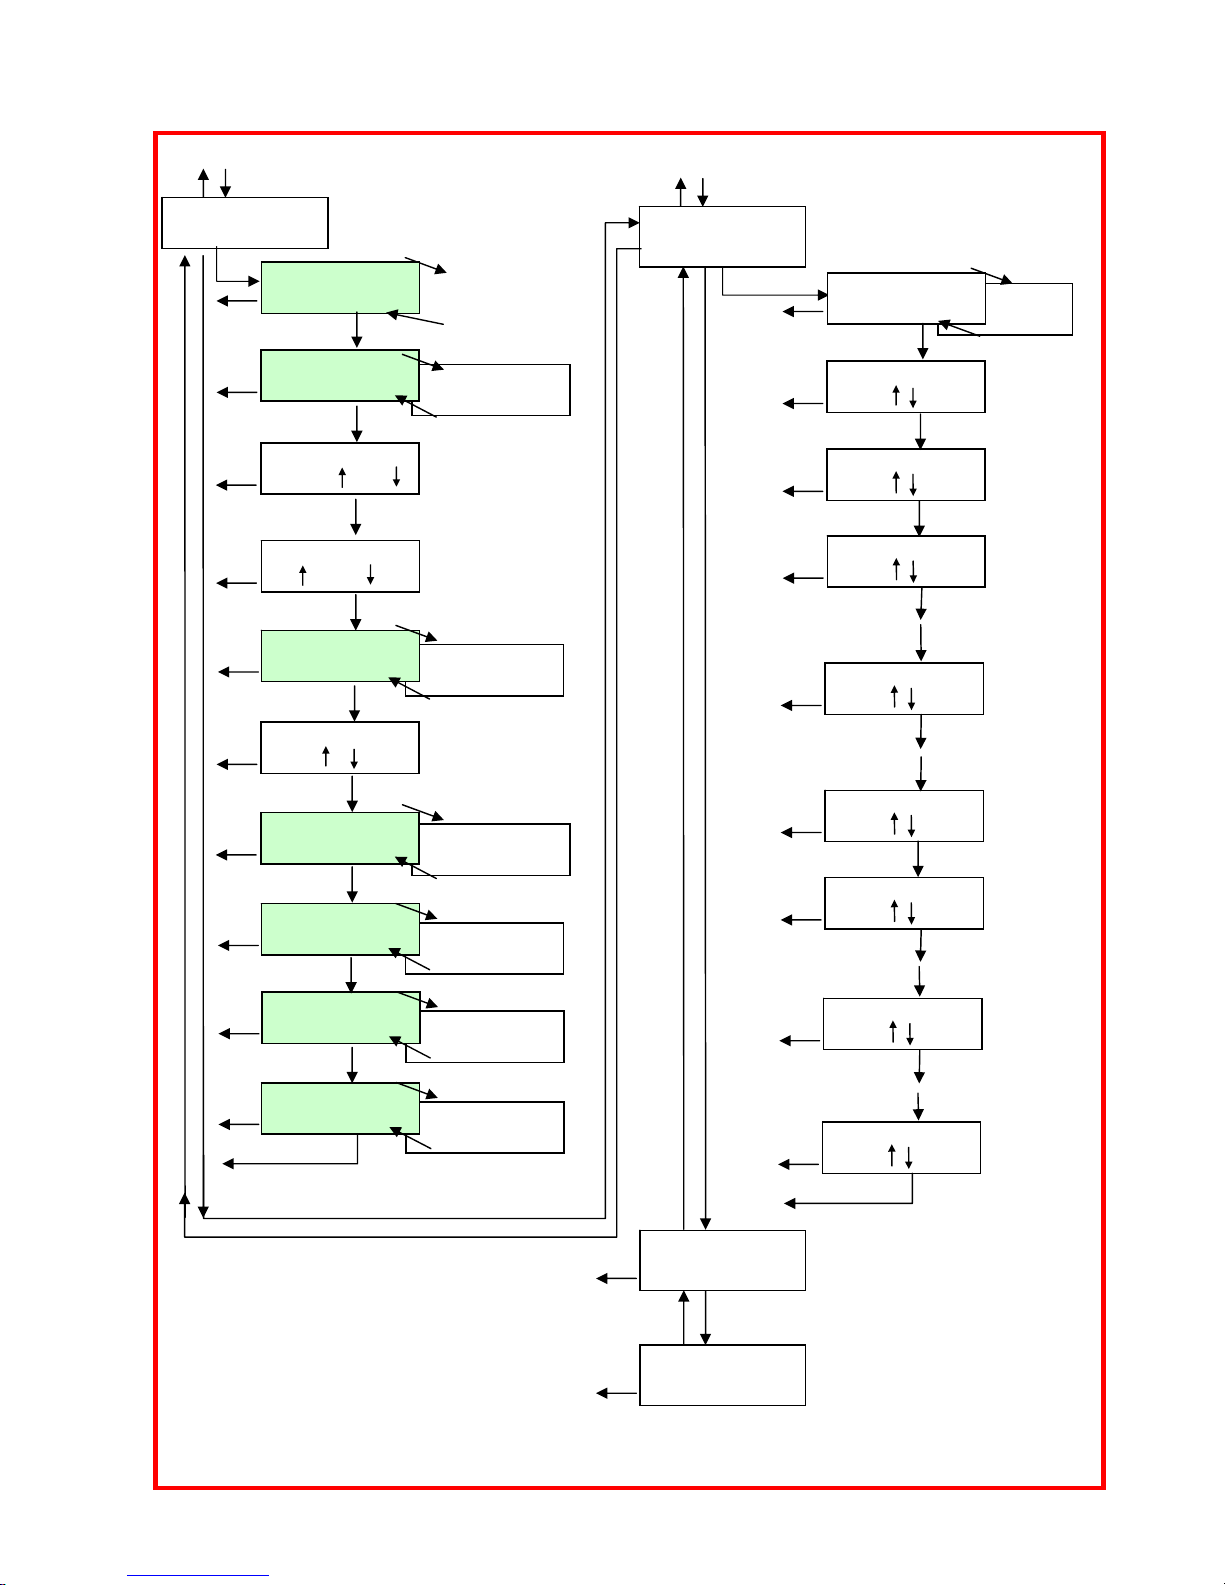
Brilliance Manual
Page 16
MACHINE PARAM.
+
-
Enter
+
-
Boiler Temperat.
T.act. 97
Enter
Enter
Canc
Canc
Canc
Canc
+
-
T.act.= Actual Boiler
Temperature
Set Temp= Temp. to which
b
oiler is se
t
+
-
Enter
Enter
Enter
Canc
Canc
Canc
+
-
+
-
Enter
Canc
+
-
#=0 Grounds program disabled
#=90 Standard capacity of
grounds container
Enter
StandBy DT
4
Enter
Canc
Canc
+
-
Enter
Temperature
ºC
Temperature
ºF
Express Group
Enabled
Express Group
Disabled
Grounds program
90
Preinfusion
ENABLED
Preinfusion
DISABLED
Extra Speed
Disabled
Invertion keys
DISABLED
Invertion keys
ENABLED
Smart Card
Enabled
Smart Card
Disabled
Extra Speed
Ensabled
Espanol
Deutsch
Italiano
Francais
COIN BOX
DISABLED
COIN BOX
+
-
-
Ente
+
-
Decimal Price
#
Enter
Enter
-
Canc
Canc
COIN BOX
ENABLED
Dose Price 1
#
Enter
Canc
Dose Price N
#
Enter
Canc
....
Enter
Enter
Dose Price 2
#
Can
Dose Price 9
#
Enter
Canc
....
Enter
Line Value 1
#
Enter
Canc
Line Value N
#
Enter
Canc
....
Enter
Line Value 6
#
Enter
Canc
....
Enter
RINSING
Canc
-
EMPTYING
Canc
LANGUAJE
ENGLISH
Page 17
Brilliance Manual
Page 17
6 MACHINE FUNCTION
6.1 Start up process
When the machine is supplied with energy, it checks that the internal Air Break deposit has enough
water; if not, it opens the inlet electro valve as to fill this deposit. During this filling process, the
heating of the boiler is disabled and the display shows “Please wait, Boiler Filling up”.
Note: If the air break remains unfilled after a certain security time; you will get a “Time-out alarm
Filling Up”.
Once the airbreak is conveniently full of water, boiler heat up will start. During heat up of the
boiler; “please wait” will be shown on the display.
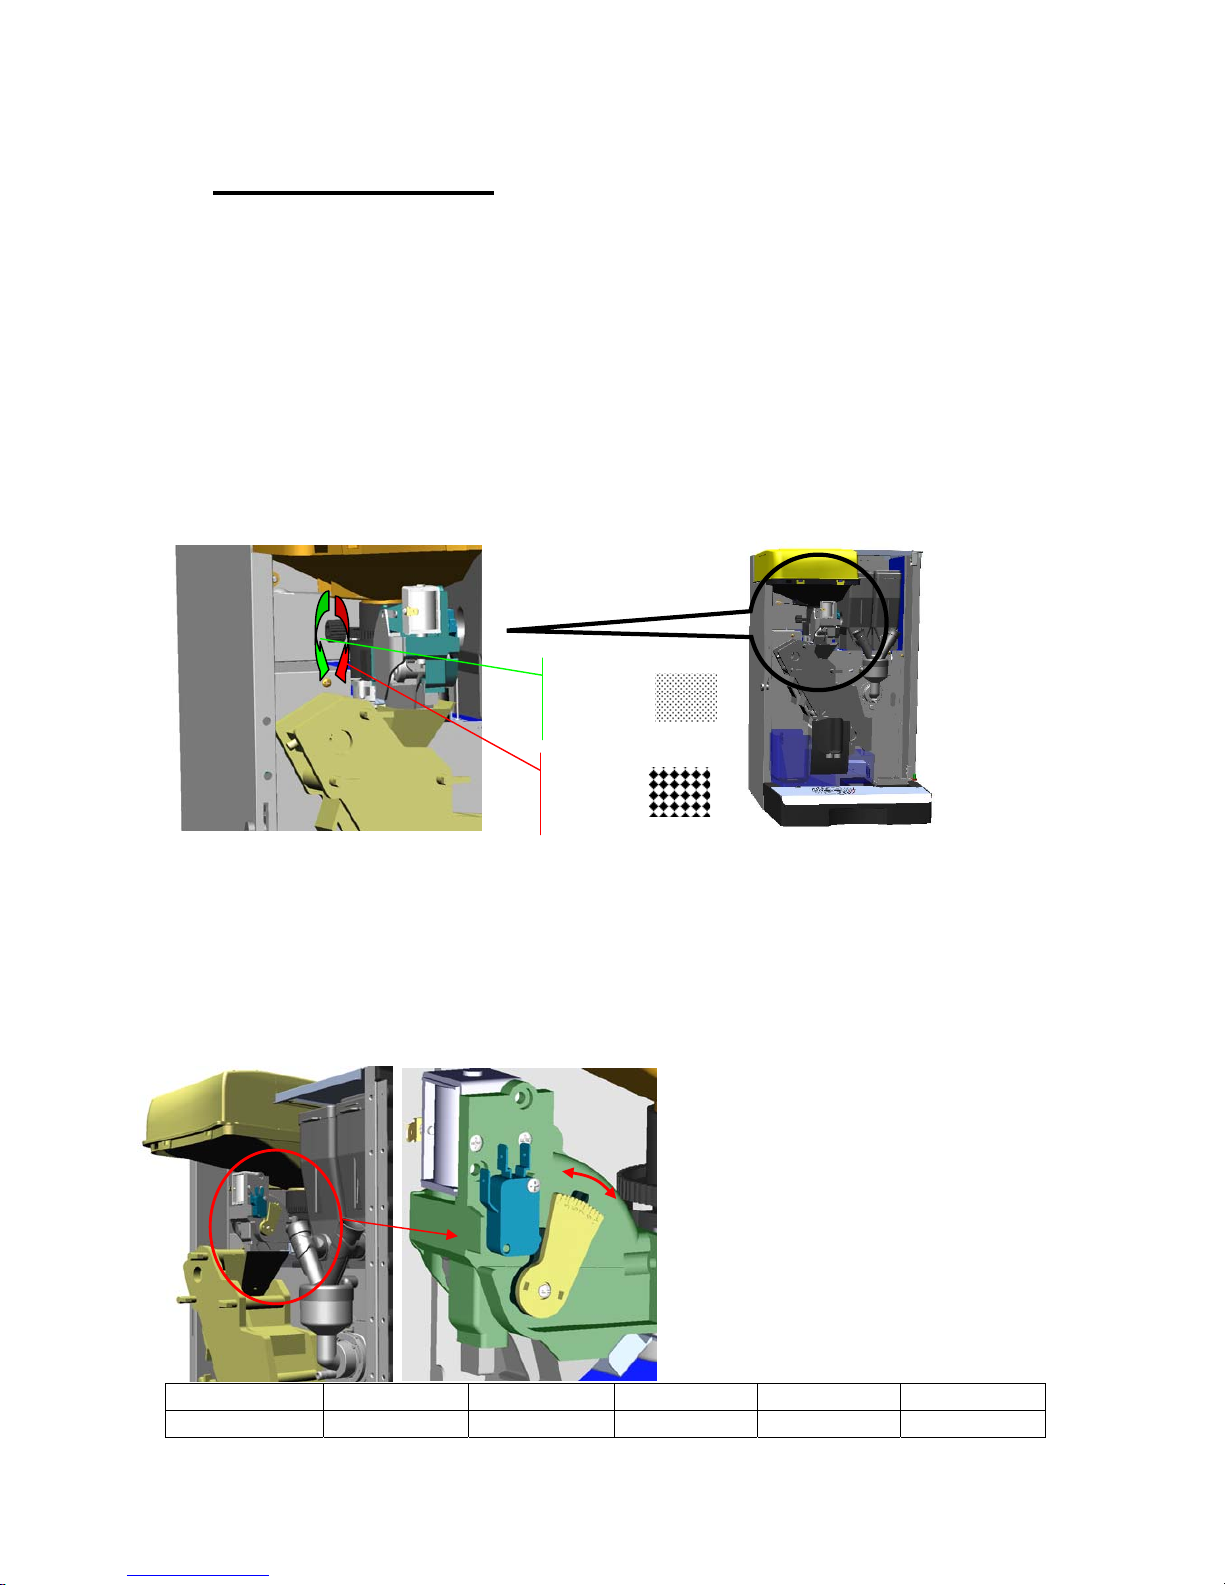
6.2 Grinder adjuster
The grinder’s adjuster, is reached through the space left between Coffee Hopper and the chassis of
the machine.
To adjust the grade of thinness of the grinder actuate on the grinder’s adjuster. Rotating the adjuster
counterclockwise, grinding gets thinner; rotating the adjuster clockwise, grinding gets coarser.
Take into account that after having moved the adjuster, the effect is not immediate in the erogated
espresso. It takes about 3 espresso cycles for the new grinded coffee to arrive to the doser. So to test
the newly selected thinness grade, observe the third or fourth espresso erogated after the change.
The thinner the grinding, the slower the espresso will come out, and longer time will be needed to
brew the espresso and vice versa.
6.3 Grinded coffee doser adjustment
Dosers are devices suitable for dosing
ground coffee with an adjustment facility.
Coffee dosage adjustment is achieved
mechanically by means of a pointer
adjustable in a scale (shown in the following
pictures).
Doser must be adjusted between position 4
and 8; never go any further, as over charging
the group can cause it to break; and undercharging it, will produce a poor espresso. To
adjust the doser, push slightly the pointing
selector, and displace it over the scaled part.
Doser Position 4 5 6 7 8
Gram Throw 7 7,5 8 8,5 9
Coarser
grinding
Thinner
grinding
Page 18
Brilliance Manual
Page 18
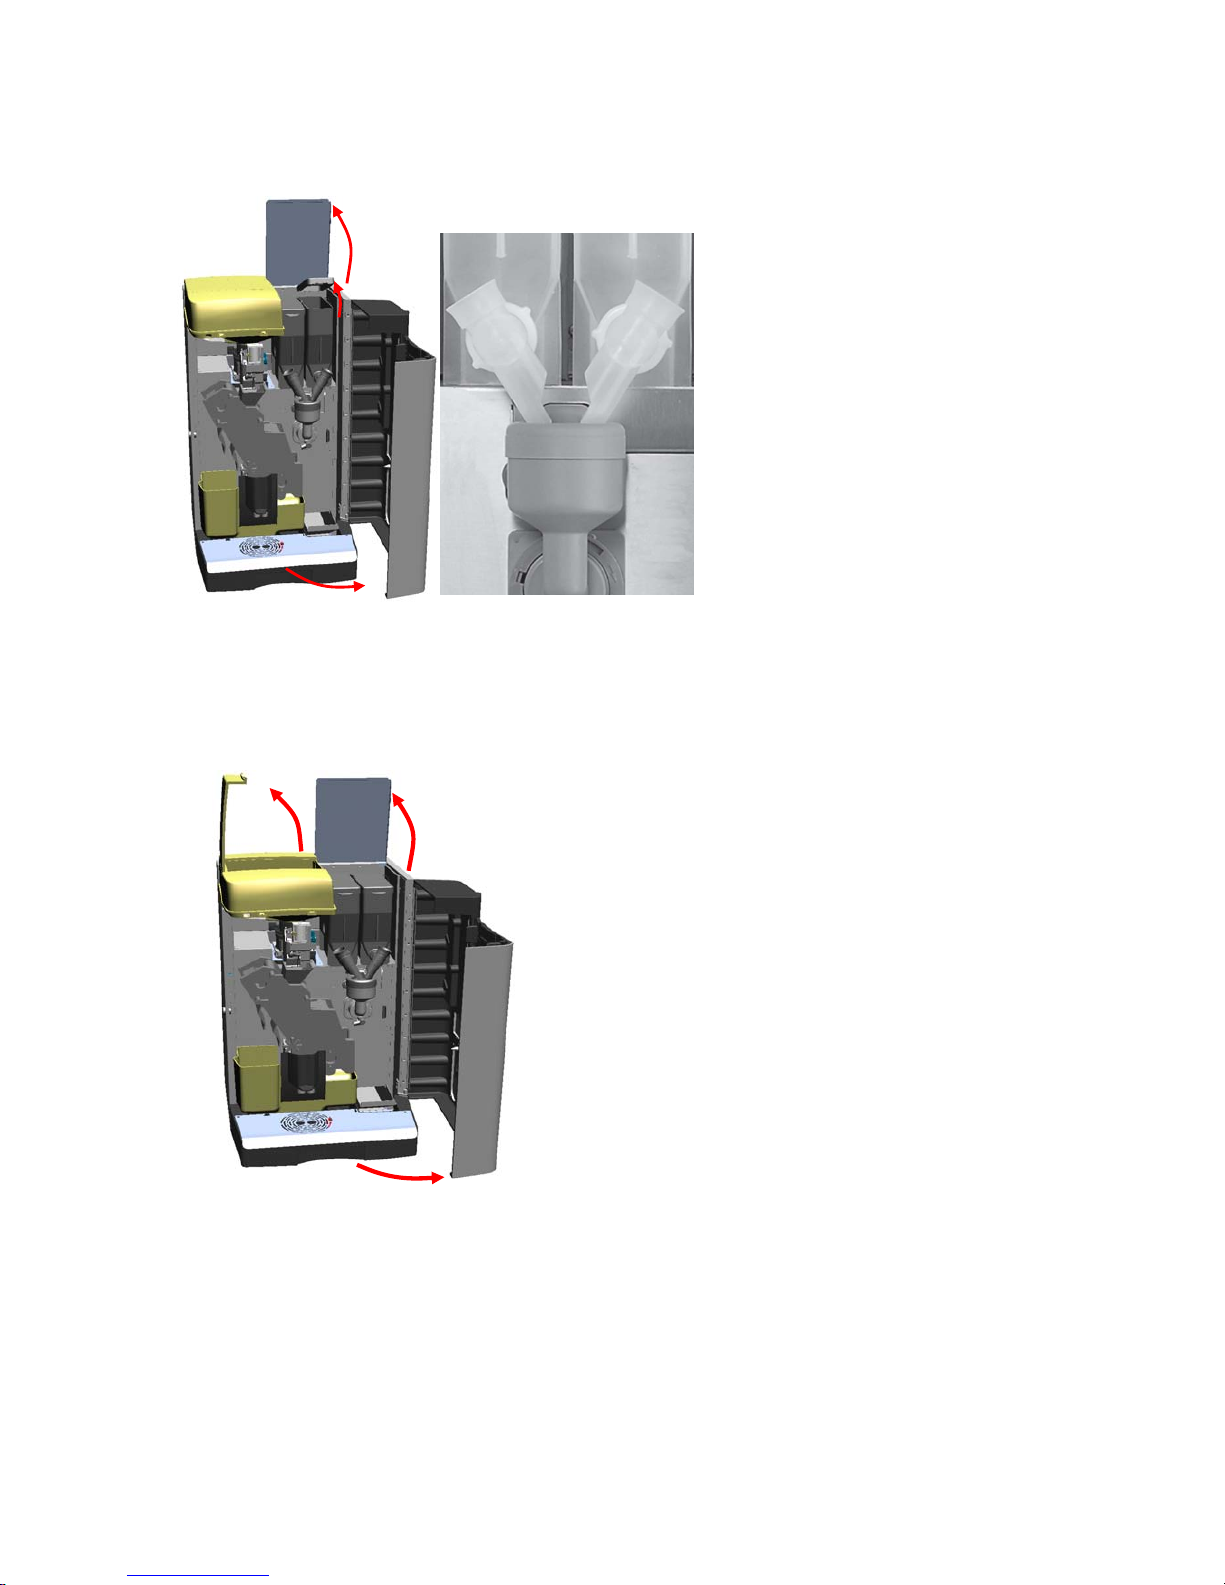
6.4 Filling canisters
In order to refill the canisters:
1.- Open the main door of the machine.
2.- Open the superior Cover.
3.- Take out (this to avoid unnecessary
spillage in the machine) ingredient
canisters.
4.- Remove lid and fill canister with
ingredients.
5.- Reassemble canisters.
Make sure that the outlet pipes on the ingredient canisters are well oriented into the steam trap (A)
Note: Always use soluble powder drinks suitable for automatic distributors. Using another kind of
soluble powders, will cause the mixer to clog, and a flooding to occur.
6.5 Filling Coffee Hopper
In order to refill the coffee hopper:
1.- Open the main door of the machine.
2.- Open the superior Cover.
3.- Open the lid of the Coffee Hopper.
4.- Refill the Hopper with Coffee.
Note: always use natural roasted coffee beans. Lower quality coffee beans (those toasted with slight
sugar added), will cause the coffee beans hopper to clog.
3
1
2
Page 19
Brilliance Manual
Page 19
7 HYGIENE AND MAINTENANCE
Following today’s directives regarding sanitation and security, the operator of an automatic
distributor is responsible of the hygiene of the materials in contact with food. Therefore he is
responsible of maintaining the automatic distributor as to prevent bacteria to appear.
7.1 Cleaning
It is important to regularly clean some mayor parts of the machine. It is necessary for the good
performance of the machine, the quality of beverages served, and to honor sanitations directives.
Maintenance has to be done with power turned off and preferably with empty hopper and canisters.
Cleaning has to be done typically at installation, and weekly or even more often depending on the
use on the machine. Neutral detergents (avoid solvents that could damage paint or plastics) are to be
used in this operation. Never clean the machine projecting water against it.
On next steps, different components of the machine will be dismounted as to proceed with the
cleaning.
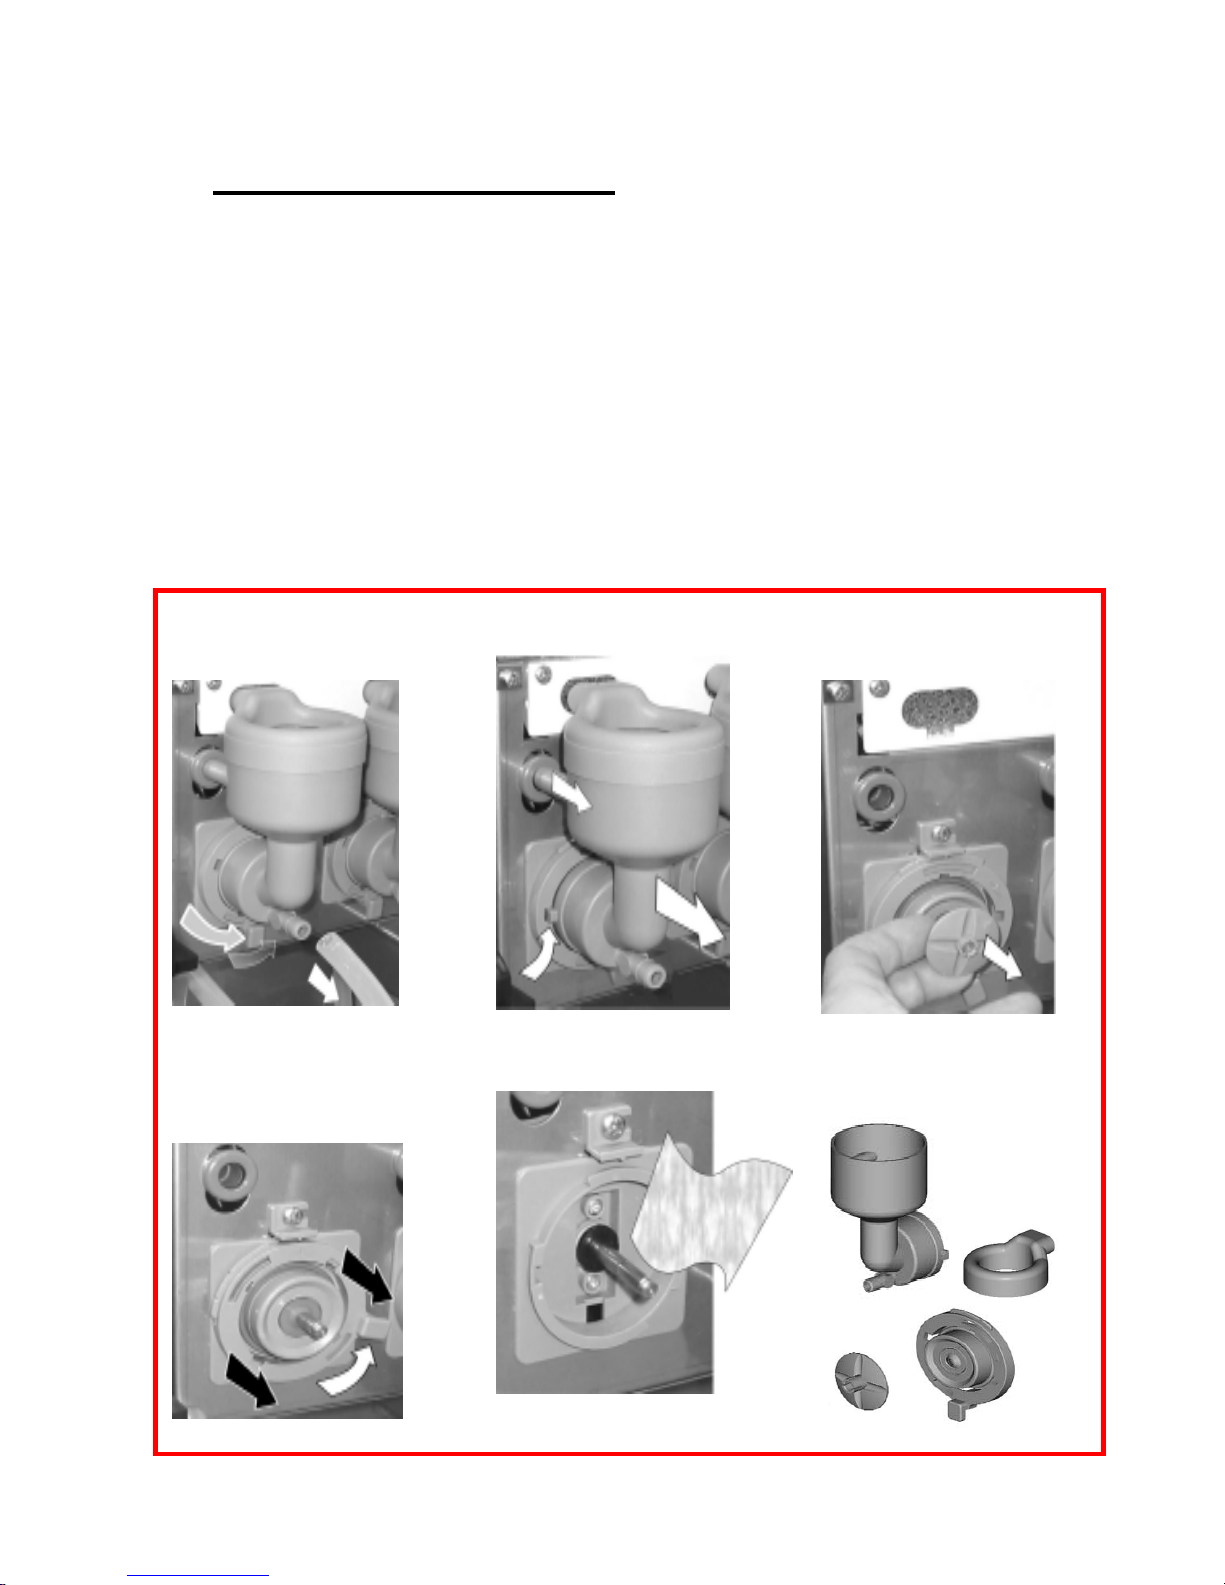
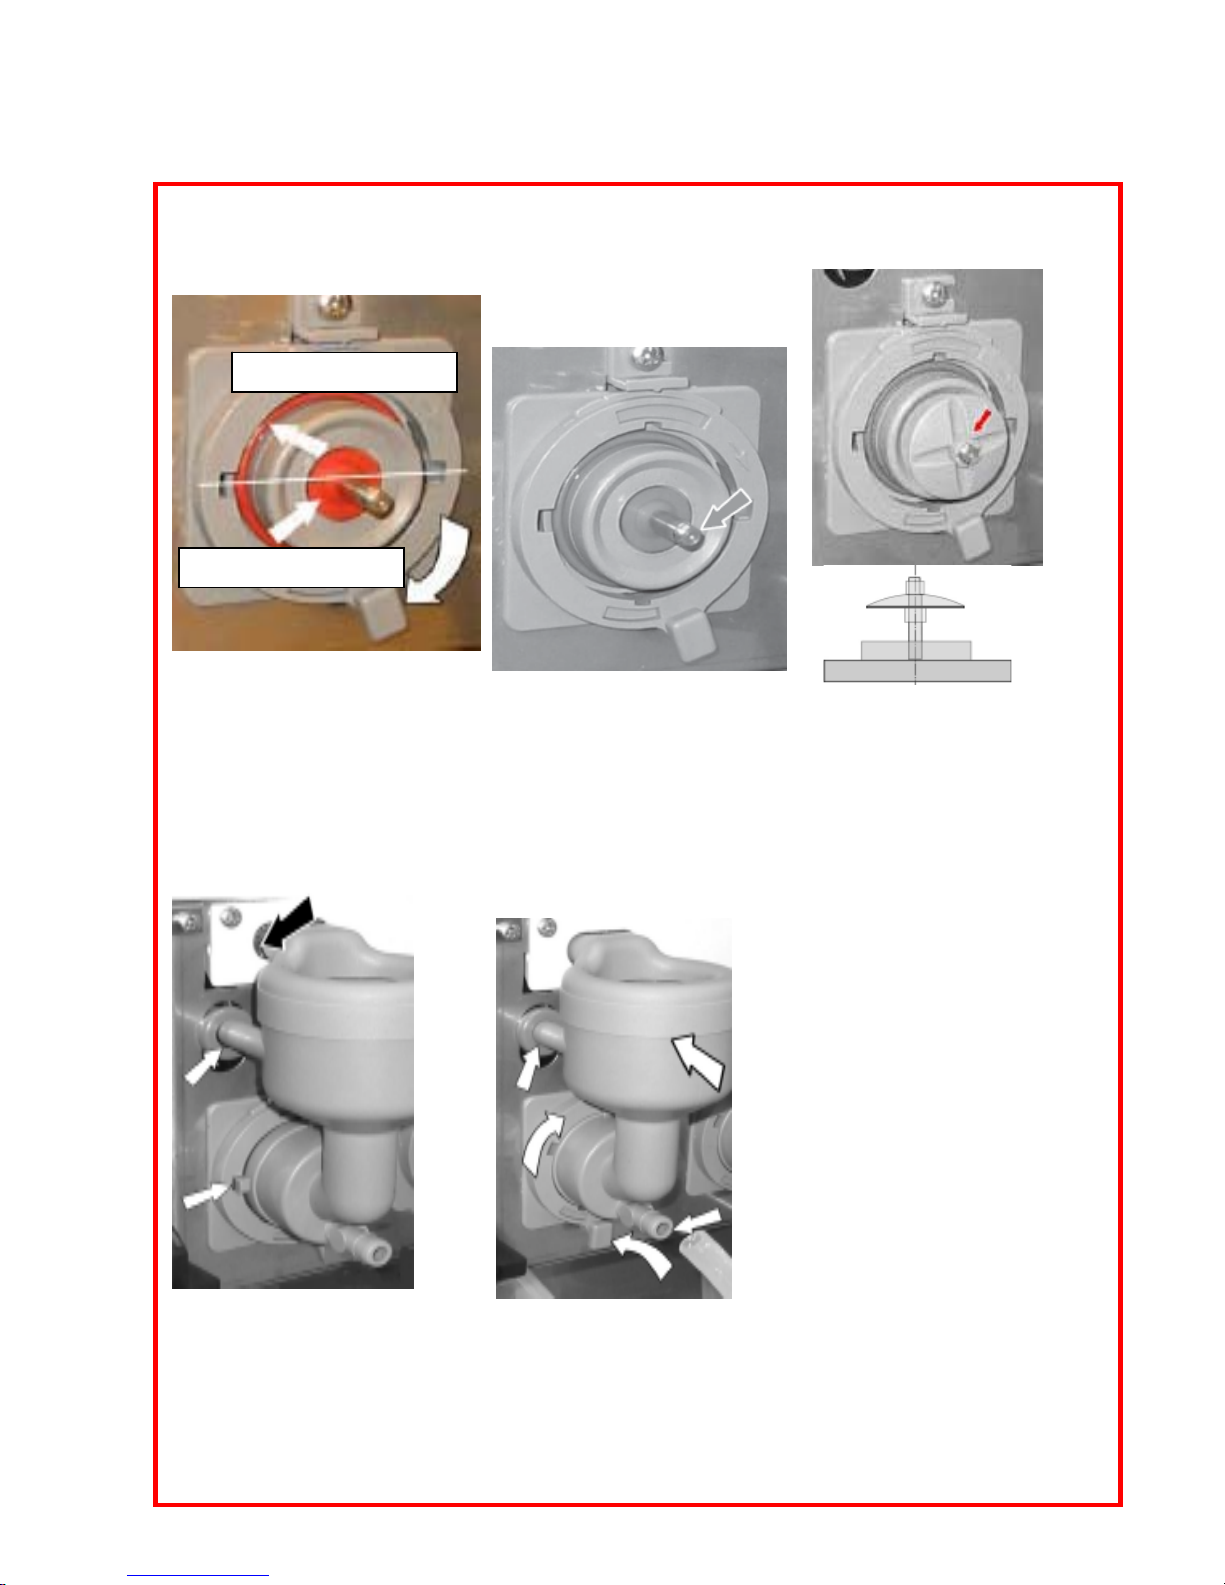
7.2 Cleaning the mixing system
1. Loosen outlet hose (A)
and turn lock knob (B) anti-
clockwise.
2. Loosen mixer bowl. Pull
apart (C).
3. Loose whipper (D), pull
whipper straight out from
the machine.
4. Turn lock knob
anticlockwise.(E) until it
stops; and again, pull this
part straight out from the
machine
5. Clean with a wet rag and
drought drily.
6. Wash all the different
parts: Mixer Bowl, Steam
trap, whipper and assembly
plate:
(A)
(B)
(E)
(D)
(C)
Page 20
Brilliance Manual
Page 20
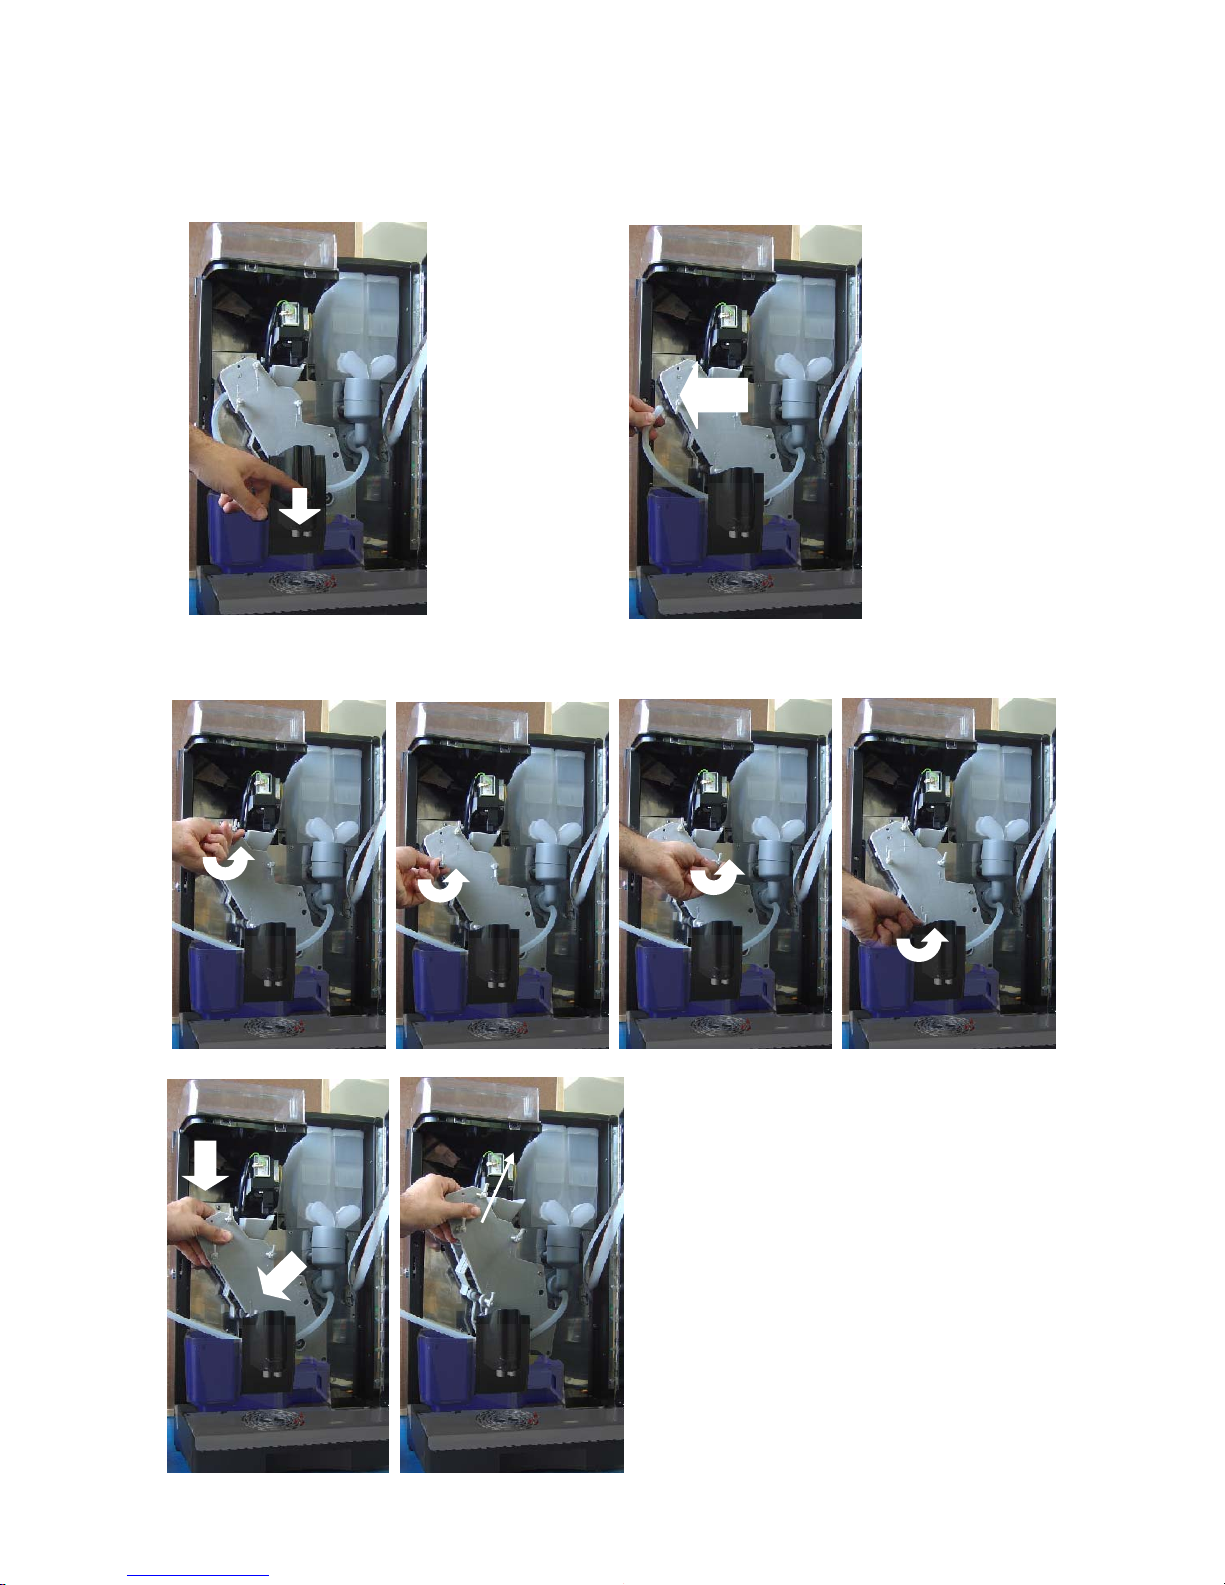
7.3 Reassembly of mixer system
7. Reassemble the assembly
plate by turning
lock knob (F) clockwise.
INSPECT gaskets.
8. Make sure that the motor
whippers plane side will be
in accordance with the
whippers plane side. see next
(G) and picture (H)
.
9. Assemble whipper , pull
until you hear a clicking noise.
(H).
10.Assemble mixer bowl
and steam
trap (J) see picture. Pay
attention to the steam trap to
be well oriented towards its
hole in the chasis.
11. Easily push the mixer
bowl towards, according
to (K) and lock with lock
knob (L).Connect outlet
hose (M). (NOTE! make
sure that all water hose
are connected at right
place
INSPECT
INSPECT
(H)
(J)
(J)
(J)
(K)
(L)
(M)
Page 21
Brilliance Manual
Page 21
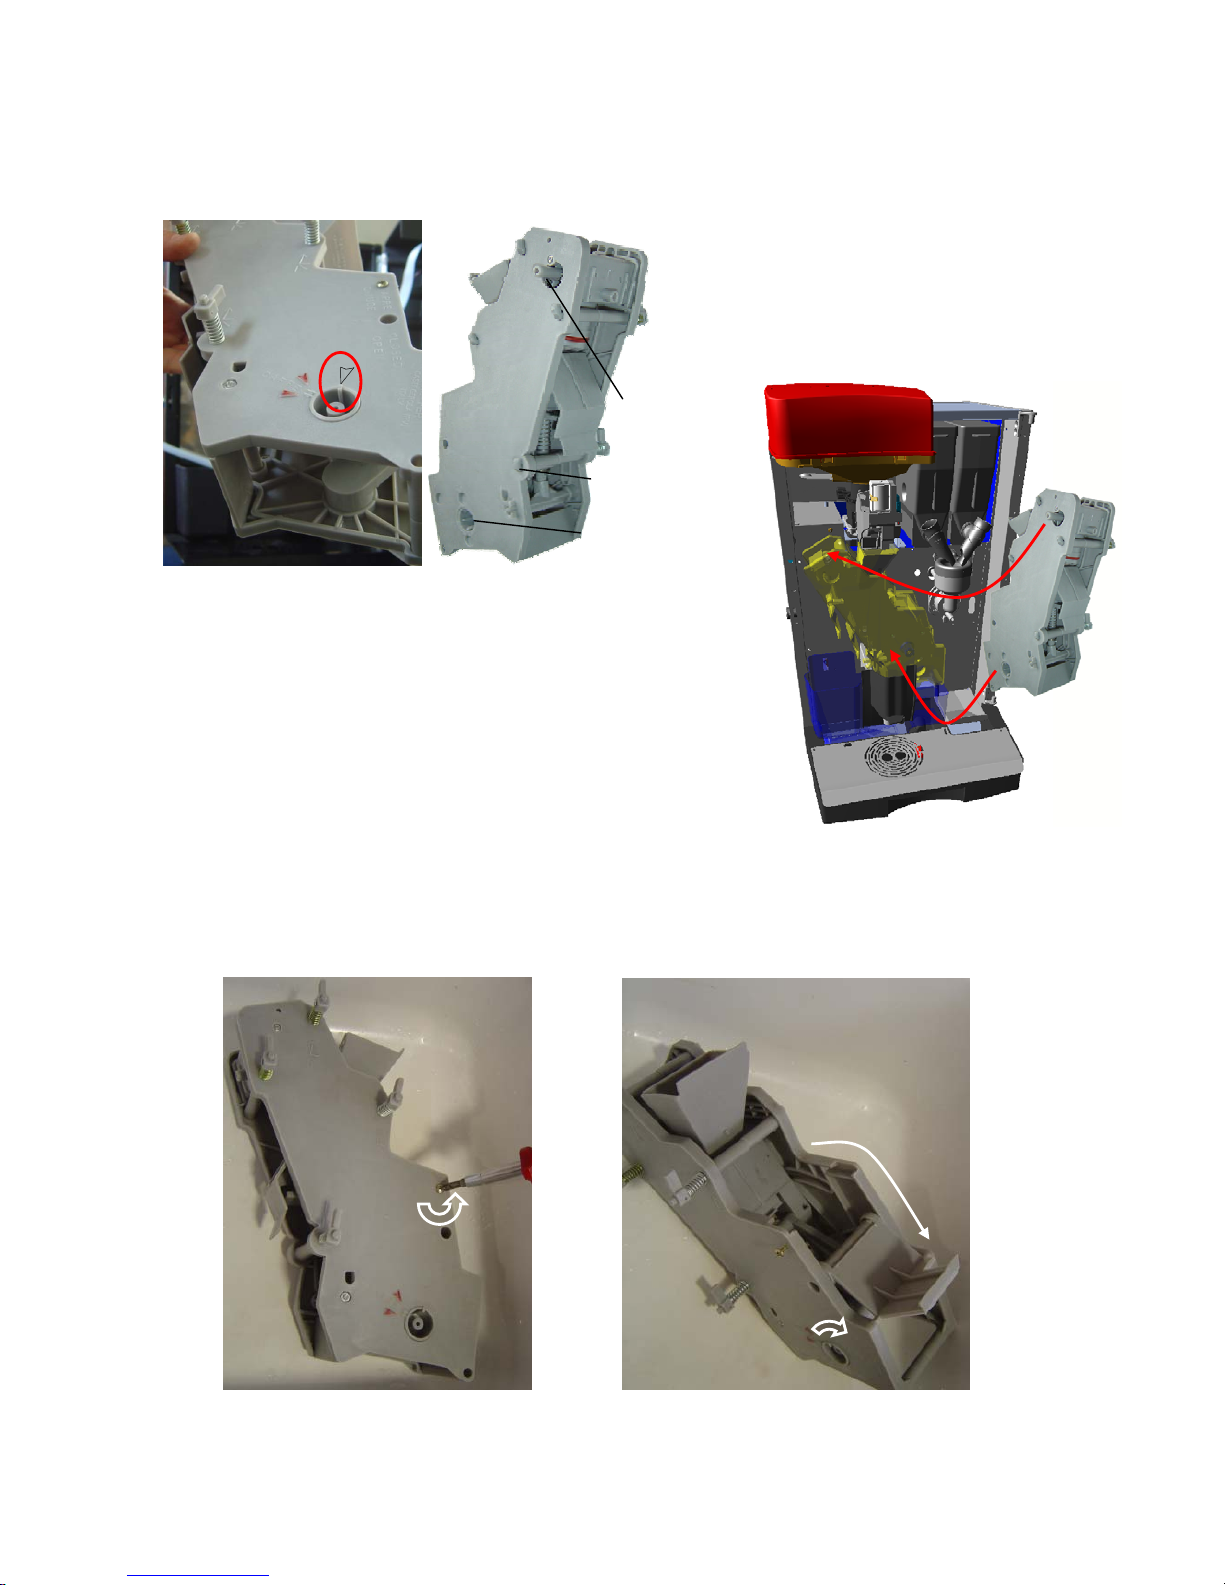
7.4 Removing the espresso group
To remove the espresso group follow the following steps:
7.4.1 Push
down
Spout
holder
As to allow the
maximum free
place to work,
move down the
Spout holder:
7.4.2 Release
the espresso
conduct
Release the espresso
conduct from the
espresso group:
7.4.3 Release the Holding Hooks
Push each hook inwards and rotate it till the long leaf points upwards. This frees the group.
7.4.4 Remove the group
Pull out the group, being careful with the
grinded coffee doser, and the mixer conducts.
Page 22
Brilliance Manual
Page 22
Rear
side
Supporting
Hooks
Water
adapter
Axle
adapter
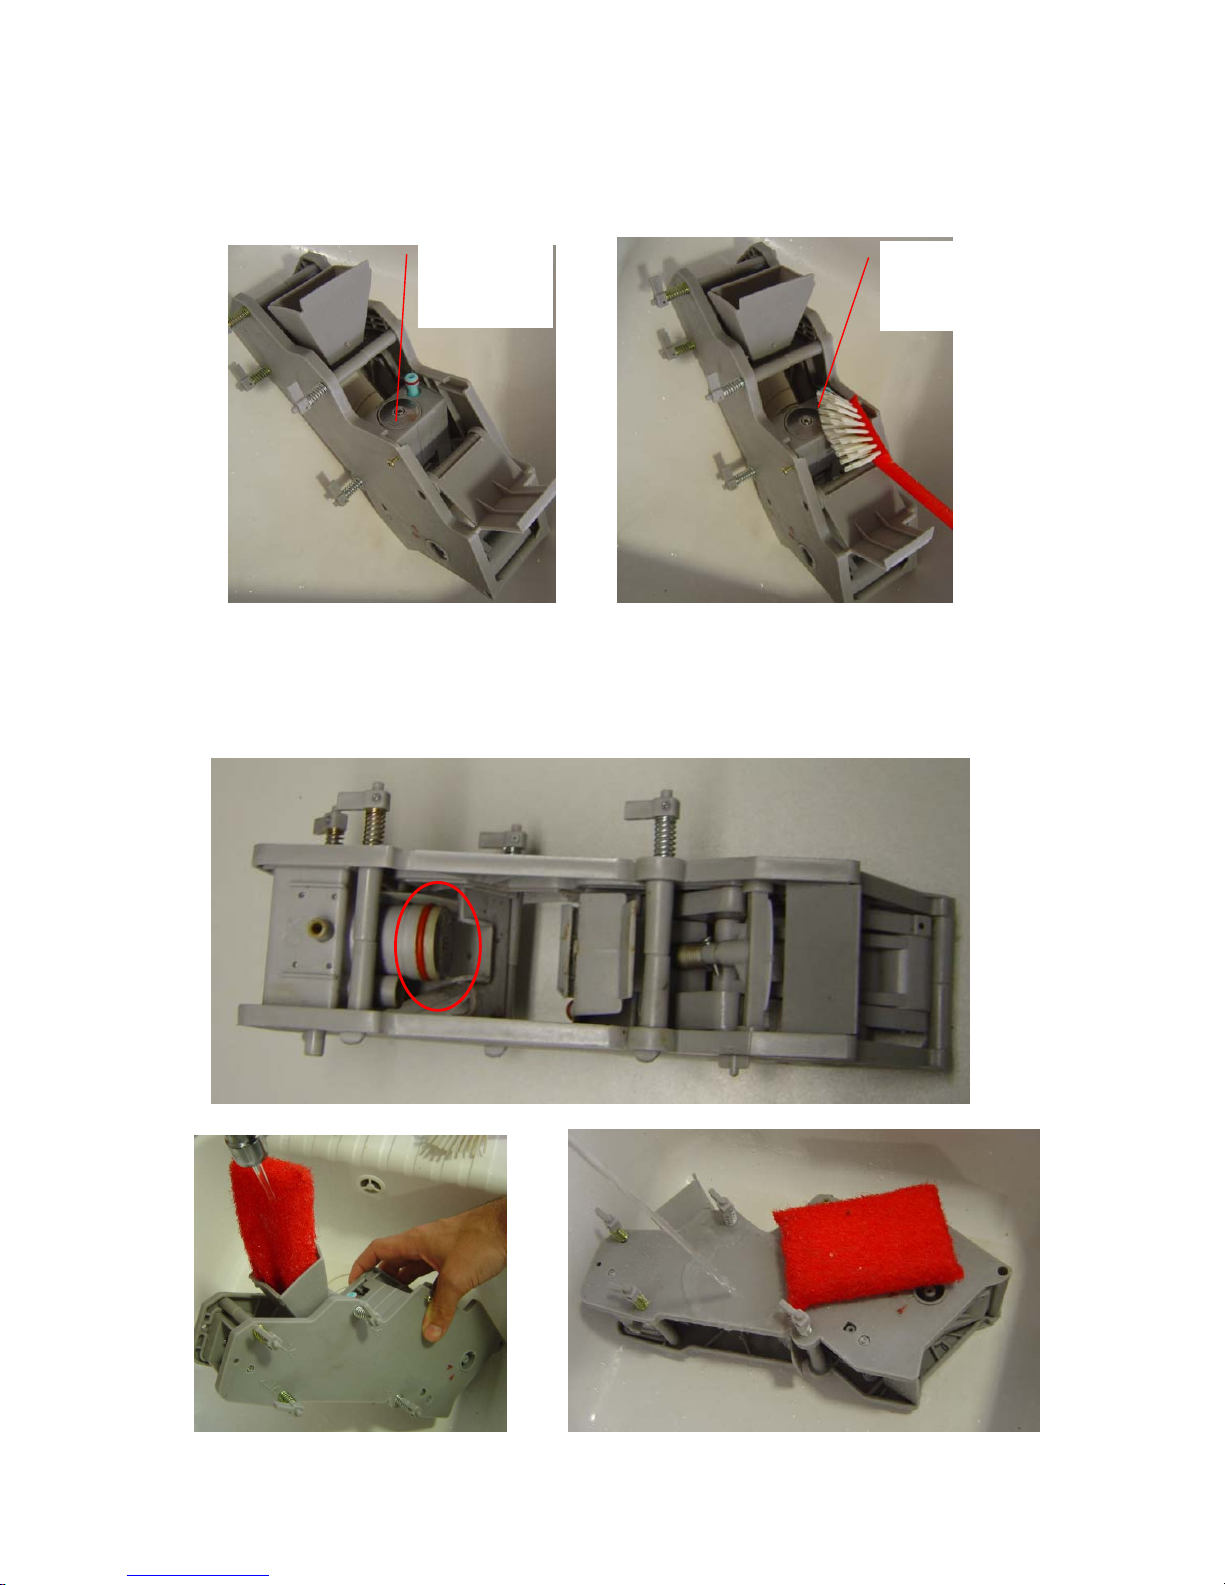
7.5 Re-assembling the coffee group in place
To place the espresso group back in place, make sure that on the front side of the espresso group,
the mark on the group’s axle, match the
outer triangle symbol . This is the normal
“wait” position of the group in the
machine. When the machine is working
normally, the adapter to the group will
be waiting for the group in this position.
When placing back in place the espresso group, begin by (1)
inserting the axle of the group in the axle adapter. Once this
axle line up with the adapter axle, proceed to insert the (2)
water connection of the espresso group to the machine.
7.6 Cleaning the group
First, dismount the espresso group from the machine as explained in this manual. Then proceed to
clean it up with neutral detergents (avoid solvents that could damage paint or plastics). Disinfectant
products as Chlorine-detergents are preferred.
The producer declines all responsibilities due to the use of caustic/aggressive detergents.
Loose the screw shown on the picture as to open the easy - access to cleaning the group.
1
2
Rear
side
Page 23
Brilliance Manual
Page 23
Once the lid opened, turn the axle of the group as to position the inner mechanism close to the
opening as to proceed to its cleaning:
Very important:
Now, turn the group around, and proceed to clean the upper filter of the espresso chamber. (See it
rounded in the attached picture)
Note: whenever the quality or speed of the outgoing espresso changes, proceed to clean thoroughly
this filter, it will be very likely partially clogged with tiny coffee bean’s powder. Cleaning this filter
will solve the speed & quality issues.
After this, proceed to clean the remaining surfaces of the group..
Position
here the
mechanis
m
Proceed to
clean
Page 24
Brilliance Manual
Page 24
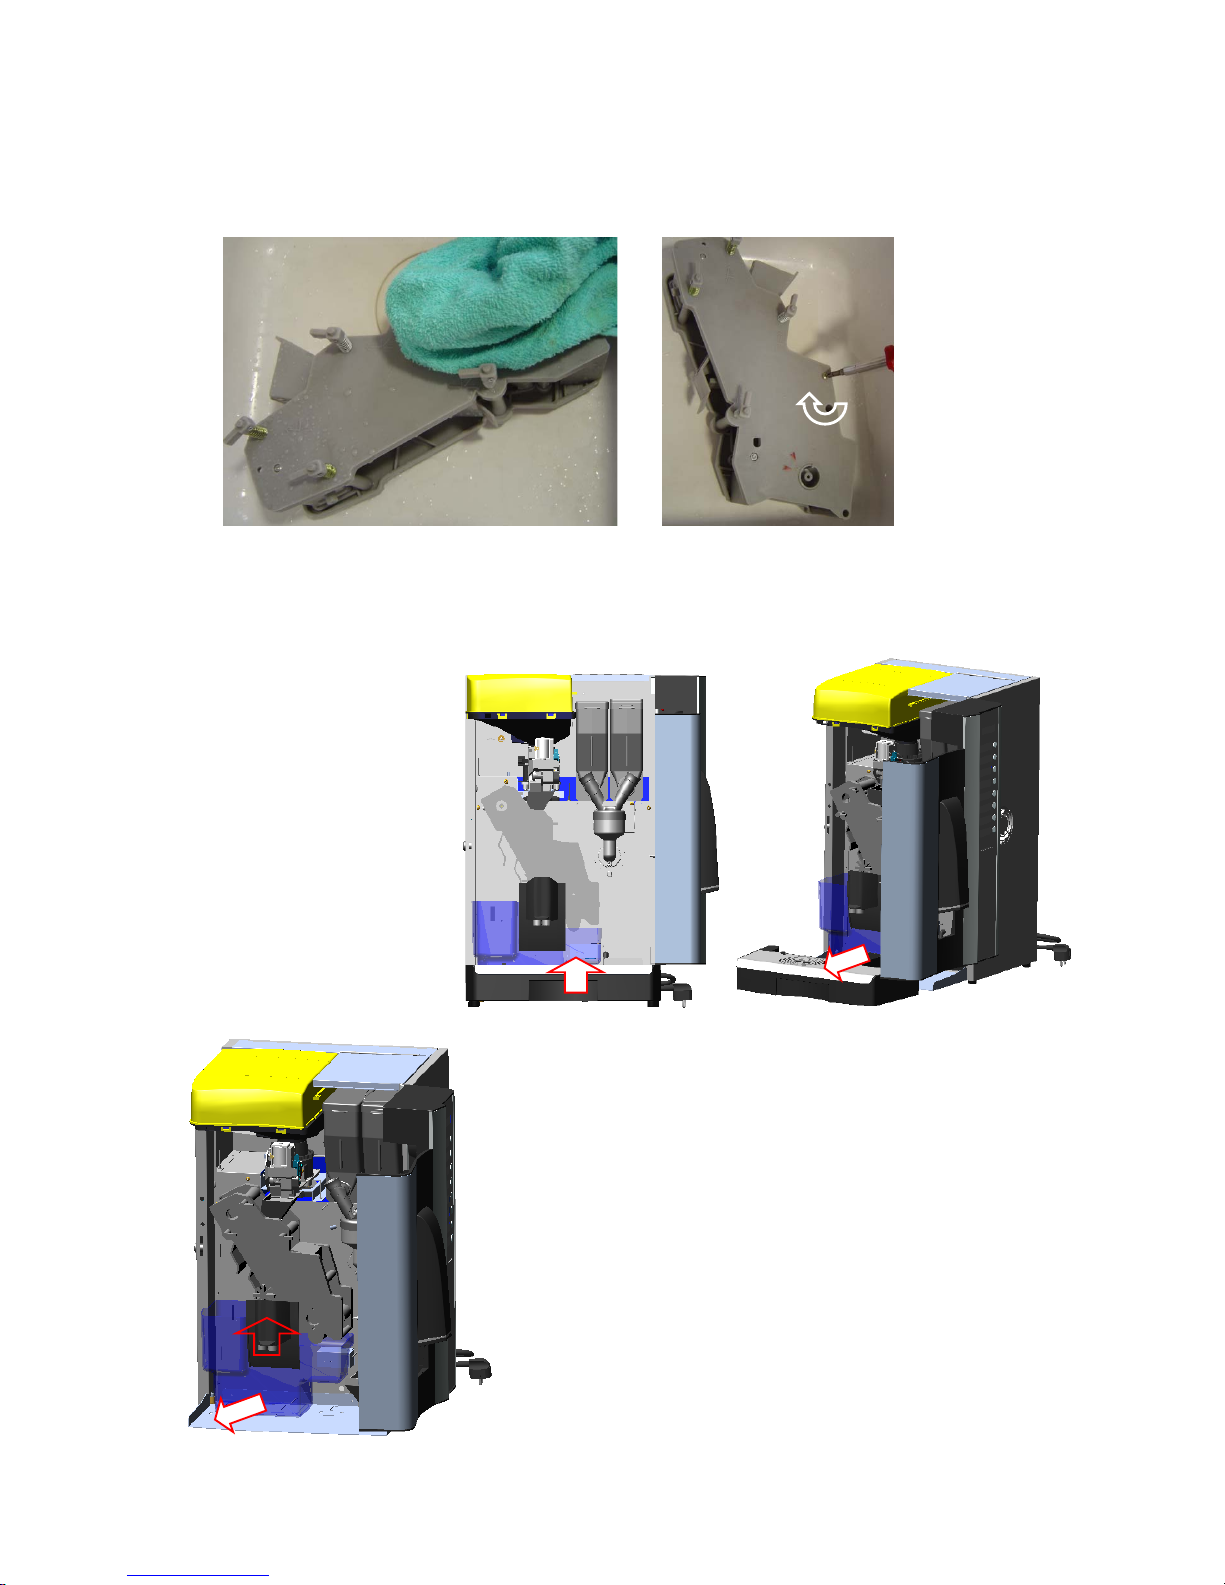
After the cleaning, proceed to dry the mechanism up. Invert it and shake it as to force water out as
maximum as possible. Dry up all the surfaces, and pay special attention to dry up the superior cone
of the group, as this is the one receiving the grinded coffee. Case this one was humid, this would
cause the cone to clog with coffee powder.
Once finished the cleaning, close the cleaning vane and re-tighten the aforementioned screw that
keeps it close, and proceed to reinstall the group on the machine.
Once completed this cleaning, and after re-installing the espresso group back in place, we
recommend to perform an auto-cleaning cycle (see the chapter in this manual).
7.7 Removing the
drip tray
To remove the drip tray,
wide open the door, and
then move the drip tray
up around 10mm and
then remove it normally.
7.8 Removing the grounds tray
First remove the driptray as already explained. Now, to
remove the grounds tray, displace upwards the spout holder,
as to allow the maximum free space to remove the grounds
container. And simply, slide out the grounds container.
Page 25
Brilliance Manual
Page 25
7.9 Cleaning the machine
Cleaning has to be done typically at installation, and weekly or even more often depending on the
use on the machine. Neutral detergents (avoid solvents that could damage paint or plastics) are to be
used in this operation.
Machine should be turned off when cleaning it. Never clean the machine projecting water against it.
To clean the different elements of the machine use preferably disinfectant products as Chlorinedetergents are preferred.
The producer declines all responsibilities due to the use of caustic/aggressive detergents.
On next steps, different components of the machine will be dismounted as to ease the cleaning.
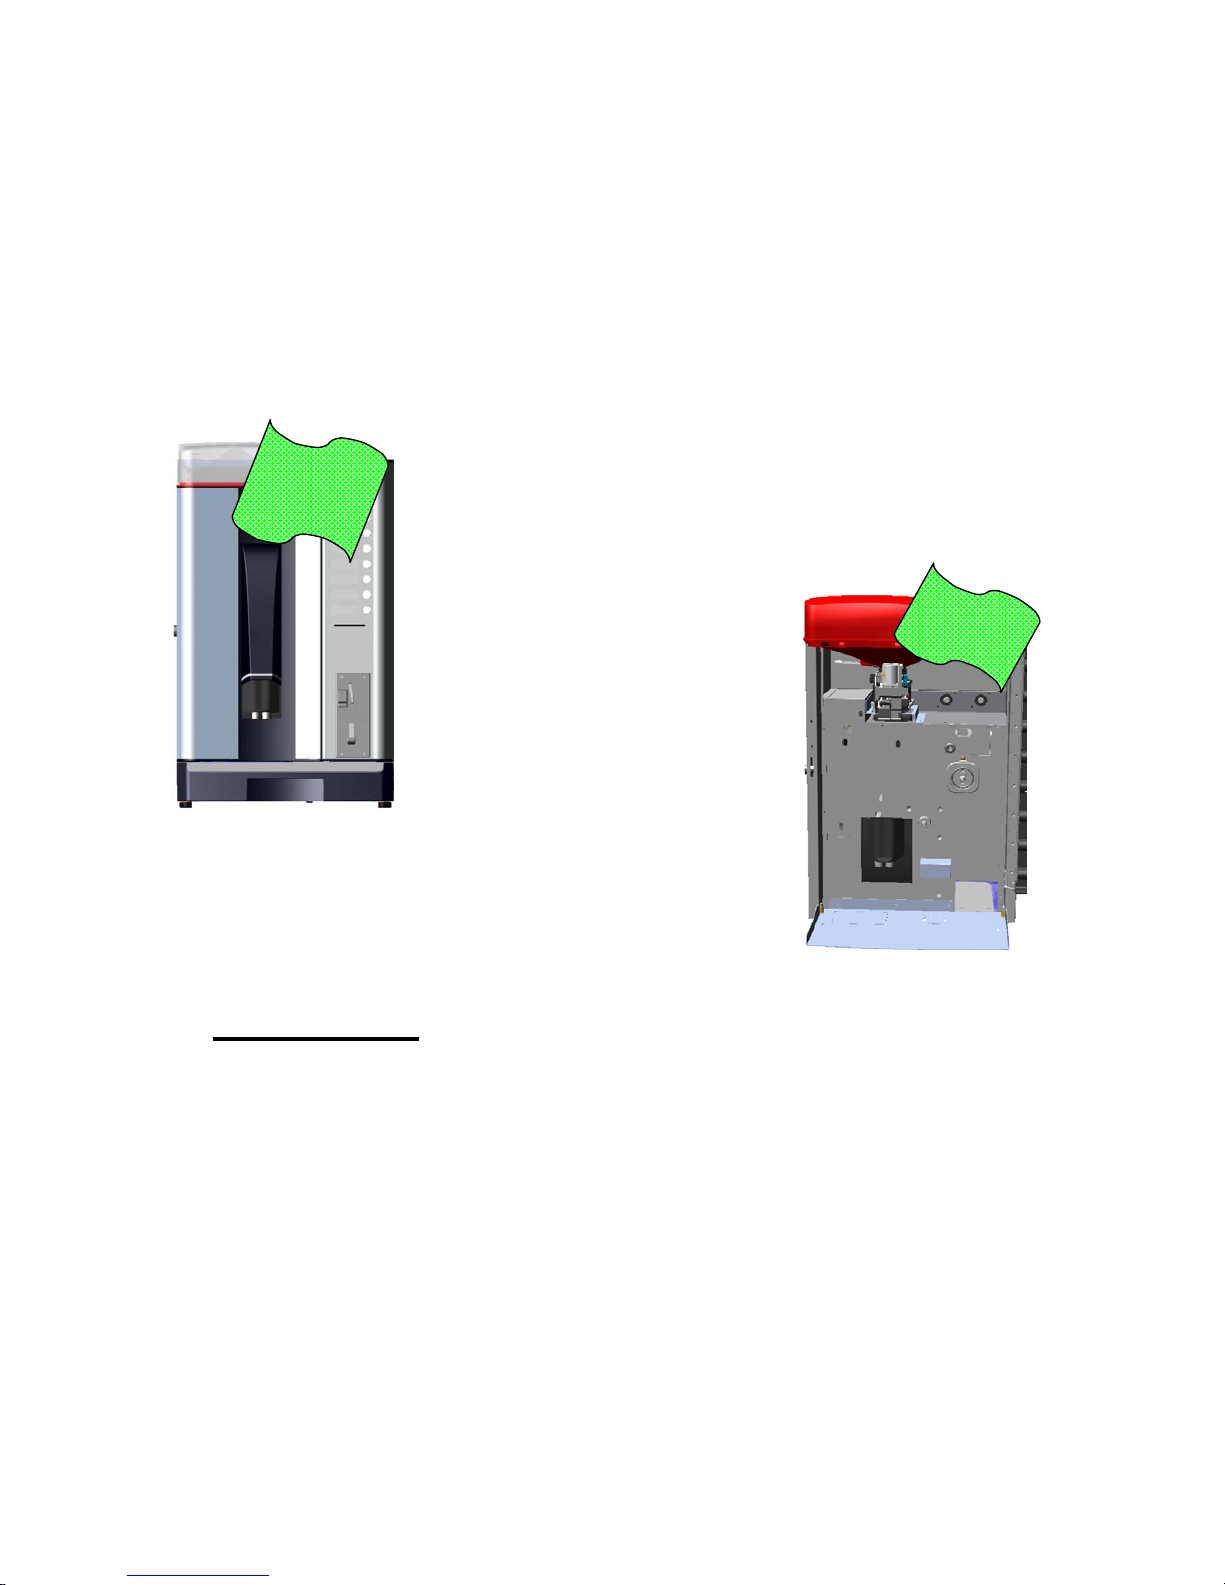
7.9.1 Outside cleaning;
use a soft rag and liquid cleaning agent to prevent scratches.
7.9.2 Inside cleaning
With the door of the machine open, dismount the canisters, the
group, remove the drip-tray and the grounds tray, remove the
mixer removable parts, and proceed to clean all the surfaces of the
machine.
8 CARD READER
The card reader allows to copy/write the settings from one machine to another. It uses a Siemens
SLE4442 chip card.
In actual software version , when inserting a new card (a card that has not been configured as a
money card) it is possible to:
- copy data programmed from the machine to the card and vice versa.
- create a money card.
If the inserted card has been already configured as a money card, it cannot be used as a data card
anymore; and the money inserted into the coin mech. is loaded to the money card. Then when a
selection is made, the system decreases the cost from the money card.
Note that the “Smart Card” enabling option on the settings menus has to be active as for these
functions to work.
Page 26
Brilliance Manual
Page 26
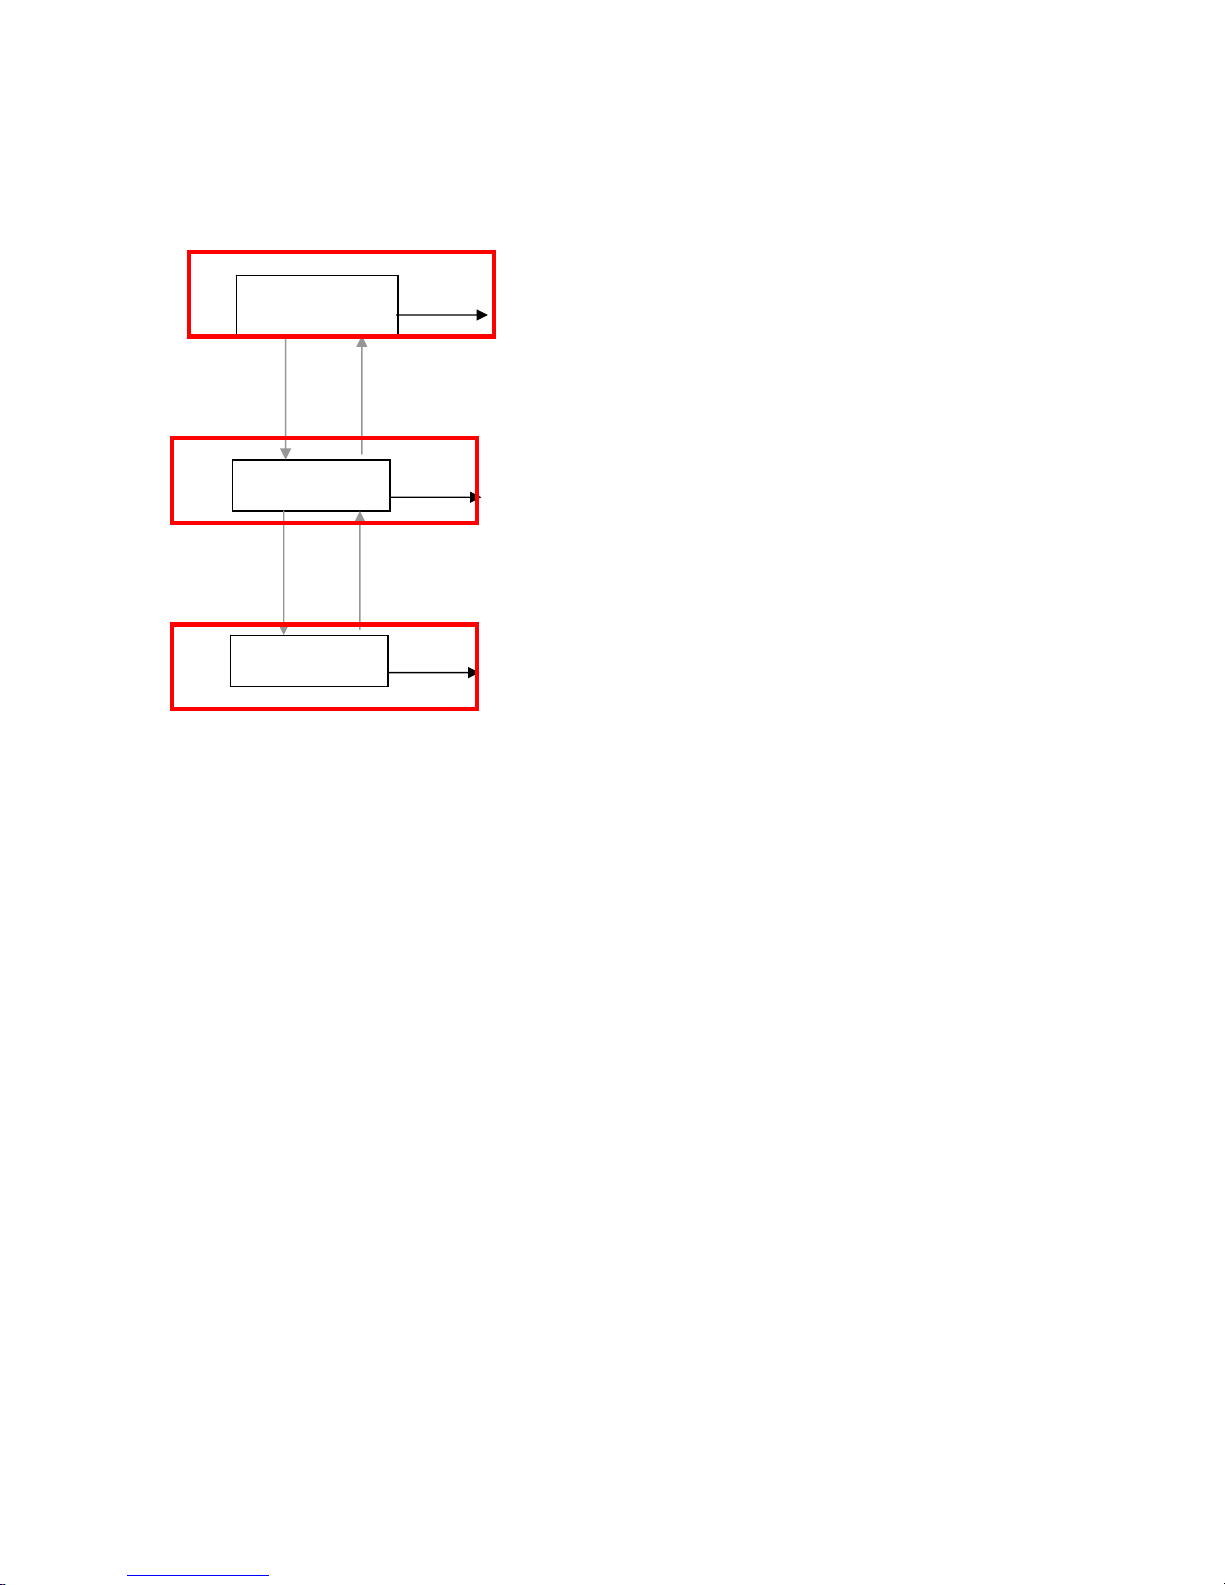
8.1 New Smart Cards & Data SmartCards:
When a new Smart Card is inserted, (with the Smart Card enabled in the settings menu), this is what
is shown in the screen:
In the “Create Money chip card” screen, pressing the “Enter” button, we configure the card as a
money card. Note that this is a “only once” way; when transformed into a money card, the card
cannot be used to store data. Pressing the “+”and “-“ buttons we will navigate to the other options.
In the ”Data copy; Machine Card” screen, the option to save the settings of the machine to a card
is given. Here, by pressing “Enter”, all the actual settings of the machine will be stored in the card.
Pressing the “+”and “-“ buttons we will navigate to the other options.
In the ”Data copy; Card Machine” screen, the option to save the settings stored on the card to the
machine is given. Here, by pressing “Enter”, all the actual settings of the machine will be
overwritten with those stored in the card.
Pressing the “+”and “-“ buttons we will navigate to the other options.
8.1.1 Money SmartCard
When a card has been already configured as a money card, it cannot be used as a data card
anymore.
If a money card is in the Card Reader, and money is inserted into the coin mechanism, the amount
of money is increased into the money card’s credit. Then when a selection is made, the system
decreases the cost of the selection from the money card.
Note that the “Smart Card” enabling option on the settings menus has to be active as for these
functions to work.
8.1.2 Free services
Whenever the “Smart Card” enabling option is “on”, the prices set on the “coin box” section, will
be considered, even if the Coin Box option is disabled. So if you intend the machine to work
without using a “money smart Card” you will have to set the prices of every button to 0.
8.2 RS232
A connector RS232 (TTL) is available on the board of the machine as to establish serial
transmissions.
Create
Money chip card
Data copy
Machine Card
+
-
Enter
Money card created
Enter
Data copied from the machine to the card
Data copy
Card Machine
+
-
Data copied from the card to the Machine
Page 27

Brilliance Manual
Page 27
9 ALARMS & DISPLAY MESSAGES
There are two levels of alarms & messages:
9.1 Temporary warnings & messages
This warnings or messages, once solved the issue, will vanish and let the machine work.
9.1.1 Insuff. Credit
A selection was made without having enough credit on the inserted SmartCard. Proceed to recharge
the credit of your SmartCard. And select again the desired beverage.
9.1.2 Empty Coffee Tray
After a certain number of espressos erogated, an “Empty Coffee Tray” will appear on the screen.
This is to obligate the user to empty the grounds tray.
To amend this warning: with the machine turned on, open the door of the machine, take out the
driptray, and the grounds container and empty them. Once emptied, reinstall them on the machine,
and close the door. On the screen, the error will have been erased.
The machine has to be powered as to detect if the grounds tray is removed or not. In the case of
emptying the grounds tray and replacing in on the machine, with it being powered off, the espresso
counter will not be reset to 0, and the error “Empty Coffee Tray” will appear on the next service.
This maximum number of espressos is set in the settings menu inside of the “Grounds Program”
option.
9.1.3 Alarm Coffee Tray
Whenever the Grounds coffee tray is removed from its place, an “alarm coffee tray” will appear on
the screen. This alarm resets the espressos counter to 0, (when it remains on for more than 2 secs).
During normal functioning of the machine when replacing the grounds coffee tray to its place, the
alarm will vanish. But, if this alarm lights up during the start up of the machine, we will have to
restart it as to make it vanish.
9.1.4 Take Cup
When the machine is brewing a beverage, once the beverage is ready, this message will appear on
the display for some seconds, advising to pick the cup.
9.1.5 Please wait Boiler FillingUp
Some times we will see this message appearing on the screen for a short while. During this short
time, the machine will be temporarily unavailable, as it will be performing an internal refi lling of an
interior water deposit.
9.2 Fixed alarms
This alarms require amending the problem, and then turn off and on the machine, in order to erase
last alarm.
9.2.1 “No Coffee”
When the machine runs out of Coffee beans, it shows on the display a “No Coffee” error. This is
detected after a certain time of being the grinder active, doser doesn’t fill up.
When the machine is showing “No Coffee” on the display, will not erogate any beverages that
include espresso.
Page 28

Brilliance Manual
Page 28
If you are refilling coffee beans after having get the “No Coffee” signal, the machine will be
showing the error “No Coffee”. To reset this error after having refilled the machine, restart the
machine, turning off the main switch, and again, turning it on.
9.2.2 Stop irregular cycle
If due to any reason, the group does not reach certain positions in a determined time, we will get a
“Stop irregular cycle”. In this case, the machine has to be revised by your technical service.
9.2.3 T.Probe Unconnect
The electronics of the machine has detected a failure in the connection of the water Temperature
probe. Disconnect the machine and make the machine be revised by the technical service.
9.2.4 Time-out alarm Filling Up
An excessive time has been detected to fill up the Airbreak deposit. Check that the water connection
to the machine is correctly open. A pressure at the inlet too low will cause the same problem.
Note: Some times more than one automatic machine are connected to the same water supply; and
from time to time, both machines will try to get water simultaneously from the supply, failing the
supply to give enough water for both demands, causing this alarm to appear. This can be solved
connecting each machine to an independent water supply.
9.2.5 No water
If after beginning pumping water during erogation of an espresso, no water is detected flowing
through the flow measurer, a “No water error” will appear on the screen.
This can be caused by:
- Commonly this will be caused by the adjustment of the grinder being too thin, preventing
the water from getting through. Try to adjust a coarser grade on the grinder; then try making
two more espressos, as to clean the already remaining grinded coffee in the interior of the
grinder; watch the results with the third coffee.
- Or much more rarely, maybe there is a problem with the flow measurer. Then the machine
has to be checked by the Technician.
9.2.6 Coffee doser error
If after activating the opening of the grinded coffee doser, the machine detects a failure on its
detector, an “Error dosific.” will be displayed. Disconnect the machine and make the machine be
revised by the technical service.
9.2.7 Security anti flooding
If, for any reason, there is some kind of leakage of water inside the machine, and the machine
detects a consumption of water without any requested beverage; the third time that the machine has
to refill the Air break being the machine idle, we will get the “Alarma Time-Out inundacion” alarm.
Disconnect the machine and make the machine be revised by the technical service.
9.2.8 Alarm temperature Boiler
Case that the temperature probe of the boiler, sensed a temperature over a certain security value for
more than 5 secs, o in case that the temperature probe got short-circuited for any reason, on the
display we would get an “alarm temperature Boiler” and the heater would get disconnected. The
error will remain as long as the defect is present.
We recommend that in this case, the machine get disconnected and got sent to the technical service.
Page 29

Brilliance Manual
Page 29
9.3 What to do if
9.3.1 Outgoing speed of espresso decreases
Very likely the espresso group is missing regular cleaning. Proceed to clean it as described in the
“cleaning the group” section, paying special attention to the group’s filters.
9.3.2 The mixer “clogs”
The clogging of the mixer, will cause water to be dripped out of the machine.
If this happens from the very first time you use the machine; this will be very likely caused by using
unappropriate soluble products.
If this happens in any time later: check that all the components of the mixer are correctly assembled,
and that the steam trap is well oriented (well connected to its connecting hole on the machine).
9.3.3 Water under the machine
Are the mixer, espresso group, steam trap and tubes well assembled?.
Have you installed a water softener to the machine?. If water hardness is too low, it might be
causing a defective level sensing in the machine. Just adjust the water hardness to a level between 3
and 5 º (French degree) (30mg/l). Lower levels will cause corrosion in the inner parts of the
machine.
9.4 Remarks:
Weather conditions; mainly humidity, affect the speed of the outgoing espresso. That is something
that must be had into consideration.
When weather becomes more humid, the speed of the outgoing espresso will be affected. Consider
adjusting the grinder a little coarser in the humid months of the year, and a little thinner in those
more dry.
 Loading...